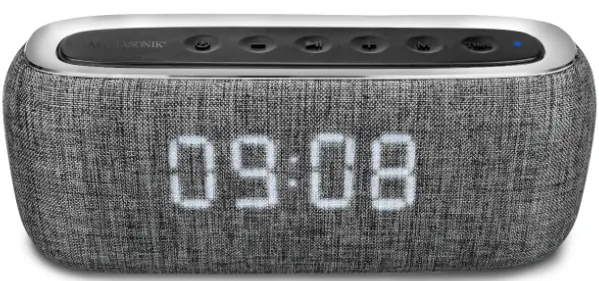
ALPHASONIK Charm Portable Bluetooth Speaker
SETTING THE PACE SINCE 1976
ALPHASONIK WAS FOUNDED IN 1976 WITH ONE MISSION, TO BRING STATE OF THE ART PERFORMANCE TO THE AUDIO ENTHUSIAST. In these early years we pioneered such ground-breaking technologies which remain a benchmark in high-end audio. Today, the new Alphasonik is committed to pushing the envelope with regards to technology, quality and value. Our electronics feature audiophile parts and circuit topology designed to let the full musical experience come through, loud and clear. Our loudspeakers employ the latest high technology materials and processes such as carbon reinforced woven glass and titanium vapor deposition to deliver your music with tremendous impact, dynamics and resolution. We stand behind our quality with one of the best warranties in consumer electronics. Compare Alphasonik products against anything the competition has to offer. We’re confident you will come to one conclusion…
Package Contents
- Portable Speaker x 1
- Micro USB Charging Cable x 1
- 3.5mm Audio Cable x 1
- Instructions Manual x 1
INTRODUCTION
Thank you for purchasing this Alphasonik product. Alphasonik products are specifically engineered and designed for the audio environment. This manual contains important information about installation and set-up procedures. With proper care and installation, your new product will provide you with many years of high performance listening enjoyment.
WARNING
- DO NOT OPERATE OR STORE THE SPEAKER IN EXTREME TEMPERATURES (BELOW 32ºF / 0ºC AND ABOVE 112ºF / 40ºC)
- DO NOT LEAVE IN DIRECT SUNLIGHT.
DECLARATION OF CONFORMITY
Hereby, Alphasonik declares that the CHARM is in compliance with the essential requirements and other relevant provisions of directive 2014/53/EU. The Declaration of Conformity can be found at www.alphasonik.com
CAUTION:
To reduce the risk of electric shock, do not remove cover (or back). No user serviceable parts are inside.
INSTRUCTIONS FOR DISPOSAL
In accordance with European Directive 2012/19/EU all electrical and electronic appliances must be disposed of separately via local collection points. Please observe the local regulations and do not dispose of your old appliances with normal household waste.
BATTERY DISPOSAL
Old batteries are hazardous waste and must be disposed of in accordance with current regulations.
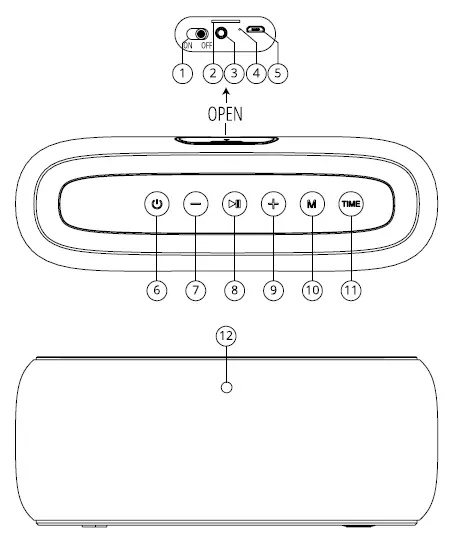
CONTROL Panel
- ON/OFF Switch
- Micro SD card input (UP TO 32GB)
- AUX IN Input
- Charging Indicator
- USB Charging Input (DC In)
- On/Off (Bluetooth / FM / Alarm)
- Volume Down / Previous Track
- Play / Pause / Phone Calls
- Volume Up / Next Track
- Input Source
- Time / Alarm
- LED Indicator
FUNCTIONS
Charging Your Speaker:
Before you start using the speaker for the first time, it’s a good idea to charge it completely. Plug the included USB charging cable into the DC IN Jack. Plug the other end of the USB cable into a power source. The charging indicator will illuminate RED while the speaker is charging. After the charge is complete the charging indicator will turn off.
NOTE: When the battery level is low an audible notification will playback. The speaker can be used while the speaker is charging.
TURN ON:
Switch the ON/OFF switch (1) to the ON position. The clocks display will turn on. Press and hold the M (10) button to activate the BLUETOOTH / FM / ALARM functions. The speaker will emit a tone and the LED indicator will begin to blink. Pause for 3 – 5 seconds and the speaker will go to Bluetooth pairing mode to pair with a compatible bluetooth device.
PAIRING AND CONNECTING:
Go to your bluetooth settings on your compatible device, make sure the speakers LED indicator is blinking (If the speakers indicator isn’t blinking then the speaker is not in bluetooth pairing mode. Switch the speaker off and on again. Choose CHARM from the pairing options on your bluetooth device. (If you do not see CHARM from the list, choose “Scan” from the menu and CHARM will pop up). Select the Charm and the speaker will reproduce an audible sound and the LED will stay illuminated when the unit has successfully paired with the compatible device.
NOTE: The process of enabling bluetooth and connecting varies from device to device. Press and hold the button for approximately 3 seconds to disable the bluetooth connection.
Bluetooth Wireless Connection Tips
- Make sure the Bluetooth compatible device is turned ON.
- Make sure there’s nothing plugged into the speaker’s AUX IN jack when you’re trying to use bluetooth.
- The Bluetooth wireless connection works up to a range of 33 feet (10 meters). This range may vary, however, based on other factors, such as obstetricals and other wireless devices the bluetooth performance may be limited.
- Default pass-code “0000”.
Music Playback: Button
Press this button to Play or Pause your media. Pressing the “+” button momentarily will increase the volume. Pressing and holding the button down will change to the next media track. Pressing the “-” button momentarily will decrease the volume. Pressing and holding the button down will change to the previous media track.
NOTE: If the AUX Cable is used the Previous/Next option will be disabled.
CLOCK / ALARM FUNCTION:
SETTING THE CLOCK
Press and hold the TIME (11) button, the hour indicator will start to blink. Now you will be able to set the hours by pressing the + to increase and – to decrease the hours. Press the button to confirm the hours and program the minutes. Using the same buttons you used for the hours and press the button to confirm your entry. Press the TIME (11) button to save and exit the clock setup.
CLOCK / ALARM FUNCTION continued:
SETTING THE ALARM
Momentarily press the TIME (11) button, the hour indicator will start to blink. Now you will be able to set the hours by pressing the + to increase and – to decrease the hours. Press the button to confirm the hours and program the minutes. Using the same buttons you used for the hours and press the button to confirm your entry. Press the TIME (11) button to save. Press the button to select which alert will be used. Press + and – to toggle which alert you want to use for the alarm.
S-1: ALARM 1
S-2: ALARM 2
S-3: ALARM 3
S-P3: MIRO SD CARD
S-FM: FM MODE
Press the TIME (11) button to save and exit the alarm settings Press the TIME button to stop alarm.
RADIO MODE
Press the M (10) to switch to radio mode. Press and hold the button to start the auto search. Up to 60 stations will be stored. Press and hold the + or – buttons to select one of the stored stations.
AUX IN MODE
Use the 3.5mm audio cable to connect the speaker to a external device. The speaker will automatically switch to AUX IN mode. To exit AUX IN mode, press the M (10) button and enter bluetooth mode.
MICRO SD CARD MODE
Insert a Micro SD card (up to 32GB) into the input on the rear of the speaker, in order to play MP3 music.
INPUT SOURCE
Press the M (10) button to switch sources (Bluetooth, Micro SD Mode, AUX IN and FM).
HANDS FREE
While in Bluetooth mode, when receiving a phone call, you can momentarily press the button on the speaker to answer the incoming call and press again to end the call. Pressing and holding down the button will reject the phone call.
IMPORTANT: Not all phones support playback control and phone answer/ end control. Check your phone’s user manual for more information if you’re having trouble with this feature.
DISPLAY BRIGHTNESS:
Press and hold the M (10) button multiple times to change the display brightness (low, med, high and off).
Specifications
- Power Output: 3.5Watts x 2
- Frequency response: 90Hz ~20kHz
- Impedance: 4-ohms
- S/N Ratio: ≥ 65dB
- Distortion: ≤ 1.0%
- Power supply: Built-in battery or micro USB 5V
- Size: 7.48” x 2.40” x 2.99” (190 x 61 x 76mm)
- Battery operating time: Up to 22 hours
- Built-in 2000mah Li-battery
- Weight: 460g (1lbs.)
WARRANTY
Alphasonik, warrants this product against all defects in material and workmanship for a period of one (1) year from the date of original purchase provided it was purchased from an Authorized Alphasonik Dealer.
The conditions of this warranty and the extent of the responsibility of Alphasonik, under this warranty are as follows:
- DATED PROOF OF PURCHASE IS REQUIRED FOR WARRANTY SERVICE OF THIS PRODUCT. Information about Alphasonik authorized warranty service may also be obtained at www.alphasonik.com or by emailing Alphasonik at [email protected].
- This warranty will become void if service is performed by any one other than an approved Alphasonik Warranty Service Center.
- This warranty does not apply to any product which has been subjected to misuse, neglect or accident, or which has had the warranty seal broken, serial number altered, defaced or removed, or which has been connected, installed adjusted or repaired other than in accordance with the instructions furnished by Alphasonik.
- This warranty does not cover static, electrical interference, adjustments or labor costs for the removal or reinstallation of the unit for repair.
- The sole responsibility of Alphasonik under this warranty shall be limited to the repair or replacement thereof, at the sole discretion of Alphasonik.
- If it becomes necessary to send the product or any defective part to Alphasonik or an authorized service station, the product must be shipped in its original or equivalent carton, fully insured, with shipping charges prepaid. Alphasonik will not assume any responsibility for any loss or damage incurred in shipping.
- This warranty is not transferable and protects the original purchaser provided they reside and made their purchase in the United States. International consumers may contact their local retailer or distributor for warranty information.
- ALL IMPLIED WARRANTIES, EXCEPT TO THE EXTENT PROHIBITED BY APPLICABLE LAW, SHALL HAVE NO GREATER DURATION THAN THE WARRANTY PERIOD SET FORTH ABOVE. UNDER NO CIRCUMSTANCES SHALL ALPHASONIK BE LIABLE FOR ANY LOSS OR DAMAGE, DIRECT OR CONSEQUENTIAL, ARISING OUT OF THE USE OR INABILITY TO USE THE PRODUCT. BECAUSE SOME STATES DO NOT ALLOW LIMITATIONS ON HOW LONG AN IMPLIED WARRANTY LASTS OR EXCLUSIONS OR LIMITATIONS OF INCIDENTAL OR CONSEQUENTIAL DAMAGES, THE ABOVE LIMITATIONS OR EXCLUSIONS MAY NOT APPLY TO YOU.
- THIS WARRANTY GIVES YOU SPECIFIC LEGAL RIGHTS AND YOU MAY ALSO HAVE OTHER RIGHTS THAT VARY FROM STATE TO STATE.
- Should you have any difficulties with the performance of this product during warranty or with any Alphasonik authorized service center, you may contact Alphasonik by emailing us at [email protected].