
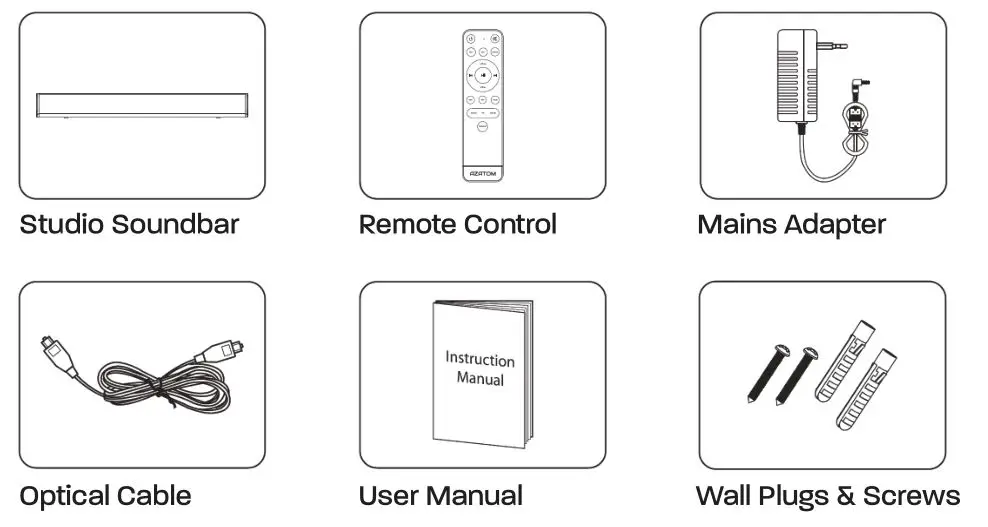
What’s in the box:
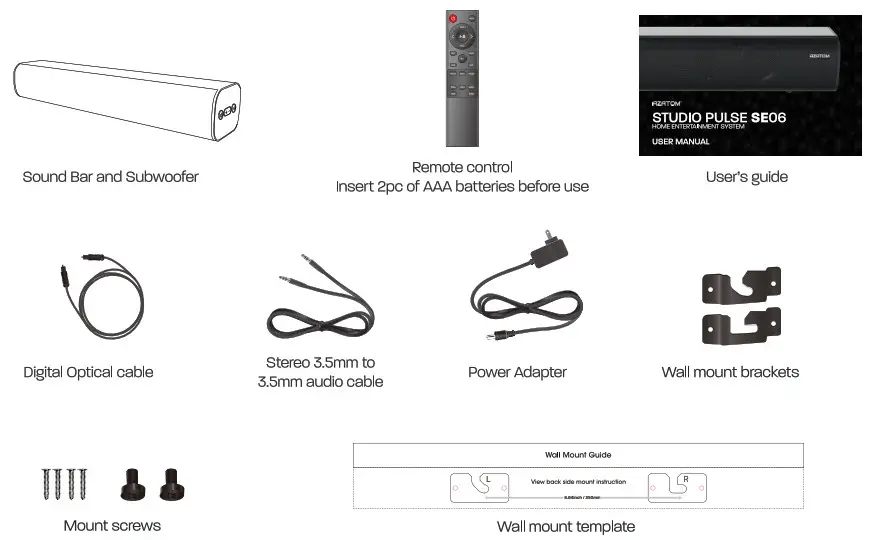
- Studio Eclipse SE500 Soundbar
- Remote Control
- Mains Adapter
- Optical Cable
- User Manual
- Wall Plugs and Screws

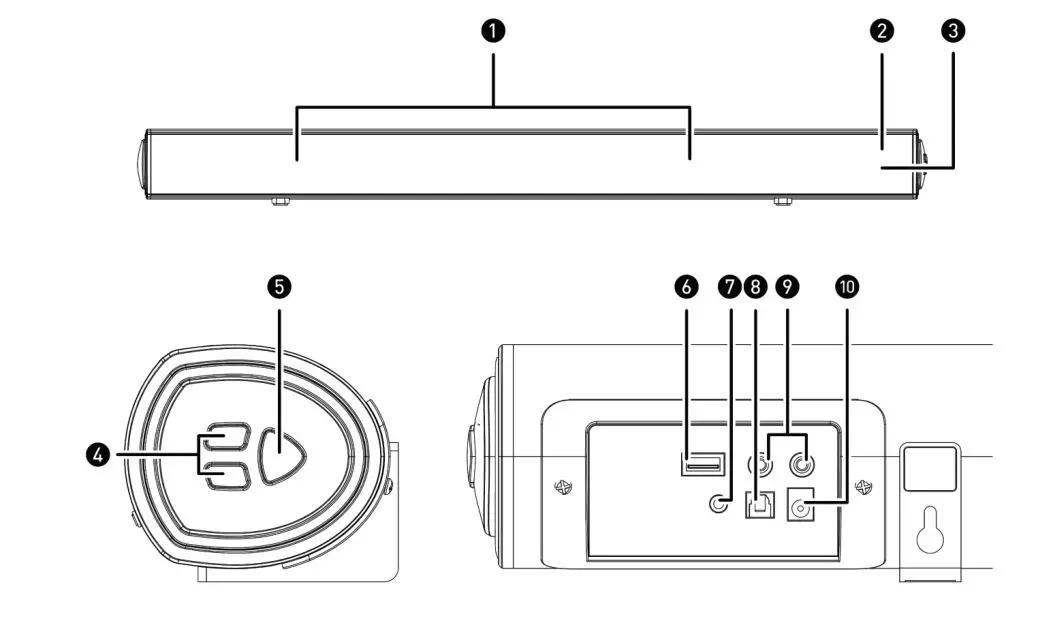
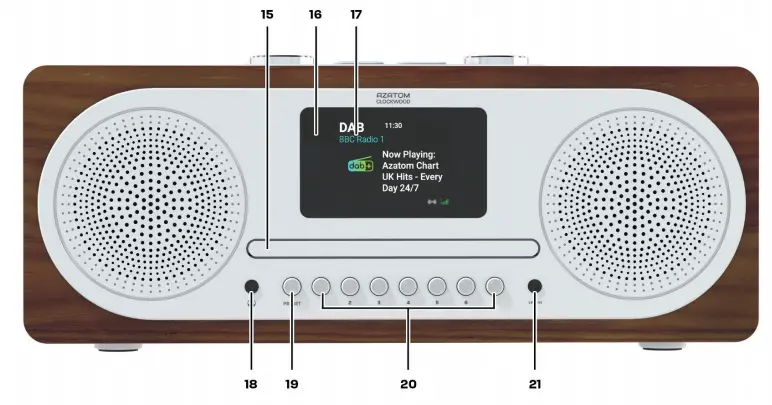
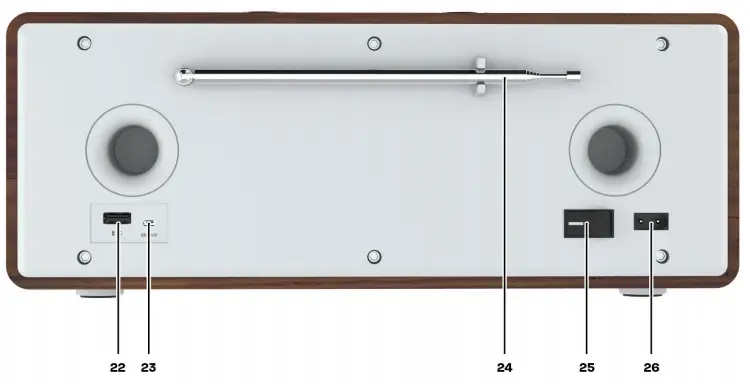
Controls & Interface:
- Speaker Drivers
- LED Indicator Light
- Remote Control Sensor
- Volume + and –
– Press to adjust volume up or down - Power Button
- USB Port
- 3.5mm Line-IN Socket
- Optical-IN Socket
- Aux (RCA L/R) Socket
- DC (20V 1.2A) Socket
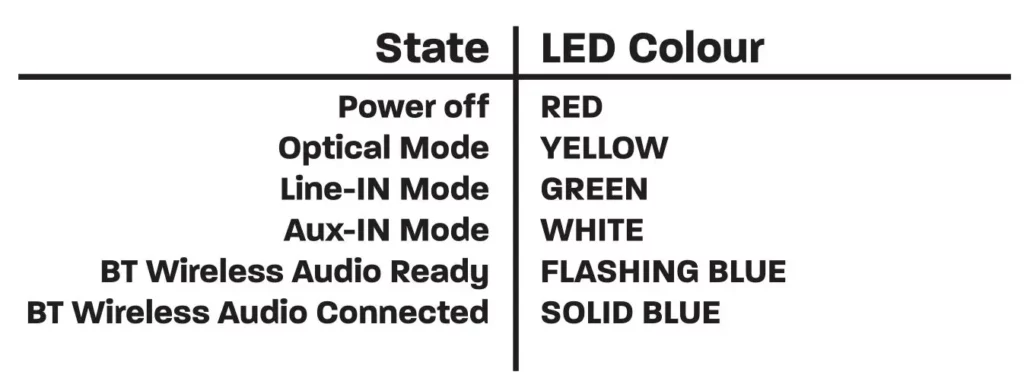
Indicator Lights:
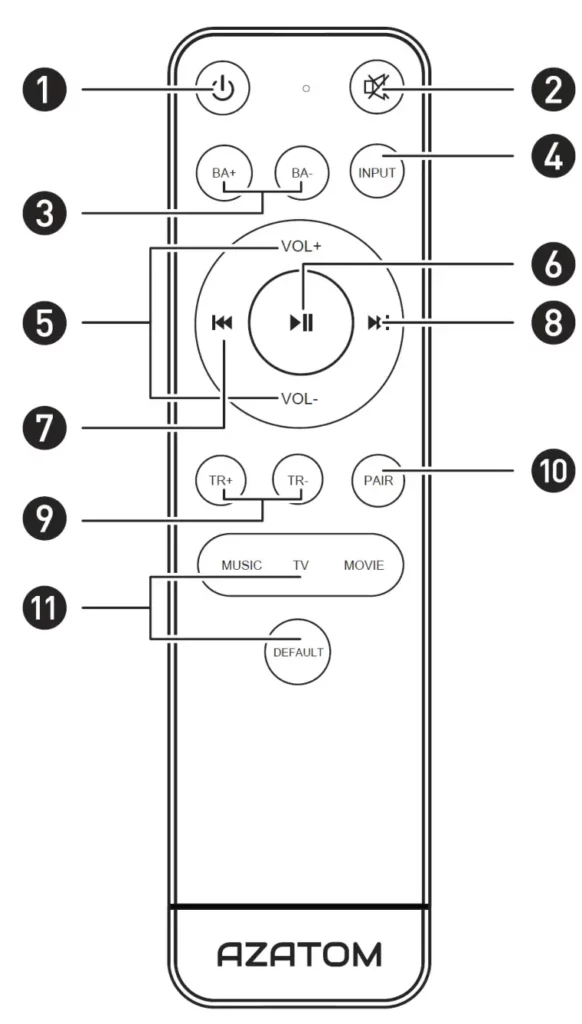
Remote Control:
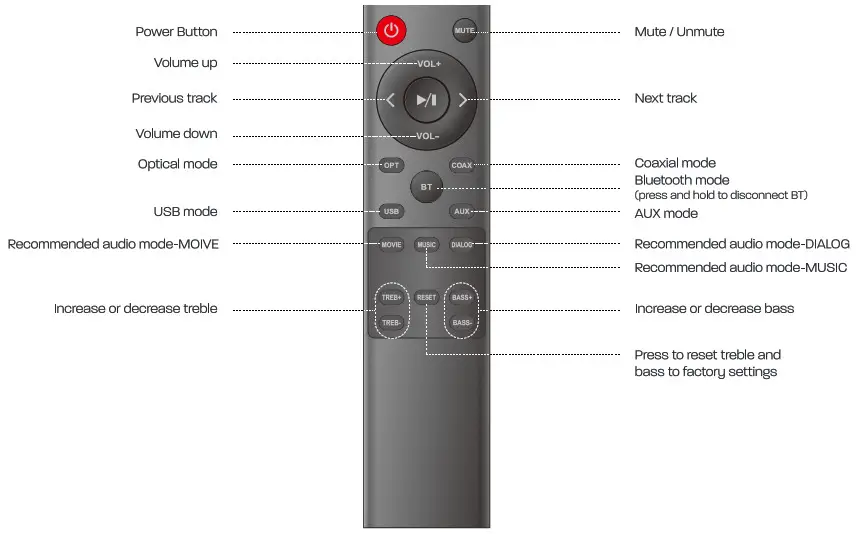
Remote Control Buttons:
- Power Button
- Mute Button
- Bass + / Bass – Button
- Source / Input Button
- Volume + / Volume – Buttons
- Play / Pause Button
- Rewind / Skip Backwards Button (BT Wireless Audio Mode)
- Fast-Forward / Skip Forward Button (BT Wireless Audio Mode)
- Treble + / Treble – Button
- BT Wireless Audio Pair Button ( / Disconnect Device)
- Equaliser Button – Choose a sound mode (Music/Voice/TV/Movie/Default)
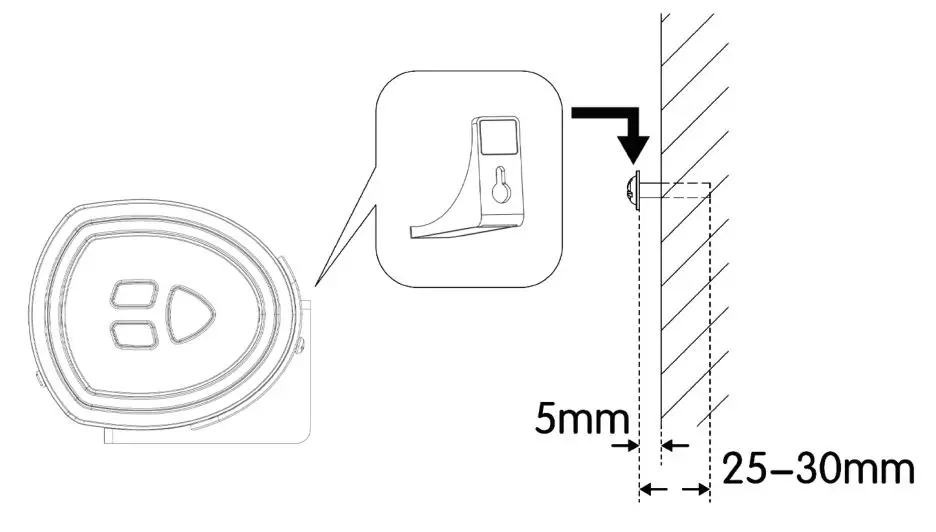
Wall Mounting:
It is the installer responsibility to verify that the wall safely supports the total weight of the Soundbar.
– Additional tools (not included) are required for the installation.
- Drill 2 parallel holes (Ø3-8mm each according to wall type) in the wall. The distance between 2 holes should be 580mm.
- Firmly fix a wall plug (included) into each hole in the wall if necessary.
- Insert a screw (included) into each dowel. Make sure to leave a 5mm gap between the wall and the screw’s head. Lift the Bar over the heads of the screws and slot into place.
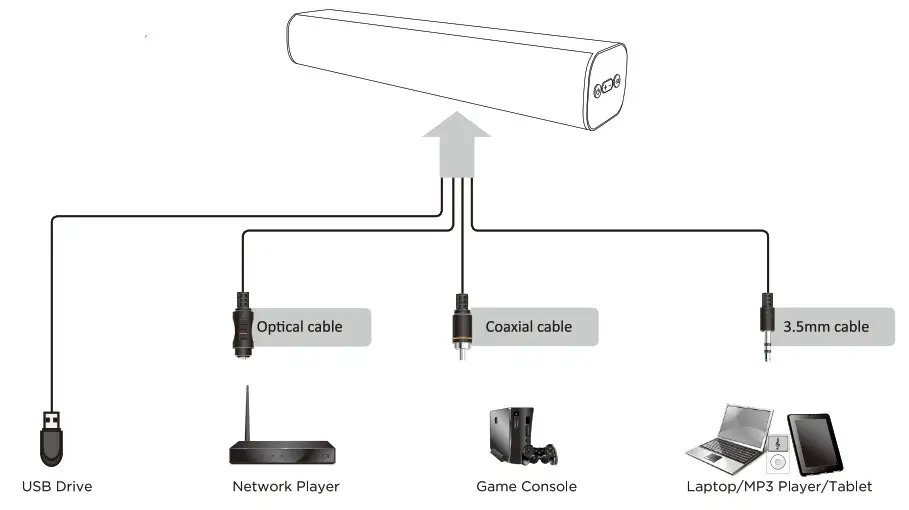
Connections:
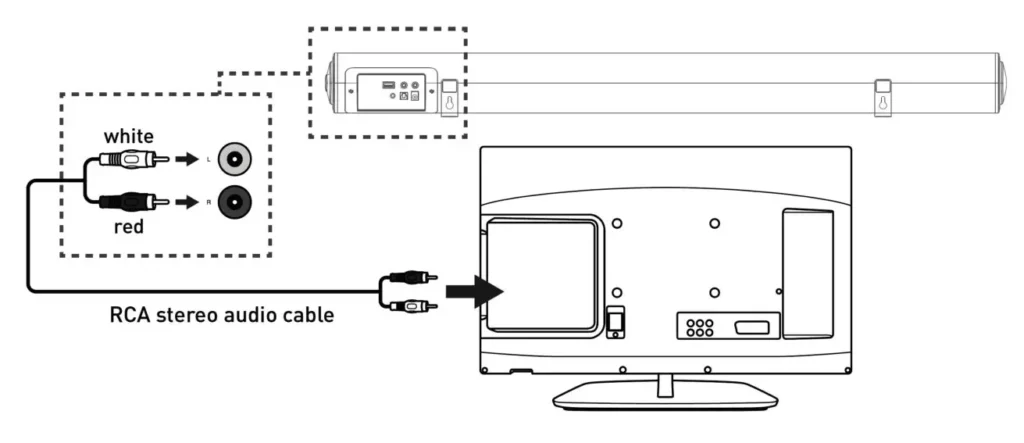
Using the AUX (RCA) Connection:
Use the RCA Stereo Audio Cable to connect the TV’s stereo RCA(L/R). Audio output socket to the AUX(L/R) Sockets of the unit.
Then press the AUX button on the remote control or press the SOURCE button on the unit to choose the AUX function. Turn on your television set to use the Studio Eclipse SE500.
Using the Line-IN Connection:
Plug one end of a 3.5mm audio input cable (included) into the Line in on the unit. Before use, disconnect any cables connected to the Stereo RCA Inputs. Plug the other end of the cable into the audio output/headphone output on an MP3 player or other audio source.
-Press the POWER button on side panel or POWER button directly on the remote control to switch on the unit.
-One touch the SOURCE button repeatedly or directly press LINE in button on remote control to enter LINE in mode. The mode indicator will turn green.
-Audio played through the connected device will now be heard through the speakers.
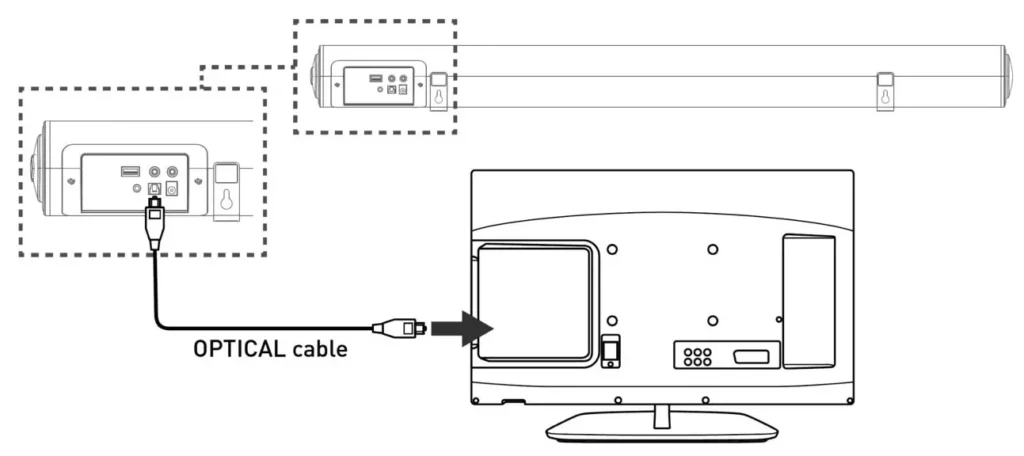
Using the Optical Connection:
You will need: An audio source device with an optical audio output and a digital optical audio cable.
Connect the Digital Optical Audio cable to the optical output on the audio source and to the Optical Input on the speaker bar. Press the POWER/SOURCE button on side panel or POWER button directly on the remote control to switch on the unit. Press the OPTICAL button on the remote control to switch to Optical mode or one touch POWER/SOURCE button on main unit repeatedly to select the Optical mode. The mode indicator LED will turn Yellow.
Using the native controls on your connected device, make sure the audio settings are set to PCM or Optical Audio and are turned on. Audio from the connected audio source will now be played through the speakers. Using the native controls on your connected device, make sure the audio settings are set to PCM or optical audio and are turned on.

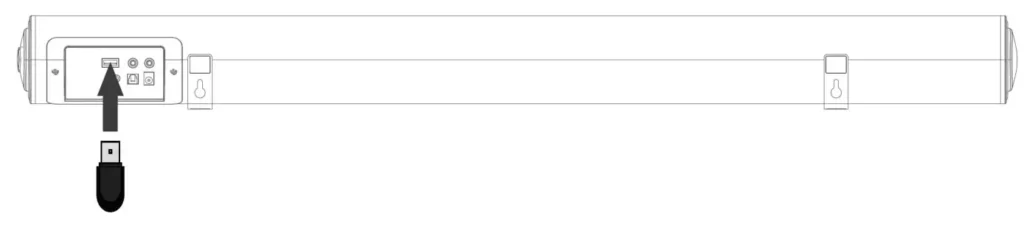
Using the USB Connection:
Connect your USB device to the USB jack on the soundbar. Press the “INPUT” button on the remote, and the LED indicator will be BABY BLUE. Play music files from the USB device through the Soundbar.
Connecting to the Mains Power Adapter:
Ensure that the power supply voltage is in the voltage of 100V~240V. This unit is designed to use adapter. Connecting the unit to any other power source may cause damage to the unit. Unwind the mains cable to its full length. Connect the mains plug to a mains socket. Make sure the mains plug is fully inserted into the mains socket. The mains plug/appliance coupler is used as the disconnect device, the
disconnect device must remain readily operable.
Connect the Adapter to the unit and AC Socket.
ENSURE ALL AUDIO CONNECTIONS OF THE UNIT ARE CONNECTED BEFORE CONNECTING THE MAIN POWER SOCKET. Unplug the power cord from the outlet when the unit is not being used for an extended period of time.
BT Wireless Audio Operation:
Pairing a BT Wireless Audio Device for the First Time: Press the POWER button on the unit or the POWER button on the remote control to switch on the unit.
Select and press the BT button directly on the remote control or press the SOURCE button repeatedly to enter BT Wireless Audio mode, indicated by a flashing blue light.
Using the native controls on your BT Wireless Audio device, selects the “STUDIO ECLIPSE SE500” in your BT Wireless Audio
settings to pair.
If your device requests a password, enters the default “0000”.
Refer to the “user manual” for your specific device for instructions on pairing and connecting BT Wireless Audio devices.
When successfully paired and connected, a beep will issue from the unit and the Pairing Indicator will display a solid blue light. After initial pairing, the unit will stay paired unless unpaired manually by the user, or until it is erased due to a reset of the device. Soundbar has BT Wireless Audio connected to a device, you can press and hold the MUTE/PAIR button 3 seconds to exit this device in order to pair the device with another BT Wireless Audio device.
If your device should become unpaired or you find it is unable to connect, repeat the above steps.
Playing Audio Wirelessly:
Follow the instructions for pairing a device with the Soundbar. Use the controls on the connected device to select and play a track. To play, pause or skip a track, use the controls on the connected audio playing device.
Specifications:
Amplifier:
Power Output: Max power output 180W
Frequency Response: 20Hz – 20KHz ± 3dB
Input Sensitivity: 700mV
Main Unit:
Power Supply:
Input: 100 – 240V ~ 50-60Hz
Output: 20V 1.2A
Standby Power Consumption: ≤ 0.5W
Full Range Speaker Drivers:
Impedance: 4ohm (3 inches)
Frequency Response: 180Hz ~ 20KHz
Dimensions: 912 x 101 x 87mm
Mains Cable Length: 1.5 Metre
For Technical support please see the product page for the Studio Eclipse SE500 on www.azatom.com or email us directly at: [email protected]
AZATOM EB100 Equinox
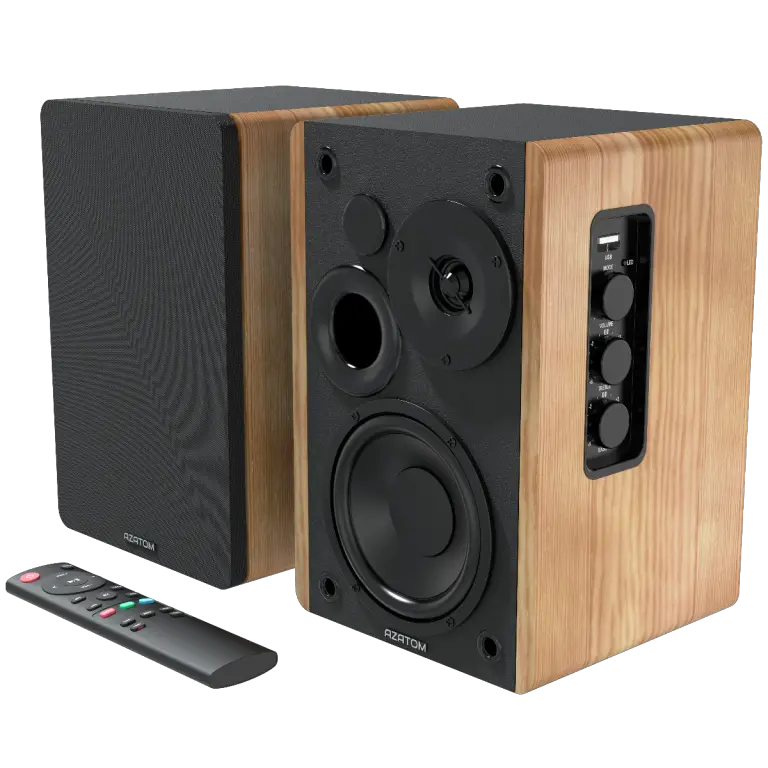
In The Box
Box Contents

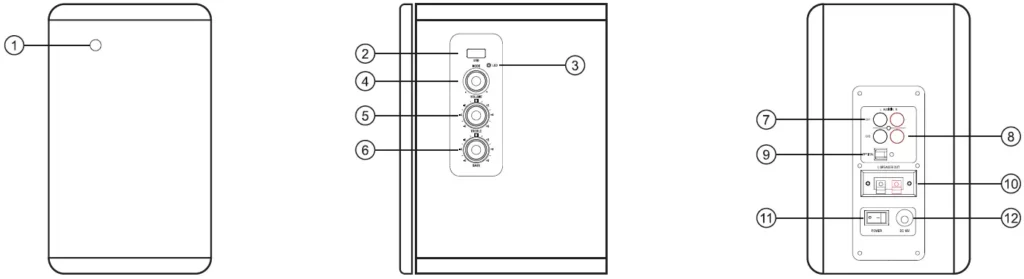
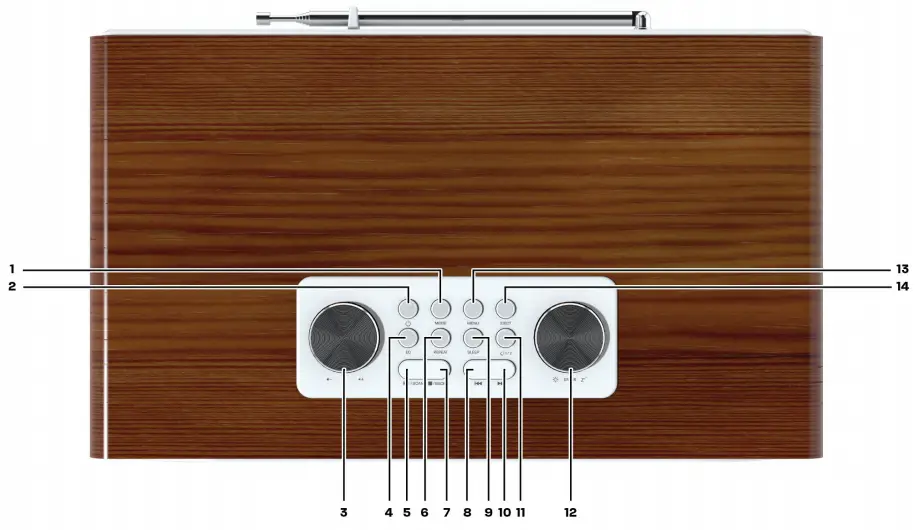
Speaker Controls

- Infrared receiver
- USB input port
- LED indicator
- Light Blue: Line in 1
- Orange: Line in 2
- Blue: Bluetooth
- White: Optical
- Purple: USB
- Master volume control / input selection Press in to navigate between audio sources:
Line in 1 -> Line in 2 -> Optical -> Bluetooth -> USB - Treble dial
- Bass dial
- Line in 1 input port
- Line in 2 input port
- Optical input port
- Speaker output
- Power switch
- Power cord
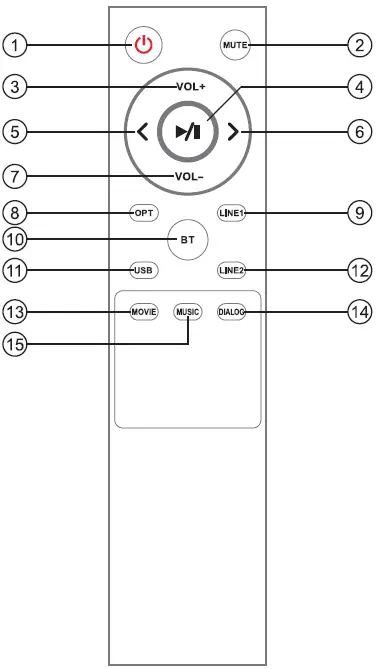
Remote Control
- Power ON/OFF
- Mute/Unmute
- Volume increase
- Pause and play
- Previous track
- Next track
- Volume decrease
- Optical mode
- Line in 1 mode
- Bluetooth input (Press and hold to disconnect Bluetooth devices)
- USB mode
- Line in 2 mode
- Recommended audio mode-MOVIE
- Recommended audio mode-DIALOG
- Recommended audio mode-MUSIC
NOTE:
- Previous Track & Next Track only works under Bluetooth or USB mode.
- Insert 2 x AAA batteries before using.
Connections
- Connect the speakers with the included speaker connecting cable.
- Connect to power source, power on the speaker, then the indicator is lit.
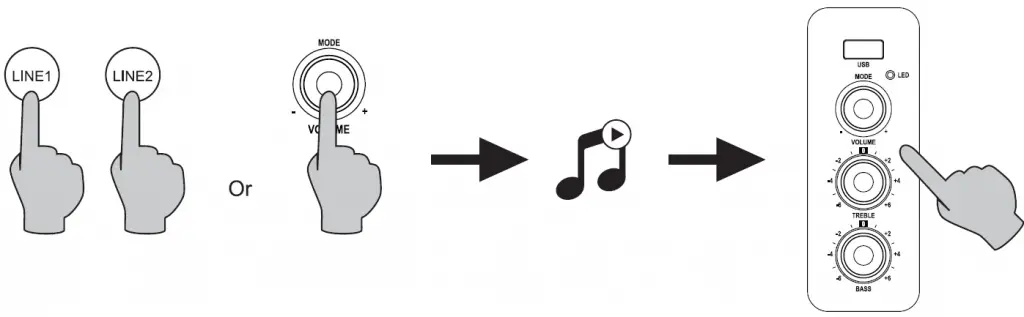
Line in Input
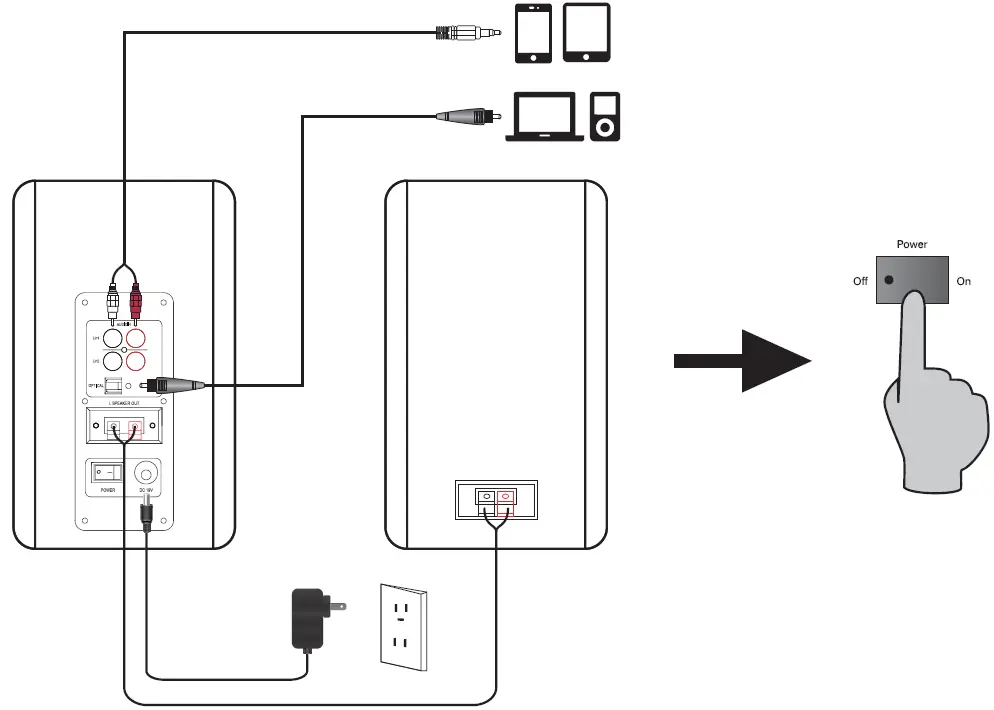
- Press the master volume control on the active speaker or press the “LINE 1/LINE2” button on the remote control to select LINE IN input. The indicator turns to Light Blue(Line in 1) or Orange (Line in 2).
- Using audio cable to connect audio source to the speaker.
- Play from your device and adjust the volume accordingly.
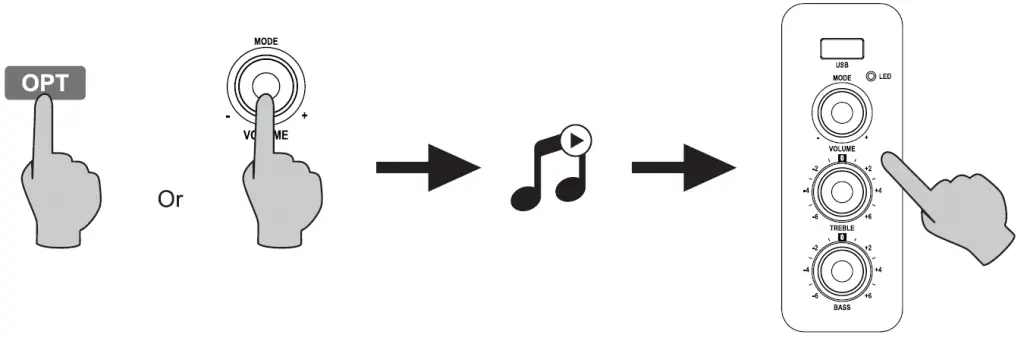
Optical Input
- Press the master volume control on the active speaker or press the “OPT” button on the remote control to select the optical input. The indicator turns to White(0plical).
- Sing optical cable (optical cable included) to connect audio sources to your speaker.
- Play from your devices and adjust the volume accordingly.
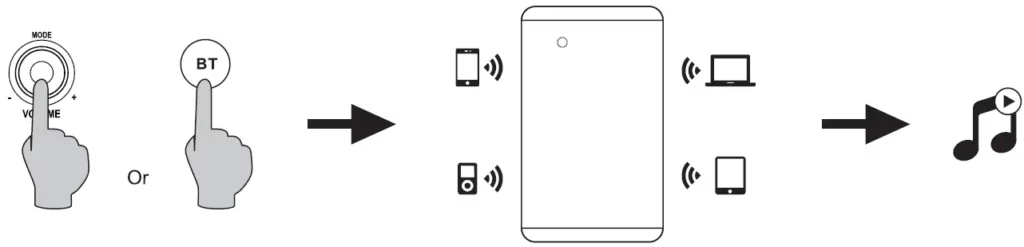
Pairing
- Turn on speaker and switch to Bluetooth mode by pressing the Bluetooth button on the remote control or press the master volume control on back panel of the active speaker, The indicator turns to blue.
- Go to setup section on your source devices (mobile phones, tablets, etc )and search for nearby Bluetooth devices, you will find “Azatom Equinox” in the isl.
- Pair your device with “Azatom Equinox”
- Play audio tracks on your device and adjust the volume to a desired level.
- To disconnect Bluetooth, press and hold the master volume control for about 2 seconds.
Note:
- Bluetooth connectivity and compatibility may be different among different source devices, depending on the software versions of source devices.
- To enjoy the full Bluetooth functions of this product, please ensure your mobile device supports ADP and AVRCP profile.
- PIN code for connection is “0000” if needed.
Specifications
Power Output: L/R:25W+25W
Signal to Noise Ratio dB(A): L/R: >85dB (A)
Noise Level: <25dB (A)
Input Sensitivity: LINE IN1: R/L: 500±50mV
LINE IN2: R/L: 700±50mV
OPT: R/L: 500±50mFFS
Bluetooth: R/L: 700±50mFFS
Frequency Response: 40HZ-20KHZ
Bass Unit: 4 inch (116mm)
Tweeter Unit: 13mm silk dome tweeter
Troubleshooting
| Problem | Solution |
| No sound |
|
| Cannot connect via Bluetooth |
|
| The Equinox does not turn on |
|
REGISTER YOUR PRODUCT ONLINE. TO LEARN MORE Iii REGISTER FOR OUR AZATOM WARRANTY* PLEASE VISIT: WWW.AZATOM.COM/WARRANTV
AZATOM@ 2021 ALL RIGHTS RESERVED. AZATOM@ IS PART OF AZATOM GROUP LIMITED.
SEE SITE FOR SAFETY INFORMATION. AZATOM@ RESERVE THE RIGHT TO WITHDRAW ANY AND ALL PROMOTIONS WITHOUT NOTICE. FOR FULL WARRANTY,
EXTENDED WARRANTY AND PROMOTIONAL OFFER TERMS & CONDITIONS PLEASE VISIT WWW.AZATOM.COM/TERMS-CONDITIONS
*REGISTRATION REQUIRED
![]()
Clockwood C100X
DAB, DAB+, FM Radio with BT Wireless Audio & CD Player

![]() User Manual
User Manual ![]()
This manual is available to download online at www.azatom.com

What’s In The Box
- Clockwood C100X
- User Manual
- Power Adapter
- Warranty Card
- Remote Control
Operating your radio
- Extend the telescopic aerial.
- Press the POWER button to switch on your radio. The display will show “Welcome AZATOM”
- If this is the first time the unit goes into DAB Mode, it will automatically start an ‘Auto Scan’ to search for available stations in your area.
(Once DAB Mode has been used before, the radio will automatically select the previously played station). - Press and hold the SCAN button at any time and the unit will automatically scan and store stations.
During the scanning process, the lower line of the display shows a progress bar. - When the scanning is complete the first station will be selected.
The clock will automatically set to the current time and date. - If the station list is still empty after the scan your radio will display “Service not available”, and no stations have been found – please
ensure the antenna is extended and test the reception by doing another auto scan in a different location. The auto set for the date and time required signal.
Selecting a station – DAB
1. 1. Press the TUN- / TUN+ buttons to enter the list of available stations in your area.
2. Press ENTER to select the station once highlighted in the menu.
Finding new radio stations
Over time new stations may become available. To find new stations you can auto-scan as follows.
- Pressing SCAN at any time and the unit will automatically scan and store stations in your area.
- Press MENU and TUN- / TUN+ to choose Full scan to search new stations.
- Select Full scan from the menu for the auto scan. The display will show “Scanning…”, and your radio will perform a scan of the Band III DAB channels. As new radio stations are found, the station counter on the right-hand side of the display will increase and the radio stations will be added to the list stored in the radio.
Manually Tuning with DAB
Manual tuning allows you to tune to the various DAB Band III channels.
UK DAB stations are located in the range 11B to 12D.
- Press MENU until the display shows “Manual Tune”, press ENTER to select the Services Menu.
- Highlight the desired channel and press ENTER, the graph will indicate the signal strength and the upper line will show the name of the DAB multiplex (group of radio stations). Any stations found will be added to the stored list in the radio.
- Press MENU to return to the normal tuning mode.
Display Modes – DAB
Your radio has a range of display modes: Press MENU to enter “Station Info” while listening to a radio station and cycle through each modes Scrolling text: Displays scrolling text messages such as artist/track name, phone in number, etc.
Program Type: Displays the type of station being listened to, e.g. Pop, Classic, News, etc.
Multiplex Name: Displays the name of DAB multiplex to which the current station belongs.
Date: Displays the current date.
Frequency: Displays the frequency of the DAB multiplex for the station listened to.
Bit rate & audio type: Displays the digital bit rate & audio type for the station being listened to.
Signal strength: Displays a graph showing the signal strength for the station being received.
Finding new stations – FM
- Carefully extend the telescopic aerial fully and press the POWER button to switch on your radio.
- Press MODE to enter FM mode.
- Press SCAN for 3 seconds for an auto scan, which when finished will automatically store the stations.
Press either TUN- / TUN+ to choose stored stations.
Press and hold the TUN– button, your radio will scan upwards. - After a few seconds, the display will update. The display will show the frequency of the signal found. If the signal is strong enough and there is RDS data present then the radio will display the station name.
- To find other stations, press the TUN– button and hold for 3 seconds as before.
- To scan the FM band in a downwards direction (high frequency to low frequency) press and hold the TUN+ button.
- When the waveband end is reached your radio will recommence tuning from the opposite waveband end. Adjust the Volume control to the required setting.
Preset Stations – DAB & FM
You may store your preferred DAB and FM radio stations to the preset station memory. There are 60 memory presets in your radio, 30 for DAB and 30 for FM. Presets are remembered by your radio in the event of a power failure.
The procedure for setting presets and using them to tune stations is the same for FM and DAB modes:
DAB mode:
- Press POWER button to switch on the radio.
- Select the desired waveband.
- Tune to the required station as previously described.
- Press PRESET button and hold it to enter the preset store, and then press TUN- / TUN+ to select the desired preset number which you wish to store the station.
- Press ENTER to confirm, for example, “Preset 01 stored”. The station will be stored under the chosen preset. Repeat this procedure as needed.
- Stations that have been stored in preset memories may be overwritten by following the above procedure.
- Short press PRESET button to recall the stored stations.
FM MODE:
- Press TUN- / TUN+ to change up to or down by 50 kHz.
- When the waveband end is reached the radio will recommence tuning from the opposite waveband end.
- Press PRESET button and hold it to enter the preset store, and then press TUN- / TUN+ to select the desired preset number which you wish to store the station.
- Press ENTER to confirm, for example, “Preset 01 stored”.
The station will be stored under the chosen preset. Repeat this procedure as needed.
Recalling a preset:
- Press the POWER button to switch on the radio.
A short press on the PRESET button, then the display shows “Preset Recall”, then press ENTER to tune to the station stored in preset memory.
Note: If you have not previously stored a preset station and the preset button is pressed, “Empty preset” will be displayed.
Prune: (To remove stations that are listed but unavailable) Under DAB mode, press the MENU button until the display shows the sub-menu, press the ENTER button to enter the Prune option. - Select “Yes” and press the ENTER button to confirm to prune.
Note: this removes all the invalid stations indicated in the station list with a “?” in front of the station name.
Time & Date Settings
If there is no DAB/FM signal available, you will need to set the TIME and DATE manually when turned on for the first time.
- Press the MENU and TUN- / TUN+ to enter “System settings”.
- Press TUN- / TUN+ and select the “Time”.
- Set time/date, auto-update, 12/24 hours, date format.
- Press TUN- / TUN+ and ENTER to set the correct time and date.
Alarm Settings
- Press ALARM to enter the setting menu, press ALARM again to choose ALARM 1 or ALARM 2.
- Press TUN- / TUN+ to set the alarm time and press ENTER to confirm.
- Press TUN- / TUN+ to set the Alarm ON or OFF, Frequency, Wake up time, Source, Duration, and Volume, and press ENTER to confirm.
NOTE: PLEASE SELECT A RADIO STATION BEFORE SETTING THE ALARM.
You will be given the option to choose from the last station used or one of your favorite preset channels.
Snooze – Stop Alarm
- When the alarm sounds, pressing the SNOOZE button will temporarily silence the alarm, you can choose the time from 5 or 10 minutes.
- The snooze function also has a countdown allowing you to see how long before the alarm re-sounds. Press POWER to turn it on.
Stop Alarm:
When the alarm is sounding you can press the ALARM or STANDBY buttons except for the Snooze button one time to stop the alarm sound. The radio will then return to Standby mode.
Using AUX In
Aux-in mode plays audio from an external source such as a smartphone or tablet.
- Plug on the end of the 3.5mm audio cable (excluded) into the headphone or line out jack on your player, plug the other end of the cable into the unit AUX-IN jack on the back of the unit.
- Turn on the external audio source and play your device.
- Press the MODE button to enter “Auxiliary Input” mode.
- The volume level can be now controlled through the main unit. Operate all other functions on the external device as usual.
Notes:
If you’re connected to the Line out jack of your external device, then you only need to adjust the volume control of this unit. If you’re connected to the Headphone Jack of your external device, then you may need to adjust both the volume control of your external device and the volume control of this unit to find the most desirable volume setting.
Please ensure the cable is disconnected to listen to the radio in other modes such as DAB and FM.
CD Player
NOTE: This unit not only plays commercial compact discs but also self-complied CD-RW discs. Because of the non-standardized format definition/production of CD-R/RW, playback quality & performance is not guaranteed. The Manufacturer is not responsible for the playability of CD-R/RW due to recording conditions such as PC performance, writing software, media properties etc.
Do not attach a label or seal to either side of the CD-R/RW disc. It may cause a malfunction.
PLAY MODE:
- Press MODE button to enter CD mode.
- Insert a CD with the label side facing upward.
- Disc information (total number of tracks) will appear on the LCD DISPLAY.
- Press PLAY/PAUSE button to start playing the CD.
- While playing music, press the PLAY/PAUSE button to pause playback, press PLAY/PAUSE button again to resume playing.
- Scroll VOLUME- or VOLUME+ adjust to the desired volume level.
- Press STOP button to stop playing music.
- To turn off the CD player, press POWER button.
NOTE: If skipping occurs during CD playback, try turning the volume down. Check the CD to ensure it is not scratched or damaged.
Do not open the CD DOOR when a CD is playing.
REPEAT MODE:
Repeat 1:
Press PRESET button once, you will see REP_ONE on LCD display. The current track will be repeated.
Repeat All Tracks:
Press PRESET button twice, you will see REP_ALL on the LCD display. The whole disc will be played continuously.
Press PRESET button three times, you will see RANDOM on the LCD display. The whole disc will be played randomly.
To Cancel Repeat Function:
Press PRESET button again to cancel the repeat function.
SKIP AND SEARCH MODE:
- During Play or Pause mode, tap the TUN- / TUN+ button to go to the next track or go back to the beginning of the current track.
- During playback, press and hold the TUN- / TUN+ button to search within the current track with audible high-speed playback.
PROGRAM PLAY MODE:
This function allows music tracks to be played in a programmed sequence.
NOTE: Program can only be set in STOP mode.
- Press the PRESET button once, you would see “P01” blink on the LCD DISPLAY.
- Press the TUN- / TUN+ button to select the track to be programmed.
- Press the PRESET button again to store the selection. The LCD DISPLAY will advance to “02” and flash to prompt for the next
track. - You may repeat steps 2 to 3 to program up to 20 tracks. As soon as you have entered the 20th track, the LCD DISPLAY will automatically show the programmed tracks one by one in their correct sequence starting from the first programmed track. If you wish to program less than 20 tracks, press the Program button twice after confirming your last track. At the end of the sequence, “01” will blink on the LCD display, ready to play your first programmed track.
- Press the PLAY button to start the programmed playback. Press the STOP button to stop playback.
- Programmed tracks will be played through once and then stop. However, you may use the REPEAT function to repeatedly play a certain track (Repeat 1) or all tracks in the program (Repeat All).
You may also press the TUN+ button to go directly to other tracks ahead or use TUN- button to go back to the previous track(s) during program playback. - To cancel program play, press the STOP button twice during program playback
FOLDER+/10 track + (MP3 CD DISC only)
- Press SCAN once to skip 10 tracks
- Press SCAN and hold 3 seconds to skip FOLDER
BT Wireless Audio
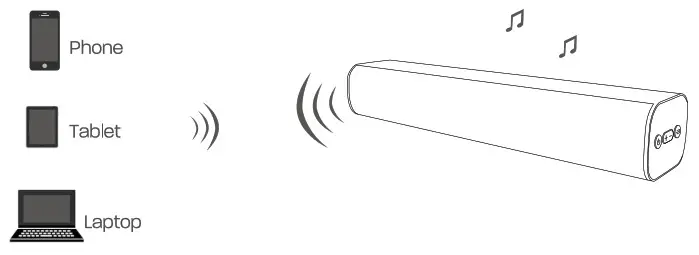
Bluetooth allows you to stream your music wirelessly from any Bluetooth-enabled media player, including smartphones, tablets, laptops
and other MP3 Players.
To pair your device via Bluetooth for the 1st time:
- Press POWER/MODE button to select Bluetooth mode
- After a few seconds, the screen will then say “BT SEARCHING” and the speaker automatically goes into pairing mode.
- On your Bluetooth Device do a search and once available please select “Azatom Clockwood”.
- After 5-20 seconds the screen will say “BT connected”.
- You are ready to start streaming via Bluetooth. Play any sound on your
Bluetooth device and listen on the speaker.
Whenever the Bluetooth Mode is selected, the radio will automatically go into pairing mode and either pair with the last paired device (if in range) or be available for pairing to a new device.
FM Stereo / Mono
If a station being received is weak some hiss may be audible (especially when listening using earphones).
1. Press MENU button and TUN- / TUN+ to choose Audio setting, press ENTER to entry this function.
2. Press TUN- / TUN+ until “Forced mono” is highlighted. Press the ENTER to select mono. Your radio will select the mono audio mode.
Factory reset
If your radio fails to operate correctly, or some digits on the display are missing or incomplete, it may be possible to restore normal operation by carrying out a system reset operation on your radio. This will restore the radio’s settings to their factory defaults. No presets will be stored, and the list of DAB radio stations will be empty.
If you have moved to a different part of the country and you wish to erase local DAB radio stations that are no longer available from the stored list, then you may carry out this procedure. Your radio will automatically re-scan for the DAB stations available at your current location when it restarts.
- Press MENU to enter the menu.
- Press MENU and TUN- / TUN+ to choose “System settings” .
- Press TUN- / TUN+ to find “Factory Reset”. Press the ENTER.
- If you wish to perform the reset operation, push the TUN- / TUN+ until “YES” is highlighted on the display and press. A full reset of your radio will be performed, All presets and station lists will be erased.
If you do not wish to reset your radio press TUN- / TUN+ until “NO” is highlighted. Your radio will return to the previous menu. - After a system reset a scan of the DAB band will be performed.
In case of malfunction due to electrostatic discharge, reset the product (temporary disconnection of the power adaptor may be required) to resume normal operation.
Language
Press and hold the MENU button and then the display shows the sub menu: System. Press the ENTER button and select Language to enter language options English / French / Germany / Italian.
Backlight Setting
- Press MENU and TUN- / TUN+ to enter “System settings”.
- Press TUN- / TUN+ and select the “Time out” auto dimmer after 10, 20, 30, 45, 60, 90, 120, 180 seconds, or “ON” to cancel auto dimmer.
- Choose High, Medium, Low for dimmer level.
- Choose High, Medium, Low for on level.
Earphones (NOT INCLUDED)
The lead connecting the earphones to your radio acts as an aerial when plugged into the Earphone socket.
- Plug the earphones into the earphone socket on the top of your radio.
- Check that the volume level is not too loud before placing the ear-pieces into your ears.
IMPORTANT: Do not switch on the radio with the earphones connected and inserted in your ear. Excessive sound pressure from earphones can cause hearing loss.
Sleep Function
Your radio can be set to turn off after a preset time has elapsed. The sleep setting can be adjusted between 15 and 90 minutes. Ensure your radio is switched on.
Press the SLEEP button to set the desired sleep time between 15, 30,45, 60 and 90 minutes or Sleep Off which will cancel the sleep function.
Safety Guidance
When used in a directed manner, this unit has been designed and manufactured to ensure your personal safety. However, improper use can result in potential electrical shock or fire hazards. Please read all safety and operating instructions carefully before installation and use, and keep these instructions handy for future reference.
Take special note of all warnings listed in these instructions and on the unit.
Water and Moisture:
The unit should not be used near water. For example: near a bathtub, washbowl, kitchen sink, laundry tub, or near a swimming pool.
Ventilation:
The unit should be situated so that its location or position does not interfere with its proper ventilation. For example, it should not be situated on a bed, sofa, rug or similar surface that may block the ventilation openings. Also, do not have the unit in an enclosed space, such as a bookcase or cabinet, which may impede the flow of air through the ventilation openings.
Heat:
The unit should be kept away from heat sources such as radiators, heat registers, stoves or other appliances (including amplifiers) which may be hot.
Power Source:
The unit should be connected to a power supply only of the type described in the operating instructions or as marked on the appliance.
Cleaning:
The unit should only be cleaned with a dry cloth. Care should be taken so that liquids are not spilled into any openings or vents located on the product.
Lightning and Power Surge Protection:
Unplug the unit from the wall outlet. This will prevent damage to the product due to lightning and power-line surges.
Overloading:
Do not overload wall outlets or extension cords as this can result in a risk of fire or electric shock.
Periods of Non-use:
If the unit is to be left unused for an intended period of time, such as a week or longer, the power cord should be unplugged from the unit
to prevent damage or corrosion.
Servicing:
The user should not attempt to service the unit beyond those methods described in the user’s operating instructions. Service methods not covered in the operating instructions should be referred to qualified service personnel.
WARNING:
The AC adaptor should be disconnected from the mains supply and the radio when not in use.
To reduce the risk of fire or electric shock, do not expose this apparatus to rain or moisture. The apparatus shall not be exposed to ripping or splashing and that objects filled with liquids, such as vases, shall not be placed on apparatus.
RECYCLING:
This product bears the selective sorting symbol for Waste electrical and electronic equipment (WEEE). This means that this product must be handled pursuant to European directive 2012/19/EU in order to be recycled or dismantled to minimize its impact on the environment.
User has the choice to give his product to a competent recycling organization or to the retailer when he buys a new electrical or electronic
equipment.
Use only power supplies listed in the user instructions, Indoor use only
NOTES:
- It is best to leave a CD inside the unit even when it is not in use. This prevents dust
accumulation on the optical lens. - A dirty or scratched CD may cause the music to skip. Clean or replace the CD if this
happens. - BEFORE OPERATION:
NOTES-CONCERNING COMPACT DISCS.
Dirty, damaged, or warped discs may damage the unit, care should be taken of the
following items:
1. a. Use compact discs only with the mark shown on the disc.
b. CD: compact disc only with digital audio signals.
2. a. NOTES ON HANDLING DISCS
Removing the disc from its storage case and loading it.
PRESS THE CLIPS AT THE CENTRE OF THE DISC CASE.
INSERT WITH THE LABEL/DULL SIDE FACING UP.|
LIFT OUT WITHOUT TOUCHING THE RECORDED SURFACE
PRESS THE DISC GENTLY TO INSERT IT.
Do not touch the reflective recorded surface
Do not stick anything to or write anything on the surface.
Do not bend compact discs.
Specifications
Power requirement mains (via adaptor):
AC 240V 50-60Hz
Frequency Coverage
FM: 87.5-108MHz
DAB: 174.928 – 239.200MHz
Loudspeaker: 2x 3” Inch Drivers
Output power: 30W MAX (speakers)
Earphone socket: 3.5mmm dia. stereo
FM & DAB Radio: telescopic aerial
![]()
REGISTER YOUR PRODUCT ONLINE. TO LEARN MORE & REGISTER FOR OUR AZATOM WARRANTY * PLEASE
VISIT: WWW.AZATOM.COM/WARRANTY AZATOM© 2020 ALL RIGHTS RESERVED. AZATOM® IS PART OF ATOM GROUP LIMITED.
SEE SITE FOR SAFETY INFORMATION. AZATOM® RESERVE THE RIGHT TO WITHDRAW ANY AND ALL PROMOTIONS WITHOUT NOTICE. FOR FULL WARRANTY, EXTENDED WARRANTY, AND PROMOTIONAL OFFER TERMS & CONDITIONS PLEASE VISIT WWW.AZATOM.COM/TERMS-CONDITIONS
*REGISTRATION REQUIRED
STUDIO PULSE SE06
HOME ENTERTAINMENT SYSTEM
USER MANUAL
Important Safety Instructions
- Read these Instructions.
- Keep these Instructions.
- Heed all Warnings.
- Follow all instructions.
- Do not use this apparatus near water.
- Clean only with a dry cloth.
- Donot block any ventilation openings. Install in accordance with the manufacturer’s instructions.
- Do not install near any heat sources such as radiators, heat registers, stoves, or other apparatus (including amplifiers) that produce heat.
- Do not defeat the safety purpose of the polarized or grounding – type plug. A polarized plug has two blades with one wider than the other. A grounding type plug has two blades and a third grounding prong. The wide blade or the third prong are provided for your safety. When the provided plug does not fit into your outlet, consult an electrician for replacement of the obsolete outlet.
- Protect the power cord from being walked on or pinched particularly at plugs, convenience receptacles, and the point where they exit from the apparatus.
- Only use attachments/accessories specified by the manufacturer.
 Use only with a cart, stand, tripod, bracket, or table specified by the manufacturer, or sold with the apparatus. When a cart is used, use caution when moving the cart/apparatus combination to avoid injury from tip-over.
- Unplug this apparatus during lightning storms or when unused for long periods of time.
- Refer all servicing to qualified service personnel. Servicing is required when the apparatus has been damaged in any way, such as power-supply cord or plug is damaged, liquid has been spilled or objects have fallen into the apparatus, the apparatus has been exposed to rain or moisture, does not operate normallY or has been dropped.
Special note: When placing your unit on a lacquered or natural finish, protect your furniture with a cloth or other protective material.
FCC Warnings
WARNING: Changes or modifications to this unit not expressly approved by the party responsible for compliance could void the user’s authority to operate the equipment.
NOTE: This equipment has been tested and found to comply with the limits for a Class B digital device, pursuant to Part 15 of the FCC Rules, These limits are designed to provide reasonable protection against harmful interference in a residential installation. This equipment generates, uses, and can radiate radio frequency energy and, if not installed and used in accordance with the instructions, may cause harmful interference to radio ommunications. However, there is no guarantee that interference will not occur in a particular installation. If this equipment does cause harmful interference to radio or television reception, which can be determined by turning the equipment off and on, the user is encouraged to try to correct the
interference by one or more of the following measures:
- Reorient or relocate the receiving antenna.
- Increase the separation between the equipment and receiver.
- Connect the equipment into an outlet on a circuit different from that to which the receiver is connected.
- Consult the dealer or an experienced radio/TV technician for help.
Additional Warnings
The apparatus shall not be exposed to dripping or splashing and that no objects filled with liquids, such as vases, shall be placed on apparatus.
Battery shall not be exposed to excessive heat such as sunshine, fire or the light.
Caution marking is located at the rear or bottom of the apparatus.
The marking information is located at the rear or bottom of apparatus.
![]() This symbol indicates that this product incorporates double insulation between hazardous mains voltage and user accessible parts,
This symbol indicates that this product incorporates double insulation between hazardous mains voltage and user accessible parts,
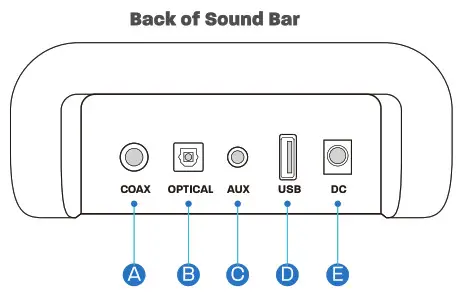
What’s in the Box

Controls and Connections

A [COAX] Digital Coaxial In
B [OPT] Digital Optical In
C [AUX] Analog Audio IN (Stereo 3.5mm)
D [USB] USB In
E [DC] Power Port
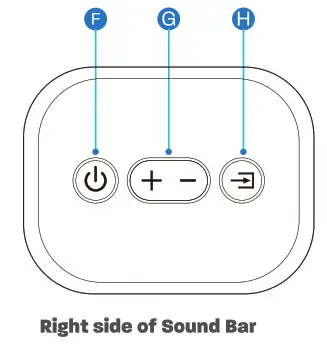
 F Press to turn on/change the audio source; Press and hols it to turn off
G Press to previous/next track; Press and hold it to decrease/increase the loudness of audio
H Select the source input mode; Press and hold to reset treble and to factory settings
Ready for the step-by-step?
Step 1: Choose one connection between your Sound Bar and TV
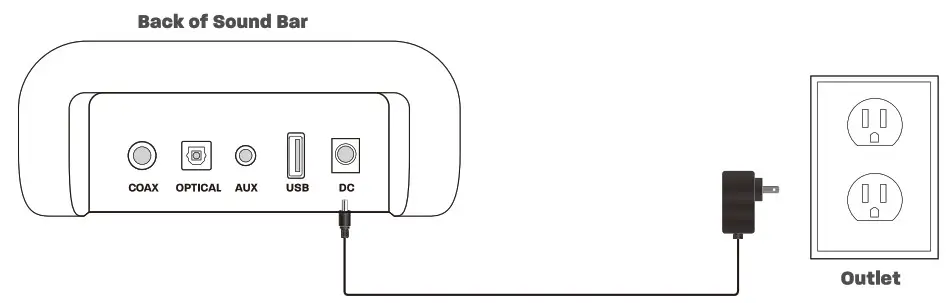
Step 2: Power on your Sound bar
Power on your Sound Bar with the included power adapter as below:
Plug the power adapter into an electrical outlet.
Step 3: Position the Sound Bar
Position your Sound Bar on your TV cabinet or mount it on the wall.
Leave 6.5 feet at least between your Sound Bar and sofa.
Sitting on the sofa which is centered to your Sound Bar.
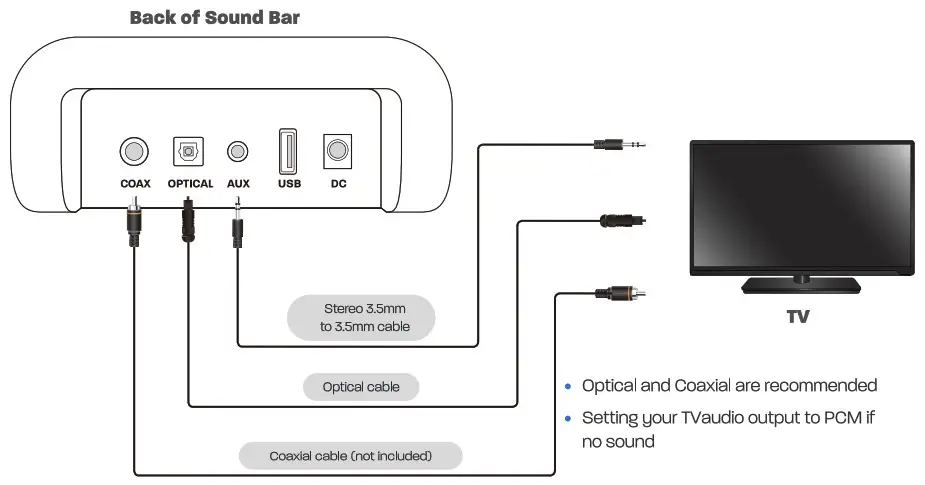
Setting “PCM” on Your TV
When all cables are connected properly, and LED indicator lights properly(Optical or HDMI connection), if there is no sound from tv or Soundbar, please setting your tv as below:
- Press “Menu” on the tv’s remote control.
- Press the arrow keys on the remote to scroll to “Audio Settings.”
- Press “OK” on the remote control.
- Scroll to “Advanced Audio” and press “OK.” Some televisions may not have an”Advanced Audio” menu and may list various audio settings instead.
- Scroll to “Audio Output Mode” or “Digital Audio Output Mode” and press “OK.”
- Scroll until “PCM” is displayed as the current audio output.
- Press “Ok” to save the settings.
* Some brand TVs maybe different in Digital Audio Output Settings, please check your TV’s manual.
Know Your Remote
Bluetooth Pairing
- Press the Bluetooth button on the remote, when the Sound Bar is in Bluetooth Pairing mode, the LED indicator will flash blue quickly.
- Now your can search for the “STUDIO PULSE” in your Bluetooth device, connect it. Once your device is paired, the LED indicator will flash blue slowly.
- Play audio in your Bluetooth device, volume and audio can be controlled by your device and the Sound Bar.
- Once your source device has paired to Sound Bar, your device(Android) should auto-paired even if you reboot Sound Bar.

This Sound Bar is not equipped with hands-free function.
Additional Bluetooth Information
- If you hear any break-up while streaming music from your device, move closer to your Sound Bar.
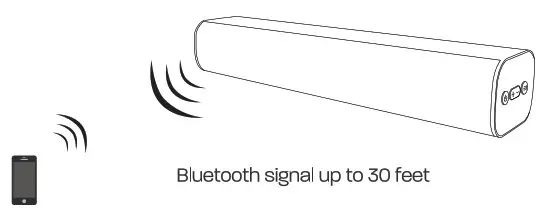
- Bluetooth signal has a range of up to 30 feet if there are no solid obstructions between your Sound Bar and source device.
- Other wireless devices may interfere with Bluetooth range, including wireless video monitors, cordless phones, wireless cameras, etc., moving or turning off these devices may improve Bluetooth range.
 Reduce the volume on your device or Sound Bar, high volume can damage your hearing.
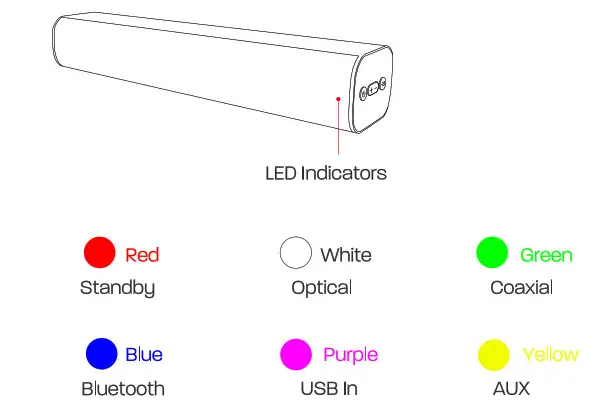
Indicator Light Explanations
The LED Indicators will behave differently with each button on the remote control.
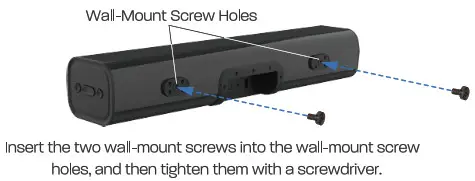
Installing the Wall Mount (Mount kits sold separately)
- Insert the two wall-mount screws into the wall-mount screw holes, and tighten them with a screwdriver.
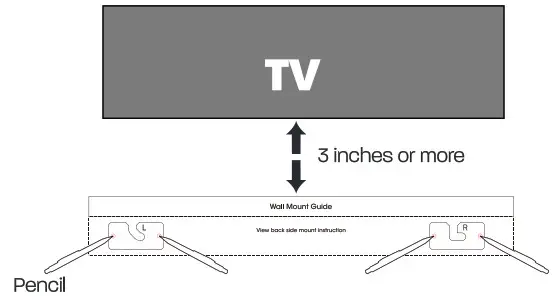
- Place the wall mounting template against the wall under your TV, using a pencil to mark the bracket holes.
• The template must be level.
• Leave 3 inches at least between the template and TV.
- Remove the template, using an appropriately sized drill bit, drill a hole in the wall at each marking.
• Be sure the wall is vertical wall. (drywall) - Push the green Hoder-Screws to the each hole on the wall, and screw each screw through each bracket firmly into a support Holder-Screws hole.
- Install the Soundbar by hanging the bracket on the wall.
 Consult a professional installer if you are unfamiliar with power tools or the layout of electrical wiring in the walls of your home.
Troubleshooting
If you have a problem with your Sound Bar, there is quick simple solution, first make sure:
- The cables between Sound Bar and input devices are securely connected, the power adapter also connected to a working power source.
- The adapter LED indicator is lighting, and the LED indicator is lighting in the middle of Sound bar,
No sound or crackling noise
- Check if all cables connected properly.
- Press Mute on the remote to ensure the Sound Bar is not muted.
- Press Volume+ on the remote or the right side of your Sound Bar.
- Make sure you have selected the right input source on your remote, and the LED is lighting accordingly.
- If using Bluetooth, check if the sound on your device is under minimum volume.
- If using Optical/Coaxial, check if your device (TV/Cable Box/Projector/etc.) audio output set to PCM or turn the Dolbu/dts off.
- When using cable connection, make sure your device has audio output port (not input).
Remote isn’t working
- Check if the battery is installed properly with power.
- Check if the signal of the receiver is covered by something.
- Contact your retailer for assistance.
I hear buzzing or humming
- Ensure all cables and wires are securely connected.
- Connect a different source device (TV, Blu-ray player, etc) to see if the buzzing persists. If it does not, the problem may be with the original device.
- Connect your device to a different input on the Sound Bar.
Bluetooth can’t be connected
- Check if the Sound Bar is connected with the third Bluetooth device.
- Be sure that there are no solid obstructions between the Sound Bar and source device.(within 30 feet)
- Reboot the Bluetooth and connect again.
Hear echo when watching TV
- Setting your TV audio to External Speaker.
- Mute the TV speaker.
Get loud hum when use white/red RCA connection with tv
- Make sure your connections are inserted all the way.
- Make sure your device’s audio port is output (not input).
- Make sure your device’s audio output is tumed on.
- Try the connection with phone or other devices, and see if there is the same loud hum, if no, you may need to have a higher end Tv. (Some TVs do not have clear audio output)
Have more questions?
- Please contact to your retailer for assistance.

REGISTER YOUR PRODUCT ONLINE. TO LEARN MORE & REGISTER FOR OUR AZATOM WARRANTY*® PLEASE VISIT: WWW.AZATOM.COM/WARRANTY
AZATOM® 2021 ALL RIGHTS RESERVED. AZATOM® IS PART OF AZATOM GROUP LIMITED. SEE SITE FOR SAFETY INFORMATION. AZATOM® RESERVE THE RIGHT TO WITHDRAW ANY AND ALL PROMOTIONS WITHOUT NOTICE. FOR FULL WARRANTY, EXTENDED WARRANTY AND PROMOTIONAL OFFER TERMS & CONDITIONS PLEASE VISIT WWW.AZATOM.COM/TERMS-CONDITIONS “REGISTRATION RECLIRED
AZATOM Desire DAB Radio

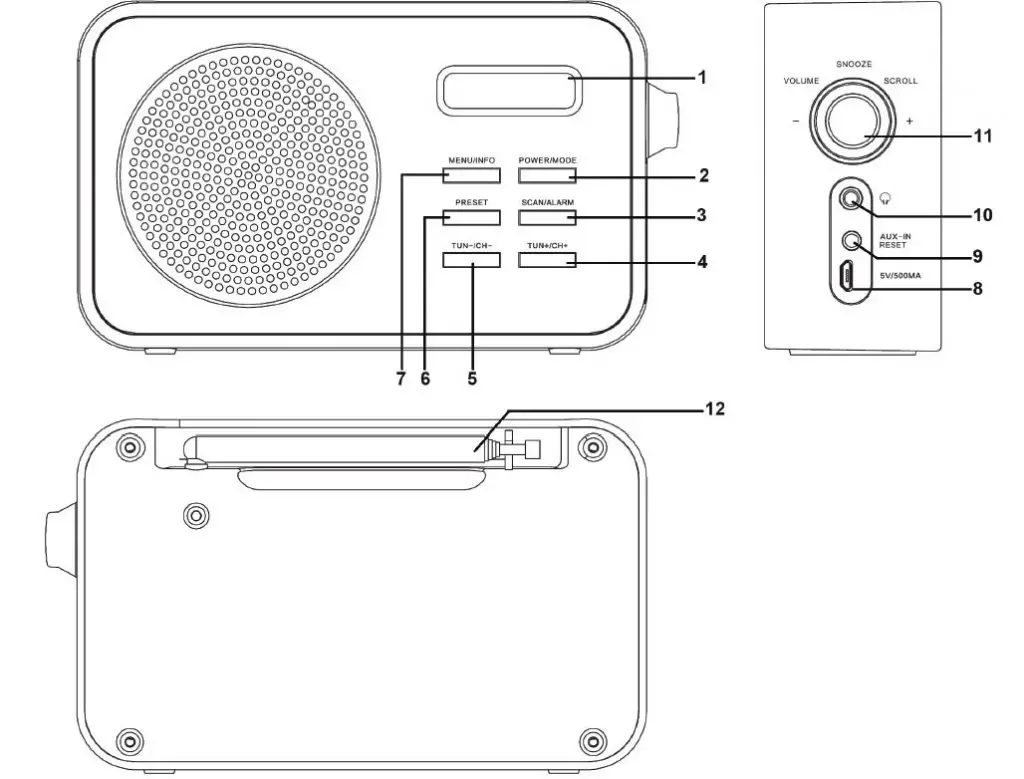
Controls & Interface
- Display
- Power / Mode
(Quick press turns the radio on, Press and hold to turn the radio off.) - Scan / Alarm
- CH+ / TUN+
- CH- / TUN-
- Presets
- Menu / Info
- DC Power IN
- AUX Port / Reset
- 3.5mm Earphone
- Snooze / Select / Volume / Scroll
- Telescopic Aerial
What’s in the box
- AZATOM® Desire DAB Radio
- User Manual
- Power Adapter
- Warranty Card
Getting Started
Installation
Please read the manual thoroughly before operating the device! Choose a suitable location for the device. Suitable locations are dry, even and anti-slip
surfaces on which you may operate the device easily. Make sure there is proper ventilation for the device! If necessary, remove the protective plastic sheet from the display.
Power supply (Adapter)
Insert the mains adaptor plug into a properly installed AC socket. Connect the device with the plug connector by inserting the plug into the 5V/500mA USB charging port of the device. Make sure the grid voltage corresponds to the figures on the rating plate.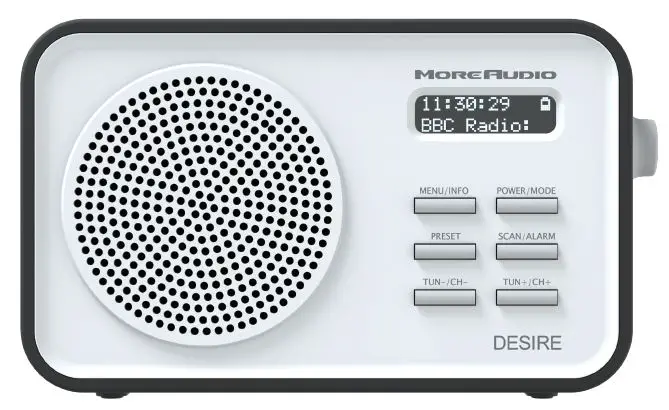 CAUTION:
Only use the supplied power adapter for this device. Do not use for other devices. Only use the original AC adapter. This adapter has been specially designed for the built-in battery in order to gradually charge the battery. Any other adapter can shorten the battery life or can damage it or the device.
NOTE: Disconnect from mains power supply during longer periods of non-use.
Operating your radio
- 1Carefully extend the telescopic aerial.
- Press the POWER button to switch on your radio. The display will show “Welcome to digital radio.”
- If this is the first time the unit goes into DAB Mode, it will automatically start an ‘Auto Scan’ to search for available stations. (Once DAB Mode has been used before, the DESIRE will automatically select the previously played station)
- Pressing and holding “SCAN” at any time will automatically start an auto scan. During the scanning process, the lower line of the display shows a bar-graph indicating progress of the scan.
- When the scanning is completed the first station (in alphanumeric order) will be selected. The clock will automatically set to the current time.
- If the station list is still empty after the scan your radio will display “Service not available”
- If no stations are found, please ensure the aerial is extended and test the reception by doing another auto scan in a different location.
Selecting a station – DAB
- The top line of the display shows the name of the station currently selected.
- Push the Tuning+/ Tuning- button to select the list of available stations on the lower line of the display, and push the SELECT button to confirm the desired station.
Finding new radio stations – DAB
Over time new stations may become available. To find new stations you can autoscan as follows.
- Press the Tuning+ / Tuning-, the display will show “Auto Scan Now”.
- Click the Tuning+/ Tuning- until the display shows “scan”.
- Press “SCAN” for auto scan. The display will show “Scanning…” and your radio will perform a scan of the Band III DAB channels. As new radio stations are found the station counter on the right-hand side of the display will increase and the radio stations will be added to the list stored in the radio.
Secondary services – DAB
- Some radio stations have additional secondary services associated with them. If a radio station has a secondary service associated with it the display will show “>>” next to the station name on the station list. The secondary service will then appear immediately after the primary services as you push the Tuning+/ Tuning-
- Click SELECT to select the station
- When the secondary service shuts down, your radio will automatically switch back to the main radio station if it is available.
Auto Scan – DAB
As an alternative to clicking the menu button to select a station, your radio can be set so as to automatically select a station.
- Press the MENU button and Tuning+/Tuning- until you find “Settings”.
- Press Tuning+/Tuning- until “Auto Scan On “ shows on the display.
- Press Tuning+/Tuning- until “YES” is highlighted. Press SELECT to confirm the selection. When tuning your radio it will now automatically select a station from the station list.
- If you do not wish to use the Auto Scan On function press Tuning+/Tuning- until “NO” is highlighted. The radio will require a click to choose a station from the station list.
Manual Tuning – DAB
Manual tuning allows you to tune the radio to the various DAB Band III channels. UK DAB stations are located in the range 11B to 12D.
- Press MENU and Tuning+/Tuning- until the display shows “Manual Scan”, press SELECT to enter the Services Menu.
- Press Tuning+/Tuning- to highlight the desired channel.
- Press MENU, the graph will indicate the signal strength, and the upper line will show the name of the DAB multiplex (group of radio stations). Any stations found will be added to the stored list in the radio.
- Press MENU to return to the normal tuning mode
Dynamic Range Control – DAB
Dynamic range control (also known as DRC) can make quieter sounds easier to hear when your radio is used in a noisy environment.
- Press the POWER button to switch on your radio.
- Press MENU and Tuning+/Tuning- until the display shows “DRC”. Press SELECT to enter the settings menu.
- Press Tuning+/Tuning- until “DRC” is highlighted.
- Press SELECT to enter the adjustment mode.
- Press Tuning+/Tuning- to select the required DRC setting (the default is 0).
- DRC OFF – DRC is switched off, Broadcast DRC will be ignored.
- DRC LOW – DRC level is set to 1/2 that sent by broadcaster.
- DRC HIGH – DRC level is used as sent by broadcaster.
- Press MENU to confirm the setting. The display will return to the previous display.
Note: Not all DAB broadcasts are able to use the DRC function. If the broadcast does not support DRC, then the DRC setting in the radio will have no effect.
Auto Search Tuning – FM
- Carefully extend the telescopic aerial fully and press the POWER button to switch on your radio.
- Press MODE to enter FM mode.
- Press the Tuning+ button and hold for 2 seconds, your radio will scan and stop automatically when it finds a station of sufficient strength.
- After a few seconds the display will update. The display will show the frequency of bthe signal found. If the signal is strong enough and there is RDS data present then the radio will display the station name.
- To find other stations, press and hold the Tuning+ button as before.
- To scan the FM band in the opposite direction (high frequency to low frequency) press the Tuning- button and hold for 2 seconds.
- When the waveband end is reached your radio will recommence tuning from the opposite waveband end.
Manual Tuning – FM
- Carefully extend the telescopic aerial fully and press the POWER button to switch on your radio.
- Select FM mode as previously described if required.
- Press Tuning+/Tuning- to tune to a station. With each press of tuning-/+ the frequency will change up or down by 50 kHz.
- When the waveband end is reached the radio will recommence tuning from the opposite waveband end.
Preset Stations – FM and DAB
You may store your preferred DAB and FM radio stations to the preset station memories. There are 60 memory presets in your radio, 30 for DAB and 30 for FM. Presets
are remembered by your radio in the event of a power failure. The procedure for setting presets and using them to tune stations is the same for FM and DAB modes:
- Press POWER button to switch on the radio.
- Select the desired waveband.
- Tune to the required station as previously described.
- Press PRESET button and hold to enter pre-set store, and then press to select the desired preset number which you wish to store the station. Press SELECT to confirm.
- Press SELECT to confirm, for example, “Preset 01 stored”. The station will be stored under the chosen pre-set. Repeat this procedure as needed.
- Stations which have been stored in preset memories may be overwritten by following the above procedure.
Recalling Presets
- Press the POWER button to switch on the radio.
- Press PRESET, then the display will show “Preset Recall” then press SELECT to tune to the station stored in preset memory.
Note: If you have not previously stored a preset station and the preset button is pressed “Empty preset” will be displayed.
Brightness setting
The brightness of the display can be adjusted on your radio
- Press MENU and Tuning+/Tuning- until “Set Brightness” shows on the display.
- Press the SELECT to enter adjustment mode.
- Press Tuning+/Tuning- to adjust the brightness level (between High, Medium, and Sleep Low). The brightness level indication on the screen will change at the same time. When you find the setting that gives you the best legibility for the location in which the radio is used, press SELECT to save the setting.
Sleep function
Your radio can be set to turn off after a preset time has elapsed. The sleep setting can be adjusted between 15 and 90 minutes. Ensure your radio is switched on.
- Press MENU and Tuning+/Tuning- until “Set Sleep time” is highlighted on the display.
- Press SELECT to enter adjustment mode.
- Press Tuning+/Tuning- to set the desired sleep time between 15, 30,45, 60,75 and 90 minutes or Sleep Off which will cancel the sleep function.
- Press SELECT to confirm the setting. The sleep timer indicator “ “ will show on the display. Your radio will switch off after the pre-set sleep time has elapsed.
Backlight Setting
- Press the MENU and Tuning+/Tuning- until “ Backlight Auto” is highlighted on the display.
- Press Tuning+/Tuning- until “NO” is highlighted. Press SELECT to confirm selection. The backlight will never dim. If select “YES”, the LCD would dim 1/4 after 20 seconds, and dim 1/2 after 2 minutes.
Time/Date Setting
When no DAB/FM signal, you need to set the TIME and DATE manually.
- Press MENU to enter the settings menu.
- Press Tuning+/Tuning- until “ Settings”, press SELECT to enter.
- Press Tuning+/Tuning- until “ Set Time/Date”, press SELECT to enter. Or Tuning+/Tuning- to set the time to AUTO UPDATE, 12/24 hours, and update the date format as well.
- Press Tuning+/Tuning- and SELECT to set the correct time and date.
Alarm Setting
NOTE: PLEASE SELECT A RADIO STATION BEFORE SETTING THE ALARM. You will be given the option to choose from last station used or one of your favourite preset channels.
- Press ALARM to enter the setting menu, press ALARM again to choose ALARM 1 or ALARM 2.
- Press Tuning+/Tuning- to set the alarm time and press SELECT to confirm.
- Press Tuning+/Tuning- to set the duration 15, 30, 45, 60, 90 minutes and press SELECT to confirm.
- Press Tuning+/Tuning- to set the alarm source and press SELECT to confirm.
- Press Tuning+/Tuning- to set the Once / Daily / Weekdays / Weekends , choose the days on which the alarm is active.
- Press Tuning+/Tuning- to set the alarm volume and press SELECT to confirm.
- Press Tuning+/Tuning- to save the alarm setting.
Snooze – Stop Alarm
- When the alarm sounds, pressing the SELECT button will temporarily silence the alarm, you can choose the time from 5, 10, 15, 20, 25, 30 minutes and snooze off.
- The snooze function also has a countdown allowing you to see how long before the alarm re-sounds.
- When you choose SNOOZE OFF, the radio returns to standby mode, showing the time and date. Press POWER to turn it on.
Stop Alarm
When the alarm is sounding you can press any buttons except the Snooze button one time to stop the alarm sound. The Desire Radio will then return to Standby mode.
AUX-IN
Aux-in mode plays audio from an external source such as a smartphone or tablet.
- Plug in the end of a 3.5mm audio cable (not included) into the headphone or line out jack on your Desire, plug the other end of cable into the unit AUX-IN jack on the back of the Desire.
- Turn on the external audio source and play your device.
- Press MODE button to “Auxiliary Input” mode.
- The volume level can now be controlled through the main unit. Operate all other functions on the external device as usual.
Notes:
If you’re connected to the Line out Jack of your external device, then you only need to adjust the volume control of this unit. If you’re connected to the Headphone Jack
of your external device, then you may need to adjust both the volume control of your external device and the volume control of this unit to find the most desirable volume
setting. Please ensure the cable is disconnected to listen to the DESIRE in other modes such as DAB and FM.
FM Stereo/Mono (Earphones only)
If a station being received is weak, some distortion may be audible (especially when listening using earphones).
- Press and hold MENU button, “Settings” is highlighted. Press SELECT to enter this function.
- Press Tuning+/Tuning- until the display shows “Audio setting” then press SELECT.
- Press Tuning+/Tuning- until “Forced mono” is displayed. Press the SELECT to select mono. Your radio will select the mono audio mode.
- To return to stereo mode press Tuning+/Tuning- until the display shows “Audio setting” then press SELECT.
- Press Tuning+/Tuning- until “Stereo allowed” is displayed. Press SELECT, your radio will switch to stereo mode.
Note: Stereo listening is only available when listening via earphones.
Earphones (NOT INCLUDED)
The lead connecting the earphones to your radio acts as an aerial when plugged into the Earphone socket.
- Plug the earphones into the Earphone socket on the side of your radio.
- Check that the Volume level is not too loud before placing the ear-pieces into your ears.
IMPORTANT: Do not switch on the radio with the earphones connected and inserted in your ear. Excessive sound pressure from earphones can cause hearing loss.
Languages
- Press and hold MENU button, “Settings” is highlighted. Press SELECT to enter settings.
- Scroll through the settings menu to find the language options.
- Select which language you require from: English, German, French or Italian.
Technical Specifications
- Power requirement mains: AC 100-240V 50/60Hz DC 5V 500mA
- Lithium rechargeable battery: 3.7V, 1800mAH
- Battery life full charge
- Up to 15 hours using the loudspeaker for 4 hours a day at normal volume.
- Up to 18 hours using earphones for 4 hours a day at normal volume.
- Frequency Coverage
- FM: 87.5-108MHz
- DAB: 174.928 – 239.200MHz
Circuit Features:
- Loudspeaker: 3.0 inch
- Output power: 3W (speaker)
- Earphone socket: 3.5mmm dia. stereo
Aerial system:
- FM: telescopic aerial
- DAB: telescopic aerial
Factory reset
If your radio fails to operate correctly, or some digits on the display are missing or incomplete, it may be possible to restore normal operation by carrying out a system reset operation on your radio. This will restore the radio’s settings to their factory defaults. No presets will be stored, and the list of DAB radio stations will be empty.
If you have moved to a different part of the country and you wish to erase local DAB radio stations that are no longer available from the stored list, then you may carry out this procedure. Your radio will automatically re-scan for the DAB stations available at your current location when it restarts.
- Press MENU to enter the menu.
- Press Tuning+/Tuning- until the display shows “Settings”, then press SELECT to enter the settings menu.
- Press Tuning+/Tuning- until the display shows “Factory Reset”. Press the SELECT.
- If you wish to perform the reset operation, push the Tuning+/Tuning- until “YES” is highlighted on the display and press. A full reset of your radio will be performed, All presets and station lists will be erased. If you do not wish to reset your radio press Tuning+/Tuning- until “NO” is highlighted. Your radio will return to the previous menu.
- After a system reset a scan of the DAB band will be performed. In case of malfunction due to electrostatic discharge, reset the product (temporary disconnection of the power adaptor may be required) to resume normal operation.

Welcome
Thank you for shopping with AZATOM® Please read this manual carefully before using your new device and keep it safe for future reference.
The StreetDance Mini 2 uses the latest Class-D amplifier and advanced ND-Boron Technology.
This improves the tone and rhythm of the music adding deeper bass to the overall sound.
A total of 5 hours playing time all from a single set of 4x AA Batteries lets you enjoy your music anywhere at any time.
This speaker is compatible with Apple® Lightning Connection devices ranging from iPhone/iPod/iPod Touch.
This speaker was designed to travel and come with you all while delivering high quality audio.
![]() NOTE: Please remove any cases from your device before using the StreetDance Mini 2.
NOTE: Please remove any cases from your device before using the StreetDance Mini 2.
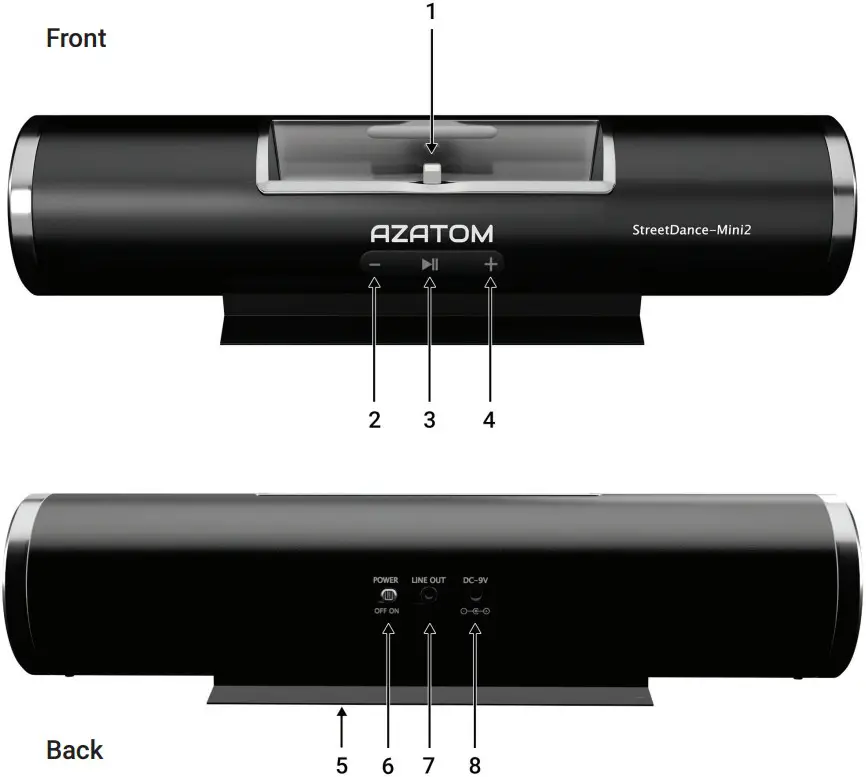
Controls & Interface
- iPhone Ligthning Dock
- Supports iPhone 5-7/iPod touch5-6/iPod nano 7
- –
- Long press to reduce the volume, Short press to skip tothe previous song
- ► ||
- Press to pause the music when playing, press again to resume playing
- +
- Long press to add volume, Short press to skip to the next song
- Battery Box
- Remove the battery cover to insert or replace the batterie
- POWER
- Slide left or right to power on the unit on and off.
- LINE OUT
- Connect the StreetDance Mini 2 to an external speaker via an AUX cable using the Line Out port.
- DC IN 9V
- Connect the included AC adapter to power the StreetDance Mini 2from a plug socket.
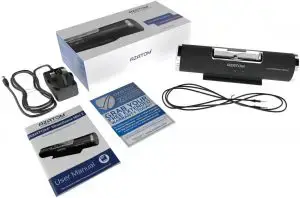
What’ s in the box?

- AZATOM® StreetDance Mini 2 Portable Docking Station
- User Manual
- Power Adapter
- Aux Cable
- AZATOM® Warranty Card
Using the StreetDance Mini 2
Getting Started:
- Make sure the StreetDance Mini 2 is powered off before connecting your device to the dock
- Insert 4 AA batteries into the base of the StreetDance Mini 2
- Make sure the “+” and “—“ polarity of the batteries match the symbols on the StreetDance Mini 2 or it will not power on
- Alternatively you can connect the power plug to a power outlet, then connect the DC adapter to the DC input jack on the back of the StreetDance Mini 2
- Dock your device on the Lightning, pressing firmly but gently down until fully connected
- Power on the StreetDance Mini 2 using the switch at the back, when successfully powered on the front buttons will light up blue
- Press the play button to start playing music from your docked device
- Using the “+” and “—“ buttons, adjust the volume of the speaker to a comfortable level
- Turn off the speaker first, then gently pull the docked device from the StreetDance Mini 2 when you’re not using the speaker.
Please take care docking and undocking your devices from the StreetDance Mini 2 to avoid damage to either device.
Use the Line out function:
The StreetDance Mini 2’s built in Hi-Fi digital-analog converter can convert the digital audio of Apple devices to analog audio and output via the Line out jack.
You can connect to Hi-Fi audio syetems and use them as external speakers to the StreetDance Mini 2 Dock. This is especially useful for iPhone 7 as the iPhone has no 3.5mm headphone jack.
The StreetDance Mini 2 can output audio and recharge at the same time.
When connecting the line out jack via an audio cable, the StreetDance Mini 2 will change to mute mode automatically
Recharging iPod Touch/iPhone:
The StreetDance Mini 2 can safely charge a lightning device. Simply plug the power adapter into speaker and then insert the Lightning Device, regardless of the speaker and iPhone are powered on or off, the StreetDance Mini 2 will charge the device. The sign of the battery charging will display on device screen and generally complete after 2 to 3 hours of charging (if you’re playing music via the StreetDance Mini 2 in the process of charging, the process of charging will be appropriately extended)
- In the process of recharging , If your device feels warm to the touch – This is normal and not a cause for concern.
- The StreetDance Mini 2 can only charge a lightning device if it is powered via the mains It will not charge devices when being powered via batteries.
Troubleshooting Guide
| Problem | Cause | Solution |
| Distortion or poor sound quality |
|
|
| iPhone displays ”Unsupported Hardware” |
|
|
| iPhone can’t play or has no sound |
|
|
| Audio system is getting hot | Audio system has been playing for a long time with high volume |
|
| Can’t recharge device | When using batteries as the StreetDance Mini 2’s power source, the speaker can’t charge the device and will only play music | Connect the ac adapter to the StreetDance Mini 2 to start charging the connected device |
Technical Specifications
| Maximum output power | 12W (6W+6W) |
| LINE IN | iPhone Interface (Lightning) |
| LINE OUT | 3.5mm stereo |
| Power supply | 4x AA size batteries DC 9V/1500mA |
| Frequency response | 150-18000Hz (± 3dB) |
| S/N | 00Hz (± 3dB) S/N ≥ |
| Channel separation | ≥ 40dB |
IMPORTANT SAFETY INFORMATION
- Keep these instructions. Instructions are also available for download at www.azatom.com
- Heed all Warnings.
- Follow all instructions.
- Do not clean the apparatus near or with water.
- Clean only with a dry cloth.
- Do not block any ventilation openings.Install in accordance with the manufacturer’s instructions.
- Do not install near any heat sources such as radiators, heat registers, stoves, or other apparatus (including amplifiers) that produce heat.
- Protect the power cord from being walked onor pinched particularly at plugs, convenience receptacles, and the point where they exit from the apparatus.
- . Only use attachments/accessories specified by the manufacturer.
- Unplug this apparatus during light storms or when unused for long periods of time.
- Refer all servicing to qualified service personnel. Servicing is required when the apparatus has been damaged in any way, such as powersupply cord or plug is damaged, liquid has been spilled or objects have fallen into the apparatus, the apparatus has been exposed to rain or moisture, does not operate normally or has been dropped.
- No naked flame sources, such as lit candles, should be placed on the apparatus.
- Dispose of used electrical products and batteries safely according to your local authority and regulations.
ADDITIONAL WARNINGS
The apparatus shall not be exposed to dripping or splashing and no objects filled with liquid, such as vases, shall be placed on apparatus.
Main plug is used to disconnect device and it should remain readily operable during intended use. In order to disconnect the apparatus from the main mains completely, the mains plug should be disconnected from the main socket outlet completely.
Battery shall not be exposed to excessive heat such as sunshine, fire or the like.
RECYCLING ELECTRICAL PRODUCTS
You should now recycle your waste electrical goods and in doing so help the environment.
 This symbol means an electrical product should not be disposed of with normal household waste. Please ensure it is taken to a suitable facility for disposal when finished with.
 IMPORTANT: Please read all instructions carefully before use and keep for future reference
- Risk of electric shock. Do not open
- Read all instructions care fully before use and keep for future reference.
- When servicing, use only identical replacement parts.


 @Azatom
 @Azatom
- @azatom.online

AZATOM HomeHub Q Compact FM Radio with BT Audio & Wireless Charging

Safety Precautions
Read these safety instructions before using your device and store them for possible future reference.
- The device is not intended for use by persons (including children) with reduced physical or sensory capacity. Persons who have not read the manual, unless they have received explanations by a person responsible for their safety and supervision.
- Children should be monitored when using the device.
- The device should not be exposed to any moisture.
- No objects filled with liquids such as vases should be placed on the device.
- Always leave a minimum distance of 10 cm around the unit to ensure sufficient ventilation.
- Open flame sources, such as candles, should not be placed on top of the device.
- The device is intended for use only in a temperate climate.
- At full volume, prolonged listening to the portable audio device may damage the user’s hearing and cause hearing troubles (temporary or permanent deafness, hearing drone, tinnitus, and hyperacusis).
- We recommend not to listen to the portable audio device at high audio volume and no more than one hour per day at medium audio volume.
CAUTION: Danger of explosion if battery is incorrectly replaced or not replaced by the same type or equivalent. - The battery should not be exposed to excessive heat such as intense sunshine, fire or similar.
- Different types of batteries such as new and used batteries should not be mixed.
- The battery must be installed according to the polarity.
- If the battery is worn, it must be removed from the product.
- The battery must be disposed of safely. Always use the collection bins provided (check with your council) to protect the environment.
Specifications
- Rated voltage: DC 9V 2A
- Max consumption: 18W
- Radio frequency: 87.5~108MHz
- Sound power: 4W x2
- Bluetooth compatible version: 5.0
- Distance Bluetooth stays connected: 10m
- Dimensions: L194 x W148 x H75mm

Using your HomeHub Q Compact
Button Breakdown:
- Power / M: Powers the unit on and off when pressed and held. Pressing once changes the mode of the unit (changing the mode will change the source of audio: Bluetooth, FM & Line-in).
- Play / Pause: Plays or pauses the audio currently playing, this does not apply when using FM mode.
- Next Track / FM Radio Tuning Forward
- Previous Track / FM Radio Tuning Backward
- Volume + Press this to increase the volume in small steps or press and hold to continuously increase the volume.
- Volume – Press this to decrease the volume in small steps or press and hold to continuously decrease the volume.
- Snooze / Dimmer: Use the Snooze button when the alarm is sounding to pause the alarm for a short period of time, When the alarm is not sounding this acts as the screen dimmer button. The screen can be set to Low, Medium and High brightness, you can cycle through these levels of brightness.
- Memory – Use this button to store FM radio stations in order of radio frequency: High to Low
- Memory + Use this button to store FM radio stations in order of radio frequency: Low to High
- Alarm 2: Use this button to set up Alarm 2
- Alarm 1: Use this button to set up Alarm 1
- Set: Adjust and set the time of the device or to store the current station manually.
- Sleep: Use this to set the sleep time for the device to stop playing after a period of time.
Powering the HomeHub Q Compact ON and OFF
When plugged into the mains, the screen will default to the 12H Time format, to change to the 24H time format press the Play / Pause button while the unit is
still in standby mode (before pressing the power button). To power on the unit and begin playing music, press the Power / M button to power the unit on. Then press again to cycle through the Modes (Audio Sources) which are FM Radio, Bluetooth and Line-In. When the unit is powered on the default Mode is FM Radio. To power off the unit, press and hold the Power / M Button.
Pairing your Bluetooth Device
Before connecting to the HomeHub Q Compact, please make sure your audio device you wish use play music from is on and ready to search for new Bluetooth devices.
Power on the Unit by pressing the Power / M button and then cycle through the modes until you have Bluetooth selected.
Once in Bluetooth mode on the HomeHub Q Compact, when you search for new Bluetooth devices on the device you wish to play music from (for example a phone or laptop) the HomeHub Q Compact will be displayed in the list of available devices to connect to.
Select the HomeHub Q Compact and pair with it on your device. To disconnect the HomeHub Q Compact from a Bluetooth device, press and hold the Next Track and Previous Track buttons at the same time. This allows others devices to connect to the HomeHub Q Compact without having to disconnect on your phone or laptop.
Using the FM Radio
Power on the Unit by pressing the Power / M button, the default mode is FM Radio. The current radio frequency will be displayed on the screen of the HomeHub Q Compact.
To start searching for your local FM radio stations, press and hold the Play / Pause button for 2 seconds until the unit starts to search the radio frequencies in your area. Once a station is found the HomeHub Q Compact will store it automatically (The HomeHub Q Compact can store up to 20 stations at once P1 to P20).
To cycle through the automatically stores stations, press the Mem + and Mem – buttons to move up and down the list of up to 20 stored stations. To search for a station manually, while in FM Mode: press either the Next Track and Previous Track buttons to move up or down the frequency once step at a time. Press and hold either Next Track and Previous Track buttons to begin scanning for stations up or down the frequency. Once you have manually found a station you’d wish to store press and hold the SET button. This will then bring up the range of P numbers (Preset Number) on the HomeHub Q Compacts screen. Cycle up and down the list of P numbers to select one you wish to use as that stations Preset number. To delete all Preset stations while in this mode press and hold the Next Track and Previous Track buttons at the same time.
Setting the Clock
When powered on for the first time or when powered on after the batteries have been removed (plugged into the mains, not turned on using the power button on the device) you will need to set the time of the HomeHub Q Compact. To do this press the SET button to cycle through the Year, Month & Date, Hours and Minutes. Once you have selected the option you wish to change, use the Next Track and Previous Track buttons to move up or down the numbers on screen. When the option you have set is correct, press the SET button again to move on to the next option and continue to set the Year, Month, Date and Time. If no button is pressed after 10 seconds once you are on the selection you wish to change, the display is default back to the current time (which will be incorrect if you have not set the time).
Setting the Alarms
With the unit in standby mode (not powered on playing music, only plugged into the mains and displaying the time) press the ALM1 button. This is display a bell icon with the number 1 inside of it. Press the ALM1 button to default the alarm tone to a BUZZ sound, while the display is flashing use the Next Track / Previous Track buttons to cycle between BUZZ or FM Radio as the alarm sound. Press the ALM1 button again to start setting the Alarm 1 volume level using the Next Track / Previous Track buttons to adjust the desired volume. Press ALM1 again to adjust the alarm mode: Monday to Friday, Saturday to Sunday or Monday to Sunday. Press ALM1 once more to confirm the settings for Alarm 1. To set up Alarm 2, simple follow the above steps using the ALM2 button instead of the ALM1 button.
Using Snooze & Sleep
To snooze the alarm when it is sounding, press the Snooze / Dimmer button. This will snooze the alarm for 30 minutes before sounding again. To wake up from the snooze feature, press the snooze button again, or press the Play / Pause button to stop the alarm. To use the sleep feature, when the unit is playing audio from any source, press
the SLEEP button to cycle through the sleep timer durations stopping on the desired duration. This will set a sleep time and put the unit into standby mode (stopping the audio playback) after the duration displayed on the screen)/
Dimming the Display
In any playback mode, press the Dimmer button to adjust the display brightness. Continuing to press the Dimmer button will cycle through Bright, Medium, and Low brightness modes.
Using the USB port for Charging
Connect your devices USB charging cable to the USB port at the rear of the unit. You can now use this to charge your device.
Using Batteries in the HomeHub Q Compact
In the battery compartment please install 2 x AAA batteries to preserve your time, date, presets and alarm settings in case of a power cut or being unplugged from the mains.
REGISTER YOUR PRODUCT ONLINE. TO LEARN MORE & REGISTER FOR OUR AZATOM WARRANTY* PLEASE
VISIT: WWW.AZATOM.COM/WARRANTY
AZATOM© 2020 ALL RIGHTS RESERVED. AZATOM® IS PART OF AZATOM GROUP LIMITED. SEE SITE FOR SAFETY INFORMATION. AZATOM® RESERVE THE RIGHT TO WITHDRAW ANY AND ALL PROMOTIONS WITHOUT NOTICE. FOR FULL WARRANTY, EXTENDED WARRANTY AND PROMOTIONAL OFFER TERMS & CONDITIONS PLEASE VISIT WWW.AZATOM.COM/TERMS-CONDITIONS. REGISTRATION REQUIRED.
]]>SONANCE T1 Digital Radio
DAB+/DAB/FM Radio Alarm Clock
Thank you for shopping with AZATOM® Please read this manual carefully before using your new device and keep it safe for future reference.
AZATOM® is a British company specialising in advanced audio products. All our products are developed by our In-house Team of British Designers.
We are experts in sound engineering and great care and attention goes into the design and manufacture of every Azatom product to ensure class-leading performance and quality.
Please read the manual thoroughly before operating the device.
Choose a suitable location for the device. Suitable locations are dry, even and anti-slip surfaces on which you may operate the device easily.
Make sure there is proper ventilation for the device.
Remove, if necessary, the protection sheet from the display.
This DAB Radio was designed to travel and come with you on your adventures, all while delivering high quality audio.
Controls & Interface
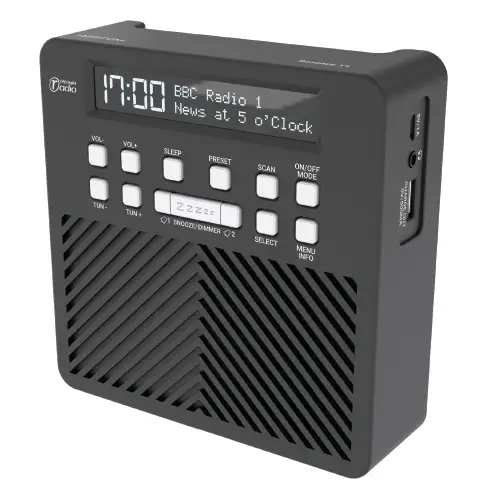
1. SLEEP
2. VOLUME+
3. VOLUME-
4.◄ / TUN-
5.► / TUN+
6. ALARM 1
7. Snooze/Dimmer (Dimmer for brightness setting)
8. ALARM 2
9. SELECT
10. MENU/INFO
11. POWER/MODE
12. SCAN
13. PRE-SET
14. LCD Display
15. DC-IN socket (5V, 500MA)
16. Headphone socket (3.5mm) / Reset
17. USB charge port (5v, 500MA for mobile phone)
What’s in the box?
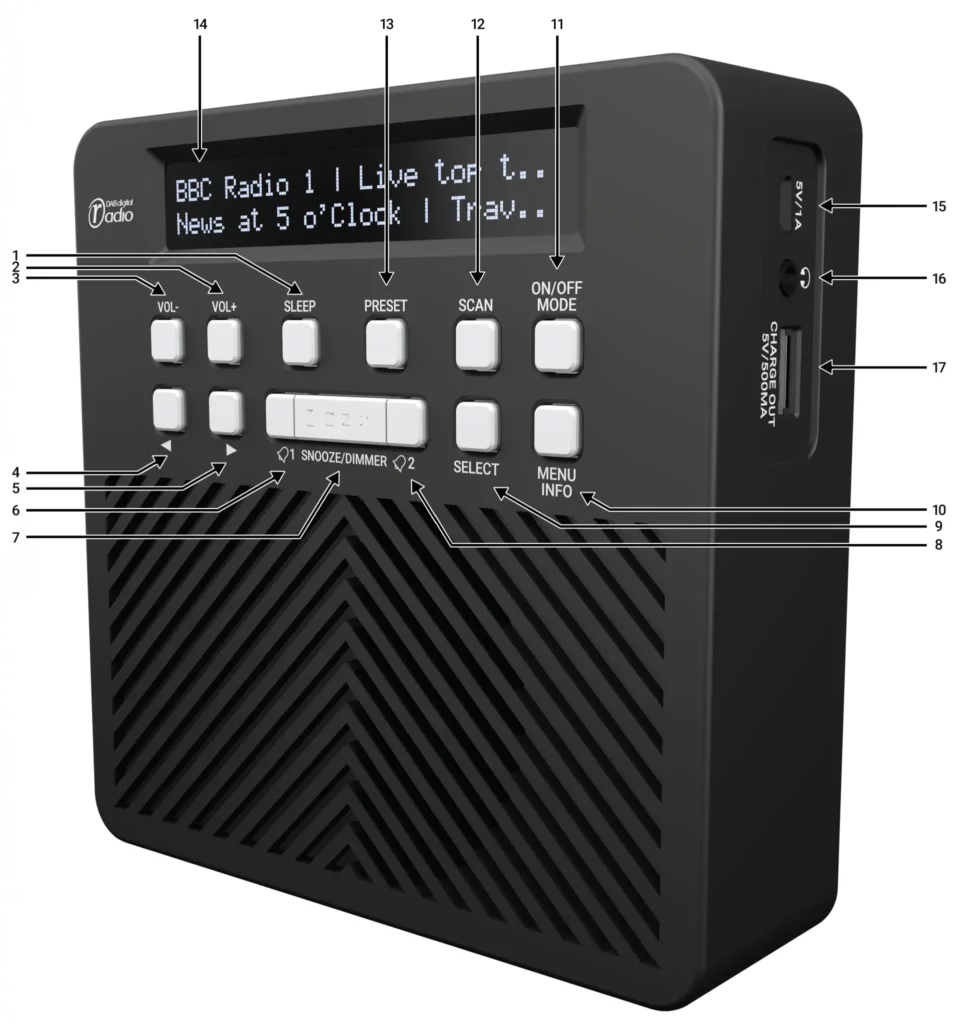
- AZATOM® SONANCE T1 Digital Radio
- User Manual
- Power Adapter
- AZATOM® Warranty Card
Using the SONANCE T1
Power supply (Adapter):
Insert the mains adapter into a properly installed power socket.
Connect the device with the plug connector by inserting its plug into the 5V DC charging port of the device.
Make sure the grid voltage corresponds to the figures on the rating plate.
Using the SONANCE T1
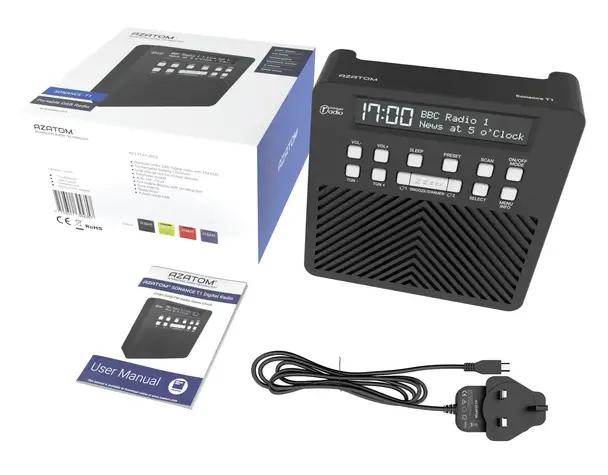
CAUTION:
Only use the supplied power adapter for this device.
Do not use the included power adapter for other devices.
This adapter has been specially designed with an anti-magnetic module in the power cord to prevent interference.
NOTE: Disconnect from mains power supply during longer periods of non-use.
Battery use:
To check the battery level of the unit, while the unit is powered on insert the power adapter into the side of the unit with the mains power turned on. The display with show the current battery level for 5 seconds and then revert back to the current station information.
When the charger is removed the display will also show the current charge level,
For example Example : BATTERY LEVEL 75%
The battery level can then be checked by inserting and removing the charger (while mains power is on) at any time.
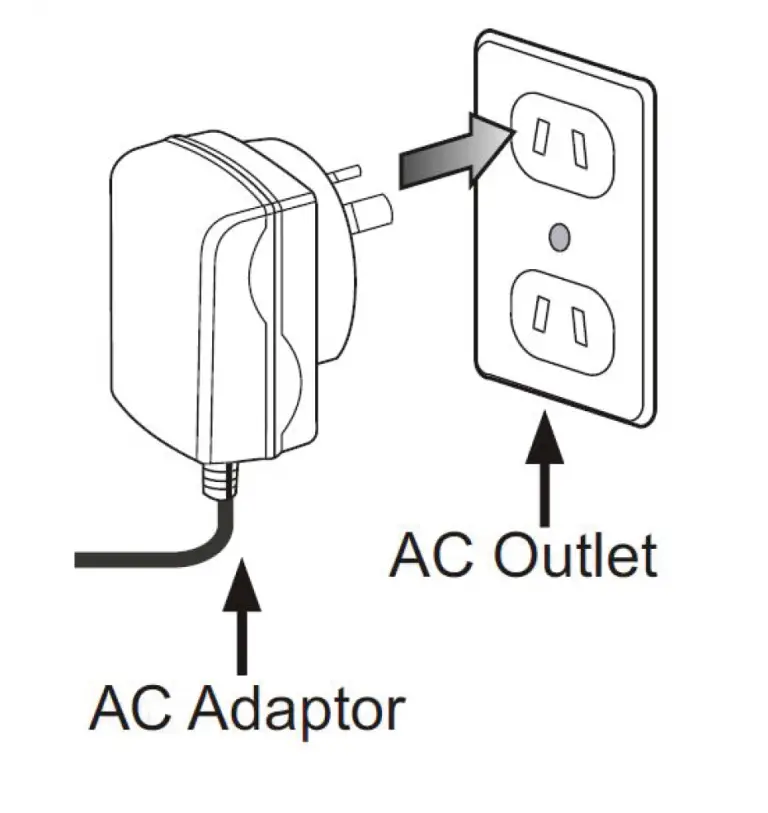
Operating your radio – DAB:
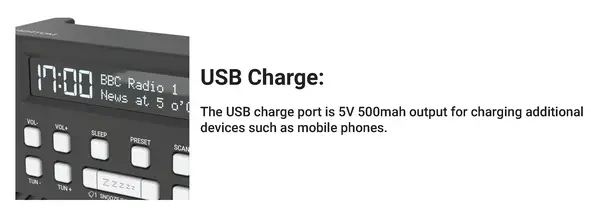
Selecting a station – DAB:
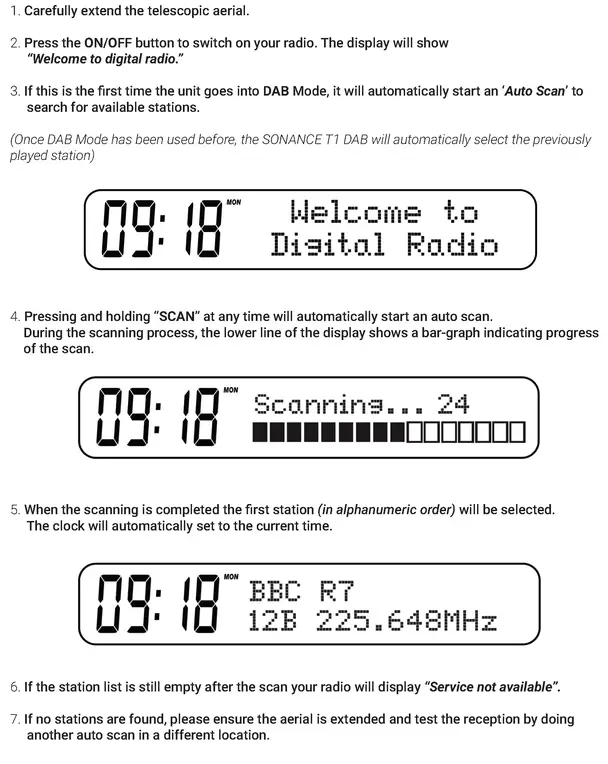
Auto Scan – DAB:
As an alternative to clicking the menu to select a station your radio can be set to automatically select a station.
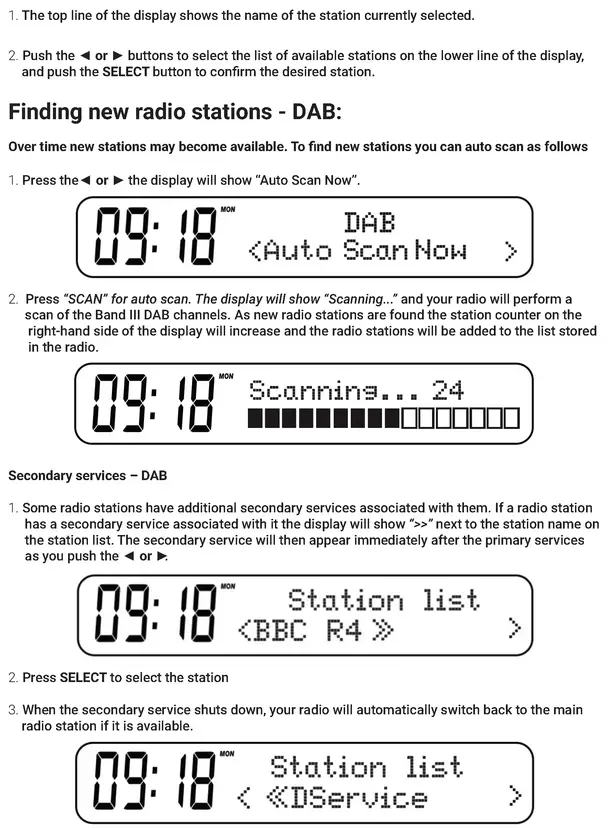
Manual Tuning – DAB:
Manual tuning allows you to tune display to the various DAB Band III channels.
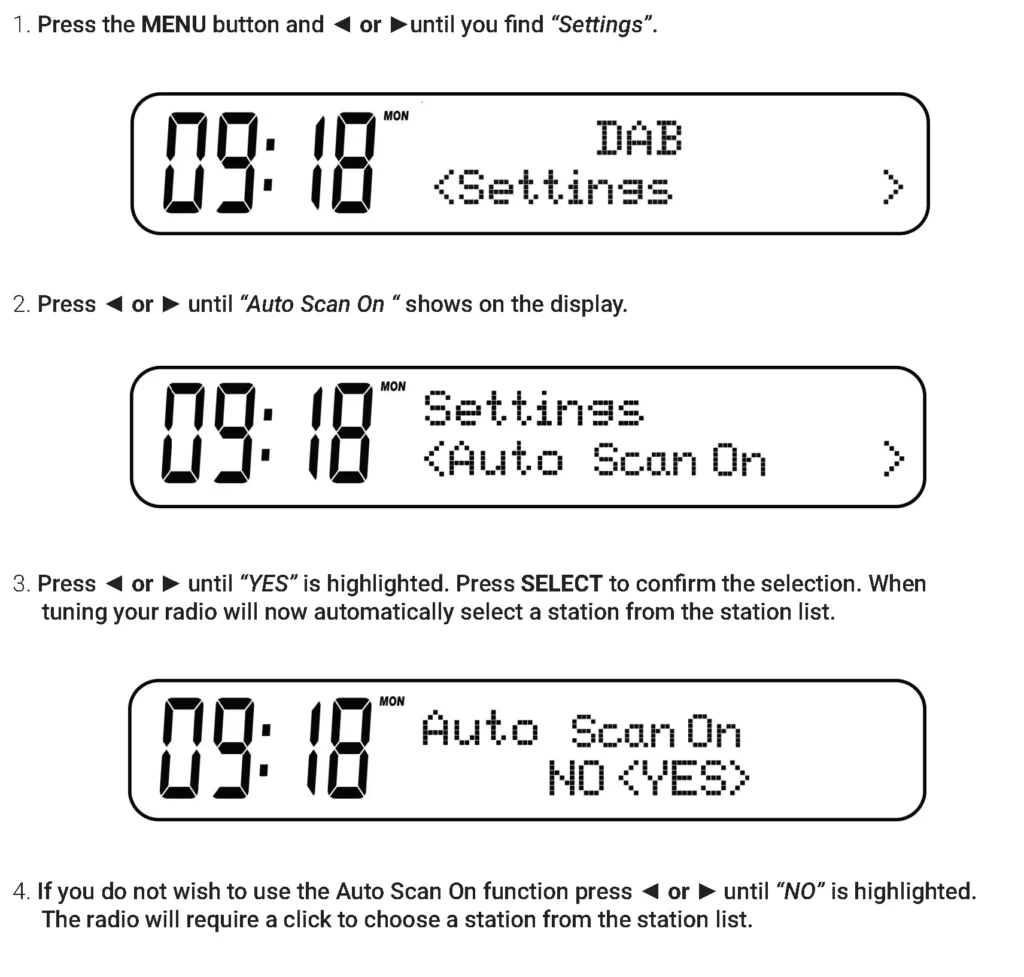
Dynamic Range Control Settings – DAB:
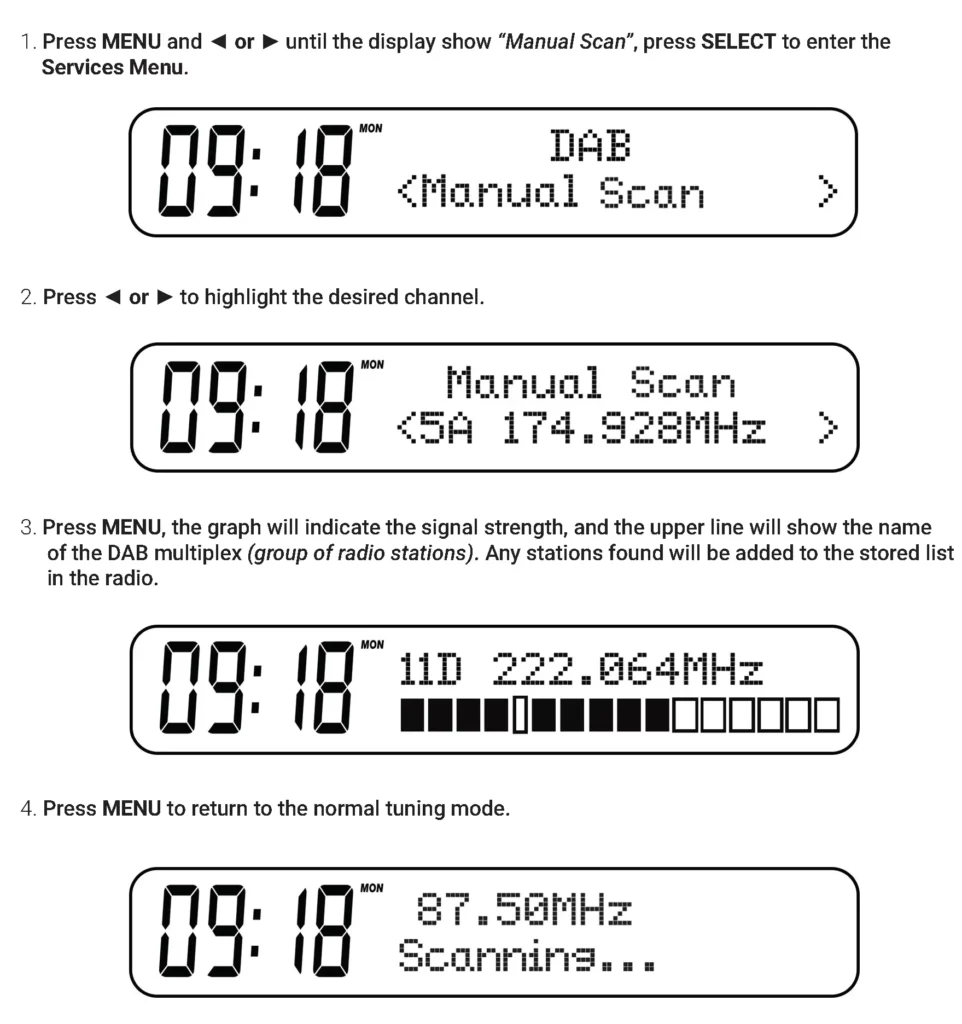
Auto Search Tuning – FM:
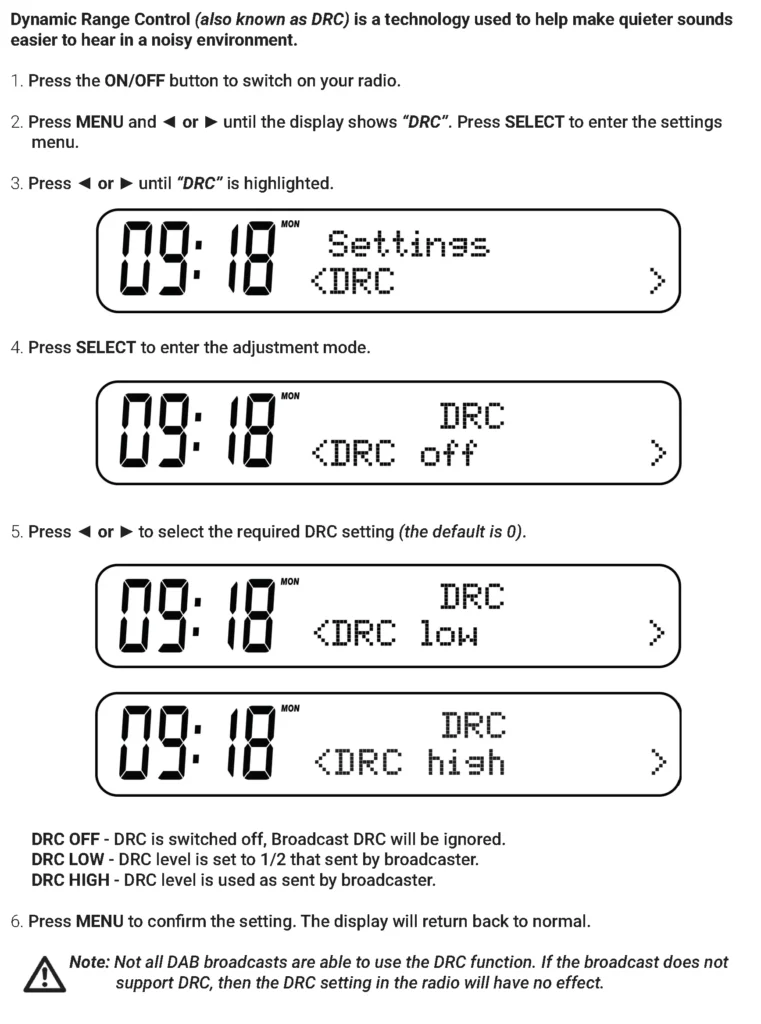
Preset Stations – FM and DAB:
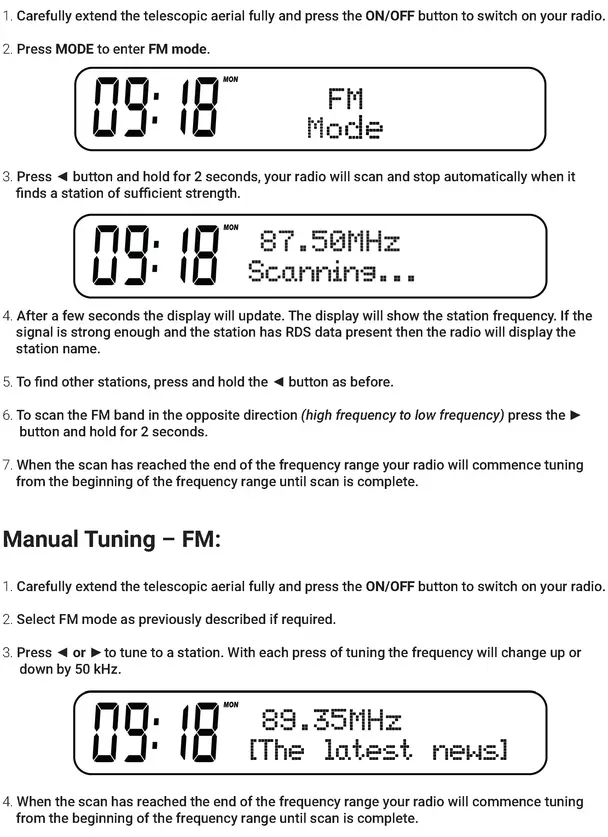
Brightness settings:
Press the Dimmer/Snooze button for four levels of brightness: High, Medium, Low and Sleep low.
Sleep function:
Your radio can be set to turn off after a pre-set time has elapsed.
The sleep setting can be adjusted between 15 and 90 minutes. Ensure your radio is switched on.
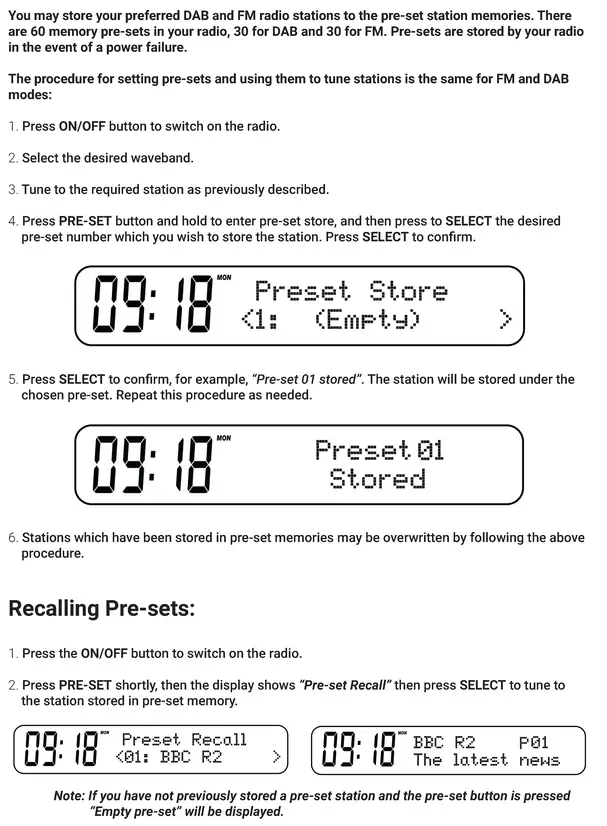
Time/Date Setting:
When no DAB/FM signal, you need to set the TIME and DATE manually.
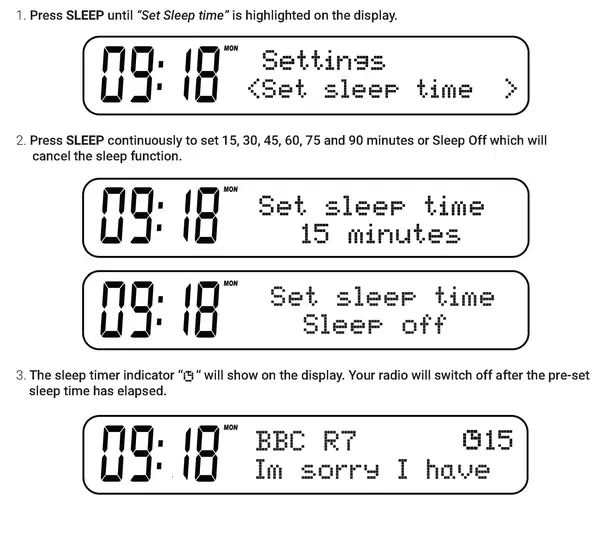
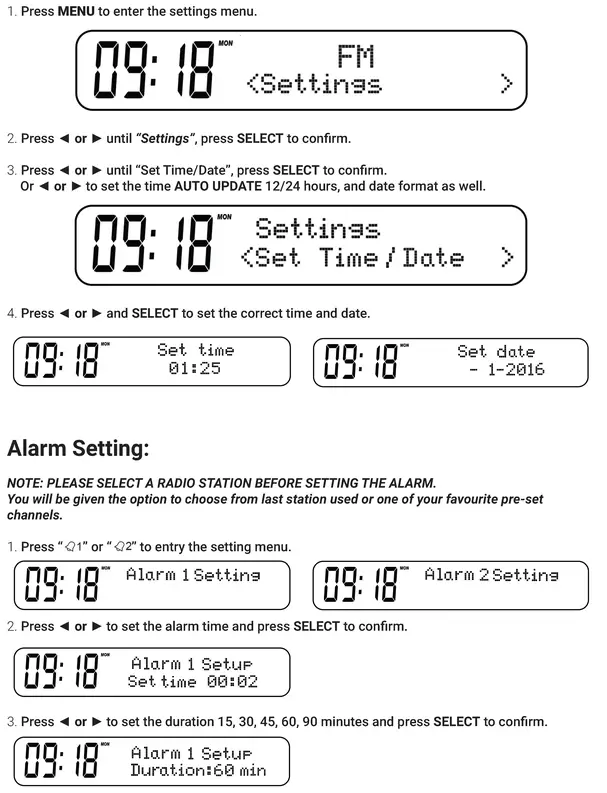
Snooze – Stop Alarm – Disable Alarms:
” sizes=”(max-width: 2861px) 100vw, 2861px” alt=”Stop Alarm” width=”2861″ height=”3924″ data-ezsrcset=”https://manuals.plus/wp-content/uploads/2021/07/Digital-Radio_Page_19.png 2861w,https://manuals.plus/wp-content/uploads/2021/07/Digital-Radio_Page_19-219×300.png 219w,https://manuals.plus/wp-content/uploads/2021/07/Digital-Radio_Page_19-747×1024.png 747w,https://manuals.plus/wp-content/uploads/2021/07/Digital-Radio_Page_19-768×1053.png 768w,https://manuals.plus/wp-content/uploads/2021/07/Digital-Radio_Page_19-1120×1536.png 1120w,https://manuals.plus/wp-content/uploads/2021/07/Digital-Radio_Page_19-1493×2048.png 1493w,https://manuals.plus/wp-content/uploads/2021/07/Digital-Radio_Page_19-1568×2151.png 1568w” data-ezsrc=”https://manuals.plus/wp-content/uploads/2021/07/Digital-Radio_Page_19.png” />
Factory reset:
If your radio fails to operate correctly, or some digits on the display are missing or incomplete, it may be possible to restore normal operation by carrying out a system reset on your radio. This will restore the radio’s settings to the factory default. No pre-sets will be stored, and the list of DAB radio stations will be empty.
If you have moved to a different part of the country and you wish to erase local DAB radio stations that are no longer available from the stored list, then you may choose to carry out this procedure.
Your radio will automatically re-scan for the DAB stations available at your current location when it restarts.
” sizes=”(max-width: 2961px) 100vw, 2961px” alt=”Factory reset” width=”2961″ height=”2382″ data-ezsrcset=”https://manuals.plus/wp-content/uploads/2021/07/Digital-Radio_Page_20.png 2961w,https://manuals.plus/wp-content/uploads/2021/07/Digital-Radio_Page_20-300×241.png 300w,https://manuals.plus/wp-content/uploads/2021/07/Digital-Radio_Page_20-1024×824.png 1024w,https://manuals.plus/wp-content/uploads/2021/07/Digital-Radio_Page_20-768×618.png 768w,https://manuals.plus/wp-content/uploads/2021/07/Digital-Radio_Page_20-1536×1236.png 1536w,https://manuals.plus/wp-content/uploads/2021/07/Digital-Radio_Page_20-2048×1648.png 2048w,https://manuals.plus/wp-content/uploads/2021/07/Digital-Radio_Page_20-1568×1261.png 1568w” data-ezsrc=”https://manuals.plus/wp-content/uploads/2021/07/Digital-Radio_Page_20.png” />
Earphones (NOT INCLUDED):
The lead connecting the earphones to your radio acts as an aerial when plugged into the Earphone socket.
- Plug the earphones into the Earphone socket on the back of your radio.
- Check that the Volume level is not too loud before listening through the earphones.
IMPORTANT: Do not switch on the radio with the earphones connected and inserted in your ears. Excessive sound pressure from earphones can cause hearing loss.
Technical Specifications
- Power requirement mains (via adaptor): AC 100-240V, 50/60Hz; DC 5V 1A
- Battery: 3.7V /1200mAh battery.
- Frequency Coverage:
FM: 87.5-108MHz
DAB: 174.928 – 239.200MHz - Circuit Features:
Loudspeaker: 3.0 inch
Output power: 3W RMS (speaker)
Earphone socket: 3.5mm dia. stereo
Aerial system: FM: Telescopic Aerial
DAB: Telescopic Aerial
IMPORTANT SAFETY INFORMATION
- Read these instructions.
- Keep these instructions. Instructions are also available for download at www.azatom.com
- Heed all Warnings.
- Follow all instructions.
- Do not clean the apparatus near or with water.
- Clean only with a dry cloth.
- Do not block any ventilation openings.
Install in accordance with the manufacturer’s instructions. - Do not install near any heat sources such as radiators, heat registers, stoves, or other apparatus (including amplifiers) that produce heat.
- Protect the power cord from being walked on or pinched particularly at plugs, convenience receptacles, and the point where they exit from the apparatus.
10. Only use attachments/accessories specified by
the manufacturer. - Unplug this apparatus during light storms or when unused for long periods of time.
- Refer all servicing to qualified service personnel.
Servicing is required when the apparatus has been damaged in any way, such as powersupply cord or plug is damaged, liquid has been spilled or objects have fallen into the apparatus, the apparatus has been exposed to rain or moisture, does not operate normally or has been dropped. - No naked flame sources, such as lit candles, should be placed on the apparatus.
- Dispose of used electrical products and batteries safely according to your local authority and regulations.
ADDITIONAL WARNINGS
The apparatus shall not be exposed to dripping or splashing and no objects filled with liquid, such as vases, shall be placed on apparatus.
Main plug is used to disconnect device and it should remain readily operable during intended use. In order to disconnect the apparatus from the main mains completely, the mains plug should be disconnected from the main socket outlet completely.
Battery shall not be exposed to excessive heat such as sunshine, fire or the like.
RECYCLING ELECTRICAL PRODUCTS
You should now recycle your waste electrical goods and in doing so help the environment .
” alt=”Disposal” width=”58″ height=”79″ data-ezsrc=”https://manuals.plus/wp-content/uploads/2020/10/Recycle-1.png” />This symbol means an electrical product should not be disposed of with normal household waste. Please ensure it is taken to a suitable facility for disposal when finished with.
IMPORTANT: Please read all instructions carefully before use and keep for future reference
- Risk of electric shock.
Do not open - Read all instructions carefully before use and keep for future reference.
- When servicing, use only identical replacement parts.