![]() QUICK START GUIDE
QUICK START GUIDE
STK-7021S Switch Wireless Gamepad
Game Controller for N S Quick Start Guide
3-Year Limited Warranty: All of our products are covered by a 3-year warranty and lifetime technical support. 4-Return and Replacement Policy: We guarantee a 45-day return and 75-day replacement if the product has any quality issues.
15.19 “This device complies with Part 15 of the FCC Rules. Operation is subject to the following two conditions:
- this device may not cause harmful interference. and
- this device must accept any interference received. including interference that may cause undesired operation.-
First Time To Pair and Connect (Y and Home)
Pair & Connect: Press Y and Home Button Simultaneously
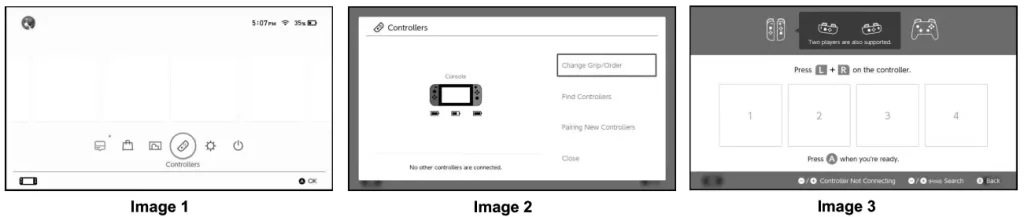
Step 1: Find Controllers Option —, Click Change Grip/Order. – Image 1/ Image 2
Step 2: Press and hold the Y and HOME button simultaneously, until the 4 LED lights flash in turn for 2 seconds, then release your finger and wait for the connection to complete. – Image 3
* NOTE: Enter the Change Grip/Order page, please complete the connection within 30 seconds as soon as possible. If you stay on this page for too long, you may not be able to connect to the NS console. – Image 3
Reconnect (Home)
Reconnect: Press Home Button
If your controller was once paired and connected to your NS console, next time you can press the Home button to make it to be rapidly connected.
Note:
For reconnecting, please turn on the NS console first, does not support pressing the Home button to wake up the console under standby mode.
Unable to connect, please follow 3 steps to solve this:
- Turn off airplane mode.
- Delete the information of this controller in the NS console, path: system setting-controllers and sensors-disconnect controllers.
- Follow the first-time connection method and re-pair again.
Screenshot (+& )
Press `+’ and ‘ —’ buttons simultaneously, and you can capture the image of your NS console.
Adjust Vibration Intensity
There are 2 levels of vibration intensity: weak and Strong
Step 1: Please make sure you connect the controller to the NS console.
Step 2: Press 4 buttons (‘L’, ‘ZL’, ‘R’, and 2R’) simultaneously .
Step 3: Then release the 4 buttons when you feel the vibration.
The vibration mode can be adjusted by repeating the above operations.
Indicator Light
Charging – 4 LED lights flash Fully Charged – 4 LED lights off
Factory Motion Controls Calibration
Step 1: Please make sure your controller stays at power-off status, then put it on a flat surface.
Step 2: Press the ‘—”B” HOME’ 3 buttons simultaneously, the Group A indicators and Group B indicators will flash alternately. (LED1&LED2/ LED3&LED4)
Step 3: Press the’+’button and 4 LED indicators will flash alternately.
Step 4: After about 15 seconds, all indicators will turn off, which means the controller finish calibrating.
Calibrate Control Sticks
If the characters in the games is automatically anmng, please complete me calibrate motion controls” by following steps:
Step 1: System setting—controllers and sensors—calibrate control sticks
Step 2: Enter calibrates control sticks interface, and operate it according to the guide on the NS console.
Upgrade
We promise to provide sustainable upgrade services for this controller, if the controller can not pair the newest version of the NS console, please go to our official website to get the newest upgrade firmware.
Official Website: www.beboncool.com/upgrade
NOTE: This equipment has been tested and found to comply with the limits for a Class B digital device, pursuant to part 15 of the FCC Rules.
These limits are designed to provide reasonable protection against harmful interference in a residential installation. This equipment generates uses and can radiate radio
frequency energy and, if not installed and used in accordance with the instructions, may cause harmful interference to radio communications.
However, there is no guarantee that interference will not occur in a particular installation. If this equipment does cause harmful interference to radio or television reception, which can be determined by turning the equipment off and on, the user is encouraged to try to correct the interference by one or more of the following measures:
- Reorient or relocate the receiving antenna.
- Increase the separation between the equipment and receiver.
- Connect the equipment into an outlet on a circuit different from that to which the receiver is connected.
- Consult the dealer or an experienced radio/TV technician for help
Changes or modifications not expressly approved by the party responsible for compliance could void the user’s authority to operate the equipment.
This device complies with Part 15 of the FCC Rules. Operation is subject to the following two conditions:
(1) this device may not cause harmful interference, and
(2) this device must accept any interference received, including interference that may cause undesired operation.