* Please read this user manual carefully and keep it for future reference. If you need any assistance, please contact our support team with your product model number and Amazon order number.
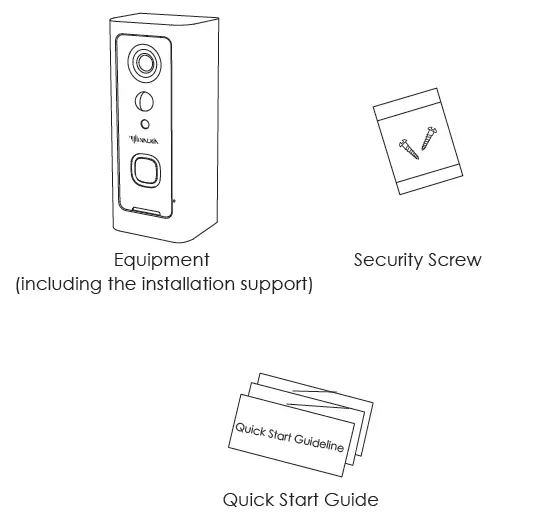
Packing List
After opening the package, please make sure the doorbell (hereinafter referred to as the “Equipment”)is in good condition and verify parts below is complete:
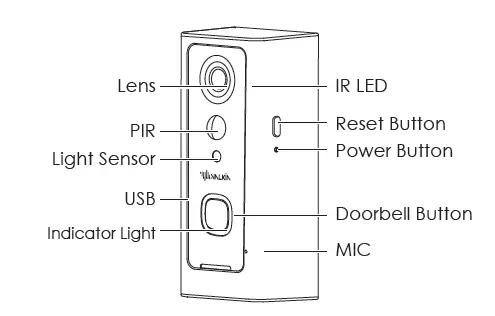
Appearance Introduction
- IR LED: The ambient light is not enough, to enable the infrared light, increase the environmental brightness
- Light Sensor: Used to collect environmental brightness value.
When the intensity of illumination is less than 2 Lux, enable the IR - MIC: Audio capture
- Doorbell Button: The doorbell button
- PIR: When human body movement in front of the equipment, the equipment could be made the notification to your mobile phone.
- Lens: Video image capture
- Indicator Light:
Blinking blue: configuration status:
Long red light: failed to connect WIFI;
Blue light is on: the device is connected successfully
Red and blue light together: The device is connected to WIFI - Speaker: Make a sound of the equipment, and voice intercom
- Power Button: Device power switch key
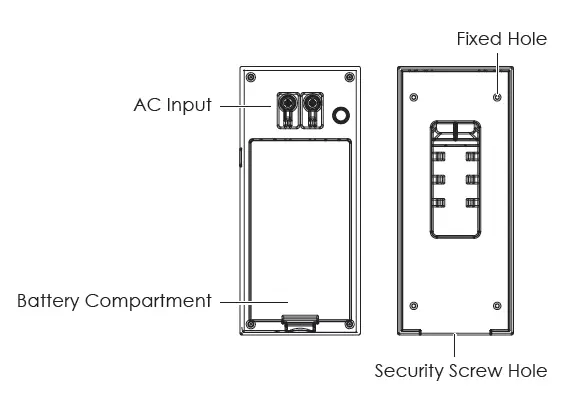
- AC Input: Power is supplied to the equipment by installing the AC input supply hole on the mounting bracket.
- Reset Button: Equipment working status, long press 5 seconds to restore factory settings
Battery Compartment: Mounting 18650 specification battery.
Fixed Hole: Fit the support on the wall with the mounting screws for the mounting kit.
Security Screw Hole: Mounting the security screw on the fittings to prevent the equipment from being removed
USB: Used to charge the Equipment through the USB Interface, The first charge is over 12 hours
TF: card slot, the largest support for 32G SD card
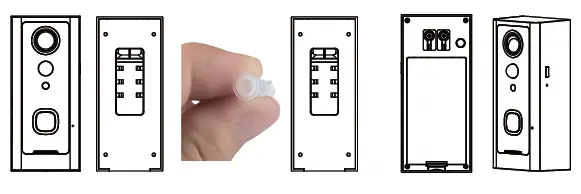
Installation Guide
- Use the screws in the mounting kit to fit the bracket on the wall
- Connect the external power cord to the AC external power supply hole
- Counting two 18650 specification batteries
- Press the reset button for 5 seconds, waiting for the indicator light to slow down(The equipment should be in working condition, long press invalid the sleep state)
- Cover the battery cover, align the equipment and the bracket, push down and lock the security screws to complete the installation.
Setup Device
Thank you for choosing our products! Please follow the below instruction to setup and using your doorbell device.
- Downloading and Installing the App
Open the App Store(for iOS)or the Google Play Store(for Android) on your mobile devices. Search for “XSH Cam” or scan the following QR Code to download and install to your device.
2. Setting up the App
Before you begin…
>Make sure the XSH Cam app is installed to your device.
>Make sure that your device is connected to a 2.4GHz Wi-Fi network, NOT a 5GHz network.
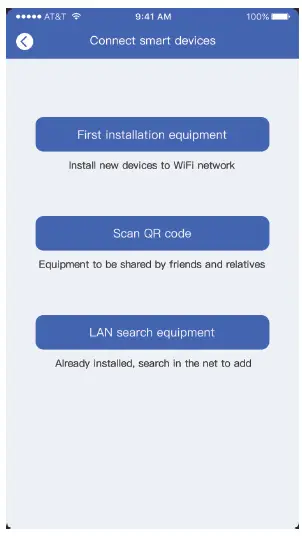
1). Launch the XSH Cam app on your device and tap Add a Camera.

2) Select Setup Camera.
Note: If you have multiple cameras, Camera only setup one at a time.
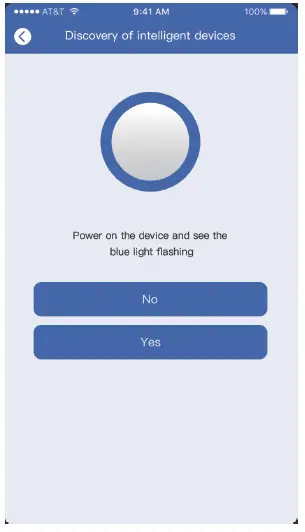
3) Before setup, make sure the the device is in configuration — with a voice prompt “The camera is now ready to begin pairing”.
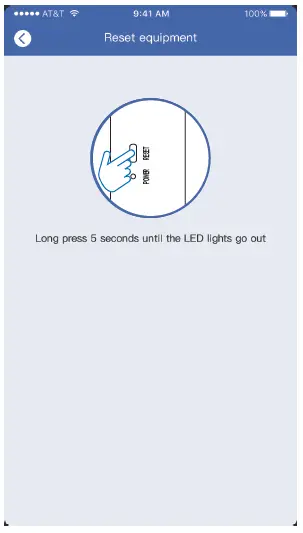
4) If you didn’t hear the voice device is in configuration—with prompt, press and hold the reset button for 5 seconds.
Release after the LED indicator turned off, and the device will restart to configure automatically.
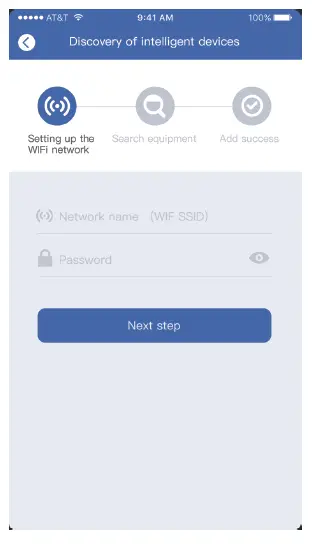
5). The name of the Wi-Fi network will automatically be filled in, enter the Wi-Fi password. And adjust the volume of your device to a reasonable level then tap “Next”. The APP will fill the corresponding password automatically if connected with the same Wi-Fi, and you don’t need to fill the password again.
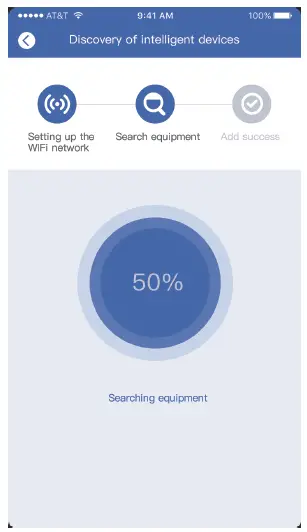
6). The mobile device will emit sound waves, keep quiet and make sure about 30cm distance between the phone and the device , and waiting for the device to configure the network. If your camera fails to connect, reset the camera and repeat all the steps(please see the previous section, Resetting the Camera).
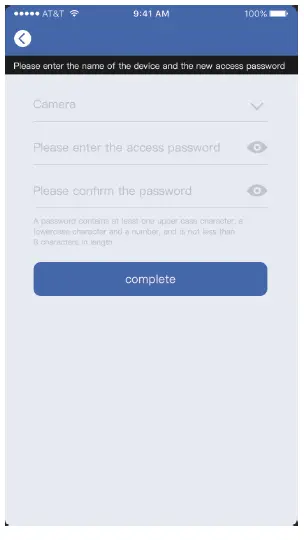
7). After a successful connection, you will be prompted to create a name and password for your camera. The password must be at least 8 characters and include an uppercase letter, a lower-case letter, and a number.
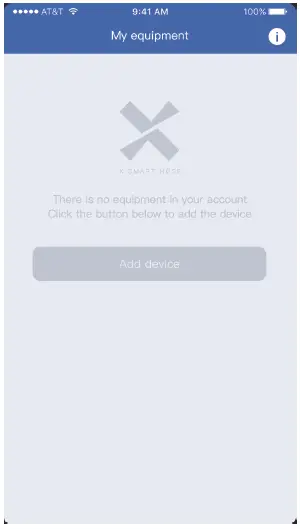
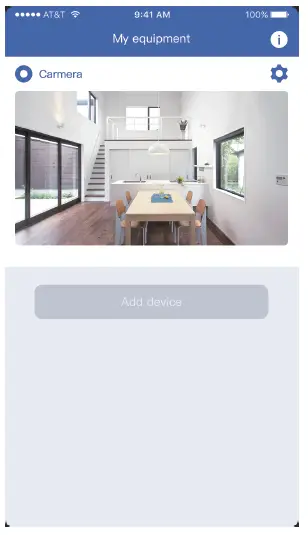
8). Setup completed! The APP will be entered the device list interface automatically. Congratulations!
The device is ready for use.
3.The Wi-Fi Doorbell Features
In the device list section, please click settings icon which is at the top right corner to enter the device settings.
Turn on-Receive the notification if somebody press the doorbell or call out.
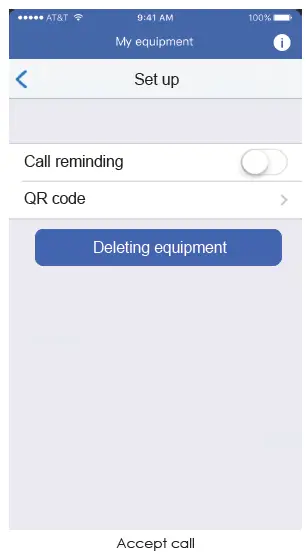
Share QR Code
Send the QR code to share the device to your friends and family or someone that you want to share.

Delete camera
The mobile device will not receive the notifications after you delete the camera. But the camera still works and the other connected mobile devices still able to receive the notifications.
Deleting equipment
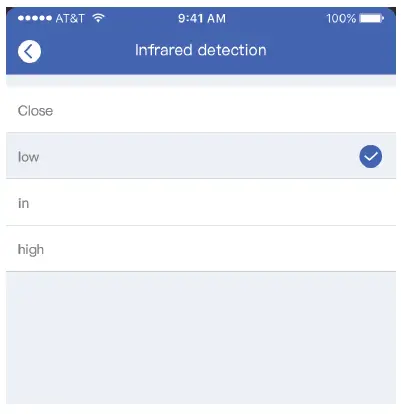
4. PIR Detection Instructions
The device can support the PIR detection. Tap “PIR detection” to open the submenus.

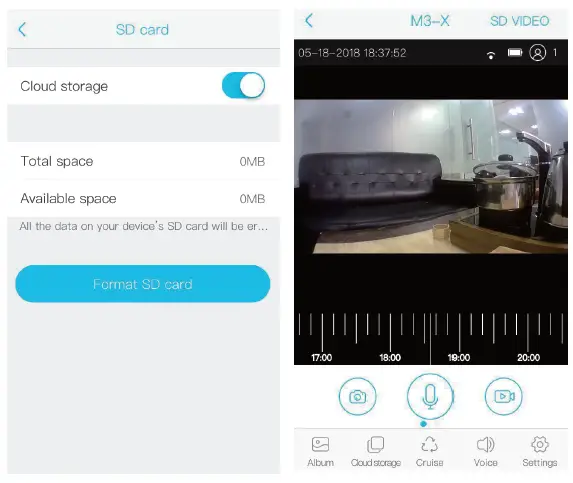
5. Cloud Storage
In the XSHcam APP setting menu, choose storage management, and open Cloud Storage
Cloud Storage Description:
When the device is in sleep state, once PIR is triggered or the doorbell button was pressed , the device will automatically upload 10 seconds of video to the cloud. Each device can record 20 events per day, and provide a week of loop recording space and Traffic for users will automatically upload 10 seconds of video to the cloud. Each device can record 20 events per day, and provide a week of loop recording space and Traffic for users.
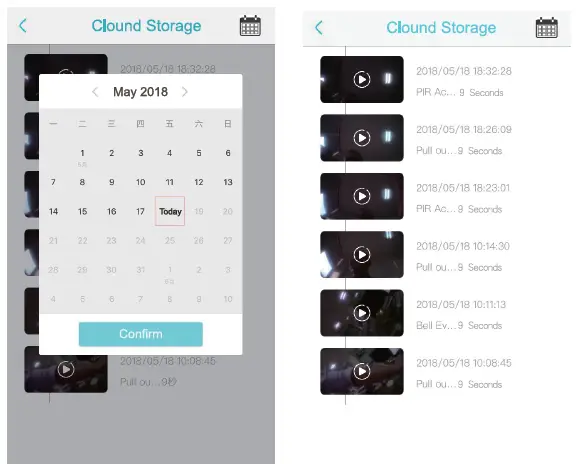
Tap the calendar icon in the upper right corner and select see the cloud video for the selected date
Click on the event video to see the cloud video
Note: In crowded environment, it is recommended to close or set the device to low sensitivity to reduce device arousal and call times to extend battery life.
6. Note for using Function Introduction
- The device is powered by rechargeable lithium batteries. With fully charged, the battery life approx be six months. The mobile device APP will be prompted while the battery voltage is low.
Please charge the device after received the reminder. - Keep the camera in range of your router. Make sure to pick a place within range of your network. Thick or insulated doors can greatly reduce the strength of your Wi-Fi signal even if your router is close by, so you should try streaming video before you mount your camera.
- The device is a low power consumption intelligent products, can support remote wake up from the APP, PIR human detection, press doorbell wake up. The device will be works for 30 seconds after wake up then be in the resting state automatically and until to next waking up.
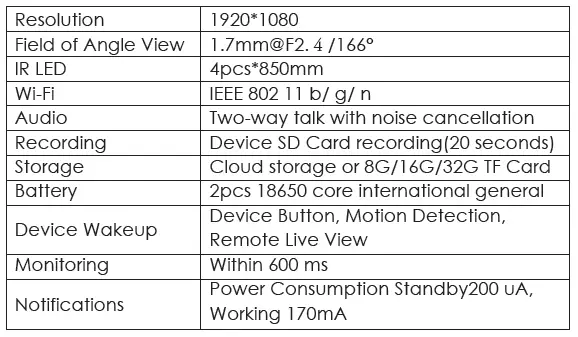
Technical Specification
Function Introduction
Aukey Technology Co.,Ltd
[email protected]
Room 102, Building P09, Huanan City Elec-trading Center,
Longgang District, Shenzhen, China
©Aukey Technology Co.,Ltd All right reserved.
Valkia and the Valkia logo are trademarks of
Aukey Technology Co.,Ltd, registered in the United States.
The Belkin Power House™ Charge Dock for Apple Watch® + iPhone®, F8J200 charges the Apple Watch and iPhone either together or separately at the same rate. Follow the steps below to know how to charge your Apple Watch and iPhone on the Belkin Power House™ Charge Dock.
NOTE: Make sure that the Belkin F8J200 is connected to a power source.
Charging the Apple Watch
Attach the back panel of the watch to the built-in Apple Watch Magnetic Charging Module.
NOTE: If the watch is placed upside down, the built-in Apple Watch Magnetic Charging Module will still charge the watch. The Apple Watch should be charged now.
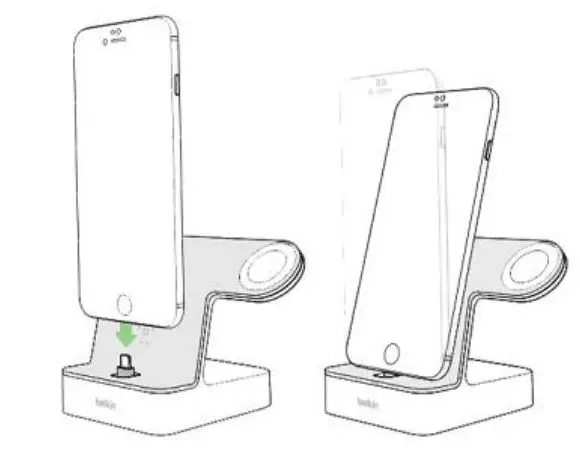
Charging the iPhone
Step 1:
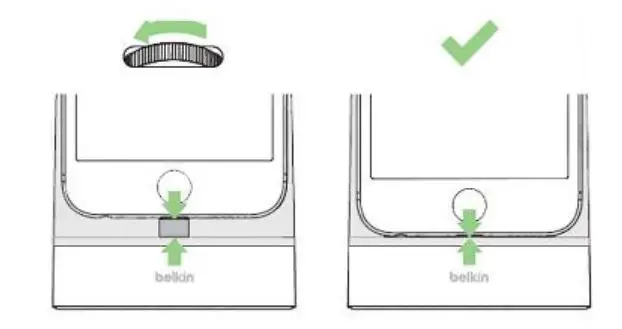
Adjust the dial on the charge dock.

Step 2:
Place the iPhone on the connector and lean it on the bar.
Step 3:
Secure a snug fit between the iPhone and the connector by adjusting the dial.
Your iPhone should now be charged.
Getting to know the Belkin PowerHouse™ Charge Dock for Apple Watch
+ iPhone, F8J200
The Belkin PowerHouse™ Charge Dock for Apple Watch + iPhone, F8J200 recharges and displays your Apple Watch® and iPhone® at the same time. With its built-in Magnetic Charging Module, this 2-in-1 PowerHouse Charge Dock holds and aligns the Apple Watch magnetically as it begins charging instantly. Featuring a built-in Versa Case™ Lightning connector that can be adjusted to fit almost any case, this dock simultaneously charges your iPhone at the fastest possible speed.
Specifications:
- Charges the Apple Watch and iPhone simultaneously or separately at the same rate
- Compatible with Belkin phone cases
- Supports up to 5 mm+ deep cases
- Total power of 3.4 A (1 A for Apple Watch, 2.4 A for iPhone)
- Cable Length of 1.2 m / 4 ft.
Charging times:
- Apple Watch charges 80 percent in 90 minutes,100 percent in 2 ½ hours
- iPhone typically charges 80 percent in 90 minutes,100 percent in 2 hours (depending on the model)
- Apple Watch + iPhone charges 80 percent in 90 minutes, 100 percent in 2 ½ hours
Warranty:
- 2-year limited warranty
Package inclusions:
- Belkin F8J200
- Power Supply (12 V, 1.5 A)
Compatible watches:
- Apple Watch Sport™
- Apple Watch Series 3
- Apple Watch Series 2
- Apple Watch Series 1
- Apple Watch Nike+ Apple Watch Edition™
Compatible iPhone models:
- iPhone X
- iPhone SE
- iPhone 8 Plus
- iPhone 8
- iPhone 7 Plus
- iPhone 7
- iPhone 6s Plus
- iPhone 6s
- iPhone 6 Plus
- iPhone 6
- iPhone 5/5s
Belkin Valet™ and Power House™ Charge Docks for Apple Watch + iPhone, F8J183 and F8J200 Frequently Asked Questions
COMPATIBILITY
- Are the current Belkin Valet™ and Power House™ Charge Docks compatible with the new iPhone® XS Max, XS, and XR?
No. The Belkin Valet and PowerHouse Charge Docks are only compatible with iPhone® 8, iPhone 8 Plus, iPhone X and previous iPhone with Lightning® connector models (iPhone 5 and later). - What devices are compatible with the Belkin Valet and PowerHouse Charge Docks for Apple Watch + iPhone, F8J183 and F8J200?
The following devices are compatible with Belkin F8J183 and F8J200:
- All Apple Watch® models
- iPhone X
- iPhone SE
- iPhone 8/8 Plus
- iPhone 7/7 Plus
- iPhone 6 Plus/6s Plus
- iPhone 6/6s
- iPhone 5/5s
PRODUCT INFORMATION
1. What is the warranty of Belkin F8J183 and F8J200?
The Belkin F8J183 and F8J200 come with a 2-year hardware warranty.
2. What are the power adapter specifications of Belkin F8J183 and F8J200?
Input: 110 – 240 V 50/60 Hz Output: 12 V / 1.6 A / 19.2 W
3. What are the charging rates of Belkin F8J183 and F8J200?
Lightning Port: 5 V / 2.4 A / 12 W
Watch Charging Pad: 5 V / 1 A / 5 W
4. What are the product features of the Belkin F8J183 and F8J200?
The Belkin F8J183 and F8J200 feature a magnetic charger for the Apple Watch and an adjustable Lightning connector for the iPhone. The integrated chargers allow you to charge your Apple Watch and iPhone simultaneously.
Below are the key features of the Belkin F8J183:
- Integrated magnetic charger for Apple Watch
- Adjustable Lightning connector that fits most cases
- Charges both Apple Watch and iPhone
- Power cable length: 1.5 m/4.9 ft.
- 2.4 A Fast Charging for iPhone
To learn more about the Belkin F8J183, click here.
Below are the key features of the Belkin F8J200:
- Charges the Apple Watch and iPhone simultaneously or separately at the same rate
- Compatible with Belkin phone cases
- Supports up to 5 mm+ deep cases
- Total power of 3.4 A (1 A for Apple Watch, 2.4 A for iPhone)
- Power cable length: 1.2 m/4 ft.
To learn more about the Belkin F8J200, click here.
SETUP AND CONFIGURATION
- How do I charge with the Belkin F8J183 and F8J200?
Charging is easy with the Belkin F8J183 and F8J200. Connect the Lightning cable to charge your iPhone and attach your Apple Watch to the dedicated magnetic base. - Will the Belkin F8J183 and F8J200 still charge my Apple Watch® even if it is upside down?
Yes. It will charge even if you place your Apple Watch upside down (as opposed to what is shown in the Quick Install Guide). - How do I know that my Apple® device has finished charging?
You may need to refer to the battery indicator of your Apple device connected to the charger to make sure it’s charging and to know the device’s battery level. The Belkin F8J183 and F8J200 don’t have any light indicators. - Can the Belkin F8J183 and F8J200 charge my Apple Watch and iPhone separately?
Yes. They can charge your Apple devices separately or together.