BenQ Display Pilot

Copyright and disclaimer
Copyright
Copyright 2019 BenQ Corporation. All rights reserved. No part of this publication may be reproduced, transmitted, transcribed, stored in a retrieval system or translated into any language or computer language, in any form or by any means, electronic, mechanical, magnetic, optical, chemical, manual, or otherwise, without the prior written permission of BenQ Corporation. All other logos, products, or company names mentioned in this manual may be the registered trademarks or copyrights of their respective companies and are used for informational purposes only.
Disclaimer
BenQ Corporation makes no representations or warranties, either expressed or implied, with respect to the contents hereof and specifically disclaims any warranties, merchantability, or fitness for any particular purpose. Further, BenQ Corporation reserves the right to revise this publication and to make changes from time to
time in the contents hereof without obligation of BenQ Corporation to notify any person of such revision or
changes.
This document aims to provide the most updated and accurate information to customers, and thus all contents may be modified from time to time without prior notice. Please visit the website for the latest version of this document.
It is the sole responsibility of the user if problems (such as data loss and system failure) occurred due to
non-factory installed software, parts, and/or non-original accessories. (Applicable for flicker-free models only) The performance of flicker-free may be affected by external factors such as poor cable quality, unstable power supply, signal interference, or poor grounding, and not limited to the
above-mentioned external factors.
Servicing (Windows only)
Should you have any queries about the software after reading the document, contact customer support from System > Information > Technical Support.
Typographics
 In this document, the steps needed to reach a menu are shown in condensed form, for example, System > Information.
Introduction
Display Pilot is a software utility that allows for quick accurate tuning of the display with the ability to easily save and use monitor configurations that are best suited for you. All adjustments are controlled via software to eliminate the need to use the monitor on-screen displays (OSD).

• Images in this document are for reference only and may look different according to the operating system of your computer. The user interface may subject to change without prior notice.
Compatible operating systems
• Windows 7 or above-operating systems
• macOS Mojave 10.14
Installing and launching the Display Pilot software
1. Visit the local website from www.BenQ.com > the purchased model > the Support tab > the Software tab to download the Display Pilot software.
2. (On Windows) Click the file just downloaded and follow the on-screen instructions to complete the installation. Choose your language preference for the installation process. Check Launch Display Pilot in the last step before you finish the installation. Now the software runs in the background and can be accessed through the Start menu or the system tray at the bottom-right corner of the screen. (On Mac) Click the file just downloaded from Downloads and install and launch the application properly.
Exiting Display Pilot
1. Right-click the ![]()
2. (On Windows) Click Exit to close the software. (On Mac) Click Quit to close the software.
Overview
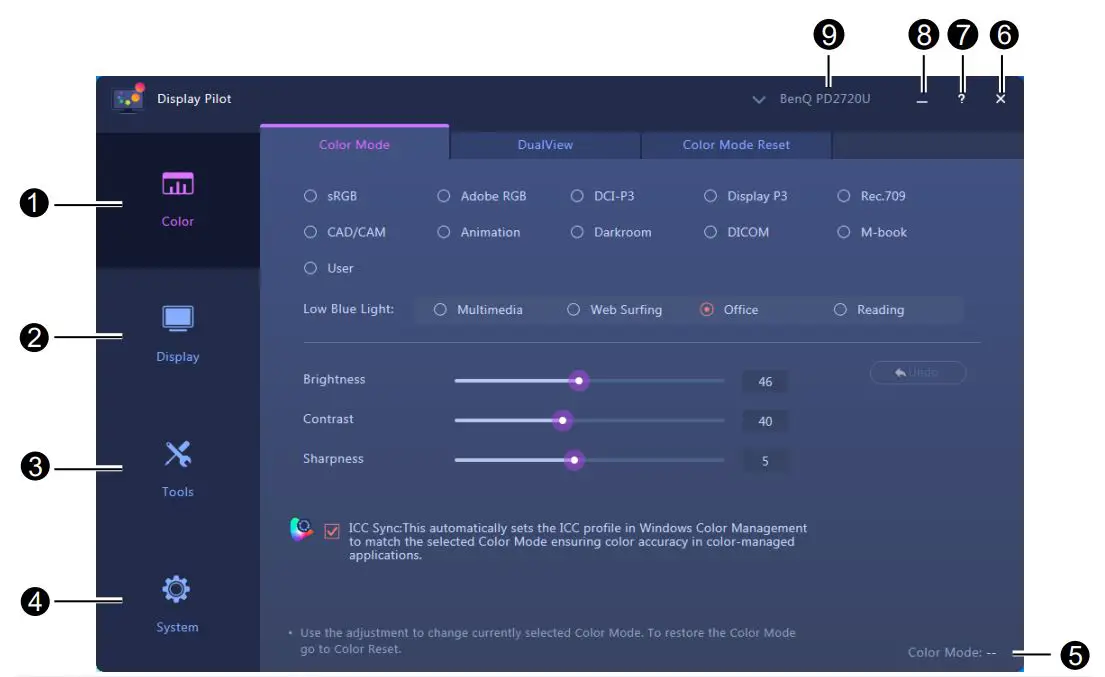
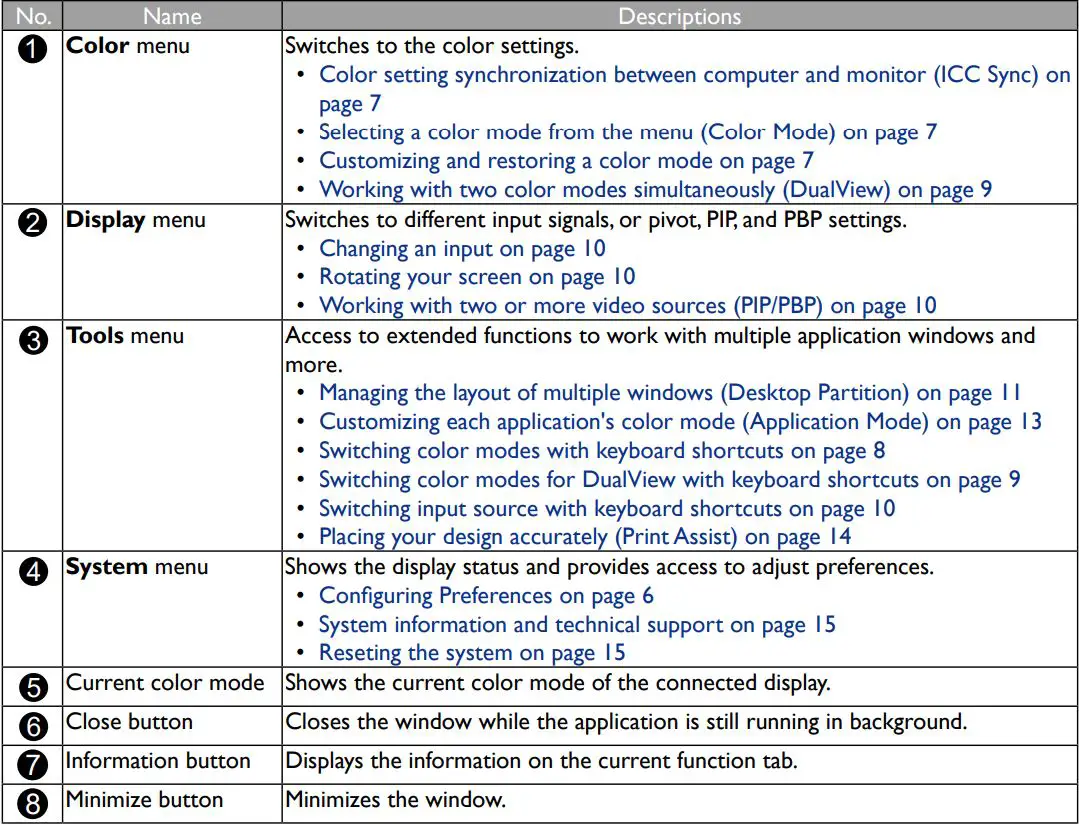

Adjusting the settings
Before you start, you might want to go through some adjustments.
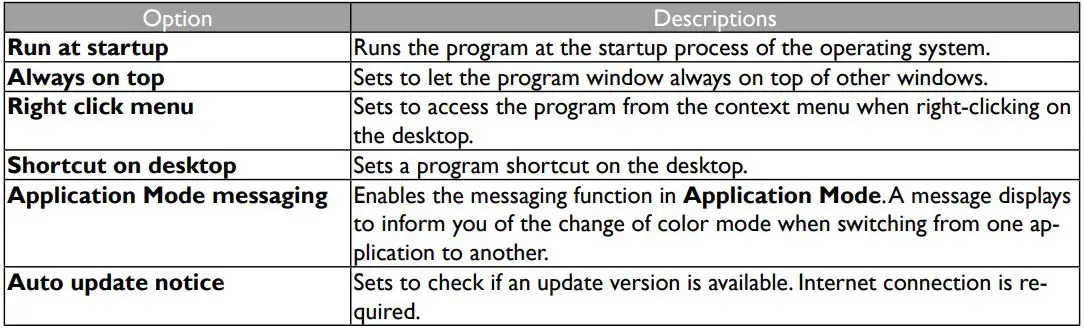
Configuring Preferences
1. Go to System > Preferences to decide the ways to access the program.
2. Enable the desired functions.
On Windows
 On Mac
 Color setting synchronization between computer and monitor (ICC Sync)
The computer’s color profile (ICC profile) may not best suit your monitor. If you want to make sure to obtain the accurate color matching representation, change the computer’s ICC profile to ensure the computer works better with the monitor. With the ICC Sync feature in Display Pilot, the adjustment is done with one click.
1. Go to Color > Color Mode.
2. Check ICC Sync to enable the synchronization.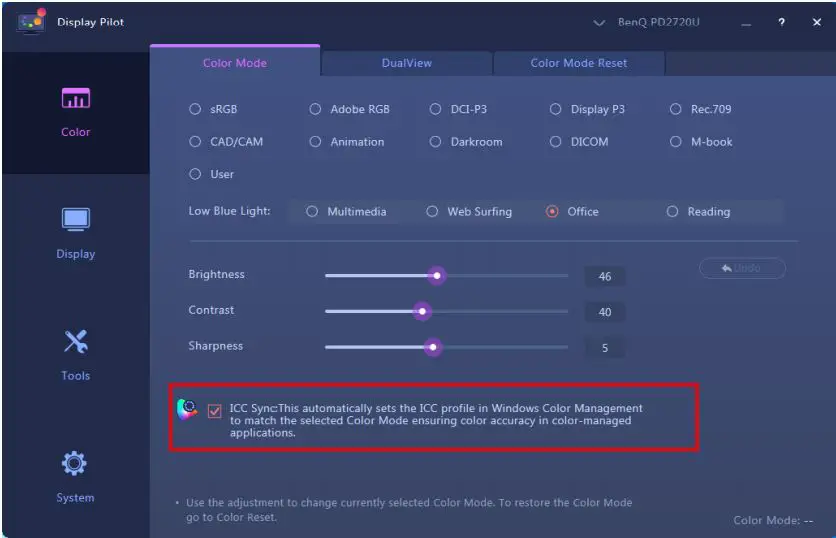
After the ICC Sync function is enabled, the synchronization is performed automatically whenever a new color mode is applied to ensure consistent and accurate color matching representation between the monitor and the computer’s color management system.

• If multiple monitors connected to the computer have been rearranged, the software may not detect the new monitor arrangement and sync properly. Before you perform ICC synchronization, unplug and plug the video cables so the system can identify the correct arrangement.
Applying and customizing a color mode
You are provided with several ways to apply a color mode.
• If your monitor is HDR-compatible, HDR mode will not be displayed in any of the Color Mode lists. However, if HDR content is connected, the monitor switches to HDR mode automatically.
Selecting a color mode from the menu (Color Mode)
1. Go to the Color > Color Mode.
2. All except the HDR color mode (if supported) available for the connected monitor are displayed. Click one mode to apply immediately.
Customizing and restoring a color mode
- You can customize the brightness, contrast, or sharpness settings of a color mode from Color Mode. To adjust a selected color mode, simply draw the adjustment bars from the window, or input a preferred value for each setting. The setting will take effect immediately.
- To undo the changes just made to a color model, click Undo on the right.
- If more than one color mode has been customized and you wish to restore to the default factory settings
all at once, go to the Color Mode Reset tab. Select the desired color modes and click Reset.
Switching color modes with keyboard shortcuts
- Go to Tools > Keyboard Hotkey.
- Move the slider to switch on Color Mode.
- Choose up to 3 color modes from the list for hotkey switch.
- A key combination is pre-defined for the hotkey switch. Simply press the keys to cycle through the selected options. If you prefer to change the key combination, click Edit on the right to customize the setting. (On Windows) The hotkey shortcut consists of 3 keys, and the first 2 keys need to be modifier keys selected from Shift, Ctrl, or Alt to make a valid hotkey shortcut. The third key could be any number or alphabet key.
(On Mac) The hotkey shortcut consists of 3 keys, and the first 2 keys need to be modifier keys such as↑control, option, or command to make a valid hotkey shortcut. The third key could be any number or alphabet key.
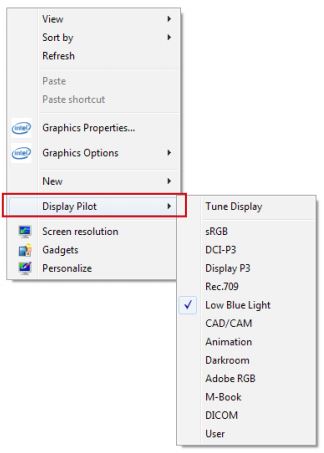
Switching color modes from the context menu (Windows only)
- Go to System > Preferences.
- Enable Right-click menu.
- Right-click on the desktop of your computer and select Display Pilot. Select one mode to apply.

Switching color modes from the system tray (Windows only)
1. Right-click on the![]()
2. Select one mode to apply.

If you have enabled Desktop Color Mode from Tools > Application Mode, the color setting selected from Color Mode will be applied whenever you click on the desktop.
Working with two color modes simultaneously (DualView)
DualView helps improve your image editing efficiency by showing an image of two different color modes side by side.
1. Go to Color > DualView.
2. Move the slider to switch on DualView.The screen is divided into two windows and the selected color mode from Color > Color Mode is applied to the left window.
3. Choose one color mode from the options for the right window. The setting will take effect immediately.
Switching color modes for DualView with keyboard shortcuts
- Go to Tools > Keyboard Hotkey.
- Move the slider to switch on DualView.
- Choose up to 3 color modes from the list for hotkey switch.
- A key combination is pre-defined for the hotkey switch. Simply press the keys to cycle through the selected options. If you prefer to change the key combination, click Edit on the right to customize the setting. (On Windows) The hotkey shortcut consists of 3 keys, and the first 2 keys need to be modifier keys selected from Shift, Ctrl, or Alt to make a valid hotkey shortcut. The third key could be any number or alphabet key.
(On Mac) The hotkey shortcut consists of 3 keys, and the first 2 keys need to be modifier keys such as↑control, option, or command to make a valid hotkey shortcut. The third key could be any number or alphabet key.
Changing an input
Changing an input source from the menu
- Connect the video cable properly between the monitor and the video source. Available inputs vary by model.
- To change the input from Display Pilot, go to Display > Display.
- Select the desired input from Input. If the video cable is properly connected, the screen will display the new source.
Switching input source with keyboard shortcuts
- Go to Tools > Keyboard Hotkey.
- Move the slider to switch on Input.
- Choose the input sources from the list for the hotkey switch. Available inputs vary by model.
- A key combination is pre-defined for the hotkey switch. Simply press the keys to cycle through the selected options. If you prefer to change the key combination, click Edit on the right to customize the setting. (On Windows) The hotkey shortcut consists of 3 keys, and the first 2 keys need to be modifier keys selected from Shift, Ctrl, or Alt to make a valid hotkey shortcut. The third key could be any number or alphabet key.
(On Mac) The hotkey shortcut consists of 3 keys, and the first 2 keys need to be modifier keys such as↑control, option, or command to make a valid hotkey shortcut. The third key could be any number or alphabet key.
Rotating your screen
You can manually or automatically rotate the screen image to go with the rotated monitor.
Manually rotate the screen (Screen Pivot)
1. Go to Display > Display.
2. Select one screen direction. The setting will take effect immediately.
3. Rotate your monitor in the same direction.
Automatically rotate the screen (Auto Pivot)
1. Go to Display > Display.
2. Move the slider to switch on Auto Pivot. The screen goes with the monitor when being rotated.
Working with two or more video sources (PIP/PBP)
The Picture-in-Picture (PIP) mode displays the main video source on the screen while the second source in an inset window. The Picture-by-Picture (PBP) mode allows displaying images from two or more video sources side-by-side.
1. Make sure you have enough video sources and cables are connected properly between the monitor and the video sources.
2. Go to Display > PIP/PBP.
3. Move the slider to switch on PIP/PBP.
4. Select the desired function. Different options are available by function.


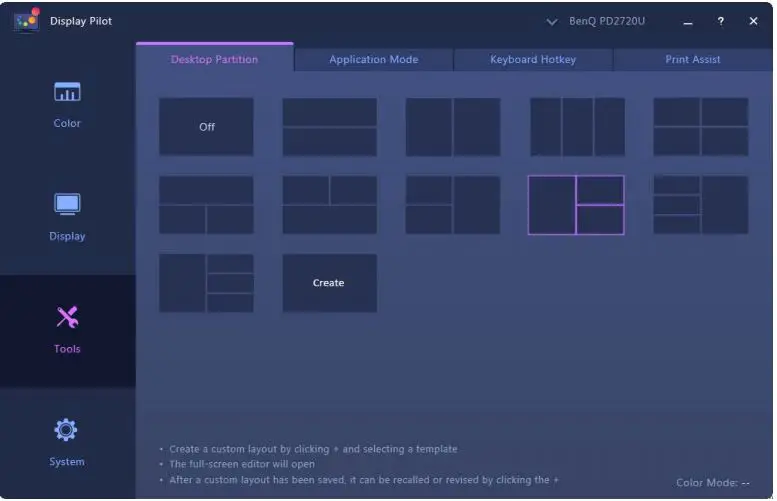
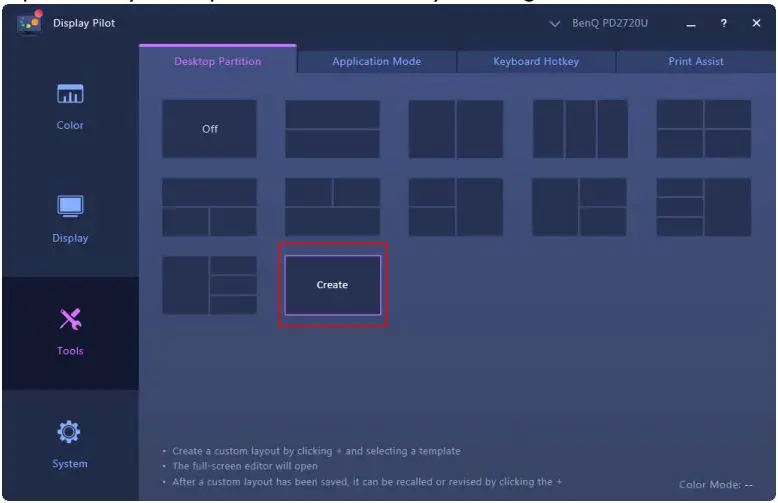
Managing the layout of multiple windows (Desktop Partition)
Select a preferred layout and arrange multiple application windows as desired. You can manage to show up to 4 windows simultaneously.
- Go to Tools > Desktop Partition.
- Select one of the preferred layouts.
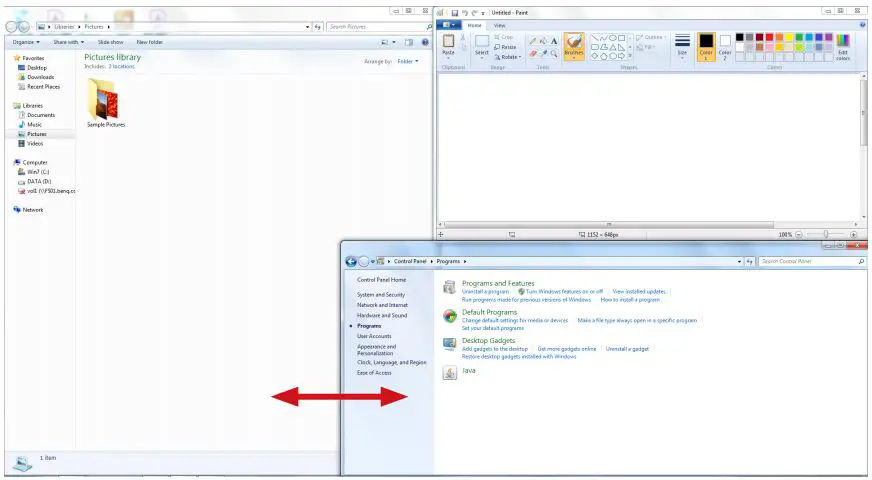
- Go to one of the application windows and drag to move it. While a small layout appears as you move the window, drag and drop the window to the desired region.

- The window is then resized and fits into the region. Repeat Step 3 until all windows are organized as planned and are displayed simultaneously.
- If you wish to customize the partition again, drag and drop the boundary of a window.
Creating a window layout
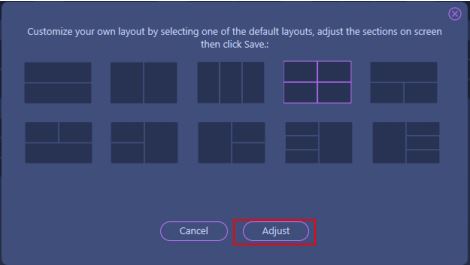
- If none of the provided layouts is preferred, create one by selecting Create.
- Select a template and click Adjust for editing.
- Move the cursor to one of the partition lines (boundaries of windows) until it turns blue. Drag and drop the line to adjust the layout. After the customization is done, click

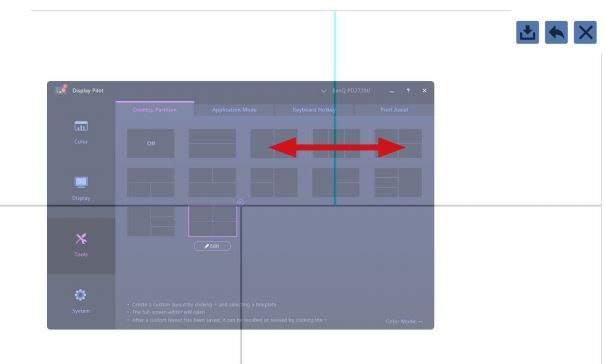
- If you wish to delete the customized layout, click x on the upper-right corner of the layout thumbnail.


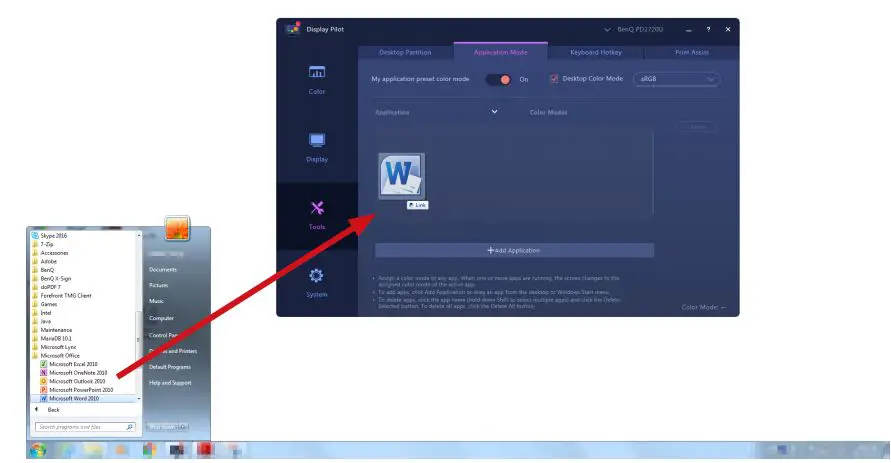
Customizing each application’s color mode (Application Mode)
Assign one color mode to an application, so when the application is launched and brought to the front, the preset color mode is applied automatically.
For Windows
- Go to Tools > Application Mode.
- Move the slider to switch on My application preset color mode.
- Check Desktop Color Mode if you wish to return to the default desktop color mode whenever you click on the desktop. This keeps the screen from changing constantly during the application switch.
- Go to the Start > All Programs menu on your computer, drag a selected application to the Display Pilot window, and drop it, the selected application is added to the list.
For both Windows and Mac
- Go to Tools > Application Mode.
- Move the slider to switch on My application preset color mode.
- (Windows only) Check Desktop Color Mode if you wish to return to the default desktop color mode whenever you click on the desktop. This keeps the screen from changing constantly during the application switch.
- Click Add Application from the Display Pilot window and look for the *.exe file of the desired application.
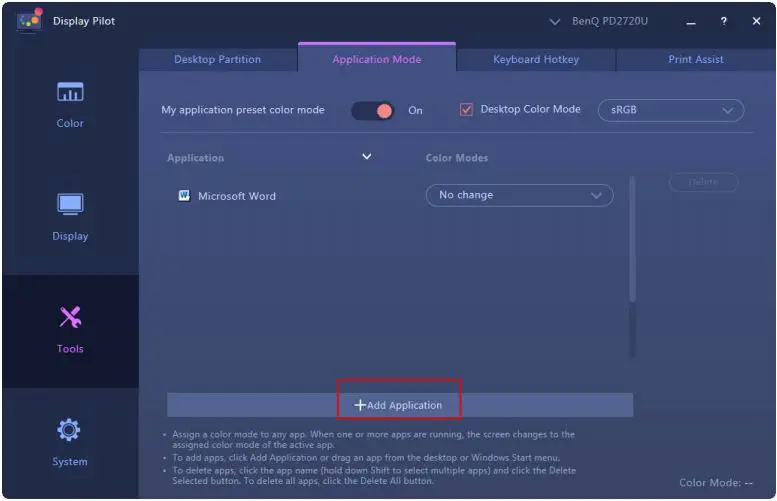
- From the application list on Display Pilot, set one color mode for each application from the drop-down menu. Once the application is launched and the window is brought to the front, the preset color mode is applied immediately.
- If you wish to remove an application from the list, select it and click Delete on the right.
Placing your design accurately (Print Assist)
As you can zoom in and out easily on the screen, you may need some measurement tool to help know the dimension of your design and to place the illustrations accurately. Now you are provided with Print Assist which is helpful by showing the range of some standard print sizes or the grid lines. The range and the grid lines are for preview only and will not be printed.
- Go to Tools > Print Assist.
- Move the slider to switch on the function.
- Under Grid, select to show the range of one of the standard print sizes or grid lines of different measurement increments.
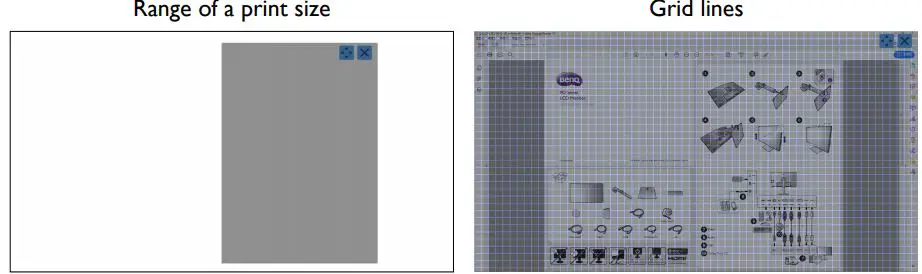 Under Line Color, select a color for grid lines.
- Under Line Weight, select the thickness of grid lines.
- (On Windows) Move the range by dragging the


(On Mac) Click on the
System information and technical support
To find out the system information and current settings, go to System > Information. (Windows only) Should you need technical support, go to System > Information > Technical Support. Note that a network connection is required.
Resetting the system
If you prefer to restore the system to factory default settings, go to System > Information > Factory Reset. All the customized changes will be reset.
Checking for a system update automatically
- Make sure your computer is connected to the Internet.
- Go to System > Preferences > Auto-update notice and move the slide to switch on the function. The system will then check for an update automatically when it is launched.
- If a software update is available, you will be prompted to download and/or install the update.