BLACK DECKER BC15BD 15 Amp Bench Battery Charger

THIS QUICK START GUIDE IS NOT A SUBSTITUTE FOR THE INSTRUCTION MANUAL.
PLEASE REFER TO THE INSTRUCTION MANUAL AND YOUR VEHICLE’S USER’S MANUAL BEFORE USE.
IF YOU HAVE ANY QUESTIONS, CALL CUSTOMER SERVICE AT 1-877-571-2391
PARTS DESCRIPTION

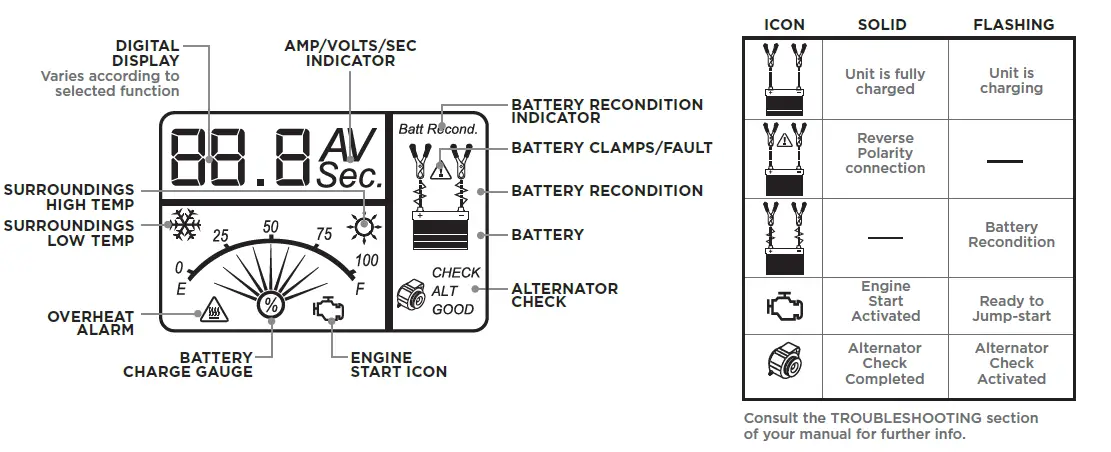
REVERSE POLARITY ALARM
When battery clamps are connected in reverse polarity, an audible alarm (continuous beep) will sound and the LCD screen will display the Reverse Polarity Indicator icon (please see Instruction Manual for details).
DO NOT activate the unit. If this happens carefully disconnect the clamps and re-connect with the proper polarity. Ensure that the grounded clamp has a firm and clean connection.
BATTERY CHARGE
Once clamps are correctly connected, press to start charging. NOTE: this unit is a high-frequency smart charger. It will need to sense baseline voltage in your battery in order to engage charging mode. If it does not sense sufficient voltage, it will enter reconditioning mode.
ENGINE START
This unit is equipped with an Engine Start function that delivers concentrated, high amperage charging for a 40-second period to start your vehicle. This is NOT a jump-starting function. After engaging the unit will display a timer. Once the timer has elapsed, you may try to start your vehicle.
ALTERNATOR CHECK
Press to engage the alternator check process, which is designed to determine the functionality of your vehicle’s internal electrical system. Please consult Instruction Manual for full details on how to complete this process.
BATTERY RECONDITION
Press to engage a 24-hour battery reconditioning cycle. This cycle will subject your battery to intermittent high-frequency pulses in order to reduce the effects of corrosion and recondition your battery. This is NOT guaranteed to ensure charging. If your battery does not charge after one reconditioning cycle, discontinue charging.
© 2021 Baccus Global, LLC. BLACK+DECKER and the BLACK+DECKER Logo are trademarks of Stanley Black & Decker, Inc. or an affiliate
thereof and are used under license. All rights reserved.
QUICK START GUIDE
J312B
 THIS QUICK START GUIDE IS NOT A SUBSTITUTE FOR THE INSTRUCTION MANUAL. PLEASE REFER TO THE INSTRUCTION MANUAL AND YOUR VEHICLE’S USER’S MANUAL BEFORE USE.
IF YOU HAVE ANY QUESTIONS, CALL CUSTOMER SERVICE AT 1-877-571-2391
REVERSE POLARITY ALARM
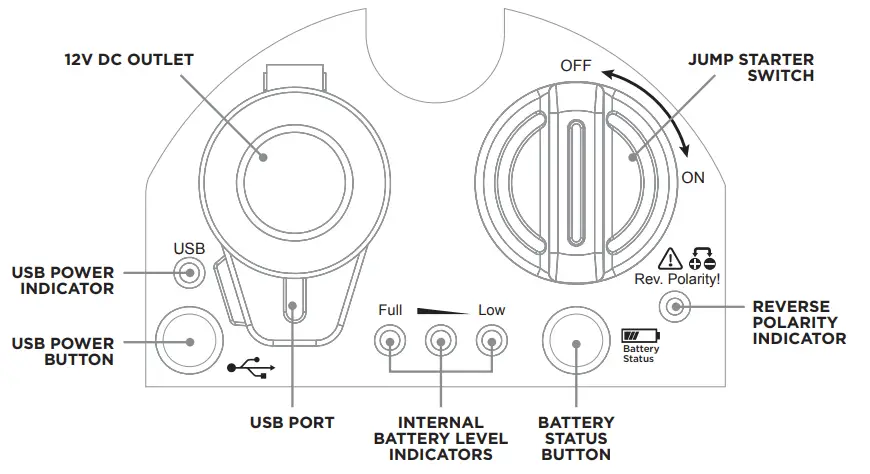
When battery clamps are connected in reverse polarity, an audible alarm (continuous beep) will sound and the Reverse Polarity Indicator will illuminate. DO NOT ACTIVATE THE UNIT. If this happens carefully disconnect the clamps and re-connect with the proper polarity. Ensure that the grounded clamp has a firm and clean connection.
12V DC POWER
- Insert the 12V DC Plug into the 12V DC Outlet
- Operate Your device normally.
USB POWER
- Press the USB Power Button on the control panel.
- Plug the electronic device into the USB Port and operate normally.
- To turn USB Port OFF, press the USB Power Button again.
BATTERY STATUS
To check the status of the internal battery, just press the Battery Status Button. One of the indicators will illuminate telling you if the unit is fully charged and ready to operate or if it needs to be recharged.
© 2021 Baccus Global, LLC. BLACK+DECKER and the BLACK+DECKER logo are trademarks of Stanley Black & Decker, Inc. or an affiliate thereof and are used under license. All rights reserved.
030421
]]>BLACK DECKER AIR FRY TOASTER OVEN TO3217SS

IMPORTANT SAFEGUARDS
When using electrical appliances, basic safety precautions should always be followed to reduce the risk of fire, electric shock, and/or injury, including the following:
- READ ALL INSTRUCTIONS BEFORE USING.
- Do not touch hot surfaces. Use handles or knobs.
- To protect against electrical shock, do not immerse cord, plug, or appliance in water or other liquid.
- Close supervision is necessary when any appliance is used by or near children.
- Unplug from outlet when not in use and before cleaning. Allow time to cool before putting on or taking off parts.
- Do not operate any appliance with a damaged cord or plug, or if the appliance malfunctions or has been damaged in any manner. Contact consumer support at the toll-free number listed in the warranty section.
- The use of accessory attachments not recommended by the appliance manufacturer may cause injuries.
- Do not use outdoors.
- Do not let cord hang over edge of table or counter, or touch hot surfaces.
- Do not place on or near a hot gas or electric burner, or in a heated oven.
- Extreme caution must be used when moving an appliance containing hot oil or other hot liquids.
- To disconnect, turn the Timer and Toast shade knobs to the O position (OFF). Then unplug from wall outlet.
- Do not use appliance for other than intended use.
- Use caution when removing tray or disposing of hot grease.
- Do not clean oven with metal scouring pads. Pieces can break off the pad and touch electrical parts, causing risk of electric shock.
- Do not attempt to clean the heating elements.
- Oversized foods or metal utensils must not be inserted in a toaster oven, as they may create fire or risk of electric shock.
- A fire may occur if the toaster oven is covered or touching flammable materials including curtains, draperies, walls, and the like, when in operation. Do not store any item on top of the unit while in operation.
- Extreme caution should be exercised when using containers constructed of other than metal or glass.
- Do not store any material, other than manufacturer’s recommended accessories, in this oven when not in use.
- Do not place any of the following materials in the oven: paper, cardboard, plastic, and other items not constructed of oven safe metal and glass pans.
- Do not cover crumb tray or any part of this oven with metal foil. This will cause overheating in the oven.
- This appliance is not intended for use by persons (including children) with reduced physical, sensory or mental capabilities, or lack of experience and knowledge, unless they have been given supervision or instructions concerning use
of the appliance by a person responsible for their safety. - Children should be supervised to ensure that they do not play with the appliance.
- The appliance is not intended to be operated by means of an external timer or separate remote-control system.
- Do not leave unattended while in operation. Food ignition may occur. If this happens, unplug the unit, but DO NOT open door. To reduce the risk of fire, keep oven interior completely clean and free of food residues, oil, grease and other combustible materials.
SAVE THESE INSTRUCTIONS. This product is for household use only.
GROUNDED PLUG
As a safety feature, this product is equipped with a grounded plug, which will only fit into a three-prong outlet. Do not attempt to defeat this safety feature. Improper connection of the grounding conductor may result in the risk of electric shock. Consult a qualified electrician if you are in doubt as to whether the outlet is properly grounded.
TAMPER-RESISTANT SCREW
Warning: This appliance is equipped with a tamper-resistant screw to prevent removal of the outer cover. To reduce the risk of fire or electric shock, do not attempt to remove the outer cover. There are no user-serviceable parts inside. Repair should be done only by authorized service personnel.
ELECTRICAL CORD
- A short power-supply cord is provided to reduce the risks resulting from becoming entangled in or tripping over a longer cord.
- Extension cords are available and may be used if care is exercised in their use.
- If an extension cord is used:
- The marked electrical rating of the extension cord should be at least as great as the electrical rating of the appliance;
- If the appliance is of the grounded type, the extension cord should be a grounding-type 3-wire cord; and
- The cord should be arranged so that it will not drape over the counter top or tabletop where it can be pulled on by children or tripped over.
Note: If the power cord is damaged, please contact the warranty department listed in these instructions.
CAUTION: THIS OVEN GETS HOT. WHEN IN USE, ALWAYS USE OVEN MITTS OR POT HOLDERS WHEN TOUCHING ANY OUTER OR INNER SURFACE OF THE OVEN.
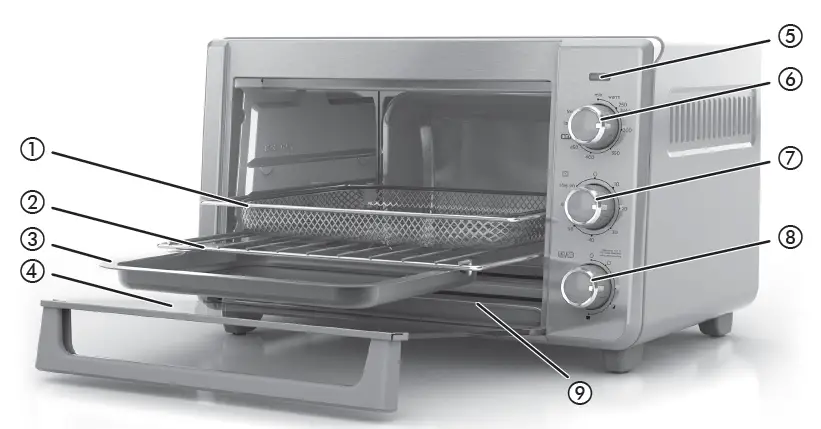
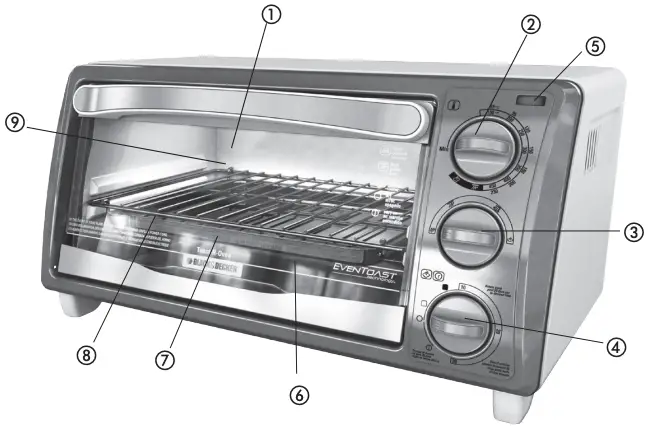
GETTING TO KNOW YOUR AIR FR Y TOASTER OVEN
- Air Fry mesh cooking rack (Part# TO3215-01)
- Rack (Part# TO3250-06)
- Bake pan/drip tray (Part# TO3250-05)
- Easy-view glass door
- Power indicator light
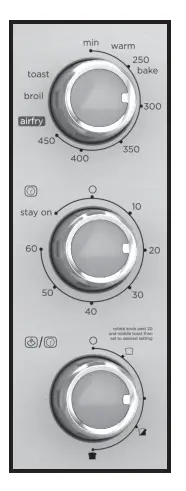
- Temperature/cooking function knob
- Timer knob
- Toast shade knob
- Crumb tray(Part# TO3217-01)
See Getting Started section for correct position.
Note: indicates consumer replaceable/removable parts.
There are three ways to turn the toaster oven ON:
- Turn Timer knob past 10 and then to desired time.
- Turn Timer knob to “Stay On”.
- Turn the Toast shade knob past medium shade and then to desired toast shade. To turn OFF turn the Timer and Toast shade knobs to the position.
GETTING STARTED
This appliance is intended for household use only.
- Remove all packing material, any stickers, and the plastic band around the power plug.
- Remove and save literature.
- Please go to www.prodprotect.com/blackanddecker to register your warranty.
- Wash all removable parts as instructed in Care and Cleaning Section.
- Select a location where this unit is to be used, allowing enough space from the back of the unit and wall to allow heat to flow without damage to cabinets and walls. During operation, the unit should have 6 inches or more of clearance around sides, back, and top.
- Before use, make sure that the crumb tray is inserted below the heating elements.
Important information about using your oven
- This oven gets hot. When in use, always use oven mitts or potholders when touching any outer or inner surface of the oven.
- When using the oven for the first time, you may notice smoke or a slight odor during the first few minutes. This is normal.
- Be sure food or baking pan does not come within 1 1/2 inches (3.8 cm) of the top heating elements.
- Food should not extend beyond the edges of the baking pan to avoid drippings from falling onto the heating elements.
- Many factors influence cook times such as altitude, humidity and variations in electrical grids. For best results, monitor the end of the cook cycle.
- Cooking Containers: Metal, ovenproof glass or ceramic bakeware can be used in your oven. Follow the manufacturer’s instructions. Be sure the top edge of the container is at least 1 1/2 inches (3.81cm) away from the upper heating elements.
- Temperatures in the oven will be lower than your set point. This is due to advanced heating elements used in this oven. Temperature dial settings have been calibrated to provide expected results for most recipes taking into account the advanced heating elements.
- You must set the timer or select Stay On for the oven to function.
- You can cook your food 3 ways:
- Use the bake pan/drip tray placed on the slide rack.
- Place the bake pan/drip tray under the slide rack / broil rack.
- Place food on Air Fry mesh rack
BAKE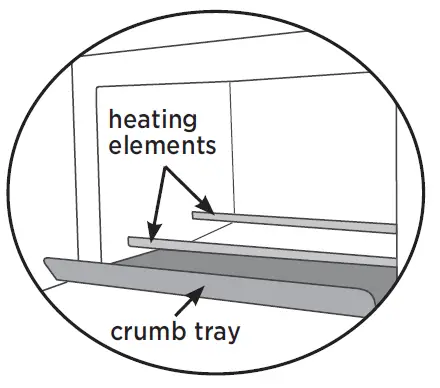
Note: For best results, when baking or cooking, preheat the oven for at least 10 minutes at the desired temperature setting.
Note: This oven has been designed to cook rapidly. Please inspect your items earlier than the prescribed cook time for a conventional oven to ensure that they do not get overcooked.
Open oven door and insert rack to the middle rack position.
- Place items to be baked directly on wire rack or place pan on wire rack.
- If the items are going to be placed directly on the wire rack, slide the baking pan into the guide under the wire rack to catch drippings during baking.
- Set temperature selector knob to the desired temperature.
- Turn TIMER selector knob to 20 and then turn to desired baking time. Select Stay On to bake longer than 60 minutes or to control cooking time yourself. The power indicator light comes on and remains on during the entire baking time.
Note: You must set the timer for the oven to function. - Once oven has preheated, open oven door and insert food. Close oven door.
- If using the oven timer, there will be an audible signal once the baking cycle is complete. The oven turns off and the power indicator light goes out. If not using the oven timer, turn the oven off once the cooking cycle is complete.
- Open the oven door. Using oven mitts or pot holders, slide the rack out to remove the cooked food.
- Unplug appliance when not in use.
AIR FRY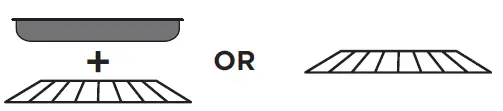
Air Fry technology uses high intensity hot air to bake, brown, and crisp your favorite fried foods with little to no oil. This mode operates the oven at 425°F. Use the cook times listed in the cooking chart on page 10 or follow the food package recommendations for baking. Adjust the cook time as needed to achieve your preferred crispiness.
Note: It is not necessary to preheat the oven for air frying.
Note: Arrange your food in a single layer on the mesh rack for optimal air frying results. Stacking food in multiple layers may result in improperly cooked food and slower cook times.
- Place food on Air Fry mesh rack. No other racks, pans, or trays are needed.
- Open door and slide Air Fry mesh rack with food into the middle or lower rack position.
- Set Temperature selector knob to AIR FRY position.
- Turn TIMER selector knob to 20 and then turn to desired Air Frying time. Select Stay On to air fry longer than 60 minutes or to control cooking time yourself. The power indicator light comes on and remains on during the entire Air Frying time.
Note: You must choose Stay On or set the timer for the oven to start. - If using the oven timer, there will be an audible signal once the Air Fry cycle is complete. The oven turns off and the power indicator light goes out. If not using the oven timer, turn the oven off once the cooking cycle is complete.
- Open the oven door. Using oven mitts or pot holders, slide the rack out to remove the cooked food.
Note: Clean out the crumb tray frequently when using the air fry setting. - Unplug the appliance when not in use.
BROIL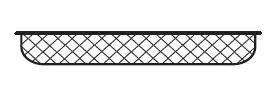
For optimal results use upper rack position. Be sure food or baking dish does not come within 1 1/2 inches of the top heating element.
- Set temperature selector knob to BROIL.
- Set the timer selector knob to 20 then turn back or forward to desired broiling time. Select Stay On to bake longer than 60 minutes or to control cooking time yourself. The power indicator light comes on and remains on during the entire broiling time.
Note: You must set the timer for the oven to function. - Once the oven is preheated, open oven door and insert food. Close oven door.
- If using the oven timer, there will be an audible signal once the broiling cycle is complete. The oven turns off and the power indicator light goes out. If not using the oven timer, turn the oven off once the cooking cycle is complete.
- Open the oven door. Using oven mitts or pot holders, slide the rack out to remove the cooked food.
- Unplug appliance when not in use.
Note: For best results when broiling meat, turn over the meat half-way through broiling.
TOAST
It is not necessary to preheat the oven for toasting.
- Set temperature selector knob to TOAST position.
- Open oven door and insert rack in the lower rack position. The toaster will hold a maximum of 6 slices of bread, placed in a single layer.
- Place items to be toasted directly on slide rack in the lower rack position and close the door.
- Turn toast shade selector knob to middle and then turn to desired toast shade.
- The power indicator light comes on and remains on until toasting cycle is complete.
- When toast cycle is complete, there will be an audible signal. The oven and the power indicator light will turn off.
- Open the oven door. Using oven mitts or pot holders, slide the rack out to remove the toast.
- Unplug appliance when not in use.
Note: You must set the toast shade selector knob as desired for the oven to begin toasting.
KEEP WARM
- Place rack in the middle rack position.
- Set Temp selector knob to Warm position.
- Turn Timer knob to “Stay On” or turn Timer knob past 10 and then to desired time.
- Open the oven door. Using oven mitts or pot holders, slide the rack out to remove the food.
- Unplug appliance when not in use.
CARE AND CLEANING
This product contains no user serviceable parts. Refer service to qualified service personnel.
Important: Before cleaning any part, be sure the oven is off, unplugged, and cool.
Note: Do not allow food debris to accumulate in oven cavity. Do not use aerosol or spray oven cleaners.
- Clean the glass door with a sponge, soft cloth, or nylon pad and dish soap and warm water. Do not use a spray cleaner.
- Remove crumb tray, wire rack, air fry mesh cooking rack, and bake pan and wash them in hot water with dish soap. To remove stubborn spots, use a polyester or nylon pad.
Note: The rack and air fry mesh cooking rack, are dishwasher safe. We recommend washing the bake pan and crumb tray by hand in hot water with dish soap. - Wipe the outside of the oven with a damp cloth or sponge. Dry thoroughly.
- Do not attempt to clean the heating elements. Any food that comes into contact with the elements will burn off on its own. If additional assistance is needed, please contact our consumer service team at 1-800-465-6070.
| FOOD | COOK TIME* |
| Frozen Food | |
| Chicken Nuggets | 13-16 min. or until crisp and golden brown. |
| Chicken Strips | 25-28 min. or until crisp and golden brown. |
| Fish Sticks | 10-12 min. or until crisp and golden brown. |
| Breaded Onion Rings | 10-12 min. or until breading is crisp. |
| Breaded Mushrooms | 16-20 min. or until breading is crisp. |
| Mozzarella Sticks | 10-12 min. or until breading is crisp. |
| Jalapeño Poppers | 14-16 min. or until breading is crisp. |
| Corn Dogs | 23-25 min. if frozen. Rotate front to back halfway through cooking. |
| Potato Skins | 13-15 min. or until hot and cheese is melted. |
| Straight or Crinkle Cut Fries | 18-24 min. or until golden brown. |
| Thick Steak Fries | 20-25 min. or until golden brown. |
| Thin Shoestring Fries | 14-18 min. or until golden brown. |
| Seasoned Potato Nuggets | 20-25 min. or until golden brown. |
| Broccoli (Frozen) | 18-20 min. Spray florets with a little pan spray. Season with salt and pepper. |
| Cauliflower (Frozen) | 18-20min Spray florets with a little pan spray. Season with salt and pepper. |
| Fresh Vegetables | |
| Potato Wedge/Fries | 20-25 min. or until golden brown. |
| Broccoli | 10 min. Toss florets in 1-2 Tbsp. of oil. Season with salt and pepper. |
| Cauliflower | 15-17 min. Toss florets in 1-2 Tbsp. of oil. Season with salt and pepper. |
| Poultry | |
| Chicken Wings (Thawed/Fresh) | 20-25 min. or until internal temp is 165°F / 75°C. |
| Chicken Drumsticks (Thawed/Fresh) | 20-30 min. or until internal temp is 165°F / 75°C. |
For these and other foods, please review manufacturer suggested cook times for baking.
Note: Do not air fry frozen raw meats (i.e. burgers, steaks).
NEED HELP?
For service, repair or any questions regarding your appliance, please call our Customer Service Line at 1-800-465-6070. Please DO NOT return the product to the place of purchase. Also, please DO NOT mail product back to manufacturer, nor bring it to a service center. You may also want to consult the website listed on the cover of this pamphlet.
Warranty Information
(Applies only in the United States and Canada)
What does it cover?
Any defect in material or workmanship provided; however, Spectrum Brands’ liability will not exceed the purchase price of product.
For how long?
Two years from the date of original purchase with proof of such purchase.
What will we do to help you?
Provide you with a reasonably similar replacement product that is either new or factory refurbished.
How do you get service?
- Save your receipt as proof of date of sale.
- Visit the online service website at www.prodprotect.com/blackanddecker, or call toll-free 1-800-465-6070, for general warranty service.
- If you need parts or accessories, please call 1-800-738-0245.
How does state law relate to this warranty?
This warranty gives you specific legal rights. You may also have other rights that vary from state to state or province to province.
What does your warranty not cover?
- Damage from commercial use
- Damage from misuse, abuse or neglect
- Products that have been modified in any way
- Products used or serviced outside the country of purchase
- Glass parts and other accessory items that are packed with the unit
- Shipping and handling costs associated with the replacement of the unit
- Consequential or incidental damages (Please note, however, that some states do not allow the exclusion or limitation of consequential or
incidental damages, so this limitation may not apply to you.)
Are there additional warranty exclusions?
This warranty shall not be valid where it is contrary to U.S. and other applicable laws, or where the warranty would be prohibited under any economic sanctions, export control laws, embargos, or other restrictive trade measures enforced by the United States or other applicable jurisdictions. This includes, without limitation, any warranty claims implicating parties from, or otherwise located in, Cuba, Iran, North Korea, Syria and the disputed Crimea region.![]()

Please Read and Save this Use and Care Book.
IMPORTANT SAFEGUARDS
When using electrical appliances, basic safety precautions should always be followed, including the following:
- Read all Instructions.
- Do not touch hot surfaces. Use handles or knobs.
- To protect against fire, electric shock and injury to persons do not immerse cord, plug, kettle, or base in water or other liquid.
- Close supervision is necessary when any appliance is used by or near children.
- Unplug from outlet when not in use and before cleaning. Allow to cool before putting on or taking off parts, and before cleaning the appliance.
- Do not operate any appliance with a damaged cord or plug or after the appliance malfunctions, or has been damaged in any manner. Contact Consumer Support at the toll free number listed in the warranty section.
- The use of accessory attachments not recommended by the appliance manufacturer may result in fire, electric shock or injury to persons.
- Do not use outdoors
- Do not let cord hang over edge of table or counter, or touch hot surfaces.
- Do not place on or near a hot gas or electric burner, or in a heated oven.
- To disconnect, lift the ON/OFF switch to OFF (O) then remove plug from wall outlet.
- Do not use appliance for other than intended use.
- Scalding may occur if the lid is opened during the heating cycle.
- This appliance is not intended for use by persons (including children) with reduced physical, sensory or mental capabilities, or lack of experience and knowledge, unless they have been given supervision or instruction concerning use of the appliance by a person responsible or their safety.
- Children should be supervised to ensure that they do not play with the appliance.
SAVE THESE INSTRUCTIONS.
This product is for household use only.
GROUNDED PLUG
As a safety feature, this product is equipped with a grounded plug, which will only fit into a three-prong outlet. Do not attempt to defeat this safety feature. Improper connection of the grounding conductor may result in the risk of electric shock. Consult a qualified electrician if you are in doubt as to whether the outlet is properly grounded.
TAMPER-RESISTANT SCREW
Warning: This appliance is equipped with a tamper-resistant screw to prevent removal of the outer cover. To reduce the risk of fire or electric shock, do not attempt to remove the outer cover. There are no user-serviceable parts inside. Repair should be done only by authorized service personnel.
ELECTRICAL CORD
- A short power-supply cord is provided to reduce the risks resulting from becoming entangled in or tripping over a longer cord.
- Extension cords are available and may be used if care is exercised in their use.
- If an extension cord is used:
- The marked electrical rating of the extension cord should be at least as great as the electrical rating of the appliance;
- If the appliance is of the grounded type, the extension cord should be a grounding-type 3-wire cord; and
- The cord should be arranged so that it will not drape over the counter top or tabletop where it can be pulled on by children or tripped over.
Note: If the power cord is damaged, please contact the warranty department listed in these instructions.
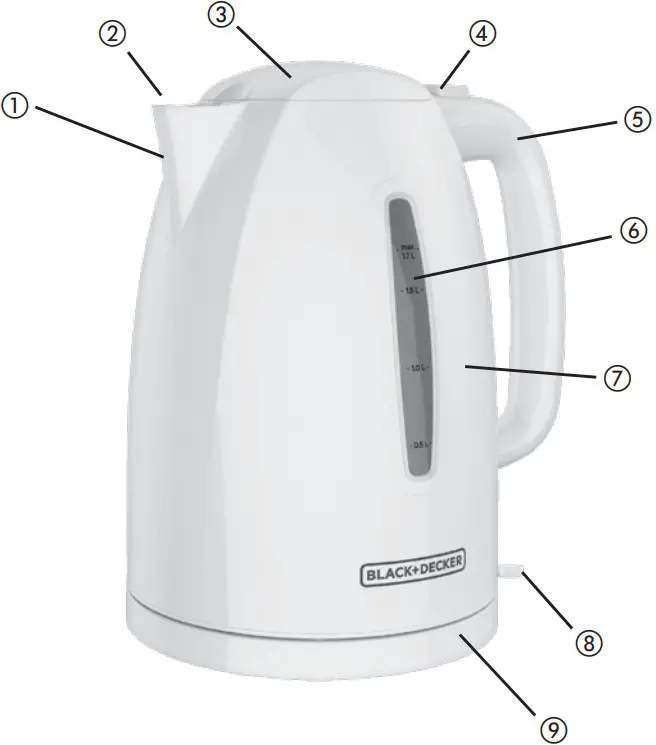
Getting to Know Your Kettle

- Pour spout
- † Removable filter
(Part# KE1500-01) (not shown) - Lid
- Lid opening button
- Handle
- Water window with level markings
- 1.7-L (7 cup) kettle body
- On/Off (I/O) switch with power indicator light
- † Base
- Cord storage (under base)
- † Water level tabs (inside kettle)
(Part# KE1500-03) (not shown)
Note: † indicates consumer replaceable/removable parts
How to Use
This appliance is for household use only.
BEFORE USING YOUR KETTLE
- To register your product, go to www.prodprotect.com/applica.
- Remove all packing materials, any stickers and the plastic band around the power plug.
- Wash all parts as instructed in CARE AND CLEANING section.
- Select a level surface where this unit is to be used allowing enough space for steam to escape without damage to counters, cabinets and walls.
- Fill kettle to maximum fill line with cold water. Bring to boil, discard and repeat. Kettle is now ready for use.
Note: The kettle only operates when placed on the base with the ON/OFF (I/O) button in the ON (I) position. The kettle automatically shuts off when water has boiled or there is no water in the kettle.
Important
- Do NOT fill the kettle with any substance other than water. Heat water only.
- Do NOT operate the kettle without water.
- Do NOT operate the kettle without the filter in place.
- Do NOT overfill the kettle. (Keep water level below the max fill line on the water window.)
FILLING THE KETTLE
- Remove the kettle from the base.
- Push the lid opening button to open the lid.
- Make sure the removable filter is in place.
To install: put filter in kettle, aligning the triangular filter with the inside/back of the pour spout. Attach the bottom first, and then the top. (A)
- Fill with desired amount of cold tap water. Use the water level tabs inside the kettle as a guide for 1 to 3 cups of water. Use the water window on the outside of the kettle as a guide for .5 liters up to 1.7 liters (7 cups).
- Close the lid.
- Unwind cord from base.
- Place the kettle securely on the base.
BOILING WATER
- Plug cord on the swivel base into standard electrical outlet.
- Press the On/Off (I/O) switch to the On (I) position. The power indicator light turns on and the water begins to heat.
- When water boils, the kettle and the power indicator light will automatically turn off.
Note: You can also turn the appliance off at any time by lifting the ON/OFF (I/O) switch to the OFF (O) position.
Warning: Kettle filled with boiling water is hot. Use only the handle to pick it up.
When taking kettle to the table, carry kettle with caution to avoid spilling. Set it on a trivet or hot pad to protect the table surface or tablecloth.
Important: Hold kettle handle firmly when pouring, especially when filled to the max fill line. Do not pour too fast. - Unplug the kettle when not in use.
Note: This kettle has a boil dry protection feature that automatically turns the kettle and power indicator light off when water has boiled or if there is no water in the kettle.
BUILT-IN SCALE PROTECTION
Note: Lime scale forms over time in the kettle when water is heated. Though harmless, it may be bothersome. The kettle has a removable filter behind the pour spout to prevent particles from pouring into your beverage.
- Always have the removable filter in place just behind the spout when using the kettle.
Care and Cleaning
This product contains no user serviceable parts. Refer service to qualified service personnel.
CLEANING
- Before cleaning, be sure the base is unplugged and the kettle has cooled completely.
Empty any remaining water from the kettle. - Pull out the removable filter for cleaning. Wash the filter in hot, soapy water and rinse or place it in the utensil holder of the dishwasher.
- Wash the inside of the kettle with hot, soapy water and rinse.
Important: Never immerse the kettle in water or other liquids or place in a dishwasher. - Wipe exterior of the kettle and base with a damp cloth or sponge and dry.
Note: The heating element at the bottom of the interior may discolor over time. This will not affect performance. Do not use abrasive soaps, cleansers, or scouring pads on the kettle.
Note: Over time, the kettle may heat up but will not boil. When this happens, it is time for descaling.
To Descale
- Fill kettle with 4 cups cold tap water and bring to a boil.
Add 2 cups white vinegar, let stand for at least 1 hour or overnight and discard. - Fill kettle to maximum fill line with cold water. Bring to boil, discard and repeat. Kettle is now ready for use.
NEED HELP?
For service, repair or any questions regarding your appliance, please call our Customer Service Line at 1-800-465-6070. Please DO NOT return the product to the place of purchase. Also, please DO NOT mail product back to manufacturer, nor bring it to a service center. You may also want to consult the website listed on the cover of this pamphlet.
Warranty Information
(Applies only in the United States and Canada)
What does it cover?
- Any defect in material or workmanship provided; however, Spectrum Brands’ liability will not exceed the purchase price of product.
For how long?
- Two years from the date of original purchase with proof of such purchase.
What will we do to help you?
- Provide you with a reasonably similar replacement product that is either new or factory refurbished.
How do you get service?
- Save your receipt as proof of date of sale.
- Visit the online service website at www.prodprotect.com/blackanddecker, or call toll-free 1-800-465-6070, for general warranty service.
- If you need parts or accessories, please call 1-800-738-0245.
How does state law relate to this warranty?
- This warranty gives you specific legal rights. You may also have other rights that vary from state to state or province to province.
What does your warranty not cover?
- Damage from commercial use
- Damage from misuse, abuse or neglect
- Products that have been modified in any way
- Products used or serviced outside the country of purchase
- Glass parts and other accessory items that are packed with the unit
- Shipping and handling costs associated with the replacement of the unit
- Consequential or incidental damages (Please note, however, that some states do not allow the exclusion or limitation of consequential or incidental damages, so this limitation may not apply to you.)
Are there additional warranty exclusions?
- This warranty shall not be valid where it is contrary to U.S. and other applicable laws, or where the warranty would be prohibited under any economic sanctions, export control laws, embargos, or other restrictive trade measures enforced by the United States or other applicable jurisdictions. This includes, without limitation, any warranty claims implicating parties from, or otherwise located in, Cuba, Iran, North Korea, Syria and the disputed Crimea region.
1500 W 120 V ~ 60 Hz
BLACK+DECKER and the BLACK+DECKER logos and product names are trademarks of The Black & Decker Corporation, used under license. All rights reserved. All other marks are Trademarks of Spectrum Brands, Inc.
At the end of this product’s life, you can mail it to Spectrum Brands at 507 Stokely Drive, Deforest, WI 53532 marked “Product Takeback: Please Recycle!”
© 2020 The Black & Decker Corporation and Spectrum Brands, Inc., Middleton, WI 53562
Made in China.
T22-5003137-D
]]>Product Overview
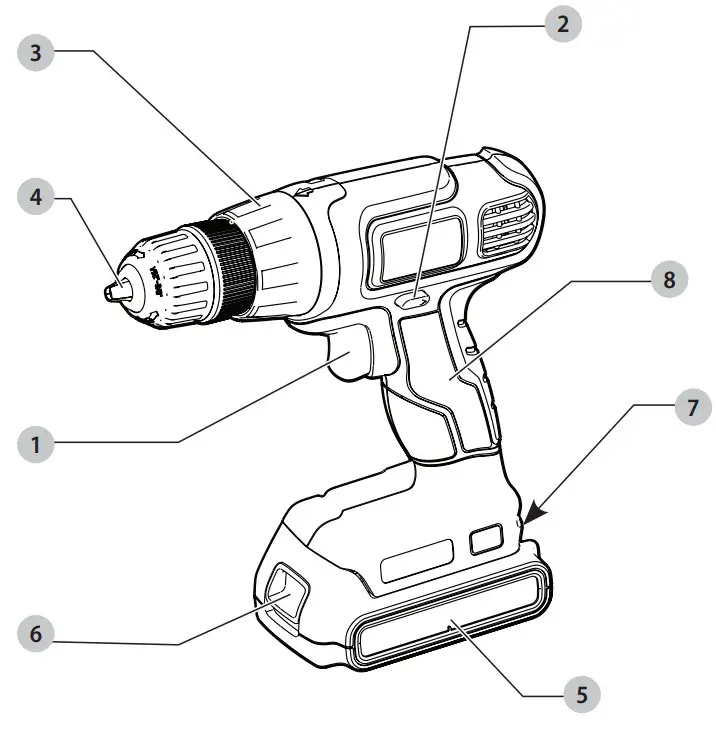
Fig. A
LD120

Components
- Variable speed switch
- Forward/reverse button
- Mode Selection Collar
- Keyless chuck
- Battery
- Battery release button
- Screwdriver bit holder
- Main handle

 WARNING: Read all safety warnings and all instructions. Failure to follow the warnings and instructions may result in electric shock, fire and/or serious injury.
 WARNING: To reduce the risk of injury, read the instruction manual.
Intended Use
This drill driver is for consumer drilling and screwdriving applications.
DO NOT use under wet conditions or in the presence of flammable liquids or gases.
DO NOT let children come into contact with the tool.
Supervision is required when inexperienced operators use this tool.
Definitions: Safety Alert Symbols and Words
This instruction manual uses the following safety alert symbols and words to alert you to hazardous situations and your risk of personal injury or property damage.
DANGER: Indicates an imminently hazardous situation which, if not avoided, will result in death or serious injury.
WARNING: Indicates a potentially hazardous situation which, if not avoided, could result in death or serious injury.
CAUTION: Indicates a potentially hazardous situation which, if not avoided, may result in minor or moderate injury.
(Used without word) Indicates a safety related message.
NOTICE: Indicates a practice not related to personal injury which, if not avoided, may result in property damage.
GENERAL POWER TOOL SAFETY WARNINGS
WARNING: Read all safety warnings, instructions, illustrations and specifications provided with this power tool. Failure to follow all instructions listed below may result in electric shock, fire and/or serious injury.
SAVE ALL WARNINGS AND INSTRUCTIONS FOR FUTURE REFERENCE.
The term “power tool” in the warnings refers to your mains‑operated (corded) power tool or battery‑operated (cordless) power tool.
Work Area Safety
- a. Keep work area clean and well lit. Cluttered or dark areas invite accidents.
- b. Do not operate power tools in explosive atmospheres, such as in the presence of flammable liquids, gases or dust. Power tools create sparks which may ignite the dust or fumes.
- c. Keep children and bystanders away while operating a power tool. Distractions can cause you to lose control.
Electrical Safety
- a. Power tool plugs must match the outlet. Never modify the plug in any way. Do not use any adapter plugs with earthed (grounded) power tools. Unmodified plugs and matching outlets will reduce risk of electric shock.
- b. Avoid body contact with earthed or grounded surfaces, such as pipes, radiators, ranges and refrigerators. There is an increased risk of electric shock if your body is earthed or grounded.
- c. Do not expose power tools to rain or wet conditions. Water entering a power tool will increase the risk of electric shock.
- d. Do not abuse the cord. Never use the cord for carrying, pulling or unplugging the power tool. Keep cord away from heat, oil, sharp edges or moving parts. Damaged or entangled cords increase the risk of electric shock.
- e. When operating a power tool outdoors, use an extension cord suitable for outdoor use. Use of a cord suitable for outdoor use reduces the risk of electric shock.
- f. If operating a power tool in a damp location is unavoidable, use a ground fault circuit interrupter (GFCI) protected supply. Use of a GFCI reduces the risk of electric shock.
Personal Safety
- a. Stay alert, watch what you are doing and use common sense when operating a power tool. Do not use a power tool while you are tired or under the influence of drugs, alcohol or medication. A moment of inattention while operating power tools may result in serious personal injury.
- b. Use personal protective equipment. Always wear eye protection. Protective equipment such as a dust mask, non‑skid safety shoes, hard hat, or hearing protection used for appropriate conditions will reduce personal injuries.
- c. Prevent unintentional starting. Ensure the switch is in the off‑position before connecting to power source and/or battery pack, picking up or carrying the tool. Carrying power tools with your finger on the switch or energizing power tools that have the switch on invites accidents.
- d. Remove any adjusting key or wrench before turning the power tool on. A wrench or a key left attached to a rotating part of the power tool may result in personal injury.
- e. Do not overreach. Keep proper footing and balance at all times. This enables better control of the power tool in unexpected situations.
- f. Dress properly. Do not wear loose clothing or jewelry. Keep your hair, clothing and gloves away from moving parts.Loose clothes, jewelry or long hair can be caught in moving parts.
- g. If devices are provided for the connection of dust extraction and collection facilities, ensure these are connected and properly used. Use of dust collection can reduce dust‑related hazards.
- h. Do not let familiarity gained from frequent use of tools allow you to become complacent and ignore tool safety principles. A careless action can cause severe injury within a fraction of a second.
Power Tool Use and Care
- a. Do not force the power tool. Use the correct power tool for your application. The correct power tool will do the job better and safer at the rate for which it was designed.
- b. Do not use the power tool if the switch does not turn it on and off. Any power tool that cannot be controlled with the switch is dangerous and must be repaired.
- c. Disconnect the plug from the power source and/ or remove the battery pack, if detachable, from the power tool before making any adjustments, changing accessories, or storing power tools. Such preventive safety measures reduce the risk of starting the power tool accidentally.
- d. Store idle power tools out of the reach of childrenand do not allow persons unfamiliar with the power tool or these instructions to operate the power tool. Power tools are dangerous in the hands of untrained users.
- e. Maintain power tools and accessories. Check for misalignment or binding of moving parts, breakage of parts and any other condition that may affect the power tool’s operation. If damaged, have the power tool repaired before use. Many accidents are caused by poorly maintained power tools.
- f. Keep cutting tools sharp and clean. Properly maintained cutting tools with sharp cutting edges are less likely to bind and are easier to control.
- g. Use the power tool, accessories and tool bits etc. in accordance with these instructions, taking into account the working conditions and the work to be performed. Use of the power tool for operations different from those intended could result in a hazardous situation.
- h. Keep handles and grasping surfaces dry, clean and free from oil and grease. Slippery handles and grasping surfaces do not allow for safe handling and control of the tool in unexpected situations.
Battery Tool Use and Care
- a. Recharge only with the charger specified by the manufacturer. A charger that is suitable for one type of battery pack may create a risk of fire when used with another battery pack.
- b. Use power tools only with specifically designated battery packs. Use of any other battery packs may create a risk of injury and fire.
- c. When battery pack is not in use, keep it away from other metal objects, like paper clips, coins, keys, nails, screws or other small metal objects, that can make a connection from one terminal to another. Shorting the battery terminals together may cause burns or a fire.
- d. Under abusive conditions, liquid may be ejected from the battery; avoid contact. If contact accidentally occurs, flush with water. If liquid contacts eyes, additionally seek medical help. Liquid ejected from the battery may cause irritation or burns.
- e. Do not use a battery pack or tool that is damaged or modified. Damaged or modified batteries may exhibit unpredictable behavior resulting in fire, explosion or risk of injury.
- f. Do not expose a battery pack or tool to fire or excessive temperature. Exposure to fire or temperature above 265 °F (130 °C) may cause explosion.
- g. Follow all charging instructions and do not charge the battery pack or tool outside the temperature range specified in the instructions. Charging improperly or at temperatures outside the specified range may damage the battery and increase the risk of fire.
Service
- a. Have your power tool serviced by a qualified repair person using only identical replacement parts. This will ensure that the safety of the power tool is maintained.
- b. Never service damaged battery packs. Service of battery packs should only be performed by the manufacturer or authorized service providers.
DRILL/DRIVER SAFETY WARNINGS
Safety Instructions for All Operations
- a. Wear ear protectors when impact drilling. Exposure to noise can cause hearing loss.
- b. Brace the tool properly before use. This tool produces a high output torque and without properly bracing the tool during operation, loss of control may occur resulting in personal injury.
- c. Hold the power tool by insulated gripping surfaces, when performing an operation where the cutting accessory or fasteners may contact hidden wiring. Cutting accessory contacting a “live” wire may make exposed metal parts of the power tool “live” and could give the operator an electric shock.
Safety Instructions When Using Long Drill Bits
- a. Never operate at higher speed than the maximum speed rating of the drill bit. At higher speeds, the bit is likely to bend if allowed to rotate freely without contacting the workpiece, resulting in personal injury.
- b. Always start drilling at low speed and with the bit tip in contact with the workpiece. At higher speeds, the bit is likely to bend if allowed to rotate freely without contacting the workpiece, resulting in personal injury.
- c. Apply pressure only in direct line with the bit and do not apply excessive pressure. Bits can bend causing breakage or loss of control, resulting in personal injury .
Additional Safety Warnings for Drills
- Do not operate this tool for long periods of time. Vibration caused by the operating action of this tool may cause permanent injury to fingers, hands, and arms. Use gloves to provide extra cushion, take frequent rest periods, and limit daily time of use.
- Hammer bits and tools get hot during operation. Wear gloves when touching them.
Additional Safety Information
WARNING: Never modify the power tool or any part of it. Damage or personal injury could result.
WARNING: ALWAYS use safety glasses. Everyday eyeglasses are NOT safety glasses. Also use face or dust mask if cutting operation is dusty. ALWAYS WEAR CERTIFIED SAFETY EQUIPMENT
- ANSI Z87.1 eye protection (CAN/CSA Z94.3),
- ANSI S12.6 (S3.19) hearing protection,
- NIOSH/OSHA/MSHA respiratory protection
WARNING: Some dust created by power sanding, sawing, grinding, drilling, and other construction activities contains chemicals known to the State of California to cause cancer, birth defects or other reproductive harm. Some examples of these chemicals are:
- lead from lead‑based paints,
- crystalline silica from bricks and cement and other masonry products, and
- arsenic and chromium from chemically‑treated lumber
Your risk from these exposures varies, depending on how often you do this type of work. To reduce your exposure to these chemicals: work in a well ventilated area, and work with approved safety equipment, such as those dust masks that are specially designed to filter out microscopic particles.
- Wear protective clothing and wash exposed areas with soap and water. Allowing dust to get into your mouth, eyes, or lay on the skin may promote absorption of harmful chemicals. Direct particles away from face and body.
- Use the appropriate dust extractor vacuum to remove the vast majority of static and airborne dust. Failure to remove static and airborne dust could contaminate the working environment or pose an increased health risk to the operator and those in close proximity.
- Use clamps or other practical ways to secure and support the workpiece to a stable platform. Holding the work by hand or against your body is unstable and may lead to loss of control and injury.
- Air vents often cover moving parts and should be avoided. Loose clothes, jewelry or long hair can be caught in moving parts.
CAUTION: When not in use, place tool on its side on a stable surface where it will not cause a tripping or falling hazard. Some tools with large battery packs will stand upright on the battery pack but may be easily knocked over.
The label on your tool may include the following symbols. The symbols and their definitions are as follows:
- BPM : beats per minute
- V : volts
- min : minutes
- DC : direct current
- min : per minute
- RPM : revolutions per minute
- A : amperes
- Hz : hertz
- W : watts
- Wh : watt hours
- no : no load speed
- n : rated speed
 |
safety alert symbol |
 |
wear respiratory protection |
 |
wear eye protection |
 |
Class II Construction (double insulated) |
 |
wear hearing protection |
 |
read all documentation |
 |
..avoid staring at light |
 |
.alternating current |
| Ah | .amp hours |
BATTERIES AND CHARGERS
The battery pack is not fully charged out of the carton. Before using the battery pack and charger, read the safety instructions below and then follow charging procedures outlined. When ordering replacement battery packs, be sure to include the catalog number and voltage.
READ ALL INSTRUCTIONS
Important Safety Instructions for All Battery Packs
WARNING: Read all safety warnings, instructions, and cautionary markings for the battery pack, charger and product. Failure to follow the
warnings and instructions may result in electric shock, fire and/or serious injury
- Do not charge or use the battery pack in explosive atmospheres, such as in the presence of flammable liquids, gases or dust. Inserting or removing the battery pack from the charger may ignite the dust or fumes.
- NEVER force the battery pack into the charger. DO NOT modify the battery pack in any way to fit into a non-compatible charger as battery pack may rupture causing serious personal injury.
- Charge the battery packs only in BLACK+DECKER chargers.
- DO NOT splash or immerse in water or other liquids.
- DO NOT allow water or any liquid to enter battery pack.
- Do not store or use the tool and battery pack in locations where the temperature may reach or exceed 104 °F (40 °C) (such as outside sheds or metal buildings in summer). For best life store battery packs in a cool, dry location.
NOTE: Do not store the battery packs in a tool with the trigger switch locked on. Never tape the trigger switch in the ON position. - Do not incinerate the battery pack even if it is severely damaged or is completely worn out. The battery pack can explode in a fire. Toxic fumes and materials are created when lithium-ion battery packs are burned.
- If battery contents come into contact with the skin, immediately wash area with mild soap and water. If battery liquid gets into the eye, rinse water over the open eye for 15 minutes or until irritation ceases. If medical attention is needed, the battery electrolyte is composed of a mixture of liquid organic carbonates and lithium salts.
- Contents of opened battery cells may cause respiratory irritation. Provide fresh air. If symptoms persist, seek medical attention.
- Battery liquid may be flammable if exposed to spark or flame.
- Never attempt to open the battery pack for any reason. If the battery pack case is cracked or damaged, do not insert into the charger. Do not crush, drop or damage the battery pack. Do not use a battery pack or charger that has received a sharp blow, been dropped, run over or damaged in any way (e.g., pierced with a nail, hit with a hammer, stepped on). Damaged battery packs should be returned to the service center for recycling.
Storage Recommendations
The best storage place is one that is cool and dry, away from direct sunlight and excess heat or cold. Store the fully charged battery pack out of the charger.
Battery Pack Cleaning Instructions
Dirt and grease may be removed from the exterior of the battery using a cloth or soft non-metallic brush. Do not use water or any cleaning solutions.
Transportation
WARNING: Fire hazard. Do not store, carry, or transport the battery pack so that metal objects can contact exposed battery terminals. For example, do not place the battery pack in aprons, pockets, tool boxes, product kit boxes, drawers, etc., with loose nails, screws, keys, coins, hand tools, etc. When transporting individual battery packs, make sure that the battery terminals are protected and well insulated from materials that could contact them and cause a short circuit.
NOTE: Li-ion battery packs should not be put in checked baggage on airplanes and must be properly protected from short circuits if they are in carryon baggage
The RBRC® Seal

Please take your spent battery packs to an authorized BLACK+DECKER service center or to your local retailer for recycling. In some areas, it is illegal to place spent battery packs in the trash. You may also contact your local recycling center for information on where to drop off the spent battery pack. Do not place in curbside recycling. For more information visit www.call2recycle.org. or call the toll free number in the RBRC® Seal. RBRC® is a registered trademark of Call 2 Recycle, Inc.
Important Safety Instructions for All Battery Chargers
WARNING: Read all safety warnings, instructions, and cautionary markings for the battery pack,charger and product. Failure to follow the warnings and instructions may result in electric shock, fire and/or serious injury.
- DO NOT attempt to charge the battery pack with any chargers other than a BLACK+DECKER charger.
BLACK+DECKER chargers and battery packs are specifically designed to work together. - These chargers are not intended for any uses other than charging BLACK+DECKER rechargeable battery packs. Charging other types of battery packs may cause them to overheat and burst, resulting in personal injury, property damage, fire, electric shock or electrocution.
- Do not expose the charger to rain or snow.
- Do not allow water or any liquid to enter charger.
- Pull by the plug rather than the cord when disconnecting the charger. This will reduce the risk of damage to the electric plug and cord.
- Make sure that the cord is located so that it will not be stepped on, tripped over or otherwise subjected to damage or stress.
- Do not use an extension cord unless it is absolutely necessary. Use of improper extension cord could result in risk of fire, electric shock or electrocution.
- When operating a charger outdoors, always provide a dry location and use an extension cord suitable for outdoor use. Use of a cord suitable for outdoor use reduces the risk of electric shock.
- An extension cord must have adequate wire size (AWG or American Wire Gauge) for safety. The smaller the gauge number of the wire, the heavier the cord and thus the greater its capacity. An undersized cord will cause a drop in line voltage resulting in loss of power and overheating. The following table shows the correct size to use depending on total length of all extension cords plugged together, and nameplate ampere rating. If in doubt, use the next heavier gauge.
Minimum Gauge for Cord Sets
| Volts | Total Length of Cord in Feet (meters) | ||||
| 120V | 25 (7.6) | 50 (15.2) | 100 (30.5) | 150 (45.7) | |
| Ampere Rating | American Wire Gauge | ||||
| More Than | Not More
Than |
||||
| 0 | 6 | 18 | 16 | 16 | 14 |
| 6 | 10 | 18 | 16 | 14 | 12 |
| 10 | 12 | 16 | 16 | 14 | 12 |
| 12 | 16 | 14 | 12 | Not Recommended | |
- Do not place any object on top of the charger. Place the charger in a position away from any heat source.
- Do not operate the charger with a damaged cord or plug–have them replaced immediately.
- Do not operate the charger if it has received a sharp blow, been dropped or otherwise damaged in any way. Take it to an authorized service center.
- Do not disassemble the charger; take it to an authorized service center when service or repair is required. Incorrect reassembly may result in a risk of electric shock, electrocution or fire.
- The charger is designed to operate on standard 120V household electrical power. Do not attempt to use it on any other voltage. This does not apply to the vehicular charger.
- Foreign materials of a conductive nature, such as, but not limited to, grinding dust, metal chips, steel wool, aluminum foil or any buildup of metallic particles should be kept away from the charger cavities.
- Always unplug the charger from the power supply when there is no battery pack in the cavity.
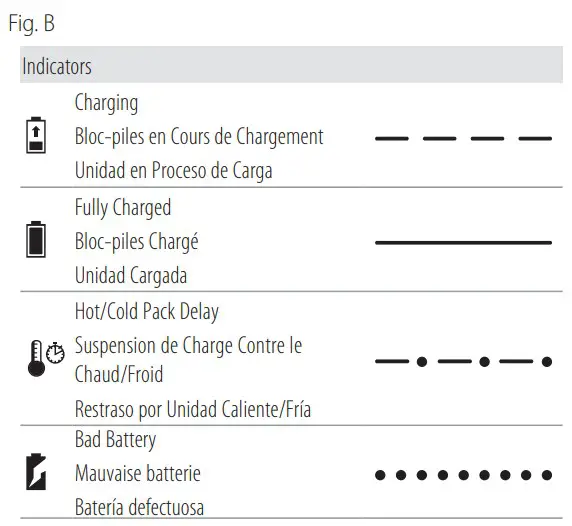
Charging a Battery (Fig. B)
- Plug the charger into an appropriate outlet.
- Insert and fully seat battery pack. Green charging light will continuously blink while charging.
- Charging is complete when the green light remains continuously ON. Battery pack can be left in charger or removed.
- Charger will not charge a faulty battery pack, which may be indicated by the light staying OFF or the red light rapidly blinking. Take charger and battery pack to an authorized service center if light stays OFF or red light rapidly blinks.
NOTE: Refer to label near charging light on charger for blink patterns.
Hot/Cold Pack Delay
When the charger detects a battery pack that is too hot or too cold, it automatically starts a Hot/Cold Pack Delay, suspending charging until the battery pack has reached an appropriate temperature. The charger then automatically switches to the pack charging mode. This feature ensures maximum battery pack life.
A cold battery pack may charge at a slower rate than a warm battery pack.
The hot/cold pack delay will be indicated by the red light continuously flashing a short ON followed by a longer ON (see charger for blink pattern). Once the battery pack has reached an appropriate temperature, the charger will resume the charging procedure.
Electronic Protection System
Li-Ion tools are designed with an Electronic Protection System that will protect the battery pack against overloading, overheating or deep discharge. The tool will automatically turn off and the battery pack will need to be recharged.
Important Charging Notes
- The charger and battery pack may become warm to the touch while charging. This is a normal condition, and does not indicate a problem. To facilitate the cooling of the battery pack after use, avoid placing the charger or battery pack in a warm environment such as in a metal shed or an uninsulated trailer.
- If the battery pack does not charge properly
- a. Check operation of receptacle by plugging in a lamp or other appliance;
- b. Check to see if receptacle is connected to a light switch which turns power off when you turn out the lights;
- c. If charging problems persist, take the tool, battery pack and charger to your local service center.
- You may charge a partially used pack whenever you desire with no adverse effect on the battery pack.
Charger Cleaning Instructions
WARNING: Shock hazard. Disconnect the charger from the AC outlet before cleaning. Dirt and grease may be removed from the exterior of the charger using a cloth or soft non-metallic brush. Do not use water or any cleaning solutions.
SAVE THESE INSTRUCTIONS FOR FUTURE USE
ASSEMBLY AND ADJUSTMENTS
WARNING: To reduce the risk of serious personal injury, turn unit off and remove the battery pack before making any adjustments or removing/ installing attachments or accessories. An accidental start‑up can cause injury.
Installing a Bit or Accessory into a Keyless Chuck (Fig. D)
WARNING: Do not attempt to tighten drill bits (or any other accessory) by gripping the front part of the chuck and turning the tool on. Damage to the chuck and personal injury may result. Always lock off trigger switch and disconnect tool from power source when changing accessories.
WARNING: Always ensure the bit is secure before starting the tool. A loose bit may eject from tool causing possible personal injury
To insert a drill bit or other accessory, follow these steps.
- Turn tool off and remove battery pack.
- Grasp the black sleeve of the chuck with one hand and use the other hand to secure the tool. Rotate the sleeve counterclockwise far enough to accept the desired accessory.
- Insert the accessory about 3/4″ (19 mm) into the chuck 4 and tighten securely by grasping and rotating the chuck sleeve clockwise with one hand while holding the tool with the other. When the chuck is nearly tightened you will hear a clicking sound. After 12-14 clicks the chuck is securely tightened around the accessory. Your tool is equipped with an automatic spindle lock mechanism. This allows you to open and close the chuck with one hand.
Be sure to tighten chuck with one hand on the chuck sleeve and one hand holding the tool for maximum tightness. To release the accessory, repeat steps 1 and 2 above.
OPERATION
WARNING: To reduce the risk of serious personal injury, turn unit off and remove the battery pack before making any adjustments or removing/ installing attachments or accessories. An accidental start‑up can cause injury
Installing and Removing the Battery Pack (Fig. A)
NOTE: For best results, make sure your battery pack is fully charged.
To install the battery pack 6 into the tool handle, align the battery pack with the rails inside the tool’s handle and slide it into the handle until the battery pack is firmly seated in the tool and ensure that it does not disengage.
To remove the battery pack from the tool, press the release button 5 and firmly pull the battery pack out of the toolhandle. Insert it into the charger as described in the charger section of this manual
Proper Hand Position (Fig. A)
WARNING: To reduce the risk of serious personal injury, ALWAYS use proper hand position as shown.
WARNING: To reduce the risk of serious personal injury, ALWAYS hold securely in anticipation of a sudden reaction.
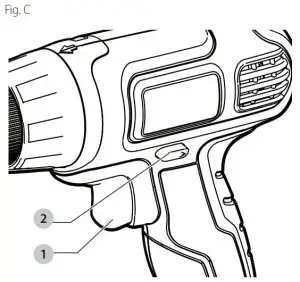
Trigger Switch/Reversing Button (Fig. A)
- The drill is turned ON and OFF by pulling and releasing the trigger switch 1 .
- A forward/reverse control button 2 determines the direction of the tool and also serves as a lock off button.
- To select forward rotation, release the trigger switch and depress the forward/reverse control button to the left.
- To select reverse, depress the forward/ reverse control button the opposite direction.
NOTE: The center position of the control button locks the tool in the off position. When changing the position of the control button, be sure the trigger is released.
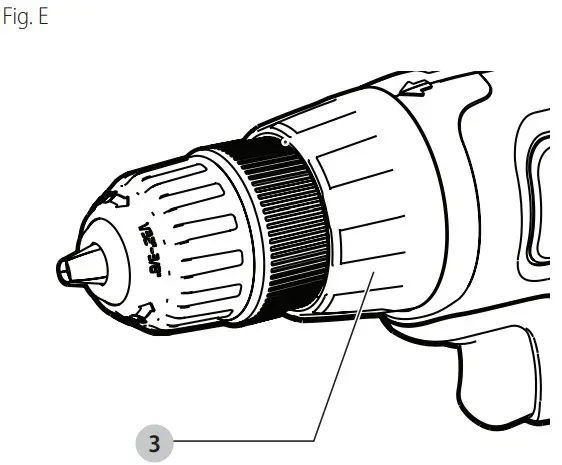
Mode Selection (Fig. A)
The mode selection collar 3 can be used to select the correct operating mode depending upon the planned application.
To select, rotate the collar until the desired symbol aligns with the arrow.
WARNING: When the mode selection collar is in the drill position, the drill will not clutch. The drill may stall if overloaded, causing a sudden twist.
| Symbol | Mode |
 |
Drilling |
| 1-15 | Screwdriving (higher number = greater torque) |
On Board Bit Storage (Fig. F)
A bit storage slot 7 is built into the base of the tool.
Performing an Application (Fig. A, E)
WARNING: To reduce the risk of personal injury, ALWAYS ensure workpiece is anchored or clamped firmly.
WARNING: Always wait until the motor has come to a complete standstill before changing the direction of rotation.
Prior to Performing Work
- Install the appropriate bit or accessory into the chuck. Refer to Installing a Bit or Accessory into a Keyless Chuck
WARNING:
- Do not use this tool to mix or pump easily combustible or explosive fluids (benzine, alcohol, etc.).
- Do not mix or stir flammable liquids labeled accordingly
Screwdriving
Your tool has a clutch with adjustable torque for driving and removing a wide array of fastener shapes and sizes. The numbers 1–15 on the mode selection collar 3 are used to set a torque range for screwdriving. The higher the number on the collar, the higher the torque and the larger the fastener which can be driven.
- Turn the mode selection collar 3 to the desired position. Refer to Mode Selection.
- Pull the trigger switch applying pressure in a straight line with the bit until the fastener is seated at the desired depth in the workpiece.
Recommendations for Screwdriving
- Start with lower torque settings, then advance to higher torque settings to avoid damage to the workpiece or fastener.
- Make some practice runs in scrap or on unseen areas of the workpiece to determine the proper position of the mode selection collar.
Drilling
IMPORTANT: For MASONRY, such as brick, cement, cinder block, etc., use carbide-tipped masonry bits.
- Turn the mode selection collar 3 to the drill symbol.
Refer to Mode Selection. - Place drill bit in contact with the workpiece.
NOTE: Use sharp drill bit only. - Pull the trigger switch applying pressure in a straight line with the bit until it reaches the desired depth.
WARNING: Drill may stall if overloaded causing a sudden twist. Always expect the stall. Grip the drill firmly to control the twisting action and avoid injury. - Keep the motor running when pulling the bit back out of a drilled hole to prevent jamming.
Recommendations for Drilling
- When drilling, always apply pressure in a straight line with the bit, but do not push hard enough to stall the motor or deflect the bit.
- IF THE DRILL STALLS:
- RELEASE TRIGGER SWITCH IMMEDIATELY, remove drill bit from work, and determine cause of stalling.
- DO NOT DEPRESS TRIGGER SWITCH ON AND OFF IN AN ATTEMPT TO START A STALLED DRILL— THIS CAN DAMAGE THE DRILL.
- To minimize stalling or breaking through the material, reduce pressure on drill and ease the bit through the last fractional part of the hole.
- Large holes (5/16″ to 1/2″ [7.9 mm to 12.7 mm]) in steel can be made easier if a pilot hole (5/32″ to 3/16″ [4 mm to 4.8 mm]) is drilled first.
- If drilling thin material or material that is prone to splinter, use a wood “back-up” block to prevent damage to the workpiece.
MAINTENANCE
WARNING: To reduce the risk of serious personal injury, turn unit off and remove the battery pack before making any adjustments or removing/ installing attachments or accessories. An accidental start‑up can cause injury
Cleaning
WARNING: Blow dirt and dust out of all air vents with clean, dry air at least once a week. To minimize the risk of eye injury, always wear ANSI Z87.1 approved eye protection when performing this procedure.
WARNING: Never use solvents or other harsh chemicals for cleaning the non‑metallic parts of the tool. These chemicals may weaken the plastic materials used in these parts. Use a cloth dampened only with water and mild soap. Never let any liquid get inside the tool; never immerse any part of the tool into a liquid
Accessories
WARNING: Since accessories, other than those offered by BLACK+DECKER, have not been tested with this product, use of such accessories with this tool could be hazardous. To reduce the risk of injury, only BLACK+DECKER recommended accessories should be used with this product.
Recommended accessories for use with your tool are available at extra cost from your local dealer or authorized service center. If you need assistance in locating any accessory, please contact BLACK+DECKER call 1-800-544-6986 .
Repairs
The charger and battery pack are not serviceable. There are no serviceable parts inside the charger or battery pack.
WARNING: To assure product SAFETY and RELIABILITY, repairs, maintenance and adjustment (including brush inspection and replacement, when applicable) should be performed by a BLACK+DECKER factory service center or a BLACK+DECKER authorized service center. Always use identical replacement parts.
Register Online
Thank you for your purchase. Register your product now for:
- WARRANTY SERVICE: Registering your product will help you obtain more efficient warranty service in case there is a problem with your product.
- CONFIRMATION OF OWNERSHIP: In case of an insurance loss, such as fire, flood or theft, your registration of ownership will serve as your proof of purchase.
- FOR YOUR SAFETY: Registering your product will allow us to contact you in the unlikely event a safety notification is required under the Federal Consumer Safety Act.
- Register online at www.BlackandDecker.com/NewOwner
TWO-YEAR LIMITED WARRANTY
Black & Decker (U.S.) Inc. warranties this product to be free from defects in material or workmanship for a period of two (2) years following the date of purchase, provided that the product is used in a home environment. This limited warranty does not cover failures due to abuse, accidental damage or when repairs have been made or attempted by anyone other than BLACK+DECKER and its Authorized Service Centers. A defective product meeting the warranty conditions set forth herein will be replaced or repaired at no charge in either of two ways:
The first, which will result in exchanges only, is to return the product to the retailer from whom it was purchased (provided that the store is a participating retailer). Returns should be made within the time period of the retailer’s policy for exchanges. Proof of purchase may be required. Please check with the retailer for its specific return policy regarding time limits for returns or exchanges. The second option is to take or send the product (prepaid) to a BLACK+DECKER owned or authorized Service Center for repair or replacement at BLACK+DECKER’s option. Proof of purchase may be required. BLACK+DECKER owned and authorized service centers are listed online at www.blackanddecker.com. This warranty does not apply to accessories. This warranty gives you specific legal rights a and you may have other rights which vary from state to state or province to province. Should you have any questions, contact the manager of your nearest BLACK+DECKER Service Center. This product is not intended for commercial use, and accordingly, such commercial use of this product will void this warranty. All other guarantees, express or implied, are hereby disclaimed.
LATIN AMERICA: This warranty does not apply to products sold in Latin America. For products sold in Latin America, check country specific warranty information contained in the packaging, call the local company or see the website for such information.
]]>BLACK&DECKER T01313SBD, TO1313SWD Instruction Manual
Model: TO1313SBD, TO1313SWD
Customer Care Line: 1-800-231-9786
For online customer service: www.prodprotect.com/applica
4-SLICE TOASTER OVEN
Product may vary slightly from what is illustrated.
- Easy-view glass door
- † Temperature selector knob (Part# TO1313-01)
- † Cooking function selector knobs (Part# TO1313-02)
- † Toast/timer selector knob (Part# TO1313-03)
- Power indicator light
- † Crumb tray (Part# TO1313-04)
- † Bake pan/drip tray (Part# TO1313-05)
- † Slide rack/broil rack (Part# TO1313-06)
- Extra deep curved interior
Note: † indicates consumer replaceable/ removable parts
Please Read and Save this Use and Care Book.
IMPORTANT SAFEGUARDS.
When using electrical appliances, basic safety precautions should always be followed, including the following:
- Read all instructions before using.
- Do not touch hot surfaces. Use handles or knobs.
- To protect against electrical shock do not immerse cord, plugs or appliance in water or other liquid.
- Close supervision is necessary when any appliance is used by or near children.
- Unplug from outlet when not in use and before cleaning. Allow to cool before putting on or taking off parts.
- Do not operate any appliance with a damaged cord or plug, or after the appliance malfunctions or has been damaged in any manner. Return appliance to the nearest authorized service facility for examination, repair or adjustment.
- The use of accessory attachments not recommended by the appliance manufacturer may cause injuries.
- Do not use outdoors.
- Do not let cord hang over edge of table or counter, or touch hot surfaces.
- Do not place on or near a hot gas or electric burner, or in a heated oven.
- Extreme caution must be used when moving an appliance containing hot oil or other hot liquids.
- To disconnect, turn timer control to OFF, then remove plug from wall outlet.
- Do not use appliance for other than intended use.
- Use extreme caution when removing tray or disposing of hot grease.
- Do not clean with metal scouring pads. Pieces can break off the pad and touch electrical parts, creating a risk of electric shock.
- Oversized foods or metal utensils must not be inserted in a toaster oven, as they may create a fire or risk of electric shock.
- A fire may occur if the toaster oven is covered or touching flammable material including curtains, draperies, walls and the like, when in operation. Do not store any item on top of unit when in operation.
- Extreme caution should be exercised when using containers constructed of other than metal or glass.
- Do not store any material, other than manufacturer’s recommended accessories, in this oven when not in use.
- Do not place any of the following materials in the oven: paper, cardboard, plastic, and the like.
- Do not cover crumb tray or any part of this oven with metal foil. This will cause overheating of the oven.
- This appliance is not intended for use by persons (including children) with reduced physical, sensory or mental capabilities, or lack of experience and knowledge, unless they have been given supervision or instruction concerning use of the appliance by a person responsible for their safety.
- Children should be supervised to ensure that they do not play with the appliance.
SAVE THESE INSTRUCTIONS.
This product is for household use only.
GROUNDED PLUG
As a safety feature, this product is equipped with a grounded plug, which will only fit into a three-prong outlet. do not attempt to defeat this safety feature. Improper connection of the grounding conductor may result in the risk of electric shock. Consult a qualified electrician if you are in doubt as to whether the outlet is properly grounded.
TAMPER-RESISTANT SCREW
Warning: This appliance is equipped with a tamper-resistant screw to prevent removal of the outer cover. To reduce the risk of fire or electric shock, do not attempt to remove the outer cover. There are no user-serviceable parts inside. Repair should be done only by authorized service personnel.
ELECTRICAL CORD
a) A short power-supply cord (or detachable power-supply cord) is to be provided to reduce the risk resulting from becoming entangled in or tripping over a longer cord.
b) Longer detachable power-supply cords or extension cords are available and may be used if care is exercised in their use.
c) If a long detachable power-supply cord or extension cord is used,
- The marked electrical rating of the detachable power-supply cord or extension cord should be at least as great as the electrical rating of the appliance,
- If the appliance is of the grounded type, the extension cord should be a grounding-type 3-wire cord, and
- The longer cord should be arranged so that it will not drape over the countertop or tabletop where it can be pulled on by children or tripped over unintentionally.
Note: If the power supply cord is damaged, it should be replaced by qualified personnel; in Latin America, by an authorized service center.
HOW TO USE
This product is for household use only.
CAUTION
THIS OVEN GETS HOT. WHEN IN USE, ALWAYS USE OVEN MITTS OR POT HOLDERS WHEN TOUCHING ANY OUTER OR INNER SURFACE OF THE OVEN.
Caution: Do not leave oven unattended when in operation. Food ignition may occur. If this happens, unplug unit but DO NOT open door. To reduce the risk of fire, keep oven interior completely clean and free of food residues, oil, grease and any other combustible materials.
Caution: A fire may occur if the toaster oven is covered or touching flammable materials including curtains, draperies, walls and the like when in operation or after, when still hot. Do not place any of the following materials in the oven, on top of the oven, or in contact with the oven sides or bottom surfaces: paper, cardboard, plastic or the like.
GETTING STARTED
- Remove all packing material and any stickers.
- Please go to www.prodprotect.com/applica to register your warranty.
- Wash all removable parts as instructed in CARE AND CLEANING.
- Select a location where this unit is to be used, allowing enough space from back of the unit and the wall to allow heat to flow without damage to cabinets and walls.
- Plug unit into electrical outlet.
IMPORTANT INFORMATION ABOUT YOUR OVEN
- This oven gets hot. When in use, always use oven mitts or potholders when touching any outer or inner surface of the oven.
- During first few minutes of use you may notice smoke and a slight odor. This is normal and should cause no concern.
- You must set the timer or select STAY ON for the oven to function.
IMPORTANT: Be sure food or baking dish does not come within 1½ inches of the top heating elements.
IMPORTANT: Food should not extend beyond the edges of the bake pan/drip tray to avoid drippings from falling onto the heating elements.
TOASTING
It is not necessary to preheat the oven for toasting.
- Set temperature selector knob to
 TOAST position.
 - Set cooking FUNCTION selector knob to TOAST.
- Open oven door and insert slide rack.
- Place items to be toasted directly on slide rack and close the door.
- Turn toast shade selector knob to 10 and then turn back to desired toast shade.
- The on indicator light comes on and remains on until toasting cycle is complete.
- When toast cycle is complete, there will be an audible signal. The oven and the on indicator light will go off.
- Open the oven door. Using oven mitts or pot holders, slide the rack out to remove the toast.
- Unplug appliance when not in use.
For best results, place the bread in the locations shown. ![]()
NOTE: You must set the toast shade selector knob as desired for the oven to begin toasting.
BAKING
NOTE: For best results, when baking or cooking, always preheat the oven for at least 10 minutes at the desired temperature setting.
- Set temperature selector knob to the desired temperature.
- Turn FUNCTION selector knob to
 BAKE.
BAKE. - Turn TIMER selector knob to 10 and then turn back or forward to desired baking time, including preheat time. (Select
 STAY ON to bake longer than 30 minutes or to control cooking time yourself.)
 - The power indicator light comes on and remains on during the entire baking time.
- The heating elements will cycle on and off to maintain even heat distribution.
- Once oven has preheated, open oven door and insert food. Close oven door.
NOTE: Use a metal, glass or ceramic baking dish placed on the slide rack - If using the oven timer, there will be an audible signal once the baking cycle is complete. The oven turns off and the light goes out. If not using the oven timer, turn the oven to
 OFF once cooking cycle is complete.
 - Open the oven door. Using oven mitts or pot holders, slide the rack out to remove the cooked food.
- Unplug appliance when not in use.
BROILING
NOTE: When broiling, preheat oven for 10 minutes.
- Set temperature selector knob to
 BROIL.
 - Turn FUNCTION selector knob to BROIL.
- Open oven door and using the bake pan as a drip tray, insert it under the slide rack and place food directly on slide rack/broil rack. Close oven door.
- Set the timer selector knob to 10 then turn back or forward to desired broiling time, including 5-minute preheat or to STAY ON.
NOTE: You can cook your food 3 ways:- Use the bake pan/drip tray placed on the slide rack.
- Place the bake pan/drip tray under the slide rack / broil rack .
- Place the food directly on the slide rack / broil tray.
- When finished broiling, the signal bell sounds. Turn the TOAST/TIMER selector to the OFF position. The power indicator light goes off.
- Using an oven mitt or pot holder, slide out broiling rack together with bake pan to remove food.
- Unplug appliance when not in use.
KEEP WARM
- Turn temperature selector knob to
 KEEP WARM.
 - Turn function selector knob to KEEP WARM .
- Turn Toast/Timerselector knob past 10 and then turn back or forward to desired warming time. (Select Stay On to control cooking time yourself.)
NOTE: This feature is designed to keep already cooked foods warm after they have been cooked. This function should be used for short periods of time; to prevent food from drying out, cover with foil. - When cycle is complete, there will be an audible signal. The oven and the power ON indicator light will go off.
- If not using the oven timer, turn the Toast/Timer selector knob to Off once cycle is complete.
- Unplug appliance when not in use.
CARE AND CLEANING
This product contains no user serviceable parts. Refer service to qualified service personnel.
CLEANING
Important: Before cleaning any part, be sure the oven is off, unplugged, and cool.
- Clean the glass door with a sponge, soft cloth or nylon pad and sudsy water. Do not use a spray glass cleaner.
- To remove the slide rack, open the door, pull the rack forward and out. Wash the slide rack in soapy water or in a dishwasher. To remove stubborn spots, use a polyester or nylon pad.
- Wash the bake pan in sudsy water. To minimize scratching, use a polyester or nylon pad.
CRUMB TRAY
- Grasp handle and pull out tray.
- Dispose of crumbs and wipe tray with a damp cloth; dry thoroughly before placing back in the oven.
EXTERIOR SURFACES
Wipe the top and exterior walls with a damp cloth or sponge. dry thoroughly.
COOKING CONTAINERS
Metal, ovenproof glass or ceramic bakeware without glass lids can be used in your oven. Follow manufacturer’s instructions. Be sure the top edge of the container is at least 1½” (3.81 cm) away from the upper heating elements.
NEED HELP?
For service, repair or any questions regarding your appliance, call the appropriate 800 number on cover of this book. Please DO NOT return the product to the place of purchase. Also, please DO NOT mail product back to manufacturer, nor bring it to a service center. You may also want to consult the website listed on the cover of this manual.
]]>![]()

www.blackanddecker.com.au
BDCH350
www.blackanddecker.co.nz
2000W Electronic Ceramic Heater
THIS PAGE IS INTENTIONALLY BLANK
General Care and Safety Guide
YOUR SAFETY IS IMPORTANT TO US. PLEASE ENSURE YOU TAKE NOTE OF THE INSTRUCTIONS AND WARNINGS OUTLINED IN THIS MANUAL.
CAUTION: In order to avoid a hazard due to inadvertent resetting of the thermal cut-out, this appliance must not be supplied through an external switching device, such as a timer, or connected to a circuit that is regularly switched on and off by the utility.
- This appliance is not intended for use by persons (including children) with reduced physical, sensory or mental capabilities or lack of experience and knowledge, unless they are supervised or have been given instruction concerning the use of the appliance by a person responsible for their safety.
- Children should be supervised to ensure that they do not play with the appliance.
- If the supply cord is damaged, it must be replaced by the manufacturer, its service agent or similarly qualified persons in order to avoid a hazard.
WARNING: You must not cover this heater. Covering this heater presents fire risk and will activate the safety fuse, permanently disabling the unit.
WARNING: Do not use this heater in small rooms when they are occupied by persons not capable of leaving the room on their own, unless constant supervision is provided.
WARNING: To reduce the risk of fire, keep textiles, curtains, or any flammable material a minimum distance of 1 metre from the air outlet.
- Use only the voltage specified on the rating label of the appliance.
- Keep all objects at least 1 metre from the front, sides and rear of the appliance.
- This appliance is intended for household use only and not for commercial or industrial use.
- Indoor use only.
- Use this appliance only as described in this manual. Any other use is not recommended by the manufacturer and may cause fire, electric shock or injury.
- Do not use the heater if it has been dropped or damaged.
- The common cause of overheating is deposits of dust or fluff in the appliance. Ensure these deposits are removed regularly by unplugging the appliance and vacuum cleaning the air vents and grills.
- Always unplug appliance when not in use.
General Care and Safety Guide
- When the appliance has been unpacked, check it for transport damage and ensure all parts have been delivered. If parts are missing or the appliance has been damaged, contact the Customer Services Team.
- Do not use if there are visible signs of damage to the heater.
- Never use the appliance to dry clothes.
- Do not connect the appliance to mains supply until completely assembled and adjusted.
- Ensure hands are dry before handling the plug or main unit.
- Ensure heater is on a flat, stable, heat-resistant surface.
- Do not operate with cord set coiled up as a heat build up is likely, which could be sufficient to become a hazard.
- Carry out regular checks of the supply cord to ensure no damage is evident
- Do not operate this appliance with a damaged cord, plug or after the appliance malfunctions or has been dropped or damaged in any manner. Return to a qualified electrical person for examination, electrical service or repair.
- Do not twist, kink or wrap the cord around the appliance, as this may cause the insulation to weaken and split. Always ensure that all cord has been removed from any cord storage area and is unrolled before use.
- It is recommended that this heater is plugged directly into the wall socket. Power boards are not rated to upply power to high wattage appliances.
- A correctly specified, undamaged extension cord may be used with this heater provided it is used in a safe manner.
- Do not remove plug from power socket until the appliance has been switched off.
- Do not remove plug from power socket by pulling cord; always grip plug.
- Do not place cord under carpet or cover with rugs or furniture. Arrange the cord so it cannot be tripped over.
- Don’t place appliance on bedding or on thick and long carpet where the openings may get blocked.
- Switch off and use handle provided when moving
- Do not place appliance close to radiant heat source.
- Do not insert or allow foreign objects to enter any ventilation or exhaust opening, as this may cause an electric shock, fire or damage to the appliance.
- Do not sit on the appliance.
- Do not use abrasive cleaning products on this appliance. Clean with a damp cloth (not wet) rinsed in hot soapy water only. Always remove plug from the mains supply before cleaning.
- Do not operate in areas where petrol, paint or other flammable liquids are used or stored.
- Do not use this appliance in the immediate surrounds of a bath, a shower, or a swimming pool or other liquids.
- The appliance must not be immersed in any liquids.
- There are no user serviceable parts installed in the unit.
- Do not use the unit in wardrobes or other enclosed spaces as this may cause fire hazards.
- This unit is not supposed to be used in or around locations where foodstuffs, works of art or delicate rticles of science, etc are stored.
- If your appliance does not work, or is not working properly, contact the place of purchase or the Customer Services Team.
The remote control supplied with this appliance uses a CR2025 coin type battery.
DANGER IF SWALLOWED
Keep batteries out of reach of children. Swallowing may lead to serious injury or death in as little as 2 hours due to internal burns.
If swallowed, go straight to a hospital emergency room.
Dispose of used batteries immediately.
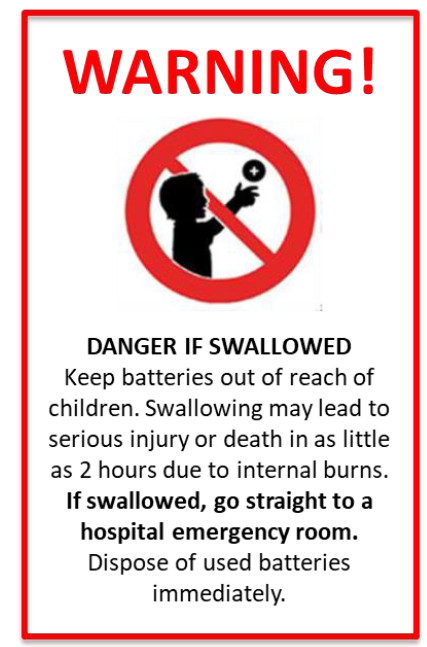
Components

Operating your Heater
Always choose a safe location for the heater, keeping in mind the safety precautions outlined. Ensure all packaging has been removed from the unit before use. Please follow the below instructions.
WARNING: In order to avoid overheating or fire, do not cover the heater.
WARNING: Keep all objects at least 1 metre from the front, sides and rear of the appliance.
WARNING: Do not use this heater with a programmer, separate timer, remotecontrol system or any other device that switches the heater on automatically, since a fire risk exists if the heater is covered or positioned incorrectly.
WARNING: Never leave this heater unattended.
Ensure heater is on a flat, stable, heat-resistant surface.
Once the heater is in a safe operating position and all switches are in the off position, insert the power plug into the mains outlet and switch on.
CAUTION: Ensure the power cord is not tight because if pulled it may partially pull the plug from the socket. A partially inserted plug will overheat the plug and
socket and could result in fire.
Note: When the appliance is turned on for the first time, it may release a slight odour or smoke. This odour or smoke is a normal occurrence caused by the initial heating of the internal heating elements and should not occur again.
Overview of Control Panel and Remote

Operating your Heater
To start using the heater switch on the master switch at the back of the heater.
HEAT SETTINGS
To change the heat setting touch the  icon. Underneath the thermostat temperature on the main display screen, dots will appear to signal what heat setting you are in. The light on the top of the unit will also change colour depending on what heat setting you are in as per the below:
1 Dot Blue Fan Only Mode
2 Dots Green Heat Setting 1
3 Dots Red Heat Setting 2
The light can be turned off using the LIGHT icon on the remote.
OSCILLATION / SWING
To make the heater oscillate, touch the icon and the heater will begin an oscillation cycle. The angle of oscillation is approximately 75°.
ELECTRONIC THERMOSTAT
The temperature around the heater will always be displayed on the front screen. To increase the
temperature touch the icon and to decrease the temperature touch the
  icon. When the room temperature reaches the preset temperature, the heating function will stop automatically. When the room temperature is lower than preset temperature, the low or high heating will turn on automatically. The thermostat range is between 16° and 37°.
TIMER
Hold on the icon for 5 seconds to change the display to the timer mode. Press theicon to increase the timers hours and touch theicon to decrease the timers hours. The timer will flash 3 times before confirming your set countdown time. The timer range is between 1 to 9 hours.
NOTES
- The heater’s fan will continue to run approximately 30 seconds after the heater is turned off. This is so the fan can cool down the ceramic heating element.
- The display screen will automatically dim approximately 100 seconds after the icons have been touched.
Operating your Heater
SAFETY DEVICES
This appliance has two protection devices:
- Tilt Switch – this will automatically turn the appliance off if the appliance is not in the correct perating position.
- Resettable Thermal Link – this will automatically disconnect the power to the appliance at a pre-set overheat temperature. After cooling down it will reset and power on again. If this occurs, investigate what is causing the appliance to overheat.
- Thermal Fuse – this disconnects the appliance permanently in case of overheating. (It is non resettable).
CAUTION: The appliance generates heat during use. Proper precautions must be taken to prevent the risk of burns, scalds, fires or other damage to persons.
CARE AND CLEANING
- The heater requires regular cleaning to ensure trouble free operation:
- Unplug the heater from the mains supply before cleaning.
- Ensure that the heater has been allowed to cool down completely before cleaning.
- The common cause of overheating is deposits of dust or fluff in the appliance. Ensure these deposits are removed regularly by unplugging the appliance and vacuum cleaning the air vents and grills.
- Use a damp cloth (not wet) to wipe the exterior of the heater to remove dust and dirt.
- Never use solutions such as petrol, thinners or polishing agents.
- Ensure the heater is dry before plugging back into the mains supply.
- Do not attempt to dismantle the appliance.
- There are no user serviceable parts. For service or repair, contact an authorised electrical service technician
PROOF OF PURCHASE
To receive warranty retain receipt as proof of purchase.
2 Year Warranty
Thank you for purchasing this Black + Decker product. Your product is warranted against faults and manufacture when used in normal domestic use for a period of two years. In non-domestic use Black + Decker limits the voluntary warranty to three months.
Black + Decker undertake to repair or replace this product at no charge if found to be defective due to a manufacturing fault during the warranty period.
This warranty excludes damage caused by misuse, neglect, shipping accident, incorrect installation, or work carried out by anyone other than a qualified electrical service technician.
PLEASE KEEP YOUR RECEIPT AS THIS WILL HELP VERIFY YOUR WARRANTY.
The benefits to you given by this warranty are in addition to other rights and remedies available to you under a law in relation to the goods or services to which this warranty relates.
In Australia, our goods come with guarantees that cannot be excluded under the Australian Consumer Law. You are entitled to a replacement or refund for a major failure and compensation for any other reasonably foreseeable loss or damage. You are also entitled to have the goods repaired or replaced if the goods fail to be of acceptable quality and the failure does not amount to a major failure.
In New Zealand this warranty is additional to the conditions and guarantees of the Consumers Guarantee Act (1993).
New Zealand
CDB
PO Box 100-707
N.S.M.C
Auckland , 0745
Phone +64 (0)9 917 4000
Phone 0800 232 633Australia
CDB Goldair Australia Pty
PO Box 574
South Morang
Victoria, 3752
Phone +61 (0)3 9365 5100
Phone 1300 465 324
Due to continual design improvements, the product illustrated in this User Manual may differ slightly from the actual product.
New Zealand
CDB Media Ltd.
PO Box 100-707
North Shore Mail Centre
Auckland, 0745
Tel. +64 (0)9 917 4000
Tel. 0800 232 633
Email [email protected]
Monday – Friday 8am-5pm
Australia
CDB Goldair Australia PTY
PO Box 574
South Morang
Victoria, 3752
Tel. +61 (0)3 9365 5100
Tel. 1300 465 324
Email [email protected]
Monday – Friday 8am-5pm
BLACK DECKER 12-cup* Programmable Coffeemaker

WELCOME!
Congratulations o n your purchase o f the Black+Decker™ 12-Cup Programmable Coffeemaker. We have developed this guide to ensure optimal product performance and your complete satisfaction. Save this use and care manual and be sure to register your appliance online at www.prodprotect.com/blackanddecker
IMPORTANT SAFEGUARDS.
When using electrical appliances, basic safety precautions should always be followed to reduce the risk of fire, electric shock, and/or injury, including the following:
- Read all instructions.
- Do not touch hot surfaces. Use handles or knobs.
- To protect against fire, electric shock and injury to persons do not immerse cord, plugs or appliance in water or other liquid.
- Close supervision is necessary when any appliance is used by or near children.
- Unplug from outlet when either the appliance or display clock is not in use, and before cleaning. Allow to cool before putting on or taking off parts, and before cleaning the appliance.
- Do not operate any appliance with a damaged cord or plug, or after the appliance malfunctions or has been damaged in any manner. Contact Consumer Support at the number listed in this manual.
- The use of accessory attachments not recommended by the appliance manufacturer may result in fire, electric shock or injury to persons.
- Do not use outdoors.
- Do not let cord hang over edge of table or counter, or touch hot surfaces.
- Do not place on or near a hot gas or electric burner, or in a heated oven.
- To disconnect, press the Start/Power button to turn the appliance off, then remove plug from wall outlet.
- Do not use this appliance for other than intended use.
- Keep lid on the carafe when in use.
- Scalding may occur if the lid is removed during the brewing cycles.
- The carafe is designed for use with this appliance. It must never be used on a range top.
- Do not set a hot carafe on a wet or cold surface.
- Do not use a cracked carafe or a carafe having a loose or weakened handle.
- Do not clean carafe with cleansers, steel wool pads or other abrasive material.
- This appliance is not intended for use by persons (including children) with reduced physical, sensory or mental capabilities, or lack of experience and knowledge, unless they have been given supervision or instruction concerning use of the appliance by a person responsible for their safety.
- Children should be supervised to ensure that they do not play with the appliance.
SAVE THESE INSTRUCTIONS.
This product is for household use only.
POLARIZED PLUG (120V models only)
This appliance has a polarized plug (one blade is wider than the other). To reduce the risk of electric shock, this plug is intended to fit into a polarized outlet only one way. If the plug does not fit fully into the outlet, reverse the plug. If it still does not fit, contact a qualified electrician. Do not attempt to modify the plug in any way.
TAMPER-RESISTANT SCREW
Warning: This appliance is equipped with a tamper-resistant screw to prevent removal of the outer cover. To reduce the risk of fire or electric shock, do not attempt to remove the outer cover. There are no user-serviceable parts inside. Repair should be done only by authorized service personnel.
ELECTRICAL CORD
- a) A short power-supply cord is provided to reduce the risks resulting from becoming entangled in or tripping over a longer cord.
- b) Extension cords are available and may be used if care is exercised in their use.
- c) If an extension cord is used:
- The marked electrical rating of the extension cord should be at least as great as the electrical rating of the appliance;
- If the appliance is of the grounded type, the extension cord should be a grounding-type 3-wire cord; and
- The cord should be arranged so that it will not drape over the counter top or tabletop where it can be pulled on by children or tripped over.
Note: If the power cord is damaged, please contact the warranty department listed in these instructions.
GETTING TO KNOW YOUR COFFEE MAKER
- Brew basket (Part # CM1231-02)
- Control panel
- Carafe with lid
(Part # CM1251W-01) white
(Part # CM1331-02) black - Lid
- Vortex showerhead
- Water reservoir
- Water level markings
- Sneak-A-Cup™ interrupt feature
- Nonstick “keep hot” carafe plate
- Built-in cord storage (not shown)
HOW TO USE
This product is for household use only.
GETTING STARTED
- Remove all packing material, any stickers, and the plastic band around the power plug.
- Go to www.prodprotect.com/blackanddecker to register your product.
- Wash removable parts as instructed in CARE AND CLEANING.
- Pour fresh cold water up to 12-cup level mark into the water reservoir.
- Place basket-style paper filter into removable filter basket. Place basket into filter basket holder. Make sure the word “Back” is towards the back of the unit.
- Plug cord into standard electrical outlet.
- Brew water through appliance without adding coffee grounds. We recommend filtered water.
- Discard water from the carafe and paper filter from filter basket.
- Turn off appliance; unplug and allow to cool down.
SETTING THE CLOCK
- Plug appliance into standard electrical outlet.
- The digital clock display flashes “12:00”. (A)
- To change the time: Press HOUR button until the correct time appears on the display. When the time passes noon the light next to the PM illuminates to let you know you are in PM time. If the PM light is not illuminated, it is AM time.
- Press the MIN button to select the minutes. The “:” will remain blinking. Pressing and holding the HOUR or MIN button will activate a rapid time advance.
Note: If the appliance is unplugged or power is interrupted even momentarily, the time may need to be reset.
BREW STRENGTH SELECTION
You may choose between regular or strongly flavored coffee to suit your personal taste. If you press the STRONG button; the light goes on and the brewing process slows to extract the maximum flavor from the coffee grounds. Regular strength is indicated by the STRONG light being off.
KEEP WARM
You may select how long you wish for the heated carafe plate to keep coffee warm after brewing. The default is 120 minutes.
- Press KEEP WARM button until your preference is shown. The button cycles through 30, 60, 90, 120 minutes or OFF.
- Coffee Maker will turn off once keep warm timer has expired.
BREWING COFFEE
- Open cover.
- Fill water reservoir with desired amount of water. The 12 Cup line represents a full carafe of coffee. Do not fill reservoir past this 12 Cup (maximum) line.
- Place an 8-12 cup basket-style paper filter into the brew basket. Make sure the tab on the brew basket fits into its slot on the right side of the opening (B) so that the lid closes.
- Add desired amount of ground coffee. Close cover.
- Make sure carafe lid is properly attached to the empty carafe. Close the lid. Note: Coffee may overflow if carafe lid is not properly placed.
- Place empty carafe on the carafe plate.
- If not already plugged in, plug power cord into an outlet.
- If regular brew strength is desired, your coffeemaker is set to brew coffee.
- If strong coffee is desired, press the STRONG button once to select the strong brew. The light next to the STRONG button illuminates.
- Press the Start/Power button , and brewing begins. The button illuminates.
- Once coffee grounds have cooled, carefully open cover and discard used grounds. Close cover.
- The coffeemaker will keep brewed coffee hot for how long is selected with the Keep Warm feature. Then the coffeemaker automatically turns off.
Note: Use spring water or filtered water. Distilled water lacks the minerals necessary to bind to elements of coffee.
Note: Filtered water will limit impurities and excessive minerals that can detrimentally impact coffee flavor and machine performance.
To turn off the coffeemaker at any time press the Start/Power button . The Start/Power button light goes off. Unplug appliance when not in use.
SNEAK-A-CUP™ FEATURE
Remove the carafe and brewing will pause. The carafe must be placed back on the carafe plate in 30 seconds to prevent overflow. Brewing will begin again.
AUTO BREW
- Make sure clock has been set to correct time of day.
- Follow steps 1 through 9 under BREWING COFFEE.
- Press the BREW LATER button.
- The digital clock will flash 12:00.
Note: If the coffeemaker has not been unplugged, the last programmed brewing time will appear on the digital display. - To change the time: press HOUR button until the desired correct time appears on the display. Press the MIN button to select the minutes.
- Delayed brewing is activated after 3 seconds with no button press. The light in the BREW LATER button will illuminate.
- To check the preset auto time, press BREW LATER button. The delayed brewing time will flash for three seconds. Then the clock time will display again.
- To change the delayed brew time, follow steps 1-5.
CARE AND CLEANING
This product contains no user serviceable parts. Refer service to qualified service personnel.
CLEANING
- Be sure the unit is unplugged and has cooled.
- Open the cover.
- To remove the filter basket, grip the handle and lift straight up. Discard the paper filter and the coffee grounds.
- Wash the filter basket, carafe and carafe lid in the top rack of the dishwasher or wash by hand with hot water and soap.
- Wipe the appliance’s exterior surface, control panel and carafe plate with a soft damp cloth. Do not use abrasive cleansers or scouring pads. Never immerse the coffeemaker in water.
- To clean the inside of the cover, open the cover and leave in the open position. Wipe surfaces with a damp cloth.
AUTO CLEAN™ SYSTEM
De-scaling With Auto Clean™
Over time, calcium deposits or “scale” may build up in your brewer. Scale is non-toxic but if left unattended can hinder brewer performance and cause premature failure. Regularly de-scaling your brewer helps to maintain quality coffee as well as the lifespan of the heating element, and other internal parts that come in contact with water throughout the brew process.
To make the de-scaling process as effortless as possible, an Auto Clean system has been programmed into your coffeemaker.
When should I use Auto Clean?
After every 60 brews, “CL” will be displayed and blink. This notifies you it is time to run the Auto Clean system. “CL” will be displayed until you run the Auto Clean system. If you would like to clean your coffeemaker prior to 60 brew cycles, you may do so by following the steps below.
Please note: If the unit is unplugged, the counter that keeps track of reminding you to clean your coffeemaker will reset to 0.
If you have unplugged the coffeemaker, or if there have been power outages, we recommend cleaning the unit once a month.
How do I use Auto Clean?
Follow the simple steps below. Your coffeemaker will take care of the rest.
- Combine 6 cups of white vinegar and 4 cups of cold water in carafe. We recommend filtered water.
- Pour into water reservoir.
- Place an 8 to 12 cup basket style paper filter in the removable filter basket. Insert filter basket into filter basket holder and close cover.
- Make sure the lid of the carafe is in place and place empty carafe on the carafe plate.
- Plug power cord into an outlet.
- Press CLEAN to activate cleaning cycle; “CL” is displayed and the Start/Power button illuminates. The word, “CLEAN” scrolls across the display.
- Part of the mixture will brew through. The remaining mixture will be held in the coffeemaker for 30 minutes before completing its brew through.
Note: The entire cleaning cycle will take 45–60 minutes to complete. - When the coffeemaker completes the AUTO CLEAN cycle, it shuts off automatically.
- Brew fresh water through appliance following instructions given in GETTING STARTED before brewing coffee again.
TROUBLESHOOTING
| PROBLEM | POSSIBLE CAUSE | SOLUTION |
| Coffeemaker does not turn on. | Coffeemaker is not plugged in. | Make sure appliance is plugged into a working outlet. |
| Coffeemaker is leaking. | Water reservoir may have been overfilled. | Make sure you don’t fill the water reservoir
beyond the 12-cup line. |
| Cover may not be correctly placed on carafe. | Make sure cover is correctly placed and tightened on carafe | |
| Carafe may not be correctly placed on the carafe plate. | Make sure carafe is placed securely onto the carafe plate. | |
| The filter basket overflows. | The carafe has been removed for longer than 30 seconds when using the Sneak-A- Cup™ feature. | Make sure to replace the carafe within 30 seconds during the brewing cycle. |
| Excessive amount of coffee is used. | Reduce the amount of coffee used. | |
| Brewing with softened water. | Always brew with cold, filtered water. | |
| Coffee sediment in brewed cup of coffee. | The paper filter and/or the filter basket are not properly placed. | Insert basket-shaped paper filter into filter basket and insert basket properly into holder. |
| The coffeemaker brews slowly. | The coffeemaker needs cleaning. | Follow the instructions in the “Auto Clean” section. More than one cleaning cycle may be required
if the coffeemaker is heavily calcified. |
If additional assistance is needed, please contact our consumer service team at 1-800-465-6070.
NEED HELP?
For service, repair or any questions regarding your appliance, please call our Customer Service Line at 1-800-465-6070. Please DO NOT return the product to the place of purchase. Also, please DO NOT mail product back to manufacturer, nor bring it to a service center. You may also want to consult the website listed on the cover of this pamphlet.
Warranty Information
(Applies only in the United States and Canada)
What does it cover?
Any defect in material or workmanship provided; however, Spectrum Brands’ liability will not exceed the purchase price of product.
For how long?
Two years from the date of original purchase with proof of such purchase.
What will we do to help you?
Provide you with a reasonably similar replacement product that is either new or factory refurbished.
How do you get service?
- Save your receipt as proof of date of sale.
- Visit the online service website at www.prodprotect.com/blackanddecker, or call toll-free 1-800-465-6070, for general warranty service.
- If you need parts or accessories, please call 1-800-738-0245.
How does state law relate to this warranty?
This warranty gives you specific legal rights. You may also have other rights that vary from state to state or province to province.
What does your warranty not cover?
- Damage from commercial use
- Damage from misuse, abuse or neglect
- Products that have been modified in any way
- Products used or serviced outside the country of purchase
- Glass parts and other accessory items that are packed with the unit
- Shipping and handling costs associated with the replacement of the unit
- Consequential or incidental damages (Please note, however, that some states do not allow the exclusion or limitation of consequential or incidental damages, so this limitation may not apply to you.)
Are there additional warranty exclusions?
This warranty shall not be valid where it is contrary to U.S. and other applicable laws, or where the warranty would be prohibited under any economic sanctions, export control laws, embargos, or other restrictive trade measures enforced by the United States or other applicable jurisdictions. This includes, without limitation, any warranty claims implicating parties from, or otherwise located in, Cuba, Iran, North Korea, Syria and the disputed Crimea region.![]()
BLACK DECKER Drill Screwdriver

Intended use
Your BLACK+DECKER drill/screwdriver has been designed for screwdriving applications and for drilling in wood, metal, plastics and soft masonry. This tool is intended for consumer use only.
Safety instructions
General power tool safety warnings
Warning! Additional safety warnings for drills and
impact drills Warning! Additional safety warnings for drills and
impact drills Warning! Read all safety warnings and all instructions. Failure to follow the warnings and instructions listed below may result in electric shock, fire and/or serious injury
Save all warnings and instructions for future reference.
The term “power tool” in all of the warnings listed below refers to your mains operated (corded) power tool or battery operated (cordless) power tool.
- Keep work area clean and well lit. Cluttered or dark areas invite accidents.
- Do not operate power tools in explosive atmospheres, such as in the presence of flammable liquids, gases or dust. Power tools create sparks which may ignite the dust or fumes.
- Keep children and bystanders away while operating a power tool. Distractions can cause you to lose control.
- Power tool plugs must match the outlet. Never modify the plug in any way. Do not use any adapter plugs with earthed (grounded) power tools. Unmodified plugs and matching outlets will reduce risk of electric shock.
- Avoid body contact with earthed or grounded surfaces such as pipes, radiators, ranges and refrigerators. There is an increased risk of electric shock if your body is earthed or grounded.
- Do not expose power tools to rain or wet conditions.
Water entering a power tool will increase the risk of electric shock. - Do not abuse the cord. Never use the cord for carrying, pulling or unplugging the power tool. Keep cord away from heat, oil, sharp edges or moving parts. Damaged or entangled cords increase the risk of electric shock.
- When operating a power tool outdoors, use an extension cord suitable for outdoor use. Use of a cord suitable for outdoor use reduces the risk of electric shock.
- If operating a power tool in a damp location is unavoidable, use a residual current device (RCD) protected supply. Use of an RCD reduces the risk of electric shock.
- Stay alert, watch what you are doing and use common sense when operating a power tool. Do not use a power tool while you are tired or under the influence of drugs, alcohol or medication. A moment of inattention while operating power tools may result in serious personal injury.
- Use personal protective equipment. Always wear eye protection. Protective equipment such as dust mask, non-skid safety shoes, hard hat, or hearing protection used for appropriate conditions will reduce personal injuries.
- Prevent unintentional starting. Ensure the switch is in the off-position before connecting to power source and/or battery pack, picking up or carrying the tool.
Carrying power tools with your finger on the switch or energising power tools that have the switch on invites accidents. - Remove any adjusting key or wrench before turning the power tool on. A wrench or a key left attached to a rotating part of the power tool may result in personal injury.
- Do not overreach. Keep proper footing and balance at all times. This enables better control of the power tool in unexpected situations.
- Dress properly. Do not wear loose clothing or jewellery. Keep your hair, clothing and gloves away from moving parts. Loose clothes, jewellery or long hair can be caught in moving parts.
- If devices are provided for the connection of dust extraction and collection facilities, ensure these are connected and properly used. Use of dust collection can reduce dust-related hazards.
- Do not force the power tool. Use the correct power tool for your application. The correct power tool will do the job better and safer at the rate for which it was designed.
- Do not use the power tool if the switch does not turn it on and off. Any power tool that cannot be controlled with the switch is dangerous and must be repaired.
- Disconnect the plug from the power source and/or the battery pack from the power tool before making any adjustments, changing accessories, or storing power tools. Such preventive safety measures reduce the risk of starting the power tool accidentally
- Store idle power tools out of the reach of children and do not allow persons unfamiliar with the power tool or these instructions to operate the power tool. Power tools are dangerous in the hands of untrained users.
- Maintain power tools. Check for misalignment or binding of moving parts, breakage of parts and any other condition that may affect the power tools operation. If damaged, have the power tool repaired before use. Many accidents are caused by poorly maintained power tools.
- Keep cutting tools sharp and clean. Properly maintained cutting tools with sharp cutting edges are less likely to bind and are easier to control.
- Use the power tool, accessories and tool bits etc. in accordance with these instructions, taking into account the working conditions and the work to be performed. Use of the power tool for operations different from those intended could result in a hazardous situation.
- Recharge only with the charger specified by the manufacturer. A charger that is suitable for one type of battery pack may create a risk of fire when used with another battery pack.
- Use power tools only with specifically designated battery packs. Use of any other battery packs may create a risk of injury and fire.
- When battery pack is not in use, keep it away from other metal objects, like paper clips, coins, keys, nails, screws, or other small metal objects, that can make a connection from one terminal to another.
Shorting the battery terminals together may cause burns or a fire. - Under abusive conditions, liquid may be ejected from the battery; avoid contact. If contact accidentally occurs, flush with water. If liquid contacts eyes, additionally seek medical help. Liquid ejected from the battery may cause irritation or burns.
- Have your power tool serviced by a qualified repair person using only identical replacement parts. This will ensure that the safety of the power tool is maintained.
Additional power tool safety warnings
 Warning! Additional safety warnings for drills and impact drills
- Wear ear protectors with impact drills. Exposure to noise can cause hearing loss.
- Use auxiliary handles supplied with the tool. Loss of control can cause personal injury.
- Hold power tool by insulated gripping surfaces when performing an operation where the cutting accessory may contact hidden wiring. Cutting accessory contacting a “live” wire may make exposed metal parts of the power tool “live” and could give the operator an electric shock.
- Hold power tool by insulated gripping surfaces when performing an operation where the fastener may contact hidden wiring. Fasteners contacting a “live” wire may make exposed metal parts of the power tool “live” and could give the operator an electric shock
- Use clamps or another practical way to secure and support the workpiece to a stable platform. Holding the work by hand or against your body leaves it unstable and may lead to loss of control.
- Before drilling into walls, floors or ceilings, check for the location of wiring and pipes.
- Avoid touching the tip of a drill bit just after drilling, as it may be hot.
- This tool is not intended for use by persons (including children) with reduced physical, sensory or mental capabilities, or lack of experience and knowledge, unless they have been given supervision or instruction concerning use of the appliance by a person responsible for their safety. Children should be supervised to ensure that they do not play with the appliance.
- The intended use is described in this instruction manual.
The use of any accessory or attachment or performance of any operation with this tool other than those recommended in this instruction manual may present a risk of personal injury and/or damage to property.
Residual risks.
Additional residual risks may arise when using the tool which may not be included in the enclosed safety warnings. These risks can arise from misuse, prolonged use etc.
Even with the application of the relevant safety regulations and the implementation of safety devices, certain residual risks can not be avoided. These include:
- Injuries caused by touching any rotating/moving parts.
- Injuries caused when changing any parts, blades or accessories.
- Injuries caused by prolonged use of a tool. When using any tool for prolonged periods ensure you take regular breaks.
- Impairment of hearing.
- Health hazards caused by breathing dust developed when using your tool (example:- working with wood, especially oak, beech and MDF.
Vibration
The declared vibration emission values stated in the technical data and the declaration of conformity have been measured in accordance with a standard test method provided by EN 60745 and may be used for comparing one tool with another. The declared vibration emission value may also be used in a preliminary assessment of exposure.
Warning! The vibration emission value during actual use of the power tool can differ from the declared value depending on the ways in which the tool is used. The vibration level may increase above the level stated.
When assessing vibration exposure to determine safety measures required by 2002/44/EC to protect persons regularly using power tools in employment, an estimation of vibration exposure should consider, the actual conditions of use and the way the tool is used, including taking account of all parts of the operating cycle such as the times when the tool is switched off and when it is running idle in addition to the trigger time.
Labels on tool
The following pictograms are shown on the tool:
 Warning! To reduce the risk of injury, the user must read the instruction manual.
Additional safety instructions for batteries and chargers
Batteries
- Never attempt to open for any reason.
- Do not expose the battery to water.
- Do not store in locations where the temperature may exceed 40 °C.
- Charge only at ambient temperatures between 10 °C and 40 °C.
- Charge only using the charger provided with the tool.
- When disposing of batteries, follow the instructions given in the section “Protecting the environment”.
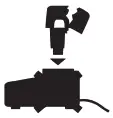 Do not attempt to charge damaged batteries.
Chargers
- Use your BLACK+DECKER charger only to charge the battery in the tool with which it was supplied. Other batteries could burst, causing personal injury and damage.
- Never attempt to charge non-rechargeable batteries.
- Have defective cords replaced immediately.
- Do not expose the charger to water.
- Do not open the charger.
- Do not probe the charger.
 The charger is intended for indoor use only.
 Read the instruction manual before use.
Electrical safety
 Your charger is double insulated; therefore no earth wire is required. Always check that the mains voltage corresponds to the voltage on the rating plate. Never attempt to replace the charger unit with a regular mains plug.
- If the supply cord is damaged, it must be replaced by the manufacturer or an authorised BLACK+DECKER Service Centre in order to avoid a hazard.
Features
This tool includes some or all of the following features.
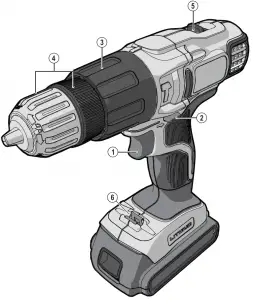
- Variable speed switch
- Forward/reverse slider
- Mode selector / torque adjustment collar
- Chuck
- Speed selector
- Bit holder
Fig. A - Battery
- Charger
- Charge indicator
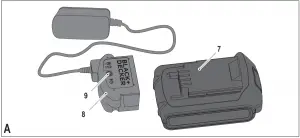
Assembly
Warning! Before assembly, remove the battery from the tool.
Fitting and removing the battery (fig. B)
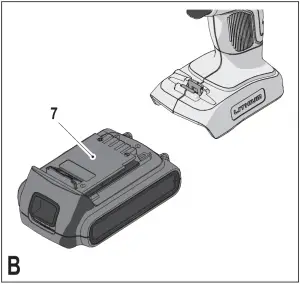
- To fit the battery (7), line it up with the receptacle on the tool. Slide the battery into the receptacle and push until the battery snaps into place.
- To remove the battery, push the release button (10) while at the same time pulling the battery out of the receptacle.
Fitting and removing a drill bit or screwdriver bit
This tool is fitted with a keyless chuck to allow for an easy exchange of bits.
- Lock the tool by setting the forward/reverse slider (2) to the centre position.
- Open the chuck (4) by turning the front part with one hand while holding the rear part with the other.
- Insert the bit shaft into the chuck and firmly tighten the chuck.
This tool is supplied with a double-ended screwdriver bit in the bit holder (6).
- To remove the screwdriver bit from the bit holder, lift the bit from the recess.
- To store the screwdriver bit, firmly push it into the holder
Use
Warning! Let the tool work at its own pace. Do not overload.
Warning! Before drilling into walls, floors or ceilings, check for the location of wiring and pipes.
Charging the battery (fig. A)
The battery needs to be charged before first use and whenever it fails to produce sufficient power on jobs that were easily done before. The battery may become warm while charging; this is normal and does not indicate a problem.
Warning! Do not charge the battery at ambient temperatures below 10 °C or above 40 °C. Recommended charging temperature: approx. 24 °C.
Note: The charger will not charge a battery if the cell temperature is below approximately 10 °C or above 40 °C. The battery should be left in the charger and the charger will begin to charge automatically when the cell temperature warms up or cools down.
- To charge the battery (7), insert it into the charger (8). The battery will only fit into the charger in one way. Do not force. Be sure that the battery is fully seated in the charger.
- Plug in the charger and switch on at the mains
The charging indicator (9) will blink.
The charge is complete when the charging indicator (9) switches to continuously on. The charger and the battery can be left connected indefinitely. The LED will switch on as the charger occasionally tops up the battery charge.
- Charge discharged batteries within 1 week. Battery life will be greatly diminished if stored in a discharged state.
Leaving the battery in the charger
The charger and battery pack can be left connected with the LED glowing indefinitely. The charger will keep the battery pack fresh and fully charged.
Selecting the direction of rotation (fig. C)
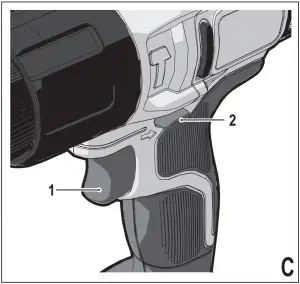
For drilling and for tightening screws, use forward (clockwise) rotation. For loosening screws or removing a jammed drill bit, use reverse (counterclockwise) rotation.
- To select forward rotation, push the forward/reverse slider (2) to the left.
- To select reverse rotation, push the forward/reverse slider to the right.
- To lock the tool, set the forward/reverse slider into the centre position.
Selecting the operating mode or torque (fig. D)
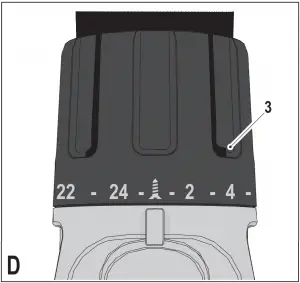
This tool is fitted with a collar to select the operating mode and to set the torque for tightening screws. Large screws and hard workpiece materials require a higher torque setting than small screws and soft workpiece materials. The collar has a wide range of settings to suit your application.
- For drilling in wood, metal and plastics, set the collar (3) to the drilling position by aligning the symbol
 with the marking.
 - For screwdriving, set the collar to the desired setting. If you do not yet know the appropriate setting, proceed as follows:
– Set the collar (3) to the lowest torque setting.
– Tighten the first screw.
– If the clutch ratchets before the desired result is achieved, increase the collar setting and continue tightening the screw. Repeat until you reach the correct setting. Use this setting for the remaining screws.
Drilling in masonry (fig. D & E)
- For drilling in masonry, set the collar (3) to the hammer drilling position by aligning the symbol
 with the marking.
 - Slide the speed selector (5) towards the front of the tool (2nd gear).
Speed selector (fig. E)
- For drilling in steel and for screwdriving applications, slide the speed selector (5) towards the rear of the tool (1st gear).
- For drilling in materials other than steel, slide the speed selector (5) towards the front of the tool (2nd gear).
Drilling/screwdriving
- Select forward or reverse rotation using the forward/ reverse slider (2).
- To switch the tool on, press the switch (1). The tool speed depends on how far you press the switch.
- To switch the tool off, release the switch.
Hints for optimum use
Drilling
- Always apply a light pressure in a straight line with the drill bit.
- Just before the drill tip breaks through the other side of the workpiece, decrease pressure on the tool.
- Use a block of wood to back up workpieces that may splinter.
- Use spade bits when drilling large diameter holes in wood.
- Use HSS drill bits when drilling in metal.
- Use masonry bits when drilling in soft masonry.
- Use a lubricant when drilling metals other than cast iron and brass.
- Make an indentation using a centre punch at the centre of the hole to be drilled in order to improve accuracy.
Screwdriving
- Always use the correct type and size of screwdriver bit.
- If screws are difficult to tighten, try applying a small amount of washing liquid or soap as a lubricant.
- Always hold the tool and screwdriver bit in a straight line with the screw.
Maintenance
Your BLACK+DECKER tool has been designed to operate over a long period of time with a minimum of maintenance.
Continuous satisfactory operation depends upon proper tool care and regular cleaning.
Your charger does not require any maintenance apart from regular cleaning.
Warning! Before performing any maintenance on the tool, remove the battery from the tool. Unplug the charger before cleaning it.
- Regularly clean the ventilation slots in your tool and charger using a soft brush or dry cloth.
- Regularly clean the motor housing using a damp cloth.
Do not use any abrasive or solvent-based cleaner. - Regularly open the chuck and tap it to remove any dust from the interior.
Protecting the environment
 Separate collection. This product must not be disposed of with normal household waste.
Should you find one day that your BLACK+DECKER product needs replacement, or if it is of no further use to you, do not dispose of it with household waste. Make this product available for separate collection.
 Separate collection of used products and packaging allows materials to be recycled and used again.
Re-use of recycled materials helps prevent environmental pollution and reduces the demand for raw materials.
Local regulations may provide for separate collection of electrical products from the household, at municipal waste sites or by the retailer when you purchase a new product.
BLACK+DECKER provides a facility for the collection and recycling of BLACK+DECKER products once they have reached the end of their working life. To take advantage of this service please return your product to any authorised repair agent who will collect them on our behalf.
You can check the location of your nearest authorised repair agent by contacting your local BLACK+DECKER office at the address indicated in this manual. Alternatively, a list of authorised BLACK+DECKER repair agents and full details of our after-sales service and contacts are available on the Internet at: www.2helpU.com
Batteries
BLACK+DECKER batteries can be recharged many times. At the end of their useful life, discard batteries with due care for our environment:
- Run the battery down completely, then remove it from the tool.
- NiCd, NiMH and Li-Ion batteries are recyclable. Take them to any authorised repair agent or a local recycling station.
Technical data
| EGBL148 (H1) | EGBL188 (H1) | ||
| Voltage | VDC | 0-450/ | 0-400/ |
| No-load speed | Min-1 | 0-1500 | 0-1350 |
| Max. torque | Nm | 14/35 | 17/38 |
| Chuck capacity | mm | 10 | 10 |
| Max Drilling capacity | |||
| Steel/wood/ masonry | mm | 10/25/10 | 10/25/10 |
| Charger | 905902** (typ. 1) | |
| Input Voltage | VAC | 100 – 240 |
| Output Voltage | VDC | 8 – 20 |
| Current | mA | 400 |
| Approx. charge time | h | 3 – 5 |
| Battery | BL1118 | BL1318 | BL1518 | |
| Voltage | V DC | 18 | 18 | 18 |
| Capacity | Ah | 1.1 | 1.3 | 1.5 |
| Type | Li-Ion | Li-Ion | Li-Ion |
| Level of sound pressure according to EN 60745: |
| Sound pressure (LpA) 87.4 dB(A), uncertainty (K) 3 dB(A) |
| Sound power (LWA) 98.4 dB(A), uncertainty (K) 3 dB(A) |
| Vibration total values (triax vector sum) according to EN 60745: |
| Impact drilling into concrete (a h, ID) 11 m/s2, uncertainty (K) 1.5 m/s2 |
| Drilling into metal (a h, D) < 2.5 m/s2, uncertainty (K) 1.5 m/s2 |
| Screwdriving without impact (a h,s) < 2.5 m/s2, uncertainty (K) 1.5 m/s |
EC declaration of conformity
MACHINERY DIRECTIVE
![]() EGBL148/EGBL188
EGBL148/EGBL188
Black & Decker declares that these products described under “technical data” are in compliance with:
2006/42/EC, EN 60745-1, EN 60745-2-1
These products also comply with Directive 2014/30/EU and 2011/65/EU. For more information, please contact Black & Decker at the following address or refer to the back of the manual.
The undersigned is responsible for compilation of the technical file and makes this declaration on behalf of Black & Decker.

R. Laverick
Engineering Manager Black & Decker Europe, 210 Bath Road, Slough, Berkshire, SL1 3YD
United Kingdom
04/09/2014
Guarantee
Black & Decker is confident of the quality of its products and offers an outstanding guarantee. This guarantee statement is in addition to and in no way prejudices your statutory rights.
The guarantee is valid within the territories of the Member States of the European Union and the European Free Trade Area.
If a Black & Decker product becomes defective due to faulty materials, workmanship or lack of conformity, within 24 months from the date of purchase, Black & Decker guarantees to replace defective parts, repair products subjected to fair wear and tear or replace such products to ensure minimum inconvenience to the customer unless:
- The product has been used for trade, professional or hire purposes;
- The product has been subjected to misuse or neglect;
- The product has sustained damage through foreign objects, substances or accidents;
- Repairs have been attempted by persons other than authorised repair agents or Black & Decker service staff
To claim on the guarantee, you will need to submit proof of purchase to the seller or an authorised repair agent. You can check the location of your nearest authorised repair agent by contacting your local Black & Decker office at the address indicated in this manual. Alternatively, a list of authorised Black & Decker repair agents and full details of our after-sales service and contacts are available on the Internet at: www.2helpU.com
Please visit our website www.blackanddecker.co.uk to register your new BLACK+DECKER product and to be kept up to date on new products and special offers. Further information on the BLACK+DECKER brand and our range of products is available at www.blackanddecker.co.uk

 EASY GARMENT STEAMER
use and care manual
HGS011 Series

Please Read and Save this Use and Care Book.
IMPORTANT SAFEGUARDS
When using electrical appliances, basic safety precautions should always be followed, including the following:
- READ ALL INSTRUCTIONS BEFORE USING.
- To reduce the risk of contact with hot water emitting from steam vents, check appliance before each use by holding it away from the body and operating the steam button.
- Use steamer only for the intended use.
- To reduce the risk of electric shock, do not immerse the steamer in water or other liquids.
- Always turn the unit off before plugging or unplugging the unit from the electrical outlet.
- Never pull on the cord to disconnect from the electrical outlet; instead grasp the plug and pull to disconnect.
- Do not allow the cord to touch hot surfaces. Let steamer cool completely before putting it away.
Loop cord loosely around the appliance when storing. - Always unplug the steamer from the electric outlet before filling with water, emptying, or cleaning, and when not in use.
- Do not operate the steamer with a damaged cord, or if the appliance has been dropped or damaged, or if it is leaking. To reduce the risk of electric shock, do not disassemble or attempt to repair the steamer; take it to a qualified service person for examination and
repair, or call the appropriate toll-free number in this manual. Incorrect reassembly or repair could cause a risk of fire, electric shock, or injury to persons when the steamer is used. - Close supervision is necessary for any appliance being used by or near children. Do not leave the steamer unattended while connected.
- Burns can occur from touching hot water or steam. The appliance should not be turned upside down – there may be hot water in the reservoir. Avoid rapid movement of the steamer to minimize hot water spillage.
- To reduce the likelihood of circuit overload, do not operate another high wattage appliance on the same circuit.
- If an extension cord is absolutely necessary, a minimum 10-ampere rated cord should be used. Cords rated for less amperage may overheat. Care should be taken to arrange the cord so that it cannot be pulled or tripped over.
- Do not use outdoors.
- Do not use anything other than water in the steamer while in use or during cleaning.
- Never steam clothing while on a body.
- Never aim the steam directly towards people, animals, or plants. The steam is very hot and can result in burns. Burns can occur from touching hot parts (including the steamer head and frames), hot water, or steam.
- This unit should be used in an upright position only. Never hold the steam head down while at rest or tilt it as this may result in hot water discharge and possibly injury.
- This appliance is not intended for use by persons (including children) with reduced physical, sensory, or mental capabilities, or lack of experience and knowledge unless they have been given supervision or instruction concerning the use of the appliances by a person responsible for their safety.
- Children should be supervised to ensure that they do not play with the appliance.
- The steamer must be used and rested on a stable surface.
SAVE THESE INSTRUCTIONS.
This product is for household use only.
POLARIZED PLUG (120V models only)
This appliance has a polarized plug (one blade is wider than the other). To reduce the risk of electric shock, this plug is intended to fit into a polarized outlet only one way. If the plug does not fit fully into the outlet, reverse the plug. If it still does not fit, contact a qualified electrician. Do not attempt to modify the plugin anyway.
Note: If the power supply cord is damaged, in order to avoid a hazard, it should be replaced by qualified personnel.
TAMPER-RESISTANT SCREW
Warning: This appliance is equipped with a tamper-resistant screw to prevent the removal of the outer cover. To reduce the risk of fire or electrical shock, do not attempt to remove the outer cover. There are no user-serviceable parts inside. Repair should be done only by authorized service personnel.
PARTS AND FEATURES

| 1. Steam head 2. Top 3. Base 4. Handle |
5. Max fill water line 6. Water tank window 7. On/Off switch 8. 8-foot cord (not shown) |
GETTING STARTED
- Remove all labels, tags, and stickers attached to the body, or cord of the steamer and the plastic band around the power plug.
- Remove and save literature.
- Please go to www.prodprotect.com/blackanddecker to register your warranty.
- Read all the instructions before using your steamer.
- Use distilled, purified, or filtered water. Tap water contains minerals that build up.
- Any water droplets are visible inside the tank are from individual quality control tests.
- Do not use perfumes, oils, or other additives.
- Always review the garment manufacturer’s care label instructions before steaming. Test fabrics for colorfastness in inconspicuous areas (such as an inseam). Do not use it on leather, suede, vinyl, or plastic.
- The steamer becomes hot during use.
HOW TO USE This unit should be used in an upright position only. Do not tilt.
 |
 |
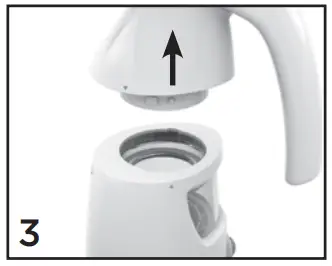 |
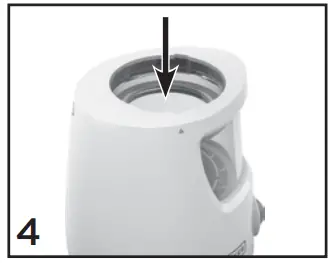 |
| To fill the water tank, hold the base firmly with one hand and the top with the other. |
Turn top counterclockwise. | Lift the top off. | Pour distilled, purified, or filtered water into the opening until the water reaches the “MAX” level. Note: Do not use oils, perfumes, or scented additives. |
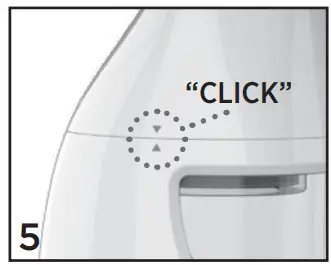 |
 |
 |
 |
| Replace and turn top clockwise until the arrows align and you feel a “click”. Dry off excess water. Plug into the power outlet. Press the ON/ OFF switch to ON. |
The steamer will take approximately 80 seconds to heat up and generate steam. Hang garment against a heat/ steam proof surface. |
Hold steamer by the handle in the upright position. Do not tilt. Hold the fabric taut while slowly moving the steamer. Keep hands away from steam. |
When done, unplug, allow to cool, empty tank, wipe all surfaces with a soft cloth, reassemble, and store upright. |
TROUBLESHOOTING
| Problem | Possible Cause | Solution |
| The steamer is plugged in but not heating. | There’s a power supply issue. | Check that the plug is properly inserted into the outlet or try plugging the steamer into a different outlet. |
| Not enough steam or no steam is coming out of the steamer. | The steamer isn’t heated up to full temperature. | Always allow the steamer to preheat for at least 80 seconds. |
| There is not enough water in the water tank. | Follow the instructions under the “filling the water tank” section and fill to Max level marker. | |
| Calcium deposits have built up. | Follow the instructions under TIPS on how “To decalcify steamer”. | |
| Discolored water is coming through the holes and staining the fabric. | Residue has built up in the water tank. | Empty the water tank after each use. Only use distilled, filtered, or purified water. |
| Perfumed or scented additives were used. | Regularly clean steamer and refrain from using perfumed or scented additives. | |
| The steamer is leaking or spitting. | The steamer is not hot enough. | Allow the steamer to heat for about 80 seconds. |
| Condensation has built up. | Gently wipe the steam head with a soft, damp cloth to remove condensation. | |
| The water tank is running low. | Follow the instructions in the “How to Use” section and fill in the Max level marker. |
TIPS
- Sensitive items (such as items with embellishments) should be steamed from the inside of the garment to avoid damage.
- Allow the clothing to cool for about 5 minutes after steaming to set the press.
- To decalcify steamer, mix 1/2 white vinegar with 1/2 water. Plug in a steamer and run half of the solution through the steamer. Unplug and let it sit for 30 min. Dump out. Repeat as needed until steam output improves. Run fresh water through steamer before using on clothes.
CLEANING AND CARE
This product contains no user-serviceable parts. Refer to qualified service personnel.
CLEANING STEAMER EXTERIOR
- Make sure steamer is unplugged and completely cool.
- Wipe the outer surface with soft, damp cloth. Water and small amounts of gentle household soaps, such as dishwashing liquid, can be used on the exterior. Never use heavy-duty cleaner, or abrasive scouring pads that may scratch or discolor the steamer.
- After the steamer has been thoroughly dried, turn it back on and lightly steam over an old cloth. This will help remove any reside left in the steam holes.
REMOVING MINERAL BUILDUP
- Make sure steamer is unplugged and completely cool.
- Mix together half a cup of vinegar with half a cup of water.
- Remove steamer head and slowly pour mixture into the opening.
- Run the steamer until half of the mixture is gone. Let rest for 30 minutes and pour out.
- Rinse water tank with water and replace steamer head.
STORING THE STEAMER
- Check that the steamer is unplugged and completely cool.
- Wrap the cord loosely around the base of the steamer.
- Always store steamer upright on its base to prevent water leakage.
Tip: Emptying the tank after each use is recommended because standing water can leave a residue over time.
NEED HELP?
For service, repair or any questions regarding your appliance, please call our Customer Service Line at 1-800-4656070.
Please DO NOT return the product to the place of purchase. Also, please DO NOT mail product back to manufacturer, nor bring it to a
service center.
You may also want to consult the website listed on the cover of this pamphlet.
Warranty Information
(Applies only in the United States and Canada)
What does it cover?
- Any defect in material or workmanship provided; however, Spectrum Brands’ liability will not exceed the purchase price of product.
For how long?
- Two years from the date of original purchase with proof of such purchase.
What will we do to help you?
- Provide you with a reasonably similar replacement product that is either new or factory refurbished.
How do you get service?
- Save your receipt as proof of date of sale.
- Visit the online service website at www.prodprotect.com/blackanddecker, or call toll-free 1-800-465-6070, for general warranty service.
- If you need parts or accessories, please call 1-800-738-0245.
How does state law relate to this warranty?
- This warranty gives you specific legal rights. You may also have other rights that vary from state to state or province to province.
What does your warranty not cover?
- Damage from commercial use
- Damage from misuse, abuse or neglect
- Products that have been modified in any way
- Products used or serviced outside the country of purchase
- Glass parts and other accessory items that are packed with the unit
- Shipping and handling costs associated with the replacement of the unit
- Consequential or incidental damages (Please note, however, that some states do not allow the exclusion or limitation of consequential or incidental damages, so this limitation may not apply to you.)
Are there additional warranty exclusions?
- This warranty shall not be valid where it is contrary to U.S. and other applicable laws, or where the warranty would be prohibited under any economic sanctions, export control laws, embargos, or other restrictive trade measures enforced by the United States or other applicable jurisdictions. This includes, without limitation, any warranty claims implicating parties from, or otherwise located in, Cuba, Iran, North Korea, Syria and the disputed Crimea region.
BLACK+DECKER and the BLACK+DECKER logos are trademarks of The Black & Decker Corporation, used under license by Spectrum Brands, Inc. for its manufacturing and sale of this product. All rights reserved.
At the end of this product’s life,
you can mail it to Spectrum Brands at
507 Stokely Drive, Deforest, WI 53532
marked “Product Takeback: Please Recycle!”
Customer Care Line: 1-800-465-6070
For online customer service:
www.prodprotect.com/blackanddecker
© 2021 Spectrum Brands, Inc., Middleton, WI 53562
All rights reserved.
Made in China.