CSA CERTIFIED TO UL STANDARD 197
Protected under U.S. Patents and International Patents and Patent Pending
6,711,992; 6,941,857; 7,412,922; 7,981,459; D625,545; D644,475
READ ALL INSTRUCTIONS
When using electrical appliances, basic safety precautions should always be followed, including but not
limited to the following:
- The maximum turkey size is 22 lbs (9.98 kgs.).
- A short cord is provided to prevent the possibility of entanglement or tripping that may occur with the use of a longer cord.
- Never move appliances when oil or water is above 100 °F(37 °C).
- Do NOT touch hot surfaces. Use lifting hook handle.
- To protect against electric shock, do NOT immerse the cord, plugs, or any part of the control panel in water or other liquids.
- Do NOT move appliances while in use or HOT.
- This is an ATTENDED appliance. Do NOT leave this appliance unattended during use. The heated liquid inside the cooking pot remains dangerously HOT for a period of time after use.
- Unplug from outlet when not in use and before cleaning. Allow cooling before removing parts for cleaning and storing.
- Do NOT operate this appliance with a damaged cord, plug, or after appliance malfunctions, or has been damaged in any manner. Contact Masterbuilt Customer Service for assistance at 1-800-215-7204.
- Accessory attachments not supplied by Masterbuilt Manufacturing, Inc. are not recommended and may cause injury.
- Do NOT use outdoors, the appliance is for indoor use only.
- Do NOT let cord hang over the edge of table or counter, or touch hot surfaces.
- Do NOT place on or near a HOT gas or electric burner, or in a heated oven.
- ALWAYS attach breakaway cord w/plug to appliance first, then plug the cord in the outlet.
- To disconnect, dial down the temperature button Fº to the OFF setting, then remove the plug from the outlet.
- Do NOT use appliances other than intended use.
- If oil begins to smoke, IMMEDIATELY turn the appliance off.
- NEVER overfill the cooking pot. Do NOT exceed the max fill line.
- Open lid with caution to prevent being burned by escaping steam.
- Add food slowly to avoid boil over.
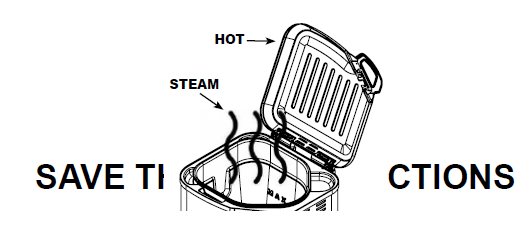
IMPORTANT INFORMATION: DO NOT USE AN EXTENSION CORD.
- Use of extension cord increases the risk of entanglement or tripping.
- Use of extension cord causes loss of energy and appliance may not heat properly.
- Do NOT operate the appliance with a damaged cord, plug, or after appliance malfunctions, or has been damaged in any manner. Contact Masterbuilt Customer Service for assistance at 1-800-215-7204.
DO NOT RETURN TO RETAILER For Assembly Assistance, Missing or Damaged Parts
Call: MASTERBUILT Customer Service at 1-800-215-7204. Please have Model Number and Serial Number available when calling. These numbers are located on silver label on back of unit.
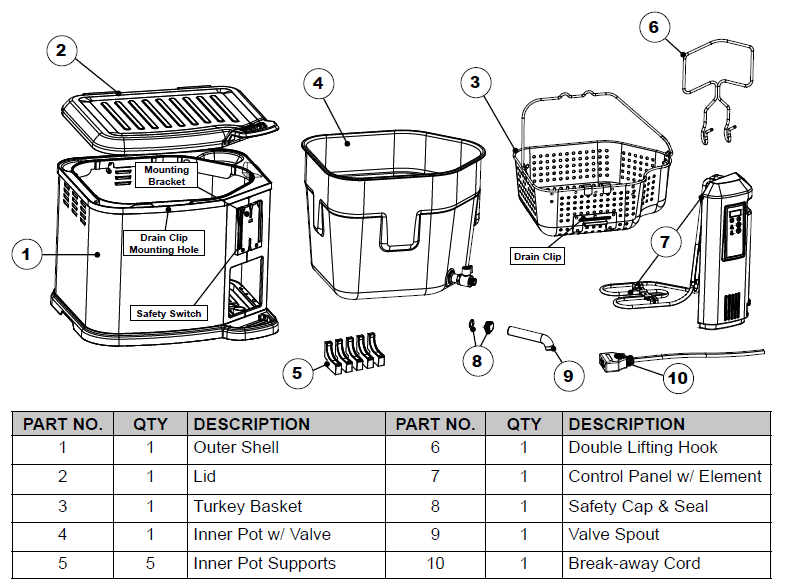
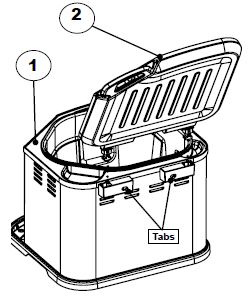
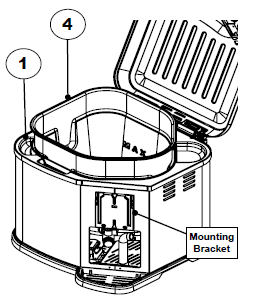
Insert hinge on lid (2) into the outer shell (1). Lid will snap into place when assembled correctly.
Note: To remove lid push tabs together on the outer shell, and pull lid up.
Insert inner pot (4) into the outer shell (1).
Insert inner pot at an angle to fit valve into the side opening of the outer shell.
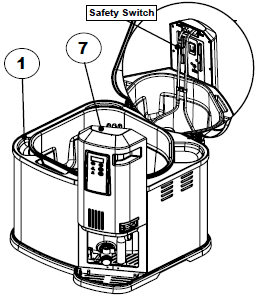
Slide control panel and element (7) down onto mounting bracket (shown in Step 2) on side of the outer shell (1).
Note: The control panel is correctly attached when the heating element is positioned inside the inner pot. The Control panel must be correctly attached for the appliance to operate. A built-in safety switch on the control panel will prevent elements from heating if not mounted properly.
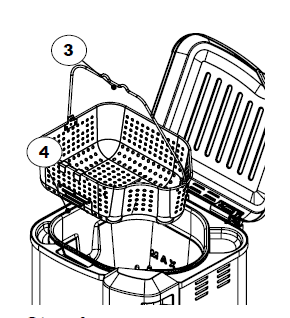
Place basket (3) inside the inner pot (4).
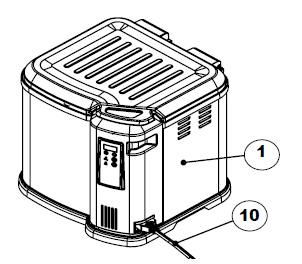
Insert breakaway cord (10) into connection on the outer shell (1). Make sure “This Side Up” is shown on top for proper connection.
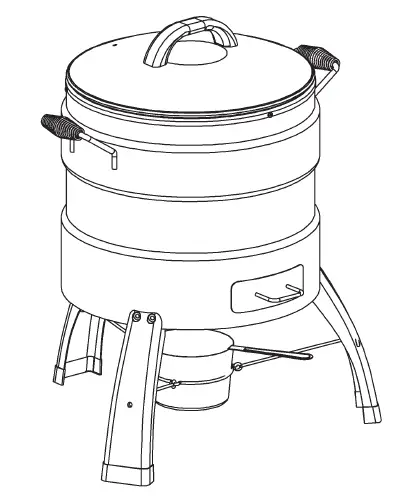
Butterball Oil Free Turkey Fryer
OIL FREE TURKEY FRYER
OPERATION MANUAL & SAFETY INSTRUCTIONS
MODEL: 20100809
THIS PRODUCT IS FOR OUTDOOR USE ONLY
Tool required for assembly: Phillips Head Screwdriver.
CARBON MONOXIDE HAZARD
- Burning wood gives off carbon monoxide which can cause death.
- DO NOT burn wood chips inside homes, vehicles, tents, garages or any enclosed areas.
- Use only outdoors where it is well ventilated.
WARNING
- This manual contains important information necessary for the proper and safe use of this unit.
- Read and follow all warnings and instructions before using smoker and during use. Keep this manual for future reference.
- Some parts may have sharp edges handle with care.
Failure to follow these warnings and instructions properly could result in personal injury or death.
WARNINGS & IMPORTANT SAFEGUARDS
READ ALL INSTRUCTIONS
When using electrical appliances, basic safety precautions should always be followed including the following:
- For outdoor use only. Do not operate in an enclosed area.
- Unit MUST be on the ground. Do not place unit on tables or counters.
- Do not plug in oil free turkey fryer until fully assembled and ready for use.
- Use only approved grounded electrical outlet.
- Do not use during an electrical storm.
- Do not expose oil free turkey fryer to rain or water at anytime.
- To protect against electrical shock do not immerse cord, plug or control panel in water or other liquid.
- Do not operate any appliance with a damaged cord or plug, or after appliance malfunctions or has been damaged in any manner. Contact Masterbuilt Customer Service for assistance at 1-800-489-1581.
- Keep a fire extinguisher accessible at all times while operating oil free turkey fryer.
- Do not let cord touch hot surfaces.
- Do not place on or near a hot gas or electric burner, or in a heated oven.
- Keep children and pets away from oil free turkey fryer at all times. Do not allow children to use oil free turkey fryer. Close supervision is necessary should children or pets be in area where oil free turkey fryer is being used.
- Fuel, such as charcoal briquettes or heat pellets, are not to be used in oil free turkey fryer.
- Never use oil free turkey fryer as a heater (READ CARBON MONOXIDE HAZARD ON COVER).
- Use oil free turkey fryer only on a level, stable surface to prevent tipping.
- Oil free turkey fryer is HOT while in use and will remain HOT for a period of time afterwards. Use caution.
- Do not touch HOT surfaces.
- Do not allow anyone to conduct activities around oil free turkey fryer during or following its use until the unit has cooled. Oil free turkey fryer is HOT during operation and remains HOT for a period of time following use.
- The use of alcohol, prescription or non-prescription drugs may impair the user’s ability to
properly assemble or safely operate oil free turkey fryer. - Avoid bumping or impacting oil free turkey fryer.
- Never move oil free turkey fryer when in use. Allow oil free turkey fryer to cool completely before moving or storing.
- Be careful when removing food from oil free turkey fryer. All surfaces are HOT and may cause burns. Use protective gloves or long, sturdy cooking tools.
- Drip cup is only for the bottom of oil free turkey fryer. Do not put drip cup on cooking rack as this may damage oil free turkey fryer.
- Wood chip tray is HOT when oil free turkey fryer is in use. Use caution when adding wood.
- To disconnect, turn control panel “OFF” then remove plug from outlet.
- Unplug from outlet when not in use and before cleaning. Allow unit to cool completely before adding/removing parts.
- Accessory attachments not supplied by Masterbuilt Manufacturing, Inc. are not recommended and may cause injury.
- Never use oil free turkey fryer for anything other than its intended purpose. This unit is not for commercial use.
- Always use oil free turkey fryer in accordance with all applicable local, state and federal fire codes.
SAVE THESE INSTRUCTIONS.
IMPORTANT INFORMATION
DO NOT USE AN EXTENSION CORD WITH THIS PRODUCT
- Use of an extension cord causes loss of energy and unit may not heat properly.
- Use of an extension cord increases risk of entanglement or tripping.
WARNING
- Combustion by-product produced when using this product contains chemicals known to the State of California to cause birth defects, other reproductive harm, or cancer.
- The materials used in this product may contain lead a chemical known to the State of California to cause birth defects and other reproductive harm.
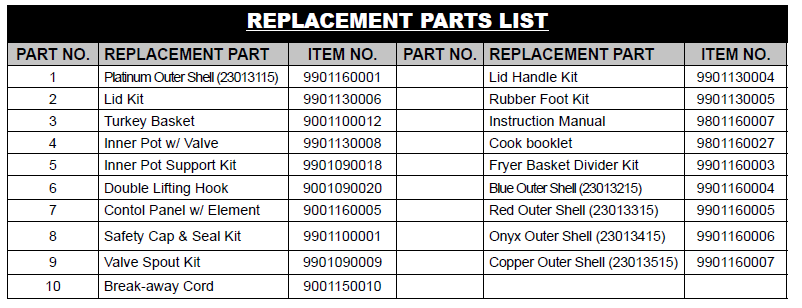
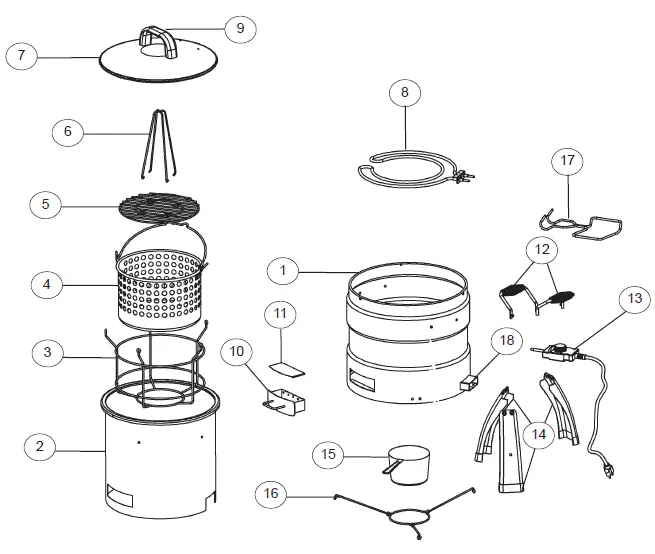
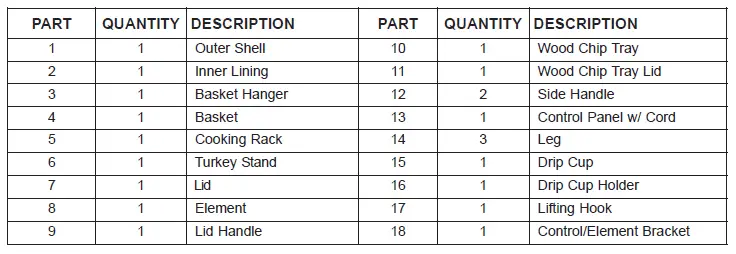
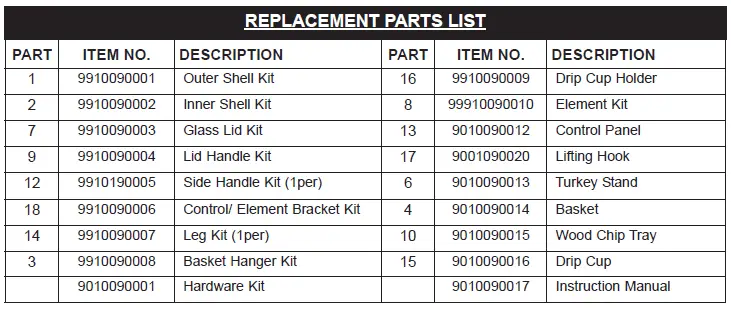
PARTS LIST
STOP!
DO NOT RETURN TO RETAILER
For Assembly Assistance, Missing or Damaged Parts
Call: MASTERBUILT Customer Service at 1-800-489-1581 or
EMAIL us at [email protected].
ASSEMBLY
Before assembly read instructions carefully. Assemble grill on a clean, flat surface. Tool needed for assembly: Phillips Head Screwdriver
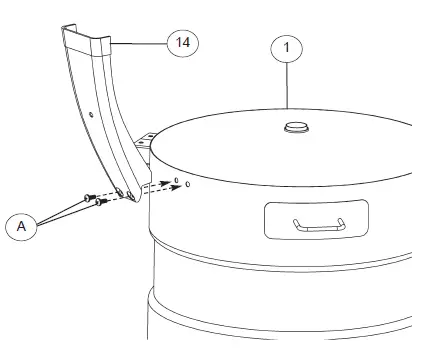
- Attach leg (14) to outer shell (1) using pan head screws (A) as shown. Repeat for remaining legs.
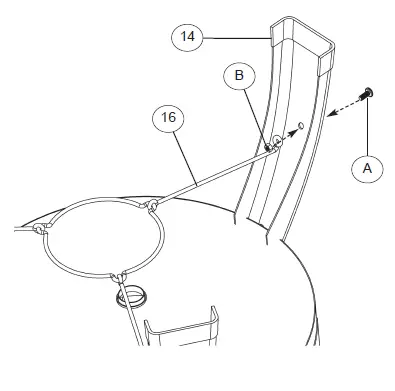
2. Attach drip cup holder (16) to leg (14) using pan head screw (A) and hex nut (B) as shown.
Repeat for remaining legs
3. Secure side handles (12) to outer shell (1) using pan head screws (A).
Repeat step on opposite side.
4. Place basket (4) into inner lining (2). Insert cooking rack (5) and turkey stand (6) into basket (4). Place lid (7) on assembled unit.
Insert wood chip tray with wood tray lid (10) into outer shell (1). Place drip cup (15) into drip cup holder (16).
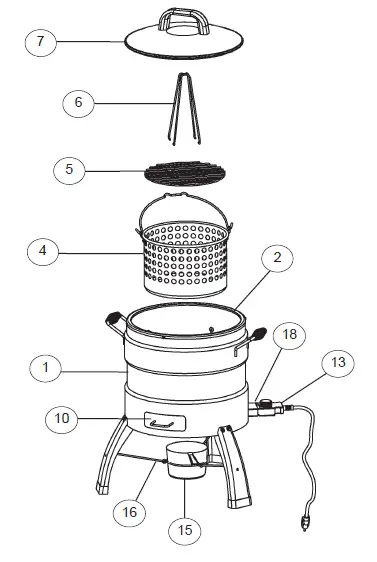
Connect control panel (13) into control element bracket (18) as shown.
UNIT IS READY FOR USE
OPERATING INSTRUCTIONS
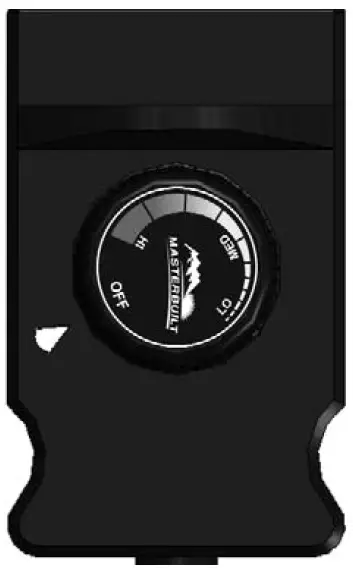
Step 1
Connect control panel into control element bracket.
Step 2
Plug power cord into an outlet (refer to “Warnings & Important Safeguards” section of manual).
Step 3
Turn control knob to desired setting. Indicator light will turn off when set temperature is reached.
Note: Never use an extension cord. This will reduce wattage, lowering the temperature of the element resulting in longer cooking time.
TURKEY PREPARATION
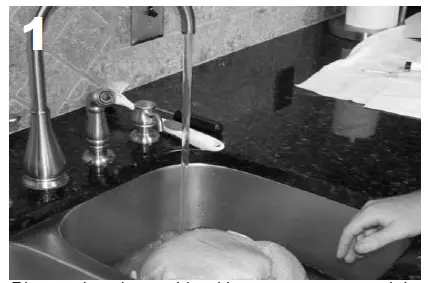
- Rinse turkey thoroughly with warm water or soak in a warm water bath for no more than 30 minutes to ensure cavities are free of ice.
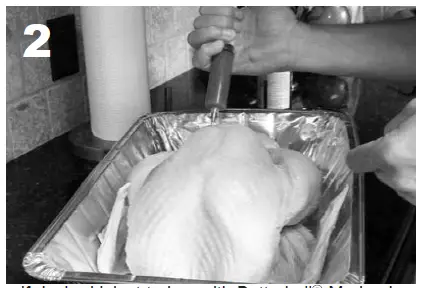
2. If desired inject turkey with Butterball Marinade (not included). Insert 4 to 8 oz into each side of turkey breast, thigh, leg, and wing (total 8 to 16 oz)
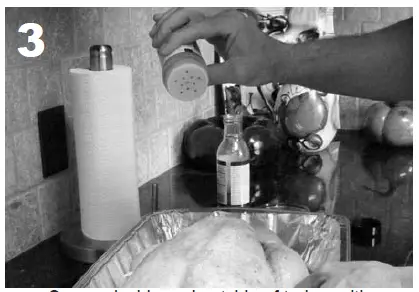
3. Season inside and outside of turkey with Butterball R Turkey Seasoning (not included).
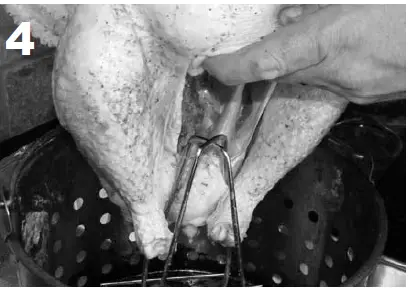
4. Center inner cavity of turkey over stand as shown. Carefully push turkey down on stand.
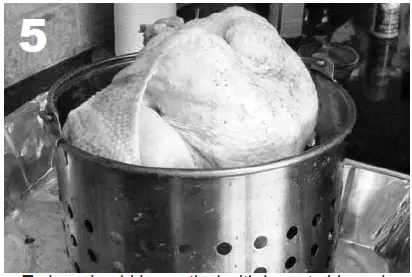
5. Turkey should be vertical with breast side up in basket.
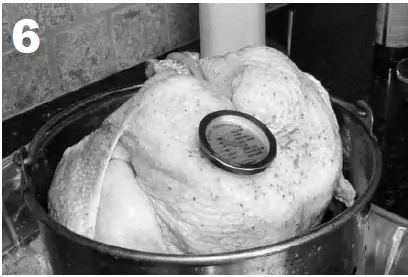
6. Insert thermometer into deepest part of turkey breast.
TO ORDER BUTTERBALL SEASONING KIT CALL 1-800-489-1581
TIPS FOR USING WOOD CHIP TRAY
- Pre-soak wood chips for at least 30 minutes.
- Before starting unit, place 1 cup of wood chips in wood chip tray.
- Never use more than 1 cup of wood chips at a time.
- Wood chips should be no higher than level with top rim of wood chip tray.
- Check wood chip tray periodically to see if wood has burned down. Add more chips as needed.
- Wood chip loader MUST be in place when using oil free turkey fryer.
- Do not leave old wood ashes in the wood chip tray. Once ashes are cold empty tray. Tray should be cleaned out prior to and after each use to prevent ash buildup.
- Should wood chips flare up, immediately close lid, wait for wood chips to burn down. Do not spray with water.
CAUTION
- Do NOT operate appliance with a damaged cord, plug, or after appliance malfunctions, or has been damaged in any manner. Contact Masterbuilt Customer Service for assistance at 1-800-489-1581.
RECIPES
1. ROASTED TURKEY
A 10-12lb (4.5-5.4kgs) turkey is recommended. However, you can roast up to an 18 lb (8.16kgs) turkey in this unit. DO NOT EXCEED 18 lbs (8.16kgs).
Frozen turkeys that are to be used should be thoroughly defrosted 35°- 40°F (1.6°- 4.4°C). The turkey may be rinsed on the outside and in the cavities with warm water to remove any possibility of remaining ice crystals and then dried thoroughly with paper towels before roasting.
THAWING TURKEY
Allow approximately 24 hours for every 4lbs (1.8kgs) of turkey thawed in the refrigerator.
COOKING INSTRUCTIONS
- Ensure that the turkey is completely thawed and free of ice. Remove neck and giblet bag. Pay special attention to inner cavity area when checking for ice or water.
- Pre-soak 1 cup wood chips for at least 30 minutes (optional for smoke flavor).
- Place 1 cup of wood chips in wood chip tray (optional for smoke flavor).
- Set control dial to HIGH.
- Prepare the turkey. Inject with Butterball Marinade, season inside and outside of the turkey with Butterball Turkey Seasoning (Seasonings not included).
- CALCULATE COOKING TIME
The formula for calculating turkey cooking time is 10 minutes per pound (0.45kg) or until a food thermometer reads a temperature of 165°F-170°F (74°C-77°C) 2 inches (5.08cm) into the deepest part of the turkey breast.
12 lbs – weight listed on tag
x 10 min
___________________
120 min Total Cooking Time - Indicator light will turn off when set temperature is reached.
- Place turkey on turkey stand vertically in basket, breast side up (see pg. 8).
- Insert thermometer into deepest part of turkey breast (see pg. 8).
- Wearing protective gloves or mitts, hook the basket handle with the lifting hook and slowly lower the basket into oil free turkey fryer.
- With basket in place, close lid.
- Set a timer.
- Be certain to cook for complete calculated time, or until internal temperature in turkey breast reaches 165°F (74°C).
- When time is up, turn the control panel to OFF and unplug from outlet. Lift the basket from the oil free turkey fryer slowly. Place on a heat-resistant surface.
- Carefully transfer turkey from basket to serving platter.
- Let turkey rest 10-15 minutes.
NOTE:
- Cooking conditions vary. Insert a food thermometer 2 inches (5.08cm) into the deepest
part of turkey breast and make sure an internal temperature of 165°F-170°F (74°C-77°C) is reached. - Butterball turkey is recommended however if you have another brand please remove the pop-up cooking indicator and leg ties.
TURKEY BREAST WITH ROASTED VEGETABLES
- 1 bone-in whole turkey breast, about 5 pounds
- 4 tbsp. (1/2 stick) unsalted butter, softened
- 1 tsp. garlic
- ½ tsp. each salt and freshly ground pepper
- 1 yellow onion
- 6 carrots
- 1 pound Brussels sprouts
- 8 red new potatoes
- ¼ cup olive oil
Peel and cut carrots into 2-inch chunks. Set controller to MED. Mix 2 tablespoons butter, garlic, salt and pepper together.
Spread mixture over the turkey breast. Place breast in basket. Roast the turkey for 1 hour. Toss the vegetables with olive oil and scatter the onion, carrots, Brussels sprouts and potatoes. Spread around turkey and sprinkle with salt and pepper.
Continue to roast for about 1 hour more until breasts are well browned and an instant-read thermometer inserted into the thickest part of the breast registers 165° F (74°C). Remove the turkey to a cutting board, cover and let rest for 20 minutes. Stir the vegetables. Continue to cook the vegetables while the turkey rests. Slice the turkey and serve on a platter with the roasted vegetables.
2. ROASTED FISH ON ROSEMARY
- 1 tablespoon olive oil
- 1 (12-ounce) boneless fish fillet, 1 inch thick
- 1/8 teaspoon salt
- 1/8 teaspoon freshly ground black pepper
- 8 sprigs fresh rosemary
- 2 teaspoons chopped fresh rosemary
- 1 lemon, thinly sliced
Preheat unit on HI setting.
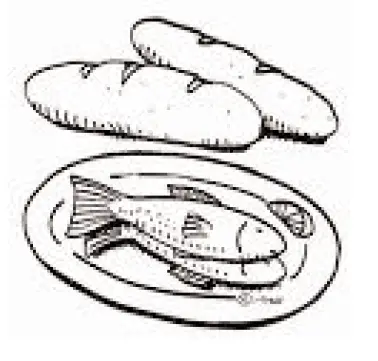
Heat oil in a medium non-stick skillet over high heat just until hot. Sprinkle fish with salt and pepper. Sear fish 1 to 2 minutes on each side. Place rosemary sprigs in bottom of basket. Place fish on top of rosemary. Sprinkle fish with chopped rosemary, and top with lemon slices. Roast on HI for 10 minutes or just until fish is opaque.
3. ROASTED PEACH SUNDAES
- 3 ripe peaches, halved and pitted
- 1 tablespoon brown sugar
- 2 teaspoons lemon juice
- 3 cups nonfat vanilla frozen yogurt
- 6 gingersnaps, crumbled
Set controller on MED-HI setting.Toss peach halves withbrown sugar and lemon juice, and place them cut-side-up in basket. Roast until the peaches are tender, 20 to 30 minutes.
Top each peach half with a 1/2-cup scoop of frozen yogurt and a sprinkle of crumbled gingersnaps (if using). Serve immediately.
4. ROASTED TOMATOES
- 4 medium size ripe tomatoes, cut in half
- 4 tablespoons extra virgin olive oil
- 2 tablespoons fresh chopped herbs (oregano, marjoram, parsley, thyme or rosemary)
- Sea salt and freshly ground pepper to taste
Set controller to MED. Drizzle the oil over tomatoes, sprinkle the herbs on top. Place tomatoes in basket, cut sides facing up. Roast for 30 – 40 minutes, or until they are very tender. Serve warm or at room temperature, seasoned with salt and pepper to taste.
5. ROASTED CHICKEN
- whole chicken 4 to 4 1/2 lb.
- Olive oil as needed
- Freshly ground pepper, to taste
- 6 to 8 bacon slices
- 2 tablespoons finely diced shallots
- 1 teaspoon all-purpose flour
- 1/2 cup white wine
- 2 tablespoons chicken demi-glace
- 1 cup chicken broth
- 1 teaspoon minced fresh thyme
- 2 tablespoons cold unsalted butter, cut into 2 pieces
Wash and blot the chickens dry with paper towels. Rub the back sides with olive oil and season on both sides with pepper. Place chicken on stand, breast side up in basket. Tuck the wings behind the breasts. Drape the bacon slices over the breasts.
Set controller on HI. Roast until an instant-read thermometer inserted into the thickest part of a thigh, away from the bone, registers 170°F (77°C), 1 to 1 1/4 hours. Transfer the chicken to a carving board, cover loosely with foil and let rest for 10 minutes.
Set a pan over medium-high heat and warm olive oil. Add the shallots and cook, stirring occasionally, until softened, about 2 minutes. Stir in the flour and cook for 30 seconds. Add the wine, stirring to scrape up the browned bits, then whisk in the demiglace and broth. Simmer until the sauce is slightly thickened, 3 to 4 minutes. Remove the pan from the heat and whisk in the thyme and butter.
Carve chicken and arrange on a warmed platter. Drizzle with sauce and store remaining sauce alongside.
6. ROASTED PORK
- 1 (2 1/2 lb.) pork tenderloin roast
- 2 teaspoons mint leaves (freeze dried)
- 2 cloves garlic
- Salt & pepper
- Italian salad dressing
Cut up garlic in small bits. Add 1 teaspoon mint and salt and pepper. Cut slits in roast and stuff with dry mixture. Coat roast with remaining mint leaves. Place roast in plastic bag and dribble about 1/4 jar of Italian seasoning. Marinate overnight. Roast on MED until internal temperature is 160°F (71°C).
WOOD FLAVOR GUIDE FOR MEATS
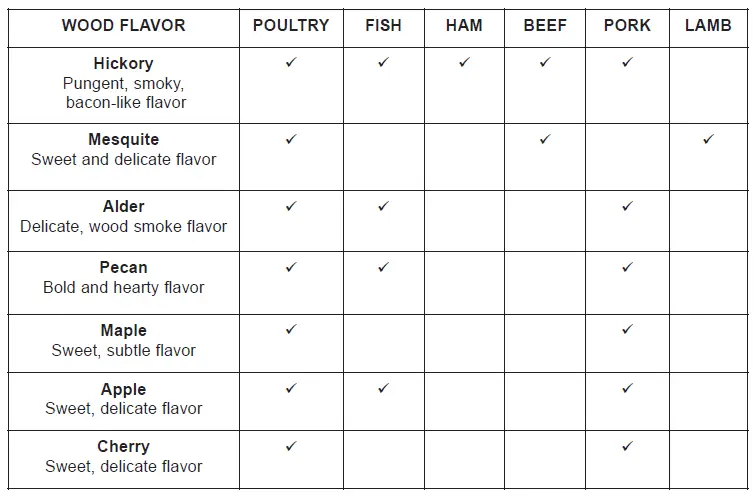
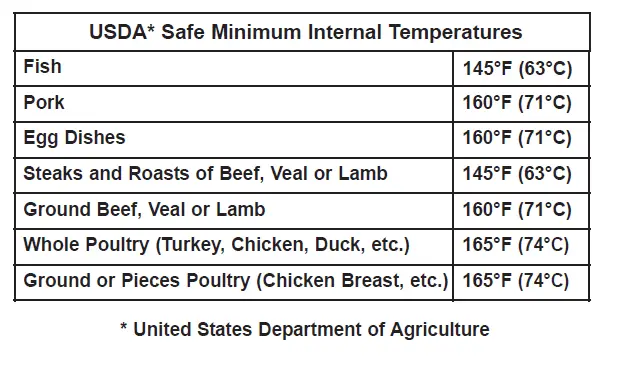
TO ENSURE THAT IT IS SAFE TO EAT, FOOD MUST BE COOKED TO THE MINIMUM INTERNAL TEMPERATURES LISTED IN THE TABLE BELOW.
STORAGE & MAINTENANCE
Masterbuilt recommends cleaning unit prior to use.
After use, turn appliance off, unplug and let cool before cleaning or storing.
Remove drip cup and rinse thoroughly using mild detergent.
Clean lid, cooking rack, turkey stand, and basket with a damp cloth or sponge using a mild detergent. Rinse and dry thoroughly. These parts may also be cleaned in a dishwasher.
Clean outer shell, inner lining cord, and control panel with a damp cloth or sponge using a mild detergent. Dry thoroughly. NEVER put these parts in a dishwasher or submerge in water.
ALWAYS MAKE SURE UNIT IS UNPLUGGED AND COOL TO THE TOUCH BEFORE CLEANING AND STORING.
TROUBLESHOOTING GUIDE
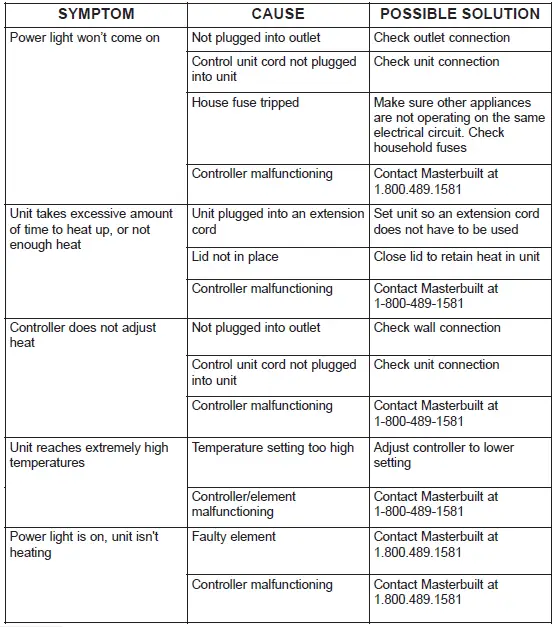
If symptom is not listed here OR in FAQ section, please contact Masterbuilt at 1-800-489-1581
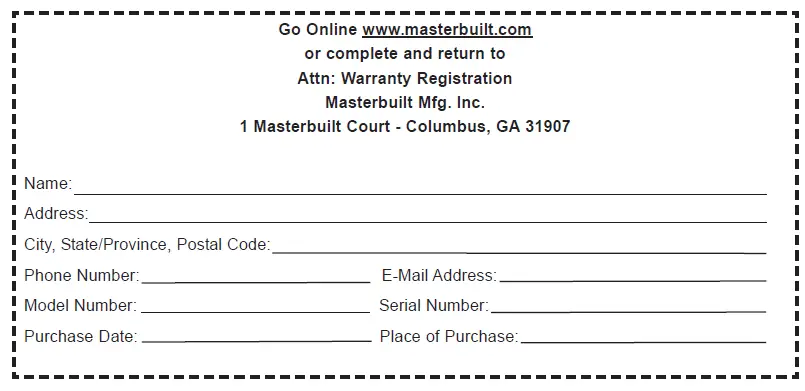
LIMITED WARRANTY INFORMATION
Masterbuilt warrants its products to be free from defects in material and workmanship under properassembly, normal use and recommended care for 90 days from the date of original retail purchase.
Masterbuilt warranty does not cover paint finish as it may burn off during normal use.
Masterbuilt warranty does not cover rust of the unit.
Masterbuilt requires reasonable proof of purchase for warranty claims and suggests that you keep your receipt. Upon the expiration of such warranty, all such liability shall terminate.
Within the stated warranty period, Masterbuilt, at its discretion, shall repair or replace defective components free of charge with owner being responsible for shipping. Should Masterbuilt require return of component(s) in question for inspection Masterbuilt will be responsible for shipping charges to return requested item. This warranty excludes property damage sustained due to misuse, abuse, accident, damage arising out of transportation, or damage incurred by commercial use of this product.
This expressed warranty is the sole warranty given by Masterbuilt and is in lieu of all other warranties, expressed or implied including implied warranty, merchantability, or fitness for a particular purpose. Neither Masterbuilt nor the retail establishment selling this product, has authority to make any warranties or to promise remedies in addition to or inconsistent with those stated above.
Masterbuilt’s maximum liability, in any event, shall not exceed the purchase price of the product paid by the original consumer/purchaser. Some states do not allow the exclusion or limitation of incidental or consequential damages. In such a case, the above limitations or exclusions may not be applicable.
California residents only: Not withstanding this limitation of warranty, the following specific restrictions apply; if service, repair, or replacement of the product is not commercially practical, the retailer selling the product or Masterbuilt will refund the purchase price paid for the product, less the amount directly attributable to use by the original buyer prior to the discovery of the nonconformity. Owner may take the product to the retail establishment selling this product in order to obtain performance under warranty.
This expressed warranty gives you specific legal rights, and you may also have other rights which vary from state to state.
Read More About this Manual…
Butterball-Oil-Free-Turkey-Fryer-Manual-Optimized
Butterball-Oil-Free-Turkey-Fryer-Manual-Original
Questions about your Manual? Post in the comments!
References
]]>