IMPORTANT RECOMMENDATIONS AND SAFETY INSTRUCTIONS
Our products are all tested and therefore represent the highest current safety standards. However, this fact does not make it unnecessary to observe the following principles strictly.
- Assembly the machine exactly as described in the installation in- structions and use only the enclosed, specific parts of the machine contained in the assembly. Before assembling, verify the completeness of the delivery against the delivery notice and the completeness of the carton against the installation and operating instructions.
- Check the firm seating off all screws, nuts and other connections before using the machine for the first time and at regular intervals (every 1-2 months) to ensure that the trainer is in a safe condition. Re- place defective components immediately and/or keep the equipment put of the use until repair
- Set up the machine in a dry, level place and protect it from mois- ture and water. Uneven parts of the floor must be compensated by suitable measures and by the provided adjustable parts of the machine if such are installed. Ensure that no contact occurs with moisture or water.
- Place a suitable base (e.g. rubber mat, wooden board etc.) be- neath the machine if the area of the machine must be specially pro- tected against indentations, dirt etc.
- Before beginning training, remove all objects within a radius of 2 metres from the machine.
- Do not use aggressive cleaning agents to clean the machine and employ only the supplied tools or suitable tools of your own to assem- ble the machine and for any necessary repairs. Remove drops of sweat from the machine immediately after finishing training
- WARNING! Systems of the heart frequency supervision can be inexact. Excessive training can lead to serious health damage or to the death. Consult a doctor before beginning a planned training pro- gramme. He can define the maximum exertion (pulse, Watts, duration of training etc.) to which you may expose yourself and can give you precise information on the correct posture during training, the targets of your training and your diet. Never train after eating large meals.
- Only train on the machine when it is in correct working order. Use original spare parts only for any necessary repairs. WARNING: Replace the worm parts immediately and keep this equipment out of use until repaired.
- When setting the adjustable parts, observe the correct position and the marked, maximum setting positions and ensure that the new- ly adjusted position is correctly secured. Please remove the tools you need to adjust after adjusting a new position.
- Unless otherwise described in the instructions, the machine must only be used for training by one person at a time. The exercise time should not overtake 45 min./daily.
- Wear training clothes and shoes which are suitable for fitness training with the machine. Your clothes must be such that they can- not catch during training due to their shape (e.g. length). Your training shoes should be appropriate for the trainer, must support your feet firmly and must have non-slip soles.
- WARNING! If you notice a feeling of dizziness, sickness, chest pain or other abnormal symptoms, stop training and consult a doctor.
- Never forget that sports machines are not toys. They must there- fore only be used according to their purpose and by suitably informed and instructed persons.
- People such as children, invalids and handicapped persons should only use the machine in the presence of another person who can give aid and advice. Take suitable measures to ensure that children never use the machine without supervision.
- Ensure that the person conducting training and other people never move or hold any parts of their body into the vicinity of moving parts.
- At the end of its life span this product is not allowed to dispose over the normal household waste, but it must be given to an assembly point for the recycling of electric and electronic components. You may find the symbol on the product, on the instructions or on the packing.
The materials are reusable in accordance with their marking. With the re-use, the material utilization or the protection of our environment. Please ask the local administration for the responsible disposal place. - To protect the environment, do not dispose of the packaging ma- terials, used batteries or parts of the machine as household waste. Put these in the appropriate collection bins or bring them to a suitable col- lection point.
- The maximum permissible load (=body weight) is specified as 120 kg. Evaluate your body weight before you starting the exercise.
- If the connecting cable of this item is damaged, this must be re- placed by the manufacturer or the customer service or with an electri- cally certified person.
- Do not leave the treadmill switched on or in operation unattended and secure unintentional use by unplugging the power plug.
- The assembly and operating instructions is part of the product. If selling or passing to another person the documentation must be pro- vided with the product.
UNPACKING AND OPERATION
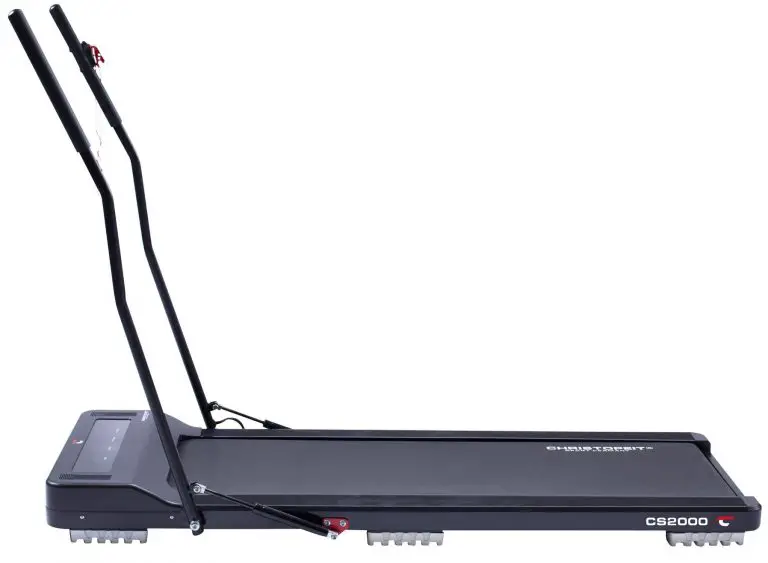
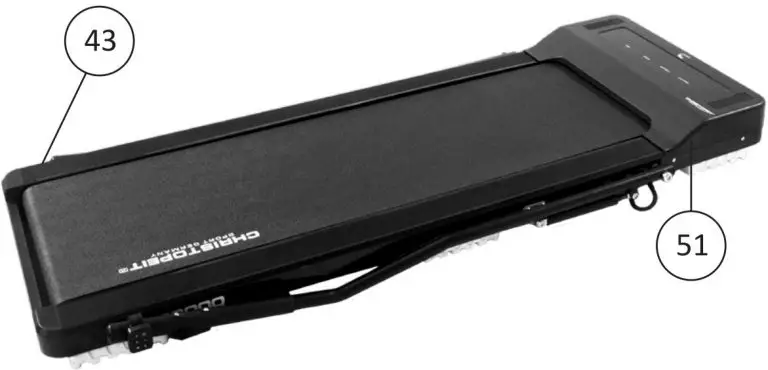
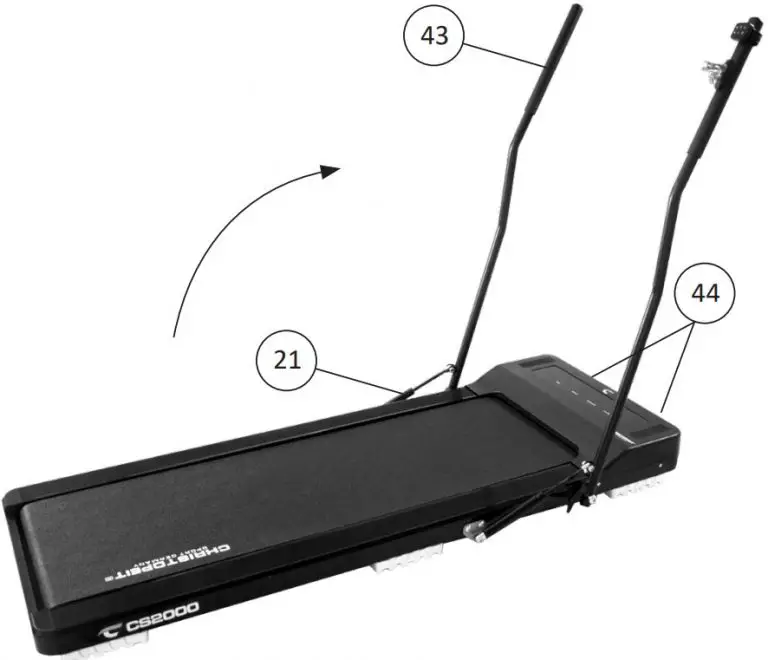
Before usage, observe our recommendations and safety instructions.
STEP 1:
Remove the treadmill
- Remove small parts, loose packing material out of the box and then take out with help of a second person the preassembled frame of packaging. Put your hands below the main frame (51) and take care of no squeezing.
STEP 2:
Unfold the handgrips
- Lift the handgrips (43) from the lying position in upright position. Hold the handgrips (43) firmly during the entire folding process, as the dampers exert corresponding force on the handgrips (43).
STEP 3:
Fold up the handgrips
- To fold the handgrips (43) back move them into lying end positi- on. Caution hold the handgrips (43) as the dampers exert force on the handgrips. Attention: We always recommend training with handgrips (43) in upright position and with safety clip so it may give help you during a dangerous situation / emergency descent and the treadmill stops.
STEP 4:
Transportation the treadmill
- Turn off the treadmill and disconnect the power cord from
treadmill. - Only lift the treadmill at the rear end until the treadmill stands on the front transport rollers (44) and it is easy to move.
Attention:
Before folding the treadmill, switch off the treadmill and wait until the surface fully stops.
STEP 5:
Checks and How to start
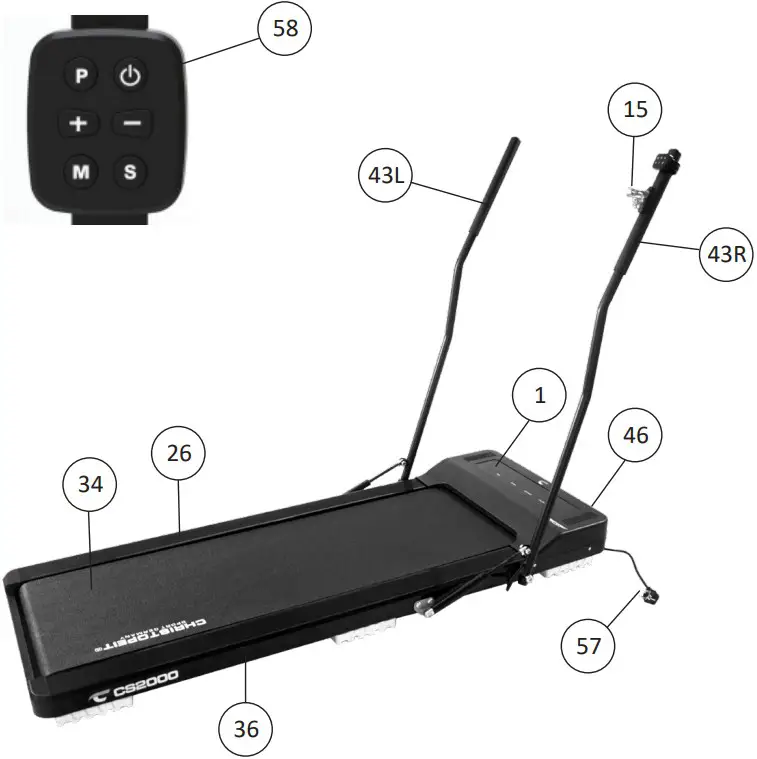
- When everything is in order, connect the power supply cable (57) with wall power (220-240V~50-60Hz) and socket on the main switch (46) below the front frame.
- Put the safety key (15) onto the right handgrip (43R) and the com- puter will show normal manual mode. Put the safety clip (15) at your exercising cloth and stand on the side rails (26+36).
- Press „ “-button and after a 3 sec. Count Down the treadmill start moving. Start walking onto the walk surface (34) when speed is slow- ly and follow the speed. Familiarize yourself with the machine at low speed settings. Run in the middle of the running surface (34) and hold balance by using handgrips (43) if you feel insecure. Don’t step on the side foot rails (26+36). Only run with look at the computer (1) on the treadmill during exercising. In emergency case, step of the treadmill la- teral and hold at handgrip (43).
Note:
Please keep the instructions in a safe place as it may be required for re- pairs or spare parts orders becoming necessary later.
MAINTENANCE AND ADJUSTING

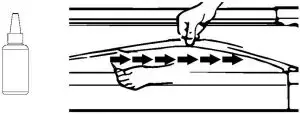
- Lubrication for the running belt: In order to keep the machine in the best condition, please add some Silicone oil between the running belt and the running board after 50 hours or 1 to 2 month of use. But the running belt may slip, if you lu- bricate too much. To lubricate the belt please pull the walking belt up and injection the silicone oil into the gap between belt and walking deck.
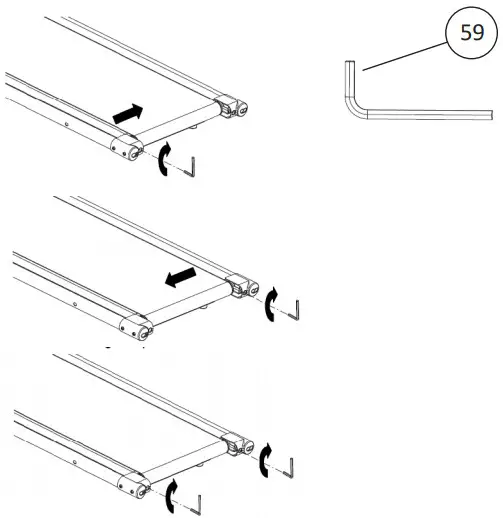
- Adjusting running belt: You need to adjust the walking belt to the normal position, per the fol- lowing steps if it is off.
- Set speed at 3-5km.
- Using the Allen key to adjust the belt tension bolt on the end cap of the system frame.
- If you want to move the belt towards left, turn the right tension bolt clockwise.
- If you want to move the belt towards right, turn the left tension bolt clockwise.
- If you have already done according to the steps above and it is stillnot at the good range, then the running belt should be damaged alrea- dy, please contact your local dealer for replacement.
Note: Make sure that the running surface is as centered as possible. Once these moves too far from the center, (about 10 mm) it should be readjusted into the center.
- Running belt slips:
- Make sure the walking belt is not too loose.
- Make sure the motor belt is not too loose.
- No light on the Display:
- Check if the power plug is properly connected.
- Check if the safety key at handgrip right is in place.
- Overload protection: The fuse compartment (B) is located between the main switch (A) and the mains connection socket (C) for the main connection. There is a mi- crofuse 5x20mm with the data 5A / 250V.
- Abnormal noise from the machine:
- Check if any screw of machine is loose.
- Check if the motor belt is off.
- Check if the running belt is off.
Note: Please contact your local dealer if you have checked all the ab- ove listed things but the problem is still there.
CLEANING, CHECKS AND STORAGE
- Cleaning
Use only a less wet cloth for cleaning. Caution: Never use benzene, thinner or other aggressive cleaning agents for surface cleaning as this dama- ge caused. The device is only for private home use and for use suitable indoors. Keep the unit clean and moisture from the device. - Storage
Plug out the power supply unit while intending the unit for more than 4 weeks not to use. Choose a dry storage in-house. Cover the product to protect it from being discolor by any sunlight and dirty through dust. - Checks
We recommend every 50 hours to review the screw connections for tightness, which were prepared in the assembly.
COMPUTER MANUAL
FUNCTION OF DISPLAYS
TIME-Display:
Shows actually time of exercising in minutes and seconds.
SPEED-Display:
Shows actually speed in km/h during exercise mode.
Shows programs P01~P06 in stop mode.
DISTANCE-Display:
Shows actually distance in KM.
CALORIES-Display:
Shows actually approx. calories in kcal.
P -key:
On the stop status, press P-key to select exercising speed programs P01-P06.
 -Start-key:
Press this key to start chosen exercise program or stop the exercise program.
“+”-key:
Press speed up key increase settings or motor speed.
“-”-key:
Press speed down key decrease settings or motor speed.
M-key:
Select key of time-, distance- or calories preset program.
S -Key:
Press S-key during exercise to interrupt the program and stops the treadmill after a 1 min count down
PROGRAM
The treadmill can only controlled with the supplied remote control. The remote control requires a button cell type CR2032. Guide the wrist- band through the two openings on the back of the remote control to carry the remote control on your wrist and to operate it. The range is ap- prox.1.5m. If the remote control does not respond, first change the battery.
MANUAL MODE
How to start manual mode:
- Put in the AC cable (57) in wall power 230V~50Hz and put on the power switch (46). Put safety clip (15) at right handgrip (43R) and it will show normal manual mode.
- Stand your feet on both side rails.
- Put the safety key at you exercise cloth and press
 -key to start with exercising. After a 3 sec. count down, the motor begin to run slowly and you can step on the running belt and follow the speed.
 - Adjust the speed with “+” and “-“ -keys into desired speed. If put off the safety clip from handrail at any time, the motor stop immediately and the display will show „- – -“. After put on the safety key on handrail the normal, manually program will show.
Setting Programs Time-Distance-Calories:
Time Program:
On the normal manual mode, press M-key, to enter time program. The time display will flash and the initial value is 30:00. Press “+”- key or “-“- key to set value. The range is: 5:00-99:00. Press  -key to start the program. If set a value the display counts up till zero and then stops running motor.
Distance-Program:
On the normal manual mode, press M-key, to enter distance program. The distance display will flash and the initial value is 1,00KM. Press “+”-key or “-“-key to set value. The range is: 0,5-65:0 KM. Press  -key to start the program. If set a value the display counts up till zero and then stops running motor.
Calories-Program:
On the normal manual mode, press M-key, to enter calories program. The calories display will flash and the initial value is 50kcal. Press “+”-key or “-“-key to
set value. The range is: 10-995kcal. Press  -key to start the program. If set a value the display counts up till zero and then stops running motor.
| Display | Preset Value | Setting Range | Display Range | |
| ZEIT (MIN:SEK) | 0:00 | 30:00 | 5:00-99:00 | 0:00-99:59 |
| KM/H | 0.0 | N/A | N/A | 1.0-8.0 |
| KM | 0.00 | 1.00 | 0.5-65.0 | 0.00-99.99 |
| KALORIEN (Kcal) | 0 | 50 | 10-995 | 0-999 |
Exercise programs P01-P06:
On the normal manual mode, press P-key to choose one of the exercise speed programs P01-P06. Each program is divided into 20 intervals of time and the speed changes as following program list shows. Initial setting time is 30min, set a time for training session and press  -key to start the program. Press speed “+” or “-“-key to adjust speed during the program if it is to quick or slow. With next intervals of time the speed level will change back to program mode. If the pro- gram runs till end of time the motor will stop running after the display counts down time to zero. Pressing
  -key to finish earlier the program.
| Time → | Programs in 20 intervals of time | ||||||||||||||||||||
| ↓ Program | 1 | 2 | 3 | 4 | 5 | 6 | 7 | 8 | 9 | 10 | 11 | 12 | 13 | 14 | 15 | 16 | 17 | 18 | 19 | 20 | |
| P01 | Km/h | 1 | 2 | 3 | 4 | 5 | 4 | 3 | 2 | 1 | 2 | 3 | 4 | 5 | 4 | 3 | 2 | 1 | 2 | 3 | 2 |
| P02 | Km/h | 2 | 2 | 3 | 3 | 4 | 4 | 5 | 5 | 6 | 6 | 5 | 5 | 4 | 4 | 3 | 3 | 2 | 2 | 3 | 3 |
| P03 | Km/h | 1 | 2 | 3 | 2 | 3 | 4 | 3 | 4 | 5 | 4 | 5 | 6 | 5 | 4 | 5 | 4 | 3 | 4 | 3 | 2 |
| P04 | Km/h | 2 | 3 | 3 | 4 | 3 | 4 | 4 | 5 | 4 | 5 | 5 | 6 | 5 | 6 | 6 | 5 | 4 | 3 | 2 | 1 |
| P05 | Km/h | 2 | 2 | 3 | 4 | 5 | 6 | 6 | 5 | 4 | 3 | 3 | 2 | 3 | 4 | 4 | 5 | 6 | 5 | 4 | 3 |
| P06 | Km/h | 1 | 2 | 3 | 3 | 3 | 4 | 5 | 6 | 6 | 6 | 5 | 4 | 3 | 2 | 2 | 2 | 3 | 4 | 3 | 2 |
Function of safety key
The safety clip (15) has an emergency function. In fear or danger or if you fall down or jumped from it, the safety clip will lose position at handgrip and stops the motor with break system. Put the safety key out from right handgrip on any status, the display is „- – -“, the buzzer beep each second. Put the safety key on at right handgrip the display will en- ter normal manual mode. All parameter reset to zero.

Dimension
- Training area in mm (for home trainer and user)

- Free area in mm (Training area and secu- rity area (rotating 60cm))

TRAINING INSTRUCTIONS
You must consider the following factors in determining the amount of training effort required in order to attain tangible physical and health benefits:
Intensity:
The level of physical exertion in training must exceed the level of nor- mal exertion without reaching the point of breathlessness and / or ex- haustion. A suitable guideline for effective training can be taken from the pulse rate.During training this should rise to the region of between 70% to 85% ofthe maximum pulse rate (see the table and formular for determination and calculation of this).
During the first weeks, the pulse rate should remain at the lower end of this region, at around 70% of the maximum pulse rate. In the course of the following weeks and months, the pulse rate should be slowly raised to the upper limit of 85% of the maximum pulse rate. The better the physical condition of the person doing the exercise, the more the level of training should been creased to remain in the region of between 70% to 85% of the maximum pulse rate. This should be done by lengthening the time for the training and/ or encreasing the level of difficulty.
If the pulse rate is not shown on the computer display or if for safety reasons you wish to check your pulse rate, which could have been dis- played wrongly due to error in use, etc., you can do the following:
- Pulse rate measurement in the conventional way (feeling the pulse at thewrist, for example, and counting the number of beats in one min- ute).
- Pulse rate measurement with a suitable specialised device (available from dealers specialising in health-related equipment).
Frequency
Most experts recommend a combination of health-conscious nutrition, whichmust be determined on the basis of your training goal, and physi- cal trainingthree times a week. A normal adult must train twice a week to maintain hiscurrent level of condition. At least three training ses- sions a week are requiredto improve one’s condition and reduce one’s weight. Of course the idealfrequency of training is five sessions a week.
Planning the training
Each training session should consist of three phases: the warm-up phase, the training phase, and the cool-down phase. The body temper- ature and oxygen intake should be raised slowly in the warm-up phase.
This can be done with gymnastic exercises lasting five to ten minutes.
Then the actual training (training phase) should begin. The training ex- ertionshould be relatively low for the first few minutes and then raised over a period of 15 to 30 minutes such that the pulse rate reaches the region of between70% to 85% of the maximum pulse rate.
In order to support the circulation after the training phase and to pre- ventaching o strained muscles later, it is necessary to follow the train- ing phase with a cool-down phase. This should be consist of stretching exercises and/ or light gymnastic exercises for a period of five to ten minutes.
Motivation
The key to a successful program is regular training. You should set a fixed time and place for each day of training and prepare yourself men- tally for the training. Only train when you are in the mood for it and al- ways have your goalin view. With continuous training you will be able to see how you are progressing day by day and are approaching your personal training goal bit by bit.
Calculation formula:
Maximum pulse rate = 220 – age (220 minus your age)
90% of the maximum pulse rate = (220 – age) x 0.9
85% of the maximum pulse rate = (220 – age) x 0.85
70% of the maximum pulse rate = (220 – age) x 0.7

WARM UP EXERCISES (WARM UP)
Start your warm up by walking on the spot for at least 3 minutes and then perform the following gymnastic exercises to the body for the training phase to prepare accordingly. The exercises do not overdo it and only as far run until a slight drag felt. This position will hold a while.

- Reach with your left hand be- hind your head to the right shoulder and pull with the right hand slightly to the left elbow. After 20sec. switch
arm. - Bend forward as far forward as possible and let your legs almost
stretched. Show it with your fingers in the direction of toe. 2 x 20sec. - Sit down with one leg stretched out on the floor and bend forward and try to reach the foot with your hands. 2 x 20sec.
- Kneel in a wide lunge forward and support yourself with your hands on the floor. Press the pelvis down. Change after 20 sec leg
After the warm-up exercises by some arms and legs shake loose.
Don’t finish the exercise phase abruptly, but will cycle leisurely something without resistance from to return to the normal pulse-zone. (Cool down) We recommend the warm-up exercises at the end of the training be conducted and to end your workout with shaking of the extremities.
PARTS LIST – SPARE PARTS LIST CS 2000
- Art.-Nr: 2030
- Technical data: Issue 28.07.2020
Walkingpad without assembly directly ready for use
- 0,6 HP Motor continuous (490 Watt), maximum 1,0 HP Motor Peak (735 Watt) • Speed from 1 km/h – 8 km/h (adjustable in 0,1 km/h steps)
- Manually program with targets of Time, Distance and Calories
- 6 installed programs with different speed
- Watch remote controller for easy handling
- 6 professional bumpers for vibration absorbing running surface
- 2 Walking Sticks for additional workout of upper body and arms
- Safety pin for emergency stop
- LED Display showing: Time, Speed, Distance and
approx. Calories consumption - Transport rollers for an easy and comfortable moving to location
- Walking surface approx. L 120 x W 40 cm
- Electrical data: 220-240V/50-60Hz /490 Watt
- Load max. 120 kg (Body weight)
This treadmill is created only for private Home sports activity and not allowed to us in a commercial or professional area. Home Sport use class H/C
Please contact us if any components are defective or missing, or if you need any spare parts or replacements in future:
Internet service- and spare parts data base: www.christopeit-service.de
Top-Sports Gilles GmbH
Friedrichstraße 55
42551 Velbert
Telefon: +49 (0)20 51 / 60 67-0
Telefax: +49 (0)20 51 / 60 67-44
e-mail: [email protected]
www.christopeit-sport.com
- Space requirement approx. [cm]: L 150 x W 66 x H 115
- Space requirement foldable approx. [cm]: L 150 x W 66 x H 115
- Exercise space: approx. [m²]: 4
- Items weight [kg]: 28
| Illustr. No. | Designation | Dimension mm | Quantity | Attached to Illustration No. | ET-Number |
| 1 | Display board | 1 | 3 | 36-2025-03-BT | |
| 2 | Overlay | 1 | 3 | 36-2025-14-BT | |
| 3 | Motor cover | 1 | 51 | 36-2025-01-BT | |
| 4 | Electric controller | 1 | 51 | 36-2025-05-BT | |
| 5 | Coil | 1 | 51 | 36-2025-06-BT | |
| 6 | Plastic sleeve | 8x16x8mm | 2 | 11 | 36-2025-07-BT |
| 7 | Nylon nut | M8 | 3 | 16+53 | 39-9818-CR |
| 8 | Motor | 1 | 51 | 33-2025-04-SI | |
| 9 | Motor belt | 122J/EPJ310 | 1 | 8+11 | 36-2025-11-BT |
| 10 | Driving belt | 185J | 1 | 11+47 | 36-2025-12-BT |
| 11 | Driving wheel | 1 | 53 | 36-2025-13-BT | |
| 12 | Cross head countersunk screw | M6x16 | 1 | 47 | 36-9841205-BT |
| 13L | Handgrip foam left | 1 | 43L | 36-2030-01-BT | |
| 13R | Handgrip foam right | 1 | 43R | 36-2030-02-BT | |
| 14 | Safety Key bracket | 1 | 43R | 36-2030-04-BT | |
| 15 | Safety key | 1 | 14 | 36-2030-05-BT | |
| 16 | Safety key cable | 1 | 4+14 | 36-2030-06-BT | |
| 17 | Hex bolt | M8x25 | 2 | 21+58 | 39-10455 |
| 18 | Hex bolt | M10x55 | 2 | 51+58 | 39-9976-SW |
| 19 | Bearing | AXK1226+2AS | 2 | 21 | 36-2025-15-BT |
| 20 | Round plug | 25 | 4 | 43 | 36-2030-07-BT |
| 21 | Gas spring | 2 | 25+43 | 36-2025-18-BT | |
| 22 | Hex bolt | M8x25 | 2 | 21+25 | 39-9809-SW |
| 23 | Hex bolt | M8x12 | 4 | 25+51 | 39-9922 |
| 24 | Nylon washer | 8//20 | 2 | 22 | 36-1660-16-BT |
| 25 | Triangle metal plate | 2 | 51 | 36-2025-19-B T | |
| 26 | Side rail left | 1 | 51 | 36-2030-08-BT | |
| 27 | Reinforced tube | 15x30x506mm | 2 | 51 | 33-2025-03-SW |
| 28 | EVA pad adhesive | 490x30mm | 2 | 27 | 36-1830-18-BT |
| 29 | EVA bumper | 28x28mm | 4 | 51 | 36-1830-19-BT |
| 30 | Rear roller | 1 | 51 | 33-2025-05-SW | |
| 31 | Washer | 8//16 | 3 | 32 | 39-9862-CR |
| 32 | Hex bolt | M8x55 | 3 | 30+47 | 39-10056 |
| 33 | End cover | 1 | 51 | 36-2025-21-BT | |
| 34 | Running belt | 1 | 30+47 | 36-2025-22-BT | |
| 35 | Foot bumper | 6 | 51 | 36-2025-23-BT | |
| 36 | Side rail right | 1 | 51 | 36-2030-09-BT | |
| 37 | Running board | 1 | 51 | 36-2025-25-BT | |
| 38 | Nylon nut | M6 | 10 | 40, 42+45 | 39-9816-VC |
| 39 | Fastener ring | 8 | 37 | 36-2025-16-BT | |
| 40 | Hex bolt | M6x25 | 4 | 37+51 | 39-10029 |
| 41 | Cross head tapping screw | 5×14 | 8 | 37 | 39-10188 |
| 42 | Hex bolt | M6x35 | 4 | 37+51 | 39-9979-VC |
| 43L | Handgrip left | 1 | 51 | 33-2030-02-SW | |
| 43R | Handgrip right | 1 | 51 | 33-2030-03-SW | |
| 44 | Transportation wheel | 2 | 45 | 36-2025-26-BT | |
| 45 | Hex bolt | M6x40 | 2 | 44+51 | 39-9979-SW |
| 46 | AC socket with switch | 1 | 51 | 36-1970-09-BT | |
| 47 | Front roller | 1 | 51 | 33-2025-06-SW | |
| 48 | Cross head tapping screw | 4×16 | 6 | 52 | 36-9206104-BT |
| 49 | Spring nut | 4.2 | 6 | 3 | 36-2025-27-BT |
| 50 | Hex bolt | M6x10 | 3 | 8 | 36-9329714-BT |
| 51 | Main frame | 1 | 33-2030-01-SW | ||
| 52 | Bottom cover | 1 | 51 | 36-2025-02-BT | |
| 53 | Hex bolt | M8x50 | 1 | 11 | 39-10016 |
| 54 | Hex bolt | M6x35 | 12 | 35 | 39-10085 |
| 55 | Corrugated protection pipe | 1 | 16+43 | 36-2025-28-BT | |
| 56 | Cross head countersunk screw | M6x16 | 2 | 33 | 39-10120-VC |
| 57 | AC cable | 1 | 46 | 36-9836113-BT | |
| 58 | Watch Controller | 1 | 36-2025-04-BT | ||
| 59 | Allen tool | 6mm | 1 | 36-9116-14-BT | |
| 60 | Assembly and exercise instruction | 1 | 36-2030-10-BT |
