comfee CRS5010BS Programmable Digital 5L Rice Cooker Instruction Manual

IMPORTANT NOTE: Please read the instructions carefully before use the machine. Please properly retention of the instructions for your future reference.
Read This Manual
Welcome
Inside you’ll find many helpful hints on how to use and maintain your Rice Cooker properly. Just a little preventive care on your part can save you a great deal of time and money over the life of your appliance.
These instructions may not cover every possible condition of use, so attention to safety details is required when operating and maintaining this product.
![]() CAUTION
CAUTION
- This appliance is not intended for use by people (including children) with reduced physical, sensory, or mental capabilities or or lack of experience and knowledge, unless they have been provided with supervision or instruction concerning use of the appliance by a person responsible for their safety. Children should be supervised to ensure that they do not play with the appliance.
- The appliance shall be installed in accordance with national wiring regulations.
Welcome
You are about to see how quick, easy, and delicious heathy eating can be!
Please read all the safety information, warnings, and instructional material found in this booklet before getting started. Set your rice cooker on a dry, level suface. Then, follow the cleaning instructions to prepare your appliance for use. Always clean your appliance before the first use.
IMPORTANT SAFEGUARDS
To prevent injury to the user or other people and property damage, the instructions shown here must be followed. Incorrect operation due to ignoring of instrcutions may cause harm or damage. The level of risk is shown by the following indications.
![]() WARNING
WARNING
- Read all instructions carefully before first use .
- Do not touch hot surfaces. Use the handles or knobs .
To prevent injury to the user or other people and property damage, the instructions shown here must be followed. Incorrect operation due to ignoring of instrcutions may cause harm or damage. The level of risk is shown by the following indications. - Use only on a level, dry and heat-resistant surfaces.
- To protect against fire, electric shock and injury to persons, do not immerst cord, plug or the appliance in water or any other liquid. See instructions for cleaning.
- Close supervision is necessary when the appliance is used by or near children.
- Unplug from oulet when not in use and before cleaning. Allow unit to cool before putting on or taking off parts and before cleaning the appliance.
- Do not operate any appliance with a damaged cord or plug or after the appliance malfunctions or has been damaged in any manner. Contact COMFEE customer service for examination, repair or adjustment.
- The use of accessory attachments not recommended by Comfee housewares may result in fire, electrical shock or injury.
- Do not use outdoors.
- Do not let cord touch hot surfaces or hang over the edge of a counter or table.
- Do not place on or near a hot gas or electric burner or in a heated oven.
- Do not use the appliance for other than its intended use.
- Extreme caution must be used when moving the appliance containing rice, hot oil or other liquids.
- Do not touch, cover or obstruct the steam vent on the top of the rice cooker as it is extremely hot and may cause scalding.
- Use only with a 120V AC power outlet.
- Always unplug from the base of the wall outlet. Never pull on the cord.
- The rice cooker should be operated on a seperate electrical circuit from other operating appliances. if the electrical circuit is overloaded with other appliances, the appliance may not operate properly.
- Always make sure the outside of the inner cooking pot is dry prior to use. If the inner pot is returned to the cooker when wet, it may damage or cause the product to malfunction.
- Use extreme caution when opening the lid during or after cooking. Hot steam will escape and may cause scalding.
- Rice should not be left in the inner cooking pot with the Keep Warm function on for more than 12 hours.
- To prevent damage or deformation, do not use the inner cooking pot on a stovetop or burner.
- To disconnect, remove the plug form the wall outlet.
- Do not use the lid handle to move the cooker when any food is in it.
- CAUTION: This appliance is not intended for deep frying foods.
- CAUTION: To reduce the risk of electrical shock, cook only in the removable inner cooking pot provided.
- Intended for countertop use only.
- WARNING: Spilled food can cause serious burns. Keep appliance and cord away from children. Never drape cord over edge of counter, never use outlet below counter, and never use with an extention cord.
NOTICE
The failure to follow any of the important safeguards and the important instructions for safe use is a misuse of your rice cooker that can avoid your warranty and create the risk of serious injury.
SAVE THESE INSTRUCTIONS
RECYCLING ![]()
The appliance must not be disposed of with household waste, but taken to an authorized waste separation and recycling center.
Short Cord Instructions
- A short power-supply cord is provided to reduce the risks esulting from becoming entangled in or tripping over a longer cord.

Polarized Plug
This appliance has a polarized plug (one blade is wider than the other); follow the instructions below:
To reduce the risk of electric shock, this plug is intended to fit into a polarized outlet only one way. If the plug does not fit fully into the outlet, reverse the plug. If it still does not fit, contact a qualified electrician. Do not attempt to modify the plug in any way.
If the supply cord is damaged, it must be replaced by the manufacturer, its service agent or a similarly qualified person in order to avoid a hazard.
THIS APPLIANCE IS FOR HOUSEHOLD USE ONLY.
PARTS AND FEATURES

Inner Cooking Pot

Steam Tray

Measuring Cup

Serving Spatula

Functions Review
 Keep Warm
Under the standby mode, ”Keep Warm” button to start the temperature preservation program. Under the “White Rice”, “Brown Rice”, “Saute”, “Oatmeal”, “Quinoa”, “Soup/Stew” and “Steam” mode, Keep Warm mode begins automatically at the end of each cooking program.
 Delay Start
The Delay Start button allows rice to be ready when needed. Come home to delicious rice ready to eat!
 White Rice
Press the White Rice button. The White Rice light illuminates and remains lit during the cooking process. When cooking is completed, the rice cooker automatically enters Keep Warm mode.
 Brown Rice
This button is ideal for cooking brown rice and other tough-to-cook whole grains to perfection
 Oatmeal
Makes a quick and healthy breakfast with no need to stir.
 Quinoa
Makes fiber and protein-filled grains for a nutritious meal.
 Soup/Stew
This button sets for 2-12 hours for perfectly cooked soups and stews.
 Steam
Steam
The “Steam” button is perfect for healthy sides and main courses.
Press the Steam button. The Steam light illuminates and the digital display shows the suggested cooking time.
 Saute Saute
Saute foods at high temperature, perfect for stir fry, browning foods and much more.
![]() Cancel
Cancel
Cancel the working function at anytime back to standy mode.
 “ - ”
“ - ”
This button is used to decrease the Delay Start, and the cooking time of the “Steam” and “Soup/Stew” function.
 “ + ”
“ + ”
This button is used to increase the Delay Start, and the cooking time of the “Steam” and “Soup/Stew” function.
Operating Instructions
Before first use
- Read all instructions and important safeguards.
- Remove all packaging materials and check that all items have been received in good condition.
- Keep plastic bags away from children as they can pose a risk to children. Dispose of properly.
- Wash steam vent and all other accessories in warm, soapy water. Rinse and dry thoroughly.
- Wipe body clean with a damp cloth.
Standby Mode
After turning-on, the rice cooker will be in a standby mode, “—-” icon will appear on the digital screen.
Delay Mode
The Delay Timer delays the start of cooking programs. The start of the cooking process can be delayed for 1 to 15 hours for White Rice and Oatmeal, and 2 to 15 hours for Brown Rice.
IMPORTANT
- To maintain the quality of the rice, it is recommended that you not set the delay timer for longer than 12 hours.
- Place the ingredients in the cooking pot, place the pot in the rice cooker and close the lid.
- Select the desired cooking program, this function is valid only for White Rice, Brown Rice and Oatmeal.
- Press the Delay Start button. The Delay Start display will illuminate and three digits will flash.
- Press the + and – buttons to set the desired number of hours.
- Defaultly, the function will automatically enter the Keep Warm mode once cooking is finished. If you don‘t need to enter the keep warm mode, press the ’Keep Warm’ button, and the ’Keep Warm’ light will go off.
- After 6 seconds, the countdown timer will start and the cooking process will finish when the delay is finished.
- Once cooking is finished, the cooker will beep and automatically switch to keep warm if the“Keep Warm” light is on.
- For better results, stir the rice with the serving spatula to distribute any remaining moisture.
White Rice
Cooking Time: Approximately 60 minutes
- Press the White Rice button. The White Rice light illuminates.
- Defaultly, the function will automatically enter the Keep Warm mode once cooking is finished. If you don‘t need to enter the keep warm mode, press the ‘Keep Warm’ button, and the ‘Keep Warm’ light will go off.
- After 6 seconds, the Digital Display shows scrolling led lights.
- The White Rice light remains lit during the cooking process.
- When cooking is completed, the rice cooker will beep and automatically switch to keep warm if the ‘Keep Warm’ light is on.
- The cooking will countdown the final 12 minutes of cook time.
- For better results, stir the white rice with the serving spatula to distribute any remaining moisture.
Brown Rice
Cooking Time: Approximately 70 minutes
- Press the Brown Rice button. The Brown Rice light illuminates.
- Defaultly, the function will automatically enter the Keep Warm mode once cooking is finished. If you don‘t need to enter the keep warm mode, press the ‘Keep Warm’ button, and the ‘Keep Warm’ light will go off.
- After 6 seconds, the Digital Display shows scrolling led lights.
- The Brown Rice light remains lit during the cooking process.
- When cooking is completed, the rice cooker will beep and automatically switch to keep warm if the ‘Keep Warm’ light is on.
- The cooking will countdown the final 10 minutes of cook time.
- Press the lid release button to open the lid, and then stir well before serving.
Oatmeal
Cooking Time: Approximately 50 minutes
- Press the Oatmeal button. The Oatmeal light illuminates.
- Defaultly, the function will automatically enter the Keep Warm mode once cooking is finished. If you don’t need to enter the keep warm mode, press the ‘Keep Warm’ button, and the ‘Keep Warm’ light will go off.
- After 6 seconds. The countdown timer begins.
- The Oatmeal light remains lit during the cooking process.
- Using caution: To avoid escaping steam, open the lid and stir occasionally with a long-handled wooden spoon.
- When cooking is completed, the cooker will automatically switch to keep warm if the ‘Keep Warm’ light is on.
Quinoa
- Using the provided measuring cup, add quinoa to the inner pot.
- Rinse and Drain rice to remove excess starch.
- Fill with water to the line which matches the number of cups of quinoa being cooked.
- Place the inner pot into the cooker.
- Close the lid securely.
- Plug the power cord into an available 120V AC wall outlet.
- Press Quinoa, press ‘Keep Warm’, if don’t need temperature preservation once cooking is finished.
- After 6 seconds, the cooker will now begin cooking.
- The cooking indicator light will illuminate and the Digital Display shows scrolling led light.
- The cooking will countdown the final 12 minutes of cook time.
- Once cooking is finished, the cooker will beep and automatically switch to keep warm mode.
- For better results, stir the quinoa with the serving spatula to distribute any remaining moisture.
Saute
- Place the inner pot into the cooker.
- Add a thin layer of oil to the inner pot and close the lid securely.
- Plug the power cord into an available 120V AC wall outlet.
- Press the Saute button, then press the “Keep Warm” if don’t need temperature preservation once cooking is finished, then wait 6 seconds the cooking indicator light will illuminate and the display begins a chasing pattern.
- After preheated for 2- 4 minutes, open the lid and adding ingredients to be sauted to the inner pot. Stir occasionally with a long-handled wooden utensil to saute evenly.
- Add any other called for ingredients and liquid to the inner pot then securely close the lid. After a few minutes, the cooker will automatically switch to simmer mode.
- Once the meal has cooked, the cooker will beep and automatically switch to keep warm if the “Keep Warm”light is on.
Steam
Default cooking time:5 minutes
NOTE: The rice cooker comes with a steamer accessory and can be used to steam foods.
- Place water in cooking pot.
- Place cooking pot in the rice cooker.
- Place ingredients in the steamer basket and place basket in cooking pot.
- Close the lid of the rice cooker.
- Press the Steam button. The Steam light illuminates and the digital display shows the suggested cooking time.
- The cooking time can be adjusted if necessary. To adjust the cooking time:
- Press the + button to add time, press the – button to subtract time.
- After 6 seconds. The countdown timer begins.
- The Steam light remains lit during the cooking process.
- When cooking is completed, the rice cooker automatically enters Keep Warm mode.
- The display time begins to decrease when it starts to boil.
Soup/Stew
- Place the inner pot into the cooker.
- Close the lid securely.
- Plug the power cord into an available 120V AC wall outlet.
- Press the Soup/Stew button. The digital display will show 2:00 to represent 2 hours of Soup/Stew time.
- Press (+) or (-) to increase or decrease Soup/Stew time by one hour, up to 12 hours. After 12 hours, it will return back to 2 hours. press the “Keep Warm” if don’t need temperature preservation once cooking is finished.
- After setting up cook time then wait 6 seconds, The Soup/Stew cooking begins to work, and the digital screen displays the cook time.
- The digital display will countdown in one minute increments from the selected time, and the cooker will automatically switch to keep warm if the the ”Keep Warm” light is on once cooking is completed.
Cancel
Stop the working function back to standy mode at anytime
–
- Decrease the steaming time by one minute from 30 minutes to 5 minute.
- Decrease the Soup/Stew time by hour from 12 hours up to 2 hours.
- Decresse the delay time of “White Rice”,“Brown Rice”and “Oatmeal” in 10 minutes increments by short press , or 1 hour increments by long press.
+
- Increase the steaming time by one minute from 5 minute to 30 minutes.
- Increase the Soup/Stew time by hour from 2 hours up to 12 hours.
- Incresse the delay time of “White Rice”,“Brown Rice”and “Oatmeal” in 10 minutes increments by short press , or 1 hour increments by long press.
CLEANING
- Remove the steam vent.

- Remove the condensation collector.

- Handwash the inner cooking pot and all accessories or wash them in the dishwasher.

- Wipe rice cooker body clean with a damp cloth.

- Thoroughly dry rice cooker body and all accessories.

- Reassemble for next use.

TROUBLESHOOTING
Before calling for service, review the following tips. It may save you time and money.
This list includes common occurrences that are not the result of poor workmanship or defective materials.
Any other servicing should be performed by an authorized service representative.
| Problem | TIPS |
| Rice is too dry/hard after cooking | If your rice is dry or hard/chewy when the rice cooker switches to Keep-Warm, additional water and cooking time will soften the rice. Depending on how dry your riceis, add 1/2 to 1 cup of water and stir through. Close the lid and press the White Rice button. When rice cooker switches to Keep-Warm, open the lid and stir the rice to check the consistency. Repeat as necessary until rice is soft and moist. |
| Rice is too moist/soggy after cooking | If your rice is still too moist or soggywhen the rice cooker switches to Keep-Warm, use the serving spatula to stir the rice. This will redistribute the bottom (moistest) part of the rice as well as release excess moisture. Close the lid and allow to remain on Keep-Warm for 10-30 minutes as needed, opening the lid and stirring periodically to release excess moisture. |
| The bottom layer of rice is browned / caramelized | The bottom layer of cooked rice may become slightly browned and/or caramelized during cooking. To reduce browning, rice should be rinsed before cooking to remove any excess starch. Stirring rice once it switches to Keep-Warm will also help to reduce browning/caramelizing |
LIMITED ONE YEAR WARRANTY
This is the only express warranty for this product and is in lieu of any other warranty or condition This product is warranted to be free from defects in material and workmanship for a period of one (1) year from the date of original purchase. During this period, your exclusive remedy is repair or replacement of this product or any component found to be defective, at your option; however, you are reponsible for all costs associated with with returning the product to us and our returning the product or component under this warranty to you. If the product or component is no l onger available, we will replace with a similar one of equal or greater value-)
This warranty does not cover glass, filters, wear from normal use, use not in conformity with the printed directions, or damage to the product resultinig from accident, alteration, abuse or misuse. This warranty extends only to the original consumer purchaser or gist recipient. Keep tile original sales receipt, as proof of purchase is required to make a warranty claim. This warranty is volid if product is used for other than single-family household use or subjected to any voltage and wave form other than as specified on the label(e.g., 120V ~)
We exclude all claims for special, incidental, and consequential damages by breach of express or implied warranty. All liability is limited to amout of the purchase price. Every implied warranty, including any statutory warranty or condition of merchantability or fitness for particular purpose, is disclaimed except to the extent prohibited by law, in which case such warranty or conditon is limited to the duration of this written warranty.
This warranty gives you specific legal rights. you may have other legal rights that vary depending on where you live. Some states or provinces do not allow limitations on implied warranties or special, incidental consequential damages, so tile foregoing limitations may not apply to you.
NOTICE
Customer Service Management office:
5 Sylvan Way, Suite 100 parsippany, NJ, 07054
Amazon Store: https://www.amazon.com/comfee
Tel: 866-646-4332
E-mail: [email protected]
![]()
comfee Toaster Oven User Guide
IMPORTANT SAFEGUARDS
When using electrical appliances, basic safety precautions should always be followed, including the following:
Read all instructions before use.
- Do not touch hot surfaces. Use handles or knobs.
- To protect against electric shock do not immerse cord or plug in water or other liquid.
- Close supervision is necessary when any appliance is used by or near children.
- Unplug from wall outlet when the appliance is not in use, before putting on or taking off parts, and before cleaning. Allow to cool before handling, putting on or taking off parts, and before cleaning the appliance.
- Do not operate any appliance with a damaged cord or plug, or after the appliance malfunctions or has been damaged in any manner.
- The use of accessory attachments not recommended by the appliance manufacturer may result in fire, electric shock or injuries to persons.
- Do not use outdoors or in a damp area.
- Do not let power cord hang over edge of table or counter, or touch hot surfaces.
- Do not place on or near a hot gas, electric burner or in a heated oven.
- Extreme caution must be used when moving an appliance containing hot oil or other hot liquids.
- Check that the TIME control knob is set to OFF before plugging the plug in the wall outlet. To turn off and disconnect, turn TIME control knob to
OFF then remove plug from wall outlet. - Do not use appliance for other than intended use.
- Oversized foods or metal utensils must not be inserted in the appliance as they may create a fire or risk of electric shock.
- A fire may occur if the appliance is covered or touching flammable material, including curtains, draperies, walls, and the like, when in operation. Do not store any item on top of the appliance when in operation.
- Use extreme caution when removing the tray or disposing of hot grease. Do not clean with metal scouring pads. Pieces can break off the pad and touch
electrical parts involving a risk of electric shock. - Extreme caution should be exercised when using containers constructed of other than metal or glass.
- Do not store any materials, other than manufacturers recommended accessories, in this appliance when not in use.
- Do not place any of the following materials in the appliance: paper, cardboard, plastic.
- Do not cover crumb tray or any part of the appliance with metal foil. This will cause overheating of the appliance.
- WARNING – To prevent electric shock, unplug the appliance before cleaning.
- Do not immerse the appliance or any electrical components in water or any other liquids.
- Never leave the appliance unattended during operation.
ADDITIONAL SAFEGUARDS
This appliance is for HOUSEHOLD USE ONLY.
DO NOT OPERATE THIS APPLIANCE, IF THE POWER CORD SHOWS DAMAGE OR IF APPLIANCE WORKS INTERMITTENTLY OR STOPS WORKING ENTIRELY.
- A short power-supply cord is to be provided to reduce the risk resulting from becoming entangled in or tripping over a longer cord.
- Longer extension cords are available and may be used if care is exercised in their use.
- If long detachable power-supply cord or extension is used:
— The marked electrical rating of the cord or extension cord should be at least as great as the electrical rating of the appliance.
— If the appliance is of the grounded type, the extension cord should be a grounding 3-wire cord; and
— The longer cord should be arranged so that it does not drape over the countertop or table top where it can be pulled on by children or tripped over unintentionally.
GROUNDING INSTRUCTIONS
- This appliance must be grounded while in use. Do not remove or ignore the grounding pin or similar during use.
CAUTION:
— To ensure continued protection against risk of electric shock, connect to properly grounded outlets only.
PARTS
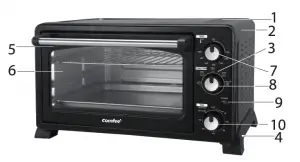
- Air vents
- Housing
- Control panel
- Anti-slip feet
- Handle
- Door
- TEMP. control knob
- FUNCTION control knob
- POWER indicator
- TIME control knob
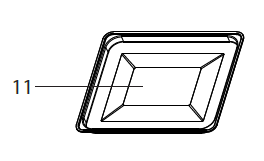
- Baking tray
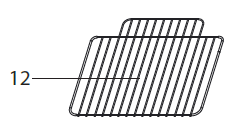
- Baking rack
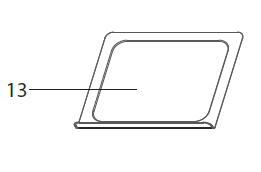
- Crumb Tray
OPERATION
Before first use
- Remove all packaging materials, labels and/or stickers from your appliance.
- Check package contents for completeness and damage. Do not operate the appliance if package content is incomplete or appears damaged. Return it
immediately to the dealer.
CAUTION:
— Danger of suffocation! Packaging materials are not toys. Always keep plastic bags, foils and Styrofoam parts away from babies and children. Packaging
material could block nose and mouth and prevent breathing.
NOTE:
— The appliance may produce an odor and emit smoke when switched on for the first time, as residues from the production process are eliminated. This is
normal and does not indicate a defect or hazard.
- When using the appliance for the first time, it is recommended to operate it for at least 15 minutes on its highest setting with the door open ( Operation), until no
odor or smoke is present. During use, ensure ample ventilation. - Let the appliance cool completely.
- Clean the appliance ( Cleaning and Maintenance).
Accessories
| Crumb tray | For easy removal all kinds of crumbs and food residues from the appliance after operation. |
| Baking tray | For rotisserie, broiling and roasting meat, poultry, fish and various other foods as well as collection food residues when used as a drip tray. Use on the middle and bottom oven rails of the appliance. |
| Baking rack | For broiling, baking, toasting and general cooking with other containers made of metal or ovenproof glass. Use on the top, middle and bottom oven rails of the appliance. |
OPERATION
Using the appliance Use the appliance for baking, broiling, toasting and roasting.
NOTE:
— The appliance has a rated power of 1500W. Before plugging it into the wall outlet, ensure that the electrical circuit is not overloaded with other appliances.
This appliance should always be operated on a separate 120V ~ 60Hz wall outlet. — Make sure the appliance is switched off before connecting it to a wall outlet
| Control knob | Function | Possible settings |
| TEMP. | Setting the temperature | 150°F – 450°F (65°C – 230°C) |
| FUNCTION | Setting the operating mode | BAKE – less tender cuts of meat, soups and stews |
| BROIL – fish, beef, steak, vegetables, etc. | ||
| TOAST – corn, bread, cookies and | ||
| heating food | ||
| CONVECTION – toasts, steaks, baking | ||
| pizza and bread | ||
| TIME | Setting the operating time and switching the appliance on/off | OFF
Clockwise rotation: LIGHT / MED / DARK (for toasting) 10 – 60 minutes (marked in 10 min. intervals) Anticlockwise rotation: STAY ON (remains on until switched off manually) |
- Place the appliance on a clean, flat and heat resistant surface.
- Insert the plug into a wall outlet.
CAUTION:
— Only use accessories recommended by the manufacturer. Only use cooking/ baking containers made of metal and ovenproof glass. Do not place any other materials in the appliance.
— Danger of burns! Always pay special attention when placing or removing
accessories and food from the appliance. Never place your bare hand inside the appliance , use it to remove accessories or touch the housing when the appliance is plugged in and switched on. Always use mittens when inserting or removing items from the appliance.
— Escaping steam can burn.
— Never let the power cord come in contact with the housing of the appliance during use or allow it be trapped by the door .
Bake function
When using the bake function, only the lower heating elements are being used. Place the baking rack on the middle oven rails while the baking
tray is placed on the bottom oven rails , if necessary .
- Turn the TEMP. control knob to the required temperature.
- Turn the control knob to BAKE .
- Preheat the appliance by turning the TIME control knob to the required preheat time. The POWER indicator turns on.
- After the preheat cycle has finished, the POWER indicator turns off and a bell rings.
- Place the baking dish with the item(s) to be baked on the baking rack.
- Turn the TIME control knob to STAY ON The or to the required time. indicator turns on.
- If a time was set, a bell will ring at the end of the cycle, to indicate the cycle has finished, and the appliance switches off. The POWER indicator turns off.
- If no time was set, turn the TIME control knob to OFF when baking is completed. The POWER indicator turns off.
Broil function
When using the broiling function, only the upper heating elements are being used. They continuously cycle on and off to maintain a maximum temperature
in the appliance. Place the baking rack on the top oven rails while the baking is placed on the middle oven rails.
- Turn the TEMP. control knob to 450°F.
- Turn the control knob to BROIL .
- Preheat the appliance by turning the TIME control knob to the required preheat time. The POWER indicator turns on.
- After the preheat cycle has finished, the POWER indicator turns off and a bell rings.
- Place the food to be broiled on the baking rack . Brush food with oil or sauces as required.
- Place the baking rack on the highest possible oven rail . The food should be placed as close as possible to the upper heating elements without
touching them. - Turn the TEMP. control knob to the required temperature.
- Turn the TIME control knob to STAY ON or to the required time. The indicator turns on.
- If a time was set, a bell will ring at the end of the cycle, to indicate the cycle has finished, and the appliance switches off. The POWER indicator turns off.
- If no time was set, turn the TIME control knob to OFF when the broiling is completed. The POWER indicator turns off.
NOTE:
— It is recommended to leave the door slightly ajar; this will keep the upper heating elements on and will ensure a more consistent temperature in the appliance.
— The following broiling temperatures and times are recommendations only. Adjust them to your personal preferences and needs. They are based on meats at refrigerator temperatures and an oven that was preheated at 450°F for 15 minutes. Roasting frozen food will take considerably longer.
Meat |
Temperature |
Time per lb. (minutes) |
| Rib steak | 400 | 20 – 25 |
| T-bone steak | 400 | 20 – 25 |
| Hamburger | 400 | 15 – 20 |
| Pork chops | 400 | 20 – 25 |
| Lamb chops | 400 | 20 – 25 |
| Chicken legs | 400 | 30 – 35 |
| Fish fillets | 350 | 20 – 25 |
| Salmon steak | 350 | 20 – 25 |
Toast function
When using the toast function, all heating elements are being used. Place the baking rack on the middle oven rails while the baking is placed on the lower rails, if necessary .
- Turn the TEMP. control knob to 450°F .
- Turn the control knob to TOAST .
- Place the to be toasted food on the baking rack.
- Turn the TIME control knob to the required browning level. The POWER indicator turns on.
- At the end of the toasting cycle, a bell will ring, to indicate the cycle has finished, and the appliance switches off. The POWER indicator turns off.
Setting |
Duration (minutes) |
Browning |
| LIGHT | about 4 | light |
| MED | about 5 | medium |
| DARK | about 7 | dark |
NOTE:
— Do not leave food in the appliance longer then recommended above, as this
may cause the food to get burned.
Convection function
When using the convection function, the convection fan circulates the hot air around the inside of the appliance. All heating elements are being used.
Place the baking tray on the bottom oven rails.
- Turn the TEMP. control knob to the required temperature.
- Turn the control knob to .
- Preheat the appliance by turning the TIME control knob to the required preheat time. The POWER indicator turns on.
- After the preheat cycle has finished, the POWER indicator turns off and a bell rings.
- Place the food on the baking tray.
- Turn the TIME control knob to STAY ON or to the required time. The indicator turns on.
OPERATION
- If a time was set, a bell will ring at the end of the cycle, to indicate the cycle has finished, and the appliance switches off. The POWER indicator turns off.
- If no time was set, turn the TIME control knob to OFF when the roasting is completed. The POWER indicator turns off.
NOTE:
— The following temperatures and times are recommendations only. Adjust them to your personal preferences and needs. They are based on meats at refrigerator temperatures and an oven that was preheated at 450°F for 15 minutes. Roasting frozen food will take considerably longer.
Meat |
Temperature |
Time per lb. (minutes) |
| Beef roast | 300 – 325 | 25 – 30 |
| Pork roast | 325 | 40 – 45 |
| Ham | 300 – 325 | 35 – 40 |
| Chicken | 350 | 25 – 30 |
| Turkey | 350 | 25 – 30 |
Baking pizza
NOTE:
— The appliance is suitable for pizza pies of up to 12 inches in diameter.
— Instructions for baking one pizza: Place pizza on baking rack and position the rack on middle rails.
— Instructions for baking two pizzas: Place first pizza on baking rack on the top rails and the second pizza on the oven rack on the bottom rails.
Please note that the pizza placed at the top rails may be ready a few minutes before the pizza placed at the bottom rails. Remove the top pizza and allow the
bottom one to finish baking.
- Place the baking racks according to the instruction for one or two pizzas in the appliance.
- Turn the TEMP. control knob to 450°F.
- Turn the control knob to .
- Preheat the appliance for 15 minutes, by turning the TIME control knob to 15. The POWER indicator turns on.
- After the preheat cycle has finished, the POWER indicator turns off and a bell rings. Lower the temperature according to the baking instructions on the package of the pizza.
- Place the frozen pizza on the baking rack . If a second frozen pizza is to be prepared at the same time, proceed according to INSTRUCTIONS FOR BAKING TWO PIZZAS.
- Turn the TIME control knob to STAY ON or the required time. The POWER indicator turns on.
- If a time was set, a bell will ring at the end of the cycle, to indicate the cycle has finished, and the appliance switches off. The POWER indicator turns off.
- If no time was set, turn the TIME control knob to OFF when baking is completed. The POWER indicator turns off.
HINTS AND TIPS
- It is recommended to always preheat the appliance, as this will reduce cooking times.
- It is recommended to only cook defrosted food and cook from a fridge temperature.
- It is recommended to use a meat thermometer to check the roasting progress.
- The indicator turns on whenever the TIME control knob and control knob are switched to a position other than the position .
- The convection fan turns on automatically when the control knob is switched to position .
- For short cooking times, it is recommended to turn the TIME control knob 10 minutes past the required time and then turning it back to the required cooking
time or the timer would not turn off. This will ensure higher timer accuracy. - In the event of food flare-ups, keep the door closed, turn the TIME control knob to and unplug the appliance.
CLEANING AND MAINTENANCE
Proper maintenance will ensure many years of service from your appliance. Clean the appliance after every use. The appliance contains no user serviceable parts and
requires little maintenance. Leave any servicing or repairs to qualified personnel.
CAUTION:
– Always turn the TIME control knob to . Disconnect the plug from the wall outlet . Allow all parts of the appliance to cool down completely.
NOTE:
– Do not immerse the power cord and plug or appliance into water or any other liquid. Do not use abrasive cleaners, steel wool or scouring pads. Dry all parts thoroughly after cleaning, before using or storing the appliance. Ensure that no water enters the appliance housing .
- Remove any other accessory placed in the appliance.
- Wipe the walls with a damp sponge, cloth or nylon scouring pad and some mild detergent if needed.
- Take extra care when cleaning near the lower and upper heating elements in order not to damage them.
- All accessories. can be washed in hot soapy water or in a dishwasher.
- Clean the appliance housing with a damp sponge or cloth.
NOTE:
– Dry all parts and surfaces thoroughly before use. Make sure that all parts and surfaces are completely dry before connecting the appliance to a wall outlet.
Storage
- Before storage, always make sure the appliance is completely cool, clean and dry.
- It is recommended to store the appliance in a dry place.
- Store the power cord on the cord storage of the appliance.
- Store the appliance on a stable shelf or in a cupboard, preferably in its original packaging. To avoid accidents, ensure that both the appliance and its power cord are beyond reach of children or pets.
TROUBLESHOOTING
PROBLEM |
CAUSE |
SOLUTION |
| The appliance is not working | Appliance not plugged in | Insert the plug into the wall outlet |
| Wall outlet not energized | Check fuses and circuit breaker | |
| The appliance does not reach set temperature | The door is not closed properly | Ensure the door is closed properly |
| Food not fully cooked | Cooking time too short
Cooking temperature too low |
Extend cooking time Increase set temperature |
| Food over cooked or burnt | Cooking time too long
Cooking temperature too high |
Reduce cooking time Reduce set temperature |
Customer Assistance/Servicio de Asistencia al Cliente: 866-646-4332
Midea America Corp
5 Sylvan Way, Parsippany, NJ 07054