conga 1090 Robot Vacuum Cleaner Instruction Manual

SAFETY INSTRUCTIONS
- Read these instructions thoroughly before using the appliance.
- Keep this instruction manual for future reference or new users.
- This product must be used in accordance with the directions in this instruction manual. Cecotec cannot be held liable or responsible for any damages or injuries caused by improper use.
- Make sure that the mains voltage matches the voltage stated on the rating label of the appliance and that the wall outlet is grounded.
- This product can only be disassembled by qualified personnel.
- Do not touch wires, power supplies or power adapters with wet hands.
- Keep the robot away from clothing, curtains and any other similar materials.
- Do not expose the robot to direct sun, open fire or wet environments.
- Do not sit or place heavy or sharp objects on top of the appliance.
- This product is designed for indoor use only, do not use outdoors.
- Before operating the robot, remove all objects and wires that could affect its operating.
- Always place the device on a flat and stable surface. Avoid placing it in unstable places where there is risk of falling, such as tables or chairs.
- Turn off the power switch, located on the bottom part of the robot, when it is not going to be used for a long time.
- Before operating it, make sure all the robot’s and charging base’s connections are in good conditions.
- Avoid operating the product under extremely high or low temperatures.
- Remove the battery from the product’s inside before scrapping the robot.
- Disconnect the appliance from the power supply before removing the battery.
- The appliance is not intended to be used by children under the age of 8. It can be used by children over the age of 8, as long as they are given continuous supervision.
- This appliance can be used by children aged 8 and above, and persons with reduced physical, sensory or mental capabilities or lack of experience and knowledge, as long as they have been given supervision or instruction concerning the use of the appliance in a safe way and understand the hazards involved. Supervise young children to make sure that they do not play with the appliance. Close supervision is necessary when the appliance is being used by or near children.
PARTS AND COMPONENTS
Wi-Fi connection light indicator (only in 1090 Connected, 1099 Connected and 1090 Connected Force)
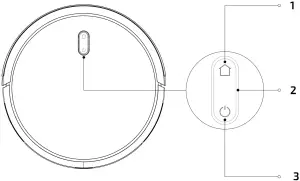
Fig. 1
- Back-home button
- Light indicator
- Power/operation button
- Back-home button
The robot will automatically go to the charging base when this button is pressed on the robot or on the remote control. - Light indicator
- Steady orange light: low battery.
- Blinking orange light: charging.
- Steady blue light: fully charged/standby mode/cleaning.
- Blinking red light: error
- Power/operation button
Long press this button for a few seconds to turn the robot on or off Press it to start cleaning too.
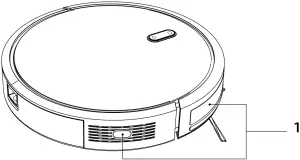
Fig. 2
- Anti-collision sensors
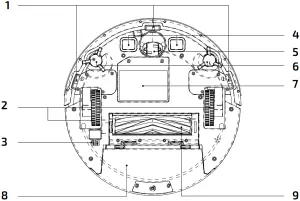
Fig. 3
- Free-fall sensors
- Driving wheels
- Power switch
- Charging terminals
- Omnidirectional wheel
- Side brushes
- Battery
- Dust tank
- Main brush
- Charging base
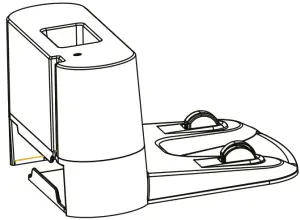
Fig. 4
- Charging base
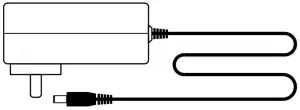
Fig. 5
- Remote control (Not included with Conga 1090 Connected)
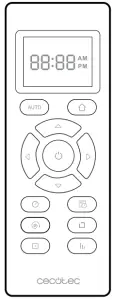
Fig. 6 - Dust tank (Not included with Conga 1090 Connected Force)
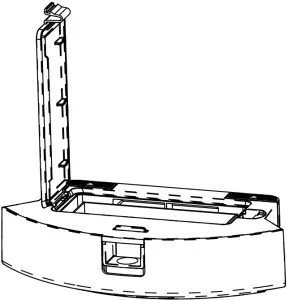
Fig. 7 - Wet and dry tank
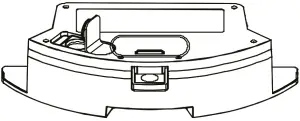
Fig. 8 - Primary filter and high-efficiency filter
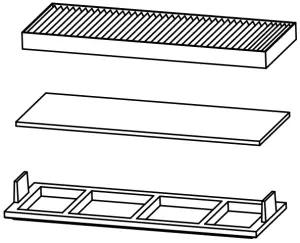
Fig. 9 - Brush
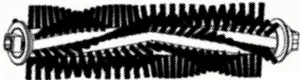
Fig. 10
- Side brushes
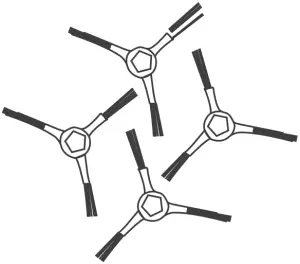
Fig. 11
- Silicone main brush
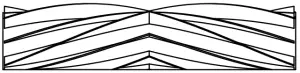
Fig. 12
- 2 mops
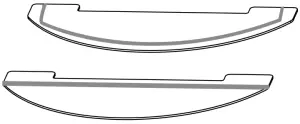
Fig. 13
- Main bristles brush
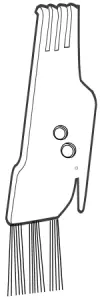
Fig. 14
- Magnetic strips (only included with Conga 1099 Connected)
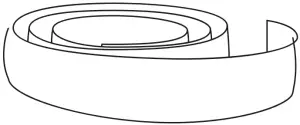
Fig. 15
Note: Conga 1090 Connected Force includes Velcro spare parts.
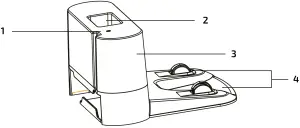
Fig. 16
- Charging indicator
- Remote control holder
- Signal transmitter
- Charging terminals
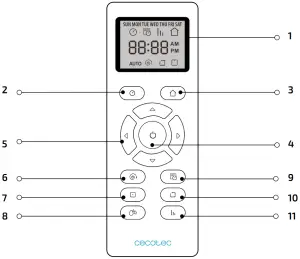
Fig. 17
- Mode and time display
- Clock settings
- Automatic charge/back home
- Auto cleaning/pause
- Direction buttons
- Spot cleaning
- Room cleaning
- Scrubbing levels
- Schedule
- Edge cleaning
- Power levels
BEFORE USE
- Take the product out of the box.
- Remove all packaging materials. Keep the original box.
- Make sure all the components are included and in good conditions, otherwise, contact immediately the official Technical Support Service of Cecotec.
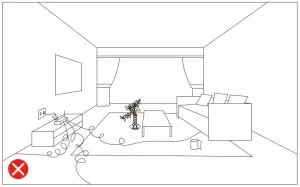
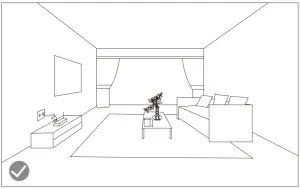
Fig. 18
Warning: Remove all objects around the robot such as clothing, papers, cables, curtains or other fragile objects.
- If the area to be cleaned has a balcony or stairs, a physical barrier must be placed in order to prevent product damage and ensure safe operation.
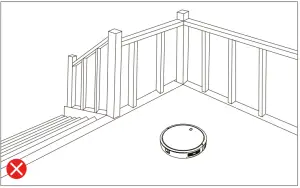
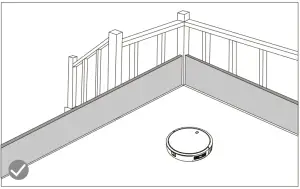
Fig. 19 - Direct exposure to sun light or great light constrasts may affect to the correct operating of the sensors. If this happens and the robot stops, change it to a new location for it to start operating again.
- Place the charging base against the wall and leave a minimum free space of:
- 2 metres to the front.
- 1 metre to each side.
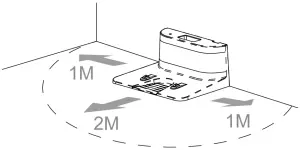
Fig. 20
- Connect the charging base to a power supply. Wind and store the remaining cord in the lower part of the charging base to avoid accidents.
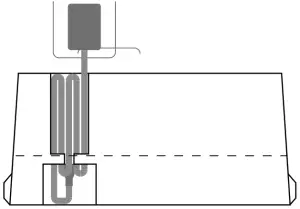
Fig. 21 - Install both side brushes in their corresponding slots, located on the robot’s bottom part. Press until it clicks to make sure they are properly fixed.
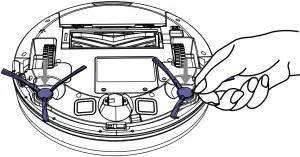
Fig. 22 - Press the power switch located on the bottom part of the robot. Make sure the power switch in ON.
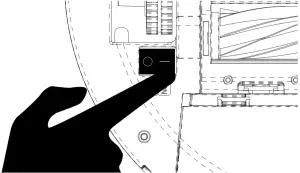
Fig. 23 - Place the robot on the charging base and make sure the charging terminals on the robot match with those of the charging base. Once the robot is properly placed, it will beep once and the power button will light up. If the light blinks orange, the battery is not completely charged. To ensure maximum cleaning time, wait until the light switches to steady blue. This will indicate the battery is fully charged and that the robot is ready to clean.
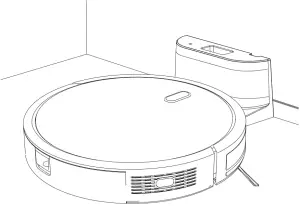
Fig. 24
OPERATION
- Start cleaning
- Long press the power button on the robot to start the robot up.
- Press the power button on the robot or on the remote control to start cleaning.
Note: if the robot runs out of battery during cleaning, it will automatically return to the charging base. Once the battery is fully charged, the robot can start a new cleaning cycle.
WARNING: if there is no good access to the charging, the robot will not be able to return to its charging position. In that case, once the robot has stopped, take it manually to the charging base.
- Pause
- Press the power button on the robot or on the remote control to pause the cleaning process.
- Press the power button on the robot or on the remote control to resume the cleaning process.

Fig. 25
- Return to the charging base
Press back-home button on the robot or on the remote control for the robot to return to the charging base. - Turn off
Long press the power button to turn the robot off.
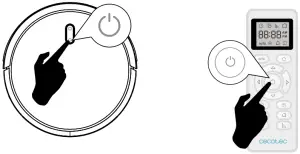
Fig. 26
WARNING: the robot vacuum cleaner has a power switch located on its main body. If the robot is not going to be used for long periods of time, it is suggested to switch it off. If the robot is switched off, it will restore factory default settings as a safety measure. The robot will only carry out scheduled cleaning if it has been scheduled while the switch is ON, otherwise, it will have to be scheduled again from the remote control or the App.
- Cleaning modes
- This robot includes different modes and different functions that can be activated from the remote control or the App.
- The App is only compatible with Conga 1090 Connected, Conga 1090 Connected Force and Conga 1099 Connected.
- Auto cleaning mode
Press button for the robot to start auto cleaning mode.The robot will clean the whole surface, edges, around objects such as tables, chairs etc. until it starts running out of battery and therefore returns to the charging base.
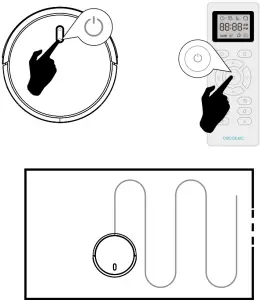
Fig. 27 - Scrubbing mode
- Attach the mop cloth to the water tank and fill the tank with water.
- Remove the dust tank.
- Install the water tank in the robot and turn it on.
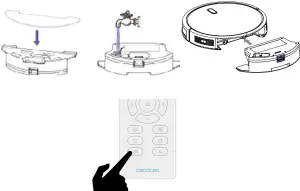
Fig. 28
Use the remote control to select the desired scrubbing power level: high, medium or low. Once the scrubbing mode is selected from the remote control or the app, the device will perform the function “All in One” to vacuum, mop and scrub at the same time thanks to its mixed tank.
Note: if you want to sweep the floor, skip the water-filling step.
To ensure perfect scrubbing from the start, it is suggested to dampen the mop cloth evenly with water before use.
- Spot cleaning mode
The robot will carry out an intense cleaning of a specific area when this mode is activated. The robot will start cleaning at a specific point and will move outwards performing spiral movements (1 meter). Then, it will return to the starting point in spiral movements again. Before operating the robot with spot cleaning mode, place it on the spot to be cleaned. Press the spot cleaning button on the remote control or on the App.
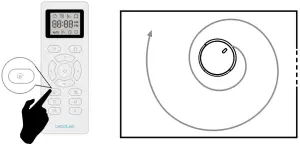
Fig. 29 - Edge cleaning mode
When this mode is selected, the robot will clean along walls and around furniture (table or chair legs, for example).
Press the edge cleaning button on the remote control or on the App.
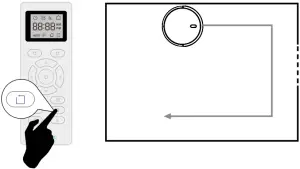
Fig. 30 - Room cleaning mode
The robot will carry out a 30-minute cleaning cycle when this mode is activated.
Press the room cleaning button on the remote control or on the App.
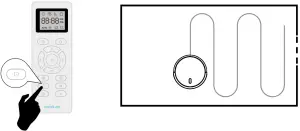
Fig. 31
To ensure an efficient cleaning of the room, close the door or use the magnetic strip (only included with Conga 1099 Connected) to delimit the cleaning area. - Power level function
Press the power level button on the remote control in order to control the robot’s suction power during the cleaning process. There are 3 suction power levels: Turbo , Normal and Eco.
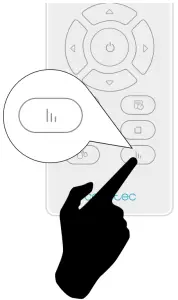
Fig. 32 - Scrubbing power level function
Press the scrubbing levels button on the remote control to adjust the water level during the scrubbing process. There are 3 water levels: High , Medium or Low. - Magnetic strip
Use the magnetic strip included with Conga 1099 to delimit the cleaning area so the robot is not able to access to certain areas. - Cleaning schedule
This robot includes schedule settings in order for you to customize the cleaning cycles. The robot can only be scheduled through the remote control or through the App (only models that feature App).
Note: make sure the remote control is near the robot when setting the clock or scheduling cleaning cycles. - Setting the remote control’s clock
- Press the clock button on the remote control. Digits will start blinking.
- Select the current day of the week by pressing the upwards and downwards buttons.
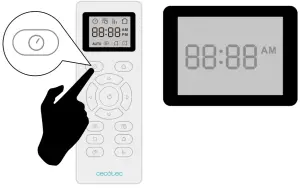
Fig. 33 - Use the left and right buttons to set minutes and hour. Use upwards and downwards buttons to change the digit while it blinks.
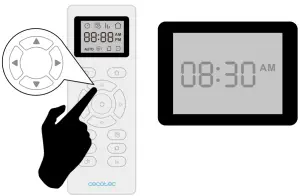
Fig. 34 - Finally, press the power or the clock button. The robot will beep when the clock settings have been confirmed.

Fig. 35
- Setting cleaning schedule
For a better and more comfortable cleaning, the robot includes a schedule function to set daily schedules through the remote control or the App in those Conga models that include app. In accordance with the configuration, the robot will automatically start cleaning the selected days at the desired time. The time options on the remote control are: 12:00 a. m. – 11:59 p.m. and 12:00 p.m. – 11:59 p.m. Before setting the time and the robot configuration, make sure the robot’s power switch is on and that the power button on the robot is lit up. - Configuration with the remote control
Press the schedule button on the remote control. Digits will start blinking.
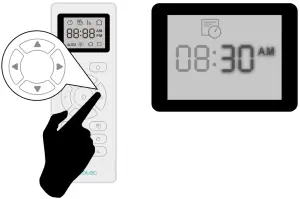
Fig. 36
Use direction buttons to select the day. Once selected, use right and left buttons to select minutes and hours. Use direction buttons when digits are blinking to configure the desired minutes and hours. Press the power button to save settings. Enter the desired days and follow the same steps to schedule them.

Fig. 37
Finally, press schedule button to exit scheduling mode. The robot will beep once indicating the scheduled cleaning settings have been confirmed.
The user may schedule as many days per week as desired. The home screen will display when the robot is scheduled. - Cancelling scheduled cleaning:
Press the schedule button on the remote control, select the day you wish to delete and change the set time to 00:00 am., this is the time to be set to cancel the cleaning program.
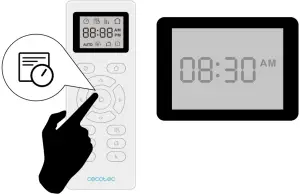
Fig. 38
CLEANING AND MAINTENANCE
In order to lengthen your robot’s shelf life and to allow your robot to operate at peak performance, carry out the following procedures periodically.
- Empty the robot’s dust tank:
Press the dust tank’s release button.
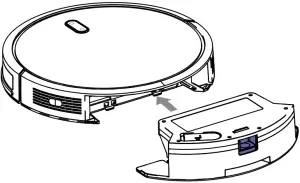
Fig. 39 - Open the dust tank and empty it.
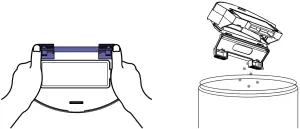
Fig. 40 - Clean the robot’s filter
- Remove the filter.
Carefully shake off all dust from the filter.
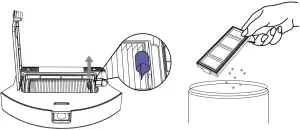
Fig. 41 - Clean the free-fall sensors:
Use a clean, dry and soft cloth to wipe off any dust from the free-fall sensor located on the right side of the robot’s bottom part.
WARNING: do not spray cleaning products directly on the sensor.
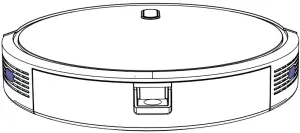
Fig. 42 - Clean the main brush:
Slightly press the main brush frame’s tabs in order to open the main brush storage gap and to remove it.
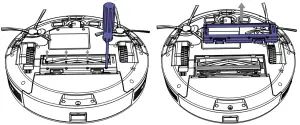
Fig. 43 - Remove any hair, fluffs or dust collected in the brush and around the axles.
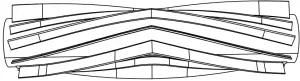
Fig. 44 - Clear and clean the robot’s suction channel.
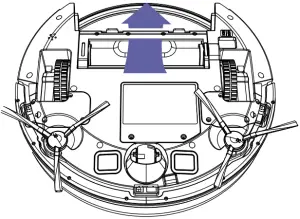
Fig. 45 - Reinstall the main brush and its frame.
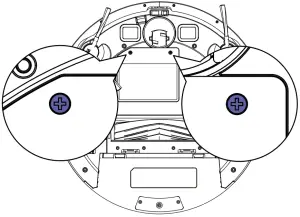
Fig. 46 - High-efficiency FILTER:
The high-efficiency filter is designed with fibres that help trapping dust particles, dust mites, pollen… It is very important to clean periodically the filter, to avoid this particles from building up in the filter, causing efficiency loss. It is convenient to carry out this maintenance once a week. It is suggested to replace the filter by a new one after a maximum of 160 hours of use. - Recommendations:
Dirt can be removed with a small brush or by shaking it carefully against a hard surface for dust to fall off. The high-efficiency filter cannot be washed. - Mesh primary filter and sponge filter:
The filtering system is featured with a mesh primary filter and a sponge filter. It is suggested to replace them either after a maximum of 160 hours of use or when they are worn out due to operation. - Recommendations:
Dirt can be removed with a small brush or by shaking it carefully against a hard surface for dust to fall off. You can also use warm water without detergents to obtain better results. Always make sure they are completely dry before installing them again. - Side brushes:
Side brushes are designed with multiple bristles and are used to push dirt towards the suction nozzle and to clean thoroughly edges and corners. These brushes can wear out over time, affecting negatively to the cleaning efficiency. In this way, it is suggested to replace each side brush after a maximum of 220 hours. - Recommendations:
It is recommended to clean the side brushes once a week with the help of the cleaning brush. - Main brush:
The main brush is designed with bristles and silicone, spins at top speed and helps introducing dirt into the suction nozzle. This brush is in contact with the floor, and therefore with dirt, so it can be worn out over time, affecting negatively to the cleaning efficiency. In this way, it is suggested to replace each side brush after a maximum of 320 hours. - Recommendations: It is recommended to clean the main brush once a week with the help of the cleaning brush.
- Sensors:
Cleaning robot vacuum cleaners have different types of sensors, for example, proximity sensors that allow the robot to move around while detecting obstacles or free-fall sensors that help the robot to detect slopes or possible gaps/unevenness such as stairs. These sensors are always in contact with dust particles, and therefore can be blocked over time, causing possible navigation errors. It is suggested to clean all the robot’s sensors with the cleaning brush or with a dry cloth after a maximum of 35 hours of operation. - Battery charge and replacement:
To lengthen the battery’s service life, keep the robot charging on the charging base when not in use.
If the robot is not going to be used for a long period of time, remove the battery and store the product and the battery in a safe and dry place. - To replace the battery, follow the instructions below:
Unscrew the 2 screws on the battery compartment, remove the battery cover and the battery.
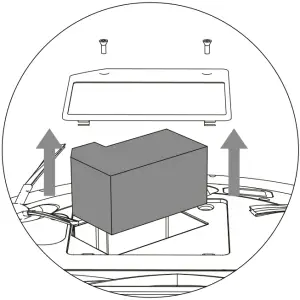
Fig. 47 - Insert the new battery with the battery label facing up.
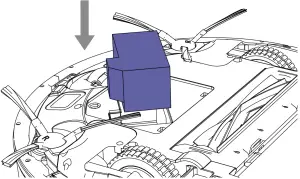
Fig. 48
Place the battery and the battery cover in its place and fix properly de screws back again.
TROUBLESHOOTING
| Robot signal | Cause | Solution | |
| Red light on. | 1 beep. | Omnidirectional wheel error. | Clean the omnidirectional wheel and press the power button to restart the robot. |
| 2 beeps. | Robot’s side brush error | Clean the side brushes and press the power button to restart the robot. | |
| 3 beeps. | Motor fan or filter error | Remove and empty the dust tank.
Remove the robot’s filter and shake off any dust rests. |
|
| 4 beeps. | Main brush error. | Remove and clean the robot’s main brush. | |
| Blinking red light. | 2 beeps. | Bumper error | Check if the bumper is blocked and press on both sides and center to unblock it. |
| 3 beeps. | Free-fall sensor error | Check if the robot is placed on an uneven surface, if its wheels are off the ground or if it is stuck in a dark place and move it to a new location. If not,
clean the free-fall sensor. |
|
| Red light on. | 4 beeps. | The robot cannot return to its charging base or starting position. | Make sure there are no obstacles in front of the charging base. Clean the charging terminals on both the charging base and the robot with a clean, soft and dry cloth. |
TECHNICAL SPECIFICATIONS
- Product: Conga 1090 Connected/ Conga 1090 Connected Force/ Conga 1099 Connected
- Product reference: 05410/ 05413/ 05411
- Voltage: 100-240 V ~, 50/60 Hz
- Battery: 14.4 V, 2600 mAh
- Frequency Band: 2.4 GHz
- Maximum Transmission Power: 17.5 dBm
- Made in China | Designed in Spain
DISPOSAL OF OLD ELECTRICAL APPLIANCES
 The European directive 2012/19/EU on Waste Electrical and Electronic Equipment (WEEE), specifies that old household electrical appliances must not be disposed of with the normal unsorted municipal waste. Old appliances must be collected separately, in order to optimize the recovery and recycling of the materials they contain and reduce the impact on human health and the environment.
The crossed out “wheeled bin” symbol on the product reminds you of your obligation to dispose of the appliance correctly. If the product has a built-in battery or uses batteries, they should be removed from the appliance and disposed of appropriately. Consumers must contact their local authorities or retailer for information concerning the correct disposal of old appliances and/or their batteries.
TECHNICAL SUPPORT SERVICE AND WARRANTY
This product is under warranty for 2 years from the date of purchase, as long as the proof of purchase is submitted, the product is in perfect physical condition, and it has been given proper use, as explained in this instruction manual.
The warranty will not cover the following situations:
The product has been used for purposes other than those intended for it, misused, beaten, exposed to moisture, immersed in liquid or corrosive substances, as well as any other fault attributable to the customer.
The product has been disassembled, modified, or repaired by persons, not authorized by the official Technical Support Service of Cecotec. Faults deriving from the normal wear and tear of its parts, due to use. The warranty service covers every manufacturing defects of your appliance for 2 years, based on current legislation, except consumable parts. In the event of misuse, the warranty will not apply.
If at any moment you detect any problem with your product or have any doubt, do not hesitate to contact Cecotec Technical Support Service at +34 963 210 728.
Web: WWW.CECOTEC.ES