COPPER CHEF Power AirFryer User Guide
COPPER CHEF Power AirFryer User Guide
See owner’s manual for complete assembly and operating instructions and important safety information before using this product.
STEP 1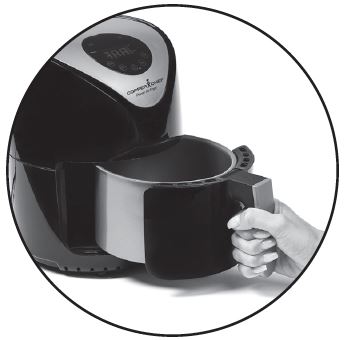
Remove Outer Basket: Pull the Easy-Grip Handle straight out.
STEP 2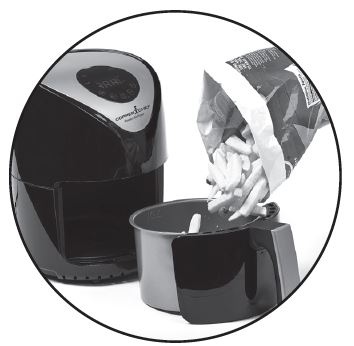
Load Outer Basket: Arrange the food you are cooking on top of the nonstick Fry Tray.
STEP 3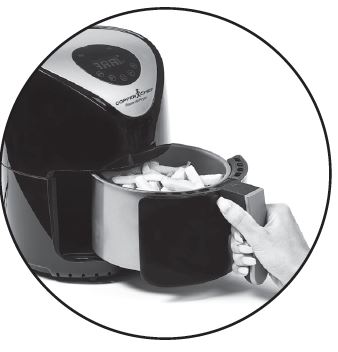
Return Outer Basket to Unit: Push the Easy-Grip Handle straight in, until it clicks.
STEP 4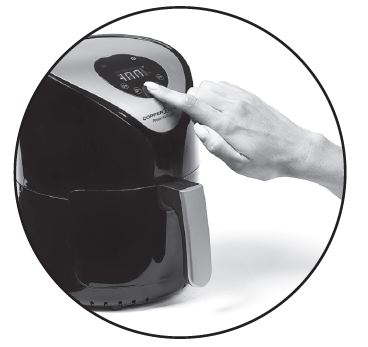
Power Unit On: Set the Time and Temperature. Follow instructions specific to your recipe.
STEP 5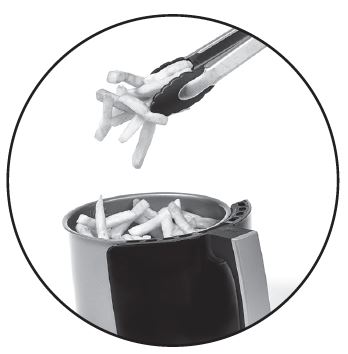
Remove Outer Basket: Set the Unit on a secure, heat-resistant surface. Use tongs to remove food.
NOTE:
- Before plugging the Copper Chef Power AirFryer into a power outlet, make sure all packaging material is removed from both outside and inside the Unit.
- After the cooking cycle has ended, the Digital Control Panel will shut off and the Unit’s internal fan will run for an additional 10 secs. to cool down. After the Unit beeps five times, check to see if your food is fully cooked and transfer to a serving dish.
Wash All Components Before First Use.
FAQS
What is the dimension of inner frying basket?
It is 7″ across and 3 1/2″ deep with the fry plate in for air frying and 4″ deep for cooking without the plate. The plate keeps the food off the bottom and allows air to go around the food. It is plenty of air fries for two people but for a family you may want to go with the bigger unit. It takes 3 minutes to preheat and about 20 minutes to air fry a load.
could use this to reheat food?
To reheat, use a microwave at 50% level for enough time to almost get the food hot enough to eat, then destroy the sogginess by finishing in the air fryer at 370 for about 3 minutes! This is fast and it gives you the best of both appliances!
Is the frying bin traditional non-stick or is it Copper Chef coating? There is one in the market place that has copper colored lining.
This 2 quart air fryer by Copper Chef has regular black color non stick coating. It is not the super non stick coating in other Copper Chef products.
Will a pop tart fit in it?
Yes of course it will fit a pop tart , it does French fries also , love it
Will it it work with 220 volts?
No.
What is the non-stick coating made of? does it have teflon or pfoa’s?
Don’t know. It is a copper infused one.
Where is it made?
Made in China.
Does the food container separate from the handle basket?
Yes. Inside the basket there is a separate food holder that lifts out for easy cleaning. Just remember that this a a small unit and you will have to make more than one batcH.
Is the inside nonstick?
Yes it nonstick
What is kind of material us the pan made out of?
Non-stick steel
What is the coating on the inner basket?
The inner basket is some kind of non stick surface. So far it’s very easy to clean. The fry rack is a copper colored non stick as well. Very easy to clean. It recommends spritzing with olive oil or PAM for real low fat items (lean meat, fish or veggies) so they crisp nicely without burning or sticking to the sides.
Is the loading Basket also dishwasher safe?
Yes the items are dishwasher safe
How many pieces of chicken can you put in the air fryer.
That depends on which pieces of chicken. The basket has a diameter of 6 3/4 inches and a depth of 3 1/4 inches.
Do you need to spray the pan with oil?
No oil is needed for the pan.
Is it safe to use on glass top stove?
Yes you can use it on a glass top stove.
what is the maximum cook time available?
Timer range is 1 to 30 minutes. Of course, you can always reset the timer for additional time, but 30 minutes is more than enough for most anything you’d want to cook.![]()
COPPER CHEF Electric Skillet Owner’s Manual

TXG-032C
Do not use the Copper Chef Electric SkilletTM until you have read this manual thoroughly.
Save These Instructions – For Household Use Only
Copper Chef Electric Skillet

Before you Begin
It is very important that you read this entire manual, making certain that you are totally familiar with this appliance’s operation and precautions.
Copper Chef Electric Skillet
Your new Copper Chef Electric Skillet will become your favorite mealtime appliance. It will help you prepare all your family favorites in a cooking environment that maintains the perfect temperature for best results.
The Copper Chef Electric Skillet will steam, sauté, and fry meats, fish, seafood, vegetables, and casseroles without the need for oils or butter thanks to the exclusive Cerami-Tech non-stick cooking surface. Nothing sticks, so clean-up’s a breeze.
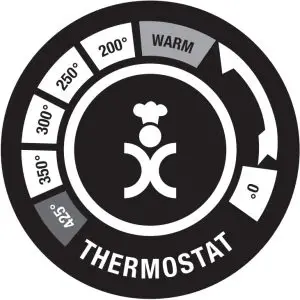
The secret to this appliance’s performance is the detachable Temperature Control Thermostat that maintains a precise temperature ranging from 120° F to 425° F. The lower setting is perfect for keeping your food warm in a buffet setting.
IMPORTANT SAFEGUARDS
When using the appliance, basic safety precautions should always be followed, including:
- READ AND FOLLOW all instructions carefully.
- MAKE SURE the appliance is plugged into a wall socket.
- This appliance is NOT INTENDED for use by persons with reduced physical, sensory, or mental capabilities, or lack of experience and knowledge, unless they are under the supervision of a responsible person or have been given proper instruction in using the appliance. This appliance is NOT INTENDED for use by children.
- DO NOT use this Unit if the plug, the power cord, or the appliance itself is damaged in any way.
- If the power cord is DAMAGED, you must have it replaced by the manufacturer, its service agent, or a similarly qualified person in order to avoid hazard.
- AVOID electric shock: Never immerse the Unit, the Temperature Control Thermostat, cord, or plug in water or other liquids.
- KEEP the appliance and its power cord out of the reach of children when it is in operation or in the cooling down process.
- KEEP the power cord away from hot surfaces. DO NOT plug in the power cord or operate the Unit controls with wet hands.
- NEVER connect this appliance to an external timer switch or separate remote-control system.
- NEVER use this appliance with an extension cord of any kind. A short power-supply cord (or detachable power-supply cord) is provided to reduce the risk resulting from becoming entangled in or tripping over a longer cord.
- The use of accessory attachments NOT RECOMMENDED by the appliance manufacturer may cause injuries.
- NEVER attempt home repair. Consult, with an authorized service technician for examination, repair, or electrical or mechanical adjustment.
- DO NOT operate the appliance on or near combustible materials such as tablecloths and curtains.
- ALWAYS use extreme caution when moving this appliance if it contains, hot oil or any other hot liquid.
- DO NOT use this appliance for any purpose other than described in this manual.
- NEVER leave the appliance unattended.
- ALWAYS attach the Temperature Control Thermostat to the appliance first, and then plug into the wall outlet. To disconnect, switch off, remove the plug from the wall outlet, and remove the Temperature Control Thermostat from the appliance.
- The Unit’s outer surfaces may BECOME HOT during use.
Use handles or knobs on the Unit and wear oven mitts when handling hot components or touching hot surfaces. - USE silicone or plastic tongs when removing or handling hot food.
- ALLOW time for the Unit to cool before cleaning or storing.
- To AVOID damage to countertops, operate this Unit only on a level, heat-resistant surface.
 WARNING: For California Residents
This product can expose you to Bisphenol A, which is known to the State of California to cause birth defects or other reproductive harm. For more information, go to www.P65Warnings.ca.gov.
Caution
- Always operate the appliance on a horizontal surface that is level, stable, and noncombustible.
- This appliance is intended for normal household use only. It is not intended for use in commercial or retail environments.
- This appliance is not intended for deep frying foods.
- If the Copper Chef Electric Skillet is used improperly or for professional or semi-professional purposes or if it is not used according to the instructions in the user manual,the warranty becomes invalid and the manufacturer will not be held liable for damages.
- Always unplug the appliance after use.
- Let the appliance cool down for approximately 30 mins before handling, cleaning, or storing.
- A short power-supply cord (or detachable power-supply cord) is provided to reduce the risk resulting from becoming entangled in or tripping over a longer cord.
Electric Power
If the electrical circuit is overloaded with other appliances, the Unit may not operate properly. It should be operated on a dedicated electrical circuit.
Electromagnetic Fields
This appliance complies with all standards regarding electromagnetic fields. If handled properly and according to the instructions in this user manual, the appliance is safe to use based on scientific evidence available today.
SAVE THESE INSTRUCTIONS – FOR HOUSEHOLD USE ONLY.
Parts & Accessories
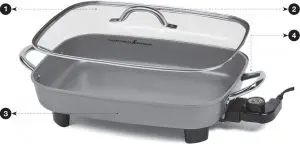
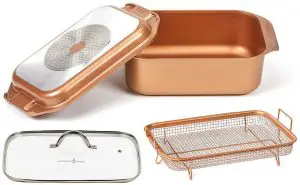
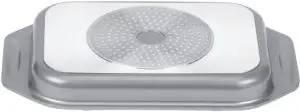
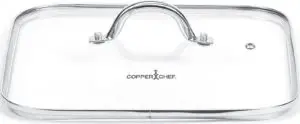
- Glass Lid
- Steam Release Vent
- 12” x 16” Electric Skillet Base
- Stainless Steel Handles
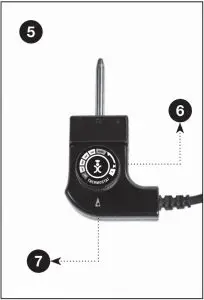
- Temperature Control Thermostat
- Temperature Control Dial
- On/Off Arrow Indicator
Important: Please make sure that your Copper Chef Electric Skillet has been shipped as per your order. Check everything carefully before use. If any part is missing or damaged, do not use this product and contact Customer Service (see the back of this manual for contact information).
Warning
Never immerse the Unit, the Temperature Control Thermostat, cord, or plug in water or other liquids. Water will short out the electrical components and possibly cause severe electrical shock.
Important: Do not use metal utensils with your Copper Chef Electric Skillet. They may damage the non-stick coating. Use non-stick friendly untensils suitable for use on hot surfaces.
Using the Copper Chef Electric Skillet
Before First Use: Wash and rinse the Glass Lid and cooking surface with warm water and a mild soapy detergent. Never use abrasive cleaners or metal scrubbers on this Unit. Never immerse the Unit, the Temperature Control Thermostat, cord or plug in water or other liquids.
Important: This appliance has a polarized plug (one blade is wider than the other). To reduce the risk of electric shock, this plug is intended to fit into a polarized outlet only one way. If the plug does not fit fully into the outlet, reverse the plug. If it still does not fit, contact a qualified electrician. Do not attempt to modify the plug in any way.
- Insert the Temperature Control Thermostat with the Temperature Control Dial facing up, into the accessory jack located on the side of the Unit below the handle. Push in all the way to ensure that the Temperature Control Dial is making full contact.
- Plug the AC cord into electric outlet.
- Set the cooking temperature by aligning the Temperature Control Dial with the On/Off Arrow Indicator on the Temperature Control Thermostat (page 5, #5). The arrow will light when the temperature is selected (page 5, #7). The light will go on and off during the cooking process when the set temperature is reached.
- Place your ingredients in the Skillet. The oversized cooking surface will hold enough ingredients for a famil-sized one-pot meal. Make sure the Unit is on a stable, level heat resistant surface located near a dedicated electrical outlet.
- Add the Glass Lid to seal in flavor and juices if desired. Monitor the cooking process according to the cooking time of your recipe. Do not leave the Unit unattended while cooking.
- When cooking is complete, you can turn the Temperature Control Dial to 0, cutting off all heat, or you may keep the dial set on the warm setting between 120° F and 200° F to keep the food warm.
Cooking Charts
| FOOD | TEMP. | TIME |
| Hamburger (1/2-in. thick) – Rare | 375° F/190° C | 4 – 8 mins. |
| Hamburger (1/2-in. thick) – Well Done | 375° F/190° C | 9 – 12 min.s |
| Bacon | 350° F/175° C | 5 – 8 mins. |
| Pancakes | 375° F/190° C | 1 – 3 mins. |
| Fried Eggs | 300° F/150° C | 3 – 5 mins. |
| Scrambled Eggs | 325° F/162° C | 2 – 3 mins. |
| Home Fried Potatoes | 350° F/175° C | 10 – 12 mins. |
| Sausage Links/Patties | 340° F/170° C | 12 – 15 min.s |
| Fish/Seafood | 375° F/190° C | 5 – 8 mins. |
| Pork Chops (Breaded) | 375° F/190° C | 10 – 15 mins. |
| Pork Chops (Browned) | 225° F/110° C | 30 – 40 mins. |
| French Toast | 325° F/162° C | 4 – 6 mins. |
| Thin Steak (Philly Style) | 400° F/205° C | 2 – 4 mins. |
| Crispy Chicken | 400° F/200° C | 12 – 18 mins. |
NOTE: The temperatures and times shown below are estimated guidelines. You may adjust them to suit your individual taste as you become more familiar with the Unit
Settings
| FOOD | TYPE | INTERNAL TEMP. |
| Beef & Veal | Ground | 160° F |
| Steaks, roasts – medium | 140° F | |
| Steaks, roasts – rare | 125° F | |
| Chicken & Turkey | Breasts | 165° F |
| Ground, stuffed | 165° F | |
| Whole bird, legs, thighs, wings | 165° F | |
| Fish & Shellfish | Any type | 145° F |
| Lamb | Ground | 160° F |
| Steaks, roasts-medium | 160° F | |
| Steaks, roasts-rare | 130° F | |
| Pork | Chops, ground, ribs, roasts | 160° F |
| Fully cooked ham | 140° F |
The chart above should be used to check internal temperature for cooked meats. USDA Food Safety Standards.
Care & Maintenance
Before Cleaning
- Allow the Unit to cool thoroughly before handling ( up to 30 mins ).
- With the Temperature Control Dial set to 0, remove the plug from the wall outlet.
- Grasp the Temperature Control Thermostat and remove it from the Unit.
- NEVER immerse the Unit, the Temperature Control Thermostat, cord, or plug in water or other liquids.
- Carefully wipe the Temperature Control Thermostat with a damp cloth to remove any food residue or grease, especially from the metal probe.
- The Glass Lid may be placed in dishwasher or cleaned in the sink with warm water and a mild detergent. Never use abrasive cleaners or scrubbers on non-stick surfaces.
- The Electric Skillet Base cannot be placed in the dishwasher. Hand wash only without submerging.
- When using the dishwasher, place the Glass Lid on the top shelf and never upside down.
- When cleaning is completed, dry the Electric Skillet Base thoroughly, giving special care to the housing that contains the electrical pins.
- *Store the Unit in a cool, dry place. Place the Temperature Control Thermostat in the Electric Skillet Base and cover with the Glass Lid.
Caution
Failure to follow these instructions could cause damage, which may result in personal injury or property damage.
Unit Specifications
| COATING | RATED POWER | TEMPERATURE | VOLUME | SIZE |
| Cerami-TechTM Non-Stick Coating | 1500 watts | 120° F -425° F | 6 quarts | 12” x 16” |
Troubleshooting
If your Unit is not working properly:
- Make sure the plug is inserted into an electrical socket.
- Make sure the Temperature Control Thermostat is properly connected to the Electric Skillet Base.
- Make sure you have set the temperature to a setting higher than 120° F.
- The Unit may not be able to draw enough operating power from the outlet. Try switching outlets to one with no other appliances attached.
- If food is undercooked or overcooked, change the temperature and cooking time accordingly.
60-Day Money-Back Guarantee
If you decide that you don’t love this product, your order is covered by our 60-Day Money-Back Guarantee. You have 60 days from the day you receive your product to request a replacement product or refund of the purchase price minus processing and handling fees.
To receive a refund or replacement, you must return the product to us at your expense. To return the product, call customer service at 1-973-287-5176 and request a return merchandise authorization number. Pack the product carefully and include in the package a note with (1) your name, (2) mailing address, (3) phone number, (4) email address, (5) reason for return, and (6) proof of purchase or order number, and (7) specify on the note whether you are requesting a refund or replacement. Write the return merchandise authorization number on the outside of the package.
Send the product to the following return address:
Copper Chef Electric Skillet
Tristar Products
500 Returns Road
Wallingford, CT 06495

We are very proud of the design and quality of our Copper Chef ® Electric Skillet.
This product has been manufactured to the highest standards.
Should you have any questions, our friendly customer service staff is here to help you.
973-287-5176
Distributed by:
Tristar Products, Inc.
Fairfield, NJ 07004
© 2019 Tristar Products Inc.
Made in China


COPPER CHEF Wonder Cooker XL Owner’s Manual
Do not use the Copper Chef™ Wonder Cooker XL until you have read this manual thoroughly.
IMPORTANT SAFEGUARDS
Before You Begin
It is important that you read this entire manual, ensuring that you are completely familiar with using your Copper Chef cookware.
- NEVER leave Copper Chef cookware or any pan empty over a hot burner. This could ruin the pan and cause damage to your stove top.
- NEVER put your cookware in the microwave or toaster oven. This is a hazard that can cause electric sparks or fire and could possibly damage the appliances and your cookware.
- NEVER leave your cookware unattended. This helps to avoid potential injury to children or the risk of fire.
- ALWAYS supervise children who are near cookware when in use, or injury may result.
- DO NOT handle Copper Chef cookware when hot, especially when inside the oven. Use oven mitts because the pan and handles will be very hot.
- Exercise caution when using the Glass Lid. As with any glassware for cooking, the Lid could shatter due to sudden temperature changes or due to impact if it is dropped or knocked against a hard object.
- If the Glass Lid should crack, chip, or become damaged, stop using it immediately.
- DO NOT attempt to repair cookware if it is damaged.
- This product is for home use only. It is not intended for camping or commercial use.
- DO NOT use aerosol cooking sprays. These sprays will build up on cookware and become difficult to remove while reducing the nonstick coating release.
SAVE THESE INSTRUCTIONS – FOR HOUSEHOLD USE ONLY.
Parts & Accessories
- GRILL PAN* (underside)
- GRILL PAN*

- GLASS LID
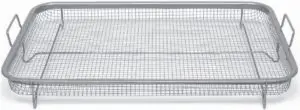
- CRISPER BASKET†
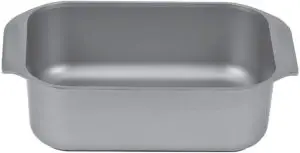
- ROASTER PAN*
Using the Accessories
Using the Crisper Basket
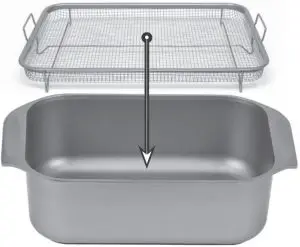
Place the Copper Crisper Basket inside the Roaster Pan/Grill Pan.
NOTE: The Copper Crisper Basket will be hot during and after the cooking process. Use oven mitts when handling the Copper Crisper Basket.
Configurations
- Double Cooker
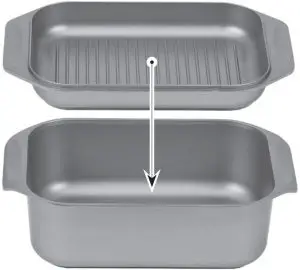
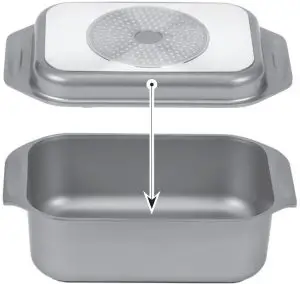
Place the Grill Pan, with its steel induction plate facing downward, on top of the Roaster Pan to cook two dishes simultaneously in the Wonder Cooker’s Double Cooker. - Shallow Roaster
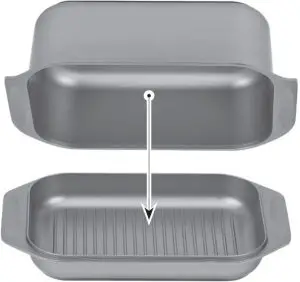
Cover the Grill Pan with the Roaster Pan to use the Wonder Cooker XL as a Shallow Roaster—great for cooking side dishes like vegetables and potatoes. - Grill Pan
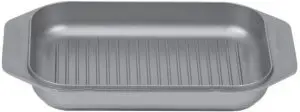
The Grill Pan can be used by itself as a Grill Pan—can be used as a grill pan for steak and grilled cheese. - Roaster
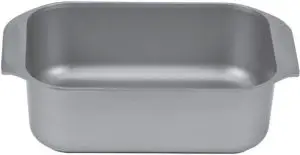
The Roaster Pan can be used by itself as a Roaster—ideal for roasting ham, making gravy, or slow cooking on an induction cooktop. - Dutch Oven
Place the Shallow Roaster, with its steel induction plate facing upward, on top of the Roaster Pan to use the Wonder Cooker XL as a Dutch Oven—perfect for braising ribs and b
Recommendations
Before Using
Please remove any clear or blue protective film on the components. Before using your new cookware, it is recommended that you wash it in hot water with mild soap or dish detergent. Rinse thoroughly and wipe dry immediately with a soft dish towel. Copper Chef cookware is dishwasher safe, so you can put it in the dishwasher to rinse and clean before using for the first time.
While Cooking on Stove Top
- We recommend low to medium heat settings for most cooking.
The CeramiTech coating will distribute heat more effectively and evenly.
This causes some protein-rich foods to cook more quickly. - The CeramiTech coating does not require the use of butter or cooking oil. If you choose to use oil or butter, we recommend oil or butter with a high smoke point: refined olive oil, peanut oil, corn oil, or (clarified) butter.
- Olive oil or oil sprays (including extra virgin olive oil) should not be used for searing or frying with high heat because olive oil has a lower smoke point than vegetable oils and can leave residue on your pan, but olive oil can be used to season your recipes.
Proper Cooking Utensils
To prevent scratching the coating, we recommend using nonmetal utensils with your Copper Chef cookware. Do not cut food on the Copper Chef Wonder Cooker XL using sharp utensils, such as forks, knives, mashers, or whisks, that can scratch the cooking surface.
Tips
Removing Stubborn Residue
When food is burned on the Copper Chef Wonder Cooker XL, a stubborn black residue may remain. If regular cleaning does not loosen it, soak in hot water and a tablespoon of non-lemon detergent for 15 mins. Allow the water to become lukewarm before you drain and rinse. Wipe with a plastic spatula or nonabrasive sponge to loosen residue. Repeat if necessary
Cooking With Gas
When cooking over a gas burner, make certain the flame touches only the bottom surface of the cookware. Your cookware can become discolored and it is a waste of energy if the flame comes up the sides of the pan.
NOTE: Copper Chef Cookware has exceptionally high thermoconductivity. Even a low setting on some gas burners could cause overheating and possibly burn foods such as thinly sliced onions.
Deep Frying
- Use oil with a high smoke point. The smoke point is the temperature to which an oil can be heated before it begins to smoke and burn. Canola, sunflower, and vegetable oil are all good choices.
- Never fill the Wonder Cooker XL more than two-thirds full of oil (6 qts.) because the oil may bubble up when food is added and could spill over the edges of the Wonder Cooker XL.
- Make sure you have a well-fitting lid, such as the Wonder Cooker XL’s Glass Lid, close to hand in case the oil catches fire. If the Glass Lid is not nearby, a large, flat baking sheet will work as a substitute.
- Check the temperature of your oil. If you have a food thermometer, heat the oil to 320° F/160° C for low, 350° F/175° C for moderate, and 375° F/190° C for high. Avoid heating the oil any higher than 375° F/190° C because it might catch fire. If you don’t have a food thermometer, test the oil with a cube of bread. It should brown in 30–40 secs. when the oil is at a moderate heat level.
- Never put wet or frozen food in the fryer. Excess liquid will cause the oil to splutter, which can cause injuries. Dry particularly wet food with a kitchen towel before frying.
- Never leave a pan of hot oil unattended. Oil can overheat and catch fire in only a minute or two.
- Remove food with a large slotted spoon or sturdy tongs – something that allows the oil to drain as you lift the food out of the Wonder Cooker.
- To dispose of the oil safely, leave it in the Wonder Cooker XL to cool completely, pour the oil into a jug, and then pour the oil back into its original bottle. Never pour the oil down the sink, which could lead to blocked pipes.
- If the oil starts to smoke, turn off the heat and leave the oil to cool.
- If the oil catches fire, turn off the heat and smother the flames with a lid, large baking tray, or fire blanket or use a fire extinguisher to put out the fire.
CAUTION: Never spray the fire with water, which will cause the flames to spread.
Care & Cleaning
Easy Maintenance
- Allow cookware to cool completely before washing. Never immerse hot cookware in cold water as this will cause irreparable warping.
- Cleaning your Copper Chef cookware is quick and easy. After each use, rinse thoroughly and dry immediately with a soft towel. If any food particles remain, fill the cookware with hot water and liquid dish detergent, soak until the water becomes lukewarm, and use a sponge or soft cloth to remove any remaining food particles.
- Do not use steel wool or other metal pads. They could leave coarse scratches.
Dishwasher Safe
Although the entire Copper Chef Collection is dishwasher safe, we recommend cleaning by hand. Hand-washing preserves the life of the cookware and helps to maintain its appearance. If cleaning in the dishwasher, follow the suggested guidelines:
- Load the dishwasher carefully. Other dishes and flatware may mark the surface of your Copper Chef cookware.
- Be sure to remove soil from other dishes and flatware.
It can be abrasive to Copper Chef’s nonstick coating. - We recommend using a non-lemon detergent.
- Regular dishwasher cleaning will eventually scratch any surface.
Storage
When storing your Copper Chef cookware, avoid stacking and crowding it in cabinets or drawers. This could cause scratches. We recommend a cookware rack or pegboard to provide convenient, safe storage.
If you must stack your nonstick cookware, always nest the cookware carefully.
Manufacturer’s Limited 5-Year Warranty on Ceramic Coating and Limited 60-Day Warranty on All Other Parts
The manufacturer warrants that your Copper Chef is free of defects in materials and workmanship.
The Copper Chef non-stick ceramic coating is warranted not to peel, chip,or blister with normal home use for 5 years from the date of the purchaser’s receipt of the product, and all other parts and components are warranted for 60 days from the date of the purchaser’s receipt of the product.
This warranty is valid only in accordance with the conditions set forth below:
- Except for the ceramic coating, normal wear and tear are not covered by this warranty.
This warranty applies to consumer use only and is void when the product is used in a commercial or institutional setting. - The warranty extends only to the original consumer purchaser and is not transferable. In addition, proof of purchase must be provided for the warranty to be applicable. This warranty is void if the product has been subject to accident, misuse, abuse, improper maintenance or repair, or unauthorized modification.
- This limited warranty is the only written or express warranty given by the manufacturer.
Any implied warranty of merchantability or fitness for a particular purpose on this product is limited to the duration of this warranty. Some states do not allow limitations on how long an implied warranty lasts, so the above information may not apply to you. - Repair or replacement of the product (or, if repair or replacement is not feasible, a refund of the purchase price less any shipping, handling, or processing fees that you paid) is the exclusive remedy of the consumer under this warranty. Under this warranty or in any claim of breach of this warranty, the manufacturer shall not be liable for any incidental or consequential damages for breach of this warranty or any implied warranty on this product. Some states do not allow the exclusion or limitation of incidental or consequential damages, so the above limitation or exclusion may not apply to you.
- This warranty gives you specific legal rights, and you may also have other rights which may vary from state to state.
60-Day Money-Back Guarantee
Your item is covered by our 60-day money-back guarantee, which starts upon receipt of your item.
To return the product, the original purchaser must package the product securely and include the following information: (1) name, (2) address, (3) the reason for return or request for refund or replacement, and (4) either proof of purchase or order number. Place the information inside an envelope, place the envelope inside the package with the unit, and mail the package to the address listed below.
Procedure for Exercise of Limited 5-Year Warranty Rights (in Use After Expiration of 60-Day Money-Back Guarantee)
To return the product under the 5-year warranty period, the original purchaser must package the product securely and include the following information: (1) name, (2) address, (3) the reason for return and request for replacement, (4) either proof of purchase or order number, and (5) a check for $12.00 for processing and handling, written out to “Copper Chef”. Place the information inside an envelope, place the envelope inside the package with the unit, and mail the package to the address listed below.
Return Address:
Copper Chef
Tristar Products, Inc.
500 Returns Road
Wallingford, CT 06495

We are very proud of the design and quality of our Copper Chef™ Wonder Cooker XL.
This product has been manufactured to the highest standards.
Should you have any problem, our friendly customer service staff is here to help you.
973-287-5131
Distributed by:
Tristar Products, Inc.
Fairfield, NJ 07004
© 2018 Tristar Products, Inc.
Made in China
CCWC_IB_RTL_ENG_V1_180612
Before You Begin
It is very important that you read this entire manual, ensuring that you are totally familiar with its operation and precautions.
Unit Specifications
IMPORTANT SAFEGUARDS
When using electrical appliances, basic safety precautions should always be followed, including:
- Read and follow all instructions carefully.
- This appliance IS NOT INTENDED for use by persons with reduced physical, sensory, or mental capabilities or lack of experience and knowledge unless they are under the supervision of a responsible person or have been given proper instruction in using the appliance. This appliance is not intended for use by children.
- Always BE SURE the Steam Vents are clear of all food debris before use. A clogged Vent may cause steam and excess pressure to build up.
- DO NOT TOUCH hot surfaces. Use pot holders or oven mitts.
- To protect against electric shock, DO NOT IMMERSE or rinse cords or plugs in water or other liquids.
- UNPLUG FROM OUTLET when not in use and before cleaning. ALLOW TO COOL before handling components.
- DO NOT OPERATE any appliance with a damaged cord or plug or after the appliance malfunctions or has been damaged in any manner. If damage occurs, contact customer service.
- DO NOT USE any attachments or utensils that were not recommended or supplied by the manufacturer. The use of attachments not
recommended for use by the manufacturer may cause serious hazardous situations, including personal injury. - DO NOT USE outdoors.
- DO NOT LET Power Cord hang over edge of table or counter or touch hot surfaces.
- DO NOT PLACE on or near a hot gas or electric burner or in a heated oven.
- EXTREME CAUTION must be used when moving an appliance containing hot contents.
- DO NOT USE appliance for anything other than its intended use.
- This appliance cooks using extreme heat.
Improper use MAY RESULT IN scalding injury.
Do not operate without Lid. - ALWAYS CHECK the Steam Vents for clogs before use.
- This appliance has been designed for use with a 120V electrical outlet only. DO NOT USE any other electrical outlet.
- The Unit generates high heat and steam during operation. All necessary precautions MUST BE TAKEN TO AVOID fire, burns, and other personal injury during operation.
- When in operation, the Perfect Egg Maker requires sufficient air space on all sides, including top and bottom. NEVER OPERATE the Unit near any flammable materials, such as dish towels, paper towels, curtains, or paper plates.
IMPORTANT SAFEGUARDS
- Always plug the Power Cord directly into the wall outlet. NEVER USE this Unit with an extension cord of any kind. A short power-supply cord (or detachable power-supply cord) is provided to reduce the risk of becoming entangled in or tripping over a longer cord.
- Anyone who has not fully read and understood all operating and safety instructions contained in this manual is NOT QUALIFIED TO OPERATE
or clean this appliance. - If this Unit falls or accidentally becomes immersed in water, unplug it from the wall outlet immediately. DO NOT REACH into the water!
- DO NOT OPERATE this appliance on an unstable surface.
- If this appliance begins to malfunction during use, immediately unplug the Cord. DO NOT USE or attempt to repair a malfunctioning appliance!
- If the appliance has a POLARIZED PLUG (one blade is wider than the other): This plug is intended to fit into a polarized outlet only one way. If the plug does not fit into the outlet, reverse the plug. If it still does not fit, contact an electrician. DO NOT attempt to modify the plug.
![]() WARNING For California Residents
WARNING For California Residents
This product can expose you to Bisphenol A, which is known to the State of California to cause birth defects or other reproductive harm. For more information, go to
www. P65Warnings.ca.gov.
![]() Caution
Caution
Hot surfaces: This appliance generates heat and escaping steam during use. Proper precautions must be taken to prevent the risk of personal injury, fires, and damage to property.
Electric Power
If the electrical circuit is overloaded with other appliances, your appliance may not operate properly. It should be operated on a dedicated electrical circuit.
SAVE THESE INSTRUCTIONS – FOR HOUSEHOLD USE ONLY
Parts & Accessories
Parts & Accessories
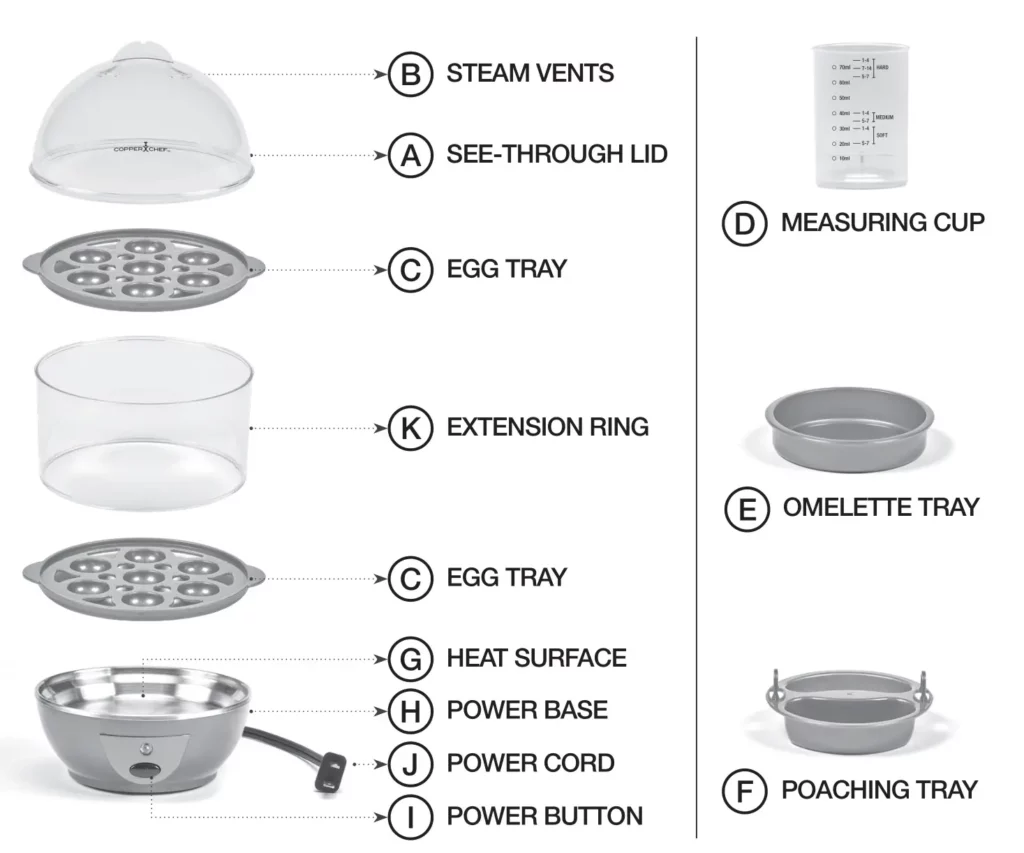
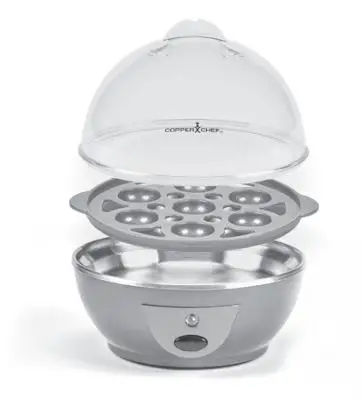
A. See-Through Lid: Must always be used during the cooking process.
B. Steam Vents: Allow excess steam to be released during the cooking process. Avoid touching the Vents during cooking. Extreme heat will cause serious harm to exposed skin.
C. Egg Trays (2): Use both Trays to hard boil up to 14 eggs at once. Cooking more than seven eggs at once for soft- or mediumboiled eggs is not recommended. This component must always be used during the cooking process. Trays should not come in direct contact with Heat Surface.
D. Measuring Cup: Used to measure water amount for each recipe. Also includes a pin to pierce eggs.
E. Omelette Tray: Holds up to two large eggs plus other ingredients for delicious omelettes.
F. Poaching Tray: Poaches two eggs at a time to perfection.
G. Heat Surface: Do not cook directly on this surface. This surface is used for steaming only. Avoid skin contact during cooking. Allow to cool thoroughly before cleaning. Never submerge in water or any other liquid.
H. Power Base: Houses the electronics that control the cooking process. Never submerge this part in water or any other liquid.
I. Power Button: Once Unit is totally set up for cooking, press the Power Button. When the cooking process is complete, press the Power Button to
shut off the Unit. Unplug the Unit when the cooking process is complete and the Unit is no longer in use.
J. Power Cord: Place Cord in proper 120V receptacle once Unit is all set up for cooking. When cooking is complete, remove Cord from the outlet and allow to
cool before cleaning.
K. Extension Ring: Use this Ring to support the second Egg Tray when hard boiling more than seven eggs at once.
IMPORTANT: Your Perfect Egg Maker has been shipped with the components shown in this section. Check everything carefully before use. If any part is missing or damaged, do not use this product and contact the shipper using the customer service number located on the back cover of the owner’s manual.
General Operating Instructions
The Measuring Cup
Using the proper amount of water during the cooking process is the key to perfect results. The cup is clearly marked for soft-, medium-, and hard-boiled eggs.
The reverse side has the measurement for omelettes and poached eggs. When cooking eggs in the shell (hard, medium, and soft), first pierce the bottom of the egg with a small hole. Then, place the eggs with the puncture facing up. Afterward, place the cap back on the Measuring Cup.
CAUTION: The pin is very sharp. Use caution when puncturing the egg.

General Operating Instructions
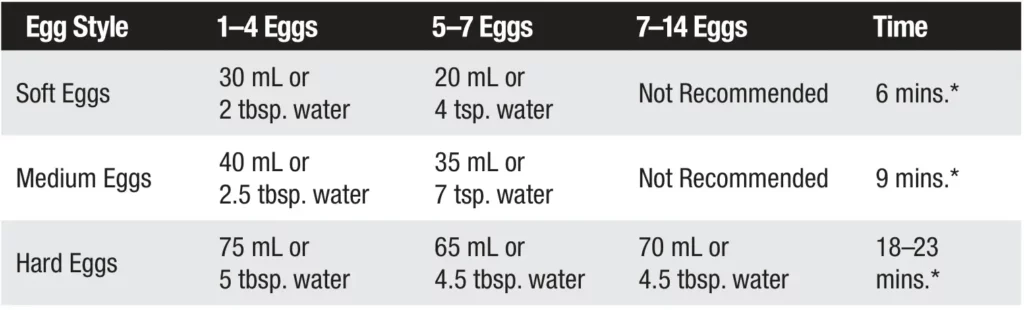
The chart is for large eggs. Time and water levels will change when cooking more than four eggs.
Tips & Tricks
- Piercing the eggs prevents them from cracking and results in uniform cooking.
- The easiest way to peel hard-boiled eggs is to blanch them in ice water to stop the cooking process. Then, crack the shell by gently tapping on a countertop or sink. Rinse the egg with cold tap water while gently peeling the shell.
Before First Use
Before using the Perfect Egg Maker for the first time, wash the components except the Power Base and Power Cord using a dish cloth or nonabrasive sponge with warm, soapy water. Rinse the components with clean water and dry thoroughly.
CAUTION: Do not submerge Heat Surface and Power Base in water or liquid of any kind. After use, you may wipe Heat Surface with a damp, nonabrasive cloth.
General Operating Instructions
For Seven or Fewer Soft-, Medium-, or Hard-Boiled Eggs
- Add water to the Heating Element using Measuring Cup. Pierce the egg bottoms with the pin located at the bottom of the Measuring Cup.
- Place up to seven eggs in the Tray with the holes facing up to prevent the egg contents from leaking.
- Cover. Plug in the Unit and press the Power Button.*
- When the cooking process is complete, press the Power Button or unplug the Unit to shut off the Unit.
For Up to 14 Hard-Boiled Eggs
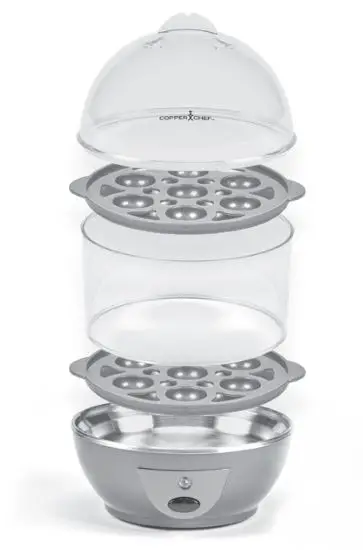
- Add water to the Heating Element using Measuring Cup.
- Pierce the egg bottoms with the pin located at the bottom of the Measuring Cup.
- Place up to 14 eggs in the Trays with the holes facing up to prevent the egg contents from leaking out.
- Place Trays in the Unit separated by Extension Ring.
- Cover. Plug in the Unit and press the Power Button.*
- When the cooking process is complete, press the Power Button or unplug the Unit to shut off the Unit.
NOTE: Be sure to press the Power Button when the cooking process is complete. If the Power Button is not pressed, the cooking process will restart once the unit cools down.
General Operating Instructions
For Omelettes

- Add water to the Heating Element using Measuring Cup.
- Mix one or two eggs with any other ingredients in a separate bowl.
- Lightly spray the Omelette Tray with oil and then add ingredients.
- Place the Egg Tray with the Omelette Pan on top of the Heating Element.
- Cover. Plug in the Unit and press the Power Button.*
- When the cooking process is complete, press the Power Button or unplug the Unit to shut off the Unit.
For Poached Eggs
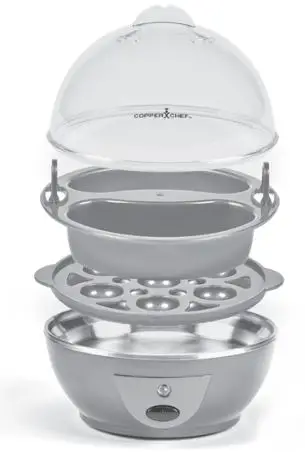
- Add water to the Heating Element using Measuring Cup.
- Lightly spray the Poaching Tray with oil. Then, add one or two eggs to the Tray. Add seasoning if desired.
- Place the Egg Tray with the Poaching Tray on top of the Heating Element.
- Cover. Plug in Unit and press the Power Button.*
- When the cooking process is complete, press the Power Button or unplug the Unit to shut off the Unit.
NOTE: Ensure that the Power Button is not depressed before plugging in the Unit. If the Power Button is depressed when the Unit is plugged in, the cooking cycle will begin and the Unit will not be able to be turned off until the cooking cycle is complete.
Care & Cleaning
Over time, minerals from hard water that collect on the heat surface have a negative effect on the functioning of the appliance. Use a sponge with warm water and soap to remove any mineral deposits from the Perfect Egg Maker.
Caution: Do not submerge Heat Surface and Power Base in water or liquid of any kind. After use, you may wipe the Heat Surface with a damp, nonabrasive cloth.
Cleaning And Maintenance
- This Unit is not dishwasher safe.
- Let the appliance cool completely before cleaning.
- Unplug the appliance from the wall socket. Drain any excess liquid.
- When cooled, wipe off the excess water and food debris with a wet sponge or towel.
- Rinse the Trays, accessories (be aware of the sharp needle at the base of the Measuring Cup), and the Lid with water and a mild detergent.
- Clean the housing and the metallic heat surface with a damp cloth. Never use abrasive cleaners. DO NOT immerse the main body in water.
- Place clean accessories inside the Perfect Egg Maker for storage. All accessories should fit inside the Unit.

60-Day Money-Back Guarantee
The Copper Chef Perfect Egg Maker is covered by a 60-day money-back guarantee. If you are not 100% satisfied with your product, return the product and request a replacement product or refund. Proof of purchase is required. Refunds will include the purchase price, less processing and handling. Follow the instructions in the Return Policy below to request a replacement or refund.
Replacement Guarantee Policy
Our products, when purchased from an authorized retailer, include a 1-year replacement guarantee if your product or component part does not perform as expected, the guarantee extends only to the original purchaser and is not transferable. If you experience an issue with one of our products within 1 year of purchase, return the product or the component part for replacement with a functionally equivalent new product or part. The original proof of purchase is required, and you are responsible to pay to return the unit to us. In the event a replacement unit is issued, the guarantee coverage ends six (6) months following the receipt date of the replacement unit or the remainder of the existing guarantee, whichever is later. Tristar reserves the right to replace the unit with one of equal or greater value.
Return Policy
To receive a refund or replacement under the money-back guarantee, you must return the product to us at your expense. To return the product, call customer service at 1-973-287-5162 or email [email protected] and request a return merchandise authorization number. Pack the product carefully and include in the package a note with (1) your name, (2) mailing address, (3) phone number, (4) email address, (5) reason for return, and (6) proof of purchase or order number, and (7) specify on the note whether you are requesting a refund or replacement. Write the return merchandise authorization number on the outside of the package.
Send the product to the following return address:
Copper Chef Perfect Egg Maker
Tristar Products
500 Returns Road
Wallingford, CT 06495
If the replacement or refund request has not been acknowledged after two weeks, please contact Customer Service at 973-287-5162.
Refund
Refunds requested within the money-back guarantee timeframe will be issued to the payment method used at purchase if the item was purchased directly from Tristar. If the item was purchased from an authorized retailer, proof of purchase is required, and a check will be issued for the item and sales tax amount. Processing and handling fees are non-refundable.
![]()
We are very proud of the design and quality
of our Perfect Egg Maker.
This product has been manufactured to the highest standards.
Should you have any questions, our friendly customer service
staff is here to help you.
Visit us at www.TristarCares.com,
email us at [email protected],
or call us at 973-287-5162
![]() Distributed by:
Distributed by:
Tristar Products, Inc.
Fairfield, NJ 07004
© 2020 Tristar Products, Inc.
Made in China
CCPEM_IB_TP_ENG_V11_200415
![]()
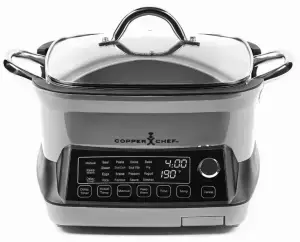
Smart Cooker
BEFORE YOU BEGIN
The Copper Chef Smart Cooker will provide you many years of delicious family meals and memories around the dinner table. But before you begin, it’s very important that you read this entire manual, making certain that you are totally familiar with this Unit’s operation and precautions.
CONGRATULATIONS
You are about to discover the latest innovation in perfectly prepared home cooked meals.
For decades, our culinary design division has created some of the most useful and popular kitchen appliances for worldwide home use. The Copper Chef Smart Cooker is the latest in our line.
The Copper Chef Smart Cooker Combines Smart Multicooker Induction Heating technology and Copper Chef Ceramic Square Cookware into one countertop unit. This Unit offers 18 preset modes to enhance your cooking experience.
How Does it Work?
The induction cooking process heats a cooking vessel through the use of magnetic induction instead of by thermal conduction from an open flame or an electrical heating element. Because inductive heating directly heats the vessel, rapid increases in temperature can be achieved and maintained.
When magnetic metal-based cookware is used, the magnetic field transfers to the bottom surface of the cookware, resulting in high heat sufficient for cooking.
The induction cooking method has heating performance comparable to that of a gas burner, but it is significantly more energy efficient.
In order for the process to work, a cooking vessel must be made of or contain a magnetic metal such as cast iron or some stainless steel.
Perfect Cooking Results
Maintaining specific cooking time and temperature is as important to a good recipe as the ingredients.
With the Copper Chef Smart Cooker, you can set and adjust the temperature and time to suit your recipe.
No more constant adjusting of the flame height and no more guesswork. The Copper Chef Smart Cooker delivers perfect cooking results without the use of dangerous open flames, exposed electrical elements, excessive heat, or wasted energy
| Model Number | Supply Power | Rated Power | Capacity | Temperature | Display |
| MFC6-Y02 | AC 120V / 60Hz | 1300W | 6.8 Qts. | 100° F–450° F | LED |
| Model Number | Supply Power | Rated Power | Capacity | Temperature | Display |
| MFC4-Y03 | AC 120V / 60Hz | 1200W | 4.5 Qts. | 100° F–450° F | LED |
IMPORTANT SAFEGUARDS
 WARNING
When using electrical appliances, always follow these basic safety precautions.
- Read all instructions carefully to prevent.
- This Unit is not intended for use by persons with reduced physical, sensory, or mental capabilities or a lack of experience and knowledge unless they are under the supervision of a responsible person or have been given proper instruction in using the Do not leave unattended with children or pets. Keep the Unit and cord away from children. Anyone who has not fully read and understood all operating and safety instructions contained in this manual is not qualified to operate or clean this Unit.
CAUTION: People with a pacemaker or similar medical device should exercise caution when using or standing near an induction unit while it is in operation, as the electromagnetic field may affect the working of the pacemaker or similar medical device.
- ALWAYS PLACE UNIT ON A FLAT, HEAT-RESISTANT SURFACE. Intended for counter top use only. DO NOT operate on unstable surface. DO NOT place Unit Base on or near a hot gas or electric burner or in a heated oven. DO NOT operate the Unit in an enclosed space or under low-hanging cabinets. Proper space and ventilation is needed to prevent property damage that may be caused by steam released during operation. NEVER operate the Unit near any flammable materials, such as dish towels, paper towels, curtains, or paper plates. DO NOT let the cord hang over the edge of the table or counter or touch hot surfaces.
- USE CAUTION when moving the Copper Chef Pan during or after a cooking cycle.
- Always handle hot pans with oven mitts while cooking. Place hot pans on heat-resistant surfaces when not seated in the Unit
- CAUTION HOT SURFACES: This Unit generates heat and steam during To avoid injury, do not touch the hot surfaces during operation. Proper precautions must be taken to prevent the risk of personal injury, fires, and damage to property.
- DO NOT USE this Unit for anything other than its intended
- NEVER FILL THE PAN to more than two thirds capacity. Many foods increase in volume or bubble vigorously while cooking and might boil over the top. Cooking with the lid will prevent splatter and possible injury if bubbles burst and touch exposed
- The use of accessory attachments not recommended by Tristar may cause injuries.
- A short power-supply cord (or detachable power-supply cord) is provided to reduce the risk resulting from becoming entangled in or tripping over a longer cord.
- NEVER plug into an outlet located below the The hanging cord may present a hazard.
- NEVER cover the steam release port on the Lid or the air vents on the back of the base of the Unit.
- DO NOT use this Unit
- DO NOT OPERATE if the cord or plug are If the Unit begins to malfunction during use, immediately unplug the cord from the power.
- DO NOT USE OR ATTEMPT TO REPAIR A MALFUNCTIONING APPLIANCE. Contact Customer Service for assistance (see the back of the manual for contact information).
- UNPLUG THE UNIT from the outlet when not in use and before Allow the Unit to cool before attaching or removing parts.
- Never immerse the Unit Base in water. If the Unit falls or accidentally becomes immersed in water, unplug it from the wall outlet immediately. Do not reach into liquid if the Unit is plugged in and Do not immerse or rinse cords or plugs in water or other liquids.
- To prevent risk of injury, replace only with authorized parts as recommended by Tristar.
- NEVER leave Copper Chef cookware or any pan empty over a hot This could ruin the pan.
- NEVER put your cookware in the microwave or toaster This is a hazard that can cause electric sparks or fire and could possibly damage the appliances and your cookware.
- NEVER leave your cookware This helps to avoid potential injury to children or the risk of fire.
- ALWAYS supervise children who are near cookware when in use, or injury may result.
- DO NOT handle hot Copper Chef cookware without hand protection, especially when using the Copper Chef Pan inside the oven. Use oven mitts because the pan and handles will be very hot.
- Exercise caution when using the Glass As with any glassware used for cooking, the Lid could shatter due to sudden temperature changes or due to impact if it is dropped or knocked against a hard object.
- If the Glass Lid should crack, chip, or become damaged, STOP USING it immediately.
- DO NOT attempt to repair cookware if it is damaged.
- This product is for home use It is NOT INTENDED for camping or commercial use.
- DO NOT use aerosol cooking sprays. These sprays will build up on cookware and become difficult to remove while reducing the non-stick coating performance.
- This Unit is not intended for deep frying Extreme caution must be used when moving the Smart Cooker when it contains hot liquids or hot oil.
- Only use the provided vessel and approved parts to avoid damage to the Unit.
- Do not put any food or liquid in the base of the Unit.
- Do not place any metal objects inside (or on) the base of the Unit. Metal will activate the induction pads. Do not place your hands on the induction heating element when hot.
It will retain heat and burn you. - Do not touch hot Use the handles or knobs.
- The fondue function is not intended to be used with oil.
- Risk of electrical shock. Cook only in removable container.
Only use the Base with the Copper Chef Pan. - Before using your new Copper Chef Smart Cooker on any countertop surface, CHECK with your countertop manufacturer or installer for recommendations about using appliances on your surfaces. Some manufacturers and installers may recommend protecting your surface by placing a hot pad or trivet under the Copper Chef Smart Cooker for heat protection. Your manufacturer or installer may recommend that hot pans, pots, or electrical appliances should not be used directly on top of the countertop. If you are unsure, place a trivet or hot pad under the Copper Chef Smart Cooker before using it.
 WARNING: For California Residents WARNING: For California Residents
This product can expose you to Bisphenol A, which is known to the State of California to cause birth defects or other reproductive harm. For more information, go to www.P65Warnings.ca.gov. |
SAVE THESE INSTRUCTIONS – FOR HOUSEHOLD USE ONLY
CAUTION: Attaching the Power Cord
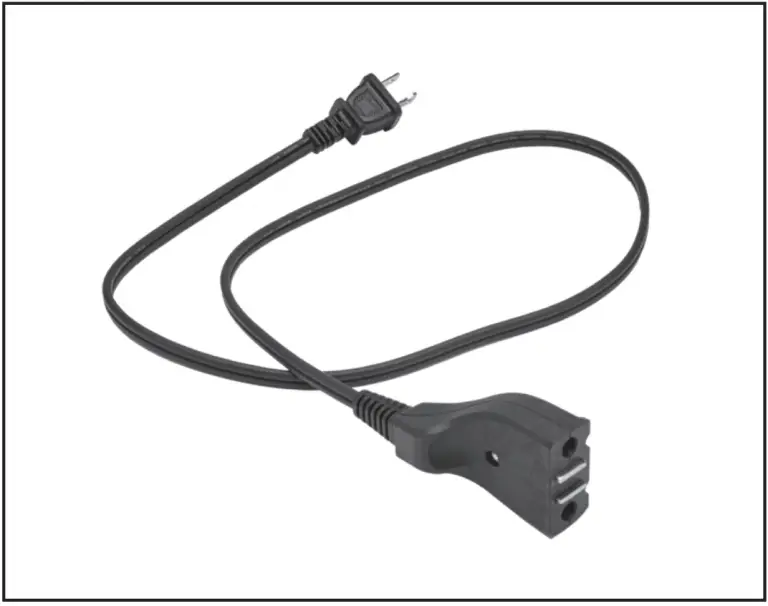
- NOTE: The Copper Chef Smart Cooker is fitted with a Quick-Release Magnetic Power Cord.
- The Smart Cooker has been designed for use with a 2-prong, 120V dedicated electrical outlet only. Always attach electrical cord to the Copper Chef Smart Cooker before plugging the Unit into an outlet. Plug into a 2-prong wall outlet with no other appliances on the same outlet.
Plugging other appliances into the outlet may cause the circuit to overload. - In the event of Unit malfunction, disconnect the Power Cord quickly from the Unit with a gentle tug where it is connected to the Unit.
- Never tug the plug forcefully from the wall outlet.
- NEVER USE WITH AN EXTENSION CORD. A short power supply cord (or detachable power-supply cord) is provided to reduce the risk from becoming entangled in or tripping over a longer cord.
- DO NOT USE WITH ANY OTHER ELECTRICAL OUTLET or modify the plug.
• A short power supply cord is provided to reduce risk of becoming entangled or presenting a tripping hazard.
This Unit has a polarized plug (one blade is wider than the other). To reduce the risk of electric shock, this plug is intended to fit into a polarized outlet only one way. If the plug does not fit fully into the outlet, reverse the plug. If it still does not fit, contact a qualified electrician. Do not attempt to modify the plug in any way

Features & Benefits
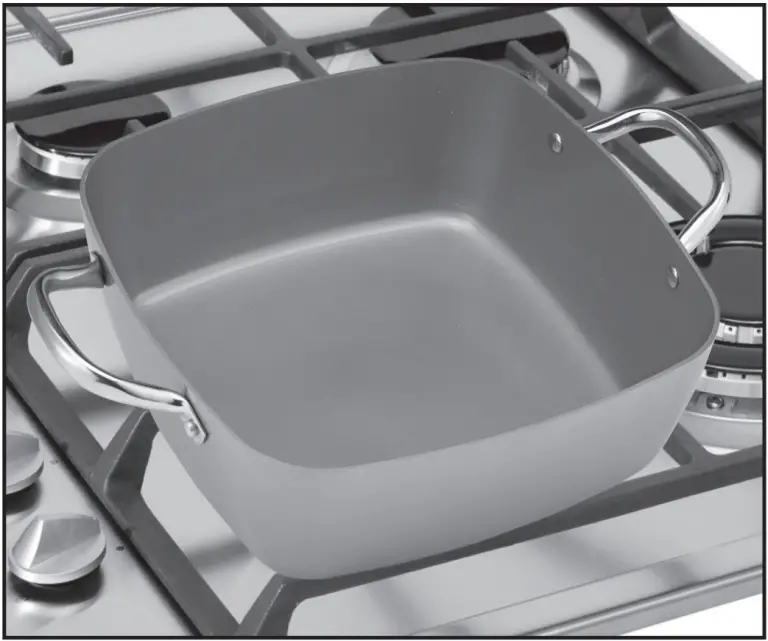
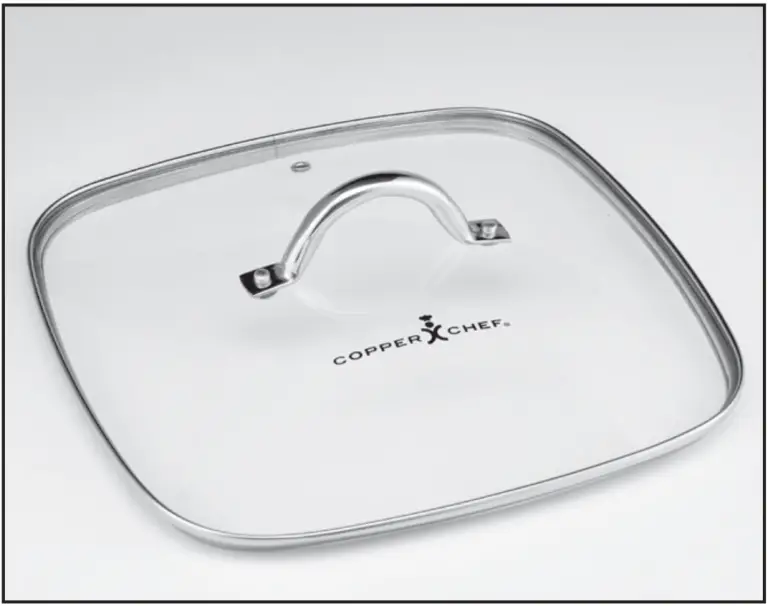
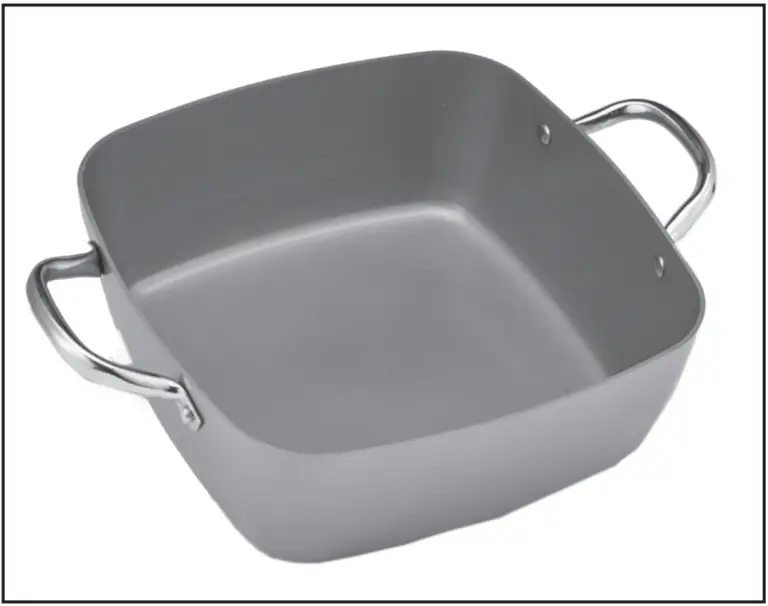
- Model MFC6-Y02 includes 11″ Cerami-Tech Copper Chef Pan with matching Tempered Glass Lid.
- Model MFC4-Y03 includes 9.5″ Cerami-Tech Copper Chef Pan with matching Tempered Glass Lid.
- The Copper Chef Pan can be used with the Smart Cooker, on the stove top, or in the oven.
- 18 cooking modes (16 preset modes and 2 manual modes) let you control the cooking time and temperature.
- Keep Warm function keeps food warm after the cooking time has expired.
18 cooking modes (16 preset modes and 2 manual modes) let you control the cooking time and temperature
Keep Warm function keeps food warm after the cooking time has expired
The Copper Chef Pan can be used with the Smart Cooker, on the stove top, or in the oven.
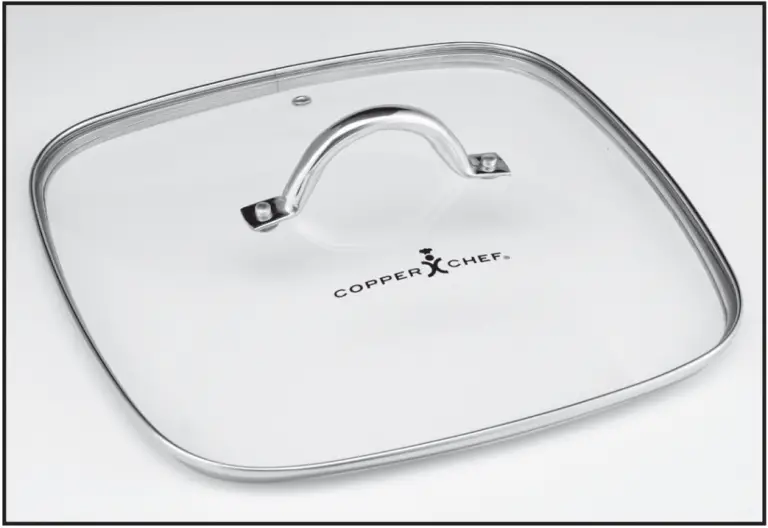
Includes matching Copper Chef Tempered Glass Lid
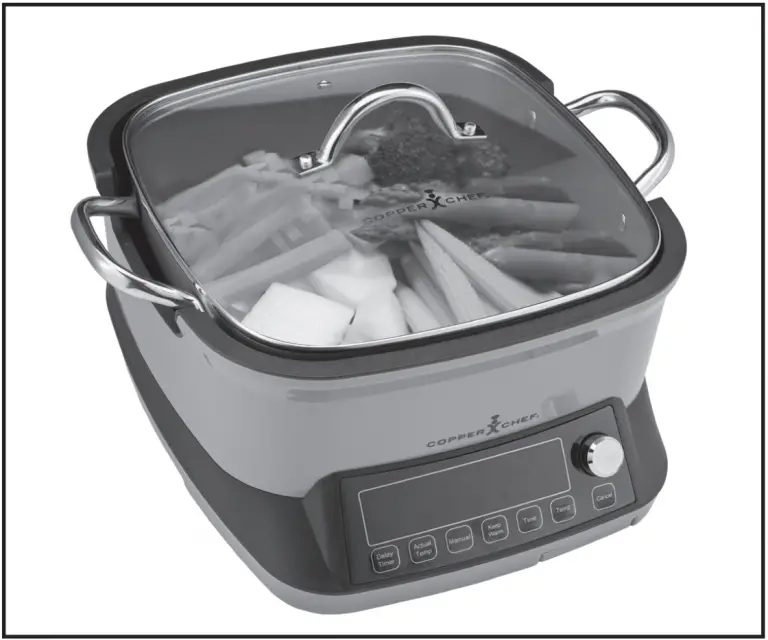
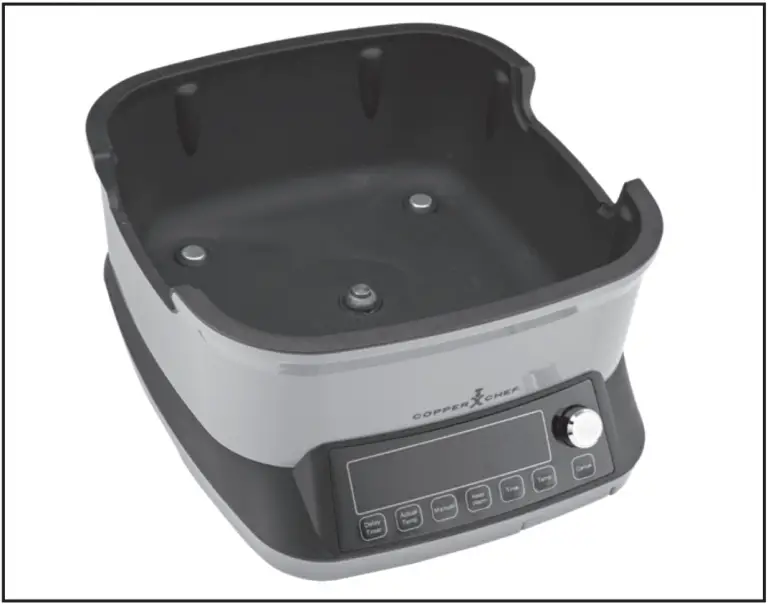
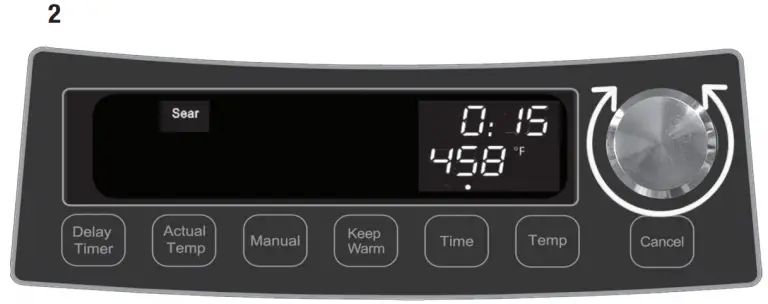
Parts & Accessories
Your Copper Chef Smart Cooker has been shipped with the parts and accessories shown below.
Check everything carefully before use. If any part appears damaged, do not use this product and contact Customer Service using the number located in the back of this manual.
Includes matching Copper Chef Tempered Glass Lid
Copper Chef Pan (9.5″ or 11″ depending on model)
Magnetic Quick-Release Power Cord
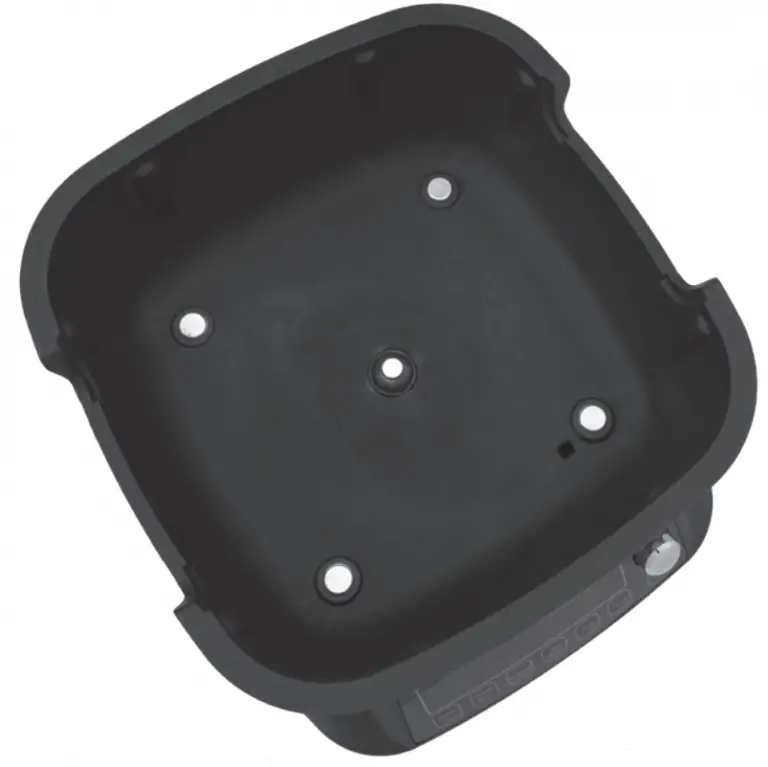
Smart Cooker Unit Base
Spillover Collection Tray
NOTE: Slide out the Collection Tray after each use to check for residue. Clean as needed
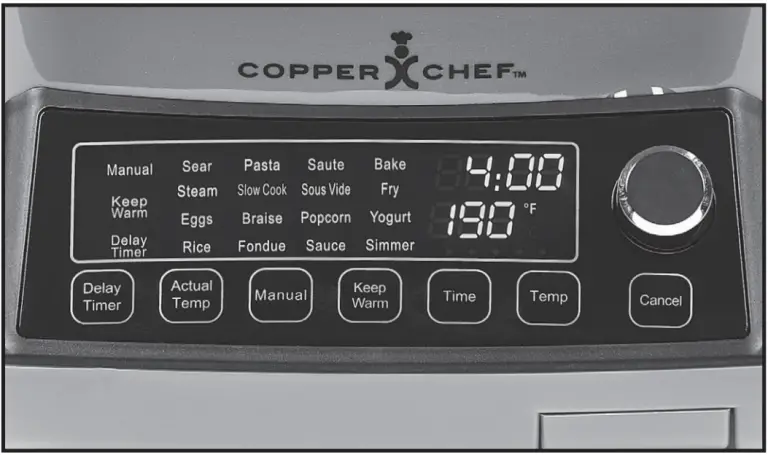
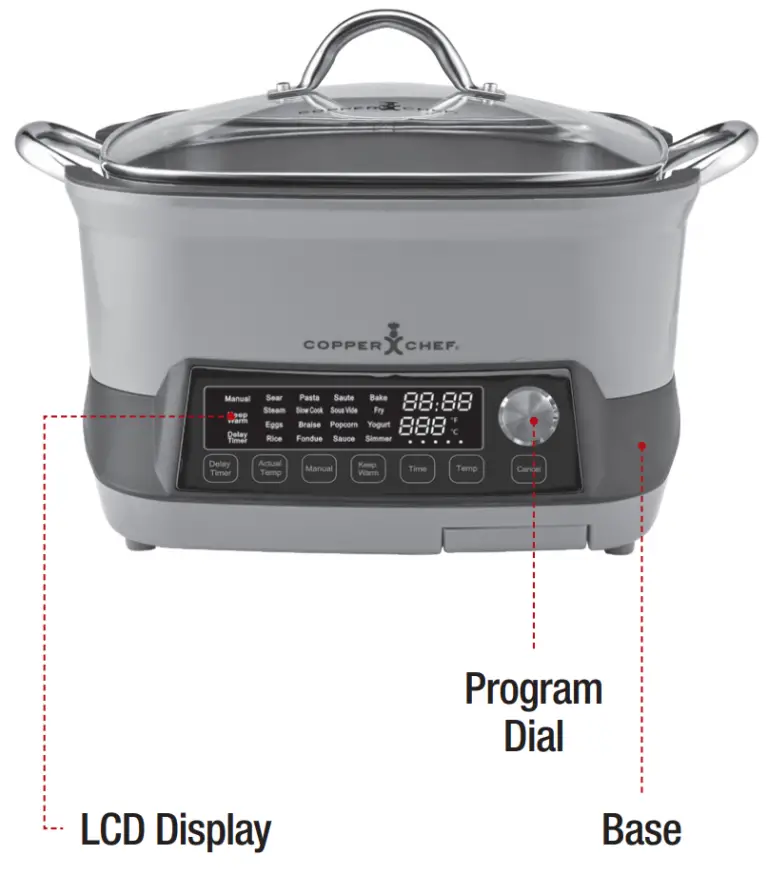
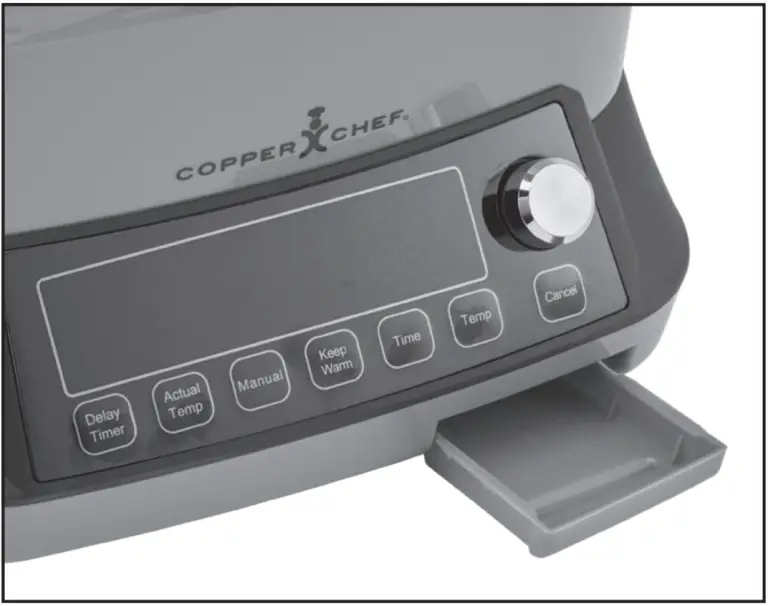
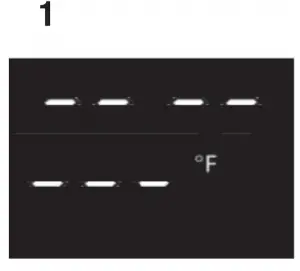
Using The Digital Control Panel
TO START: Attach the Magnetic Power Cord to the back of the Unit as shown on pg. 6. Plug the Power Cord into the wall outlet. The Digital LED Display will illuminate and the fan will turn on briefly and a series of dashes will display
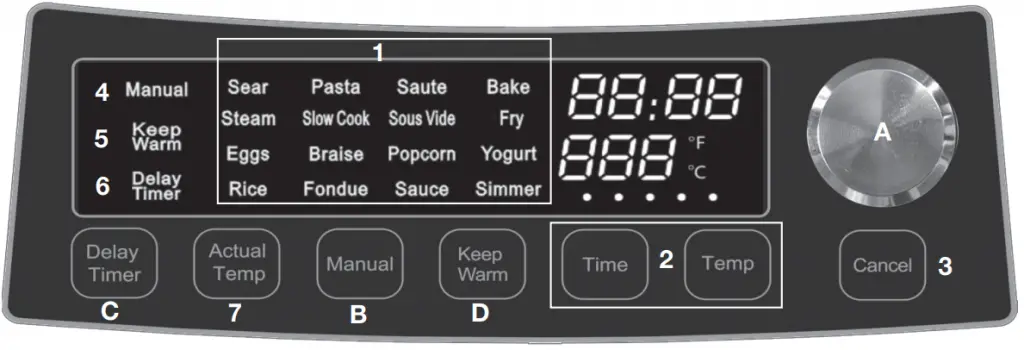
- Selecting a Preset Cooking Mode: 16 preset cooking modes are available: Sauté, Sear, Slow Cook, Sous Vide, Fry, Simmer, Bake, Steam, Braise, Popcorn, Yogurt, Rice, Pasta, Eggs, Fondue, and Sauce.
- To select a cooking mode, rotate the Program Dial to the right or left. The selected mode will illuminate the Digital LED Display. Press the Program Dial once and the cooking process will begin and the preset time and temperature will be displayed.
- Adjustable Preset Functions: The cooking time and temperature may be adjusted for some cooking modes. Press the Time or Temp Button and rotate the Program Dial to the desired setting.
The time and temperature may be changed at any time during the cooking process. - Pressing the Cancel Button will stop any cooking process immediately.
- The Manual Preset allows you to bypass the preset modes and set your own cooking time and temperature. Press the Manual Button (B), press the Time Button (2), rotate the Program Dial to the desired time, press the Temp Button (2), and rotate the Program Dial to the desired temperature. Press the Program Dial once to begin the cooking process.
- Keep Warm Function: Most presets will keep your food warm until you are ready to serve it. You may adjust the time for keeping food warm by selecting the Keep Warm Button (D) and turning the Program Dial to select the desired time.
- Delay Timer: Many Presets have a Delay Timer feature (C) that will cook your meal at a later time.
- Actual Temp: When a cooking mode is selected, the Unit takes time to reach the predetermined cooking temperature. You may select this button at any time to check the Unit’s current temperature.
SAVE THESE INSTRUCTIONS – FOR HOUSEHOLD USE ONLY
General Operating Instructions
Before using the Copper Chef Smart Cooker for the first time
- Read all material, warning stickers, and labels.
- Remove all packing materials, labels, stickers, and clear or blue protective film.
- Wash the Pan and Glass Lid with warm soapy water.
NOTE: Only the Pan and Lid are dishwasher safe. Never wash or submerge the Unit Base in water or dishwasher. - Wipe the inside and outside of the Unit Base with a clean, moist cloth.
- Before cooking food, preheat the Copper Chef Smart Cooker for a few minutes to allow the Unit to burn off the manufacturer’s protective coating of oil. Wipe the Unit with warm, soapy water and a dishcloth after the burn-in cycle.
- Place the Unit on a stable, level, horizontal, and heat-resistant surface.
- Select or set the cooking mode for your recipe
The Copper Chef Smart Cooker is designed to cook a wide variety of your favorite foods. The charts and tables provided within this manual and the Recipe Guide will help you get great results
Please refer to this information for proper time/ temperature settings and proper food quantities.
Recommendations & Tips
Re-Season Your Pan: With repeated use and washing, the characteristics of ceramic coating may fade, but you may revitalize the coating by re-seasoning your cookware:
- Add a small amount of vegetable oil to a clean paper towel. Rub the oiled paper towel all over the entire INTERIOR surface of the pan.
- Put the pan over low heat on the stove top for 30 secs. to 1 min., removing the pan if the oil starts to smoke.
- Remove the pan from the heat and let it cool.
- Once the pan has cooled, use a clean cloth or paper towel to wipe away any excess oil. Then, your pan is ready to use.
For best results, re-season your pan after a few uses or after cleaning it in a dishwasher.
Proper Cooking Utensils: To prevent scratching the coating, we recommend using nonmetal utensils with your Copper Chef cookware. Do not cut food on the Copper Chef cookware using sharp utensils, such as forks, knives, mashers, or whisks, that can scratch the cooking surface.
Removing Stubborn Residue: When food is burned on the Copper Chef cookware, a stubborn black residue may remain. If regular cleaning does not loosen it, soak in hot water and 1 tbsp. of non-lemon detergent for 15 mins. Allow the water to become lukewarm before you drain and rinse. Wipe with a plastic spatula or nonabrasive sponge to loosen residue. Repeat if necessary
Getting Started
NOTE: The Copper Chef Pan must be inserted into the Unit Base to start a cooking cycle.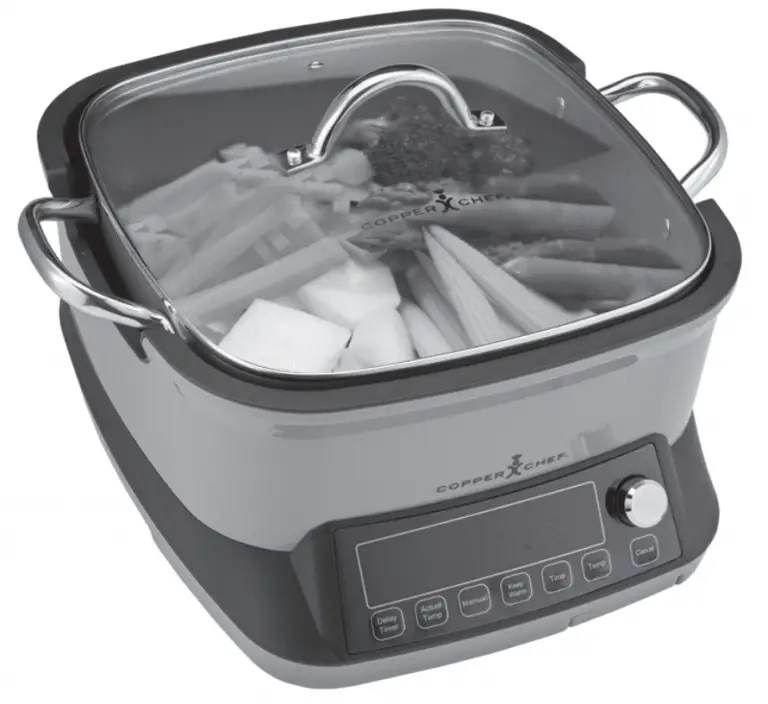
- Select and prepare recipe for cooking.
- Place all ingredients in the Pan.
- Place the Pan in the Base as shown.
- Add Lid if necessary.
- Attach the Magnetic Power Cord to the Unit Base and plug into 2-prong outlet as shown on p. 6.
Step By Step
- Once the Unit is plugged in, it will beep once.
A series of dashes will appear in place of the Time and Temperature.
- Rotate the Program Dial left or right and select the desired Preset Mode. The preset Time and Temperature will be displayed. To begin the cooking process, push the Program Dial once.
- Depending upon the cooking mode, the time count down will not begin until predetermined cooking temperature is reached.
- When the cooking time has elapsed, Unit will switch to Keep Warm for most cooking modes.
Customizing the Cooking Process
As you become more familiar with the Unit, you might want to tweak the settings to suit your individual taste.
Adjusting the cooking time and temperature and setting up the cooker for Time Delay cooking and Manual Presets are all possible with the Copper Chef Smart Cooker. See Pg. 15 for detailed instructions.
Cooking Mode Presets Explained
NOTE: See Cooking Charts & Tips (p. 13–15) for more information.
| SAUTE – | Heats the pan for use as a fry pan. |
| SEAR – | Used for browning foods. Heats the Pan to the highest temperature (450° F/232° C) for use as a fry pan. |
| SLOW COOK – | Cooks food at a low temperature for a long time |
| SOUS VIDE – | Temperature-controlled water cooking. |
| FRY – | Fry food with oil. Never fill the Pan more than one (1) inch of oil. Set the timer for the desired doneness |
| SIMMER – | Cooks food gently at a low temperature below boiling. |
| BAKE – | Used for baking. |
| STEAM – | Used for steaming foods. A small amount of water will come to a boil to create steam. Best used with a steaming rack or fry basket with the Glass Lid covering the Pan. BRAISE – Used to cook meat, fish, or vegetables by sautéeing in oi |
| BRAISE – | Used to cook meat, fish, or vegetables by sautéeing in oil and then simmering slowly in very little liquid. |
| POPCORN – | Popcorn popper. Add a small amount of oil and butter. Add popcorn and press the preset button. Adjust the time and temperature according to the amount of kernels being popped. Use with the Glass Lid covering the Pan. |
| YOGURT – | Dual temperature program for yogurt making |
| RICE – | – The rice cooker will cook rice and the Smart Cooker will switch to Keep Warm mode when the cycle is complete. The timer will not count down when using the Rice program because the cooking time will vary depending on the quantity of rice being cooked. |
| PASTA – | Used for boiling water. Best used with the Glass Lid. The timer should be set to the desired cooking time once the pasta starts to cook. |
| EGGS – | Controlled time egg cooking |
| FONDUE – | Cook and keeps food warm at a low temperature (180° F/82° C) |
| SAUCE – | Cooks’ food at a low temperature for a long time. Used for sauces for slow liquid cooking. |
| KEEP WARM – | Keeps food warm at a low temperature (160° F/71° C) |
| MANUAL – | Preset 450° F/232° C. Features adjustable time and temperature settings |
Cooking Charts & Tips
The times and temperatures on this chart show the basic default settings for the Unit.
As you become familiar with the Copper Chef Smart Cooker, you will be able to make minor adjustments to suit your taste.
Note: The Slow Cook, Sous Vide, Yogurt, Manual, and Sauce presets often require manual time and temperature settings.
| MODE | TEMPERATURE | TIME |
| Sauté | 350˚F/176˚C | 20 mins. |
| Sear | 450˚F/232˚C | 20 mins. |
| Slow Cook | 190˚F/88˚C | 4 hrs. |
| Sous Vide | 140˚F/60˚C | 60 mins. |
| Fry | 375˚F/190˚C | 45 mins. |
| Simmer | 180˚F/82˚C | 60 mins. |
| Bake | 240˚F/115˚C | 15 mins. |
| Steam | 212˚F/100˚C | 10 mins. |
| Braise | 215˚F/102˚C | 2 hrs. |
| Popcorn | 400˚F/204˚C | 6 mins. |
| Yogurt | 180˚F/82˚C | 4 hrs. |
| Rice | 212˚F/100˚C | |
| Pasta | 212˚F/100˚C | 20 mins. |
| Eggs | 212˚F/100˚C | 20 mins. |
| Fondue | 180˚F/82˚C | 25 mins. |
| Sauce | 170˚F/76˚C | 20 mins. |
Internal Temperature Meat Chart
This chart should be used along with a meat thermometer to check the internal temperature of cooked meats. Be sure to review the USDA’s food safety standards.
| FOOD | TYPE | INTERNAL TEMP. |
| Beef & Veal | Ground Steaks, roasts: medium Steaks, roasts: rare |
145° F (63° C) 145° F (63° C) 125° F (52° C) |
| Chicken & Turkey | Breasts Ground, stuffed Whole, legs, thighs, wings |
165° F (74° C) 165° F (74° C) 165° F (74° C) |
| Fish & Shellfish | Any type | 145° F (63° C) |
| Lamb | Ground Steaks, roasts: medium Steaks, roasts: rare |
160° F (71° C) 140° F (60° C) 130° F (54° C) |
| Pork | Chops, ground, ribs, roasts Fully cooked ham |
160° F (71° C) 140° F (60° C) |
Tips
- Foods that are smaller in size usually require a slightly shorter cooking time than larger ones.
- Large quantities of food only require a slightly longer cooking time than smaller quantities.
- Flipping or turning larger foods halfway through the cooking process ensures that all the pieces are evenly cooked.
Cooking Charts & Tips
Sous Vide
What is Sous Vide?
In the Sous Vide method of cooking, food is sealed inside a plastic bag immersed in water and cooked at a lower temperature.
Sous Vide allows for greater control and evenly cooked results.
The Sous Vide method holds food at the perfect level of doneness for much longer than regular cooking methods would allow.
What are the basic steps?
The food must be in a sealed plastic bag or vacuum-sealed bag.
Submerge pouches into the water bath after the liquid has reached your desired temperature.
Cook for at least the minimum amount of time called for in your recipe.
Remove each pouch carefully from the water bath. Note: Meat, poultry, or fish can be seared in a hot pan to create a crisp surface immediately before serving.
The Sous Vide Cooking Cycle
Place the Copper Chef Pan into the Smart Cooker. Fill the Pan with water. Turn the Program Dial to Sous Vide.
Adjust the cooking time and temperature and then press the Program Dial to confirm.
Cover with the Glass Lid.
The timer will begin once the water reaches the desired temperature, and the Unit will beep. Now, you can add your sealed bags. The Unit will beep once the timer is done.
CAUTION: Remove hot cooking bags with plastic tongs to prevent piercing and burns from hot water. Use oven mitts.
| FOOD | TEMP. | TIME | COOKS TIP |
| Filet or Steak | |||
| Rare | 125°F/52°C | 1 hr. 15 mins. | Sear with butter in hot skillet |
| Medium Rare | 135°F/57°C | 1 hr. 15 mins. | Sear with butter in hot skillet |
| Medium | 140°F/60°C | 1 hr. 15 mins. | Sear with butter in hot skillet |
| Medium Well | 150°F/65°C | 1 hr. 15 mins. | Sear with butter in hot skillet |
| Well Done | 160°F/71°C | 1 hr. 15 mins. | Sear with butter in hot skillet |
| Rib Roast Med. | 140°F/60°C | 6–14 hrs. | Sear all over, slice thin |
| Pork | |||
| Roast | 155°F/68°C | 3 hrs. | Sear in skillet with butter & herbs |
| Chops (Medium) | 145°F/63°C | 1 hr. | Sear in skillet with butter & herbs |
| Chops (Well Done) | 160°F/71°C | 1 hr. | Sear in skillet with butter & herbs |
| Poultry | |||
| Chicken Breast | 150°F/65°C | 1 hr. | Sear in skillet with butter & herbs |
| Dark Meat | 165°F/74°C | 1 hr. | Sear in skillet with butter & herbs |
| Fish | |||
| Filet or Steak | 125°F/52°C | 45 mins. | Sear in skillet with butter & herbs |
| Eggs | |||
| Poached | 150°F/65°C | 1 hr. | Serve on toast or muffin |
| Vegetables | |||
| Green | 180°F/82°C | 5–20 mins. | Toss with olive oil, salt & nuts |
| Root | 180°F/82°C | 1.5–3 hrs. | Slice/toss with butter & herbs |
- Place the Copper Chef Pan into the Copper Chef Smart Cooker.
- Fill the Pan with milk
- Turn the Dial to Yogurt
- Push the Dial to confirm
- Cover with the Glass Lid
- The Unit will heat the milk to 180° F/82˚ C.
Then, the Unit will beep and stop heating to let the milk cool to 110° F/43˚ C. - Once the milk cools to 110° F/43˚ C, the Unit will beep several times.
- Add your culture and cover with the Glass Lid. Press the Program Dial to confirm. The Unit will maintain this temperature for the desired time.
- The Unit will beep once the timer is done.
- Place the Copper Chef Pan into the Copper Chef Smart Cooker.
- Add the desired amount of water.
- Add the eggs.
- Turn the Dial to Egg.
- Push the Dial to confirm.
- Cover with the Glass Lid.
Boiled Eggs In Shell
Soft:
Cook 6 mins. Drain, cool in ice water, and peel.
Medium:
Cook 9 mins. Drain, cool in ice water, and peel.
Hard:
Cook 15–18 mins. Drain, cool in ice water, and peel.
- Place the Copper Chef Pan into the Copper Chef Smart Cooker.
- Add the water, rice, salt, and oil.
- Turn Dial to Rice.
- Push the Dial to confirm. Cover with the Glass Lid.
- The display will state 212° F/100˚ C and the rotating circle will spin during the cooking cycle.
- Ratio for long-grain white rice
Combine 1 ½ cups of liquid with 1 cup of rice; this will yield about 2 cups rice or enough for 4 (½-cup) servings.
Ratio for brown rice
Combine 2 cups of liquid with 1 cup of brown rice; this will yield about 2 cups rice or enough for 4 (½-cup) servings.
- Use 1 cup popcorn kernels plus 2 tbsp. canola oil.
- Toss the popcorn kernels with the oil in a bowl.
- Place the Copper Chef Pan into the Copper Chef Smart Cooker.
- Turn the Dial to Popcorn.
- Push the Dial to confirm.
- Let the pan heat up.
- Add the kernel mixture to the pan.
- Cover with the Glass Lid.
Frequently Asked Questions
- Can I use any type of pan to cook in my Copper Chef Smart Cooker?
No, use only the original Copper Chef Deep Square pan with induction base! - Does induction cooking require special techniques?
You will need to familiarize yourself with the settings used for different purposes. A common problem for new users is that in the beginning they may overcook food as they don’t realize how much heat is generated so quickly. If you are new to induction cooking, we recommend practicing by boiling a pot of water. Repeat this several times with different levels of water on different heat settings. You will soon get a good feel for how quickly the pot heats up. This absolutely can change the way you cook – if you are busy and you need to attend to another task, you should set the Unit to OFF until you return. When you return, the Pan heats up instantly. - Does the Unit get hot?
The Smart Cooker itself barely gets warm, except directly beneath the cooking vessel. As soon as the cooking vessel is removed from the Smart Cooker the element turns off and automatically cools down. However, the surface just beneath the pot takes a bit more time to cool… avoid touching it.
DISPLAY ERROR INDICATOR
DO NOT USE OR ATTEMPT TO REPAIR A MALFUNCTIONING UNIT. Contact customer service for further information.
NOTE: E6 error may be caused by too little liquid in hot pan. The Unit will display E6. Shut off Unit, turn on Unit, add more liquid or turn down heat setting
| Display Shown | Cause of Error |
| E1 | Input voltage too low |
| E2 | Input voltage too high |
| E3 | Circuit board failure (NTC for IGBT short circuit or open) |
| E4 | Temperature sensor opened |
| E5 | Temperature sensor short circuit |
| E6 | Overheat |
Cleaning & Storage
Easy Maintenance
- When cleaning the Copper Chef Pan, allow the Pan to cool completely before washing. Never immerse hot cookware in water as this will cause irreparable warping.
- Cleaning your Copper Chef Pan is quick and easy. After each use, wash it in hot water with mild soap or dish detergent. Rinse thoroughly and wipe dry immediately with a soft dish towel. If any food particles remain, fill the cookware with hot water and liquid dish detergent, soak until the water becomes lukewarm, and use a sponge or soft cloth to remove any remaining food particles.
- Do not use steel wool or metal pads. They could leave coarse scratches.
- Hand wash the Unit Base. DO NOT submerge the base in water. To hand wash, wipe the inside and outside of the Unit Base with a clean, moist cloth.
- Make sure that the device is properly cleaned before storing it in a dry place.
Dishwasher Safe
Although the entire Copper Chef Collection is dishwasher safe, we recommend cleaning by hand. Handwashing preserves the life of the cookware and helps to maintain its appearance. If cleaning in the dishwasher, follow the suggested guidelines:
- Load the dishwasher carefully. Other dishes and flatware may mark the surface of your Copper Chef cookware.
- Be sure to remove soil from other dishes and flatware. It can be abrasive to Copper Chef’s nonstick coating.
- We recommend using a non-lemon detergent.
- Regular dishwasher cleaning will eventually scratch any surface.
Note: Unplug the Magnetic Power Cord prior to cleaning the Copper Chef Smart Cooker. Do not use any caustic cleaning agents or abrasive scrubbing pads on the Unit.
- To protect yourself from electric shock, NEVER immerse the device, or the Power Cord in water or other liquids.
- DO NOT use any petroleum products, which will damage the outer Unit housing and the Control Panel.
- DO NOT use/store any flammable, acid, or alkaline materials or substances near the device, as this may reduce the service life of the device and lead to deflagration (fire) when the device is turned on.
- DO NOT stack heavy objects on top of the Unit. Excessive weight could possibly damage the Unit.
Ceramic Coating 5-Year Guarantee
We guarantee that the Copper Chef® nonstick ceramic coating will not peel, chip, or blister with normal consumer use for 5 years. In addition, a 60-Day Money-Back Guarantee applies to all of our products, and if fewer than 60 days have passed since you received the product, you may be eligible for a full refund of your purchase price. You may review our 60-Day MoneyBack Guarantee by visiting buysmartcooker.com.
If more than 60 days have passed since you received the product and the ceramic coating peels, chips, or blisters, you may return the product to us for replacement. Please call customer service at 1-973-287-5111 or send an email to [email protected] and request a return merchandise authorization number. Pack the product carefully and include in the package a note with (1) your name, (2) mailing address, (3) phone number, (4) email address, (5) reason for return, (6) proof of purchase or order number, (7) and a check or money order for $19.99 per unit, and (8) specify on the note whether you are requesting a refund or replacement. Write the return merchandise authorization number on the outside of the package.
Send the product to the following address:
Copper Chef Smart Cooker
Tristar Products Inc.
500 Returns Road
Wallingford, CT 06495.
You are responsible for the cost of returning the product. If we cannot replace the product, we may refund your purchase price. If we refund the purchase price, we will refund you the check or money order amount submitted with your return. You will not be eligible for a return, repair, or replacement if the product has been subject to accident, misuse, abuse, improper maintenance or repair, or unauthorized modification. We do not make any warranties, express or implied, about the product. However, you do have the benefit of this 5-Year guarantee.

We are very proud of the design and quality of our Copper Chef ® Smart Cooker.
This product has been manufactured to the highest standards. Should you have any questions, our friendly customer service staff is here to help you.
Visit us at www.TristarCares.com, email us at [email protected], or call us at 973-287-5111

ELECTRIC SKILLET
Owner’s Manual
12″ x 12″ Skillet | MODEL: CM-813
Warranty Information Inside
Do not use the Copper Chef Electric Skillet™ until you have read this manual thoroughly.
Save These Instructions – For Household Use Only
Copper Chef Electric Skillet™
Use As A Skillet, A Buffet Server, For Steaming, Sautéing or Frying.
Before you Begin
It is very important that you read this entire manual making certain that you are totally familiar with its operation and precautions.
Copper Chef Electric Skillet
Your new Copper Chef Electric Skillet™ will become your favorite mealtime appliance. It will help you prepare all your family favorites in a cooking environment that maintains the perfect temperature for best results.
The Copper Chef Electric Skillet will steam, sauté, and fry meats, fish, seafood, vegetables, and casseroles without the need for oils or butter thanks to the exclusive Cerami-Tech non-stick cooking surface. Nothing sticks so clean ups are a breeze.
The secret to this Unit’s perfect performance is a result of the Temperature Control Thermostat that maintains a precise temperature from 120°F to 425°F. The lower setting is perfect for keeping your food warm in a buffet setting.
The Unit’s 12″ x 12″ capacity gives the Copper Chef Electric Skillet 25% more cooking surface than other units.
IMPORTANT SAFEGUARDS
When using the appliance, basic safety precautions should always be followed, including the following:
- READ AND FOLLOW all instructions carefully.
- MAKE SURE the appliance is plugged into a wall socket.
- This appliance is NOT INTENDED for use by persons with reduced physical, sensory, or mental capabilities, or lack of experience and knowledge, unless they are under the supervision of a responsible person or have been given proper instruction in using the appliance. This appliance is NOT INTENDED for use by children.
- DO NOT use this unit if the plug, the power cord, or the appliance itself is damaged in any way.
- If the power cord is DAMAGED, you must have it replaced by the manufacturer, its service agent, or a similarly qualified person in order to avoid hazard.
- AVOID electric shock, never immerse the unit, the temperature control thermostat, cord or plug in water or other liquids.
- KEEP the appliance and its power cord out of the reach of children when it is in operation or in the “cooling down” process.
- KEEP the power cord away from hot surfaces. DO NOT plug in the power cord or operate the unit controls with wet hands.
- NEVER connect this appliance to an external timer switch or separate remote-control system.
- NEVER use this appliance with an extension cord of any kind.
- The use of accessory attachments NOT RECOMMENDED by the appliance manufacturer may cause injuries.
- NEVER attempt home repair, consult with an authorized service technician for examination, repair or electrical or mechanical adjustment.
- DO NOT operate the appliance on or near combustible materials such as tablecloths and curtains.
- ALWAYS use extreme caution when moving this appliance if it contains hot oil or any other hot liquid.
- DO NOT use this appliance for any purpose other than described in this manual.
- NEVER leave the appliance unattended.
- ALWAYS attach the temperature control thermostat to the appliance first, then plug into the wall outlet. To disconnect, switch off, remove plug from the wall outlet, then remove the temperature control thermostat from the appliance.
- The unit’s outer surfaces may BECOME HOT during use. Use handles or knobs on unit and wear oven mitts when handling hot components or touching hot surfaces.
4
- USE silicone or plastic tongs when removing or handling hot food.
- ALLOW time for unit to cool before cleaning or storing.
- To AVOID damage to countertops, operate this unit only on a level heat resistant surface.
This product can expose you to Bisphenol A, which is known to the State of California to cause cancer and/or birth defects or other reproductive harm. For more information, go to www.P65Warnings.ca.gov.
- Always operate the appliance on a horizontal surface that is level, stable, and noncombustible.
- This appliance is intended for normal household use only. It is not intended for use in commercial or retail environments.
- This appliance is not intended for deep frying foods.
- If the Copper Chef Electric Skillet is used improperly or for professional or semi-professional purposes or if it is not used according to the instructions in the user manual, the warranty becomes invalid and the manufacturer will not be held liable for damages.
- Always unplug the appliance after use.
- Let the appliance cool down for approximately 30 mins before handling, cleaning, or storing.
- A short power-supply cord (or detachable power-supply cord) is provided to reduce the risk resulting from becoming entangled in or tripping over a longer cord.
Electric Power
If the electrical circuit is overloaded with other appliances, the Unit may not operate properly. It should be operated on a dedicated electrical circuit.
Electromagnetic Fields (EMF)
This appliance complies with all standards regarding electromagnetic fields (EMF). If handled properly and according to the instructions in this user manual, the appliance is safe to use based on scientific evidence available today.
SAVE THESE INSTRUCTIONS – FOR HOUSEHOLD USE ONLY.
5
Parts & Accessories
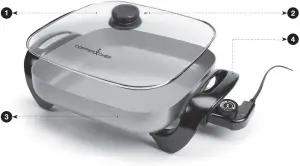
1. Glass Serving Lid 5. Temperature Control Thermostat
2. Steam Release Vent 6. Temperature Control Dial
3. 12″ x 12″ Electric Skillet Base 7. On/Off Arrow Indicator
4. Cool Grip Handles
Important: Please make sure that your Copper Chef Electric Skillet has been shipped as per your order. Check everything carefully before use. If any part is missing or damaged, do not use this product. Contact shipper using the customer service number located in the back of the owner’s manual.
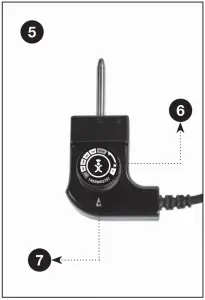
Never immerse the Unit, the Temperature Control Thermostat, cord or plug in water or other liquids. Water will short out the electrical components and cause possible severe electrical shock.
Important: Do not use metal utensils with your Copper Chef Electric Skillet.
They may damage the non-stick coating. Use non-stick friendly utensils suitable for use on hot surfaces.
6
Before First Use: Wash and rinse Glass Serving Lid and cooking surface with warm water and a mild soapy detergent. Never use abrasive cleaners or metal scrubbers on this Unit. Never immerse the Unit, the Temperature Control Thermostat, cord or plug in water or other liquids.

Important: This appliance has a polarized plug (one blade is wider than the other). To reduce the risk of electric shock, this plug is intended to fit into a polarized outlet only one way. If the plug does not fit fully into the outlet, reverse the plug. If it still does not fit, contact a qualified electrician. Do not attempt to modify the plug in any way.
- Insert the Temperature Control Thermostat with the Temperature Control Dial facing up, into the accessory jack located on the side of the unit below the handle. Push in all the way to be sure it is making full contact.
- Plug AC cord into electric outlet.
- Set cooking temperature by aligning the Temperature Control Dial with the On/Off Arrow Indicator on the Temperature Control Thermostat (page 5, #5). Arrow will light when temperature is selected (page 5, #7). Light will go on and off during the cooking process when at set temperature.
- Following your recipe, place ingredients in the Skillet. The oversize cooking surface will hold enough ingredients for a family sized “one pot” meal. Make sure the Unit is on a stable, level heat resistant surface located near a dedicated electrical outlet.
- Add the Glass Serving Lid to seal in flavor and juices if desired. Monitor the cooking process according to the cooking time of your recipe. Do not leave the Unit unattended while cooking.
- When cooking is complete, you can turn the Temperature Control Dial to “0”, cutting off all heat or you may keep the dial set on the warm setting between 120°F – 200°F to keep the food warm.
7
| FOOD | TEMP. | TIME |
| Hamburger (½-inch thick) – Rare | 375° F / 190°C | 4 – 8 min. |
| Hamburger (½-inch thick) – Well Done | 375° F / 190°C | 9 – 12 min. |
| Bacon | 350° F / 175°C | 5 – 8 min. |
| Pancakes | 375° F / 190°C | 1 – 3 min. |
| Fried Eggs | 300° F / 150°C | 3 – 5 min. |
| Scrambled Eggs | 325° F / 162°C | 2 – 3 min. |
| Home Fried Potatoes | 350° F / 175°C | 10 – 12 min. |
| Sausage Links/Patties | 340° F / 170°C | 12 – 15 min. |
| Fish/Seafood | 375° F / 190°C | 5 – 8 min. |
| Pork Chops (Breaded) | 375° F / 190°C | 10 – 15 min. |
| Pork Chops (Browned) | 225° F / 110°C | 30 – 40 min. |
| French Toast | 325° F / 162°C | 4 – 6 min. |
| Thin Steak (Philly Style) | 400° F / 205°C | 2 – 4 min. |
| Crispy Chicken | 400° F / 200°C | 12 – 18 min. |
NOTE: The temperatures and times shown below are estimated guidelines. You may adjust them to suit your individual taste as you become more familiar with the unit
8
| FOOD | TYPE | INTERNAL TEMP. |
| Beef & Veal | Ground Steaks, roasts-medium Steaks, roasts-rare |
160° F 160° F 145° F |
| Chicken & Turkey | Breasts Ground, stuffed Whole bird, legs, thighs, wings |
165° F 165° F 165° F |
| Fish & Shellfish | Any type | 145° F |
| Lamb | Ground Steaks, roasts-medium Steaks, roasts-rare |
160° F 160° F 145° F |
| Pork | Chops, ground, ribs, roasts Fully cooked ham |
160° F 140° F |
The chart above should be used to check internal temperature for cooked meats. USDA Food Safety Standards.
9
Before Cleaning
- Allow Unit to cool thoroughly before handling (up to 30 minutes).
- With Temperature Control Dial set to “0”, remove plug from wall outlet.
- Grasp the Temperature Control Thermostat and remove it from the Unit.
- NEVER immerse the Unit, the Temperature Control Thermostat, cord or plug in water or other liquids.
- Carefully wipe the Temperature Control Thermostat with a damp cloth to remove any food residue or grease, especially from the metal probe.
- The Glass Serving Lid may be placed in dishwasher or cleaned in the sink with warm water and a mild detergent. Never use abrasive cleaners or scrubbers on non-stick surfaces.
- The Electric Skillet Base cannot be placed in the dishwasher. Hand wash only without submerging.
- When using the dishwasher, the Glass Serving Lid should be on the top shelf and never upside down.
- When cleaning is completed, dry Electric Skillet Base thoroughly, giving special care to the housing that contains the electrical pins.
- *Store the Unit in a cool dry place. Place the Temperature Control Thermostat in the Electric Skillet Base and cover with the Glass Serving Lid.
Failure to follow these instructions could cause immediate damage or at a later date, which may result in personal injury or property damage.
Unit Specifications
| COATING | RATED POWER | TEMPERATURE | VOLUME | SIZE |
| Cerami-Tech™ Non-Stick Coating | 1200 watts | 120°F – 425°F | 4 liters | 12″ x 12″ |
10
If your unit is not working properly:
- Make sure Plug is in electrical socket.
- Make sure Temperature Control Thermostat is properly connected to Electric Skillet Base.
- Make sure you have set the temperature to a setting higher than 120°F.
- The Unit may not be able to draw enough operating power from the outlet. Try switching outlets to one with no other appliances attached.
- If food is under cooked or over cooked – change temperature and cooking time accordingly.
60-Day Money-Back Guarantee
If you decide that you don’t love this product, your order is covered by our 60-Day Money-Back Guarantee. You have 60 days from the day you receive your product to request a replacement product or refund of the purchase price minus processing and handling fees.
To receive a refund or replacement, you must return the product to us at your expense. To return the product, call customer service at 1-973-2875129 and request a return merchandise authorization number. Pack the product carefully and include in the package a note with (1) your name, (2) mailing address, (3) phone number, (4) email address, (5) reason for return, and (6) proof of purchase or order number, and (7) specify on the note whether you are requesting a refund or replacement. Write the return merchandise authorization number on the outside of the package.
Send the product to the following return address:
Copper Chef Electric Skillet
Tristar Products
500 Returns Road
Wallingford, CT 06495
We are very proud of the design and quality of our Copper Chef Electric Skillet™.
—————————————————————————————
This product has been manufactured to the highest standards. Should you have any problem, our friendly customer service staff is here to help you.
973-287-5129
Distributed by:
Tristar Products, Inc.
Fairfield, NJ 07004
© 2018 Tristar Products Inc.
Made in China
CCES_12IN_1PC_IB_WM_ENG_V2_181009