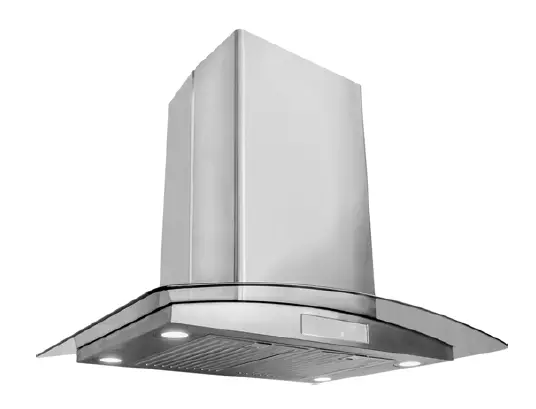
COSMO Island Mount Range Hood
This manual is made with 100 % recycled paper.
Electronic version of this manual is available at: www.cosmoappliances.com
Thank you for your purchase. We know that you have many brands and products to choose from and we are honored to know that you have decided to take one of our products into your home and hope that you enjoy it.
Our appliances are designed according to the strictest safety and performance standard for the North American market. We follow the most advanced manufacturing philosophy. Each appliance leaves the factory after thorough quality inspection and testing. Our distributors and our service partners are ready to answer any questions you may have regarding how to install, use and care for your range hood.
We hope that this manual will help you learn to use the product in the safest and most effective manner and care for it so that it may give you the highest satisfaction in cooking for years to come. If you have any questions or concerns, please contact the dealer from whom you purchased it, or contact our Customer Support at 1-888-784-3108.
The manual also includes directions for the professional installer that will install the product in your home. We recommend using trained personnel for professional installation.
Please keep this manual for future use
STAINLESS STEEL BAFFLE FILTERS

About Your New Filters
Stainless Steel Baffle Filters do not need linings or mesh inside of the filters and are completely constructed out of stainless steel. The stainless steel construction allows them to be used again after being cleaned or going through the dishwasher.
How do Baffle Filters Work?
They function by forcing the grease filled air to quickly and continuously change direction as it passes through the filter. The grease is unable to change direction as fast as the air carrying them, they end up getting caught on the metal blades and then trapped into the filter tray. These filters are both efficient and require less maintenance.
IMPORTANT SAFETY INSTRUCTIONS
Read all instructions before using this appliance.
Save these instructions for future references
Approved for residential appliances
For residential use only
IMPORTANT SAFETY INSTRUCTIONS
CAUTION
- FOR GENERAL VENTILATING USE ONLY. DO NOT USE TO EXHAUST HAZARDOUS OR EXPLOSIVE MATERIALS OR VAPORS.
- To reduce risk of fire and to properly exhaust air, do not vent exhaust air into spaces within walls, ceilings, attics, crawl spaces, or garages.
WARNING : TO REDUCE THE RISK OF FIRE, USE ONLY METAL DUCT WORK. Install this hood in accordance with all requirements specified.
WARNING : TO REDUCE THE RISK OF FIRE, ELECTRIC SHOCK, OR INJURY TO PERSONS, OBSERVE THE FOLLOWING:
A. Use this unit only in the manner intended by the manufacturer. If you have questions, contact the manufacturer
B. Before servicing or cleaning the unit, switch power off at service panel and lock service panel disconnecting means to prevent power from being switched on accidentally. When the service disconnecting means cannot be locked, securely fasten a prominent warning device, such as a tag, to the service panel.
C. Installation Work and Electrical Wiring Must Be Done By Qualified Person(s) In Accordance With all Aplicable Codes & Standards, Including Fire-rated Construction.
D. Sufficient air is needed for proper combustion and exhausting of gases through the flue (Chimney) of fuel burning equipment to prevent back- drafting. Follolow the heating equipment manufacturers guideline and safety standards such as those published by the National Fire Protection Association (NFPA), the American Society for Heating, Refrigeration and Air Conditioning Engineers (ASHRAE), and the local code authorities.
E. When cutting or drilling into wall or ceiling, do not damage electrical wiring and other hidden utilities.
F. Ducted systems must always be vented to the outdoors.
WARNING: To Reduce The Risk Of Fire Or Electric Shock, Do Not Use This Hood With Any External Solid State Speed Control Device.
GROUNDING INSTRUCTIONS
This appliance must be grounded. In the event of an electrical short circuit, grounding reduces the risk of electric shock by providing an escape wire for the electric current. This appliance is equipped with a cord having a grounding wire with a grounding plug. The plug must be plugged into an outlet that is properly installed and grounded.
WARNING – IMPROPER GROUNDING CAN RESULT IN A RISK OF ELECTRIC SHOCK.
Consult a qualified electrician if the grounding instructions are not completely understood, or if doubt exists as to whether the appliance is properly grounded.
Do not use an extension cord. If the power supply cord is too short, have a qualified electrician install an outlet near the appliance.
RANGE TOP GREASE FIRE, OBSERVE THE FOLLOWING:
A. SMOTHER FLAMES with a close – fitting lid, cookie sheet, or other metal tray, then turn off the gas burner or the electric element. BE CAREFUL TOPREVENT BURNS. If the flames do not go out immediately, EVACUATE AND CALL THE FIRE DEPARTMENT.
B. NEVER PICK UP A FLAMING PAN – you may be DO NOT USE WATER, including wet dishcloths or towels – a violent steam explosion will result.
Always leave safety grills and filters in place.Without these components, operating blowers could catch onto hair, fingers and loose clothing.
The manufacturer declines all responsibility in the event of failure to observe the instructions given here for installation, maintenance and suitable use of the product. The manufacturer further declines all responsability for injury due to negligence and the warranty of the unit automatically expires due to improper maintenance.
WARNING : Unplug or disconnect the appliance from the power supply before servicing.
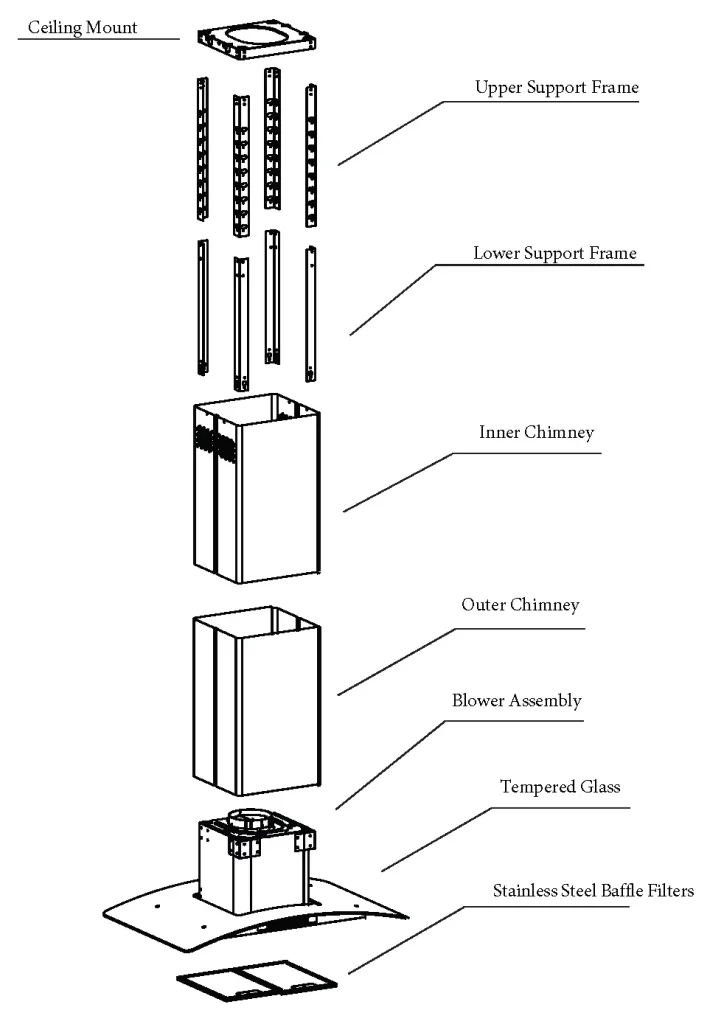
PARTS DIAGRAM
668ICS 750 / 900
MAIN PARTS
INSTALLATION REQUIREMENTS
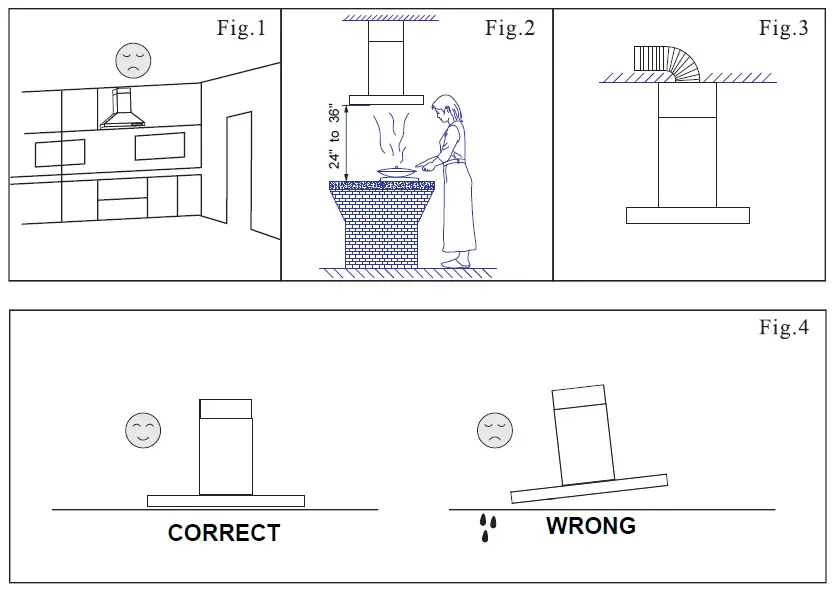
- Do not install the range hood where there are many open doors or windows. This will cause reduced performance. (Fig. 1)
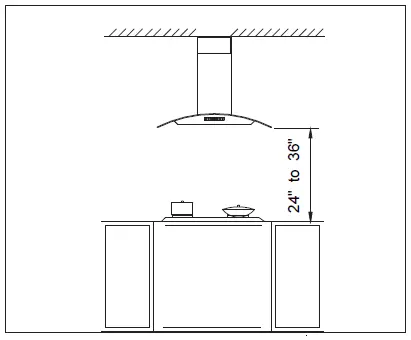
- Install the range hood right above the cooktop. The optimal distance between the cooktop and lower edge of the range hood is 24” to 36”. (Fig. 2). Install at the height appropriate to your ceiling. Make sure the chimney can still reach the ceiling. If your ceiling or preference requires installation to be a few inches higher or lower than 24-36″ you may do so without major loss of performance.
- In order to get optimal performance, do not over extend the exhaust pipe and avoid unnecessary bending. (Fig. 3)
- The air outlet must be connected to chimney flues or combustion gas ducts. Under no circumstances should the air outlet be connected to ventilation ducts for rooms in which fuel-burning appliances are installed.
INSTALLATION PROCEDURES
CAUTION: HOOD MAY HAVE VERY SHARP EDGES; PLEASE WEAR PROTECTIVE GLOVES WHENEVER IT IS NECESSARY TO REMOVE ANY PARTS FOR INSTALLING, CLEANING OR SERVICING.
Step 1:
This Island Range Hood has an adjustable height. Measure from the ceiling to a height of 24” to 36” above your cooktop. Install at a height appropriate to your ceiling. Make sure the chimney can still reach the ceiling. If your ceiling or preference requires installation to be a few inches higher or lower than 24-36″ you may do so without major loss of performance. Write down this measurement, this is the height (how tall) you will need to adjust the Island Range Hood.
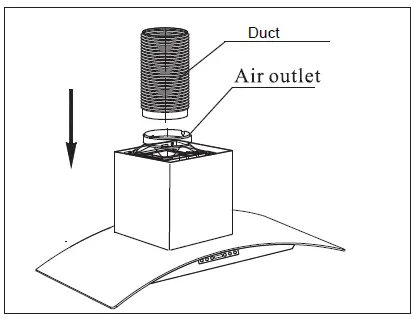
Step 2:
Remove the Island Range Hood from the carton and gently place on a flat workspace. Connect the Duct into the air outlet using HVAC foil tape.
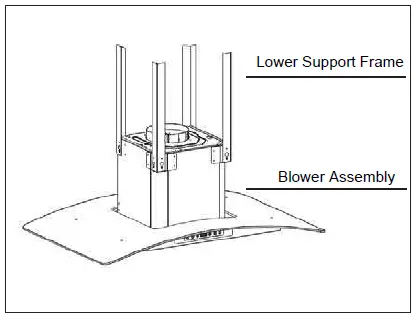
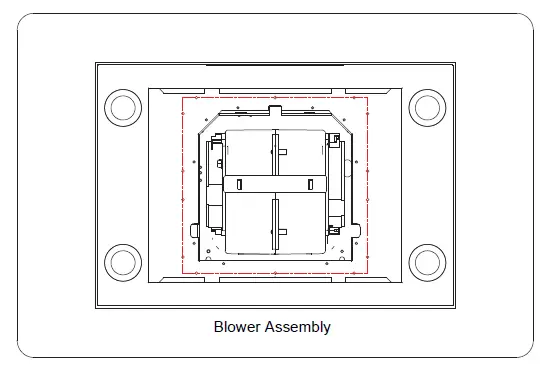
Step 3:
Align the 4 pieces of the Lower Support Frame to the holes on the Blower Assembly. Screw into place with the included screws. Set aside the combined Lower Support Frame and Blower Assembly.
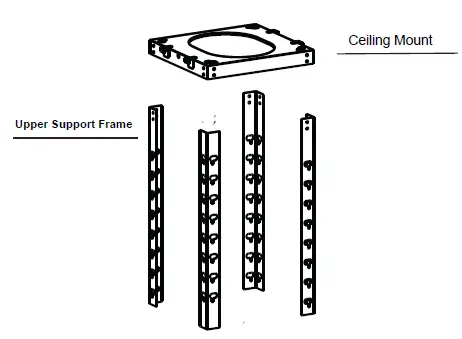
Step 4:
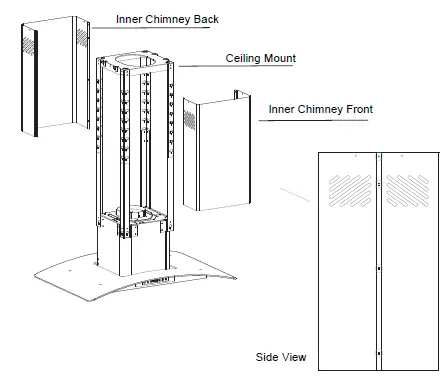
Using the Ceiling Mount as a guide drill 4 holes (8mm or 5/16 drill bit) into the ceiling area where you will be mounting your range hood. Fill the holes with the provided anchors. Screw the Ceiling Mount securely into place.
Note: In some cases the Ceiling Mount may already be attached to the Upper Support Frame

Step 5:
Align the 4 pieces of the Upper Support Frame to the holes on the Ceiling Mount. Securely screw into place with the included screws.
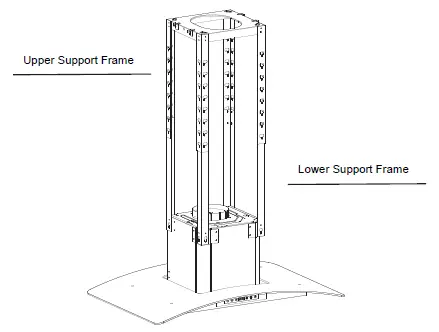
Step 6:
Slide the Lower Support Frame into the Upper Support Frame. Adjust the height according to what you measured in Step 1.
Align the holes to the desired height, screw the 4 pieces of the Lower Support Frame to the 4 pieces of the Upper Support Frame together.
Step 7:
Extend Duct from the Blower Assembly to the ceiling through the Ceiling Mount and Connect to existing duct work.

Step 8:
Take the back piece of the Inner Chimney, align and securely screw into the sides of the Ceiling mount.
Now take the front piece of the Inner Chimney, align and securely screw into the sides of the Ceiling mount.
Now connect the Back of the Inner Chimney and the Front of the Inner Chimney together on each side (where they meet).
Step 9:
Take the Back of the Outer Chimney and the Front of the Outer Chimney and connect them together as shown in the picture. Now screw the Back of the Outer Chimney and the Front of the Outer Chimney together on each side (where they meet).
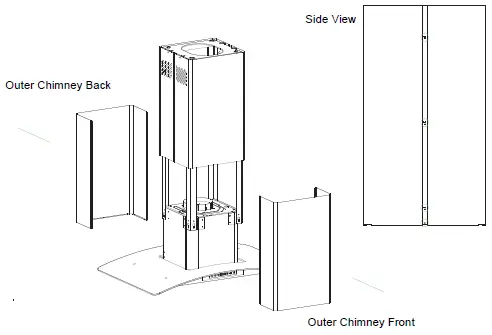
Step 10:
Remove Filters to access the bottom of the Blower Assembly. From the bottom of the Island Range Hood, secure the Outer Chimney (Back and Front Pieces) by screwing them into the Blower Assembly.
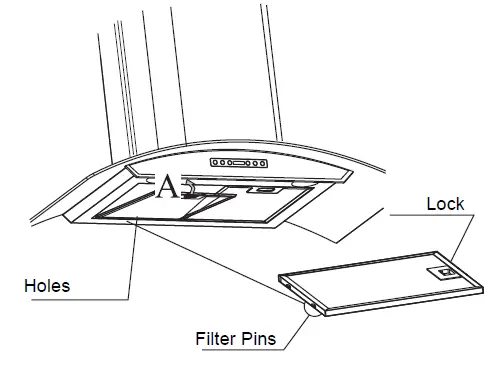
Step 11:
Reinstall the Baffle Filters. Align the filter pins with the holes under the range hood. Gently pull on filter lock. Put the filter in place and release lock.
RE CIRCULATING CHARCOAL FILTERS
Skip this page if you are installing a Ducted Range Hood.
Charcoal Filters are only included with Ductless Models
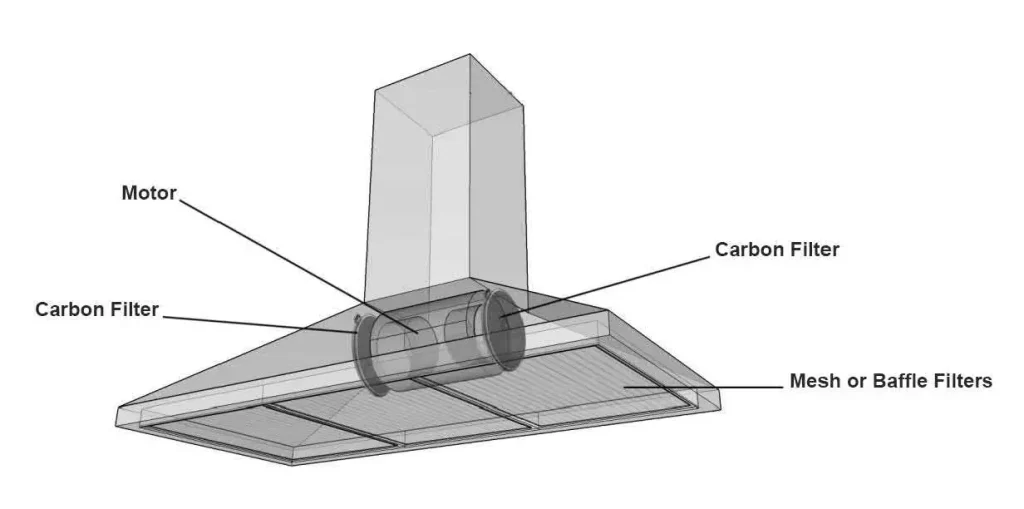
Installing Recirculating Filters (For Ductless Model Only)
- Remove the Baffle Filters
- Locate the Motor
- Place a Carbon Filter on one side of the motor and align with the clips.
- Twist and Lock into Place.
- Repeat steps 2-4 for the other side of the motor.
- Place the Baffle Filters back into place.
Skip this page if you are installing a Ducted Range Hood.
Charcoal Filters are only included with Ductless Models - Chimney Vent Holes located on the sides of the chimney must be exposed to let the filtered air recirculate.
OPERATING INSTRUCTIONS

A. Timer Button
When unit is turned on press to increase auto-shutoff timer up to 59 minutes.
B. Light Button.
Press to turn lights on / off
C. Fan Speed Button
When unit is turned on press to change fan speed.
D. Power Button
Press to turn unit on / off.
How to Set your Time
The clock on this Range Hood is set to military time. It cannot be set to a 12-hour format.
- Press Power Button – The display panel will illuminate.
- Hold Timer Button until unit beeps – The time will start flashing.
- While the time is flashing use the Light Button to set the hours. Use the Fan Speed Button to set the minutes.
- After ten seconds of not pressing anything, the settings will save.
MAINTENANCE
CAUTION: NEVER PUT YOUR HAND INSIDE OF THE UNIT WHILE ITS OPERATING. FOR
THE BEST PERFORMANCE CLEAN YOUR RANGE HOOD REGULARLY.
CLEANING
- Use only mild soap or cleaning solutions to clean the range hoods outer surface. Dry surfaces using a soft cloth.
- Stainless Steel cleaner may be used on the external surface.
- Cleaning the Baffle Filters: For daily cleaning, use hot, soapy water and a soft cloth. Wipe dry and finish with a damp micro-fiber cloth. Baffle filters can also be cleaned in the dishwasher.
- Clean the Range Hood assembly once every 6 months.
- DO NOT clean the motor or electrical components with water or any other liquid
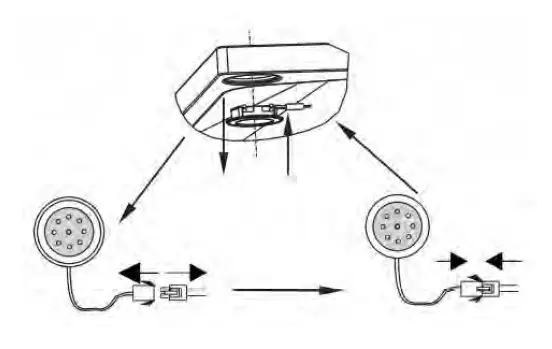
REPLACING LIGHT BULBS
CAUTION: LAMP UNIT MAY BE HOT! WAIT UNTIL THE UNIT IS COOL. BEFORE ATTEMPTING TO REPLACE THE LED LAMPS MAKE SURE THE UNIT IS POWERED OFF AND UNPLUGGED.
Note: Individual LED bulbs cannot be replaced, only entire LED lamps.
- Remove the baffle filters
- Find the wire connection of the lamp inside the unit and unplug.
- Remove old LED lamp by pushing it out of its hole from the inside.
- Plug in new LED lamp.
- Reinstall the baffle filters.
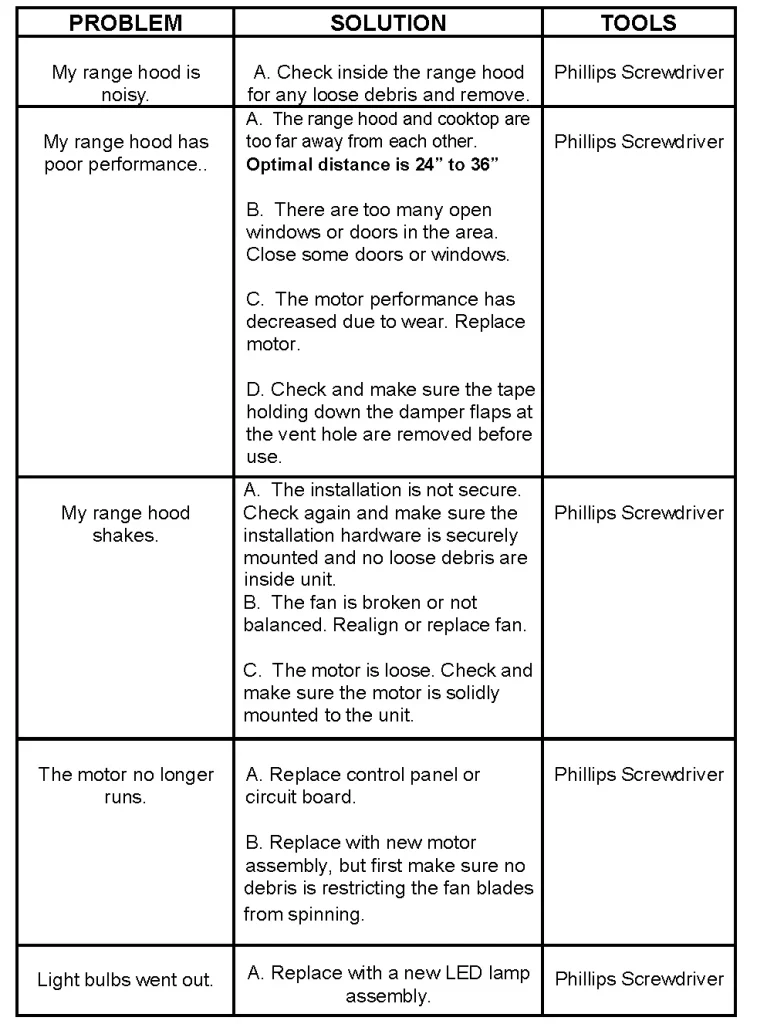
TROUBLESHOOTING
CAUTION: ALWAYS UNPLUG UNIT FROM POWER BEFORE SERVICING
WARRANTY AND SERVICE
Information
Need Help finding the Model Number or Serial Number?
The model number and serial number can be found on the box of each unit.
Range Hoods – The Serial Number can be found inside of the unit located on the motor housing.
Ranges – The Serial Number can be found on the back of the unit towards the bottom.
Ovens – The Serial Number can be found by opening the door and looking towards the bottom.
Dishwasher — The Serial Number is found on the inside of the door jamb.
Refrigerator — The Serial Number is found on the rear of the unit.
Cooktops — The Serial Number is found underneath the unit.
Faucets – Enter the order number located on your receipt in the Serial Number field.
Sous Vide Machines – Enter the order number located on your receipt in the Serial Number field.
Customer Support
Give us a call at: 1-888-784-3108
Monday Through Friday: 9:00 AM PST to 5:00 PM PST
Email us at: [email protected]
Notice
Please verify that all of the information above is correct. Entering an incorrect Serial # or Product Model # will not register your Warranty.
Warranty Terms
ATTACH YOUR RECEIPT HERE. PROOF OF PURCHASE IS REQUIRED
TO OBTAIN WARRANTY SERVICE.
Please have the following information available when you call the
Customer Service Center:
- Name, address and telephone number
- Model number and serial number
- A clear, detailed description of the problem
- Proof of purchase including dealer or retailer name and address
FIVE YEAR LIMITED WARRANTY
This unit comes with 5 Year Manufacturer’s Part Warranty. Within 5 years after date of receiving the product, Cosmo will replace any functional parts that are defective. The customer must contact Cosmo and provide a description of the defective part, including digital pictures if requested, along with original proof of purchase. Defective components must be returned to Cosmo shipping prepaid. After the 1st year, shipping costs of replacement parts will also be prepaid by customer.
Functional parts are those components/parts that are crit- ical to the performance of the product’s essential function.
Non-functional parts are those that are a cosmetic feature of the product such as knobs, grates, other metal bodies/surfac- es, etc. In the event of product replacement, your appliance will be warranted for the remaining term of the original unit’s warranty period.
]]>
THANK YOU FOR YOUR PURCHASE
Thank you for your purchase. We know that you have many brands and products to choose from and we are honored to know that you have decided to take one of our products into your home and hope that you enjoy it.
COSMO appliances are designed according to the strictest safety and performance standard for the North American market. We follow the most advanced manufacturing philosophy. Each appliance leaves the factory after thorough quality inspection and testing. Our distributors and our service partners are ready to answer any questions you may have regarding how to install, use and care for your products. We hope that this manual will help you learn to use the product in the safest and most effective manner .
If you have any questions or concerns, please contact the dealer from whom you purchased it, or contact our Customer Support at:
1-888-784-3108.
Specifications
| Model | COS-3016ORM1SS |
| Rated voltage | 120V / 60 Hz |
| Rated input power | 1550W |
| Rated output power | 1000W |
| Microwave capacity | 1.6 cu. ft. |
| Turntable diameter | 13.5 in. (34.5 cm) |
| External dimensions (WxDxH) | 29.9 x 15 x 16.4 in. (75.9 × 38.1 × 41. 7 cm) |
| Internal dimensions (WxDxH) | 20.24 x 14.41 x 9.25 (51.4 × 36.6 × 23. 5 cm) |
| Certifications | UL approved |
| Power cord length | 3.3 ft. (1 m) |
| Net weight | 56 lbs. (25.4 kg) |
SAFETY INFORMATION
For your safety, the information in this manual must be followed to minimize the risk of fire or explosion or to prevent property damage, personal injury, or loss of life.
Precautions to avoid possible exposure to excessive microwave energy:
- Do not attempt to operate this microwave with the door open because this can result in harmful exposure to microwave energy. It is important not to defeat or tamper with the safety interlocks.
- Do not place any object between the microwave front face and the door or allow soil or cleaner residue to accumulate on sealing surfaces.
- Do not operate the microwave if it is damaged. It is particularly important that the microwave door closes properly and that there is no damage to the:
- door (bent)
- hinges and latches (broken or loosened)
- door seals and sealing surfaces
- The microwave should not be adjusted or repaired by anyone except properly qualified service personnel.
IMPORTANT SAFETY INSTRUCTIONS
Warning : WARNING indicates a potentially hazardous situation which, if not avoided, could result in death or serious injury.
CAUTION : CAUTION indicates a potentially hazardous situation which, if not avoided, may result in minor or moderate injury.
READ ALL INFORMATION BEFORE USING
Warning : To reduce the risk of fire, burns, electric shock, injury to persons, or exposure to excessive microwave energy when using your appliance, follow the basic precautions included in the following sections.
- Read all instructions before using the appliance
- Read and follow the specific “Precautions to avoid possible exposure to excessive microwave energy:” on page 3.
- This appliance must be grounded. Connect only to a properly grounded outlet. See “Grounding instructions” on page 4.
- Install or locate this appliance only in accordance with the provided installation instructions.
- Some products such as whole eggs and sealed containers —for example, closed glass jars—are able to explode and should not be heated in this microwave oven.
- Use this appliance only for its intended use as described in this manual. Do not use corrosive chemicals or vapors in this appliance. This type of microwave oven is specifically designed to heat, cook, or dry food. It is not designed for industrial or laboratory use.
- As with any appliance, close supervision is necessary when used by children.
- Do not operate this appliance if it has a damaged cord or plug, if it is not working properly, or if it has been damaged or dropped.
- This appliance should be serviced only by qualified service personnel. Contact nearest Authorized Servicer for examination, repair, or adjustment.
- Do not cover or block any openings on the appliance.
- Do not store or use this appliance outdoors. Do not use this product near water—for example, near a kitchen sink, in a wet basement, or near a swimming pool, or similar locations.
- Do not immerse the cord or plug in water.
- Keep the cord away from heated surfaces.
- Do not let the cord hang over the edge of the table or counter.
- See door surface cleaning instructions on page 16
- To reduce the risk of fire in the microwave oven cavity:
- Do not overcook food. Carefully attend the appliance when paper, plastic, or other combustible materials are placed inside the microwave oven to facilitate cooking.
- Remove wire twist-ties from paper or plastic bags before placing the bag in the microwave oven.
- If materials inside the microwave oven ignite, keep the microwave oven door closed, turn the microwave oven off, and disconnect the power cord or shut off power at the fuse or circuit breaker panel.
- Do not use the cavity for storage purposes. Do not leave paper products, cooking utensils, or food in the cavity when not in use.
- Liquids, such as water, coffee, or tea are able to be overheated beyond the boiling point without appearing to be boiling. Visible bubbling or boiling when the container is removed from the microwave oven is not always present. THIS COULD RESULT IN VERY HOT LIQUIDS SUDDENLY BOILING OVER WHEN A SPOON OR OTHER UTENSIL IS INSERTED INTO THE LIQUID.
To reduce the risk of injury to persons:
- Do not overheat the liquid.
- Stir the liquid both before and halfway through heating it.
- Do not use straight-sided containers with narrow necks. Use a wide mouthed container.
- After heating, allow the container to stand in the microwave oven for at least for 20 seconds before removing the container.
- Use extreme care when inserting a spoon or other utensil into the container.
- Clean the ventilation openings and grease filters frequently. Grease should not be allowed to accumulate on ventilation openings, louver, or grease filters.
- Use care when cleaning the louver and the grease filters. Corrosive cleaning agents, such as lye-based oven cleaners, may damage the louver and the grease filters
- When flaming food under the hood, turn the fan on.
- This appliance is suitable for use above both gas and electric cooking equipment 36” wide or less.
SAVE THESE INSTRUCTIONS
Unpacking and examining your microwave
Open the bottom of the carton, bend the carton flaps back, and tilt the microwave oven over to rest on the plastic foam pad. Lift the carton off the microwave oven and remove all packing materials, including the User Guide, Installation Guide, templates (2), charcoal filter, and turntable (with ring). SAVE THE CARTON AS IT MAY MAKE INSTALLATION EASIER.
- Remove the feature sticker from the outside of the door, if there is one.
- DO NOT REMOVE THE WAVEGUIDE COVER.
- Read and SAVE the User Guide and Installation Guide
Check the microwave oven for any damage, such as misaligned or bent door, damaged door seals and sealing surfaces, broken or loose door hinges and latches, and dents inside the cavity or on the door. If there is any damage, do not operate the microwave oven and contact your dealer or repair center. See Installation Instructions for more details.
Grounding instructions
This appliance must be grounded. This microwave oven is equipped with a cord having a grounding wire with a grounding plug. It must be plugged into a wall receptacle that is properly installed and grounded in accordance with the National Electrical Code and local codes and ordinances. In the event of an electrical short circuit, grounding reduces the risk of electric shock by providing an escape wire for the electric current.
Warning : Improper use of the grounding plug can result in a risk of electric shock.
Electrical requirements
Check the Installation Instructions for proper location for the power supply. The electrical requirements are a 120 volt AC, 60 Hz, 15 amp. or more protected electrical supply. It is recommended that a separate circuit serving only the microwave oven be provided.
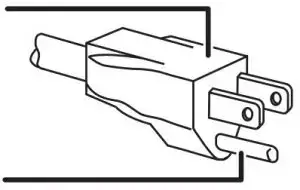
The microwave oven is equipped with a 3-prong grounding plug. It must be plugged into a wall receptacle that is properly installed and grounded. DO NOT UNDER ANY CIRCUMSTANCES CUT OR REMOVE THE GROUNDING PIN FROM THE PLUG. DO NOT USE AN EXTENSION CORD.
3-prong plug

Grounding plug
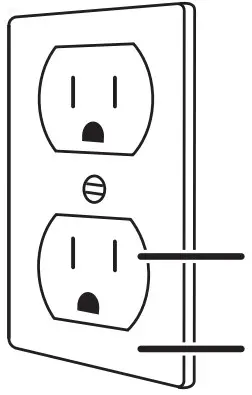
3-prong receptacle
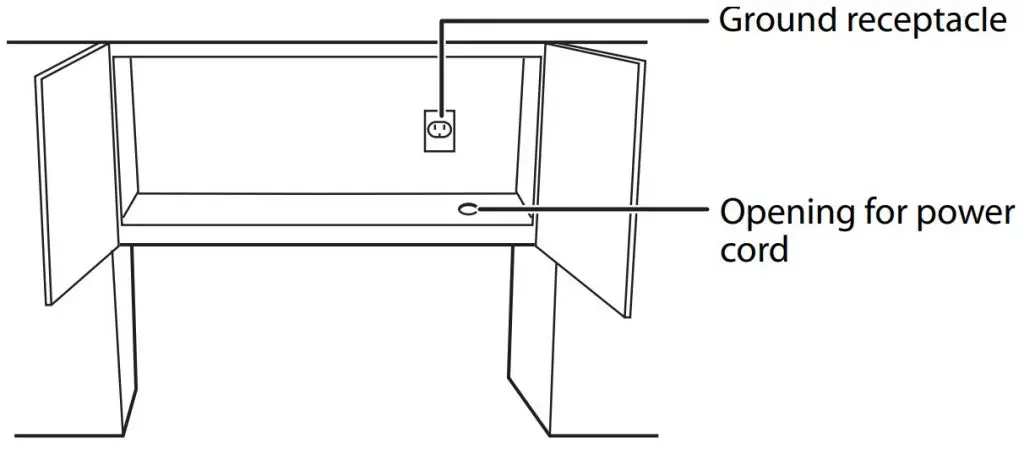
Ground receptacle box
If the power supply cord is too short, have a qualified electrician or serviceman install an outlet near the appliance.
Note :
- If you have any questions about the grounding or electrical instructions, consult a qualified electrician or service person.
- does not accept any liability for damage to the microwave oven or personal injury resulting from failure to observe the correct electrical connection procedures.
ABOUT YOUR MICROWAVE OVEN
- Read this User Guide and always save it for reference.
- A good microwave cookbook is a valuable asset. Check it for microwave cooking principles, techniques, hints, and recipes.
- NEVER use the microwave oven without the turntable and support nor turn the turntable over so that a large dish could be placed in the microwave oven. The turntable will turn both clockwise and counterclockwise.
- ALWAYS have food in the microwave oven when it is on to absorb the microwave energy.
- When using the microwave oven at power levels below 100%, you may hear the magnetron cycling on and off.
- It is normal for the exterior of the microwave oven to be warm to the touch when cooking or reheating.
- Condensation is a normal part of microwave cooking. Room humidity and the moisture in food will influence the amount of moisture that condenses in the microwave oven. Generally, covered foods will not cause as much condensation as uncovered ones. Ventilation openings must not be blocked.
- The microwave oven is for food preparation only. It should not be used to dry clothes or newspapers.
- Your microwave oven is rated at 1000 watts by using the IEC Test Procedure. In using recipes or package directions, check food a minute or two before the minimum time and add time accordingly.
ABOUT MICROWAVE COOKING
- Arrange food carefully. Place thickest areas towards outside of the dish.
- Watch the cooking time. Cook for the shortest amount of time indicated and add more as needed. Food severely over cooked can smoke or ignite.
- Cover foods while cooking. Check the recipe or cookbook for suggestions, such as paper towels, wax paper, microwave plastic wrap, or a lid. Covers prevent spattering and help foods to cook evenly.
- Shield with small flat pieces of aluminum foil any thin areas of meat or poultry to prevent overcooking before dense, thick areas are cooked thoroughly.
- Stir foods from outside to center of dish once or twice during cooking, if possible.
- Turn foods over once during microwaving to speed cooking of such foods as chicken and hamburgers. Large items like roasts must be turned over at least once.
- Rearrange foods such as meatballs halfway through cooking both from top to bottom and from the center of the dish to the outside.
- Add standing time. Remove the food from the microwave oven and stir, if possible. Cover for the standing time which allows the food to finish cooking without overcooking.
- Check for doneness. Look for signs indicating that cooking temperatures have been reached. Doneness signs include:
- Food steams throughout, not just at edge.
- Center bottom of dish is very hot to the touch.
- Poultry thigh joints move easily.
- Meat and poultry show no pinkness.
- Fish is opaque and flakes easily with a fork.
Cookware and cooking materials
Warning : Personal Injury Hazard Tightly-closed containers could explode. Closed containers should be opened and plastic pouches should be pierced before cooking.
Cookware and other materials must fit on the turntable. Always use oven mitts or pot holders because cookware may become hot. Refer to “Materials you can use” on page 7 and “Materials to be avoided” on page 7 as a guide, then test before using.
Cookware and Materials Test:
- Fill a microwave-safe container with 1 cup (250 ml) of cold water, along with the cookware or materials in question.
- Cook on maximum power for one minute. Do not exceed one minute cooking time.
- Carefully feel the cookware or material. If the empty cookware or material is warm, do not use it for microwave cooking.
Materials you can use
| MATERIAL | REMARKS |
| Aluminum foil | Use as shielding only. Small, smooth pieces can be used to cover thin parts of meat or poultry to prevent overcooking. Arcing can occur if the foil is wrinkled or too close to oven walls. The foil should be at least 1 inch (2.5 cm) away from oven walls. |
| Browning dish | Follow the manufacturer’s instructions. The bottom of the browning dish must be at least 3/16-in. (5mm) above the turntable. Incorrect usage may cause the turntable to break. |
| Dinnerware | Use microwave-safe only. Follow the manufacturer’s instructions. Do not use cracked or chipped dishes. |
| Glass jars | Always remove the lid. Use only to heat food until just warm. Most glass jars are not heat resistant and may break. |
| Glassware | Use heat-resistant oven glassware only. Make sure there is no metallic trim. Do not use cracked or chipped dishes. |
| Oven cooking bags | Follow the manufacturer’s instructions. Do not close with a metal tie. Make slits to allow steam to escape. |
| Paper plates and cups | Use for short–term cooking/warming only. Do not leave the oven unattended while cooking. |
| Paper towels | Use to cover food for reheating and absorbing fat. Use with supervision for short-term cooking only. |
| Parchment paper | Use as a cover to prevent splattering or a wrap for steaming. |
| Plastic | Use only if labeled “Microwave Safe.” Follow the manufacturer’s instructions. Some plastic containers soften as the food inside gets hot. “Boiling bags” and tightly closed plastic bags should be slit, pierced, or vented, as indicated on the package. |
| Plastic wrap | Use microwave-safe only. Use to cover food during cooking to retain moisture. Do not allow plastic wrap to touch food. |
| Thermometers | Use microwave-safe only (such as meat and candy thermometers). |
| Wax paper | Use as a cover to prevent splattering and retain moisture. |
Materials to be avoided
| MATERIAL | REMARKS |
| Aluminum tray | May cause arcing. Use a microwave-safe dish instead. |
| Food carton with metal handle | May cause arcing. Use a microwave-safe dish instead. |
| Metal or metal trimmed utensils | Metal shields the food from microwave energy. The metal trim may cause arcing. |
| Metal twist ties | May cause arcing and could cause a fire in the oven. |
| Paper bags | May cause a fire in the oven. |
| Plastic foam | Plastic foam may melt or contaminate the liquid inside when exposed to high temperature. |
| Wood | Wood will dry out when used in the microwave oven and may split or crack. |
Features
- Sensor cooking
- 10 variable power levels
- Add 30 seconds and express cooking
- 000W of power
- Exhaust fan with two speeds
- Task lighting
- Child lock
- Turntable
- Hidden vent
Package contents
- 1.6 cu. ft. over-the-range microwave oven
- Turntable (with ring)
- Installation hardware
- Mounting templates (2)
- Grease filters (2)
- Installation Guide
- User Guide
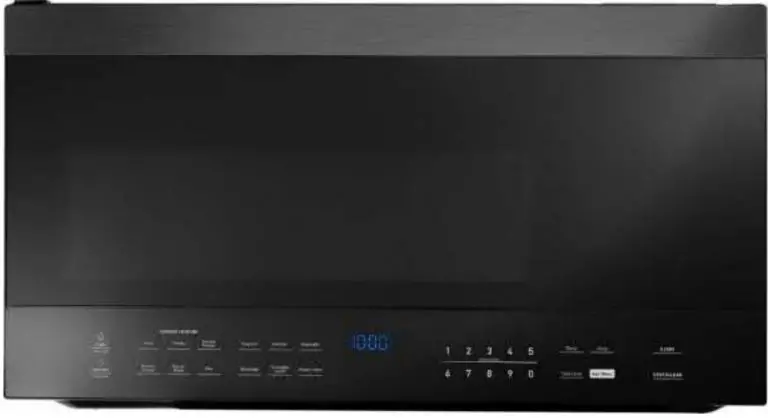
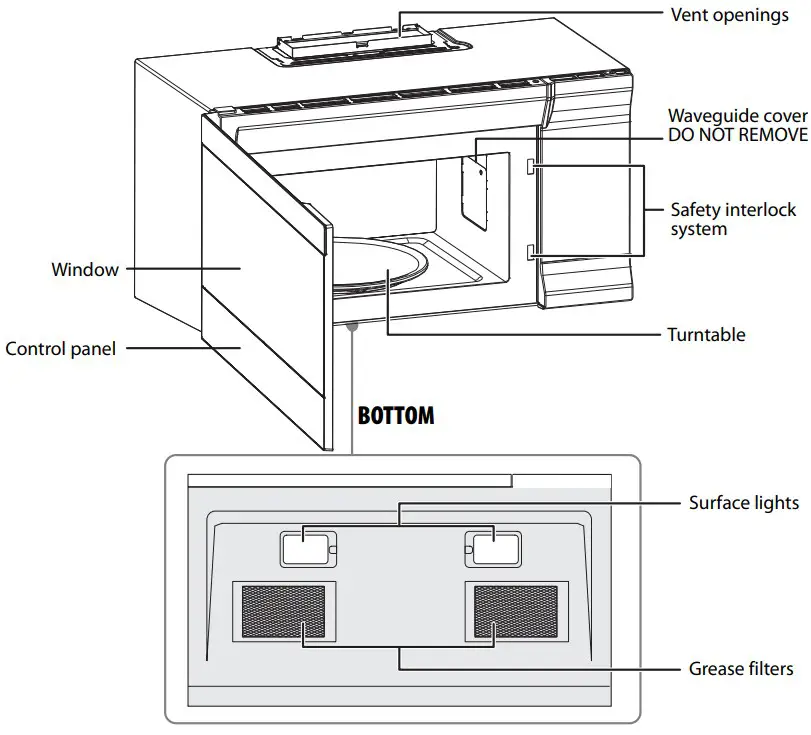
Microwave oven
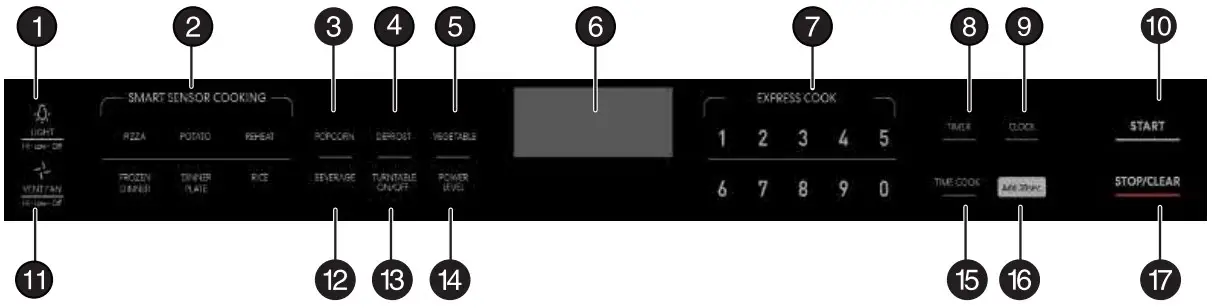
Control panel
| # | ITEM | DESCRIPTION |
| 1 | Light | Press to turn on/off the light underneath your microwave. See “Using the light” on page 15. |
| 2 | SENSOR COOKING | Detects the humidity released by your cooking food and adjusts the cooking time based on the type and amount of food cooking. |
| 3 | Popcorn | Press to cook popcorn. See “Popcorn” on page 15. |
| 4 | Defrost | Press to defrost frozen food. See “Defrosting in your microwave” on page 13. |
| 5 | Vegetable | Press to cook vegetables. See “Vegetable” on page 14. |
| 6 | Display | In standby mode, displays the time. In cooking mode, displays cooking time, weight, and other information. |
| 7 | Number pad | Press to enter cook time, defrost time, clock time, and other information. |
| 8 | Timer | Press this button, then enter the time you want to count down. See “Using the kitchen timer” on page 12. |
| 9 | Clock | Press to set or check the clock. See “Setting the clock]” on page 12 |
| 10 | START | In standby mode, press this button to begin cooking. |
| 11 | Vent Fan | Press to turn on/off your vent fan and remove odors from cooking. See “Using the vent fan” on page 15. |
| 12 | Beverage | Press to heat a beverage. See “Beverage” on page 15. |
| 13 | Turntable on/off | Press to turn your turntable on or off. See “Using the turntable” on page 15. |
| 14 | Power Level | Press to change your microwave’s power level (1-10). See “Cooking in your microwave” on page 11. |
| 15 | Time Cook | Press to enter a cooking time. |
| 16 | Add 30 sec. | While cooking, press this button to add 30 seconds to your cooking time. |
| 17 | STOP/CLEAR | Press to stop the cooking process. Press again to cancel the cooking operation. |
Setting up your microwave oven
Setting up your microwave oven / See the Installation Guide (included in your box) to install and set up your microwave. You can also find the Installation Guide online at: http://cosmoappliances.com/manuals
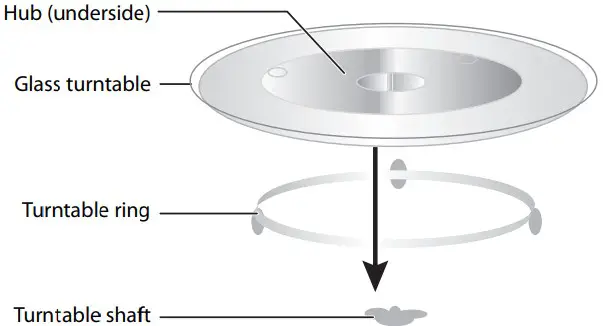
Installing the turntable
Notes
- Never place the glass tray upside down. The glass tray should never be restricted.
- Both the glass tray and turntable ring must always be used during cooking.
- Always place all food and containers of food on the glass tray for cooking.
- If the glass tray or turntable ring cracks or breaks, contact your nearest authorized service center.
- Place the turntable ring in the round depression in the bottom of the microwave oven so that it turns freely.
- Place the glass turntable (flat side up) on the turntable ring so that the hub engages the turntable shaft in the bottom of the oven. The glass turntable should not turn freely when it is correctly installed.
Using your microwave
Tips for the best results
Storage temperature : Foods taken from the freezer or refrigerator take longer to cook than the same foods would at room temperature.
Size : Small pieces of food cook faster than large ones. Pieces similar in size and shape will cook more evenly when cooked together. For more even results, reduce the power levels when cooking large pieces of food.
Natural moisture : Very moist foods cook more evenly because microwave energy heats water molecules very efficiently.
Stirring : Stir foods such as casseroles and vegetables from the outside to the center to distribute the heat more evenly. This will allow the food to cook faster. Constant stirring is not necessary.
Turn over items : Turn over foods such as pork chops, roasts, or whole cauliflower halfway through the cook time. This will help to expose all sides equally to microwave energy.
Food placement : Place delicate areas of food items, such as asparagus tips, toward the center of the turntable tray.
Food arrangement : Arrange unevenly shaped foods, such as chicken pieces or salmon, with the thicker or meatier parts toward the outside of the turntable tray.
Let the food stand : After removing the food from the microwave, cover the food with foil or a casserole lid and let it stand to finish cooking. This will help the food finish in the center and avoids overcooking the out edges. The length of stand time depends on the density and surface area of the food items.
Wrapping in paper towels or waxed paper
Sandwiches and many other food types containing pre baked bread should be
wrapped prior to placing in the microwave to help prevent the food items from drying out while heating.
Cooking in your microwave
- Press Time Cook, then use the number pad to enter the cooking time that you want
Note : For example, to enter 3 minutes and 15 seconds, press 3, 1, and then 5. - (Optional) Press Power Level, then enter the power level that you want (1-10)
Note :- By default, your microwave cooks at 100% power.
- Press Power Level while cooking to check the power level.
POWER LEVEL OUTPUT RECOMMENDED WHEN… 10 100% - Boiling wate
- Cooking ground beef
- Making candy.
- Cooking fresh fruits and vegetabl
- Cooking fish and poultry.
- Preheating browning dish.
- Reheating beverages.
- Cooking bacon slices.
9 90% - Reheating meat slices quickly.
- Sautéing onions, celery, and green peppers.
8 80% - All reheating.
- Cooking scrambled eggs.
7 70% - Cooking breads and cereal products.
- Cooking cheese dishes and veal.
- Cooking cakes, muffins, brownies and cupcakes.
6 60% - Cooking pasta.
5 50% - Cooking meats and whole poultry.
- Cooking custard.
- Cooking spare ribs, rib roast, and sirloin roast.
4 40% - Cooking less tender cuts of me
- Reheating frozen packaged foods.
3 30% - Thawing meat, poultry, and seafood.
- Cooking small quantities of food.
- Finish cooking casseroles, stew, and some sauces.
2 20% - Softening butter and cream cheese.
- Heating small amounts of food.
1 10% - Softening ice cream.
- Raising yeast dough.
- Press Start to begin heating.
Defrosting in your microwave
- Press Defrost repeatedly to select “MEAT,” “POULTRY,” or “FISH.”
- Press START.
- Use the number pad to enter the weight of the item to be defrosted (in pounds). For example, 10 = 1.0 lbs.
Note : You may enter any weight from 0.1 to 6.0 lbs - Press START to start defrosting. The remaining cooking time is displayed. Your microwave may beep periodically remind you to turn the food. Press START to continue.
Tips
For best results:
- Use defrost only for raw food items.
- Defrosting gives best results when your food is taken directly from the freezer. If the food has been stored in a refrigerator-freezer that does not maintain a temperature of 5°F (-15°C) or below, always program a lower food weight or lower cook time to prevent cooking the food.
- Enter a reduced weight if the frozen food has been outside the freezer for more than 20 minutes.
- The shape of the food package alters the defrosting time. For example, a shallow, rectangular food package will defrost more quickly than a deepblock of food.
- Separate pieces as they begin to defrost.
Tips for defrosting meat
For the best results, use these suggestions when defrosting meat:
| MEAT | NORMAL WEIGHT | COOK TIME |
| Roast beef or pork | 2.5 to 6 lbs. (40 to 96 oz.) |
|
| Steaks, chops, or fish | 0.5 to 3 lbs. (8 to 48 oz.) |
|
| Ground meat | 0.5 to 3 lbs. (8 to 48 oz.) |
|
| Whole chicken | 2.5 to 6 lbs. (40 to 96 oz.) |
|
| Chicken pieces | 0.5 to 3 lbs. (8 to 48 oz.) |
|
Cooking with the sensor
Sensor cooking detects the humidity released by your cooking food and adjusts the cooking time based on the type and amount of food cooking.
- Press Sensor Reheat, then press START. Your microwave automatically sets the cook time.
When using sensor cooking:
- Casseroles: Add 2-3 tables poods of liquid, cover with a lid or vented plastic wrap. Stir when instructed from the display.
- Canned foods: Place the contents into a microwave-safe dish and cover with a loose-fitting lid or vented plastic wrap. Let it stand a few minutes before serving.
- Plates of food: Arrange food on the plate. Cover with a loose-fitting lid or vented plastic wrap. Let it stand a few minutes before serving.
Pizza : The pizza setting cooks from one to two slices (6-12 oz.) of pizza automatically.
- Press Pizza, then press START.
Note : If additional time is needed, continue to cook manually.
Potato : The potato setting cooks from two to four potatoes automatically.
- Poke holes in your potatoes’ skin 5-6 times with a fork. Do not cover your potatoes.
- Press Potato, then press START.
- Let the potatoes stand for about five minutes after the microwave has finished to complete cooking.
Note : If additional time is needed, continue to cook manually.
Frozen dinner : The frozen dinner setting is designed for one frozen entree or frozen convenience foods (such as frozen dinners) from 10-20 oz.
- Press Frozen Dinner, then press START. When cooking frozen dinners:
- Read the instructions on your frozen food for best results, if available.
- Make sure that moisture can escape from the packaging. All frozen dinner instructions should specify that you poke holes in the plastic covering before cooking
- Be careful when removing the plastic covering. Remove the side facing away from you to avoid steam burns.
Dinner plate : The dinner plate setting is designed for one to two plates.
- Press Dinner Plate, then press START.
Note : If additional time is needed, continue to cook manually.
Rice : The rice setting cooks one to two cups of rice automatically (starting from room temperature).
- Press Rice, then press START.
Note : If additional time is needed, continue to cook manually
Vegetable : The vegetable sensor feature cooks from one to four cups of fresh vegetables (when starting at room temperature).
- Press Vegetable repeatedly to select the number of cups:
SERVINGS PRESS VEGETABLE BUTTON… 1 cup Once 2 cups 2 times 3 cups 3 times 4 cups 4 times - Press START.
Note : If additional time is needed, continue to cook manually.
Popcorn
CAUTION : DO NOT leave the microwave unattended while popping popcorn.
- Press Popcorn repeatedly to select your popcorn bag’s weight:
WEIGHT PRESS POPCORN BUTTON… 3.3 oz. Once 3.0 oz. 2 times 1.75 oz. 3 times - Press START
Beverage : The beverage setting heats one two three cups of a beverage. Use the table below to determine the setting to use.
- Press Beverage repeatedly to select the number of servings:
SERVINGS PRESS BEVERAGE BUTTON… 1 cup Once 2 cups 2 times 3 cups 3 times - Press START
Using the stop/clear button
Press STOP/CLEAR to:
- Erase information that you entered incorrectly
- Cancel the timer
- Pause the microwave during cooking (press START to resume)
- Display the clock after cooking is completed
- Cancel a programing during cooking (press twice)
Using the light : To use the light underneath your microwave, press Light repeatedly to cycle between high brightness, low brightness, or off..
Note : To change a light bulb, see “Replacing the lights” on page 19.
Using the vent fan : Your microwave’s vent fan works as a range hood to filter out smoke and other odors from cooking.
- Press Vent Fan repeatedly to cycle between high speed, low speed, or off
Note : You can use the vent fan while cooking in the microwave - The fan automatically starts when heat rises from range surface units or burners and stays on until the temperature decreases. It cannot be turned off manually during this time. This protects the microwave from excessive temperatures.
Using the turntable : For the best results, leave the turntable on. However, you can turn it off for large dishes.
- Press Turntable on/off to turn your turntable on or off
Using the child lock
- To lock the microwave, press and hold STOP/CLEAR for three seconds. The microwave beeps and a lock indicator appears on the display.
- To unlock the microwave, press and hold STOP/CLEAR until the lock indicator disappears (about three seconds).
Cleaning and maintaining your microwave
Cleaning the outside of your microwave
Exterior : The outside surface is precoated steel and plastic. Clean the outside with mild soap and water, then rinse and dry with a soft cloth. Do not use any type of household or abrasive cleaner.
Door : Wipe the window on both sides with a damp cloth to remove any spills or spatters. Metal parts will be easier to maintain if wiped frequently with a damp cloth. Avoid the use of spray and other harsh cleaners as they may stain, streak, or dull the door surface.
Control panel : If the control panel is dirty, open the microwave door before cleaning. Wipe the panel with a cloth dampened slightly with water only. Dry with a soft cloth. Do not scrub or use any sort of chemical cleaners. Close the door and press STOP/CLEAR to clear any buttons you may have pressed.
Cleaning the inside of your microwave
Interior : Wipe with a soft cloth and warm water. Do not use abrasive or harsh cleaners or scouring pads. For baked-on food, use baking soda or a mild soap, then rinse thoroughly with hot water. To help loosen baked-on food particles or liquids, heat two cups of water (add lemon juice if you want to keep your microwave fresh smelling) in a four-cup measuring cup at high power for five minutes or until boiling. Let it cool in the microwave, then wipe the interior with a soft cloth.
Waveguide cover : The waveguide cover is located on the right wall inside your microwave. Keep the waveguide cover clean to assure good microwave performance. Carefully wipe with a damp cloth any food spatters from the surface of the cover immediately after they occur. Built-up splashes may overheat and cause smoke or possibly catch fire. DO NOT REMOVE THE WAVEGUIDE COVER.
Removing odors : Occasionally, a cooking odor may remain in the microwave. To remove, combine one cup water, lemon juice, and several whole cloves in a two-cup glass measuring cup. Boil for several minutes at high power, then let it cool in the microwave. Wipe the interior with a soft cloth.
Turntable and turntable support : Remove the turntable and turntable support and wash them in mild, sudsy water. For stubborn stains, use a mild cleanser and non-abrasive scouring sponge. You can also wash them in the top rack of a dishwasher. The turntable motor shaft is not sealed, so excess water or spills should be wiped up immediately.
Cleaning and replacing the filters
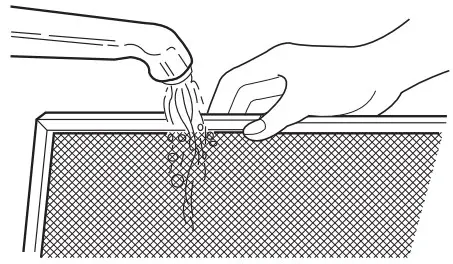
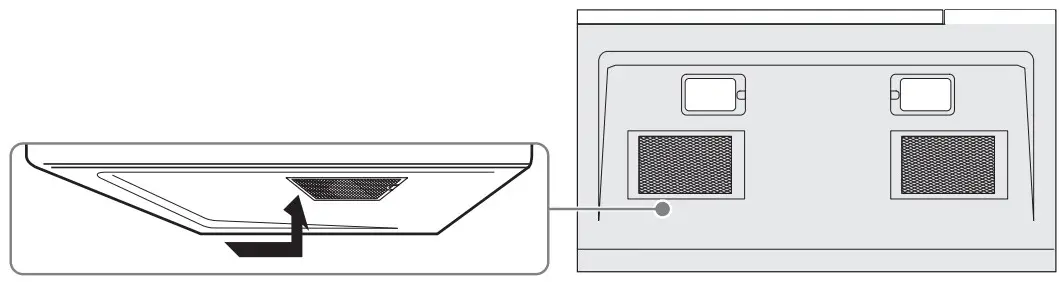
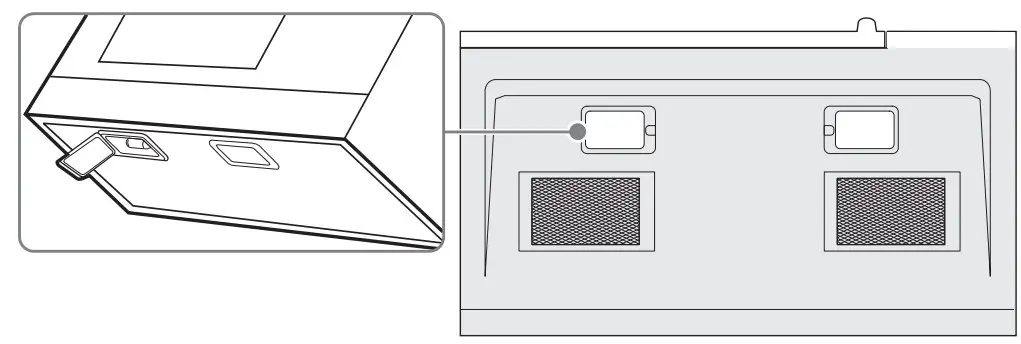
Cleaning the exhaust filters : The exhaust filters should be removed and cleaned about once a month.
CAUTION : Do not operate the oven hood without the filters properly in place.
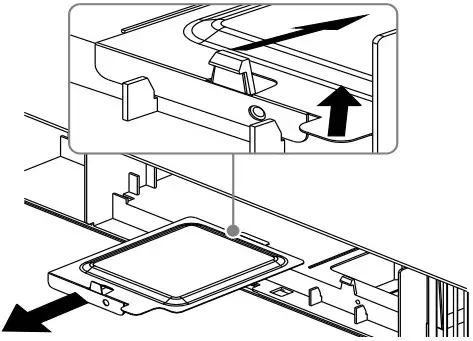
- To remove the exhaust filters, slide the filter toward the back of the microwave, then pull it downward while sliding it out of the side slot. Repeat for the second filter.
- Soak the ventilation filters in hot water using a mild detergent or wash in a dishwasher. Rinse well and shake to dry.
- To reinstall the exhaust filter, slide it into the side slot, then push up and toward the front of the microwave to secure it. Repeat for the second filter.
Replacing the charcoal filter
The charcoal filter is used in non vented, recirculated installations. The filter should be changed every 6 to 12 months depending on use.
- Unplug the microwave oven or turn off power at the main circuit breaker.
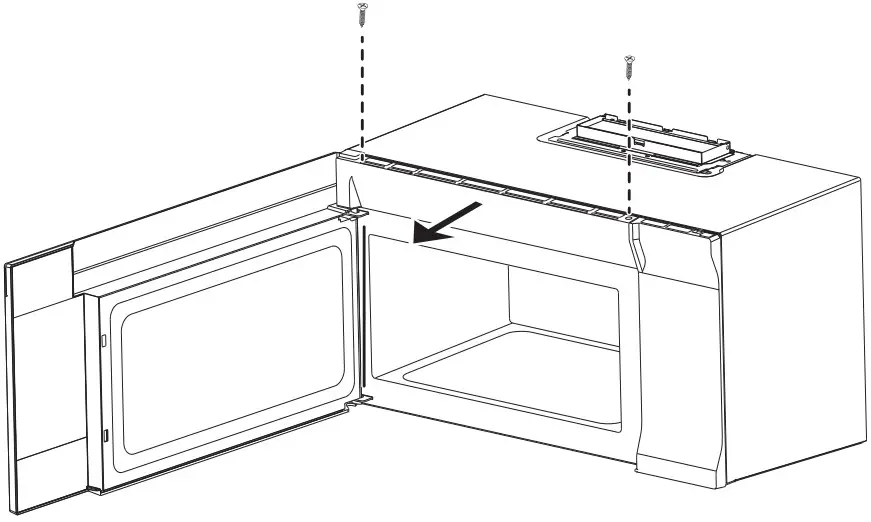
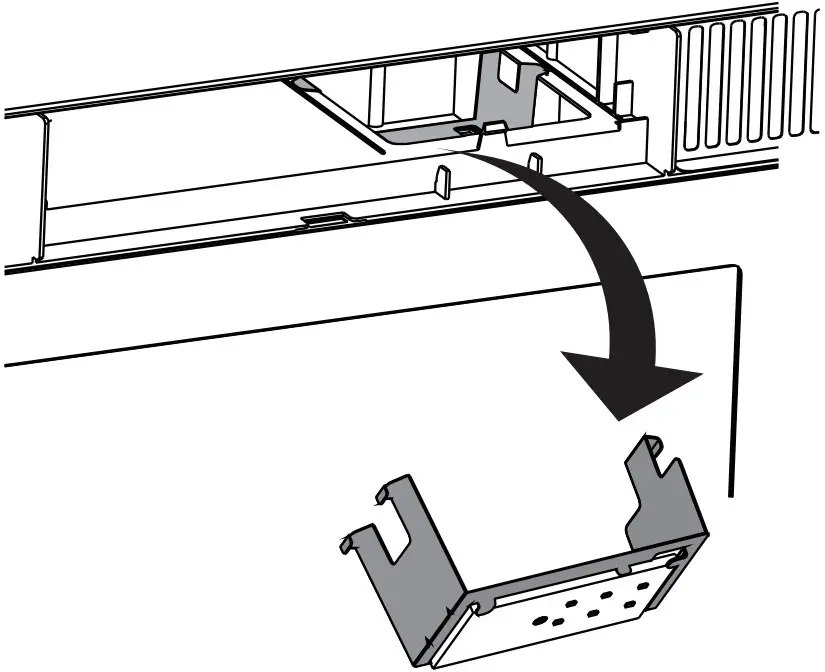
- Remove the vent grill screws.
- Pull the vent grill away from the unit.
- Remove the charcoal filter by pushing it inwards, then lift up and pull it out of the microwave.

- Insert the new charcoal filter, close the vent grill, and secure with the vent grill screws.
- Plug the microwave back in or turn the power back on at the main circuit breaker.
Replacing the lights
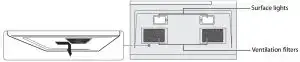
Surface light (external)
- Unplug the microwave oven or turn off power at the main circuit breaker.
- Remove the light cover screws under the microwave.

- Remove the old light bulbs and replace with new 1.2W LED lights.
- Reinstall the light cover screws to secure the covers.
- Plug the microwave back in or turn the power back on at the main circuit breaker.
Microwave light (internal)
- Unplug the microwave oven or turn off power at the main circuit breaker.
- Remove the vent grill screws.
- Pull the vent grill away from the unit.
- Remove the charcoal filter by pushing it inwards, then lift up and pull it out of the microwave.
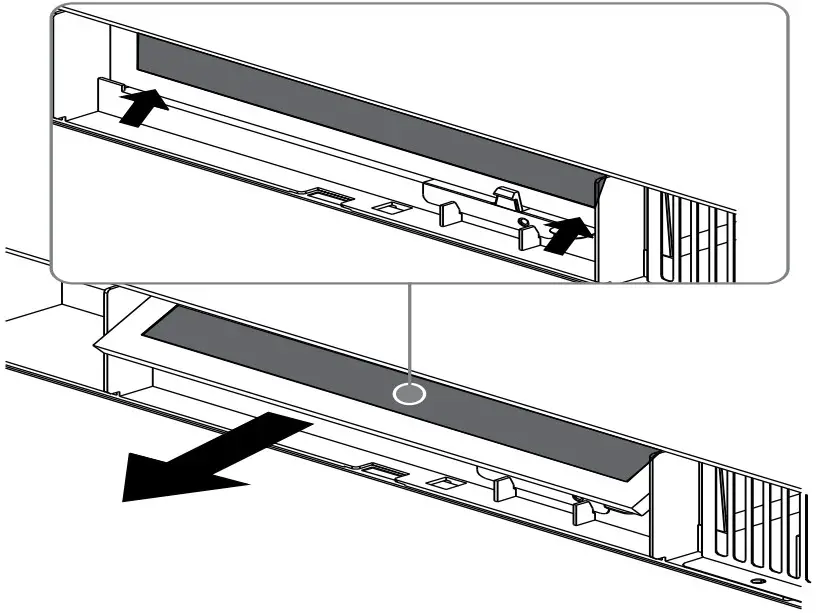
- 5 Push the tab to release the light cover and carefully pull it up from the front edge.
- Remove the LED module and replace only with an equivalent 1.2 watt LED bulb.
- Carefully push the light cover back into place.
- Replace the charcoal filter. Push the vent grill back into place (engaging both the bottom and top tabs) and replace the vent grill mounting screws.
Troubleshooting
If you have a problem with your microwave, review the following chart for a possible solution. If the microwave still does not work properly, contact the nearest authorized service center.
| PROBLEM | POSSIBLE CAUSE | POSSIBLE SOLUTION |
| Microwave will not start | The electrical cord is not plugged in. | Plug in the electrical cord. |
| The door is open. | Close the door and try again. | |
| The wrong operation is set. | Check the instructions and try again. | |
| Arcing or sparking in the microwave | You are attempting to use incorrect materials in the microwave. | Use only microwave-safe materials. |
| You are attempting to use the microwave when it’s empty. | Do not operate the microwave when it’s empty. | |
| Spilled food remains in the microwave. | Clean the microwave with a wet towel. | |
| Unevenly cooked foods | You are attempting to use incorrect materials in the microwave. | Use only microwave-safe materials. |
| The food is not defrosted completely. | Defrost the food completely before attempting to cook it. | |
| The cooking time or power level is not adequate to cook the food. | Use the correct cooking time and power level. | |
| The food is not turned or stirred. | Turn or stir the food. | |
| Overcooked foods | The cooking time or power level is not adequate to cook the food. | Use the correct cooking time and power level. |
| Undercooked foods | You are attempting to use incorrect materials in the microwave. | Use only microwave-safe materials. |
| The food is not defrosted completely. | Defrost the food completely before attempting to cook it. | |
| The cooking time or power level is not adequate to cook the food. | Use the correct cooking time and power level. | |
| The microwave ventilation ports are blocked or restricted. | Make sure that the ventilation ports are not blocked or restricted. | |
| Improper defrosting | You are attempting to use incorrect materials in the microwave. | Use only microwave-safe materials. |
| The cooking time or power level is not adequate to cook the food. | Use the correct cooking time and power level. | |
| The food is not turned or stirred. | Turn or stir the food. | |
| The vent fan turns on by itself | The fan automatically starts when heat rises from range surface units or burners and stays on until the temperature decreases. This protects the microwave from excessive temperatures. | Your microwave is operating normally. The fan cannot be turned off manually during this time. |
| The turntable will not move | The turntable is misaligned. | Make sure that the turntable is properly aligned on the ring and shaft. |
| The turntable is turned off. | Press Turntable on/off to turn your turntable back on. |
Obtaining replacement parts
Call Customer Service at: 888.784.3108
Specifications
| Model | COS-3016ORM1SS |
| Rated voltage | 120V / 60 Hz |
| Rated input power | 1550W |
| Rated output power | 1000W |
| Microwave capacity | 1.6 cu. ft. |
| Turntable diameter | 13.5 in. (34.5 cm) |
| External dimensions (WxHxD) | 29.9 × 16.4 × 15.0 in. (75.9 × 41.7 × 38.2 cm) |
| Internal dimensions (WxHxD) | 20.24 × 9.25 × 14.41 in. (51.4 × 23.5 × 36.6 cm) |
| Certifications | UL approved |
| Power cord length | 3.3 ft. (1 m) |
| Net weight | 56 lbs. (25.4 kg) |
APPLIANCE
WARRANTY AND SERVICE
For full warranty details on this product please visit: http://www.cosmoappliances.com/warranty TO RECEIVE WARRANTY SERVICE, YOUR PRODUCT MUST BE REGISTERED. TO REGISTER, VISIT: WWW.COSMOAPPLIANCES.COM/WARRANTY
SCAN TO REGISTER

IMPORTANT
Do Not Return This Product To The Store If you have a problem with this product, please contact Cosmo Customer Support at +1(888)784-3108 DATED PROOF OF PURCHASE, MODEL #, AND SERIAL # REQUIRED FOR WARRANTY SERVICE
 Correct Disposal of this product:
This marking indicates that this appliance should not be disposed with other household wastes. To prevent possible harm to the environment or human health from uncontrolled waste disposal, recycle it responsibly to promote the sustainable reuse of material resources.
]]>