COSTCO 1600215 2000 Lumens Rechargeable LED Worklight and Spotlight Instructions
IMPORTANT: RETAIN FOR FUTURE REFERENCE: READ CAREFULLY.
SAFETY WARNINGS AND INSTRUCTIONS
READ AND UNDERSTAND ALL INSTRUCTIONS BEFORE USE
WARNING: Read and understand all instructions in this manual prior to operating this Product. Failure to follow all of the instructions listed in this manual may result in electric shock, fire, and/or serious injury/death.
SAFETY DEFINITIONS AND GUIDELINES
WARNING: A statement that indicates impending danger, or a potentially hazardous condition which, if not avoided, could result in serious injury or death to the operator and/or bystanders.
CAUTION: A statement that indicates impending danger, or a potentially hazardous condition which, if not avoided, could result in minor or moderate injury to the operator and/or property damag
SAFETY INSTRUCTIONS
WARNING:
- Unit is not waterproof. DO NOT immerse in water.
- To protect against electrical hazards, do not immerse charger, adapters in water or other liquid.
- Do not use this unit for applications other than its intended uses.
- Charge indoors only.
- Do not expose the internal battery to fire or severe heat; it may explode.
- Do not place or store this item where it can fall, or be pulled into a tub or sink.
- Do not clean this product with a water spray gun or the like.
- Close supervision is necessary when this product is used near children.
- Use only attachments recommended or sold by the manufacturer.
- Use only the USB charging cable that is provided with this product to charge the internal battery.
- Do not operate this product if it has been subjected to a sharp blow, dropped, or otherwise damaged in any shape or form.
CAUTION:
- Never look directly into the light or shine the light into another person’s eyes when it is illuminated.
- Charge this product with the USB charging cable that is provided with the product. If using an AC charger from another appliance, plug in the USB charging cable into the unit first, then plug into the charging source.
- Do not cut, pull, or expose the USB charging cable to extreme heat.
- Do not disassemble the housing. There is no internal serviceable part.
- Pull by the USB plug rather than the cord when disconnecting the USB charging cable.
- This unit contains rechargeable batteries. Although this product arrives partially charged from the factory, it MUST be fully charged before the first use.
- Recharge the unit after each use, or every 6 months to prevent the battery charge from depleting.
- Place the USB charging cable so that it does not become entangled or become a safety hazard.
- Do not attempt to charge the product if the charging adaptor or power cable is damaged. Contact the manufacturer for the replacement.
- Keep the charging adaptor cord and power cable away from sharp corners.
FEATURES
- Main Power ON/OFF Button
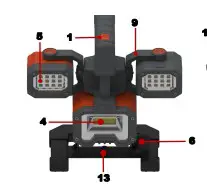
- USB Charging Port
- Battery Charge Status Indicator Bars
- Spotlight – 1000 Lumens COB
- Removable & Rechargeable Worklight 500 Lumens SMD LED
- Base Adjustable Locking Knob
- Adjustable Base / Stand
- Carrying Handle
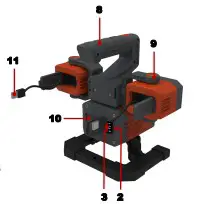
- Worklight Bracket
- 2 x 5.0V – 2.1A Combined USB Power Ports
- USB Charging Plug
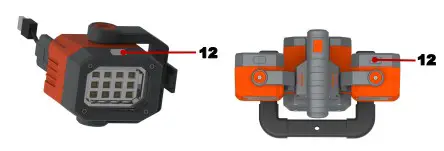
- Worklight ON/OFF Power Button

- Standard Camera Tripod Interface (Tripod not included)
- Worklight Charging Status LED – Below Surface
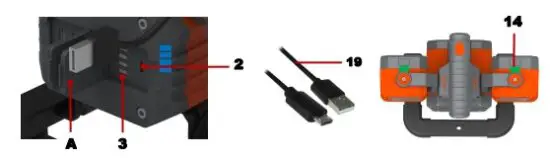
FEATURES
- 5. Worklight 500 Lumens SMD LED Worklight Carriage Track
- Worklight Bracket Guide
- Magnetic Strip
- Power Terminals
- USB Main Charging Cable with Micro USB Plug
- AC Wall Charger
CHARGING AND RECHARGING THE INTERNAL BATTERIES:
This product has been shipped partially charged. Charge the unit right out of the box and before the first use.
Charging and Recharging all 3 lights simultaneously using the AC Wall Charger and the USB Charging Cable (included).
- Attach both Worklights (5) by inserting each Bracket Guide (16) fully and securely into the Worklight Carriage Track (15).
- Insert the Regular USB Plug of the USB Main Charging Cable (19) into the USB Port of the AC Wall Charger (20).
- Lift the Charging Port Compartment Dust Cover (A) and swing it completely open to expose the USB Charging Port (2). Insert the Micro USB Plug of the USB Main Charging Cable (19) into the USB Charging Port (2).
- Plug the AC adaptor into a 110 or 220 Volt AC outlet.
- The Battery Charging Status Indicator Bars (3) on the unit will illuminate according to the charging status of the internal battery. In addition, both Worklights Charging Status LED will illuminate RED.
- Charge the unit until all 4 bars of the Battery Charging Status Indictor LED (3) illuminate without flashing and both Worklight Charging Status LED’s illuminate GREEN.
IMPORTANT: BOTH WORKLIGHTS (SIDE LIGHTS) WILL NOT TURN ON DURING THE CHARGING PERIOD. ONLY THE SPOTLIGHT (BOTTOM LIGHT) WILL TURN ON IF THE MAIN POWER ON/OFF BUTTON (1) IS PRESSED. NOTE: The internal battery must be charged every 6 months, even if the unit is not in use.

Charging and Recharging Worklight and Spotlight using USB Charging Cable (included).
- Insert the Main Charging Cable (19) Regular USB Plug into the USB Port of a desktop, laptop, or any enabled USB accessory power port, such as a power bank.
- Lift the Charging Port Compartment Dust Cover (A) and swing it completely open to expose the USB Charging Port (2). Insert the Micro USB Plug of the USB Main Charging Cable (19) into the USB Charging Port of the unit (2).The Battery Charging Status Indicator Bars (3) on the unit will illuminate according to the charging status of the internal battery. In addi-tion, both Worklights Charging Status LED will illuminate RED.
- Recharge the unit until all 4 bars of the Battery Charging Status Indictor LED (3) illuminate blue without flashing and both Worklight Charging Status LED’s illuminate GREEN.
IMPORTANT: BOTH WORKLIGHTS (SIDE LIGHTS) WILL NOT TURN ON DURING THE CHARGING PERIOD. ONLY THE SPOTLIGHT (BOTTOM LIGHT) WILL TURN ON IF THE MAIN POWER ON/OFF BUTTON (1) IS PRESSED.
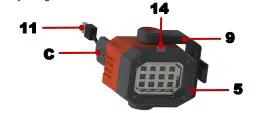
Charging the Worklights while Detached from the Base using USB Charging Cable (included).
Both Worklights (5) are equipped with internal rechargeable Lithium ion batteries and may be charged independently while they are removed from the base.
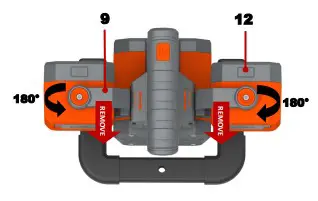
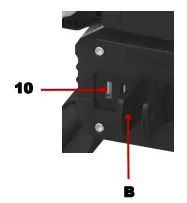
- Remove the Worklight (5) by grasping the Worklight Bracket (9) firmly and sliding it from the Carriage Track (15).
- Lift the Charging Cable Compartment Dust Cover (C) and swing it open to expose the USB Charging Cable and Plug (11). Insert the USB Charging Plug (11) into the USB Port of a desktop, laptop, or any enabled USB accessory power port such as a power bank.
- The Worklight Charging Status LED (14) illuminates RED (appears below the surface) during charging and turns to GREEN when the Worklight internal battery becomes fully charged.
OPERATING INSTRUCTIONS
Main Power ON/OFF Worklight – Spotlight Mode.
By pressing the Main Power ON/OFF Button (1), the unit can be set to perform the following functions:
- Press the Main Power ON/OFF Button (1) once, the Spotlight (4) and the Worklights (5) will illuminate in High Intensity.
- Press the Power ON/OFF Button (1) for the 2nd time, the Spotlight (4) and Worklights (5) will illuminate in Low Intensity.
- Press the Power ON/OFF Button (1) for the 3rd time, the Spotlight (4) will turn OFF and Worklights (5) stay illuminated.
- Press the Power ON/OFF Button (1) for the 4th time, the Worklight (5) will turn OFF. Worklight Dedicated Power ON/OFF. Each Worklight is equipped with a dedicated Power ON/OFF Button (12). Each Worklight can be operated independently while attached to the base or detached from the base.
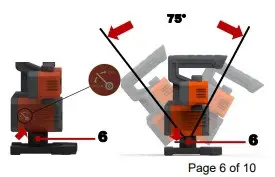
To adjust the Spotlight Head (4) Up and Down.
- Turn the Base Adjustable Locking Knobs (6) Counter clockwise to UNLOCK.
- Adjust the Spotlight head (4) to the desired angle within 75°.
- Turn the Base Adjustable Locking Knobs (6) Clockwise to LOCK.
OPERATING INSTRUCTIONS – Continued
Removing the Worklights from the Base.
Both Worklights (5) are equipped with internal rechargeable Lithium ion batteries and may be charged and operated independently while they are removed from the base.
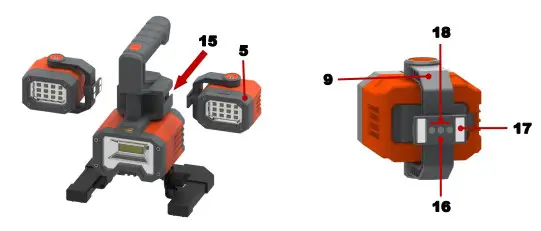
Remove the Worklight (5) by grasping the Worklight Bracket (9) firmly and sliding it from the Carriage Track (15).
Both Worklights (5) are equipped with internal batteries, ON/OFF Power buttons (12), charging USB Plug (11), and Magnetic strips (17).
Worklights (5) can be attached to any Carbon Steel material surface, for hands free application.
CAUTION: Make certain the Power Terminals (18) do not get damaged while the Worklight (5) is detached from the base for remote operation.
OPERATING INSTRUCTIONS – Continued
INTERNAL BATTERY CHARGE LEVEL Status:
To check the internal battery charge level status.
- Press the Main Power ON/OFF Button (1) to ON position
- The Battery Charge Status Indicator Bars (3) will illuminate as follow:
4 LED Bars illuminated (100% Charge Capacity) …… Internal battery is fully charged.
3 LED Bars illuminated (75% Charge Capacity) …….. Available power for the power bank and worklight operation.
2 LED Bars illuminated (50% Charge Capacity) ……. Charge the unit as soon as possible.
1 LED Bar illuminated (25% Charge Capacity) …..….. Charge the unit immediately.
NOTE: The Battery Charge Status Indicator Bars (3) will automatically turn OFF in 5 seconds after the LED lights are turned ON and 30 seconds after the USB Output Ports are activated.
POWER BANK
The USB ports provide 5.0V – 2.1A DC (total output power).
- Make sure the device is powered OFF before inserting the power plug into the USB ports.
- Lift the USB Power Output Compartment Dust Cover (B) and swing it completely open to expose the USB Output Power Ports (10).
- Plug the USB connector into the USB Port (10) of the Worklight/Spotlight.
- The USB Port (10) will automatically turn ON with available power.
- Turn ON the device that is intended to be operated by the USB port.
- Charge or operate the intended device such as iPhones, iPads, Tablets, and any USB power rated 5V enabled devices (not included).
- Turn OFF the device and disconnect the device USB plug from the USB Port (10) after charging your device.
- Periodically check the battery charge level status of the Worklight/Spotlight by pressing the ON/OFF Power Button (1). Make sure the internal battery does NOT deplete below a 25% charge level. Recharge the internal battery as required.
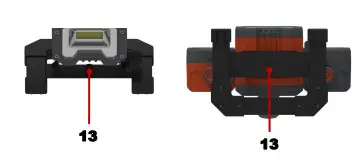
Standard Camera Tripods (Not included):
The Worklight/Spotlight Base is designed with an interface (13) that
can be attached to most standard camera tripods currently available in the market
CARE AND MAINTENANCE
- After use and before performing maintenance, unplug and disconnect the unit from the charging cable.
- Make sure all of the components are in place, and are in good working condition.
- Wipe the unit with a soft, lint free, dry cloth. Make certain not to use any form of abrasive cleaner or solvents to clean this unit. Never dip this unit into liquids.
- Store the unit in a clean and dry place.
- DO NOT disassemble the housing. There are no serviceable parts.
- All rechargeable batteries discharge over time, and do so more rapidly at elevated and/or low temperatures. When the unit is not in use, the internal battery shall be charged every 6 months until the 4 Battery Charge Status Indicator Bars (3) illuminate.
- SAFE BATTERY DISPOSAL – This product contains maintenance free, sealed, non-spillable batteries, which must be disposed of properly; recycling is required. Contact your local authority for disposal information. Failure to comply with local, state and federal regulations can result in fines and/or imprisonment.
CONTACT YOUR LOCAL WASTE MANAGEMENT AUTHORITY TO DISPOSE OF THIS PRODUCT.
TROUBLESHOOTING
A. The Product Does Not Operate
1. Check that the unit is fully charged. Recharge the product’s internal battery if necessary.
2. Make certain that the Power ON/OFF Button (1) is firmly pressed to set the unit to the ON position.
IMPORTANT: BOTH WORKLIGHTS (SIDE LIGHTS) WILL NOT TURN ON DURING THE CHARGING PERIOD. ONLY THE SPOTLIGHT (BOTTOM LIGHT) WILL TURN ON IF THE MAIN POWER ON/OFF BUTTON (1) IS PRESSED.
B. The Product Does Not Charge
- Check the connection to the USB Charging Cable/Plug and the power source is firmly and securely established.
- Check if there is power through the AC outlet or the power source.
SPECIFICATIONS
ONE YEAR LIMITED WARRANTY
POWER 360 LLC (the “Manufacturer”) warrants this product against defects in materials and workmanship that may occur under normal use and care, for a period of ONE YEAR from the date of purchase by the ORIGINAL purchaser (known as the “warranty period”). THIS LIMITED WARRANTY IS NOT TRANSFERABLE OR ASSIGNABLE.
If there is a defect and a valid claim is received within the warranty period due to material or workmanship, the manufacturer will repair or replace the defective product with a new or reconditioned unit at the option of the manufacturer. It is the obligation of the purchaser to forward the defective product and the proof of purchase, along with shipping charges prepaid to the manufacturer or its authorized representatives in order for repair or replacement to occur.
The manufacturer hereby excludes and disclaims any and all other warranties, expressed or implied or statutory warranties, beyond those warranties specified above. The manufacturer excludes any implied warranty of merchantability or fitness for a particular pur-pose. This limited warranty is void if the product is misused, subjected to careless handling, repaired, or modified by anyone other than the manufacturer, or if this product is resold through an unauthorized retailer.
The manufacturer does not provide any warranty for any accessories used with this product that are not manufactured and approved by ePOWER 360 LLC for use with product. Further, the manufacturer shall not be liable for any incidental, special, or consequential damage claims incurred by purchasers, users, others associated with this product, including, but not limited to, lost profits, anticipated sales, business opportunities, business interruption, and any other injury or damages.
This warranty gives the original purchaser specific legal rights and original purchaser may have other rights which vary from state to state. This product is not intended for commercial use.
Customer Service: 9:00 am – 5:00 pm EST | 888.432.6825 | Spoken Language: English | epower360.com
AUSTRALIA: Our goods come with guarantees that can not be excluded under the Australian Consumer Law. You are entitled to a replacement or refund for a major failure and for compensation for any other reasonably foreseeable loss or damage. You are also entitled to have the goods repaired or replaced if the goods fail to be of acceptable quality and the
Distributed by:
Costco Wholesale Corporation P.O. Box 34535 Seattle,
WA 98124-1535 USA 1-800-774-2678
www.costco.com
![]()
![]()
8+
INSTRUCTION MANUAL
4K Action Camera with WiFi
4K WiFi
Record & Share The Action!
 WARNING:
CHOKING HAZARD-Small parts.
Not for children under 3 years.
WELCOME
This product is a high-definition digital motion video recording device tailored to market demand. It has a variety of industry-leading features including video recording, photo shooting, audio recording, video display, and rechargeable battery, which makes it perfect for vehicle data recording, photo-shooting, outdoor sports, deep-water probing.
About this Instruction Manual
![]() Please read the safety instructions and the operating instructions carefully before use. Keep these instructions for renewed use at a later date. When the device is sold or given to someone else, the instruction manual must be provided to the new owner/user of the product.
Please read the safety instructions and the operating instructions carefully before use. Keep these instructions for renewed use at a later date. When the device is sold or given to someone else, the instruction manual must be provided to the new owner/user of the product.
Read these safety instructions before using your device and store them for possible future reference. This product is intended only for private use. It was developed as an electronic medium for the use of multimedia services.
Important Safety Instructions
- Read these instructions.
- Keep these instructions.
- Heed all warnings.
- Follow all instructions.
- Store the device in cool, dry and dust-proof places.
- Do not use this apparatus near water unless the unit is securely enclosed in the waterproof housing.
- Clean only with dry cloth.
- Never touch the lens surface with your fingers.
- Do not block any ventilation openings. Install in accordance with the manufacturer’s instructions.
- Never point the camera lens directly at the Sun. Doing so may damage the image sensor.
- Do not place or store the device near any heat sources such as radiators, heat registers, stoves, or other apparatus (including amplifiers) that produce heat.
- Do not defeat the safety purpose of the polarized or grounding-type plug. A polarized plug has two blades with one wider than the other. A grounding type plug has two blades and a third grounding prong. The wide blade or the third prong is provided for your safety. If the provided plug does not fit into your outlet, consult an electrician for the replacement of the obsolete outlet.
- The charging cord should always be readily accessible.
- While it is charging, keep the product and the power cord out of the reach of children to prevent accidental suffocation or electric shock.
- Protect the power cord from being walked on or pinched particularly at plugs, convenience receptacles, and the point where they exit from the apparatus.
- In case of overheating, smoke, or unpleasant smell in the process of charging, unplug your device immediately to prevent a fire.
- If the charging cord is damaged, have it repaired by the manufacturer, its service, or a similarly qualified person in order to avoid any hazard.
- Replacing the battery incorrectly or with a battery that is not the same type or its equivalent could result in an explosion.
- The battery should not be exposed to excessive heat such as sunlight, fire, or any heat sources such as radiators, heat registers, stoves, or other apparatus (including amplifiers) that produce heat.
- The battery must be installed according to the polarity.
- The battery must be disposed of safely. Always use the collection bins provided (check with your dealer) to protect the environment.
- Non-rechargeable batteries are not to be recharged.
- Rechargeable batteries must be removed from the unit before being charged, and should only be charged under adult supervision.
- Do not short-circuit the supply terminals.
- Only use attachments/accessories specified by the manufacturer or sold with the apparatus. When a cart is used, use caution when moving the cart/apparatus combination to avoid injury from tip-over.
- Unplug this apparatus during lightning storms or when unused for long periods of time.
- Refer all servicing to qualified service personnel. Servicing is required when the apparatus has been damaged in any way, such as power-supply cord or plug is damaged, liquid has been spilled or objects have fallen into the apparatus, the apparatus has been exposed to rain or moisture, does not operate normally, or has been dropped.
- Do not expose the unit to strong magnetic objects or strong radio waves. Strong magnetic fields may cause product malfunctions or damage to images and sounds.
- If the unit has not been operated in a long time, check whether the camera operates normally or not before using the camera again.
- Always backup or download any data from any memory card before reusing. It is recommended that you test any memory card to make sure it is properly storing the data before any imaging session.
- Please choose branded Micro SD card. Neutral cards are not guaranteed to work normally.
- Do not place Micro SD cards near strong magnetic objects to avoid data loss.
General Warnings
- Risk of choking! — Keep packaging material, like plastic bags and rubber bands, out of the reach of children, as these materials pose a choking hazard. This product contains small parts that could be swallowed by children.
- Leaking battery acid can lead to chemical burns! Avoid contact of battery acid with skin, eyes, and mucous membranes. In the event of contact, rinse the affected region immediately with plenty of water and seek medical attention.
- Risk of electric shock! — Never bend, pinch or pull the power and connecting cables, extensions, and adapters. Protect the cables from sharp edges and heat. Before operating, check the device, cables, and connections for damage. Never use a damaged unit or a unit with damaged power cables. Damaged parts must be exchanged immediately by an authorized service center.
- Risk of property damage! — Do not disassemble the device. In the event of a defect, please contact your dealer. The dealer will contact the Service Centre and can send the device in to be repaired, if necessary.
- Do not expose the device to high temperatures! Use only the supplied power adapter. Do not short-circuit the device or throw it into a fire. Excessive heat or improper handling could trigger a short circuit, a fire, or an explosion.
- Do not interrupt an ongoing data connection to a computer before all data has been transferred! This could lead to data loss for which the manufacturer is not liable.
Notes on Cleaning
Turn off the camera. Clean the eyepieces and/or lenses only with a soft, lint-free cloth, (e.g. microfibre cloth). To avoid scratching the lenses, use only gentle pressure with the cleaning cloth. Only use a dry cloth to clean the exterior of the device. To avoid damaging the electronics, do not use any cleaning fluid. Clean the protective case after each use with clear, clean water and dry it thoroughly.
Disposal
 Dispose of the packaging materials properly, according to their types, such as paper or cardboard. Contact your local waste disposal service or environmental authority for information on the proper disposal.
 The integrated battery must only be removed for disposal. Opening the device housing can damage the unit. Drain the battery completely before disposal. Remove all the screws in the housing and open the device housing. Remove the connections to the battery and remove it. Cover the open contacts with tape and package the battery in such a way that it cannot shift in the packaging.
CAN ICES-3 (B)/NMB-3(B)
IC: 25149-8883005
This Class B digital apparatus complies with Canadian ICES-003.
This device complies with Industry Canada licence-exempt RSS standard(s).
Operation is subject to the following two conditions: (1) this device may not cause interference, and (2) this device must accept any interference, including interference that may cause undesired operation of the device.

![]() FCC ID: 2ADRX88-83005
FCC ID: 2ADRX88-83005
CAUTION: Changes or modifications not expressly approved by the party responsible for compliance could void the user’s authority to operate the equipment.
Note: This equipment has been tested and found to comply with the limits for a Class B digital device, pursuant to part 15 of the FCC Rules. These limits are designed to provide reasonable protection against harmful interference in a residential installation. This equipment generates, uses, and can radiate radio frequency energy and, if not installed and used in accordance with the instructions, may cause harmful interference to radio communications. However, there is no guarantee that interference will not occur in a particular installation. If this equipment does cause harmful interference to radio or television reception, which can be determined by turning the equipment off and on, the user is encouraged to try to correct the interference by one or more of the following measures:
– Reorient or relocate the receiving antenna.
– Increase the separation between the equipment and receiver.
– Connect the equipment into an outlet on a circuit different from that to which the receiver is connected.
– Consult the dealer or an experienced radio/TV technician for help.
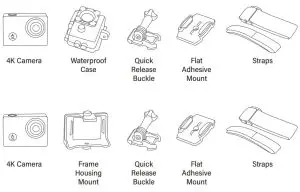
CONTENTS
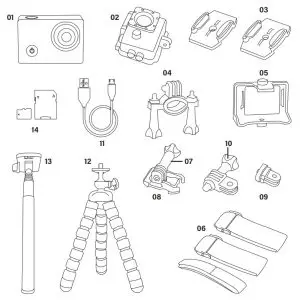
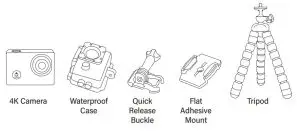
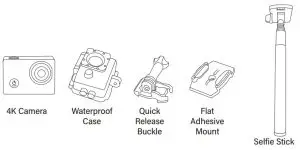
| 01 4K Camera 02 Waterproof Case 03 Flat Adhesive Mounts 04 Handle Bar/Pole Mount 05 Frame Housing Mount 06 Straps 07 Long Thumb Screw |
08 Quick Release Buckle 09 Pivot Mounts 10 Short Thumb Screw 11 USB Cable 12 Tripod 13 Selfie Stick 14 MicroFlash Card and Adapter |
INSTRUCTIONS
Product Features
- A waterproof casing that allows you to film fascinating water sports; waterproof up to 30 meters underwater
- 2 in (50.8mm) screen that displays and replays fascinating videos recorded.
- Support storage cards up to 64GB maximum.
- WiFi latest remote control technology, smart device application can control camera and download videos and photos.
- Multiple video recording formats: 4K/2.7K/1080P/720P
- HD 20M 140° wide-angle lens.
Operating
- Inserting MicroFlash card
Note: For best performance, please choose a branded MicroFlash card and format it on your computer before use. No-name cards are not guaranteed to work flawlessly.
Insert a MicroFlash card with the label facing the screen.
Use brand name memory cards that meet these requirements:
a) microSD, microSDHC
b) Class 10 speed rating
c) Micro Flashcard up to 64GB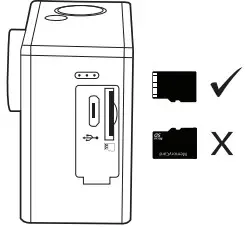
- Charging
A. Connected computer or power adapter via USB cable for charging.
B. Charging of the action camera can be done even when it’s powered off.
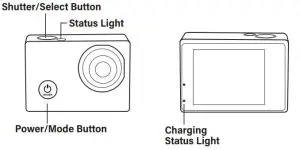
C. When charging, the red indicator light long bright, fully charged, the red light goes out. - Turning camera on and off
Press and hold the power switch for three to five seconds to turn the camera on or off. - Mode Switching
A. Press the [Power On-Off/mode] button [ ] repeatedly to cycle through the camera modes.
Camera mode Description 
Video recording mode Video recording/Slow motion 
Photo shooting mode Self-timer/Photo taken 
Playback mode Fast view/Delete file 
Settings Adjust all camera settings - How to record videos and configure recording setting
5.1. Video Recording
Turn the camera on. You will start with the video recording mode. Insert a MicroFlash card and start recording by pressing “OK”. Press “OK” again if you want to stop the recording.
5.2. Photo shooting
Switch to photo shooting mode by pressing [ ]. Press ”OK” to take photos.
5.3 Slow Motion
1. From the menu, open video settings. 2. Select the slow-motion option. 3. When the slow-motion screen appears, select the “720P 120” or “1080P 60” option. The camera will now take video at 120 or 60 frames per second and play it back at 30 frames per second. 4. To turn off slow motion, go back to the slow-motion screen and select “Off”.
5.4 Playback
1. Verify the camera is in the playback menu. 2. Press the “UP” or “DOWN” button to select a file.
3. Press the “OK” button to play the selected video. 4. Press the “UP” button, a prompt appears asking, “Delete this file?”. You can delete files here.
5.5. Setting
Switch to the setting mode by pressing [ ]. There will be an icon in the bottom right corner.
Press the “OK,” “UP,” or “DOWN” button to set.
5.6. File Storage and Playback
The USB cable is for charging the camera only.
Take the MicroFlash card out of the camera and access the images on a computer with a card reader for playback and storage. - Connecting to WiFi
To connect the camera to an Android or Apple iOS smart device follow these steps:
1. Download the Live DV app from the application store on your smart device and install it.
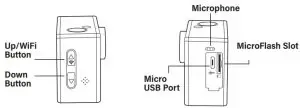
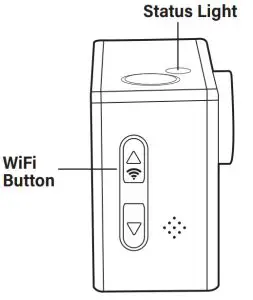
2. Turn on the camera and press the WiFi button on the side of the device. The WiFi logo will appear on the screen.
3. Using your smart device’s WiFi settings, locate the camera’s WiFi connection. It will appear as SSID: Live DV followed by the camera’s serial number. The default password is 12345678.
4. Once connected, the Live DV app can be used to view images in real-time. It can also be used to control the camera’s video functions, take photos and download content directly to your device.
Please Note Instructions for viewing and saving videos on mobile phones.
Video on the Live DV app can be saved directly to your phone.
Is the WiFi signal not stable?
WiFi signal susceptible to interference, make sure the phone is not held too far away from the camera to prevent loss of signal.
Unable to connect to WiFi?
First, make sure your smart device’s WiFi is turned on. Press the power button on the camera and press the WiFi button on the side of the device. The WiFi logo will appear on the screen. If no connection, it is recommended to power off and power on both the camera and your smart device and repeat the steps. Also, check for any app updates.
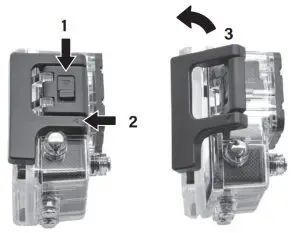
How to Open and Close the Waterproof Case
How to Open:
Press and hold down the  switch (1) and then use the
  arrow (2) to open the clamp (3).
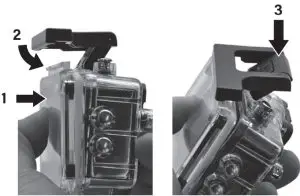
How to Close:
Press the case door all the way down (1) and then snap the clamp to the hinge (2).
Now, simply press the clampdown (3) to close.
Base Mount Example

Helmet Mount Example
Pole/Bicycle Mount Example

Tripod Example
Selfie Stick Example
Technical Data
| Display | 2.0 (50.8 mm) inch display |
| Lens | 140° wide angle |
| Waterproof case | Up to 30 m (100 ft) |
| Language options | English/Traditional Chinese/Simplified Chinese/Russian/Portuguese/Spanish/ Japanese/Greek/German/French/ Polish/Italian |
| Resolution of photos | 20 M(by interpolation) 16 M(by interpolation) 12 M(by interpolation) 8 M 5 M |
| Resolution of videos | 4K @ 30FPS (by interpolation) 2.7K @ 30FPS (by interpolation) 1080p @ 60FPS 1080p @ 30FPS 720p @ 120FPS 720p @ 60FPS |
| Video format | MOV |
| Video compression format | H.264 |
| Storage | Micro Flashcard up to 64 GB |
| Shooting mode | Self-timer (2s/5s/10s) Burst Photo(Off/3 Photos/5 Photos) |
| Frequency of optical source | 50Hz/60Hz |
| USB interface | USB 2.0 |
| Rated voltage | DC 5 V  1 A 1 A |
| Battery capacity | Li-ion 3.7V 750 mAh |
| Recording time | About 45 minutes (at 1080p) |
| Charging time | About 3-4 hours |
| Dimensions | 2.33 x 1.62 x 1.19 in. (59.3 x 41.1 x 30.2 mm) |
| Operating system | Windows/Linux/Unix/Win7/Mac OS |
| WiFi Function | Yes |
Note: Specifications could be subject to change due to upgrading or updating.
Please regard the actual product as the standard.
ITM./ART. 1450002
TW
![]()
#88-83005
©2020 Explore Scientific, LLC.
1010 S 48th Street, Springdale, AR 72762
All rights reserved.
explorescientificusa.com | 866.252.3811
Made in China.
costco BiCore C R-Li User Guide
First Fit Process
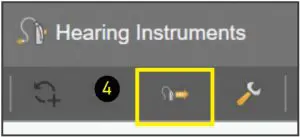
- Click on Programmer Selection
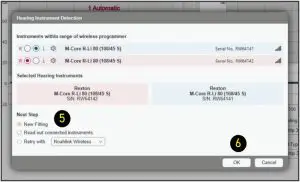
- Select Noahlink Wireless
- Remove hearing aids from charger
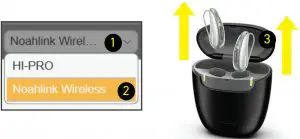
- Wait 6 seconds for hearing aids to power on
- Click Detect Hearing Instruments.
- Click New Fitting
- Click OK to begin First Fit
- Click Acoustical Parameters tab
- Select Coupling Type
- Select Click Dome / Eartip 3.0 or Earmold 3.0
- Select Mold Type
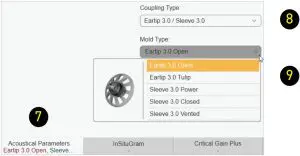
- Select Eartip or Sleeve
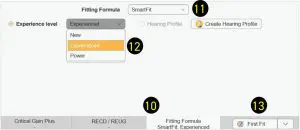
- Click Fitting Formula tab
- Select Fitting Formula
- Select Experience level
- Click First Fit
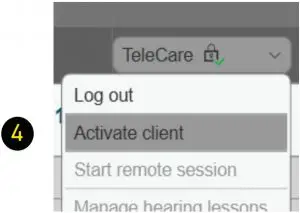
TeleCare Activation
TeleCare may be activated at any time. The member doesn’t have to be present.
- Click Login
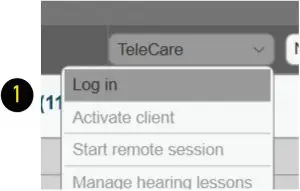
- Enter your credentials
- Click Ok to close notification

- Click Activate client
- Enter the Member’s smart phone number You may check the Continue without mobile number box if the app is going to be used on a tablet.
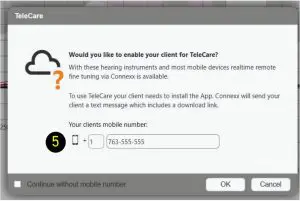
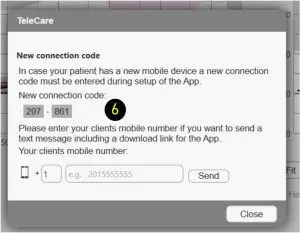
- If using a phone, the member will get a text message with a single use connection code. If using a tablet, you may provide the code.
Soundpro 2.0
Customizing Soundpro 2.0
Soundpro ModeThe default setting, Balanced Focus, should be maintained during First Fit. If changes are required during follow up visits, proceed as follows:
- To shift the focus toward environmental sounds, move the slider to the left. You have 3 steps available.

This classification will more often choose microphone modes with less directionality.
This is more beneficial for people that require full processing support only in very demanding situations. - To increase the focus on speech components, move the slider to the right. You have 3 steps available.
This classification will more often choose microphone modes with more directionality and stronger noise reduction.
This is more beneficial for people that face challenges understanding speech even at low noise levels.
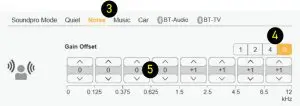
Manual Offsets
Changing these offsets will affect all acoustic environments where that component is present. (i.e. Noise as part of Speech in Noise or Noise as part of Background Noise, etc.). - Select the component to change
- Select a number of handles
- Click on the up or down arrows as needed These changes are made in 1 dB steps
Manual Offsets – Bluetooth
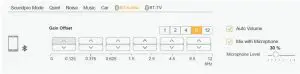
You may adjust the audio streaming response for Bluetooth phone and TV streaming independently. The changes will carry over to the Audio Streaming in tab under Fine Tuning also.
Basic Tuning
Basic Tuning

Use the Basic Tuning tab to make adjustments for gain, loudness and comfort issues after First Fit.
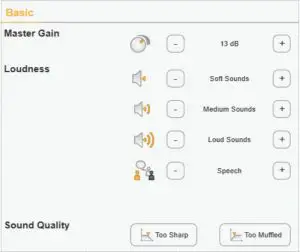
- Master Gain adjusts overall gain for all frequencies and levels.
- Soft Sounds adjusts the 50 dB curve
- Medium Sounds adjusts the 65 dB curve
- Loud Sounds adjusts the 80 dB curve
- Speech increases / decreases gain for speech intelligibility
- Too Sharp increases low and mid and decreases high frequencies.
- Too Muffled decreases low and mid and increases high frequencies
Fine Tuning – Amplification Settings
Fine Tuning
Fine Tuning is divided in multiple tabs to make detailed adjustments to most features of the hearing aids.
It is divided into:
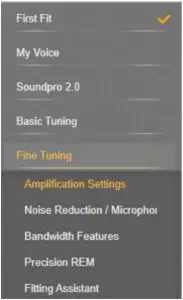
- Amplification
- Noise Reduction/Microphone
- Bandwidth Features
- Precision REM
- Fitting Assistant
- Audio Streaming/Bluetooth
Loudness
Use this tab to control gain and compression.
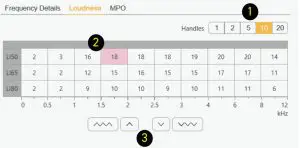
- Handles: Click to change the number of channels available to modify
- Click in the box of the channel you wish to modify
- Adjust the loudness in 1 or 3 dB steps
Lasso Function
You may quickly adjust several channels simultaneously.
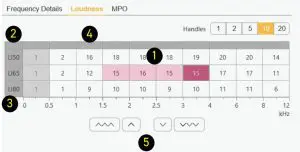
- Click and drag to lasso specific channels/ loudness levels #3 currently)
Quick Selection Function - Click top left box to lasso and adjust all channels and loudness levels simultaneously ( curently 5)
- Click LI50, LI65 or LI80 to lasso and adjust all channels for that level (6)
- Click the gray box above the channel to adjust all loudness levels for that frequency range
- Adjust the loudness in 1 or 3 dB steps (7/8)
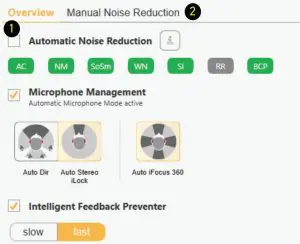
Fine Tuning – Noise Reduction / Microphone
Noise Reduction
Noise reduction is primarily controlled by Soundpro 2
It is recommended to leave it on Automatic Noise Reduction in program 1 (Automatic).
- To modify Noise Reduction uncheck the Automatic Noise Reduction Box (unchecked by default in programs 2 through 6)
- Click on the Manual Noise Reduction tab
- Change from Min to Med or Max as preferred
- If the wearer prefers not to have noise management, uncheck the box to the left of the option to turn off.
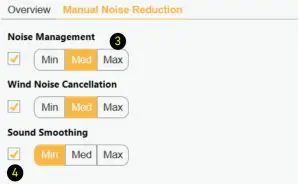
It is not recommended to deactivate Noise Management, Wind Noise Cancellation or Sound Smoothing.
Microphones
Microphones are completely controlled by Soundpro 2.0 in program 1.
To adjust microphones in programs 2 through 6:
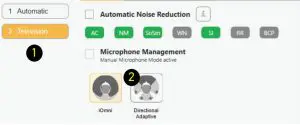
- Select the program where you want to change the microphone settings
- Click on a microphone option Options may vary depending on the program selected.
Intelligent Feedback Preventer
Feedback Reduction Strategies
If feedback conditions exist there are several ways to make adjustments.
Strategy 1
- Intelligent Feedback Preventer
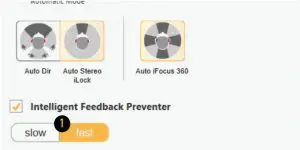
This feature is on Fast by default for maximum You may change from Fast (default) to Slow for people that require specialized sound processing, such as musicians.
Strategy 2
Perform a Critical Gain Measurement and
Optimize
Insert hearing aids into the wearer’s ears.
- Click on Critical Gain Tab in the First Fit screen to open
- Click on Start
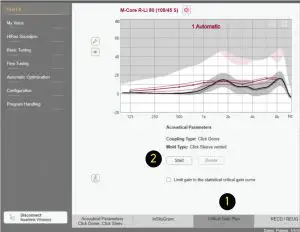
- The system will optimize the Automatic program. As other programs are added, they will also be optimized if required. Optimizing may or may not affect the gain of the hearing aid. If there is a significant overlay of the critical gain area and the hearing aid response, it is advisable to consider changing to a different style of dome, sleeve or custom mold and recalculate the fit.
- Repeat for the other ear
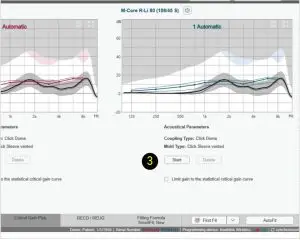
In situations where the current settings are prone to feedback, optimization may affect the hearing aid’s response to the point of being unable to reach targets on REM. In this situation, change your Acoustical parameters (both physically and in the software) and/or receiver power.
Loading Demo & Previous Settings
Loading Previous or Demo Settings into Both Hearing Aids of a Binaural Fitting
- Open the desired Noah session
- Connexx will open in simulation mode
- Click the Connect icon to program the hearing aids

- Select Use session data
- Click OK

Loading Previous Settings into One Hearing Aid of a Binaural Fitting
- Open the desired Noah session

- Connexx will open in simulation mode
- Click Service in the toolbar
- Select Program left hearing instrument or Program right hearing instrument.

- Select OK in Service Programming window

Successful completion will be noted.
The session will remain in simulation mode, but the hearing aids have been reprogrammed and the settings will be saved in the hearing aids.
Rexton App
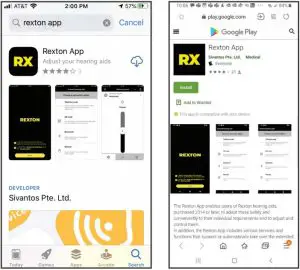
Download the Rexton App to your iPhone or Android smart phone before your fitting.
Download Instructions
- Go to your app store
- Type Rexton App in search bar
- Tap “Get” (or cloud icon) or “Install”
- Follow the instructions on screen


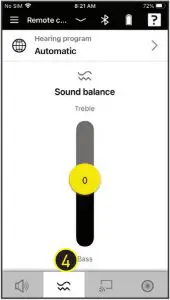
Rexton App Controls
- Program change
- Mask Mode
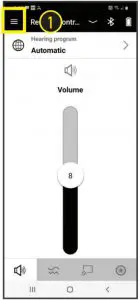
- Volume change
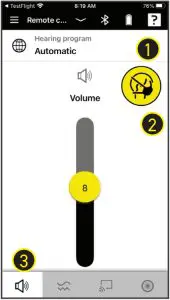
- Sound Balance (Treble and Bass)
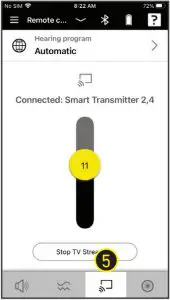
- TV Streaming *
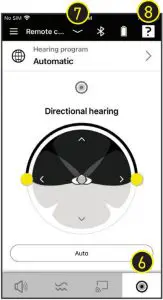
- Directional hearing
- Battery status
- Rexton Assist
* Accessory required
Rexton Assist Overview
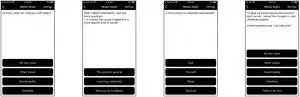
Remote Services
The Rexton app allows you to visit your Costco dispenser for hearing aid adjustments from anywhere after your initial fitting – without having to return to the hearing center.
Your Costco dispenser can walk you through the one-time activation at your fitting or you can activate later should you want a remote support session.
How to activate TeleCare
- Tap Menu
- Tap Settings
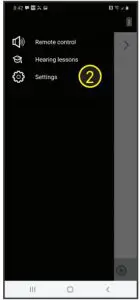
- Tap App Settings
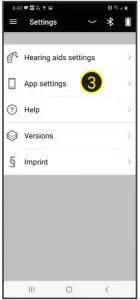
- Tap Connect to TeleCare

Accept Terms and allow microphone and camera access - Enter Activation Code (provided by dispenser or text message)
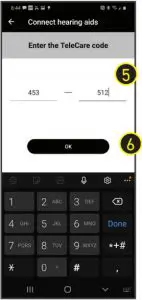
- Tap Ok
You are now ready for remote appointments
Preparing for a Virtual Appointment
- Fully charge your hearing aids and phone
- Be in an area that has a strong cell signal (3 or more bars)
- Have your Rexton app open at appointment time
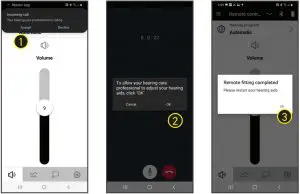
Attending Your Appointment
- Accept incoming call from your dispenser (Costco).
- Tap Ok to allow adjustments to your hearing aids Discuss your concerns while adjustments are made.
- Your Costco dispenser will end the call when complete Restart your hearing aids (via rocker switch or charger.
Made for iPhone
The Bluetooth® word mark and logos are owned by the Bluetooth SIG, Inc. and any use of such marks by Sivantos GmbH is under license. Other trademarks and trade names are those of their respective owners. Apple and the Apple logo are trademarks of Apple Inc., registered in the U.S. and other countries. App Store is a service mark of Apple Inc. Google Play is a trademark of Google Inc. “Made for iPhone” and “Made for iPad” mean that an electronic accessory has been designed to connect specifically to iPhone or iPad, respectively, and has been certified by the developer to meet Apple performance standards. Apple is not responsible for the operation of this device or its compliance with safety and regulatory standards. Please note that the use of this accessory with iPhone or iPad may affect wireless performance. iPad, iPhone are trademarks of Apple Inc., registered in the U.S. and other countries.
Made for Android, ASHA protocol.
RELY ON
REXTON
It’s a tough world out there, and even tougher when your hearing starts to go. At Rexton, we won’t let hearing loss hold you back. Good hearing is critical: From getting the job done, to getting home safely and being there for the people who count on you, we know what’s at stake. That’s why we work hard to deliver proven hearing technology in the most reliable way. We understand what reliability means in real life, and make practical, easy-to-use products you can count on. Our hearing aids have been getting the job done since 1955, so whatever life throws at you, you can rely on Rexton.
Sivantos GmbH
Henri-Dunant-Straße 100
91058 Erlangen, Germany
Visit: www.rexton.com
The Bluetooth® word mark and logos are owned by the Bluetooth SIG, Inc. and any use of such marks by Sivantos GmbH is under license. Other trademarks and trade names are those of their respective owners. Apple and the Apple logo are trademarks of Apple Inc., registered in the U.S. and other countries. App Store is a service mark of Apple Inc. Google Play is a trademark of Google Inc. “Made for iPhone” and “Made for iPad” mean that an electronic accessory has been designed to connect specifically to iPhone or iPad, respectively, and has been certified by the developer to meet Apple performance standards. Apple is not responsible for the operation of this device or its compliance with safety and regulatory standards.
Please note that the use of this accessory with iPhone or iPad may affect wireless performance. iPad, iPhone are trademarks of Apple Inc., registered in the U.S. and other countries.
Order No. A91SAT-04285-99T1-7600 © 2021 Rexton is a registered trademark of WS Audiology. SIV-10593-21 Rev. 05/21
]]>Costco Palm Sized High Performance Drone Instruction Manual

WARNING: Never leave product charging unattended for extended periods of time. Always disconnect PA-1008 from charger immediately after the PA-1008 is fully charged. Please refer to enclosed safety instructions.
PACKAGE CONTAINS:

Colors and styles may vary slightly.
Thank you for purchasing the 2.4G Indoor/Outdoor PA-1008. Please read this instruction booklet as it contains valuable information on how to properly fly and care for your PA-1008.
FEATURES
- Air Pressure Sensor Locks Flight Altitude
- Built In 6 Axis Gyroscopic Chip Keeps the PA-1008 Extremely Stable in All Conditions
- T(Training) Mode Helps Beginner Pilots Learn How to Fly
- Automatically Start and Lands with The Push of A Button
- Different Speed Settings for Slow to High Speed Flying
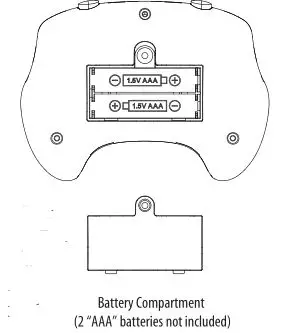
REMOTE CONTROL BATTERY INSTALLATION
- Unscrew and remove the battery cover from the back of the remote control.
- Install 2 “AAA” alkaline batteries into the battery compartment as shown in the diagram A1.
- Replace the battery cover and secure it.
CHARGING THE PA-1008
1. Before playing, you need to charge the PA-1008 battery first. Connect the charging socket of USB charging cord to the charging plug on the battery side. (See diagram A)
Caution: The USB plug fits the charging socket only in one way. Do not force it.
2. Connect the PA-1008 charging cord to your computer’s USB port (see diagram B).
Caution: Only use this charging cord with a computer USB port! Do not attempt to use other USB charging devices.
3. The red LED on the USB plug lights up when charging is complete (See diagram C).
Note: If the red LED lights up, either the charging is complete or the USB plug is not properly connected.
4. The average charging time is approximately 35-40 minutes. The PA-1008 operates for about 5 minutes per charge.
Low battery indication: the PA-1008 `s LED lights will begin to flash to notify you that the battery is running low. 45 seconds after the LED lights start flashing your PA-1008 will automatically land to the floor.

PA-1008 DIAGRAM
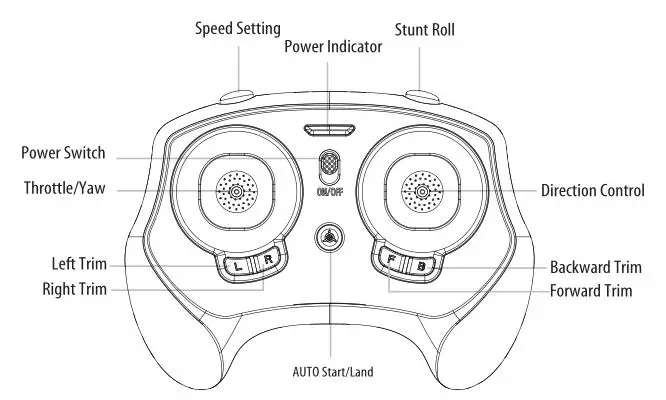
REMOTE DIAGRAM
WARNING
DO NOT FLY YOUR PA-1008 IN FOUL WEATHER!

PREPARING FOR FLIGHT
- Verify that there are 2 “AAA” batteries inside the remote control unit and the PA-1008 has been fully charged.
- Make sure to be in a large space with an open radius of at least 50 feet.
- Make sure the empty space has no obstacles or rivers. Set your PA-1008 on a clean flat surface before take-off.
DO NOT ATTEMPT TO FLY YOUR PA-1008 IF THERE IS RAIN, SNOW, HEAVY WINDS, THUNDER OR LIGHTNING OUTDOORS. IT COULD DAMAGE YOUR PRODUCT AND POSSIBLY EVEN CAUSE BODILY HARM.
SYNCING YOUR PA-1008
Important! When syncing your PA-1008 drone with the controller always make sure that the drone is on a flat level surface. This insures that the 6-axis gyro is properly programmed to mimic your trim settings.
Your PA-1008 utilizes an automatic 2.4G channel selection system that allows up to 8 people to fly side by side in the same wireless range.
For One-person Play:
1. Before starting, make sure that both your controller and PA-1008 are powered off . Make sure that there are no other 2.4G devices in the area as well.
2. Connect the battery into your PA-1008 and set it down on a flat level surface. The white and red LED indicators of the PA-1008 should start flashing rapidly
3. Turn ON your remote and you will hear 1 short beep, the white and red LED lights will start flashing slower. Push the throttle all the way up then pull it all the way down. You will hear one long beep and the LED lights will turn solid. Your PA-1008 and remote should have successfully synced. Should this not happen, repeat all steps again.
For Multi-person Play:
4. Before starting, make sure that all PA-1008s and Controllers are powered off. Make sure that there are no other 2.4G devices in the area as well.
5. Each person will have to sync their PA-1008 individually at a different time to avoid interference. Follow steps 1 to 3 above, making sure to keep away from other people while also making sure that no one else is syncing at the same time.
6. After syncing one player’s PA-1008, it should be left ON until all players have synced their PA-1008s.
7.Should there be a mistake/interference, all players must turn off their controllers and PA-1008s and start the process all over again.
FLYING TIPS
- It is recommended that you operate the PA-1008 in a wide space. The ideal space should have a 61 m/200 ft radius.
- Parental guidance or adult supervision is suggested at all times.
- If you are flying the PA-1008 with others, make sure all spectators are behind you.
- For best performance, it is recommended that you operate the PA-1008 in zero wind conditions. Wind can greatly affect the performance of the PA-1008.
NOW YOU ARE READY TO FLY!
If you have successfully synced your PA-1008 to your controller as explained on page 4 you are now ready to fly. Before beginning to fly your drone you should familiarize yourself with how to start and stop the rotors, how to use your take off and auto land feature and how the controls work. please carefully read and familiarize yourself with various control features explained in the next few pages. Once again as a beginner pilot you should learn how to control your drone in a large open field or park on a day with zero or very light wind. Do not try to fly your PA-1008 too high until you become a more experienced pilot.
RECOGNIZING THE FRONT AND REAR OF THE PA-1008
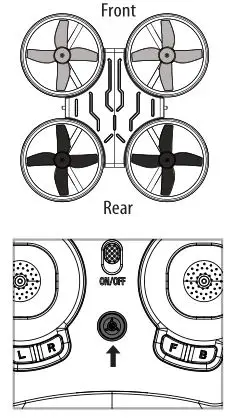
Even though the PA-1008 has four rotors there is still a front or Front forward-facing direction and back or backwards-facing direction. The Front and forward-facing direction of the PA-1008 is the side with two grey propellers. The rear and back of the PA-1008 is the side with two black propellers and where the battery compartment is. The PA-1008 when in flight will also help you keep aware of the orientation with lighted LED lights in the arms of the PA-1008.
NOTE: The front of the drone displays WHITE LED light and the back of the drone displays RED LED light.
AUTOMATICALLY TAKE OFF / LAND
Make sure you have properly synced The PA-1008.
- simply press the Auto Start/Land button, your PA-1008 will automatically take off.
- To stop or land the PA-1008 just Press the Auto Start/Land button again and the PA-1008 will descend and land automatically.
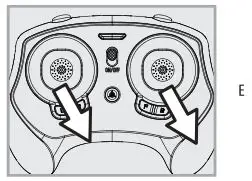
Tips: You also can move the two control sticks simultaneously down inside or outside corners, hold them till you hear a “beep” and the blades start spinning. Release the control sticks and push the throttle stick slowly to take off manually.
UNDERSTANDING THE ALTITUDE LOCK
The PA-1008 has a unique Altitude Lock function. With the help of air pressure sensor you can control, your PA-1008 more stable than ever. The sensor locks in the altitude of the drone while allowing the user to adjust the directional control without having to hold the throttle. After starting the drone, fly upwards to a safe height. Once at a safe height, let go of the throttle control, your PA-1008 should lock in the altitude and allow the user to focus on getting used to the directional controls. NOTE: The altitude sensor does have some tolerance based on atmospheric conditions and could have a slight variation in altitude.
SPEED SETTING BUTTON
The PA-1008 has 4 speed Modes; T (Training), 1 (SLOW), 2 (MEDIUM) and 3 (HIGH). The Default setting when you first turn on your PA-1008 is1 (SLOW). Short press speed button you can switch among the 3 speed settings.
T (Training) MODE
Simply press and hold the Speed Button, you will hear a long beep indicating you are in T Mode now. T mode allows you to learn how to operate your PA-1008 at a very slow speed. Also there are maximum and minim height limits set to avoid crashing to ceiling or floor in T mode. To exit T mode just press the speed setting button again.
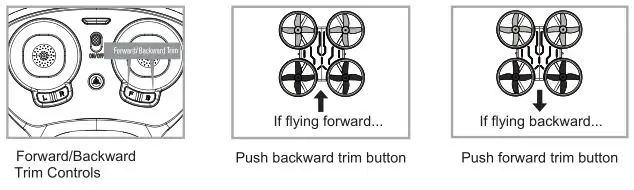
UNDERSTANDING TRIM ADJUSTMENTS
Forward/Backward Trim
- If your PA-1008 is moving forwards or backwards automatically, you may need to adjust the FORWARD/BACKWARD TRIM buttons.
- If your PA-1008 flies forward, push and release the Backward TRIM button repeatedly until the moving stops and proper flight is maintained.
- If your PA-1008 flies backwards, push and release the Forward TRIM button in the same manner until the problem is resolved.
- From time to time you may have to adjust the FORWARD/BACKWARD TRIM to ensure thePA-1008 will hover in mid-air and respond accurately to your commands.
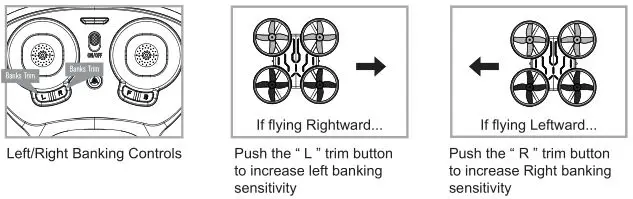
Banking Left/Right Trim
- If your PA-1008 is not steadily hovering and is banking to the left or right automatically, you may need to adjust the BANKING TRIM buttons.
- If your PA-1008 banks to the left, push and release the R Trim button repeatedly until the banking stops and proper flight is maintained.
- If your PA-1008 banks to the right, push and release the L Trim button in the same manner until the problem is resolved.
- From time to time you may have to adjust the BANKING TRIM to ensure the PA-1008 will and respond accurately to your commands.
NOTE: The use of the Trim buttons are accompanied with a beep tone. A single long beep indicates the product is centre-trimmed. No beeping after press the trim button indicates the product is trimmed to the maximum on a particular side.
3/4 CHANNEL SELECT
PA-1008 allows you to control your quadrocopter in 3 channel mode (beginner) or 4 channel mode (advanced flying). The PA-1008 default setting is 4 channel mode.
To change to 3 channel mode:
PRESS the Direction Control stick vertically down then release, you will hear 3 short beeps indicating the PA-1008 now is set to 3CH mode.
To change back to 4 Channel mode:
PRESS the Direction Control stick vertically down then release again, you will hear 4 short beeps indicating the PA-1008 is now set to 4CH mode.

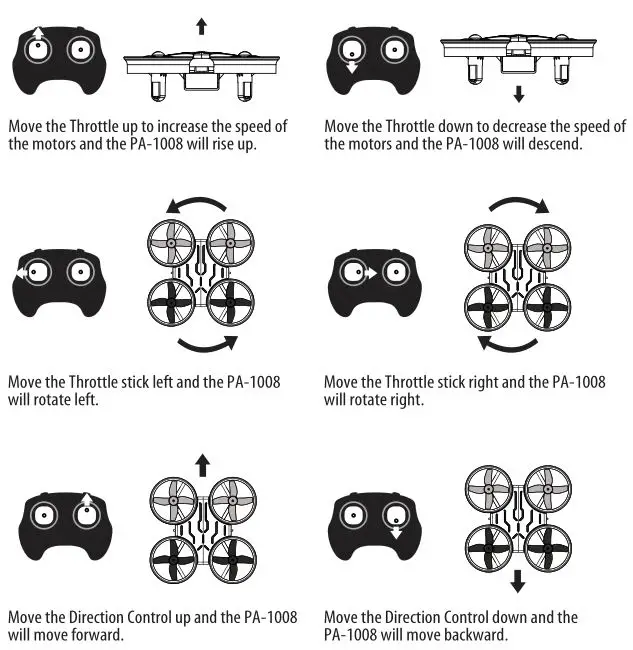
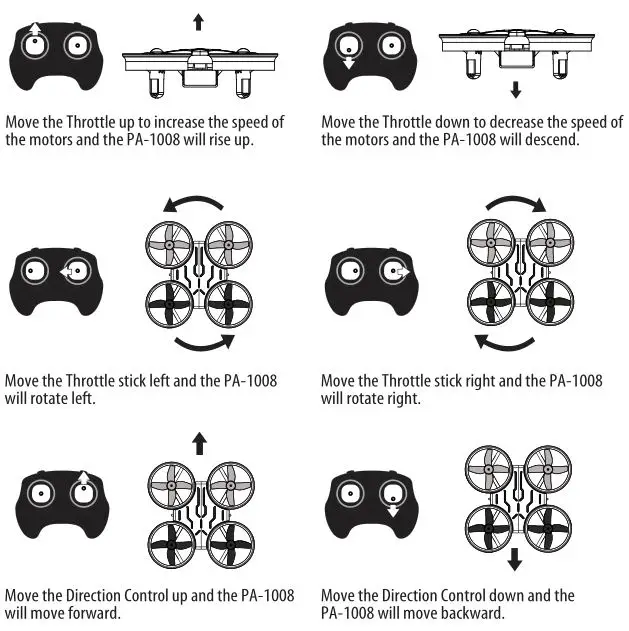
4 CHANNEL FLIGHT CONTROL
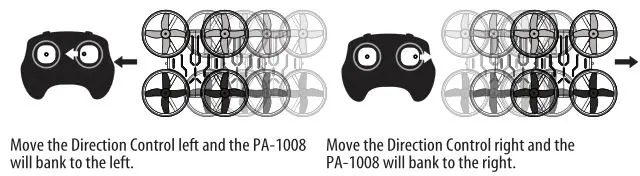
3 CHANNEL FLIGHT CONTROL
For beginner pilot, you may want to practice in 3 CHANNEL mode first. Press the direction control stick vertically down, you will hear a beep and now you are in 3 CHANNEL mode. Follow the below steps to start your flight practice. (Note: To switch back to 4 CHANNEL MODE, just press the Direction Control Stick again, you will also hear a beep too.)
CALIBRATING THE PA-1008
If the PA-1008 becomes unstable during the course of flying, you may need to calibrate the internal gyros. To do this place the PA-1008 on a flat level surface. Do not start the blades. Instead move both the throttle and control stick down and to the right corner . The LEDs on the PA-1008 will flash quickly and then remain solid, this indicates your drone has been recalibrated (see diagram E).
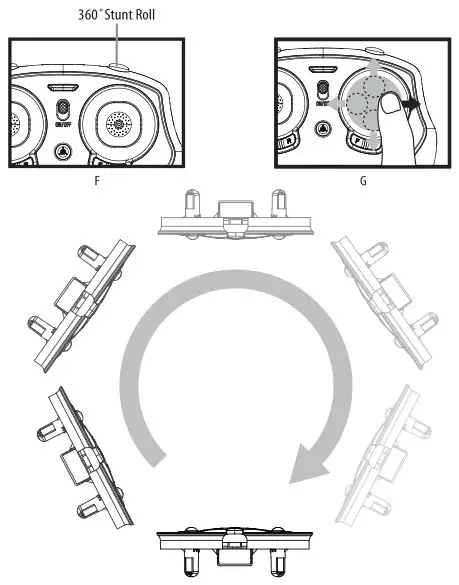
HOW TO DO 360º STUNT ROLLS
- In order to make your PA-1008 do 360º rolls you must fully charge your battery. Note: The PA-1008 will not do 360º stunt rolls in T mode and Mode 1 or under low battery indication (The LED lights on the drone will be flashing).
- Once you are ready to attempt a 360º roll, simply depress and let go of the “STUNT” button on the top right hand side of your controller (see Remote Diagram on page 3). You will hear beeping sounds, this means you are now in “STUNT MODE.”
- Now quickly move your right control stick in any of 4 directions; up, down, left or right. Your PA-1008 drone will instantly roll in the associated direction. See diagram below.
Note: After performed the stunt roll, the beeping sounds will stop. Repeat step 2 to 3 if you wish to do it again.
PA-1008 WARNING:
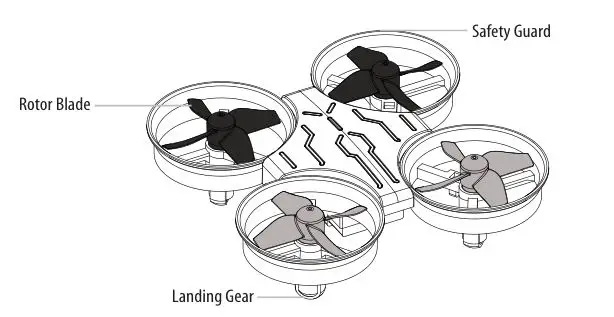
The PA-1008 is designed for INDOOR and OUTDOOR use. The PA-1008 blades revolve at high speeds and can cause damage to the user, spectators and animals. Stand away from the PA-1008 to reduce the risk of getting into the flight path. Warn spectators that you will be flying your PA-1008 so that they are aware of its position. Before flight, inspect the rotor blades to make certain that the blades are securely fastened to the PA-1008.
WARNING!
- Choking/Cutting Hazard. Small Parts/Sharp Rotor Blades.
- Keep hands, hair and loose clothing away from the propeller when the power switch is turned to the ON position.
- Turn off the transmitter and PA-1008 power switches when not in use.
- The included charger is built specifically for the PA-1008 Li-Poly battery. Do not use it to charge any other battery.
- New alkaline batteries are recommended for maximum performance.
- Parental supervision recommended when flying PA-1008.
BATTERY WARNINGS
RECHARGEABLE BATTERY:
This PA-1008 uses a Li-Poly rechargeable battery. If battery no longer stays charged, dispose of battery properly according to local disposal requirements.
CONTROLLER BATTERIES:
Remote control requires 2 “AAA” batteries (not included). Please read the important battery safety warning below.
- Do not mix alkaline, standard (carbon-zinc) and rechargeable batteries (nickel metal hydride).
- Do not mix old and new batteries.
- Non-rechargeable batteries are not to be recharged.
- Rechargeable batteries are to be removed from the item before being charged (if removable).
- Rechargeable batteries are only to be charged under adult supervision.
- Exhausted batteries should be removed immediately and must be recycled or disposed of properly according to state or local government ordinances and regulations.
- The supply terminals are not to be short-circuited.
- Only batteries of the same or equivalent type as recommended are to be used.
- Batteries are to be inserted with the correct polarity (see inside booklet for diagram).
- Do not dispose of batteries in a fire batteries may leak or explode.
CARE AND MAINTENANCE
- Always remove the batteries from the wireless remote control when it is not being used for an extended period of time.
- To clean, gently wipe the remote control and PA-1008 with a clean damp cloth.
- Keep the toy away from direct heat or sunlight.
- Do not submerge the toy into water. This can damage the unit beyond repair.
- Parental guidance recommended when installing or replacing the batteries.
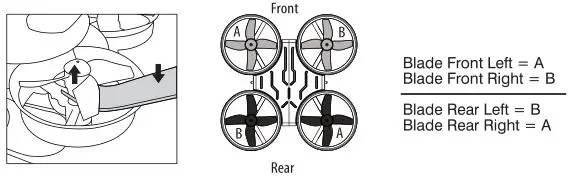
REPLACING THE PROPELLER BLADE
Your PA-1008 propeller system is a precision instrument that may need repair or replacement from time to time for optimal flight function. Crash landing from high-speed aerial flights may cause damage to your PA-1008 propellers. 1. PA-1008 has four blades, two gray propellers on the front and two black propellers on the back. 2. When taking off the damaged blade, always use the included blade wrench. Refer to the instruction diagrams below. Always use mild force, be gentle! 3. When replacing the new blades, make sure to match the indicating letter embossed on the blades to the diagram below.
Limited 90-Day Warranty
NORTH AMERICA
AMAX Group USA warrants to the original consumer that this product is free from any electrical or mechanical defects for a period of 90 DAYS from the date of purchase. If any such defect is discovered within the warranty period, AMAX Group USA will repair or replace the unit free of charge upon receipt of the unit, shipped postage prepaid and insured to our warranty center ALONG WITH THE ORIGINAL RECEIPT evidencing that the product was purchased from an approved AMAX retail partner and that the product is still within the 90 day warranty period. The warranty covers normal consumer use and does not cover damage that occurs in shipment or failure that results from alterations, accident, misuse, abuse, neglect, wear and tear, inadequate maintenance, commercial use or unreasonable use of the unit. Removal of any parts/components voids all warranties. This warranty does not cover cost of repairs made or attempted outside by third-party individuals or companies. Any applicable implied warranties, including warranties of merchantability and fitness, are hereby limited to 90 DAYS from the date of purchase. Consequential or incidental damages resulting from a breach of any applicable express or implied warranties are hereby excluded. Some states do not allow limitations on the duration of implied warranties and do not allow exclusion of incidental or consequential damages, so the above limitations and exclusions in these instances may not apply.
REPAIR/REPLACE PRODUCT
If your product begins to malfunction or stop working, immediately contact our warranty center (contact details listed below). If it is determined that a return is necessary, our warranty department will issue you an RMA number/form and an address to the nearest return center for shipping the product to us. When honoring the warranty, AMAX reserves the right to either repair, replace or refund the product.
IMPORTANT NOTICE:
We will reject and return to sender returns that are not accompanied by an AMAX issued RMA form and RMA number so make sure to contact our warranty center before attempting to return your product!
PREPARATION FOR SHIPPING YOUR PRODUCT:
Please repack your product in a durable box, preferably in the original carton, and send it prepaid, and adequately insured. Include the RMA form that was issued by our warranty department along with your daytime telephone number and email address inside the shipping carton. If your warranty has expired and you still require service please contact our customer care team For further information please send all inquiries to: [email protected]
IMPORTANT NOTICE!
DO NOT ATTEMPT TO SHIP YOUR PRODUCT BACK WITHOUT FIRST CONTACTING OUR WARRANTY
DEPARTMENT AT:
www.amaxbrands.com
Email: [email protected]
Phone 1-866-360-1510
INDUSTRY CANADA NOTICE: CANADA ONLY.
This device contains licence-exempt transmitter(s)/receiver(s) that comply with Innovation, Science and Economic Development Canada’s licence-exempt RSS(s). Operation is subject to the following two conditions:
- This device may not cause interference.
- This device must accept any interference, including interference that may cause undesired operation of the device.
Hereby, [Amax Group], declares that this [PA-1008] is in compliance with the essential requirements and other relevant provisions of Directive2014/53/EU.
The full text of the EU declaration of conformity is available at the following internet address: www.amaxbrands.com
For 2.4G Remote controller and Drone
For remote controller
Frequency Bands: 2407MHz-2461MHz
Max. power transmitted: -16.42dBm
For Drone
Frequency Bands: 2407MHz-2461MHz
Max. power transmitted: -15.38dBm
FCC Part 15 C Notice
CAUTION: Changes or modifications not expressly approved by the party responsible for compliance could void the user’s authority to operate the equipment. NOTE: This equipment has been tested and found to comply with the limits for a Class B digital device, pursuant to Part 15 of the FCC Rules. These limits are designed to provide reasonable protection against harmful interference in a residential installation. This equipment generates, uses and can radiate radio frequency energy and, if not installed and used in accordance with the instructions, may cause harmful interference to radio communications. However, there is no guarantee that interference will not occur in a particular installation. If this equipment does cause harmful interference to radio or television reception, which can be determined by turning the equipment off and on, the user is encouraged to try to correct the interference by one or more of the following measures:
- Reorient or relocate the receiving antenna.
- Increase the separation between the equipment and receiver.
- Connect the equipment into an outlet on a circuit different from that to which the receiver is connected.
- Consult the dealer or experienced radio/TV technician for help.
This device complies with Part 15 of the FCC Rules. Operation is subject to the following two conditions :
- This device may not cause harmful interference, and
- this device must accept any interference received, including interference that may cause undesired operation.
This equipment complies with FCC/IC radiation exposure limits set forth for an uncontrolled environment.
This equipment should be installed and operated with minimum distance 20cm between the radiator and your body.
This Regulation require it to be separately collected so that it can be treated using the best available recovery and recycling techniques. This will minimize the impact on the environment and human health from soil and water contamination by any hazardous substances, decrease the resources required to make new products and avoid using up landfill space.
Batteries or battery packs must be recycled or disposed of properly. When this product has reached the end of its useful life it should not be disposed of with other household waste.
You can return an old product to your retailer when you buy a similar new one. For other options, please contact your local council.
Please do your part by keeping this product out of the municipal waste stream!
The “wheelie bin” symbol means that the battery should be collected and not be disposed of with other household waste.
The toy is only to be connected to Class II equipment bearing the symbol.
![]() WEEE Directive & Product Disposal
WEEE Directive & Product Disposal
At the end of its serviceable life, this product should not be treated as household or general waste. It should be handed over to the applicable collection point for the recycling of electrical and electronics equipment, or returned to the supplier for disposal.
Internal/Supplied Batteries
This symbol on the battery indicates that the battery is to be collected separately. This battery is designed for separate collection at an appropriate collection point.
![]() WARNING!
WARNING!
CHOKING HAZARD – Small parts. Not suitable for children under 3 years.

Costco France
1 avenue de Bréhat
91140 Villebon-sur-Yvette, France
01 80 45 01 10
www.costco.fr
Conforms to safety requirements of RED 2014/53/EU and FCC.
Voyage AeronauticsTM is the registered trademark of Amax Group USA, LLC.
AMAX Group USA Address: 12645 Memorial Dr Suite F1 #388 Houston, TX 77024
© 2020 All Rights Reserved. visit us at www.amaxbrands.com
Made in China
CT- 6164
C008S-FRN-V 1.0
E1 360 Kids Watch
User Guide
Functions
|
Pedometer Caring for kids’ health |
|
Large battery capacity The large battery capacity of 800 mAh |
|
HD screen 1.4-inch HD large screen with clear and vivid color |
|
Smart PA Saturated sound |
|
Positioning Accurately positioning kids any time and any place |
|
Camera 2-megapixel camera |
|
IPX8 waterproof Unnecessary to take the wrist phone off while washing or swimming |
|
One-button SOS Asking for help with one button |
SIM Card Specifications
- Thank you for choosing the 360 Kids Smartwatch!
The wrist phone supports 4G network. Make sure a SIM card is inserted.
- Make sure the calling line identification presentation service has been activated.
- Make sure the Internet service has been activated, with the data traffic of 200 MB and above.
- Make sure the 4G service has been activated.
- For a new SIM card, please activate it by inserting the SIM card into the wrist phone or with the help of the carrier.
- Please use a standard Nano card (do not independently cut the card using a card cutter).
Button Description and Card Loading Guidelines
- Power button
- In the shutdown state, if you press and hold The power button, the Smartwatch is powered on.
- In the startup state, if you press the Power button, the Smartwatch goes back to the home screen.
- If you press and hold the Power button for 6s, The smartwatch initiates an SOS alarm.
- Card loading procedure
- In the shutdown state, take out the SIM card from the card tray using an ejection tool.
- Place the standard Nano SIM card in the card tray and then insert the SIM card tray into the device.
Downloading and Installing the App
- Scan the following QR code to download and install the 360 Kids Smart Watch App.
Activation Process
Procedure:
- Properly insert the SIM card.
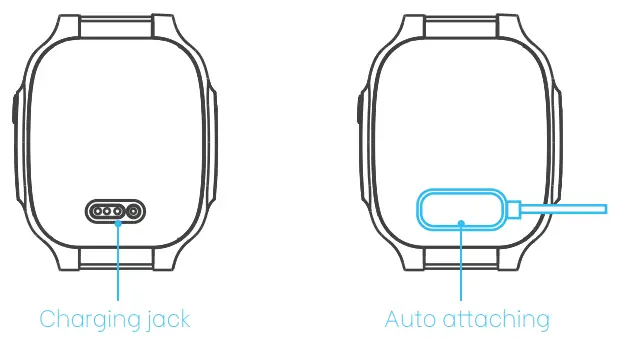
- Ensure that the battery is sufficient. If the Smartwatch cannot start up due to an insufficient battery connect the Smartwatch and the charger using a magnetic charging cable. Charge the Smartwatch for more than 15 minutes.
- Scan the QR code in the app to activate the Smartwatch If the activation fails, check the following:
(1) Check whether the Smartwatch is powered on.
(2) Ensure that the SIM card is not suspended and under the signal coverage.
Binding Process
- To ensure kids’ safety, parents must bind and activate the Smartwatch through the app, to fully use the phone functions. The user who activates the Smartwatch will become the admin of the wrist phone. Other users can bind with the Smartwatch in the following ways:
(1) Scan the QR code in the app and get approval from the admin.
(2) The admin invites family members and grants permissions through the address book in the app. - The admin can set other family members as the admin. When all admins unbind from the Smartwatch, it restores to factory settings.
Introduction and Declaration
The 360 Kids Smartwatch includes the Smartwatch unit and the mobile client software, which cooperate to fully provide phone functions. Please read the operation instructions and the safety information in this manual before using the Smartwatch to ensure safe and correct use. Please use the original accessories to avoid unpredictable damage to the device. The warranty is not valid if the product is not used properly or connected to incompatible accessories. Incorrect use of this product may cause personal injury or endanger others. In this regard, 360 does not assume any responsibility. The warranty is not valid if you remove or modify the casing of the product without permission. The function implementation and accuracy of this product depend on the GPS network, GIS (geographic information) system, and electronic computer system. It requires a smooth network for normal operation. 360 does not assume any responsibility for any loss caused by service interruption due to network failure or other force majeure. 360 reserves the right to modify and improve any product in this manual for continuous improvement without prior notice. The content of this manual is provided at the time of manufacturing. Except as required by applicable laws, no warranties of any kind, either express or implied, including but not limited to, the implied warranties of merchantability and fitness for a particular purpose, are made in relation to the accuracy, reliability or contents of this manual. Please use a standard Nano card rather than cutting the card using a card cutter. Otherwise, the user shall assume any responsibility formed any consequences arising from the user.
Safety
The issue before using this product, please read this chapter carefully, follow the instructions, and pay attention to these warnings. 360 and the manufacturer are not responsible for the consequences of improper use or failure to follow the instructions in this manual. Medical products and public medical facilities: Any radio transmitting device (including this product) may interfere with the functions of improperly protected medical devices. If there is a problem or it is uncertain whether a medical device can shield external RF energy, please consult a doctor or medical equipment manufacturer. Please obey the relevant regulations where the wireless transmission function of electronic devices is prohibited. Cardiac pacemaker: When this product is enabled, always keep it away from the cardiac pacemaker with a distance of long than 15.3 cm (about 6 inches). Do not place this product in your jacket pocket. Use this product on the other side of the cardiac pacemaker to reduce potential interference. If you suspect Procedure: (1) Properly insert the SIM card. If interference has occurred, please turn off the product immediately. (2) Ensure that the battery is sufficient. If the wrist phone cannot start up due to insufficient battery connect the wrist phone and the charger using a Hearing aids and cochlear implant: Some digital wireless devices may cause interference to certain hearing aids or cochlear implants. If such interference occurs, consult an authorized medical professional and refer to the medical equipment manufacturer’s instructions. Other medical equipment: If you and other people use other medical equipment consult an authorized medical professional or equipment manufacturer to determine if the equipment can shield surrounding RF signals. Precautions for using the product on the aircraft: Please turn off the product when the aircraft takes off. To prevent interference with the aircraft communication system, do not use this product during flight.
Operating environment
Do not use this product in a place that is dusty, damp, dirty, or close to a magnetic field, to avoid any internal circuit failure. Do not use this product during thunderstorms. Thunderstorms can cause malfunction or hazards to this product. This product is normally used in a temperature range of –10 ℃ to 45 ℃. If the operating temperature is out of this range, it may cause a product malfunction fire or explosion. To ensure kids’ safety, parents must bind and activate the wrist phone through the app, to fully use the phone functions. The user who activates the wrist phone will become the admin of the wrist phone. Other users can bind with the wrist phone in the following ways:
Do not attempt to disassemble the product. Improper operation or handling may cause the product and battery contents to affect human health or pollute the environment.
- Flammable and explosive areas Do not use this product in the following environments: gas stations, fuel depots chemical plants, places where blasting is being carried out, potentially explosive areas (such as vessel bottom tanks, fuel or chemical transportation, or storage facilities), places where the air contains chemicals or particles such as particles powders, and metal powder. Sparks can cause an explosion or fire in these environments, causing casualties.
- Electronic equipment The use of RF equipment, including this product, may cause interference to some electronic equipment with poor shielding performance, such as some electronic systems in motor vehicles. Please consult the equipment manufacturer before using this product if necessary.
- Children and pets Keep all parts, such as the data cable, out of reach of children and pets. It may cause suffocation or other dangerous situations if children and pets swallow any parts. Do not allow children to charge their wrist phones or touch the charging sockets to prevent the risk of electric shock.
- Maintenance and servicing Do not severely shock or vibrate this product and its accessories to avoid damage, which may result in a malfunction of this product. Please stop using this product before cleaning and maintenance. Clean the screen with a clean, dry, and soft cloth. Do not disassemble or modify this product or accessories without permission. To extend the lifetime of the battery, keep the battery always in the charged state. When the product is not in use, please charge it before turning it off and store it in a cool, dry place that is away from light. The storage time should not exceed one month. Otherwise, charge the product again. After the charging is completed or unnecessary, please disconnect the product from the charger and remove the charger plug from the power socket. If the charger plug or power cord is damaged, do not continue to use it to avoid electric shock or fire. Please do not use the charger to charge the wrist phone in high temperature and high humidity places such as kitchens and bathrooms. Otherwise, it may cause electric shock, fire, or other safety hazards. Do not touch the power cord, product, or charger with wet hands to avoid short circuit, malfunction, or electric shock.
- Safety precautions for the battery Please do not disassemble or modify the built-in battery without permission to avoid damaging the battery, generating heat, or causing a fire. Do not throw the battery into a fire, or place it in a hot place, as this may cause the battery to catch fire or explode. If the battery has abnormal phenomena such as heating, deformation discoloration, swelling, or liquid leakage during use, charging or storage, please stop using it and contact the after-sales service center to replace the battery to avoid safety problems. Waterproof performance The water intrusion ability is tested according to the IEC60529-2013 standard under controlled conditions, and the waterproof rating of the factory product is IPX8. The waterproof performance of the wrist phone is not a permanent feature. To ensure normal functioning, please follow the instructions below:
- It is recommended not to wear the wrist phone during bathing, sauna, swimming, and taking a hot spring bath.
- Do not replace the SIM card or charge the product when it is not dry.
- Do not place the wrist phone in an environment where water flows (such as taps, water guns, etc.)
- Do not immerse the wrist phone in water for a long time.
- Wipe the sweat on the wrist phone in a timely manner.
- Avoid falling or shocking the wrist phone (it may damage the waterproof performance).
- Avoid contact with any liquid (such as wine, seawater, salt water, detergent, etc.) other than clean water.
- The waterproof performance of the wrist phone is not a permanent feature and may deteriorate as the waterproof ring ages or accidentally experiences shocks.
- If the product is used in water, the touch screen and other functions may not work properly.
- Description of Hazardous Substance Status
| Toxic and Hazardous Substances and Elements |
Parts | ||||
| Plastic Casing | PCB Assembly | Power Cord | Battery | Touch Screen | |
| Lead (Pb) |  |
|
|
||
| Mercury (Hg) | |||||
| Cadmium (Cd) | |||||
| Hexavalent chromium (Cr (VI)) |
|||||
| Polybrominated biphenyls (PBB) |
|||||
| Polybrominated Diphenyl Ethers (PBDE) |
|||||
| The environmental protection period of each component is as follows: 10 years for the PCB assembly, 10 years for the power cord, and 5 years for the battery. The environmental protection period marked by this product refers to the safe period of use of the product without leakage of toxic and hazardous substances under the conditions specified in this user manual. | |||||
○: It indicates that the toxic and hazardous substance in all homogeneous materials of this part is below the limit specified in SJ/T11363-2006. ×: It indicates that the toxic and hazardous substance in at least one homogeneous material of this part exceeds the limit specified in SJ/T11363-2006.
Remarks: The lead content in a small number of special-purpose SMT electronic components (such as high-voltage resistors, ceramic resistors diodes, etc.) in the section labeled “×” In the above table may be ≥ 0.1 %. The lead content in screws or cores of data cables can be ≥0.1% due to the superior performance of the alloy. These components are in compliance with exemption clauses of the EU RoHS Directive. At this stage, due to the limitations of the global technological development level, there are no alternative technologies and components, and the lead content of the external contactable parts of the product meets the environmental protection requirements.
After-sales Service
Warranty policies
- This product enjoys local maintenance service within one year from the date of purchase. Please contact 360 authorized dealers for specific details.
Non-warranty policies
- No valid purchase and warranty certificate, or expired warranty period
- Damage due to improper use, maintenance, and services in violation of the user manual, or damage or malfunctions due to unauthorized disassembling, repairing or modifying of the system software.
- Collision, water intrusion, and bumping.
- Damage of the surface of the product such as the outer casing, LCD, or antenna during use, except for the crack of the outer casing due to structural or material factors.
- Damage caused by force majeure, or due to changes in national policies and updates and improvements in carrier’s technology.

Contact Us
Customer service: [email protected]
Facebook@360smartlife
Youtube@360smartlife
Instagram@360smartlife
Website:smart.360.com