
COUNTYLINE 30 Ton Log Splitter Owner’s Manual

GENERAL SAFETY
- ALWAYS keep the operator’s manual in canister for reference. Reread the manual periodically.
- ALWAYS keep all bystanders and pets a minimum of 10 feet away from your work area when operating this log splitter. Only the operator is to be near the log splitter during use.
- NEVER actuate the control valve until all people are clear of the work area.
- NEVER wear loose clothing or jewelry when operating log splitter. Keep clothing and hair away from all moving parts when operating this log splitter.
- NEVER allow adults lacking proper instructions and understanding to operate this log splitter.
- NEVER operate the log splitter when under the influence of drugs, alcohol or medication or when otherwise not alert enough to operate this log splitter.
WORK AREA
- NEVER operate the log splitter on wet, icy, slippery or unstable ground.
- NEVER operate the log splitter in an enclosed area. Exhaust fumes contain carbon monoxide which are deadly.
- ONLY operate the log splitter in good lighting conditions.
- ONLY operate the log splitter on level ground. Operating on a slope could cause log splitter to move or logs to fall off.
- ALWAYS keep the work area free of debris. Remove split wood around the log splitter immediately to eliminate the possibility of tripping.
PREPARATION OF THE LOG
Both ends of the log should be cut as square as possible to help prevent the log from moving during splitter operation. Max log length is 26 inches.
OPERATION OF THE LOG SPLITTER
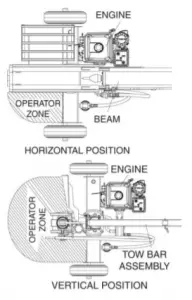
ONLY operate the log splitter from the operator zone as shown in the diagram. Operating the log splitter in another location can result in serious injury or death.
- ALWAYS chock the wheels to prevent movement of the log splitter while in operation.
- KNOW how to stop the log splitter and disengage the controls before operating it.
- NEVER try to split log against grain.
- NEVER try to split two logs at the same time.
- NEVER step over the log splitter during operation.
- NEVER reach or bend over the log splitter to pick up a log.
- NEVER attempt to load the log splitter when the wedge is in motion.
- NEVER place hands or feet between the log and splitting wedge during forward or reverse stroke as this could result in serious injury or death.
- NEVER use your foot, a rope or any extension device to operate the control lever on the valve. Only use hand.
- NEVER touch the muffler and other hot areas of the engine during operation. Wait until the engine cools down.
- NEVER move the log splitter while the engine is running. Shut off the engine if you are leaving the log splitter, even for a short period of time.
GENERAL REPAIR
- NEVER operate your log splitter when it is in poor mechanical condition or in need of repair.
- NEVER alter your log splitter in any manner. Such alterations may cause your log splitter to be unsafe and will void the warranty.
- NEVER perform any service or repair on your log splitter without first removing the spark plug wire.
- NEVER tamper with the engine settings. The maximum engine speed is preset by the manufacturer and is within safety limits. Refer to the engine owner’s manual for your particular log splitter.
- ALWAYS perform all recommended maintenance procedures before using your log splitter.
- ALWAYS check the level of hydraulic oil and engine oil before operation.
- NEVER attempt to free a stuck log with hands while log splitter is running.
- ALWAYS replace all damaged or worn parts immediately.
- ALWAYS periodically check that all nuts, bolts, screws, hydraulic fittings and hose clamps are tight.
- ALWAYS be sure that all replacement parts meet manufacturer’s specifications.
MAINTENANCE and SAFETY
- The mechanical and hydraulic systems of your log splitter require careful inspection. Be sure to replace damaged hydraulic hoses or hydraulic components.
- NEVER check for leaks of hydraulic fluid with your hand. Fluid escaping from a small hole can be almost invisible. Escaping fluid under pressure can have sufficient force to penetrate skin causing SERIOUS INJURY or even DEATH. Leaks can be safely detected by passing a piece of cardboard over the suspected leak and looking for discoloration.
- NEVER remove the cap from the hydraulic tank while the log splitter is running. The tank could contain hot oil under pressure which could result in serious injury.
- NEVER adjust the relief valve setting. The pressure relief valve on your log splitter is preset at the factory. Only a qualified service technician should perform this adjustment.
- ALWAYS seek medical attention immediately if injured by escaping hydraulic fluid. Serious infection or reaction can develop if proper medical treatment is not administered immediately.
- ALWAYS be sure system is not under any pressure by shutting off the engine and moving the valve control handle back and forth should it become necessary to loosen or remove any hydraulic fitting.
FIRE PREVENTION
- ONLY refuel your log splitter in a clear area with no gas fumes or spilled gas.
- NEVER operate your log splitter near a flame or spark or smoke during operation. Hydraulic oil and gasoline are flammable and can explode.
- NEVER add fuel while the engine is hot or running. Allow the engine to cool before refueling.
- If gasoline has spilled, move the log splitter away from the area of the spill and avoid creating any source of ignition until the spilled gas has evaporated.
- ALWAYS securely replace the gas cap.
- ALWAYS clean wood debris from the muffler area of the engine.
- ALWAYS store gasoline in an approved, tightly sealed container and away from heating appliances. Store the container in a cool, dry place.
IMPORTANT NOTE – (on spark arrester):
As a precautionary measure against possible flying sparks, always take a Class B fire extinguisher with you when operating this log splitter in dry areas. This log splitter is equipped with an internal combustion engine and should not be used on or near any unimproved forest-covered, brush-covered or grass-covered land unless the engine’s exhaust system is equipped with a spark arrester meeting applicable local or state laws (if any). If a spark arrester is used, it should be maintained in effective working order by the operator. In the state of California, a spark arrester is required by law. Other states have similar laws. Federal laws apply on federal lands. A spark arrester muffler is optional and available as an accessory at your nearest engine dealer. Always check the legal.
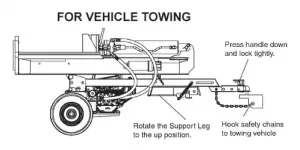
TOWING SAFETY
- NEVER carry cargo or wood on your log splitter.
- NEVER allow anyone to sit or ride on your log splitter.
- NEVER Move your log splitter over hilly or uneven terrain without a tow vehicle or adequate help.
- NEVER exceed weight capacity of ball or load limits of coupler.
- NEVER exceed 45 mph when towing your log splitter. Towing the log splitter at speeds higher than 45 mph could result in loss of control, damage to the equipment, or serious injury or death. Adjust towing speed for terrain and conditions. Be extra cautious when towing over rough terrain, and avoid sharp turns and steep angles when towing your log splitter.
- ALWAYS attach safety chains when towing your log splitter.
- ALWAYS confirm coupler tightness each time before towing and after towing 50 miles.
- ALWAYS take care when backing up with your log splitter in tow. It could jackknife.
- ALWAYS allow for added length of your log splitter when turning, parking and crossing intersections and in all driving situations.
- ALWAYS disconnect your log splitter from the towing vehicle before operation.
- ALWAYS confirm all local and state regulations regarding towing, licensing, and lights before towing your log splitter.
- ALWAYS check before towing to make sure that the log splitter is correctly and securely attached to the towing vehicle and that the safety chains are secured to the hitch or bumper of the vehicle with enough slack to allow turning. Always use a Class I or above, 2” ball for connection to log splitter.
- ALWAYS replace ball or coupler if damaged.
- ALWAYS turn the fuel shut off valve on the engine to the “OFF” position before towing the log splitter. Failure to do so may result in flooding the engine and damaging engine oil.
ASSEMBLY INSTRUCTIONS
TOOLS REQUIRED
- Large Philips Screw Driver
- Hammer or Crowbar
- Band Cutter
- 17mm, 19mm, 22mm and 32mm Wrenches
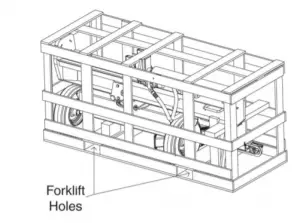
STEP 1: Unpack Unit
1.1 Remove outer carton sleeve then remove sides and top of crate using hammer or crowbar.
1.2 Remove log table from crate.
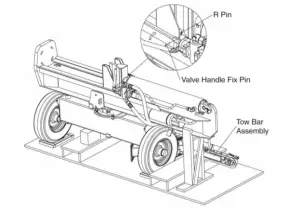
STEP 2: Remove Tow Bar andFix Handle on Control Valve
2.1 Remove the tow bar assembly from the crate.
2.2 Remove the valve handle fix pin from valve and reinstall with handle in vertical position
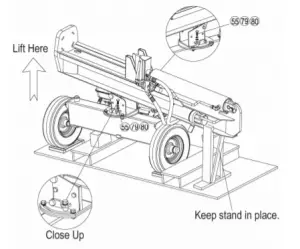
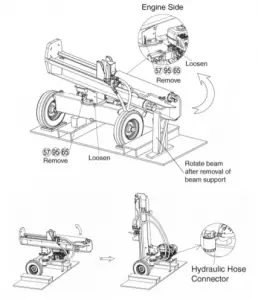
STEP 3: Pivot and Secure Beam to Working Height
3.1 Remove items 55,79 and 80 (M14x30 hex bolt, Ø14 lock washer, Ø14 flat washer) from the rotating mechanism.
3.2 Lift up the foot piece end of the beam and rock forward.
3.3 Secure the beam pivot by reinstalling items 55, 79 and 80.
STEP 4: Rotate and Secure Beam
4.1 Remove the two sets of items 57, 65 and 95, that are painted red (M12x35 red hex bolts, Ø12 flat washers and
Ø12 lock washers) from the outer portion of the rotating assy.
4.2 Loosen the other two bolts on rotating assembly which will allow beam assy. to rotate.
4.3 Rotate the beam 90 degrees towards the front while simultaneously lifting beam to vertical position.
4.4 Reinstall the red bolts and tighten the other outer two bolts.
4.5 Loosen connector of hydraulic hose with 32mm wrench or adjustable wrench, adjust the hydraulic hose to a non-kinked state, then retighten the connector
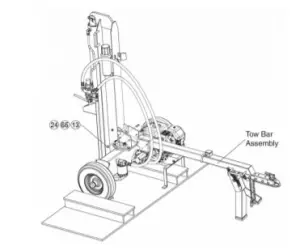
STEP 5: Attach the Tow Bar Assembly
5.1 Insert the tow bar assembly into the rotating mechanism, secure using items 24, 65 and 13 (M12x150 hex bolt,
Ø12 flat washer and M12 nylon lock nut).
Note: M12x150 hex bolt, Ø12 flat washer and M12 nylon lock nut are preassembled in the tow bar.
STEP 6: Install Fill Plug
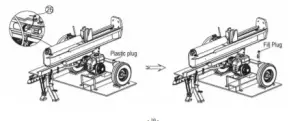
6.1 Lower the beam to the horizontal position.
6.2 Remove item 26 (fill plug) from manual canister and replace plastic plug. Plastic plug can be discarded.
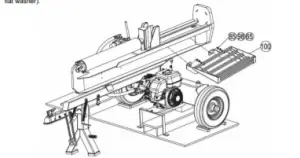
STEP 7: Attach Log Table
7.1 Attach item 100 (log table) to the beam using items 85, 98 and 65 (M12x30 hex bolt, Ø12 lock washer and Ø12 flat washer).
STEP 8: Remove Completed Unit from Crate Bottom
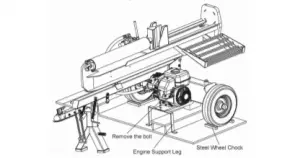
8.1 Remove the engine support leg with 17mm wrench and the steel wheel chocks.
8.2 Roll the splitter off of the crate.
8.3 Check to make sure all hardware has been tightened.
STEP 9: Check Engine Oil Level
9.1 The engine is prefilled with SAE10W-30 (Refer to the Engine Owner’s Manual)
9.2 Make sure the log splitter is on a level surface
9.3 Remove oil fill cap/dipstick, check oil level and add if necessary
9.4 Replace oil fill cap/dipstick
NOTE: During the break-in period check the engine oil level often.
CAUTION
DO NOT attempt to crank or start the engine before it has been properly filled with the recommended type and amount of oil. Damage to the log splitter as a result of failure to follow these instructions will void your warranty.
STEP10: Add Gasoline to the Engine
10.1 Use only clean, fresh, regular unleaded fuel with a minimum 87 octane rating.
10.2 DO NOT mix oil with fuel.
10.3 Remove the fuel cap and slowly add fuel to the tank. DO NOT overfill allow approximately ¼ inch of space for fuel expansion.
10.4 Screw on the fuel cap and wipe away any spilled fuel.

Log splitter engine exhaust contains carbon monoxide, a colorless, odorless, poison gas. Breathing carbon monoxide will cause nausea, dizziness, fainting or death. If you start to feel dizzy or weak, get to fresh air immediately. Operate log splitter outdoors only in a well ventilated area.
DO NOT operate the log splitter inside any building, enclosure or compartment.
DONOR allow exhaust fumes to enter a confined area through windows, doors, vents or other openings.
DANGER CARBON MONOXIDE, using a log splitter indoors CAN KILL YOU IN MINUTES.

Fuel and fuel vapors are highly flammable and extremely explosive. Fire or explosion can cause severe burns or death. Unintentional startup can result in entanglement, traumatic amputation or laceration. Only use regular unleaded gasoline with a minimum 87 octane rating. DO NOT mix oil and gasoline together. Fill tank approximately ¼” below the top of the tank to allow for fuel expansion.
DO NOT fill fuel tank indoors or when the engine is running or hot.
DO NOT light cigarettes or smoke when filling the fuel tank.
STEP 11: Check Hydraulic Oil
11.1 The log splitter needs to be on a flat level surface before checking or adding the hydraulic oil.
11.2 The log splitter was prefilled with 5.7 gallons of AW32 hydraulic oil before shipping. AW46 & universal hydraulic oil are all acceptable types of fluid. Automatic transmission fluid can be used when operating in temperatures below 32 degrees to enhance engine starting.
11.3 Start engine and use the control lever to extend and retract wedge several times to remove air from the lines.
11.4 With the wedge retracted, check hydraulic oil level again and fill if necessary.

DO NOT remove the hydraulic oil fill cap when the engine is running or hot. Hot oil can escape causing severe burns. Always allow the log splitter to cool completely before removing the hydraulic oil cap. High fluid pressure and temperatures are created in the hydraulic log splitters. Hydraulic fluid will escape through a pin-size hole opening and can puncture skin and cause severe blood poisoning. Inspect hydraulic system regularly for possible leaks. Never check for leaks with your hand while the system is pressurized. Seek medical attention immediately if injured by escaping fluid. Make sure all fittings are tight and secure before applying pressure. Relieve system pressure before servicing.
Make sure the hydraulic hoses do not touch any hot surfaces or cutting areas. Hoses need to be positioned were they are clear from the engine and cutting wedge. To avoid serious bodily injury always inspect the hoses before operating the log splitter.
CONTROLS AND FEATURES IDENTIFICATION
Below Diagram identifies major component described in this manual.
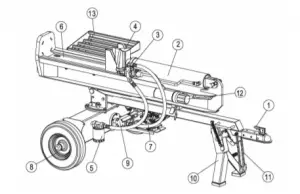
- 2” Ball Coupler
- Hydraulic Cylinder
- Control Valve
- 8” Wedge
- External Filter
- Beam
- Engine
- Tire / Wheel Assembly
- Gear Pump
- Support Leg
- Safety Chains
- Manual Canister
- Log Table
OPERATING INSTRUCTIONS
 WARNING: Read and understand all instructions and safety information in this manual and on safety decals before assembling or operating this log splitter. Failure to understand may cause serious injury or death. Do not allow anyone to operate this log splitter who has not read this manual. A log splitter can be dangerous if assembled or used improperly. Do not operate this log splitter if you have any questions concerning safe operation. Call our technical support department at 1-888-376-9601 for answer to any questions.
CAUTION: DO NOT START OR RUN THE ENGINE BEFORE CHECKING OIL IN THE HYDRAULIC RESERVOIR AND OIL IANTHE ENGINE.
ENGINE OIL RECOMMENDATIONS
Engine is supplied with 10W-30 oil. Refer to the engine owner’s manual for information on oil temperature ranges and grades to use. Engine oil capacity is 36.7 ounces.After the hydraulic reservoir and the engine crankcase are filled with oil, start the engine. The hydraulic pump should prime itself. With the engine running, move the control valve lever toward the foot plate. This will cause the cylinder to extend and expel air. When the cylinder is fully extended, retract it. Repeat this procedure several times. After this procedure check oil level once again. NOTE: If the tank is overfilled it will tend to expel oil from the breather cap when the cylinder is retracted. Cycle the cylinder again until it has a constant speed indicating that all air has been expelled.
STARTING INSTRUCTIONS
Refer to the Kohler Owner’s manual for complete information on starting, maintenance and specifications.
277cc Kohler Engine
a) Check that “ON”/“OFF” switch is in the on position.
b) Move the throttle lever to “FAST”. Always operate the engine with throttle lever in the “FAST” position.
c) Move choke control lever to “CHOKE” position.
d) Grasp rope handle and pull slowly until resistance is felt. Then pull rapidly to start engine and avoid engine kickback.
e) Allow the engine to warm up. If operating in warm weather, move the choke control lever toward “RUN” a short distance at a time over several seconds. For cold weather operation do this procedure over several minutes. Operate with choke lever in the “RUN” position.
f) To stop engine, move “ON”/“OFF” switch to “OFF”.
CAUTION: TURN FUEL SHUT OFF VALVE TO THE “OFF” POSITION PRIOR TO TOWING. FAILURE TO DO SO MAY RESULT INFLOODING THE ENGINE AND DESTROYING ENGINE OIL.
NOTE: The engine maximum governed speed is preset at the factory at 3600 RPM no load speed. When splitting wood the throttle should be set at the maximum speed to develop the horsepower required for the pump.
WARNING: See safety information related to operation of the log splitter on page 5 and 6 of this manual. Make sure that you have the recommended personal protective equipment described on page 3.
- Set up the log splitter in a clear, level area and chock the wheels.
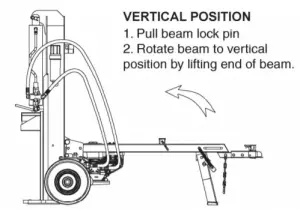
- For horizontal operation place a log on the beam against the foot plate. Make sure the log is securely on the foot plate and up against the beam. To split wood in the vertical position, release the pin on the beam latch located near the front end of the beam. Tilt the beam up until the foot plate is sitting squarely on the ground and the log splitter is stable. Place the log on the foot plate up against the beam. When the beam is returned to the horizontal position make sure the beam latch pin is secure.
- Move control valve handle so that the cylinder will drive the wedge into the log. Extend the cylinder until the log splits or to the end of its stroke. If the log has not completely split after the cylinder has reached the end of its extension, retract the cylinder.
IMPORTANT: Leaving the valve in the “actuate” position at the end of the stroke can accelerate wear on hydraulic component. Do not split logs with unsquared ends.
NOTE: For operation in wooded areas, obtain a spark arrestor for the exhaust system. See the engine operating and maintenance manual and check with your authorized Kohler service center. See also Fire Prevention on page 6 of this manual. TOWING
This log splitter is equipped with pneumatic tires, a Class I or above coupler (2 in. diameter ball required) and safety chains. Before towing, the safety chains must be secured to the hitch or bumper of the vehicle. Local regulations should be checked regarding licensing, lights, towing, etc. Turn fuel shut off valve on the engine to the “Off” position prior to towing. Failure to do so may result in flooding the engine. Do not exceed 45 mph when towing this log splitter. See also Towing Safety on page 6 of this manual.
MAINTENANCE
- Consult the operating and maintenance instructions of the engine manufacturer for engine care and maintenance.
- Always check the oil level of the hydraulic reservoir before operation. Operating the log splitter without an adequate oil supply will cause severe damage to the pump.
- Change the oil filter after the first 25 hours of operation. There after change the oil filter every 100 hours or seasonally, whichever comes first.
- To drain the hydraulic oil, remove drain plug fitting on the bottom of the tank. It is located just to the right of the oil filter.
- If the wedge needs sharpening, it can be removed and sharpened.
- Clean the breather cap after 25 hours of operation. Clean it more often when operated in dusty conditions. To clean, remove the breather cap from the tank and flush with solvent or blow out with air.
- See also General Repair and Maintenance Safety on page 5 and 6 of this manual.
- All replacement parts must meet manufacturer’s specifications
HORIZONTAL POSITION
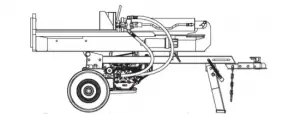
Position used most commonly
Position commonly used for splitting large logs.
TROUBLESHOOTING
| Problem | |
| Cylinder rod will not move | SOLUTION: A,D |
| Slow cylinder rod speed when extending or
retracting |
SOLUTION: A,B,D,I |
| Wood will not split or splits extremely slowly | SOLUTION: A,B,D,G,I |
| Valve will not stay in detent or will not kick
out of detent position |
SOLUTION:H |
| Engine bogs down during splitting | SOLUTION: This is normal |
| Engine stalls under low load condition | SOLUTION: L |
| Engine will not start | SOLUTION: C,E,F |
| Engine is difficult to turn over and will not start when cold | SOLUTION:J |
| Engine runs but cylinder does not move | SOLUTION: D,K |
| Cause | Solution |
| A-Insufficient oil to pump | Check oil level in reservoir |
| B-Air in oil | Check oil level in reservoir |
| C-Low engine oil | Check and add engine oil |
| D-Blocked hydraulic lines | Check for restriction |
| E-“ON”/“OFF” | Move to “ON” position |
| F-Fuel shut off in “OFF” position | Move to “ON” position |
| G-Damaged control valve | Return control valve for authorized repair |
| H-Detent setting incorrect | Remove plastic cap on valve and adjust
detent kick out pressure |
| I-Internally damaged cylinder | Return cylinder for authorized repair |
| J-Cold ambient temperature | Cold weather (below 32°) can result in
difficult engine starting. Change to ATF. |
| K-Broken pump / Engine coupler | Check and replace coupler |
| L-Defective pump or engine | Contact service center |
SPECIFICATIONS
Max. Splitting Force 30 Ton
Cycle Time 10.5 Sec
(Cycle time can vary with many mechanical and environmental factors, our published cycle time is for ideal conditions)
Wedge Height 8” Hardened Steel
Gear Pump 19 GPM
Hydraulic Oil AW32, AW46 & Universal Hydraulic Oil
Hydraulic Capacity 5.7 Gallon
Max. Log Length 26”
Hydraulic Cylinder 41/2” x 24”
Max. Pressure . 3800 PSI
Wheel Size 4.8-8 wheel with 16” outside diameter D.O.T tires
Hitch Type 2” Ball Coupler
Max. Towing Speed 45 MPH
Manual Start Engine 9.5 HP
Filter (External) 25 Micron Spin On
Filter (Internal) Micron Screen
NOTE: For Engine Details Refer to the Engine Owner’s Manual.
DRAWING and PARTS LIST
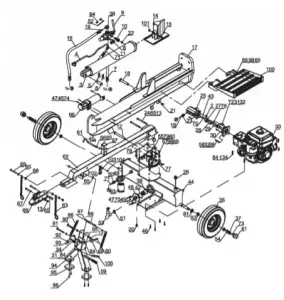
| Ref# | Drawing No. | Description | Qty |
| 1 | 9306-10000-DX | Lock Washer Ø10 | 4 |
| 2 | 9121-06010-FH | Inner Hex Cone Point Set Screw M6x10 | 1 |
| 3 | 30002 | Cylinder | 1 |
| 4 | LSP25-00001-DX | Metal Tube | 1 |
| 5 | LSP25-00005-DX | R Pin | 2 |
| 6 | LSP25-00004-DX | Cylinder Pin | 1 |
| 7 | 25006 | Hydraulic Hose(valve-external filter) | 1 |
| 8 | LSP25-06000 | Connector | 2 |
| 9 | 25002 | Control Valve | 1 |
| 10 | LSP25-17000 | Combination Connector | 1 |
| 11 | LSP25-00002-DX | 130°Joint | 1 |
| 12 | LSP2501-00004 | Safety Pin | 1 |
| 13 | 9206-12000-DX | Nylon Lock Nut M12 | 6 |
| 14 | LSP30B-02000 | Wedge Slide | 1 |
| 15 | 9101-14080-DX8.8 | Hex Bolt M14x80 | 1 |
| 16 | 25007 | Hydraulic Hose(valve-gear pump) | 1 |
| 17 | LSP3001-01000 | Beam | 1 |
| 18 | LSP2501-00005 | Hitch Pin | 1 |
| 19 | 9901-11X2.5 | O Ring Ø11×2.5 | 2 |
| 20 | LSP25-00010-DX | Oil Plug | 1 |
| 21 | LSP25-00012-DX | R Pin | 2 |
| 22 | 9901-15X2.5 | O Ring Ø15×2.5 | 1 |
| 23 | LSP25-00014-DX | Gear Pump Connector | 1 |
| 24 | 9101-12150-DX8.8 | Hex Bolt M12x150 | 2 |
| 25 | 30001 | Gear Pump 16.5/3.6 | 1 |
| 26 | LSP25-13000 | Fill Plug | 1 |
| 27 | LSP35-02003 | Gear Pump Coupling | 1 |
| 28 | LSP30A-10004 | Engine Coupling | 1 |
| 29 | LSP30A-10002-DX | Engine Axle Sleeve | 1 |
| 30 | LSP30A-10001 | Gear Pump Stand | 1 |
| 31 | 9206-08000-DX | Nylon Lock Nut M8 | 8 |
| 32 | 9306-08000-DX | Lock Washer Ø8 | 8 |
| 33 | LSP30A-10003 | Engine | 1 |
| 34 | 9301-10000-DX | Flat Washer Ø10 | 8 |
| 35 | 25004 | Wheel | 2 |
| 36 | 9301-08000-DX | Flat Washer Ø8 | 4 |
| 37 | LSP25-00020-FH | Hex Slotted Thin Nut M20 | 2 |
| Ref# | Drawing No. | Description | Qty |
| 38 | LSP25-00019-DX | Angle Connector | 1 |
| 39 | LSP30-00007 | Oil Filter | 1 |
| 40 | 9404-03030-DX | Cotter Pin Ø3×30 | 1 |
| 41 | LSP25-00009-DX | Axle Cap | 2 |
| 42 | LSP30-00006 | Rubber Washer | 1 |
| 43 | LSP25-10008-FH | Steel Wire Snap Ring for Shaft | 1 |
| 44 | LSP3001-02000 | Hydraulic Reservoir | 1 |
| 45 | 9301-06000-DX | Flat Washer Ø6 | 9 |
| 46 | 9101-10045-DX8.8 | Hex Bolt M10x45 | 4 |
| 47 | 9101-06020-DX8.8 | Hex Bolt M6x20 | 9 |
| 48 | LSP30-15000-DX | Filter Fixed Plate | 1 |
| 49 | LSP25-09001 | Aluminum Base | 1 |
| 50 | LSP25-00007-DX | Connector | 1 |
| 51 | LSP25-00011 | Clamp | 2 |
| 52 | LSA22-00025 | Plate | 1 |
| 53 | LSP2501-00007 | Clear Oil Pipe | 1 |
| 54 | 9301-20000-DX | Flat Washer Ø20 | 2 |
| 55 | 9101-14030-DX8.8 | Hex Bolt M14x30 | 2 |
| 56 | LSP25-00003-DX | Spring | 1 |
| 57 | 9101-12035-DX8.8 | Hex Bolt M12x35 | 4 |
| 58 | MZ01-08025-DX8.8 | Hex Bolt 5/16”x24-1” | 4 |
| 59 | E050-05002 | Gum Cover | 1 |
| 60 | 9105-10030 | Hex Socket Round Head Screw M10x30 | 1 |
| 61 | LSP2501-00008-DX | Latch Pin | 1 |
| 62 | LSP2501-03000 | Tow Bar Assembly | 1 |
| 63 | LSP25-11000-DX | Chain | 2 |
| 64 | 9110-08010 | Screw M8x10 | 4 |
| 65 | 9301-12000-DX | Flat Washer Ø12 | 17 |
| 66 | Z103 | 2” Coupler | 1 |
| 67 | 9101-12080-DX8.8 | Hex Bolt M12x80 | 2 |
| 68 | LSP25-00015-DX | Thick Washer | 2 |
| 69 | 9101-12090-DX8.8 | Hex Bolt M12x90 | 1 |
| 70 | 9306-06000-DX | Lock Washer Ø6 | 6 |
| 71 | 9901-17X2.5 | O Ring Ø17×2.5 | 2 |
| 72 | 9101-08030-DX8.8 | Hex Bolt M8x30 | 4 |
| 73 | 9404-04036-DX | Cotter Pin Ø4×36 | 2 |
| 74 | 9206-06000-DX | Nylon Lock Nut M6 | 3 |
| 75 | Gear Pump Flat Key | 1 |
| Ref# | Drawing No. | Description | Qty |
| 76 | Engine Flat Key | 1 | |
| 77 | LSP3001-03000 | Outer Rotating Mechanism | 1 |
| 78 | LSP2501-05000 | Driver Plate Weldment | 1 |
| 79 | 9306-14000-DX | Lock Washer Ø14 | 2 |
| 80 | 9301-14000-DX | Flat Washer Ø14 | 2 |
| 81 | LSP25-14002 | Oil Seal | 2 |
| 82 | L44643 | Tapered Roller Bearing | 4 |
| 83 | 60001 | Spin-on Filter | 1 |
| 84 | 9206-10000-DX | Nylon Lock Nut M10 | 6 |
| 85 | 9101-12030-DX8.8 | Hex Bolt M12x30 | 2 |
| 86 | LSF3000-00006 | Spring of Support Leg | 2 |
| 87 | 9304-01500 | Circlip for Shaft Ø15 | 2 |
| 88 | LSF3000-00003 | Spring Pin | 1 |
| 89 | LSF3000-00050 | Rubber Mat | 1 |
| 90 | 9101-12100-DX8.8 | Hex Bolt M12x100 | 1 |
| 91 | 9101-10110-DX8.8 | Hex Bolt M10x110 | 1 |
| 92 | LSF3000-00004 | Spring Pendant | 2 |
| 93 | LSP2501-09000 | Support Lock Weldment | 1 |
| 94 | LSP3001-04000 | Support Leg | 1 |
| 95 | LSP3001-00001 | Elastic Cushion | 2 |
| 96 | 9105-08025-DX | Hex Socket Round Head Screw M8x25 | 4 |
| 97 | LSP2501-00003 | Square Tube Rubber Mat | 1 |
| 98 | 9306-12000-DX | Lock Washer Ø12 | 6 |
| 99 | LSP30MD-02000 | Manual Canister | 1 |
| 100 | LSP3001-06000 | Log Table | 1 |
| 101 | 9206-14000-DX | Nylon Lock Nut M14 | 1 |
| 102 | LSP2501-00011 | Connecting Belt | 1 |
| 103 | 9301-06000-DX | Large Flat Washer Ø6 | 1 |
| 104 | 9199-06325-CD | Hex Flange Head Tapping Screw ST6.3×25 | 1 |
| 105 | N560-00019 | Handle Sleeve | 1 |
LIMITED WARRANTY
Warranty
For 5 years from the date of purchase YTL International will replace or repair defects in material and workmanship for the original purchaser of the log splitter. For 3 years the engine warranty is covered per the engine manufactures warranty. For 3 years from date of purchase YTL International will replace the hydraulic system component parts. The warranty will not apply to any unit which was not assembled correctly, misused, overloaded or which has been used or operated contrary to our instructions, or which has been repaired or altered by anyone other than a service representative authorized by YTL International Inc.
Warranty Exclusions
This warranty does not cover cosmetic defects such as paint, decals or wear items such as tires. This warranty will not
cover failures or problems due to acts of God, or events or forces beyond the control of the manufacturer.
Normal Wear Exclusion
The log splitter needs periodic service to perform well. This warranty does not cover repair when normal use has exhausted the life of a part or the equipment as a whole.
Installation, Use and Maintenance Exclusion
This warranty will not apply to parts and/or labor if the log splitter has been misused, neglected, involved in an accident, abused, loaded beyond its limits, modified or assembled incorrectly. Normal maintenance is not covered under this warranty.
Limits of Implied Warranty and Consequential Damage Exclusion
YTL International disclaims any obligation to cover any loss of time, use of this product, freight, or any incidental or consequential claim by anyone from using this log splitter. THIS WARRANTY IS IN LIEU OF ALL OTHER WARRANTIES, EXPRESS OR IMPLIED, INCLUDING WARRANTIES OF MERCHANTABILITY OR FITNESS FOR A
PARTICULAR.
An exchange unit will be subject to the original warranty. The length of the warranty governing the exchanged unit will have the date as the purchase date of the original unit. This warranty gives you certain legal rights which may change from state to state. Your state may also have other rights you may be entitled to that are not listed within this warranty. Contact Information
YTL International Inc.