Creative BT-W3 Adapter
Instruction Manual

PAIRING CREATIVE BT-W3 IN 3 EASY STEPS
STEP 1:
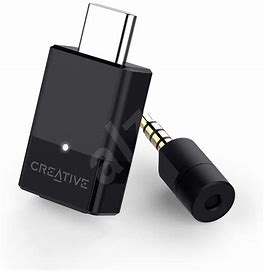
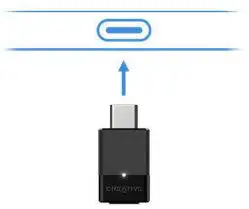
Plug the Creative BT-W3 into an available USB-C port on your device
For devices with USB-A port, connect the included USB-C to USB-A converter before plugging in
Once the Creative BT-W3 is plugged in, the LED light will blink blue (slow), indicating that it is in standby mode
STEP 2:
Press the Bluetooth button for 2 seconds until the indicator light flashes blue (fast) to indicate pairing mode.
Go into Bluetooth pairing mode on your headphones / speakers as well

STEP 3:
Wait for your headphones/ speakers to connect with Creative BT-W3
Once connected, the LED light on Creative BT-W3 will turn solid white, yellow, green, or blue, depending on the available codecs on your headphones/ speakers1

Your headphones or speakers need to support the codec in order for you to use it with Creative BT-W3
CONTROLS

VOICE CALLS
aptX LL, aptX HD, aptX, and SBC are all operating on A2DP Bluetooth profile and do not support voiceback. You’ll need to switch to HFP mode or use the bundled analog microphone for voice calls
HFP MODE:
In HFP mode, the Creative BT-W3 allows you to use your wireless headset for voice chat, but high-quality audio streaming capabilities of A2D P Bluetooth codecs (i.e. aptX LL, aptX HD, aptX, and SBC) will not be available.
ANALOG MICROPHONE:
Alternatively, using the analog microphone will allow you to stream your voice chat while using high-quality audio with A2DP codecs at the same time. However, due to it being a near-field microphone, it is not suitable for use with laptops and computers due to the position of the 3.5 mm audio jack, and the likelihood of it picking up your keyboard sounds.
SETTING UP THE ANALOG MICROPHONE
FOR PS4:
- Connect Creative BT-W3 to an available USB port
- On the console, go to Settings> Devices> Audio Devices> Uncheck “Switch Output Device Automatically”> Ensure that that “Output Device” is shown as “USB Headset (Creative BT-W3)”
- Connect the 3.5 mm Analog Microphone to PS4 controller’s headset jack
- On the console, select Output to Headphones > All Audio
FOR NINTENDO SWITCH:
- Connect Creative BT-W3 to your PC
- Download and install HFP-off firmware* from creative.com/support/BTW3
- Unplug Creative BT-W3 from the PC and plug it into Nintendo Switch’s USB port
- Connect the 3.5 mm Analog Microphone to the consoles’s headset jack
MORE QUESTIONS?
If you require more assistance, please do not hesitate to contact us directly on Amazon. Alternatively, you can also find our support materials and help resources online easily.