User Manual

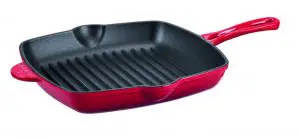
CROFTON Cast Iron Grill Pan
IMPORTANT SAFETY INSTRUCTIONS
- The cast iron construction provides this product durability and a wide range of uses for both preparing and cooking.
- Before using your new cast iron cookware, wash it in warm water with mild liquid soap. The cookware should be rinsed and dried immediately. Do not air dry or store wet.
- Your cast iron cookware is safe for use in the oven or on a gas, electric, ceramic or induction stovetop. Although it is safe for this cookware to be used on these stovetops, it is strongly suggested that you refer to your appliance manual to ensure the stovetop is compatible with enameled cast iron cookware prior to use. Also, be sure to always lift the cast iron cookware when moving to avoid scratching your stovetop and damaging your cookware.
- Note that the cast handles on the cookware will become hot during stovetop or oven use. Oven mitts or hot pads should be used when moving. Rising steam can cause burns as well, use caution.
- Always use plastic, wood or silicone utensils when stirring. Metal utensils will scratch the surface.
- Do not use mixers or hand-held blenders in any cookware as this may cause permanent damage to the surface.
- Do not cut food directly on the enamel surface of the cookware.
- Never use your cast iron cookware in the microwave, on outdoor grills or campfires.
- Tighten the knob carefully if it becomes loose.
- Oven safe up to 400 °F (204 °C).
- When placing the hot cookware on a table or countertop, use a trivet to protect the surface from heat damage.
USING YOUR COOKWARE
- None of the enameled surfaces require seasoning before use.
- Place the cookware on a stovetop burner no larger than the bottom of the pan.
- For best results, you should apply your choice of liquid vegetable oil or butter to the inside base before you begin heating. Do not overheat the cookware, with or without oil, prior to cooking.
- Low to medium heat settings will provide the best results for most cooking, including frying or searing. Always allow the pan to heat gradually as this will ensure the most even and efficient cooking results.
- High heat settings should only be used for boiling water for pasta, vegetables, or reducing sauces. Do not use high heat to pre-heat a pan as this may cause the pan to become overheated. This could cause poor cooking result such as sticking or discoloration of the cooking surface.
CLEANING AND CARING FOR YOUR COOKWARE
- Always allow a hot pan to cool before washing. Use a sponge or soft cloth to remove any residual food, then wash in warm, soapy water. If there is residual food in the pan, fill it with water and allow it to sit for 15–20 minutes before washing. Soft brushes, nylon pads or soft abrasive pads may be used to remove stubborn residual food. If staining persists after following this process, repeat the soaking process with ¼ cup of vinegar and 1 cup of water. You may also simmer this mixture on your stovetop at low to medium heat for an additional 15–20 minutes.
- Never use steel wool, steel abrasive pads or abrasive cleaners as these will damage the porcelain enamel finish.
- Always dry your cookware completely after washing.
- Never wash your cookware in the dishwasher.
- Avoid dropping or hitting your cookware against a hard surface as the porcelain enamel coating may chip or crack.
RECIPES
GRILLABLE VEGAN BURGER PATTY
This grillable vegan burger will be the star at any party paired with your favorite toppings!
Prep Time: 15 minutes (plus 30 minutes to chill)
Cook Time: 11 minutes
Total Time: 26 minutes (plus 30 minutes to chill)
Servings: 4
Ingredients:
- 2 cups cauliflower florets
- 1/3 cup diced yellow onion
- 3 cups quartered baby bella mushrooms
- 1 tablespoon Carlini Vegetable Oil
- 3 cloves garlic, minced
- ½ cup cooked Simply Nature Organic Quick Cook Brown Rice
- 3/4 cup Simply Nature Organic Black Beans, drained and rinsed
- ½ cup Dakota’s Pride Kidney Beans, drained and rinsed
- ½ cup Baker’s Corner All Purpose Flour
- 2/3 cup Chef’s Cupboard Panko Breadcrumbs
- 1 ½ teaspoons Stonemill Iodized Salt
- ¼ teaspoon Stonemill Ground Black Pepper
- ½ teaspoon Stonemill Garlic Powder
- 1 ½ teaspoons Stonemill Chili Powder
- ½ teaspoon Stonemill Cumin
- 2 tablespoons Burman’s Original BBQ Sauce
- Carlini Canola Cooking Spray
Directions:
- In a food processor, pulse cauliflower florets until finely chopped. Remove and reserve. Add onions and mushrooms to the food processor and pulse until finely chopped.
- In a medium skillet, over medium heat, add oil and sauté the vegetables and garlic until tender. Remove from skillet and transfer to a medium bowl.
- In a food processor, puree the rice and beans until smooth. Add to the vegetable mixture.
- Add flour, breadcrumbs, spices and barbecue sauce to the bowl and mix until well combined. Form into 4 patties and chill for 30 minutes.
- Meanwhile, heat the Crofton Cast Iron Grill Pan over medium heat.
- Coat with cooking spray and cook the burgers for 3–4 minutes per side or until heated through. Remove from grill pan, dress the burgers with your favorite toppings and enjoy!
Recipe Courtesy of Chef Leigh An, ALDI Test Kitchen
WARRANTY CARD
Please contact our AFTER SALES SUPPORT by phone or e-mail before sending in the item.
This allows us to provide support in the event of possible user errors.
ALDI INC. FULL WARRANTY CONDITIONS
Dear Customer:
The ALDI warranty is a full warranty offering you the following benefits:
- Warranty period:
2 years from date of purchase.
6 months for movable parts and consumables under normal and proper conditions of use
(e.g. rechargeable batteries). - Costs:
Free repair/exchange or refund.
No shipping or handling costs - Hotline: 1 855 754 8297
- Operating hours: Monday–Friday, 9am–8pm EST
Please contact our service hotline by phone, e-mail or fax before sending in the device. This allows us to provide support in the event of possible operator errors.
In order to make a claim under the warranty, please send us:
- The faulty item with all component parts, the original receipt and the warranty card properly completed.
The warranty does not cover damage caused by:
- Accident or unanticipated events (e.g. lightning, water, fire).
- Improper use or transport.
- Failure to follow the safety and maintenance instructions.
- Other improper treatment or modification of the product.
After the expiration of the warranty period, you may choose to have your product repaired at your own expense. You will be notified of the repair costs in advance.
This warranty gives you specific legal rights, and you may also have other rights which vary from state to state but this warranty is not intended to exceed statutory minimum requirements beyond what is included above.
This warranty does not limit the statutory obligation of the seller arising from any implied warranties. The period of warranty can only be extended in accordance with applicable law.
Neither the service company nor ALDI will assume any liability for data or settings stored on any returned product.
Made in China
IMPORTED & SOLD EXCLUSIVELY BY:
ALDI
BATAVIA, IL 60510
AFTER SALES SUPPORT
- Phone: 1 855 754 8297 (US)
- Email: [email protected]
Two years warranty
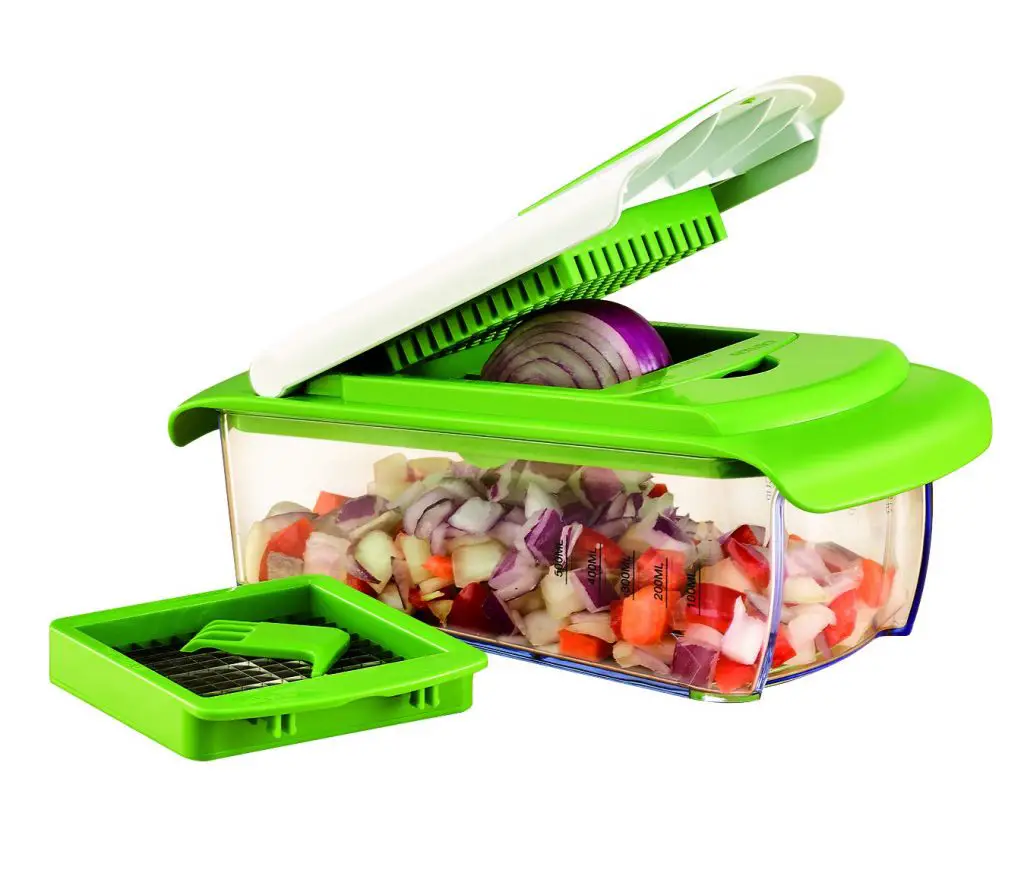
]]> FOOD CHOPPER
PICADORA

General information
Reading and storing the user manual
 This user manual accompanies this food chopper and contains important information on setup and handling. Before using the food chopper, read the user manual carefully. This particularly applies to the safety notes. Failure to do so may result in personal injury or damage to the food chopper.
Store the user manual for further use. Make sure to include this user manual when passing the food chopper on to third parties.
Explanation of symbols
The following symbols and signal words are used in this user manual, on the food chopper or on the packaging.
![]() WARNING!
WARNING!
This signal symbol/word designates a hazard with moderate risk, which may result in death or severe injury if not avoided.
NOTICE! : This signal symbol/word warns of possible damage to property.
 This symbol provides you with useful additional information on handling and use.
 Food-safe! The taste and smell of your food are not affected by this product.
 This product is dishwasher safe only when it is placed on the top rack of a dishwasher.
Safety
Proper use
The food chopper is exclusively designed for cutting fruits and vegetables. It is only intended for private use and not suitable for commercial purposes. Only use the food chopper as described in this user manual. Any other use is considered improper and may result in personal injury or damage to property. The manufacturer or vendor cannot be held liable for damages incurred through improper or incorrect use.
Safety instructions
IMPORTANT SAFEGUARDS
Read and fully understand all instructions and warnings prior to using the food chopper. Your safety is most important. Failure to comply with procedures and safeguards may result in serious injury or property damage.
![]() WARNING!
WARNING!
Risk of injury! Improper handling of the food chopper may result in injury.
− The food chopper is for HOUSEHOLD use only.
− Do not use the food chopper for other than its intended use.
− Use extreme care when handling the cutting blades. The blades are very sharp. Keep fingers clear of the blades at all times.
− Keep children away from the food chopper.
− Do not leave the food chopper unattended during use.
− Before using the food chopper, check that all parts are operating properly, and perform the intended functions. Do not use the food chopper if damage is found.
− Ensure that the food chopper is stable during use. The base container should be placed on a level and stable work surface.
Do not move the food chopper during the cutting process.
− Never push food through the cutting blades with hands.
− Do not use the food chopper while under the influence of drugs or alcohol. − Do not allow children to play with the blades or the packaging wrapper.
NOTICE!
Risk of damage!
Improper handling of the food chopper may result in damage to the food chopper.
− Do not use the food chopper for frozen food, meat, fish, fruit or vegetable with pits, nuts or anything other than foodstuff. The food chopper is not suitable to cut hard items.
− Never place the food chopper on or near hot surfaces such as ovens or heaters. Keep it away from open fire.
− All parts of the food chopper are dishwasher safe only when placed on the top rack of the dishwasher.
− Never use the food chopper inside a microwave or oven.
SAVE THESE INSTRUCTIONS
Keep the user manual for future reference.
Product contents/device parts
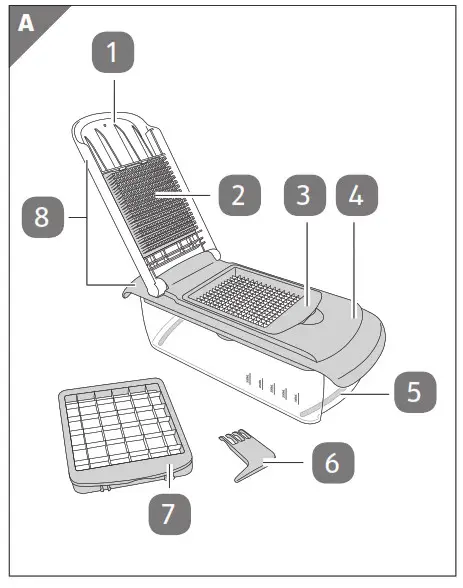
1 Pusher
2 Push plate
3 Cutting blade (for dicing)
4 Chopper base
5 Base container
6 Cleaning tool
7 Cutting blade (for chopping)
8 Lid*
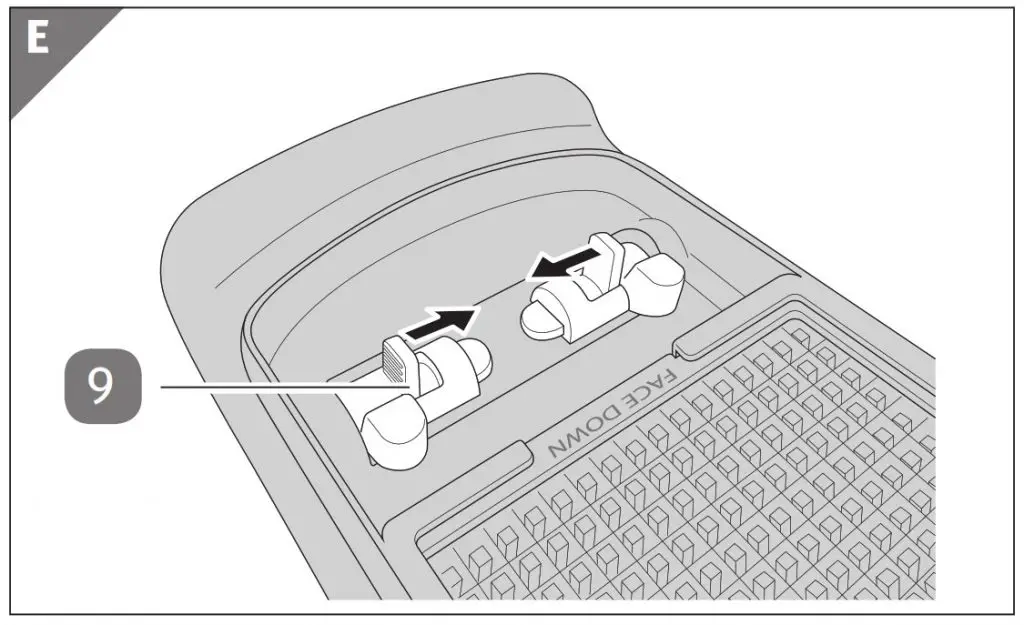
9 Pusher lock
*The lid consists of the pusher and chopper base.
First use
Checking the food chopper and package contents
1. Take the food chopper out of the packaging and check whether the food chopper or any of the individual parts are broken or damaged. If this is the case, do not use the food chopper. Be very careful when opening the packaging to prevent damage to the food chopper.
2. Check to make sure that all parts are included (see Fig. A).
Basic cleaning
1. Remove the packaging material and all plastic wrapping.
2. Clean all parts of the food chopper before first use as described in the chapter “Cleaning”.
Assembling the food chopper
1. Place lid 8 onto the base container 5 .
2. Flip the pusher 1 open.
3. Select a cutting blade 3 or 7 and place it onto the chopper base 4 with the text “THIS SIDE UP” on the cutting blade facing upward (see Fig. B).
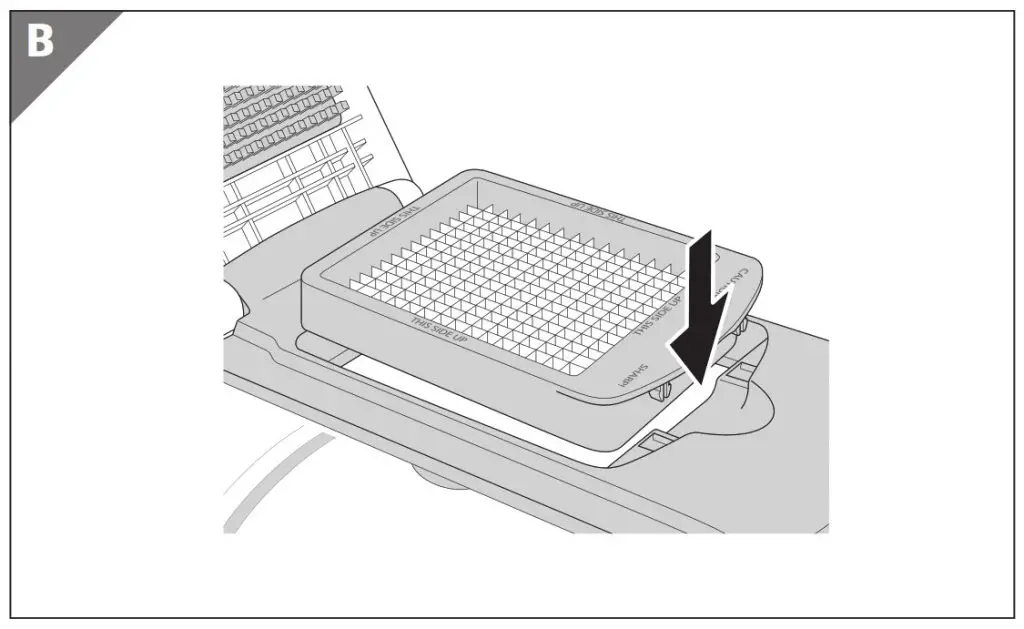 To replace the cutting blade, remove the installed cutting blade before placing the desired one onto the chopper base.
4. Close the pusher. The food chopper is now assembled and ready for use. It is recommended to always close the pusher when the food chopper is not in use.
Using the food chopper
![]() WARNING!
WARNING!
Risk of injury!
Improper handling of the food chopper may result in injury.
− Use extreme care when handling the cutting blades. The blades are very sharp. Keep fingers clear of the blades at all times.
 Before using the food chopper:
− Peel fruit or vegetable with thick skin (e.g. onion),
− Remove stems and trim ends,
− Cut large fruit or vegetable into smaller pieces (must be
smaller than the cutting blade).
1. Flip the pusher 1 open.
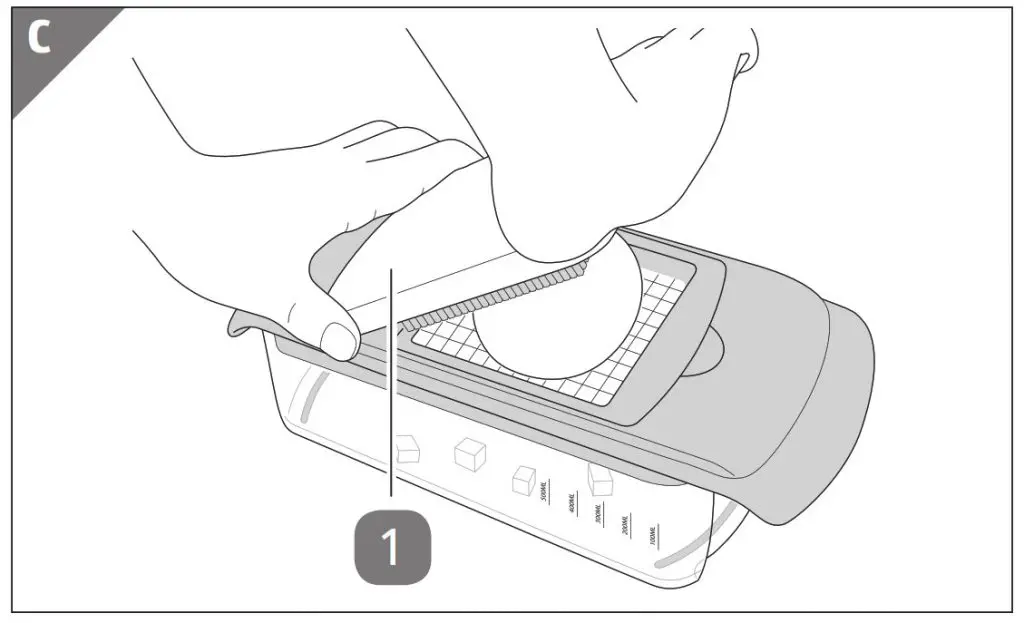
2. Place the fruit or vegetable you want to cut onto the cutting blade 3 or 7 with the flat or larger side facing down.
3. Close the pusher and press it down onto the fruit or vegetable (see Fig. C).
If necessary, use both hands to press the pusher downward.
The fruit or vegetable to be cut is pressed downward through the cutting blade.
4. Remove the lid 8 to empty the cut fruit or vegetable from the base container 5 .
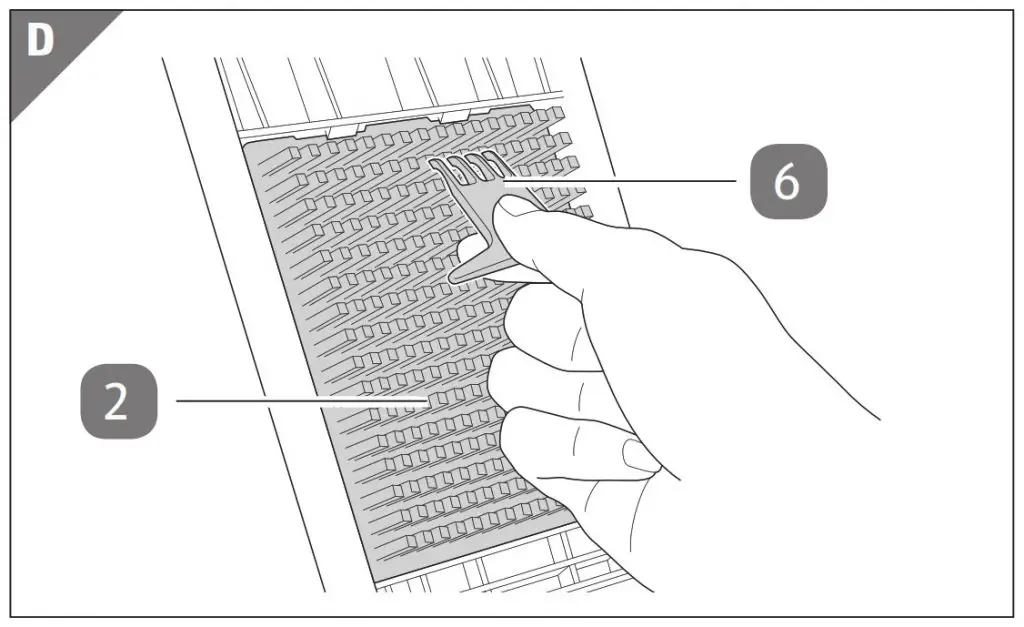
5. If necessary, flip the pusher open and use the cleaning tool 6 to remove any food residuals on the push plate 2 before using the food chopper again (see Fig. D).

Cleaning
NOTICE!
Risk of damage!
Improper handling of the food chopper may result in damage.
− Do not use any aggressive cleaners, brushes with metal or nylon bristles, sharp or metallic cleaning utensils such as knives, hard scrapers, and the like. They could damage the surfaces.
− All parts of the food chopper are dishwasher safe only when placed on the top rack of the dishwasher.
 The food chopper should be thoroughly cleaned before and after each use.
Cleaning the lid
1. The pusher 1 and chopper base 4 can be separated for cleaning. To do so, push the pusher locks 9 on the underside of the chopper base towards each other to release the pusher from the chopper base (see Fig. E).
 2. Remove the cutting blade 3 or 7 installed on the chopper base.
3. If necessary, use the cleaning tool 6 to remove any food residuals on the push plate 2 (see Fig. D).
4. Clean all parts in warm soapy water. Then rinse and dry them thoroughly.
You can also place them on the top rack of a dishwasher for cleaning.
5. After cleaning, replace the pusher and cutting blades onto the chopper base.
Cleaning the base container
− Clean the base container 5 with warm soapy water. Then rinse and dry it thoroughly.
− You can also place the base container on the top rack of a dishwasher for cleaning.
Storage
All parts must be completely dry before storing.
− Put the cutting blades 3 and 7 , and the cleaning tool 6 inside the base container 5 . Close the base container with the lid 8 for storage.
− Always store the food chopper in a cool, dry place. Avoid dust, extreme temperatures, high humidity and direct sunlight.
− Safely store the food chopper out of the reach of children.
Technical data
Model: 50884
The volume of base container: 5.07 cups (1.2 L)
Weight: 21.1 oz (598 g)
Dimensions (L × W × H): 10.71 × 4.72 × 4.25 in. (27.2 × 12 × 10.8 cm)
Product code: 50884
Disposal
Disposing of the packaging
− Sort the packaging before you dispose of it. Dispose of paperboard and cardboard with the recycled paper service and wrappings with appropriate collection service.
Disposing of the food chopper
− Should the food chopper no longer be capable of being used at some point in time, dispose of it in accordance with the regulations in force in your city or state.
− Please ensure your recycling information applies to local regulations and the EPA recommendations (www.epa.gov).
IMPORTED BY • IMPORTADO POR:
ALDI INC., BATAVIA, IL 60510
WWW.ALDI.US