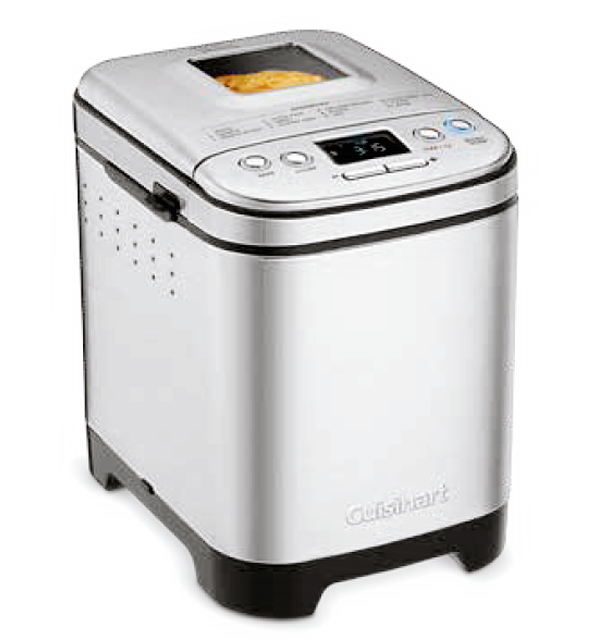
Cuisinart Bread Maker
Compact Automatic Bread Maker
CBK-110
For your safety and continued enjoyment of this product, always read the instruction book carefully before using.
IMPORTANT SAFEGUARDS
When using electrical appliances, especially when children are present, basic safety precautions should always be taken, including the following:
- READ ALL INSTRUCTIONS, PRODUCT LABELS AND WARNINGS BEFORE USING THIS BREAD MAKER.
- Do not touch hot surfaces; carry the unit by plastic base. Always use oven mitts when handling hot material, and allow metal parts to cool before cleaning. Allow the bread maker to cool thoroughly before putting on or taking off parts.
- When unit is not in use and before cleaning, unplug the bread maker from wall outlet. Let the bread maker cool down completely before assembling or disassembling it.
- To protect against risk of electric shock, do not immerse the appliance or plugs in water or other liquids.
- Close supervision is always necessary when this or any appliance is used near children or incapacitated persons.
- Do not allow anything to rest on the power cord. Do not plug in cord where people may walk or trip on it. Unplug this bread maker from the wall outlet when not in use, before you leave for a trip, or go out for a long period of time.
- Do not operate this or any appliance with a frayed or damaged cord or plug, or after the appliance malfunctions or is dropped or has been damaged in any manner. Take appliance to the nearest authorized service facility for examination, repair, or electric or mechanical adjustment.
- Do not let the cord dangle over the edge of a table or counter or touch hot surfaces. Do not place on an unsteady or cloth-covered surface.
- Avoid contact with moving parts.
- Do not use attachments not recommended by the manufacturer. They may cause fire, electric shock or injury or may damage the unit and void the warranty.
- Do not use outdoors or for commercial purposes.
- Do not place the appliance near a hot gas or electric burner, or in a heated oven.
- Keep power cord away from the hot surface of this bread maker. Do not put any flammable objects on the hot surface of this bread maker.
- Place this bread maker a minimum of 2 inches away from any wall or other object.
- Do not use this bread maker for other than its intended use.
- When plugging or unplugging this bread maker, be sure not to touch the plug blades with your fingers.
- Before unplugging, press and hold the START/STOP button for 1 to 3 seconds to cancel any programs, then grip plug and pull from wall outlet. Never pull on the cord.
- Use of extension cords: A short power-supply cord has been provided to reduce the risk of injury resulting from becoming entangled in or tripping over a longer cord. Extension cords may be used with care. The marked electrical rating of the extension cord should be at least as great as the electrical rating of the appliance. The cord should be arranged so that it will not drape over the counter or tabletop where it can be pulled by children or tripped over accidentally. If the appliance is of the grounded type, the extension cord should be a grounding-type 3-wire cord.
- If electric circuit is overloaded with other appliances, your bread maker may not operate properly. This bread maker should be operated on a separate electrical circuit from other operating appliances.
- Do not operate your appliance in an appliance garage or under a wall cabinet. When storing in an appliance garage, always unplug the unit from the electrical outlet. Not doing so could create a risk of fire, especially if the appliance touches the walls of the garage or the door touches the unit as it closes.
- Preheating of the appliance is necessary.
- For household use only.
- This appliance is not intended for use by persons (including children) with reduced physical, sensory or mental capabilities, or lack of experience and knowledge, unless they have been given supervision or instruction concerning use of the appliance by a person responsible for their safety.
- Children should be supervised to ensure that they do not play with the appliance.
- Appliances are not intended to be operated by means of an external timer or separate remote-control system.
SAVE THESE INSTRUCTIONS FOR HOUSEHOLD USE ONLY
SPECIAL CORD SET INSTRUCTIONS
NOTICE
This appliance has a polarized plug (one blade is wider than the other). To reduce the risk of electric shock, this plug will fit in apolarized outlet only one way. If the plug does not fit fully in the outlet, reverse the plug. If it still does not fit, contact a qualified electrician. Do not modify the plug in any way.
BEFORE FIRST USE
Remove all packing material and any promotional labels or stickersfrom your bread maker. Be sure that all parts of your new breadmaker have been unpacked before discarding any packing materials.You may want to keep the box and packing materials for use at alater date.
Wipe housing with a damp cloth to remove any dust from the warehouse or shipping. Wash inside of lid with sponge or damp cloth. Wash kneading paddle and bread pan with warm, soapy water and dry completely.
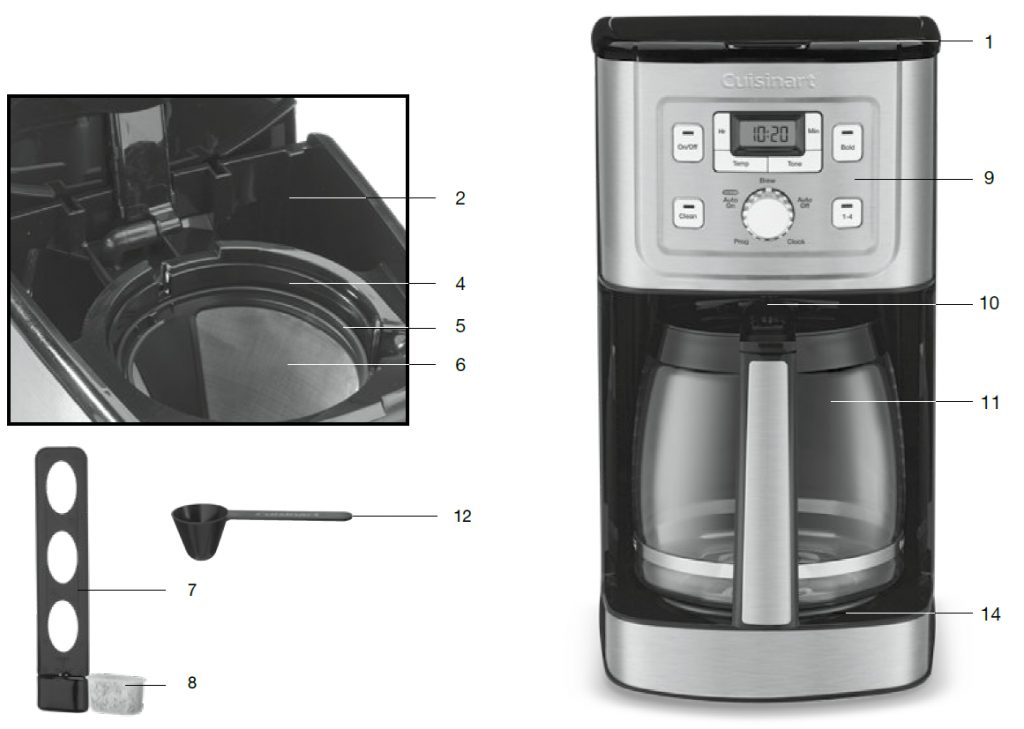
PARTS AND FEATURES
- Lid
With viewing window - Control panel with LCD display
- Baking chamber
a. Removable bread pan with handle
Vertical loaf, nonstick coating
b. Kneading paddle
Removable, nonstick paddle
c. Heating element (not shown) - Power cord (not shown)
- Pan hook
Helpful tool for lifting bread pan handle
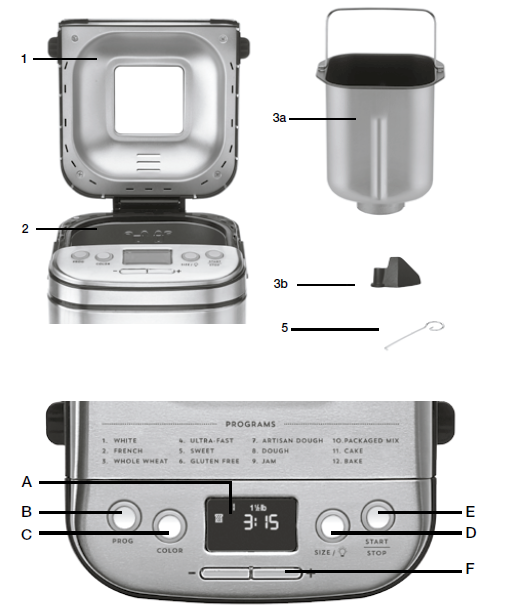
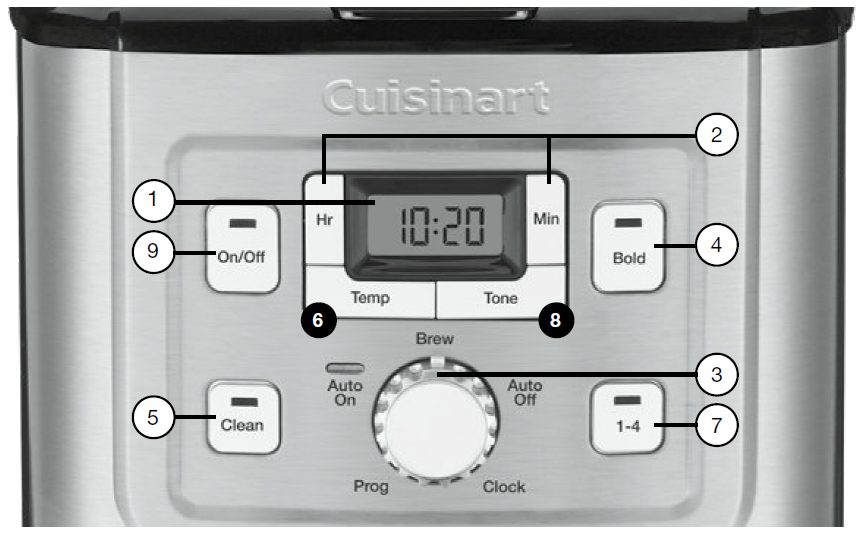
CONTROL PANEL
A. LCD Display – Displays program, crust color and loaf size selections.
Also view cycle and delay start timing.
B. PROG Button – Selects program; refer to the program list above display panel for options.
C. COLOR Button – Selects a light, Light: Medium: Dark:
D. SIZE / –
a. Select a 1-lb., 1½-lb. or 2-lb. loaf.
b. Enables internal chamber light.
E. START/STOP Button – Starts and stops the bread-making process. Also controls Pause function.
F. –/+ Buttons – Adjust time for bake program and delay start timer.
NOTE: Some program selections are limited to certain crust colors and loaf sizes. The LCD will display accordingly. Please see Programs and Timing on page 9 for all available combinations.
OPERATING INSTRUCTIONS
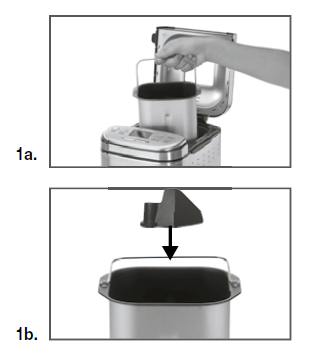
- Remove bread pan from baking chamber by grasping the handle, turning the pan counterclockwise and lifting up. It may be helpful to first lift the handle of the bread pan by using the pan hook (see figure 1a). To properly attach the kneading paddle, insert onto shaft with wide basefacing down (see figure 1b).
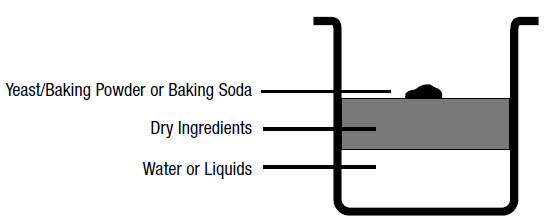
- Properly measure all ingredients and put into the bread pan in the exact order they are listed. Always put the liquids in first, the dry ingredients in next, and the yeast last. Yeast should not touch wetingredients. Please refer to the Measuring and Loading Ingredients sections (page 11) for instructions.
- Insert the bread pan back into the baking chamber, turning clockwise to lock in place.
- Close the lid and connect power cord to a standard electrical outlet.
- Select your program by pressing the PROG button. For more information on each program, see pages 9–10.
- Select your crust color (light, medium or dark) by pressing the COLOR button. If no crust color is selected, the unit will automatically default to dark crust.
- Select your loaf size (1-lb., 1½-lb. or 2-lb.) by pressing the SIZE/ button. If no loaf size is selected, the unit will automatically default to a1½-lb. loaf size.
- If you would like the bread-making process to start immediately, press the START/STOP button now, the indicator will light to show that the bread maker is on.
- To cancel the process at any time, press and hold the START/STOP button for 3 seconds.
Delay Start Timer
The Cuisinart® Compact Automatic Bread Maker can be programmed up to 13 hours in advance. For example, you can program your bread maker at 8 p.m. to finish baking at 9 a.m. Be sure to set your timer based on when you would like your bread to be complete.
NOTE: Do not use perishable ingredients such as milk, eggs, cheese and yogurt with the Delay Start function.
To set the Delay Start Timer:
- Add ingredients.
- Select program, crust color and loaf size.
- Set the number of hours ahead that you want the loaf to finish. By pressing the + or – buttons you can set time for completion up to 13 hours later. Press to increase or decrease by 10-minute increments or hold button down to scroll faster.
- Press the START/STOP button to begin the delay start countdown.
During Bread Making
The Process
Once you start a program, the unit will automatically take care of each step of the process until the loaf is done. An indicator on the LCD will show the current function: Knead, Rise, Bake, or Keep Warm.
Knead – Most bread types use 2 Knead cycles. The first Knead cycle quickly mixes the main ingredients. The second Knead cycle is longer, and continues the mixing process. The dough is “punched down” before the longer cycle begins, prior to removing the kneading paddle.
Rise – Rise cycles help to ensure the perfect consistency of all yeast breads.
During the Rise cycles, your bread maker will appear to be inactive. The display will show it is actually in Rise mode.
Bake – This bread maker will consistently regulate both baking time and temperature according to the recipe you select.
Keep Warm – Allows you to leave the finished bread in the machine to serve warm for up to 60 minutes. It also helps to keep the crust from becoming soggy if bread is not removed from the machine immediately after baking. Some crusts will darken slightly in Keep Warm.
Options:
- Light: Press and hold SIZE/ for 3 seconds to turn on the internal chamber light at any time. The light will automatically turn off after 30 seconds, or press and hold again to turn off.
- Pause: You can pause the process for up to 10 minutes at any time by pressing the START/STOP button while the unit is on. The time and power light will flash while the program is paused. Press START/STOP to resume the program.
- Add-ins: An audible signal of 4 sets of 5 long beeps each will sound to remind you to add any additional ingredients your recipe requires. To do so, open the lid and add additional ingredients. Be sure to close the lid, once finished. This typically occurs during the second knead. The display will show “add-in” for a few minutes during the Knead cycle in case you miss the initial beeps.
- Removing kneading paddle: After mixing/kneading is complete, there will be an audible signal of 10 short beeps before the last Risecycle, indicating the point at which the mixing/kneading is complete (the display will show “paddle” for one minute in case you miss the initial beeps). At this point in the bread-making process, you have the option of removing the kneading paddle, and/or re-shaping the dough, though neither is necessary. To do so:
a. Press START/STOP to pause the program.
b. Open the lid and remove the bread pan by the handle.
c. Take the dough from the pan and remove the kneading paddle.
d. Form the dough into a neat ball and place in the center of the bread pan.
e. Replace the bread pan into the machine and turn clockwise to lock the bread pan into the unit. Close the lid.
f. Press START/STOP to resume the program.
NOTE: If you plan to remove the dough and reshape it in another pan for baking in your conventional oven, this is the time to do so. Be sure to press and hold the START/STOP button to reset the machine, so it does not automatically resume the bread-making process after 10 minutes.
After Bread Making
There will be 10 beeps to signal the end of the Baking cycle; the LCD display window will read 00:00. Your bread will be kept warm for 60 minutes in the keep warm cycle. There will be one long beep at the end of the Keep Warm cycle and then unit will shut off. For optimal results, we recommend removing the loaf as soon as the Baking cycle is complete and letting it cool on a wire rack.
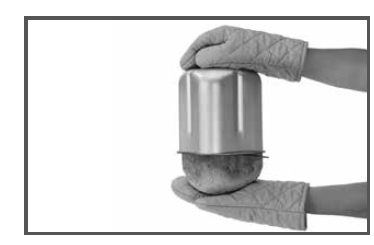
To remove bread from the pan:
a. Open the lid and use pan hook to lift the bread pan handle. Using ovenmitts, remove the bread pan by turning counterclockwise.

b. Still using the oven mitts, hold the bottom of the bread pan, move thehandle aside, and shake until the bread is released.
c. For best results, allow the loaf to cool on a wire rack for 20 to 30 minutesprior to slicing.
NOTE: If you have not removed the kneading paddle before baking, be sure to remove the kneading paddle from the finished loaf. Use caution; the kneading paddle will be extremely hot.
POWER FAILURE BACKUP
This unit is equipped with a power failure backup system. In case of any disruption of the power supply, the unit will store in memory the stage of bread-making cycle and resume once power is restored. The power backup feature can maintain memory for a power failure up to 15 minutes.
TYPES OF BREADS AND PROGRAMS
- White – The White program uses primarily all-purpose or bread flour.
- French – French breads require special timing and temperatures to achieve that wonderful, crispy crust. Because they traditionally lack sugars or large amounts of fat, they tend to be lighter in color.
- Whole Wheat – Whole-wheat bread is a yeast bread that is made with a significant portion of whole-wheat flour (50% or more), rather than with 100% all-purpose or white bread flour. Breads made from whole-wheat flour are more nutritious because the flour is milled from the entire wheat berry (including the bran and the germ). Using wholewheat flour produces a bread that is brown to dark brown in color, and the breads are more flavorful and healthful than breads made with refined white flours (even though “lost” nutrients are added back into white flours). Many times they are denser than 100% white breads.
- Ultra-Fast – The Ultra-Fast program must be used with a recipe using rapid rise yeast, or the bread will not rise and bake properly. Almost any recipe can be modified by replacing standard yeast with an equal or larger amount of rapid rise yeast. NOTE: This program cannot be used with the gluten-free recipes.
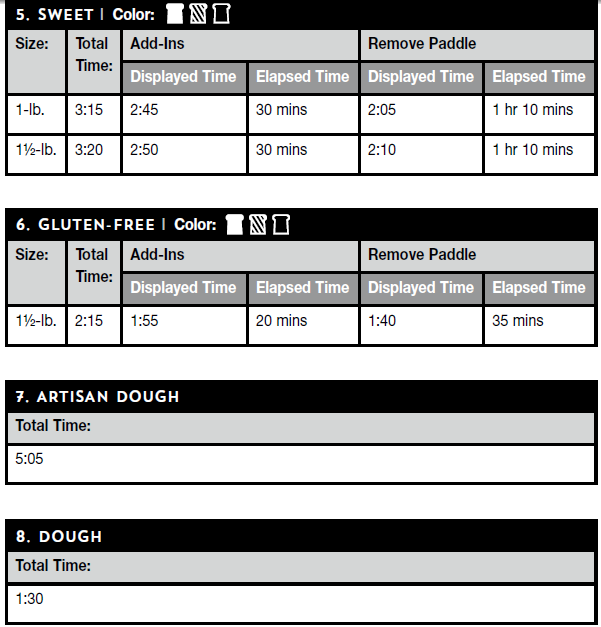
- Sweet – The Sweet bread program is specifically designed to bake breads with high amounts of sugar, fats and proteins. These added ingredients tend to increase the height and browning of the finished loaves.
- Gluten-Free – Since gluten is found in most flours used in traditional bread baking, the ingredients to create gluten-free breads are unique. While they are “yeast breads,” the doughs are generally wet and often have a batter-like consistency. It is also important not to over-mix or over-knead gluten-free doughs. NOTE: For list of Gluten-Free ingredients, refer to pages 15–16.
- Artisan Dough – This program allows the preparation of artisan doughs. There are several long, slow, cool rises that will enhance the development of texture, taste and crust in the final shaped and baked bread. This is a dough ONLY program. The dough can be baked using the Bake program, or shaped and baked in a conventional oven.
- Dough – There are two ways to prepare dough in the bread maker if you wish to bake it in a conventional oven. One way is by using our Dough program. It mixes ingredients, kneads and takes the dough through the two rises. It is appropriate for almost any dough recipe (except gluten free) and ideal for pizza dough. It is intended that the dough will be removed and shaped by hand and allowed to rise 1 or
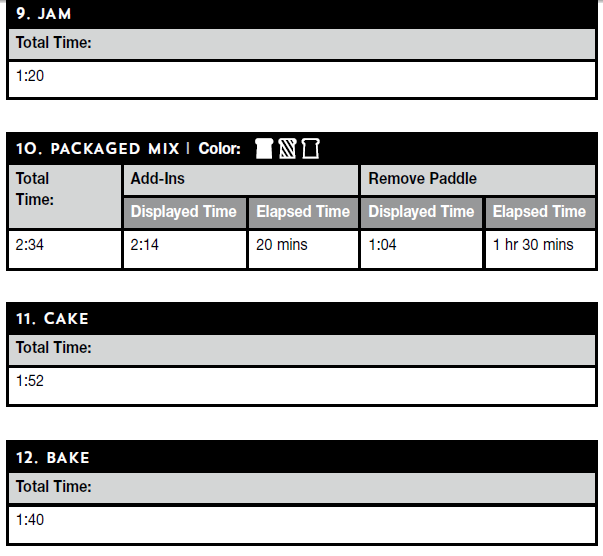
2 more times out of the bread maker. Alternatively, you can choose a specific bread program from the menu options, and remove the dough when the Remove Paddle signal tones. This will take you through two rise cycles. This method is suitable for any alternative loaf shape, dinner rolls, braided challah bread, and so on. Last rise will take place outside the bread maker. - Jam – The bread maker is a great cooking environment for homemade jams and compotes. The paddle automatically keeps the ingredients stirring through the process. The heating element is placed in a way that the contents will not get burned. The program starts in a heating phase so it will appear to be inactive. It will start mixing about 10 minutes into the program. We provide recipes to get you started. They make a wonderful complement to freshly baked bread!
- Packaged Mix – This program is meant for prepackaged yeast bread mixes intended for the bread machines. Mixes for 1½ and 2 lbs. work best.
- Cake – Cake-like in texture, and often referred to as “quick breads,” recipes for this program are usually baked in a shaped pan such as a loaf pan or muffin tin. They are a batter-type bread rather than a yeast dough, and get their leavening from baking powder, baking soda and eggs. Add-ins must be added at the very beginning of the cycle with other basic ingredients. If the finished bread is a little moist on top when baking is complete (moisture will depend on ingredients of the cake), leave it in the bread maker on Keep Warm for 10 to 15 minutes, and it will continue baking – this is called “after cooking.”
- Bake – This program activates the bread maker for Bake function only. You can use this setting if you want the finished loaf to have a darker crust color (this will only require a few extra minutes, so keep your eye on the loaf). Only the Bake function should be used to bake store-purchased doughs.
PROGRAMS AND TIMING
For each program, there are two times listed under ADD-INS and under REMOVE PADDLE. The Displayed Time is what you will see in the countdown timer window. The Elapsed Time under ADD-INS and REMOVE PADDLE is the number of minutes that have passed since you pressed start. Elapsed Times are listed to let you know when you should return.
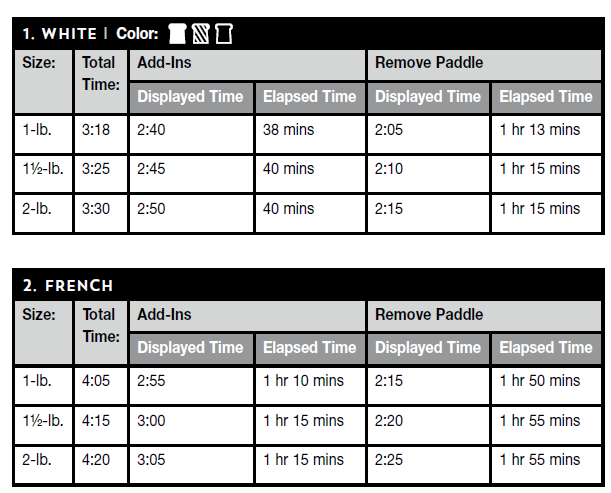
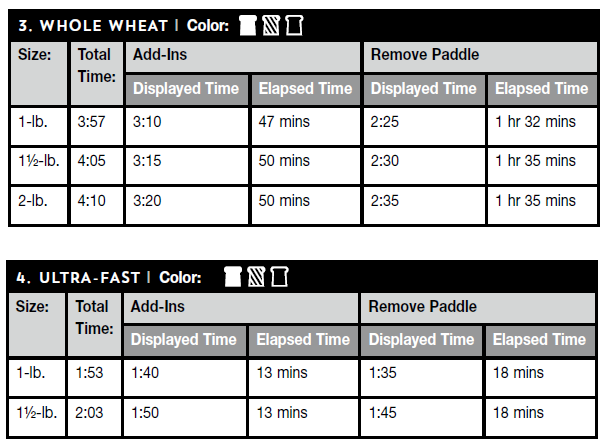
NOTE: Removing the kneeding paddle is an optional step. See page 6 for more details.
MEASURING INGREDIENTS
Important Note: The MOST important rule of making bread:
Use exact measurements. This is the key to successful bread baking. When measuring wet ingredients, use only liquid measuring cups with the cups/ounces marked clearly on the side. After filling the measuring cup, place it on a flat surface and view it at eye level to make sure the amount of liquid is exact. Most recipes require liquids to be at room temperature. When measuring dry ingredients, fill a dry measuring cup with a spoon and then level off the measurement with the back of a knife or a spatula to make sure the measurement is exact. Never use the cup to scoop the ingredients directly from container (for example, flour). By scooping, you could add up to one tablespoon of extra ingredients. Do not pack down, unless otherwise noted.
LOADING INGREDIENTS INTO THE BREAD PAN
Important Note: The SECOND MOST important rule of making bread:
Put the ingredients into the bread maker in the EXACT order given in the recipe. This means, in most cases:
— FIRST, liquid ingredients
— SECOND, dry ingredients
— LAST, yeast – Yeast must be separate from wet ingredients and salt. Create a small crater in dry ingredients using your finger or a spoon, and place yeast within the crater. Make sure yeast is fresh.
Also, make sure ALL ingredients are at room temperature, unless otherwise noted (that is, between 75˚F– 90˚F). Temperatures too cool or too warm can affect the way the bread rises and bakes.
NOTE: Water should not be hot, or it will affect rising.
Last, it is a good idea to start with fresh ingredients. Fresh flour and fresh yeast are critical.
See Troubleshooting
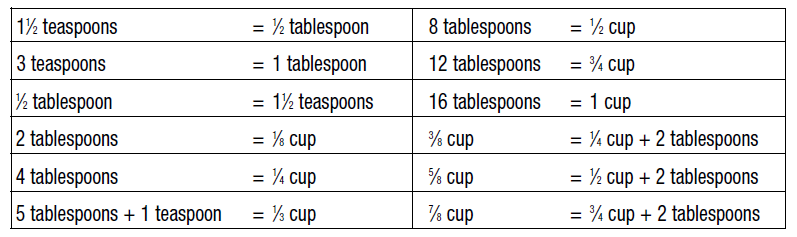
MEASUREMENT/CONVERSION CHART
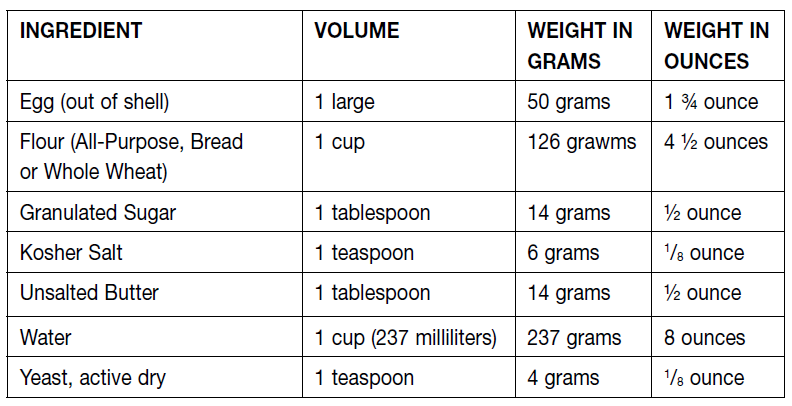
INGREDIENT CONVERSION CHART
CLEANING AND CARE
Caution: Unplug machine before cleaning. Do not put the bread maker in water or in a dishwasher. Do not use scrubbing brushes or chemical cleansers, as these will damage the machine. Use only a mild, nonabrasive cleanser to clean the outside of the bread maker.
Bread pan and kneading paddle – Pan and kneading paddle should be hand-washed with warm water and soap. Do not use metal utensils as they will damage the nonstick surface.
Baking chamber – Remove all bread crumbs by wiping them away with a slightly damp cloth or clean pastry brush. DO NOT bend the heating element, which is located on the inside of the bread maker.
Lid – Wipe inside of lid with sponge or damp cloth. Lid should not be immersed in water.
Outer housing – Use only a mild, nonabrasive cleanser to clean the outside of the bread maker.
Control panel – Wipe with a slightly damp cloth as necessary. Take care not to allow water or cleaning fluids under buttons of control panel.
Maintenance – Any other servicing should be performed by an authorized service representative.
Keep your bread maker clean at all times.
Don’t worry if the color of the exterior of the baking pan changes over time. The color change is a result of steam and other moisture and does not affect the machine’s performance.
If you have trouble removing the kneading paddle from bread pan, put warm, soapy water in the bread pan for 10 to 15 minutes – this will loosen the paddle.
TIPS AND HINTS
Important: Use top-quality ingredients to make your bread-maker breads. Temperature of ingredients is important in bread-machine baking. Ideal temperatures are between 75°F–90°F. Use an instant-read thermometer to check the temperatures. Cold ingredients should be allowed to come to room temperature.
Measure all ingredients accurately and have them ready before adding to bread pan. This helps to ensure that you measure each ingredient correctly, and do not find that you get down to the last (or nearly last) ingredient and discover that it is not available in your pantry.
When measuring ingredients, use liquid measuring cups for liquids, and dry measures for dry ingredients. Stir all flours first, spoon into dry measure and level off using the flat side of a knife or spatula – do not pack down.
Add ingredients to the pan in this order – liquids, melted or softened butter, salt and sugars (including honey, molasses, syrup), herbs, flours, dried milk, vital wheat gluten (if using), yeast. Do not allow the yeast to touch the wet ingredients. See detailed instructions on page 11.
Giving the kneading paddle a light coating with a nonstick cooking spray or vegetable oil may make it easier to remove if it bakes into a loaf.
Bread-maker baking is affected by the temperature and humidity of the day – this is often the cause of varied dough consistency and results. On a humid day, you may need additional flour. Pay attention to the dough during the kneading process and if sticky, add flour 1 teaspoon at a time. Alternately, if it is especially dry, you may need to add additional liquid. In most cases, dough should be smooth and not cling to fingers when touched. Additional amounts of flour or liquid should be added 1 teaspoon at a time. Scrape down sides of pan if ingredients are sticking to the sides.
If using perishable, fresh ingredients such as dairy products, eggs, chopped fruits or vegetables, do not use the Delay Start Timer feature. Some dairy products and eggs may be substituted by using dried ingredients, such as dried egg powders, dried buttermilk, or dry milk. Add the water to the machine first, then add the dried substitution after the flour to keep them separate. If you substitute these dried ingredients and have no other fresh,
perishable ingredients in your bread recipe, you may then use the Delay Start
Timer feature.
It is also important to keep yeast separate from salt if using Delay Start Timer
feature – add salt with the liquids and the yeast last, on top of the flour and
other dry ingredients.
Nuts and seeds, raisins and other dried fruits, shredded cheeses, chocolate morsels, and any other additions to the dough should be added when the Add-In signal sounds, except for the Cake program.
For a more uniform loaf of bread, remove the dough when you hear the Remove Paddle signal, then remove the kneading paddle and reshape the dough into a neat loaf. This will ensure a more uniformly shaped loaf of bread, particularly with the smaller 1- and 1½-pound loaves.
Use the Whole Wheat program when baking breads containing not only whole-wheat flour, but other heavy flours that will require a longer knead and rise – for example, pumpernickel bread.
All breads slice best when allowed to cool for a minimum of 30 minutes (preferably longer) before slicing.
For cake/quick breads, spray the bottom and halfway up the sides of the bread pan with cooking spray before adding ingredients, to assist in release.
Loosen the loaf with a heatproof plastic spatula before turning out.
If bread bakes over the bread pan handle, let it cool, then remove bread from pan in unit.
Amounts/Sizes/Ingredients
For white breads and any recipe calling for a white flour, the best flour to use is unbleached, all-purpose flour. Doughs made using the Artisan program should use bread flour, which has a higher protein makeup.
A general formula for a 1½-pound bread machine loaf is: 3 cups flour, 1 to 1¼ cups liquid, 1 to 1½ teaspoons salt, 1 to 2 teaspoons sugar, 1 to 1½ teaspoons yeast. Use this as your basic formula and make adjustments from there.
In general, a 2-cup flour recipe will produce a loaf that is about 1 pound, a 3-cup flour recipe will produce a loaf that is about 1½ pounds, and a 4-cup flour recipe will produce a loaf that is about 2 pounds. Some recipes will
have slightly larger or smaller amounts of flour for each size, and with mixins, they may weigh more than their specified weight.
You should not use more than 4½ cups flour total in the bread machine. If you are adapting a recipe, and your mathematical measurements become something odd, such as half of an egg, whisk your egg well and then measure out half. A large egg is generally equal to about ¼ cup.
It is important to measure ingredients accurately – do not be tempted to omit small amounts such as 1/8 teaspoon. Baking is chemistry, and changing the formula by even this small amount can change the final product significantly.
For Higher Altitudes
Flour is drier at higher altitude levels and will absorb more liquid, so use less flour in the recipe. Pay attention to the dough as it mixes and kneads – if it appears dry, add more of the same liquid used in the recipe.
Doughs prepared and baked at higher altitude levels will tend to rise faster – use about 1/3 less yeast to help counteract this phenomenon.
Adding less sugar (where applicable) also helps in producing the proper dough and bread. Reduce sugar or sweetener by about ¼.
Also, adding a little more salt will retard the yeast action and promote slower, more even rising. Add no more than ¼ teaspoon of additional salt. Start with one of these changes to determine the best results.
BREAD MAKER PANTRY
To be able to prepare breads quickly and easily in your Cuisinart® Compact Automatic Bread Maker, we suggest keeping some basics on hand. Depending on the types of breads you and your family prefer, you may also want to have some of the other items readily available. Not all the ingredients listed are in the recipes, but can be added to improve taste and texture.
Storing Ingredients
Flours and other bread-making ingredients are prone to rancidity and should be stored properly. It is best to buy them in smaller quantities and purchase as needed. Many flours can be stored at room temperature, but more whole-grain and gluten-free flours are best kept in the freezer (in airtight bags/containers). Always mark the date on the bag/container so you can keep track. Freezers can often impart flavors onto what is frozen in there, so be sure it is well sealed.
White Flours (all-purpose, bread and cake): These should be stored in a dark, cool place for up to 1 year (but best to go by the use-by date on the bag). These can also be put in the freezer for a year as well, but be sure to wrap well so they do not pick up any flavors or odors from the freezer.
Whole-Grain and most Gluten-Free Flours: In a cool, dark place for up to 3 months, or in the freezer for up to 6 months.
Nut Flours: These are very prone to spoiling, so store in the refrigerator for up to 3 months or in the freezer for up to 6 months.
Starches and Gums: More stable than flours, these can be stored in a cool, dark place for at least a year.
Yeast: Always store in the refrigerator and check the expiration date prior to using.
All-Purpose Flour – Can be bleached or unbleached – we prefer unbleached. For the bread machine, all-purpose flour is used for most yeast and cake quick breads.
Baking Powder – Baking powder is a combination of baking soda and acid, so this leavener can be used in baked goods where there is no existing acid. Be sure to read the label because some baking powders use starches to keep the compound dry, which may affect those with gluten allergies.
Baking Soda – Baking soda is a chemical leavener that requires an acidic ingredient to activate. Examples include brown sugar, buttermilk, yogurt, etc. Not only does baking soda provide lift to your baked product, but it also improves browning.
Bread Flour – An unbleached flour high in protein and gluten. This is best for artisan-style breads. This flour can be used as a substitute for all-purpose flour and will give the baked bread more volume.
Cake Flour – A very soft flour with low protein. Do not use cake flour for yeast breads unless a recipe specifically requires it. It is most often used to make very tender cakes and pastries.
Eggs – Add taste, richness and color to breads. They act as emulsifiers and aid in keeping breads fresh and moist. They also work as a leavener and help with the volume of the bread. Do not ever use with Delay Start feature unless using powdered egg or powdered egg white and adding with flour. Egg washes (egg beaten with water or milk) are used with some Dough Only recipes to brush on shaped dough after rising, before baking, to add color and shine to finished baked goods. All recipes included use large eggs.
Fats (assorted) – Add flavor, nutrition and texture to breads. May be added to just about any bread recipe where such flavors are appropriate.
Nonfat Dry Milk – When loading ingredients, add powdered milk along with flour. Using dry milk instead of fresh milk enables you to use the Delay Start feature. Dry milk is also added to breads (often along with fresh milk/milk products) to produce a softer crumb.
Nuts, Seeds, Raisins – Add flavor, nutrition and texture to breads. May be added to just about any bread recipe where such flavors are appropriate.
Powdered Buttermilk – A shelf staple, this is essence of buttermilk without the milk solids. Acts as a preservative and retards the growth of bacteria and mold.
Salt – Salt is a necessary part of a yeast bread recipe – it not only adds or enhances flavor, but it controls the yeast and aids in the rising of the dough. We use non-iodized kosher salt in all of the recipes.
Sweeteners – Granulated sugar, brown sugar, honey, molasses, maple syrup, golden syrup and others, stimulate yeast growth and development.
Vital Wheat Gluten – A very high-protein flour made from hard wheat and treated to remove most of the starch. For regular yeast bread baking, vital wheat gluten is used primarily as an additive to enhance doughs made with low glutens, such as whole-wheat and other grains. When making Ultra-Fast breads, vital wheat gluten can provide a better rise in a shorter rising time.
Whole-Wheat Flour – Contains the wheat germ of the flour, giving it a higher fiber, nutritional, and fat content. Once thought of as “health food,” breads that were heavy and dense, breads made with all or part wholewheat flour are the most nutritious and can be light textured and appealing. Purchase good quality whole-wheat flour, and store in a refrigerator or freezer to prevent from turning rancid. Bring to room temperature before using for
bread machine recipes.
Yeast – For most bread machine recipes, we recommend active dry, instant or bread machine yeast. The “Instant” type yeast is milled slightly finer and produced at lower temperatures, resulting in fewer “dead” cells. It gives very good results in the bread machine. Rapid rise yeast or quick rise yeast is specifically for the shorter/rapid/last-minute cycles, as it helps to shorten the rising cycle – adding vital wheat gluten as well, will aid in its rise.
GLUTEN-FREE INGREDIENTS
If you thought regular baking was a science, gluten-free baking has its own rules! To make gluten-free bread, a variety of flours and ingredients is necessary to develop a stable and desirable bread that can be used for slicing, toasting, and making sandwiches. We developed recipes that have a good balance of protein, fat and starch to create a delicious end result.
All of the following ingredients can be found either in the baking or gluten-free section of your local grocery store or in your local natural food market. They can also be easily found and ordered online. There are several commercial brands of gluten-free, all-purpose flour blends that can be used successfully.
Almond Flour – Almond flour adds a lot of protein to your bread, but is better left for savory and sweet cakes rather than yeast breads. You can use either almond flour or almond meal, as long as it is finely ground.
Baking Powder – Baking powder is a combination of baking soda and acid, so this leavener can be used in baked goods where there is no existing acid. Be sure to read the label because some baking powders use starches to keep the compound dry, which may affect those with gluten allergies.
Baking Soda – Baking soda is a chemical leavener that requires an acidic ingredient to activate. Examples include brown sugar, buttermilk, yogurt, etc. Not only does baking soda provide lift to your baked product, but it also improves browning.
Buckwheat Flour – Buckwheat is not actually wheat at all. Buckwheat flour has a high protein content and a pleasant nutty flavor. It does need to be combined with other flours to produce a baked item with good structure
Cornstarch – Cornstarch is a way to add structure and stability to a glutenfree bread that is otherwise provided by gluten. Be sure not to go overboard, or your finished bread will have a very starchy and unpleasant flavor.
Flax Seeds (ground) – When ground, flax seeds are even more nutritious and act as a binder to produce a stable structure in baked goods.
Garbanzo Bean Flour – Milled from garbanzo beans (chickpeas) and high in protein, garbanzo bean flour imparts a rich and sweet flavor in baked goods. Some find it to be overpowering, so it is better to use this flour with more savory breads.
Guar Gum – Similar to xantham gum and interchangeable, is another thickening agent that helps with the structure of the bread. It should be used sparingly because it does impart a starchier flavor to baked goods than other gums or thickeners do.
Gluten-Free, All-Purpose Flour Blend – There are a number of these blends on the market now and they all work well. We have found in our testing that the ones with the higher percentage of rice flours tend to be the most neutral in flavor.
Nonfat Milk Powder – Nonfat milk powder adds structure to breads by acting as an emulsifier by linking gluten-free flours to fats. The milk proteins also increase browning.
Powdered Psyllium Husk – Full of fiber, powdered psyllium husk (or psyllium husk powder) works similarly to a gum. We have found it to be the best way to add structure and bind ingredients together in gluten-free recipes.
Oat Flour – Oat flour is very high in protein and is inexpensive to purchase prepared, or you can make your own (process rolled oats in a blender, food processor, or spice grinder until finely ground). This flour will add a slight nuttiness to baked breads.
Potato Starch – Another starch option for gluten-free breads to contribute to the structure of the loaf. It is also a good tenderizer and is best used with doughs that are higher in moisture.
Brown Rice Flour – Milled from the whole rice kernel (still contains the bran), brown rice flour is high in fiber and has a nuttier flavor than white rice flour. You want to use a flour that is as finely ground as possible – it should have a smooth, sandy texture. This flour is high in protein, 7.5%, so it is a good base
for gluten-free baking.
White Rice Flour – Milled from polished white rice (where the bran and germ have been removed), white rice flour is considered to be very versatile in gluten-free baking because it has a rather mild, undetectable flavor. It is a bit lower in protein than brown rice flour, closer to 5%, but it blends well with other flours.
Sweet White Rice Flour – A starchier version of white rice flour (not actually sweet), it is ground from glutinous rice and is a better binder than brown or white rice flours. Only a small amount is needed and is a great addition when making your own gluten-free flour blend.
Sorghum Flour – This is a flour that is high in protein and fiber and is a good substitution for oat flour. Look for “sweet” white sorghum flour when purchasing.
Teff Flour – Very high in protein, it is a great addition to gluten-free breads. It has an earthy flavor, similar to whole-wheat flour.
Tapioca Starch (Flour) – This starch is a great binder for gluten-free breads and gives the finished breads good structure. Do not use too much of it or the bread will be too elastic.
Xantham Gum – Similar to guar gum, and interchangeable, xantham gum is a thickening agent and helps stabilize gluten-free breads. You only need a small amount to see the effects.
Yeast – Crucial to most breads, yeast is what brings your bread to life. There are many types, and in most cases we call for active, dry yeast or bread machine yeast, but when using the Ultra-Fast program, it is necessary to use rapid rise yeast. Always store yeast in the refrigerator and check the expiration date prior to using.
TROUBLESHOOTING
Why did my dough/bread not rise well?
There are a number of factors that could result in a short rise. Be sure that the yeast is fresh and that all ingredients are room temperature (75ºF to 90°F). If the liquids are too warm or too cold, they will not activate the yeast properly. Be sure the ingredients are put into the baking pan in the correct order. The salt should be as far away from the yeast as possible. Note that not all breads rise as much as others. Whole-wheat or whole-grain breads tend to be shorter than white breads. Also, breads with more sugar or sweeteners, and ones that are enriched with eggs, will be taller than regular white breads.
Why is my bread sunken/uneven on the top?
Humidity and room temperature can greatly affect the results of baked yeast breads. Keep the bread maker away from direct sunlight. If the humidity is especially high, add an additional teaspoon per cup of flour used in the recipe
Why does my yeast bread have an under-baked/gummy texture?
The dough was too wet, or possibly does not have enough white flour (for gluten development). Add a bit more flour, 1 tablespoon per cup, or reduce the amount of whole-wheat/grain flours in the recipe and substitute white flour.
Why does the interior of my yeast bread have excessive holes?
This would happen if either the bread is too wet or if too much yeast was used. Double-check the recipe and, if necessary, make changes by either adding a small amount of flour or reducing the yeast slightly.
Why is my yeast bread heavy and dense?
This could be one of a few different issues. The mixture may be too dry as a result of not enough liquid or because lower fat substitutes were used. Another reason may be not using enough yeast. If this is occurring in whole-wheat/grain bread, you may need to use vital wheat gluten to help with the structure of the finished bread.
Why are the corners/edges of the bread full of extra flour/not evenly mixed?
Sometimes ingredients will stick to the corners of the pan, most commonly in the cake/quick bread or gluten-free bread (both have more batter-like consistencies than a dough). Check the bread about 10 minutes into the kneading/mixing time and pause to scrape down if necessary. Lightly coating the bread pan with nonstick cooking spray will help to prevent this from happening as well.
How do I get the kneading paddle out of the loaf?
There are two options. In most programs you can remove the paddle after you hear the Remove Paddle signal (prior to the final rise). If this is not an option, or you were not present to remove it, wait until the bread is cooled and then, carefully take out the paddle (use caution because it may be hot).
Why is the unit smoking/producing a burning smell?
Most likely this is from ingredients that fell into the bottom of the bread machine or onto the heating element. If it is excessive, unplug the unit and once cool, clean the interior of the unit. Plug the unit back in and resume the program (the program will be stored in memory for a maximum of 15 minutes). In most cases, the smoke/odor will be minimal and it will dissipate.
What do the error codes mean?
The display shows “HHH” (accompanied by beeps): The unit’s internal temperature is too high. This usually occurs when trying to make two successive loaves. Open the lid and allow the unit to cool 10–20 minutes. The display shows “LLL” (accompanied by beeps): The unit’s internal temperature is too low to bake bread. Stop the beeps by pressing the START/STOP button. The display shows “EEO” or “EEI” (accompanied by beeps): Unplug the unit and contact your nearby service center.
WARRANTY
Limited Three-Year Warranty (U.S. and Canada Only)
This warranty is available to consumers only. You are a consumer if you own a Cuisinart® Compact Automatic Bread Maker that was purchased at retail for personal, family or household use. Except as otherwise required under applicable law, this warranty is not available to retailers or other commercial purchasers or owners. We warrant that your Cuisinart® Compact Automatic Bread Maker will be free of defects in materials and workmanship under normal home use for 3 years from the date of original purchase.
We recommend that you visit our website, www.cuisinart.com for a fast, efficient way to complete your product registration. However, product registration does not eliminate the need for the consumer to maintain the original proof of purchase in order to obtain the warranty benefits. In the event that you do not have proof of purchase date, the purchase date for purposes of this warranty will be the date of manufacture.
CALIFORNIA RESIDENTS ONLY
California law provides that for In-Warranty Service, California residents have the option of returning a nonconforming product (A) to the store where it was purchased or (B) to another retail store that sells Cuisinart products of the same type. The retail store shall then, according to its preference, either repair the product, refer the consumer to an independent repair facility, replace the product, or refund the purchase price less the amount directly attributable to the consumer’s prior usage of the product. If either of the above two options does not result in the appropriate relief to the consumer, the consumer may then take the product to an independent repair facility, if service or repair can be economically accomplished. Cuisinart and not the consumer will be responsible for the reasonable cost of such service, repair, replacement, or refund for nonconforming products under warranty. California residents may also, according to their preference, return nonconforming products directly to Cuisinart for repair or, if necessary, replacement by calling our Consumer Service Center toll-free at 800-726-0190. Cuisinart will be responsible for the cost of the repair, replacement, and shipping and handling for such nonconforming products under warranty.
BEFORE RETURNING YOUR CUISINART PRODUCT
If your Cuisinart® Compact Automatic Bread Maker should prove to be defective within the warranty period, we will repair or, if we think necessary, replace it. To obtain warranty service, please call our Consumer Service Center toll-free at 1-800-726-0190 or write to: Cuisinart, 7475 North Glen Harbor Blvd., Glendale, AZ 85307. To facilitate the speed and accuracy of your return, enclose $10.00 for shipping and handling. (California residents need only supply a proof of purchase and should call 1-800-726-0190 for shipping instructions.) Be sure to include your return address, description of the product’s defect, product serial number, and any other information pertinent to the return. Please pay by check or money order made payable to Cuisinart.
NOTE: For added protection and secure handling of any Cuisinart product that is being returned, we recommend you use a traceable, insured delivery service. Cuisinart cannot be held responsible for in-transit damage or for packages that are not delivered to us. Lost and/or damaged products are not covered under warranty.
Your Cuisinart® Compact Automatic Bread Maker has been manufactured to the strictest specifications and has been designed for use only in 120 volt outlets and only with authorized accessories and replacement parts. This warranty expressly excludes any defects or damages caused by attempted use of this unit with a converter, as well as use with accessories, replacement parts or repair service other than those authorized by Cuisinart. This warranty does not cover any damage caused by accident, misuse, shipment or other than ordinary household use. This warranty excludes all incidental or consequential damages. Some states do not allow the exclusion or limitation of these damages, so these exclusions may not apply to you. This warranty gives you specific rights, and you may also have other rights, which vary from state to state.
Important: If the nonconforming product is to be serviced by someone other than Cuisinart’s Authorized Service Center, please remind the servicer to call our Consumer Service Center at 1-800-726-0190 to ensure that the problem is properly diagnosed, the product is serviced with the correct parts, and to ensure that the product is still under warranty.
© 2017 Cuisinart
150 Milford Road
East Windsor, NJ 08520
Printed in China
17CE027767
IB-14957B
Cuisinart CBC-7200PC Brew Central 14-Cup Programmable Coffeemaker
IMPORTANT SAFEGUARDS
When using electrical appliances, basic safety precautions should always be taken to reduce the risk of fire, electric shock and/or injury to persons, including the following:
- READ ALL INSTRUCTIONS.
- Always unplug from outlet when either the appliance or display clock is not in use and before cleaning. Allow to cool before putting on or taking off parts and before cleaning the appliance.
- Do not touch hot surfaces. Use handles and knobs.
- To protect against electric shock, do not place cord, plug, or base unit in water or other liquids.
- This appliance should not be used by or near children or individuals with certain disabilities.
- Do not operate any appliance with a damaged cord or plug, or after the appliance malfunctions or has been dropped or damaged in any manner. Return appliance to the nearest Cuisinart Repair Center for examination, repair, and electrical or mechanical adjustment.
- The use of accessory attachments not recommended by Cuisinart may cause injuries.
- Do not use outdoors.
- Do not let cord hang over edge of table or counter, or touch hot surfaces.
- Do not place on or near a hot gas or electric burner, or in a heated oven.
- Always fill water reservoir first, then plug cord into the wall outlet. To disconnect, push the On/Off button, then remove plug from wall outlet.
- Do not use appliance for other than its intended use.
- Snap lid securely onto carafe before serving any beverages.
- Scalding may occur if the lid is removed during the brewing cycle.
- The glass carafe is designed for use with this coffeemaker only. It must never be used on the range top.
- Do not set a hot carafe on a wet or cold surface.
- Do not use a cracked carafe or a carafe having a loose or weakened handle.
- Do not clean carafe or heating plate with cleansers, steel wool pads, or other abrasive materials.
- WARNING: TO REDUCE THE RISK OF FIRE OR ELECTRIC SHOCK, DO NOT REMOVE THE BASE PANEL. NO USER-SERVICEABLE PARTS ARE INSIDE. REPAIRS SHOULD BE DONE ONLY BY AUTHORIZED PERSONNEL.
- Do not place cloth beneath coffeemaker or otherwise restrict airflow.
- Use only the Cuisinart® Gold-Tone Commercial-Style Filter or standard basket-style paper filter with this unit. OTHER GOLD-TONE PERMANENT FILTERS MAY CAUSE THE COFFEEMAKER TO OVERFLOW.
- Do not operate your appliance in an appliance garage or under a wall cabinet. When storing in an appliance garage, always unplug the unit from the electrical outlet. Not doing so could create a risk of fire, especially if the appliance touches the walls of the garage or the door touches the unit as it closes.
WARNING: RISK OF FIRE OR ELECTRIC SHOCK
The lightning flash with arrowhead symbol within an equilateral triangle is intended to alert the user to the presence of uninsulated, dangerous voltage within the product’s enclosure that may be of sufficient magnitude to constitute a risk of fire or electric shock to persons.
The exclamation point within an equilateral triangle is intended to alert the user to the presence of important operating and maintenance (servicing) instructions in the literature accompanying the appliance.
SPECIAL CORD SET INSTRUCTIONS
A short power-supply cord is provided to reduce the risks resulting from becoming entangled in or tripping over a longer cord.
Extension cords may be used if care is exercised in their use.
If an extension cord is used, the marked electrical rating of the extension cord must be at least as great as the electrical rating of the appliance, and the longer cord should be arranged so that it will not drape over the countertop or tabletop where it can be pulled on by children or tripped over.
NOTICE:
This appliance has a polarized plug (one blade is wider than the other). To reduce the risk of electric shock, this plug will fit into a polarized outlet only one way. If the plug does not fit fully into the outlet, reverse the plug. If it still does not fit, contact a qualified electrician.
Do not modify the plug in any way.
OPERATING NOTICE
Clogging and backing up of water and/or coffee in the filter basket can occur under any or a combination of any of the following conditions: The use of too finely ground coffee, using two or more paper filters, using the gold-tone filter in conjunction with a paper filter or not properly cleaning coffee grounds from the gold-tone filter, or allowing coffee grounds to spill over the filter.
Caution: Never open the filter basket during the brewing cycle, even if no water is draining from the filter basket, because extremely hot water/coffee can spill out from the filter basket and cause injury. If water/coffee is not draining from the filter basket during the brewing cycle, unplug the unit and wait 10 minutes before opening and checking the filter basket.
IMPORTANT UNPACKING INSTRUCTIONS
- Place the box on a large, sturdy, flat surface.
- Remove literature.
- Turn the box so that the back side of the coffeemaker is down and slide the coffeemaker from the box.
- After the coffeemaker has been removed, place the box out of the way and lift off the left and right inserts.
- Grasp the carafe by its handle, remove it from the heating plate, and remove the polybag.
- Remove the polybag covering the coffeemaker.
Save all packing materials in case you have to ship the machine in the future.
KEEP ALL PLASTIC BAGS AWAY FROM CHILDREN.
THE QUEST FOR THE PERFECT CUP OF COFFEE
ELEMENT 1: WATER
Coffee is 98% water. The quality of that water is as important as the quality of your coffee. If water doesn’t taste good from the tap, it won’t taste good in your coffee. Cuisinart includes a charcoal water filter to remove chlorine, bad tastes and odors for the purest coffee flavor, every time you brew.
ELEMENT 2: COFFEE
While coffee is 98% water, all of the flavor comes from the beans. To achieve the same great taste you enjoy at a coffee bar, you need to use the same quality of coffee. If you choose to grind your own beans, buy them fresh and whole. Buy only about a two-week supply at a time, because once the bean is broken, its flavor degrades quickly.
ELEMENT 3: GRIND
The grind is critical for proper flavor extraction. If the grind is too fine, over-extraction and bitterness will result. Too fine a grind may also clog the filter.
If grind is too coarse, the water will pass through too quickly and the maximum flavor will not be extracted. When grinding your own beans, we recommend a medium-fine grind.
ELEMENT 4: PROPORTION
Coffee that is too strong or too weak is always a disappointment. Follow the recommended portions of ground coffee in the instructions under MAKING COFFEE, and later adjust the amount to suit your taste.
NOTE: A cup of coffee = 5 oz.
FEATURES AND BENEFITS
- Coffeemaker Lid Opens to access filter basket, water filter and water reservoir.
- Water Reservoir with Water Level Indicator Window
- Showerhead (not shown) Distributes water evenly over coffee, reducing temperature loss as water passes through grounds.
- Filter Basket Holds a #4 paper filter OR a gold-tone filter.
- Filter Basket Holder
- Cuisinart® Permanent Gold-Tone Commercial-Style Filter Eliminates the need for paper filters. NOTE: Some fine grounds may flow through the filter and appear as sediment in the carafe.
- Charcoal Water Filter Holder Holds water filter firmly in place.
- Charcoal Water Filter Eliminates chlorine, bad tastes and odors from tap water.
- Control Panel See detailed illustration.
- Brew Pause™ Stops flow of coffee from basket when carafe is removed (20 seconds max) from the heater plate, so a cup can be poured mid-brew.
- 14-Cup Glass Carafe The easy-pour carafe has an ergonomic handle and brewed coffee markings for 4 to 14 cups.
- Measuring Scoop
- 60-Second Reset (not shown) One-minute protection in case a breaker trips, the unit is unplugged, or the power fails. It holds all programmed information, including time of day, Auto On time and Auto Off time.
- Heating Plate
GETTING TO KNOW YOUR CONTROL PANEL
- Blue Backlit Display
Displays time of day, Auto On and Auto Off times.- Low, Medium and High (L, M, H) warning plate indicators.
- Ready Tone off icon appears when Ready Tone is off.
- Hour and Minute Buttons
Use to set hours and minutes for time of day, Auto On and Auto Off times. - Function Knob
See page 7 for programming instructions.- PROG
The PROG function lets you select a time for the coffeemaker to turn on when Auto On setting is activated. - Auto On
The Auto On function programs the coffeemaker to turn on at the desired time selected in the PROG function. - Brew
The Brew function is used to start the brew cycle immediately - Auto Off
The Auto Off setting lets you program the coffeemaker to shut off 0 to 4 hours after brew cycle ends. Default setting is 2 hours. - Clock
The Clock setting lets you program the time of day. LCD displays “PM” for afternoon and nighttime brew starts. Holds selected time until you change it or if the power outlet is unplugged for over a minute.
- PROG
- Bold Flavor Strength Button
Lets you choose Bold or Regular coffee flavor; blue indicator appears when bold is selected. - Clean Button
Red indicator appears when it is time to decalcify your coffeemaker. See page 9 for decalcify instructions. - Carafe Temperature Button
Adjusts heating plate temperature to Low, Medium or High to keep freshly brewed coffee at the temperature you prefer. - 1–4 Cup Button
Adjusts brew process to maximize coffee flavor when brewing fewer than 5 cups. Blue indicator appears when function is selected. - Ready Tone Button
Lets you turn an audible “Brew Cycle Finished” alert on or off. - On/Off button
Turns coffeemaker on and off.
BEFORE BREWING YOUR FIRST POT OF COFFEE
Rinsing your coffeemaker: During the manufacturing process, dust can get trapped in the unit. We recommend flushing out the system before brewing your first pot of coffee. Simply fill the reservoir, power on the unit, and follow steps 1, 3 and 5 on page 8 under MAKING COFFEE. Do not add coffee.
Charcoal Water Filter
Your coffeemaker comes with a charcoal water filter that eliminates chlorine, bad tastes and odors from tap water.
Inserting the Water Filter
- Remove the filter from polybag and soak it, fully immersed, in cold tap water for 15 minutes.
- Lift the water filter holder out of the water reservoir.
- Press down on the filter compartment and pull toward you to open.
- Place filter into the holder and snap it closed. Be careful – improper placement can tear the filter skin.
- Flush filter by running cold tap water through holes in bottom of compartment for 10 seconds.
- Allow the filter to drain completely.
- Slide the water filter holder back into the channel in the water reservoir, pushing it down to the base of the unit.
NOTE: We recommend changing the water filter every 60 days or after 60 uses, and more often if you have hard water.
Replacement filters can be purchased in stores, by calling Cuisinart Customer Service (1-800-726-0190), or at www.cuisinart.com
PROGRAMMING YOUR COFFEEMAKER
SETTING THE CLOCK
When the Function knob is turned to Clock and the coffeemaker is plugged in, 12:00 will flash in the display for 10 seconds, indicating the unit is in Clock Set mode. If 12:00 stops flashing, simply press and hold Hour or Minute button to return to flashing Clock Set mode.
Turn the function knob to CLOCK
Press both Hour and/or Minute buttons to select the desired time. Hold buttons down to scroll through the digits, or press and release to advance one digit at a time. When scrolling, the numbers will advance slowly and then speed up, so as number displayed approaches the desired time, press and release to advance one digit at a time. Be sure the PM indicator is on if a PM time is desired. If neither button is pressed for five seconds, the clock will stop flashing and selected time will be displayed.
SETTING THE AUTO-ON TIME
- Turn the Function knob to PROG The digital display will flash the default (12:00) or previously selected time. Follow directions under SETTING THE CLOCK (in previous section) to program your start-brew time.
- Turn the Function knob to Auto On LCD will display the current time.
- Press and release On/Off button The blue light indicates that the coffeemaker is in Auto On mode. The blue On/Off light will come on when brew cycle begins and will go off when Keep Warm cycle ends.
NOTE: To start brew time at the same time the next day, simply make sure the Function knob is on Auto On and press and release the On/Off button once more. Blue Auto On light will go on.
NOTE: To exit auto on mode, rotate the knob to another position. Auto on light will go off.
SETTING THE AUTO-OFF TIME
- Turn Function knob to Auto Off.
The digital display will flash the programmed Auto Off default (2:00) or previously selected time. Follow directions under SETTING THE CLOCK to program coffeemaker to shut off from 0 to 4 hours after brew cycle is finished. - To exit/confirm Auto Off time setting:
Do not touch any buttons. Auto Off Setup mode will be exited automatically after 5 seconds.
TURNING OFF READY TONE
Your coffeemaker features a Ready Tone that beeps 5 times when coffee is finished brewing. To turn this alert off, press Tone button; an icon will appear in display to indicate tone is off. To turn tone back on, press Tone button again; icon will disappear.
MAKING COFFEE
Follow instructions in BEFORE BREWING YOUR FIRST POT OF COFFEE.
This only needs to be performed once.
- Fill the water reservoir
Lift the coffeemaker lid to open. Pour the desired amount of water into the water reservoir using the water level indicator located at the side of the coffeemaker.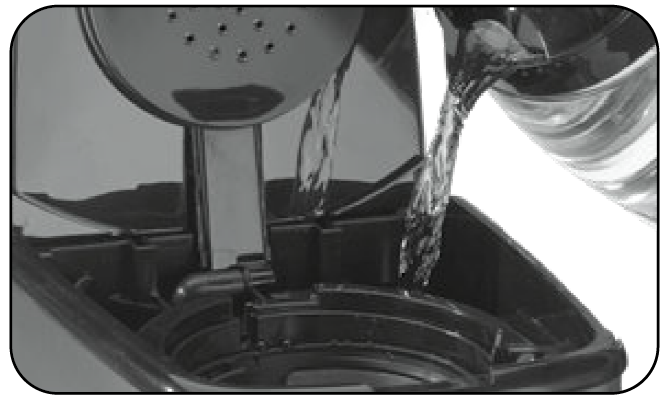
- Add the ground coffee
Insert a #4 paper filter OR the gold-tone filter. Be sure that the paper filter is completely open and fully inserted in the basket. It may help to fold and flatten the seams of a paper filter beforehand. Add 1 level scoop of ground coffee per cup. Adjust the amount according to taste.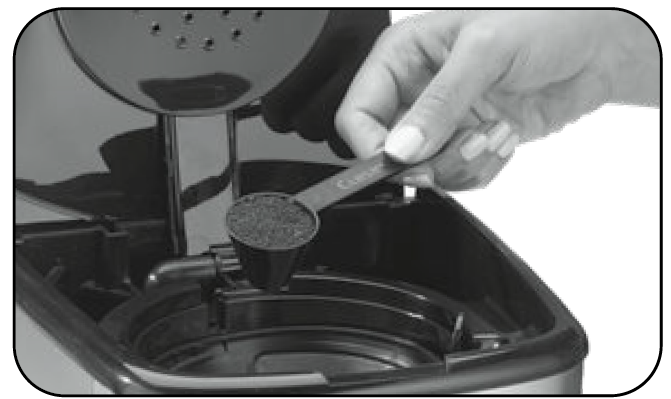 NOTE: The maximum capacity for ground coffee is 15 tablespoons for this coffeemaker. Exceeding this amount may cause overflow if the coffee is too finely ground.
 - Position carafe and plug in unit
Place carafe on heating plate and be sure coffeemaker lid is closed. Plug coffeemaker into an electrical outlet. - Set preferences
- Press the 1–4 cup button if you are brewing 4 cups or less. The indicator light will illuminate.
- Press the Bold button to select stronger coffee flavor, if desired. The button’s indicator light will illuminate. Press again to turn off light and brew at regular strength.
- Choose Low (L), Medium (M) or High (H) carafe temperature by pressing Carafe Temp button. Selection will appear in display.
- Start Brewing
Turn Function knob to Brew. Press the On/Off button to begin brewing. The blue indicator light will illuminate. - After brewing
When the brewing cycle has been completed, five beeps will sound. Coffee will continue to stream from the filter for several seconds.
NOTE: Reservoir cover may be hot during and directly after brewing. Wait at least 10 minutes before opening.
BREW PAUSE™ FEATURE
This feature interrupts the flow of coffee from the basket to let you pour that first cup mid-brew. Because the flavor profile of coffee brewed at the start of a cycle differs from that brewed toward the end, be aware that using this feature will weaken the flavor strength of the finished pot.
NOTE: Removing carafe for more than 20 seconds during brew cycle may cause filter basket to overflow.
CLEANING AND MAINTENANCE
Always turn coffeemaker off and remove the plug from the electrical outlet before cleaning.
Lift up the coffeemaker lid. Remove and discard the paper filter and ground coffee. The filter basket can be washed in warm, soapy water and rinsed thoroughly, or cleaned in the upper rack of the dishwasher. Dry all parts after cleaning.
Do not put any water in the unit once the filter basket has been removed. Wipe the area under the filter basket with a damp cloth.
Remove the carafe from the heating plate. Discard any remaining coffee. The carafe and lid can be washed in warm, soapy water and rinsed thoroughly, or placed in a dishwasher. The carafe and carafe lid should be placed on the upper rack only.
Do not use any scouring agents or harsh cleansers on any part of the coffeemaker.
Never immerse base unit in water or other liquids. To clean base, simply wipe with a clean, damp cloth and dry before storing. Fingerprints and other blemishes on the housing can be washed off with soap and water or a nonabrasive cleaning solution. Wipe heating plate with a clean, damp cloth. Never use rough, abrasive materials or cleansers to clean the heating plate. Do not dry the inside of the water reservoir with a cloth, as lint may remain.
MAINTENANCE
Any other servicing should be performed by an authorized service representative.
DECALCIFICATION
Decalcification refers to the removal of calcium deposits that form over time on the metal parts of your coffeemaker. The mineral content of the tap water in your area and the frequency of use affects the rate of the calcium buildup, which can affect the functioning of your coffeemaker and the flavor of your coffee.
For best performance from your Brew Central® coffeemaker, we recommend cleaning it whenever the red CLEAN LED indicator lights up.
NOTE: Before decalcifying your unit, remove the charcoal water filter from the water reservoir.
To clean:
- Fill the water reservoir to capacity with a mixture of ¹/³ white vinegar and ²/³ water.
- Press and hold the CLEAN button. When the CLEAN LED indicator flashes, the coffeemaker is in Clean mode. Release the button.
- When the cycle is completed, 5 beeps will sound and the coffeemaker will shut off.
- If the CLEAN indicator illuminates once more, repeat the cleaning procedure with a fresh solution of vinegar and water. NOTE: One cleaning cycle is usually sufficient.
- When the CLEAN indicator remains off, run one cycle with a full reservoir of fresh, cold water to rinse the unit.
- Return the charcoal water filter to the holder inside the water reservoir and your coffeemaker is ready to brew!
WARRANTY
Limited Three-Year Warranty
This warranty is available to U.S. consumers only. You are a consumer if you own a Cuisinart® Brew Central® 14-Cup Programmable Coffeemaker that was purchased at retail for personal, family or household use. Except as otherwise required under applicable law, this warranty is not available to retailers or other commercial purchasers or owners. We warrant that your Cuisinart® Brew Central® 14-Cup Programmable Coffeemaker will be free of defects in materials and workmanship under normal home use for 3 years from the date of original purchase.
We recommend that you visit our website, www.cuisinart.com for a fast, efficient way to complete your product registration. However, product registration does not eliminate the need for the consumer to maintain the original proof of purchase in order to obtain the warranty benefits. In the event that you do not have proof of purchase date, the purchase date for purposes of this warranty will be the date of manufacture.
CALIFORNIA RESIDENTS ONLY
California law provides that for In-Warranty Service, California residents have the option of returning a nonconforming product (A) to the store where it was purchased or (B) to another retail store that sells Cuisinart products of the same type. The retail store shall then, according to its preference, either repair the product, refer the consumer to an independent repair facility, replace the product, or refund the purchase price less the amount directly attributable to the consumer’s prior usage of the product. If neither of the above two options results in the appropriate relief to the consumer, the consumer may then take the product to an independent repair facility, if service or repair can be economically accomplished. Cuisinart and not the consumer will be responsible for the reasonable cost of such service, repair, replacement, or refund for nonconforming products under warranty. California residents may also, according to their preference, return nonconforming products directly to Cuisinart for repair or, if necessary, replacement by calling our Consumer Service Center toll-free at 800-726-0190. Cuisinart will be responsible for the cost of the repair, replacement, and shipping and handling for such nonconforming products under warranty.
HASSLE-FREE REPLACEMENT WARRANTY
Your ultimate satisfaction in Cuisinart products is our goal, so if your Cuisinart® Brew Central® 14-Cup Programmable Coffeemaker should fail within the generous warranty period, we will repair it or, if necessary, replace it at no cost to you. To obtain a return shipping label, email us at https://www.cuisinart.com/customer-care/product-return. Or call our toll-free Customer Service Department at 1-800-726-0190 to speak with a representative.
Your Cuisinart® Brew Central® 14-Cup Programmable Coffeemaker has been manufactured to the strictest specifications and has been designed for use only in 120-volt outlets and only with authorized accessories and replacement parts. This warranty expressly excludes any defects or damages caused by attempted use of this unit with a converter, as well as use with accessories, replacement parts or repair service other than those authorized by Cuisinart. This warranty does not cover any damage caused by accident, misuse, shipment or other than ordinary household use. This warranty excludes all incidental or consequential damages. Some states do not allow the exclusion or limitation of these damages, so these exclusions may not apply to you. You may also have other rights, which vary from state to state.
Important: If the nonconforming product is to be serviced by someone other than Cuisinart’s Authorized Service Center, please remind the servicer to call our Consumer Service Center at 1-800-726-0190 to ensure that the problem is properly diagnosed, the product is serviced with the correct parts, and to ensure that the product is still under warranty.
Cuisinart offers an extensive assortment of top-quality products to make life in the kitchen easier than ever. Try some of our other countertop appliances, cookware, tools and gadgets.
www.cuisinart.com
![]()

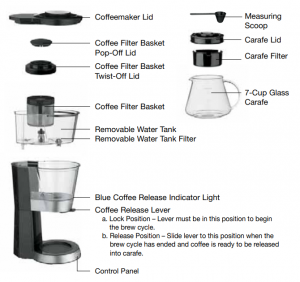
FEATURES
BEFORE FIRST USE
Before using your Cuisinart® Automatic Cold Brew Coffeemaker for the first
time: Be sure to remove polybags from carafe and coffeemaker. Place carafe back onto base.
During the manufacturing process, dust can get trapped in the coffeemaker.
We recommend rinsing all removable parts before first use. For detailed instructions, see Cleaning and Maintenance section in instruction booklet.
HELPFUL HINTS
- Always keep Coffee Release Lever in the LOCK position when coffeemaker is not in use.
- Use a dark roast, medium-to-coarse grind for optimal flavour.
- For best results, use filtered cold water to fill the water tank.
| Recommended Recipe | ||
| Ground Coffee | Total Water | Brewed Cups |
| 5½ level scoops | 15 oz./470ml | 3 |
| 9 level scoops | 25 oz./790ml | 5 |
| 13 level scoops | 35 oz./1100ml | 7 |
1. 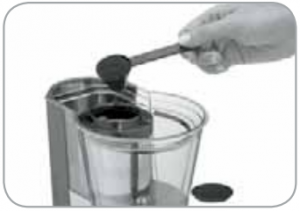 Lift off the coffeemaker lid to access the coffee filter basket. Carefully remove pop-off lid from basket and use measuring scoop to add ground coffee. See Recommended Recipe. Replace pop-off basket lid. NOTE: The coffee filter basket can also be removed to fill. See instruction booklet, page 7.
2. 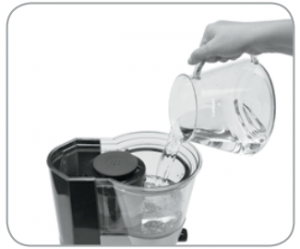 Before filling the water tank, make sure Release Lever is in the LOCK position to prevent water from flowing out. Pour cold water (NEVER FILL WITH HOT WATER) into the tank. Since the coffee filter basket is in the water tank, use WITH COFFEE BASKET indicators on back of the tank to add amount desired. Replace the coffeemaker lid.
3.  Insert carafe filter and lid into carafe and place on the base. Plug into an electrical outlet. If coffeemaker remains untouched for 30 minutes, it enters standby mode – all lights will be off. Press any button to wake unit up.
4. 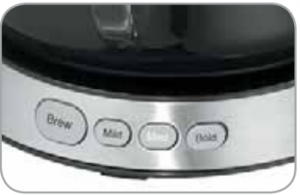 The default strength setting is Medium. Press Mild or Bold button to change selection. The LED on selected button will illuminate. NOTE: Brew times vary based on selected strength.
Mild = 25 minutes • Medium = 35 minutes • Bold = 45 minutes
5. 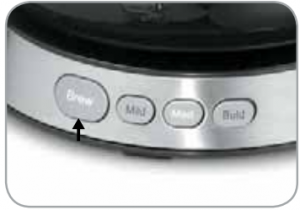 Press the Brew button to begin brewing. The brew LED will illuminate. The coffee filter basket will gently spin and pause throughout brew cycle. When the brew cycle is completed, 3 beeps will sound and the brew and strength setting LEDs will flash.
6.  Slide the coffee release lever to the RELEASE position. The blue coffee release indicator light will illuminate, coffee will stream into carafe, and the coffee filter basket will go through a final spin cycle. When the release cycle is finished, 5 beeps will sound
7.  Slide the Release lever back to LOCK position and your Cuisinart® Cold Brew coffee is ready to serve!
TROUBLESHOOTING GUIDE
| Problem | Cause | Solution |
| Water is pouring out onto the counter | Coffee release lever is not in the lock position | • Slide coffee release lever to the Lock position
• Always keep coffee release lever in the Lock position before and after release cycle |
| The unit will not work | ||
| Coffeemaker lid is shaking during brew cycle | Coffee filter basket is not in place | • Press Brew button to pause the brew cycle
• Remove coffeemaker lid • Make sure coffee basket filter twist-off lid is screwed on correctly • Push coffee filter basket down until clicked into the water tank • Replace coffeemaker lid and press the Brew button to continue the brew cycle |
| Coffee filter basket is filled with more water than usual after the release cycle has been completed | Coffee oils build up over time | • Soak coffee filter basket in warm, soapy water for 30 minutes
• Soak coffee filter basket regularly to prevent oil build-up |
| Coffee is too dark and oily | • When using a very dark, oily bean, coffee may not drain as efficiently as a regular roast or less oily bean | |
| Coffee is weaker than usual | Coffee to water ratio is incorrect | • Adjust coffee-to-water ratio to taste
• When using the MAX 16 scoops of coffee, reduce the amount of water |
| Strength setting is incorrect | • Check your strength setting — selected strength indicator LED is illuminated
• To change your strength setting, press the desired strength button |
|
| Oil build-up in the coffee filter basket can prevent coffee from filtering properly | • Soak coffee filter basket in warm, soapy water for 30 minutes before running next brew cycle
• Soak coffee filter basket regularly to prevent oil build-up • Avoid using a very dark, oily bean |
|
| The brew cycle has ended but no coffee is in the carafe | Coffee release lever is in the lock position. | • Slide coffee release lever to right so it is in the release position.
• The blue release indicator light will illuminate and coffee will begin to stream into the carafe. |
| The unit will not operate and the button indicator lights are flashing | The coffee filter basket may be jammed or not in the correct position | • Press the brew button once to cancel the cycle
• Remove coffeemaker lid • Replace the coffee filter basket back into the water tank making sure it is securely in position • Replace the coffeemaker lid and restart the brew cycle |
]]>
Touchscreen 14-Cup Coffeemaker DCC-T20
For your safety and continued enjoyment of this product, always read the instruction book carefully before using.
IMPORTANT SAFEGUARDS
When using electrical appliances, especially when children are present, basic safety precautions should always be taken to reduce the risk of fire, electric shock and/or injury to persons, including the following:
- READ ALL INSTRUCTIONS.
- Always unplug from outlet when either the appliance or display clock is not in use and before cleaning. Allow to cool before putting on or taking off parts and before cleaning the appliance.
- Do not touch hot surfaces. Use handles and knobs.
- To protect against electric shock, do not place cord, plug, or base unit in water or other liquids.
- This appliance should not be used by or near children or individuals with certain disabilities.
- Do not operate any appliance with a damaged cord or plug, or after the appliance malfunctions or has been dropped or damaged in any manner. Return appliance to the nearest Cuisinart Repair Center for examination, repair, and electrical or mechanical adjustment.
- The use of accessory attachments not recommended by Cuisinart may cause injuries.
- Do not use outdoors.
- Do not let cord hang over edge of table or counter, or touch hot surfaces.
- Do not place on or near a hot gas or electric burner, or in a heated oven.
- Always fill water reservoir first, then plug cord into the wall outlet. To disconnect, push the brew/off button during brewing and Keep Warm or push the power i-con to shut down all the function i-con light, then remove plug from wall outlet.
- Do not use appliance for other than it’s intended use.
- Snap lid securely onto carafe before serving any beverages.
- Scalding may occur if the lid is removed during the brewing cycle.
- The glass carafe is designed for use with this coffeemaker only. It must never be used on the range top.
- Do not set a hot carafe on a wet or cold surface.
- Do not use a cracked carafe or a carafe having a loose or weakened handle.
- Do not clean carafe or heating plate with cleansers, steel wool pads, or other abrasive materials.
- WARNING: TO REDUCE THE RISK OF FIRE OR ELECTRIC SHOCK, DO NOT REMOVE THE BASE PANEL. NO USER-SERVICEABLE PARTS ARE INSIDE. REPAIRS SHOULD BE DONE ONLY BY AUTHORIZED PERSONNEL.
- Do not place cloth beneath coffeemaker or otherwise restrict airflow.
- Use only the Cuisinart® Gold-Tone Commercial-Style Filter or standard cone-shaped paper filter with this unit. OTHER GOLD-TONE PERMANENT FILTERS MAY CAUSE THE COFFEEMAKER TO OVERFLOW.
- Do not operate your appliance in an appliance garage or under a wall cabinet. When storing in an appliance garage, always unplug the unit from the electrical outlet. Not doing so could create a risk of fire, especially if the appliance touches the walls of the garage or the door touches the unit as it closes.
SAVE THESE INSTRUCTIONS FOR HOUSEHOLD USE ONLY
WARNING: RISK OF FIRE OR ELECTRIC SHOCK
 The lightning flash with arrowhead symbol within an equilateral triangle is intended to alert the user to the presence of uninsulated, dangerous voltage within the product’s enclosure that may be of sufficient magnitude to constitute a risk of fire or electric shock to persons.
 The exclamation point within an equilateral triangle is intended to alert the user to the presence of important operating and maintenance (servicing) instructions in the literature accompanying the appliance.
SPECIAL CORD SET INSTRUCTIONS
A short power-supply cord is provided to reduce the risks resulting from becoming entangled in or tripping over a longer cord.
Extension cords may be used if care is exercised in their use.
If an extension cord is used, the marked electrical rating of the extension cord must be at least as great as the electrical rating of the appliance, and the longer cord should be arranged so that it will not drape over the countertop or tabletop where it can be pulled on by children or tripped over.
NOTICE
This appliance has a polarized plug (one blade is wider than the other). To reduce the risk of electric shock, this plug will fit into a polarized outlet only one way. If the plug does not fit fully into the outlet, reverse the plug. If it still does not fit, contact a qualified electrician. Do not modify the plug in any way.
OPERATING NOTICE
Clogging and backing up of water and/or coffee in the filter basket can occur under any or a combination of any of the following conditions: the use of too finely ground coffee, using two or more paper filters, using the gold-tone filter in conjunction with a paper filter or not properly cleaning coffee grounds from the gold-tone filter, or allowing coffee grounds to spill over the filter.
Caution: Never open the filter basket during the brewing cycle, even if no water is draining from the filter basket, because extremely hot water/ coffee can spill out from the filter basket and cause injury. If water/coffee is not draining from the filter basket during the brewing cycle, unplug the unit and wait 10 minutes before opening and checking the filter basket.

IMPORTANT UNPACKING INSTRUCTIONS
- Place the box on a large, sturdy, flat surface.
- Remove literature.
- Turn the box so that the back side of the coffeemaker is down and slide the coffeemaker from the box.
- After the coffeemaker has been removed, place the box out of the way and lift off the left and right inserts.
- Grasp the carafe by its handle, remove it from the heating plate, and remove the polybag.
- Remove the polybag covering the coffeemaker.
Save all packing materials in case you have to ship the machine in the future.
KEEP ALL PLASTIC BAGS AWAY FROM CHILDREN.
THE QUEST FOR THE PERFECT CUP OF COFFEE
ELEMENT 1: WATER
Coffee is 98% water. The quality of that water is as important as the quality of your coffee. If water doesn’t taste good from the tap, it won’t taste good in your coffee. Cuisinart includes a charcoal water filter to remove chlorine, bad tastes and odors for the purest coffee flavor, every time you brew.
ELEMENT 2: COFFEE
While coffee is 98% water, all of the flavor comes from the beans. To achieve the same great taste you enjoy at a coffee bar, you need to use the same quality of coffee. If you choose to grind your own beans, buy them fresh and whole. Buy only about a two-week supply at a time, because once the bean is broken, its flavor degrades quickly.
ELEMENT 3: GRIND
The grind is critical for proper flavor extraction. If the grind is too fine, over-extraction and bitterness will result. Too fine a grind may also clog the filter. If the grind is too coarse, the water will pass through too quickly and the maximum flavor will not be extracted. When grinding your own beans, we recommend a medium-fine grind.
ELEMENT 4: PROPORTION
Coffee that is too strong or too weak is always a disappointment. Follow the recommended portions of ground coffee in the instructions under MAKING COFFEE, and later adjust the amount to suit your taste.
FEATURES AND BENEFITS
1. Coffeemaker Lid
Opens to access filter basket, water filter and water reservoir.
2. Water Reservoir with Water Level Indicator Window (not shown)
3. Showerhead (not shown)
Distributes water evenly over coffee, reducing temperature loss as water passes through grounds.
4. Charcoal Water Filter Holder
Holds water filter firmly in place.
5. Charcoal Water Filter
Eliminates chlorine, bad tastes and odors from tap water.
6. Filter Basket
Holds a #4 paper filter OR a gold-tone filter (included).
7. Cuisinart® Permanent Gold-Tone
Commercial-Style Filter Eliminates the need for paper filters. NOTE: Some fine grounds may flow through the filter and appear as sediment in the carafe.
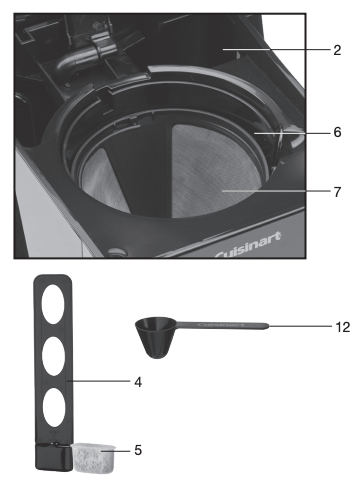
8. Touchscreen Control Panel
See detailed illustration, page 6.
9. Brew Pause™
Stops flow of coffee from basket when carafe is removed (20 seconds max) from the heater plate, so a cup can be poured mid-brew.
10. 14-Cup Glass Carafe
The easy-pour carafe has an ergonomic handle and brewed coffee markings for 4 to 14 cups.
11. 60-Second Reset (not shown)
One-minute protection in case a breaker trips, the unit is unplugged, or the power fails. It holds all programmed information, including time of day, Auto On time and Auto Off time.
12. Measuring Scoop
13. BPA Free (not shown)
All parts that come in contact with coffee or liquids are BPA free.
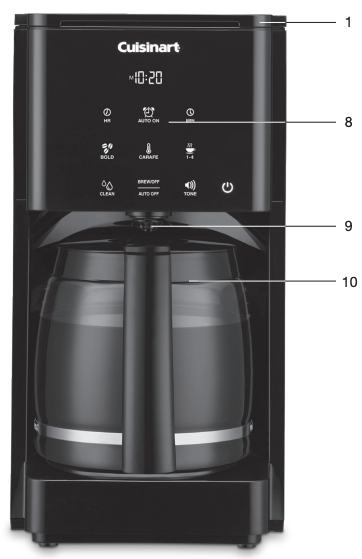
GETTING TO KNOW YOUR TOUCHSCREEN CONTROL PANEL
Detailed programming and use instructions are on pages 8 and 9.
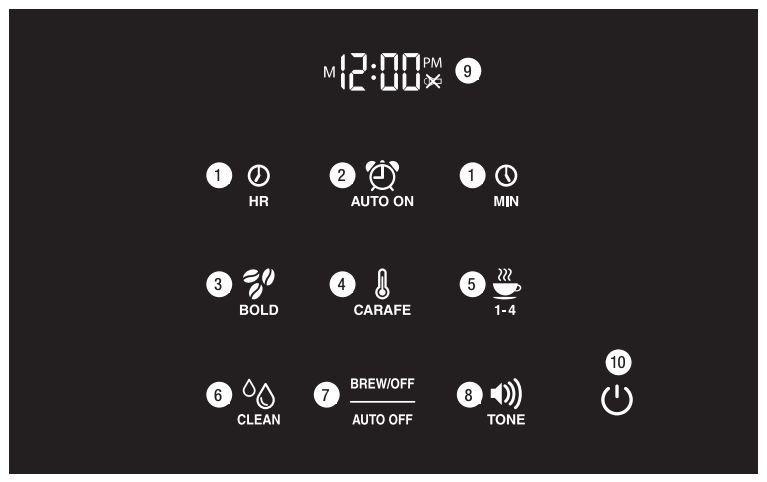
1. Hour and Minute Icons
Use to set hours and minutes for time of day, Auto On and Auto Off times.
2. Auto On Icon
Lets you program coffeemaker to automatically begin brewing up to 24 hours in advance.
3. Bold Icon
Lets you choose bold or regular coffee strength; white indicator appears when bold is selected.
4. Carafe Temperature Icon
Adjusts warming plate temperature to Low, Medium or High to keep freshly brewed coffee at the temperature you prefer.
5. 1–4 Cup Icon
Adjusts brew process to maximize coffee flavor when brewing fewer than 5 cups. White indicator appears when function is selected.
6. Clean Icon
Indicator appears in red, when it is time to decalcify your coffeemaker.
7. Brew/Off & Auto Off Icon
Turns coffeemaker on and off. Use the Auto Off feature to program the time you want the coffeemaker to shut off – from 0 to 4 hours after brew cycle is finished.
8. Ready Tone Icon
Lets you turn an audible “Brew Cycle Finished” alert on or off.
9. LCD Clock Display
Displays time of day, Auto On and Auto Off times. A. Low, Medium and High (L, M, H) warming plate indicators. B. Ready Tone off icon appears when Ready Tone is off.
10. Power/Wake Icon
Tap to wake up LCD touchscreen or put to sleep.
REVEAL SCREEN TECHNOLOGY
The control panel becomes invisible when unit is in idle mode – making this a statement piece in your kitchen. To select your options, simply touch the  icon to wake up your screen and choose how you want to brew!
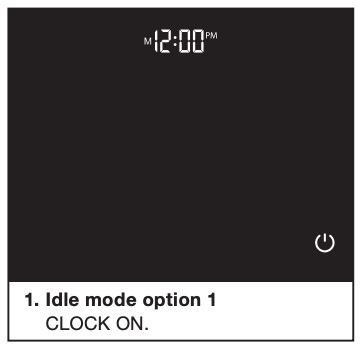
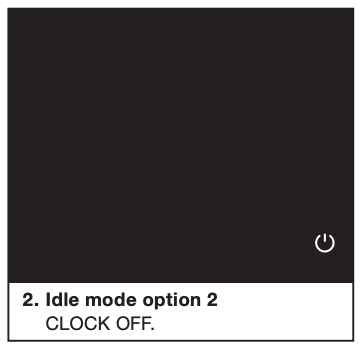
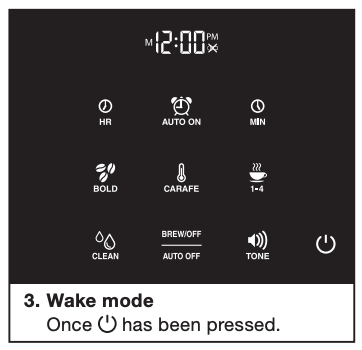
BEFORE BREWING YOUR FIRST POT OF COFFEE
Rinsing your coffeemaker: During the manufacturing process, dust can get trapped in the unit. We recommend flushing out the system before brewing your first pot of coffee. Simply fill the water reservoir, power on the unit, and follow steps 1, 3 and 5 on page 8 under MAKING COFFEE. Do not add coffee!
Charcoal Water Filter
Your coffeemaker comes with a charcoal water filter that eliminates chlorine, bad tastes and odors from tap water.
Inserting the Water Filter
- Remove the filter from polybag and soak it, fully immersed, in cold tap water for 15 minutes.
- Lift the water filter holder out of the water reservoir.
- Press down on the filter compartment and pull toward you to open.
- Place filter into the holder and snap it closed. Be careful – improper placement can tear the filter skin.
- Flush filter by running cold tap water through holes in bottom of compartment for 10 seconds.
- Allow the filter to drain completely. • Slide the water filter holder back into the channel in the water reservoir, pushing it down to the base of the unit.
Note: We recommend changing the water filter every 60 days or after 60 uses, and more often if you have hard water.
Replacement filters can be purchased in stores, by calling Cuisinart Consumer Service, or at www.cuisinart.com
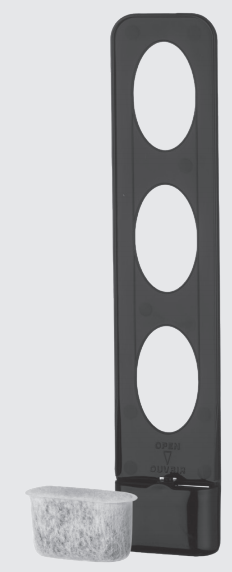
PROGRAMMING YOUR COFFEEMAKER
SETTING THE CLOCK
When the coffeemaker is plugged in, the power icon and 12:00 will illuminate. Simply tap the power icon to view all options.
Setting Hours and Minutes
Press and hold either HR or MIN icons for 2 seconds until clock starts to flash. Hold icon down to scroll through the digits quickly, or touch and release to advance one digit at a time until the desired time is reached. Be sure the PM indicator is on if setting a PM time.
Turning ON/OFF the Clock in Idle Mode
When the unit is idle, you have the option to have the clock display on or off. Press and hold the HR and MIN icons for 3 seconds – clock display will go off. To turn back on, press and hold the HR and MIN icons for 3 seconds. Clock display will turn on.
SETTING THE AUTO ON TIME
1. Press and hold the Auto On icon for 2 seconds.
The digital display will flash the default (12:00) or previously selected time. Follow directions under SETTING THE CLOCK (above) to program your brew-start time. Ten seconds after programming, the unit will automatically exit Auto On or you can touch the Auto On icon to exit setting mode immediately. The Auto On icon will illuminate, letting you know Auto On is activated.
2. To activate Auto On using previously selected time:
Press the Auto On icon for 2 seconds. The previously set time will appear and icon will light up.
3. To deactivate Auto On:
Press illuminated Auto On icon; light will go off, indicating mode is turned off.
SETTING THE AUTO OFF TIME
1. Press and hold the Brew/Auto Off icon for 5 seconds.
The digital display will flash the programmed Auto Off default (2:00) or previously selected time. Follow directions under SETTING THE CLOCK to program coffeemaker to shut off from 0 to 4 hours after brew cycle is finished.
2. To exit/confirm Auto Off time setting:
Do not touch any icons. Auto Off setup mode will be exited automatically after 5 seconds.
TURNING OFF READY TONE
Your coffeemaker features a Ready Tone that beeps 5 times when coffee is finished brewing. To turn this alert off, press the Ready Tone icon; an icon will appear next to the time with an “X”, indicating the tone is off. To turn tone back on, press Ready Tone icon again; the “X” will disappear.
MAKING COFFEE
Follow instructions in BEFORE BREWING YOUR FIRST POT OF COFFEE (page 7).
1. Fill the water reservoir
Lift the coffeemaker lid to open. Pour the desired amount of water into the water reservoir using the water level indicator located at the side of the coffeemaker.
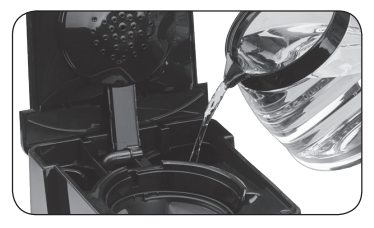
2. Add the ground coffee
Insert a #4 paper filter OR the gold-tone filter. Be sure that the paper filter is completely open and fully inserted in the basket. It may help to fold and flatten the seams of a paper filter beforehand. Add 1 level scoop of ground coffee per cup. Adjust the amount according to taste.
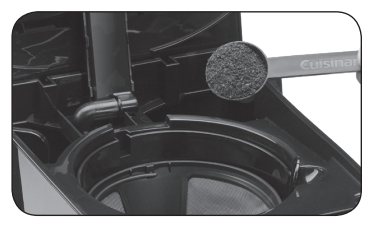
NOTE: The maximum capacity for ground coffee is 15 tablespoons for this coffeemaker. Exceeding this amount may cause overflow if the coffee is too finely ground.
3. Position carafe and plug in unit
Place carafe on heating plate and be sure coffeemaker lid is closed. Plug coffeemaker into an electrical outlet.
4. Set preferences
a. Press the 1–4 cup icon if you are brewing fewer than 5 cups. The icon will illuminate.
b. Press the Bold icon to select stronger coffee flavor, if desired. The icon will illuminate. Press again to turn off icon and brew at regular strength.
c. Choose Low (L), Medium (M) or High (H) carafe temperature by pressing Carafe Temp icon. Selection will appear in display next to the time. Once you reach the desired temperature, simply leave it and the unit will automatically confirm the setting.
5. Start brewing
Press the Brew/Off icon to begin brewing. The icon will pulse on and off to indicate the unit is brewing.
6. After brewing
When the brewing cycle has been completed, five beeps will sound. Coffee will continue to stream from the filter for several seconds. NOTE: Reservoir cover may be hot during and directly after brewing. Wait at least 10 minutes before opening.
BREW PAUSE™ FEATURE
This feature interrupts the flow of coffee from the basket to let you pour that first cup mid-brew. Because the flavor profile of coffee brewed at the start of a cycle differs from that brewed toward the end, be aware that using this feature will weaken the flavor strength of the finished pot.
NOTE: Removing carafe for more than 20 seconds during brew cycle may cause filter basket to overflow.
CLEANING AND MAINTENANCE
Always turn coffeemaker off and remove the plug from the electrical outlet before cleaning.
Lift up the coffeemaker lid. Remove and discard the paper filter and ground coffee. The filter basket can be washed in warm, soapy water and rinsed thoroughly, or cleaned in the upper rack of the dishwasher. Dry all parts after use.
Do not put any water in the unit once the filter basket has been removed. Wipe the area under the filter basket with a damp cloth.
Remove the carafe from the heating plate. Discard any remaining coffee. The carafe and lid can be washed in warm, soapy water and rinsed thoroughly, or placed in a dishwasher. The carafe and carafe lid should be placed on the upper rack only.
Do not use any scouring agents or harsh cleansers on any part of the coffeemaker.
Never immerse base unit in water or other liquids. To clean base, simply wipe with a clean, damp cloth and dry before storing. Fingerprints and other blemishes on the housing can be washed off with soap and water or a nonabrasive cleaning solution. Wipe heating plate with a clean, damp cloth. Never use rough, abrasive materials or cleansers to clean the heating plate. Do not dry the inside of the water reservoir with a cloth, as lint may remain.
Maintenance
Any other servicing should be performed by an authorized service representative.
DECALCIFICATION
Decalcification refers to the removal of calcium deposits that form over time on the metal parts of your coffeemaker. The mineral content of the tap water in your area and the frequency of use affects the rate of the calcium buildup, which can affect the functioning of your coffeemaker and the flavor of your coffee.
For best performance from your coffeemaker, we recommend cleaning it whenever the CLEAN icon lights up.
NOTE: Before decalcifying your unit, remove the charcoal water filter from the water reservoir.
To clean:
- Fill the water reservoir to capacity with a mixture of ¹⁄³ white vinegar and ²⁄³ water.
- Press and hold the CLEAN icon. When it starts to flash, the coffeemaker is in Clean mode. Release the icon.
- When the cycle is completed, 5 beeps will sound and the coffeemaker will shut off.
- If the CLEAN icon illuminates once more, repeat the cleaning procedure with a fresh solution of vinegar and water. NOTE: One cleaning cycle is usually sufficient.
- When the CLEAN icon remains off, run one cycle with a full reservoir of fresh, cold water to rinse the unit.
- Return the charcoal water filter to the holder inside the water reservoir and your coffeemaker is ready to brew!

Woodcreek 4-in-1 Pellet Grill
OWNER’S MANUAL
OPERATING INSTRUCTIONS
SAVE THIS MANUAL FOR FUTURE REFERENCE
Model SMK0036AS / SMK0036ASO
NOTICE TO INSTALLER: LEAVE THESE INSTRUCTIONS WITH THE GRILL OWNER FOR FUTURE REFERENCE .
PLEASE READ THIS ENTIRE MANUAL BEFORE INSTALLATION AND USE OF THIS PELLET FUEL-BURNING APPLIANCE. FAILURE TO FOLLOW THESE INSTRUCTIONS COULD RESULT IN PROPERTY DAMAGE, BODILY INJURY OR EVEN DEATH. CONTACT LOCAL BUILDING OR FIRE OFFICIALS ABOUT RESTRICTIONS AND INSTALLATION INSPECTION REQUIREMENTS IN YOUR AREA.SAVE THESE INSTRUCTIONS.
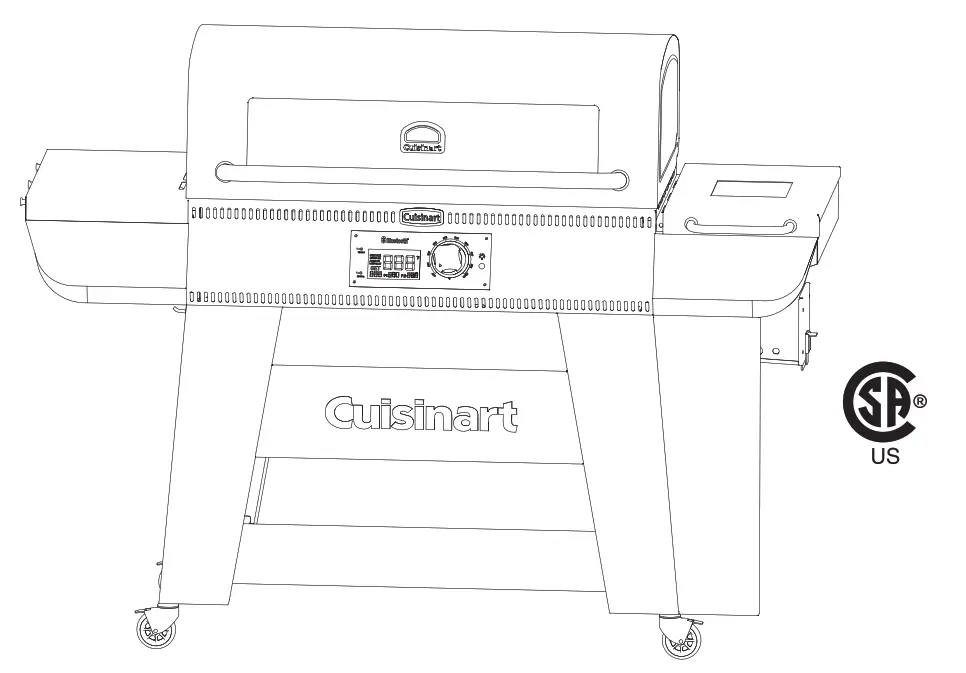
IMPORTANT SAFETY WARNINGS
WE WANT YOU TO ASSEMBLE AND USE YOUR GRILL AS SAFELY AS POSSIBLE. THE PURPOSE OF THIS SAFETY ALERT SYMBOL
IS TO ATTRACT YOUR ATTENTION TO POSSIBLE HAZARDS AS YOU ASSEMBLE AND USE YOUR GRILL & SMOKER. WHEN YOU SEE THE SAFETY ALERT SYMBOL, PAY CLOSE ATTENTION TO THE INFORMATION WHICH FOLLOWS!
READ ALL SAFETY WARNINGS AND INSTRUCTIONS CAREFULLY BEFORE ASSEMBLING AND OPERATING YOUR GRILL & SMOKER.
 WARNING
Do NOT use in humid or wet conditions
WARNING
- Improper installation, adjustment, service or maintenance can cause injury or property damage.
- Read all instructions and guidelines carefully and thoroughly before installation, use or service.
- Failure to follow these instructions could result in fi re or electrical shock.
DANGER
NOT for use in or on boats or recreation vehicles.
DANGER
 1. Do not store or use gasoline, liquid propane or any other fl ammable vapors or liquids in the vicinity of this appliance.
A MAJOR CAUSE OF FIRES IS FAILURE TO MAINTAIN REQUIRED CLEARANCES (AIR SPACES TO COMBUSTIBLE MATERIALS). IT IS OF UTMOST IMPORTANCE THAT THIS PRODUCT BE INSTALLED ONLY IN ACCORDANCE WITH THESE INSTRUCTIONS.
DANGER: Indicates an imminently hazardous situation which, if not avoided, will result in death or serious injury.
WARNING: Be alert to the possibility of serious bodily injury if the instructions are not followed. Be sure to read and carefully follow all of the messages.
CAUTION: Indicates a potentially hazardous situation which, if not avoided, may result in minor or moderate injury.
CALIFORNIA PROPOSITION 65 WARNING
 WARNING: This product can expose you to chemicals, including carbon monoxide, which are known to the State of California to cause cancer and birth defects or other reproductive harm.
For more information go to www.P65Warnings.ca.gov
WARNING: CONTAINS LEAD. MAY BE HARMFUL IF EATEN OR CHEWED. COMPLIES WITH FEDERAL STANDARDS. KEEP OUT OF REACH OF CHILDREN.
GENERAL WARNINGS:
WARNING
When using electric appliances, basic safety precautions should always be followed including the following:
- Operate only per manufacturers instructions.
- Keep all combustible materials at least 60 inches (152.4 cm) away from the grill at all times. Do not use this grill under any overhang or near any combustible structures.
- Minimum clearance from side and back of unit to combustible materials, 60 inches (152.4 cm) from side and 60 inches (152.4 cm) from back.
- DO NOT use on wood decks. Set up this grill on a hard, non-combustible smooth level surface.
- In case of fi re, turn the control “OFF”. Unplug the grill from the power source and allow the fi re to burn out on its own. Do not use water to try to extinguish a fi re.
- Keep a fi re extinguisher on hand acceptable for use with electric products. Refer to your local authority to determine proper size and type.
- Creosote – Formation and need for removal. When wood pellets are burned slowly, they produce tar and other organic vapors that combine with expelled moisture to form creosote. The creosote vapors condense in a relatively cool oven fl u and exhaust hood of a slow burning fi re. As a result, creosote residue accumulates on the fl ue lining and exhaust hood. When ignited, this creosote makes an extremely hot fi re.
- The grease duct should be inspected at least twice a year to determine when grease and/or creosote buildup has occurred.
- When grease or creosote has accumulated, it should be removed to reduce risk of fi re.
- Do not attempt to touch cooking surfaces or other hot surfaces. Use handles or knobs.
- To protect against electric shock, do not immerse cord, plugs, or heating element in water or any other liquids.
- Never leave appliance unattended. Hot while in operation. Keep children, clothing and furniture away. Contact may cause burns.
- Unplug this grill from the power source when not in use and before cleaning. Allow appliance to cool down before attempting to clean or service.
- Do not operate any appliance with a damaged power cord or plug, or after the appliance has malfunctioned or been damaged in any manner.
- Do not use accessories or attachments not recommended by the manufacturer, as they may not be compatible with this appliance, and may cause damage or injury.
- Do not place power cord where it may come in contact with hot surfaces, or pose a tripping hazard.
- Do not use this appliance for anything other than its intended use.
- NEVER add cooking pellets to a hot fi re pot by hand. You could be seriously burned. If the hopper runs out of pellets or your fi re goes out while cooking, let the grill completely cool and follow the Initial Lighting Instructions.
- Use only cooking grade wood pellets. Never use heating grade wood pellets as they are not safe for cooking.
- Always store wood pellets away from heat and in a dry location.
- NEVER use gasoline, gasoline-type lantern fuel, kerosene, charcoal lighter fl uid, or similar liquids to start or “freshen up” a fi re in this appliance. Keep all such liquids well away from the appliance when in use.
- This grill is not for use indoors. Do not use inside a building, garage or any other enclosed area.
- This product is not designed for commercial use.
- This product is not designed for tabletop use. Do not set this product on a tabletop.
- Outdoor extension cords must be used with outdoor use products and are marked with suffix “W” and with the statement “Suitable for Use with Outdoor Appliances.”
- Only use a properly-grounded power source.
- Use only with a properly-grounded GFI (Ground Fault Interrupter) household circuit.
- Do not operate this product in rain or wet conditions. Do not allow this product to come in contact with water. Set this product up more than 10’ from any large body of water (swimming pool, lake, pond, etc).
- CAUTION – To reduce the risk of electric shock, keep extension cord connection dry and off the ground.
- Never alter or remove the grounding plugs on the power cord or household outlet.
- Disconnect electric cord from outlet before cleaning.
- Keep appliance clean. See Proper Care and Maintenance section for cleaning.
- Do not operate this grill while under the infl uence of drugs, alcohol, or while fatigued.
- Do not use in the presence of explosive or fl ammable gases, vapor or other substances.
- Do not use this grill unless it is completely assembled and all parts are securely fastened and tightened.
- Use only identical replacement parts.
- Do not use this product in high winds.
- Do not attempt to move this appliance while it is in use.
- Always open the grill hood carefully – heat and steam trapped inside the hood can burn.
- Do not use this product for indoor heating, as toxic fumes will accumulate.
- After a period of storage, inspect the grill for abrasion, wear, cuts, or damage to the temperature controller and power cord.
- Always use a meat thermometer to ensure food is cooked to a safe temperature.
- Keep grill covered when not in use – out of the reach of children. Do not clean this product with a water spray or the like.
- Unplug from outlet when not in use and before cleaning. Allow to cool before putting on or taking off parts.
- Do not operate any appliance with a damaged cord or plug or after the appliance malfunctions or is dropped or damaged in any manner.
Follow these guidelines to prevent this colorless,odorless gas from poisoning you, your family or others.
- Know the symptoms of carbon monoxide poisoning; headache, dizziness, weakness, nausea, vomiting, sleepiness and confusion. Carbon monoxide reduces the blood’s ability to carry oxygen. Low blood oxygen levels can result in loss of consciousness and death.
- See a doctor if you or others develop cold or fl u-like symptoms while cooking or in the vicinity of this appliance. Carbon monoxide poisoning, which can easily be mistaken for a cold or fl u, is often detected too late.
- Alcohol consumption and drug use increase the effects of carbon monoxide poisoning.
- Carbon monoxide is especially toxic to mother and child during pregnancy, infants, the elderly, grills and people with blood or circulatory system problems, such as anemia or heart disease.
USE CAUTION AND COMMON SENSE WHEN OPERATING YOUR PELLET GRILL & SMOKER. FAILURE TO ADHERE TO THE SAFETY WARNINGS AND GUIDELINES IN THIS MANUAL COULD RESULT IN SEVERE BODILY INJURY OR PROPERTY DAMAGE. SAVE THIS MANUAL FOR FUTURE REFERENCE.
OPERATING THE GRILL:
WARNING
Read and follow all warnings and instructions contained in the preceding sections of this manual.
BREAKING IN YOUR GRILL:
- In manufacturing and preserving the components of your grill, oil residue may be present on the cooking surfaces of your grill.
- Before cooking on your grill for the fi rst time you should follow “Initial Lighting Instructions” to ensure the auger is fully charged with pellets.
PREHEATING GRILL:
- Prior to use, it is recommended that you preheat your grill. This ensures that the cooking grates are at the desired temperatures to sear the food sugars when cooking. Preheat the grill for 15 to 20 minutes or until it reaches the desired temperature before adding food. Close the lid during the preheat period.
- For searing, allow the controller to reach 500°F and then wait an additional 15 minutes for the cooking grates and ceramic insert to fully heat up.
WARNING
- DO NOT leave your grill unattended while in use.
- DO NOT move grill when in use. Lock wheels in place to stabilize grill.
- DO NOT use water to extinguish fl are-ups.
IF AN EXTENSION CORD IS NECESSARY:
- Use a CSA or UL approved 3-prong grounded extension cord that is rated for at least 7-10 Amp and is marked as suitable for outdoor use.
- Keep the power cord connection dry and off of the ground.
- Avoid running the power or extension cord across walkways, driveways, or anywhere where it could pose a tripping hazard.
TURNING ON THE GRILL:
Initial Lighting Instructions (To be used on initial fi ring or anytime the grill runs out of pellets)
Always allow the auger tube to fully load with pellets to ensure proper lighting of the grill.
Step 1 Open hood to cooking chamber and remove cooking grates, heat plates and heat baffle from inside the grill. Leave hood open.
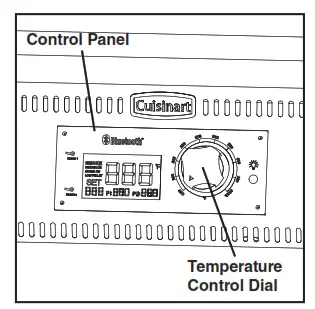
Step 2 Make sure temperature control knob is “OFF”. Plug power cord into a GFI (grounded) outdoor electrical outlet. When connecting, fi rst connect plug to the outdoor cooking gas appliance then plug appliance into the outlet; Use only a Ground Fault Interrupter (GFI) protected circuit with this outdoor cooking gas appliance; Never remove the grounding plug or use with an adapter of 2 prongs; and Use only extension cords with a 3 prong grounding plug, rated for the power of the equipment, and approved for outdoor use with a W-A marking.
Step 3 Open the pellet hopper lid. Make sure the auger is free from debris and other objects. Turn the temperature control knob to 200°F.
Step 4 In the cooking chamber, place your hand about 3” above the fi re pot and make sure you can feel air blowing out from the fire pot.
Step 5 Look inside the fi re pot and make sure the ignitor is getting hot. It will take a couple of minutes for the ignitor 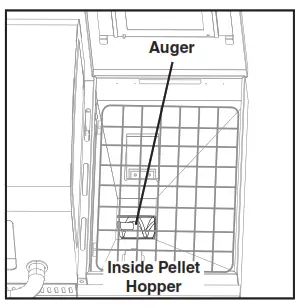 to glow red. DO NOT TOUCH THE IGNITOR! Turn temperature control knob to “OFF”.
Step 6 Fill the pellet hopper with cooking pellets. NEVER USE HEATING FUEL PELLETS AS THEY ARE NOT SAFE FOR COOKING.
Step 7 Turn the temperature control knob to 200°F.
NOTE: During the initial loading of the auger tube, it will take approximately 2 minutes for the pellets to movefrom the pellet hopper to the fi re pot
Step 8 When the pellets start falling into the fi re pot, turn the temperature control knob to “OFF”.
Step 9 Replace heat baffle, heat plates and cooking grates into the cooking chamber.
Step 10 Keep the cooking chamber lid open. Turn temperature control knob to 200°F. You should see smoke coming out of the cooking chamber as the pellets ignite in about 2 to 4 minutes.
NOTE: The ignitor will stay on for the fi rst 8 minutes and then turn off.
Step 11 Close cooking chamber lid and set the temperature control knob to the desired setting. See
note below for curing process.
NOTE: Curing the grill is highly recommended before fi rst use. Close cooking chamber lid and set temperature control knob to 400°F and allow grill to cure for 45 minutes. This will burn off any oil or paint residue inside the cooking chamber before cooking for the fi rst time.
SUBSEQUENT LIGHTING INSTRUCTIONS:
Step 1 Open pellet hopper lid and check the pellet level. Add more pellets if necessary.
WARNING: NEVER add cooking pellets to a hot fi re pot by hand. You could be seriously burned.
Step 2 Open cooking chamber lid and turn temperature control knob to 200°F. You should see smoke coming out of the cooking chamber as the pellets ignite in about 2 to 4 minutes.
NOTE: Always start the grill on 200°F. setting with the cooking chamber lid open. Step 3 Close cooking chamber lid and set the temperature control knob to the desired setting. For best results, preheat the grill for 15 to 20 minutes with the lid closed before placing food in the grill.
Follow these steps If the grill does not ignite or if the fi re in the fi re pot goes out while cooking:
Step 1 Turn the temperature control knob to “OFF” and unplug. Open cooking chamber lid and remove all food, cooking grates, grease tray and heat distribution plate.
CAUTION: Some parts may contain sharp edges. Wear protective gloves if necessary.
WARNING: Always use oven mitts/gloves to protect your hands. Metal parts become hot during use. Use extreme caution when handling cooking grates, grease tray and baffle.
Step 2 Open Ash Clean-out to remove all pellets and ash from the fi re pot. Close ash clean-out.
Step 3 Restart the grill and check that the ignitor is working. The ignitor should turn red after 2 minutes and pellets should be falling into the fi re pot from the auger tube.
Step 4 Wearing oven mitts/gloves, replace the baffle, grease tray and cooking grates.
Step 5 Preheat the grill for 10 to 15 minutes with the lid closed before placing food back in the grill. If this procedure is not successful, see Trouble Shooting section in your owner’s manual.
MANUAL START-UP PROCEDURE (To be used is Ignotor is not working properly):
Step 1 Ensure the control knob is in the “OFF” position. Plug the power cord into a grounded power source.
Step 2 Check fi re pot to ensure there is no obstruction for proper ignition. Fill pellet hopper with cooking grade pellets.
Step 3 Open the hood. Remove the cooking grates, heat plates, and heat baffle to expose the fi re pot. Place a small handful of pellets into the fi re pot. Squirt a gelled fi re starter, or other appropriate pellet starter, over the top of the pellets. A small amount of solid fuel fi re starter, such as those composed of sawdust and wax, or wood shavings, is also recommended. Add another small handful of pellets in the fi re pot.
NOTE: Do not use gasoline, lighter fl uid, kerosene, or petrol for lighting a fi re in your grill
Step 4 Light the contents of the fi re pot using a long match or a long lighter. Allow the starter to burn 3 to 5 minutes. Do not attempt to add more starter into the fi re pot as this can cause injury.
Step 5 Quickly and carefully replace the heat baffle, heat plates, and cooking grates. Continue on from step 2 of the “Subsequent Lighting Instructions.”
TURNING OFF THE GRILL:
- Turn the temperature control knob to “OFF”. An auto cool down feature will keep the fan running for 12 minutes. If you don’t allow the grill to run the cool down feature it can cause a fi re in the fi re pot and catch the pellet hopper on fi re.
- Unplug the power cord from the wall outlet.
WARNING: NEVER add cooking pellets to a hot fi re pot by hand. You could be seriously burned. If the hopper runs out of pellets or your fi re goes out while cooking, let the grill completely cool and follow the Initial Lighting Instructions.
COOKING:
- Set temperature controller to desired level and allow temperature to be reached.
- Place food on cooking grill.
- With hood closed, cook until desired internal temperature is reached.
- Use caution when removing food from Pellet Grill. All surfaces are HOT and may cause burns. Use protective gloves or long, sturdy cooking tools to remove food.
- This grill is HOT while in use and will remain HOT for a period of time afterwards. Use caution. • Pellet grills do not provide smoke 100% of the time. Even though you don’t see smoke you are still getting smoke flavor.
OPERATING TIPS:
- Your Pellet Grill should never be moved while it is hot. If you are transporting your grill in a vehicle after cooking on it, make sure the fi re is completely out and the grill is cold before placing it in any vehicle.
NEVER put water into the fi re pot. It will jam the auger and can damage the ignitor. - The Pellet Grill is designed to operate with the lid closed.
- Make sure the heat baffle is properly seated on its locating brackets. The opening of the heat baffle should be pointing left over the fi re pot. If not seated properly, direct heat and fl ame could come up out of the fi re pot and cause a grease fi re or grill damage.
- The temperature readout is an approximate and can be affected by the following factors: outside ambient temperature, the amount and direction of wind, the quality of pellet fuel being used, the lid being opened, and the quantity of food.
- When selecting a temperature setting, the auger will feed pellets for several minutes. This will momentarily raise the temperature, but the temperature will decrease and stabilize after 10-15 minutes.
- The auger will not run 100% of the time, it cycles on and off depending on the temperature setting.
- Hot weather can cause the temp to drop very slowly and make it more difficult to cook at lower settings.
- This grill is equipped with a pellet hopper sensor. “LOW PELLET” will start fl ashing on the controller and it will start beeping once the pellets are below the sensor.
- Pellets can hang up in the pellet hopper after cooking for a long period of time. It’s important to monitor the pellet level and mix the pellets by hand to ensure they fl ow into the auger.
GRILL INSERTS:
- Ceramic Sear Insert:
- Remove right side heat plate and replace with ceramic sear insert. Turn grill to “SEAR”.
- Wait approximately 20 minutes for the controller and cooking grates to get up to temperature before cooking.
- Wait until the sear insert is cool before trying to remove or clean the insert.
- The ceramic insert can be stored on the left side of the cart.
- Charcoal Insert:
- Remove right side heat plate and install charcoal insert.
- Place approximately 2lbs of charcoal in charcoal tray and spread evenly so there is only one level of
 charcoal
NOTE: DO NOT USE MATCHLIGHT CHARCOAL - Turn grill to “SEAR” and keep hood open. Charcoal should start turning white around 15-20 minutes. After charcoal is hot, turn the controller to “OFF” and start cooking.
- Wait until the charcoal insert is cool before trying to remove the insert or cleaning out the ashes.
- The charcoal insert can be stored on the left side of the cart.
- Griddle:
- Place Griddle on top of cooking grates with the grease reservoir toward the back of the grill. Push the Griddle to the back of the grill. It is best to locate the Griddle near the middle of the grill.
- Turn grill to the desired temperature and allow 15 to 20 minutes for griddle to get to desired temperature.
- Keeping the lid closed during cooking will help prevent grease splatter.
- Grease and food particles can be pushed back into the grease reservoir while cooking.
- Do not let the grease reservoir overfl ow. Stop cooking, allow griddle to cool and remove excess grease
- Wait until the Griddle is cool before trying to remove the Griddle or clean out the grease reservoir.
- The Griddle can be stored on the right side of the cart.
- Ash Clean-Out:
Before each use, open ash clean-out to get rid of ash and burnt pellets.
- Lift Ash Clean-Out Handle Lock
- Pull Ash Clean-Out Handle to open ash door.
Note: Make sure Ash Cup is in place before empting ash.
- Pellet Hopper Clean-Out:
If grill will be left un-attended for a long period of time, we recommend you remove unused pellets. Always store wood pellets away from heat and in a dry location.
1. Lift Clean-Out Handle Lock
2. Open Hopper Clean-Out door.
Note: Make sure to hold a pail or bag in place before emptying pellets. - Meat Probes:
Plug the meat probes into the pellet control panel as shown. You can read the temperature of
Probe 1 and Probe 2 at the bottom of the display screen.
Example: “P1:86” — means Probe 1’s temperature is 86 degrees Fahrenheit.
Example: “P2:__” — Displays nothing when the meat probe is not inserted into controller.
• Bluetooth App:
- Your grill is Bluetooth capable.
- This Bluetooth app allows you to monitor the internal grill temperature as well as two meat probe temperatures.
- The Bluetooth range is around 120 ft and can vary with obstructions such as interior and exterior walls.


COOK MODE:
- The temperature dial can be changed at any time to increase or decrease the cooking temperature of the grill.
- The 200°F to 300°F temperature settings are for slow cooking/smoking.
- The 325°F to 450°F temperature settings are for grilling.
- The “SEAR” temperature setting is for searing.
- Adjust the control knob to a desired temperature. The selected temperature will be in the bottom left hand corner of the digital display.
ERROR CODES:
- “ErP” – Error Power will occur when grill is plugged into power outlet and the temperature control knob is not in “OFF” position. It will also appear if power is lost during cooking.
 “ErH” – High Temp Limit indicates that the temperature in the cooking chamber has exceeded 775°F.
 “ErL” – Low Temp Limit indicates that the temperature in the cooking chamber is below 160°F.
 “Err” – Thermocouple may be unhooked or damaged.
 “Er1” – The temperature measured by the on-board temperature sensor of the main control board has exceeded maximum working temperature (158°F)
 “LOW PELLET” –
- Always ON: Low on pellets.
- Flash once a second: Sensor maybe unhooked or damaged.
- OFF: Normal operation.
 “IGNITOR ON” –
- Start up
- The temperature is below 120*F in the cooking chamber.
When falling the temperature is less than 15% of the set temperature.

PROPER CARE & MAINTENANCE:
- Remove wood pellets from hopper if grill will not be used for a long period of time. Wood pellets can become soggy due to moisture/humidity and can cause the auger to bind up or not push pellets to burn chamber.
- Disposal of ashes – Ashes should be placed in a metal container with a tight-fi tting lid. The closed container of ashes should be placed on a non-ombustible fl oor or on the ground, well away from all combustible materials, pending fi nal disposal. When the ashes are disposed by burial in soil or otherwise locally dispersed, they should be retained in the closed container until all cinders have thoroughly cooled.
- It’s important to keep your grill always covered when not in use to avoid rain getting inside the grill and damaging the grill and/or cause excessive corrosion. The grill and pellets must be kept dry in order to function properly.
- Wash cooking grates and heat distribution plate with hot, soapy water, rinse well and dry. Lightly coat cooking grill with vegetable oil or vegetable oil spray.
- Clean inside and outside of grill by wiping off with a damp cloth. Apply a light coat of vegetable oil or vegetable oil spray to the interior surface to prevent rusting.
- Never apply paint to the interior surface. Rust spots on the interior surface can be buffed, cleaned, the lightly coated with vegetable oil or vegetable oil spray to minimize rusting.
- Depending on use, periodically remove the cooking grates, grease tray and heat distribution plate to clean the ash from in and around the fi re pot. Make sure the grill is cold before starting this procedure.
HELPFUL HINTS:
- If you pre-cook meat or poultry, do so immediately before grilling.
- Never defrost meat at room temperature or on a counter top.
- Refrigerate leftovers within 2 hours of taking food off the grill.
- For additional information, please phone the USDA’s toll free Meat & Poultry Hotline at 800-535-4555.
CLEANING AND MAINTENANCE:
- Keep the appliance free and clear of combustible materials, gasoline and other fl ammable vapors and liquids.
- For safe grilling and peak performance of your grill, perform these checks at least twice per year or after extended periods of storage.
- Be sure to tighten up all hardware (nuts, bolts, screws, etc.) at least twice per year.
CAUTION: Some parts may contain sharp edges. Wear protective gloves if necessary. - Remove the cooking grates, from inside your grill. Use a brush with hot water and detergent to remove excess residue. NEVER use a commercial oven cleaner. Rinse completely with water. Towel dry and replace all components as described in the assembly instructions.
TRANSPORTING AND STORAGE
WARNING
- Never move a grill when it is hot or when objects are on the cooking surfaces.
- Never store fl ammable liquids or spray canisters under or near the grill.
- DO NOT extinguish grease fi res using water.
BEFORE STORING YOUR GRILL:
- Clean all surfaces.
- If storing the grill outdoors, close the wood pellet lid and cover the grill with a cover for protection from the weather.
- If the grill is stored outside during the rainy season, care should be taken to ensure that water does not get into the pellet hopper. Wood pellets, when wet, expand greatly and will jam your auger.
GRILL COOKING TIPS:
CLEANLINESS:
- Always wash hands thoroughly with soap and hot water prior to handling food and after handling raw meat, uncooked poultry or seafood.
- When using a platter to carry raw meat, uncooked poultry or seafood to the grill, make sure to wash the platter thoroughly with soap and hot water before placing cooked foods back on the platter or use different platters for raw and cooked foods.
- Never use the same utensils when handling raw meat, uncooked poultry or seafood unless you wash the utensils thoroughly with soap and hot water.
- Never re-use marinade from raw meat or uncooked poultry on foods that have been cooked and are ready to be served.
GRILLING TO PROPER TEMPERATURE:
- Use a meat thermometer to be sure food has reached a safe internal temperature.
- The US Department of Agriculture recommends the minimum temperature be reached for the following food items:
Chops . . . . . . . . . . . . . . . . . . . . . 145 degrees F (62.8° C)
Ground Meat . . . . . . . . . . . . . . . 160 degrees F (71° C)
Pork . . . . . . . . . . . . . . . . . . . . . . 145 degrees F (62.8° C)
Poultry . . . . . . . . . . . . . . . . . . . . 165 degrees F (73.9° C)
Roasts . . . . . . . . . . . . . . . . . . . . 145 degrees F (62.8° C)
Seafood . . . . . . . . . . . . . . . . . . . 145 degrees F (62.8° C)
Vegetables . . . . . . . . . . . . . . . . . 145 degrees F (62.8° C)
TROUBLE SHOOTING:

For more information, please visit us at www.cuisinart.com
WIRING DIAGRAM:
IC: 25523-0356
FCC ID: 2AURUJINHENG
The device complies with part 15 of the FCC Rules.
Operation is subject to the following two conditions:
- This device may not cause harmful interference, and
- this device must accept any interference received, including interference that may cause any undesired operation.
FCC Warning
Warning: Changes or modifi cations to this smoker not expressly approved by the party responsible for compliance could void the user’s authority to operate the equipment.
FCC Statement
This equipment has been tested and found to comply with the limits for a Class B digital device, pursuant to Part 15 of the FCC Rules. These limits are designed to provide reasonable protection against harmful interference in a residential installation. This equipment generates, uses and can radiate radio frequency energy and, if not installed and used in accordance with the instructions, may cause harmful interference to radio communications.
However, there is no guarantee that interference will not occur in a particular installation. If this equipment does cause harmful interference to radio or television reception, which can be determined by turning the equipment off and on, the user is encouraged to try to correct the interference by one of the following measures:
- Reorient or relocate the receiving antenna.
- Increase the separation between the equipment and receiver.
- Connect the equipment into an outlet on a circuit different from that to which the receiver is connected.
- Consult the dealer or an experienced radio/TV technician for help.The Bluetooth word mark and logos are registered trademarks owned by Bluetooth SIG, Inc. and any use of such marks by the Jordan Kahn Co., Inc. is under license. Other trademarks and trade names are those of their respective owners.
WARRANTY
PROOF OF PURCHASE is required to access this warranty program, which is in eff ect from the date of purchase. Customers will be subject to parts, shipping, and handling fees if unable to provide proof of the purchase or after the warranty has expired.
If you have any questions or problems, you can call our customer service department at 1-866-212-3150 from 9:00am to 5:00pm Eastern time, Monday through Friday for assistance.
This limited warranty applies to the functionality of the product ONLY and does not cover cosmetic issues such as scratches, dents, corrosion or discoloring by heat, abrasive and chemical cleaners or any tools used in the assembly or installation of the appliance, surface rust, or the discoloration of stainless steel surfaces. Paint is not warranted and will require touch up. RUST is not considered a manufacturing or materials defect.
This limited warranty will not reimburse you for the cost of any inconvenience, food, personal injury or property damage.
LIMITED WARRANTY
All parts warrantied 3-years from date of purchase.
WARRANTY PROVISIONS
This warranty is non-transferable and does not cover failures due to misuse of improper installation or maintenance.
This warranty is for replacement of defective parts only, We are not responsible for incidental or consequential damages or labor costs.
This warranty does not cover corrosion or discoloration after the grill is used, or lack of maintenance, hostile environments, accidents, alterations, abuse or neglect.
This warranty does not cover damage caused by heat, abrasive and chemical cleaners, or any damage to other components used in the installation or operation of the gas grill.
Paint is not warranted and may require touch-up. Items considered to be consumable such as batteries are not covered under this warranty.
DISCLAIMER OF IMPLIED WARRANTIES; LIMITATION OF REMEDIES
Repair of replacement of defective parts is your exclusive remedy under the terms of this limited warranty. Manufacturer will not be responsible for any consequential or incidental damages caused by weather. This limited warranty or any applicable implied warranty, or for failure of damage resulting from acts of God, improper care and maintenance, grease fi re, accident, alteration, replacement of parts by anyone other than manufacturer, misuse, transportation, commercial use, hostile environments (inclement weather, act of nature, animal tampering), improper installation not in accordance with local codes or printed manufacturer instructions.
For replacement parts, call our customer service department at 1-866-212-3150 from 9:00am to 5:00pm Eastern time, Monday through Friday for assistance.
OM0036AS/ASO
1019
©2019 The Boltz Group LLC
Carrollton, Texas 75006 U.S.A.
Owner’s Manual for Models
SMK0036AS / SMK0036ASO

Cuisinart-CRC-800-Rice-CookerLOGO
INTRODUCTION
Cooking rice and steaming food has never been easier. All you have to do is fill the cooking bowl or steaming tray, and press the switch! When the cooking cycle is complete, the temperature is automatically reduced to keep food warm until you’re ready to eat. As always, cleanup is quick, because all removable parts are dishwasher-safe.
PARTS AND FEATURES
- Glass Lid with Steam Vent: See-through glass lid allows you to view the rice while the steam vent helps to prevent splattering. Stainless steel rim accents complement any kitchen decor.
- Steaming Tray: This allows you to steam a variety of foods while the rice is cooking.|
- Cooking Bowl: Nonstick coating prevents the rice from sticking to the bowl.
- Stainless Steel Housing: Durable stainless steel construction makes cleanup easy.
- Chrome-plated Handles: Cool-touch handles.
- “Cook” and “Warm” Indicator Switch: LED lights on top of the switch to indicate that the unit is in Cook or Warm mode.
- Measuring Cup: Calibrated specifically for your Cuisinart® Rice Cooker/Steamer; allows you to measure the proper rice to water proportions with ease.
- Rice Paddle: This allows you to fluff and scoop the rice out of the cooking bowl.
- Retractable Cord Storage (not shown): Convenient retractable cord storage.
- BPA-Free (not shown):
All parts that come in contact with food are BPA-Free.
IMPORTANT GUIDELINES
- This appliance generates steam. Do not operate it without the lid in place.
- Do not use your Rice Cooker/Steamer under hanging wall cabinets; the escaping steam could cause damage.
- Do not use metal utensils. Metal utensils will damage the nonstick finish on inner cooking bowl.
- Add rice and water before plugging in the cooker. Because the Rice Cooker/Steamer does not have an Off setting, the unit will automatically be in Warm mode immediately after the unit is plugged in.
TIPS AND HINTS
- The Cuisinart® Rice Cooker/Steamer is a perfect appliance for a busy lifestyle and limited space. It will cook rice and grains perfectly with minimal fuss, taking up little counter space and leaving all your burners free for other tasks. Cleaning up the nonstick bowl is quick and easy and there is virtually no maintenance.
- Your rice cooker can be used for more than just rice. It is a simple way to cook pilafs. Simply turn unit on and walk away — it will automatically switch to Warm when ready to serve.
- You can use your rice cooker to cook a combi-nation of rice, grains and legumes at the same time. Follow our recipes for ideas and suggested amounts to use — let your imagination be
your guide. - Rinsing/washing rice: Generally the rule is to wash or rinse imported rice and not to wash or rinse domestic (grown in U.S.) rice, as it has been enriched with vitamins. To wash rice: place in a medium bowl and cover with water, swirl until the water appears chalky/cloudy, and drain in a fine mesh strainer. Repeat until water is clear (or nearly clear) when rice is covered and swirled. Rice aficionados will even wash domestic rice, as it removes the starches and reduces sticki-ness. If you follow a well-balanced diet, then the loss of these vitamins will not be detrimental. Do not wash your rice in the rice cooker bowl – if the outside of the bowl is wet when cooking, it may cause damage to your rice cooker.
- Some varieties of rice may call for a soaking period. This can be done in the rice cooker bowl prior to cooking.
- When cooking rice, boil it until it has absorbed all the liquid. At this time it is not quite done. Rice benefits from a “boil-steam” method of cooking. Allow your rice to rest on the Warm setting for 5 to 10 minutes before serving for best results. Do not remove the cover and peek.
- After rice rests for 5 to 10 minutes, open rice cooker cover and stir rice gently with rice paddle or a wooden spoon. If rice is not ready to serve, re-cover and let stand on Warm until ready.
- The rice cooker will switch to the Warm cycle when it has finished cooking. At this time, you may stir in chopped raw vegetables such as green onions, slivered snow peas, shredded car-rots, or even grape tomatoes to add texture to the dish – they will warm while the rice is resting, and if served in 5 to 10 minutes will retain their unique texture.
- The rice cooker can be used to prepare com-mercially packaged pilafs, rice and grain mixes. Some packages will come with generic rice cooker instructions, or they may be found on the websites of the manufacturers. If the package has a sautéing step, do it right in the rice cooker bowl. Turn on, add specified amount of butter or oil, add rice/vegetables/meat and sauté accord-ing to package instructions, with the lid on. Add liquid and continue to cook. If the rice is too wet, allow it to remain on Warm for 15 to 20 minutes before serving. If it is too chewy, add up to ¼ cup more liquid and let stay on Warm until liquid is absorbed (about 15 to 20 minutes).
- When measuring rice with your rice cooker cup, level it off with a table knife or spatula as you would flour for baking.
- If desired, you may spray your rice cooking bowl with nonstick cooking spray, but this step is not necessary, as it has a nonstick coating.
- When rice is placed in the cooking bowl, level it off to a flat layer that covers the entire bottom of the bowl, to ensure that it cooks evenly.
- The water you use for cooking rice should be the same water that you drink. If you do not like the taste of your tap water, use bottled or filtered water. The taste of the water will affect the taste of the rice.
- For best results, use cold water. Cooking times will vary depending on the temperature of the water being used.
- Liquids other than water may be used to cook rice. Use low-fat, low-sodium meat or vegetable stocks/broths. Fish stock or clam broth may be used for seafood-flavored rice.
- One to two teaspoons of unsalted butter, olive, vegetable or nut oil will help keep grains of rice separate and prevent boiling over.
- If your recipe calls for salt, add and swirl in with the rice paddle or a wooden spoon after adding liquid — then level the rice as evenly as possible.
- The rice cooker can be used to steam vegeta-bles, seafood and some meats while cooking the rice. Use our recipes as a guide, then create your own combinations.
- When steaming vegetables, clean them and trim to similar size. Follow Steaming Guide (page
- 7) for steaming vegetables alone. To steam veg-etables while preparing rice, use steaming guide to time when to add vegetables to steaming tray. Most vegetables can be added about 10 minutes before rice has finished cooking.
- When steaming meats such as poultry or sau-sage, cut all into small, similar sized pieces (such as “finger strips” or 1-inch slices). Arrange in a single layer in the steaming tray, which has been sprayed with cooking spray.
- When steaming shrimp, scallops and other sea-food, arrange in a single layer in the steaming tray, which has been sprayed with cooking spray.
- When using your rice cooker, plug it in and arrange it on the counter away from the wall and not under hanging cabinets, to prevent steam damage.
- The steam vent in the cover should always be placed facing the back of the rice cooker. Lift the lid from the back to the front to prevent steam burns.
- One cup of uncooked rice makes approximately three cups of cooked rice.
- 1 rice cooker cup (filled to the top) = ¾ cup = 12 tablespoons
ASSEMBLY INSTRUCTIONS
To use your Cuisinart® Rice Cooker/Steamer:
- Carefully unpack the cooker.
- Rinse the nonstick cooking bowl, steaming tray and lid in warm, soapy water. Rinse well and dry thoroughly.
- Wipe all interior and exterior surfaces of the rice cooker base with a soft, damp cloth.
- Place cooking bowl in base of unit.
- Place steaming tray in cooking bowl with open part facing down.
- Place the lid on top of the cooking bowl.
- Do not plug in unit. Your rice cooker is now ready for use.
OPERATION
Cooking Rice
- Make sure your Cuisinart® Rice Cooker/Steamer is unplugged.
- Place cooking pot in the stainless steel housing.
- Measure desired amount of raw rice with the measuring cup provided. Rinse rice if needed. See Guide for Cooking Rice (page 6) for rice-to-water ratios.
- Choose one of the following ways to add water or stock for cooking:
- Measure the appropriate amount of water using standard liquid measuring cup. See Guide for Cooking Rice.
- Using the water line inside the cooking pot, add water to the rice inside the bowl up to the proper water line. For example, if you added 2 cups of raw rice, add water to line 2 (white rice only).
- Cover the cooking bowl with lid. Make sure the steam vent is facing toward the back of the unit.
- Plug in unit.
- Set to the cook position by pressing the switch down. The Cook LED light will be illuminated.
- Rice cooker will heat and cook the rice. Cooking time will vary, depending on the amount and type of rice or grain being cooked.
- Once the rice is cooked, the unit will automati-cally switch to the Warm setting and the Warm LED will be illuminated. The unit will stay in Warm mode until the unit is unplugged from the outlet.
- For best texture, allow cooked rice to rest in Warm mode for 5 to 10 minutes.
- Once you are ready to serve the rice, lift the lid away from you.
- Fluff rice with paddle or utensil suitable for nonstick cookware.
- Lift and remove cooking bowl from rice cooker using potholders.
Cooking Rice and Steaming
- Clean and prepare your vegetables, seafood, fish or poultry.
- Follow steps 1 to 8 under the Cooking Rice section (page 4).
- Fill the steaming tray with open end facing up.
- Place the filled steaming tray on top of the cooking bowl at the appropriate time for food being steamed. See Steaming Guide (page 7), for approximate cooking times.
- Place lid on top of the steaming tray.
- When the appropriate cooking time has elapsed, unplug the unit.
Steaming Only
- Make sure unit is unplugged.
- Fill cooking bowl with the suggested amount of water based on the Steaming Guide.
- Fill the steaming tray with open end facing up.
- Place the filled steaming tray on top of the cooking bowl.
- Place lid on top of the steaming tray.
- When water is completely evaporated, the unit will automatically switch to the Warm setting and the Warm LED will be illuminated. The unit will stay in Warm mode until the unit is unplugged from the outlet. Do not allow bowl to boil dry.
- For best results, unplug unit immediately after the unit switches to Warm, to prevent over-cooking.
Reheating Rice
- Make sure unit is unplugged.
- To reheat rice, add ¼ cup (4 tablespoons) of cold water per cup of cooked rice.
- Stir to mix.
- Place lid on top of the cooking bowl.
- Plug in unit and set to the cook position by pressing the switch down. The Cook LED light will be illuminated.
- Once the rice is cooked, the unit will automati-cally switch to the Warm setting and the Warm LED will be illuminated. The unit will stay in Warm mode until the unit is unplugged from the outlet.
CLEANING, CARE AND MAINTENANCE
- Unplug your Cuisinart® Rice Cooker/Steamer and allow it to cool before cleaning.
- Place cooking bowl, steaming tray and lid in the dishwasher or wash with warm, soapy water. If food sticks to the surface, fill with warm, soapy water and allow to soak before cleaning.
- If scouring is necessary, use a nonabrasive cleanser or liquid detergent with a nylon pad or brush.
- Wipe base of unit with a soft, damp cloth or microfiber towel. NEVER IMMERSE BASE OF UNIT IN WATER.
- Make sure all parts are cool before storing. Store unit in a clean, dry place.
- Any other servicing should be performed by an authorized service representative.
Cuisinart GR-6S Smoke-Less Contact Griddler
- Remove all packing materials and any promotional labels or stickers from your grill. 1. Confirm all parts of your new appliance have been included.
- Remove any dust from the unit by wiping the base, cover and control panel with a damp cloth. Thoroughly clean cooking plates, drip tray and cleaning/scraping tool (they are dishwasher safe).
Setup and Operation
- Place Griddler® on a clean, flat surface where you intend to cook.
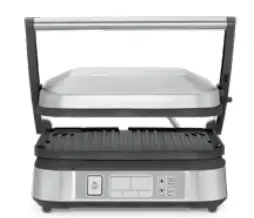
- To Position Drip Tray: Slide the drip tray into the base according to the instructions on the tray.
 Setup Instructions Continue Inside
Setup and Operation - To Insert Cooking Plates: Adjust to the flat position by lifting the hinge release lever. Slide the plate underneath the metal brackets of the housing and push down the front end of the plate. If you require only one plate for cooking, we recommend using the bottom plate. Plug the unit into an outlet.
- Select Cooking Function: Press
 to choose your function: Grill / Griddle or . Smoke-less Mode. To confirm your cooking function, press
- Cooking in Grill / Griddle Mode:
Set Temperature – Press the Confirm button to select the plate(s) you wish to set the temperature for. Once the plate(s) have been confirmed, the word LOWER and/or UPPER will go solid, and the associated temperature will start flashing.To set temperature of either the upper or lower plate, press the up button to increase temperature or the down button to decrease temperature. Set Timer – After your Smoke-less Contact Griddler® has reached the set temperature, the timer will appear in the LCD, flashing 00:00. To select your cook time to count down, press the button (increase time) or the button (decrease time).
Add food to the Smoke-less Contact Griddler®, then press the Confirm button to start the timer. - Cooking in Smoke-less Mode: To cook in Smoke-less mode, there are two actions that need to be performed to the unit, depending upon what position you are cooking in this mode:
- Create the lower plate / base angle by pulling out the front foot extension
- Create upper plate / cover angle by adjusting the hinge
- Food selection:
After you have confirmed SMOKE-LESS MODE, the words LOWER and UPPER will flash in sequence. At this point, you have three options: Set the lower plate, set the upper plate or set both plates to be the same food group. Press Confirm to select the plate(s) you wish to set the food group for. Once the plate(s) have been confirmed, the word LOWER and/or UPPER will go solid and the associated food group will start flashing. Press the confirm button to select your desired food group. Follow these steps to set the food group for the other plate. With the confirmed food group(s) flashing, your Smoke-less
Contact Griddler® will begin to preheat.
Once set plate(s) are preheated, the unit will beep 3 times. The boxes associated with the selected food group(s) will become solid and the word(s) PREHEAT will disappear.
Cooking Options
- CONTACT GRILL: Cook burgers, boneless meats and vegetables by resting the top cover on top of the food until it has reached the desired cooking temperature.
- PANINI PRESS: Grill sandwiches, breads and quesadillas by resting the top cover on top of the food, pressing, and heating to your liking.
- FULL GRILL: Cook burgers, steak, poultry, fish and vegetables in the open, flat position.
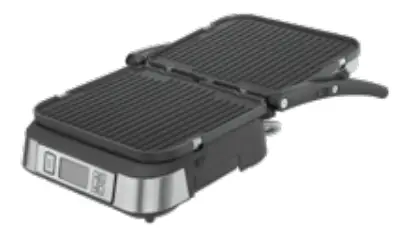
- FULL GRIDDLE: Cook pancakes, eggs, hash browns and breakfast meats in the open, flat position.
- HALF GRILL / HALF GRIDDLE: Cook full meals like bacon & eggs and steak & potatoes at the same time in the open, flat position.
- DuoControl™ Heating Advantage: Provides independent temperature control for each plate, so you can program the top and bottom plates to reach different temperatures in order to cook different foods at the same time.
- Smoke-less Mode: Smoke-less mode can be used with any of the previous five cooking options. Smoke-less mode offers precise temperature control based on the foods being cooked, and limits the amount of smoke generated by reducing the amount of fats that are burned with certain foods.
Cleaning and Care
CAUTION: Before cleaning appliance, make sure it has cooled down completely (for 30 minutes).
- Press the ON/OFF button to turn the grill off, and unplug the power cord from the 1. wall outlet.
- Use the cleaning/scraping tool to remove any leftover food from the cooking plate. Do not use metallic objects (such as knives or forks) or a scouring pad for cleaning.

- Dispose of grease from the drip tray once cooled.
- To Remove Cooking Plates: With unit in the flat position, press the plate release buttons on the right side of the housing, and slide the plates out from under the metal brackets.
- The cooking plates, drip tray, and cleaning/scraping tool can all be cleaned in the dishwasher or by hand.
- The housing base, cover and control panel, can be wiped clean with a soft, dry cloth.
IMPORTANT
Do not throw away. Read before operating your new Griddler®. Keep for future reference. These helpful hints are intended to be a supplement to the Instruction Booklet. In order to ensure safe operation and optimum performance, please read the entire Instruction Booklet.
Cuisinart Electronic Yogurt Maker with Automatic Cooling Instruction and Recipe Booklet
CYM-100
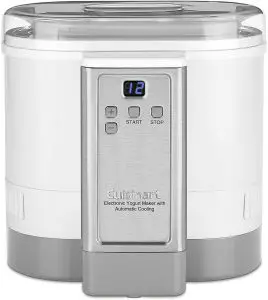
For your safety and continued enjoyment of this product, always read the instruction book carefully before using.
IMPORTANT SAFEGUARDS
When using an electrical appliance, basic safety precautions should always be adhered to, including the following:
- READ ALL INSTRUCTIONS.
- Always unplug unit from outlet when not in use, before putting on or taking off parts and before cleaning. To unplug, grasp plug and pull from electrical outlet. Never pull cord. Allow to cool before handling.
- To protect against risk of electric shock, do not put motor base in water or other liquids.
- Close supervision is necessary when any appliance is used by or near children.
- Do not operate any appliance with a damaged cord or plug, after the appliance malfunctions, or if appliance has been dropped or damaged in any manner. Return the appliance to the nearest authorized Cuisinart Service Facility for examination, repair, and electrical or mechanical adjustment.
- The use of attachments not recommended or sold by Cuisinart may cause fire, electric shock or injury.
- Do not let cord hang over edge of table or counter, or touch hot surfaces.
- Do not plug in or take out plug when your hands are wet.
- Do not use outdoors.
- Do not touch hot surfaces. Use handles or knobs.
- Do not operate your appliance in an appliance garage or under a wall cabinet. When storing in an appliance garage always unplug the unit from the electrical outlet. Not doing so could create a risk of fire, especially if the appliance touches the walls of the garage or the door touches the unit as it closes.
- Do not use the appliance for other than intended use.
- Where applicable, always attach plug to appliance and check that the control is off before plugging cord into wall outlet. To disconnect, turn the control to OFF, then remove plug from wall outlet.
- Do not place on or near a hot gas or electric burner, or in a heated oven.
SAVE THESE INSTRUCTIONS
FOR HOUSEHOLD USE ONLY
SPECIAL CORD SET INSTRUCTIONS
A short power supply cord is provided to reduce the risks of becoming entangled in or tripping over a longer cord. Extension cords may be used if care is exercised.
If an extension cord is used, the marked electrical rating of the extension cord should be at least as great as the electrical rating of the appliance. The longer cord should be arranged so that it will not drape over the countertop or tabletop, where it can be pulled on by children or tripped over unintentionally.
NOTICE
This appliance has a polarized plug (one prong is wider than the other). As a safety feature, this plug will fit into a polarized outlet only one way. If the plug does not fit fully in the outlet, reverse the plug. If it still does not fit, contact a qualified electrician. Do not attempt to defeat this safety feature.
PARTS AND ACCESSORIES
 Scoop
Scoop- Housing Lid
- Yogurt Container Lid
- Yogurt Container
- Control Panel with LED display
- Detachable Cord
- Housing
BEFORE THE FIRST USE
Carefully unpack the unit and remove any packaging and promotional labels in or on the yogurt maker. Rinse all accessories thoroughly in warm soapy water, then dry completely
INTRODUCTION
The Cuisinart Electronic Yogurt Maker takes the guesswork out of making yogurt at home. Simply mix together ingredients and pour into the yogurt container, letting the yogurt maker do the rest. You will love the ready-to-eat chilled results.
Homemade yogurt is a healthy and more economical option to store-bought yogurt. Not only a great source of protein and calcium, yogurt also contains probiotics, or good bacteria, that are crucial for a healthy digestive system.
Either plain or flavored, yogurt is the perfect anytime food to enjoy alone, with granola or in your morning smoothie. Yogurt is also a great ingredient to have on hand in the kitchen for delicious and moist baked goods, as a secret ingredient to marinades for meat and poultry, and also the perfect vehicle for soups and sauces.
OPERATION
- Put all of the ingredients in the yogurt container and then cover it with the yogurt container lid.
- Place the filled container into the housing and cover with the housing lid.
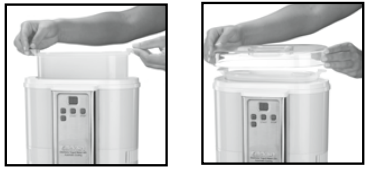
- Plug the unit in and the default* fermentation time will begin flashing on the screen. To change the fermentation time (1–24 hours) use the “+” and “-” buttons, then press the START button.
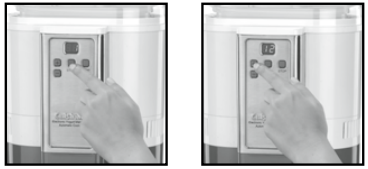 * 8 hours is the default starting point, but refer to recipes for more specific guidelines.
Note: In the case that the yogurt maker is accidentally turned off during the cooling process, it is possible to skip fermentation and proceed directly to cooling mode. To do so, scroll down past 1 hour and the LED will display “C”. Once Start is pressed, the cooling mode will begin.
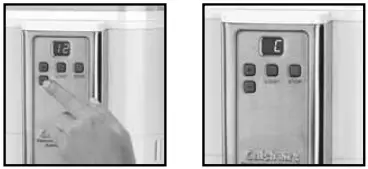
- Once desired fermentation time is flashing on the LED display, press the Start button. At this point the fermentation numbers on the LED will become solid and fermentation countdown will begin.
NOTE: To change the fermentation time during operation, press the StOP button. The fermentation time will begin flashing again and you can adjust the time using the “+” and “-” buttons. Once adjusted time is shown flashing on the screen, press the Start button again and the unit will adjust the time accordingly.
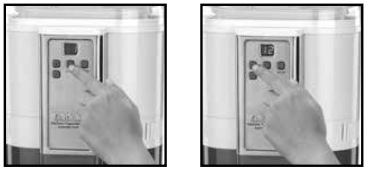
- After the fermentation is complete, the unit will automatically switch into cooling mode and display “C” in the LED. As long as the unit is plugged in, it will stay in cooling mode until you turn the unit off. After 8–12 hours the temperature of the yogurt will be between 43 and 52 degrees Fahrenheit (6–11 degrees Celsius).
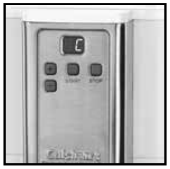 Note: Yogurt will be at its best and should be eaten within the first three days after completion. Yogurt can be kept for up to 8 days.
 - To turn the unit off or end the cooling cycle, press and hold the Stop button for 3 seconds.
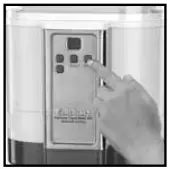
- Once the unit is off, you can either remove the yogurt container and place it directly in the refrigerator, or use the yogurt scoop provided and divide yogurt into individual portions.
TIPS AND HINTS
Cultures and Fermentation
The taste, texture and consistency of your yogurt will depend on the type of culture that is used. Each type of culture contains different bacteria strains with individual properties that affect the tang and taste of the yogurt as well as its texture. Some yogurts are meant to be thin and runny where others are meant to be thick.
Yogurt can be fermented from a purchased culture or from yogurt that is either store bought or homemade with a reusable culture.
Use only one type of culture per batch of yogurt. Mixing cultures may force different bacteria that are not meant to coexist to compete with one another instead of properly fermenting.
Fermenting times vary depending on the type of culture used. There are two types of yogurt cultures – direct-set and reusable. These two types of cultures also vary depending on yogurt flavor – Bulgarian, Piima, Greek, etc.
Direct set cultures can be used only once and take less time to ferment, about 8–12 hours.
Reusable cultures take longer the first time used, up to 16 hours. When used again as a culturing agent, the fermentation time will be shorter, about 6–8 hours.
The Cuisinart® Electronic Yogurt Maker uses thermophilic culture. Thermophilic (heat-loving) culture needs an elevated temperature to ferment as opposed to mesophilic culture, which is best suited to ferment at room temperature. If you are unaware of what type of culture you have, check the ingredient list of the culture or ask your supplier.
When fermenting with store-bought yogurt, the average fermentation time is 6 hours.
The fermenting time can always be increased or decreased while yogurt maker is in operation.
Heating and Consistency
Different cultures yield different results, with some producing thinner yogurts than others. If after making a batch of yogurt thicker results are desired, we recommend following the step for heating the milk below before adding the yogurt base to the yogurt maker.
Heating the milk breaks down its proteins, allowing yogurt to coagulate, facilitating the thickening process during fermentation.
Heat milk on the stove to 180°F (some cultures recommend only 160°F, so follow the instructions per the particular culture).
For best results (but not essential), keep milk at this temperature for about 20 minutes.
Cool milk until a thermometer reads 110°F. Once cooled to 110°F, stir in culture and any other thickening agent into the milk so that it is fully incorporated. Transfer mixture to the yogurt maker and set the appropriate fermentation time.
If following the recommended step, subtract one to two hours from the fermentation time.
Adding dry milk powders to a culture-based yogurt will add to the thickness in the final product. For every 4 cups of milk add ¼ to ½ cup powdered milk when using cow’s milk, and ½ to 1 cup milk powder to the base when using goat’s milk.
Other thickeners can also be used to thicken yogurt. Always make a slurry with the thickener and a small amount of the milk before mixing into the entire batch.
Approximate amounts for 4 cups milk:
Tapioca starch – 2 tablespoons
Agar-agar powder– ½ teaspoon (dissolve into ½ cup water, bring to a boil and then cool before adding to mixture)
Cornstarch – 2 tablespoons
Powdered gelatin – 1 teaspoon
Finished Yogurt and Taste
We recommend checking consistency of yogurt during the fermentation process to avoid over-culturing. Begin checking yogurt on the earlier side of the recommended time range.
Yogurt should have some body and be slightly firm when fully fermented.
Always stir yogurt before serving.
Yogurt starts to over-culture when whey begins to separate. Yogurt is over-cultured when curds and whey have completely separated.
More time can always be added to under-cultured yogurt, even if it has been through the cooling cycle. However, once over-cultured, yogurt is no longer edible.
Longer fermentation times will produce a tangier yogurt, but also aid in thickening.
Strain yogurt overnight using a strainer lined with a coffee filter, for an ultra-rich and thick treat.
Do not consume any yogurt that smells, looks or tastes displeasing.
We recommend using whole milk for making yogurt, and avoiding ultra-pasteurized milk. Fuller-fat milks produce thicker yogurts.
When adding a flavor to yogurt, we recommend waiting until 6 hours after the cooling process has begun. Flavors can also be added to individual portions as needed instead of to the entire batch.
Certain flavors may shorten the shelf life of yogurt. Fruit mix-in flavors last longer and are better added to the entire batch, while sweeter syrups are best added to individual portions.
TROUBLESHOOTING
Q: Why is the consistency of my yogurt so thin?
A: To thicken the consistency of your yogurt you can heat the milk first on a stove or add a thickening agent like dry milk or gelatin. See the Tips and Hints section for more information.
A: Fermentation may not have been long enough.
A: Culture was damaged.
Q: Why did my yogurt curdle?
A: Yogurt has been over-fermented. Reduce fermentation time and begin checking yogurt on the earlier side of the recommended time range.
A: Culture was damaged.
CLEANING AND MAINTENANCE
Always make sure the appliance is unplugged before you start cleaning it.
Cleaning Accessories and Housing/Base:
Rinse the yogurt container, yogurt container lid and housing lid immediately after each use so food doesn’t dry on them. All can be washed with warm soapy water or on the top rack of the dishwasher.
Wipe the housing/base clean with a damp sponge or cloth. Dry it immediately. Never submerge the base or the plug in water or other liquids.
Storage
The Cuisinart Electronic Yogurt Maker stores neatly on the countertop in a minimum of space. When it is not in use, store the unit assembled to prevent loss of parts.
The Cuisinart Electronic Yogurt Maker is intended for HOUSEHOLD USE ONLY. Any service other than cleaning and normal user maintenance should be performed by an authorized Cuisinart Service Representative.

Cuisinart offers an extensive assortment of top quality products to make life in the kitchen easier than ever. Try some of our other countertop appliances, cookware, tools and gadgets.
]]>![]()
INSTRUCTION BOOKLET
Mix It In™ Soft Serve Ice Cream Maker [ICE-45]
For your safety and continued enjoyment of this product, always read the instruction book carefully before using.
U IB-6405
IMPORTANT SAFEGUARDS
When using an electrical appliance, basic safety precautions should always be followed to reduce the risk of fire, electric shock, and/or injury, including the following:
- READ ALL INSTRUCTIONS BEFORE USING.
- To protect against risk of electric shock, do not place cord, plug, or base of appliance in water or any other liquid.
- Close supervision is necessary when any appliance is used by or near children.
- Always unplug appliance from outlet when not in use, before putting on or taking off parts, and before cleaning.
- Avoid contact with moving parts. Keep hands, hair, clothing, as well as spatulas, and other utensils away from the appliance during operation to reduce the risk of injury and/or damage to the appliance.
- Do not operate any appliance with a damaged cord or plug, or after the appliance malfunctions, or is dropped or damaged in any manner. Return the appliance to the nearest Cuisinart Repair Center for examination, repair, electrical or mechanical adjustment.
- The use of attachments other than those made by Cuisinart may cause fire, electric shock or risk of injuries.
- Do not use outdoors.
- Do not let cord hang over edge of table or counter, or touch hot surfaces. 10. Keep hands and utensils out of freezer bowl while in use to reduce the risk of injury to persons or to the appliance itself. DO NOT USE SHARP OBJECTS OR UTENSILS INSIDE THE FREEZER BOWL! Sharp objects will scratch and damage the inside of the freezer bowl. A rubber spatula or wooden spoon may be used when the appliance is in the OFF position.
- This appliance is for household use. Any servicing other than cleaning and user maintenance should be done only by authorized Cuisinart Repair Personnel.
- Do not use the freezer bowl on flames, hot plates or stoves. Do not expose to heat source. Do not wash in the dishwasher; doing so may cause risk of fire, electric shock or injury.
SAVE THESE INSTRUCTIONS
FOR HOUSEHOLD USE ONLY
SPECIAL CORD SET INSTRUCTIONS
A short power-supply cord is provided to reduce the risks resulting from becoming entangled in or tripping over a longer cord.
Longer extension cords are available and may be used if care is exercised in their use.
If a long extension cord is used, the marked electrical rating of the extension cord should be at least as great as the electrical rating of the appliance. The longer cord should be arranged so that it will not drape over the countertop or tabletop where it can be pulled on by children or animals, or tripped over.
NOTICE
This appliance has a polarized plug (one blade is wider than the other). To reduce the risk of electric shock, this plug will fit in a polarized outlet only one way. If the plug does not fit fully in the outlet, reverse the plug. If it still does not fit, contact a qualified electrician. Do not attempt to defeat this safety feature.
CAUTION
This appliance is for household use. Any servicing other than cleaning and user maintenance should be performed by an authorized service representative.
- Do not immerse base in water.
- To reduce the risk of fire or electric shock, do not disassemble the base.
Note: the base does not contain any user-serviceable parts. - Repairs should be made only by authorized personnel.
- Check voltage to be sure that the voltage indicated on the nameplate agrees with your voltage.
- Never clean with scouring powders or hard implements.
INTRODUCTION
Get ready to enjoy professional-quality soft ice cream, yogurt, sorbet, and sherbet right at home, with your new Cuisinart® Mix It In™ Soft Serve Ice Cream Maker. Not only can you make all of your favorites, but with three built-in condiment dispensers, you can make them extra delicious! With the pull of a tab, sprinkles, chips, and other toppings mix right into your frozen dessert as you fill up cones or bowls. Operation is fully automatic, so just pick a recipe from the ones we’ve included, put the ingredients in the bowl, and turn the dial!
BEFORE USING FOR THE FIRST TIME
DO NOT immerse this product in water. Wipe it with a moist cloth. Wash the lid, freezer bowl, mixing arm, condiment containers, condiment chute, and drip tray in warm soapy water to remove any dust or residue from the manufacturing and shipping process. DO NOT clean any of the parts with abrasive cleaners or hard implements. DO NOT immerse unit in water or put unit under running water. Clean with a damp cloth only.
FREEZING TIME AND BOWL PREPARATION
The freezer bowl must be completely frozen before you begin your recipe. Before freezing, wash and dry the bowl. Wrap it in a plastic bag to prevent freezer burn. We recommend that you place the freezer bowl in the back of your freezer where it is coldest. Be sure to place the freezer bowl on a flat surface in its upright position for even freezing. The length of time needed to reach the frozen state depends on how cold your freezer is. For the most convenient frozen desserts, leave your freezer bowl in the freezer at all times. You can take it out any time for immediate use. In general, freezing time should be a minimum of 12 hours. To determine whether the bowl is completely frozen, shake it. If you do not hear liquid moving, the cooling liquid is frozen.
Reminder: Your freezer should be set to 0°F to ensure proper freezing of all foods.
FEATURES AND BENEFITS
- Easy-lock Lid with Window – Lid is designed to remove and lock easily. An ingredient window allows you to pour ingredients directly through the top and watch the freezing process.
- Mixing Arm (not shown) – Mixes and aerates ingredients in freezer bowl to create smooth soft ice cream.
- 1 1⁄2-Quart Freezer Bowl (not shown) – Contains cooling liquid within a double-insulated wall to create fast and even freezing. Double-wall keeps the bowl cool and at an even temperature.
- Three Condiment Containers – Dispense the mix-ins of your choice. The front condiment container with a curved edge dispenses small mix-ins such as sprinkles. Two rectangular condiment containers dispense larger mix-ins such as mini M&M® s or mini chocolate morsels.
- Condiment Dispensing Levers – Pull out one of three levers to add the mix-ins of your choice into your soft ice cream.
- Condiment Chute – Mix-ins are dispensed from the chute into your ice cream cone or bowl while you dispense ice cream. Removable for easy cleaning.
- Dispensing Bracket with Handle – Dispenses the soft ice cream when handle is pulled down. Removable for easy cleaning.
- Base – Contains heavy-duty motor strong enough to make and dispense ice cream.
- ON/OFF Power Dial
- Cone Holder – Conveniently holds a stack of extra ice cream cones. Can hold both flat and pointed-bottom cones.
- Removable Drip Tray – Can be removed for easy cleaning. Dot in center of tray indicates where to place the ice cream cone.
- Mix-in Gauge – Check the size of mix-ins by dropping them through. Mix-ins that do not fit through will clog the ice cream maker.
- Rubber Feet – Nonslip feet keep base stationery during use.
ASSEMBLY
- Insert the condiment containers into the indent on the top side of the ICE-45 so that they are firmly in place. The condiment container with the rounded edge should be inserted into the front space.
- Place the small narrow cover over the condiment containers.
- Attach the dispenser with handle by inserting the tab into the slot under the dispensing area, then push the dispenser upwards until it locks into place. (Make sure the handle is in the upright position.)

- Slide the condiment chute into the space provided under the condiment containers. Be sure to slide it all the way in until it stops.
- Place the drip tray on the base under the dispenser.
- Push the mixing arm into the hole on the bottom of the lid.
- Insert the freezer bowl. Make sure that it is securely in place.
- Put the lid with mixing arm attached over the freezer bowl and push down until it clicks securely in place. To remove lid, push in and lift the two side tabs.
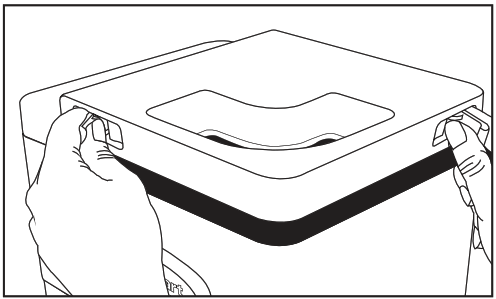
MAKING SOFT SERVE ICE CREAM AND FROZEN DESSERTS
- Fill the condiment containers with the desired mix-ins. Place small mix-ins such as sprinkles in the front condiment container with the curved edge. Place large mix-ins such as mini M&M ®s or mini chocolate morsels in the rectangular condiment containers.
NOTE: Do not place liquid condiments in the condiment containers. - Use Cuisinart’s recipes from the pages that follow. Do not fill the freezer bowl higher than ½” from the top, as the ingredients will increase in volume during the freezing process. For best results, prepare ingredients in a container from which it is easy to pour.
- Remove the freezer bowl from the freezer. (Remove plastic bag if you have wrapped freezer bowl.) Lift the lid and place freezer bowl inside the base.
NOTE: Bowl will begin to defrost quickly once it has been removed from freezer. Use it immediately after removing from freezer. - Push the mixing arm into the hole on the bottom of the lid.
- Place lid with mixing arm on base and push down until it locks in place.
- Turn the power dial to the ON position. Mixing arm will begin to turn.
- Add ingredients to the freezer bowl by pouring them through the opening in the lid.
- Soft ice cream will be finished in as little as 20 minutes. The time will depend on the recipe and volume of the dessert you are making. If ingredients are refrigerated, ice cream-making time will be reduced.
NOTE: You must watch the ice cream to determine when to dispense. If you wait too long, ice cream may get too thick to dispense. If this happens, remove the bowl, scoop out and enjoy the ice cream. - Hold an ice cream cone or bowl one inch below the ice cream chute and pull down the handle to dispense the soft ice cream. Turn cup or bowl as you dispense to swirl ice cream.
- Pull out one, two or all three condiment dispensing levers to add the mix-ins of your choice into your soft ice cream or dessert. To stop the flow of mix-ins, push in the dispensing levers.
- When finished filling the cone or bowl, push the handle back up to stop the flow of ice cream.
NOTES: Some liquid may initially come out of the dispensing bracket when the handle is first pulled down. Use a cup to collect this liquid, then proceed with filling the first bowl or cone.
Do not store frozen desserts in the freezer bowl. Desserts will stick to the side of the freezer bowl and may damage the bowl. Store only in an airtight container.
The ice cream will lose its soft consistency and harden after it is stored in the freezer.
RECOMMENDED MIX-INS
These items can be found in most well-stocked grocery stores and specialty grocery/gourmet food stores.
The location of the items will depend upon the individual store (for example, some items will be found near the ice cream and ice cream cones while others may be found in the baking section).
Mini M&M®s*
Mini chocolate morsels*
Confetti sprinkles
Chocolate sprinkles
Caramel sprinkles
Praline crunch
Critter crunch or other decorative
crunch bits
Almond brickle bits/chips
*NOTE: Do not use full-sized M&M®s or chocolate morsels, they are too large to dispense. Use the mix-in gauge to make sure mix-ins are not too large. If they do not fit through the hole in the gauge, then they will clog the unit.
SAFETY FEATURE
The Cuisinart® Mix It In™ Soft Serve Ice Cream Maker is equipped with a safety feature that automatically stops the unit if the motor overheats. This may occur if the dessert is extremely thick or if the unit has been running for an excessively long period of time, or if added condiments are too large. If ice cream is too thick to dispense, remove the bowl and eat the ice cream.
DISASSEMBLING FOR CLEANING
- Remove the lid and disconnect the mixing paddle.
- Lift the freezer bowl up and out of the base.
- Remove the condiment chute by pulling it toward you.
- Remove the dispensing bracket with handle by pushing the button located on the center of the face of the dispenser down and pulling it down and out towards you.
TROUBLESHOOTING
| Problem | Solution |
| Ice cream is not ready in the recommended time. | Check the recipe to make sure that the ingredients are correct. Keep the freezer bowl in the freezer for a longer amount of time before making ice cream. Do not let the freezer bowl sit outside of the freezer for more than 5 minutes before making ice cream. Make sure your freezer is set to 0˚F. |
| Ice cream is not dispensing. | The ice cream may be too thick. Check the processing time. Check the recipe to make sure that the ingredients are correct. Remove the bowl, scoop out and eat the ice cream. |
| Motor stalls. | The ice cream may be too thick. Check the processing time. Turn off the ice cream maker. Clean ice cream maker and put freezer bowl in the freezer. Make a new batch once the bowl is frozen for the recommended amount of time. |
| Mix-ins are not dispensing. | Check the condiment chute to make sure that mix-ins are not stuck. Clean and dry the chute. Check mixins to make sure that they are not melting. Clean and dry condiment dispensers. Check for jammed mix-ins. Mix-ins may be too large. |
| The mixing arm is not turning. | Check to make sure there is no ice in the freezer bowl. Check to see if the unit is on. The ice cream may be too thick. |
CLEANING
- Unplug your Cuisinart® Mix It In™ Soft Serve Ice Cream Maker before cleaning.
- Base: Wipe with a damp cloth and dry.
Never use abrasives or immerse in water. - Freezer Bowl and Lid: Wash by hand in warm soapy water and dry thoroughly.
DO NOT PUT IN THE DISHWASHER.
DO NOT CLEAN WITH ABRASIVE
CLEANSERS OR IMPLEMENTS. - Handle with Dispensing Bracket: Wash thoroughly by hand in warm soapy water. Be sure to eliminate all ice cream residue by cleaning the dispensing while it is opened (with the handle pushed down) and closed (with the handle up).
- Mixing Arm, Condiment Containers, Condiment Chute and Drip Tray: Wash by hand in warm soapy water and dry thoroughly. These parts are also top-rack dishwasher-safe. Be careful not to remove the small rubber pads that are located inside the condiment containers when cleaning. The rubber pads are a part of the condiment containers and are not removable.
STORAGE
DO NOT put freezer bowl in freezer if bowl is wet. DO NOT store lid, mixing arm, base, drip tray or condiment containers in the freezer. You may store the freezer bowl in the freezer, in its upright position, for convenient, immediate use. Before freezing, wrap the bowl in a plastic bag to prevent freezer burn. Do not store frozen desserts in the freezer bowl. Transfer desserts to an airtight container for longer storage in the freezer.
When filled condiment containers are not in use, store in a cool, dark place. Empty containers if not used once a week. Start with fresh mix-ins so they don’t spoil.
NOTE: The ice cream will lose its soft consistency and harden after it is stored in the freezer
WARRANTY LIMITED THREE-YEAR WARRANTY
This warranty is available to consumers only. You are a consumer if you own a Cuisinart® Mix It In™ Soft Serve Ice Cream Maker which was purchased at retail for personal, family or household use. Except as otherwise required under applicable law, this warranty is not available to retailers or other commercial purchasers or owners.
We warrant that your Cuisinart® Mix It In™ Soft ServeIce Cream Maker will be free of defects in materials and workmanship under normal home use for 3 years from the date of original purchase.
We suggest you complete and return the enclosed product registration card promptly to facilitate verification of the date of the original purchase. However, the return of the product registration card does not eliminate the need for the consumer to maintain the original proof of purchase in order to obtain the warranty benefits. In the event that you do not have proof of purchase date, the purchase date for purposes of this warranty will be the date of manufacture.
If your Cuisinart® Mix It In™ Soft Serve Ice Cream Maker should prove to be defective within the warranty period, we will repair or, if we think necessary, replace it. To obtain warranty service, please call our Customer Service Center toll-free at
1-800-726-0190 or write to:
Cuisinart
150 Milford Road,
East Windsor, NJ 08520
To facilitate the speed and accuracy of your return, enclose $10.00 for shipping and handling. (California residents need only supply a proof of purchase and should call 1-800- 726-0190 for shipping instructions.) Please be sure to include your return address, description of the product’s defect, product serial number, and any other information pertinent to the return. Please pay by check or money order.
NOTE: For added protection and secure handling of any Cuisinart® product that is being returned, we recommend you use a traceable, insured delivery service. Cuisinart cannot be held responsible for in-transit damage or for packages that are not delivered to us. Lost and/or damaged products are not covered under warranty.
Your Cuisinart® Mix It In™ Soft Serve Ice Cream Maker has been manufactured to the strictest specifications and has been designed for use only with authorized accessories and replacement parts. This warranty expressly excludes any defects or damages caused by accessories, replacement parts or repair service other than those authorized by Cuisinart.
This warranty does not cover any damage caused by accident, misuse, shipment or other than ordinary household use.
This warranty excludes all incidental or consequential damages. Some states do not allow the exclusion or limitation of these damages, so they may not apply to you.
CALIFORNIA RESIDENTS ONLY
California law provides that for In-Warranty Service, California residents have the option of returning a nonconforming product (A) to the store where it was purchased or (B) to another retail store that sells Cuisinart® products of the same type. The retail store shall then, according to its preference, either repair the product, refer the consumer to an independent repair facility, replace the product, or refund the purchase price less the amount directly attributable to the consumer’s prior usage of the product. If the above two options do not result in the appropriate relief to the consumer, the consumer may then take the product to an independent repair facility if service or repair can be economically accomplished. Cuisinart and not the consumer will be responsible for the reasonable cost of such service, repair, replacement, or refund for nonconforming products under warranty.
California residents may also, according to their preference, return nonconforming products directly to Cuisinart for repair or, if necessary, replacement by calling our Consumer Service Center toll-free at 800-726-0190. Cuisinart will be responsible for the cost of the repair, replacement, and shipping and handling for such nonconforming products under warranty.
BEFORE RETURNING YOUR CUISINART® PRODUCT
Important: If the nonconforming product is to be serviced by someone other than Cuisinart’s Authorized Service Center, please remind the servicer to call our Consumer Service Center to ensure that the problem is properly diagnosed, the product serviced with the correct parts, and to ensure that the product is still under warranty.
©2006 Cuisinart
Cuisinart® is a registered trademark of Cuisinart
150 Milford Road
East Windsor, NJ 08520
Printed in China
05CU26519
Any other trademarks or service marks referred to herein are the trademarks or service marks of their respective owners.
]]>Cuisinart DGB-400C Series Automatic Grind and Brew 12-Cup Coffeemaker Instructions
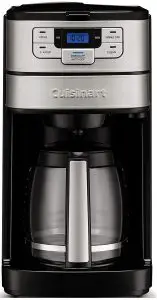
For your safety and continued enjoyment of this product, always read the instruction book carefully before using.
IMPORTANT SAFEGUARDS
When using electrical appliances, especially when children are present, basic safety precautions should always be taken to reduce the risk of fire, electric shock and/or injury to persons, including the following:
- READ ALL INSTRUCTIONS.
- Always unplug from outlet when either the appliance or display clock is not in use and before cleaning. Allow to cool before putting on or taking off parts and before cleaning the appliance.
- Do not touch hot surfaces. Use handles and knobs.
- To protect against electric shock, do not place cord, plug, or base unit in water or other liquids.
- This appliance should not be used by or near children or individuals with certain disabilities.
- Do not operate any appliance with a damaged cord or plug, or after the appliance malfunctions or has been dropped or damaged in any manner. Return appliance to the nearest Cuisinart Repair Center for examination, repair, and electrical or mechanical adjustment.
- The use of accessory attachments not recommended by Cuisinart may cause injuries.
- Do not use outdoors.
- Do not let cord hang over edge of table or counter, or touch hot surfaces.
- Do not place on or near a hot gas or electric burner, or in a heated oven.
- Always fill water reservoir first, then plug cord into the wall outlet. To disconnect, push the Brew/Off button, then remove plug from wall outlet.
- Do not use appliance for other than its intended use.
- Snap lid securely onto carafe before serving any beverages.
- Scalding may occur if the lid is removed during the brewing cycle.
- The glass carafe is designed for use with this coffeemaker only. It must never be used on the range top.
- Do not set a hot carafe on a wet or cold surface.
- Do not use a cracked carafe or a carafe having a loose or weakened handle.
- Do not clean carafe or heating plate with cleansers, steel wool pads, or other abrasive materials.
- WARNING: TO REDUCE THE RISK OF FIRE OR ELECTRIC SHOCK, DO NOT REMOVE THE BASE PANEL. NO USER-SERVICEABLE PARTS ARE INSIDE. REPAIRS SHOULD BE DONE ONLY BY AUTHORIZED PERSONNEL.
- Avoid contact with moving parts.
- Check grinder basket for presence of foreign objects before using.
- Use the coffee grinder to grind roasted coffee beans only. Grinding other substances, such as nuts, spices or unroasted beans, may dull the blade and cause poor grinding or injury.
- Do not place cloth beneath coffeemaker or otherwise restrict airflow.
- Use only the Cuisinart® Gold-Tone Commercial-Style Filter or standard #4 basket paper filter with this unit.
OTHER GOLD TONE PERMANENT FILTERS MAY CAUSE THE COFFEEMAKER TO OVERFLOW. - Do not operate your appliance in an appliance garage or under a wall cabinet. When storing in an appliance garage, always unplug the unit from the electrical outlet. Not doing so could create a risk of fire, especially if the appliance touches the walls of the garage or the door touches the unit as it closes.
SAVE THESE INSTRUCTIONS
FOR HOUSEHOLD USE ONLY
WARNING: RISK OF FIRE OR ELECTRIC SHOCK
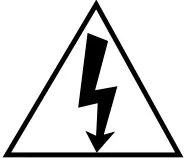 The lightning flash with arrowhead symbol within an equilateral triangle is intended to alert the user to the presence of uninsulated dangerous voltage within the product’s enclosure that may be of sufficient magnitude to constitute a risk of fire or electric shock to persons.
 The exclamation point within an equilateral triangle is intended to alert the user to the presence of important operating and maintenance (servicing) instructions in the literature accompanying the appliance.
SPECIAL CORD SET INSTRUCTIONS
A short power-supply cord is provided to reduce the risks resulting from becoming entangled in or tripping over a longer cord. Longer extension cords are available and may be used if care is exercised in their use.
If a long extension cord is used, the marked electrical rating of the extension cord must be at least as great as the electrical rating of the appliance, and the longer cord should be arranged so that it will not drape over the countertop or tabletop where it can be pulled on by children or tripped over.
NOTICE
This appliance has a polarized plug (one blade is wider than the other). To reduce the risk of electric shock, this plug will fit into a polarized outlet only one way. If the plug does not fit fully into the outlet, reverse the plug. If it still does not fit, contact a qualified electrician. Do not modify the plug in any way.
OPERATING NOTICE
Clogging and backing up of water and/or coffee in the filter basket can occur under any or a combination of any of the following conditions: The use of too finely ground coffee, using two or more paper filters, using the gold-tone filter in conjunction with a paper filter or not properly cleaning coffee grounds from the gold-tone filter, or allowing coffee grounds to spill over the filter.
Caution: Never open the filter basket during the brewing cycle, even if no water is draining from the filter basket, since extremely hot water/coffee can spill out from the filter basket and cause injury. If water/coffee is not draining from the filter basket during the brewing cycle, unplug the unit and wait 10 minutes before opening and checking the filter basket.
WARNING
RISK OF FIRE OR ELECTRIC SHOCK
DO NOT OPEN
WARNING: TO REDUCE THE RISK OF FIRE OR ELECTRIC SHOCK,
DO NOT REMOVE COVER (OR BACK)
NO USER-SERVICEABLE PARTS INSIDE
REPAIR SHOULD BE DONE BY AUTHORIZED SERVICE PERSONNEL ONLY
IMPORTANT UNPACKING INSTRUCTIONS
- Place the box on a large, sturdy, flat surface.
- Remove the instruction book and any other literature.
- Turn the box so that the back side of the coffeemaker is down and slide the coffeemaker from the box.
- Remove Starter Kit (paper filters, scoop and charcoal water filter) located in front of unit.
- After the coffeemaker has been removed, place the box out of the way and lift off the packing material.
- Grasp the carafe by its handle, remove it from the resting plate, and remove the polybag.
- Remove the polybag covering the coffeemaker. Save all packing materials in case you have to ship the machine in the future. KEEP ALL PLASTIC BAGS AWAY FROM CHILDREN.
THE QUEST FOR THE PERFECT CUP OF COFFEE
ELEMENT 1: WATER
Coffee is 98% water. The quality of that water is as important as the quality of your coffee. If water doesn’t taste good from the tap, it won’t taste good in your coffee.
Cuisinart includes a charcoal water filter to remove chlorine, bad tastes and odours, for the purest coffee flavour, every time you brew.
ELEMENT 2: COFFEE
While coffee is 98% water, all of the flavour comes from the beans.
To achieve the same great taste you enjoy at a coffee bar, buy only a two-week supply of fresh coffee beans at a time. Once the bean is broken, its flavour degrades quickly.
That’s why Cuisinart grinds your beans just prior to brewing.
ELEMENT 3: GRIND
The grind is critical for proper flavour extraction. If the grind is too fine, overextraction and bitterness will result. Too fine a grind may also clog the filter. If grind is too coarse, the water will pass through too quickly and the maximum flavour will not be extracted. Your coffeemaker is preset for medium, the optimal grind for this type of brewing process.
ELEMENT 4: PROPORTION
Coffee that is too strong or too weak is always a disappointment. Follow the recommended portions of whole beans or ground coffee in the instructions under MAKING COFFEE, and later adjust the amount to your taste.
DO NOT OVERFILL OR THE GRINDER COULD MALFUNCTION AND/OR OVERFLOW.
FEATURES AND BENEFITS
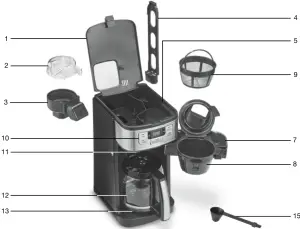
- Reservoir Cover
Flips back for easy filling of the water reservoir and access to the grinder compartment. - Grinder Basket Lid
Use the recess on each side of the lid to remove lid for easy addition of beans.
NOTE: Lid must be in place for unit to operate. - Grinder Basket with Stainless Steel Blade
- Charcoal Water Filter Holder
NOTE: Follow directions for preparing and inserting filter. - Water Reservoir with Level Indicator
- Showerhead (not shown)
Distributes water evenly over coffee, reducing temperature loss as water passes through grounds. - Filter Basket Door with Release Button
Open to access coffee filter. - Filter Basket
Cover flips up to access/holds paper filter or Cuisinart permanent gold-tone filter.
NOTE: Filter basket holder must be in place for unit to operate correctly Cover becomes hot after coffee is brewed.
Use caution when removing cover. - Gold-Tone Cuisinart Commercial-Style Filter
A note about filters: When using our permanent filter, position handle toward front of the unit so it does not interfere with the flow of coffee into the filter basket. Also
NOTE: Using our permanent gold-tone filter may allow some fine coffee grounds to fall into, and appear as sediment in the carafe. - Control Panel
See detailed drawing. - Brew Pause
Stops flow of coffee from basket when carafe is removed (20 seconds max) from resting plate, so a cup can be poured in mid-brew, if desired. - Carafe
The easy-pour, dripless, 12-cup carafe has an ergonomic handle and brewed coffee markings for four to 12 cups. - Warming Plate
Scratch resistant with nonstick coating. - Cord Storage (not shown)
- Measuring Scoop with Brush
- #4 Basket Paper Filters included (not shown)
GETTING TO KNOW YOUR CONTROL PANEL
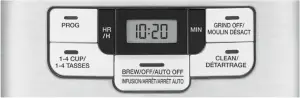
Clock/LCD Display
Displays time of day and Auto On times.
Program Button with LED Indicator
Sets and/or displays programmed Auto On time.
1-4 Cup Setting
Improves extraction, flavour and temperature when brewing fewer than 5 cups.
Hour and Minute Buttons
Use to program clock, Auto On, and Auto Off functions.
Grind Off Button with LED Indicator
Turns off the grinder when using pre-ground coffee.
Clean Button
Red indicator appears when it is time to decalcify your coffeemaker. See page 10 for detailed decalcification instructions.
Brew/Off/Auto Off Button with LED Indicator
Programs coffeemaker to automatically shut off 0 to 4 hours after brew cycle is complete. Manually turns coffeemaker on or off.
PROGRAMMING YOUR COFFEEMAKER
SETTING THE CLOCK
When the coffeemaker is plugged in, 12:00 will flash in the display for 5 seconds, indicating the unit is in Time Set mode. If 12:00 stops flashing, simply press and hold Hour or Minute button to return to flashing Time Set mode.
Setting Hours and Minutes
Press either button to select the desired time.
Hold buttons down to scroll through the digits quickly, or press and release to advance one digit at a time. Be sure the PM indicator is on if setting a PM time.
Exiting Time Set Mode
- Press any function button besides Hour or Minute to exit mode.
- If you do nothing for a period of 5 seconds, the mode will be exited.
SETTING THE PROGRAM TIME
When you press the Program set button, it displays a previously selected auto-on time, or the default time (12:00).
Entering Set Program Time Mode
Press and hold the Program set button until the blue indicator light and LCD display begin to flash. You are now in Set Program Time mode. Set the time you want coffee to begin brewing by following the instructions in “Setting Hours and Minutes.” The coffeemaker will start to brew at the programmed time. The Program mode cannot be entered if the coffeemaker is in its brew cycle.
Exiting Set Program Time Mode
- Press and release Program button.
- Press any function button besides Hour or Minute to exit mode and activate the selected function.
- If you do nothing for a period of 5 seconds, the mode will be exited
To Activate Auto On Using the Set Programmed Time
To select the time you want coffee to start brewing, press the Program button. The previously set time or default time will appear and the blue indicator will come on to remind you that the programming function is in use. The brew cycle will begin at the time you selected. The Brew/Off blue indicator light will come on at the selected start time.
To Deactivate Auto On
Press illuminated Brew/Off button; light will go off, indicating mode is turned off.
SETTING THE AUTO-SHUTOFF TIME
Your coffeemaker can be programmed to automatically shut off from 0 to 4 hours after brewing is complete. The default shutoff time is 2 hours.
To change the preset time, press and hold the Auto Off button until the blue indicator light and LCD display begin to flash. This signals that you have entered the Set automatic shutoff mode. Set the time you want the coffeemaker to shut off by following the “Setting Hours and Minutes” instructions.
When the coffeemaker shuts itself off, two tones will sound.
NOTE: Automatic shutoff may be programmed either before or during coffee brewing. If you program the auto shutoff time after brewing is completed, the unit will automatically account for elapsed time. For example, if you set the auto shutoff for 40 minutes, and 25 minutes have already elapsed, the unit will shut off automatically after 15 minutes (40 minutes minus the 25 elapsed equals 15 minutes).
BEFORE BREWING YOUR FIRST POT OF COFFEE
We recommend flushing out the system before brewing your first pot of coffee. Simply follow “Making Coffee with Pre-Ground Beans,” page 9. Skip step #2 and be sure to use only water and a paper filter…no coffee!
Once you’ve done that, brew a pot of real coffee and get ready to enjoy Cuisinart at its best!
Charcoal Water Filter
Your coffeemaker comes with a charcoal water filter that eliminates chlorine, bad tastes and odours from tap water.
Inserting the Water Filter
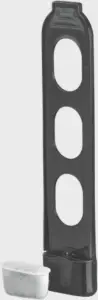
- Remove the filter from polybag and soak it, fully immersed, in cold tap water for 15 minutes.
- Lift the water filter holder out of the water reservoir.
- Press down on the filter compartment and pull toward you to open.
- Place filter into the holder and snap it closed. Be careful – improper placement can tear the filter skin.
- Flush filter by running cold tap water through holes in bottom of compartment for 10 seconds.
- Allow the filter to drain completely.
- Slide the water filter holder back into the channel in the water reservoir, pushing it down to the base of the unit.
NOTE: We recommend changing the water filter every 60 days or after 60 uses, and more often if you have hard water.
Replacement filters can be purchased in stores, by calling Cuisinart Consumer Service, or at www.cuisinart.ca
MAKING COFFEE WITH WHOLE BEANS
Follow instructions in BEFORE BREWING YOUR FIRST POT OF COFFEE.
- Insert Charcoal Water Filter
Follow directions for the preparation and insertion of the charcoal water filter.
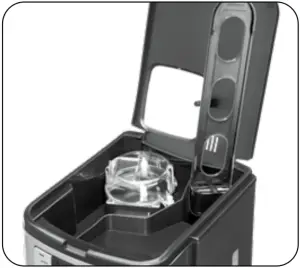
- Fill the Water Reservoir
Open the reservoir cover and pour in water, using the water level window indicator to measure the number of cups desired.
NOTE: Do not exceed the 12-cup line. Doing so could cause carafe to overflow.
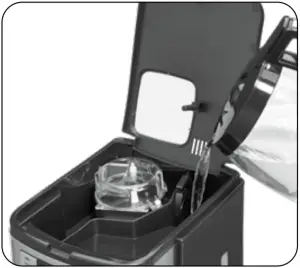
- Add Beans
Lift the grinder basket lid, using the recess on either side. Fill the basket with the desired quantity of beans and replace lid.
NOTE: Use 1 level scoop (1 tablespoon [15 ml]) of whole beans per cup. For 1 to 4 cups, use 1½ level scoops per cup. Do not add more than 14 scoops. This could cause the grinder to malfunction and/or the coffeemaker to overflow.
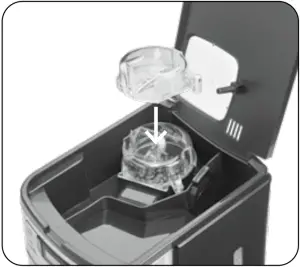
- Insert Coffee Filter
Press the filter basket door release button to open door and place either a paper filter OR permanent filter in the basket.
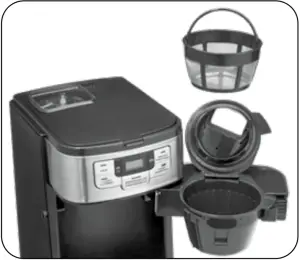
- Paper Filter – place a #4 basket paper filter in the basket, making sure the filter is completely open and touching the side walls and bottom of basket.
- Cuisinart’s Commercial-Style Permanent Filter – Be sure the filter handle is facing away from the grinder basket, so it does not interfere with the flow of ground coffee into the filter basket.
NOTE: Some ground coffee may flow into the carafe.
- Put Filter Basket in Place and Close Filter Door
- Close Reservoir Cover Lid
Press down to lock. This coffeemaker is equipped with a safety interlock system, which prevents the unit from operating if the cover is open or the grinder cover is left out. If you try to turn the unit on with the cover open, the unit will beep continuously until the missing parts are installed and you close the lid. If you open the cover during the grinding process, it will beep, the grinder will stop grinding and, if brewing, the brewing will stop. Once the missing parts are in place and the cover is closed, the beeping stops. The brewing process can be restarted by pressing the Brew/Off button. Restarting the process will not affect coffee results. If you do not want the grinder to come on again, press the Grind Off button before pressing the Brew button. - Put Carafe in Place
Make sure you have replaced the glass carafe in its position on the warming plate. - Brewing
To Brew Right Away- a) Push the 1-4 cup button if you are brewing fewer than 5 cups.
NOTE: Coffeemakers traditionally produce cooler coffee when brewing small pots because the heater doesn’t have time to warm up. This setting double heats water for piping hot coffee. - b) Press the Brew/Off button. Blue LED will light up and brewing will begin
To Brew Later - a) Push the 1-4 cup button if you are brewing fewer than 5 cups.
- b) Press and release the Program button.
The blue LED indicates that the unit is in programmed-start mode and the brew cycle will begin at the time you selected.
To change time, follow “Setting The Program Time” instructions.
- a) Push the 1-4 cup button if you are brewing fewer than 5 cups.
- After Brewing
When brew cycle is complete, five beeps will sound. Coffee will continue to stream from the filter for several seconds.
The coffeemaker will automatically shut off after 2 hours or at the programmed auto-shutoff time.
MAKING COFFEE WITH PRE-GROUND BEANS
Follow instructions in “Before Brewing Your First Pot of Coffee,”.
- Fill the Reservoir and Insert Filter
See steps #1 and #2 in “Making Coffee with Whole Beans,”. - Add Pre-Ground Coffee
Press the filter basket door release button to open door and place either a paper filter OR the permanent filter in the basket. Add ground coffee the close filter door.
Our recipe suggestion: Use 1 level scoop (1 tablespoon [15 ml]) of ground coffee per cup. Adjust the recipe according to taste.
NOTE: The maximum capacity for ground coffee is 16 level scoops (16 tablespoons [236 ml]), using either a paper or permanent filter. Exceeding that amount may cause overflow if the coffee is too finely ground. - Press Grind Off Button
When this function is activated, the blue LED will come on. - Follow Steps #5 though #8 in “Making Coffee with Whole Beans,”.
BREW PAUSE FEATURE
Our Brew Pause™ feature interrupts the flow of coffee from the basket to let you pour that first cup mid-brew. Be aware that using this feature will weaken the flavour strength of the finished pot, because the flavour profile of coffee brewed at the beginning of the cycle differs from coffee made at the end.
NOTE: Removing carafe for more than 20 seconds may cause filter basket to overflow.
TIPS AND HINTS
- If you buy large portions of beans, separate them into one- or two-week portions and store them in airtight containers in the freezer. Preserve freshness by minimizing exposure to air, light, and moisture. Once beans are removed from the freezer, keep them in a sealed container at room temperature, since damaging condensation can occur when beans move from cold to warmer temperatures.
- Some experts feel freezing dark-roast beans can cause oils to coagulate; others disagree. You’ll have to decide that one for yourself!
CLEANING AND MAINTENANCE
COMPLETELY CLEAN AND DRY ALL PARTS AFTER EVERY USE
Always turn coffeemaker OFF and remove the plug from the electrical outlet before cleaning.
Open the reservoir lid*. Remove the grinder basket lid by using the recessed area on each side of the lid. Then remove grinder basket.
Open filter basket door. Remove filter basket cover, filter basket and filter basket holder. The grinder basket, grinder basket lid, filter basket and filter basket cover can be washed in warm, soapy water and rinsed thoroughly, or cleaned in the upper rack of the dishwasher. Dry all parts after every use. Do not put any water in the unit once the grinder basket has been removed. Wipe the area under the grinder basket with a damp cloth. If water gets into the grinder motor, the motor may become damaged and may malfunction. Once clean, reverse the above steps. Remove the carafe from the resting plate. Discard any remaining coffee. The carafe and lid can be washed in warm, soapy water and rinsed thoroughly, or placed in a dishwasher.
The carafe and carafe lid should be placed on the upper rack only. Do not use scouring agents or harsh cleansers on any part of the coffeemaker. Never immerse base unit in water or other liquids. To clean base, simply wipe with a clean, damp cloth and dry before storing.
Wipe heating plate with a clean, damp cloth. Never use rough, abrasive materials or cleansers to clean the heating plate. Do not dry the inside of the water reservoir with a cloth, as lint may remain.
- NOTE: Reservoir lid can also be removed for easy cleaning. Open the lid 60˚ and gently pull toward you. To replace, reverse steps.
MAINTENANCE
Any other servicing should be performed by an authorized service representative.
DECALCIFICATION
Decalcification refers to the removal of calcium deposits that form over time on the metal parts of your coffeemaker. The mineral content of the tap water in your area and the frequency of use affects the rate of the calcium buildup, which can affect the functioning of your coffeemaker and the flavour of your coffee.
For best performance from your coffeemaker, we recommend cleaning it whenever the CLEAN LED indicator lights up.
NOTE: Before decalcifying your unit, remove the charcoal water filter from the water reservoir.
To clean:
- Fill the water reservoir to capacity with a mixture of ¹⁄³ white vinegar and ²⁄³ water.
- Press and hold the CLEAN button. When the CLEAN LED indicator flashes, the coffeemaker is in Clean mode. Release the button.
- When the cycle is completed, 5 beeps will sound and the coffeemaker will shut off.
- If the CLEAN indicator illuminates once more, repeat the cleaning procedure with a fresh solution of vinegar and water.
NOTE: One cleaning cycle is usually sufficient. - When the CLEAN indicator remains off, run one cycle with a full reservoir of fresh, cold water to rinse the unit.
- Return the charcoal water filter to the holder inside the water reservoir and your coffeemaker is ready to brew!
WARRANTY
LIMITED THREE-YEAR WARRANTY
We warrant that this Cuisinart product will be free of defects in materials or workmanship under normal home use for 3 years from the date of original purchase. This warranty covers manufacturer’s defects including mechanical and electrical defects. It does not cover damage from consumer abuse, unauthorized repairs or modifications, theft, misuse, or damage due to transportation or environmental conditions. Products with removed or altered identification numbers will not be covered.
This warranty is not available to retailers or other commercial purchasers or owners. If your Cuisinart product should prove to be defective within the warranty period, we will repair it or replace it if necessary. For warranty purposes, please register your product online at www.cuisinart.ca to facilitate verification of the date of original purchase and keep your original receipt for the duration of the limited warranty.
This warranty excludes damage caused by accident, misuse or abuse, including damage caused by overheating, and it does not apply to scratches, stains, discolouration or other damage to external or internal surfaces that does not impair the functional utility of the product. This warranty also expressly excludes all incidental or consequential damages.
Your Cuisinart product has been manufactured to the strictest specifications and has been designed for use only in 120 volt outlets and only with authorized accessories and replacement parts. This warranty expressly excludes any defects or damages caused by attempted use of this unit with a converter, as well as use with accessories, replacement parts or repair service other than those authorized by Cuisinart.
If the appliance should become defective within the warranty period, do not return the appliance to the store.
Please contact our Customer Service Centre:
Toll-free phone number:
1-800-472-7606
Address:
Cuisinart Canada
100 Conair Parkway
Woodbridge, ON L4H 0L2
Email:
[email protected]
Model:
DGB-400C Series
To facilitate the speed and accuracy of your return, please enclose:
- $10.00 for shipping and handling of the product (cheque or money order)
- Return address and phone number
- Description of the product defect
- Product date code*/copy of original proof of purchase
- Any other information pertinent to the product’s return
- The date code format we are using on unit is WWYY, representing week, and year. eg.2420 = manufactured in 24th week of the year 2020.
Note: We recommend you use a traceable, insured delivery service for added protection. Cuisinart will not be held responsible for in-transit damage or for packages that are not delivered to us.
To order replacement parts or accessories, call our Customer Service Centre at 1-800- 472-7606. For more information, please visit our website at www.cuisinart.ca.
Other Product
- Food Processors
- Juicers
- Coffeemakers
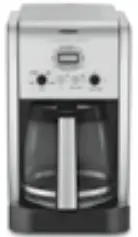
- Cookware

- Tools and Gadgets
Cuisinart offers an extensive assortment of top quality products to make life in the kitchen easier than ever. Try some of our other countertop appliances and cookware, and Savour the Good Life®.
©2020 Cuisinart Canada
100 Conair Parkway,
Woodbridge, ON L4H 0L2
