delimano KF-R50 18 in 1 Multicooker

Dear customer!
Many thanks for selecting our Delimano 18in1 Multicooker!
All Delimano products are perceived very valuable, so counterfeiters really like to copy us and thus abuse customers by worse quality with no warranty and service. Please, report any copied, counterfeited, similar product or unauthorised distributor to [email protected] in order to help us fighting against illegal counterfeits.
For Delimano 18in1 Multicooker you just bought we guarantee that by carefully following instructions below and with appropriate care you will enjoy many confident years with the Delimano 18in1 Multicooker.
Delimano 18in1 Multicooker– Instruction Manual
Read this manual thoroughly before using and save it for future reference.
WARNINGS
- Children aged from 3 years and less than 8 years shall only switch ON/OFF the appliance provided that it has been placed or installed in its intended normal operating position and they have been given supervision or instruction concerning use of the appliance in a safe way and understand the hazards involved. Children aged from 3 years and less than 8 years shall not plug in, regulate and clean the appliance or perform user maintenance.
- Children must be supervised not to play with this appliance.
- This device should never operate empty, because such action could result in appliance failure and/or injuries to the user.
- Plug in power supply that corresponds to the rated one on product only. In case of misusage power supply or device failure may occur.
- This device is equipped with a grounded plug. Please ensure the wall outlet in your house is well earthed.
- This device is intended for household, indoor and dry use only.
- Before use, place the product on hard, flat, stable and dry surface.
- Slight odors are possible at beginning of usage until device reaches its thermal stability.
- If the device is not working as it should, has received a sharp blow, has been dropped, damaged, left outdoors or dropped into water, do not use it.
- This device should never be switched on or stay plugged in power supply when not in use, while replacing accessories or during cleaning.
- Do not attempt any modification or repair by yourself and ensure that any repair is conducted only by appropriately qualified technician.
- If the supply cord is damaged, it must be replaced immediately by authorized and qualified person only.
- Wash and dry thoroughly before first use.
- The use of attachments or accessories not recommended or sold by the product distributor may cause personal or property hazards or injuries.
- When cooking, steam may come from the air outlet, so it is not allowed to close your face or hands to the outlet and the upper lid for avoidance of scalding
- This device is not intended to be operated by means of an external timer or separate remote-control system.
- Dry the inner pot and confirm there are no impurities on the heater. Put the inner pot in the electric cooker and then turn the inner pot around to allow the pot to be in full contact with the heater. Don’t fill water in the outer pot to avoid any failure or electric shock.
- When cooking, steam may be released from the air outlet, so avoid putting your face or hands near the steam outlet on the lid.
- Keep inner pot and heater clean – Keep the inner pot, heater and internal side of the cooker clean to avoid over burning which may result in failure or other unforeseen accidents.
- Regularly check for and remove possible blockages caused by cooking because they can greatly reduce device’s general performance and/or safety.
- Although the product has been checked its usage and consequences are strictly user responsibility.
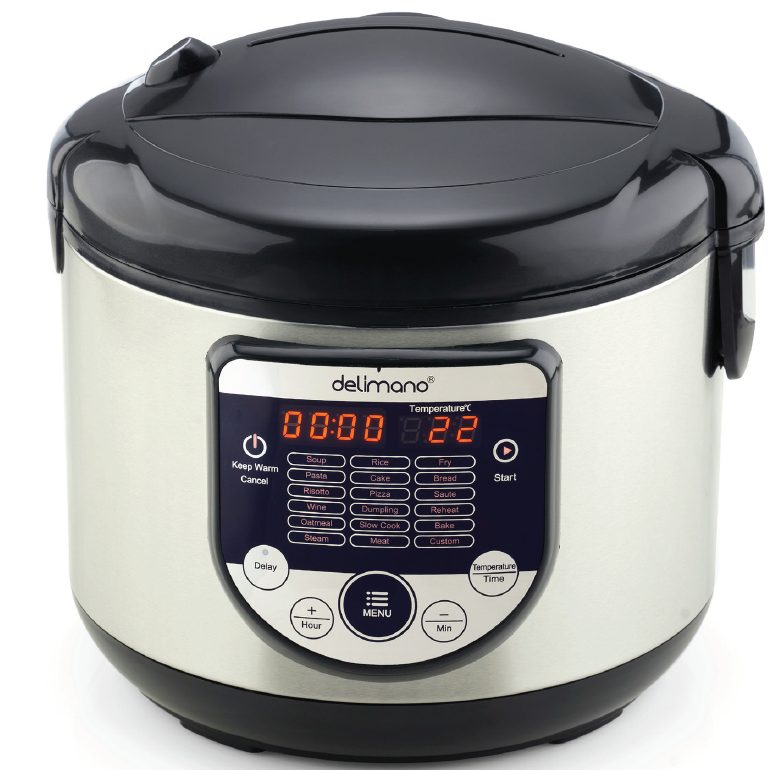
PARTS
Main parts of the product:
- inner pot (capacity 5 l)
- outer pot
- body
- valve
- lid
- lid’s bottom plate with seal
- control panel
- spoon
- ladle
- measuring cup
- steamer
- power cable
- steam collector

BEFORE USE
Remove all packing material and clean the device and all its accessories properly.
Before use, place the device on hard, flat, stable and dry surface.
Plug the power cable into device’s connector and in power supply that corresponds to the rated one on product only. In case of misusage power supply or device failure may occur.
Do not turn power on when inner pot is not inside – It is not allowed to turn the power on when the cooker is not loaded or the inner pot hasn’t been put inside to avoid the fuse reaction.
USAGE
Control panel
| 18 DEFAULT PROGRAMS | DETAILED DESCRIPTION FOR ALL FUNCTIONS | |
| 1 | Soup | Can cook the soup with food materials. |
| 2 | Rice | For regular rice. |
| 3 | Fry | For fried chicken, French fried potatoes, onion rings and so on. Lid can not be closed during frying. |
| 4 | Pasta | Cook the pasta with water |
| 5 | Cake | For cake baking. |
| 6 | Bread | Make the bread cake. |
| 7 | Risotto | Make the rice with meat and vegetable. |
| 8 | Pizza | Make the pizza crust with meat or fruit or cheese on it |
| 9 | Saute | Can saute the meat or vegetable. |
| 10 | Wine | Make the wine. |
| 11 | Dumpling | Can cook the dumpling or sausage. |
| 12 | Reheat | Can make the food hot again. |
| 13 | Oatmeal | Can cook the oats with water. |
| 14 | Slow Cook | Cook the rice, soup, porridge slowly in lower temperature. |
| 15 | Bake | Can bake any kind of food as you like. |
| 16 | Steam | Can steam sea food or vegetables. Need to put the water in pot and put the food on steamer. |
| 17 | Meat | Stew the meat. |
| 18 | Custom | User can set the cooking temperature ,cooking time as he/she want. |


OPERATION
- Pluging in and stand-by mode
The control panel will turn on, timer display will show “00:00”, while temperature display will show current hater plate’s temperature. This is stand-by mode. - Choosing the preset program
Press the MENU (or “+” / “-“ ) buttton as many times is needed to choose the selected program: at which point the chosen program name will start blinking and timer display will show cooking time and (if applicable) temperature display will show preset temperature.*
To initiate the program press “Start” button at which point only the chosen program wil stay lit while time display wil be showing remaining time and (if applicable) temperature display will show preset temperature.
NOTE:
You can pause the running program at any time by pressing “Keep warm/Cancel” button and continue the operation by pressing the same button again.
You can stop/reset the running program by pressing and holding (for about 3 seconds) the “Keep warm/cancel” button for few seconds which will put the device in stand-by mode.
If the chosen program is not initiated (by pressing the start button), the device will notify this by beeping 14 times before switching back to stand-by mode. - Adjusting the cooking time
After choosing the preset program and BEFORE pressing the “Start” button cooking time can be adjusted by pressing the “Temperature/Time” button (once). At this point timer display will be flashing and cooking time can be adjusted by pressing “+” or “-“ buttons to increase or decrease cooking time in increments of 10, 5 or 1 minute (depending of the program). After adjusting the timer “Start” button should be pressed to initiate the program. - Adjusting the temperature
If the presset temperature is part of the preset program (Fry, Pizza or Custom) it can also be set BEFORE pressing the “Start” button. Press “Temperature/Time” button (twice) and temperature display will start flashing. Temperature can be adjusted by pressing “+” or “-“ buttons to increase or decrease cooking temperature in increments of (10 or 5 °C (depending of the program)). After adjusting the timer “Start” button should be pressed to initiate the program.
NOTE: You can cancel time or temperature adjusting with the press of “Keep Warm /Cancel” button and set the device in stand-by mode. - Cancel/keep warm button functions
- When plugged in power supply(stand-by mode), press “Keep Warm/Cancel”to turn on the “keep warm” mode. The timer display will turn on and start measuring the “keep warm” time. Press and hold the “Keep Warm/Cancel” button to cancel the keep warm mode.
- If pressed during operations/ settings device will go to stand-by mode. The temperature range for Keep Warm Mode is 60-80°C.
- If pressed during program running (“Keep Warm/ Cancel” indicator is flashing) the device will turn of the heating after program is finished. If this button is not pressed it will automatically keep the food warm after the program has finished. If keep warm mode is activated, the timer display will show the time of keeping warm (after the program has finished.
- If pressed and holded (for 3 s) the device will go to stand-by mode.
- Delay
- After choosing the program and BEFORE pressing “Start” button press the “Delay” button to set the delay time – the timer display will start flashing 30 (min).
- Press “+” ( incerement of 1 h) or “-“ (increment of 10 min) buttons to adjust the delay time (excluding the cooking time) between 30 min and 24 h.
- When done press the “Start” button to start the delay timer (shown on timer display) with “Keep Warm/Cancel” indicator flashing and chosen program (and set temperature if applicable) indicator lit.
After delay time has elapsed, the device will start cooking automatically based on preset program chosen.
PROGRAM TABLE
| NO | PROGRAM | COUNT DOWN STARTS | PROGRAM DETAILS |
| 1 | Soup | After start of program | Default cooking time :1hour
Cooking time adjusted from 1-4hours, step 10 min Cooking temperature : 97 °C |
| 2 | Soaked rice | After start of program | Default cooking time : 40min
Cooking time adjusted from 20min-2hour, step 5 min Cooking temperature : 115 °C, temperature of program finish 115 °C+ 5 min |
| 3 | Fry | After work temperature level | Default cooking time : 30 min
Default cooking temperature: 110 °C Cooking time adjusted from 10min-1hour, step 5 min Cooking temperature adjusted from 100 °C to 160 °C |
| 4 | Pasta | After work temperature level Voice when countdown start | Default cooking time : 8 min
Cooking time adjusted from 8-20min, step 1 min Cooking temperature : 105-115 °C, temperature of program finish 140 °C |
| 5 | Cake | After start of program | Default cooking time : 1 hour
Cooking time adjusted 30 min-3,5 hours, step 10 min Cooking temperature : 130 °C |
| 6 | Bread | After start of program | Default cooking time : 3 hour(phase 1 – 2 h, (phase 2 – 1 h) Cooking time can not be adjusted
Cooking temperature : 45 °C – first 2 h, 130 °C – last 1h |
| 7 | Risotto | After start of program | Default cooking time : 1 hour
Cooking time adjusted from 20 min-2 h, step 5 min Cooking temperature : 120-125 °C, temperature of program finish -145-150 °C |
| 8 | Pizza | After start of program | Default cooking time : 20 min
Default cooking temperature: 135 °C Cooking time adjusted from 20 min-1 h, step 5 min Cooking temperature : 120-160 °C |
| 9 | Saute | After start of program | Default cooking time : 2 h
Cooking time adjusted from 1-8 hours, step 30 min Cooking temperature : 90 °C |
| 10 | Wine | After start of program Without keep warm | Default cooking time : 12 h
Cooking time adjusted from 6-12 h, step 1 h Cooking temperature : 55 °C |
| 11 |
Dumpling |
After work temperature level Voice if countdown start | Default cooking time : 15 min
Cooking time adjusted from 8-50 min, step 1 min Cooking temperature : 125 °C |
| 12 | Reheat | After start of program | Default cooking time : 20 min
Cooking time adjusted from 10 min-1 h, step 5 min Cooking temperature : 115 °C |
| 13 | Oa |
After start of program |
Default cooking time : 5 min
Cooking time adjusted from 5 min-1 h, step 5 min Cooking temperature : 96 °C |
| 14 | Slow cook | After start of program | Default cooking time : 5 h
Cooking time adjusted from 1 -5 h, step 1 h Cooking temperature 1st hour – 45 °C, 2nd hour – 65 °C, 3rd hour -85 °C, 4th hour – 95 °C |
| 15 | Bake | After start of program | Default cooking time : 30 min
Cooking time adjusted from 10 min-2,5 h, step 5 min Cooking temperature : 145 °C |
| 16 | Steam | After water boiling | Default cooking time : 30 min
Cooking time adjusted from 10 min-1 h, step 5 min Cooking temperature : 98-99 °C |
| 17 | Meat | After start of program | Default cooking time : 6 h
Cooking time adjusted from 2-8 h, step 1 h Cooking temperature : 93 °C |
| 18 | Custom | Time adjust range is from 5 min to 9 h 55 min
Temperature adjust range is from 35 to 160°C. |
|
| 19 | Keep warm | 24 h | |
| 20 | Delay | From 30 min to 24 h | step (“+”) 1h, step (“-“) 10 minutes |
NOTES:
- Press the upper lid firmly to avoid poor cooking and heat insulation performance caused by poor sealing.
- If there are 8 or less cups of rice inside the cooker, the cooked rice will taste the best and with nice flavour.
- After the inner pot is put inside the electric cooker, turn it around for full contact with the heater. Before selecting a working mode for cooking, please confirm that the inner pot with food is well placed inside the outer pot. When the inner pot is not (well) placed, it is not allowed to start cooking to avoid any accident.
- Do not put any utensils into the pot to avoid poor heat performance.
- If there is any corrosion caused by the deformed or damaged inner pot surface, please stop using it and contact nearest dealer for replacement. The inner pot is treated with non-adhesive coating, so it is not allowed to use hard or metal spoons or brush.
- If you wish to stop any operation, you should press “Keep Warm/Cancel” button for 3 seconds to put device in stand-by mode..
CLEANING AND MAINTENANCE
Body/main unit and lid should be cleaned after every use.
- Unplug the multi cooker before starting to clean it.
- Wait until the multi cooker has cooled down sufficiently before cleaning it.
Interior Part :
- Inside of the lid and the main body : Wipe with damp cloth, make sure to remove all the food residues stuck to the multi cooker.
- Heating element : Wipe with with damp cloth and remove food residues.
Exterior Part :
- Surface of the lid and outside of the main body: Wipe with a cloth damped with soapy water.
- Only use soft and dry cloth to wipe the control panel.
- Make sure to remove all the food residues around the control buttons.
- Before cleaning remove the valve by turning it counter clockwise before pulling it out. To reposition align the valve and turn it clockwise until it locks securely in place.
- Accessories (pot , spoon, ladle, steamer, measure cup) – soak in hot water and clean with sponge, or put them into dishwasher for cleaning.
Lid’s bottom plate and seal are not removable.
TROUBLESHOOTING
If you encounter problems when using this multi cooker, check the following points before requesting service. If you cannot solve the problem, contact the service center in your country.
| Problem | Solution |
| The light on the button does not go on. | There is a connection problem. Check if the power cord is connected to the cooker properly and if the plug is inserted firmly into the power outlet |
| The light is defective. Take the appliance to service center to check. | |
| The rice is not cooked. | There is not enough water. Add water according to the scale on the inside of the inner pot. |
| You did not press the start button (Start) to start cooking. | |
| Make sure that there is no foreign residue on the heating element and the outside of the inner pot before switching the multi cooker on. | |
| The heating element is damaged, or the inner pot is deformed. Take the cooker to service center to check. | |
| The rice is scorched. | You have not rinse the rice properly. Rinse the rice until the water runs clear. |
| You did not choose the correct function for cooking. | |
| Water spills out of the multi cooker during cooking | Make sure that you add water to the level indicated on the scale inside the inner pot that corresponds to the number of cups of rice used. |
| Make sure the water does not exceed the first level (as max) on the scale, as this may cause the appliance to overflow during cooking. | |
| Error message (E1, E2, E3, or E4) appears on the display. | There is malfunction in your multicooker. Take the appliance to service center authorized to check. |
| Item Number | KF-R50 (touch panel) |
| Voltage | 220-240 V~ , 50/60Hz |
| Power | 700 W |
| Capacity | 5L |
| Number of persons served | 5-10 |

This marking indicates that this product should not be disposed with other household wastes throughout the EU. To prevent possible harm to the environment or human health from uncontrolled waste disposal; recycle it responsibly to promote the sustainable reuse of material resources. To return your used device, please use the return and collection systems or contact the retailer where the product was purchased. They can take this product for environmental safe recycling.
VISIT: WWW.DELIMANO.COM
Product name: Delimano 18in1 MultiCooker
ID: 105973384
Model no: KF-R50
Voltage/Frequency/Wattage: 220-240V~, 50/60Hz, 700W
Country of origin: P.R.C.
Trademark owner/EU Importer/Distributor: TOP SHOP INTERNATIONAL SA, Via al Mulino 22, CH-6814 Cadempino, Switzerland Production date and batch number can be found on product.
Manufacturer: FOSHAN SHUNDE KUFU ELECTRIC APPLIANCES CO.,LTD Address: Floor 2nd, 3rd floor, No.2-1, Changbao East Road, Julong Industrial Area, Huakou Neighborhood Committee, Ronggui Town, Shunde District, Foshan City, Guangdong Province, P.R.C
