![]() HDWT02B Automatic Water Timer
HDWT02B Automatic Water Timer
Instruction Manual
Thank you for your purchase.
Please contact us if you have any questions. We will get back to you within 24 hours.
Email: [email protected]
Please attach your Order ID so that we can serve you better.
Warning:
- Do not use for industrial purposes or in conjunction with chemicals, foodstuffs, and explosive materials.
- Only use clear freshwater.
- Do not pull the hose connected to the Water Timer.
- Children are not allowed to use the water timer without supervision.
- When expecting freezing temperatures, timers should be removed from the hose faucet and stored indoors to avoid potential freeze damage.
- Do not disassemble or repair the product, but only by authorized service personnel.
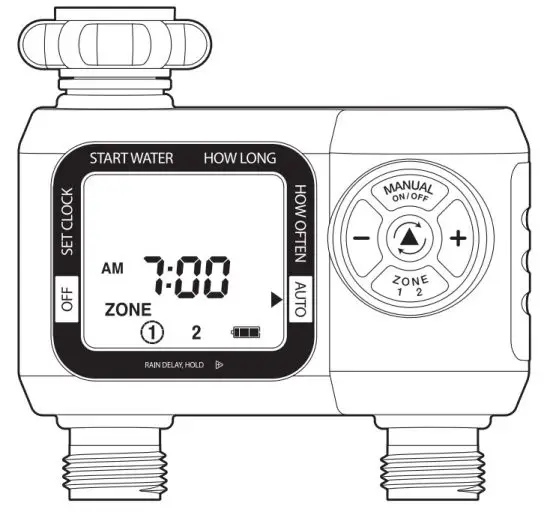
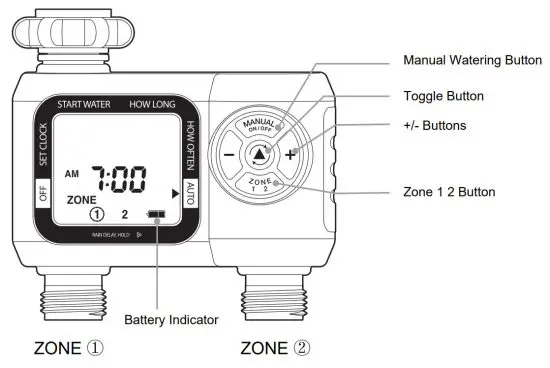
Product Layout
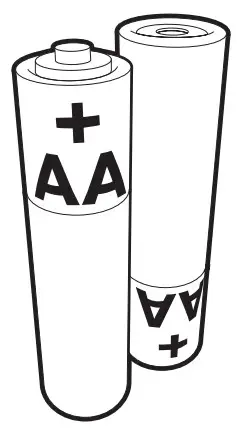
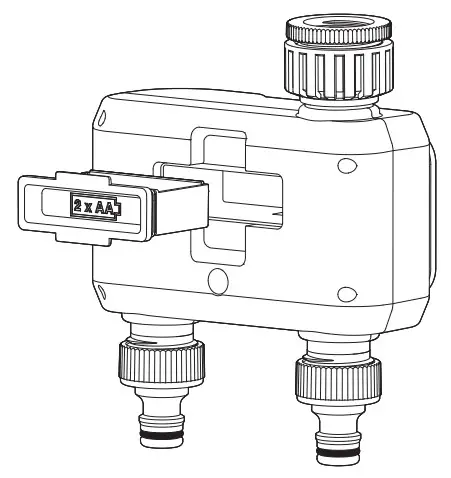
Battery Installation
Install 2AA Alkaline batteries by removing the battery holder from the back of the water timer and inserting the battery as indicated. Replace the battery holder, making sure that is firmly and securely placed in the water timer.

We recommend replacing batteries when the indicator reaches

Note:
- In order to stop the water timer from failing because of a weak battery, if you are away for a long time, the battery must be replaced when the battery still shows “LOW”.
- Do not dispose of batteries in a fire. Batteries may explode or leak.
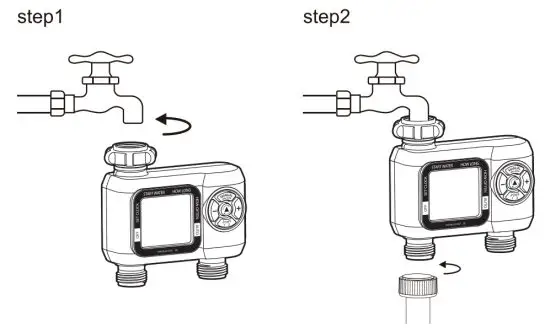
Installation
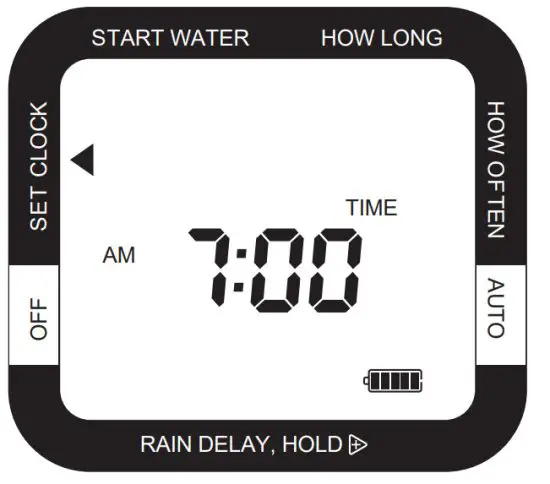
Setting The Clock
- Press the Cursor button
 to move the Arrow Pointing◄ to SET CLOCK.
 - Press the
 &
& buttons to adjust the clock to the current time.
 - Press the Cursor Button again to set the time and move to the next setting, Start Water.
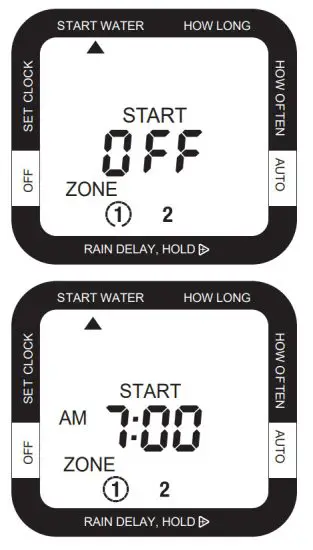
Select When To Water
- With the arrow pointing to Start Water, use the & buttons to select the first time of the day you want to water. All remaining watering cycles during the day will be based on this time.
- Press ZONE
 to change the zone. You must first enter a start time for each zone you are programming before any other settings for a zone.
 - Press the Cursor Button to move to the next setting.
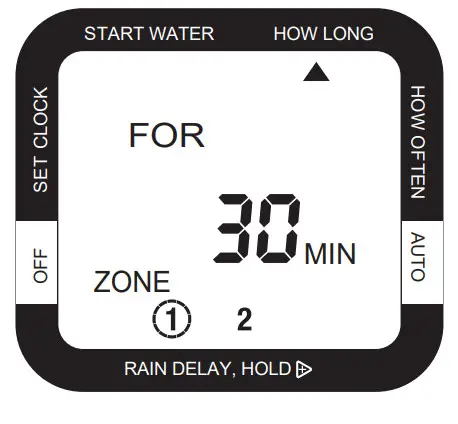
Select How Long To Water
- With the arrow pointing to How Long use the & buttons to select the length of each watering cycle. Cycles can be up to 360 minutes (6 hours) in duration.
- Press ZONE to change the zone. You must set How Long for each zone you are programming before proceeding.
- Press the Cursor Button to move to the next setting.
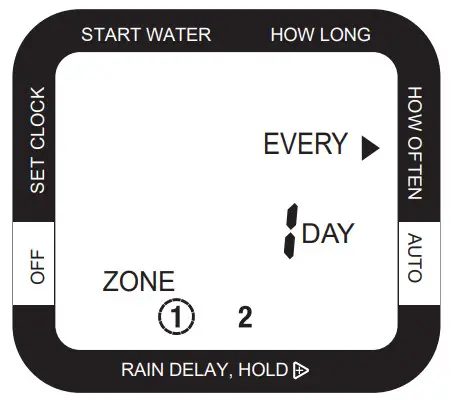
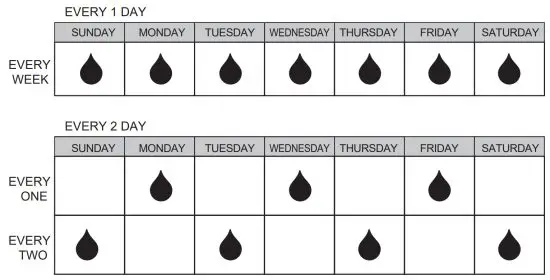
Select How Often To Water
- With the arrow pointing to How Often use the & buttons to select the watering frequency.
- You will be able to water as often as every 1 hour, every day or as infrequently as once every 7 days.
- Press ZONE to change the zone or the Cursor Button to move to the next setting. You must set How Often for each zone you are programming before proceeding.
- After programming, the timer will be in Auto mode.
- If the timer is not in Auto mode, press the Cursor Button to switch to Auto.
- The screen display will alternate between the current TIME and the NEXT START TIME for each zone. This will allow you to see at a glance what will happen next.
- If the next watering cycle is more than 24 hours away, the NEXT START TIME will be displayed in days instead of showing a time.


Rain Delay Mode
- If there is rain in the forecast and you wish to temporarily stop watering, you can use Rain Delay.
- Rain Delay Mode will stop all watering for up to 7 days.
- After the delay period, the watering program will begin running automatically.
- To activate Rain Delay Mode, make certain the arrow is pointing to AUTO.
Hold the key for 3 secs, then select the delay period. You can reduce the delay period with the key. - In Rain Delay Mode, the screen will toggle between the current TIME and the remaining DELAY time. If the delay is greater than 12 hours, the DELAY will be shown in DAYS.

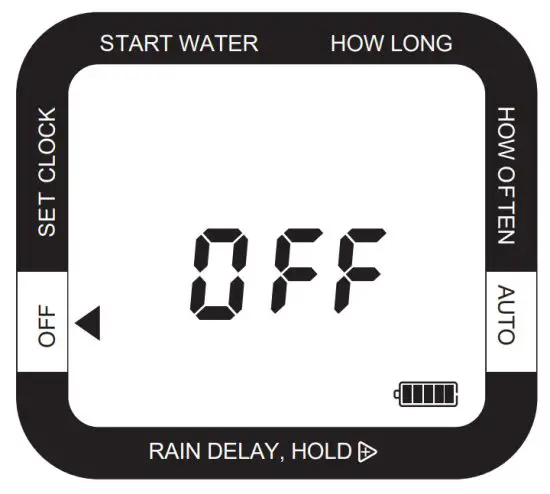
Off Mode
- If you wish to stop watering for an extended period, push the Cursor Button until the arrow is pointing to OFF. The timer will not water automatically while in this mode. The screen will display the word OFF in large letters.
- To start watering automatically again, simply press the Cursor Button until the arrow is pointing to AUTO. The program will begin watering at the next available Start Time.
Note:
Setting the timer to OFF disables all watering zones. In order to disable a specific zone (or zones), use the Cursor Button![]() to move to HOW LONG.
to move to HOW LONG.
Ensure you are adjusting the desired watering zone by using the ZONE![]() button. Adjust the HOW LONG setting to “0”. To reactivate the zone, adjust the HOW LONG setting back to the desired watering duration.
button. Adjust the HOW LONG setting to “0”. To reactivate the zone, adjust the HOW LONG setting back to the desired watering duration.
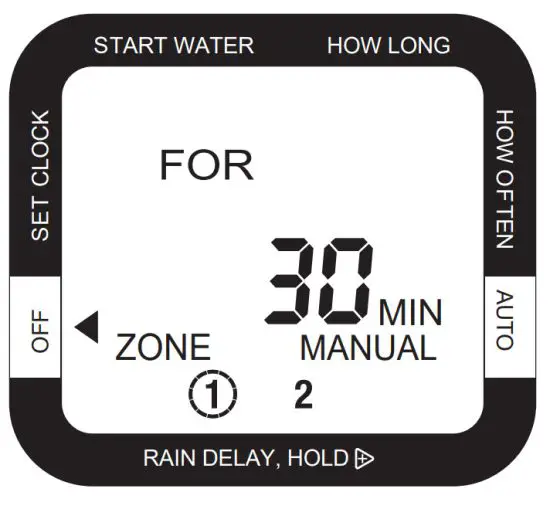
Manual Watering
- Press Manual On/Off
 , then the manual mode will start.
 - Press ZONE to select the zone you want to open. Then press the or button to adjust the amount of time you want the valve to be open.
- The valve will open after a few seconds and automatically close after the selected time.
NOTE:
The manual mode of both zones cannot be activated as long as any zone is open.
Timer Reset
- If you need to completely erase all settings in the timer and return it to its original state, press and hold the Cursor Button for 7 seconds.
- The screen will display RESET to confirm the action.
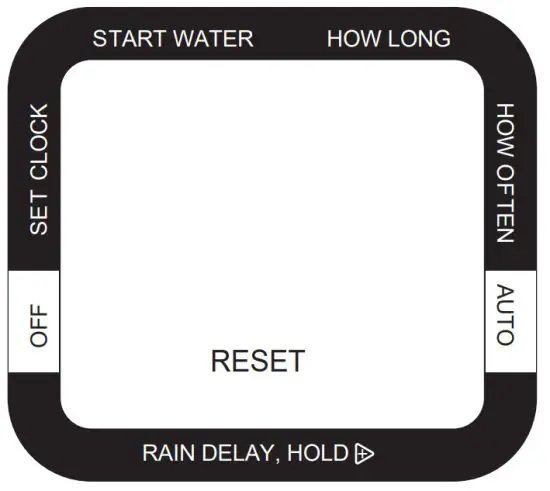
NOTE: All programming will be lost when the timer is RESET.
Useful Tips
- BATTERY LIFE
– Only use fresh long-lasting alkaline batteries
– Do not use rechargeable batteries
– Turn off the unit when not in use
– Remove the batteries before storage
– Moisture sensor uses more energy
– Frequently watering schedules can cause the batteries to drain faster - CLEANING YOUR TIMER
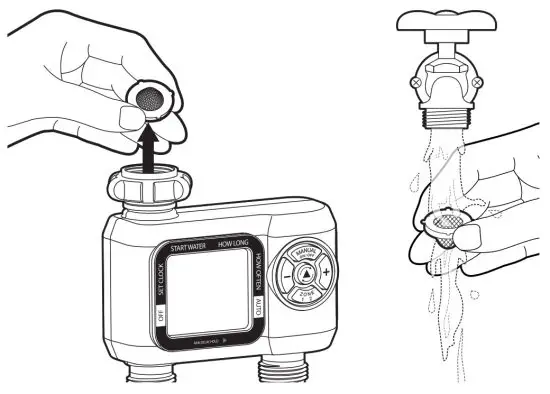
Your timer should be cleaned periodically. From time to time, you may get sediment or dirt build-up in your timer. Follow the information below.
1) Turn off your water faucet. Remove the timer from the faucet connection and your hose connections. Look at the filter washer at the faucet connection input. Check that the filter washer is clear of any built-up sediment.
2) If the filter is dirty, remove the filter washer from the timer. Clean out the filter washer by placing it under running water.
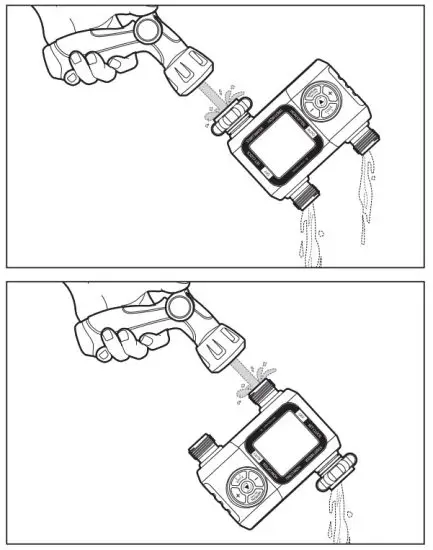
 3) Turn the timer upside down and activate the MANUAL mode. This will open up the valves and allow you to run water into the output connectors.
By doing this, you can see if there are any clogs in the water flow. Once you see the water flow is correct, deactivate the MANUAL mode.
- SEASONAL STORAGE
Cold or freezing temperatures can damage the timer if still connected to the faucet. At the first forecast of frost, it is best to remove the timer from the faucet and place the timer indoors. (Coldwater, if left in the timer, will damage the timer from the ice formed).
– Remove the batteries when the timer is placed in storage
– Recycle used batteries, do not dispose of in the garbage
Specifications
- Watering Duration: 1min-360min
- Max. Water Pressure:120 psi
- Battery:2 x AA batteries (not included)
Packing List
- Water Hose Timer x 1
- Instruction Manual x 1
One Year Limited Warranty
DEWENWILS warrants this product to be free from defects in material and workmanship for a period of one year from the date of purchase.
Warranty is void if the damage is caused by misuse or improper installation.
Email: [email protected].
Our dedicated customer service team will get back to you within 24 hours.
dewenwils HODT12B Outdoor Remote Control Countdown Timer Instruction Manual

Thank You for Your purchase.
Please contact us if you have any problem.
Email: [email protected].
Please attach your User Name or Order ID so that we can assist you better.
CAUTION
- Suitable for use with outdoor appliances.
- For use ONLY with a three conductor GFCI protected outlet.
- Raintight when mounted vertically with receptacles facing downward.
- Do not immerse in water.
- DO NOT EXCEED RATED CAPACITY.
- The device must be mounted in a vertical position with the receptacle facing downward and with the receptacle at least 2 FT above the ground level.
- Cord-connected Operating Control.
- Temperature limits of the SWITCH HEAD: -40-40ºC.
Installation
- Mount or hang the RECEIVER on the wall near a GFCI protected outlet (125V 60Hz) which the power supply cord of the RECEIVER will plug into.
- Plug the cord of the device you wish to control remotely at the bottom of the RECEIVER.
Button Layout
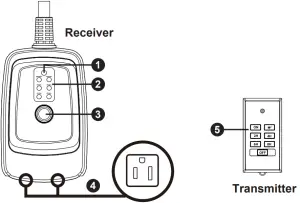
- Sensor (
 ):
):
Sensor will turn receiver on at dusk and off at dawn. - Operating Mode:
Timer will turn ON, 2, 4, 6, or 8 hours after dusk. - Select button:
To select the function and repeatedly.
Power ON Sensor ( ) → 2H → 4H → 6H → 8H → OFF → ON - Outlets:
Plug the lights or devices to be controlled by the timer into one of the outlets. - Transmitter
Opoerating Instructions
Receiver & Transmitter operation modes:
ON: Power is ON to attached devices Sensor ( Dusk – Dawn): power will turn on at dusk and remain on until dawn
- 2 Hrs: Power will turn on at dusk and remain on for 2 hours
- 4 Hrs: Power will turn on at dusk and remain on for 4 hours
- 6 Hrs: Power will turn on at dusk and remain on for 6 hours
- 8 Hrs: Power will turn on at dusk and remain on for 8 hours
- OFF: Power is OFF to attached devices
Note for Transmitter: Control electrical outlet up to a distance of 100 feet.
Note The timer has daily repeat after setting, in case of power failure, it will stop operating when the power goes out. Once power is restored, reset the desired operating mode as the operating instructions.
Helpful Tips
- When set to “ON”, the timer will provide continual power to attached devices until the timer is switched to “OFF”, or to any of the other operating modes.
- In the sensor ( dusk-to-dawn) mode, temporary light sources like headlights, porch lights and other external light sources will not interfere with the photocell function unless the external light source is on for more than 15 minutes. In that case, the timer will shut off until darkness is restored. The improvement avoids the flickering.
- Once programming activates at dusk in the 2hr, 4hr, 6hr, or 8hr mode, the program cycle will complete before the timer resets. Headlights, porch lights, street lamps and other external lighting sources will not interfere with the active timer program.
Battery Handling and Usage
- Install the battery observing the positive (+) side up as indicated inside the battery compartment.
- Never throw batteries into a fire. Do not expose batteries to fire or other heat sources.
- Battery contains mercury. Do not put in trash. Recycle or manage as hazardous waste.
Battery Replacement
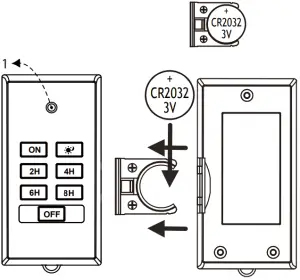
- Remove the battery compartment cover away from the remote (see diagram below)
- Remove the old battery and place a new Type 3V (CR2032) lithium battery into the battery compartment.
- Ensure the battery is installed correctly with the positive (+) side up.
- Replace the battery compartment cover.
- Dispose or recycle spent/discharged batteries in compliance with all applicable laws. For detailed information, contact your local solid waste authority.
Caution: Failure to properly align the battery polarity can cause personal injury and/or property damage.
WARNING:
Do not ingest the battery, Chemical Burn Hazard (The remote control supplied with) This product contains a coin/button cell battery. If the coin/button cell battery is swallowed, it can cause severe internal burns in just 2 hours and can lead to death. Keep new and used batteries away from children. If the battery compartment does not close securely, stop using the product and keep it away from children. If you think batteries might have been swallowed or placed inside any part of the body, seek immediate medical attention.
Specifications
DO NOT ATTACH A DEVICE THAT EXCEEDS THE UNIT RATINGS:
125 V ac 60 Hz,
15 A Resistive,
15 A General Use,
1000 W Tungsten,
500 VA Electronic Ballast, 1/2HP.
120 V ac, 60 Hz, 8.3 A Ballast
RECEIVER MODEL: TM-110
TRANSMITTTER MODEL: TR-034-7
FCC ID: PAGTR-034-7
Safety Information
Federal Communication Commission Interference Statement
This equipment has been tested and found to comply with the limits for Class B digital device, pursuant to part 15 of the FCC Rules.
These limits are designed to provide reasonable protection against harmful interference in a residential installation. This equipment generates, uses and can radiate radio frequency energy and, if not installed and used in accordance with the instructions, may cause harmful interference to radio or television reception, which can be determined by turning the equipment off and on, the user is encouraged to try to correct the interference by one or more of the following measures:
- Reorient or relocate the receiving antenna.
- Increase the separation between the equipment and the receiver
- Connect the equipment into an outlet on a circuit different from that to which the receiver is connected.
- Consult the dealer or an experienced radio/TV technician for help.
This device complies with Part 15 of the FCC Rules. Operation is subject to the following two conditions: (1) This device may not cause harmful interference, and (2) this device must accept any interference received, including interference that may cause undesired operation.
FCC Caution: Any changes or modifications not expressly approved by the party responsible for compliance could void the user’s authority to operate this equipment.
One Year Limited Warranty
Dewenwils warrants this product to be free from defects in material and workmanship for a period of one year from the date of purchase. Warranty is void if damage is caused by misuse or improper installation. Please contact us if you have any questions.
Email: [email protected].
Our dedicated customer service team will get back to you within 24 hours.
- Antenna Type Max. Antenna Gain(dBi)
- PCB printed antenna: 0
This device complies with Part 15 of the FCC rules and Industry Canada license‐exempt RSS standard(s). Operation is subject to the following two conditions: (1) this device may not cause harmful interference, and (2) this device must accept any interference received, including interference that may cause undesired operation.
The manufacturer is not responsible for any radio or TV interference caused by unauthorized modifications or change to this equipment. Such modifications or change could void the user’s authority to operate the equipment.
This radio transmitter (identify the device by certification number or model number if Category II) has been approved by Industry Canada to operate with the antenna types listed below with the maximum permissible gain indicated. Antenna types not included in this list, having a gain greater than the maximum gain indicated for that type, are strictly prohibited for use with this device.
This equipment has been tested and found to comply with the limits for a Class B digital device, pursuant to part 15 of the FCC Rules. These limits are designed to provide reasonable protection against harmful interference in a residential installation. This equipment generates, uses and can radiate radio frequency energy and, if not installed and used in accordance with the instructions, may cause harmful interference to radio communications. However, there is no guarantee that interference will not occur in a particular installation. If this equipment does cause harmful interference to radio or television reception, which can be determined by turning the equipment off and on, the user is encouraged to try to correct the interference by one or more of the following measures:
- Reorient or relocate the receiving antenna.
- Increase the separation between the equipment and receiver.
- Connect the equipment into an outlet on a circuit different from that to which the receiver is connected.
- Consult the dealer or an experienced radio/TV technician for help.
The device has been evaluated to meet general RF exposure requirement.
