![]()
4D-V4
Suitable for ages over 14
Quadcopter operating instructions

WIFI
- In order to meet the requirements of the aeronautical radio station’s electromagnetic environment (various aero models and UAV are not allowed to fly within the range of 10 km on each side of the centerline and 20km on both ends of the airport runway and in them) and civil aviation routes and airlines. Using various models and drones in the no-fly zone issued by the relevant state departments is prohibited.
Warning
- The packaging and instructions contain important information and should be kept.
- With this aircraft, you are responsible for ensuring that no harm will be caused to the personal and property of others.
- Commissioning and installing of aircraft must be strictly in accordance with the operating instructions, and attention shall be paid to the distance between the aircraft and the user or other people shall be 2 to 3m to prevent the aircraft from bumping into the head, face, and body of people and causing injury in flying and landing, etc.
- Our company and distributors are not responsible for any loss and damage, as well as injury to people caused by improper use or operation.
- Children should be guided by adults when operating the aircraft. This product is prohibited to be operated by children under 14 years old.
- Please follow the instructions or packaging instructions to install and use correctly, and some parts should be assembled by adults.
- The product contains small parts, please place it out of the reach of children to prevent the risk of accidental eating or suffocation.
- It is strictly forbidden to play on the road or in place where water is accumulated to avoid accidents.
- Please put away the packing materials in time to avoid harm to children.
- Do not disassemble or modify the aircraft. Disassembly or modification may cause malfunction to the aircraft.
- The charging cable needs to be inserted into the designated power supply 5V = 2A which is the same as the product label.
- Only use the charging cable configured by the factory.
- The charging cable is not a toy.
- When charging the rechargeable battery, it must be under the supervision of an adult. When charging, it must be far away from flammable materials. During charging, the guardian should not leave the monitoring range.
- Please do not short circuit or squeeze the battery to avoid explosion.
- Do not mix different types of lithium batteries.
- The aircraft uses a rechargeable lithium battery, which needs to be pulled out for charging.
- Do not short-circuit, decompose or throw the battery into the fire: do not put the battery in a place with high temperature and heat (such as in a fire or near an electric heating device).
- The aircraft should be used as far away from other electrical equipment and magnetic objects as possible, they may cause mutual interference.
- Please keep a safe distance from the high-speed rotating propeller to avoid the risk of scalp or cut.
- The motor is a hot part; please do not touch it to avoid bums.
- LED has laser radiation; please do not give direct light beam to others.
- Do not use the model near your ears! Misuse may cause hearing damage.
- As for the USI3 charging cable, the data cable provided by our company must be used to charge the battery, otherwise, it will cause damage to the battery.
- Turn off the switch and unplug the battery when the battery of the aircraft is used up, and charge after 30 minutes of rest, otherwise, the battery will be easily damaged.
List of accessories included:

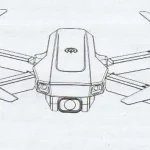
Name of each part of aircraft:

Aircraft unfolding steps
Unfold the aircraft in order according to the map

Installation figure of aircraft protection ring:

According to the figure, align the protection ring parts with the armhole to make the connection, confirm the installation is in place before flying to avoid falling during the flight.
![]() Note: Please be sure to install the protective ring before flying!
Note: Please be sure to install the protective ring before flying!
Wind blade installation diagram:

5.1 Unscrew the screw and remove the fan blade. iL
![]() Note: The fan blade is printed with letters of Al, A2, Bl, and B2, in which, Al = A2. B1 = B2, please install it correctly according to the diagram. otherwise, it cannot take off
Note: The fan blade is printed with letters of Al, A2, Bl, and B2, in which, Al = A2. B1 = B2, please install it correctly according to the diagram. otherwise, it cannot take off

5.2 Loosen the screw, open the two fan blades and the connecting parts, and remove the fan blades for replacement. (When Al/A2 fan blade is broken, replace Al/A2, and so do to B1/B2 fan blade, error in replacement will cause that it can’t take off)
Lithium battery charging instructions:

6.1 Buckle the battery lock of the aircraft.
 6.2 Remove the battery.
 6.3 Charging: Insert the USB interface of the USB charging line into the USB port of the computer (or use the power adapter with an output of 5V = 2A), and connect the plug at the other end of the USB charging line to the battery socket. The USB red light of the aircraft will go out when charging. The red light will always be on when the battery is full and the charging is completed.
 It must be charged with the aircraft charging cable provided by the factory, and other charging cables cannot be used. Be sure to remember to avoid accidents.
Name of each part of the remote control:

Remote control battery installation:

Note
- The positive and negative poles and the positive and negative poles of the battery box must be identified when inserting the battery, and error is not allowed.
- Do not mix old and new batteries.
- Do not mix different types of batteries.
Instructions in charging:
- Do not put the charged battery in a place with high temperature and heat, such as an open flame or an electric heating device, otherwise, damage or explosion may occur.
- Do not hit or beat the surface of hard objects with the battery.
- do does not disassemble the battery.
- Do not immerse the battery in water, and please store the battery in a dry place.
- Do not leave the battery alone when charging.
Warning ![]()
When this aircraft not flying, disconnect the battery plug from the aircraft power connector to avoid battery damage.
Environmental requirements before flight:

Please choose an outdoor open environment with no rain, snow, and windless than Level 3. Please stay away from people, trees, wires, tall buildings, airports, and signal transmission towers when flying. Do not play it indoor environment
APP can only be viewed (photographed/recorded) when using the remote controller, and the remote controller cannot be used when using the APP.
Pre-flight preparation instructions (using a remote control):

10.1 Turn on the power of the aircraft and place it on the horizontal plane. At this time, the aircraft placed on the horizontal plane will automatically enter the code-matching state, and the front white light and the red light of the fuselage will flash.
![]() Note: Set the aircraft in a correct direction, and the nose shall face forward. It must be placed on the horizontal plane.
Note: Set the aircraft in a correct direction, and the nose shall face forward. It must be placed on the horizontal plane.

10.2 Turn on the power switch button of the remote controller![]() (step 1), the power indicator of the remote controller will flash, push the throttle lever upward to the top (step 2) and then push it to the end (step 3). The frequency is successfully matched, and the unmanned plane lamp will not flash and turn on normally.
(step 1), the power indicator of the remote controller will flash, push the throttle lever upward to the top (step 2) and then push it to the end (step 3). The frequency is successfully matched, and the unmanned plane lamp will not flash and turn on normally.
The aircraft/remote controller must ensure sufficient power or it cannot take off!
10.3Horizontal calibration operation:
Press and hold the calibration button on the remote control, the LED light on the aircraft flashes quickly![]() . The LED lights on the aircraft are always on, which means the calibration is complete, and the remote controller emits a “beep” (Figure 1).
. The LED lights on the aircraft are always on, which means the calibration is complete, and the remote controller emits a “beep” (Figure 1).
![]() Note: The calibration must be completed only when the aircraft is placed on a horizontal plane.
Note: The calibration must be completed only when the aircraft is placed on a horizontal plane.
 10.4 Start/stop
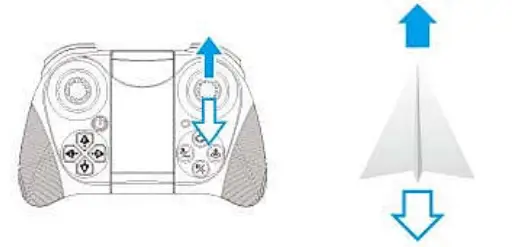
Push the left control lever on the remote control upward (Figure 2). At this time, the aircraft can take off normally. After taking off, all the indicator lights of the aircraft will always be on. During the flight, whether you short press the % key, the aircraft will stop flying (Figure 3).
![]() Note: This function operation is only suitable for the aircraft in an uncontrolled state. Under normal circumstances, it is recommended to use the one-key takeoff/one-key landing
Note: This function operation is only suitable for the aircraft in an uncontrolled state. Under normal circumstances, it is recommended to use the one-key takeoff/one-key landing ![]() key.
key.

10.5 One-key take-off and landing
When unlocking is complete, gently press the “One Key Takeoff/Landing” key on the remote control ![]() (Figure 4), the aircraft will automatically rise to a height of about 1 meter to maintain a stable flight; when you press this function key gently again, the aircraft will automatically land slowly.
(Figure 4), the aircraft will automatically rise to a height of about 1 meter to maintain a stable flight; when you press this function key gently again, the aircraft will automatically land slowly.
 Please follow the steps in the above sequence before taking off: frequency matching (reference 10.1)→ remote control starting frequency matching (reference 10.2)→ horizontal calibration (reference 10.3)→ start/stop (reference 10.4)→ one-button take-off, and landing (reference 10.5)
Remote control method:
 |
When the left joystick (throttle) is pushed up, the rotation rate of the main blade increases, and the aircraft rises. When the left joystick (throttle) is pushed down, the rotation rate of the main blade slows down and the aircraft descends. |
 |
When the left joystick (rudder) is pushed to the left, the aircraft nose turns to the left. When the left joystick (rudder) is pushed to the right and the nose of the aircraft will turn to the right. |
 |
When the right joystick (rudder) is pushed up, the aircraft moves forward. When the right joystick (rudder) is pushed down, the aircraft moves backward. |
 |
When the right joystick (rudder) is pushed to the right, the aircraft fuselage deviates to the right. When the right joystick (rudder) is pushed to the left, the aircraft fuselage deviates to the left. |
360° roll:
 |
12.1 360° roll on the left Short press the 360° roll button, then push the right joystick to the left, and the aircraft will flip 360° to the left accordingly. |
 |
12.2 360° roll on the right Short press the 360° roll button, then push the right joystick to the right, and the aircraft will flip 360° to the right accordingly. |
 |
12.3 Roll Forward 360° Press the 360° tumble button for a short time, then push the right joystick upward, and the aircraft will turn forward 360°correspondingly. |
 |
12.4 360° roll backward Short press the 360° roll button, then push the right joystick down, and the aircraft will flip 360° backward accordingly. |
NOTE: This equipment has been tested and found to comply with the limits for a Class 13 digital device, pursuant to part 15 of the FCC Rules. These limits are designed to provide reasonable protection against harmful interference in a residential installation. This equipment generates uses and can radiate radio frequency energy and, if not installed and used in accordance with the instructions, may cause harmful interference to radio communications. However, there is no guarantee that interference will not occur in a particular installation. If this equipment does cause harmful interference to radio or television reception, which can be determined by turning the equipment off and on, the user is encouraged to try to correct the interference by one or more of the following measures:
- Reorient or relocate the receiving antenna.
- Increase the separation between the equipment and receiver.
- Connect the equipment into an outlet on a circuit different from that to which the receiver is connected.
- Consult the dealer or an experienced radio/TV technician for help
Changes or modifications not expressly approved by the party responsible for compliance could void the user’s authority to operate the equipment.
This device complies with Part 15 of the FCC Rules. Operation is subject to the following two conditions:
- this device may not cause harmful interference, and
- this device must accept any interference received, including interference that may cause undesired operation.
Introduction of remote control function and operation:
13.1 Headless mode
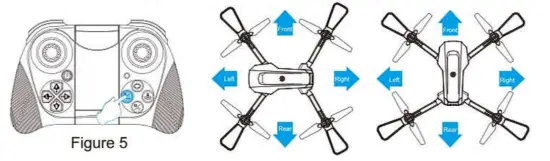
The front of the aircraft when the code-matching is turned on is by default the front in headless mode; if it is necessary to adjust the direction, please turn on the code-matching again, and short press the remote controller “headless mode” function key c / (Figure 5). When exiting, please tap gently press this function key again.
![]() Special prompt: Please make sure the aircraft is aligned with the straight line and let the gyroscope automatically detect the straight line, and the headless mode of straight-line flight can be realized.
Special prompt: Please make sure the aircraft is aligned with the straight line and let the gyroscope automatically detect the straight line, and the headless mode of straight-line flight can be realized.
13.2 One key return
When the flying distance of the aircraft is too far, the aircraft can be recalled with the return function. When turning on the code-matching, the remote control must be directly facing the tail of the aircraft. During flight, press and hold the one-key home button 0 (Figure 6). When the remote control emits a “beep” sound, the aircraft will enter the one-key home function, and will automatically return to our site; when the joystick is operated in any form, the aircraft will be released from the home function.

13.3 Speed switching
When the aircraft takes off, it is by default in the low-speed mode (3-geared switching); gently press the remote control by a “beep” sound for low-speed gear, two “beep” sounds for medium-speed gear, and three “beep” sounds for high-speed gear (Figure 7)”.

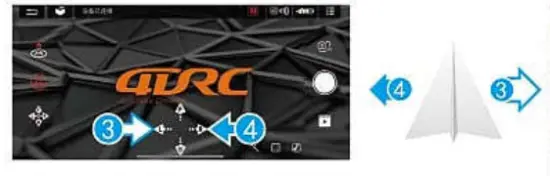
13.4 Fine-tuning function
 |
Fine-tuning of aircraft moving forward/backward When the aircraft leaves the ground and the aircraft deviates to the rear, press and hold 1 forward fine-tuning key to fine-tuning; when the aircraft deviates to the front, press and hold 2 backward fine-tuning keys to fine-tune. |
 |
Fine-tuning of aircraft deviates to the left/right When the aircraft leaves the ground and the aircraft deviates to the right, press and hold 3 left fly fine-tuning keys to adjust, and when the aircraft deviates to the left, press and hold 4 right fly fine-tuning keys to adjust. |
APP download and installation instructions:
14.1 Download and install the software
For Google mobile phone, after scanning the code, choose to open and download in the browser.

https://play.google.com/store/apps/details?id=com.vison.macrochip.drc.pro
 https://apps.apple.com/cn/app/id1510269271
14.2 Link description
1 Turn on the power of aircraft, enter the (Settings) option (of mobile phone or IPAD), and open the wireless network; find the device name of “4DRC-4K- ” in the wireless network search list and connect; after connection, exit the setting option.
2 Open the software icon of “4DRC PRO” in the mobile phone to enter the control interface. (Try to stay away from other signal source environments when flying)

APP control interface function introduction:

Pre-flight preparation instructions (using APP operation):

16.1 Turn on the power of the aircraft and place it on the horizontal plane. At this time, the aircraft placed on the horizontal plane will automatically enter the code-matching state, and the front white light and the red light of the fuselage will flash.
![]() Note: Set the aircraft in a correct direction, and the nose shall face forward. It must be placed on the horizontal plane.
Note: Set the aircraft in a correct direction, and the nose shall face forward. It must be placed on the horizontal plane.
16.2 Turn on the WiFi function in the mobile device, select “4DRC_4K_********” (Figure 8) in the WiFi list, and turn on APP after it is connected successfully. Click on more functions (Figure 9), turn on the touch rocker and the aircraft lights will turn on normally, indicating successful frequency matching (Figure 10).

16.3 Horizontal calibration operation:
APP Application operation: click the “correction” icon in the app interface. The LED light on the aircraft flash and the calibration of the LED light on the aircraft is completed. ![]() Note: The calibration must be completed only when the aircraft is placed on a horizontal plane.
Note: The calibration must be completed only when the aircraft is placed on a horizontal plane.
16.4 One-Key Takeoff and Landing
APP operation:
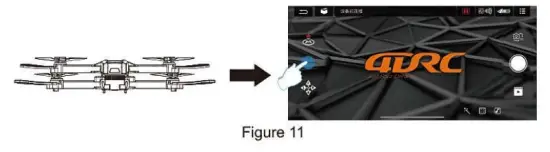
Click the “one-key take-off’ icon (Figure 12) in the APP control interface, the one-key take-off function can also be achieved; during flight, click this icon again, the aircraft will automatically land slowly.
 APP Application Operation Before taking off, please follow the steps in the above sequence: Open (reference 16.1)•APP Application startup frequency matching (reference 16.2), horizontal calibration (reference 16.3), one-touch take-off, and landing (reference 16.4)
APP Application Control Method:
 |
When the left joystick (throttle) is pushed up, the rotation rate of the main blade increases, and the aircraft rises. When the left joystick (throttle) is pushed down, the rotation rate of the main blade slows down and the aircraft descends. |
 |
When the left joystick (rudder) is pushed to the left, the aircraft nose turns to the left. When the left joystick (rudder) is pushed to the right and the nose of the aircraft will turn to the right. |
 |
When the right joystick (rudder) is pushed up, the aircraft moves forward. When the right joystick (rudder) is pushed down, the aircraft moves backward. |
 |
When the right joystick (rudder) is pushed to the right, the aircraft fuselage deviates to the right. When the right joystick (rudder) is pushed to the left, the aircraft fuselage deviates to the left. |
APP Application function operation introduction:
18.1 Headless mode
APP Application operation: the front of the aircraft when starting up for frequency matching is the front of headless mode by default; Whether you need to adjust the direction you need, please restart the frequency matching, enter the APP Application interface, expand the function menu and click the headless mode function (Figure 13). when exiting, please click this function icon again.
![]() Special prompt: Please make sure the aircraft is aligned with the straight line and let the gyroscope automatically detect the straight line. and the headless mode of straight-line flight can be realized.
Special prompt: Please make sure the aircraft is aligned with the straight line and let the gyroscope automatically detect the straight line. and the headless mode of straight-line flight can be realized.

18.2 Speed switching
APP operation: Click the “More Functions” icon (Figure 14) in the APP control interface, and the flight speed can also be switched (Figure 15).

18.3 Fine-tuning function
 |
1. Fine-tuning of aircraft moving forward/backward When the aircraft leaves the ground and the aircraft deviates to the rear, click the forward fine-tuning button of the fine-tuning joystick (1) to adjust. When the aircraft deviates to the front, click the back fine-tuning button of the fine-tuning joystick (2) to adjust. |
 |
2. Fine-tuning of aircraft deviates to the left/right When the aircraft leaves the ground and the aircraft deviates to the right, click the left fine-tuning button on the fine-tuning joystick (3) to adjust. When the aircraft deviates to the left, click the right fine-tuning button on the fine-tuning joystick (4) to adjust. |
18.4 Gesture recognition
When facing the camera’s front lens, click the gesture photo button on the APP. and use any of the following gestures to trigger the aircraft’s photo or camera function.
![]() Special prompt: Please aim at the lens directly and perform gesture recognition at a position about 2-3M away from the lens and in an environment with good light and background.
Special prompt: Please aim at the lens directly and perform gesture recognition at a position about 2-3M away from the lens and in an environment with good light and background.
![]() Yeah, gesture photo
Yeah, gesture photo
In about 3m in front of the aircraft lens, make a Yeah gesture with one hand in a horizontal position; after the aircraft successfully recognizes the gesture. count down 3 seconds and take photos.
![]() Palm gesture video-recording
Palm gesture video-recording
In about 3m front of the aircraft lens, put five fingers together and lift one hand to horizontal position: after the aircraft successfully recognizes the gesture, it will start recording. The recording will end when the gesture is re-recognized (the time difference between the two recognitions shall be greater than 3s).
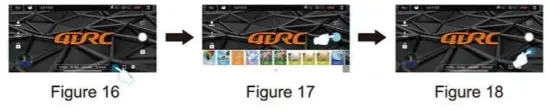
18.5 MV interface
Click the “filter interface” icon (Figure 16) in the APP control interface, after entering the filter interface, you can choose to match your favorite filter effect. Click the recording icon to start recording (Figure 17). After the recording is completed, the synthesized short video or picture will be saved to the media library (Figure 18).
![]() Special prompt: During the recording process, you can rotate the screen or switch the filter effect, and you can also turn the joystick on / off to control the direction and altitude of the aircraft.
Special prompt: During the recording process, you can rotate the screen or switch the filter effect, and you can also turn the joystick on / off to control the direction and altitude of the aircraft.
FAQ and solving guidelines:
| Question | Reason | Solution |
| The aircraft indicator flashes without any response | The aircraft indicator flashes without any response | Charge the battery |
| The blades of the aircraft rotate but cannot fly | 1. Low battery 2.1 Blade deformation 2.2 Installation error of AB propeller |
1. Charge the battery 2.1 Replace the blade 2.2 The fan blades are printed with letters A and B. For fan blades A or B, replace the one that is broken. |
| The aircraft vibrates badly | Blade deformation | Replace the blade |
| Fine-tuning is done but still can’t make the aircraft stable | 1. Blade deformation 2. Defective motor |
1. Replace the blade 2. Replace the motor |
| After the impact, start the aircraft again and it flies uncontrollably | The three-axis acceleration sensor loses its balance due to impact | Leave the aircraft stationary for 5-10 seconds. or correct it by correcting the level. For the steps. please refer to the manual. 10.3 horizontal calibration operation. |