Dura-Pan CURTIS STONE 17PC Nesting Cookware Set Ensemble
RECEPIES
Cheesy Crêpes with Prosciutto, Sun-dried Tomatoes, and Olives
Serves: 6
Prep Time: 15 minutes (plus 30 minutes for resting)
Cook Time: 40 minutes
Make-Ahead: Crêpe batter can be made up to 1 day ahead, covered and refrigerated.
INGREDIENTS
1 1/4 cups whole milk
1 cup all purpose flour, sifted
1/2 cup heavy cream
2 large eggs
3 tsp. sugar
Pinch of salt
3 tbs. unsalted butter
14 oz. fontina cheese, grated
2 oz. fresh ricotta cheese
3/4 cup oil-packed sun-dried tomatoes, drained of excess oil and thinly sliced 1/2 cup kalamata olives, pitted and sliced
6 thin prosciutto slices, torn into bite-size pieces
METHOD
- In a blender, blend milk, flour, cream, eggs, sugar, and salt until smooth. Transfer batter to a bowl, then cover and set aside for 30 minutes. This allows time for flour to absorb all of the liquid.
- Preheat oven to 200°F.
- Using a Curtis Stone 6” Frypan, melt butter over low heat, then remove from heat.
- Heat a Curtis Stone 8” Frypan over medium-low heat. Lightly brush some melted butter over pan. Pour about 3 tbs. of batter into center of pan and swirl to coat the bottom thinly. Cook until edge of the crêpe is light brown, about 1 1/2 minutes. Loosen edges gently with a spatula. Carefully turn crêpe over.
- Sprinkle some of fontina cheese, then ricotta cheese, sun-dried tomatoes, olives, and prosciutto over half of crêpe. Cook until bottom begins to brown in spots and fontina cheese melts, about 1 minute.
- Fold uncovered side of crêpe over the filling, then fold crêpe in half again, forming a triangle. Transfer to baking sheet and tent with foil. Place in oven to keep warm while you make more crêpes. Repeat to form 12 crêpes total, brushing pan with butter as needed.
Celery Root Soup
Serves: 6
Prep Time: 15 minutes
Cook Time: 20 minutes
Make-Ahead: The soup can be made up to 1 day ahead, cooled, covered, and refrigerated. Rewarm soup, covered, over medium-low heat, adding water or milk to thin soup to desired consistency, as needed.
INGREDIENTS
2 tsp. olive oil
1/2 onion, diced
1 garlic clove, coarsely chopped
2 celery roots, peeled, cut into medium dice
7 cups chicken stock or low-sodium chicken broth
1/2 cup heavy whipping cream
2 tbs. chopped fresh chives
Extra-virgin olive oil, for garnish
METHOD
- Heat a Curtis Stone 5qt Stockpot over medium-high heat. Add oil and onion and sauté 3 minutes, or until tender. Add garlic and celery root and cook
3 minutes, or until celery root begins to soften but does not take on any color. Add stock and cream and simmer gently for 15 minutes, or until celery root is tender. - In a blender, working in batches, puree celery root and onion mixture with enough liquid to form a smooth soup consistency. Season soup to taste with salt and pepper.
- Ladle the soup into bowls. Garnish with chives and extra-virgin olive oil and serve.
Creamy Polenta with Goat Cheese and Parmesan
Serves: 4
Prep Time: 30 minutes
Cook Time: 1 hour and 15 minutes
Make-Ahead: The polenta is best served as soon as it is made, since it will continue to thicken after it is made and may become too thick. If the polenta becomes thicker than desired, stir in more hot stock or milk to thin it to the desired consistency.
INGREDIENTS
5 cups chicken broth or stock
2 cups heavy whipping cream
2 cups whole milk
2 garlic cloves, finely chopped
1 shallot, cut in half
1 rosemary sprig
1 thyme sprig
1 1/2 cups polenta (coarse cornmeal)
1/2 cup coarsely crumbled soft goat cheese
1/2 cup freshly grated Parmesan cheese
2 tbs. (1/4 stick) unsalted butter
2 tbs. thinly sliced fresh flat-leaf parsley
METHOD
- In a Curtis Stone 3qt Saucepan, heat the chicken stock over medium heat just until hot. Remove from heat and cover with lid to keep warm.
- Meanwhile, in Curtis Stone 2qt Saucepan, combine cream, milk, garlic, shallot, rosemary, and thyme, and bring to a gentle simmer over medium-high heat. Strain cream mixture into a Curtis Stone 5qt Stockpot.
- Slowly whisk polenta into the hot cream mixture, and then whisk in warm chicken stock. Whisk polenta over medium heat until it boils. Reduce heat to medium-low, cover with lid, and simmer gently, stirring often 1 hour, or until polenta resembles the consistency of mashed potatoes and no longer has a starchy taste.
- Stir in goat cheese, Parmesan, butter, and parsley. Season to taste with salt and pepper. Serve immediately.
Turkey Meatballs with Marinara Sauce
Serves: 8
Prep Time: 15 minutes
Cook Time: 40 minutes
INGREDIENTS
Marinara Sauce:
3 tbs. olive oil
1/2 cup finely chopped shallots
6 large garlic cloves, finely chopped
4 large sprigs of fresh thyme
1 bay leaf
1/2 cup dry white wine
Two 28 oz. cans whole tomatoes, undrained
1/2 cup loosely packed torn fresh basil leaves
Meatballs:
1 1/2 cups cubed (3/4-in.) crustless Italian or French bread (about 2 oz.) 2/3 cup reduced-fat (2%) milk
1/2 cup finely chopped shallots
5 large garlic cloves, finely chopped
1/3 cup finely chopped fresh flat-leaf parsley
1 tbs. chopped fresh thyme
2 tbs. Dijon mustard
2 tsp. kosher salt
1 1/2 tsp. sweet paprika
1 large egg
2 lbs. ground turkey
1/4 cup olive oil
Freshly grated Parmesan cheese, for serving
METHOD
To make the marinara sauce:
- Heat a Curtis Stone 5qt Stockpot over medium heat. Add olive oil, then add shallots and garlic and cook, stirring often 2 minutes, or until tender but not browned. Add thyme, bay leaf, and wine, then add tomatoes. Crush them with a potato masher to break them up.
- Bring to a simmer, then reduce heat to medium low and simmer, uncovered, stirring occasionally, for 25 minutes, or until liquid has reduced slightly and flavors are well blended. Discard thyme stems and bay leaf. Stir in basil. Season to taste with salt and pepper.
To make the meatballs: - In a large bowl, combine bread cubes and milk. Set aside for 5 minutes, or until bread is soggy. Using your hands, mash bread mixture. Add shallots, garlic, parsley, thyme, mustard, salt, paprika, and egg and mix until blended. Add turkey and, using your hands, gently mix until blended. The mixture will be soft, which will ensure tender meatballs. Form mixture into 8 large meatballs.
- Heat a Curtis Stone 11” Frypan over medium heat. Add olive oil. Working in batches, add meatballs and cook, turning occasionally, for 12 minutes per batch, or until browned all over. Using a slotted spoon, transfer to plate.
- When the sauce is ready, add meatballs and simmer for 5 minutes more, or until meatballs are cooked through, with no sign of pink.
- Spoon meatballs and tomato sauce into serving bowls. Sprinkle with Parmesan cheese and serve hot.
Rigatoni with Italian Sausage, Arugula, and Lemon Ricotta
Serves: 4
Prep Time: 15 minutes
Cook Time: 20 minutes
INGREDIENTS
2 tbs. olive oil
3 Italian sausages (about 1 lb. total), casings removed
1 cup finely diced yellow onion
5 garlic cloves, finely chopped
1 tsp. dried hot red chile flakes
3/4 cup dry white wine
12 oz. rigatoni pasta
2 oz. arugula
2 tbs. finely chopped flat-leaf parsley
1 tbs. fresh lemon juice
4 tbs. (1/2 stick) unsalted butter
3/4 cup ricotta cheese, preferably fresh ricotta
1/2 tsp. finely grated lemon zest
METHOD
- Bring a Curtis Stone 5qt Stockpot of lightly salted water to boil over high heat.
- Meanwhile, preheat a Curtis Stone 11” Frypan over high heat. Add oil, then sausages and cook, breaking them up with side of a wooden spoon into about 1/2-inch pieces for about 1 1/2 minutes, or until they are browned on the bottom. Stir sausage pieces and continue cooking for about 1 1/2 minutes longer, or until they are browned all over. Using a slotted spoon, transfer sausage pieces to a bowl, leaving fat in frypan.
- Add onions to pan drippings in stockpot and cook for 2 minutes, or until they begin to soften. Reduce heat to medium. Add garlic and chile flakes and sauté for 2 minutes, or until fragrant and garlic is tender. Return sausage pieces to stockpot and add wine, scraping browned bits in pan with a wooden spoon. Reduce heat to low and simmer gently for 2 minutes to marry flavors. Keep warm over very low heat.
- Add the pasta to boiling water and cook, stirring often to prevent pasta from sticking, for 8 minutes, or until pasta is tender but still firm to the bite. Scoop out and reserve about 3/4 cup of pasta cooking liquid, and drain pasta.
- Add pasta to sausage mixture and toss to coat. Remove from heat. Add arugula, parsley, and lemon juice to pasta mixture and toss until arugula begins to wilt. Season to taste with salt. Add about 1/3 cup of reserved pasta cooking liquid to moisten the pasta. Add butter and toss until butter melts and blends into sauce.
- In a small bowl, whisk ricotta, lemon zest, and 1 tbs. of reserved pasta cooking liquid to blend. Season to taste with salt and freshly ground black pepper.
- Divide pasta among four pasta bowls. Spoon ricotta on top and serve.
Spanish-Style Steamed Mussels with Chorizo
Serves: 2
Prep Time: 5 minutes
Cook Time: 15 minutes
INGREDIENTS
8 oz. Spanish chorizo, thinly sliced
3 shallots, finely chopped
2 garlic cloves, finely chopped
4 lb. black mussels, debearded, scrubbed
1 cup dry white wine
3 tbs. finely chopped fresh flat-leaf parsley, plus more for garnish 6 tbs. butter, cubed
1 baguette, warm, torn into large pieces
METHOD
- Heat a Curtis Stone 5qt Stockpot over medium heat. Add chorizo and sauté for 8 minutes, or until golden brown. Add shallots and garlic and sauté for 2 minutes, or until fragrant. Add mussels and toss quickly to coat. Add wine, cover with lid, and cook over medium-high heat for 3 minutes, or until mussels begin to open. Discard any mussels that do not open. Stir in 3 tbs. of parsley. Using a slotted spoon, transfer mussels and chorizo to 4 warm serving bowls. Cover to keep warm.
- Boil cooking juices for 1 minute. Whisk in butter. Pour sauce over mussels.
- Sprinkle with additional parsley and serve immediately with baguette pieces.
Sautéed Spring Vegetables
Serves: 4
Prep Time: 10 minutes
Cook Time: 6 minutes
INGREDIENTS
2 green onions, trimmed, sliced
2 garlic cloves, finely chopped
3 tbs. olive oil
1/4 cup low-sodium chicken broth or water
6 oz. asparagus, woody ends trimmed, stalks cut into 1 1/2-in. pieces
3/4 cup shelled fresh English peas (from about 3/4 lb. peas in pod)
1/2 cup shelled fresh fava beans (from about 1/2 lb. pods), peeled, or sugar snap peas, trimmed, halved crosswise
2 cups loosely packed baby spinach leaves
1/4 cup loosely packed fresh basil leaves
1 lemon, zested, juiced
2 tsp. finely chopped fresh chives
Small chunk of Parmesan cheese, for grating
METHOD
- In a Curtis Stone 9.5” Frypan, combine green onions, garlic, oil, and broth and bring to a simmer over medium heat. Cook for 2 minutes, or until green onions soften.
- Add asparagus, peas, and fava beans and sauté for 2 minutes, or until vegetables are heated through. Add spinach and basil and sauté for
2 minutes, or until spinach wilts and asparagus is crisp-tender. - Stir in 2 tsp. lemon zest and 2 tsp. lemon juice. Season with salt. Transfer to a serving platter. Sprinkle with chives, grate Parmesan over, and serve immediately.
Spiced Hot Chocolate Floats
Serves: 4
Prep Time: 15 minutes
Cook Time: 15 minutes
Make-Ahead: Hot chocolate mixture can be made 1 day ahead, cooled, covered, and refrigerated. Cover and rewarm over medium-low heat before serving. Whipped cream can be made 2 hours ahead, covered and refrigerated.
INGREDIENTS
1 1/3 cups whole milk
1/3 cup amaretto or other almond-flavored liqueur
2 tbs. sugar
1 cinnamon stick
1 whole clove
4 oz. dark chocolate (bittersweet or semisweet), chopped
3/4 cup heavy cream
1 pint vanilla ice cream
Shaved dark chocolate, for garnish
METHOD
- In a Curtis Stone 1.5qt Saucepan, combine milk, amaretto, sugar, cinnamon, and clove and bring to a near simmer over medium heat, stirring until sugar dissolves.
- Add chocolate and stir until chocolate is melted and well blended. Keep warm.
- In large bowl, whisk cream until soft peaks form.
- Place one scoop of ice cream in each of four bowls. Strain spices from mixture and pour hot chocolate mixture, over ice cream. Top with whipped cream. Garnish with shaved chocolate and serve immediately.
Creole-Style Shrimp with Corn and Rice
Serves: 4
Prep Time: 10 minutes
Cook Time: 15 minutes
Make-Ahead: Kernels and corn milk can be removed from cobs up to 1 day ahead, covered separately and refrigerated.
INGREDIENTS
2 ears corn, husked
2 bacon slices, coarsely chopped
3 tbs. butter, divided
1 poblano pepper, diced
1 red bell pepper, diced
3 green onions, thinly sliced, white and green parts separated
2 garlic cloves, finely chopped
8 oz. medium shrimp, peeled, halved lengthwise
1/4 cup heavy cream
2 tbs. coarsely chopped fresh parsley
Fluffy Steamed Rice (see recipe)
METHOD
- Using large knife, remove kernels from corn cobs. Reserve kernels. Using back of knife, scrape cobs over a bowl to catch corn milk. Reserve corn milk, about 1/3 cup.
- Heat a Curtis Stone 2qt Sauteuse over medium-high heat. Add bacon and cook, stirring occasionally, 5 minutes, or until crisp. Using slotted spoon, transfer bacon to a paper towel-lined plate.
- Melt 1 tbs. butter in sauteuse with bacon fat. Add peppers and white parts of green onions and cook, stirring occasionally, 5 minutes, or until vegetables have softened. Add garlic and cook for 1 minute. Add corn kernels and cook 5 minutes, or until corn is tender. Stir in shrimp and reserved corn milk and cook 2 minutes, or until shrimp are pink and just cooked through. Stir in remaining 2 tbs. butter, remaining green onions, cream, parsley, and 1/4 cup water and remove from heat. Season with salt and pepper.
- Spoon shrimp and corn mixture over rice. Garnish with reserved bacon.
Fluffy Steamed Rice
Serves: 6
Prep Time: 5 minutes Cook Time: 20 minutes
INGREDIENTS
2 cups long-grain rice 3 cups water
1 1/2 tsp. kosher salt
METHOD
- Put rice in sieve and rinse under cold running water, stirring rice with your hand, until water runs fairly clear. Drain well.
- In a Curtis Stone 2qt Saucepan, bring rice, water, and salt to boil over high heat. Reduce heat to low, cover with lid, and simmer gently 15 minutes, or until water has been absorbed and rice is tender. (Don’t stir rice during cooking, as this can release starches that cause sticking.)
- Fluff rice with fork and let stand, covered, 5 minutes before serving.
SET INCLUDES:
6” Frypan with buffet handles
8” Frypan with buffet handles + lid 9.5” Frypan with buffet handles + lid 11” Frypan with buffet handles
2qt Sauteuse with buffet handles
1.5qt Saucepan with buffet handles + lid 2qt Saucepan with buffet handles + lid 3qt Saucepan with buffet handles + lid 4qt Saucepan with buffet handles + lid 5qt Stockpot with buffet handles + lid
DURA-PAN® NON-STICK INTERIOR:
- 5 layers of interior coating
- 4x stronger than non-reinforced coatings
- Premium food release that lasts
- Easy clean up
- PFOA free
PRODUCT INFORMATION
- Forged aluminium body with reinforced rims for added strength
- Exclusive DURA-PAN® non-stick interior for reliable food release and easy cleaning
- Safe to use on all cooktops, including induction
- Double-riveted stainless steel handles
- Tempered glass lid for see-through convenience
- Dishwasher Safe
- Suitable for oven and cooktop use
USAGE & CARE INSTRUCTIONS
BEFORE FIRST USE
- Remove all packaging, stickers, labels and tags.
- Wash in warm, soapy water, rinse and dry thoroughly.
- The high quality DURA-PAN® non-stick interior does not need to be conditioned with oil, however you may choose to use oil depending on your recipe requirements.
CLEANING YOUR COOKWARE
- Carefully wipe off any drips which occur during cooking immediately for easier clean up later.
- Do not pour cold water onto hot cookware, as this may cause warping or oil to splatter and may affect the non-stick performance of your non-stick cookware.
- After each use, wash the inner and outer coatings of your pan with warm water, mild liquid detergent and a sponge. Rinse and dry thoroughly.
- Do not use metal scouring pads, abrasive wire wool or harsh scouring powder. This can scratch both the interior and exterior coating and is not covered by the manufacturer’s warranty.
- To remove stubborn stains, partially fill the cookware with three parts water to one part detergent or vinegar and bring to the boil. Turn off the heat source and set aside for a period to cool and allow these stains or deposits to soften; then wash in mild dishwashing detergent and warm water using a nonabrasive mesh pad or a soft brush.
- To help preserve the finish of the pan hand washing is recommended. The pans are dishwasher safe, however dishwasher may cause discoloration to the base, this in no way affects the performance of the pan. Discoloration is not covered by the manufacturer’s warranty.
- Always dry cookware thoroughly after washing, paying particular attention to the rims, handles, rivets and other small spaces where water might collect.
OVEN USE
- This cookware is oven safe to 450°F. Do not use above this temperature setting. Using above the temperature setting can cause discoloration and can permanently damage the cookware.
- In a convection oven, adjust the temperature in line with the oven manufacturer’s guidelines.
- Do not place empty cookware in a hot oven.
- Always use oven mitts when removing cookware from the oven.
- This cookware can be used under a broiler. Ensure that the cookware and handle is at least 2” away from the heat source. Do not exceed the oven safe temperature when using cookware under the broiler / grill.
HANDLES, KNOBS & LIDS
- The glass lid is oven safe up to 400°F.
- The handles are stainless steel. Always use oven gloves when handling the pan in and out of the oven.
- While the handles are designed to minimize heat transfer under normal stovetop cooking conditions, it is recommended to use a tea towel or gloves to handle the pan.
- Do not place lid directly on the cooktop
- If dropped or subjected to extreme temperature changes (i.e. submerging in water before glass lid is completely cool), the glass lid may shatter. This is not covered by the manufacturer’s warranty.
COOKWARE USE
- This cookware is suitable for all cooktops including induction.
- We recommend not to cook on high heat as this may damage the non-stick coating, burn food, produce stains or damage the base of the product.
- Always choose a suitable sized flame or ring for the base of the pan. When using a gas cooktop, do not allow the flames to rise up along the sides of the pan. This could damage the cookware, coating and handles. Turn down the flame to prevent this from happening. If the flames do rise up along the sides of the pan, the stainless steel handles will get hot.
- Never heat fat or oil to the extent that it smokes, burns or turns black.
- After prolonged usage some minor discoloration of the non-stick coating may occur. This is quite normal and will not affect the non-stick properties of your cookware.
- Never heat an empty pan or allow to boil dry. This may damage the coating or base. If this occurs, turn off the heat and allow the cookware to cool completely before attempting to move it from the cooktop.
- Your cookware interior is lined with the high quality Dura-Pan® non-stick which allows for easy food release and clean up.
- While the interior of the pan is metal utensil safe, we do recommend that you use nylon, wooden or silicone utensils to prolong the life of your non-stick cookware. Do not use sharp edged utensils on the non-stick surface.
- Do not use a knife or any pointed tip utensils to cut or pierce food directly on the non-stick surface as this could cause permanent damage and is not covered under the manufacturer’s warranty. Do not gouge the non-stick surface.
- Always clean & dry the base of your cookware before cooking, especially if you use it on a ceramic or halogen cooktop otherwise the pan may stick to the hob.
- Avoid dragging or sliding cookware over the cooktop surface as this may damage your cook top surface. Take special care when you’re using a glass cooktop or any other surface that may scratch easily. We do not take responsibility for scratched cooktops.
- Depending on your cooktop type, the base of your pan may become marked or scratched. This is normal. Centre your pan over the heat source (this prevents damage to the handle and exterior coating). Small pans may need careful placement on the support legs of gas cooktops.
- To protect your non-stick coating, do not stack or nest cookware inside each other without a protective sheath (ie. tea towel) in between.
GENERAL SAFETY ADVICE
- Cookware should never be used in a microwave.
- Ensure cookware is stable on the cooktop surface to prevent tipping.
- Never leave cookware unattended on a hot cooktop. Never leave food cooking unattended.
- Continuous high heat or over heating may shorten the life of cookware, cause discoloration and damage both in the interior and exterior surface.
- Never leave the handle of your pan sticking out over another hob.
- Never put a hot pan on the floor or near the edge of a kitchen surface. Let it cool down and keep out of reach of children.
- Use the lid to prevent burns caused by hot ingredients splattering.
- In general, we recommend using oven mitts when holding handles on cookware and lids.
- In the event of a pan fire, turn off the heat supply and place a dampened towel over the pan and leave for 30 minutes before removing.
WARRANTY: 1-YEAR LIMITED
Your Curtis Stone cookware is warranted for 1 year to be free of defects under normal household use to the original purchaser.
This warranty excludes damage caused by accident, overheating, misuse or abuse, and does not apply to scratches, discoloration, stains, dents or other damage which does not affect the functionality of the cookware. This warranty gives you specific legal rights, and you may also have other rights which vary between states. If it is determined that the warranty claim is valid, we will provide the original purchaser with a replacement of the same product. Should the product be discontinued, a replacement product of close to equivalent value will be sent. Shipping and handling charges may apply.
Curtis Stone Products
[email protected]
Phone: 1-877-822-7450
Dura-Pan® is a registered Trademark of Food Fight Ltd
Made in China
![]()
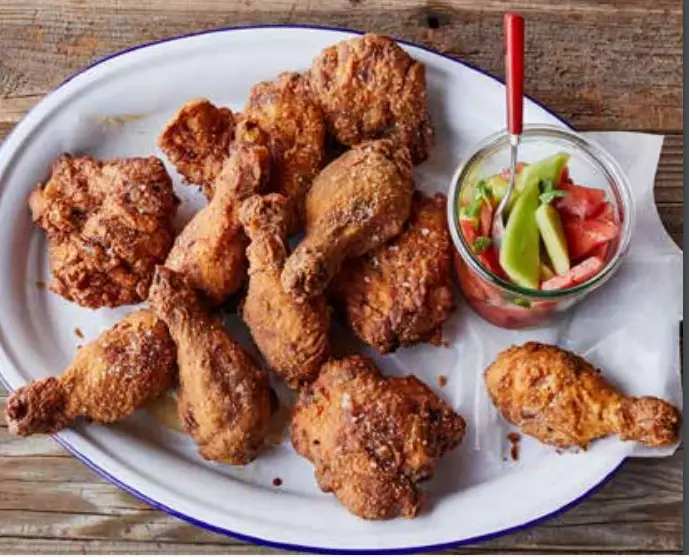
Fried Chicken with Melon Salad
SERVES 4
PREP TIME 30 minutes
COOK TIME 35 minutes
MAKE-AHEAD Chicken can marinate up to 1 day, covered and refrigerated.
INGREDIENTS FOR FRIED CHICKEN
2 tsp. paprika
1/2 tsp. cayenne (optional)
3 cups all-purpose flour, divided
1 cup buttermilk
1/4 cup cornstarch
4 chicken drumsticks (about 1 1/2 lb. total)
4 chicken thighs (about 1 1/2 lb. total)
2 cups canola oil, for frying
INGREDIENTS FOR MELON SALAD
1/2 cup fresh mint leaves, plus more for garnish
1/4 cup red wine vinegar
1 tbs. sugar
1 1/2 lb. watermelon flesh, cut into
1/4-inch-thick triangular slices (from 2 lb. watermelon)
1/2 lb. honeydew melon flesh, cut into
1/4-inch-thick triangular slices (from 1 lb. honeydew melon)
METHOD FOR FRIED CHICKEN
- Preheat oven to 200°F. In small bowl, mix paprika, cayenne (if using), 1 tbs. kosher salt, and 1 tsp. pepper. Sprinkle half of spice mixture all over chicken pieces. Reserve remaining spice mixture.
- In one large bowl, add 1 1/2 cups flour. In second large bowl, add buttermilk. In third large bowl, mix remaining 1 1/2 cups flour, cornstarch, and reserved spice mixture. Dredge chicken pieces in plain flour, shaking off any excess. Toss chicken in buttermilk, turning to coat evenly. Lift chicken from buttermilk, allowing excess moisture to drip back into bowl. Transfer chicken to flour-spice mixture and pat firmly to ensure chicken is completely coated. Place dredged chicken on a sheet pan.
- Set wire rack in another sheet pan. In a Curtis Stone 4qt Cast Aluminum Roaster, heat oil over medium-high heat to 350°F (oil will be shimmering). Fry half of chicken pieces, turning every 2 to 3 minutes and maintaining oil temperature around 325°F, for 12 to 15 minutes, or until golden brown, crisp all over, and cooked through (instant-read thermometer inserted into chicken should register 165°F).
- Using tongs, transfer chicken to prepared rack and sprinkle with salt. Place fried chicken in oven to keep warm and repeat to cook remaining chicken.
- Transfer melon salad and some of their juices to platter and garnish with fresh mint leaves. Serve with fried chicken.
METHOD FOR MELON SALAD
- Place mint in small bowl. In small saucepan, bring vinegar, sugar, and 1/4 tsp. salt to a boil over medium-high heat, stirring until sugar dissolves. Remove from heat and pour vinegar mixture over mint. Steep 30 minutes. Strain sauce, discarding mint.
- In large bowl, toss melon pieces with strained vinegar sauce. Refrigerate until cold.
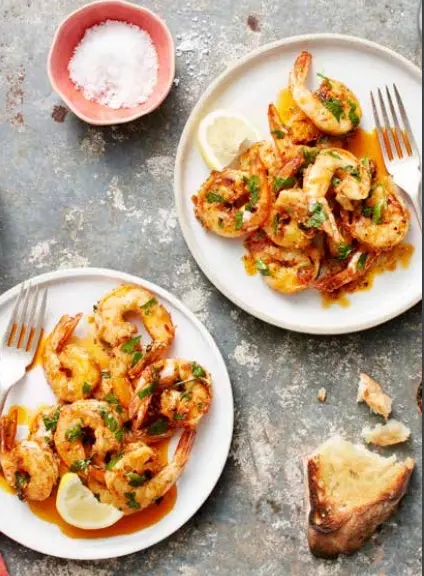
Garlic Shrimp
SERVES 4
PREP TIME 10 minutes
COOK TIME 8 minutes
INGREDIENTS
2 tbs. olive oil
1 tbs. butter
1/2 shallot, finely chopped
1/4 tsp. each red pepper flakes (optional) and fennel seeds
1 lb. jumbo shrimp, peeled, deveined, tail-on
2 garlic cloves, finely chopped
1/2 tsp. paprika
1 lemon, zested and juiced
1 tbs. chopped fresh parsley
4 slices crusty bread, for serving.
METHOD
- In a Curtis Stone 4qt Cast Aluminum Roaster over medium heat, heat oil and butter. When butter has melted, add shallot, red pepper flakes, if using, and fennel seeds. Cook, stirring often, for 2 minutes, or until shallots soften.
- Increase heat to medium-high and stir in shrimp, garlic, and paprika. Season with salt and pepper. Cook, stirring often, for 3 to 4 minutes, or until shrimp are cooked through. Remove from heat and stir in lemon zest, 2 tsp. lemon juice, and parsley. Check seasoning and add more salt, pepper, or lemon juice if necessary.
- Spoon shrimp and sauce onto serving plates and serve with bread for sopping up sauce.
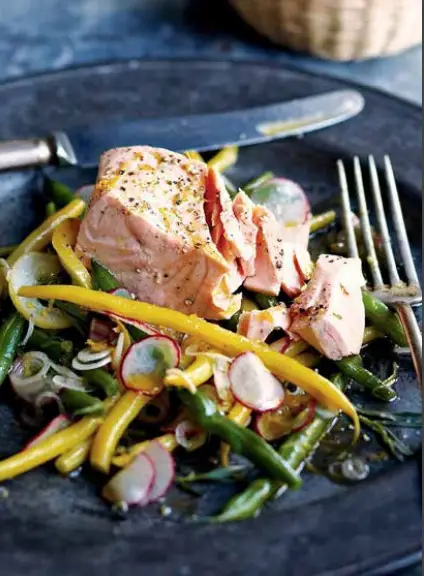
Lemon Poached Salmon with Green & Yellow Bean Salad

SERVES 4
PREP TIME 15 minutes, plus 45 minutes chilling time
COOK TIME 10 minutes
MAKE-AHEAD Salmon can be poached up to 4 hours ahead, uncovered and refrigerated.
MAKE-AHEAD Salmon can be poached up to 4 hours ahead, uncovered and refrigerated.
INGREDIENTS
4 sprigs fresh tarragon
2 lemons
10 white pearl onions, thinly sliced Four 6 oz. skinless salmon fillets
12 oz. green beans, trimmed
12 oz. yellow wax beans, trimmed
6 radishes, sliced into paper-thin rounds
1/4 cup extra-virgin olive oil
METHOD
- Remove leaves from tarragon and coarsely chop. Reserve stems.
- Thinly slice 1 lemon crosswise. In a Curtis Stone 4qt Cast Aluminum Roaster combine sliced lemon, tarragon stems, 1/3 onions, and enough cold water to come halfway up sides of pan. Cover and bring to simmer over medium-high heat.
- Season salmon with salt and pepper. Lay fillets in pan and add hot water as needed to submerge them completely. Cover, reduce heat to low, and cook salmon, without simmering, 7 minutes, or until opaque with rosy center when flaked in thickest part with tip of small knife. Using slotted spatula, transfer salmon fillets to baking sheet. Refrigerate, uncovered, for 45 minutes, or until cold.
- Meanwhile, bring large pot of salted water to a boil. Add green and yellow beans and cook 3 minutes, or until crisp-tender. Drain well, then plunge beans into large bowl of ice water to cool. Drain well and pat dry with paper towels.
- In large bowl, toss beans, radishes, and remaining onions with chopped tarragon. Grate zest from 1 lemon over salad. Squeeze juice from lemon and add to bowl. Drizzle with olive oil and toss to coat. Season with salt and pepper.
- Divide salad among 4 dinner plates and top with salmon fillets.
Creamy Asparagus Risotto
SERVES 4
PREP TIME 20 minutes
COOK TIME 35 minutes
INGREDIENTS
2 tbs. olive oil
3 shallots, finely chopped
2 garlic cloves, finely chopped
3 sprigs fresh thyme
2 cups Arborio rice
3/4 cup dry white wine
8 cups low-sodium vegetable broth or chicken broth, hot
1 1/2 lb. thin asparagus, woody ends removed, stalks cut into 1-inch lengths
1/2 cup grated Parmigiano-Reggiano cheese
4 tbs. (1/2 stick) butter, cut in small pieces
1/3 cup mascarpone cheese
1/4 cup finely chopped fresh mint leaves
2 tbs. finely chopped fresh flat-leaf parsley
Juice of 1/2 lemon
Parmigiano-Reggiano cheese, shaved with vegetable peeler, for garnish.
METHOD
- In a Curtis Stone 4qt Cast Aluminum Roaster over medium heat, heat oil. Add shallots, garlic, and thyme and sauté for about 2 minutes, or until shallots are tender but not browned. Add rice and sauté for 30 seconds to coat with oil. Stir in wine and cook for about 3 minutes, or until wine is absorbed.
- Add 3/4 cup hot broth and cook, stirring constantly, until it has absorbed. Continue adding hot broth, 3/4 cup at a time, stirring until each addition has been absorbed, for about 22 minutes, or until rice is al dente (center of each grain of rice should still be slightly firm).
- Add asparagus and cook 2 minutes. Discard thyme stems (thyme leaves should have fallen off stems and into risotto). Remove risotto from heat and add grated Parmigiano-Reggiano, butter, and mascarpone cheese. Stir until butter has melted Stir in mint, parsley, and lemon juice, and season risotto generously with salt and pepper.
- Divide risotto among 4 warmed serving bowls. Garnish with shaved ParmigianoReggiano and serve.
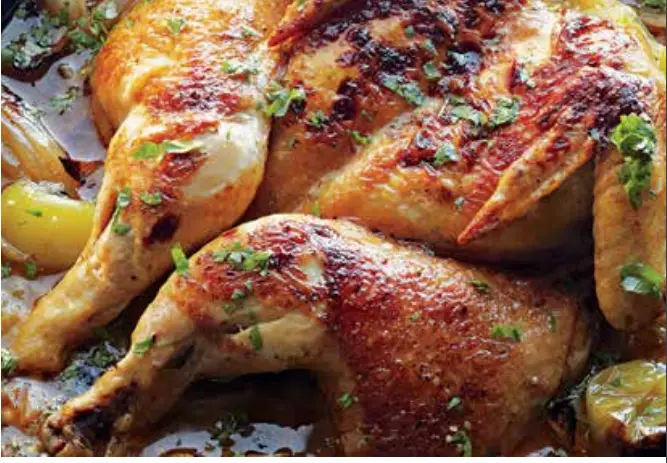
Roasted Chicken with Tomatillos
SERVES 4
PREP TIME 15 minutes, plus 10 minutes resting time
COOK TIME 1 hour
INGREDIENTS
One 4-lb. whole chicken
1/4 cup olive oil, divided
2 tsp. sweet paprika
1 tsp. ground cumin
1 1/2 lb. tomatillos, husked, rinsed, cut in half
1 white onion, halved, cut into 1/2-inch thick wedges
3 garlic cloves, finely chopped
1 jalapeño pepper, seeded, finely chopped (for a hotter sauce, keep seeds)
1/4 cup coarsely chopped fresh cilantro
1 lime, cut into wedges, for serving
8 corn tortillas, warmed, for serving
METHOD
- Preheat oven to 375°F.
- Using poultry shears, split chicken open by cutting down one side of backbone, then cut out and remove backbone. Place chicken skin side up on chopping board. Put your hand on breastbone and press hard to flatten chicken.
- Heat a Curtis Stone 4qt Cast Aluminum Roaster over medium-high heat. Meanwhile, in small bowl, mix 2 tbs. oil with paprika, cumin, 1 tsp. salt, and 1 tsp. pepper. Rub mixture all over chicken. Place chicken skin side down in hot pan and cook for about 4 minutes, or just until skin is golden brown. Transfer chicken to a large plate. Set pan aside.
- In large bowl, toss tomatillos, onions, garlic, and jalapeños with remaining 2 tbs. oil. Season with salt and pepper. Arrange half of tomatillo mixture in pan and nestle chicken on top, skin side up. Scatter remaining tomatillo mixture around chicken.
- Roast about 55 minutes, or until chicken shows no sign of pink when pierced in thickest part with tip of a small sharp knife and tomatillos are completely tender and falling apart into sauce. Remove from oven and let stand for 10 minutes.
- Season tomatillo salsa with salt. Sprinkle cilantro over chicken and salsa and serve with lime wedges and tortillas.
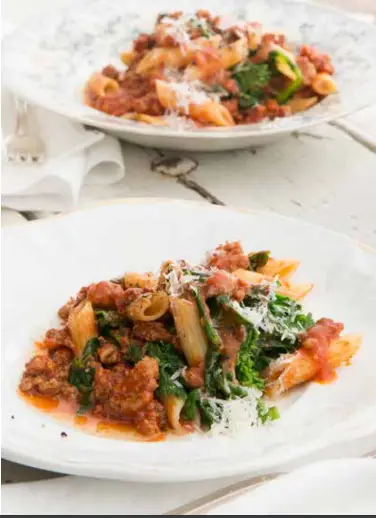
Penne Pasta with Sausage-Tomato Ragú

SERVES 4
PREP TIME 5 minutes
COOK TIME 15 minutes
INGREDIENTS
4 sweet Italian sausages (about 1 1/3 lb. total), casings removed
1/2 bunch broccoli rabe, trimmed, sliced (about 2 cups)
2 garlic cloves, chopped
1/2 cup dry white wine
1 1/4 cups tomato sauce
10 oz. penne
2 tbs. freshly shredded Pecorino cheese.
METHOD
- Bring large pot of salted water to a boil over high heat. Meanwhile, heat a Curtis Stone 4qt Cast Aluminum Roaster over medium-high heat. Add sausages and cook, breaking meat up with wooden spoon, for 6 minutes, or until golden brown. Add broccoli rabe and garlic and cook 4 minutes, or until broccoli rabe leaves are wilted. Add wine and then tomato sauce, bring to a simmer, and cook 3 minutes, or until liquid is reduced by one-fourth.
- When water comes to a boil, add penne and cook, stirring often so pasta doesn’t stick together, for about 8 minutes, or until tender but firm to bite. Drain, reserving about 1/2 cup of cooking water.
- Stir penne into sauce and add enough reserved cooking water to thin sauce to desired consistency. Season with salt and pepper. Sprinkle with cheese and serve immediately.
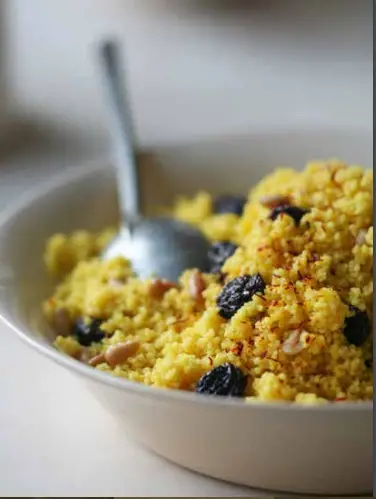
Middle Eastern Couscous
SERVES 4
PREP TIME 3 minutes
COOK TIME 10 minutes
INGREDIENTS
2 cups low-sodium chicken broth
Large pinch of saffron threads, crumbled (optional)
10 oz. plain couscous
1/4 cup raisins
1/4 cup pine nuts, toasted
METHOD
- In a Curtis Stone 4qt Cast Aluminum Roaster, combine broth, saffron, if using, and 1 tsp. salt. Bring mixture to a boil over high heat.
- Remove pan from heat. Add couscous and stir to blend. Sprinkle raisins over. Place lid on pan and let stand for about 5 minutes, or until liquid is absorbed and couscous is tender.
- Fluff couscous with fork and mix in pine nuts. Season with pepper and serve.
Homemade Chorizo & Potato Tacos
SERVES 4
PREP TIME 10 minutes
COOK TIME 35 minutes
MAKE-AHEAD Uncooked chorizo mixture can be made up to 1 day ahead, covered and refrigerated.
INGREDIENTS
12 oz. ground pork
3 tbs. cider vinegar
2 garlic cloves, finely chopped
2 tbs. chili powder
1 tbs. sweet paprika
1/8 tsp. cayenne pepper
3 tbs olive oil, divided
1 lb. white potatoes or red-skinned potatoes, cut into 1/4-inch dice
12 corn tortillas, warmed
1 cup shredded green cabbage
1/2 cup Mexican crema or sour cream
2 oz. queso fresco, crumbled
2 limes, cut into wedges.
METHOD
- In large bowl, using hands, mix pork, vinegar, garlic, chili powder, paprika, cayenne, 2 tsp. salt, and 1/4 tsp. black pepper.
- Heat a Curtis Stone 4qt Cast Aluminum Roaster over high heat. Add 1 tbs. oil and then pork mixture and cook, stirring frequently to break up pork into small pieces, for 6 minutes, or until browned and crisp. Using slotted spoon, transfer pork to heat safe bowl and reserve.
- Add 2 tbs. oil to pan and heat until smoking. Add potatoes and cook, stirring occasionally, for 20 to 25 minutes, or until very crisp on all sides. Season with salt.
- Add chorizo to crispy potatoes and cook 1 minute to rewarm. Divide potato and chorizo mixture among warm tortillas. Top with cabbage, crema, and queso. Serve with lime wedges.
Barbecue Braised Pot Roast
SERVES 4
PREP TIME 15 minutes
COOK TIME 4 hours
MAKE-AHEAD Beef can be cooked up to 2 days ahead, cooled, covered and refrigerated. Rewarm covered over low heat, adding water if sauce gets too thick.
INGREDIENTS
One 4-lb. beef chuck roast
2 tbs. olive oil
1 tbs. butter
1 onion, grated
2 garlic cloves, smashed
2 tsp. paprika
3 cups reduced-sodium beef broth
1/2 cup ketchup
1/4 cup brown sugar
1/4 cup cider vinegar
1 1/2 tbs. Worcestershire sauce
Coleslaw, for serving
METHOD
- Preheat oven to 325°F. Pat beef dry and season with salt and pepper. Heat oil in a Curtis Stone 4qt Cast Aluminum Roaster over medium-high heat. Add beef and cook, turning as needed, for 10 to 12 minutes, or until browned on all sides. Transfer beef to plate. Pour off and discard oil in pan.
- Return pan to medium heat and melt butter. Add onions, garlic, and paprika and cook, stirring frequently, for 3 minutes, or until fragrant. Whisk in broth, ketchup, vinegar, sugar, Worcestershire sauce, 1 tsp. salt, and 1/2 tsp. pepper and bring to a boil.
- Add beef and cover pan with lid. Place in oven and braise, turning beef over halfway through cooking, for 3 1/2 hours, or until beef is fork-tender.
- Transfer beef to plate and cover with foil. Strain cooking liquid into measuring cup. Allow fat to settle on top and spoon off fat. Return defatted cooking liquid to pan. Simmer over medium heat to reduce by half, 15 to 20 minutes.
- Increase oven temperature to 425°F. Return beef to pan, spooning sauce over. Rewarm in oven 5 mins.
- Slice beef and serve with sauce and coleslaw.
Baked Cinnamon Apple Crisp
SERVES 8
PREP TIME 15 minutes
COOK TIME 1 1/4 hours, plus 10 minutes cooling time
MAKE AHEAD Crisp topping can be made up to 1 day ahead, covered and refrigerated or frozen up to 1 month. Baked crisp is best served warm, but will keep for up to 1 day, covered at room temperature.
INGREDIENTS
1 cup plus 3 tbs. all-purpose flour, divided
1 cup old-fashioned oats
2/3 cup granulated sugar
1 tsp. fine sea salt, divided
10 tbs. chilled unsalted butter, cut into pieces
3/4 cup packed light brown sugar
1 1/4 tsp. ground cinnamon
5 Granny Smith apples, cored and cut into 1/2-inch wedges
5 Golden Delicious apples, cored and cut into 1/2-inch wedges Vanilla ice cream, for serving.
METHOD
- Position rack in center of oven. Preheat oven to 350°F.
- In medium bowl, mix 1 cup flour, oats, granulated sugar, and 3/4 tsp. salt to blend. Using your fingers, rub butter into flour mixture until clumps form. Freeze topping 10 minutes, or until firm.
- Meanwhile, in large bowl, mix brown sugar, remaining 3 tbs. flour, cinnamon, and remaining 1/4 tsp. salt. Add apples and toss to coat. Transfer to a Curtis Stone 4qt Cast Aluminum Roaster. Sprinkle crumble topping over.
- Place pan on baking sheet lined with aluminum foil to catch any juices that bubble over. Bake 1 1/4 hours, or until topping is golden brown and filling is bubbling. Cool 10 minutes. Spoon crumble into bowls and serve warm with ice cream.
INCLUDES
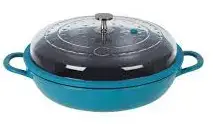
- 4qt Cast Aluminum Roaster with Glass Lid
DURA-PAN
DURA-PAN ® PRODUCT INFORMATION
- Cast aluminium body with reinforced rims for added strength
- Exclusive DURA-PAN ® non-stick interior for reliable food release and easy cleaning.
- Safe to use on all cooktops, including induction
- Dishwasher Safe
- Suitable for oven and cooktop use DURA-PAN ® NON-STICK INTERIOR
- 5 layers of interior coating
- 4x stronger than non-reinforced coatings
- Premium food release that lasts
- Easy clean up
- PFOA free
BEFORE FIRST USE
- Remove all packaging, stickers, labels and tags.
- Wash in warm, soapy water, rinse and dry thoroughly.
- The high quality DURA-PAN® non-stick interior does not need to be conditioned with oil, however you may choose to use oil depending on your recipe requirements.
CLEANING YOUR COOKWARE
- Carefully wipe off any drips which occur during cooking immediately for easier clean up later.Do not pour cold water into hot cookware, as this may cause warping or oil to splatter and may affect the non-stick performance of your non-stick cookware.
- After each use, wash the inner and outer coatings of your pan with warm water, mild liquid detergent and a sponge. Rinse and dry thoroughly. Do not use metal scouring pads, abrasive wire wool or harsh scouring powder. This can scratch both the interior and exterior coating and is not covered by the manufacturer’s warranty.
- Do not use metal scouring pads, abrasive wire wool or harsh scouring powder. This can scratch both the interior and exterior coating and is not covered by the manufacturer’s warranty.
- To remove stubborn stains, partially fill the cookware with three parts water to one part detergent or vinegar and bring to the boil. Turn off the heat source and set aside for a period to cool and allow these stains or deposits to soften; then wash in mild dishwashing detergent and warm water using a nonabrasive mesh pad or a soft brush.
- To help preserve the finish of the pan hand washing is recommended. The pans are dishwasher safe, however dishwasher may cause discoloration to the base, this in no way affects the performance of the pan. Discoloration is not covered by the manufacturer’s warranty.
- Always dry cookware thoroughly after washing, paying particular attention to the rims, handles, rivets and other small spaces where water might collect.
OVEN USE - This cookware is oven safe to 450°F. Do not use above this temperature setting. Using above the temperature setting can cause discoloration and can permanently damage the cookware.
- In a convection oven, adjust the temperature in line with the oven manufacturer’s guidelines.
- Do not place empty cookware in a hot oven.
- Always use oven mitts when removing cookware from the oven. This cookware can used under a broiler. Ensure that the cookware and handle is at least 2” away from the heat source. Do not exceed the oven safe temperature when using cookware under the broiler / grill.
HANDLES, KNOBS & GLASS INSERT
- Glass lid is oven safe up to 450°F.
- The knob is stainless steel. Always use oven gloves when handling the pan or lid in and out of the oven.
- Always use oven gloves when handling the pan or glass lid.
- Do not place glass lid directly on the cooktop.
- If dropped or subjected to extreme temperature changes (i.e. submerging in water before glass lid is completely cool), the glass lid may shatter. This is not covered by the manufacturer’s warranty.
COOKWARE USE
- This cookware is suitable for all cooktops including induction.
- We recommend not to cook on high heat as this may damage the non-stick coating, burn food, produce stains or damage the base of the product.
- Always choose a suitable sized flame or ring for the base of the pan. When using a gas cooktop, do not allow the flames to rise up along the sides of the pan. This could damage the cookware, coating and handles. Turn down the flame to prevent this from happening. If the flames do rise up along the sides of the pan, the stainless steel handles will get hot.
- Never heat fat or oil to the extent that it smokes, burns or turns black.
- After prolonged usage some minor discoloration of the non-stick coating may occur. This is quite normal and will not affect the non-stick properties of your cookware.
- Never heat an empty pan or allow to boil dry. This may damage the coating or base. If this occurs, turn off the heat and allow the cookware to cool completely before attempting to move it from the cooktop.
- Your cookware interior is lined with the high quality Dura-Pan® non-stick which allows for easy food release and clean up.
- While the interior of the pan is metal utensil safe, we do recommend that you use nylon, wooden or silicone utensils to prolong the life of your non-stick cookware. Do not use sharp edged utensils on the non-stick surface.
- Do not use a knife or any pointed tip utensils to cut or pierce food directly on the non-stick surface as this could cause permanent damage and is not covered under the manufacturer’s warranty. Do not gouge the non-stick surface.
- Always clean & dry the base of your cookware before cooking, especially if you use it on a ceramic or halogen cooktop otherwise the pan may stick to the hob.
- Avoid dragging or sliding cookware over the cooktop surface as this may damage your cook top surface. Take special care when you’re using a glass cooktop or any other surface that may scratch easily. We do not take responsibility for scratched cooktops.
- Depending on your cooktop type, the base of your pan may become marked or scratched. This is normal. Center your pan over the heat source (this prevents damage to the handle and exterior coating). Small pans may need careful placement on the support legs of gas cooktops.
STORAGE
- To protect your non-stick coating, do not stack or nest cookware inside each other without a protective sheath (ie. tea towel) in between.
GENERAL SAFETY ADVICE
- Cookware should never be used in a microwave.
- Ensure cookware is stable on the cooktop surface to prevent tipping.
- Never leave cookware unattended on a hot cooktop.
- Continuous high heat or over heating may shorten the life of cookware, cause discoloration and damage both in the interior and exterior surface.
- Never leave the handle of your pan sticking out over another hob.
- Never put a hot pan on the floor or near the edge of a kitchen surface. Let it cool down and keep out of reach of children.
- Use the lid to prevent burns caused by hot ingredients splattering.
- In general, we recommend using oven mitts when holding handles on cookware and lids.
- In the event of a pan fire, turn off the heat supply and place a dampened towel over the pan and leave for 30 minutes before removing.
1 YEAR LIMITED WARRANTY
Your Curtis Stone cookware is warranted for 1 year to be free of defects under normal household use to the original purchaser. This warranty excludes damage caused by accident, overheating, misuse, or abuse, and does not apply to scratches, discoloration, stains, dents, or other damage which does not affect the functionality of the cookware. This warranty gives you specific legal rights, and you may also have other rights which vary between states. If it is determined that the warranty claim is valid, we will provide the original purchaser with a replacement of the same product. Should the product be discontinued, a replacement product of close to equivalent value will be sent.
Shipping and handling charges may apply. Proof of purchase is required to confirm the warranty.
CURTIS STONE PRODUCTS CUSTOMER SERVICE INFORMATION
EMAIL [email protected]
TOLL-FREE PHONE 1.877.822.7450
HOURS M-F 8:00am – 4pm CT
WARRANTY SITE https://warranty.curtisstone.com/ Visit our warranty site to register your Curtis Stone Products.
Dura-Pan® is a registered trademark of Food Fight Ltd. • Made in China.
Dura-Pan
INFORMATIONS SUR LE PRODUIT
- En aluminium forgé avec rebords renforcés pour plus de solidité
- Intérieur antiadhésif Dura-PanMD exclusif permettant de dégager facilement les aliments et facilitant le nettoyage
- Sécuritaire pour toutes les surfaces de cuisson, sauf induction
- Résiste au lave-vaisselle
INTERIEUR ANTI-ADHERENT DURA-PAN M - 5 couches de revêtement intérieur
- 4 fois plus résistant que les revêtements non renforcés
- Facilite le détachement des aliments pour plus longtemps
- Facile à nettoyer
- Sans PFOA