USER’S MANUAL
SAFETY WARNINGS AND GUIDELINES
Before installing and using this machine, make sure to read the following contents. Please do not use this machine with the methods not described in this user manual.
- Take care to avoid touching hot parts, including heat blocks, extruder nozzle, filament, and the heated print platform.
- Keep the machine and all accessories out of reach of children.
- Please use the power cord supplied with this machine.
- This machine applies to a 110 – 240V power supply.
- Do not pull or twist the black cable at any time.
- Do not reach inside the machine during operation.
- Always allow the printer and extruded filament to cool before reaching inside.
- Do not install the machine on an unstable surface where it could fall.
- When printing with PLA filament, the plastics will create a light odor. Please place the machine in a ventilated, cool, dry area.
- Do not expose the machine to water or moisture. If moisture does get in the machine, please unplug it from the power outlet and allow it to fully dry.
- If the machine discharges smoke when printing, please unplug it from the Power outlet immediately to stop use.
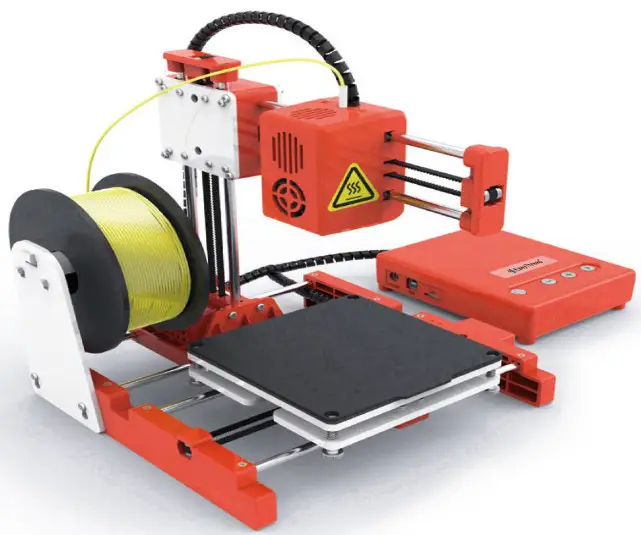
INTRODUCTION
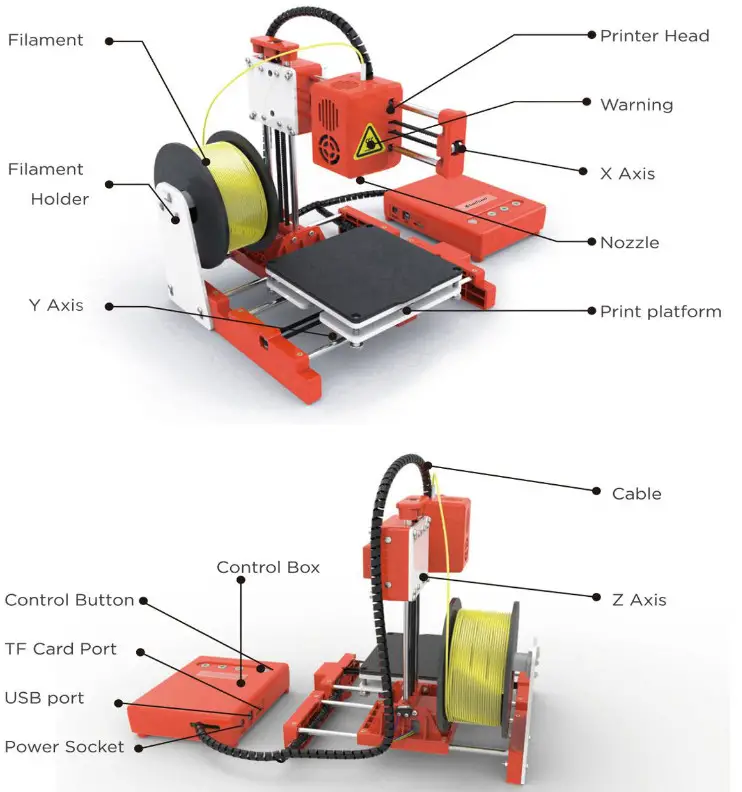
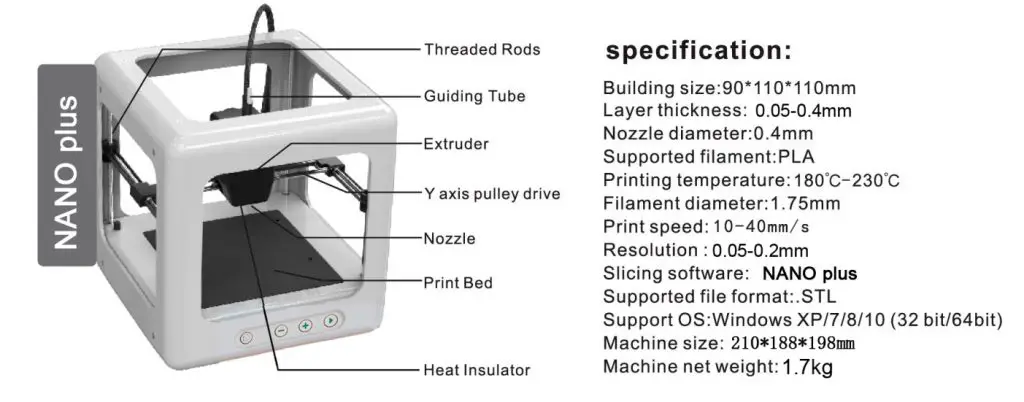
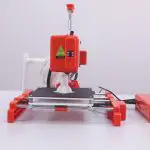
PRODUCT OVERVIEW
Main Part:
BASIC PARAMETER
| Nozzle Diameter | 0.4mm | Print Material | PLA |
| Extruder Temperature | 180 – 230 C | Melt-down Temperature | PLA: 180t |
| Print Speed | 10-40mm/s | Layer Thickness | 0.05 – 0.2mm |
| Building Size | 100X100X100mm | Machine Size | 245X205X210mm |
| Compatible Systems | Windows, Mac | Connection Type | TF card, USB |
| File Format | STL, G-code | Slicer Support | Ea sywa re. CUBA, S3D |
| Power Input | 100 — 240V AC, 50 / 60Hz | Maxinum Power | 30W |
| Working Temperature | 5t — 35°C/ 40°F , 95°F |
Working Humidity | 30% — 90% |
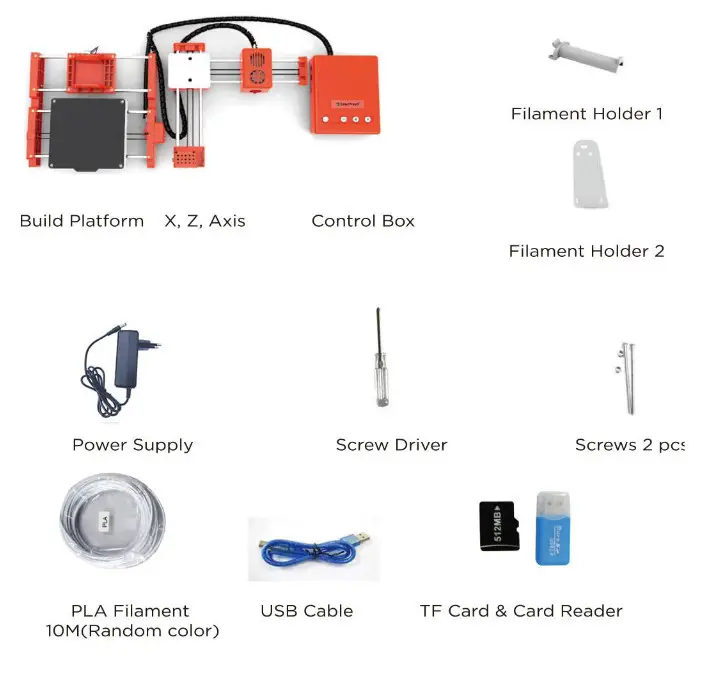
PACKAGE CONTENT
INSTALLATION
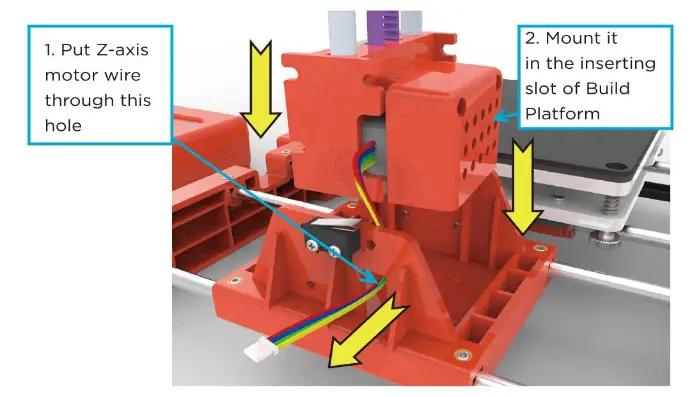
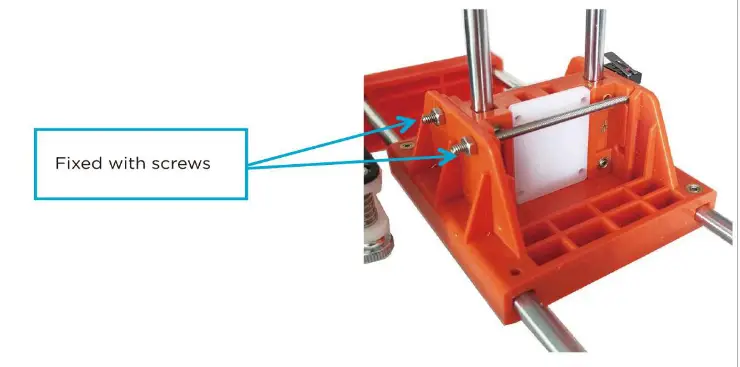
1. Install the X, Z, Axis set to the Printer Base.

- After inserting the XZ Axis, fix XZ Axis on the Build Platform with 2 screws.
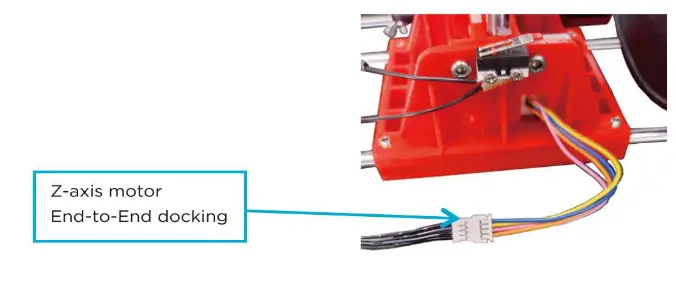
- Connect the Z-axis motor wire to the black wire of the printer control box as shown in the figure below.
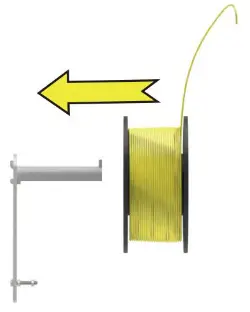
- Install the filament holder as below.Important Notice: This filament holder can only hang on 250g weight filament.
- Hang the filament on the holder.
- Put the filament material through the Teflon hose.
INTRODUCTION OF
- Power On
Insert power supply to the power port of the printer control box. After powering up, the button![]() will light up. (Note: If printing is finished or no need to use for quite a long time, please unplug the power supply to power off).
will light up. (Note: If printing is finished or no need to use for quite a long time, please unplug the power supply to power off).
Precaution: Do not move the X-axis and Y-axis with your hand when the printer is powered on
- Slicer Software Installation and Set-Up
(1) This 3D printer has its independently developed slicing software named Easy ware which is pre-installed in the TF card.
♦ Please copy the Easyware file to your computer and do no need for installation. Or You can download software Easyware fromEasyThreedofficial website directly. And you can watch the Slicer operation video on the EasyThreed 3D Youtube channel. Easyway slicer can recognize STL file format. if you want better printing quality, you need to learn how to use a CURA slicer
♦ Convert STL file format to G-code format, and save it to TF card, and insert TF card to the printer, then create the selected model.
(2) Create your own G-code file using other open sources programs, such as Cura or Repetier-Host. These programs use machine-specific information to generate a G-code file.
To learn more about how to install and operate slicer software, please access www.easythreed.com
Warm Notice: there is a geode file inside the IF card when it comes from the factory
PRINTING
- Platform Leveling
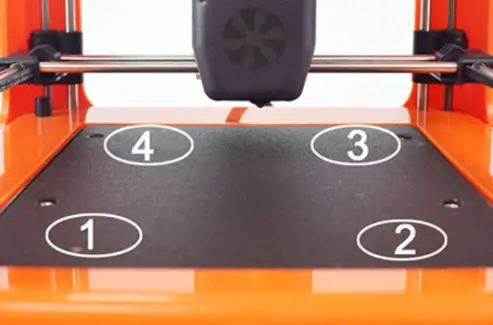
For the first time to use this printer, you need to level the build platform. Please adjust the distance between the nozzle and the platform in (1) (2) (3) (4) points. The nozzle height above the build platform should be 0.1mm, which is the thickness of a sheet of A4 paper.
- Click the button
 , Z-axis will move to the home position.
please turn off the power. after turn off the power .then you can move the X-axis and Y axis by hand - Move the nozzle to point (1). Put a sheet of paper between the nozzle and the print platform. If the distance is too far, please turn the hand-twisted nut counter-clockwise to make the print platform rise to the standard distance. If the distance between the nozzle and the platform is too close. please turn the hand-twisted nut clockwise to make the printing platform fall to the standard distance. (check the distance is right or not. That is, when drawing A4 sheet, the nozzle should be attached to the A4 sheet without scratching it).
- Follow the same way to adjust another 3 points ee.
- When the distance between the nozzle and the platform all is the right distance in (1) (2) (3) (4) four points, leveling is finished and succeeds.
Please turn on the power again after platform leveling
Load Filament & Feed
(1) Insert filament into the print head tube until it can not go further, and gentle press the filament to stop it from running back.
- Click
 the button, the button light turns on and flashes at a fast rate (take for 1 minute), the nozzle is heating; After the button light off, the machine begins to feed, it feeds successfully when there is regular silk come out of the nozzle. Then you can press
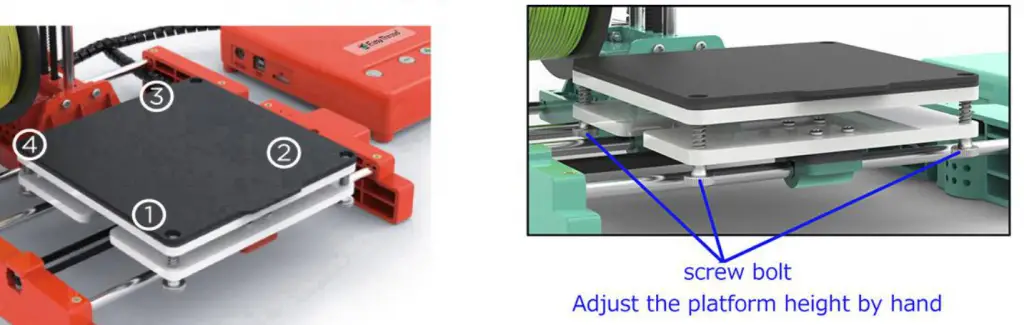 the button to finish feed.
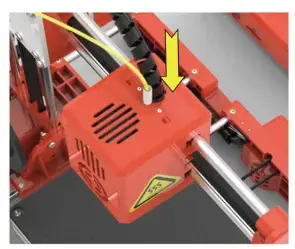
Precaution: Make sure the distance between the nozzle and printing bed is 3cm at least. If no enough space. Press the button![]() for 3 seconds then release hand.
for 3 seconds then release hand.
Z-axis will go up 1cm (when the machine stopped printing, press![]() for 3 seconds then release, every time the nozzle will go up lcm, users can decide the height).
for 3 seconds then release, every time the nozzle will go up lcm, users can decide the height).
- Print
Click the button, and the button light flashes regularly, printing starts (the Printer will choose the latest G-code file to print automatically).
- Pause/Restore
During printing, Click, the button light stops flashing, then printing paused.
If need to continue print, Click to restore, the button light flashes again, the printer goes back to print.
- Stop Print
If you want to stop print during printing, long press button for 3 seconds then release it, the machine will stop printing, then printing canceled.
- Unload Filament, Retract
If users want to change filament or keep the machine stop working for quite a long time, then need to unload the filament, Click button and draw out the filament.
(If the machine stopped printing for more than 5 minutes and the extruder becomes cold, then need to wait for 1 minute to reheating before retracting). Click button again to finish the retract.
After print, remove the platform, and easy to take off the object.

The high-quality filament is preferred to be used.
Various filaments are available on the market, and the quality is much different too. poor quality filament may cause broken or nozzle jam, Please choose high-quality filament.
 Safety Warning
keep your fingers away from the NOZZLE and BLACK INSULATOR when the printer is working as the temperature in this area reaches over 200 Celsius degrees. Always be sure to keep your hands away from moving parts when it is working.
MAINTENANCE
- Do not use the methods that are not mentioned in this manual to disassemble or modify this machine, to avoid damage to this printer or may cause other serious accidents.
- When the power is off, regularly clean the machine with a piece of cloth to wipe off dust and residue, if the cloth is wet, do not use inflammable liquid to contact the inner circuit to avoid fire or electronic shock.
- When printing is finished, clean the residue in the nozzle and extruder, to avoid nozzle choking for the next printing.
- The recommended temperature for the working environment is 5 C -35 C. Please do not air the machine body with a fan when the printer is working .
Recommended humidity for the working environment is 30%-90%.
FAQ
01: Why is the printing model not adhesive to the printing bed?
Al: The nozzle is too far away from the bed, the proper distance between the nozzle and bed is the thickness of a piece of A4 paper.
Q2: Why the filament do not come out from the nozzle?
Al: Check the filament feeder. If it’s an external gear feeder, then observe whether the gear rotates or not. If it’s a built-in stepper motor feeder, then observe if the motor is working with a little sound. Otherwise, check if the filament feeder is connected to it’s main board well.
A2: Check temperature. Printing nozzle temperature of PLA material ranges from 180-230 C.
A3: Check if the nozzle is blocked.
Heat the nozzle to 230 C for PLA, push the filament gently, if there is still no filament come out, then need to disassemble the nozzle, clean or replace it.
A4, Check if the nozzle is too close to the platform, if so. the filament can not come out, so adjust the distance between nozzle and platform with a piece of A4 paper.
Q3, The problem of print model misplaced
Al, The model did not slice properly, need to re-slice or change the model position to generate a new Gcode file.
A2, The model file problem, if the model is still misplaced after re-slicing, it’s the original file problem.
A3. the nozzle is forced to stop printing Path:
First, make sure you have not touched the nozzle when the machine is printing. Second, if there is filament residue on the top layer, the residue area will become larger gradually, when it accumulates to a certain amount and become stiffer enough, the nozzle will be forced to move abnormally.
A4, the Power supply is not stable
Check if large power electrical equipment is working while the machine is printing. a dislocation happens when some equipment turns off such as an air conditioner, if so, you need to connect a voltage stabilizer to the printer power supply. Otherwise, observe if the nozzle is blocked at a certain position, if so, the power supply on X, Y.Z axles are not even, then need to adjust the X.Y, Z electric current on the mainboard.
AS, If the above solution can not solve the misplace problem, the dislocation mostly happens at the same height for various models, then need to change the motherboard.
- Why the printing accuracy is quite different from the real model
Al, There is a lot of filament piled up on the model surface
Al.l, Nozzle temperature is too high, filament melt too fast and caused overflowing.
A1.2, The filament flow is too large, there is a filament flow setting in slice software, change the default value 100% to be 80%.
A1.3, Filament diameter setting problem, it’s in slice software, the default settings are different, there are both 1.75mm and 3mm filament on the market, for 1.75mm, the diameter should be 1.75, but for 3mm, the diameter should be 2.85 or 2.95.
A2, Poor surface after removing the support for FDM technology.
A2.1, The support density should be as lower as possible, 10% is proper, it’s easy to remove.
A2.2, Trim the model with a grinding tool, rub gently with a towel and dip a little acetone, make sure to wear gloves beforehand and do not wipe too long to cause the appearance affected or dimension changed.
A3, The inappropriate distance between the platform and nozzle.
A3.1, The first layer is not formed, or the models are without edges or corners if the distance is too large.
A3.2. The nozzle will scratch the platform and no filament comes out of the nozzle if the distance is too close, the proper distance is the thickness of an A4 paper.
A4, The inappropriate printing filament
With the maturity of 3d printing, various of filaments are available on the market, but the compatibility for filament and printers are particularly important.
Please watch operation video on the Website or YouTube
Channel: Easythreed3D
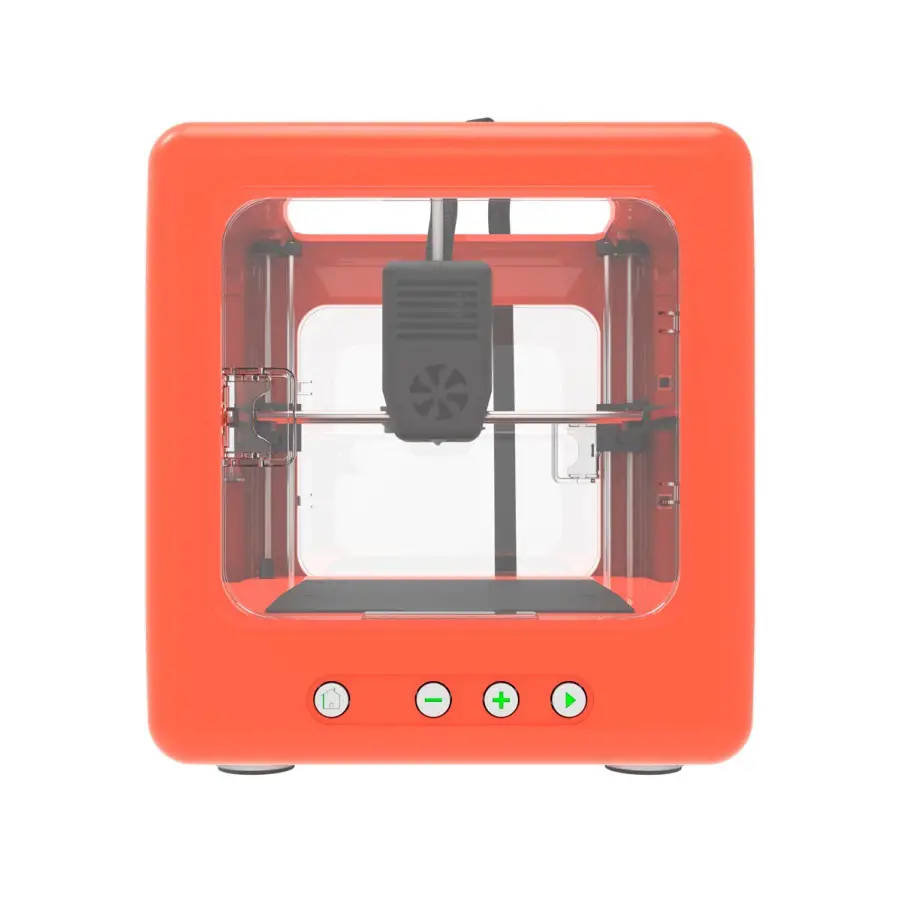 Thank you for purchasing NANO plus 3d Printer, NANO plus is kind of consumer 3d printer,it can make your custom creations come to life, Just plug in the printer, download the models, click print, and watch as you bring an object into the world through 3D printing
For updated information, please visit www.easythreed.com
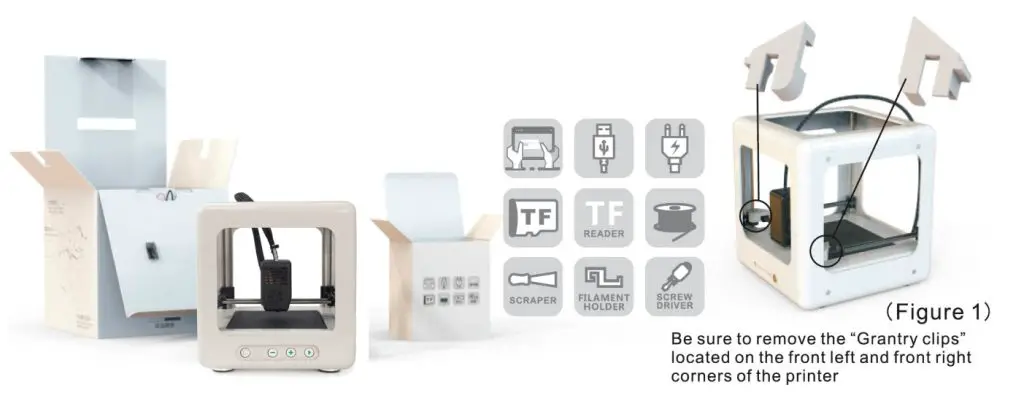
Un-Boxing NANO plus 3d printer
- Lift the NANO plus from it packaging box. Remove bubble wrap, foam. Tape.
- Inside is a NANO plus 3d printer and accessories box with manual, filament, power adaptor, TF card, card reader, screwdriver. Filament holder
- Be sure to remove the “clips” in the left and front right corners of the printer. The clips are only for protection during transportation (As shown in the above figure 1)
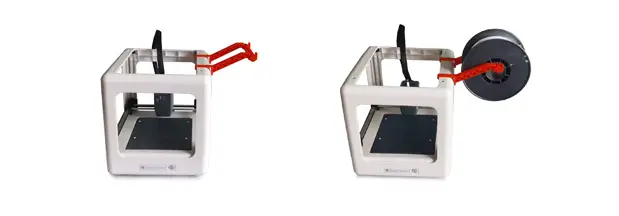
- install the filament holder at the left side or right side of the printer, the right is the best side. (Don’t put on front side and backside. These two sides will be not good for printing quality.) pls, see the below picture show. And hang on the filament.
Slicer software application
(STL format 3D file need be sliced to code format that printer can recognize).
- This 3d printer runs with it’s own developed slicing software named NANO plus, it is in the TF card included in the accessories box, please copy it to your computer, and no need for installation, you can also download NANO plus from the official website, and you can watch Slicer operation video in Youtube channel. NANO plus slicer can recognize STL format 3D files.
- STL format 3D file need be sliced to .gcode format, and save to TF card, and Insert TF card to the printer, then can print 3D file. (3D Printer can read code format file only)
Warm Notice: there is a code file inside the TF card when it come from the factory
Connect and power the printer
Connect the power to the 3d printer, the light inside the Print button will be light.
1. Platform Leveling,The first time to use this printer, you need to level the platform
Please adjust the distance between the nozzle and the platform in 1,2,3,4points, the distance should be just the thickness of a sheet of paper.( Please do this leveling with the help of adults.)
a), Click the button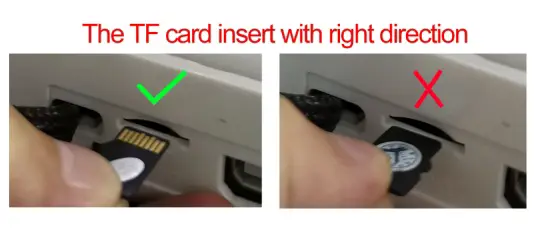 , Z axis will go home position. After Z-axis come to the home position, please turn off the power, after turn off the power , then you can move the X-axis and Y-axis by hand (Attention: when the hotbed is heating up, the home function will not react until the temperature of the hotbed reaches the set temperature)
b), Move the nozzle to 1 point And put a sheet of paper between the nozzle and the platform, if the distance is too far, turn the hand-twisted nut counter-clockwise to make the printing platform rise to the standard distance. If the distance between the nozzle and the platform is too close, turn the hand-twisted nut clockwise to make the printing platform fall to the standard distance, (check the distance is right or not .that is, when drawing A4 sheet, the nozzle should be attached to the A4 sheet without scratching it).
c), do the same way to adjust another 2,3,4, three points。
d), When the distance between the nozzle and the platform all is right distance in 1,2,3,4, four points, leveling is finished and succeed.
Please turn on the power again after platform leveling.

2.Load Filament, feed
(a), Insert the filament into the print head tube until it can not go further, and gently press the filament to stop it runs back.
(b), Click the button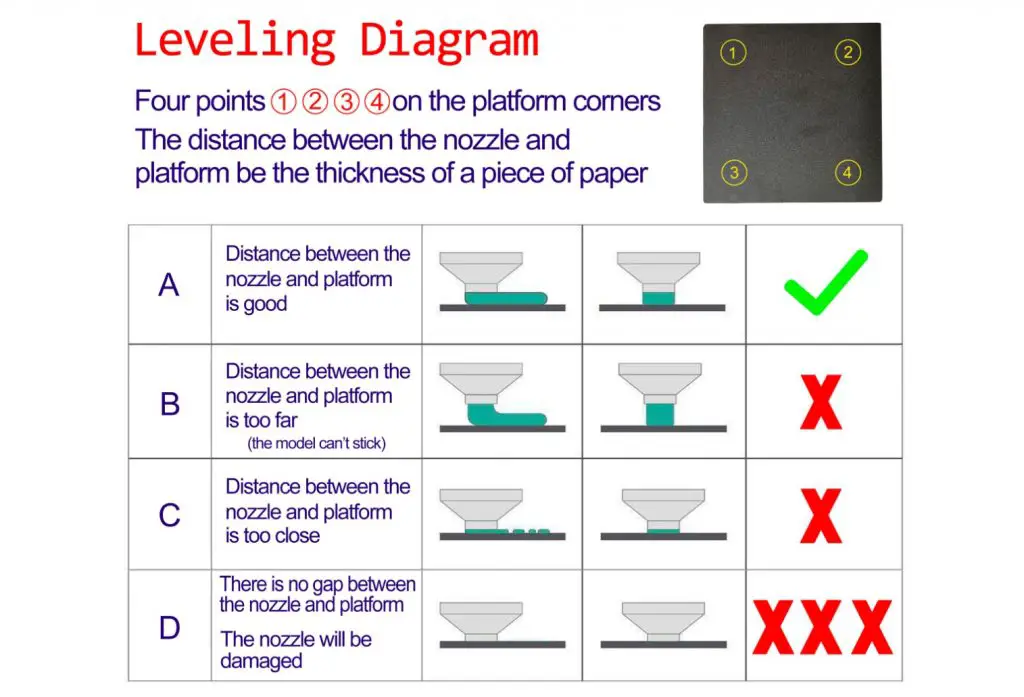 , the button light turns on and flash,the nozzle is heating, Please be patient and wait about 2 minutes, the machine begins to feed, when there is regular silk come out of the nozzle, feed succeed, Then you can press button to finish feed.
Note: Make sure the distance between the nozzle and printing bed is 3cm at least. If no enough space, press the button hold for 3 seconds then release, Z axis will go up 1cm ( when the printer power on , press for 3 seconds then release, every time the nozzle will raise 1cm)
3. Print
Insert the TF card to the printer, click the button, and the button light will flash, Please be patient and wait about 5 minutes, for the nozzle and hotbed to heat up, the printer starts printing when the temperature rises to set value ( the Printer will choose the lastest code file to print automatically) .
4. Pause/Restore
during printing, Click, the button light stops flashing, then printing paused. If need to continue printing, Click to restore, the button light flashes again, the printer goes back to print .
5. Stop Print
If you want to stop print during printing, press the button for 3 seconds then release, the machine will stop printing, then printing canceled.
6. Unload Filament, Retract
If users want to change filament or keep the machine stop working for quite a long time, then need to unload the filament, Click the button, the light inside will flash, Please be patient and wait about 2 minutes, the motor inside the head will work and draw out the filament, after that, take out the filament from the print head.
After print, remove the platform, and easy to take off the object.
Maintenance
- Do not try to use the methods not described in this manual to disassemble or modify the machine, in order to avoid damage to the printer or other more serious accidents
- When power is cut off, regularly clean the printer with a cloth to wipe off dust and residue. If wet cloth is needed, do not use flammable solvents to touch the internal circuit of the printer to avoid fire or electric shock
- The recommended temperature for the working environment: 5C-30C, do not air the machine body with a fan during the printing process
- Recommended humidity for the working environment: 20%–80%
Safety
- Safety and Warn:
Children under 10 years old use this printer should be with adult supervision, the print head exposed nozzle, extruded plastic, and areas near the nozzle may be extremely hot, Keep your finger away from the print head and extruded material unless it has been unplugged for at least 10 minutes. Use the products in a well-ventilated area. Use the printer only as intended, as described by the user manual. Do not leave the product running while unattended. - Precaution
None of the components of the NANO plus 3d Printer or parts printed from it or using filaments are
certified for food safety nor should they be regarded as food-safe therefore should not come in touch with the mouth or foods/liquids that will be ingested by humans or animals - Maintenance: Long time use or improper use, nozzles, nozzle assemble parts, or others may need to be replaced or cleaned, print platforms and its overlays may need to be replaced, the extruder may need to be cleaned.
FAQ
Q1: why the printing head can not move after pressing the printing button in initial printing?
A: Please remove the clips in the front left and right corner before using the machine. The clips are or transportation protection
Q2:How to feed the filament and how to judge filament feed successfully?
A: First, straighten the filament and gently push it into the feeding hole, at the same time, use the other hand to operate the screen to “in filament” choose it and confirm. Then wait about 1 minute(the machine is warming up), release the material when feeling the filament is caught by the machine. Then wait another 10 seconds to observe if there has “silk” coming from the machine. There is about 10cm filament come out. Till this time, filament feed successfully.If you operate based on the above steps, but no silks come out from the nozzle after waiting for more than 5 minutes, please re-power the machine and try again.
Q3: How to retract filament? How to solve when the filament can not be retracted
A: slide the back gear to ‘retract’ gear, normally this way will retract successfully, if failed pls try to feed first, then retract again. Please Pay special attention that, gently pull up the material to help till the filament completely get out of the printer head.
Q4: What’s the reason that the model can not stick to the printing bed in the initial, printing or in the process of printing?
A: The gap between the bed and the nozzle is too far, you need to level the bed, use the method we mentioned above( 4.4 article)
Q5: What needs to pay attention to when adjusting the printing bed? Need to check a bed Before each print?
A: adjust the printing bed, need to use the screwdriver in the accessories box to rotate the bed screws when rotating clockwise the bed goes down when rotating counterclockwise the bed go up.
No need to always adjust the leveling with every printing.
How to leveling pls refer to above mentioned(4.4 article)
Q6:How to judge what’s the best distance between nozzle and printing bed? What is the difference when its too close and too far?
A: The standard distance between the nozzle and printing bed is the thickness of a piece of A4 paper, Insert a piece of paper between the bed and the nozzle, with normal pull and with resistance as the standard; in the condition that does not scratch bed. The closer it is, the firmer the model will be.
- The right distance between nozzle and bed: the” silks” are flat, spread on the bed very smooth, and no burrs.
- The distance is too far: the “silks” are round, spread on the bed unevenly, with gaps and tilt. Filament
comes down to the bed is by gravity force. The rounded strips’ adhesion effect is not good, they are easily moved. The printing effect is very unsatisfactory. - The distance is too close: the “silks” are irregular protrusion(with burrs)on both sides, but thin in the middle. Or there are no silks coming down. Or the bed is scratched with a deep trace.
Q7:Why do there twist lots of filament nearby the nozzle in the process of printing? Does the model become a mess of silks?
A: there are several situations:
- When it happens in the initial printing, the distance between nozzle and bed is too far, the silks can not stick to the bed, so it would become messy filament. Please twist the 4-bed screws 90 degrees anti-clockwise. If still not ok, then please twist 90 degrees anti-clockwise again till normal printing.
- The bed is with oil, please use a dry towel to tidy the bed, do not use your hand to touch the bed directly.
Q8:How can i move the printing head X, Y?
A: Please unplug the power, then use your hand to move the printing head to where you want. Please do
not try to move the head up and down, Z-axis can not be moved by hand.
Q9:How can i move the printing head up?
A: Only in the condition that the printer is power on but is not printing, press the printing bed for 3 seconds then release, it will go up 1 cm.
Q10:Does the printer need warming up before each printing?
A: There needs to warm-up when feed and retract operation, In normal printing, you only need to choose the model and wait about 1 minute, then the printer will start work.
Q11:Can the model continue printing if electricity is cut off?
A: If there is no electricity in the process of printing, the models can not continue printing.
Q12:Can pause printing in the process of printing?
A: Yes, press the printing button, it will pause. Then press again,it will continue printing.
Q13:How to stop printing?
A: Please press the printing button for 3 seconds then release, then it will stop printing(precaution:can not continue printing after a stop).
Q14:Filament will run out soon in the process of printing, What should do?
A: Please pause the printing, then slide the switch to retract gear, use your hand to pull up the filament.(precaution: please do this before all the filament goes into the feeding hole, or there will be no filament hand can pull up). Then put the new filament into the hole and use another hand to slide the switch to feed gear, wait about 10 seconds till the filament come down. Then slide switch to the middle gear and press the printing button shortly to resume printing. Please pay special attention that, after feeding 10 seconds, timely slide switch to the middle gear in avoid that the filament pimple appears in the model.
Q15:When print the first layer, there is no filament on the bed, why?
A: Please check if the distance between nozzle and bed is to close cause no space for the filament to come out.
Q16:Can the_machine print online?
A: Yes, it needs to use third-party slicing software CURA. Please refer to the above step of point 5.0 Online printing(For experts)
Thanks for choosing Easythreed, we will try our best to serve you
Shenzhen Easythreed Technology CO., LTD
Address: No.A2 , 2nd Floor, Avant Low Carbon Innovation Park , No1034 of
Longgang Road , Pingdi Street , Longgang District , ShenZhen , China
Website: www.easythreed.com
Email: [email protected]