EMACROS HS002W W Wireless Solar Driveway Alarm System with Wifi

eMACROS was founded in 2012 by the “brainchild” group of friends who previously designed Motorola products. After a few years, we became the industry leader in home intercom and security products. Our vision is to create a global world leader in home intercom solutions and products. We create intelligent residential home solutions and intercom systems. Our company philosophy is to focus our efforts on the needs of our clients.
We want you to have the best experience pos with our products. We also offer superior customer service to address damaged or defective products. If you have any questions, don’t hesitate to contact us at: [email protected]; we will assist you as quickly as possible.
Notes, cautions, and warnings
NOTE: A NOTE indicates important information that helps you make better use of your product.
CAUTION: A CAUTION indicates either potential damage to hardware or loss of data and tells you how to avoid the problem.
WARNING: A WARNING indicates a potential for property damage, personal injury, or death.
Overview
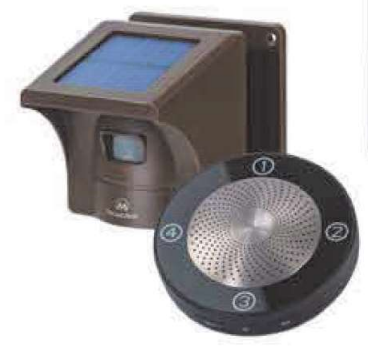
The Wifi Motion Alert ranges up to 1/2 mile (800 meters) in the open air. It uses a Passive Infrared (P.I.R.) Motion Sensor to detect movement of people and vehicles while allowing small animals to pass through undetected. An AC adapter powers the Base Station; it can also run on 4AA batteries as backup in case of a power outage for 4 weeks.
You will receive the notifications on your cellphone when your sensor triggered.
What’s in the Box
- 1 Base Station
- AC adapter
- Documentation
- Sensor Back Plate Screws
- Masonry Screw Anchors
- PIR Motion Sensor
Operation and Features
Base Station
Power
- Power on: Short press the power button, with one beep.
- Power off: Long press the power button for 3S, with a long beep.
Volume+/Volume
- Volume Up and Down: short beep when adjusting the volume, no beep when reaching highest or lowest volume.
- Network connection: Long press the Volume+ or Volume- button for 3S to enter the network configuration mode; the red indicator light changes from slow flashing to fast flashing
Passive Infra-Red(PlIR) Motion Sensor
- Before installing the PIR Sensor, recharge the sensor (with an 18650 battery attached) using the AC adapter to ensure a full charge. The blue light will illuminate while charging The blue light will turn off once the battery is fully charged.
Note: The sensor has been tested several times in the factory. If the blue light won’t be illuminated, the battery may be fully charged, you can install it directly. - High/Low/Off Switch: First, open the black silicone scal cap at the bottom of the PIR Motion Sensor, then turn on the sensor by switching to High or Low. Set the detection range to High (30feet), Low (20 feet), or turn sensor Off.
- CH 1-4 Switch: Select a different channel for each outside sensor. If installing multiple PIR Motion Sensors, ensure that each sensor is set to a different Channel/Zone.
Note: Each Separate channel uses a unique chime, allowing you to match different chimes with different channels. - Test the PIR Motion Sensor by waving your hand in front of the sensor. The Base Station will produce a unique tone based upon the sensor’s setting.
- When detecting movements, a sensor eye will flash red only when assigned to lines 1 and 2, not lines 3 or4
Setting Up Your Home Security System
- Pairing Sensors:
- In Receiver: Long press the power button for 5S to enter the pairing mode with a long beep then 4 blue lights flash with one beep. Choosing one channel and turn on the sensor by switching to Hi or Low, The receiver will produce a unique tone based on the channel automatically, The receiver and sensor are paired successfully.
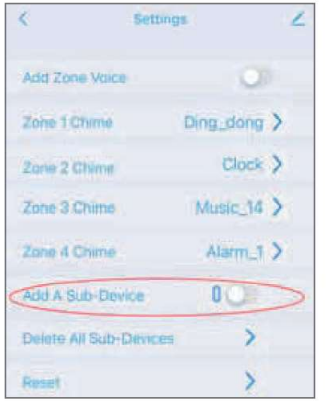
- In-App: You also can pair the sensor in the App after the receiver connect to wifi. Click the Setting in the App, turn on the Add a Sub-Device, then the 4 blue lights would flash 30 seconds with a short beep, then trigger the sensor, the receiver will produce a unique tone based on the channel automatically, The receiver and sensor are paired successfully.
- Clear the pairing:
- In Receiver: If you need to clear the paired Sensor, long-press the Power button for 5S, plug in the USB cable, or insert batteries back to enter the clear pairing mode. Four blue indicator lights will be on after one beep, then turn off in turna. After one beep, the clearing is complete, and you can return to normal mode.
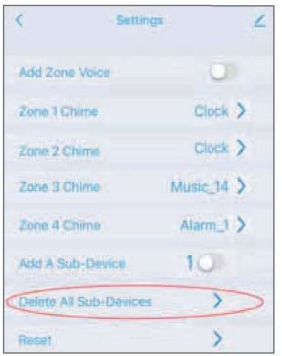
- In App: You can also clear the paired Sensor in the App by pressing Deleting All Sub-Devices in the Settings.


Download Apps And Create Account
Search the My Home App or scan below QR Code to download from the Apple App Store or Google play.
Note: Please make sure that your mobile device’s operating system is either iOS 9.0 or higher, or Android 4.1 or higher.
- Creating a new account on My Homeyo App.
Open your My Homeyo App and click the Sign
Up and click Agree to agree the user agreement.
Notes: To make sure you can receive the notifications when your sensor is triggered, please Agree on the user agreement.
Enter your email address or mobile number and create a password.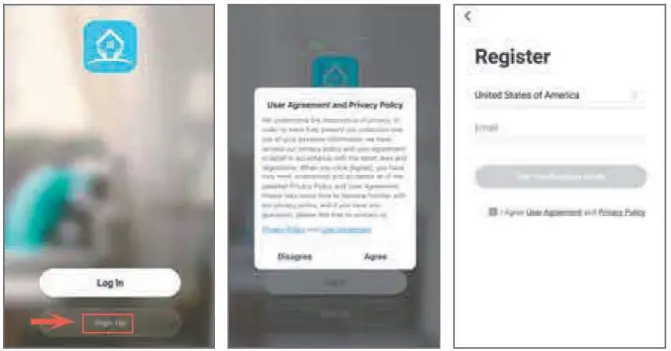
Enter your verification code. 
Network connection
The red indicator light flashes slowly when the receiver is not connected with the network, long-press Volume/Volume- 3S to enter the network configuration mode, the red indicator light changes from slow flashing o fast flashing. When the network configuration is successful. The receiver’s red indicator light goes off. Connect your phone to WI-FI, turn on GPS and Bluetooth, open the MY HOMEYO App, click to add a device.
Manually connection: Select Smart Solar Drive Alarm (W1-FI), fill in the working WI-Fl and enter the password, click next, confirm that the indicator light flashes quickly, click next to wait for the connection, wait for the pop-up of Add successfully, then the network configuration is successful. 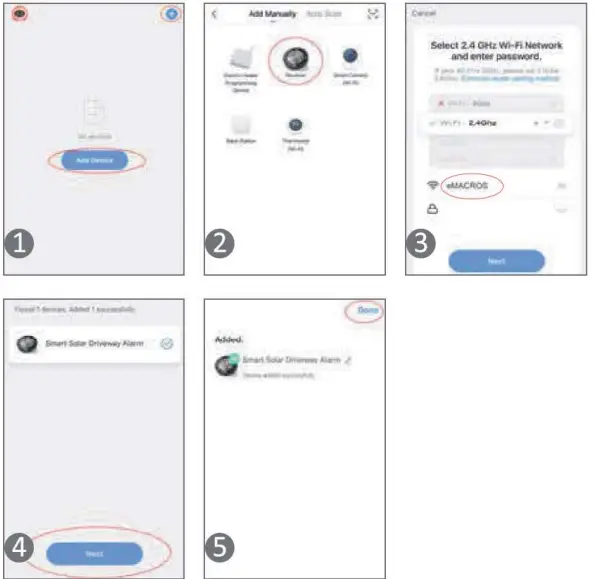
Automatic connection: After the available equipment is found, the alarm receiver icon appears, click Go to add, click Bluetooth device+, fill in the working Wl-FI and password, click confirm to wait for the connection, wait for the pop-up of Add successfully, then the network is successfully configured, and the receiver’s red indicator light goes off.
App Control
HSO02W can receive alarm information through the mobile phone App and control the receiver function.
Note: The same alarm notification will be sent one minute apart. On the home page of the App, click on the multi-function receiver to enter operation page. the main
Main page
Power Supply Mode Display: USB is displayed in the circular box at the top of the interface when the adapter powers the receiver. When batteries power the receiver, the circular box displays the percentage value of the power; when the battery power is less than 20%, the percentage number will turn red, and the receiver will report a BASE POWER LOW voice alarm.
Base Volume Level: the volume can be set through the volume bar; there are 5 levels in total, when the level is 0 the receiver would be muted.
Alarm Zone Display: You can view the alarm indications in 4 areas. If a zone alarms, the alarm indication will change from No Alarm to Alarm.
Clicking the alarm indication will enter the history record interface to view the details and the history of the alarm. After exiting, the alarm indication changes to normal.
History Record
- Alarm Records: Record the date, time, and alarm area of the alarm information.
- Settings Records: Record the operation of the App controlling the receiver.
- Other Records: Record the power supply mode of the receiver.
Zone Arm settings
- All Disarmed: After clicking, the four blue indicator lights will turn off, all areas will be disarmed, and the receiver will not alarm.
- All Armed: After clicking, the four blue indicator lights are on, all areas are in an arming state, and all areas of the receiver can normally alarm.
- Defense Zone: A defense zone can be armed and disarmed through the switch button. After arming, the blue indicator light in this area is on. This defense area can normally alarm. After disarming, the blue indicator light in this area will go out; this zone will not alarm.
Settings
- Add Zone Voice: You can add channel voice before the alarm chime to let you easily know which zone triggered.
- Zone Chime: The alarm chime of a certain defense zone can be changed, and there are 27 chimes to choose from.
- Add A Sub-Device: The number in the front is the number of paired sensor; a total of 16 sensors can be paired.
- Deleting All Sub-Devices: After clicking, a confirmation interface will pop up, and all paired sensors will be cleared after confirmation.
- Reset: Click to pop up a confirmation interface; after confirmation, all paired sensors will be cleared, and the distribution network will also be cleared.
Remove the device
If you want to remove the device from the mobile App, you can click the edit icon in the upper right corner of the homepage or the upper right corner of the settings page, click the Disconnect anc wipe data or Disconnect only.
Product Installation
- P.I.R. Motion Sensor Installation
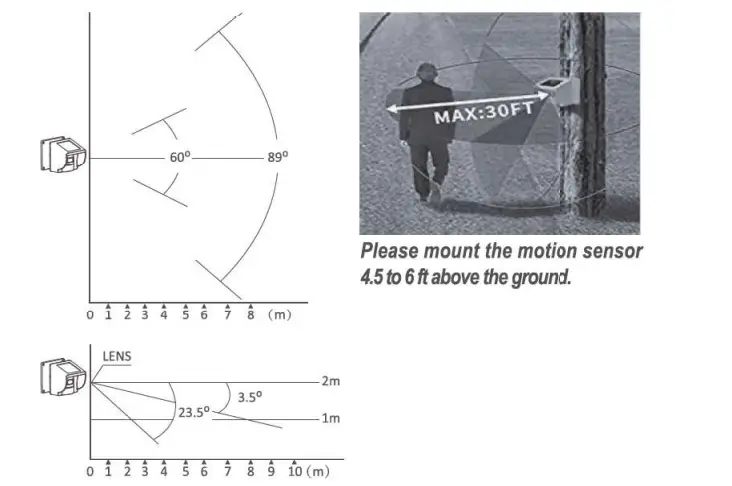
- Mount the waterproof P.I.R. motion sensor vertically on a solid surface 4.5-6 feet (1.5-2m) above the ground and make sure the detected object is within 30 feet when the sensitivity is set to High. Please refer to below for the installation height and detection angle.
- Rotate sensor to access screw holes.
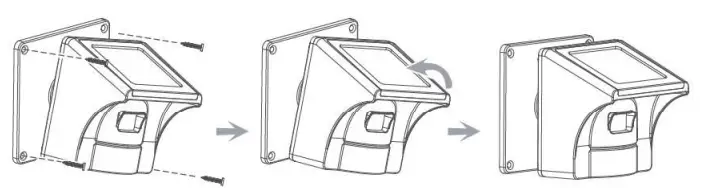
- To prevent or reduce the false alarms (go off), the sensor can adjust the angle as needed. Position the sensor to avoid direct sunlight to the sensor cycs while keeping the solar panel Lacing up

Please point the sensor in an environment free from limbs, falling leaves, or other items affected by the wind which may trigger a false alarm.
Install the sensor high enough off the ground to prevent false alarms from dirt and small animals.
Note: Pairing and testing are required before installation, and ensure that the sensor is fully charged.
- Mount the waterproof P.I.R. motion sensor vertically on a solid surface 4.5-6 feet (1.5-2m) above the ground and make sure the detected object is within 30 feet when the sensitivity is set to High. Please refer to below for the installation height and detection angle.
Technical parameters
- Power Input: 5V 1A
- Battery Power Supply: 6V 4pcs A.A. battery
- WI-FI Working Frequency: 2412-2484MHZ
- WI-FI Maximum Power: 16dBm(E.I.R.P)
- Wi-Fi Band: Only support 2.4G
- Wi-Fi Network Support: IEEE 802.11b/g/n Open
- WEP, WPA, WPA2 Encryption
- Rf433 Wireless Transmission Working Frequency: 433.92MHZ
- RF433 transmission distance: 1/2mile(open area)
- Normal working temperature:-20-60’C
Troubleshooting
- The PIR Motion Sensor operates, but the base station does not respond.
Check the sensor switch settings and make sure the sensor and base station in the valid range. - PIR Motion Sensor is detecting motion only part of the time.
Set the PIR Sensor Switch to High sensitivity setting. To detect vehicles, The PIR sensor detects the movements with heat sources. Please adjust the sensor eye with a horizontal angle to the engine of the car. Swivel the sensor to obtain the best line of sight to a vehicle. - The system is giving false alarms.
Check for moving tree branches or insects in the sensor window and remove as necessary. Check the Sensor Switches on the PIR Motion Sensor. Ensure that sunlight is not shining directly onto the sensor eye. - The system is not getting the expected transmission range.
Ensure that the PIR Motion Sensors are vertically aligned, not attached to the far side of a tree, and away from metal objects. Ensure that the Base Station has the clearest possible line of site to the sensors. The fewer objects between the devices, the longer the range. - The Solar Panel stop working.
Please clean the dust from the solar panel after using for a period of time. - How to prevent the sensor get the water inside.
Please tighten the black rubber cover seal at the bottom of the sensor - If the sensor continuously goes off.
Please cover the sensor to confirm if it still goes off or gets false alarm, if so, Your receiver may get interference with other sensors. Please contact our service support, we will do our best to make it right for you.
FCC Statement
According to Part 15 of the FCC Rules, this equipment has been evaluated and found to meet the limits for a Class B digital device. These limits are designed to provide reasonable protection against harmful interference in a residential installation. This equipment generates uses and can radiate radio frequency energy and, if not installed and used by the instructions, it may cause harmful interference to radio communications. However, there is no guarantee that interference will not occur in a particular installation. Suppose this equipment causes harmful interference to radio or television reception, which can be determined by turning the equipment off and on; the user is encouraged to try to correct the interference by one or more of the following measures:
- Reorient or relocate the receiving antenna.
- Increase the separation between the equipment and receiver.
- Connect the equipment into an outlet on a circuit different from
that to which the receiver is connected, - Consult the dealer or an experienced radio/T.V. technician for help.
This device complies with part 15 of the F.C.C. Rules. Operation is subject to the following two conditions: (1) This device may not cause harmful interference, and (2) this device must accept any interference
received, including interference that may cause undesired operation. Warning: Changes or modifications not expressly approved by the party responsible for compliance could void the user’s authority to operate the equipment. - – This radio is designed for and classified as “General population/uncontrolled
Use- DO NOT operate the radio withouta proper antenna attached, as this may damage the radio and may also cause you to exceed RF exposure limits. A proper antenna is an antenna supplied with this radio by the manufacturer or an antenna specifically authorized by the manufacturer for use with this radio, and the antenna gain shall not exceed 2dBi by the manufacturer declared.
- DO NOT transmit for more than 50% of total radio use time, more than 50% of the time can cause RF exposure compliance requirements to be exceeded.
- During operation, the separation distance between user and the antenna shall be at least 20cm, this separation distance will ensure that there is sufficient distance froma properly installed externally-mounted antenna to satisfy the RF exposure requirements
- During transmissions, your radio generates RF energy that can possibly cause interference with other devices or systems. To avoid such interference, turn aff the radio in areas where signs are posted to do so. DO NOT operate the transmitter in areas that are sensitive to electromagnetic radiation such as hospitals, aircraft, and blasting sites.
Thank you for purchasing this eMacros product.
This user manual will help you to familiarize yourself with all the features of your newly purchased product.
If you have any queries, don’t hesitate to contact our support team at [email protected]