Model:310 Series
IMPORTANT
Do not return this product to the store.
For assembly problems or questions contact: Eureka’s Customer Service Division
toll free at 1-800-282-2886, 7 a.m. to 8 p.m., Central Standard Time, Monday through Saturday.
For replacement of broken or missing items to be shipped direct to you, call 1-800-438- 7352, 8 a.m. to 4:45 p.m., Central Standard Time, Monday through Friday.
For location of nearest Eureka Warranty Station or Service Information, call 1-800-282-2886 *En México llame al 254 23 52
IMPORTANT SAFEGUARDS
When using an electrical appliance, basic precautions should always be
followed, including the following:
READ ALL INSTRUCTIONS BEFORE USING THIS STEAM CLEANER.
WARNING
To reduce the risk of fire, electric shock, or injury:
- Do not use outdoors.
- Do not leave steam cleaner when plugged in. Turn off the switch and unplug the electrical cord when not in use and before servicing.
- Do not allow to be used as a toy. Close attention is necessary when used near children, pets or plants.
- Use only as described in this manual. Use only manufacturer’s recommended accessories.
- Do not use with damaged cord or plug. If steam cleaner is not working as it should, has been dropped, damaged, left outdoors, or dropped into water, return it to a service center before using.
- Do not pull or carry by cord, use cord as a handle, close a door on cord, or pull cord around sharp edges or corners. Keep cord away from heated surfaces.
- Do not use extension cords or outlets with inadequate current carrying capacity.
- Turn off all controls before unplugging from electrical outlet.
- Do not unplug by pulling on cord. To unplug, grasp the plug, not the cord.
- Do not handle plug or steam cleaner with wet hands or operate without shoes.
- Do not put any object into openings. Do not use with any opening blocked.
- Do not use without floorcloth in place.
- Do not use on stairs.
- Store your steam cleaner indoors in a cool, dry area.
- Keep your work area well lighted.
- Never turn the appliance over or on its side when using steam. Never direct steam towards people, animals or plants.
- Do not immerse the steam cleaner into water or other liquids. Always unplug the power cord from the electrical socket when filling the steam cleaner.
- Never put descaling, aromatic, alcoholic or detergent products into the steam cleaner, as this may damage it or make it unsafe for use.
- Before filling, proceed as follows: 1) turn off the steam cleaner, (2) unplug the power supply, 3) slowly unscrew cap (see page 6, item D) and wait 5 seconds before removing.
SAVE THESE INSTRUCTIONS
GROUNDING INSTRUCTIONS
This appliance must be grounded. If it should malfunction or breakdown, grounding
provides a path of least resistance for electric current to reduce the risk of electric shock.
This appliance is equipped with a cord having an equipment-grounding conductor and
grounding plug. The plug must be inserted into an appropriate outlet that is properly
installed and grounded in accordance with all local codes and ordinances.
DANGER
Improper connection of the equipment-grounding conductor can result in a risk of electric shock. Check with a qualified electrician or service person if you are in doubt as to whether the outlet is properly grounded. Do not modify the plug provided with the
appliance – if it will not fit the outlet, have a proper outlet installed by a qualified electrician.
ADVERTISEMENT
This appliance is for use on a nominal 120 volt circuit and has a grounding plug that
looks like the plug illustrated in Figure A. A temporary adapter which looks like the adapter illustrated in Figure B may be used to connect this plug to a two-pole receptacle, as shown, if a properly grounded outlet is not available. The temporary adapter should be used only until a properly grounded outlet, Figure A, can be installed by a qualified electrician. The green colored rigid ear, lug, or the like extending from the adapter must be connected to a permanent ground such as a properly grounded outlet box cover.
Whenever the adapter is used, it must be held in place by a metal screw.
NOTE: In Canada, the use of a temporary adapter is not permitted by the Canadian
Electrical Code.


GENERAL INFORMATION
The steamer is designed as a complete change from old methods of manual floor
cleaning. This appliance is designed to obtain excellent floor cleaning and effective
sterilization of these surfaces.
Service Information
The instructions in this booklet serve as a guide to routine maintenance. For additional
service information telephone our toll free number for the nearest Eureka Authorized
Warranty Station. You should know the model and type numbers when you call:
USA: 1-800-282-2886
Mexico: 254 23 52
Canada: 1-800-282-2886
If you prefer, you can write to The Eureka Company, Service Division, 807 North Main
Street, Bloomington, Illinois 61701, USA. In Canada write to The Eureka Company, 866
Langs Drive, Cambridge, Ontario N3H 2N7. Refer to The Eureka Warranty for complete
service information.
Rating Plate
The model and type are indicated on the rating plate located on the back side of the cleaner under the handle. For prompt and complete service information, always refer to these numbers when inquiring about service.
Model & Type _________
Serial No. ____________
DESCRIPTION OF THE DELUXE ENVIRO STEAMER

A) Floorcloth
B) Main part of steam cleaner
C) On/Off Switch
D) Safety Cap
E) Pilot light
F) Refill water light
G) Cloth clip
H) Telescopic tube
I) Measuring cup
J) Funnel
K) Hanging hook
L) Preheating/cool down tray
MAIN FEATURES OF THE DELUXE ENVIRO STEAMER
Thank you for having chosen our product and allow us to congratulate you for having
purchased the Eureka Deluxe Enviro Steamer.
The Eureka Deluxe Enviro Steamer achieves a high degree of hygienic and degreasing
power on floors. It turns water into steam in just a few minutes, so when contact is made with surfaces dirt and grime is removed.
Since the Eureka Deluxe Enviro Steamer uses the active power of steam without the use of detergents or soap, it is safe for the environment.
The Deluxe Enviro Steamer is a new way of cleaning that is effective and hygienic.
The Eureka Deluxe Enviro Steamer does not allow calcium deposits to adhere to the
boiler and does not require distilled water. Areas with hard water should use distilled
water for better performance. See the maintenance section for care.
Other Advantages of the Eureka Deluxe Enviro Steamer
The Eureka Deluxe Enviro Steamer can kill dust mites and some types of bacteria, such as salmonella and E-coli when used properly.
To disinfect a specific area, position the steamer over the area for a minimum of eight
seconds. This allows the floor under the steamer to reach approximately 170°F. Use this procedure to disinfect floors near: bathroom stools, food preparation areas (not on
kitchen counters), pet sleeping quarters, etc.
INSTRUCTIONS FOR USE
The Eureka Deluxe Enviro Steamer is designed to thoroughly clean floor surfaces, such as marble, ceramic, stone, linoleum, sealed hard wood floors and parquet.
WARNING: On surfaces that have been treated with wax or some no wax floors,
the sheen may be removed by the heat and steam action. Do not use on unsealed wood floors or let unit stand on any wood floor for an extended period of time. This could cause the woodgrain to rise.
It is therefore recommended that a sample cleansing be carried out on an isolated area of the floor. Also, check use and care instructions from the floor manufacturer.
HOW TO ASSEMBLE AND USE
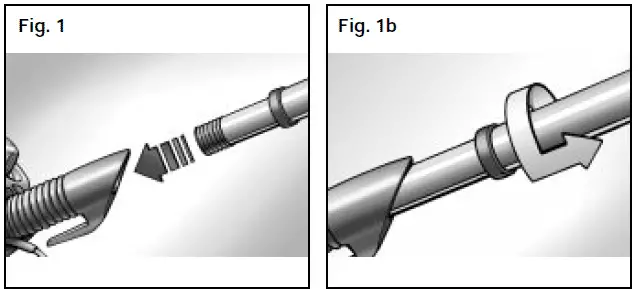
- After having taken the appliance out of its box, screw the telescopic tube onto the main part of the appliance (Fig. 1). Then turn the two ends and pull them out to the desired length. Lock in the upper part by turning clockwise (Fig. 1b).
Do not plug unit into an electrical outlet until Step 5.
HOW TO ASSEMBLE AND USE (continued)
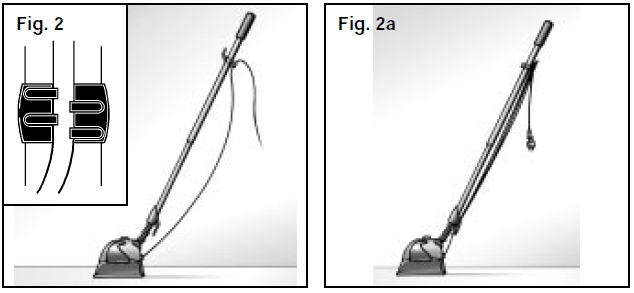
- Secure the cable onto its hook at the top of the tube (Fig. 2). Wrap cord for storage (Fig. 2a).

3. Rest the base of the Enviro Steamer on its floorcloth as supplied, making sure that the edges are secured over the base (Fig. 3). Then tuck both ends of the floor cloth under the cloth clips. Do not use without a floorcloth in place.
CAUTION: Floorcloth grippers have sharp teeth.
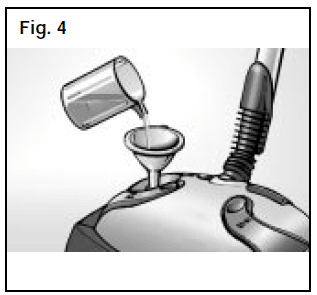
4. Unscrew the safety cap (D), insert funnel (J) and pour 2 measures of water using the measuring cup (I) (total 12 oz.) into the tank, then screw the safety cap back on.
NOTE: Do not overfill.
5. Now, plug the unit into an electrical outlet.
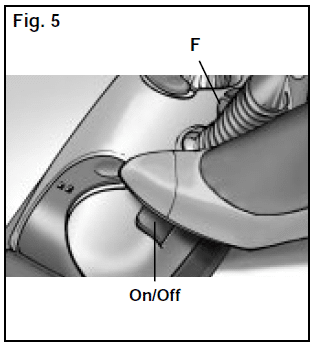
6. Place the Deluxe Enviro Steamer on its preheating/cool down tray then press on/off switch and wait for about 3-4 minutes (Fig. 5). Do not leave the device unattended during the waiting period. CAUTION: Do not leave the device standing on the floor. If you notice the formation of a whitish “halo,” it may be removed using a normal decalcifying product or with a few drops of vinegar.
7. As soon as Deluxe Enviro Steamer emits steam, begin using it, passing slowly over the surfaces to be cleaned. This is the ideal method for thoroughly cleaning your floor. To disinfect specific areas of the floor, leave the steamer over the spot for a minimum of eight seconds, but no more than 15 seconds.
WARNING: Never turn the floor steamer over, or on its side when using steamer, or direct steam at any person, animal, or plants. Use only on floors.
8. When Deluxe Enviro Steamer no longer emits steam the water refill light (F) will
come on. This means that there is no more water (this will happen after approximately
15 minutes of use). Place appliance on preheating/cool down tray, turn off (Fig. 5)
and unplug from the electrical outlet. Take off the safety cap, and refill. During
refilling, be careful not to touch the hot parts of the device. CAUTION: Safety cap
and floorcloth may be hot.
9. Replace safety cap, turn your Deluxe Enviro Steamer on again and steam will start
to be produced as before.
10. After each use, rinse the floorcloth in running water and line dry. It may shrink if put
in a clothes dryer.
CAUTION: Whenever changing the floorcloth, turn off the appliance (Fig. 5)
and unplug. Be careful not to touch the hot parts of the device.
11. After use, wind the power cord around the cord hooks (Fig. 2a) before putting the
appliance away.
12. Always empty leftover water prior to storage.
CLEANING AND MAINTENANCE
NOTE: The unit must be turned off and unplugged from the electrical outlet and
allowed to cool down before all cleaning and maintenance tasks.
In order to guarantee perfect functioning over a long period of time the tank needs to be rinsed out with water once a month to eliminate any accumulated calcium deposits. Do not use vinegar or other decalcifying substances. Put in two measures of water,
replace the safety cap and shake to loosen deposits. Remove safety cap and immediately empty water into a sink. CAUTION: Do not immerse the unit in water.
The Eureka Deluxe Enviro Steamer should be used with its own specially developed
floorcloths (spare floorcloths are available from your Eureka retailer).
PROBLEM SOLVING
NOTE: Turn OFF the power switch and unplug the electrical cord before servicing.

eureka acuum cleaner; household

IMPORTANT SAFEGUARDS
When using an electrical appliance, basic precautions should always be followed, including the following:
READ ALL INSTRUCTIONS BEFORE USING THIS VACUUM CLEANER
To reduce the risk of fire, electric shock, or injury:
- Do not use outdoors or on wet surfaces.
- Do not leave vacuum cleaner when plugged in. Turn off the switch and unplug the electrical cord when not in use and before servicing.
- Do not allow to be used as a toy. Close attention is necessary when used by or near children.
- Use only as described in this manual. Use only manufacturer’s recommended attachments.
- Do not use with damaged cord or plug. If vacuum cleaner is not working as it should, has been dropped, damaged, left outdoors, or dropped into water, return it to an authorized service center before using.
- Do not pull or carry by cord. Do not use cord as a handle. Do not close a door on cord or pull cord around sharp edges or corners. Do not run vacuum cleaner over cord. Keep cord away from heated surfaces.
- Do not use extension cords or outlets with inadequate current carrying capacity.
- Turn off all controls before unplugging.
- Do not unplug by pulling on cord. To unplug, grasp the plug, not the cord.
- Do not handle plug or vacuum cleaner with wet hands.
- Do not put any objects into openings. Do not use with any openings blocked; keep free of dust, lint, hair, and anything that may reduce airflow.
- This vacuum cleaner creates suction and contains a revolving brush roll. Keep hair, loose clothing, fingers, and all parts of body away from openings and moving parts.
- Do not place vacuum cleaner on furniture or stairs as the brushroll may cause damage. Use extra care when cleaning stairs. Place vacuum cleaner on floor with the handle in storage position while using attachments.
- Do not pick up anything that is burning or smoking, such as cigarettes, matches, or hot ashes.
- Do not use without dust cup, filter, screen and exhaust filter in place.
- Belt pulleys can become hot during normal use. To prevent burns, avoid touching the belt pulley when servicing the drive belt.
- Do not use to pick up flammable or combustible liquids such as gasoline, or use in areas where they may be present.
- Store your vacuum cleaner indoors in a cool, dry area.
- Keep your work area well lit.
- Unplug electrical appliances before vacuuming them.
- Unplug before connecting pet turbo brush.
WARNING: This product can expose you to chemicals including Di(2-ethylhexyl)phthalate (DEHP), which is known to the State of California to cause cancer and to cause birth defects or other reproductive harm. For more information go to www.P65Warnings.ca.gov
SAVE THESE INSTRUCTIONS
To reduce the risk of electric shock, this appliance has a polarized plug (one blade is wider than the other). This plug will fit in a polarized outlet only one way. If the plug does not fit fully into the outlet, reverse the plug. If it still does not fit, contact a qualified electrician to install the proper outlet. Do not change the plug in any way.
What comes in the carton

How to identify parts of your vacuum cleaner
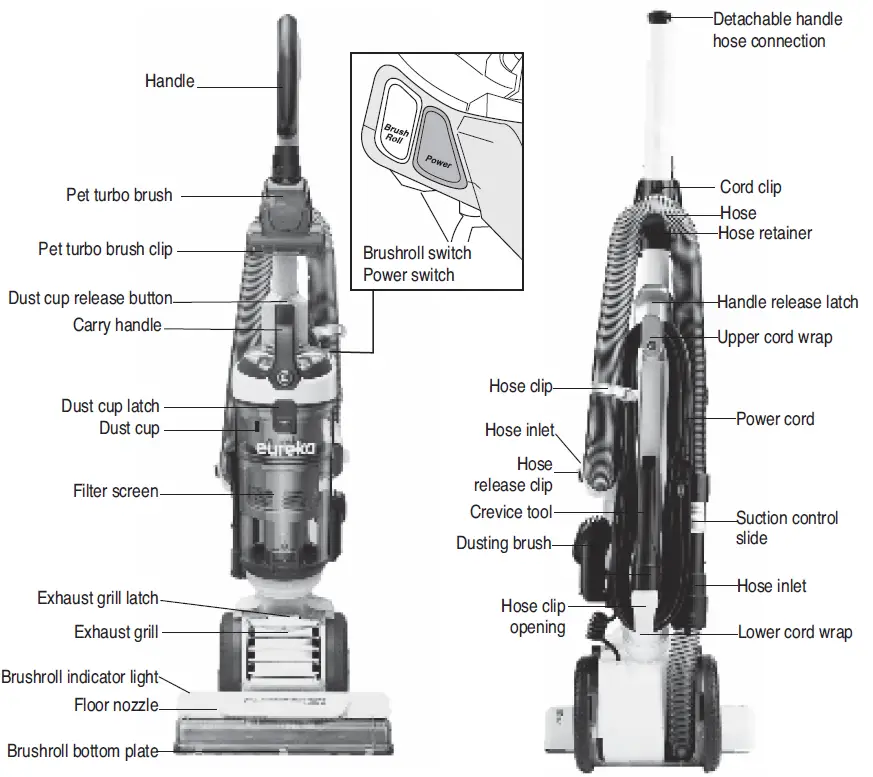
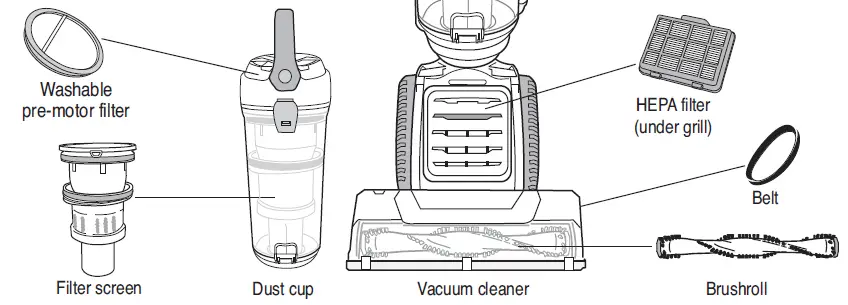
How to assemble your vacuum cleaner
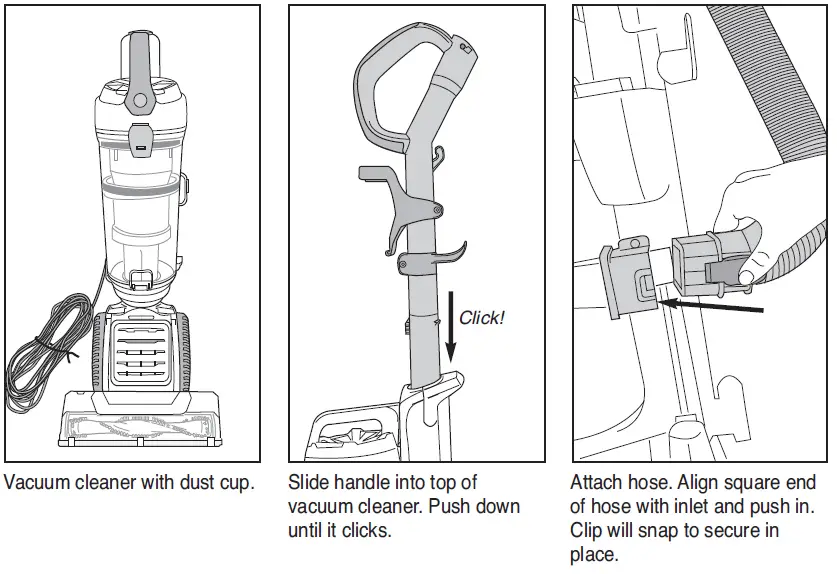
- Vacuum cleaner with dust cup.
- Slide handle into top of vacuum cleaner. Push down until it clicks.
- Attach hose. Align square end of hose with inlet and push in. Clip will snap to secure in place.
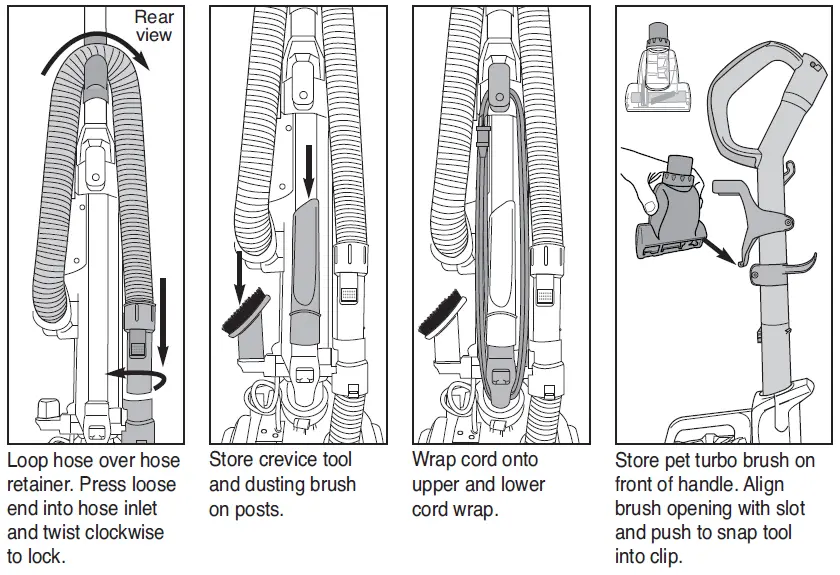
- Loop hose over hose retainer. Press loose end into hose inlet and twist clockwise to lock.
- Store crevice tool and dusting brush on posts.
- Wrap cord onto upper and lower cord wrap.
- Store pet turbo brush on front of handle. Align brush opening with slot and push to snap tool into clip.
How to use your vacuum cleaner
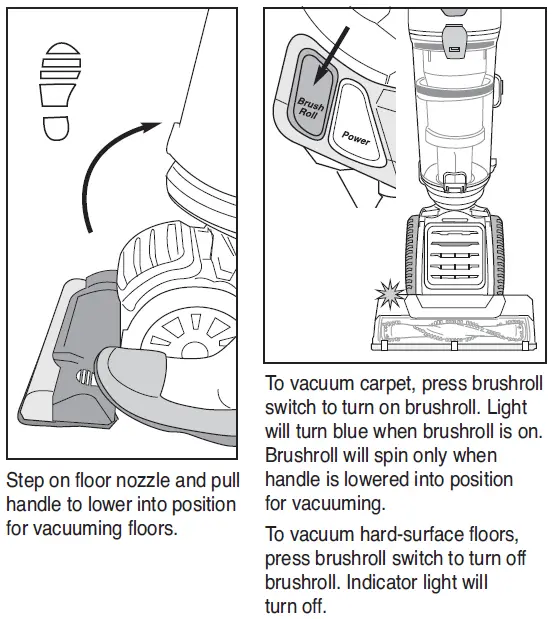
CAUTION: Be sure brushroll is turned OFF when vacuuming hard-surface floors.
- Plug power cord into outlet. Press power switch to turn on.
- Step on floor nozzle and pull handle to lower into position for vacuuming floors.
- To vacuum carpet, press brushroll switch to turn on brushroll. Light will turn blue when brushroll is on. Brushroll will spin only when handle is lowered into position for vacuuming.
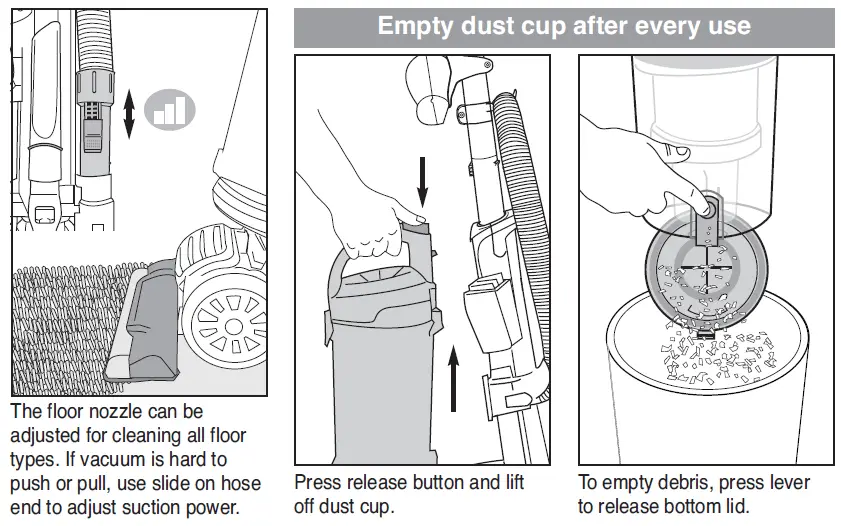
To vacuum hard-surface floors, press brushroll switch to turn off brushroll. Indicator light will turn off. - The floor nozzle can be adjusted for cleaning all floor types. If vacuum is hard to push or pull, use slide on hose end to adjust suction power.
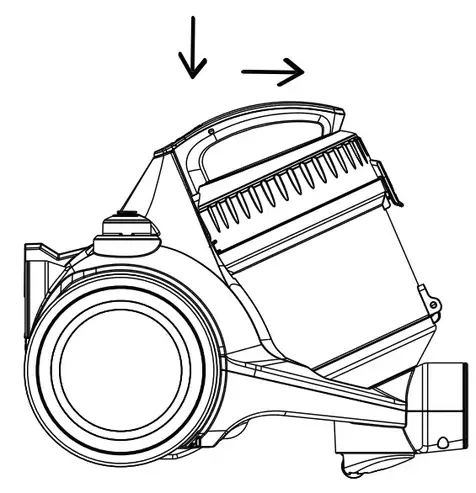
- Press release button and lift off dust cup.
- To empty debris, press lever to release bottom lid.
How to use accessories
CAUTION: When using tools, always place vacuum in upright position. Make sure vacuum cleaner is turned off while attaching tools.
- Place vacuum in upright position.
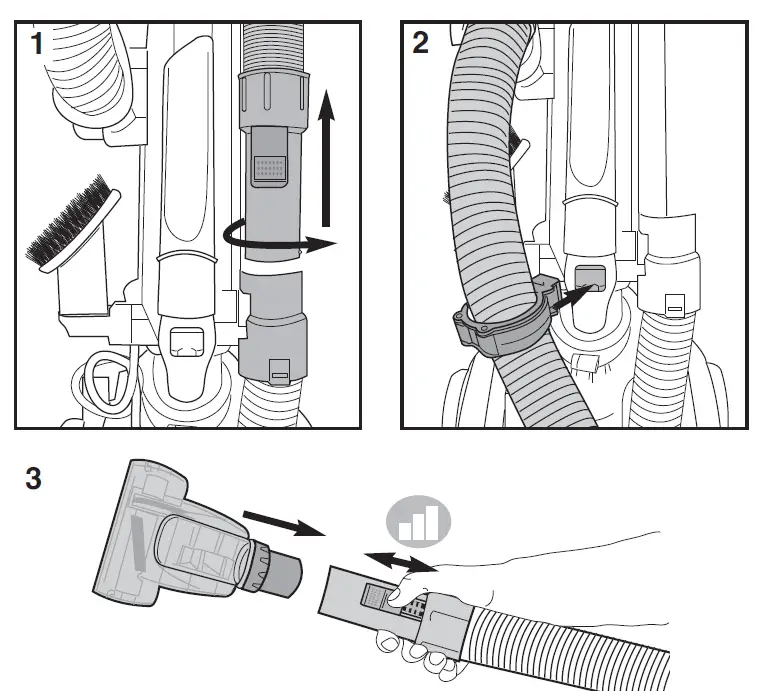
- Turn hose end counterclockwise to unlock. Pull up on hose end to release (Fig. 1).
- To prevent vacuum from tipping over while using accessories, insert hose clip into opening on back of vacuum. Press clip in to snap into place (Fig. 2).
- Use slide on hose end to adjust suction power (Fig. 3).
- Using accessories with hose only
- Push desired tool directly onto end of hose (Fig. 3).
- Using accessories with hose only
- Push desired tool directly onto end of hose (Fig. 3).
- Using accessories with handle as extension wand
- Push end of hose into top of handle and twist clockwise into locked position. On NEU526, open cap first. (Fig. 4).
- Push handle release latch and pull out handle/extension wand (Fig. 5).
- Push desired tool onto end of extension wand (Fig. 6).
- When finished using accessories, twist hose counterclockwise and pull off handle. Slide handle into top of vacuum cleaner and push down until it clicks (Fig. 7).
- Squeeze sides of hose clip to release it from back of vacuum. (Fig. 8). Reposition hose over retainer and push loose end securely into hose inlet.
- Store tools on vacuum cleaner; wrap cord.

How to use accessories
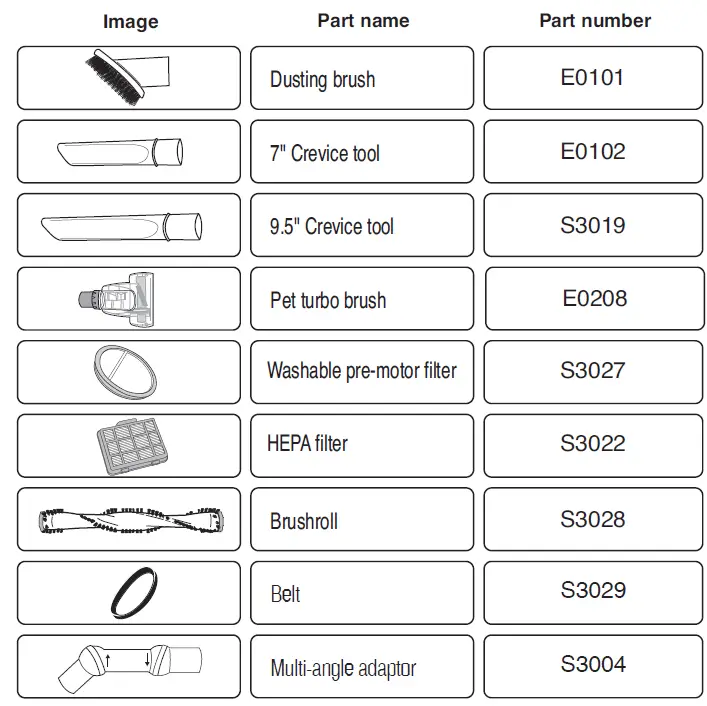
Crevice tool – Use for baseboard edges, sofas, detailing chairs, dryer vents and tight spaces.
Dusting brush – Use for furniture, drapes, blinds, drawers and vents.
Pet turbo brush – Use to easily remove pet hair and debris from stairs, rugs and upholstery.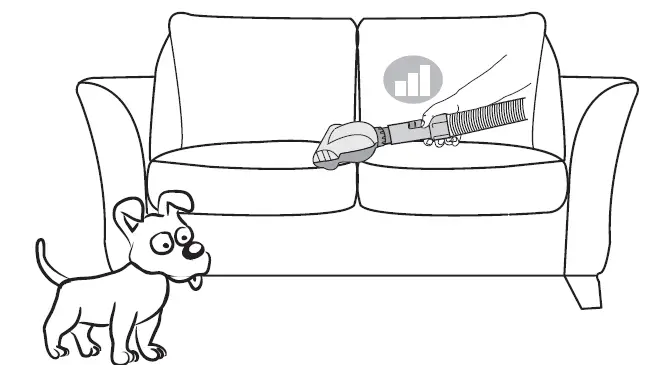 Multi-angle adapter
(NEU522) Use to adjust angle of tool. Insert adapter into hose end or extension wand first, then insert tool. Twist adapter sections to adjust angle.
How to maintain pet turbo brush

- Grasp collar and twist counterclockwise to unlock cover. Lift cover up.
- With cover open, use fingers or small brush to clear accumulated hair and debris from turbo blades.
- Close cover and twist collar clockwise to lock.
How to maintain dust cup and filters
CAUTION: Never operate vacuum cleaner without pre-motor filter, filter screen and dust cup in proper position.
WARNING: Moving parts! Make sure vacuum cleaner is turned off and power cord is unplugged.
Dust cup – Empty after each use
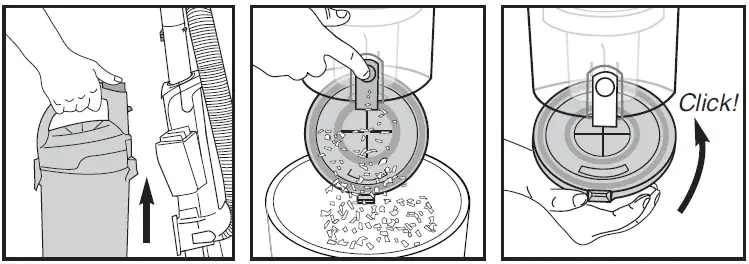
- Press release button and lift off dust cup.
- Hold dust cup over wastebasket and press lever to release bottom lid. Debris will empty.
- Close bottom lid until it clicks.

- Pull dust cup latch to lift up dust cup lid.
- Lift out pre-motor filter and shake off dust frequently. Every three months, rinse filter and dry THOROUGHLY.
- Rotate handle up to lift out filter screen. Tap to remove dust. Rinse dust cup and filter screen; dry THOROUGHLY.

- Align tab on filter screen with slot on front of dust cup and drop into position. Rotate handle down into position.
- Reinstall pre-motor filter.
- Close cover until it clicks.
How to replace HEPA filter
Caution: Make sure vacuum cleaner is turned off and power cord is unplugged.
HEPA filter – Replace or wash every year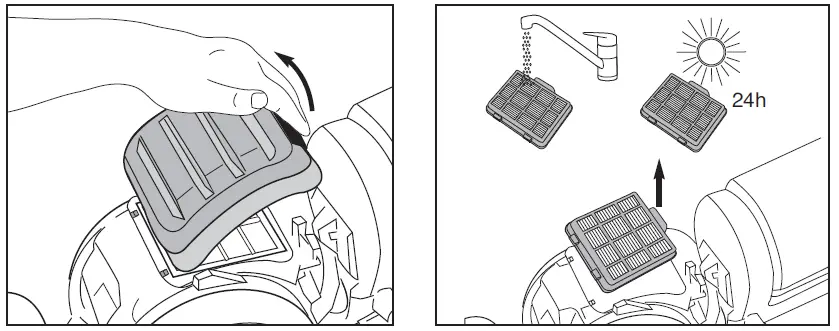
- Step on floor nozzle and lay vacuum flat for easy access to filter. Press latch and lift off exhaust grill.
- Press tab and grasp edges to lift out HEPA filter.
Note: All filters are washable and can be cleaned by rinsing with warm water. Be sure the filter is THOROUGHLY dry before installing.
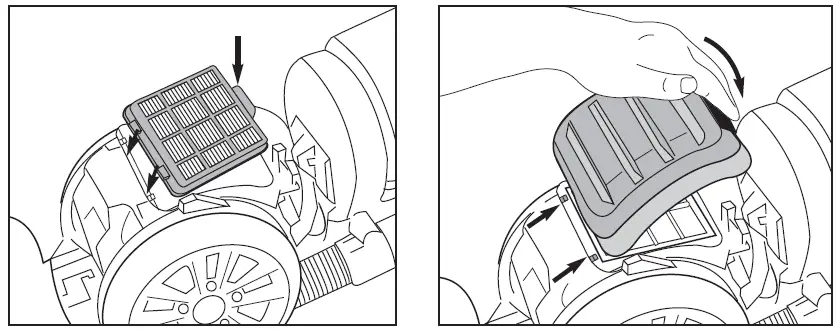
- Install HEPA filter: Align tabs at front edge and press into position.
- Insert front edge of exhaust grill between two tabs; press to close.
Warning: Never operate vacuum cleaner without all filters, filter screen, and dust cup in proper position.
How to maintain brushroll
To avoid unnecessary service calls, periodically check brushroll for debris.
CAUTION: Make sure vacuum cleaner is turned off and power cord is unplugged.
Warning: Do not attempt to remove belt. Call the Eureka Customer Service HELPLINE at 1-800-282-2886.
If brushroll light turns red, this indicates the brushroll is clogged and cannot spin. Brushroll will automatically shut off. Turn vacuum off and unplug before attempting to remove clog.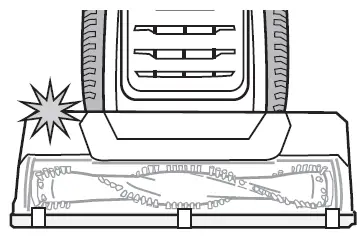
Step on floor nozzle to lower handle. Turn vacuum face down on floor. Use scissors to clip heavy threads or strings.
If debris cannot be removed easily, remove bottom plate for greater access to brushroll. Using flat-head screwdriver or coin, turn 3 slots counterclockwise a quarter turn to ‘unlock’ position.
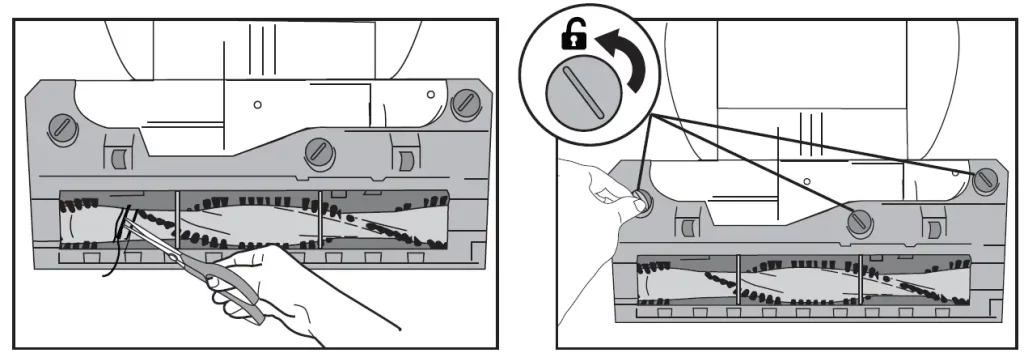
Grasp brushroll bottom plate at top and pull down to flip open.
To close bottom plate, use coin to turn slots clockwise to ‘lock’ position.
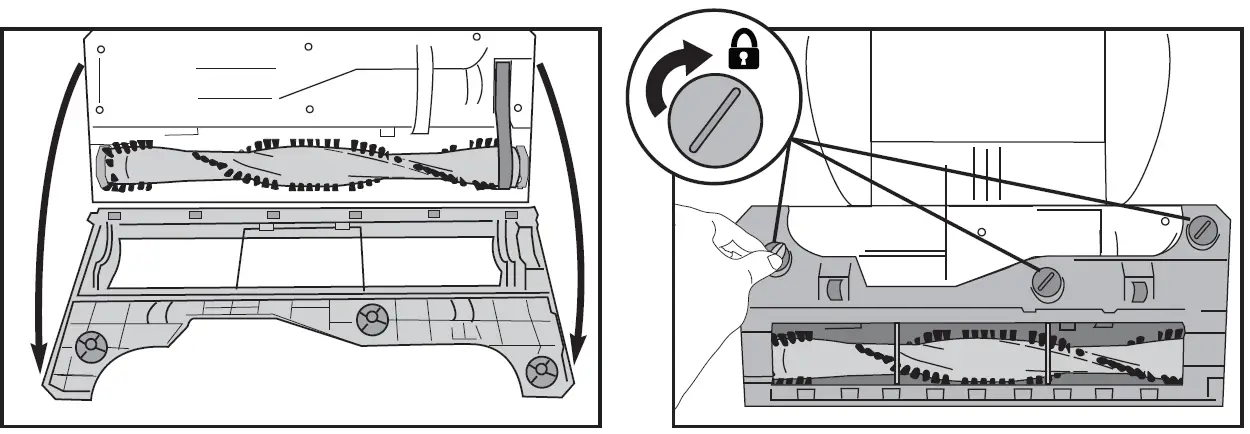
How to clear a blockage
CAUTION: Make sure vacuum is turned off and power cord is unplugged.
Warning: Never operate vacuum cleaner without all filters, filter screen and dust cup in proper position.

If vacuum is not cleaning properly, or if no suction at end of hose, check to be sure air path is not blocked.
- Press release button and lift off dust cup. Empty debris. Hold over wastebasket and press lever to release bottom lid (Fig. 1).
- Check filters and filter screen. Remove any debris and shake off dust (Fig. 2). (See maintenance instructions on page 10.)
- Use finger to check for debris in air path (Fig. 3).
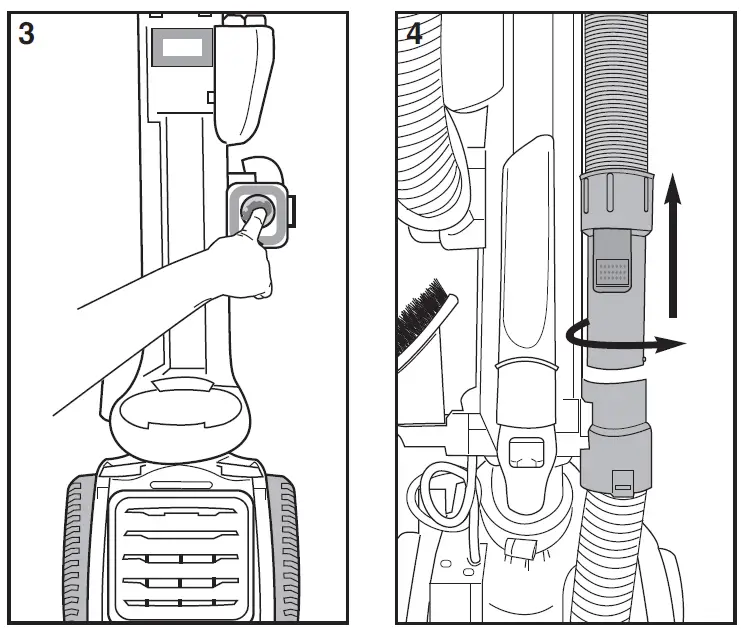
If still no suction, check for blockage in hose.
- Turn hose end counterclockwise to unlock. Pull up on hose end to release (Fig. 4).
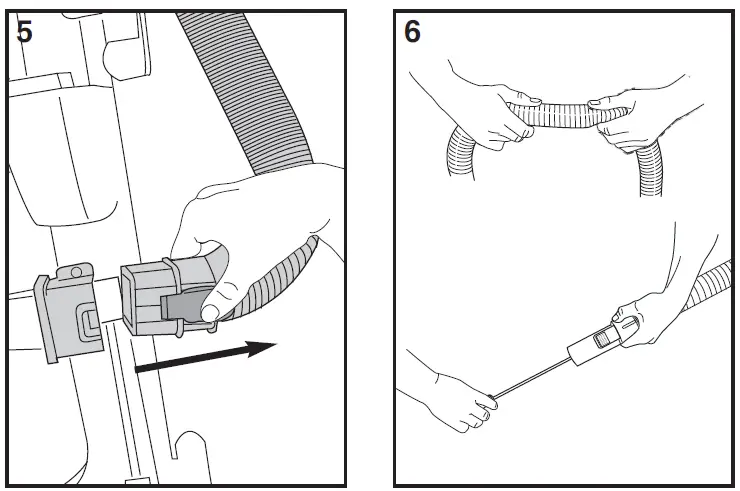
- On other end of hose, press clip to release and pull away from hose inlet (Fig. 5).
- Flex hose to loosen debris. Use a rod or similar blunt implement to clear a blockage in hose (Fig. 6). Use caution if there is any risk that glass or nails could have become imbedded in hose.
- Reattach upper and lower hoses. Ensure that filters and dust cup are returned to proper position.
Problem solving
Make sure vacuum is turned off and power cord is unplugged.
N O T I C E: Thermal cut-off
This vacuum cleaner has a special thermostat that protects the vacuum in case of motor overheating. If the vacuum suddenly shuts off, proceed as follows: 1) Push the power switch to off and unplug the vacuum. 2) Check the vacuum for a possible source of overheating such as a full dust cup, blocked hose or clogged filter. If these conditions are found, fix them and wait at least 30 minutes before attempting to use the vacuum. 3) After the 30 minute period, plug the vacuum back in and turn on the switch. If the vacuum still does not work, call the Eureka customer service helpline.
| Problem | Solution |
| Motor will not start. | • Push plug securely into outlet, try another outlet or check circuit breaker.
• Press on power switch to turn vacuum on. • See detailed “thermal cut-off” instructions above. |
| Vacuum cleaner does not clean carpet or bare floor. | • Make sure suction control is closed. Page 7.
• Empty dust cup, clean and/or change filters regularly to maintain suction. Page 10. • Press brushroll switch to turn on brushroll. Indicator light will turn blue. • Red indicator light indicates the brushroll is clogged. Clean brushroll if needed. Page 12. |
| No suction at the end of hose. | • See other solutions above.
• Remove clogs from the hose that restrict the airflow. Page 13. |
| Vacuum cleaner is hard to push or pull. | • Open suction control at end of hose. Page 7.
• Check brushroll for debris and clean if needed. Page 12. |
| Brushroll indicator light turns red or brushroll will not spin. | • Check brushroll for debris. Page 12. |
| Pet turbo brush will not spin. | • Check pet turbo brush for debris. Page 9. |
The Eureka limited warranty
Midea America Corp. (“Eureka”), subject to the terms and conditions herein, warrants this vacuum cleaner to be free from defects in material and workmanship for a term of five years from the date of original purchase when used in accordance with the Eureka operating and maintenance instructions and under normal household usage. This warranty is granted only to the original purchaser and members of immediate household, and is applicable only to original purchases from Eureka authorized resellers.
What Eureka will do:
Eureka will, at its option, repair or replace a defective vacuum or vacuum part that is covered by this warranty. Repairs may be performed using new or refurbished parts that meet or exceed Eureka specifications for new parts. If Eureka elects to replace the vacuum, the replacement may be a reconditioned unit. Depending on availability of products, Eureka reserves the right to provide you with a replacement product that is the same or similar, or substitute equivalent of the original product. As a matter of warranty policy, Eureka will not refund the consumer’s purchase price.
This warranty does not cover:
- Normal wear and tear of the vacuum and vacuum parts that require replacement under normal use such as disposable dust bags, filters, drive belts, light bulbs, brushroll, bristles, impellers and cleaning.
- Damages or malfunctions resulting from: improper or unreasonable use or maintenance, abuse, negligence, failure to follow instructions contained in any written materials that accompany the product, deterioration by reason of excess moisture, corrosive atmosphere, lightning, power surges, connections to improper voltage supply, unauthorized alteration, or other external causes such as extremes in temperature or humidity, modifications, scratches or discoloration, accidents, misuse, or acts of God. This warranty also does not cover damage resulting from repair or attempted repair by anyone other than Eureka or an authorized Eureka Warranty Station. This warranty is not applicable to any product that has been altered or on which the serial number has been defaced, modified or removed. Altering, erasing, or forging any proof-of-purchase documents voids any applicable product warranty.
Obtaining warranty service:
To obtain warranty service you must contact the Eureka Service Team, toll free, at 1-800-282-2886 or email [email protected], to discuss the warranty claim and procedures to be followed. All warranty claims must include submission of proof-of-purchase documentation. For additional information, you may also visit www.eureka.com.
Shipping charges:
You will be responsible for any initial shipping and insurance charges if the defective product(s) must be shipped for warranty service or warranty evaluation; however, Eureka or a Eureka Authorized Warranty Station will pay the return shipping charges if repairs are covered by the warranty. When returning parts for repair, you must include the model, type and serial number located on the rating plate on the lower backside of the vacuum. If any product submitted for warranty service is found to be ineligible, an estimate of repair cost will be furnished and the repair performed only if requested by the owner and upon receipt of payment or acceptable arrangements for payment.
Further limitations and exclusions:
Any warranty that may be implied in connection with your purchase or use of the vacuum, including any warranty of Merchantability or any warranty of Fitness For A Particular Purpose is limited to the duration of this limited warranty. Some states do not allow limitations on how long an implied warranty lasts, so the above limitations may not apply to you.
Your relief for the breach of this warranty is limited to the relief expressly provided above. In no event shall the manufacturer be liable for any consequential or incidental damages you may incur in connection with your purchase or use of the vacuum. Some states do not allow the exclusion or limitation of incidental or consequential damages, so the above limitation or exclusion may not apply to you.
This warranty gives you specific legal rights. You may also have other rights, which may vary by state.
Midea America Corp.
200 Rivers Edge Drive
Medford, MA. 02155
USA
PARTS

EUREKA Drift Vacuum Cleaner
User Manual

l. Welcome to The World of Forbes
Thank you for purchasing Forbes Drift Vacuum Cleaner. Forbes has been a pioneer and trendsetter in Cleaning Solutions, and all our expertise and research has gone into the superior design of this high-tech home cleaning system.
Your Forbes Drift Vacuum Cleaner is built with high performance features, and we back it with our exclusive one year warranty. Consumers are the centre of our business, so should you ever have a problem, you will receive fast, considerate assistance in quick time.
Forbes mission to build a sustainable relationship with customers continues through quality homecare products like the Forbes Drift Vacuum Cleaner.
Thanks again from all of us.
– Team Eureka Forbes
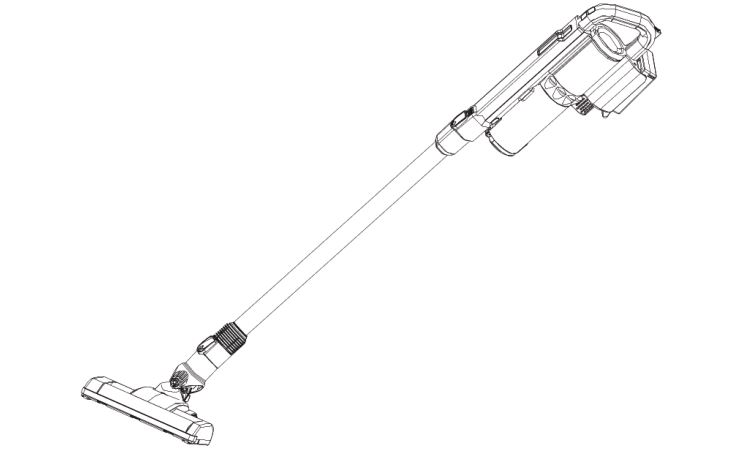
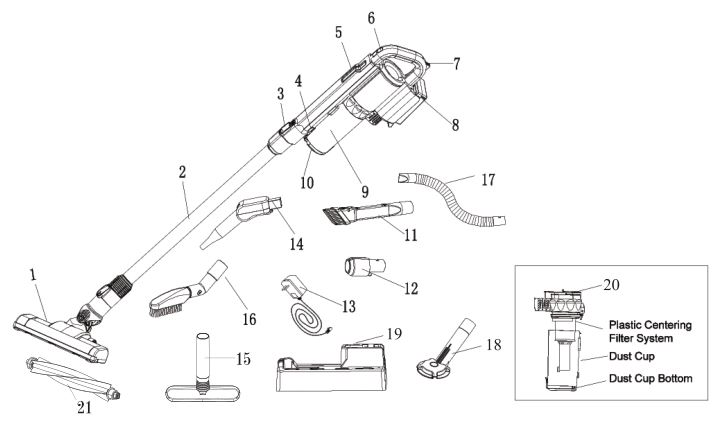
2. Product Overview
- Motorized Brush
- Aluminum extension tube
- Tube release button
- Dust cup release button
- LED lamp
- Power switch
- Battery pack release button
- Battery Pack
- Dust cup
- Dust cup bottom
- Crevice nozzle cum multipurpose brush
- Accessories connector
- Adapter
- Blower nozzle
- Upholstery cleaner
- Flexi cleaner
- Hose Pipe
- Pet Brush
- Charging and Storage Stand
- Filter Set
- Extra roller brush for Motorized Brush
3. Product Features
a. Powerful Suction
Forbes Drift is powered with best in class 17 KPA suction to tackle deep seated dust, dirt and dust mites.
b. Powerful Blower
Forbes Drift Vacuum cleaner is equipped with state of the art powerful blower to blow away all the hidden dust from corners and crevices easily.
c. Motorized Brush
The motorized brush can be used across marble, carpet and wooden floors. The
Power brush rotates at a speed of 6500 RPM and gets rid of the toughest dirt and dust embedded deep within the surface, leaving no traces of dust mites and other microscopic creatures.
d. Multi Mode Cleaning
Forbes Drift can also be converted into a hand-held vacuum cleaner giving the user freedom to perform wireless hand-held cleaning. This makes it the perfect solution for car cleaning and daily cleaning activities.
e. Twin Speed mode
Forbes Drift is powered with two power modes namely low and high to perform cleaning at different areas as desired by the user.
f. Range of accessories
Forbes Drift comes with state of the art range of accessories for different cleaning needs.
g. Easy Dust disposal
Forbes Drift gives you convenience to conveniently dispose dust without touching the dust.
h. HEPA Filter
Forbes Drift is equipped with HEPA filter which ensures that the expelled air is ultra clean.
i. Swivel Steering
The 180 Degree swivel makes the Forbes Drift easy to use and manoeuver your way across surfaces without stress.
4. Safety Instructions
When using an electrical vacuum cleaner, basic safety precautions should always be observed, including the following:
Read All Instructions Before Using Your Vacuum Cleaner.
WARNING: To reduce the risk of fire, electrical shock, or injury
- Do not use outdoors or on wet surfaces
- Do not allow it to be used as a toy. Close attention is necessary when used by or near children.
- Use only as described in this manual. Use only recommended attachments.
- Do not use the vacuum cleaner if it has been dropped, damaged, left outdoors, or dropped in water.
- Do not handle the plug or vacuum cleaner with wet hands.
- Do not use the Vacuum Cleaner if the suction end is blocked. Keep the Vacuum Cleaner free from dust, hair etc.
- Keep hair, loose clothing, fingers, and all parts of the body away from suction end.
- Do not pick up anything that is burning or smoking, such as cigarettes, matches, or hot ashes.
- Use extra care when cleaning on stairs.
- Do not use to pick up flammable or combustible liquids such as gasoline or use in areas where they may be present.
- Look at your vacuum cleaner and follow all label and marking instructions.
- Keep suction end away from your face and body.
- Do not use the vacuum cleaner without a dust cup filter in place.
- Do not use the machine while the charging is ON.
- Store the vacuum cleaner indoors.
- It is advised to use original and authentic batteries only in order to avoid any damage to the machine.
- Use only on dry, indoor surfaces.
- Do not use it for any purpose other than described in this user’s guide
- In case of malfunction, the machine should be repaired by Eureka Forbes Authorized Service Center only.
5. Operating Your Forbes Drift Vacuum Cleaner
GETTING READY
• Remove the vacuum cleaner from the box.
• Remove any packaging from the vacuum cleaner.
• Place the packaging inside the box and either store or dispose safely.
ASSEMBLY &. OPERATION
Install the Motorised Brush.
The brush head is suitable for all floors.
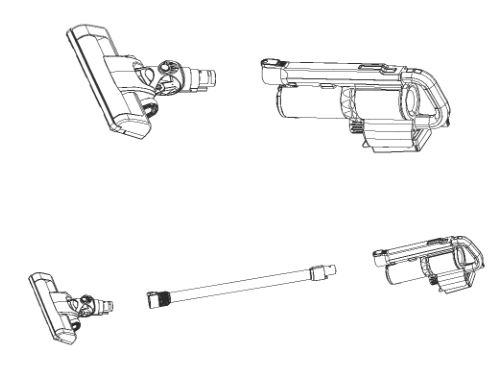
- Motorised brush can be connected directly to the vacuum cleaner body. Press until you hear a click sound.
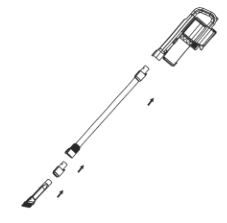
- Motorised brush can also be connected to the aluminium extension tube. Press until you hear a click sound.
- To disassemble the Motorised brush: Press the tube release button, then remove the aluminium extension tube and the motorised brush.
Installing the Crevice Nozzle cum Multipurpose Brush
The crevice nozzle is suitable for cleaning narrow gaps and multipurpose brush can be used to clean delicate items, table tops, paintings, etc.
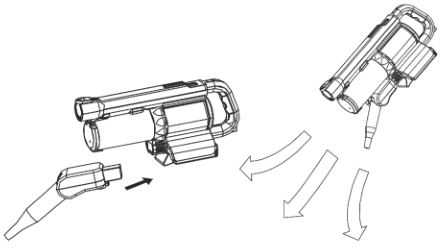
- Connect the crevice nozzle cum multipurpose brush into the accessories connector, then insert the accessories connector to the Vacuum Cleaner body unit.

- The brush on the crevice nozzle can be pulled forward or backward, as per the cleaning requirement.

Installing the blower nozzle:
The blower nozzle is used for blower function.
It is recommended to blow away dust from corners and crevices.
- Insert the blower nozzle into the vacuum cleaner unit.
- You can adjust the blower speed and direction by adjusting vacuum cleaner speed and the blower nozzle direction.
Installing the Aluminium Extension Tube
- Motorised brush connected with aluminium extension tube can be used to clean hard floors and carpet.
- Crevice nozzle cum multipurpose brush connected with the aluminium extension tube can be used to clean hard to reach surfaces such as ceiling, curtain, etc.
Installing the Accessories Connector
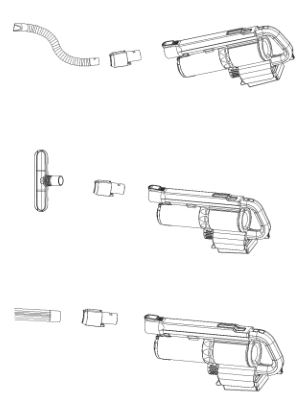
- Insert the accessories connector to the vacuum cleaner until you hear a click sound.
- Accessories like hose pipe, upholstery cleaner, pet brush, flexi nozzle and crevice nozzle cum multi purpose brush are connected to accessories connector.
USING THE VACUUM CLEANER
Install the battery pack:
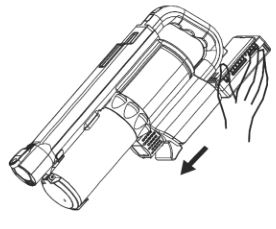
Slide the battery pack into the vacuum cleaner body until you hear click sound.
Switch the vacuum cleaner on or off:
- To switch on, press the power switch button, the vacuum cleaner is ON, and LED light is lighting up.
- If you need the high suction for cleaning, press the high mode button.
- To switch if off, press the power switch button, the vacuum cleaner is OFF
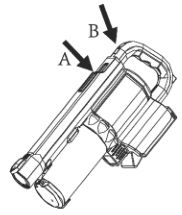
The vacuum cleaner must be switched off for charging.
The rechargeable battery is not fully charged upon delivery. To reach the maximum charging capacity, charge the vacuum cleaner fully before using it for the first time.
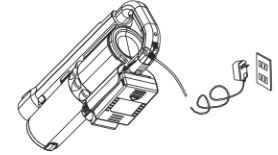
Charging your Drift cordless vacuum cleaner:
- Plug the adapter into the charging point on the rear end of the vacuum cleaner.
- The LED indicator light will flash one by one while it is charging. Once all the indicators light up, the battery is fully charged.
- Use the charging stand to charge the product.
Note: If the wrong adapter is used during the charging, all the LED lights will flash quickly, not one by one while charging.
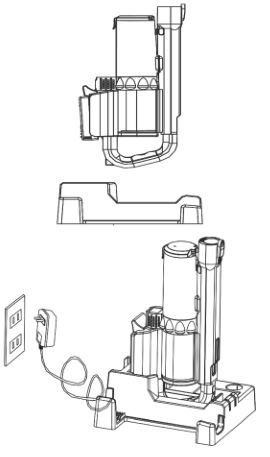
6. Maintaining Your Vacuum Cleaner
Cleaning the Dust Tank
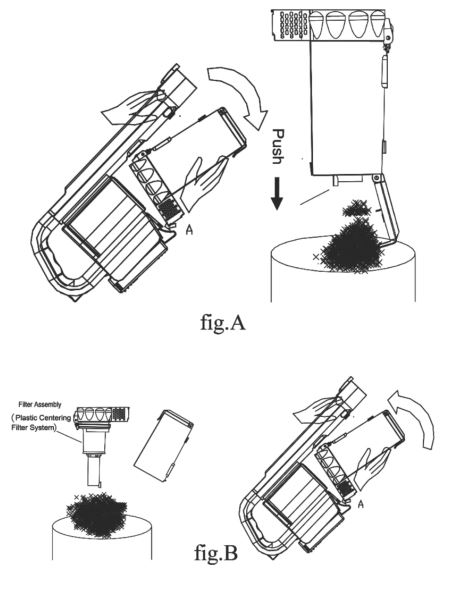
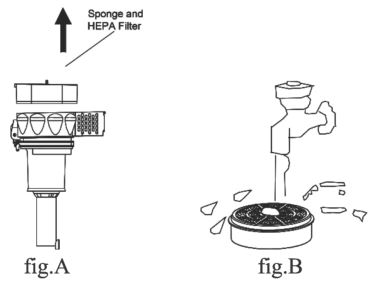
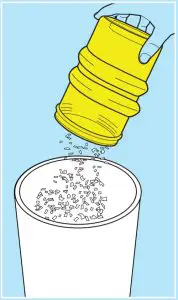
Empty the dust from the dust cup (fig. A)
Cleaning the dust cup (fig. B)
- Remove the dust cup from the body.
- Press the dust cup bottom release button, the dust will fall automatically.
- Press the dust cup cover (for air exhaust) release button.
- Take out the filter assembly from the dust cup and clean them.
Changing or Cleaning the Sponge and HEPA Filter
- Remove the dust cup from body.
- Rotate the dust cup cover anti-clockwise from “close” to “open” position. Take out the dust cup cover.
- Draw out the Sponge and HEPA filter set. (fig. A)
- Pull up the knob of the filter frame, and pull out the Sponge and HEPA filter from the case boxes.
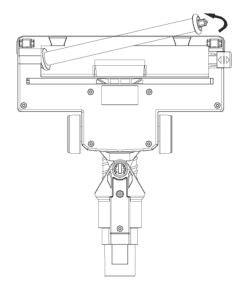
Clean the head of the Motorized Brush
Remove the head of the motorized brush by pressing the release button.
Slide the locking button.
Take out the brush roller.
Clean the dirt/hair if any.
If required the brush roller can be washed.
Please ensure it is completely dry before inserting it again.
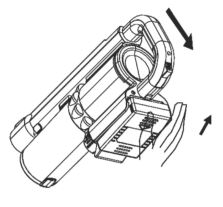
Remove the battery pack
Press the battery pack releasing button and pull the battery out.
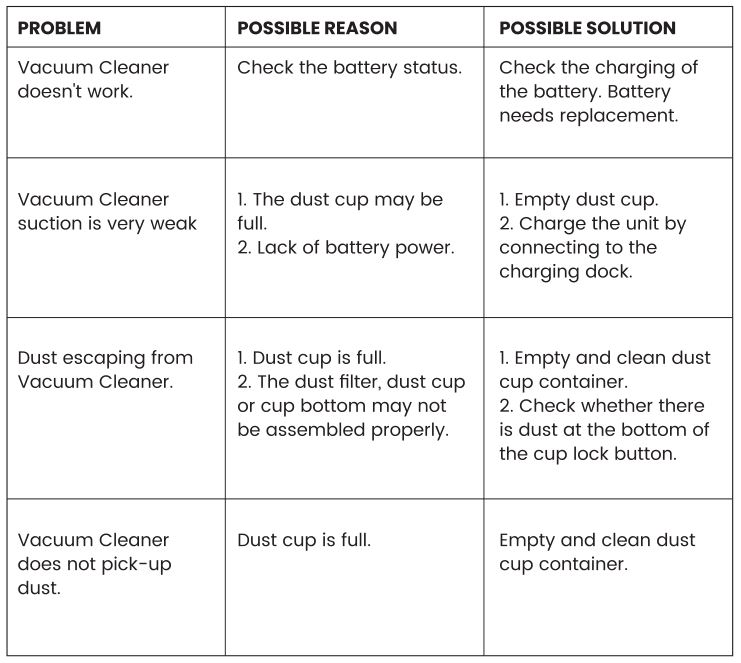
7. Troubleshooting
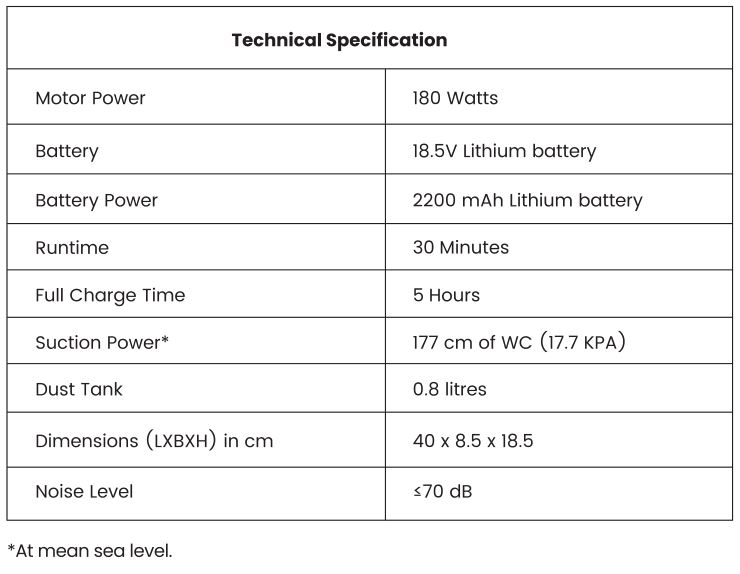
8. Technical Specifications
9. Warranty Terms&. Conditions
Forbes Drift Vacuum Cleaner is warranted against manufacturing defects for a period of twelve (12) months from the date of original purchase, subject to the following conditions:
- The customer will notify the company, in writing, promptly of any defect noticed and give the company or its authorised agent sufficient opportunity to inspect, test and remedy them, for which the customer will deposit the goods, if so, required by the company, with company’s office/Service centre along with the original invoice, in the city where they are sold.
- Inspection and test report of the company’s office/service centre will be treated as final and binding under the warranty for determining defects, repairs/alterations required or carried out, or certifying working of the goods, thereafter.
- The company or its authorised dealer will be entitled to retain any defective parts replaced under the warranty.
- The company’s liability under the warranty will be limited only to defects which occur under the conditions of normal operation and under proper use. It excludes defects occurring because of abuse, faulty care or maintenance, repairs/alterations to goods or parts by others, use on electrical supply for which the goods are not designed or to damage caused by lighting or other electrical disturbances.
- Components subject to wear, such as Power Cable, Accessories, Battery, Charging Dock and HEPA filter are not covered under this warranty
- The customer will have no claims under this warranty in respect of any personal injury, damage to property or consequential damages, or for utilisation of the goods not in accordance with the user manual.
- Force Majeure: The Company shall not be liable for the non-performance of its obligations under these terms and conditions where such failure is due to force majeure event i.e. due or attributable to any act of God, orders, restrictions, or regulation of Government, Central or State, war working conditions, hostilities, riots, civil commotion, strike, lock out, lockdown, pandemic, labour trouble, explosion, or any other cause or circumstance of whatsoever nature beyond control.
- In case a product needs upgradation due to reason not under control of the company, customers must accept upgradation at prevailing rate.
- The Company reserves the absolute right to amend/extend/cancel/discontinue the terms and conditions or any part thereof without giving any reasons or prior notice to the customer.
- All the terms and conditions other than above criteria on products of the company will have the same effect.
- Any disputes are subject to Mumbai Court Jurisdiction only.
NOTE: The expressions noted below should have the following meaning:
– “The goods” shall mean goods described in the invoice.
– “The Customer” shall mean the original purchaser as per the invoice.
– “The company” shall mean “EUREKA FORBES LIMITED”.
POST WARRANTY
The customer has the option of calling our Service Centre and having Forbes Vacuum cleaner serviced on an actual basis i.e. by paying for labour cost and spares needed to attend to that Service/complaint call at the prevailing company rates. Such services will be rendered by the company in towns/places where the company has it Service Centres.
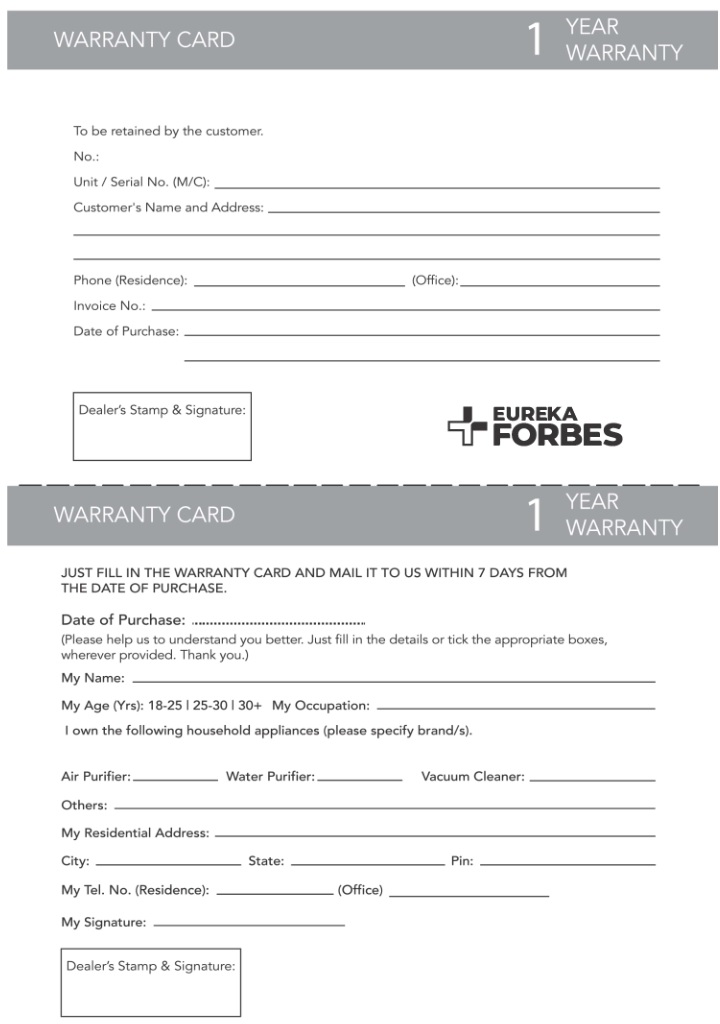
10. WARRANTY CARD
11. CUSTOMER CARE

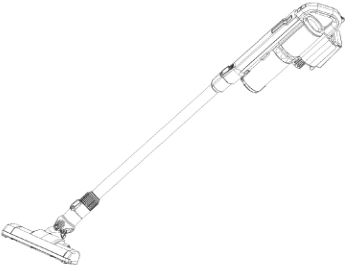 If your Forbes product requires any service or to claim under our Limited One-Year Warranty, please contact us as follows:
Website:
www.eurekaforbes.com
Email:
[email protected]
Toll-free Telephone:
1860 2601177 / 70398 83333
Write to us:
Eureka Forbes Limited
Bl/B2, 701, 7th Floor,
Marathon lnnova, Marathon NextGen,
Off Ganpatrao Kadam Marg, Lower Parel
Mumbai- 400013, India.

eureka Upright Vacuum Cleaner
Thank you for purchasing your new Eureka vacuum!
Important Instructions
To view an assembly video, go to Eureka.com/videos or scan QR code. If you have questions about your new vacuum, please contact our customer service helpline at
1-800-282-2886. We’re here to help!
Promotional code: eurekaad15
Special Offer – receive 15% off parts and accessories when ordering online. Promotion excludes vacuums.
Where To Find Important Vacuum Information
Keep this information
Write the model, type and serial number here:
Date of purchase (keep your receipt) _______________
Model number and type ________________________
Serial number _________________________________
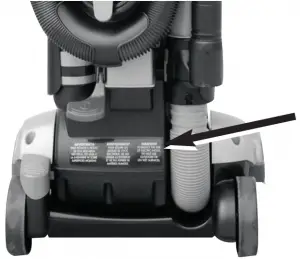
Find these numbers on a label on the middle back side of the vacuum cleaner. Refer to these numbers when ordering parts and accessories or if service is needed.
Before You Start Your Vacuum Cleaner
Refer to Quick Start Guide for assembly and use. This Owner’s Guide provides important instructions to prolong the life of your Eureka vacuum cleaner.
Registration: To register your product visit www.eureka.com and click on the ‘Register Your Product’ link in the top right corner.
Inspection: Carefully unpack and inspect your new Eureka vacuum cleaner for shipping damage. Each unit is tested and thoroughly inspected before shipping. For instructions regarding any shipping damage, call Eureka Customer Service HELPLINE 1-800-282-2886 immediately.
IMPORTANT SAFEGUARDS
When using an electrical appliance, basic precautions should always be followed, including the following:
READ ALL INSTRUCTIONS BEFORE USING THIS VACUUM CLEANER
 WARNING
To reduce the risk of fire, electric shock, or injury:
- Do not use outdoors or on wet surfaces.
- Do not leave vacuum cleaner when plugged in. Turn off the switch and unplug the electrical cord when not in use and before servicing.
- Do not allow to be used as a toy. Close attention is necessary when used by or near children.
- Use only as described in this manual. Use only manufacturer’s recommended attachments.
- Do not use with damaged cord or plug. If vacuum cleaner is not working as it should, has been dropped, damaged, left outdoors, or dropped into water, return it to a service center before using.
- Do not pull or carry by cord. Do not use cord as a handle. Do not close a door on cord or pull cord around sharp edges or corners. Do not run vacuum cleaner over cord. Keep cord away from heated surfaces.
- Do not use extension cords or outlets with inadequate current carrying capacity.
- Turn off all controls before unplugging.
- Do not unplug by pulling on cord. To unplug, grasp the plug, not the cord.
- Cord rewind models: Hold plug when rewinding into cord reel. Do not allow plug to whip when rewinding.
- Do not handle plug or vacuum cleaner with wet hands.
- Do not put any object into openings. Do not use with any opening blocked; keep free of dust, lint, hair, and anything that may reduce airflow.
- This vacuum cleaner creates suction and contains a revolving brush roll. Keep hair, loose clothing, fingers, and all parts of body away from openings and moving parts.
- Do not place vacuum cleaner on furniture or stairs as the brush roll may cause damage. Use extra care when cleaning stairs. Place vacuum cleaner on floor with the handle in storage position while using attachments.
- Do not pick up anything that is burning or smoking, such as cigarettes, matches, or hot ashes.
- Do not use without dust cup, filter, screen and exhaust filter in place.
- Belt pulleys can become hot during normal use. To prevent burns, avoid touching the belt pulley when servicing the drive belt.
- Do not use to pick up flammable or combustible liquids such as gasoline, or use in areas where they may be present.
- Store your vacuum cleaner indoors in a cool, dry area.
- Keep your work area well lighted.
- Unplug electrical appliances before vacuuming them.
- Unplug before connecting turbo nozzle
WARNING: This product contains chemicals known to the State of California to cause cancer, birth defects or reproductive harm. WASH HANDS AFTER HANDLING
SAVE THESE INSTRUCTIONS
To reduce the risk of electric shock, this appliance has a polarized plug (one blade is wider than the other). This plug will fit in a polarized outlet only one way. If the plug does not fit fully into the outlet, reverse the plug. If it still does not fit, contact a qualified electrician to install the proper outlet. Do not change the plug in any way.
 Motor
Motor
Do Not Oil the motor or the brush roll at any time. The bearings are permanently lubricated and sealed.
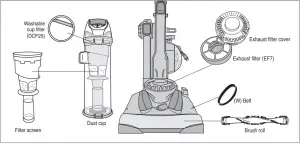
How To Identify Parts Of Your Vacuum Cleaner
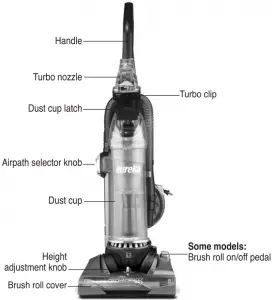
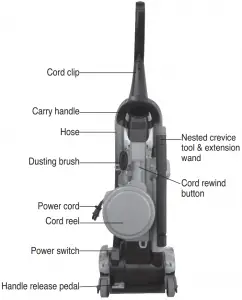
NOTE: For further instructions, see Owners Guide at www.eureka.com
Problem Solving
 Make sure vacuum is turned off and power cord is unplugged.
 NOTICE: Thermal cut-off NOTICE: Thermal cut-off |
|
| This vacuum cleaner has a special thermostat that protects the vacuum in case of motor overheating. If the vacuum suddenly shuts off, proceed as follows: 1) Push the power switch to off and unplug the vacuum. 2) Check the vacuum for a possible source of overheating such as a full dust cup, blocked hose or clogged filter. If these conditions are found, fix them and wait at least 30 minutes before attempting to use the vacuum. 3) After the 30 minute period, plug the vacuum back in and turn on the switch. If the vacuum still does not work, call the Eureka customer service helpline. | |
| Problem | Solution |
| Motor will not start. |
|
| Vacuum does not clean carpet or bare floor. |
|
| No suction at the end of hose. |
|
| Burning smell; brush roll will not turn. |
|
| Cord will not rewind fully. |
|
| Turbo nozzle will not turn. |
|
| Vacuum is hard to push. |
|
The Eureka Limited Warranty
Eureka warrants this vacuum cleaner to be free from defects in material and workmanship for a term of three years for normal household use.
Warranty is granted only to the original purchaser and members of immediate household.
This warranty is good for three years from the date of purchase only when the vacuum cleaner is used in the accordance with Eureka operating instructions. Note: refurbished or remanufactured products have a one year limited warranty.
This warranty does not cover
- Parts of the vacuum that require replacement under normal use such as disposable dust bags, filters, drive belts, light bulbs, brush roll, bristles, impellers and cleaning.
- Damages or malfunctions caused by negligence, abuse, and use not in accordance with the Owner’s Guide.
- Defects or damages caused by unauthorized service or the use of other than Genuine Eureka, ARM & HAMMERTM and FiltreteTM by 3M parts.
What Eureka will do
Eureka will, at its option, repair or replace a defective vacuum or vacuum part that is covered by this warranty. As a matter of warranty policy, Eureka will not refund the consumer’s purchase price.
Obtaining warranty service
To obtain warranty service you must return the vacuum or vacuum part along with “proof of purchase” to any Eureka Authorized Warranty Station. For Eureka Authorized Warranty Station or Service Information, visit www.eureka.com, write or telephone toll free:
USA: 1-800-282-2886
Electrolux Home Care
North America Service Division
P.O. Box 3900
Peoria, IL 61612
Canada: 1-800-282-2886
Electrolux Home Care
North America Service Division
5855 Terry Fox Way
Mississauga, Ontario L5V 3E4
Obtaining warranty service outside your community
You must pay the shipping charges to the Eureka Authorized Warranty Station.
Return shipping charges will be paid by the Warranty Station. When returning parts for repair, please include the model, type and serial number located on the rating plate on the lower backside of the vacuum.
Further limitations and exclusions
Any warranty that may be implied in connection with your purchase or use of the vacuum, including any warranty of Merchantability or any warranty for Fitness For A Particular Purpose is limited to the duration of this warranty. Some states do not allow limitations on how long an implied warranty lasts, so the above limitations may not apply to you.
Your relief for the breach of this warranty is limited to the relief expressly provided above. In no event shall the manufacturer be liable for any consequential or incidental damages you may incur in connection with your purchase or use of the vacuum.
Some states do not allow the exclusion or limitation of incidental or consequential damages, so the above limitation or exclusion may not apply to you.
This warranty gives you specific legal rights. You may also have other rights, which may vary by state.
The ARM & HAMMER name is a trademark of Church and Dwight Co., Inc. 3M and Filtrete are trademarks of 3M Company, used by Electrolux Home Care Products, Inc. under license.
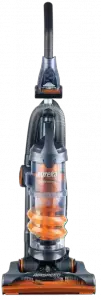
]]>
AS4000 Series
IMPORTANT SAFEGUARDS
When using an electrical appliance, basic precautions should always be followed, including the following:
READ ALL INSTRUCTIONS BEFORE USING THIS VACUUM CLEANER.
To reduce the risk of fire, electric shock, or injury:
- Do not use outdoors or on wet surfaces.
- Do not leave vacuum cleaner when plugged in. Turn off the switch and unplug the electrical cord when not in use and before servicing.
- Do not allow to be used as a toy. Close attention is necessary when used by or near children.
- Use only as described in this manual. Use only manufacturer’s recommended attachments.
- Do not use with damaged cord or plug. If vacuum cleaner is not working as it should, has been dropped, damaged, left outdoors, or dropped into water, return it to a service center before using.
- Do not pull or carry by cord, use cord as a handle, close a door on cord, or pull cord around sharp edges or corners.
- Do not run vacuum cleaner over cord. Keep cord away from heated surfaces.
- Do not use extension cords or outlets with inadequate current carrying capacity.
- Turn off all controls before unplugging.
- Do not unplug by pulling on cord. To unplug, grasp the plug, not the cord.
- Do not handle plug or vacuum cleaner with wet hands.
- Do not put any object into openings. Do not use with any opening blocked; keep free of dust, lint, hair, and anything that may reduce airflow.
- This vacuum cleaner creates suction. Keep hair, loose clothing, fingers, and all parts of body away from openings and moving parts.
- Do not place vacuum on furniture or stairs as the brush roll may cause damage.
- Use extra care when cleaning on stairs. Do not place vacuum at top of stairs.
- Use extra care when cleaning area rugs as the brush roll may cause damage.
- Unplug before connecting turbo nozzle or other attachments. Place vacuum on floor with the handle in upright position while using attachments.
- Do not pick up anything that is burning or smoking, such as cigarettes, matches, or hot ashes.
- Do not use without dust cup or filter(s) in place.
- Do not use to pick up flammable or combustible liquids such as gasoline, or use in areas where they may be present.
- Store your vacuum indoors in a cool, dry area.
- Keep your work area well lighted.
- Unplug electrical appliances before vacuuming them.
- Brush roll could suddenly restart. Unplug before servicing.
SAVE THESE INSTRUCTIONS
FOR HOUSEHOLD USE ONLY
To reduce the risk of electric shock, this appliance has a polarized plug (one blade is wider than the other). This plug will fit in a polarized outlet only one way. If the plug does not fit fully into the outlet, reverse the plug. If it still does not fit, contact a qualified electrician to install the proper outlet. Do not change the plug in any way. Do not oil the motor or brush roll at any time, the bearings are permanently lubricated and sealed.
Thermal Cutoff
This vacuum cleaner has a special thermostat that protects the vacuum in case of motor overheating.
If the vacuum suddenly shuts off proceed as follows:
- Push the on/off switch off (l) and unplug the vacuum.
- Check the vacuum for a possible source of overheating such as a full dust cup, a blocked hose or clogged filter. If these conditions are found, fix them and wait at least 30 minutes before attempting to use the vacuum.
- After the 30 minute period, plug the vacuum back in and push the on/off switch on (l). If the vacuum still does not work, call the Eureka customer service helpline.
Problem Solving
For questions and problems related to your vacuum, please visit www.eureka.com or call the Customer Service Helpline: 1-800-282-2886
Registration
To register your product visit www.eureka.com and click on the ‘Register Your Product’ link in the top right corner
What’s In The Carton
- Base

- Backbone

- Handle

- Dust Cup

- Hose
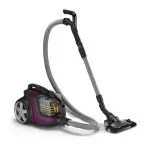
- Crevice Tool
Note: Remove Crevice Tool (F) and Extension Wand (G) from inside of Backbone (B) hole before assembly. - Extension Wand
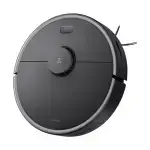
- Dusting Brush
- Turbo Nozzle

Eureka Limited Warranty
For full warranty details, please refer to the back of the manual or call the customer service helpline at 1-800-282-2886
Easy 4 Step Assembly
For additional assembly assistance, view our “How to Assemble” demo, by visiting www.eureka.com/ airspeed/assembly,or contact our customer service helpline.
STEP 1

STEP 2

STEP 3

STEP 4

Hose and Tool Storage
Step 1

Step 2

Step3

Step 4

Step 5

Get Ready to Vacuum
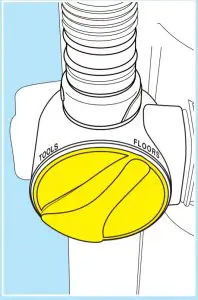
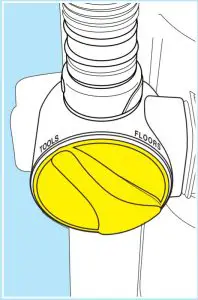
- To vacuum floors, turn air path knob to ‘floors
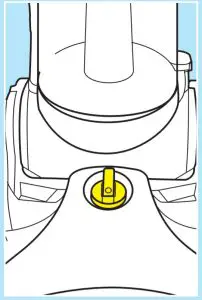
- Adjust height for carpet or bare floors.
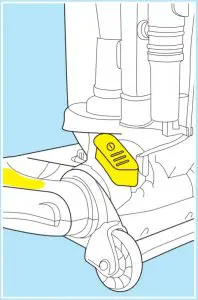
- Step on foot graphic on hood and pull back on handle to recline vacuum. Step on power switch to turn on; step on again to turn off.
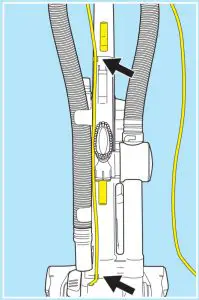
- If desired, route cord through cord clips before storing on hooks.
- For hose cleaning turn air path knob to “tools”. Attach tools to end of wand. To replace, store crevice tool inside extension wand and store this, dusting brush and turbo nozzle in clips.
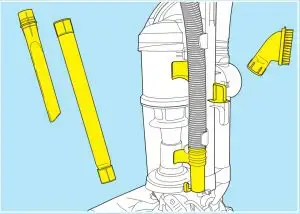
Maintenance
Make sure vacuum cleaner is turned off and power cord is unplugged when performing any maintenance.
For maintenance information, see maintenance section in this guide, see backside of dust cup or visit www.eureka.com. Maintenance not described must be performed by an authorized dealer.
Cleaning the Dust cup
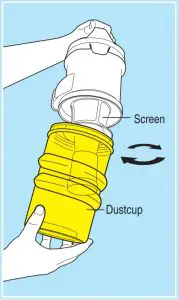
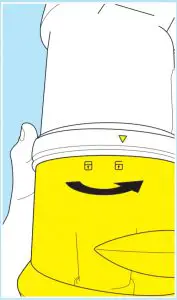
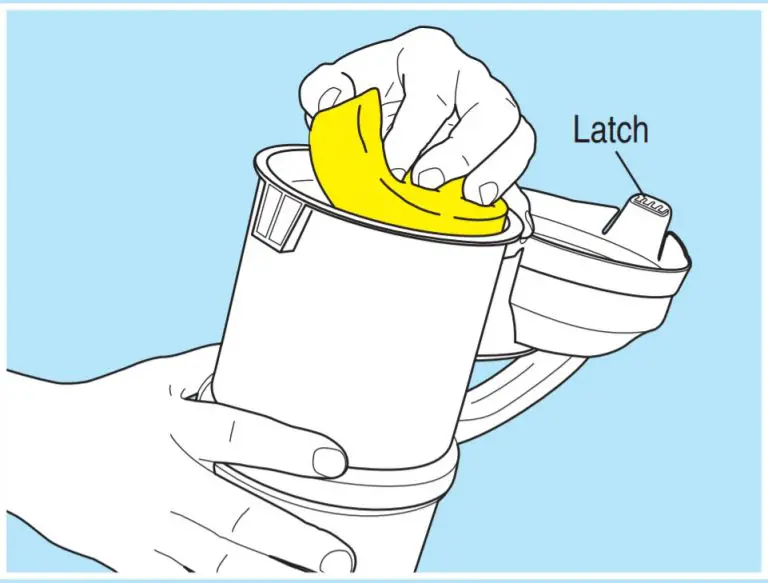
Cleaning the Filter
Pull dust cup latch to release dust cup. Remove filter and wash. Allow to air dry thoroughly (24 hours) before placing back in dust cup.
THE EUREKA LIMITED WARRANTY
Eureka warrants this vacuum cleaner to be free from defects in material and workmanship for a term of three years for normal household use. Warranty is granted only to the original purchaser and members of immediate household.
This warranty is good for three years from the date of purchase only when the vacuum cleaner is used in the accordance with Eureka operating instructions.
Note: refurbished or re manufactured products have a one year limited warranty.
What This Warranty Does Not Cover
- Parts of the cleaner that require replacement under normal use, such as disposable dust bags, filters, drive belts, light bulbs, brush roll bristles, impellers and cleaning.
- Damages or malfunctions caused by negligence, abuse, or use not in accordance with the Owner’s Guide,
- Defects or damages caused by unauthorized service or the use of other than Genuine Eureka, ARM & HAMMERTM and FiltreteTM by 3M parts.
What Eureka Will Do
Eureka will, at its option, repair or replace a defective cleaner or cleaner part that is covered by this warranty. As a matter of warranty policy, Eureka will not refund the consumer’s purchase price.
Obtaining warranty service
To obtain warranty service you must return the vacuum or vacuum part along with “proof of purchase” to any Eureka Authorized Warranty Station. For Eureka Authorized Warranty Station or Service Information, visit www.eureka.com, write or telephone toll free:
USA: 1-800-282-2886
Electrolux Home Care
North America Service Division
P.O. Box 3900
Peoria, IL 61612
Mexico: (55) 5343-4384
Electrolux Home Care
Canada: 1-800-282-2886
Electrolux Home Care
North America Service Division
5855 Terry Fox Way
Mississauga, Ontario L5V 3E4
Obtaining warranty service outside your community
You must pay the shipping charges to the Eureka Authorized Warranty Station.
Return shipping charges will be paid by the Warranty Station. When returning parts for repair, please include the model, type and serial number located on the rating plate on the lower backside of the vacuum.
Further limitations and exclusions
Any warranty that may be implied in connection with your purchase or use of the vacuum, including any warranty of Merchantability or any warranty for Fitness For A Particular Purpose is limited to the duration of this warranty. Some states do not allow limitations on how long an implied
warranty lasts, so the above limitations may not apply to you. Your relief for the breach of this warranty is limited to the relief expressly provided above. In no event shall the manufacturer be liable for any consequential or incidental damages you may incur in connection with your purchase or use of the vacuum. Some states do not allow the exclusion or limitation of incidental or consequential damages, so the above limitation or exclusion may not apply to you.
This warranty give you specific legal rights. You may also have the other rights, which may vary by state.
The ARM & HAMMER name is a trademark of Church and Dwight Co., Inc. 3M and Filtrete are trademarks of 3M Company, used by Electrolux Home Care Products, Inc. under license.
AS4039 Series
For detailed vacuum information including FAQs please visit eureka.com or call the Customer Service Helpline: 1-800-282-2886.
8 a.m. to 7:30 p.m. (CST), Monday – Friday
10 a.m. to 6:30 p.m. (CST), Saturday – Sunday
What’s In The Carton
- Base

- Backbone

- Handle

- Dust Cup

- Hose

- Crevice Tool

Note: Remove Crevice Tool (F) and Extension Wand (G) from inside of Backbone (B) hole before assembly. - Extension Wand

- Dusting Brush

- Turbo Nozzle

Easy 4 Step Assembly
For additional assembly assistance, view our “How to Assemble” demo, by visiting www.eureka.com/airspeed/assembly,or contact our customer service helpline.
STEP 1

STEP 2

STEP 3

STEP 4

Hose and Tool Storage
Step 1

Step 2

Step3

Step 4

Step 5

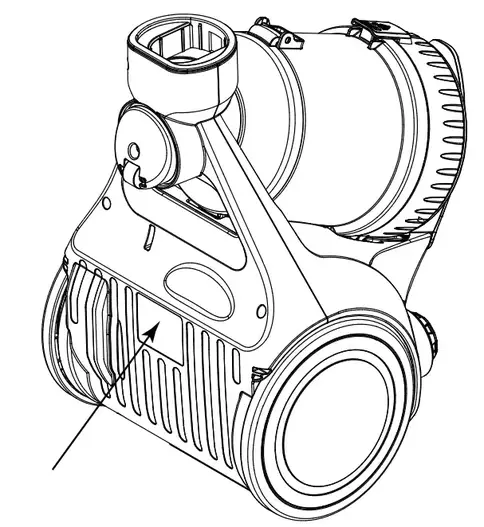
Owner’s Guide
NEN110 series
Canister vacuum cleaner, household type
Thank you for purchasing your new Eureka vacuum!
Important instructions
For easy assembly, please take a few moments to read this owner’s guide.
If you have questions about your new vacuum, please contact our customer service HELPLINE at 1-800-282-2886. We’re here to help!
![]() Eureka stands by our Clean Promise seal. Learn more at www.eureka.com/cleanpromise/ www.eureka.com
Eureka stands by our Clean Promise seal. Learn more at www.eureka.com/cleanpromise/ www.eureka.com
Where to find important vacuum information
Please Retain
 We suggest you record the model, type and serial numbers below. They are located on the bottom of your cleaner. For prompt and complete service information, always refer to these numbers when inquiring about service.
Model & Type ________________________________
Serial No. ___________________________________
It is also important to keep your receipt as proof of date of purchase.
This Owner’s Guide provides important instructions to prolong the life of your Eureka vacuum cleaner.
Registration: To register your product visit www.eureka.com and click on the `Register Your Product’ link in the top right corner.
Inspection: Carefully unpack and inspect your new Eureka vacuum cleaner for shipping damage. Each unit is tested and thoroughly inspected before shipping. For instructions regarding any shipping damage, call Eureka Customer Service HELPLINE 1-800-282-2886 immediately.
IMPORTANT SAFEGUARDS
When using an electrical appliance, basic precautions should always be followed, including the following:
READ ALL INSTRUCTIONS BEFORE USING THIS VACUUM CLEANER
WARNING
 To reduce the risk of fire, electric shock, or injury:
- Do not use outdoors or on wet surfaces.
- Do not leave the vacuum cleaner when plugged in. Turn off the switch and unplug the electrical cord when not in use and before servicing.
- Do not allow it to be used as a toy. Close attention is necessary when used by or near children.
- Use only as described in this manual. Use only the manufacturer’s recommended attachments.
- Do not use with damaged cord or plug. If a cleaner is not working as it should, has been dropped, damaged, left outdoors, or dropped into water, call the Eureka Customer Service HELPLINE at 1-800-282-2886.
- Do not pull or carry by the cord, use the cord as a handle, close door on the cord, or pull the cord around sharp edges or corners. Do not run the vacuum cleaner over the cord. Keep cord away from heated surfaces.
- Do not use extension cords or outlets with inadequate current carrying capacity.
- Turn off all controls before unplugging
- Do not unplug by pulling on the cord. To unplug, grasp the plug, not the cord.
- Do not handle the vacuum cleaner with wet hands or operate without shoes.
- Do not put any objects into openings. Do not use with any opening blocked; keep free of dust, lint, hair, and anything that may reduce
- This vacuum cleaner creates suction. Keep body away from openings and moving parts.
- Do not pick up anything that is burning or smoking, such as cigarettes, matches, or hot ashes cup
- Use extra care when cleaning on stairs.
- combustible liquids such as gasoline, or use on areas where they may be present.
- Store your cleaner indoors in a cool, dry area.
- Keep your work area well lit.
- Unplug electrical appliances before vacuuming them.
- Belt pulleys can become hot during normal use. To prevent burns, avoid touching the belt pulley when servicing the drive belt.
- Turn off the power switch and unplug the cleaner before rotating the nozzle.
SAVE THESE INSTRUCTIONS
To reduce the risk of electric shock, this appliance has a polarized plug (one blade is wider than the other). This plug will fit in a polarized outlet only one way. If the plug does not fully fit into the outlet, reverse the plug. If it still does not fit, contact a qualified electrician to install the proper outlet. Do NOT change the plugin anyway.
Thermal Cut Off
This vacuum cleaner has a special thermostat that protects the cleaner in case of motor overheating. If the cleaner suddenly shuts off, push the on/off switch off (0) and unplug the cleaner. Check the cleaner for a possible source of overheating such as a full dust cup, a blocked hose or a clogged filter. If these conditions are found, fix them and wait
at least 30 minutes before attempting to use the cleaner. After the 30 minute period, plug the cleaner back in and push the on/off switch on (l).
 Do Not Oil the motor or the brush roll at any time. The bearings are permanently lubricated and sealed.
How to identify parts of your vacuum cleaner
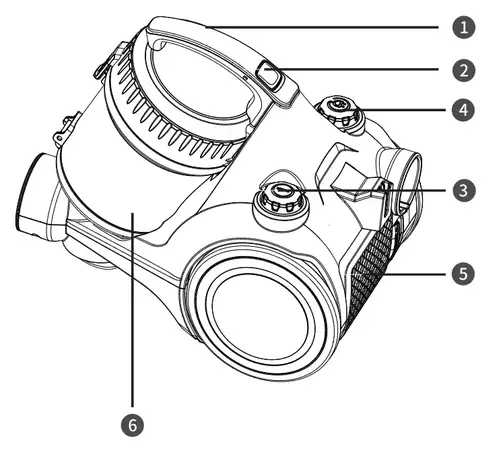
- Handle
- Dust cup release button
- Power button
- Cord rewind button
- Filter
- Dust cup
Accessories
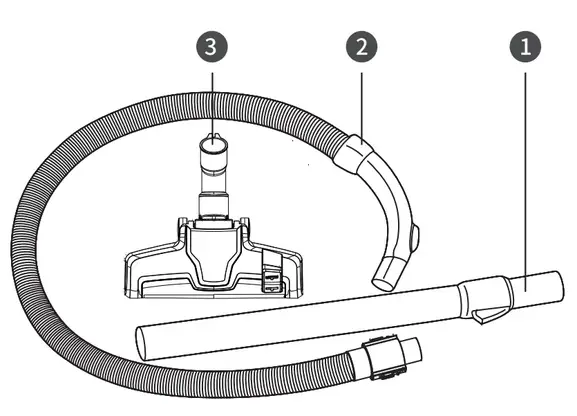
This vacuum cleaner includes the following accessories:
- Telescoping metal wand
- Hose
- ORRUEUXVK
- Eureka Customer Service HELPLINE 1-800-282-2886
How to assemble your vacuum cleaner
ASSEMBLY
Always disconnect the vacuum cleaner from the electrical socket before attaching or removing accessories.
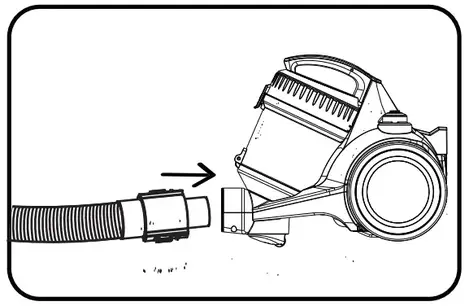
- Attach the hose to the front of the vacuum cleaner by inserting it into the air inlet and twisting to the right. To remove the hose twist to the left and pull to detach.
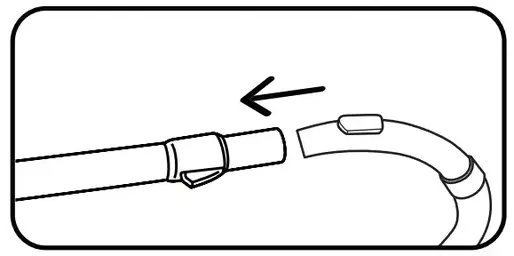
- Attach the telescoping wand to the hose at the bend by pushing the two components together.
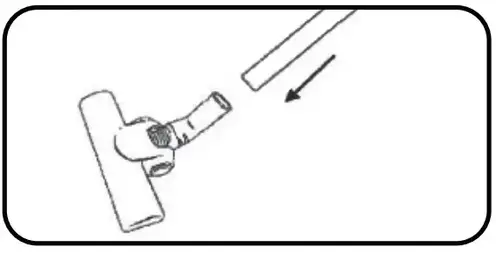
- Attach the floor nozzle to the wand by connecting the two parts. And then twist them into position.
How to use your vacuum cleaner
CAUTION: Always switch off the vacuum cleaner before connecting or disconnecting the hose/attachments or removing and emptying the dust cup.
IMPORTANT: The vacuum cleaner is equipped with a thermal cut-off. If for any reason the vacuum cleaner does overheat, the thermostat will automatically turn the vacuum cleaner off. If this happens, switch the vacuum cleaner off and unplug it from the electrical socket. Remove and empty the dust cup and check the vacuum deaner for blockages. Allow the vacuum cleaner to cool for approximately 1 hour (if you have cleaned the incorrect space, please wait 24 hours for the filters to fully dry before putting them back into the machine).
Operation
Pull the power cord out of the vacuum cleaner and stop when you see the yellow mark. Make sure the red mark is not visible or you have pulled too far. When done cleaning, turn off the power, pull the plug out of the electrical socket, and then push the rewind button until the cord is completely retracted.
 To turn on the vacuum cleaner, push the plug into an electrical socket and press the power button.
 Switching between carpet & hard floor
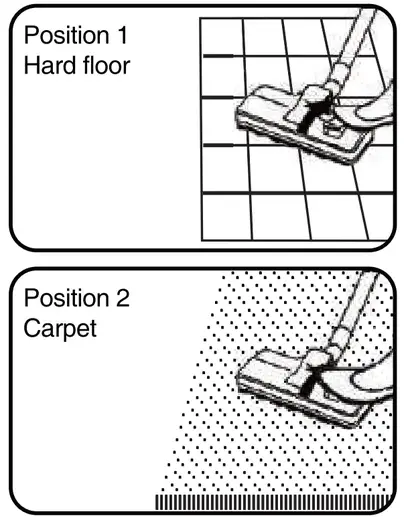
There is a switch located on the floor nozzle that can be pressed with your foot to switch between floor modes. The symbols shown below correspond to the type of floor the setting is for.
Position 1: Bristles extended for hard floor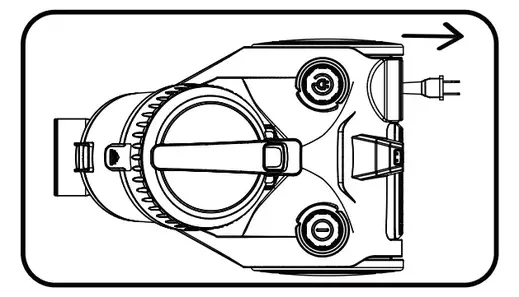
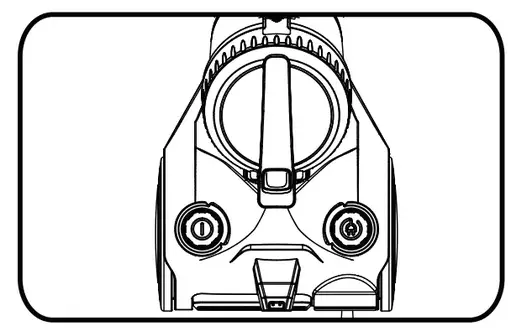 Position 2: Bristles retracted for carpet
How to maintain your vacuum cleaner
Emptying the dust cup
Always switch off the vacuum and unplug it from the electrical socket before conducting any maintenance or cleaning.
Empty the dust cup after each use. Also, be sure to empty the dust cup anytime dust reaches the max fill line.
A full dust cup will reduce the efficiency of the vacuum cleaner so be sure to empty the dust cup regularly.
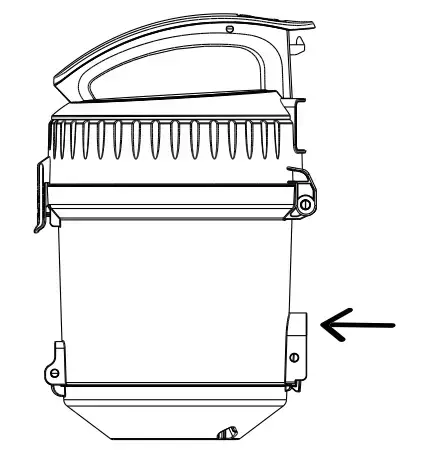
- Press the dust cup release button and take the dust cup out of the vacuum.
- Bring the dust cup over a trash receptacle and then press the release button to open the lower lid. The dust will fall out the bottom and into the trash.

- Close the dust cup lid after the dust has been fully emptied. Return the dust cup to the vacuum cleaner.
How to maintain your vacuum cleaner
Cleaning the Filter
The filter is an effective system for removing dust. Sponge filters require cleaning on a monthly basis (or more depending on use frequency). Do not operate the vacuum cleaner without the sponge filter in place.
- To remove the filter, pull on the dust cup lid clip and lift the cover upwards
- The filter is located inside the top cover of the dust cup. Pull on the handle of the filter housing then removes it.
- Tap the filter over a bin to remove the dust.
- Take the sponge filter out of the filter housing.
- Wash the filter under water (max. 40 degrees).
DO NOT USE DETERGENTS to clean any part. Leave it out to dry for 24 hours or until fully dry before placing it back in the vacuum cleaner. - Put the filter back into the housing. Put the housing and filter back into the dust cup lid. Finally, close the dust cup lid.
- Place the dust cup back into the vacuum cleaner until a click is heard.
Problem-solving
! Make sure the vacuum is turned off and the power cord is unplugged.
NOTICE: Thermal cut-off
This vacuum cleaner has a special thermostat that protects the vacuum in case of motor overheating. If the vacuum suddenly shuts off, proceed as follows:
- Push the power switch off and unplug the vacuum.
- Check the vacuum for a possible source of overheating such as a full dust cup, blocked hose or clogged filter. If these conditions are found, fix them and wait at least 30 minutes before attempting to use the vacuum.
- After the 30 minute period, plug the vacuum back in and turn on the switch. If the vacuum still does not work, call the Eureka Customer Service HELPLINE at 1-800-282-2886.
| Problem | Possible cause | Solution |
| The vacuum cleaner does not turn on | Too much dust in the cup Filter is blocked Hose is blocked |
Empty the dust cup Rinse the filter Clear the blockage |
| The vacuum cleaner does not work | An electrical outlet is not connected or not working The power switch was not turned on |
Ensure the plug is properly connected in the socket and the socket is active Press the power button |
| The vacuum cleaner suddenly stops |
The dust cup is filled The filter is blocked The suction inlet of brush or accessories is blocked |
Empty the dust cup Clean the filter Clear the blockage |
Connecting to an electrical socket
Please check that the voltage indicated on the product corresponds with your supply voltage.
Replacement Parts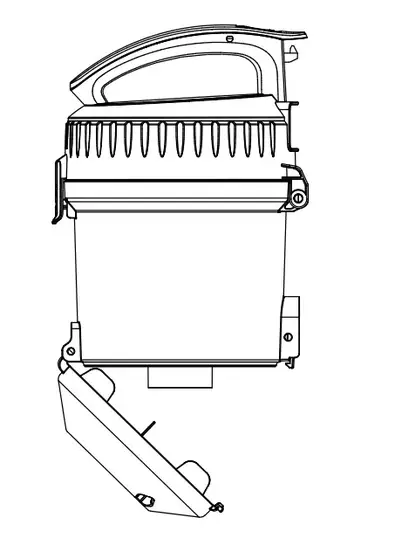
| Part No | Part Name | |
| 1 | NEN0101 | Filter frame and inlet filter |
| 2 | NEN0102 | Floor Nozzle(MB16 with clip) |
| 3 | NEN0103 | Dust Cup Assembly |
| 4 | NEN0104 | Hose Assembly |
| 5 | NEN0105 | Wand |
| 6 | NEN0106 | Outlet Sponge filter |
The Eureka one-year limited warranty
Midea America Corp. (“Eureka”), subject to the terms and conditions herein, warrants this vacuum cleaner to be free from defects in material and workmanship for a term of one year from the date of original purchase when used in accordance with the Eureka operating and maintenance instructions and under normal household usage. This warranty is granted only to the original purchaser and members of the immediate household and is applicable only to original purchases from Eureka authorized resellers.
What Eureka will do:
Eureka will, at its option, repair or replace a defective vacuum or vacuum part that is covered by this warranty. Repairs may be performed using new or refurbished parts that meet or exceed elects to replace the vacuum, the replacement may be a reconditioned unit. Depending on the availability of products, Eureka reserves the right to provide you with a replacement product that is the same or similar, or substitute equivalent of the original product. As a matter of warranty policy, Eureka will not refund the consumer’s purchase price.
This warranty does not cover:
- Normal wear and tear of the vacuum and vacuum parts that require replacement under normal use light bulbs, brush-roll, bristles, impellers, and cleaning.
- Damages or malfunctions resulting from improper or unreasonable use or maintenance, abuse, negligence, failure to follow instructions contained in any written materials that accompany the product, deterioration by reason of excess moisture, corrosive atmosphere, lightning, power surges, connections to the improper voltage supply, unauthorized alteration, or other external causes such as extremes in temperature or humidity, accidents, misuse, or acts of God. This warranty also does not cover damage resulting from repair or attempted repair by anyone other than Eureka. This warranty is not applicable to any product that has been altered or on which the serial Altering, erasing, or forging any proof-of-purchase documents voids any applicable product warranty.
Obtaining warranty service:
To obtain warranty service you must contact the Eureka Service Team, toll-free, at 1-800-282-2886 or email [email protected], to discuss the warranty claim and procedures to be followed. All warranty claims must include submission of proof-of-purchase documentation. For additional information, you may also visit www.eureka.com.
Shipping charges:
You will be responsible for any initial shipping and insurance charges if the defective product(s) must be shipped for warranty service or warranty evaluation; however, Eureka will pay the return shipping charges if repairs are covered by the warranty. When returning parts for repair, you must include the model, type, and serial number. If any product submitted for warranty service is found to be ineligible, an estimate of repair cost will be furnished and the repair performed only if requested by the owner and upon receipt of payment or acceptable arrangements for payment.
Further limitations and exclusions:
Any warranty that may be implied in connection with your purchase or use of the vacuum, including any warranty of merchantability or any warranty of Fitness For A Particular Purpose is limited to the duration of this limited warranty. Some states do not allow limitations on how long an implied warranty lasts, so the above limitations may not apply to you.
Your relief for the breach of this warranty is limited to the relief expressly provided above. In no event shall the manufacturer be liable for any consequential or incidental damages you may incur in connection with your purchase or use of the vacuum. Some states do not allow the exclusion or limitation of incidental or consequential damages, so the above limitation or exclusion may not apply to you.
Your relief for the breach of this warranty is limited to the relief expressly provided above. In no event shall the manufacturer be liable for any consequential or incidental damages you may incur in connection with your purchase or use of the vacuum. Some states do not allow the exclusion or limitation of incidental or consequential damages,
so the above limitation or exclusion may not apply to you.
This warranty gives you specific legal rights. You may also have other rights, which may vary by state.
Midea America Corp.
200 Rivers Edge Drive
Medford, MA. 02155
USA

NEC180 series
Cordless stick vacuum cleaner; household type

Owner’s Guide
Thank you for purchasing your new Eureka vacuum!
Important instructions
For easy assembly, please take a few moments to read this owner’s guide. If you have questions about your new vacuum, please contact our customer
service HELPLINE at 1-800-282-2886.
We’re here to help!

Eureka stands by our Clean Promise seal.
Learn more at www.eureka.com/cleanpromise www.eureka.com
Where to find important vacuum information Keep this information
Write the model, type and serial number here:
Date of purchase (keep your receipt) ______________
Model number and type _________________________
Serial number ________________________________
 Find these numbers on a label on the hand vacuum, battery, and charger. Refer to these numbers when ordering parts and accessories, or if service is needed.
This Owner’s Guide provides important instructions to prolong the life of your Eureka vacuum cleaner
Registration: To register your product visit www.eureka.com and click on the ‘Register Your Product’ link in the top right corner.
Inspection: Carefully unpack and inspect your new Eureka vacuum cleaner for shipping damage. Each unit is tested and thoroughly inspected before shipping. For instructions regarding any shipping damage, call the Eureka Customer Service HELPLINE at 1-800-282-2886 immediately.
IMPORTANT SAFEGUARDS
When using an electrical appliance, basic precautions should always be followed, including the following:
READ ALL INSTRUCTIONS BEFORE USING THIS VACUUM CLEANER
Failure to follow the warnings and instructions may result in electric shock, fire and/or serious injury.
WARNING
- Prevent unintentional starting. Ensure the switch is in the off-position before picking up or carrying the appliance. Carrying the appliance with your finger on the switch or energizing appliance that has the switch on invites accidents.
- Do not touch the nozzle when the vacuum cleaner is on. Danger.
- Do not put any object into openings.
- Do not use with any openings blocked; keep free of dust, lint, hair, and anything that may reduce airflow.
- Do not use outdoors or on wet surfaces.
- Do not operate the vacuum cleaner or charger if it has been damaged in any way. If the vacuum cleaner is not working as it should, has been dropped, damaged, left outdoors, or dropped into water. call the Eureka Customer Service HELPLINE at 11100-282-2886.
- To avoid excessive heat and damage to the unit or battery, the vacuum cleaner will not operate while charging.
- Do not allow to be used as a toy. Close attention is necessary when used by or near children.
- Use only as described in this manual. Use only the manufacturer’s recommended attachments.
- Recharge only with the charger specified by the manufacturer. A charger that is suitable for one type of battery pack may create a risk of fire when used with another battery pack.”
- Do not pull or carry the charger by a cord, use the cord as a handle. close a door on the cord, or pull the cord around sharp edges or corners.
- Do not run appliance over cord. Keep cord away from heated surfaces.
- This charger is not intended for use by travelers.
- Do not use extension cords or outlets with inadequate current-carrying capacity for the charger.
- Do not unplug by pulling on the cord. To unplug, grasp the plug, not the cord.
- Do not handle chargers or vacuum cleaners with wet hands.
- Use appliances only with specifically designated battery packs. The use of any other battery packs may create a risk of injury and fire.
- DO NOT MUTILATE OR INCINERATE BATTERIES. THEY BECOME DANGEROUS AT HIGH TEMPERATURES.
- Liquid ejected from the battery may cause irritation or burns. If the liquid gets on the skin, (1) seek medical attention, (2) wash quickly with soap and water, and (3) neutralize with a mild acid such as lemon juice or vinegar. If the liquid gets into the eyes. flush them immediately with clean water for a minimum of 10 minutes.
- When the battery pack is not in use, keep it away from other metal objects, like paper clips, coins, keys, nails, screws or other small metal objects, that can make a connection from one terminal to another. Shorting the battery terminals together may cause burns or a fire.
- This product is functioning at a temperature range within 40°F – 104°F.
- Do not use a battery pack or appliance that is damaged or modified. Damaged or modified batteries may exhibit unpredictable behavior resulting in fire, explosion or risk of injury.
- Do not expose a battery pack or appliance to fire or excessive temperature. Exposure to fire or temperature above 266°F may cause an explosion.
- Follow all charging instructions and do not charge the battery pack or appliance outside of the temperature range specified in the instructions. Charging improperly or at temperatures outside of the specified range may damage the battery and increase the risk of fire.
- Have servicing performed by a qualified repair person using only identical replacement parts. This will ensure that the safety of the product is maintained.
- Do not modify or attempt to repair the appliance or the battery pack except as indicated in the instructions for use and care.
- The terminals on both the vacuum cleaner and battery should be kept free and clear of objects. Do not insert metal objects inside the terminals.
- This vacuum cleaner creates suction. Keep hair, loose clothing, fingers, and all parts of the body away from openings and moving parts.
- Do not pick up anything that is burning or smoking, such as cigarettes, matches, or hot ashes.
- Do not use without filters in place. “Use extra care when cleaning stairs.
- Do not use to pick up flammable or combustible liquids, such as gasoline, or use in areas where they may be present.
- Store vacuum cleaner and charger indoors in a cool, dry area. To avoid electric shock and/or cleaner damage, do not expose to weather elements.
- Keep your work area well M. Unplug electrical appliances before vacuuming them.
- Overcharging, short-circuiting, reverse charging, mutilating or incinerating the cells and the batteries must be avoided.
- If a cell or a battery has leaked or vented, it should be replaced immediately using protective gloves.
- If and when necessary, these cells or batteries must be replaced with identical new ones from the same manufacturer. If a cell or a battery to be replaced is connected with other cells or batteries in series, it is recommended that the other cells or batteries be replaced with new ones at the same time.
- Reverse polarity installation of the cell or the battery in the end product must be avoided.
- Do not incinerate this appliance even if it is severely damaged. Contact the local waste facility before discarding in trash.
SAVE THESE INSTRUCTIONS
What comes in the carton

How to identify parts of your vacuum cleaner

Easy assembly
- Slide wand onto hand vacuum until it clicks (Fig. 1).
- Push the wand into the motorized floor nozzle until it clicks (Fig. 2).

How to install wall mount
- Choose a location near the power outlet. Locate point high enough on wall to allow wand and motorized floor nozzle to hang freely.
- Place mount against the wall and use a pencil to mark drill holes.
- Drill holes (with 1/4” bit) and insert drywall anchors. Insert screws through holes on the mount and tighten until firmly attached (Fig. 3).
How to charge battery and store accessories
- Place assembled vacuum cleaner on the wall mount.
- Plug the charger into a power outlet and then into the charger port on handle (Fig. 4).
- Loop charger cord into clips on sides of wall mount.
Battery indicator lights show level of charge (Fig. 4):
A. Half charged
B. Fully charged

- Indicator lights stop blinking when fully charged.
- Charge the battery fully before using it for the first time. This may take up to six hours.
How to use cleaner for cleaning floors
- Click the power button once to start (Fig 1). The vacuum starts on High mode. Use the Low/ High button to switch between modes.
- Using a motorized floor nozzle, glide back and forth on the area to be cleaned. Avoid oversized or sharp items (such as screws) with cleaner.
- Twist wrist to engage swivel function.
- When done, click the power button once to stop the motor.

Empty dust cup after every use
- Click the dust cup release button, located on the front of the handle just above the dust cup, and pull the dust cup out. (Fig. 2).
- Press the lever to release the bottom lid of dust cup to empty the debris. (Fig. 2)
- To place the dust cup back, angle it forward so the lower hook catches in the slot, and then gently push it back towards the wand until you hear a click indicating it is locked in place. (Fig. 3)

How to use hand vacuum and accessories
 CAUTION
Moving parts! Always turn off hand vacuum before attaching accessories.
The hand vacuum can be used with or without tools.
- To use without tools, press the release button and remove the wand. Collect debris directly with a hand vacuum nozzle (Fig. 4).
- To use tools with a wand, press the release button to remove the motorized floor nozzle. Slide tool onto end of wand until it clicks (Fig. 5).
- To use tools with a hand vacuum only, press the release button to remove the wand. lide tool onto hand vacuum until it clicks.

Use with or without a wand.
- 2-in-1 upholstery tool: Use a brush to vacuum blinds, vents or upholstered surfaces. Use felt portion to clean delicate surfaces. To switch between felt and brush portions, press the thumb release and slide the brush up or down.
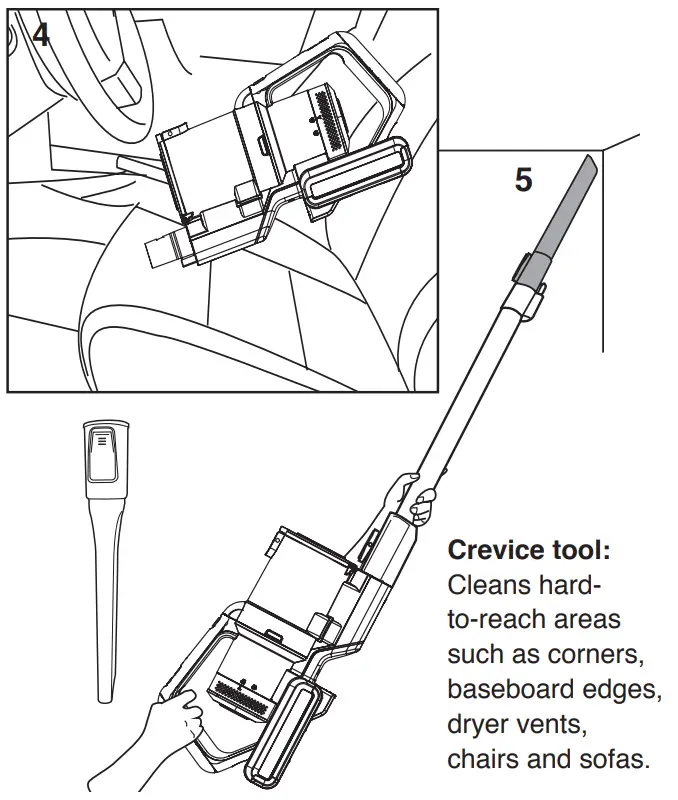
How to use hand vacuum and motorized floor nozzle
Ideal for cleaning stairs.
- Press the release button to remove the wand from the hand vacuum. Attach motorized floor nozzle directly to hand vacuum until it clicks.
- Click the power button once to start. The vacuum starts on High mode. Use the Low/High button to switch between modes depending on the suction power desired.
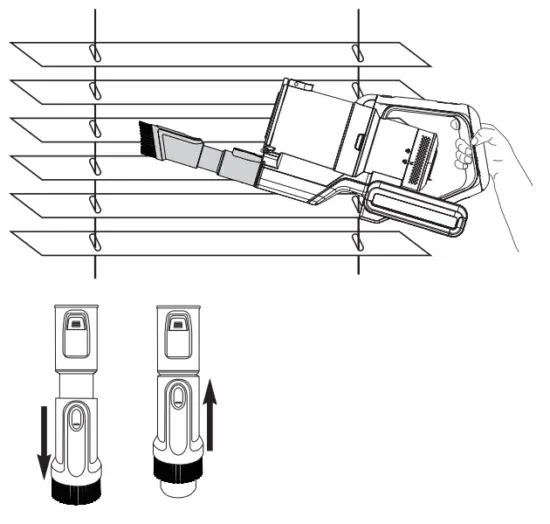
How to maintain your vacuum cleaner
 CAUTION
Never operate a vacuum cleaner without all filters, filter screen and dust cup in proper position.
WARNING: Moving parts! Recharge cleaner after each use.
Dust cup – Empty after each use
 |
|
| Click the dust cup release button, located on the front of the handle just above the dust cup, and pull the dust cup out. | Press the lever to release the bottom lid of the dust cup to empty the debris. |
Washable dust cup filter — clean monthly
 Click the dust cup release button, located on the front of the handle just above the dust cup, and pull the dust cup out.
- Lift out the pre-motor filter and shake off dust frequently. Every three months rinse the filter and dry THOROUGHLY.
- Reattach filter and Cyclone.
- Click dust cup back into place on unit.
Washable post-motor filter – clean every 6 months
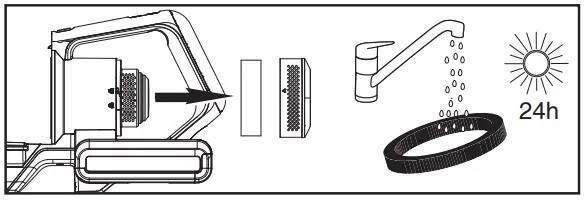 Twist filter cover and remove.
- Lift out post-motor filter.
- Shake to remove dust.
- Every 6 months, replace the filter or rinse and dry THOROUGHLY.
- Reposition filter and cover and twist to ‘lock.’
How to maintain brush roll
To avoid unnecessary service calls, periodically check brush roll for debris. If the brush roll gets clogged it will automatically shut off. Turn the vacuum off and unplug before attempting to remove the clog.
Washable brush roll – clean frequently
 CAUTION
Make sure the vacuum cleaner is turned off and not plugged into a power source.
WARNING: Do not attempt to remove belt. Call the Eureka Customer Service HELPLINE at 1-800-282-2886.
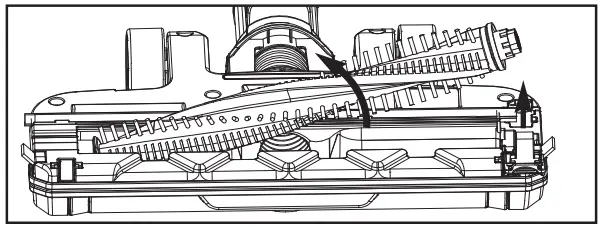
Step on floor nozzle to lower handle. Turn vacuum face down on the floor. Use scissors to clip heavy threads or strings.
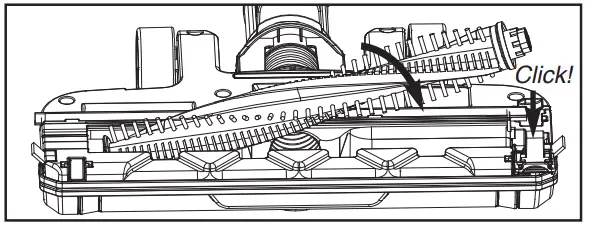 If debris cannot be removed easily, locate the brush roll release tab on the right side and open the brush roll cover. Remove the brush roll and clear any tangled hair and remaining debris.

To reassemble:
- Align one end of brush roll with floor nozzle gear.
- Press another end into the slot.
- Replace the brush roll release tab into the slot and press down to click it into place.
The Eureka 1.5-year limited warranty
Media America (Canada) Corp. (“Eureka”), subject to the terms and conditions herein, warrants this vacuum cleaner to be free from defects in material and workmanship for a term of one and a half years from the date of original purchase when used in accordance with the Eureka operating and maintenance instructions and under normal household usage. This warranty is granted only to the original purchaser and members of the immediate household and is applicable only to original purchases from Eureka authorized resellers.
What Eureka will do:
Eureka will, at its option, repair or replace a defective vacuum or vacuum part that is covered by this warranty. Repairs may be performed using new or refurbished parts that meet or exceed Eureka’s specifications for new parts. If Eureka elects to replace the vacuum, the replacement may be a reconditioned unit. Depending on the availability of products, Eureka reserves the right to provide you with a replacement product that is the same or similar, or substitute equivalent of the original product. As a matter of warranty policy, Eureka will not refund the consumer’s purchase price.
This warranty does not cover:
- Battery module and battery components. The battery module and its components are covered by a separate one-year limited battery warranty.
- Normal wear and tear of the vacuum and vacuum parts that require replacement under normal use such as disposable dust bags, filters, drive belts, light bulbs, brush-roll, bristles, impellers, and cleaning.
- Damages or malfunctions resulting from improper or unreasonable use or maintenance, abuse, negligence, failure to follow instructions contained in any written materials that accompany the product, deterioration by reason of excess moisture, corrosive atmosphere, lightning, power surges, connections to the improper voltage supply, unauthorized alteration, or other external causes such as extremes in temperature or humidity, modifications, scratches or discoloration, accidents, misuse, or acts of God. This warranty also does not cover damage resulting from repair or attempted repair by anyone other than Eureka or an authorized Eureka Warranty Station. This warranty is not applicable to any product that has been altered or on which the serial number has been defaced, modified or removed. Altering, erasing, or forging any proof-of-purchase documents voids any applicable product warranty.
Obtaining warranty service:
To obtain warranty service you must contact the Eureka Service Team, toll-free, at 1-800-282-2886 or email [email protected], to discuss the warranty claim and procedures to be followed. All warranty claims must include the submission of proof-of-purchase documentation. For additional information, you may also visit www.eureka.com.
Shipping charges:
You will be responsible for any initial shipping and insurance charges if the defective product(s) must be shipped for warranty service or warranty evaluation; however, Eureka or a Eureka Authorized Warranty Station will pay the return shipping charges if repairs are covered by the warranty. When returning parts for repair, you must include the model, type and serial number located on the rating plate. If any product submitted for warranty service is found to be ineligible, an estimate of repair cost will be furnished and the repair performed only if requested by the owner and upon receipt of payment or acceptable arrangements for payment.
Further limitations and exclusions:
Any warranty that may be implied in connection with your purchase or use of the vacuum, including any warranty of Merchantability or any warranty of Fitness For A Particular Purpose is limited to the duration of this limited warranty. Some states do not allow limitations on how long an implied warranty lasts, so the above limitations may not apply to you. Your relief for the breach of this warranty is limited to the relief expressly provided above. In no event shall the manufacturer be liable for any consequential or incidental damages you may incur in connection with your purchase or use of the vacuum. Some states do not allow the exclusion or limitation of incidental or consequential damages, so the above limitation or exclusion may not apply to you. This warranty gives you specific legal rights. You may also have other rights, which may vary by state.
The Eureka 12-month limited battery warranty
Midea America Corp. (“Eureka”), subject to the terms and conditions herein, warrants this Battery Module to be free from defects in material and workmanship for a term of one year from the date of original purchase when used in accordance with the Eureka operating and maintenance instructions and under normal household usage. This warranty is granted only to the original purchaser and members of the immediate household and is applicable only to original purchases from Eureka authorized resellers.
What Eureka will do:
Eureka will, at its option, repair or replace a defective Battery Module or battery part that is covered by this warranty. Repairs may be performed using new or refurbished parts that meet or exceed Eureka’s specifications for new parts. If Eureka elects to replace the Battery Module, the replacement may be a reconditioned unit. Depending on the availability of products, Eureka reserves the right to provide you with a replacement product that is the same or similar, or substitute equivalent of the original product. As a matter of warranty policy, Eureka will not refund the consumer’s purchase price.
This warranty does not cover:
- Normal wear and tear of the Battery Module and battery parts that require replacement under normal use.
- Damages or malfunctions resulting from improper or unreasonable use or maintenance, abuse, negligence, failure to follow instructions contained in any written materials that accompany the product, deterioration by reason of excess moisture, corrosive atmosphere, lightning, power surges, connections to the improper voltage supply, unauthorized alteration, or other external causes such as extremes in temperature or humidity, modifications, scratches or discoloration, accidents, misuse, or acts of God. This warranty also does not cover damage resulting from repair or attempted repair by anyone other than Eureka or an authorized Eureka Warranty Station. This warranty is not applicable to any product that has been altered or on which the serial number has been defaced, modified or removed. Altering, erasing, or forging any proof-of-purchase documents voids any applicable product warranty.
Obtaining warranty service:
To obtain warranty service you must contact the Eureka Service Team, toll-free, at 1-800-282-2886 or email [email protected], to discuss the warranty claim and procedures to be followed. All warranty claims must include the submission of proof-of-purchase documentation. For additional information, you may also visit www.eureka.com.
Shipping charges:
You will be responsible for any initial shipping and insurance charges if the defective product(s) must be shipped for warranty service or warranty evaluation; however, Eureka or a Eureka Authorized Warranty Station will pay the return shipping charges if repairs are covered by the warranty. When returning parts for repair, you must include the model, type and serial number located on the rating plate. If any product submitted for warranty service is found to be ineligible, an estimate of repair cost will be furnished and the repair performed only if requested by the owner and upon receipt of payment or acceptable arrangements for payment.
Further limitations and exclusions:
Any warranty that may be implied in connection with your purchase or use of the Battery Module, including any warranty of Merchantability or any warranty of Fitness For A Particular Purpose is limited to the duration of this limited warranty. Some states do not allow limitations on how long an implied warranty lasts, so the above limitations may not apply to you. Your relief for the breach of this warranty is limited to the relief expressly provided above. In no event shall the manufacturer be liable for any consequential or incidental damages you may incur in connection with your purchase or use of the Battery Module. Some states do not allow the exclusion or limitation of incidental or consequential damages, so the above limitation or exclusion may not apply to you. This warranty gives you specific legal rights. You may also have other rights, which may vary by state.
Problem-solving
 Make sure the vacuum cleaner is off and the charging plug is unplugged.
NOTICE: Thermal cut-off
This vacuum cleaner has a special thermostat that protects the vacuum cleaner in case of motor overheating. If the vacuum suddenly shuts off, proceed as follows: 1) Check the vacuum for a possible source of overheating such as a full dust cup, blocked wand or clogged filters. If these conditions are found, fix them and wait at least 30 minutes before attempting to use the vacuum. 2) After the 30-minute period, press the power button. If the vacuum still does not work, call the Eureka Customer Service HELPLINE at 1-800-282-2886.
| Problem | Solution |
| The motor will not start | •Make sure cleaner is fully powered. •Push the charger securely into an electrical outlet, try another outlet or check the circuit breaker. •See detailed “thermal cut-off” instructions above. |
| Charging indicator lights are not lit while charging |
•Make sure the charger is securely inserted into an electrical outlet. •Make sure the charging plug is securely inserted into the handle. •Indicator lights stop blinking when fully charged. |
| Not enough suction power | •Empty dust cup and clean or change filters. See page 9 for maintenance instructions. •Make sure cleaner is fully powered. Charge battery. •Remove clogs that restrict the airflow. |
| Not enough running time | •Make sure cleaner is fully powered. •Charge the battery for up to six hours before using. |
| The brushroll will not turn | •Check brush roll for debris. See page 9 for maintenance instructions. |
Discarding the vacuum and battery pack
 Before you discard this vacuum, dispose of the battery in an environmentally safe manner. Do not discard batteries with your regular household trash.
 Important battery disposal information.
To find a disposal location nearest you, call 1-800-822-8837.
 To preserve natural resources, please recycle or dispose of expired battery packs properly. This product contains a lithium-ion battery. It must be disposed of properly. Local laws may prohibit the disposal of lithium-ion batteries in ordinary trash. Consult your local waste authority for information regarding available recycling and/or disposal options.
| Image | Part name | Part # (fits models) |
 |
Charger | P0801 |
| Crevice tool | Z0101 (all) | |
| Post-motor filter | P0301 | |
| Wall mount | P0701 | |
| Floor nozzle | P0501 | |
| Wand | P0101 | |
| Cyclone (no filter) | PO401 | |
| 2-in-1 upholstery tool | Z0201 (all) | |
| Brush roll | P0601 |
©2020 Midea America (Canada) Corp.
Markham ON, L3R 8V2
Eureka Customer Service HELPLINE 1-800-282-2886
SAFETY INSTRUCTIONS
The producer has reasonably considered every precaution possible, so to assure
user’s safety. Anyway, in installing and using the grinder, various conditions may create uncontrollable and unpredictable events; so, it’s always necessary to evaluate any risks and consider what follows:
- Before connecting the grinder, it’s necessary to verify that plate data match with electric net ones.
- Both installation and repair must respect safety instructions and the inforce rules of the country in which the grinder is installed.
- The grounding wire is necessary, like the installation. Both must respect the inforce rules of the country in which the grinder is installed.
- Adaptors, multiple outlets and extension cables are not suggested.
- Do not use this grinder if it is damaged on the cable. In case of malfunctioning, switch off the grinder and take it to the closest authorised service center.
- Do not immerse the grinder, the cable or the plug into water or other liquids. It’s necessary to avoid that internal parts enter in contact with other liquids.
- Do not use any water jets, unsuitable detergents or steam-cleaners to clean.
- During its use, install the grinder on a flat and stable surface being able to sustain the weight of the grinder.
- The grinder is intended to be used only to grind roasted coffee beans. A different use is considered unsuitable and dangerous. The producer cannot be considered responsible for possible damages related to misuse or erroneous and unreasonable actions.
- The grinder cannot be used in extreme enviromental conditions. In any case, use the grinder just between -5° C ÷ + 30° C degrees.
- This grinder has been conceived for commercial use, like restaurant kitchen, cantines, hospitals and shops, like bakeries and butchers. It is not suitable for continous food production.
- For home-use, it is necessary to switch off the grinder and to unplug it before changing any accessory or coming clode to any parts that is working.
- This grinder is conceived for home-useand similar domains, like kitchen equipments for the staff of shops, offices, agritourism, customers in hotels, motels or other locations, like residential areas or bed and breakfast.
- Do not allow children or untrained people to use the grinder.
- The grinder can be used by children being 8 years old or above and by people with reduced physical, sensory or mental capabilities ; by people without adequate experience just when monitored and if these have received user instruction on the grinder. Cleaning cannot be performed by unmonitored children.
IMPORTANT WARNINGS
- Do not pull the cable or the grinder itself to disconnect its power cable.
- Do not use the grinder with wet or damp hands.
- Do not use the grinder when you are barefoot.
- Before cleaning or servicing, unplug the grinder from the electric net.
- Do not leave the grinder switched on when not necessary. When it is not working, unplug the grinder.
- Do not obstruct the fan or heat elimination systems. Do not enter any water or liquids.
- While the grinder is working, do not enter spoons, forks or other utensils in the spout or the coffee container to perform anything.
- To solve any blockage in the spout, always switch off the grinder before.
- In case of failure of the motor, switch off the grinder and contact an authorised service center.
- Prevent the grinder to be used under any weather conditions (sun, rain, ecc.).
- Children must be monitored to prevent they play with the grinder.
- The owner is responsible for monitoring the installation of the grinder, so to assure it has been installed in enviromental conditions that will not create a safety or health danger for the users.
- If you decide not to use anymore this grinder, we suggest to make it inoperative. After having it unplugged, cut the cable. In case of failure, switch it off and do not tamper with.
CONSERVATION OF THE MANUAL
This manual must always be at any user disposal. The user must be informed on the
correct use of the grinder and on potential risks. It must be conserved in a dry, clean and heat-protected place. Use the manual so to avoid any damage to itself. Do not remove, rip or write on any manual parts. In case you cannot find the manual, take contact with the re-seller or the producer for further information.
UNPACKING THE GRINDER
- It’s necessary to check out that there is not any damage on the grinder, looking at the external packacing
- After having removed the packing, check out there are no damages on the grinder.
- Check out the entirety of all components. In case of defects or damages, inform
immediately the authorised reseller. - The packing (box, cellophane, metallic parts, styrofoam, etc.) can cut, wound or be dangerous if mismanaged. Prevent children or non-responsible people entering in contact with the packing.
- This symbol on the grinder or on the packing informs that the grinder cannot be considered like a usual home waste ; it must be delivered to a suitable waste collection facility that recycle electric and electronic devices. If this grinder is correctly disposed of, you will prevent potential damages to both environment and health; these damages may occur in case the grinder is not correctly disposed of. Waste recycling protects natural sources. For further information on the recycling of this product, you can contact your local authority, local recycling center or the reseller you purchased the grinder from.
IMPORTANCE OF THE MANUAL
This manual is adressed to the user of the grinder and it is considered part of this
product. It shares information on its correct use and maintanance, including information on user’s safety. This manual must be held during all the grinder’s lifespan and must be transmitted to any user or future owner. All information in this manual do not replace safety rules and techicnal data on the installation and functioning of the grinder and its packing. This manual reflects the nowadays state of the art and it cannot be considered inadaquate just because revised on the base of new techologies. The producer may modify the manual without revising previous editions, except in special cases. A misuse of the grinder, or a different use than the one described on the manual, will invalidate any warranty or responsability of the producer. The grinder can be used just by a responsible adult. It’s necessary to preserve the manual, as the producer cannot be held responsible for any damage on people or things, or any damage on the grinder in case it is misused or in case safety and maintenance rules are not respected.
GENERAL INFORMATION
- MANUFACTURER:
CONTI VALERIO – Via Luigi Longo, 39/41 – 50019 Sesto Fiorentino (FI) – ITALIE - MODEL:
MEB – MEE – MEA – MEM – MPE – MPA – MPM – MPT
TECHNICAL DATA
| DESCRIPTION | MODEL | ||
| MEB – MEE – MEA – MEM – MPE – MPA – MPM – MPT | |||
| SILENT | EVOLUTION | FILTER | |
| Volts (V) | 220 V / 60 Hz 220-240 V /50-60 Hz |
||
| Power consumption (W) | 310 | ||
| RPM | 1350 (50Hz) 1630 (60Hz) |
||
| Production rate (g/s) | 50
1,2 – 1,6 (Espresso) |
1,1 – 1,5 (Espresso) 1,5 – 2,1 (Brew) |
50 |
| 1,1 – 1,5 (Espresso) 1,5 – 2,1 (Brew) |
|||
| 55
1,4 – 1,8 (Espresso) |
55 | ||
| 1,9 – 2,5 (Brew) | |||
| Empty weight (kg) | 5,6 | ||
| Hopper capacity (g) | standard 300 / optional 500 | ||
| Ground coffee basket capacity (g) | 160 | ||
| Height (mm) | 350 330 (Mignon Design) | ||
| Width (mm) | 120 | ||
| Depth (mm) | 180 | ||
- T ON: 60 s
- T OFF: 120 s or 600 s
PRODUCT DESCRIPTION

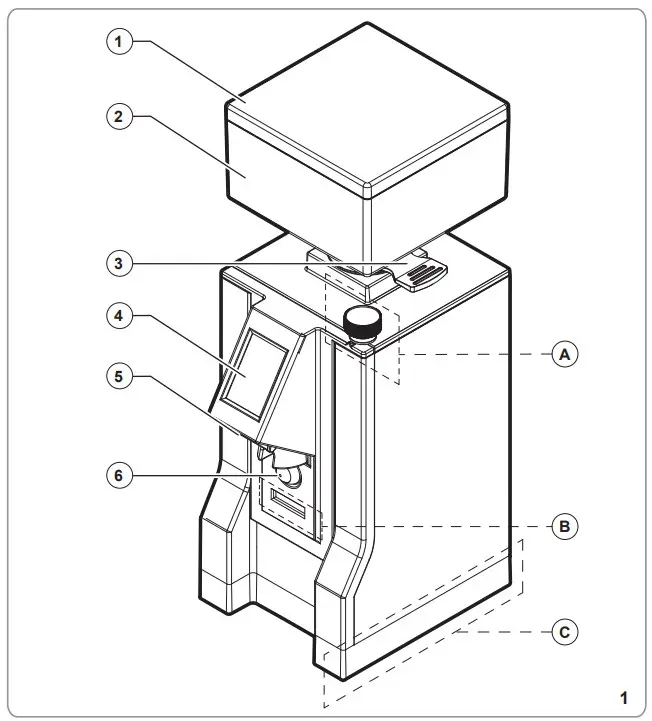
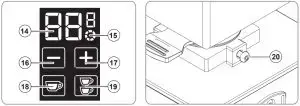
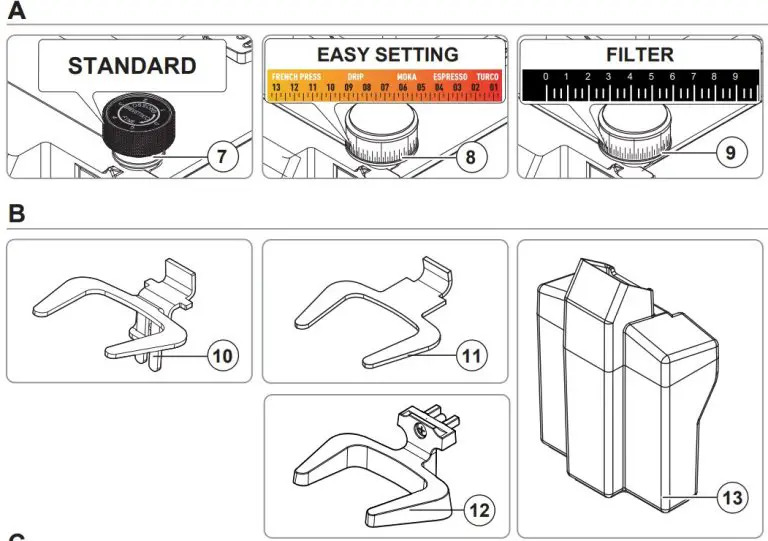
- Container lid
- Coffee beans container
- Coffee beans container opening/closing tab
- Touch-screen display
- Spout
- Activation button for grinding
- Setting knob for grinding
- EASY SETTING regulation knob
- Setting knob FILTER grinding
- Adjustable filter holder knob
- Fixed fork
- Plastic fork
- Ground coffee basket
- Display dispensing time/dose counter
- Continuous mode on
- Decreasing key
- Increasing key
- 1 cup button
- 2 cups button
- Fixing screw of the coffee beans container
- Switch on button
- Manual/Timer mode button
- Potentiometer timer button
- Side button triggering grinding
- Side button triggering grinding
LOCKING THE CONTAINER
Before operating the appliance, it is necessary to fit the coffee bean container (2).
- Insert the container (2) into its seat (Fig. 2), positioning it so that the hole lines up with the screw on the back part of the appliance.
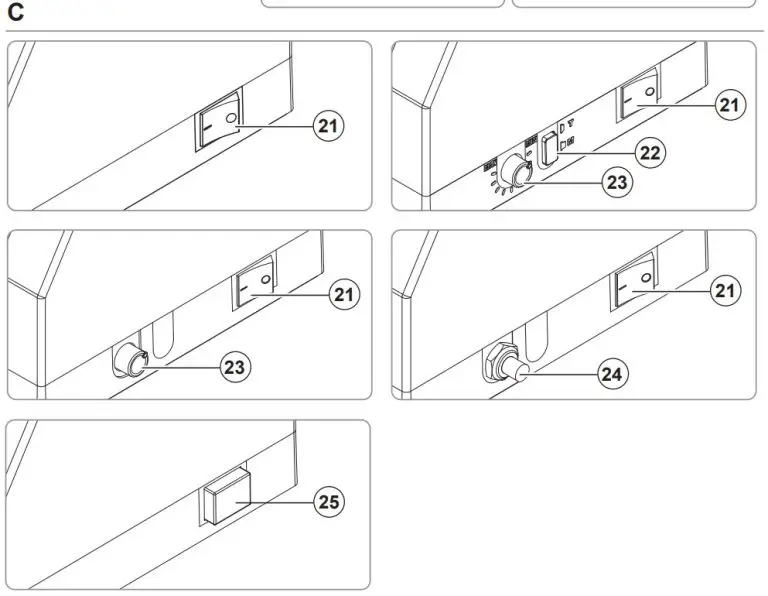
- Tighten the lock screw (12) (Fig. 3).
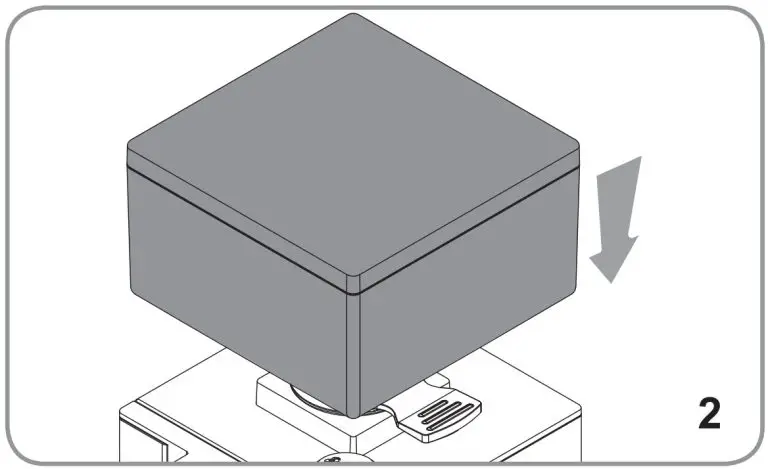
SETTING AND USE
PREPARATORY OPERATIONS
Looking at the type of coffee (more or less roasted) and grinding, it’s necessary to set up the grinder before working with it.
- Evaluate the type of coffee (more or less roasted).
- Evaluate the grinding level.
- If equipped with adjustable fork (10), set it in height (Fig. 6).
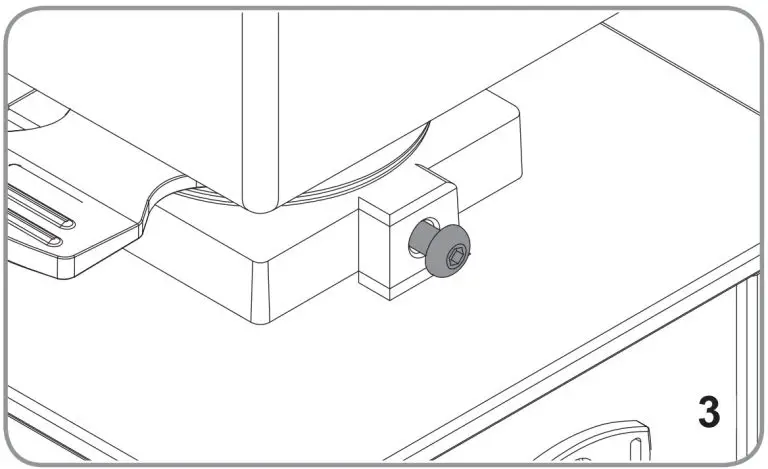
- Insert the container (2) in its position (Fig. 2).

- After having set the electric connection, pull the tab (3) on the bottom of the coffee bean container (2) to close it (Fig. 4). Then, set up dose programming.
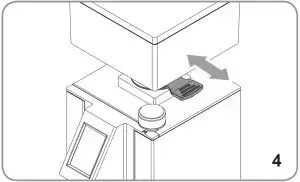
- Remove the cover (1) of the container (2) and fill it with coffee beans.
- Put the cover back (1) and push the lid (9) so to let the beans go all the way down.
MANUAL MODE FUNCTION
- Lay the filter holder on the fork (10/11/12) (Fig. 9) or position the ground coffee basket (13) under the outlet chute (5)(Fig.10).


- Push the filter holder, or position the ground coffee basket (13) under the outlet chute, until in contact with the micro-switch button (6), or keep pressed the side activation button (24/25), so to dispense the ground coffee from the spout (5).
- The dispensing stops moving away the filter holder or the basket from the microswitch (6) or releasing the side button (24/25).
TIMER MODE FUNCTION
- Lay the filter holder on the fork (10/11/12) (Fig. 9) or position the ground coffee basket (13) under the outlet chute (5)(Fig.10).


- Push the filter holder, or the basket, until in contact with the micro-switch button (6), so to dispense the ground coffee from the spout (5).
- Dispensing time is set regulating the potentiometer (23), turning it to increase or
decrease coffee ground quantity. - Dispensing stops at the end of the set time. To stop automatic dispensing before the time is over, push again the micro-switch button (6).
If equipped with, it’s possible to use the select button (22) to switch from manual to timer mode (and vice-versa). To activate the manual mode, push the « M » positioned button ; to activate timer mode, press the « T » positioned button.
DISPLAY FUNCTIONING
TURNING THE MACHINE ON
When starting the machine for the first time, the appliance has the factory default settings. In the subsequent starts, it keeps the settings preceding the last turning off.
When starting, the display loads the firmware and gets ready for dispensing.
DOSE DISPENSING AND ADJUSTMENT (DISPLAY)
- By pressing the button of one dose(18)
 or double dose (19)
  , the dose to be dispensed is selected (the buttons goes on).
 - With a single pressure (quick) of the grinding start button (6),the coffee dispensing and the countdown to zero are activated.
- When the dispensing is complete, the grinding time goes back to the value set. The counter of single or double doses is increased by 1.
- Select the single (18)
 or double dose (19)
  and press the buttons (16)
  and (17) to increase or reduce the dispensing time of the selected dose (the time is shown in seconds on the display).
 - If the button (16)
 or (17) , is kept pressed for some seconds, the time is increased or reduced according to the pressure time.
To pause the automatic dispensing before the grinding time has elapsed, press the grinding start button (5) with the filter holder:
- Press the button (5) again to restart the dispensing for the remaining time.
- Keep pressed the button of the selected dose (blinking) to stop dispensing.
The grinding time goes back to the value set.
CONTINUOUS DISPENSING
- Press the single dose (18)
 and double dose (19)
  . buttons at the same time to access this mode.
 - The symbol (15)
 appears on the display.
 - The continuous dispensing lasts up to max 60 seconds.
- To exit the continuous dispensing mode, keep pressed the single dose (18)
 or the double dose(19)
  button for some seconds.
LOCKING THE TIME
- Press the buttons(16)
 and (17) . at the same time. When releasing them, the dose dispensing time adjustment stops. Furthermore, on the display the buttons (16)
  and (17) disappears.
 - Press both buttons (16)
 and (17) again to unlock the functions.
DOSE COUNTS
When starting the machine, keep pressed for 5 seconds the grinding start button (6) and then select one of the counts:
- Single dose button (18)
 : access to the count of the dispensed single doses;
 - Double dose button (19)
 : access to the count of the dispensed double doses;
 - Single dose button (18)
 and double dose button (19)
  : access to the count of the dispensed continuous doses;
On the display, only the selected buttons remain on and the numbers of doses are shown in pairs progressively.
For instance, if the dose total is 142536, the display shows the digits 14, 25, and 36
(each one for two seconds).
After the last digit pair, it stops for 4 seconds and then the sequence restarts.
To exit the count, press the grinding start button (6).
DISPLAY CONTRAST ADJUSTMENT
When starting the machine, keep pressed the grinding start button (6) and then press the button (16) ![]() or (17) to access the contrast adjustment. On the display, only the buttons (16)
or (17) to access the contrast adjustment. On the display, only the buttons (16) ![]() and (17) To exit the contrast adjustment, press the grinding start button (6).
and (17) To exit the contrast adjustment, press the grinding start button (6).
GRINDING SETTING (FIG. A)
Turn the adjustment knob (7-8-9) clockwise for more finely ground coffee and counterclockwise for a coarser grind. The adjustment is to be made gradually, by grinding a little coffee every max 2 notches.
If the knob is turned of a turn with the motor in standstill, the machine could stop.
The adjustment system EASY SETTING (8), if fitted, makes this procedure easier and allows to adjust grinding in a quick and intuitive manner according to the required final product.
POSITIONING THE FIXED FORK
- Insert the filter holder fork (11) (Fig. 7) into its seat.

WARNING
- Do not use the fork (12) (fig. 8) without having fixed it with the apposite screw

FILTER HOLDER FORK ADJUSTMENT (FIG.6)
- Insert the filter holder fork (10) (Fig. 7) into its seat.
- With a screwdriver, loosen the fixing screw of the filter holder fork (6). Do not loosen the screw completely.
- Lift or lower the fork to adjust it according to the filter holder dimensions.
- Once having found the correct position, tighten the fork fixing screw (10).
- The fork is suitable for any kind of filter holder available on the market.
CLEANING AND MAINTENANCE
 ATTENTION
Unplug the grinder from the electrical net before performing any cleaning and maintenance. Do not pull the feeding cable or the grinder itself to unplug.
 ATTENTION
Maintenance and cleaning operations must be performed by trained technicians, authorised by the producer.
 ATTENTION
Do not perform any approximate maintenance and always use original spare parts.
CLEANING
Cleaning is fundamental for the correct use of the grinder. A neglected grinder can negatively impact on the coffee dispensing and on the precision of the dose and the grind. Before cleaning, check if the grinder is unplugged.
HOPPER CELANING
After having removed the hopper, clean the internal parts of it with water and neutral
soap, taking off any oil left by the coffee beans. Rinse and dry it carefully. Perform the same on the cover. Do not use the dish-washer.
GRINDING SYSTEM CLEANING
After having removed the lid, open the upper burr holder. Then, clean the blades and the other internal parts with a brush or a dry cloth. If necessary, use a vacuum cleaner or an air compressed jet. After having installed back the upper burr holder and the lid, install the hopper. For a complete cleaning, use detergent pills.
 ATTENTION
Any cleaning operation must be performed with food use approved products.
MAINTENANCE
- To ensure correct operation of the appliance, avoid grinding more than 160g of coffee per activation.
- Check and possibly replace the blades every 250 kg of coffee. For burrs maintenance, unplug the grinder from the electric net and remove the coffee beans container.
- Then, unscrew the screw being on the lid and the screws fixing the upper burr holder.
- To clean the blades, use a brush or a dry cloth. If necessary, use a vacuum cleaner or air compressed jet.
 ATTENTION
Maintenance must be performed only by trained technicians, authorised by the producer.
 ATTENTION
Do not perform any approximate maintenance and always use original spare parts.
TROUBLESHOOTING
- Contact specialist personnel.

