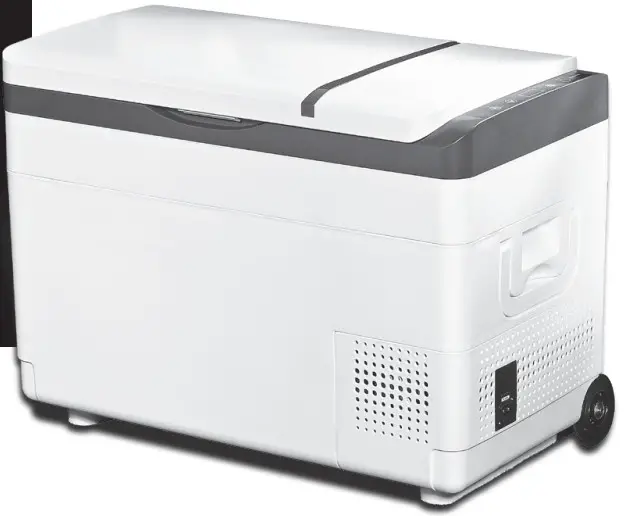
30L Compressor Coo/box
Use as an Xbox or a freezer Set the exact temperature you waif Efficient and quiet operation
2 YEAR GUARANTEE

Product image for illustrative purposes only
INSTRUCTIONS FOR USE
USER MANUAL
Item Code: 414734
Thank you for purchasing this coolbox. Please read the warnings and instructions below carefully and familiarise yourself with the product before use. As with all electrical items, please exercise extreme caution during use and take care not to misuse or damage the product which could result in injury.
Safety Instructions
General Safety
WARNING!
- Before use, check that the cables, plugs, and casings are undamaged. DO NOT use if any parts are damaged or worn.
- If the power supply cable is damaged, it must be replaced.
- The coolbox can only be repaired by a qualified electrician.
- This appliance can be used by children aged 8 years and above and persons with reduced physical, sensory or mental capabilities or lack of experience and knowledge if they have been given supervision or instruction concerning use of the appliance in a safe way and understand the hazards involved. Children shall not play with the appliance. Cleaning and user maintenance shall not be made by children without supervision.
- Always keep and use the coolbox out of the reach of children under 8 years of age.
- Do not store any flammable or explosive materials in the coolbox.
- Avoid using in areas where the supply cables may become a trip hazard and DO NOT sit or stand on it.
- DO Not use in the rain, or other wet or damp conditions. DO NOT handle if your hands are wet.
CAUTION!
- Disconnect the coolbox from the power supply:
– before cleaning and maintenance
– after every use - Food may only be stored in its original packaging or in a suitable container.
NOTICE!
- Check that the voltage specification on the rating label corresponds to the power supply you intend to use.
- Only connect the coolbox as follows:
– Connect the DC cable to a 12/24V DC (negative earth) power supply in the vehicle.
– Or, connect the DC cable to an AC adaptor (12/24V DC output) and then connect the
– AC adaptor to an AC power supply. - NEVER pull the plug out of the socket by the cable.
- If the coolbox is connected to the DC outlet in the vehicle, disconnect it and other powered devices before connecting any battery charger to the vehicle.
- If the coolbox is connected to the DC outlet in the vehicle, disconnect it or switch it off when you turn off the engine. This will prevent the vehicle battery from becoming excessively discharged or flat.
- The coolbox is intended for use with food only. It is not recommended or intended for medicines or chemical storage. It is not suitable for transporting caustic materials or material containing solvents.
Operating the Coolbox Safely
CAUTION!
- Before connecting and switching on the coolbox, ensure that the power supply cable and the plug are dry.
NOTICE!
- Do not place the coolbox near naked flames or other heat sources (heaters, strong direct sunlight, gas ovens etc.)
- Danger of overheating!
- Ensure at all times that there is sufficient ventilation around the coolbox so that any heat generated during normal use can rise freely and does not build up during operation. Make sure the coolbox is sufficiently far away from walls and other objects so that the air can circulate.
- Ensure that the coolbox ventilation openings are not covered.
- Do not fill the inner container with ice or fluid.
- Do not immerse the coolbox in water.
- Protect the coolbox and the power supply cable against heat and moisture.
Coolbox Intended Use
The coolbox is designed to be operated from:
- a 12/24V DC on-board power supply from a vehicle, boat or caravan.
- a 12/24V DC auxiliary (leisure) battery.
- an AC power supply via an AC adaptor with a 12/24V DC output.
The coolbox is intended for temporary in-vehicle, camping, caravanning and leisure use. It is not designed for permanent installation and should not be used as such.
CAUTION! Possible health hazard! - Please check that the cooling/freezing capacity and performance of the device is suitable for storing the food you wish to cool/freeze.
Coolbox Features
The coolbox can refrigerate or freeze food products. A fast-acting and efficient compressor cooling system provides maintenance-free cooling performance with a control module. The coolbox is designed for mobile use.
Features include:
- A 3-level battery monitor for protecting the vehicle/supplementary leisure battery.
- LCD temperature display with automatic switch off when the coolbox detects vehicle low battery voltage.
- Temperature adjustment in increments of 1°C or 2°F.
Coolbox Operation and LCD Display
NOTICE!
- After buying your new coolbox, please lay it horizontally for at least 6 hours before switching on. Before using your new coolbox for the first time, you should clean it inside and outside with a damp cloth for hygiene reasons. Please also refer to section 7 “Cleaning and Maintenance”.
Display and Control Panel

Coolbox Switch ON/OFF
- To switch on: Press the “ON/OFF” button once lightly.
- To switch off: Press and hold the “ON/OFF” button for 5 seconds to turn it off.
Setting °C or °F and the Cooling Temperature Required
- Switch on the coolbox as above.
- Setting the temperature display unit (°C or °F): Press the “set” and “down” buttons together for about 10 seconds. A flashing “°C” or “°F” will appear on the display screen, then release both buttons. You can now press the “up” button or “down” button to select the temperature unit in Celsius or Fahrenheit. The selected temperature unit will appear and flash on the display screen for a few seconds, and then the display screen will display the current temperature automatically.
- Setting the cooling temperature required: Touch the “set” button once, then touch the “UP +” and “DOWN -” buttons to set the cooling temperature you want. The selected temperature number will flash on the display screen for a few seconds, and then the display screen will display the current temperature automatically.
Low Voltage Battery Protection Monitor Setting:
The coolbox is equipped with a 3-level battery monitor which protects the vehicle battery against excessive discharging when the device is connected to the vehicle DC supply.
If the coolbox is operated when the vehicle engine is not running and the ignition is switched off, the coolbox will switch off automatically as soon as the supply voltage falls below a set level. The coolbox will switch back on once the battery has been recharged to the restart voltage level.
NOTICE! Danger of damage!
When the coolbox is switched off by the inbuilt battery monitor, the vehicle battery will no longer be fully charged. Avoid starting the vehicle repeatedly or operating without first recharging the vehicle battery through driving (alternator charging) or connecting a battery charger.
At the “H3” level, the battery monitor responds faster than at the “H1” and “H2” levels.
| Monitor Level | H1 H2 H3 | |||
| 12V | Switch-off voltage | 10.3V | 10.8V | 11.3V |
| Restart voltage | 11.1V | 11.8V | 12.6V | |
| 24V | Switch-off voltage | 21.5V | 22.3V | 24.3V |
| Restart voltage | 22.7V | 23.7V | 25.7V | |
When the coolbox is supplied by the vehicle battery, select the battery monitor level “H3” for maximum protection. If the coolbox is connected to a supplementary leisure battery, the battery monitor level “H1” should suffice. The user should decide which level of protection they require.
- Switch on the coolbox.
- There are 3 levels of low voltage battery protection to choose from and set: H1, H2 and H3.
Touch the “UP “ and “DOWN” buttons at the same time for about five seconds. A flashing “H1” or “H2” or “H3” will appear on the display screen. Touch the “UP +” button or “DOWN -” button to select the battery monitor level “H1” or “H2” or “H3” that is required. The selected monitor level “H1” or “H2” or “H3” will flash on the display screen for a few seconds after setting, before the display returns to the current temperature.
4.5 Coolbox Working Mode Setting:
- Coolbox working mode selection:
There are two working modes:
HH working mode:
The coolbox will work normally in this mode.
The LED “on” light will be red in this working model.
ECO working mode:
the coolbox is in energy-saving mode.
The LED “on” light will be green in this working model.
Touch the “set” button twice. There will be a flashing “HH” or “ECO” display on the screen. Use the “UP +” and “DOWN -” buttons to select the mode you what. The working mode letter “HH” or “ECO” will flash on the screen for a few seconds, and then the display screen will return to display the current temperature.
Explanation of Error Codes Shown on the Display Screen:
| Error code | Possible reason | Suggested solution |
| E0 | The sensor circuit is broken or there is a short circuit. |
Connect or replace the sensor. |
| E1 | Input voltage is low. | Check the battery voltage or adjust the battery monitor level. |
| E2 | Ventilating fan problem. | Check if the ventilating fan is blocked or if there is a short circuit. |
| E3 | The compressor is self-protecting. | Disconnect the device from the power supply for 30 minutes and re-start the coolbox. |
| E4 | Compressor protecting itself against an unusual running speed. |
Change the working model using the coolbox control panel. |
| E5 | Coolbox is overheating. | Move the coolbox to a well-ventilated place. |
4.7 Energy Saving Tips:
- Choose a well-ventilated location which is protected against strong direct sunlight.
- Allow warm food to cool down first before placing it in the coolbox to keep cool.
- Do not open the coolbox more often than necessary.
- Do not leave the coolbox open for longer than necessary.
- Defrost the coolbox if a layer of ice forms.
- Avoid using at unnecessarily low temperatures.
Connecting the Coolbox
WARNING! DC power supply cable.
- The manufacturer does not recommend using any type of 12/24V DC extension cord.
- Under no circumstance should an extension to the power cable be attempted by splicing the cable wires?
- Do not use vehicle multi sockets or splitters with this product.
- Always unroll or uncoil the DC power supply cable fully to avoid heat build-up, retention, and possible melting.
When connecting to a battery (vehicle or boat), the coolbox can be operated with12V or 24V DC.
NOTICE! Danger of damage!
Disconnect the coolbox and other powered devices from the battery before you connect the battery to a battery charger.
Over-voltage can damage the electronics of the coolbox.
For safety reasons, the coolbox is equipped with an electronic system to prevent damage caused by reversed polarity connection. This protects the device against short-circuiting when connecting to a battery.
Using the Fused DC Plug for Coolbox Connection.
NOTICE! The danger of damage!
To protect the coolbox, the DC power supply cable supplied includes a fuse inside the plug. Do not remove the fuse from the DC plug. Only use the DC cable supplied with the coolbox.
- Plug the DC power supply cable into the coolbox DC power supply input.
- Connect the DC power supply cable to the DC output socket in the vehicle.
Connection to an AC Power Supply.
- Plug the DC power supply cable into the coolbox DC power supply input.
- Connect the DC power supply cable to the DC output socket of an AC adaptor.
- Connect the AC power supply cable of the AC adaptor to the AC power supply outlet.
NOTICE! The danger of damage!
- Only use an AC adaptor rated to the input of the coolbox.
- Never handle electrical plugs and switches with wet hands or if you are standing on a wet surface.
- When using an AC mains supply, it is advisable to use a residual current device (RCD) between the AC power supply and the coolbox. If in doubt, seek advice from a qualified electrician.
Using the Coolbox
Switch on the Coolbox
NOTICE! The danger of overheating!
Ensure at all times that there is sufficient ventilation around the coolbox so that heat generated under normal operation can dissipate. Ensure that the ventilation slots in the coolbox are not covered. Make sure that the coolbox is sufficiently far away from walls and other objects so that air can circulate.
- Ensure the coolbox is in a position in the vehicle where it cannot fall over easily. If using the coolbox outside of the vehicle, place it on a firm, flat surface in the desired location. Use the fold-out handle and wheels to pull along, manoeuvre and lift.
- Make sure that the ventilation slots are not covered and that heat can dissipate.
- Close the coolbox lid.
- Switch on the coolbox.
NOTICE! Danger from excessively low temperature!
Ensure only items placed in the coolbox are those intended to be cooled at the selected temperature.
NOTE!
The temperature displayed on the screen is that at the sensor point.
The temperature elsewhere in the coolbox can deviate from this temperature.
Switch off the Coolbox
- Empty the coolbox.
- Switch off the coolbox.
- Pull out the 12/24V DC power supply cable plug from the socket.
If you do not want to use the coolbox for a long period of time. - Leave the coolbox lid slightly open to help prevent odour build-up and mould growth.
Defrosting the Coolbox
Natural air humidity can result in ice or frost forming in the interior of the coolbox or on the vapouriser, this will reduce the cooling efficiency of the coolbox. Check regularly and defrost the coolbox when you notice this.
NOTICE! Danger of damage!
Never use hard or pointed tools to remove ice or to loosen objects which have frozen in the coolbox.
Follow the steps below to defrost the coolbox
- Remove the contents of the coolbox.
- If necessary, place them in another cooling device to keep them cool.
- Switch off the coolbox.
- Leave the lid open.
- Wipe away the defrosted ice.
Cleaning and Maintenance
Replacing the DC Plug Fuse
- Unscrew the screw out of the upper half of the housing.
- Carefully raise the upper half of the housing from the lower half.
- Remove the centre contact pin.
- Replace the defective fuse with a new fuse of the same type and rating
- Re-assemble the plugin in the reverse order.
Cleaning the Coolbox
- Occasionally clean the coolbox interior and exterior with a cloth dampened with mild
detergent solution. - Make sure that the air inlet and outlet vents in the device are free of any dust and dirt, so that
heat can dissipate freely to prevent damage.
WARNING!
Always disconnect the coolbox from the power supply before you clean it.
NOTICE! Risk of damage.
- Never clean the coolbox under running water or immerse in water.
- Do not use abrasive cleaning agents/materials or hard objects during cleaning as these can damage the coolbox.
Guarantee
This product is covered by our two-year Quality Guarantee. This means you have the confidence knowing that, if it fails within two years of purchase, we will replace it.
Subject to the Terms & Conditions below:
- That defects are attributable to flaws or defects in materials or workmanship. (Components that are subject to wear caused by normal use or other natural wear and rear, cuts or scratches, or impact or accidental damage, are not covered by the guarantee).
- Products have been used, installed, and maintained in accordance with the directions in these instructions.
- The product has been used for domestic, private use only (not used for rental or commercially in any way).
- That modifications or repairs have not been carried out or attempted by you or a third party.
- That original accessories have been used.
- That the product has not been exposed to misuses such as knocks or bumps, neglect, accident, improper storage, installation or handling.
- That a copy of the receipt is available and the claim is made within the guarantee period.
- The guarantee period will not be extended if we replace the product and will continue to run from the original date of purchase.
- If we replace a product, we will replace it with the same product, or one of equivalent specification or its selling price value. (We will always do our best to match what you had previously).
- Halfords is not liable for any loss as a result of using this product.
- This Quality Guarantee does not affect your statutory rights.
Troubleshooting
- If the unit does not appear to function correctly, unplug the unit and check:
| Fault | Possible cause | Suggested remedy |
| The coolbox does not switch on, LED light does not illuminate. | No voltage detected by the coolbox from the DC power supply cable | The vehicle ignition might need to be switched on |
| The coolbox DC plug fuse
is defective. |
Replace the coolbox plug fuse
with a new one. See section 7.1. |
|
| The coolbox does
not cool (plug is inserted, “ON” LED is illuminated). |
Defective compressor | This can only be repaired by a
qualified electrician. |
| The device does not cool (plug is inserted, display screen shows Error Code “E1”). See section 4.6. | Low voltage battery protection monitor is set too high. See section 4.4. | Select a lower level for battery monitor. |
| Battery voltage is too low | Test the battery and charge it if necessary. | |
| When operating the coolbox from a
12/24V DC outlet (with the vehicle ignition switched on, but the coolbox is not working and the LED light is not illuminated either). |
The DC outlet is dirty, resulting in a poor electric contact. | If the plug of your device becomes very hot in the DC socket outlet, either the DC outlet must be cleaned, or the plug has not been assembled correctly. |
| The fuse of the DC plug
has blown. |
Replace the coolbox plug fuse
with a new one. See section 7.1. |
|
| The vehicle fuse has blown | Replace the vehicle’s DC outlet fuse, please refer to your vehicle owner’s manual. | |
| The display screen shows an Error Code and the coolbox does not cool. See section 4.6. | See section 4.6. | This should only be repaired by a qualified electrician. |
Technical Data
NOTE.
The coolant circuit contains R600a refrigerant gas.
Contains fluorinated greenhouse gases.
Hermetically sealed equipment.
| Gross Volume (Ltrs)
Supply Voltage (V) Dimensions (mm) Temp. Range Cooling system Refrigerant Net weight Battery protection Cable length |
30L
12 Vdc / 24 V dc Height: 578cm Width: 350cm Length: 420cm +20°C to -22°C Compressor R600a 42g Temperature displayed and set on control panel 12.5Kg CFC-Free Polyurethane 46Watt approx. 3.8A @ 12Vdc approx.. 1.9A@ 24Vdc 3 Stage low voltage protection approx. 3.5m |
Disposal.
This unit is only suitable for vehicle and leisure use and should not be used in industrial conditions where dirt may be drawn into the unit. It must not be used in damp or wet conditions and under no circumstances must it be exposed to rain. The cool box can only be repaired by a qualified electrician.
Information on Waste Disposal for Consumers of Electrical & Electronic Equipment
 This mark on a product and/or accompanying documents indicates that when it is to be disposed of, it must be treated as Waste Electrical & Electronic Equipment (WEEE).
Any WEEE marked waste products must not be mixed with general household waste, but kept separate for the treatment, recovery, and recycling of the materials used. For proper treatment, recovery and recycling; please take all WEEE marked waste to your Local Authority Civic waste site, where it will be accepted free of charge. If all consumers dispose of Waste Electrical & Electronic Equipment correctly, will be helping to save valuable resources and prevent any potential negative effects upon human health and the environment from any hazardous materials that the waste may contain.
Please keep these instructions for future reference.
- Suitable for 12V in-car and 24V in-truck
- Choose refrigeration or freezing down to -22C
- Useful when transporting chilled and frozen foods
- Holds 44 standard 330ml cans, or 12 x 0.5L bottles, or 6 x 1.5L bottles
- Complete with two removable divider grids
- Hygienic wipe-clean sealed interior
OUR QUALITY GUARANTEE
This item is covered by our two-year Quality Guarantee. In the unlikely event that it develops a fault within this period, we will replace it. For more details and full conditions,
see halfords.com/guarantees or ask in-store.
All dimensions and capacities are approximate
CONTACT US
Halfords Ltd, B98 0DE.
Produced for Halfords.
www.halfords.com
Item Code: 414734

ROI: Halfords c/o DWF, Dublin 1
HAL4345_80142_414734 – Halfords 30L Compressor Coolbox – Manual.indd 16