
hamiltonbeach.com
hamiltonbeach.ca
hamiltonbeach.com.mx
IMPORTANT SAFEGUARDS
When using electrical appliances, basic safety precautions should always be followed to reduce the risk of fire, electric shock, and/or injury to persons, including the following:
- Read all instructions.
- This appliance is not intended for use by persons (including children) with reduced physical, sensory, or mental capabilities, or lack of experience and knowledge, unless they are closely supervised and instructed concerning use of the appliance by a person responsible for their safety.
- Close supervision is necessary when any appliance is used by or near children. Cleaning and user maintenance shall not be made by children without supervision. Children should be supervised to ensure that they do not play with the appliance.
- Do not touch hot surfaces. Use handles or knobs. Care must be taken, as burns can occur from touching hot parts or from spilled, hot liquid.
- To protect against electric shock, do not place cord, plug, or coffee maker in water or other liquid.
- Unplug from outlet when the coffee maker is not in use and before cleaning. Allow to cool before putting on or taking off parts and before cleaning the appliance.
- Coffee maker must be operated on a flat surface away from the edge of counter to prevent accidental tipping.
- Do not operate any appliance with a damaged supply cord or plug, or after the appliance malfunctions or has been dropped or damaged in any manner. Supply cord replacement and repairs must be conducted by the manufacturer, its service agent, or similarly qualified persons in order to avoid a hazard. Contact Customer Service for information on examination, repair, or adjustment as set forth in the Limited Warranty.
- The use of accessory attachments not recommended by the appliance manufacturer may cause injuries.
- Do not use outdoors.
- Do not let cord hang over edge of table or counter or touch hot surfaces, including stove.
- Do not place coffee maker on or near a hot gas or electric burner or in a heated oven.
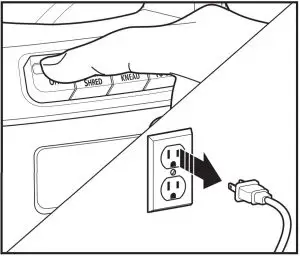
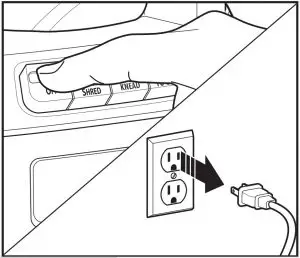
- To disconnect coffee maker, turn controls to off and then remove plug from wall outlet. To unplug, grasp the plug and pull from the outlet. Never pull from the power cord.
- WARNING! To reduce the risk of fire or electric shock, do not remove the bottom cover. No user-serviceable parts are inside. Repair should be done by authorized service personnel only.
- Do not use appliance for other than intended use.
- Do not place coffee maker in a cabinet when in use.
- CAUTION! Cut Hazard: Removable single-serve pack holder contains a sharp needle. Use caution when handling.
- CAUTION! Cut Hazard: Piercing needle is sharp. Use caution when cleaning.
- WARNING! To avoid hot water spraying from the piercing needle, do not lift the lid during the brew process.
SAVE THESE INSTRUCTIONS
This appliance is intended for household use only.
![]() WARNING Electrical Shock Hazard: This appliance is provided with a polarized plug (one wide blade) to reduce the risk of electric shock. The plug fits only one way into a polarized outlet. Do not defeat the safety purpose of the plug by modifying the plug in any way or by using an adapter. If the plug does not fit fully into the outlet, reverse the plug. If it still does not fit, have an electrician replace the outlet.
WARNING Electrical Shock Hazard: This appliance is provided with a polarized plug (one wide blade) to reduce the risk of electric shock. The plug fits only one way into a polarized outlet. Do not defeat the safety purpose of the plug by modifying the plug in any way or by using an adapter. If the plug does not fit fully into the outlet, reverse the plug. If it still does not fit, have an electrician replace the outlet.
The length of the cord used on this appliance was selected to reduce the hazards of becoming tangled in or tripping over a longer cord. If a longer cord is necessary, an approved extension cord may be used. The electrical rating of the extension cord must be equal to or greater than the rating of the appliance. Care must be taken to arrange the extension cord so that it will not drape over the countertop or table top where it can be pulled on by children or accidentally tripped over.
To avoid an electrical circuit overload, do not use another high-wattage appliance on the same circuit with this appliance.
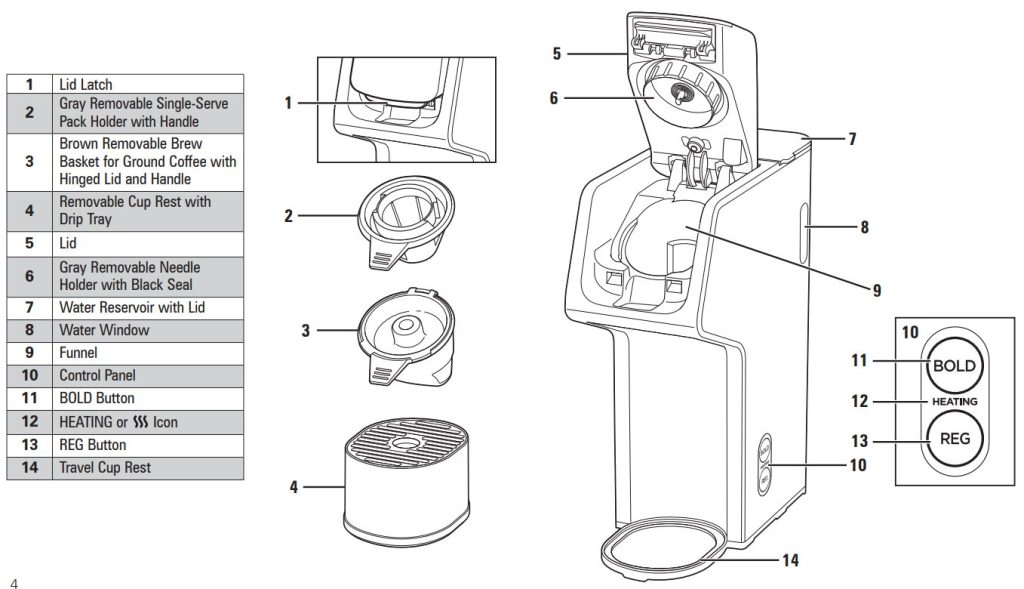
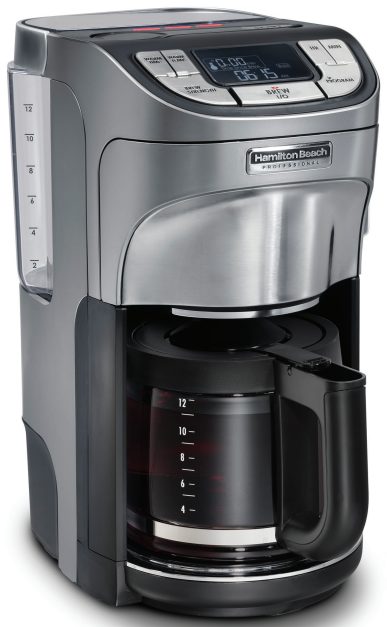
Parts and Features
To order parts, visit: hamiltonbeach.com/parts
How to Brew a Single-Serve Pack
![]() WARNING Burn Hazard.
WARNING Burn Hazard.
If overflow occurs, unplug and allow coffee maker to cool. To avoid hot coffee overflowing:
- Fill reservoir with cup or travel mug of water into which the coffee will be brewed.
- Fully insert cup or travel mug on cup rest.
- Do not lift lid during the brewing process.
- If brew process is stopped early, the water must be drained from the unit. Place a large mug on cup rest. Press BOLD or REG button. Failure to drain the unit can cause the next cup brewed to overflow.
![]() CAUTION Cut Hazard.
CAUTION Cut Hazard.
Removable single-serve pack holder has a sharp needle. Piercing needle on underside of lid also is sharp. Use caution when handling.
NOTES:
- Use only cold water in Reservoir. Do not use hot water.
- Do not reheat coffee in machine.
- Do not use creamer or non-dairy creamer in Reservoir.
- After brewing hot cocoa single-serve packs, brew a water-only cycle without a single-serve pack to avoid possibility of clogging piercing needle.
- Coffee Maker brews all water in Water Reservoir while brewing.
- Press BOLD or REG Button again to STOP brewing midcycle. Remaining water must be removed. See warning statement above.
- If BOLD or REG Button flashes three times, Lid is not closed. Lower Lid until it clicks into place. Press BOLD or REG Button.
- Do not brew coffee without Removable Needle Holder locked into place.
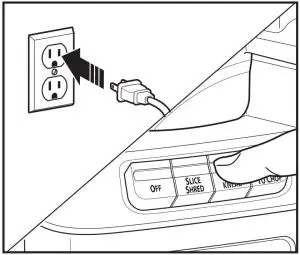
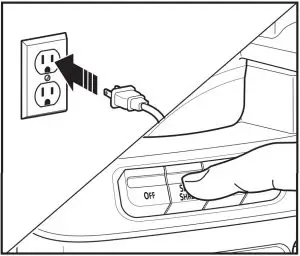
- Plug into outlet.
- Lift Lid Latch until Lid clicks into place.
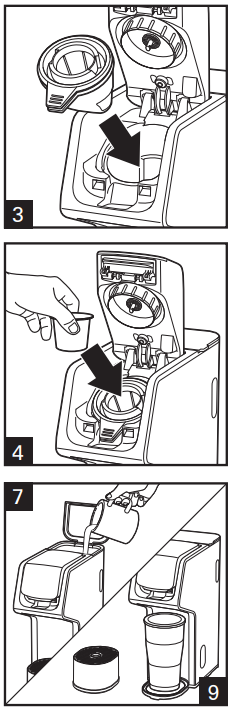
- Place Gray Removable Single-Serve Pack Holder with Handle into Funnel.
- Place a pack into Single-Serve Pack Holder. Do not remove foil.
- Close Lid and snap in place to pierce single-serve pack.
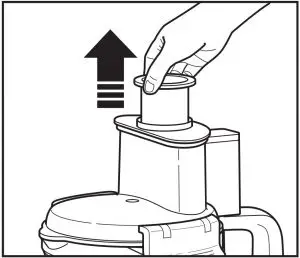
- Lift Water Reservoir Lid.
- Fill cup or travel mug into which coffee will be brewed and add water to Water Reservoir. 10 oz. (296 mL) of water is maximum recommended amount for best flavour with single-serve pack.
- Close Lid.
- Use Cup Rest for a cup or mug, and remove Cup Rest for a travel mug.
- Press BOLD or REG Button to start brewing. HEATING or icon will light up to show that Coffee Maker is heating water. Coffee Maker will shut off automatically when brewing is complete.
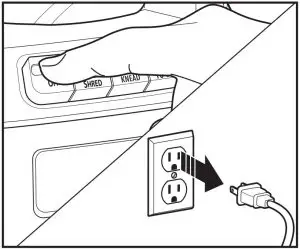
- Unplug.
- Single-Serve Pack Holder should be rinsed after every use.
How to Brew Single-Serve Ground Coffee
![]() WARNING Burn Hazard.
WARNING Burn Hazard.
If overflow occurs, unplug and allow coffee maker to cool. To avoid hot coffee overflowing:
- Fill reservoir with cup or travel mug of water into which coffee will be brewed.
- Fully insert cup or travel mug on cup rest.
- Remove single-serve pack holder before adding coffee grounds to brew basket.
- To avoid overflow, keep ground coffee below MAX fill line.
- Do not lift lid during the brewing process.
- If brew process is stopped early, the water must be drained from unit.
Place a large mug on cup rest. Press BOLD or REG button. Failure to drain unit can cause the next cup brewed to overflow.
![]() CAUTION Cut Hazard.
CAUTION Cut Hazard.
Piercing needle on underside of lid is sharp. Use caution when handling.
NOTES:
- Use only cold water in Reservoir. Do not use hot water.
- Do not reheat coffee in machine.
- Do not use creamer or non-dairy creamer in Reservoir.
- Do not use hot cocoa powder or mix in Brew Basket.
- Coffee Maker brews all water in Water Reservoir while brewing.
- If finer ground coffee is used, coffee will continue to drip after light has gone off.
- Press BOLD or REG Button again to STOP brewing midcycle. Remaining water must be removed. See note above.
- If BOLD or REG Button flashes three times, Lid is not closed. Lower Lid until it clicks into place. Press BOLD or REG Button.
- Do not brew coffee without Removable Brew Basket with Lid closed in place.
- If you have sediment from coffee, add a #1 paper cone coffee filter to Brown Removable Brew Basket.
- Do not brew coffee without Removable Needle Holder locked into place.
- Plug into outlet.
- Lift Lid Latch until Lid clicks into place.
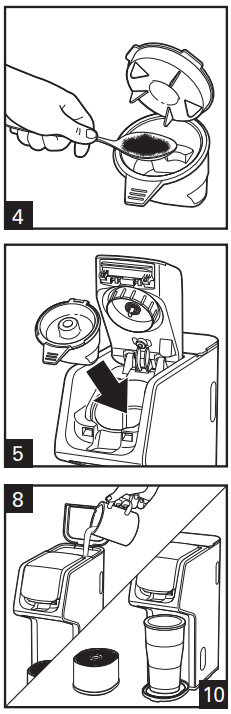
- Open Brew Basket Lid; then place Brown Removable Brew Basket on counter top.
- Add ground coffee to Brown Removable Brew Basket (3 tablespoons [15 g]) maximum.
- Close Brew Basket Lid. Place Brew Basket in Funnel.
- Close Lid and snap in place to latch Lid closed.
- Lift Water Reservoir Lid.
- Fill cup or travel mug into which coffee will be brewed and add water to Water Reservoir. 14 oz. (414 mL) of water is maximum amount for ground coffee.
- Close Water Reservoir Lid.
- Use Cup Rest for a cup/mug, or remove Cup Rest for a travel mug.
- Press BOLD or REG button to start brewing. HEATING or icon will light up to show that Coffee Maker is heating water. Coffee Maker will shut off automatically when brewing is complete.
- Unplug.
- Brew Basket should be rinsed after every use.
Care and Cleaning
![]() WARNING Shock Hazard.
WARNING Shock Hazard.
Do not immerse cord, plug, or coffee maker in any liquid.
![]() CAUTION Cut Hazard.
CAUTION Cut Hazard.
Removable single-serve pack holder has a sharp needle. Piercing needle on underside of lid also is sharp. Use caution when handling.
General Cleaning
- Unplug and allow to cool.
- Hand wash all removable parts in hot, soapy water. Rinse and dry or wash in TOP RACK only of dishwasher. DO NOT use “SANI” setting when washing in dishwasher. “SANI” cycle temperatures could damage your product.
- Wipe outside of Coffee Maker with a soft damp cloth.
Routine Cleaning
All coffee makers should be cleaned at least once a month (once a week for areas with hard water).
- Plug into outlet.
- Pour 3/4 cup (177 mL) of plain white vinegar and 3/4 cup (177 mL) of cold water into Reservoir.
- Place a 14-oz. (414-mL) or larger cup or travel mug underneath to catch water/vinegar solution. Press BOLD or REG Button once. After 30 seconds, press BOLD or REG Button again to stop brewing and allow vinegar to clean. After 30 minutes, press BOLD or REG Button and allow it to finish brew cycle. When brew cycle is finished, empty cup and rinse. Run 2 to 3 cycles of cold tap water. Coffee Maker is cleaned and ready to brew coffee.
- Unplug.
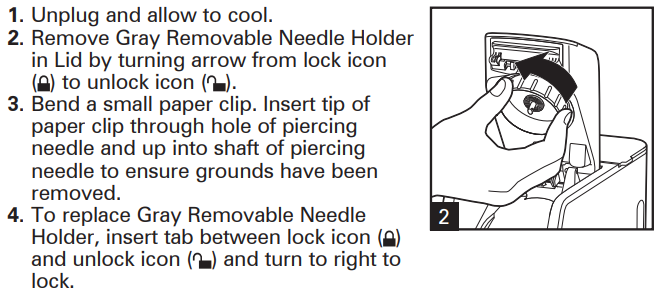
Clogged Needle
Troubleshooting
Coffee Maker will not brew/coffee not dispensing.
- Piercing needle may be clogged. Remove Gray Removable Needle Holder. Clean piercing needle in Lid of Coffee Maker as shown on page 7.
- Mineral deposits have formed. Clean Coffee Maker following directions in Care and Cleaning section.
- Too little water. Need 6 oz. (177 mL) or more.
Coffee tastes bad.
- Too much water was added or too much or too little ground coffee was added. Change amount of water to coffee grounds or use less water with coffee packs.
- Poor coffee quality and freshness.
- Soft water causes poor coffee extraction, leading to poor tasting coffee. Use filtered, spring, or bottled water if your water is soft.
Coffee sediment in cup.
- Try a more coarsely ground coffee or add a #1 paper cone coffee filter to Brew Basket. Make sure Hinged Lid is closed on Removable Brew Basket.
Coffee overflows from Brew Basket.
- Use Removable Brew Basket with Lid for ground coffee.
- Use a lesser amount of ground coffee. 3 tablespoons (15 g) is maximum amount of grounds to brew. Do not fill grounds above MAX fill line.
- When using whole bean coffee, a standard automatic drip coffee grind will yield best results. Be careful not to overgrind, since very finely ground coffee can cause overflow.
- Black seal around needle in Removable Needle Holder is missing. Carefully place seal around needle and push until in place.
- Do not use soft water. Use filtered, spring, or bottled water.
Water on counter under unit.
- Overfilled Water Reservoir. Do not add more than 14 oz. (414 mL) of water. Some mugs/cups do not pour cleanly and can dribble water down side of cup and onto counter.
Coffee overflows from mug or travel mug.
- To prevent coffee overflowing from a mug/travel mug, use same mug/travel mug to brew into that was used to fill Water Reservoir. Do not add more than 14 oz. (414 mL) of water. There may also be additional water in system that is causing overflow. Remove Brew Basket or Single-Serve Pack Holder. Press and hold BOLD or REG Button to remove any remaining water.
Water remaining in Reservoir.
- Added too much or too little water. Place cup or travel mug on Cup Rest. Remove single-serve pack and replace Brew Basket. Repeat brewing cycle. Press and hold BOLD or REG Button to remove any remaining water.
Coffee single-serve pack bursts.
- There is variability in single-serve pack manufacturing process which causes some types of single-serve packs to be weaker at seams so foil seal fails. Try a different brand.
- If you are using softened water or live in an area where your tap water is naturally soft, this can cause single-serve pack issues and filter basket overflows. Use filtered, spring, or bottled water.
BOLD or REG Button flashes:
- 2 times: Coffee Maker needs to be cleaned. See page 7.
- 3 times: Coffee Maker Lid is not closed properly. Push Lid down to lock into place.
- 7 times: Coffee Maker needs to be cleaned. See page 7.
- 8 times: Needle is clogged. Remove Gray Removable Needle Holder and follow “Clogged Needle” instructions on page 7.
- 9 times: Not enough water. Add water to Water Reservoir.
Limited Warranty
This warranty applies to products purchased and used in the U.S. and Canada. This is the only express warranty for this product and is in lieu of any other warranty or condition. This product is warranted to be free from defects in material and workmanship for a period of five (5) years from the date of original purchase in Canada and one (1) year from the date of original purchase in the U.S. During this period, your exclusive remedy is replacement of this product or any component found to be defective, at our option; however, you are responsible for all costs associated with our returning a product or component under this warranty to you. If the product or component is unavailable, we will replace with a similar one of equal or greater value. This warranty does not cover glass, filters, wear from normal use, use not in conformity with the printed directions, or damage to the product resulting from accident, alteration, abuse, or misuse. This warranty extends only to the original consumer purchaser or gift recipient. Keep the original sales receipt, as proof of purchase is required to make a warranty claim. This warranty is void if the product is used for other than single-family household use or subjected to any voltage and waveform other than as specified on the rating label (e.g., 120 V ~ 60 Hz).
We exclude all claims for special, incidental, and consequential damages caused by breach of express or implied warranty. All liability is limited to the amount of the purchase price. Every implied warranty, including any statutory warranty or condition of merchantability or fitness for a particular purpose, is disclaimed except to the extent prohibited by law, in which case such warranty or condition is limited to the duration of this written warranty.
This warranty gives you specific legal rights. You may have other legal rights that vary depending on where you live. Some states or provinces do not allow limitations on implied warranties or special, incidental, or consequential damages, so the foregoing limitations may not apply to you. To make warranty claim, do not return this appliance to the store. Please write Hamilton Beach Brands, Inc., Customer Service Department, 4421 Waterfront Dr., Glen Allen, VA 23060, or visit hamiltonbeach.com/customer-service in the U.S. or hamiltonbeach.ca/customer-service in Canada. For faster service, locate the model, type, and series numbers on your appliance.
![]()
Grupo HB PS, S.A. de C.V. Monte Elbruz No. 124 – 401 Col. Polanco V Sección Miguel Hidalgo Ciudad de México, C.P. 11560
GERENCIA INTERNACIONAL DE SERVICIO 800 71 16 100
Email:
CENTROS DE SERVICIO AUTORIZADOS
Ciudad de México ELECTRODOMÉSTICOS Av. Plutarco Elias Calles, No. 1499 Zacahuitzco, Benito Juárez, Cuidad de México, C.P. 09490 Tel: 55 5235 2323
CASA GARCÍA Av. Patriotismo No. 875-B Mixcoac, Benito Juárez, Cuidad de México, C.P. 03910 Tel: 55 5563 8723
Nuevo León
FERNANDO SEPÚLVEDA REFACCIONES Ruperto Martínez No. 238 Ote. Col. Centro Monterrey, N.L., C.P. 64000 Tel: 81 8343 6700
Jalisco
SERVICIOS DE MANTENIMIENTO CASTILLO Garibaldi No. 1450 Ladrón de Guevara Guadalajara, Jalisco, C.P. 44660 Tel: 33 3825 3480
READ BEFORE USE LIRE AVANT UTILISATION LEA ANTES DE USAR hamiltonbeach.com
For recipes, tips and product information.
ENTER TO WIN $100 TO SPEND ON WEBSITE
Scan code or visit

register.hamiltonbeach.com
Open to US customers only
IMPORTANT SAFEGUARDS
When using electrical appliances, basic safety precautions should always be followed to reduce the risk of fire, electric shock, and/or injury to persons, including the following:
- Read all instructions.
- This appliance is not intended for use by persons (including children) with reduced physical, sensory, or mental capabilities, or lack of experience and knowledge, unless they are closely supervised and instructed concerning use of the appliance by a person responsible for their safety.
- Close supervision is necessary when any appliance is used by or near children. Cleaning and user maintenance shall not be made by children without supervision. Children should be supervised to ensure that they do not play with the appliance.
- Do not touch hot surfaces. Use handles or buttons. Care must be taken, as burns can occur from touching hot parts or from spilled, hot liquid.
- To protect against electric shock, do not place cord, plug, or coffee maker in water or other liquid.
- Unplug from outlet when either the coffee maker or clock is not in use and before cleaning. Allow to cool before putting on or taking off parts and before cleaning the appliance.
- Coffee maker must be operated on a flat surface away from the edge of counter to prevent accidental tipping.
- Do not operate any appliance with a damaged supply cord or plug, or after the appliance malfunctions or has been dropped or damaged in any manner. Supply cord replacement and repairs must be conducted by the manufacturer, its service agent, or similarly qualified persons in order to avoid a hazard. Contact Customer Service for information on examination, repair, or adjustment as set forth in the Limited Warranty.
- The use of accessory attachments not recommended by the appliance manufacturer may cause injuries.
- Use only the carafe provided with the appliance.
- Do not use outdoors.
- Do not let cord hang over edge of table or counter or touch hot surfaces, including stove.
- Do not place coffee maker on or near a hot gas or electric burner or in a heated oven.
- The carafe is designed for use with this coffee maker. It must never be used on a range top or in a microwave oven.
- Do not set a hot carafe on a wet or cold surface.
- Do not use a cracked carafe or one with loose or weakened handle.
- Do not clean carafe with cleansers, steel wool pads, or other abrasive materials.
- Be certain carafe lid is securely in place during brew cycle and when pouring coffee. Do not use force when placing lid on carafe.
- To disconnect coffee maker, turn controls to OFF ( ) and then remove plug from wall outlet. To unplug, grasp the plug and pull from the outlet. Never pull from the power cord.
- Warming plate may remain hot after the coffee maker is turned off.
- Do not use appliance for other than intended use.
- WARNING! To reduce the risk of fire or electric shock, do not remove the bottom cover. No user-serviceable parts are inside. Repair should be done by authorized service personnel only.
- Do not place coffee maker in a cabinet when in use, or when coffee maker is still hot.
SAVE THESE INSTRUCTIONS
Other Consumer Safety Information
This appliance is intended for household use only.
 WARNING Electrical Shock Hazard: This appliance is provided with a polarized plug (one wide blade) to reduce the risk of electric shock. The plug fits only one way into a polarized outlet. Do not defeat the safety purpose of the plug by modifying the plug in any way or by using an adapter. If the plug does not fit fully into the outlet, reverse the plug. If it still does not fit, have an electrician replace the outlet.
The length of the cord used on this appliance was selected to reduce the hazards of becoming tangled in or tripping over a longer cord. If a longer cord is necessary, an approved extension cord may be used. The electrical rating of the extension cord must be equal to or greater than the rating of the appliance. Care must be taken to arrange the extension cord so that it will not drape over the countertop or tabletop where it can be pulled on by children or accidentally tripped over.
To avoid an electrical circuit overload, do not use another high-wattage appliance on the same circuit with this appliance.
Parts and Features
To order parts, visit: hamiltonbeach.com/parts
| 1 | Filter Basket with Handle |
| 2 | Swing-Out Filter Basket Holder |
| 3 | Basket Holder Release Button |
| 4 | 12 cup Glass Carafe with Lid |
| 5 | Warming Plate |
| 6 | Base |
| 7 | Water Filter with Pod |
| 8 | Control Panel |
| 9 | Removable Water Reservoir with Handle |
| 10 | Removable Water Reservoir Lid |
| 11 | Shower Head |
| 12 |
|
| 13 | Measuring Scoop Holder |
| 14 | Cord Storage (back of Coffee Maker) |
Before first use: Wash Carafe with Lid, Removable Water Reservoir with Handle, Removable Water Reservoir Lid, Filter Basket with Handle, and Measuring Scoop in hot, soapy water. Rinse and dry

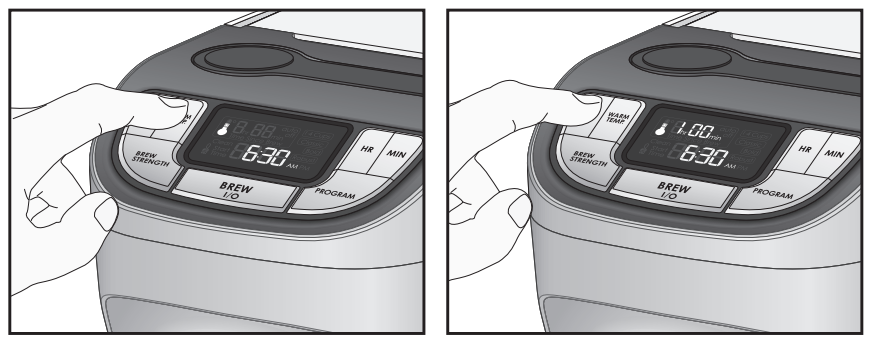
Control Panel
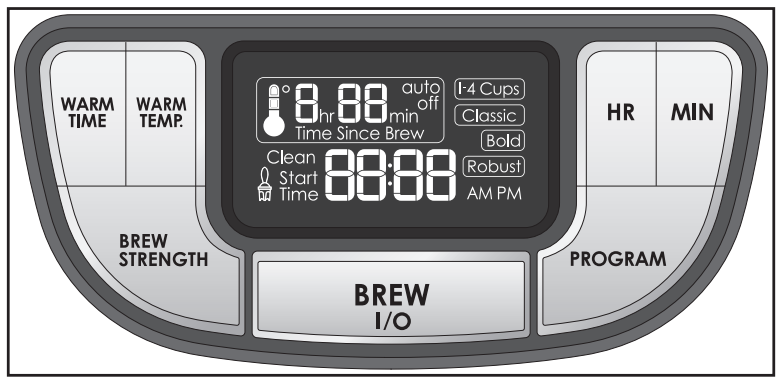
HR/MIN Buttons: Use to adjust time of day or to set a programmed brew time.
Keep Warm Adjustment: Select from 10 minutes to 4 hours to keep coffee warm. The function of Keep Warm Adjustment includes adjusting the WARM TIME and the WARM TEMP.
WARM TIME Button: Use to select between 10 minutes to 4 hours (10 minute increments), the default time is 2 hours.
WARM TEMP Button: High, Medium and Low settings.
BREW STRENGTH: Select “1–4 Cups,” “Classic,” “Bold” and “Robust.”
PROGRAM Button: Use to select a start time for your brew.
Clean Notification: “Clean” will be on display. Follow directions in Care and Cleaning section.
BREW l/ (ON/OFF) Button: Use to start your brew cycle or turn the Coffee Maker on or off.
Feature
Pause and Serve: Allows to serve coffee during brewing cycle; remove Carafe and pour a cup. By removing Carafe, flow of coffee from bottom of Filter Basket will stop momentarily
Coffee Measurement Chart
NOTE: 1 Measuring Scoop of coffee grounds = 2 tablespoons (10 g)
| Brewed Coffee Desired | Measuring Scoops of Ground Coffee |
| 4 cups (591 ml) | 2 |
| 6 cups (887 ml) | 3 |
| 8 cups (1.18 L) | 4 |
| 10 cups (1.48 L) | 5 |
| 12 cups (1.77 L) | 6 |
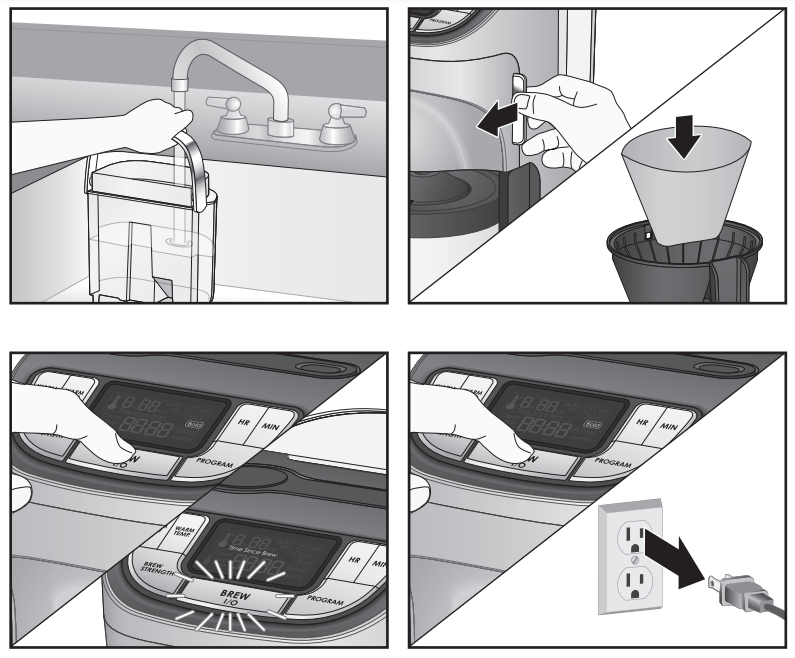
How to Make Coffee
- Plug into outlet.
- Press HR button to set current hour with AM or PM. Press MIN button to set current minutes.
- To Fill Water Reservoir: Remove Water Reservoir Lid and hold Water Reservoir Handle to lift from Base. Fill Reservoir with desired amount of water.
- Press Basket Holder Release Button to open Swing-Out Filter Basket Holder. Place a #4 cone filter in Filter Basket. Push on end of Measuring Scoop to remove to measure ground coffee. One tablespoon (5 g) ground coffee is recommended for each cup of coffee. Add grounds to Filter Basket.
TIP: Included Measuring Scoop equals 2 tablespoons (10 g) of ground coffee. - Close Swing-Out Filter Basket Holder before brewing, and do not open until brewing cycle is complete and unit is cool.
- Select your brew option and Keep Warm settings (see “How to Use BREW STRENGTH and WARM TIME/WARM TEMP Features”).
- Press BREW l/ button once to turn on Coffee Maker and button will light up. “Time Since Brew” freshness timer will come on once brew cycle begins. Coffee Maker will beep when brewing is complete and will continue to count up after brewing is complete and keep your coffee warm until auto shutoff.
- When all coffee has been served, press BREW l/ button once to turn off Coffee Maker and unplug.
NOTE: If Coffee Maker is not turned off manually, it will shut off automatically after 2 hours.
PAUSE AND SERVE: To serve coffee during brewing cycle, remove carafe and pour a cup. By removing Carafe, flow of coffee from bottom of Filter Basket will momentarily stop.
WARNING Burn Hazard. The carafe must be replaced within 20 seconds of being removed to prevent overflow.
WARNING Burn Hazard.
To avoid hot coffee overflowing from the filter basket:
- When using decaffeinated coffee, do not exceed coffee manufacturer’s recommended serving amount.
- If filter basket overflow occurs, unplug coffee maker and allow coffee in filter basket to cool before removing filter basket.
Programming
NOTE: “Time Since Brew” time starts from beginning of brewing at “0 hr 00 min”.
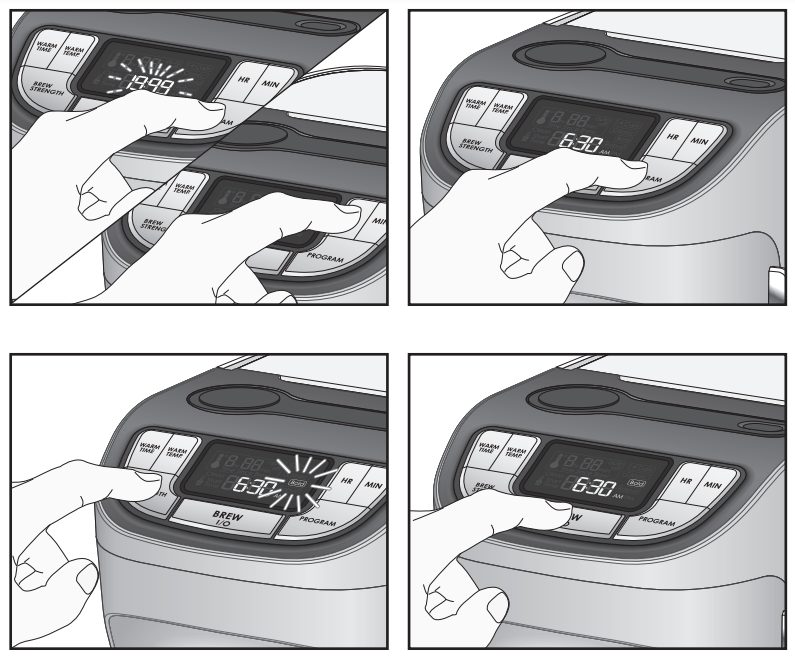
How to Program to Brew Automatically
- Press PROGRAM button until “19:99” flashes. Press HR and MIN buttons until desired brewing time is reached.
- Press and release PROGRAM button again to activate automatic brew; green LED illuminates and current time is displayed.
NOTE: Green LED light will illuminate to indicate PROGRAM is activated and “Start Time” is displayed. Green LED will go off when Coffee Maker begins to brew at preprogrammed time.
How to Use BREW STRENGTH and WARM TIME/WARM TEMP Features
Brew Options
Your Coffee Maker will default to “Classic” strength coffee setting when brewing.
NOTE: Choosing stronger Brew Strength settings will increase brewing times
- For stronger coffee, press BREW STRENGTH button until “Bold” or “Robust” illuminates; then release.
- For small amounts, use “1–4 Cups” setting by pressing BREW STRENGTH button until “1–4 Cups” illuminates; then release.
- Press BREW l/ button or PROGRAM button to set automatic brew to start Coffee Maker after your brew option has been selected
WARNING Burn Hazard.
To avoid hot coffee overflowing from the filter basket:
- When using decaffeinated coffee, do not exceed coffee manufacturer’s recommended serving amount.
- If filter basket overflow occurs, unplug coffee maker and allow coffee in filter basket to cool before removing filter basket.
Keep Warm
This unit is equipped with an adjustable keep warm temperature and adjustable auto-off feature. It defaults to highest (warmest) temperature setting and 2-hour auto shutoff.
- Adjust keep warm temperature by pressing WARM TEMP or until your desired temperature setting is displayed; then release.
- Adjust keep warm shutoff time by pressing WARM TIME until desired time is displayed. Shutoff time can be set in 10-minute intervals up to 4 hours.
NOTES:
- To see “auto off” time, press WARM TIME. Display will go back to clock time within 5 seconds.
- “Auto off” time can be checked whenever Coffee Maker is plugged in. This includes any time during programmed brew, brewing, keep warm, and standby mode.
Care and Cleaning
WARNING
Electrical Shock Hazard.
Do not immerse cord, plug, or coffee maker in any liquid.
To remove mineral deposits and buildup: All coffee makers should be cleaned at least once a month; once a week for areas with hard water.
- Unplug. This resets Coffee Maker for cleaning or water filter notification.
- Wipe Coffee Maker with a damp cloth or sponge. Dry.
- Remove Water Filter and Pod, see “How to Replace Water Filter.”
- Pour a minimum of 1 pint (2 cups [473 mL]) white vinegar into Water Reservoir.
- Plug in. Press BREW STRENGTH button repeatedly and select “Clean”. “Clean” will flash in the display. Press BREW l/ button once to start. When clean cycle is finished, wait for unit to cool. Clean cycle takes about 35 minutes to complete.
- Empty Carafe and rinse. Press BREW STRENGTH and select “Classic”. Run 2–3 more brew cycles with clean water only. Allow to cool between cycles.
- Carafe with Lid, Filter Basket with Handle, and Measuring Scoop are dishwasher-safe. DO NOT use “SANI” setting on dishwasher. “SANI” cycle temperatures could damage your product. Do not clean removable water reservoir, removable water reservoir lid in the dishwasher.
NOTES:
- Clean Notification: If unit is always plugged in, after 30 cycles, “Clean” will illuminate in display. Follow directions in “Care and Cleaning” above.
- Performing cleaning procedure will clear display. Display will clear automatically after two brews.
- Brew cycle counter resets every time Coffee Maker is unplugged or when power is lost.
Tips for Best-Tasting Coffee
- All coffees are made from either Arabica beans or Robusta beans, or some combination of both. Arabica beans are slightly more expensive, but tend to produce better-tasting coffee.
- Ground coffee will become stale much faster than whole beans. If buying reground coffee, choose a package with the latest expiration date, or buy a smaller quantity.
- If grinding whole beans, set your coffee grinder on a medium grind. This will yield best-tasting grounds. Try to use freshly ground coffee within about a week of grinding.
- Using a water filter, filtered water, or bottled water will yield better-tasting coffee than tap water.
- Use approximately 1 tablespoon (5 g) of grounds for each cup of coffee being made. To avoid overflow, use slightly less grounds (3/4 tablespoon [4 g]) when brewing decaf or flavored coffees. Also, be aware that using coffee that is ground too finely may also cause Filter Basket to overflow.
- Make sure your Coffee Maker is clean. See “Care and Cleaning” section.
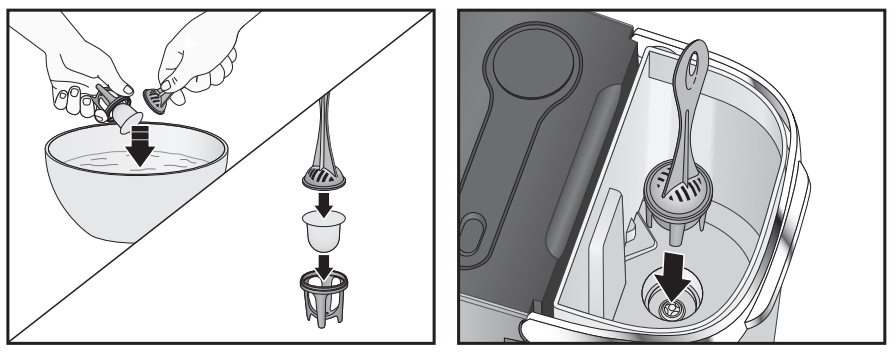
Water Filter Notification
If Coffee Maker is left plugged in, ( ) will show in the display after 60 cycles. This symbol means that Water Filter should be replaced. How to Replace Water Filter (optional)
NOTE: For better-tasting coffee, use a water filter.
- Soak Water Filter with Pod for 15 minutes in water.
- Add filter pod to bottom of Water Filter and snap on filter handle.
- Place assembly into opening on bottom of Water Reservoir.
NOTE: The brew cycle counter resets every time Coffee Maker is unplugged or when power is lost.
Troubleshooting
Filter Basket overflows or coffee brews slowly.
- The “Bold” or “1–4 Cups” brew option is recommended for brewing decaffeinated coffee.
- Excessive amounts of coffee were added to Filter Basket.
- Coffee ground too finely (not automatic drip grind).
- Carafe not securely placed on Warming Plate or Filter Basket
Holder not seated correctly.
- Carafe removed during brewing for more than 20 seconds and not placed securely back on Warming Plate.
- Coffee Maker needs cleaning.
- Coffee grounds between filter and Filter Basket. Coffee not brewing/unit will not turn on.
- Water Reservoir is empty.
- Unit is unplugged.
- Power outage.
- Power surge. Unplug; then plug Coffee Maker back in.
FIL H20 appears on display.
- Water Reservoir is out of water, doesn’t have enough water or not in place. Fill Water Reservoir with water or remove Water Reservoir and ensure it is in place. If Water Reservoir is removed after 60 seconds of brewing, Coffee Maker will automatically stop brewing.
Coffee Maker beeps.
- Coffee Maker will automatically beep when Auto Off time, Start Time, WARM TEMP, or BREW STRENGTH has been set. Coffee Maker also beeps at end of brewing and Keep Warm cycles.
Limited Warranty
This warranty applies to products purchased and used in the U.S. and Canada. This is the only express warranty for this product and is in lieu of any other warranty or condition.
This product is warranted to be free from defects in material and workmanship for a period of five (5) years from the date of original purchase. During this period, your exclusive remedy is replacement of this product or any component found to be defective, at our option; however, you are responsible for all costs associated with our returning a product or component under this warranty to you. If the product or component is unavailable, we will replace with a similar one of equal or greater value.
This warranty does not cover glass, filters, wear from normal use, use not in conformity with the printed directions, or damage to the product resulting from accident, alteration, abuse, or misuse. This warranty extends only to the original consumer purchaser or gift recipient. Keep the original sales receipt, as proof of purchase is required to make a warranty claim. This warranty is void if the product is used for other than single-family household use or subjected to any voltage and waveform other than as specified on the
rating label (e.g., 120V ~ 60 Hz).
We exclude all claims for special, incidental, and consequential damages caused by breach of express or implied warranty. All liability is limited to the amount of the purchase price. Every implied warranty, including any statutory warranty or condition of merchantability or fitness for a particular purpose, is disclaimed except to the extent prohibited by law, in which case such warranty or condition is limited to the duration of this written warranty. This warranty gives you specific legal rights. You may have other legal rights that vary depending on where you live. Some states or provinces do not allow limitations on implied warranties or special, incidental, or consequential damages, so the foregoing limitations may not apply to you.
To make warranty claim, do not return this appliance to the store. Please write Hamilton Beach Brands, Inc., Customer Service Department, 4421 Waterfront Dr., Glen Allen, VA 23060, or visithamiltonbeach.com/customer-service in the U.S. or hamiltonbeach.ca/ customer-service in Canada. For faster service, locate the model, type, and series numbers on your appliance.
]]>Hamilton Beach Stack and Snap Food Processor User Guide
IMPORTANT SAFEGUARDS
When using electrical appliances, basic safety precautions should always be followed to reduce the risk of fire, electric shock, and/or injury to persons, including the following:
- Read all instructions.
- This appliance is not intended for use by persons with reduced physical, sensory, or mental capabilities, or lack of experience and knowledge, unless they are closely supervised and instructed concerning use of the appliance by a person responsible for their safety.
- This appliance shall not be used by children. Keep the appliance and its cord out of reach of children.
- Close supervision is necessary when any appliance is used near children. Children should be supervised to ensure that they do not play with the appliance.
- To protect against risk of electrical shock, do not immerse base, motor, cord, or plug in water or other liquid.
- Turn the appliance OFF( ), then unplug from outlet when not in use, before putting on or taking off parts, and before cleaning. To unplug, grasp the plug and pull from the outlet. Never pull from the power cord.
- Avoid contacting moving parts. Keep fingers out of feed chute.
- Do not operate any appliance with a damaged supply cord or plug, or after the appliance malfunctions or has been dropped or damaged in any manner. Supply cord replacement and repairs must be conducted by the manufacturer, its service agent, or similarly qualified persons in order to avoid a hazard. Call the provided customer service number for information on examination, repair, or adjustment.
- The use of attachments not recommended or sold by the appliance manufacturer may cause fire, electric shock, or injury.
- Do not use your food processor if any part is broken.
- Do not use appliance outdoors.
- Do not let cord hang over edge of table or counter or touch hot surfaces, including stove
- Keep hands and utensils away from moving blade and disc while processing food to reduce the risk of severe personal injury and/ or damage to the food processor. A rubber scraper may be used but ONLY when the food processor is not running.
- Blades are sharp. Handle cutting blades carefully when inserting or removing, emptying the bowl, and during cleaning. Store out of reach of children.
- To reduce the risk of injury, never place cutting blade or disc on base without first putting bowl properly in place.
- Be certain lid is securely locked in place before operating appliance.
- Never feed food into food chute by hand. Always use the food pushers.
- Do not attempt to defeat the lid interlock mechanism.19. Make sure the blade
- or disc has come to a full stop before removing lid.
- To reduce the risk of injury, be sure to insert or remove blade and disc using hubs provided for this purpose. Use caution when removing blade and disc from the bowl, when emptying the bowl, and when cleaning.
- Check that the appliance is OFF (O) before plugging cord into wall outlet. To disconnect, turn the control to OFF (O ); then remove plug from wall outlet. To unplug, grasp the plug and pull from the outlet. Never pull from the power cord.
- Be sure to turn switch to OFF (O) position after each use. Always use the pushers to clear the food chute. When this method is not possible, unplug cord from outlet and disassemble unit to remove the remaining food.
- The appliance is not intended for commercial, professional, or industrial use. It is designed and built exclusively for household use only.
- Never use appliance for a longer period or with a larger amount of ingredients other than that recommended by appliance manufacturer.
- The maximum rating of this unit is based on using the stainless steel chopping blade. Using the slicing/shredding disc may draw significantly less power.
- Do not place on or near a hot gas or electric burner or in a heated oven.
- Do not use appliance for other than intended purpose.
- CAUTION! In order to avoid a hazard due to inadvertent resetting of the thermal cut-out, this appliance must not be supplied through an external switching device, such as a timer, or connected to a circuit that is regularly switched on and off by the utility.
- Be careful if hot liquid is poured into the food processor bowl as it can be ejected out of the appliance due to a sudden steaming.
- Do not fill the bowl above the marked maximum fill line (or rated capacity) to avoid risk of injury due to damage to the cover or bowl.In order to avoid a hazard due to inadvertent resetting of the thermal cut-out, this appliance must not be supplied through an external switching device, such as a timer,
or connected to a circuit that is regularly switched on and off by the utility. - Be careful if hot liquid is poured into the food processor bowl as it can be ejected out of the appliance due to a sudden steaming.
- Do not fill the bowl above the marked maximum fill line (or rated capacity) to avoid risk of injury due to damage to the cover or bowl.
SAVE THESE INSTRUCTIONS
Other Consumer Safety Information
This appliance is intended for household use only.
WARNING : Electrical Shock Hazard: This appliance is provided with a polarized plug (one wide blade) to reduce the risk of electric shock. The plug fits only one way into a polarized outlet. Do not defeat the safety purpose of the plug by modifying the plug in any way or by using an adapter. If the plug does not fit fully into the outlet, reverse the plug. If it still does not fit, have an electrician replace the outlet.
Wattage Information:
The wattage rating of the food processor is determined by an Underwriters Laboratory test and is based on use of the plastic dough blade and the following dough load: 730g flour, 418.5g water, 52.5g oil, 33.5g sugar, 12g salt and 14g yeast. The food processor using other attachments as recommended may draw significantly less power.
The length of the cord used on this appliance was selected to reduce the hazards of becoming tangled in or tripping over a longer cord. If a longer cord is necessary, an approved extension cord may be used. The electrical rating of the extension cord must be equal to or greater than the rating of the appliance. Care must be taken to arrange the extension cord so that it will not drape over the counter top or tabletop
where it can be pulled on by children or accidentally tripped over. To avoid an electrical circuit overload, do not use another high-wattage appliance on the same circuit with this appliance.
Parts and Features
Before first use: Unpack Food Processor and remove protective covers from the Blade and Disc. Handle Blade and Disc carefully; they are very sharp. Wash all parts except Base in hot, soapy water. Rinse; then dry.
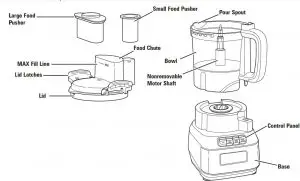
- Cord Storage
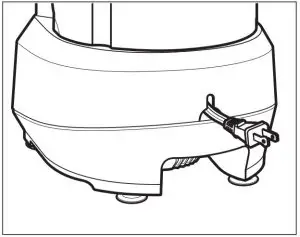
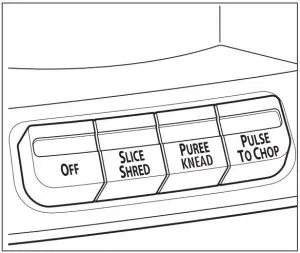
- Control Panel
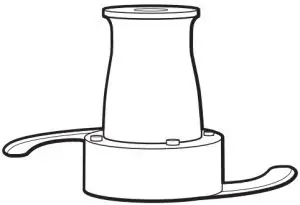
- Plastic Dough Blade
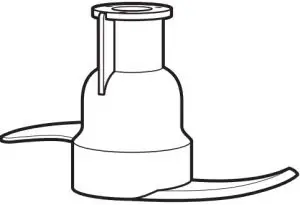
- Stainless Steel Chopping Blade : Use to coarsely chop, grate, mince, mix, or puree food.
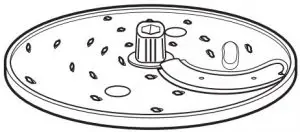
- Reversible Slicing/ Shredding Disc : Use to shred or to slice a variety of foods (such as cheese, carrots, onions, tomatoes, peppers, and cucumbers)
How to Use Stainless Steel Chopping Blade
WARNING : Laceration Hazard.
Handle blade carefully; it is very sharp. Make sure unit is turned OFF (O) and is unplugged.
NOTE: Operate using only one blade or disc at a time.
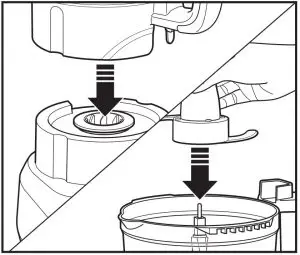
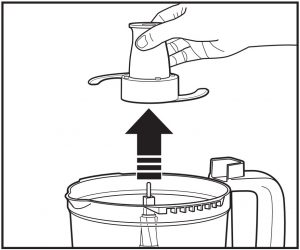
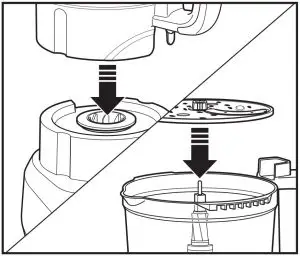
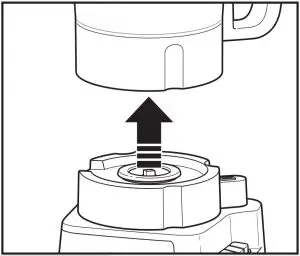
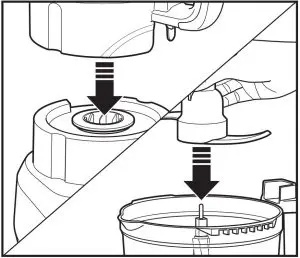
- Place Bowl on Base. Carefully slide Blade down onto Motor Shaft.
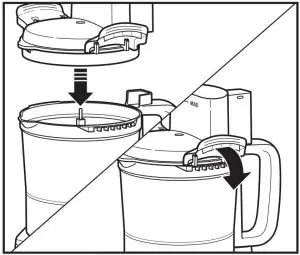
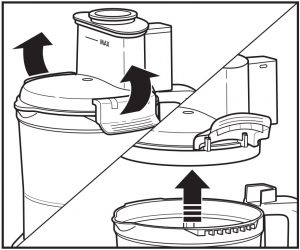
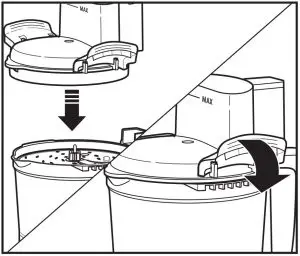
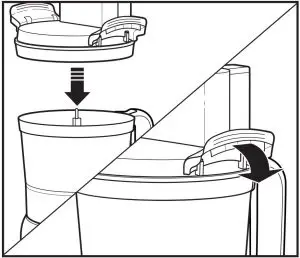
- Add food to Bowl. Place Lid on Bowl, aligning Pour Spout on Lid with Pour Spout on Bowl. Push Lid Latches down until they snap into place.
NOTE: Unit will not work unless Latches are locked. Do not force Latches to close.
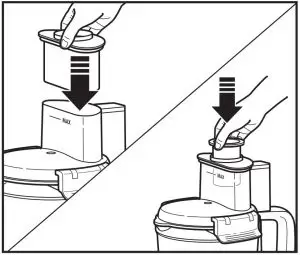
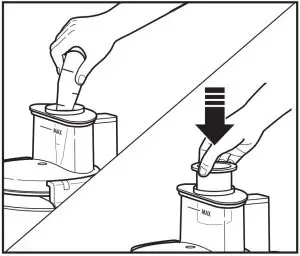
- Place Food Pushers in Food Chute.
NOTE: Unit will not operate until Large Food Pusher engages the protective interlock. Do not add food above MAX Fill Line on Food Chute.
WARNING Laceration Hazard. Always use food pusher to feed food into the chute. Never push food through chute with hands or other objects.
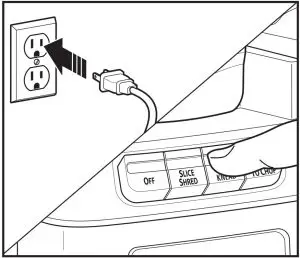
- Plug into outlet. Press desired function button.
WARNING : Laceration Hazard. Always unplug unit before removing lid.
- When finished, press OFF (O). Unplug.
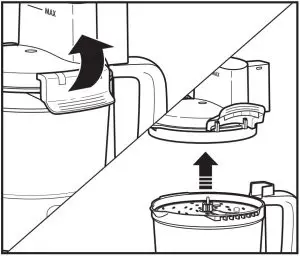
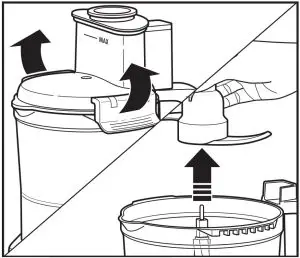
- Lift up on Lid Latches to remove Lid.
- Carefully pull up on Blade to remove from Motor Shaft. Lift Bowl straight up to remove food.
How to Use Reversible Slicing/ Shredding Disc
WARNING Laceration Hazard. Handle blade carefully; it is very sharp. Make sure unit is turned OFF ( ) and is unplugged.
NOTE: Operate using only one blade or disc at a time.
WARNING Laceration Hazard. Always use food pusher to feed food into the chute. Never push food through chute with hands or other objects.
- Place Bowl on Base. Make sure protective cover has been removed from Disc
to prevent damage and scratches to Bowl. Carefully,insert fingers into two finger holes in Disc and place onto Motor Shaft with stamped name (SLICE or SHRED) side facing up.
- Place Lid on Bowl, making sure to align Pour Spout on Lid with Pour Spout on Bowl. Push Lid Latches down and in until they snap into place.
NOTE: Unit will not work unless Latches are locked. Do not force Latches to close.
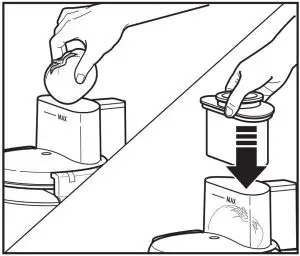
- For smaller, thinner foods: Put Large Food Pusher into place.Place food into smaller open tube and use Small Food Pusher to push food in.
NOTE: Soft cheese like mozzarella should be placed in the freezer for 30 minutes prior to processing to ensure it is firm enough for shredding.
- For larger foods: Push large foods using Large and Small Food Pushers together.
NOTE: Unit will not operate until Large Food Pusher engages the protective interlock. For safety, unit will not operate until Large Food Pusher is inserted to MAX Fill Line. Do not add food above the MAX Fill Line.
- Plug into outlet. Press desired function button.
- When finished, press OFF ( ). Unplug.
WARNING Laceration Hazard. Always unplug unit before removing lid.
- Lift up on Lid Latches and Remove Lid.
- Carefully, insert fingers into two finger holes on Disc and pull up to remove from Motor Shaft.
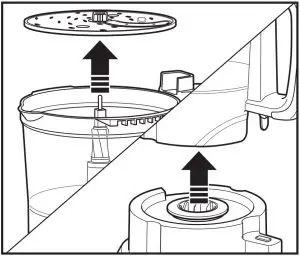
- Lift Bowl straight up and remove food.
How to Use Plastic Dough Blade
NOTE: Operate using only one blade or disc at a time.
- Place Bowl on Base. Slide Dough Blade straight down onto Motor Shaft and add dry ingredients.
- Place Lid on Bowl and push Lid Latches down until they snap in place.
NOTE: Unit will not work unless Latches on Bowl are locked and Food Pusher is in place.
- Plug into outlet. Press Puree/Knead button.
- Add liquid slowly through two small holes at bottom of Small Food Pusher, and follow recipe.
- When finished, press OFF ( ) and unplug.
- Lift up Lid Latches to remove Lid. Lift straight up on Dough Blade and remove food.
Tips and Techniques
- For a more uniform consistency, start with pieces of food that are similar in size. Cut food into 1-inch (2.5 cm) pieces before processing with Stainless Steel Chopping Blade and leave room in Bowl for the food to be tossed around.
- This Food Processor is excellent to chop, mix, slice, or shred most foods. However, to maintain peak performance, do not use your Food Processor for the following: grinding grain, coffee beans, or spices; slicing frozen meats; or crushing ice.
- When chopping foods, pulsing on and off will produce the best results.
- Operating time will depend on quantity of food being processed. Most foods can be sliced, chopped, or shredded in seconds. If unit is operated continuously for an extended period of time, let the Food Processor rest about 4 minutes before continuing.
- Do not puree or mash starchy vegetables like potatoes as they are easily over processed and will become gummy.
- To slice or shred cheese, use only firm cheese like Cheddar or Swiss that has been chilled for at least 30 minutes. Cheese should be processed immediately after being removed from the refrigerator. Soft cheese like mozzarella should be placed in the freezer for 30 minutes prior to processing to ensure it is firm
enough for shredding. - The Reversible Slicing/Shredding Disc has a slicing blade on one side and shredding teeth on the other. The name stamped on the Blade, facing up, is the function selected. Place on Motor Shaft with desired cutting edge facing up.
- To julienne vegetables, slice and then remove from Bowl. Restack the vegetables. Pack into Food Chute with slices vertical. Slice again to make matchstick-cut vegetables.
Processing Charts
Disc attachments are reversible and labeled. The stamped label should face up for the desired function. When using disc attachments, do not process past the MAX Fill Line on the Bowl.
| ATTACHMENT | FOODS |
| Stainless Steel Chopping Blade | Chop: nuts, meat, garlic, onions, peppers, cauliflower, celery, herbs, bread (for crumbs), crackers |
| Mince/Puree: vegetables, fruit, nuts | |
| Mix: salad dressings | |
| Puree: soups, sauces | |
| Grate: cheese, such as Parmesan (chilled) | |
| Slicing Disc (SLICE side facing UP) | Cucumbers, apples, mushrooms, carrots, potatoes, cabbage, tomatoes, pepperoni, peppers, radishes, firm cheeses (chilled) |
| Shredding Disc (SHRED side facing UP) | Cabbage, potatoes, carrots, cheese (chilled) |
| Plastic Dough Blade | Bread, Cookies, Pie Crust, Pizza Dough |
For best results do not exceed the following amounts when chopping, mincing, or pureeing with the Stainless Steel Chopping Blade.
| FOOD | MAXIMUM AMOUNT TO PROCESS |
| Dry ingredients such as crackers or nuts | 12 cups (2.8 L) |
| Vegetables or fruits | 3 pounds (1.4 kg) |
| Cheese such as Parmesan or Cheddar | 40 ounces (1.2 L) |
| Thick sauces or dips | 8 cups (1.9 L) |
| Liquids such as marinades or soups | 7 cups (1.7 L) |
Care and Cleaning
- Unplug. Wipe Base, Control Panel, and cord with a damp cloth or sponge. If necessary, use a mild, nonabrasive cleaner.
- Bowl, Lid, Food Pushers, Blades, and Disc are dishwasher-safe in top-rack only, or hand-wash in hot, soapy water. Rinse and dry.
- NOTE: If food particles get trapped in the back of the Food Chute above the handle, place area under running water to rinse pieces out before putting in the dishwasher.
- DO NOT use the “SANI” setting when washing in the dishwasher. “SANI” cycle temperatures could damage your product. All removable parts may also be cleaned in the sink with hot, soapy water. Use caution when washing Stainless Steel Chopping Blade and Slicing/Shredding Disc.
WARNING : Electrical Shock Hazard. Disconnect power before cleaning. Do not immerse cord, plug, or base in any liquid.
Troubleshooting
Unit does not operate on any speed or Pulse.
- Is the unit plugged in? Does the outlet work?
- Is the Lid latched in place? See “How to Use” sections. Place Lid on Bowl, making sure to align the Pour Spout on the Lid with the Pour Spout on the Bowl.
- Is the Large Food Pusher in the Food Chute? The Large Food Pusher must be in place to operate.
- Is the Food Chute overfilled? Do not add food above the MAX Fill Line. The Large Food Pusher must be in the Food Chute to operate.
Food is not sliced or shredded uniformly.
- Packing too much food in the Food Chute or pushing too hard on the Food Pusher may cause the processed food to be irregulary sliced or shredded. Refer to “Processing Charts” for recommended sizes and quantities.
Unit stops and will not come back on.
- Is the Lid latched in place? See “How to Use” sections. Place Lid on Bowl, making sure to align the Pour Spout on the Lid with the Pour Spout on the Bowl.
- Is the outlet still working? Check it by plugging in a working lamp or other appliance. You may have overloaded the circuit and blown a fuse or tripped the circuit breaker.
- Turn unit OFF ( ), allow to stand for 3 to 4 minutes, and then turn back on.
- If none of these suggestions correct the problem, DO NOT attempt to repair the unit. Call the Customer Service number. Unit has a burning smell.
- There may be a residue left on the motor from the manufacturing process, causing a slight odor during initial use. This will go away. If a strong odor or any visible smoke appears, unplug unit IMMEDIATELYand call the Customer Service number. Motor seems weak.
- Are you using the recommended food size and quantity to be processed? Refer to “Processing Charts” for recommended food sizes and speeds. Cheese is not shredding well.
- Cheese should be processed immediately after being removed from the refrigerator. Soft cheese like mozzarella should be placed in the freezer for 30 minutes prior to processing to ensure it is firm enough for shredding. Vegetables are not shredding or slicing.
- Store vegetables with high water content in the refrigerator prior to processing. Room-temperature vegetables are less firm and do not perform as well. Food particles stuck in the back of the Food Chute above the handle.
- Place back of the Food Chute under running water to rinse out thefood before placing in the dishwasher.
Recipes
Roasted Red Pepper Hummus
- 2 cloves garlic
- 2 green onions, white portion and half of green tops
- 1 can (15 oz. [425 g]) garbanzo beans (chickpeas), drained
- 1 jar (14 oz. [397 g]) roasted red peppers, drained
- 1/4 cup (59 ml) tahini (sesame paste), stirred
- 2 tablespoons (30 ml) lemon juice
- 2 teaspoons (10 ml) olive oil
- 1/4 teaspoon (1.3 ml) ground cumin Dash cayenne pepper Salt and pepper to taste Dash paprika Pita chips or cut vegetables
Directions
- Using Stainless Steel Chopping Blade and with Food Processor running, drop garlic cloves and onions into Food Chute.
- Add garbanzo beans, roasted red peppers, tahini, lemon juice, olive oil, cumin, cayenne, salt and pepper. Continue to process until smooth. Scrape Bowl as needed.
- Place in serving bowl and garnish with paprika.
- Serve with pita chips and/or vegetables. Refrigerate to store.
Fresh and Spicy Salsa
- 1 onion, peeled
- 1 clove garlic
- 1 hot pepper (jalapeño or finger hot), cored, seeded, and quartered 4 tomatoes, quartered
- 1/4 cup (59 ml) cilantro, packed
- 1/2 teaspoon (2.5 ml) cumin
- 1 tablespoon (15 ml) lime juice Salt and pepper to taste Hot sauce, optional
Directions
- Using Stainless Steel Chopping Blade and with Food Processor running, drop onion, garlic clove and hot pepper through the Food Chute and chop until finely minced. Scrape Bowl as needed.
- Add tomatoes, cilantro, cumin, lime juice, salt and pepper. Pulse until desired texture, scraping Bowl as needed. Add hot sauce if desired.
Cilantro Butter
- 1 bunch cilantro
- 1 cup (237 ml) unsalted butter, softened Juice from one lemon Salt and pepper to taste
Directions
- Wash cilantro and separate leaves from stems. Discard stems. Add Stainless Steel Chopping Blade to Food Processor Bowl. Mix cilantro and butter until light and fluffy
- Add lemon juice, salt and pepper to taste. Process to blend.Scrape Bowl as needed.
- Use for grilled dishes. Delicious with grilled salmon, swordfish or tuna. Refrigerate to store.
Cajun Veggie Gratin
- 3 medium zucchini, sliced in Food Processor
- 1 red onion, sliced in Food Processor
- 6 plum tomatoes, sliced in Food Processor
- 2 teaspoons (10 ml) extra virgin olive oil1 1/2 teaspoons (7.5 ml) Cajun seasoning
- 1 teaspoon (5 ml) salt
- 1 teaspoon (5 ml) freshly ground pepper Cooking spray Topping:
- 1 cup (237 ml) bread crumbs
- 1/2 cup (118 ml) Parmesan
- cheese, chopped finely in Food Processor
- 1/2 teaspoon (2.5 ml) Cajun seasoning
Directions
- Heat oven to 425°F (218°C). Spray 8-in. (20-cm) square baking pan with cooking spray.
- Using Slicing/Shredding Disc with “SLICE” side facing up, slicezucchini, onion and tomatoes.
- Heat oil in large sauté pan over medium heat.
- Add sliced zucchini and onion and sauté for 3 to 4 minutes until beginning to soften.
- Add sliced tomatoes, Cajun seasoning, salt and pepper to pan.
- Sauté mixture, stirring gently, for 8 to 10 minutes until all vegetables are softened and heated through. Place vegetable mixture in prepared pan.
- Combine bread crumbs, Parmesan cheese and Cajun seasoning. Sprinkle evenly over top of vegetables.
- Bake 15 to 20 minutes or until topping is brown and crispy.
Bleu Cheese Dressing
- 1 clove garlic
- 8 ounces (227 g) Bleu cheese
- 1 cup (237 ml) mayonnaise
- 1/2 cup (118 ml) milk
- 1/2 cup (118 ml) sour cream
- 1/4 cup (59 ml) white vinegar
- 1 teaspoon (5 ml) Worcestershire sauce
- 1 teaspoon (5 ml) sugar
- 1/2 teaspoon (2.5 ml) salt
- 1/4 teaspoon (1.3 ml) black peppe
Directions
- Using Stainless Steel Chopping Blade and with Food Processor running, drop garlic clove into the Food Chute and mince.
- Add Bleu cheese and process for 10 seconds.
- Add remaining ingredients. Process until blended, but still chunky
Cranberry Orange Relish
- 12 oz. (340 g) cranberries (fresh with stems removed, or frozen)
- 1 cup (237 ml) sugar
- 1 small navel orange, washed, cut into wedges
- 3 tablespoons (44 ml) Grand Marnier® liqueur or orange juice Dash of ground cloves
Directions
- Using Stainless Steel Chopping Blade, place cranberries, sugar, orange, Grand Marnier® or orange juice and cloves into the work Bowl.
- Process until cranberries are almost smooth, yet a bit chunky.
- Cover and refrigerate overnight.
Basic White Bread
- 2 ¾ cups (675ml) or 356g all-purpose flour
- 1 teaspoon (5ml) or 5g salt
- 1 ½ tablespoons (22.5ml) or 18g sugar
- 1 teaspoon (5ml) or 3.6g instant or active dry yeast
- 1 cup (237ml) warm water (100°F-110°F), divided
- 2 tablespoons (30ml) or 28.4g butter, melted
Directions
- Using the food processor fitted with the plastic dough blade, pulse to combine flour and salt.
- In a medium bowl, stir together sugar, yeast and ¼ cup warm water until well blended. Let stand 5 minutes. Add remaining water and butter and stir until blended.
- With food processor running, pour yeast mixture through food chute and process until the dough forms a ball and the sides of the food processor bowl are clean.
- Press KNEAD and process for 1 minute. Transfer dough to floured countertop and knead for 2 to 3 minutes until dough is smooth and elastic.
- Grease a large bowl. Add dough and turn to coat. Cover and let rise in a warm place until doubled in size, about 1 hour.
- Grease a 9×5-inch loaf pan. Punch dough down and shape into aball. Place in prepared pan and let rise until doubled in size, about 1hour.
- Preheat oven to 350°F (177°C).
- Bake 20 to 25 minutes or until top is browned and loaf sounds hallow when tapped. Internal temperature should be 190°F (88°C).
Easy Pepperoni Pizza
- 2 1/2 cups (591 ml) or 325g allpurpose flour
- 1 envelope pizza crust yeast
- 1 1/2 teaspoons (7.5 ml) or 10g sugar
- 1 teaspoon (5 ml) or 5g salt
- 1 cup (237 ml) very warm water (120° to 130°F [49°–54°C])
- 1/4 cup (59 ml) vegetable oil 2/3 cup (158 ml) pizza sauce 8 ounces (227 g) chilled mozzarella cheese
- 1 small (2-ounce [57-g]) stick pepperoni
- 1 small green pepper, sliced into rings, divided
- 2 large mushrooms, sliced,divided
Directions
- Assemble Food Processor with Plastic Dough Blade. Place 2 cups (473 ml) flour, undissolved yeast, sugar and salt in work bowl.Pulse a few times to blend ingredients.
- Add water and oil. Process 1 minute. Add additional flour until mixture forms a soft dough.
- Preheat oven to 425°F (218°C).
- Place dough on floured counter and let the dough rest for 10 minutes.
- Assemble Food Processor with Slicing/Shredding Disc with “SHRED” size up. Shred mozzarella; set aside.
- Assemble Food Processor with Slicing/Shredding Disc with “SLICE”
side up. Set to thin slice. Slice pepperoni; set aside. - Spray pizza pan with nonstick cooking spray. Shape dough into a 15- to 16-inch (38.1- to 40.6-cm) round pizza pan. Add toppings.
- Bake 20 to 25 minutes or until crust is browned and cheese is
melted.
Limited Warranty
This warranty applies to products purchased and used in the U.S. and Canada. This is the only express warranty for this product and is in lieu of any other warranty or condition.
This product is warranted to be free from defects in material and workmanship for a period of five (5) years from the date of original purchase in Canada and one (1) year from the date of original purchase in the U.S. During this period, your exclusive remedy is repair or replacement of this product or any component found to be defective, at our option; however, you are responsible for all costs associated with returning the product to us and our returning a product or component under this warranty to you. If the product or component is no longer available, we will replace with a similar one of equal or greater value.
This warranty does not cover glass, filters, wear from normal use, use not in conformity with the printed directions, or damage to the product resulting from accident, alteration, abuse, or misuse. This warranty extends only to the original consumer purchaser or gift recipient. Keep the original sales receipt, as proof of purchase is required to make a warranty claim. This warranty is void if the product is used for other than single-family household use or subjected to any voltage and waveform other than as specified on the rating label (e.g., 120 V ~ 60 Hz).
We exclude all claims for special, incidental, and consequential damages caused by breach of express or implied warranty. All liability is limited to the amount of the purchase price. Every implied warranty, including any statutory warranty or condition of merchant ability or fitness for a particular purpose, is disclaimed except to the extent prohibited by law, in which case such warranty or condition is limited to the duration of this written warranty. This warranty gives you specific legal rights.
You may have other legal rights that vary depending on where you live. Some states or provinces do not allow limitations on implied warranties or special, incidental, or consequential damages, so the foregoing limitations may not apply to you.To make a warranty claim, do not return this appliance to the store.
Please call 1.800.851.8900 in the U.S. or 1.800.267.2826 in Canada or visit
hamiltonbeach.com in the U.S. or hamiltonbeach.ca in Canada. For faster service, locate the model, type, and series numbers on your appliance.
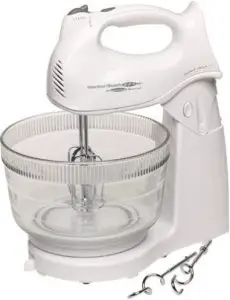
Hamilton Beach Hand/Stand Mixer Instructions
IMPORTANT SAFEGUARDS
When using electrical appliances, basic safety precautions should always be followed to reduce the risk of fire, electric shock, and/or injury to persons, including the following:
- Read all instructions. in any manner. Supply cord replacement and
- This appliance is not intended for use by repairs must be conducted by the manufacturer, persons with reduced physical, sensory, or its service agent, or similarly qualified persons mental capabilities, or lack of experience and in order to avoid a hazard. Call the provided knowledge, unless they are closely supervised customer service number for information on and instructed concerning use of the appliance examination, repair, or adjustment. by a person responsible for their safety.
- This appliance shall not be used by children. sold by the appliance manufacturer for use with Keep the appliance and its cord out of reach of this model may cause fire, electric shock, or children. injury.
- Close supervision is necessary when any appliance is used near children. Children should be supervised to ensure that they do not play with the appliance.
- To protect against risk of electrical shock, do plugging cord into wall outlet. To disconnect, not put cord, plug, or mixer body in water or turn the control to OFF other liquid.
- Turn the appliance OFF(
 ), then unplug fromoutlet when not in use, before putting on or taking off parts, and before cleaning. To unplug, grasp the plug and pull from the outlet. Never pull from the power cord.
 - Avoid contacting moving parts. Keep hands, hair, and clothing, as well as spatulas and other utensils, away from beaters during operation to reduce risk of injury to persons and/or damage to mixer.
- Remove beaters from mixer before washing.
- Do not let cord hang over edge of table or counter or touch hot surfaces, including stove.
- Do not operate any appliance with a damaged supply cord or plug, or after the appliance
malfunctions or has been dropped or damaged in any manner. Supply cord replacement and repairs must be conducted by the manufacturer, its service agent, or similarly qualified persons in order to avoid a hazard. Call the provided customer service number for information on examination, repair, or adjustment. - The use of attachments not recommended or sold by the appliance manufacturer for use with this model may cause fire, electric shock, or
injury. - Do not use outdoors.
- Do not place on or near a hot gas or electric burner, or in a heated oven.
- Check that the appliance is OFF ( ) before plugging cord into wall outlet. To disconnect, turn the control to OFF ( ); then remove plug from wall outlet. To unplug, grasp the plug and pull from the outlet. Never pull from the power cord.
- Do not use appliance for other than intended purpose.
- CAUTION! In order to avoid a hazard due to inadvertent resetting of the thermal cut-out, this appliance must not be supplied through an
external switching device, such as a timer, or connected to a circuit that is regularly switched
on and off by the utility.
SAVE THESE INSTRUCTIONS
Other Consumer Safety Information
This appliance is intended for household use only.
 WARNING Electrical Shock Hazard: This appliance is provided with a polarized plug (one wide blade) to reduce the risk of electric shock. The plug fits only one way into a polarized outlet. Do not defeat the safety purpose of the plug by modifying the plug in any way or using an adapter. If the plug does not fit fully into the outlet, reverse the plug. If it still does not fit, have an electrician replace the outlet.
The length of the cord used on this appliance was selected to reduce the hazards of becoming tangled in or tripping over a longer cord. If a longer cord is necessary, an approved extension cord may be used. The electrical rating of the extension cord must be equal to or greater than the rating of the appliance. Care must be taken to arrange the extension cord so that it will not drape over the countertop or tabletop where it can be pulled on by children or accidentally tripped over.
BEFORE FIRST USE:
Wash bowl and beaters in hot, soapy water. Rinse and dry.
NOTICE:
Never place mixing bowl in oven, microwave oven, or on a hot cooking surface. Mixing bowl is not intended to be used at high temperatures and should never be used as cookware, ovenware, or bakeware.
WATTAGE/PEAK POWER INFORMATION
The marked rating of the hand mixer is determined by Underwriters Laboratories as the maximum stabilized power consumption of the hand mixer at high speed under a loaded condition. Peak power is an average of the maximum wattage a hand mixer may consume during initial operation at high speed.
Parts and Features
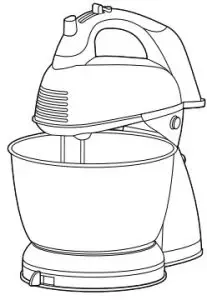
- Speed Control (ON/OFF)
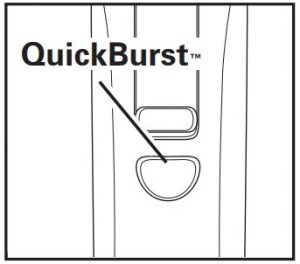
- QuickBurstTM
- Eject Button
- Mixer Beaters
- Bowl
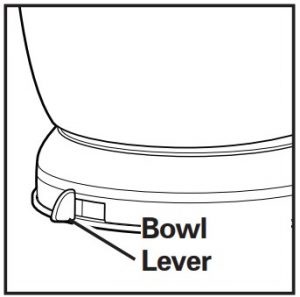
- Turntable Shift and StirTM Bowl Lever
- Platform
- Mixer Release Button
- Mixer Tilt Button (located on rear of stand)j Stand
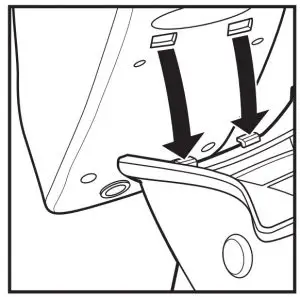
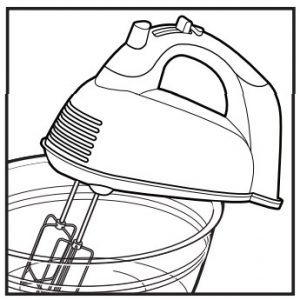
How to Assemble Stand
The stand mixer is very convenient for most recipes. However, small amounts– like one cup (237 ml) of cream–may not contact the beaters in the stand mixer mode. In these cases we recommend using as a hand mixer.
NOTE: Attach mixer to stand before attaching beaters or dough hooks.
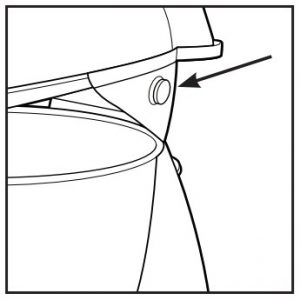
- Set stand on counter. With platform level and while holding mixer as shown, place the two small holes on the bottom of the mixer into the two hooks on platform.
- As the mixer is lowered, gently press the back of the mixer onto the platform until it locks in position. The mixer can now be used as a stand mixer.
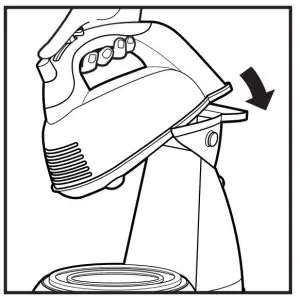
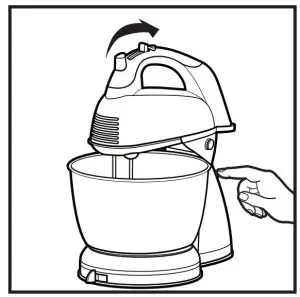
- Push the Tilt Button to tilt the mixer.
Optional Attachments (available on selected models)
Before first use: wash beaters or attachments in warm, sudsy water; rinse and dry. Always unplug mixer from electrical outlet before inserting or removing attachments. This mixer comes with 1 or more of the following attachments:
| ATTACHMENT | DESCRIPTION |
 |
The flat beaters are designed for general mixing purposes. |
 |
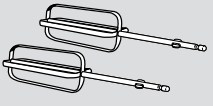
The straight wire beaters, which have no center post for ease in cleaning, are designed for mixing thick batters and cookie dough. |
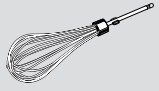 |
The single whisk is perfect for whipping cream. The whisk may be inserted into either opening. |
 |
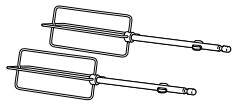
The twisted wire beaters, which have no center post for ease in cleaning, are designed for mixing thick batters and cookie dough. |
 |
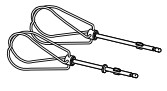
The dough hooks can perfectly knead a one loaf bread recipe. Always use dough hooks on speed 4, 5, or 6 in the hand mixer mode. Do not use dough hooks in the stand mixer mode. |
To Insert Attachments
Flat Beaters, Straight Wire Beaters, and Whisk
- Always make sure mixer is unplugged and speed control is set to OFF ( ).
- Insert a beater or attachment into an opening on the bottom of the mixer. Push until it clicks into place. Repeat with other beater or attachment.
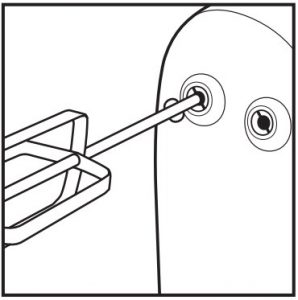
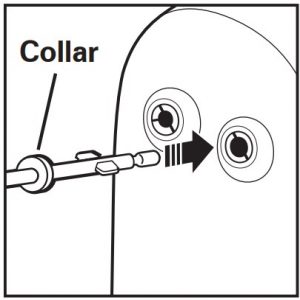
Twisted Wire Beaters and Dough Hooks
- Always make sure mixer is unplugged and speed control is set to OFF ( ).
- Insert the wire beater or the dough hook with the Collar collar into the larger opening.
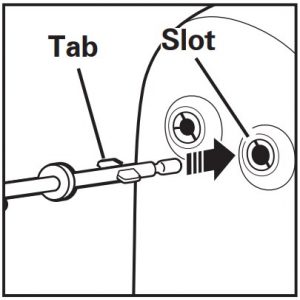
- Align tabs on the beater or dough hook with the Tab Slot slots in the opening. Push until it clicks into place. Repeat with other beater or dough hook.
Features
Mixer Release Button
Use this feature to release the mixer from the “locked” position on the stand.
Bowl RestBowl Rest™
This feature can be used on most large mixing bowls. Use the Bowl Rest while adding ingredients or checking a recipe. To use, TURN MIXER OFF ( ) and then set the mixer on
CAUTION: Pinch Hazard Never use Bowl Rest when mixer is on.
NOTE: Do not use Bowl Rest on small (11/2 quart [1.4 L]) mixing bowls or plastic mixing bowls.
QuickBurst™
Press and hold down the button for additional powe at any speed.
NOTE: Never use QuickBurst for more than two minutes at a time or motor may overheat.
Shift and Stir™ Bowl Lever
Use the lever to move the turntable. This allows you to position the
beaters near the edge of the bowl or in the center for better mixing performance.
Using Your Mixer
- Always make sure mixer is unplugged and OFF ( ) before inserting beaters, using as a hand mixer or assembling on the stand.
- Plug mixer into electrical outlet.
- Move the speed control to desired speed, starting at 1 and increasing to a higher speed as necessary.
- If using as a stand mixer do not leave mixer unattended. Always monitor the progress of the mixing.
- When finished mixing, move the speed control to OFF ( ) and unplug mixer.
- To eject beaters, push straight down on the eject button.
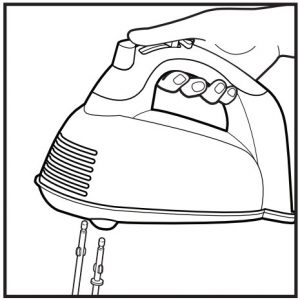
- To remove mixer from stand, hold mixer and press mixer release button. Pull mixer to release from stand.
Mixing Guide
The following mixing guide is a suggestion for selecting mixing speeds. Begin on speed 1 and increase to desired speed depending on the recipe consistency.
| 6 SPEED | FUNCTION |
| 0 | OFF ( ) and/or Eject |
| 1 | LOW speed for folding or mixing in dry ingredients, muffins, |
| 2 | or quick breads |
| 3 | To cream butter and sugar; most cookie dough |
| 4 | MEDIUM speed for most packaged cake mixes |
| 5 | Frosting and mashed potatoes; kneading dough |
| 6 | Beating egg whites; kneading dough |
Mixing Tips
Cookie dough is one of the thickest doughs to mix. Make it easier by following these tips:
- Use a large mixing bowl so that ingredients spread out for easier mixing.
- Have butter or margarine at room temperature.
- Add ingredients one at a time and thoroughly mix after each addition.
- Add flour one cup at a time.
- To add chips or nuts to a very thick dough or batter, we recommend stirring them in by hand at the very end of the recipe.
Cleaning Your Mixer
WARNING Electrical Shock Hazard: Do not immerse base, cord or plug in water or any other liquid.
- Always unplug mixer from electrical outlet and eject the attachments before cleaning.
- Wash attachments in hot, soapy water; rinse and dry.
- Wipe the mixer body and cord with a clean, damp cloth.
NOTE: Do not use abrasive cleaners or scouring pads.
Customer Service
If you have a question about your mixer, call our toll-free customer service number. Before calling, please note the model, type, and series numbers and fill in that information below. These numbers can be found on the bottom of your mixer. This information will help us answer your question much more quickly. MODEL:___________________ TYPE :___________________ SERIES: __________________
LIMITED WARRANTY
This warranty applies to products purchased and used in the U.S. and Canada. This is the only express warranty for this product and is in lieu of any other warranty or condition. This product is warranted to be free from defects in material and workmanship for a period of five (5) years from the date of original purchase in Canada and one (1) year from the date of original purchase in the U.S. During this period, your exclusive remedy is repair or replacement of this product or any component found to be defective, at our option; however, you are responsible for all costs associated with returning the product to us and our returning a product or component under this warranty to you. If the product or component is no longer available, we will replace with a similar one of equal or greater value.
This warranty does not cover glass, filters, wear from normal use, use not in conformity with the printed directions, or damage to the product resulting from accident, alteration, abuse, or misuse.
This warranty extends only to the original consumer purchaser or gift recipient. Keep the original sales receipt, as proof of purchase is required to make a warranty claim.
This warranty is void if the product is used for other than single-family household use or subjected to any voltage and waveform other than as specified on the rating label (e.g., 120V ~ 60 Hz). We exclude all claims for special, incidental, and consequential damages caused by breach of express or implied warranty. All liability is limited to the amount of the purchase price. Every implied warranty, including any statutory warranty or condition of merchantability or fitness for a particular purpose, is disclaimed except to the extent prohibited by law, in which case such warranty or condition is limited to the duration of this written warranty
This warranty gives you specific legal rights. You may have other legal rights that vary depending on where you live. Some states or provinces do not allow limitations on implied warranties or special, incidental, or consequential damages, so the foregoing limitations may not apply to you. To make a warranty claim, do not return this appliance to the store.
Please call 1.800.851.8900 in the U.S. or 1.800.267.2826 in Canada or visit hamiltonbeach.com in the U.S. or hamiltonbeach.ca in Canada. For faster service, locate the model, type, and series numbers on your appliance.
![]()
Digital Steamer
READ BEFORE USE LIRE AVANT UTILISATION LEA ANTES DE USAR
Visit www.hamiltonbeach.com for our complete line of products and Use and Care Guides – as well as delicious recipes, tips, and to register your product online!
Rendez-vous sur www.hamiltonbeach.ca pour notre liste complète de produits et de nos manuels utilisateur – ainsi que nos délicieuses recettes et nos conseils !
¡Visite www.hamiltonbeach.com (EE. UU.) o www.hamiltonbeach.com.mx (México) para ver otros productos de Hamilton Beach o para contactarnos!
Questions?
Please call us – our friendly associates are ready to help.
USA: 1.800.851.8900
IMPORTANT SAFEGUARDS
When using electrical appliances, basic safety precautions should always be followed to reduce the risk of fire, electric shock, and/or injured persons, including the following:
- Read all instructions.
- This appliance is not intended for use by persons (including children)with reduced physical, sensory, or mental capabilities, or lack of experience and knowledge unless they are closely supervised and instructed concerning the use of the appliance by a person responsible for their safety.
- Close supervision is necessary when any appliance is used by or near children. Children should be supervised to ensure that they do not play with the appliance.
- Do not touch hot surfaces. Use handles or knobs. Use pot holders when removing hot containers.
- To protect against a risk of electrical shock do not immerse cord, plug, or base in water or other liquid.
- Unplug from outlet when not in use and before cleaning. Allow cooling before putting on or taking off parts and before cleaning.
- Do not operate any appliance with a damaged supply cord or plug, or after the appliance malfunctions or has been dropped or damaged in any manner. Supply cord replacement and repairs must be conducted by the manufacturer, its service agent, or similarly qualified persons in order to avoid a hazard. Call the provided customer service number for information on examination, repair, or adjustment.
- The use of accessory attachments not recommended by the appliance manufacturer may cause injuries.
- Do not use outdoors.
- Do not let the cord hang over the edge of the table or counter, or touch hot surfaces.
- Do not place on or near a hot gas or an electric burner, or in a heated oven.
- Extreme caution must be used when moving an appliance containing hot food, water, or other hot liquids.
- To disconnect, turn the unit OFF ( ) and then remove the plug from the wall outlet.
- Do not use appliances other than intended use.
- Lift and open cover carefully to avoid scalding, and allow water to drip into the steam bowl.
- Do not place the unit directly under cabinets when operating as this product produces large amounts of steam. Avoid reaching over the product when operating.
- The vessel may remain hot after the unit is turned off.
SAVE THESE INSTRUCTIONS
Other Consumer Safety Information
This appliance is intended for household use only.
 WARNING Electrical Shock Hazard: This appliance is provided with a polarized plug (one wide blade) to reduce the risk of electric shock. The plug fits only one way into a polarized outlet. Do not defeat the safety purpose of the plug by modifying the plugin any way or by using an adapter. If the plug does not fit fully into the outlet, reverse the plug. If it still does not fit, have an electrician replace the outlet.
The length of the cord used on this appliance was selected to reduce the hazards of becoming tangled in or tripping over a longer cord. If a longer cord is necessary, an approved extension cord may be used. The electrical rating of the extension cord must be equal to or greater than the rating of the appliance. Care must be taken to arrange the extension cord so that it will not drape over the countertop or tabletop where it can be pulled on by children or accidentally tripped over.
Parts and Features
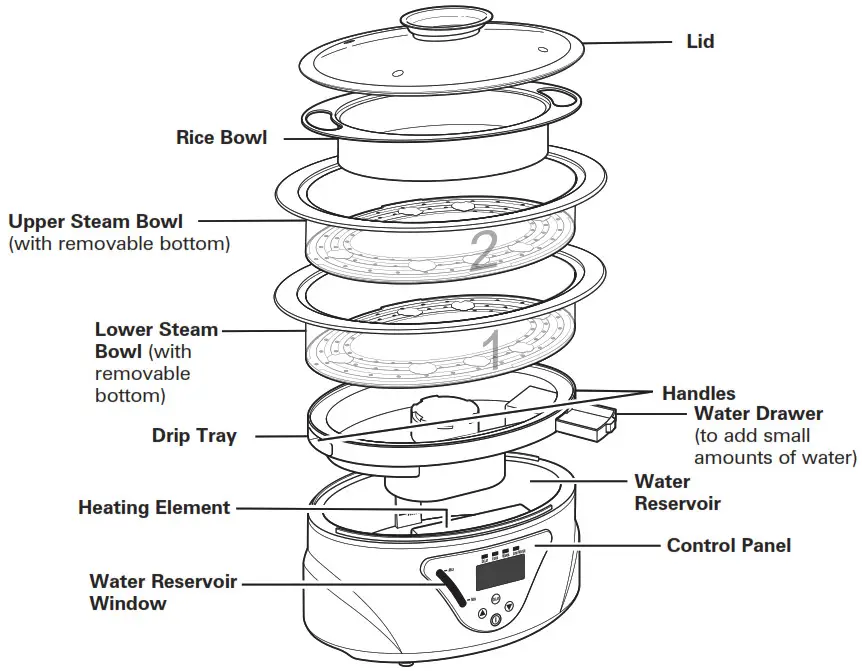
To order parts:
US: 1.800.851.8900
www.hamiltonbeach.com
Canada: 1.800.267.2826
Mexico: 01 800 71 16 100
NOTE: Both the upper and lower steam bowls may be used as an egg tray.
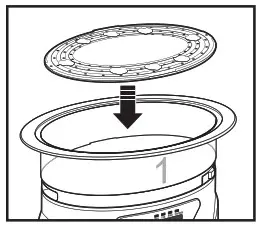
How to Steam
BEFORE FIRST USE: Wash lid, rice bowl, steaming and drip trays, and removable bottoms in warm, soapy water.
Dry thoroughly.
Wipe the interior of the water reservoir with a damp, nonabrasive cloth. Never operate steamer without water in the reservoir, or use a liquid other than water for cooking purposes, since this may damage the unit.
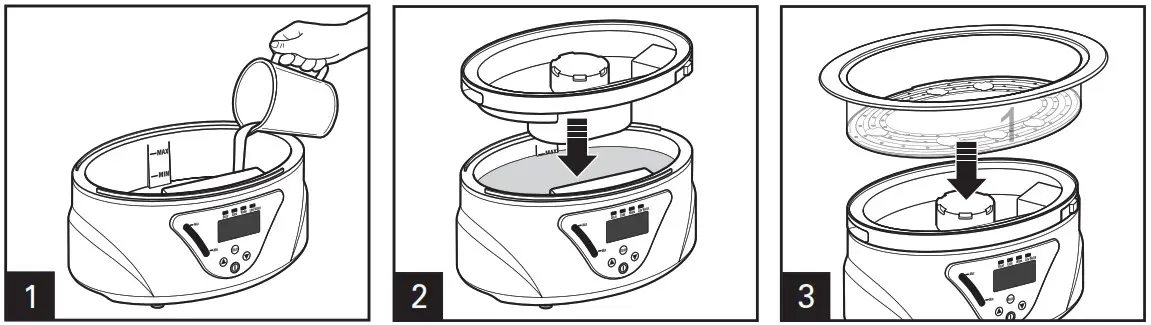
Fill the water reservoir to MAX line.
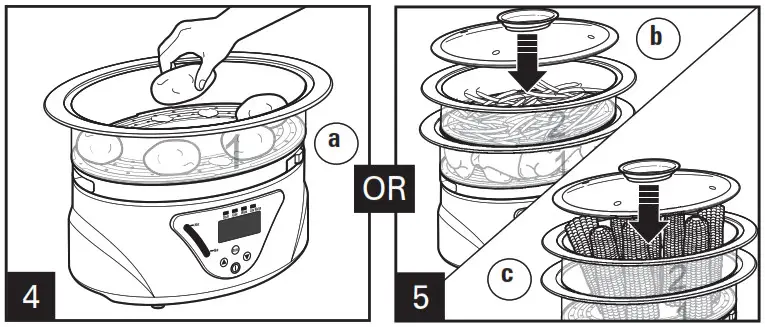
Steaming bowls may be used three ways:
- 1 single steaming bowl. Place bowl number 1; see (a) above.
- 2 steaming bowls together. Place bowl 1 on base and top with bowl 2; see (b) above.
- Remove the bottom from bowl 2 (upper bowl) for larger foods; see (c) above.
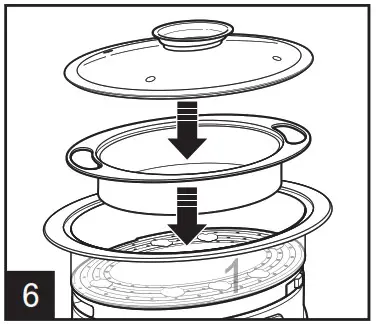
To cook rice: Ensure water reservoir is filled to MAX line. Place rice and water into the rice bowl; then insert rice bowl into the lower steaming bowl.
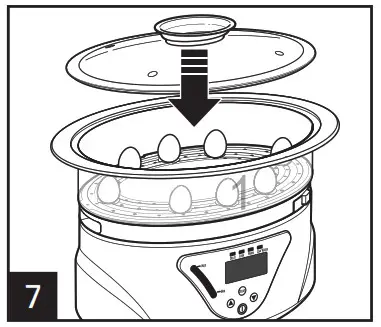
To hard-cook eggs: Place bottom in bottom of the bowl with egg holder side up. Stand eggs in egg holder (maximum of 8 large eggs).

The product will beep when plugged in and turned on.
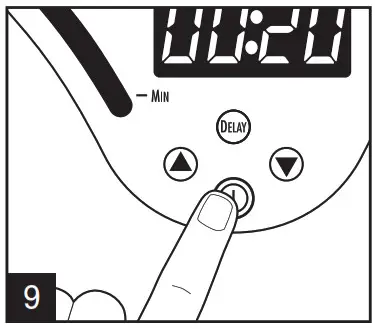
Press the ON/OFF ( ![]() ) button to initiate the steaming cycle.
) button to initiate the steaming cycle.
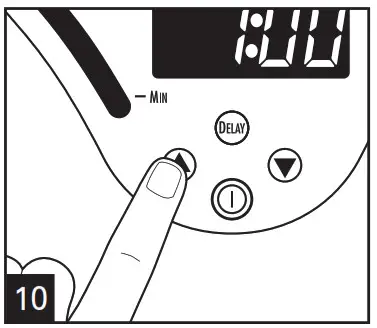
To adjust the desired cooking time, press the up or down arrows. Max steam time is 1 hour.
NOTE: If no adjustment is made to cooking time, the unit will begin streaming after approximately 5 seconds.
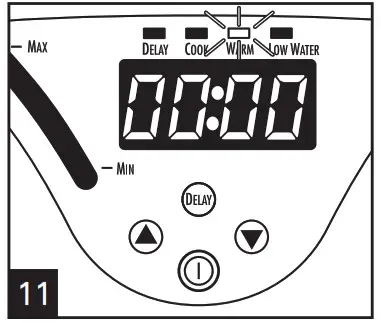
The unit will switch to the WARM mode for up to 1 hour. The WARM mode can be canceled at any time by pressing the ON/OFF (![]() ) button.
) button.
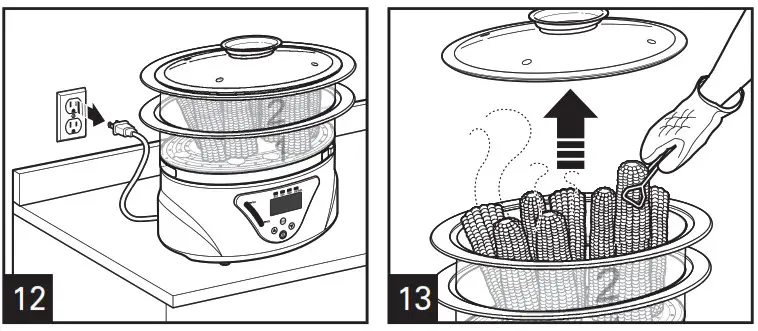
The unit beeps when turned off and beeps again when unplugged.
NOTE: Unit will automatically shut off after 1 hour of keep warm time.
For Low Water:
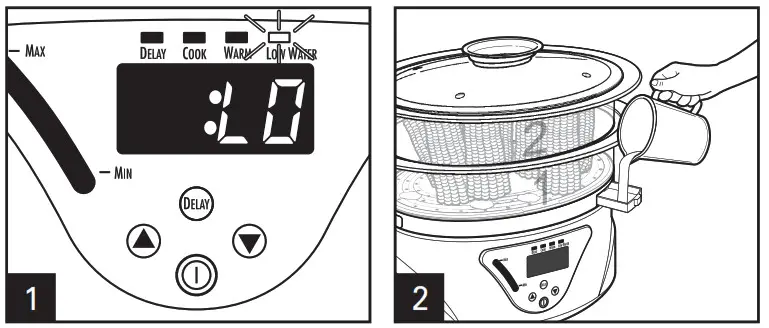
The unit will beep, the display will tell you the water is low, and the LOW WATER light will come on. To Add Water: Pull out the water drawer and gradually fill it with water. Check the viewing window to see the water level.
NOTE: Raw meat should NEVER be cooked using Delay Start Timer. Visit www.foodsafety.gov for more information on safe food handling.
- Cooking/steaming will begin once the unit has completed the delay time countdown.
- The steamer will switch to the WARM mode for up to 1 hour after cooking ends.
- If the water level in the steamer becomes too low, it will switch OFF and flash “– –.” Fill the unit with water to the MAX line; then push the ON/OFF (
 ) button to restart the steamer. The LOW WATER indicator light will also illuminate.
How to Set Delay Start Timer
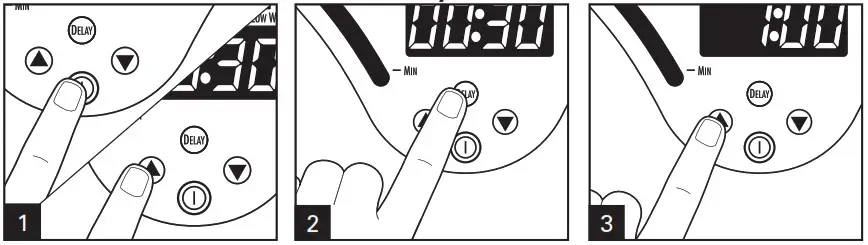
Press the ON/OFF (![]() ) button and then up or down arrows to set the cooking time. Press the DELAY button. The display will flash 00:30 as the default delay time. The minimum set time is 30 minutes and the maximum delay time is 24 hours.
) button and then up or down arrows to set the cooking time. Press the DELAY button. The display will flash 00:30 as the default delay time. The minimum set time is 30 minutes and the maximum delay time is 24 hours.
Press up or down arrows to set delay time. After approximately 5 seconds, the display will show the selected delay time and the unit will begin to count down. After the delay ime expires, the steamer will switch to cooking mode and steam for selected cook time.
Steaming Chart
Steamer Cooking Times (approximate) are based on steaming with cold water filled to the Max Fill line. The steamer will switch to WARM after cooking time.
| FOOD ITEM | WEIGHT/NUMBER | APPROXIMATE COOKING TIME |
| Asparagus, thin stalks | 1 pound (454 g) | 14–20 minutes |
| Baby Carrots | 1 pound (454 g) | 18–25 minutes |
| Broccoli Flowerettes from 1 head | 1/2 to 3/4 pound (227 g to 340 g) | 18–22 minutes |
| Cauliflower Flowerettes from 1 head | 1 to 1 1/4 pounds (454 g to 567 g) | 18–22 minutes |
| Corn on the Cob halved | 4 ears | 18–22 minutes |
| Green Beans | 1 pound (454 g) | 12–16 minutes |
| Sugar Snap Peas | 1 pound (454 g) | 13–18 minutes |
| Squash, yellow and green, 1/2-inch (1.3 cm) thick | 1 pound (454 g) | 16–20 minutes |
| Whole Small Red Potatoes | 1 pound (454 g) | 28–32 minutes |
| Boneless, Skinless Chicken Breasts | 3 (5 oz. [142 g] each) | 14–18 minutes |
| Hot Dogs | 8 | 12–15 minutes |
| Salmon Steaks, 1-inch (2.5 cm) thick | 1 1/2 pounds (680 g) | 18–22 minutes |
| Salmon Fillet | 1 pound (454 g) | 16–20 minutes |
| Swordfish Steak, 1-inch (2.5 cm) thick | 1 1/2 pounds (680 g) | 16–20 minutes |
| Tilapia Fillets | 1 pound (454 g) | 13–17 minutes |
| Little Neck Clams or Steamers | 1 pound (454 g) | 15–19 minutes |
| Shrimp, deveined with tails (16/20 count) | 1 pound (454 g) | 11–15 minutes |
| Lobster Tail, 4 to 5 oz. | 4 (4 to 5 oz. [113 g to 142 g] each) | 18–22 minutes |
| Eggs, large | 8 | 20–22 minutes |
| Long-Grain White Rice | 1 cup (237 ml) rice/1 cup (237 ml) water | 32–35 minutes |
| Long-Grain Brown Rice | 1 cup (237 ml) rice/1 1/4 to 1 1/2 cups(296 ml to 355 ml) water | 67–70 minutes |
Cleaning
WARNING Electrical Shock Hazard. Do not immerse base in water or other liquid.
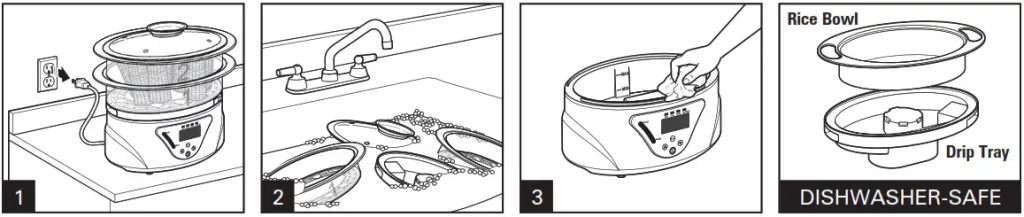
Unplug the unit and allow all parts to cool completely.
Troubleshooting
| PROBLEM | PROBABLE CAUSE/SOLUTION |
| Drip tray and/or steaming bowls tilt/are unstable. | • Drip tray installed incorrectly. Reorient the drip tray and place tray 1 first. |
| The unit will not turn on. | • Check to ensure the unit is plugged in. |
| Steaming takes too long/little or no steam. | • Heating element has accumulated deposits. Clean by putting 5 Tablespoons (74 ml) white vinegar into the water reservoir; then fill the water reservoir with tap water to the MIN line. Turn unit on and set timer for 5 minutes. Allow the liquid to cool and then wash/dry all pieces thoroughly. |
| Rice cooked in a rice bowl is under/overcooked. | • Water level is too low, or lid not placed on the steam bowl. Ensure only one steaming bowl is used. Ensure lid is placed securely on the steam bowl. |
| The unit does not shut off after steaming. | • Unit has switched to Keep Warm mode. Turn steamer off if desired, or allow the unit to keep food warm until ready to eat. |
| Food not cooked uniformly. | • Steaming bowl overcrowded with food. Leave enough space for adequate steam flow. |
| Food did in the bottom tray, but not done in the top tray. | • Food cooks faster in the bottom tray. Always place the longer cooking food items in the lower tray. Or, place one tray (with the longer cooking food) onto the base and let steam first; then later add the second tray with the shorter cooking food. Try not to block steam holes. |
Limited Warranty
This warranty applies to products purchased and used in the U.S. and Canada. This is the only express warranty for this product and is in lieu of any other warranty or condition.
This product is warranted to be free from defects in material and workmanship for a period of five (5) years from the date of original purchase in Canada and one (1) year from the date of original purchase in the U.S. During this period, your exclusive remedy is repair or replacement of this product or any component found to be defective, at our option; however, you are responsible for all costs associated with returning the product to us and our returning a product or component under this warranty to you. If the product or the component is no longer available, we will replace it with a similar one of equal or greater value.
This warranty does not cover glass, filters, wear from normal use, use not in conformity with the printed directions, or damage to the product resulting from accident, alteration, abuse, or misuse. This warranty extends only to the original consumer purchaser or gift recipient. Keep the original sales receipt, as proof of purchase, is required to make a warranty claim. This warranty is void if the product is used for other than single-family household use or subjected to any voltage and waveform other than as specified on the
rating label (e.g., 120V ~ 60 Hz).
We exclude all claims for special, incidental, and consequential damages caused by a breach of express or implied warranty. All liability is limited to the amount of the purchase of rice. Every implied warranty, including any statutory warranty or condition of merchantability or fitness for a particular purpose, is disclaimed except to the extent prohibited by law, in which case such warranty or condition is limited to the duration of this written warranty. This warranty gives you specific legal rights. You may have other legal rights that vary depending on where you live. Some states or provinces do not allow limitations on implied warranties or special, incidental, or consequential damages, so the foregoing limitations may not apply to you.
To make a warranty claim, do not return this appliance to the store. Please call 1.800.851.8900 in the U.S. or 1.800.267.2826 in Canada or visit hamiltonbeach.com in the U.S. or hamiltonbeach.ca in Canada. For faster service, locate the model, type, and serial numbers on your appliance.
IMPORTANT SAFETY INFORMATION
 WARNING
Please read all instructions before using this appliance.
Safety Definitions
This is the safety alert symbol. It is used to alert of potential personal injury hazards. Obey all safety messages that follow this symbol to avoid possible injury =or death.
 DANGER
DANGER indicates an imminently hazardous situation which, if not avoided, will result in death or serious injury.
 WARNING
WARNING indicates a potentially hazardous situation which, if not avoided, could result in death or serious injury.
 CAUTION
CAUTION indicates a potentially hazardous situation which, if not avoided, may result in minor or moderate injury.
 IMPORTANT
IMPORTANT indicates installation, operation or maintenance information which is important but not hazard-related.
Child Safety
Destroy or recycle the carton, plastic bags, and any exterior wrapping material immediately after the refrigerator is unpacked. Children should NEVER use these items to play. Cartons covered with
rugs, bedspreads, plastic sheets or stretch wrap may become airtight chambers, and can quickly cause suffocation.
Safety Instructions
DO NOT store or use gasoline, or other flammable liquids in the vicinity of this or any other appliance. Read product labels for warnings regarding flammability and other hazards.
DO NOT operate the refrigerator in the presence of explosive fumes.
DO NOT store explosive substances such as aerosol cans with a flammable propellant in this appliance.Appliance shall not be exposed to rain. Remove all staples from the carton. Staples can cause severe cuts, and also destroy finishes if they come in contact with other appliances or furniture.
REFRIGERATOR SAFETY
Your safety and the safety of others are very important.
We have provided many important safety messages in this manual for your appliance. Always read and obey all safety messages.
 This is the Safety Alert Symbol. This symbol alerts you to potential hazards that can kill or injure you and others. All safety messages will follow the Safety
Alert Symbol and either the words” DANGER”, “WARNING” or “CAUTION”.
 Danger means that failure to heed this safety statement may result in severe personal injury or death
 .Warning means that failure to heed this safety statement may result in extensive product damage, serious personal injury, or death.
 Caution means that failure to heed this safety statement may result in minor or moderate personal injury, property or equipment damage.
All safety messages will alert to know what potential hazard is, tell you how to reduce the chance of injury, and let you know what can happen if the instructions are not followed.
IMPORTANT SAFEGUIDES
Before the refrigerator is used, it must be properly positioned and installed as described in this manual, so read the manual carefully. To reduce the risk of fire, electrical shock or injury when using the refrigerator, follow basic precaution, including the following:

- Plug into a grounded 3-prong outlet, do not remove grounding prong, do not use an adapter, and do not use an extension cord.
- Replace all panels before operating.
- It is recommended that a separate circuit, serving only your refrigerator be provided. Use receptacles that cannot be turned off by a switch or pull chain.
- Never clean refrigerator parts with flammable fluids. These fumes can create a fire hazard or explosion. And do not store or use gasoline or other flammable vapors and liquids in the vicinity of this or any other appliance. The fumes can create a fire hazard or explosion.
- Before proceeding with cleaning and maintenance operations, make sure the power cord of the unit is disconnected.
- Do not connect or disconnect the electric plug when your hands are wet.
- Unplug the refrigerator or disconnect power before cleaning or servicing. Failure to do so can result in electrical shock or death.
- Do not attempt to repair or replace any part of your refrigerator unless it is specifically recommended in this manual. All other servicing should be referred to a qualified technician.
 FOLLOW WARNING CALL OUTS BELOW ONLY WHEN APPLICABLE TO YOUR MODEL
- Use two or more people to move and install the refrigerator. Failure to do so can result in back or other injury.
- To ensure proper ventilation for your refrigerator, the front of the unit must be completely unobstructed. Choose a well-ventilated area with temperatures above 60°F (16°C) and below 90°F (32°C). This unit must be installed in an area protected from the elements, such as wind, rain, water spray or drips.
- The refrigerator should not be located next to ovens, grills or other sources of high heat.
- The refrigerator must be installed with all electrical, water and drain connections in accordance with state and local codes. A standard electrical supply (115 V AC only, 60 Hz), properly grounded in accordance with the National Electrical Code and local codes and ordinances is required.
- Do not kink or pinch the power supply cord of the refrigerator.
- The fuse (or circuit breaker) size should be 15 amperes.
- It is important for the refrigerator to be leveled in order to work properly. You may need to make several adjustments to level it.
- All installation must be in accordance with local plumbing code requirements.
- Make certain that the pipes are not pinched or kinked or damaged during installation.
- Check for leaks after connection. • Never allow children to operate, play with or crawl inside the refrigerator.
- If you use the drainage container, you MUST set the Drain Select switch to OFF or the water can overflow from the drainage container.
- Although the unit has been tested at the factory, due to long-term transit and storage, the first batch of cubes must be discarded.
- Do not use solvent-based cleaning agents of abrasives on the interior. These cleaners may damage or discolor the interior.
- Do not use this apparatus for other than its intended purpose.
- This appliance is not intended for use by persons (including children) with reduced physical, sensory or mental capabilities, or lack of experience and knowledge, unless they have been given supervision or instruction concerning use of the appliance by a person responsible for their safety.
- WARNING—-Do not use mechanical devices or other means to accelerate the defrosting process, other than those recommended by the manufacturer.
- WARNING—-Do not damage the refrigerant circuit.
- WARNING—- Do not use electrical appliances inside the food storage compartments of the appliance, unless they are of the type recommended by the manufacturer.
REFRIGERANT GAS WARNINGS
DANGER – Risk of fire or explosion. Flammable refrigerant used.
DO NOT use mechanical devices to defrost refrigerator. DO NOT puncture refrigerant tubing.
DANGER – Risk of fire or explosion. Flammable refrigerant used.
To be repaired only by trained service personnel. DO NOT puncture refrigerant tubing.
CAUTION – Risk of fire or explosion. Flammable refrigerant used.
Consult repair manual/ owner’s guide before attempting to service
this product. All safety precautions must be followed.
CAUTION – Risk of fire or explosion. Dispose of properly in accordance with federal or local regulations. Flammable refrigerant used.
CAUTION – Risk of fire or explosion due to puncture of refrigerant tubing;
Follow handling instructions carefully. Flammable refrigerant used.
PARTS & FEATURES

- Door bins
- Door
- Thermostat
- Chiller compartment door
- Drip tray
- Removable shelf (big)
- Removable shelf (small)
- Leveling leg
- Front foot
IMPORTANT SAFETY INSTRUCTIONS
WARNING;¥
To reduce the risk of fire, electrical shock, or injury when using your appliance, follow these basic precautions:
- Read all instructions before using the refrigerator. DANGER or WARNING: Risk of child entrapment.
Child entrapment and suffocation are not problems of the past. Junked or
abandoned refrigerators are still dangerous … even if they will “just sit in the - garage a few days.” Before you throw away your old refrigerator: Take off the doors. Leave the
- shelves in place so that children may not easily climb inside. . Never allow children to operate, play with, or crawl inside the refrigerator. Never clean refrigerator parts with flammable fluids.The fumes can create a
- fire hazard or explosion. Do not store or use gasoline or any other flammable vapors and liquids in the vicinity of this or any other refrigerator. The fumes can create a fire hazard or explosion.
INSTALLATION INSTRUCTIONS
- Before Using Your Unit
- Remove the exterior and interior packaging.
- Check to be sure you have all of the following parts:
1 Water Drip Tray
1 Ice Cube Tray
1 Instruction Manual - Before connecting the unit to the power source, let it stand upright for approximately 2 hours.
This will reduce the possibility of a malfunction in the cooling system from handling during transportation - Clean the interior surface with lukewarm water using a soft cloth.
Installino Your Unit
- This appliance is designed to be free standing only, and should not be recessed or built-in.
- Place your unit on a floor that is strong enough to support the unit when it is fully loaded. To level your unit, adjust the leveling legs at the bottom of the unit.
- Allow 5 inches of space between the back and sides of the unit, which allows the proper air circulation to cool the compressor and condenser.
- Locate the unit away from direct sunlight and sources of heat (stove, heater, radiator, etc. Direct sunlight may affect the acrylic coating and heat sources may increase electrical consumption. Extreme cold ambient temperatures may also cause the unit not to perform properly.
- Avoid locating the unit in moist areas.
- Plug the unit into an exclusive, properly installed and grounded wall outlet. Do not under any circumstances cut or remove the third (ground) prong from the power cord. Any questions concerning power and/or grounding should be directed toward a certified electrician or the service center.
- After plugging the appliance into a wall outlet, allow the unit to cool down for 2-3 hours before placing food in the refrigerator and freezer compartments.
Electrical Connection
;¥’Warning;¥’
Improper use of the grounded plug can result in the risk of electrical shock. If the power cord is damaged, have it replaced by the service center.
This unit should be properly grounded for your safety. The power cord of this unit is equipped with a three-prong plug which mates with standard three prong wall outlets to minimize the possibility of electrical shock.
Do not under any circumstances cut or remove the third ground prong from the power cord supplied. For personal safety, this appliance must be properly grounded.
This unit requires a standard 115/120 Volt AC -/60Hz electrical outlet with three-prong ground.
Have the wall outlet and circuit checked by a qualified electrician to make sure the outlet is properly grounded. When a standard 2-prong wall outlet is encountered, it is your responsibility and obligation to have it replaced with a properly grounded 3-prong wall outlet.
The cord should be secured behind the unit and not left exposed or dangling to prevent accidental injury.
The unit should always be plugged into its own individual electrical outlet which has a voltage rating that matches the rating label on the appliance. This provides the best performance and also prevents overloading house wiring circuits that could cause a fire hazard due to overheating.
Never unplug the unit by pulling the power cord. Always grip the plug firmly and pull straight out from the receptacle. Repair or replace immediately all power cords that have become frayed or otherwise damaged. Do not use a cord that shows cracks or abrasion damage along its length or at either end. When moving the unit, be careful not to damage the power cord.
► Extension Cord
Because of potential safety hazards under certain conditions, it is strongly recommended that you do not use an extension cord with this unit. However, if you must use an extension cord it is
absolutely necessary that it be a UL/CUL-Listed, 3-wire grounding type appliance extension cord having a grounding type plug and outlet and that the electrical rating of the cord be 115 volts and at least 10 amperes.
► SURGE PROTECTOR
Most electrical appliances use a series of electric control boards to operate. These boards are very susceptible to power surges and could be damaged or destroyed. If the appliance is going to be used in an area or if your city/country is prone to power surges/outages; it is suggested that you use a power surge protector for all electrical devices/appliances you use. The surge protector that you select must have a surge block high enough to protect the appliance it is connected to. If you have any questions regarding the type and size of surge protector needed contact a licensed electrician in your area.
Damages due to power surges are not considered a manufacturer-covered defect and will void your product warranty.
► Reversing the Door Swing of Your Appliance
This appliance has the capability of the door opening from either the left or right side. The unit is delivered to you with the door opening from the left side.
Following refrigerator pictures are for your reference only.
OPERATING YOUR UNIT
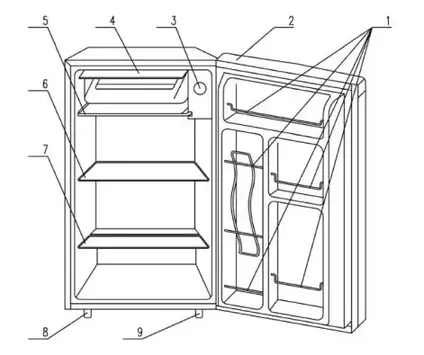
► Setting the Temperature Control
- Your unit has only one control for regulating the temperature in the compartment. The temperature control is located on the upper right hand side of the compartment.
- The first time you turn the unit on, set the temperature control to “5”.
- The range of the temperature control is from position “O” to “5”. After 24 to 48 hours, adjust the temperature control to the setting that best suites your needs. The setting of “3” should be appropriate for home or office use.
- To turn the appliance off, turn the temperature control to “O”.
NOTE:
- Turning the temperature control to “O” position stops the cooling cycle but does not shut off the power to the unit.
- If the unit is unplugged, has lost power, or is turned off, you must wait 3 to 5 minutes before restarting the unit. If you attempt to restart before this time delay, the unit will not start.
► Using Your Ice Cube Tray
- Recommended thermostat setting for ice-making is position 5.
- Fill the ice cube tray (two thirds of it) with cold water or with any liquid suitable for freezing and place the tray on the bottom of the chiller compartment to freeze properly.
- Dry the tray, otherwise it may stick to the bottom of the chiller.
- The best method to get ice cubes out of the tray is to hold the tray under cold tap water for a second.
- To eject the ice cubes from the tray, place over the ice bucket and twist slightly.
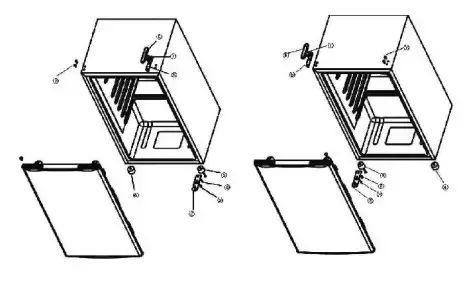
► The Chiller Compartment
- This compartment is designed for production of ice cubes and short-term storage (3-4 days at most) of some commercially frozen foods.
- The temperature in this compartment does not get cold enough to freeze food safely for long periods of time and works best when the food is already frozen.
- By design, this chiller compartment is not a true freezer, and may not keep ice cream frozen, or freeze items.
- A colder setting may be used for these items, but other items in the refrigerator may also be affected.
- The chiller door is susceptible to breaking due to excessive ice build up. This part is not covered under your warranty. Be sure to defrost when the ice reaches 1/4 inch thickness.
CARE AND MAINTENANCE
► Defrosting Your Unit
- Defrost the unit when the frost accumulated on the evaporator is about 5mm (1/5 inch) thick. Set the thermostat dial to “O” position.
- Remove frozen or perishable foods from the appliance and place it in a cooler to protect the food.
- During the defrost cycle, the ice melts into the water collection tray.
- To remove the water, either remove the water collection tray and/or place a collection container under the tray.
- Dry the water collection tray and place back under the appliance compartment.
- Defrosting usually takes a few hours. After defrosting, return the thermostat dial to the desired position. To defrost quickly remove all foods from the unit and leave the door open. Never use a knife or other metal instrument to scrape ice/frost from the evaporator.
► Cleaning Your Unit
- Turn the temperature control to “O”, unplug the unit, and remove the food, shelves, and trays.
- Wash the inside surfaces with a warm water and baking soda solution. The solution should be about 2 tablespoons of baking soda to a quart of water.
- Wash the shelves and trays with a mild detergent solution.
- The outside of the unit should be cleaned with mild detergent and warm water.
- Wring excess water out of the sponge or cloth before cleaning the area of the controls, or any electrical parts.
- Wash the outside cabinet with warm water and mild liquid detergent. Rinse well and wipe dry with a clean soft cloth.
CAUTION:
Failure to unplug the unit could result in electrical shock or personal injury.
CAUTION
Do not use boiling water because it may damage the plastic parts. In addition, never use a sharp or metallic instrument to remove frost as it may damage the cooling coils and will
void the warranty. We recommend using a plastic scraper.
- Use a sponge or towel to pick up the melting ice off the unitfloor.
- Remove the frozen food from the chiller compartment and place it in a cooler to protect the food.
► Power Failure
Most power failures are corrected within a few hours and should not affect the temperature of your unit if you minimize the number of times the door is opened. If the power is going to be
off for a longer period of time, you need to take the proper steps to protect your food
► Vacation Time
Short vacations: Leave the unit operating during vacations of less than three weeks.
Long vacations: If the appliance will not be used for several months, remove all food and unplug the power cord. Clean and dry the interior thoroughly. To prevent odor and mold growth, leave the door open slightly: blocking it open if necessary.
► Moving Your Unit
- Remove all the food.
- Securely tape down all loose items inside your unit.
- Turn the leveling screws up to the base to avoid damage.
- Tape the door shut.
- Be sure the unit stays secure in the upright position during transportation. Also protect the outside of the unit with a blanket, or similar item.
PROBLEMS WITH YOUR UNIT
You can solve many common unit problems easily, saving you the cost of a possible service call. Try the suggestions below to see if you can solve the problem before calling the servicer.
TROUBLESHOOTING GUIDE
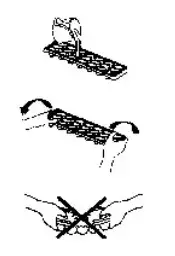
WIRING DIAGRAM
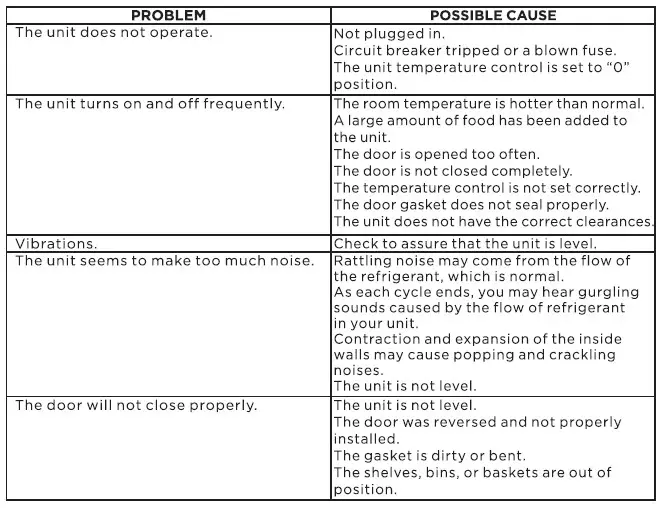
Voltage/ Frequency: 115V/60Hz
For service assistance and product information, please call: 1-800-968-9853. Curtis International Ltd.
7045 BECKETT DRIVE, UNIT 15, MISSISSAUGA, ON, L5S 2A3 www.curtisint.com
► Handle install instruction
- Take out the handle from the unit and remove the package of two handle parts and 2 screws.
- Use a screwdriver to secure the handle to the bottom of the door using the two screws.
- Push the handle horizontally until the handle is secure.
- Push and pull the handle to make sure the handle is installed well.
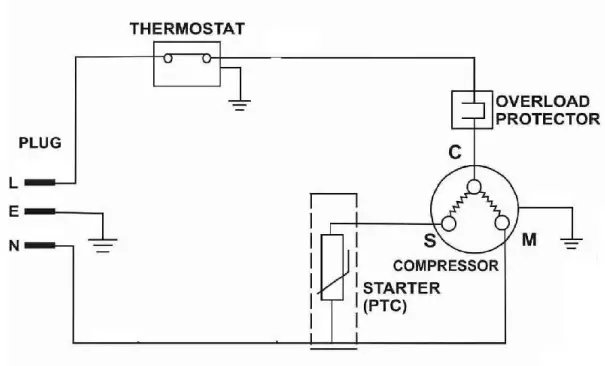
► Bottle Opener Assembly
- Remove the two Screws from the exterior of the refrigerator door using a Phillips-head screwdriver.
- Align the holes of the Bottle Opener with the holes on the refrigerator door. Secure the Bottle Opener to the door using the two Screws and screwdriver
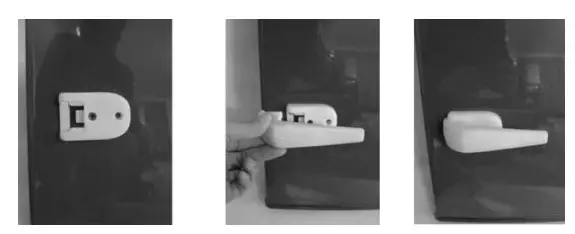
PRODUCT SPECIFICATIONS
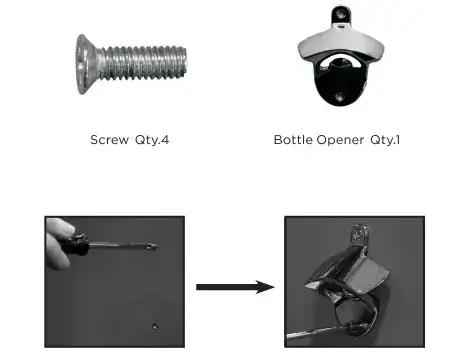
WARNING – Keep ventilation openings, in the appliance enclosure or in the built-in structure, Clear of obstruction.
WARNING – Do not use mechanical devices or other means to accelerate the defrosting process, other than those recommended by the manufacturer.
WARNING – Do not damage the refrigerant circuit.
WARNING – Do not use electrical appliances inside the food storage compartments of the appliances, unless they are of the type recommended by the manufacturer.
DANGER: Risk of child entrapment. Before you throw away your old refrigerator or freezer:
- Take off the doors.
- Leave the shelves in place so that children may not easily climb inside.
LIMITED WARRANTY
To make a warranty claim, please email [email protected] or call 1-800-968-9853.
Year Warranty
This product is warranted to be free from defects in material and workmanship for a period of one (1) year from the date of original purchase. During this period, your exclusive remedy is repair or replacement of this product or component found to be defective, at our option; however, you are responsible for all costs associated with returning the product to us. If the product or component is no
longer available, we will replace with a similar one of equal or greater value. Prior to a replacement being sent, the product must be rendered inoperable or returned to us.
This warranty does not cover glass, filters, wear from normal use, use not in conformity with the printed directions., or damage to the product resulting from accident, alteration, abuse, or misuse.
This warranty extends only to the original consumer purchaser or gift recipient. Keep the original sales receipt, as proof of purchase is required to make a warranty claim. This warranty is void if the product
is used for other than single-family household use or subjected to any voltage and waveform other than as on the specified rating on the label (e.g., 120V-60Hz).
We exclude all claims for special, incidental, and consequential damages caused by breach of express or implied warranty. All liability is limited to the amount of the purchase price. Every implied warranty, including any statutory warranty or condition of merchantability or fitness for a particular purpose, is disclaimed except to the extent prohibited by law, in which case such warranty or condition is limited to the duration of this written warranty. This warranty gives you specific legal rights. You may have other legal rights that vary depending on where you live. Some states or provinces do not allow limitations on implied warranties or special, incidental, or consequential damages, so the foregoing limitations may not apply to you.
For faster service, locate the model, type, and serial numbers on your appliance.
ATTACH YOUR PROOF OF PURCHASE HERE, PROOF OF PURCHASE IS REQUIRED TO OBTAIN WARRANTY SERVICE.
Please have the following information available when you contact the Support Team:
- Name, address and telephone number.
- Model number and serial number.
- A clear, detailed description of the problem. Proof of purchase including dealer or retailer name, address and date of purchase
Hamilton Beach HBWC109-WHITE Water Dispenser
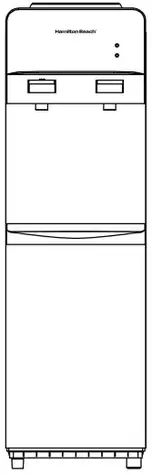
BEFORE USE, PLEASE READ AND FOLLOW ALL SAFETY RULES AND OPERATING INSTRUCTIONS.
Hamilton Beach ® is a registered trademark of Hamilton Beach Brands,Inc. used under license by Curtis International Ltd.
For service assistance and product information, please call: 1-800-968-9853. Curtis International Ltd. 7045 BECKETT DRIVE, UNIT 15, MISSISSAUGA, ON, L5S 2A3 www.curtisint.com
Important Safeguards
- When using electrical appliances, basic safety precautions should always be followed, including the following:
- WARNING: BURN HAZARD. The product heats water to a temperature of approximately 95° C / 203° F. Water temperatures above 52° C / 125° F can cause severe burns or death from scalding. Children should be supervised by an adult when using this product.
- WARNING: FIRE HAZARD. Do not store or use gasoline or other flammable vapors and liquids in the vicinity of this or any other appliance. Do not operate the dispenser with a damaged cord. Do not use with an under rated extension cord or an extension cord without a ground.
- WARNING: SHOCK HAZARD. Unplug the water dispenser before cleaning or wiping up spilled water on unit Do not attempt to service the dispenser. Do not operate dispenser with a damaged cord.
- NOTE: The water pump system includes a special safety feature that prevents operation when the water bottle is empty. Water pump
operation is also linked to the Door Switch (see # 10 on the Parts and :Features list) mounted inside of the lower storage compartment. When you replace the water bon:le, remember to close the Lower Door (see # 8 on the Parts and Features list). - Never turn the product upside down or tilt more than 45 degTees. f the unit has been resting on its side or upside down for a long period of time, the unit must be put in the upright position for approximately 12 hours before turning it on.
- Never use this dispenser with water that is unsafe to drink or is from an unknown source.
- Never use any other liquids in this dispenser other than bottled water.
- Install this water dispenser in a dry place away from direct sunlight. For indoor use only.
- Never put anything flammable close to the dispenser.
- Leave a minimum of 2″ {5 cm} around the back and sides of the dispenser for proper ventilation.
- Regular cleaning of the water dispenser is required for proper operation. Clean the dispenser every four months using the instructions in this manual.
NAME AND STRUCTURE

- Power ON/OFF switches at rear
- Water Bottle Inlet
- Hot Water Button
- Cold Water Button
- Indicator Lights
- Hot Water Faucet
- Cold Water Faucet
- Water Drip Tray
OPERATION
- Ambient temperature
- Temperature 0-35°C
- Atmosphere 86-106 kpa
- VOLTAGE:115V/60HZ
- Position the water cooler on the horizontal, structurally sound ground. Leave an adequate open space (10-20 cm) behind the water cooler for good ventilation.
- When using the bottles holding ultra-pure water, distilled water or space water with the so-called clever lid, tear off the hygienic labels on the lid. Place the bottles at the intake, then the core of water guard will automatically open the valve and seal it in the meantime, when moving the bottles, the valve will also seal automatically to avoid any possible oozing.
- Push the hot water valves, bubbles are generated inside the bottle, indicating that water is flowing into hot water and cold water tanks, keep pressing the hot water valve until water flows out, dispensing cold water required need no particular adjustment.
- Caution: Do not connect the electrical power plug until water comes out of the hot water tap.
- After water is flowing out from the hot tap, then open the switch at the back side.
- Turn the heating switch on, the red indicator is on and the heating system starts working. When the hot water comes up (86-95°C) or so, the red light goes off, the heating system stops working, and it is on a warm keeping status.
- When the hot water temperature is lower than 85°C, the heating system will resume working again automatically.
- Turn on the cooling switch, the green indicator is on and the cooling system starts working. When the cold water falls down to 5-10°C (for compressor-cooling), the green light goes off, the cooling system stops working, and it is on a cold keeping status.
- When the cold water temperature goes up to a set degree, the cooling system will resume working again atomically.
- Since the temperature has already been adjusted, it is unnecessary for customers to set the temperature.
- If device is not applied for a long time, after the hot water cools down, please remove the power plug and revolve the drain the rest water in the hot tank then tighten the cap open the cold water tap to drain the rest water in the cold tank.
- If there is no water flowing from cooling tap, please shut down the cooling switch until there is water flowing out.
CAUTION
- The back of the device should be kept away from wall and high temperature elements, TV or video valuables and be put in shady places.
- Do not switch on untilwater comes out of the hot water valve to prevent any damage on the heating tube.
- During operation keeping it beyond the children to avoid scald.
- Never turn on the heating switch when there is no water
- When carrying it, the angle of inclination should be less than 45°.
- Choose the proper electrical wire and plug, keep the plug from being too hot. Meanwhile, adopt the ground wire to avoid any electric shock. Please shut down the power before leaving or during night.
- This appliance is not intended for use by persons (including children) with reduced physical, sensory or mental capabilities, or lack of experience and knowledge, unless they have been given supervision or instruction concerning use of the appliance by a person responsible for their safety.
- Children should be supervised to ensure that they do not play with the appliance.
- Household used only.
- If the supply cord is damaged, it must be replaced by the manufacturer, its service agent or similarly qualified persons in order to avoid a hazard.
- WARNING— Do not use electrical appliances inside the food storage compartments of appliance,unless they are of the type recommended by the manufacturer.
MAINTENANCE
- Remove power plugs or disconnect from the mains before performing any maintenance or servicing the product.
- Never use detergent or chemicals harmful to health to clean the water tank.
- Do not directly spray water on the surface of the product.Wipe the front and back of the product with water-soaked soft cloth.
- If dust of other foreign substance has accumulated on the condenser, wipe off with water soaked soft cloth.
- After cleaning the product, completely dry it. Fill the water with the tanks until water comes out of the hot water tap, then connect the electric power plug. If the surface of the electric heater in the hot water tank is deposited by water deposition, heating capacity will decrease. Fill hot water tank with aqueous solution of 2%edible citric acid and keep it for about two hours then cleaning. If the problems can not be solved contact your dealer or the service center of our company.
- If the supply cord on this device is damaged. It must be replaced with a special cord switch is obtainable at the service center of our company.
TROUBLESHOOTING GUIDE
| Problem | Possible cause |
| Water cooler does not operate | Not plugged in
The circuit breaker tripped or blown fuse. |
| Water cooler is not cold enough | Check to be sure the cold switch on the back is on.
The water cooler does not have the correct clearance. |
| Water cooler hot water is not hot enough | Check to be sure the hot switch on the back is on. |
| Compressor turns on and off frequently | The room temperature is hotter than normal. The water cooler does not have the correct
clearance. |
| Vibration | Check to assure that the water cooler is level |
| The water cooler seems to make too much noise | The rating noise may come from flow of the refrigerant, which is normal.
As each cycles ends, you may hear gurgling. Sound cause by the flow of refrigerant in your water cooler. Contraction and expansion of inside walls may cause popping and cracking noises. The water cooler is not level. |
| Will not dispense hot water. | It may be caused by dry burn. Unplug the power cord and wait for more than 1 hour.Then plug in, and fill the tank with the water, the hot tank may work again. |
WIRING DIAGRAM
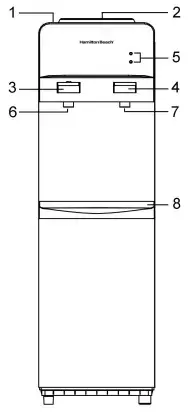
To make a warranty claim, do not return this product to the store. Please email [email protected] or call 1-800-968-9853.
1 Year Warranty
- This product is warranted to be free from defects in material and workmanship for a period of one (1) year from the date of original purchase. During this period, your exclusive remedy is repair or replacement of this product or component found to be defective, at our option; however, you are responsible for all costs associated with returning the product to us. If the product or component is no longer available, we will replace with a similar one of equal or greater value. Prior to a replacement being sent, the product must be rendered inoperable or returned to us.
- This warranty does not cover glass, filters, wear from normal use, use not in conformity with the printed directions., or damage to the product resulting from accident, alteration, abuse, or misuse. This warranty extends only to the original consumer purchaser or gift recipient. Keep the original sales receipt, as proof of purchase is required to make a warranty claim. This warranty is void if the product is used for other than single-family household use or subjected to any voltage and waveform other than as on the specified rating on the label (e.g., 120V~60Hz).
- We exclude all claims for special, incidental, and consequential damages caused by breach of express or implied warranty. All liability is limited to the amount of the purchase price. Every implied warranty, including any statutory warranty or condition of merchantability or fitness for a particular purpose, is disclaimed except to the extent prohibited by law, in which case such warranty or condition is limited to the duration of this written warranty. This warranty gives you specific legal rights. You may have other legal rights that vary depending on where you live. Some states or provinces do not allow limitations on implied warranties or special, incidental, or consequential damages, so the foregoing limitations may not apply to you.
- For faster service, locate the model, type, and serial numbers on your appliance.
- ATTACH YOUR PROOF OF PURCHASE HERE, PROOF OF PURCHASE IS REQUIRED TO OBTAIN WARRANTY SERVICE.
- Please have the following information available when you contact the Support Team:
- Name, address and telephone number.
- Model number and serial number.
- A clear, detailed description of the problem.
- Proof of purchase including dealer or retailer name, address and date of purchase.

At least one copy of this manual should be kept in a location available at all times to maintenance and management staff.
IMPORTANT SAFEGUARDS
When using electrical appliances, especially when children are present, basic safety precautions should always be followed, including the following:
READ ALL INSTRUCTIONS BEFORE USING. KEEP AWAY FROM WATER.
–As with most electrical appliances, electrical parts are electrically live even when the switch is off. To reduce the risk of death by electric shock:
- Always unplug it immediately after using. Do not use where the unit can fall into or reach a tub, sink, toilet, or shower. Always store in a drawer after using. To unplug, grasp the plug and pull from the outlet. Never pull from the power cord.
- Do not use while bathing or in the shower.
- Do not place or store hair dryer where it can fall or be pulled into a tub or sink.
- Do not place in or drop into water or other liquid.
- If unit falls into water, unplug it immediately. Do not reach into the water.
When using electrical appliances, basic safety precautions should always be followed to reduce the risk of burns, fire, electric shock, and/or injury to persons, including the following: - Read all instructions.
- This appliance is not intended for use by or on persons (including children) with reduced physical, sensory, or mental capabilities, or lack of experience and knowledge, unless they are closely supervised and instructed concerning use of the appliance by a person responsible for their safety.
- Close supervision is necessary when any appliance is used by or near children. Children should be supervised to ensure that they do not play with the appliance. Do not place in or drop into water or other liquid.
- This appliance should never be left unattended when plugged in.
- Use this appliance only for its intended use as described in this manual
- Do not use attachments not recommended by the appliance manufacturer.
- Attachments may be hot during use. Allow them to cool before handling.
- Never operate this appliance if it has a damaged cord orplug, if it is not working properly, is damaged, or if it has been dropped into water or other liquid. Email customer service for information on examination, repair, or electrical and mechanical adjustment.
- Keep the cord away from heated surfaces. Do not wrap cord around hand unit.
- Never block the air openings of the appliance, or place it on a softsurface such as a bed, couch, or towel where the air openings may be blocked. Keep the air openings free of lint, hair, etc.
- Never use while sleeping.
- Never drop or insert any object into any opening in the unit.
- Do not use outdoors or operate where aerosol (spray) products are being used or where oxygen is being administered.
- Do not use an extension cord with this appliance.
- Do not direct hot air toward eyes or other heat-sensitive areas.
- The air outlet grille and surrounding area may be hot during and after use. Allow them to cool before handling.
- Do not place appliance on any surface while it is operating.
- While using the appliance, keep your hair away from the air intake grille.
- Never use hair dryer for heating or drying clothing or footwear.
- Always unplug unit before cleaning. Refer to Care and Cleaning section.
- Do not use voltage converter.
– SAVE THESE INSTRUCTIONS –
Other Consumer Safety Information
Electrical Shock Hazard: This appliance has a polarized plug (one wide blade) that reduces the risk of electric shock. The plug fits only one way into a polarized outlet. Do not defeat the safety purpose of the plug by modifying the plug in any way or by using an adapter. If the plug does not fit fully into the outlet, reverse the plug. If it still does not fit, have an electrician replace the outlet.
The length of the cord used on this appliance was selected to reduce the hazards of becoming tangled in or tripping over a longer cord. The electrical rating of the extension cord must be equal to or greater than the rating of the appliance. Care must be taken to arrange the extension cord so that it will not drape over the counter top or tabletop where it can be pulled on by children or accidentally tripped over.
Parts and Features

Operation Instructions
TESTING THE ALCI PROTECTION DEVICE
This appliance is equipped with a polarized Appliance Leakage Circuit Interrupter plug (ALCI). This device will automatically shut off hair dryer under certain abnormal operating conditions, such as submersion of dryer in water.
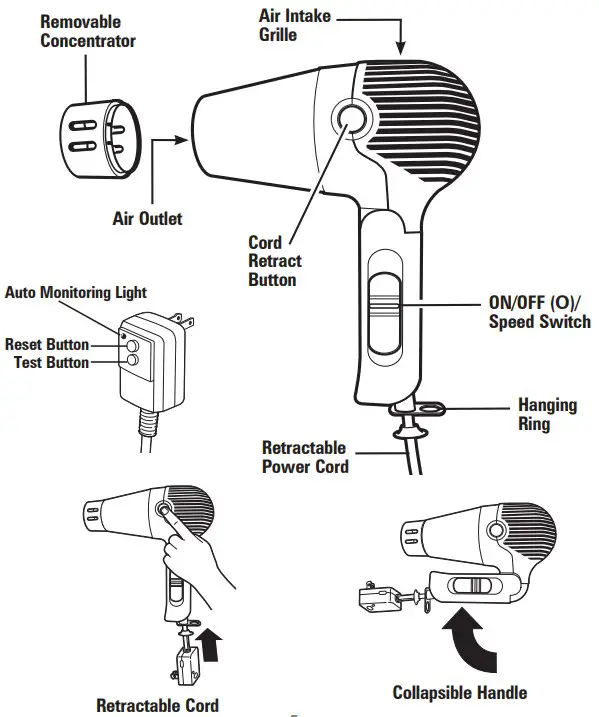
The ALCI must be tested before each use of the hair dryer.
- Make sure ALCI is plugged in; then press the “Reset” button.
- Press “Test” button. The “Reset” button should pop out, which indicates the ALCI is working properly.
NOTE: If the “Reset” button does not pop out during the test, or pops out before or during operation, or if hair dryer fails to function properly, do not operate hair dryer. Refer to the warranty. - Press the “Reset” button again to reactivate the ALCI. You are now ready to operate the hair dryer.
- If Auto Monitoring Light stays on or continues to blink, or Reset Button continues to pop out, the ALCI is not functioning properly. Stop using Hair Dryer and email customer service for information on examination and repair.
- In addition to the above required manual test, your ALCI plug will automatically conduct a test every few minutes. If the Auto Monitoring Light stays on or continuously blinks or the Reset Button pops out, unplug and allow the appliance to cool. Press Reset Button and plug into outlet. The appliance should then function normally. If not, email customer service for further instructions.
TO DRY HAIR
- Towel dry to remove excess water from hair.
- Choose a setting that is most comfortable and that gives the best results:
- MED and LOW are best for styling.
- HIGH is best for drying hair.
Burn Hazard. Do not direct a high volume of heat continuously to one area. This will overheat hair and/or scalp.
- To use the removable concentrator (optional): attach concentrator to nozzle of unit. The concentrator provides extra airflow over a concentrated area of the hair/scalp.
- Keep dryer a few inches from hairand in motion while using.
- When finished, switch to OFF (O) and unplug dryer.
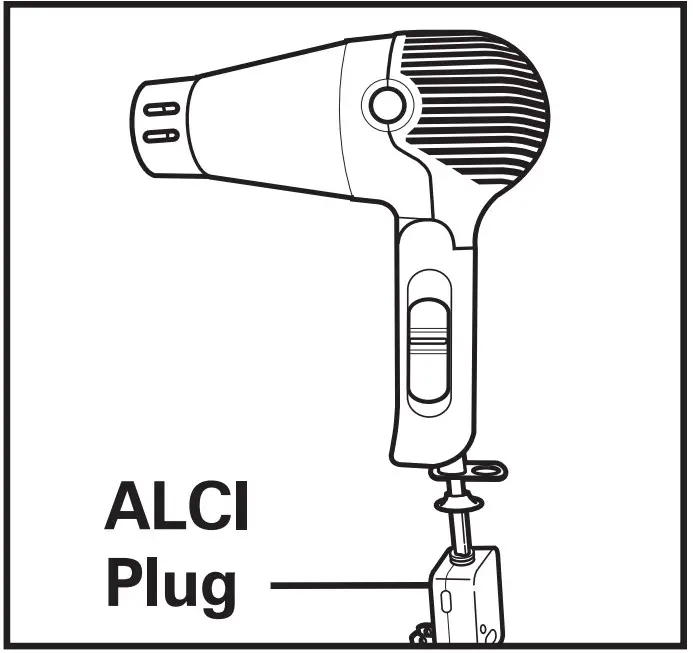
TO USE RETRACTABLE CORD
- Pull cord to desired length. Do not unwind cord beyond colored tape indicator on cord.
- To store cord, press and hold cord release button while guiding cord into storage area.
Hold plug while retracting cord. Do not let cord retract freely. Cord may jam on reel or loose cord may whip back and forth and could cause injury.
Care and Cleaning
Shock Hazard. There are no user-serviceable parts in this appliance. All servicing should be performed by an authorized service representative.
- Unplug dryer before cleaning.
- Clean external surfaces of dryer with a damp soft cloth or sponge. Do not use harsh cleansers, detergents, or solvents.
- Clean air intake and air outlet grilles with a vacuum cleaner.
- NEVER PUT HAIR DRYER IN WATER.
- Dry thoroughly before plugging in and using.
NOTES:
- The motor never requires grease or oil.
- Untangle cord before use.
LIMITED WARRANTY
This warranty applies to products purchased and used in the U.S. and Canada. This is the only express warranty for this product and is in lieu of any other warranty or condition.
This product is warranted to be free from defects in material and workmanship for a period of one (1) year from the date of original purchase.
If you have a claim under this warranty please contact our TECHNICAL SERVICES DEPARTMENT at 1-866-285-1087 or 910-693-4277. For faster service, locate the model, type, and series numbers on your appliance.
This warranty does not cover glass, filters, wear from normal use, use not in conformity with the printed directions, or damage to the product resulting from accident, alteration, abuse, or misuse, or subjecting it to any voltage and waveform other than as specified on the rating label (for example, 120V ~ 60 Hz).
This warranty extends only to the original purchaser. Keep the original sales receipt, as proof of purchase is required to make a warranty claim or the warranty term will be based on the date of manufacture plus one (1) year.
We exclude all claims for special, incidental, and consequential damages caused by breach of express or implied warranty. All liability is limited to the amount of the purchase price. Every implied warranty, including any statutory warranty or condition of merchantability or fitness for a particular purpose, is disclaimed except to the extent prohibited by law, in which case such warranty or condition is limited to the duration of this written warranty. This warranty gives you specific legal rights. You may have other legal rights that vary depending on where you live. Some states or provinces do not allow limitations on implied warranties or special, incidental, or consequential damages, so the foregoing limitations may not apply to you.
]]>
Customer Service Number
In USA: 1-800-851-8900 (8:00 a.m. -5:00 p.m. Eastern Standard Time)
In Canada: 1-800-267-2826
Web Site Address – http://www.hambeach.com
Keep this number for future reference!
IMPORTANT SAFEGUARDS
When using electrical appliances basic safety precautions should be observed, including the following:
- Read all instructions.
- To protect against risk of electric shock, do not immerse base, cord, or plug in water or other liquid.
- Close supervision is necessary when any appliance is used by or near children.
- UNPLUG FROM OUTLET WHEN NOT IN USE, before putting on or taking off parts and before cleaning.
- Avoid contact with moving parts.
- Do not operate any appliance with a damaged cord or plug, or after the appliance malfunctions, or is dropped or damaged in any manner. Call our toll-free customer service number for information on examination, repair, or electrical or mechanical adjustment.
- The use of attachments not recommended or sold by Hamilton Beach/Proctor-Silex, Inc. may cause fire, electric shock, or injury.
- Do not use outdoors.
- Do not let cord hang over edge of table or counter or touch hot surfaces, including stove.
This appliance is intended for household use only.
SAVE THESE INSTRUCTIONS
CONSUMER SAFETY INFORMATION
This appliance is equipped with a polarized plug. This type of plug has one blade wider than the other. The plug will fit into an electrical outlet only one way. This is a safety feature. If you are unable to insert the plug into the outlet, try reversing the plug.
If the plug should still fail to fit, contact an electrician to replace the obsolete outlet. Do not attempt to defeat the safety purpose of the polarized plug.To avoid an electrical circuit overload do not use a high wattage appliance on the same circuit with the Juicit®. This appliance has a short cord to reduce the hazards of becoming entangled or tripping over a longer cord. An extension cord may be used if the electrical rating of the extension cord is equal to or greater than the rating of the Juicit or juicer. Use only an extension cord rated 10 amperes or greater. Care must be taken to arrange the extension cord so that it will not drape over countertops or tabletops where it can be pulled on by children or tripped over.
KNOW YOUR JUICER

HOW TO USE

- Unplug from outlet.
- Place pitcher onto base. Hold base and turn pitcher clockwise to lock. The pitcher will “click” when locked and the vertical lines on pitcher and base will line up. The juice level indicator should be above the logo. (Illustration A.)
- To juice, place reamer attached to strainer onto center shaft of juicer, aligning handle of strainer with the handle of the pitcher. (Illustration B.)
- For juice with more pulp, separate reamer from strainer by pulling apart. Lock pitcher onto base following instructions in 2. Place reamer onto center shaft of juicer. (Illustration C.) If reamer is used without strainer, the juice will contain pulp and seeds. When serving, pour juice through a slotted spoon to remove the seeds.


5. Plug cord into 120 volt AC outlet.
6. Push down on reamer with halved fruit to start the juicing action. Lift the fruit up off the reamer and the juicer stops. This juicer is designed with an auto-reverse. It automatically reverses direction, from time to time, to make juicing easier.
7. When finished juicing, unplug from outlet, then remove reamer (and strainer if used).
8. To unlock pitcher, hold base and turn pitcher counterclockwise.
9. Pour juice from pitcher.
JUICE TIPS
This juicer is designed to juice citrus fruit such as oranges, lemons, limes, and grapefruit. For maximum juice, fruit should be room temperature. Before juicing, roll fruit between counter top and palm of your hand. Slice fruit in half, cutting across sections.
HOW TO CLEAN
- Unplug from electrical outlet.
- Lift off reamer (and strainer if used).
- To unlock pitcher, hold base and turn pitcher counterclockwise.
- Lift pitcher to remove.
- The lid, reamer, strainer, and pitcher may be washed in hot, soapy water or in the top rack of an automatic dishwasher.
- Wipe base with a damp cloth.
- Reassemble for storage.
TWO YEAR LIMITED WARRANTY
Hamilton Beach/Proctor-Silex, Inc. warrants this appliance to be free from defects in material and workmanship for a period of two (2) years from the date of original purchase, except as noted. There is no warranty with respect to the following, which may be supplied with this appliance: glass parts, glass containers, cutter/strainer, nonstick soleplate and/or nonstick cooking surfaces. This warranty extends only to the original consumer purchaser and does not cover damage from abuse, neglect, use for commercial purposes, or any other use not found in the printed directions.
HAMILTON BEACH/PROCTOR-SILEX, INC. DISCLAIMS ALL RESPONSIBILITY FOR
CONSQUENTIAL DAMAGES OR INCIDENTAL LOSSES CAUSED BY USE OF THIS APPLIANCE. Some states, or provinces, do not allow this exclusion or limitation of incidental or consequential losses, so the foregoing disclaimer may not apply to you. If you have a claim under this warranty, DO NOT RETURN THE APPLIANCE TO THE
STORE! Please call our CUSTOMER SERVICE NUMBER. (For faster service please have model, type, and series numbers ready for operator to assist you.)
In the U.S. 1-800-851-8900 ••• In Canada 1-800-267-2826
This warranty gives you specific legal rights, and you may also have other legal rights
which vary from state to state, or province to province.
Hamilton Beach Proctor-Silex, Inc.
Washington, North Carolina 27889
Hamilton-Beach-Juicit-Citrus-Juicer-User-ManualDownload
Questions about your Manual ? Post in the comments!