
Infrared Thermal Image Detector
Model: HG-T01 V1.1
Symbol Description

Attention refers to the matters needing attention in the process of use. If you do not operate according to the requirements, losses may be caused

Tips help to better experience the product functions and performance during use
.

Usage Advice – Please read before using the product
.
! The detector uses a very sensitive thermal sensor. Therefore, under no circumstances (power on or power off) should the lens be directly aimed at the source of intense radiation (such as the sun, direct laser beam or reflection, etc.), otherwise it will cause permanent damage to the detector!
! The original packaging box must be used during transportation. Do not shake or collide with the detector violently during use and transportation.
It is recommended to use the original packaging box to store the detector, and place it in a cool, dry, ventilated environment without strong electromagnetic field.
! Avoid oil stains and various chemicals from dirtying the lens surface and damaging the surface. Please cover the lens after use.
! Please copy (back up) the data to a computer frequently to prevent the risk of data loss.
! Before reading the data accurately, it may take 3-5 minutes to warm up when the detector is powered on for the first time.
! In order to ensure more accurate temperature measurement, please put the detector within the range of 1-4m to the object to be measured.
! The Product uses two 18650 lithium batteries for power supply. Please install the batteries correctly according to the instructions. Pay attention to the polarity of the batteries during installation. Be sure to select the same brand and model when it is required to replace the batteries, otherwise it may cause product damage or explosion.
! Please do not open the case or modify it without authorization. Maintenance can only be carried out by authorized personnel of the Company.
! Please be sure to read this manual carefully before use.
Product Overview
HG-T01 infrared thermal image detector is a non-contact, highly sensitive and intelligent infrared imaging detection system that does not need to be equipped with a computer. It can be externally connected to audio and video device, and can be flexibly and conveniently deployed. The product uses dual-light monitoring lens to efficiently integrate infrared thermal imaging and AI recognition technology, uses dual-light configuration for dynamic ranging, and high-performance infrared core to bring in more accurate temperature measurement, forming a complete set of intelligent temperature monitoring solutions.
Specifications:
- Product name: Infrared thermal image detector
- Product model: HG-T01
- Type of thermal imaging sensor: uncooled focal plane detector
- Sensor pixel: 160120 Response wave band: 7.5~14m Pixel spacing: 17m NETD60mK F/1300K 50Hz NETD: 60mK (F/1, 300K, 50Hz) Focusing mode: fixed focus Frame rate: 15Hz Temperature measuring range: 20-50 (Note 1)
- Temperature measuring accuracy: 0.5 (with blackbody 0.3) (Note 2) Temperature measuring area: meet the requirements of simultaneous temperature measuring of more than 5 points Temperature measuring distance: 1-4m Visible light camera resolution: 32802464
- Display screen: 4.3-inch capacitive touch screen with resolution of 800×480
- Storage: removable TF card, up to 128G
- Image format: JPG
- Video format: MP4
- Interface language: Chinese and English
- Video output: HDMI port
- Audio output: 3.5mm coaxial audio connector
- Input power supply: 12V 3A
- Battery voltage/capacity: 7.4V 3350mAh (two 18650 lithium batteries)
- Battery life: >3h
- WIFI frequency band: 2.4GHZ
- Working temperature: 10 ~ 40 (*Note 3)
- Storage temperature: -20 ~ +70
- Product size: 119x130x107mm
- Net weight (without batteries): 560g
- Accessories: tripod, battery, power adapter, HDMI extension cord, HDMI to VGA cord, audio extension cord, TF card, blackbody (optional)
*Note 1: If the temperature measurement range is exceeded, the temperature measurement accuracy will decrease.
*Note 2:The temperature measurement accuracy is the typical value under the specified mode and the calibration temperature is 33~42C.
*Note 3: When the object to be measured enters the detection range from another environment with relatively large temperature difference, it is recommended to put the object to be measured and the detector under the same environment temperature for more than 3 minutes and then measure it, so as to avoid inaccurate measurement due to the influence of temperature difference.
Part Name
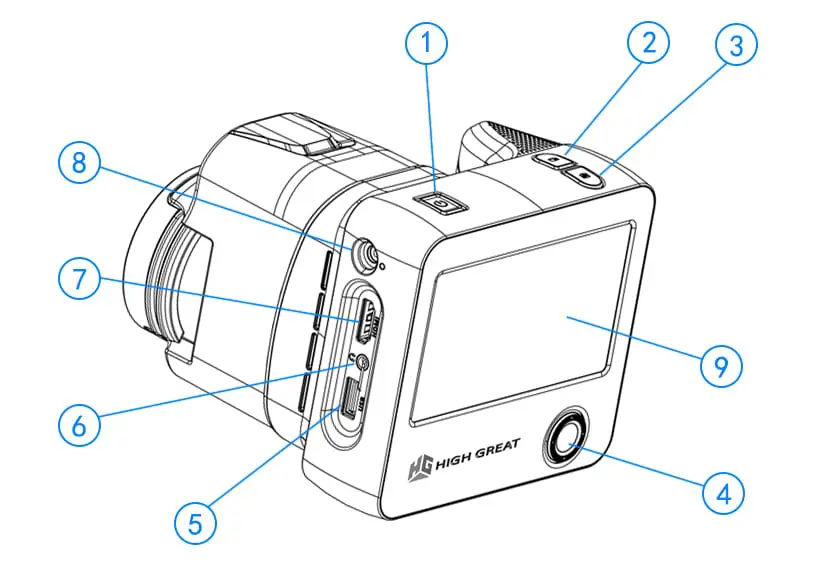
- ① ON/OFF
- ② Record key
- ③ Photo key
- ④ Direction key
- ⑤ USB port
- ⑥ Audio output jack
- ⑦HDMI output
- ⑧ Power port
- ⑨ Touch screen
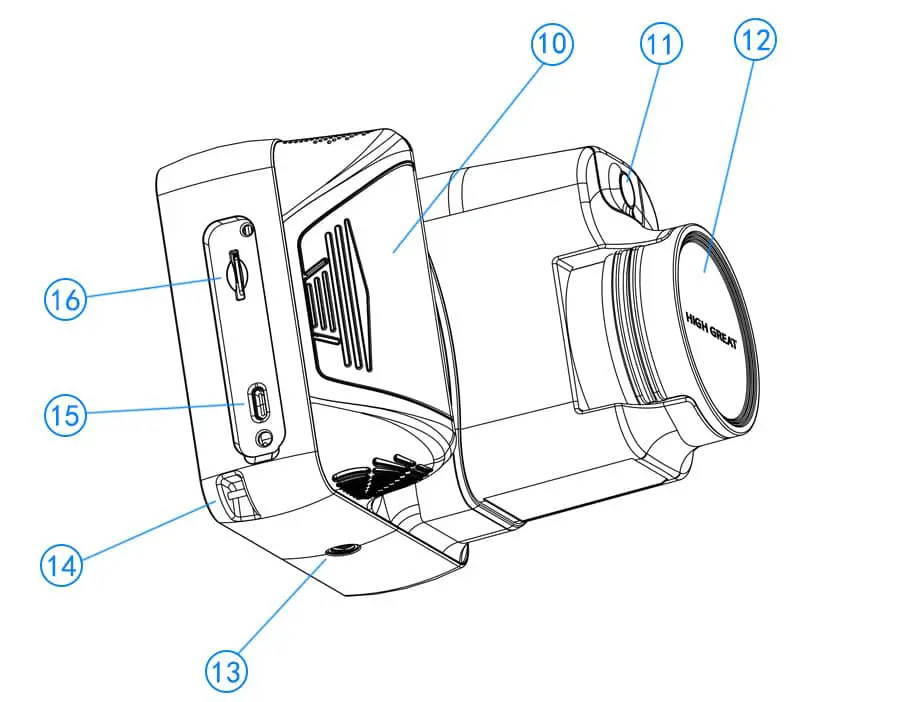
- ⑩ Battery compartment cover
- ⑪ Visible light lens
- ⑫ Thermal imaging lens
- ⑬ Tripod threaded hole
- ⑭Lanyard buckle
- ⑮ Type-C port
- ⑯ TF card slot
Part Introduction
①Long press the ON/OFF key for 3 seconds to turn on, and long press it for 3 seconds to turn off. When connecting with other display devices, short press it for 1 second to project images to the display.
②Press this key to record a video, and press it again to stop recording
③Press this key to take a photo
④Move, select and confirm the screen menu bar
⑤Connect peripheral devices such as mouse and keyboard through this USB port
⑥Connect devices such as loudspeaker box through this jack and output alarm sound. This jack can be turned off or turned on in the “Output Setting” of the system.
⑦Output high-definition video signal through this interface, and can connect the display, television, projector and other equipment.
⑧Connect the DC 12V-3A power adapter and the battery can be charged after connection. If it is used for a long time, it is recommended to connect the adapter.
⑨ Display the picture through this screen, and can operate the detector through the touch function at the same time.
⑩Open the battery compartment cover to replace the battery (Be sure to use the battery provided by the original factory)
⑪ Image the visible light
⑫Image the heat source, and it is best that the lens and the temperature measuring target are in the range of 1-4m when measuring the temperature
⑬Used for fixing the tripod
⑭Tie the lanyard here
⑮Connect computer equipment through this port to read the contents of the detector and operate the TF card.
⑯Insert TF card into this slot, with maximum support of 128GB
Interface Introduction

Load the battery or connect the external power supply, long press the ON/OFF key for 3 seconds to start up, and then enter the system interface after starting up.
- This device provides two control methods: one is to directly touch the screen, and the other is to use the arrow keys. The following mainly explains how to use the arrow keys.
- Home page operation: Press the “OK” button, and a check box will pop up on the interface. Use the up, down, left, and right buttons to select the icon, and press “OK” to enter the relevant page.
Setting operation:
- Main menu interface: use the “up and down” keys to select the menu icon, press the “confirm” key or “right key” to enter the lower menu; press the “left key” to return to the upper menu.
- >
- Sub-menu interface: use the “up and down” keys to select. If you encounter a switch button, press the “confirm” key to adjust; if you encounter a slider, press the left nd right keys to adjust; if you encounter the “>” symbol, press the “confirm” key or right-key to jump to the lower-level page; press the “OK” key to save, and press the “left key” to return to the upper-level menu.
Mode Switch
The device has three modes: visible light mode, thermal imaging mode and blending mode, which can be selected by clicking the “Mode Switch” icon through the touch
screen (or through the arrow keys).
WIFI
It can be networked through WIFI connection, which is mainly used for firmware upgrade and remote terminal viewing function
Settings
It is necessary to set the relevant parameters of the equipment before using the product.
Temperature Setting
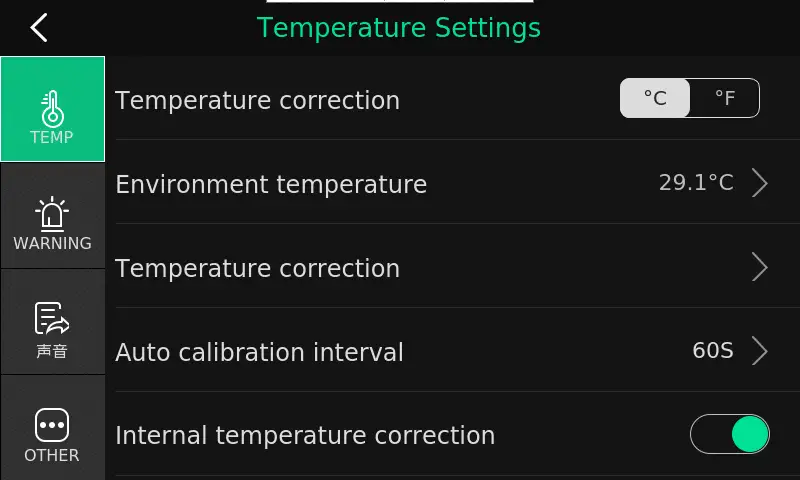
Temperature unit
Celsius or Fahrenheit is optional depending on the user
Ambient temperature
Enter the current ambient temperature. If the ambient temperature is not entered within 3 minutes after starting up, the system will automatically detect the ambient temperature and fill it in. If more accurate measuring accuracy is needed, please manually enter the current ambient temperature.
Temperature correction
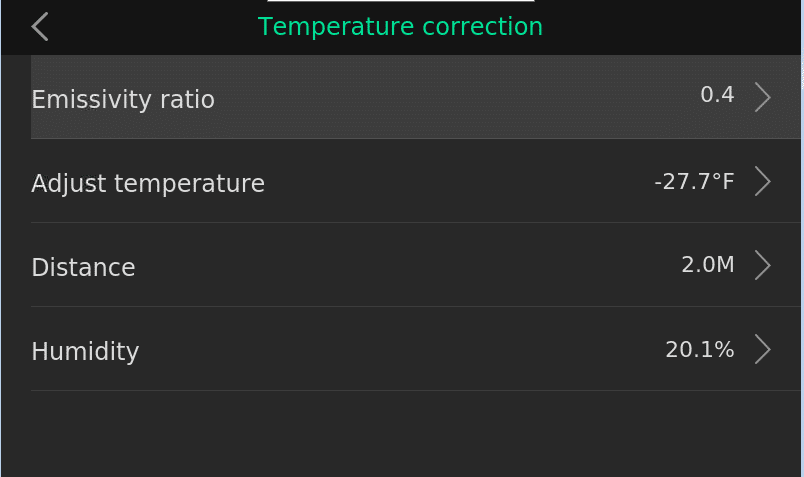
Amplitude comparison coefficient: because the emissivity of different objects is different, different emissivity can be set for different temperature measuring points.
If not, the system default emissivity will be applied.
Correction temperature: used to correct the temperature measuring value of the temperature measuring target. When there is a fixed error in measurement, this function can be used for temperature correction.
Distance: set the distance between the detector and the temperature measuring target to make the temperature measurement more accurate. Please set it within the range of 1-4m. If the distance is not within the range, there may be errors in measurement.
Humidity: set the relative humidity of the environment where the detector is used. Used in normal indoor environment, the system has been set, and it is not necessary to set it separately.
Automatic calibration time
Set automatic calibration interval time to get better thermal image and improve temperature measuring accuracy. The system default calibration time is 180s.
Internal temperature correction
It is turned on by default for automatic internal temperature correction of the detector.
Alarm Setting

Alarm temperature range
Set the alarm temperature range in the blending mode, that is, the device will alarm if the detected temperature is within this range.
Alarm prompt:
The target recognition box displays red, the periphery of screen also flashes red, and the text prompts “Warning: abnormal temperature”; the buzzer produces 1 long “beep”, and the audio outputs 4 “beeps”.
Suspected temperature range
Set the suspected temperature range in the blending mode, that is, the device will alarm if the detected temperature is within this range.
Alarm prompt: the recognition box displays orange, the buzzer produces 2 short “beeps”, and the audio outputs 2 “beeps”.
Normal temperature
The measured target temperature is normal temperature in the range except alarm and suspected temperature, and choose to take photos of the normal temperature target automatically or close it.
At normal temperature, the target recognition box on the screen displays green, the buzzer produces 1 short “beep”, and the audio outputs 1 short “beep”.
Suspected temperature
In case the measured target temperature is in the suspected temperature range, choose to take photos of the suspected temperature target automatically or close it.
Alarm temperature
In case the measured target temperature is in the alarm temperature range, choose to take photos of the alarm temperature target automatically, record a video or close it.
The alarm function is only valid in the blending mode.
Sound Setting
Buzzer switch
Select to turn on or off the buzzer sound
Coaxial audio output
Select to turn on or off the audio output.
Other Settings

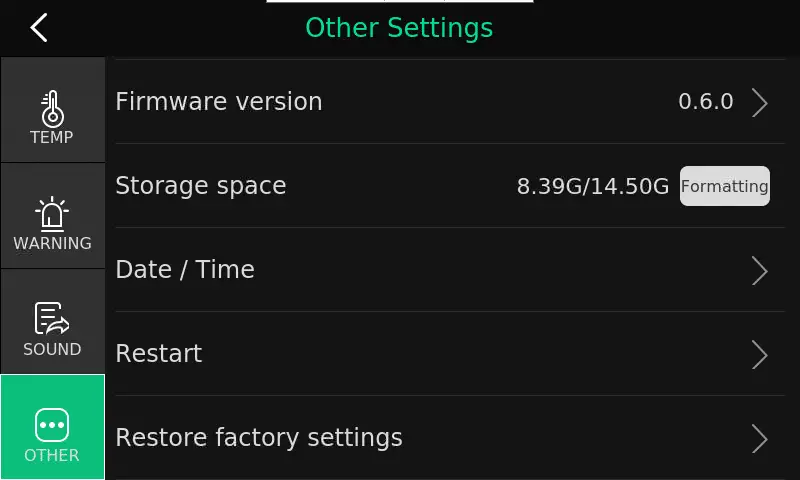
Multi-language
Both Chinese and English languages are currently supported
Screen brightness adjustment
Adjust the brightness of LCD screen
Firmware revision number
Check the version number of the firmware. If the version is updated, the device can download and upgrade the firmware when connected to WIFI. Please connect the adapter during the upgrade, and do not power off during the upgrade.
Storage space
Query the storage space of TF card and can format the memory card
Set the system date and time
Soft start the device again
Restore factory defaults
Battery Level
Display the current battery level and charging state
Mode Introduction
Visible Light Mode
The function mode of pure camera, in which functions such as photo taking, video
recording and playback viewing can be carried out.

Click to select the function of photo taking or video recording.
.

Click for photo taking or video recording, and click it again to stop the recording if it is in the video mode.
.

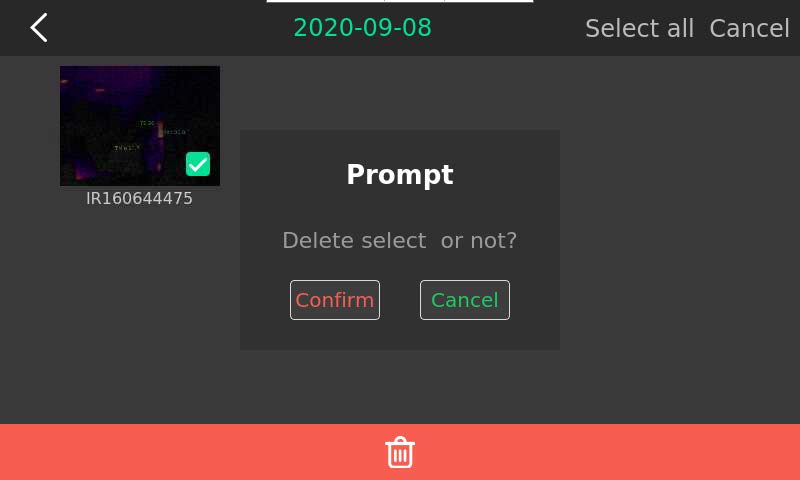
Click to enter the photo album for relevant playback viewing, editing and deleting functions.
.
If you want to delete a certain photo or video, enter the relevant photo album, click “Select“, and then you can select All or Single to delete the relevant items.
Thermal Imaging Mode
In this mode, thermal imaging display and temperature measurement can be performed.
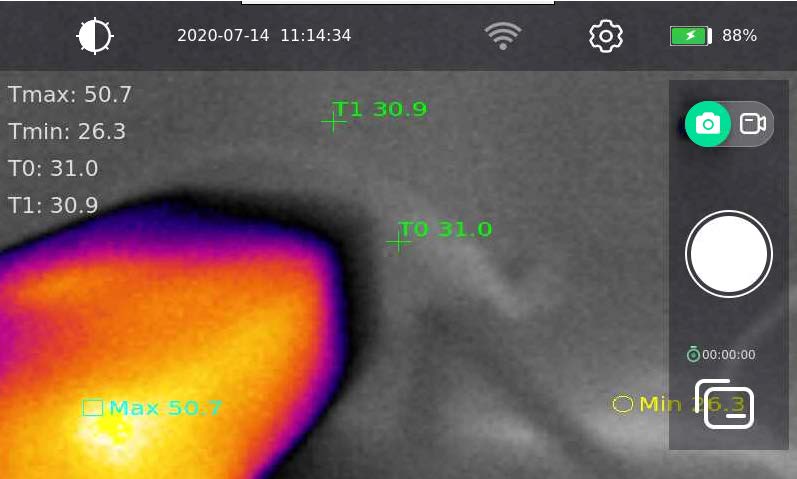
Tmax is the maximum temperature value measured in the imaging picture. Click Tmax in the upper left corner to hide or display the Tmax cursor in the picture.
Tmin is the minimum temperature value measured in the imaging picture. Click Tmin in the upper left corner to hide or display the Tmin cursor in the picture.
T0 is the temperature value measured at the fixed center point in the imaging picture, and the cursor is fixed at the center of the picture. Click T0 in the upper left corner to hide or display the T0 cursor in the picture.
T1 is the temperature of the measurement target that the user manually clicks on the screen at will. If the user does not click on the screen, this cursor will not be displayed. Click T1 in the upper left corner to close the T1 cursor in the picture.
Photo taking, video recording, playback and other related operations are the same as that of visible light mode.
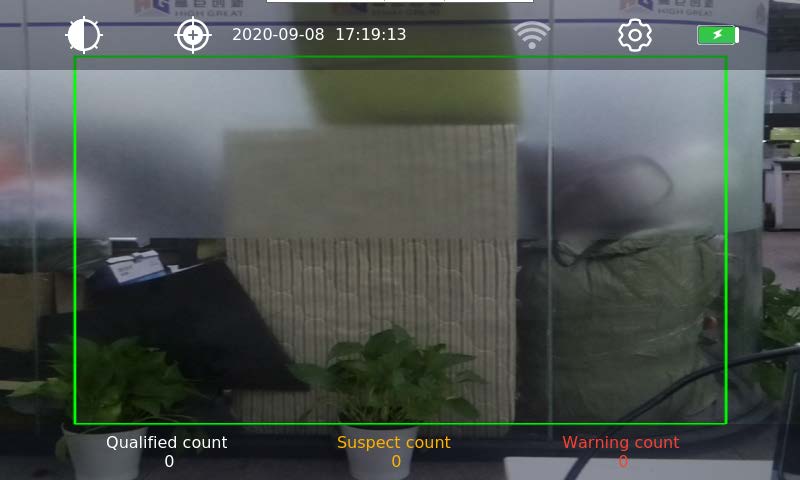
Blending Mode
It integrates visible light with thermal imaging picture, and is mainly used for AI automatic recognition and temperature measurement in this mode.
Add Blackbody
In the blending mode, blackbody can be added in order to improve the measurement with higher accuracy.

Click the icon to add blackbody.
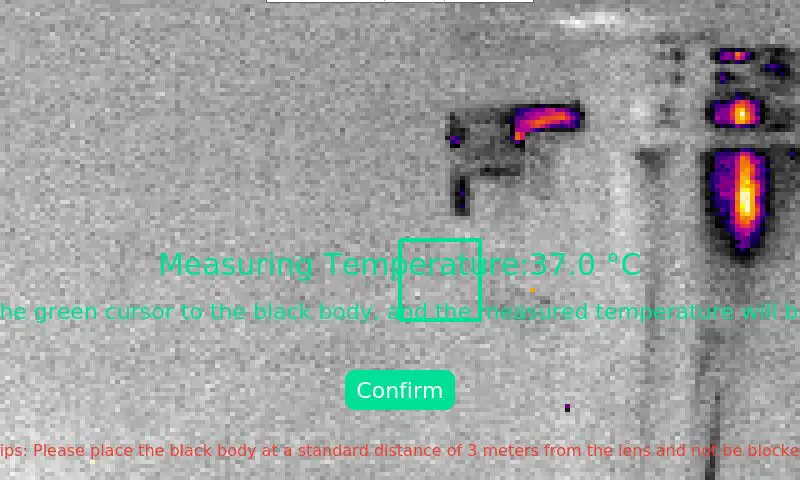
Put the blackbody at a fixed distance of 3m from the lens, and it can be arranged outside the upper left corner or the upper right corner of the picture without being blocked. Set the blackbody temperature well (the fixed temperature of blackbody used in the Product is 37). Next, click on the screen, move the green box and surround the blackbody target with the green box, wait for more than 3 seconds, and the measured temperature of the blackbody will be automatically filled in. At this time, click “OK” to complete the configuration of adding blackbody.
Qualified count
It means that if the measured target temperature meets the set value of normal temperature, it is qualified, and the AI recognition box is green if the qualified is detected. Every time it is detected, it will be included in the qualified count for statistics. Click “Qualified Count” to view the contents of qualified photos. (The photo taking function of “Normal Temperature” should be turned on in Alarm Setting)
Suspected count
It means that if the measured target temperature meets the set value of suspected temperature interval, it is suspected, and the AI recognition box is orange if the suspected is detected. Every time it is detected, it will be included in the suspected count for statistics. Click “Suspected Count” to view the contents of suspected photos. (The photo taking function of “Suspected Temperature” should be turned on in Alarm Setting)
Alarm count
It means that if the measured target temperature meets the set value of alarm temperature interval, it is an alarm, and the alarm is detected. AI recognition box displays red and flashes red on the screen, and the text prompts “Warning: abnormal temperature”. Every time it is detected, it will be included in the alarm count for statistics. Click “Alarm Count” to view the contents of alarm photos or videos. (The photo taking/video recording function of “Alarm Setting” should be turned on in Alarm Setting)
Based on the system time of the detector, the counting statistics only count the number of the current day, and the counting will be restarted at 00:00 every day. The counting statistics of the previous day can be viewed in the counting statistics directory.
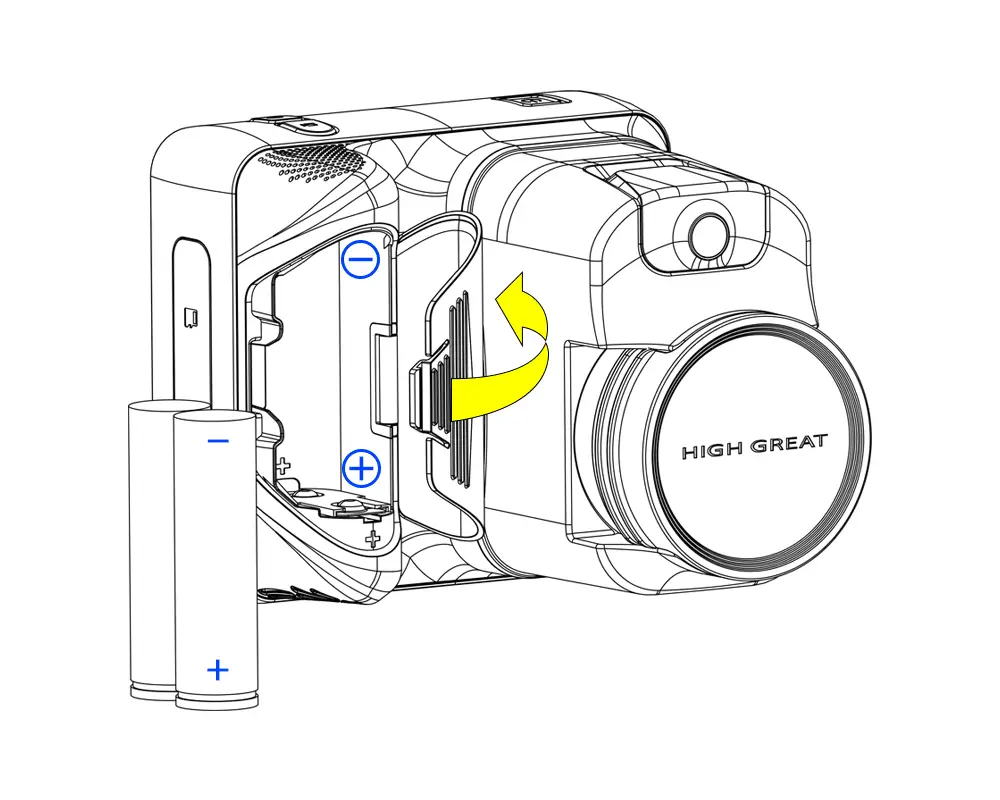
Installation and Replacement of Battery
The battery compartment is in the handle of the instrument. Buckle open the push button of the battery cover, and open the battery compartment to load and unload the battery as shown in the below figure.
Attentions for Use of Battery:
- Two 18650 lithium batteries (3.7V 3350mAh) are used in the Product to supply power in series, and the users can replace the batteries of the same brand model by themselves. If battery of other brand model is replaced, accidents may occur due to different charging and discharging currents!
- Please pay attention to the positive and negative electrodes of the battery during installation. Incorrect installation may damage the device.
- It is recommended to use the dedicated charging equipment of HighGreat to charge the battery. All consequences caused by using the charging equipment not provided by HighGreat shall be borne by the user.
- Do not pull out the battery when the device is turned on.
- Overheating of the battery may affect the product performance, please do not use it in high temperature environment (above 40).
- In case of any leakage, peculiar smell, self heating, deformation (including bulge), discoloration or any other abnormal phenomenon of the battery during use, charging or storage, please remove the battery and stop using it under the premise of ensuring safety.
- The normal working temperature range of the battery is 5 ~ 40. It is prohibited to use the battery in low temperature environment (below 0), otherwise it may cause irreversible damage to the battery. In case of low ambient temperature, the service time of the battery may decrease sharply.
- It is prohibited to disassemble, puncture, impact, squeeze or throw the battery into the fire.
- If the device is not in use for a long time, please charge the battery to about 60%, then remove it from the machine body and store it at normal temperature.
- Charge once every 6 months in case the ambient temperature is -20 ~ 20;
- Charge once every 3 months in case the ambient temperature is 20 ~ 45;
- Charge once every month in case the ambient temperature is 45 ~ 60. Otherwise, the battery will be permanently damaged due to excessive discharge.
- It is prohibited to use the battery after immersion; replacing with the wrong type of battery will cause explosion danger; be sure to dispose of used batteries according to environmental protection requirements.
Installation and Use of Product
HDMIHDMIHDMI
The display device with HDMI port can be connected to HDMI port of the detector (the equipped HDMI extension cord can be used for transfer if the display device is relatively far away from the detector). When both the display device and the detector are turned on, the picture of the detector can be projected to the connected display device by short pressing the power ON/OFF key; short press the power ON/OFF key again to switch the picture back to the detector.
Audio Output Connection
Other sound equipment can be inserted into the audio output port of the detector. The audio extension cord equipped with the product can be used for transfer if the sound equipment is relatively far away from the detector. Audio output is mainly used for audible alarm. If a display device with built-in audio such as a TV is connected with HDMI, the audio output is not necessary.
HDMI to VGA
It is mainly used to connect the detector to the displayer of VGA connector. In normal use, the HDMI extension cord can be used to make a longer transfer with this cable to facilitate long-distance erection.
Diagram of Tripod Installation
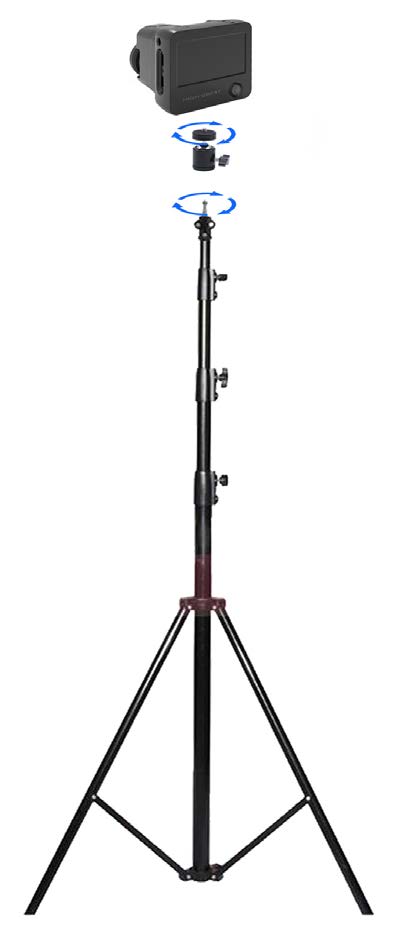
Diagram of Site Layout
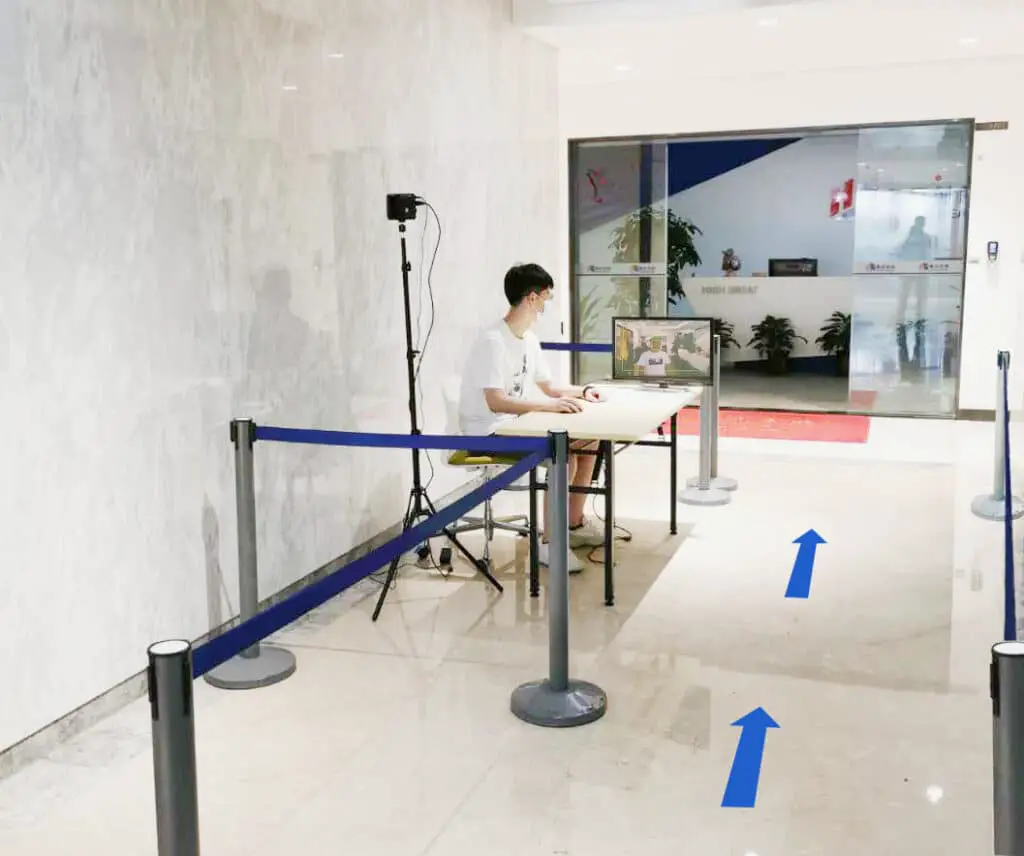
The distance between the detector and the object to be measured should be within 1-4m. As shown in the above figure, place the detector at an angle of 45 with the corridor, and ensure that the object to be measured can stay within the green box of the video for 1-3 seconds.
Disclaimer
Thank you for purchasing the products of Shenzhen HighGreat Innovation Technology Development Co., Ltd. (hereinafter referred to as “HighGreat”). In order to make better use of the Product and ensure your safety, please read this statement carefully before use. Once the Product is used, it will be deemed as recognition and acceptance of all contents of this statement!
HighGreat reserves the right to update this user manual. To obtain the latest User Manual, please visit the official website of HighGreat http://www.hg-fly.com to download the electronic version. If there is any update, it will be subject to the electronic version published on the official website without prior notice.
For possible semantic differences in the disclaimers of different language versions, the Chinese version shall prevail, and other language versions are for reference only.
Shenzhen HighGreat Innovation Technology Development Co., Ltd. reserves the final interpretation right of this disclaimer.
- Machine damage due to improper operation by the user.
- Improper storage, such as strong impact or squeezing, or being placed in an inappropriate environment (such as water immersion or fire)
- Improper maintenance, unauthorized disassembly, repair, modification or replacement of original accessories with those not supplied by HighGreat.
- Make sure to use special battery and charging equipment provided by HighGreat, otherwise there will be explosion danger. At the same time, please dispose of the used battery correctly according to the instructions.
- The battery after use may be at a high temperature, and immediate contact may cause scald. Please do not contact it directly. HighGreat does not assume any responsibility for the scald caused by not using it according to the instructions.
- The Product conforms to the specified requirements of FCC Part 15 of for Class B digital products, including two aspects: (1) The Product will not produce harmful interference; (2) And the Product can withstand harmful interference that may lead to abnormal operation of the Product. Meanwhile, the Product conforms to the basic requirements specified in 1999/5/EC and other relevant directives. It is strictly prohibited to modify or change the Product without permission to avoid harmful interference during its work. The manufacturer will not be responsible for any problems caused by unauthorized modification or change.
- HighGreat reserves the intellectual property rights of the Product and Manual. Without written permission, no organization or individual may reproduce, reprint or publish in any form. In case of any quotation or publication, the source must be indicated, and the User Manual shall not be quoted, abridged or modified contrary to the original intention.
FCC Caution:
This device complies with part 15 of the FCC Rules. Operation is subject to the following two conditions: (1) This device may not cause harmful interference, and (2) this device must accept any interference received, including interference that may cause undesired operation.
Any Changes or modifications not expressly approved by the party responsible for compliance could void the user’s authority to operate the equipment.
Note: This equipment has been tested and found to comply with the limits for a Class B digital device, pursuant to part 15 of the FCC Rules. These limits are designed to provide reasonable protection against harmful interference in a residential installation. This equipment generates uses and can radiate radio frequency energy and, if not installed and used in accordance with the instructions, may cause harmful interference to radio communications. However, there is no guarantee that interference will not occur in a particular installation. If this equipment does cause harmful interference to radio or television reception, which can be determined by turning the equipment off and on, the user is encouraged to try to correct the interference by one or more of the following measures:
-Reorient or relocate the receiving antenna.
-Increase the separation between the equipment and receiver.
-Connect the equipment into an outlet on a circuit different from that to which the receiver is connected.
-Consult the dealer or an experienced radio/TV technician for help.
The device has been evaluated to meet general RF exposure requirement. The device can be used in portable exposure condition without restriction.
Warranty Card
/Purchase Information
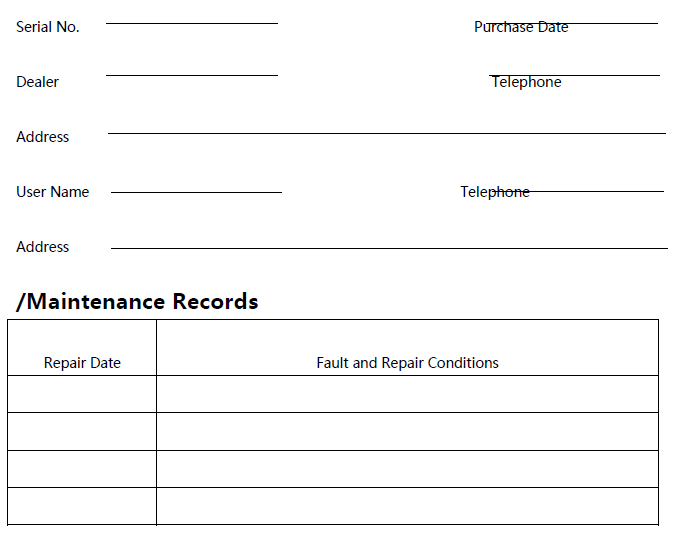
In need of maintenance service, please contact your dealer, or contact HIGHGREAT customer service in the following ways:
Shenzhen HighGreat Innovation Technology Development Co., Ltd.
2/F, Building 6, Yuanlingzi Industrial Zone, Hengping Road, Yuanshan Street,
Longgang District, Shenzhen
E-mail: [email protected]
Tel:+86-0755-89730369


High-Great-HG-T01-Infrared-Thermal-Image-Detector-Manual-OptimizedOptimized PDFHigh-Great-HG-T01-Infrared-Thermal-Image-Detector-Manual-OriginalDownload
Questions about your Manual? Post in the comments!