View Fullscreen
Instruction Manual
Refrigerator
No Frost
Model
R-B380PH9
R-B380PH9L
Content
Preparation for Use
Warning and Caution for Safety…. 2 Preparations before Use……………. 4
Installation………………………………… 4 Before Use……………………………….. 4 Food Storage…………………………….. 4
Operation
Locaton of Food Storage…………… 4 How to operation………………………. 5
Temperature Control…………………… 5 Freezer Compartment …………………. 5 Refrigerator Compartment…………….. 6
Maintenance
Maintenance……………………………… 6 Troubleshooting……………………….. 6 Dew or Frost is generated…………. 7 Service Center…………………………… 9
Thank you very much for purchasing the Hitachi refrigerator. Before installation and usage, please read the user’s guide carefully for the correct usage.
Maintenance work must only be carried out at works by well-trained maintenance work
For household use only
R600a Refrigerant
Warning and Caution for Safety
To avoid harm to the user, other persons or damage to property, please read and follow the warnings and cautions below and those given throughout this manual.
The following warnings and cautions are categorized by the level of
This symbols are shown as below clearly showing
possible harm or damage that may occur from ignoring directions.
WKHVLJQL¿FDQFHRIGLUHFWLRQV
This pictograph indicates “There is a
WARNING high possibillity of serious injury or death, if ignored”.
The symbols below are examples. This symbols is an alert mark.
This pictograph indicates “There is a
CUATION high possibillity of sinjury or damage to property, if ignored”
This symbols indicates “prohibited”.
7KLVUHIULJHUDWRUXVHÀDPPDEOHUHIULJHUDQWV The symbol column below states WKHSUHFDXWLRQVRQÀDPPDEOHUHIULJHUDQWV
This symbols indicates “necessary”.
This symbol denotes the preFDXWLRQVRQÁDPPDEOHrefrigerators.
WARNING
:KHQRXLQVWDOO7RDYRLG¿UHHOHFWULFVKRFkDQGLQMXU
Do not install the refrigerator in a place where it
may come in contact with water. Do not install the refrigerator in a place exposed to rain.
Ground this refrigerator to prevent electric shock and noise interference. Always ground this refrigerator and install earth leakage circuit breaker when using it in please with high himidity or
This may impair electricity insulation and FDXVHHOHFWULFVKRFNRU¿re.
moisture. (Please consult with a retailer or Hitachi Service Center.)
3RZHU&RUGDQG3RZHU3OXJ7RDYRLG¿UHHOeFWULFVKRFN
Do not connect the wall outlet whose
power capacity is less than the refrigerator’s. Also, do not use power
Rated Voltage
sources that are not a rated voltage.
If a power source is shared with other appliances using double or multipoint adapters, the adapter
PDKHDWXSEHRQGWKHQRUPDOOHYHODQGFDXVH¿UH
Do not locate multiple portable socket-outlets
or portable power supplies at the rear of the appliance.
&RQQHFWWKHSRZHUSOXJ¿UPOWRDSRZHURXWOHWZLWK the cord running down.
Connection of the power plug with the cord running up could apply stress on the cord and cause electrical short or overheat, which
FRXOGUHVXOWLQHOHFWULFDOVKRFNRU¿UH Incomplete connection of the power plug could
resultLQHOHFWULFDOVKRFNRU¿UHGXHWRKHDW
Do not use a damaged or loose power plug or power RXWOHW7KLVPDFDXVH¿UHRUHOHFWULFVKRFN
Do not cut, bend, fold the power cord WRDYRLG¿UHDQGHOHFWULFVKRFN When positioning the appliance, ensure the supply cord is not trapped or damaged.
Be sure to unplug the power plug before maintaining the refrigerator. Be sure to hold the power plug to unplug.
If the supply cord is damaged, it must be replaced by the manufacturer, its service agent or similarly TXDOL¿HGSHUVRQVLQRUGHUWRDYRLGDKD]DUG
Clean the dust on the power plug frequently with dry cloth. Unplug the power plug and wipe it with dry cloth. An insulation failure due to moisture or when dust
FROOHFWVRQWKHSRZHUSOXJPDFDXVH¿UH
Do not insert or remove the power plug
with wet hands.
‘XULQJGDLOXVH7RDYRLG¿UHHOHFWULFVKRFN
Do not splash water on or inside the refrigerator. This may impair electricity insulation causing HOHFWULFVKRFNRU¿UH This may also cause gas leakage because of pipe rust.
This appliance is not intended for use by persons
(including children) with reduced physical, sensory or mental capabilities, or lack of experience andknowledge, unless
they have been given supervision or instruction concerning
use of the appliance by a person responsible for their safety.
Do not hang on the doors or step up on the various compartments. Injury may be caused by the refrigerator tipping over or hands getting caught in door.
Do not enter in the refrigerant.
Do not disassem ble, repair, or modify the refrigerator by yourselves. Please consult with a retailer or Hitachi Service Center if any repair is required.
Ether, liquid propane gas, solvent, etc.
which is volatile cannot be stored in this refrigerator. Do not store explosive substances
VXFKDVDHURVROFDQVZLWKDÀDPPDEOH propellant in this appliance.
Do not put water containers or foreign articles on the top of the refrigerator.
Opening and closing doors etc. may cause the articles on the top of the refrigerator to fall down, resulting in injury.
2
WARNING
Do not damage the refrigerant circuit.
If there the damage of refrigerant pipe happened, stay away from the refrigerator and DYRLGXVLQJ¿UHDQGHOHFWULFDODSSOLDQFHV
And, open windows to ventilate and contact retailers or Hitachi Service Center.
Do not use electrical appliances inside the food
storage compartments of the appliance, unless they are of the type recommended by the manufacturer.
,QDQHYHQWRIDÀDPPDEOHJDVOHDNGRQRWWRXFKWKH refrigerator and open windows for ventilation. 6SDUNVIURPSRLQWVRIHOHFWULFDO contacts such as door switches may LJQLWHH[SORVLRQVFDXVLQJ¿UHRUDEXUQ
‘RQRWXVHWKHUHIULJHUDWRULQWKHDWPRVSKHUHRIÀDPPDEOHJDV
‘RQRWPDNHDQLPSDFWRQWKHJODVVPDGHGRRUVRUVKHOYHV They are made of tempered glass, however, an excess LPSDFWPDEHUHVXOWLQEUHDNDJHDQGLVGDQJHURXV
When discarding the refrigerator. :KHQGLVFDUGLQJWKHUHIULJHUDWRUUHPRYHWKHGRRUJDVNHWV 7RDYRLGDULVNRIDQLQIDQWRUFKLOG
to be entrapped inside.
Medicines, chemicals, research and experimental substances should not be stored in the refrigerator. Substances that require precise conditions for storage cannot be stored in a domestic refrigerator.
Do not use mechanical devices or other
means to accelelate the defrosting process, other than those recommended by the manufacturer.
Children should be supervised to ensure that they do not play with the appliance. Children getting inside may not be able to get out.
Cleaning and user maintenance shall not be made by children without supervisor.
Keep ventilation openings in the appliance enclosure RULQWKHEXLOWLQVWUXFWXUHFOHDURIREVWUXFWLRQ
,IRX¿QGVRPHWKLQJZURQJZLWKWKHUHIULJHUDWRU immediately unplug and consult with the retailers or Hitachi Service Center.
Follow the instructions of your region when discarding. 7KLVUHIULJHUDWRUXVHV5DIRUWKHUHIULJHUDQWDQGFFORSHQWDQH for the blowing agent of the urethane heat insulation.
CAUTION
During daily use …To avoid illness and injury.
‘RQRWSXWERWWOHVHWFIRUFLEOLQWKHGRRUSRFNHWV This may cause bottles to drop down or GRRUSRFNHWVWRFRPHRII
Do not store food which smells or food whose color is changed abnormal. Such an action may cause diseases.
Food and containers inside the freezer compartment should not be touched with wet hands. 7KLVPDFDXVHIURVWLQMXU (Especially in case of metal items.)
Do not hold the top, bottom and side of the doors when closing them. 7KLVPDUHVXOWLQRXU¿QJHUVEHLQJFDXJKWE the door edge.
If someone else is using the refrigerator,do not open the door. Fingers may get caught in the spaces EHWZHHQWKHGRRUVDQGPDFDXVHLQMXU
Do not have food items protruding over the front edge of each shelf. Doors may not be closed properly or WKHGRRUSRFNHWVPDGURSGRZQ,QMXUPDEH FDXVHGIURPLWHPVOLNHERWWOHVJHWWLQJNQRFNHGRYHURXUIHHW
Do not store glass bottles in the freezer compartment. %RWWOHVPDEUHDNEWKHFRQWHQWVIUHH]LQJ DQGFDXVHLQMXU
Do not put your hands into the base surface of the refrigerator cabinet. When cleaning, putting your hands near the base surface of the frigerator may UHVXOWLQLQMXUEWKLQPHWDOVKHHWV
%HVXUHWRKROGWKHKDQGOH¿UPOWRRSHQRUFORVHWKHGRRU
Do not have your feet too close when opening the door of the refrigerator. When opening the door, your feet PDEHKLWUHVXOWLQJLQLQMXU
When moving or carrying … To avoid damaging, wetting, sRLOLQJWKHÀRRURUWRDYRLGLQMXU
Do not use door handles when carrying the refrigerator. Never use the carrying handles to hang
up with a chain hoist or similar machines.
Use the carrying handle when carrying the refrigerator. Hold the carrying handles only. If hold door handles, KDQGVPDVOLSDQGPDFDXVHLQMXU Carry the refrigerator by at least 4 persons for safety reasons. Carry it with the doors facing upward.
Before carrying the refrigerator: 1. 7DNHRXWDOOIRRGLWHPVDQGLFHFXEHV 2. /DDSURWHFWLYHVKHHWRUFORWKWRSURWHFWWKHÀRRUIURPGDmage and catch remaining water spilled from the refrigerator. 3. With a large piece of old cloth underneath, tilt the refrigerator EDFNZDUGWRGUDLQZDWHU 4. Finally carry the refrigerator with the doors facing upward. Secure the doors well with adhesive tapes so they do not open. If transporting in a vehicle, do not load the refrigerator on its side. This could damage the compressor.
When replacing lamps (LED) is required.
When lamps (LED) need to be replaced, please contact Hitachi Service Center.
)RUDÀRRUWKDWPDEHHDVLOVFUDWFKHG lay a protective mat, etc..
Such as old cloth
3
Preparations before Use
1 Installation ,QVWDOORQDULJLGDQGOHYHOÀRRU 3OHDVHXVHWKLVUHIULJHUDWRUEHWZHHQWKHURRPWHPSHUDWXUHRI&WR&6XI¿FLHQW performance may not be obtained, if room temperature is too low or too high.
3) Do not install where the refrigerator is exposed to direct sunlight or other heat source. ,QVWDOOLQDQDWPRVSKHUHZKLFKLVGURUKDVDLUYHQWLODWLRQ 5) The refrigerator requires enough air ventilation space around the cabinet to have
HI¿FLHQWFRROLQJSHUIRUPDQFH6SDFHRIDWOHDVWPPRYHUWKHWRSPPDWUHDU and 10 mm at both sides for proper air circulation is needed.
6) Ground the refrigerator to prevent electric shock and noise interference. Alway ground
this refrigerator when using it in place with high humidity or moistute.
(Please consult with retailers or Hitachi Service Center.) 7) Adjusting the adjustable legs to keep the left/right refrigerator door level,
:LWKRXWDGMXVWLQJWKHOHJVGRRUKHLJKPDQRWEHOHYHORUWKHUHPay be abnormal YLEUDWLRQRUQRLVHVGHSHQGLQJRQÀRRUFRQGLWLRQV)ROORZWKHLQVWUXctions below.
7XUQWKHDGMXVWDEOHOHJVXQWLOOWKHWRXFKWKHÀRRU¿UPO
More than 50 mm
Rear side more than 50 mm
CUATION
Back & both sides of fridge is hot proceed from hot gas pipe inside.
Adjustable leg
More than 10 mm
When installing, do not press the power plug with the refrigerator back.
2 Beginning $IWHUWUDQVSRUWLQJ,I5HIULJHUDWRUKDVEHHQNHSWKRUL]RQWDOSRVLWLRQIRUPRUH
than 10 minutes for transportation or any other reasons,it should stand
upright for more than 1 hour before plugging it in.
2) Cleaning inside the refrigerator. Wipe the surface gently with soft cloth.
3) Connect the refrigerator to an exclusive wall power outlet.The refrigerator
can be connected to an outlet soon after it is installed. Surely use with the rated
4 hrs.
voltage and exclusive power outlet.
4) The compressor will start running in approximately 30 seconds, if inside is not cold.
$OORZHQRXJKGXUDWLRQIRUVXI¿FLHQWFRROLQJEHIRUHVWRULQJIRRG,WPDWDNHDERXWKRXUV
to fully cool down and could even take about 24 hours when the ambient temperature is high.
3 Food storage 1) Keep enough space between food. Several foodplaced too close toJHWKHUPDREVWUXFWWKHÀRZRIFROGDLU 2) Make food cool enough before putting it in the refrigerator.Putting warm food in the refrigerator raises the inside temperature and wastes electricity. ‘RQRWEORFNWKHFROGDLUYHQW7KLVZLOODGYHUVHODIIHFWWKHFROGDLUÀRZDQGPDQRWNHHSWKHWHPSHUDWXUHLQVLGHHYHQ Moreover, it could result in food near the vent freezing.
4) Using food wrap or sealed containers prevent the food from drying or transition of smells.
Location of Food Storage
LED Lamp
Refrigerator Compartment
Refrigerator Shelves Storage of side
dish, desert, etc.
2°C~5°C
Temperature control Refrigerator temperature control dial
Refrigerator Door Pockets
2°C~6°C
Refrigerator Door Pockets
Storage of packed small food and drinks such as juice, milk, etc.
Adjustable Door Pockets Adjustable for storage as customizing.
Egg Tray
Vegetable Compartment 3°C~7°C
Vegetable Drawers Storage of fruits and vegetables.
Freezer Compartment -20°C~-18°C
Temperature control Freezer temperature control dial
Freezer Compartment Storage of frozen food and
ice cream, etc.
Twist ice maker
NOTICE 4
$ERYHWHPSHUDWXUHVDUHWKHDSSUR[LPDWHYDOXHVLQWKHFRQGLWLRQVRIRXWVLGH temperature 32°C, the temperature setting of the refrigerator compartment “Normal”, freezer compartment “Normal”,doors being closed and without food storage.
‘RRUSRFNHWWHPSHUDWXUHVPDEHVOLJKWOKLJKHUWKDQDERYHWHPSHUDWXUHV 7KHVSHFL¿FDWLRQRIRXUSXUFKDVHGPRGHOPDEHGLIIHUHQWIURPRQHRIWKHDERYHLOOXVWUDWLRQ
How to operation
1 Temperature Control Refrigerator Compartment
When the food is too cold
For normal use
When cooling food more coldly or quickly
Cold
Normal
Coldest
Please return the dial to the position of “Normal” after the “Coldest” has been set. Food may be frozen if the “Coldest” is set for a long time. If set the dial to the “Cold” side for a long time, the temperature of the food in refrigerator compartment may rise .
Freezer Compartment
When storing neither frozen food or ice-cream
“Cold”. For normal use
When making ice quickly or making frozen food quickly. Or, a surrounding temperature is high and the Freezer compartment is no cold enough
Cold
Normal
Coldest
If set the dial to the “Cold” side for a long time, the temperature of the food in freezer compartment may rise .
2 Freezer Compartment Ice Making
Moveable Twist Ice Maker Put the “Twist Ice Maker” in the freezer drawer on the middle.
How to use the Ice Maker
1. Take the “Twist Ice Maker” and pour in water up to the full line.
$IWHULFHLVPDGHWXUQWKHOHYHU¿UPOEIROORZLQJ arrow and drop the ice into the “Ice Bank”.
Drink Water
Caution When you put the case wrong position you can not close the door properly but if you still try close the door, it may cause the case break down.
5
How to operation (Continue)
3 Refrigerator Compartment If you keep refrigerator in a hot and humid place, frequent openning the door or storing a lot of vegetables in it may cause dew forming which has no effect on its performance. Remove the dew with cloth free from care.
1. Egg tray It can place 16 eggs also turn the rear side to place the small items.
2. Adjusting the shelves
Pull up the front and pull out the shelf forward. Set the refrigerator shelves be combining with stored food.
3. Adjustable Door pocket Gently tap the left and right of the bottom surface Set the door pocket by combinning with stored food
Adjustable Door pocket
Egg Tray
Maintenance
Cleaning (To Clean the refrigerator once a month)
1. Unplug the refrigerator. 2. Take out all the food. 3. Wipe the refrigerator clean. ,WLVKLJKOUHFRPPHQGHGWRZLSLQJRIIVPXGJHVLPPHGLDWHO,WLVDOVRUHFRmmended
to clean the areas of the refrigerator which are not easily accessible, once a year 8VHVRIWFORWKZLWKOXNHZDUPZDWHUWRZLSHRIIVPXGJHV,ILWLVGLI¿FXOWWRUHPRYH
smudges, use diluted, ph-balanced washing liquid. 1HDWOFOHDQWKHGRRUJDVNHWEHFDXVHLWJHWVGLUWHDVLO 4. If any droplets remain on the surface of the parts, wipe them off. 5. Return all parts to their original locations. 6. Check and clean the power plug, cord and outlet. 7. Plug the power cord into the outlet.
NOTICE
(YHQLIWKHSRZHUSOXJLVSOXJJHGLQLPPHGLDWHODIWHUEHLQJXQSOXJJed, the compressor will not run for 10 minutes. However, if the inside is not cold, it will start running in approximately 30 seconds.
Troubleshooting
CAUTION
Do not do the following, since parts and paint may be damaged. 1. Do not splash water to the doors and refrigerator body.
,WPDFDXVHHOHFWULFVKRFNRUD¿UH ,WPDFDXVHUHIULJHUDQWOHDNDJHEHFDXVHRISLSHUXVW It may result in rusty door surface.
2. Do not use following: Pollishing powder, soap powder,oil boiling water, brush, acid, benzene, thinner,alcohol and alkaline detergent, etc. ,WPDGDPDJHGRRUVXUIDFH ,WPDFUDFNSODVWLFSDUWV
3. If the cooking oil smears on the refrigerator,please wipe it off immediately. Otherwise, the plastic parts might be cracked.
2Before you call for service, please check the following items:
Problem
Things to check
The refrigerator does not get cold ,VWKHUHIULJHUDWRUSOXJJHGLQSURSHUO”
at all.
,VWKHUHIULJHUDWRUSODFHGLQWKHGLUHFWVXQOLJKW”
,VWKHWHPSHUDWXUHVHWWR³&ROG´”
The refrigerator does not get cold ,VWKHIRRGVWRUHGWRRPXFK”
enough.
,VWKHGRRUVOLJKWORSHQHG” ,VWKHUHIULJHUDWRUSODFHGQHDUKHDWVRXUFHV”
Food in the refrigerator compartment freezes.
+DVDQWKLQJKRWEHHQSODFHGLQWKHUHIULJHUDWRU” ,VWKHGRRURSHQHGDQGFORVHGWRRIUHTXHQWO”
,VWKHWHPSHUDWXUHVHWWR³&ROGHVW´” ‘RRXSODFHIRRGZLWKPRLVWXUHRUYHJHWDEOHV
QHDUEWKHFROGDLUYHQW”,WZLOOEHIUR]HQLILWLV is placed nearby the cold air vent.
Instructions
&KHFNWKHIXVHER[IRUEORZQIXVH or tripped circuit breaker.
‘RQRWLQVWDOOWKHUHIULJHUDWRULQDSODFHZKHUHLW may come in contact with sunlight.
$GMXVWGLDO³7HPSHUDWXUHFRQWURO´WRQRUPDORUFROGHVW .HHSHQRXJKVSDFHEHWZHHQIRRG 6KRXOGFORVHWKHGRRU¿UPOFORVHG ‘RQRWLQVWDOOWKHUHIULJHUDWRULQDSODFHZKHUHLW
may come in contact with heat sources. 0DNHIRRGFRROHQRXJKEHIRUHSXWWLQJLQWKHUHIULJHUDWRU ‘RQRWRSHQ FORVHWKHGRRUWRRIUHTXHQWO
6HWGLDOWR1RUPDORU&ROG .HHSHQRXJKVSDFHEHWZHHQIRRG’RQRWEORFNWKH
cold air vent.
Dew appears Outside
:KHQWKHDPELHQWKXPLGLWLVWRRKLJKWKHGRRU
6HHFRQWHQW³’HZRUIURVWLVJHQHUDWHG´
gasket may have dew. Please wipe it up with dry cloth.
Dew appears Inside
Please wipe it off with dry cloth and please
check the details below.
,VWKHGRRUFORVHG¿UPO” ,VWKHGRRURSHQHGDQGFORVHGWRRIUHTXHQWO
RURSHQHGIRUDORQJWLPH” ,VLWWRRKXPLGRXWVLGH”
6HHFRQWHQW³’HZRUIURVWLVJHQHUDWHG´
Page
2
4 5 4 –
4 4 5 4
7-8
7-8
The inside is smelling.
‘RRXVWRUHIRRGZLWKRGRUZLWKRXWZDUSSLQJLW” 8VLQJIRRGZUDSRUVHDOHGFRQWDLQHUV
4
The refrigerator is noisy
0DNHVXUHWKHUHIULJHUDWRULVLQVWDOOHGIULPO ,VWKHUHIULJHUDWRUWRXFKLQJWKHZDOO”
6KRXOGEHLQVWDOOWKHUHIULJHUDWRUEIROORZLQJWKH preparing instruction manual.
4
6
Troubleshooting (Continue)
This is not a malfunction of the refrigerator:
Problem
The surface of the refrigerator is hot.
Things to check
–
Instructions
The refrigerator is equipped with the dew prevention and heat radiation tubes. The back and side plates may be heated especially when starting up or if the door is frequently opened and closed.
Page
–
If a door is shut, other doors may open.
The two compartments are connected with an air duct.
–
When closing one of the doors, the other door may be
–
opened by the air pressure through the duct.
This is a normal phenomenon.
Does the refrigerator make any abnormal noises (sound)?
7KHVRXQGOLNHZDWHUÀRZLQJDQGERiling water is the
–
sound of the cooling liquid (refrigerant). A creaking sound comes from the storage
–
compartment. It is the sound caused by friction of
the parts due to temperature change.
There are waving and / or distortions on the door surface, the side and the top surface of the refrigerator.
Slight waving and/or distortions are generated in the
manufacturing process of the refrigerator.
–
They may be conspicuous according to the position of the
–
light source and/or the brightness etc.,
but there is no problem with the performance.
Annoying sound is generated by the refrigerator.
Operation sound lasts long. Operation sound sometimes becomes louder.
You may feel that the operation sound is loud because the
compressor operates in high-speed under the
following conditions: the refrigerator does not cool fully
–
RQWKHRFFDVLRQVXFKDVXVLQJLWIRUWKH¿rst time, opening/closing the door frequently, the surrounding
–
temperature is high.
The sound becomes more quiet after cooling fully.
The compressor operates at low speed at night, or during
long vacations or absence.
–
It is because the compressor operates in low-speed for
–
conserving energy
–
It is because the system changes the operating power of he refrigerator according to the temperature change.
–
Dew or Frost is generated
General operation Please check here
The door of the freezer compartment was not left open temporarily?
Possible causes and / or Recommened solutions
Check that the wrapping paper of the food is not getting caught in order not to make gap between door and door gasket when you close the door.
Frost or ice is generated in the freezer compartment
The door of the freezer compartment was not opened frequently or longer time than necessary?
When the door is opened frequently or if the door is opened when the humidity around the refrigerator is high, moisture in the air may be turned into some frost or ice on the inner wall or component of the freezer compartment, or around the air chanels. This is not a failure. Please try not to open the door too many times or for a long time. Also, please wipe frost or ice generated in the freezer compartment off with use of a dry cloth.
Making extra ice by using an additional ice-tray which was not originally installed in the refrigerator?
When the many containers in which water or liquid is stored are put in the same time, water or liquid may be evaporated and turned into frost or ice on the wall or component of the freezer compartment, or around the air channels. You can suppress these frost and ice by putting lid to avoid evaporation Please wipe frost and ice off with use of a dry cloth.
7
Dew or Frost is generated (Continue)
General operation Please check here
The door of the refrigerator compartment was not left open temporarily?
Possible causes and / or Recommended solutions
Please check not to pinch the food or plastic bag between the door and door frame when you close the door.
Dew is generated in the refrigerator compartment
Dew is generated on outer surface of the refrigerator
The door of the refrigerator compartment was not opened frequently or longer time than necessary?
When the door is opened frequently or if the door is opened
when the humidity around the refrigerator is high, moisture in the air may be turned into some dew on the inner wall or component of the refrigerator compartment, or around the chilled air blow-off port. This is not failure . Please try not to open the door too many times or for long time. Also, please wipe off the dew in the refrigerator compartment with adry cloth.
dew condensation
Storing many vegetables containing much water?
The humidity of the vegetable compartment is higher than other compartments. Accordingly, depending on the amount or type of the vegetable, dew condensation may be generated on the plastic case of vegetable compartment. However, this is not a failure. When you do not want to have this kind of dew, please warp your YHJHWDEOHVLQDSODVWLFÀLP$OVRZKHQWKHGHZFRQGHQVDWLRQ happens many times, water may be accumulated in the vegetable compartment. Please wipe the water off with a dry cloth.
The volume of humidity around When the humidity rises such as in rainy day, some dew many be generated on
the refrigerator is not high?
the outer surface of the refrigerator. Please wipe the dew off with a dry cloth.
The temperature setting is not set as “Coldest”?
When the temperature setting is set as “Coldest”, some dew may be generated on the outer surface of the refrigerator. Please set the
setting as “Normal”. Also, please wipe dew off with use of a dry cloth.
Why frost and dew are generated?
When warm and humid air contacts something cold, dew is generated. For example, if you put some ice in the glass in your room, air around the glass will be cold down and some dew may be generated on the outer surface of the glass.
In the same way, when warm and humid air enters into the refrigerator at the door opening, the warm and humid air contacts cold inner wall and little dew may be generated.
Accordingly, if the door opening is too frequent or too long, dew will be accumulated at every door opening. In some cases,
View Fullscreen
Instruction Manual
Vacuum Cleaner
Model /
CV-SH18E
Contents /
Before use /
Operational safety precautions…………………….. 2
Accessories and preparation before use ………. 5
How to use /
How to operate…………………………………………….. 7
When Finished cleaning /
Maintenance………………………………………………… 10
Head service office of Hitachi Sales (Thailand), Ltd.
No. 333, 333/1-8 Moo 13 Bangna-Trad Road km. 7, Bangkaew, Bangplee, Samutprakarn 10540 Tel. +66 2335 5455 Fax. +66 2316 1128
()
333, 333/1-8 13 – . 7 10540 0-2335-5455 0-2316-1128 2,290
Hitachi Sales (Thailand), Ltd.
No. 333, 333/1-8 Moo 13 Bangna-Trad Road km. 7, Bangkaew, Bangplee, Samutprakarn 10540 Tel. +66 2335 5455 Fax. +66 2316 1126
()
333, 333/1-8 13 – . 7 10540 0-2335-5455 0-2316-1126
Web Site : http://www.hitachi-th.com E-mail : [email protected]
3-135861-1
Thank you very much for purchasing the Hitachi Vacuum cleaning. Before usage, please read the user’s guide carefully for the correct usage.
For household use only
Operational safety precautions
In order to prevent personal injury or damage to the property of the user or other persons, please read and understand (the operational safety precautions) thoroughly and follow them correctly.
( )
WARNING
This box illustrates actions which
may cause serious injury or death.
Meaning of the Symbols
Denotes a warning or precaution
CAUTION
This box illustrates actions which
may cause injury or damage to
property.
Denotes an action which you shouldn’t do (prohibited)
()
Denotes an action which must always be done (instruction)
()
WARNING /
This appliance is not intended for use by persons (including children) with reduced physical, sensory or mental capabilities, or lack of experience and knowledge, unless they have been given supervision or instruction concerning use of the appliance by a person responsible for their safety.
()
Do not operate when the cable is torn or damaged
While rolling the cable up, hold the plug, as it may flick up causing personal injury.
Wipe the plug terminals with a dry cloth regularly in order to eliminate dust.
Always remove the plug from the socket prior to dusting and cleaning and refrain from removing the plug with wet hands.
Do not disassemble, repair or modify the vacuum cleaner unless you are a professional technician, as this may result in damage to the unit and personal injury.
Use with 220-240V AC, 10A upwards.
220-240V 10
2
Children should be supervised to ensure that they
do not play with the appliance.
Model
Rated voltage
Rated frequency
Input power (IEC)
Input power (MAX.)
Dust filter
Dust capacity
Cord length
Net Weight (kg)
Dimension (mm) L x W x H
Rug-Floor Nozzle
Cleaning Tools
Extension Pipe
Accessories
Specifications
CV-SH18E 220 – 240V 50 – 60 Hz 1100 – 1400W 1300 – 1600W Dust case
1.6 L 5 m 4.4 kg 385 mm x 282 mm x 226 mm 2 Step Nozzle Head Extension Pipe (Plastic) Crevice Nozzle / Dusting Brush
(.) (.) x x
CV-SH18E
220 – 240V
50 – 60 Hz
1100 – 1400W
1300 – 1600W
1.6 5 4.4 . 385 . x 282 . x 226 . 2 /
15
8 How to Clean the Vacuum Cleaner Body /
· Wipe with a soft cloth soaked with water.
·
CAUTION /
· Do not wash the cleaner with benzene, thinner and detergent, it may cause color change and transformation.
· ,
14
WARNING /
Do not use the unit to vacuum kerosene, benzene, flammable gas or cigarette butts.
, , ,
Using the unit outdoors or on wet surfaces may result in electric shock.
If the power supply cord is damaged, it must only be replaced by a repair shop appointed by the manufacturer or its service agents in order to avoid a hazard.
Always remove the plug prior to carrying out repairs.
Only use Hitachi carbon brushes.
Keep hair, loose clothing, fingers, and all parts of
the body away from openings and moving parts.
Failure to do so could result in electrical shock or
personal injury.
CAUTION /
Always remove the plug after use.
Do not rinse the vacuum cleaner with
water, as this may damage the unit.
To remove the plug, pull the plug,
not the cable.
Do not use the unit to vacuum water or dump areas, as this may damage the unit.
Do not plug the vacuum cleaner in the
loose outlet as it may melt the plug.
Airflow from the ventilation duct may result in personal injury if contract is made with the body for long periods.
3
CAUTION /
Do not use in close proximity to flammable materials (benzene, thinner), as this may result in fire.
(, )
Do not expose your body to the air
released from the exhaust for long
periods of time. Doing so may cause
burns.
When transporting the vacuum cleaner, do not lift the unit using the vacuum hose, as this may result in the hose becoming torn.
Do not allow your children to play with the vacuum cleaner.
Do not vacuum the following types of material: water or liquids, desiccant, large quantities of sand or powder, long rope, glass and needles, as this may result in damage to the unit.
Do not use the cleaner to pick up wet dirt, and do not use the cleaner in a wet and moist place as moisture will damage the motor and other mechanical parts.
Pull the cord in parallel to the ground. If pulled up, the cord may be damaged due to friction with the cleaner. Doing so may cause electrical shock or flame.
Do not cover the ventilation outlets, as this may result in the unit become deformed and may cause fire due to excessive heat.
Do not violently pull the cord, it may be
damaged and cause electrical shock or
flame.
· This product complies with standards according to the safety regulations of IEC60335-1 and IEC60335-2-2
· IEC60335-1 IEC60335-2-2
4
6 Clean the dust case ass’y / · Take out the dust case ass’y from the cyclone room cap and wash the net filter and paper filter by using a brush with water. After washing, let the filters dry up in the shade. ·
WARNING /
1) The cleaner should be unplugged from the mains when not in use. 2) Be sure to set the dust case and each filter, and operate the cleaner. 3) Install the dust case to original position firmly. 4) Set the dust case not to make any gap between the lid of the dust case and cleaner body.
1) 2) 3) 4)
7 How to remove the motor protection filter /
1 · Open the dust cover. Remove the filter. Rinse the filter with water and hang in the shade to dry. ·
Filter
2 · Rinse the filter with water and wash by hand gently. ·
Filter
3 · Insert the dried filter in the same position. ·
CAUTION /
· Do not wash the filter by washing powder, bleach, benzene and alcohol. It’s may caused of damage and deteriorate to filter.
· Do not wash the filter by washing machine and do not dried it by hair dryer.
· ·
13
4 Filter cleaning /
1 · Move the dust removal several times more. ·
2 · Put the dust case into large-sized plastic bag and push the open button of the dust case to release dust into provided
plastic bag.
·
Open button of the dust case
3 · Clean the gap of paper filter with the brush or water. ·
How to remove the paper filter from net filter
4 · Fix the dust case cover to the body. Check that the rubber packing is attached to dust case firmly.
·
WARNING /
· After washing, let the filters dry up in the shade before use.
·
5 How to clean cyclone cylinder filter /
1 · Turn the cyclone cylinder filter to “Open” and pull out. · “Open”
Open / Close /
Claw /
2 · Clean the cyclone cylinder filter with the brush or water. ·
WARNING /
· After washing, let the cyclone cylinder filter dry up in the shade before use.
·
12
Accessories and preparation before use
Crevice nozzle
Extension pipe
Curved joint pipe
Cord rewind pedal
On/Off switch
/
Power cord
Flexible crush proof hose
Joint pipe
Hose inlet
Dust case cover
Rug and floor nozzle
· For dust removal and filter cleaning,
refer to page 11-12.
Dust case
· 11-12
Power plug
Rug and floor nozzle
Accessories /
Extension pipe
Flexible crush proof hose
Curved joint pipe
Joint Pipe
Dusting Brush
Crevice nozzle
Filter cleaning brush
5
Accessories and preparation before use
1 How to Assemble the Hose / · The hose and joint pipe are packed individually. To put them together, insert the handle into the hose until the claws of the stopper ring click into the holes. ·
How to assemble Seal ring and Stopper ring
Seal ring Stopper Ring
Holes Claws
2 How to attach the hose to the cleaner /
· Insert the joint pipe into the hose inlet of the cleaner. · When you remove the hose from the cleaner, pull the joint pipe
while pressing the button.
·
Hose inlet
·
Joint pipe
Click
Button
Hose
3 1 How to connect the curved joint pipe to the extension pipe
Twist tightly
Extension pipe
Curved joint pipe
2
How to connect the extension pipe
Extension pipe
Twist tightly
41
How to assemble nozzle
2
How to store the accessories
Twist tightly
Extension pipe
· Fit the crevice nozzle on the curved joint pipe.
· When you remove the crevice nozzle, pull the
dusting brush and the crevice nozzle toward the
direction of the arrow.
· ·
Rug and floor nozzle
6
Curved joint pipe
Hook
Crevice nozzle
3 Dust removal /
1 · Move the dust removal several times more.
·
2 · Put the dust case into large-sized plastic bag and push the open button of the dust case to release dust into provided plastic bag. ·
Open button of the dust case
3 · Remove dust on the net filter with brush. ·
4 · Fix the dust case cover to the body. Check that the rubber packing is attached to dust case firmly.
·
Net filter
DIRECTION /
Every time you remove dust from the dust case, also clean the filter. For more details, see page 12.
12
CAUTION /
· For those who allergic to dust, wearing gloves and mask while releasing the dust is necessary. In order to prevent dust allergy.
·
11
Maintenance
1 Filter maintenance sign / · When the orange indicator appears in the filter maintenance window continuously, remove dust in the dust case. · Check the dust indicator by lifting suction tool from the floor and removing the crevice nozzle when it is used. · ·
Filter indicator window
CAUTION /
· When the orange sign appears in the window continuously, do not use the vacuum cleaner without dust removal. If the cleaner is used in such a condition as the orange sign appears in the window, air to the motor will be reduced and the motor will eventually burn out.
·
2 How to empty dust case /
1 · Switch off the power supply and disconnect the power cord.
· Open the dust cover until it is in a standing position.
· ·
Dust case cover
2 · Open the lock button of dust case. ·
Do not press this button while removing the dust case.
How to Operate
1 Insert the mains plug into a socket /
CAUTION /
· The cleaner should be unplugged from the mains when not in use.
·
2 On/Off switch / / · Turn the cleaner on or off by pushing the on/off switch. · /
Socket
On/Off switch
/
3 How to operate the rug and floor nozzle / · The nozzle is fitted with a brush at the back which can either be used in the “withdrawn” or “projected” position. These positions are operated by the pedal on the tool marked ” ” (Carpet) and ” ” (Floor),. For cleaning rug or carpet, keep the brush in its “withdrawn” position, i.e., with the pedal marked ” ” pressed down with your toe. If you feel the tool is heavy to slide on the carpet, please reduce the suction power by adjusting the suction control. · “” “” ” ” () ” ” () “” ” ”
3 · Pull up the dust case. ·
CAUTION /
· Do not press open button while pulling up the dust case (Dust may drop).
· ()
10
Brush “withdrawn” position
Brush “projected” position
CAUTION /
· When setting it to “projected” position, do not use the vacuum cleaner to clean carpets. (It requires more force.)
· To clean the wood surface, do not use excessive force. Doing so may scratch the wood.
· () ·
7
4 How to control suction power with curved joint pipe /
· Suction pressure is reduced by moving the adjustment ring on the
curved joint pipe to expose a hole.
· The more hole area exposed the lower the suction.
Low suction pressure is recommended for cleaning curtains, blinds,
delicate fabrics etc.
· To decrease suction power, turn the adjustment ring so that the air
could pass through the hole.
·
·
Adjustment ring
·
5 Automatic cord rewind / · The power cord is stored neatly inside the cleaner using an
automatic cord rewind.
When cleaning is completed, unplug the mains and press the
cord rewind pedal.
The cord will automatically rewind.
·
Cord rewind pedal
DIRECTION /
If the cord does not fully rewind, pull out in short length and press the pedal again. For smooth rewinding, turn the cord inlet toward the same direction as the cord pulled out.
To use Accessories /
6 Crevice Nozzle
1 For cleaning at :
· Corners on stairs · Corners in closet · Gap between furniture · Gaps in sofa · Corners on floor · Slits in sashes
: · · · · · · ,
2 · Use the crevice nozzle by pushing into the extension pipe or Curved joint pipe. ·
8
Push
Extension pipe
Curved joint pipe
7 Clean-up technique /
1 · Crevice nozzle can be used for cleaning the hard-to-reach parts of the sofa. ·
2 · Crevice nozzle can be used for cleaning the corner of your house. ·
Dusting brush can be turned
to adjust the angle.
Dusting brush can be used for
cleaning the bookshelf.
CAUTION /
· Do not push a soft surface like piano to avoid scratches on it.
·
8 Blower function / · Insert the joint pipe of the hose into the blower outlet. · When you remove the hose, pull the joint pipe while pressing the button. · ·
9 To store vacuum cleaner / · Hose, Extension pipe, and rug & floor nozzle can be stored in assembled condition at two positions of the cleaner by using nozzle hook. This combination allows you a space saving storage. 1. Place the cleaner upright. 2. Slide the nozzle hook of the rug and floor tool into the hook supporter at the lower rear of the cleaner. 3. Coil the hose around the extension pipe to make it compact and stable. Notes · Do not carry the cleaner in the hose stand storage position. · Do not store the cleaner with the hose near a stove or a warm place. It may be damaged due to excessive heat.
· ,
1. 2.
3. · ·
Button
Blower outlet Joint pipe
Nozzle hook
Extension pipe
Hook supporter
Hose
9
]]>View Fullscreen
Instruction Manual
Refrigerator
No frost
Model
R-WB640VRU0X
Content
Preparation for Use
Warning and Caution for Safety………. 2 Preparations before Use…………………. 4
Installation……………………………………………..4.. Beginning………………………………………………4.. Food Storage………………………………………….4. Location of Food Storage……………….5.
Operation
ECO Monitoring Sensor…………………… 5 How to use Auto Door…………………….. 6 How to use the Control panel………….. 6
Name and Function of the Control Panel…. 6 Temperature Control……………………………….7.. Other functions……………………………. 7 Refrigerator / Selectable Zone / Freezer Compartment………………….. 10 How to use Auto Ice Maker…………………….11 Swing Partition Suggestion……………………. 11 How to use the Vacuum Compartment……..1..2.. How to remove part……………………………… 13
Maintenance
Care and Maintenance……………………1..4 Cleaning………………………………………………1…4.
Troubleshooting……………………………16 Dew or Frost is generated………………1..9 HITACHI REFRIGERATORS DISCLAIMER / WARNING………………20
Thank you very much for purchasing the Hitachi refrigerator. Before installation and usage, please read the user’s guide carefully for the correct usage.
Maintenance work must only be carried out at workshop by well-trained maintenance work.
For household use only
R600a Refrigerant
Warning and Caution for Safety
To avoid harm to the user, other persons or damage to property, please read and follow the warnings and cautions below and those given throughout this manual.
The following warnings and cautions are categorized by the level of
This symbols are shown as below clearly showing
possible harm or damage that may occur from ignoring directions.
the significance of directions.
This pictograph indicates “There is a
WARNING high possibillity of serious injury or death, if ignored”.
This pictograph indicates “There is a
CAUTION high possibillity of sinjury or damage to property, if ignored”
The symbols below are examples. This symbols is an alert mark. This symbols indicates “prohibited”.
This refrigerator use flammable refrigerants. The symbol column below states the precautions on flammable refrigerants.
This symbols indicates “necessary”.
This symbol denotes the precautions on flammable refrigerators.
WARNING
When you install … To avoid fire, electric shock, and injury.
Do not install the refrigerator in a place where it may come in contact with water.
Do not install the refrigerator in a place exposed to rain. This may impair electricity insulation andcause electric shock or fire.
Ground this refrigerator to prevent electric shock and noise interference. Always ground this refrigerator and install earth leakage circuit breaker when using it in please with high himidity or moisture. (Please consult with a retailer or Hitachi Service Center.)
Power Cord and Power Plug … To avoid fire, electric shock.
Do not connect the wall outlet whose
power capacity is less than the refrigerator’s. Also, do not use power
Rated Voltage
sources that are not a rated voltage.
If a power source is shared with other appliances
using double or multipoint adapters, the adapter
Do not locate multiple portable socket-outlets
or portable power supplies at the rear of the appliance.
Connect the power plug firmly to a power outlet with the cord running down.
Connection of the power plug with the cord running up could apply stress on the cord and cause electrical short or overheat, which
could result in electrical shock or fire.
Incomplete connection of the power plug could result in electrical shock or fire due to heat.
Do not use a damaged or loose power plug or power outlet. This may cause fire or electric shock.
Do not cut, bend, fold the power cord to avoid fire and electric shock. When positioning the appliance, ensure the supply cord is not trapped or damaged.
Be sure to unplug the power plug before maintaining the refrigerator. Be sure to hold the power plug to unplug.
If the supply cord is damaged, it must be replaced by the manufacturer, its service agent or similarly qualified persons in order to avoid a hazard.
Clean the dust on the power plug frequently with dry cloth. Unplug the power plug and wipe it with dry cloth. An insulation failure due to moisture or when dust collects on the power plug may cause fire.
Do not insert or remove the power plug with wet hands.
During daily use … To avoid fire, electric shock.
Do not splash water on or inside the refrigerator. This may impair electricity insulation causing electric shock or fire. This may also cause gas leakage because of pipe rust.
This appliance is not intended for use by persons
(including children) with reduced physical, sensory or mental capabilities, or lack of experience and knowledge, unless they have been given supervision or instruction concerning use of the appliance by a person responsible for their safety.
Do not disassemble, repair, or modify the refrigerator by yourselves. Please consult with a retailer or Hitachi Service Center if any repair is required.
Ether, liquid propane gas, solvent, aerosol cans, etc.
which is volatile cannot be stored in this refrigerator. Do not store anything that are generate
heat or fire spark inside the refrigerator.
2
WARNING
Do not hang on the doors or step up on the various compartments.
Injury may be caused by the refrigerator tipping over or hands getting caught in door.
Do not enter in the refrigerator.
Do not damage the refrigerant circuit.
If there the damage of refrigerant pipe
happened, stay away from the refrigerator and
avoid using fire and electrical appliances.
Window Open
And, open windows to ventilate and contact
retailers or Hitachi Service Center.
Do not use electrical appliances inside the food storage compartments of the appliance, unless they are of the type recommended by the manufacturer.
In an event of a flammable gas leak, do not touch the refrigerator and open windows for ventilation. Sparks from points of electrical contacts such as door switches may
ignite explosions causing fire or a burn.
Do not use the refrigerator in the atmosphere of flammable gas.
Do not make an impact on the glass-made doors or shelves. They are made of tempered glass, however, an excess impact may be result in breakage and is dangerous.
When an infant child may use the Auto Door to make mischief, Please stop the Auto Door function.
This appliance is intended to be used in household and
similar applications such as
Staff kitchen areas in shop, offices and other working environments. Farm houses and by clients in hotels, motels and other residential
type environments. Bed and breakfast type environments. Catering and similar non-retail applications.
When discarding the refrigerator.
When discarding the refrigerator, remove the door gaskets. To avoid a risk of an infant or child
to be entrapped inside.
Do not put water containers or foreign articles on the top of the refrigerator. Opening and closing doors etc. may cause the articles on the top of the refrigerator to fall down, resulting in injury.
Medicines, chemicals, research and experimental substances should not be stored in the refrigerator. Substances that require precise conditions for storage cannot be stored in a domestic refrigerator.
Do not use mechanical devices or other
means to accelelate the defrosting process, other than those recommended by the manufacturer.
Children should be supervised to ensure that they do not play with the appliance. Children getting inside may not be able to get out.
Cleaning and user maintenance shall not be made by children without supervisor.
This appliance can be used by children aged from 8 years and above and persons with reduced physical,sensory or mental capabilities or lack of experience and knowledge if they have been given supervision or instruction concerning use of the appliance in a safe way and understand the hazards involved.
Children shall not play with the appliance.
Children aged from 3 to 8 years are allowed to load and unload refrigerating appliance.
Keep ventilation openings in the appliance enclosure or in the built-in structure clear of obstruction.
If you find something wrong with the refrigerator, immediately unplug and consult with the retailers or Hitachi Service Center.
Follow the instructions of your region when discarding. This refrigerator uses R-600a for the refrigerant and cyclopentane for the blowing agent of the urethane heat insulation.
CAUTION
During daily use …To avoid illness and injury.
Do not put bottles, etc. forcibly in the door pockets. This may cause bottles to drop down or door pockets to come off.
Do not store food which smells or food whose color is changed abnormal. Such an action may cause diseases.
Food and containers inside the freezer compartment should not be touched with wet hands. This may cause frost injury. (Especially in case of metal items.)
Do not hold the top, bottom and side of the doors when closing them. This may result in your fingers being caught by the door edge.
If someone else is using the refrigerator,do not open the door. Fingers may get caught in the spaces between the doors and may cause injury.
Be careful not to operate the Auto Door when another person is in front of the refrigerator, which may lead to personal injury unexpectedly caused by the opening door.
Do not have food items protruding over the front edge of each shelf. Doors may not be closed properly or the door pockets may drop down. Injury may be caused from items like bottles getting knocked over your feet.
Do not store glass bottles in the freezer compartment. Bottles may break by the contents freezing and cause injury.
Do not put your hands into the base surface of the refrigerator cabinet. When cleaning, putting your hands near the base surface of the frigerator may result in injury by thin metal sheets.
Be sure to hold the handle firmly to open or close the door.
Do not have your feet too close when opening the door of the refrigerator. When opening the door, your feet may be hit, resulting in injury.
3
CAUTION
When moving or carrying … To avoid damaging, wetting, soiling the floor, or to avoid injury.
Use the carrying handle when carrying the refrigerator. Hold the carrying handles only. If hold door handles, hands may slip and may cause injury. Carry the refrigerator by at least 4 persons for safety reasons. Carry it with the doors facing upward.
Before carrying the refrigerator: 1. Take out all food items and ice cubes.
2. Lay a protective sheet or cloth to protect the floor from damage
and catch remaining water spilled from the refrigerator. 3. With a large piece of old cloth underneath, tilt the refrigerator
backward to drain water.
4. Finally carry the refrigerator with the doors facing upward.
Secure the doors well with adhesive tapes so they do not open. If transporting in a vehicle, do not load the refrigerator on its side.
This could damage the compressor.
Do not use door handles and ECO monitoring sensor when carrying the refrigerator.
Never use the carrying handles to hang up with a chain hoist or similar machines.
On a floor that is easily scratched, do not move the refrigerator with
the wheels of refrigerator. The wheels may scratch the floor. For a floor that may be easily scratched,
lay a protective mat, etc..
When replacing lamps (LED) is required.
When lamps (LED) need to be replaced, please contact Hitachi Service Center.
Such as old cloth
Preparations before Use
Installation
1 1) Install on a rigid and level floor. 2) Please use this refrigerator between the room temperature of 10°C to 43°C Sufficient
Rear side more than 100 mm
More than 100 mm
performance may not be obtained, if room temperature is too low or too high.
3) Do not install where the refrigerator is exposed to direct sunlight or other heat source. CUATION
4) Install in an atmosphere which is dry or has air ventilation. 5) The refrigerator requires enough air ventilation space around the cabinet to have
efficient cooling performance.Space of at least 100 mm over the top, 100 mm at rear and 70 mm at both sides for proper air circulation is needed.
Back & both sides of fridge is hot proceed from hot gas pipe inside.
More than 70 mm
6) Ground the refrigerator to prevent electric shock and noise interference. Alway ground this refrigerator when using it in place with high humidity or moisture. (Please consult with retailers or Hitachi Service Center.)
Parallel adjustment of the door.
Left door has fallen
Right door has fallen
7) Adjusting the adjustable legs to keep the left/right
refrigerator door level, Without adjusting the legs, door heigh may not be level,
Adjustable leg Front cover
or there may be abnormal vibration or noises depending on floor conditions. Follow the instructions below.
Adjustable leg
Adjustable left leg.
Adjustable right leg.
Turn the adjustable legs untill they touch the floor firmly.
2
Beginning
1) After transporting : If Refrigerator has been kept horizontal position for more than 10 minutes for transportation or any other reasons,it should stand
Please turn the left leg in Please turn the right leg in the direction of the arrow. the direction of the arrow.
1 rotation of adjustable leg is about 1mm in difference. 1-5 days might take for the main body of the
refrigerator becomes familiar with the floor, and until the door is reconciled in parallel.
upright for more than 1 hour before plugging it in.
2) Cleaning inside the refrigerator. Wipe the surface gently with soft cloth. 3) Connect the refrigerator to an exclusive wall power outlet.The refrigerator
CAUTION
can be connected to an outlet soon after it is installed. Surely use with the rated
voltage and exclusive power outlet.
4 hrs.
4) The compressor will start running in approximately 30 seconds, if inside is not cold.
5) Allow enough duration for sufficient cooling before storing food. It may take about 4 hours
When installing, do not press the power plug with the refrigerator back.
to fully cool down and could even take about 24 hours when the ambient temperature is high.
6) Opening the door for long periods can cause a significant increase of the temperature in the
compartments of the appliance.
3 Food storage 1) Keep enough space between food. Several food placed too close together may obstruct the flow of cold air. 2) Make food cool enough before putting it in the refrigerator.Putting warm food in the refrigerator raises the
inside temperature and wastes electricity.
3) Do not block the cold air vent. This will adversely affect the cold air flow and may not keep the temperature inside even.
Moreover, it could result in food near the vent freezing.
Food
4) Using plastic wrap or sealed containers prevent the food from drying or transition of smells.
5) Store raw meat and fish in suitable containers in the refrigerator, so that it is not in contact with or drip onto other food.
4
Cool air flow Air vent
Location of Food Storage
Refrigerator Compartment 2°C~5°C
Refrigerator Shelves Storage of side
dish,desert,etc.
Vegetable Compartment
3°C~7°C
Vegetable Drawer
Storage of fruits and vegetables.
Water Tank
Approx. 3.0 L
Tank-full line
Selectable Zone Compartment
Refrigerator
1°C~5°C
Chill/Meat -1°C~3°C
Utility Drawer
Storage of cosmetics, medicine,packed small food, etc.
Refrigerator Compartment 2°C~5°C
Refrigerator Door Pockets Storage of packeld small
food and drinks such as juice, milk, etc.
Dry-Vegetable Compartment 3°C~7°C
Dry-Vegetables Drawer
Tea
COFFEE
Vegetable
Dry food
Vacuum Compartment
Fish/Meat (-1°C) -3°C~1°C
Cheese/Fruits (1°C) -1°C~3°C Cheese
Freezer Compartment -20°C~-18°C Auto Ice Maker
Soft Freeze
(-1°C~-5°C)
Freezer
(-20°C~-18°C)
Adjustable legs
Freezer Compartment Storage of frozen food and
ice cream, etc.
NOTICE
Above temperatures are the approximate values in the conditions of outside temperature 32°C, the temperature setting of the refrigerator compartment “Normal”, freezer compartment “Normal”,doors being closed and without food storage.
Door pocket temperatures may be slightly higher than above temperatures. The specification of your purchased model may be different from one of the above illustration. One-, two- and three-star compartment are not suitable for the freezing of fresh food. Two-star frozen-food compartment are suitable for storing pre- frozen food, storing or making ice cream and making ice cubes.
ECO Monitoring Sensor
ECO Monitoring Sensor
The controller section is displayed automatically only when the refrigerator is used and provides guidance in a user-friendly manner.
Nobody else
when nobody is near the refrigerator, “Auto Door” open button is not displaying.
When somebody approach
When somebody comes to the front of refrigerator in ECO monitoring zone (about 80 cm.), “Auto Door” open button and door handle LED is lighting up automatically.
“Auto Door” open button
ECO Monitoring Sensor
80 cm.
Lamp lights off.
CAUTION
Avoid placing the refrigerator in the hallway or areas where the most peoples walk through it.
ECO Monitoring Sensor can detect people near refrigerator only. If the sensor cover dirty may cause sensor error. Always clean it with dry cloth. Do not put any things in the detecting area.
Lamp lights on.
NOTICE
When the ECO Monitoring Sensor does not work. You can light up the touch screen button as follows Open any door. Touch any on button area.
5
How to use Auto Door
You can open the door easily by touching the door lightly with your thanks to the Auto Door function.
When touching “Auto Door” button, the operation
sound is heard, and then it will open automatically. When closing it, use
Control Panel for the Auto Refrigerator Door
Refrigerator Door open assist unit
your hand to close the door (not electrically operate).
1 Opening one door on either side.
(Automated).
Handle (manual operation)
Pi!
Touch “Auto Door” open button of the door to be opened
2 Opening both doors at a time.
Control Panel for the Auto
Selectable Zone Door (Automated).
Control Panel for the Auto Freezer Door (Automated).
Peep!
Selectable Zone Door open assist unit
Freezer Door open assist unit
Slide your finger from one edge of the open button to the end of button. (Doors will op.en in turn from the side your touch.)
CAUTION
When an infant child may use the Auto Door of make mischief, please stop the Auto Door function . (P.9) Use fingers to operate the control panel. Do not operate the Auto Door when another person is in front of the refrigerator or opening door (which may lead to personal injury
unexpectedly by the opening door.) Be sure to unplug the power before cleaning the Auto Door. Do not put any item on the refrigerator.
NOTICE
Auto door is the function to reduce the load when opening the refrigerator door. Opening angle of the door may vary or the door may go back a little after it is opened automatically depending on installation conditions of the refrigerator how beverages or foods are stored in the door pocket, but this is not malfunction.
Auto Door of the Refrigerator Compartment will not be opened, When door of vegetable compartment opened. After touching the open button for the Auto Door, the operation sound may be heard when opening the door, but this is not malfunction. If open button for the Auto door is wet or dirty, it may not respond. Use wet cloth to wipe off dirt, and then wipe it with a dry cloth. If you touch the open button for the Auto Door and its neighbouring part at the same time, or you touch it for about
one second or more, the Auto Door may not be opened automatically.
How to use the Control Panel
Name and Function of the Control Panel
1
Control Panel
Setting Refrigerator Temperature button
Setting Freezer Temperature button
Setting Selectable Zone Compartment button
Setting Vacuum Temperature button
“Quick Mode” Button
“Energy Saving” Button
“Ice Maker” and “Auto Door” Button
NOTICE
If you unplug the power plug or a power failure occurs, then the refrigerator restart, the temperature display and each setting
will be automatically resumed. However “Quick Freezing”and “Quick Cooling” operation will be cancelled.
There must set more than 45 seconds before unplug the power or power failure. otherwise the temperature display shown as
before setting.
6
How to use the Control Panel
2 Temperature Control Refrigerator Compartment
For foods that doesn’t need a lot of coldness.
For normal use.
When cooling food more coldly or quickly
Press “Refrigerator” button, To setting a temperature.
Freezer Compartment
Cold
Normal
( Sound ” Pi ” )
( Sound ” Pi Pi ” )
The display is indicating the status of temperature setting.
When storing neither frozen food or ice cream.
For normal use.
Coldest
( Sound ” Pi ” )
When making ice quickly or making frozen food quickly. Or, a surrounding temperature is high and the Freezer compartment is not cold enough.
Cold
Normal
Press “Freezer” button, To setting a temperature.
Selectable Zone Compartment
( Sound ” Pi ” )
( Sound ” Pi Pi ” )
The display is indicating the status of temperature setting.
Coldest
( Sound ” Pi ” )
1,2 Second Peep!
Pi!
Pi!
Pi!
Press “Selectable Zone” button, 2 seconds for unlock. To select Selectable Zone Compartment mode
When in Freezer operation,lamp light is on.
Press “Selectable Zone” Press “Selectable Zone”
button Refrigerator
button Chill/Meat
operation, lamp light is on. operation, lamp light is on.
The display is indicating the status of temperature setting.
Press “Selectable Zone” button Soft Freeze operation, lamp light is on.
NOTICE
“Refrigerator” mode doesn’t de suitable for storing vegetables and fruits. If you store vegetables on “Refrigerator” mode, the vegetables might dry or freeze.In such cases, wrap the items to be
stored, in plastic wrap to prevent them from drying out or freeze.
Other Functions
Door Alarm and ECO Alarm Function
If the door is left open for more than 1 minute, the alarm system
will inform the user by the sound and digital display. Door Alarm: Informs by PeepPeepPeep sound. Eco Alarm Display: Indicates the door opening state on the control panel.
To Disactivate Alarm and Sound
1. Keep pressing “Quick Mode” button for 5 seconds until “Peep!” sound is heard.
2. There is not sound when pressing any button (deactive door alarm sound).
After 1 minute After 2 minute After 3 minute
PeepPeepPeep
All LED on display-
PeepPeepPeepPeepPeep
Peep continuously
are Flashing
To re-activate Alarm and Sound
1. Keep pressing ” Quick Mode” button for 5 seconds until “PiPi!” sound is heard.
2. There is sound when pressing any button (active door alarm sound).
Pi!
1,2,..5 Second
….
Peep!
….
1,2,..5 Second
Pi!
PiPi!
NOTICE
Factory setting, the alarm and sound are set “ON” If the Door Alarm, Eco Alarm Display and each button operation sound have been deactivated, The refrigerator will still set
the alarm and sound to “OFF” even though a power failure or when unplugging and reconnecting the power plug. There must set more than 45 seconds before unplug the power or power failure. otherwise the temperature display shown as before setting.
7
Other Functions
How to use temperature control 9 step (Refrigerator compartment/ Freezer Compartment)
Setting
Open the Refrigerator door before press “Refrigerator” button to setting.
Each time you press the button, the corresponding indicator lamp changes in order shown below (9 steps).
( Lighting Blinking Turned off )
Pi! 1,2,..5 Seconds
Indication lamp
Peep!
Setting Cold
Normal
Coldest
Press “Refrigerator” button
for 5 seconds until
Sound
Pi!
Pi!
Pi!
Pi! PiPi! Pi!
Pi!
Pi!
Pi!
1 “Peep!” sound is heard.
Cancel
Open the Refrigerator door before press “Refrigerator” button to cancel. you can set temperature by normal step ( 3 steps)
Pi! 1,2,..5 Seconds
PiPi!
Press “Refrigerator” button for 5 seconds until 1 “PiPi!” sound is heard.
NOTICE
This function is subjected to change according model type. Factory setting, the adjustment temperature by normal step ( 3 steps).
Quick Mode
Quick Freezing : When you want to freeze food or make ice quickly, use this function. Quick Cooling : When you want to cool food or drinks quickly, use this function.
1
2
Press “Quick Mode” button
for Start Quick Freezing
operation, lamp light is on.
“Quick Freezing” will
Pi! be finished automaically
Pi!
in approximately 2 hours.
Press “Quick Mode” button for Start Quick Cooling operation, lamp light is on.
“Quick Cooling” will be finished automaically in approximately 90 minutes.
3
4
Press “Quick Mode” button for start two function operation,
both lamp light are on.
Press “Quick Mode” button for stop two function operation, both lamp light are off.
Pi!
PiPi!
Quick Freezing
Put food on the quick freezing “Quick Freezing” corner is located located on the upper part of the freezer compartment.
“Quick Freezing” is more effective if food is place near the back wall of the freezer compartment.
Quick Cooling
Put food on the quick cooling “Quick Cooling” corner is located on the upper part of the refrigerator compartment.
“Quick Cooling” is more effective if food is place near the back wall of the refrigerator compartment.
NOTICE
During “Quick Freezing”, priority cooling of the freezer compartment will be done, Thus, try to avoid unnesessary opening and closing the doors not to have a temperature rise of the refrigerator compartment.
During defrost period,”Quick Freezing” and “Quick cooling” operation will stop even though the lamp is on. After finishing defrost period, the operation will restart automatically.
Please note “Quick Freezing” and “Quick Cooling” mode will be released after power cut off or unplug.
8
Other Functions
Vacuum The display switches in sequence as shown below everytime the button is touched. The temperature is set to “-1°C” at default.
1
When in “Vacuum Compartment” button “-1 °C” operation. Lamp lights on.
2
Press “Vacuum Compartment” button for start Vacuum 1°C operation. “1°C” lamp light is on.
3
Press “Vacuum Compartment” button for stop Vacuum
operation. “off”
lamp light is on.
Pi!
PiPi!
After off vacuum function,the temperature will be autometically to default ( -1 °C )
CAUTION The “Off” indicator lamp continues to be lit during the “Off”operation.
Ice Maker / Auto Door
Ice Maker : First, check whether the Automatic Ice Maker is in operation.
1
2
Press
button
for start Ice Maker operation,
lamp light is on.
Press
button
again for stop Ice Maker operation,
lamp light is off.
Pi!
PiPi!
When you wish to make ice especially quickly, use the “Quick Freezing” function.
Ice Preparation Time ( 8 (eight) cubes / ice making cycle)
Normal Operation
Approx. 90 to 110 minutes
Quick Freezing
Approx. 70 to 90 minutes
The Ice Preparation Time shown is the average time to make ice when the ambient temperature is 32°C and the door is not opened and closed and temperature setting “normal”.
NOTICE
When using the “Auto Ice Maker” for the first time, discard the first of ice cubes for cleaning. If you do not intend to use the Automatic Ice Maker, manually cancel its operation.
Ice cannot be made until the interior of the refrigerator is sufficiently cool. It may take 24 hours or longer to make ice for the first time after
installation. Normally, it only takes 2 to 3 hours to make 8(eight) ice cubes.
The Ice Making Time will be longer in the following situations.
1. When the door is frequently opened and closed 2. When a large amount of food is placed inside the refrigerator at the same time 3. After “Ice Tray Cleaning” has been run 4. When there is a power outage 5. During winter, or when the surrounding temperature is low When an infant child may use the Auto Door to make mischief please stop the Auto Door function.
Auto Door : You can prevent mischief of all the buttons on the control panel by children.
1
2
To activate this function,
To stop this function,
press
button
Pi!
1,2,..5 Second
5 seconds.
press
Pi!
1,2,..5 Second
button 5 seconds again.
Peep!
PiPi!
NOTICE When an infant child may use the Auto Door to make mischief please stop the Auto Door function. 9
Other Functions
Energy Saving Recommend to use this function in case of low storage volume, or a long vacation when the doors are not opened for long time.
1
2 No ECO Monitoring sensor detection.
No door open.
No control panel operation.
Press “Energy Saving” button again for stop Energy Saving operation, lamp light is off.
Press “Energy Saving” button
Pi!
for Start Energy Saving
PiPi!
operation, lamp light is on.
NOTICE
In case the compartment temperature rises up, the operation will be back to a normal setting temporarily. After a long time operation of “Energy Saving”, in some cases, fatty ice cream, etc, may become soft. Please stop
“Energy Saving” operation in this case.
If you Touch “Quick Feezing” or “Quick Cooling” button during “Energy Saving ” operation, “Energy Saving” operation will be done after “Quick Freezing” or “Quick Cooling” operation finished.
CAUTION If “Energy Saving” operation is working in high humidity environment, dew may appear on refrigerator surface.
How to use Dry-Vegetable Drawer If you keep the refrigerator in a hot and humid place, frequently open the door or store a lot of vegetables, it may cause dew forming which has no
effect on its performance. Wipe the dew with dry cloth.
Dry Food
Vegetable
Slide the lever to “Dry food” for coffee bean/ tea leaf 3°C~7°C
Slide the lever to “Vegetable” to provide temperature for vegetable
and fruit 3°C~7°C
There is a humidity control which can adjust the amount of dry air flowing
into the drawer.
CAUTION
Do not store dry food and vegetable together. Vegetable moisture may transfer to dry food and may not be able
to keep food dry.
Refrigerator/Selectable Zone/Freezer Compartment
Refrigerator Door-Left Swing Partition Door Pockets Egg Tray
Upper Vegetable Drawer Lower Vegetable Drawer
Water Tank Handle LED Lamp Selectable Zone Door Upper Selectable Zone Drawer Middle Selectable Zone Drawer Lower Selectable Zone Drawer ECO monitoring sensor
10
Ice Bank
LED Lamp Refrigerator Door-Right Adjustable-height Shelves
Fixed shelf Dry-Vegetable Drawer
Utility Drawer Vacuum compartment
Handle LED Lamp Auto Ice Maker
MiddleFrFereezeezreDr oDorrawer Upper Freezer Drawer Middle Freezer Drawer Lower Freezer Drawer
Refrigerator/Selectable Zone/Freezer Compartment
1 How to use the Auto Ice Maker 1. Remove the water tank.
2. Slide the Lid and fill the water. Lid
Hold the handle and pull the water tank towards yourself. 3. Carry the water tank by the handle with care.
Tank-full line Fill the water not over the full line. 4. Insert the water tank until it stops.
Process complete.
When carrying the water tank, place one hand below the tank for horizontal stability.
If the water tank is not inserted all the way, water will not be supplied to the Automatic Ice Maker. This will prevent these features from functioning properly.
CAUTION
Do not fill the Water Tank with anything other than water. Filling the Water Tank with fluids such as juice, sports drinks, tea, or hot water can damage your refrigerator. The Water Tank can withstand temperatures up to 50 C
MINERAL WATER
Mineral water Filtered water Well water
JUICE Tea
Juice Sports Carbonated Tea drink drink drink
NOTICE
Germs can multiply quickly when filtered water, dechlorinated water, mineral water, or boiled water is used in the Water Tank.
Be sure to thoroughly clean the Water Tank regularly.
Change the water in the Water Tank once a week.
When not using the Water Tank for extended periods of time, thoroughly clean and dry the water tank and reinstall it to its place in
the refrigerator.
The capacity of the Water Tank is approx. 3.0 liters.
For a first installed, allow 24 hours for the refrigerator to cool down and make ice.
Ice maker will stop automatically when ice bank is full and start again automatically when ice cubes in the ice bank is reducing or empty.
Ice Bank
It is normal that a noise is generated when ice made or ice dropped into the ice bank.
Ice detection level.
2 Swing Partition Suggestion Do not hold the swing partition while opening or closing the letf door. Otherwise, other parts may collapse.
Whenever the door is opened, the swing partition will close automatically. While the door is closed, the swing partition will open. Please follow as usual. The swing partition and the swing stopper hit each other, the door will not close.
In order to prevent the dew, there is a heater installed inside to heat up the swing partition. Due to this heater, the temperature of the swing partition is hot (the swing partition is not defective though it is hot).
This is not abnormal when you feel heavy while opening or closing the left door which is installed with the swing partition.
While opening the door
While closing the door
Swing Partition
Swing Partition
Swing Partition
Swing Partition
11
Refrigerator/Selectable Zone/Freezer Compartment
3 How to use the Vacuum Compartment
Vacuum cutting valve (blue) The machine is unlocked by lifting the handle and the vacuum cutting valve will cut the vacuum system with the “Whoosh…” sound.
Vacuum pump Handle
CAUTION
If the lid of the refrigerator is closed but the door of the vacuum case is not closed, there may be some parts will be broken.
Vacuum Box (With Aluminum Tray)
Open Vacuum Compartment
1. Lift the handle to unlock.
Handle
” Whoosh… ”
Door
2. Pull the door out.
While there is the ” Whoosh… ” sound, it’s still vacuum; thus, the door can not be removed. Please remove the door after the “Whoosh” sound stops.
Close Vacuum Compartment
1. Push the vacuum case to the end of the inside.
2. Push the handle down to lock the door.
Do not put too much food or too many containers into the vacuum case. if you do, you may not be able to pull the vacuum case out.
Push the handle down to the end. If not, the case might not be vacuumed.
WARNING
Vacuum pump will work when the handle of the vacuum compartment and the door of refrigerator are closed only. When the vacuum pump starts working,there will be loud noise which is not unusual at all. From the vacuum pump stats working until the case becomes vacuumed, it akes around 2 minites. If the door of the vacuum case opened before 2 minutes, You may not hear the “Whoosh…” sound.Thus, please check the vacuum system after waiting for longer than 2 minutes. Since the vacuum case generates coolness indirectly, it need more time to cool food than other cases.
With the ability to prevent oxidation, the product can preserve the nutrients and tastes of food longer than conventional food conservation techniques.
Foods to be stored Meats/processed meats
Fishes and seafood
Vegetables and fruits
Tea
COFFEE
Beef/pork/chicken/ham/ sausage/etc…
Salmon/mackerel fish/ seafood/boiled fish paste/etc…
Salad vegetables/bell pepper/apple/orange/
kiwi/etc…
Food not recommended to be stored Vegetables vulnerable to low temperature. Skin of the vegetables that are
vulnerable to low temperature will sink or change the colors, please store them in vegetable compartment.
Coffee bean/tea leaf/dairy products/ nuggets/etc…
Egg plant/cucumber/roselle fruit/ asparagus/ginger/sweet pepper/etc…
Food and containers should be stored with care
Food should be kept in a closed plastic bag.
Store the food carefully because the bag will be swollen
and press on other food.
Such as sausage and
cheese in bags
Be careful
sausage
Cheese
12
Closed and sealed plastic containers.
Be careful
Please pick containers out carefully because
the doors of the containers may be detached.
Refrigerator/Selectable Zone/Freezer Compartment
Instructions for disassembly or assembly
1. Slowly lift the front of the vacuum case to detach the core of the door of the vacuum case.
Aluminum Tray
Vacuum case
2. Lift the vacuum case higher.
Core
3. Install all parts by following the reverse steps of the disassembly procedure.
CAUTION
Please remove placed food from the vacuum box before disassembled. Please do not detach any part other than the one described in the instruction. If you want to disssemble any part not described in the instruction for cleaning, please consult the Service Center through the consultancy channels. As for the disassembly or installation of any part, please open the door of the refrigerator wider than 90 degrees.
4 How to remove part
Ice Bank
To remove Ice Bank, pull Upper Freezer Drawer all the way out, then lift Ice Bank upward.
Vegetable Drawer/Dry-Vegetable Drawer
To remove Vegetable Drawer and Dry-Vegetable Drawer, pull it all the way out, then lift it upward.
Upper Freezer Drawer
Ice Bank
Adjustable-height the Shelves
The height of these shelves can be adjusted to match the height of your food and the
way in which they are to be used.
Remove all food stored on the shelf. Lift the back of the shelf upward slightly then pull the shelf out towards to you. Adjust the shelf to the desired height, then push the shelf in until it reaches the
back of the slot.
Utility Drawer
To remove Utility Drawer, pull it all the way out, then lift it upward.
Shelf Trim
Rail Stops
2 1
CAUTION
Shelf trims are removable, Holding the shelf with both hands. DO NOT holding trim or holding shelf with only one hand otherwise it may drop or injury.
Door Pocket
Gently tap the left and right of the bottom surface while pulling a pocket up to remove it. When installing the pockets, push it all the way down in a smooth, controlled manner.
13
Refrigerator/Selectable Zone/Freezer Compartment
Upper Drawer, Middle Drawer, Lower Drawer (Selectable Zone / Freezer Compartment)
To remove Upper Drawer, Middle Drawer, Lower Drawer,pull it all the way out, then lift it upward.
Upper Drawer
Middle Drawer
Care and Maintenance
Lower Drawer
Cleaning
WARNING
Make sure to unplug the power plug when maintaining the refrigerator.
When dirt is found Wipe off it immediately. It is recommended to clean the hidden places once a year.
Power plug
Door gaskets
If the power plug is plugged in with dust on the power cord, it can result in fire. Remove all dust once a year and wipe with a dry cloth.
Cleaning once or twice a year
This area is prone to smudges, so be sure to wipe it thoroughly.
Cleaning once a month
Door Surface
To clean the door surface, wipe with a soft cloth wetted with lukewarm water.
Each shelf/pocket
Use a soft cloth wet by lukewarm water to wipe off.
Cleaning once per three months
Cleaning once a month
Drip Catcher
Liquid that has accumulated here should be wiped away. Drip catcher
Cleaning once a month
Back Panel, Foor of Refrigerator
1. Turn the leg adjuster to raise the refrigerator up off the floor. If the adjuster does not turn easily, use a screwdriver to turn it. If it still will not turn, then remove the leg cover and try again.
2. Pull the refrigerator straight out toward you. For floors that are easily damaged, lay out a protective mat, or other protective material.
3. Wipe off the smudges on the back panel, walls, and floor of the refrigerator. Due to the convection of air, this is a place where fine dust is likely to adhere.
Cleaning once or twice a year
Drawer
Use a soft cloth wet by lukewarm water to wipe off.
Cleaning once per three months
NOTICE 14
Clean regularly surfaces that can come in contact with food and accessible drainage systems. If the refrigerating appliance is left empty for long periods, switch off, defrost, dry and leave the door open to prevent mould
developing within the appliance.
Care and Maintenance
Ice maker
WARNING
WARNING Do not touch the mechanical parts of the automatic ice maker.
(Touching these parts might result in injury.)
Vacuum Compartment
1. Pull the vacuum box out In order to take the products stored in vacuum box.
2. For the following part, clean it with a piece of cloth soaked in warm water.
Aluminum tray
Vaccum box gasket Packing Receiver
When Vacuum Box gasket is dirty. 1. Disassembly of Vacuum Box gasket out off Vacuum Box Case. Facing
the Vacuum Box, twist the knob of the Vacuum Box gasket on top right and carefully remove.
Knob
Vaccum box Case 3. Assembly the Vacuum Box case attach with the core of Vacuum Box Door.
Vaccum box Case
2. Wipe gently with sponge on the stain with plain water. Don’t use any detergent.
Vaccum box gasket
Core Cleaning once a month
CAUTION
If the detergent or any product other than warm water is used for cleaning Vacuum Box gasket, there may be
effects in terms of deformation, color change or loss vacuum property. If Vacuum Box gasket is dropping or Vacuum Box Door not well aligned, there may be the loss of vacuum property.
Please clean gasket track also. gasket track
3. Wipe water out with dry cloth and leave the part until it is naturally dried.
4. Assemble Vacuum Box gasket, twist the knob to align with the gasket track, deliberately assemble.
Knob
Packing track
In order to prevent grime and hard water stains from building up, make sure to clean the Water Tank once a week. 1. How to open the cover.
To remove the lid, use your finger to insert pull the cover up.
Tank 2. How to close the cover.
Water tank
Lid
Cover
In order to prevent grime and hard water stains from building up,
make sure to clean the Water Filter once per week. 1. Pull the case to remove it from the cover.
Cover Case
Water filter Tank
Case
2. Pull the tab to remove the Water Filter from the case. Tap
Cleaning once a week
Handle
3. Use a soft sponge to clean the Water Filter.
Do not use cleansers as this may damage the filter.
NOTICE
If the Automatic Ice Maker is not set to “Stop,” the water pump may make sounds occasionally. This is not a malfunction. Slide the lid in back-end first in the direction of the arrows to close the lid. Replace the Water Filter when it wears out. Water Filters need replacing every 3 to 4 years. Clean water tanks if they have not been used for 48 h;flush the water system connected to a water supply if water has not been
drawn for 5 days.
15
Troubleshooting
Before you call for service, please check the following items:
Problem
Things to check
Instructions
The refrigerator does not get cold Is the refrigerator plugged in properly? at all.
Is the refrigerator placed in the direct sunlight?
Is the temperature set to “Cold”?
Is the food stored too much? The refrigerator does not get cold Is the door slightly opened?
enough.
Is the refrigerator placed near heat sources?
Has anything hot been placed in the refrigerator? Is the door opened and closed too frequently?
Check the fuse box for blown fuse or tripped circuit breaker.
Do not install the refrigerator in a place where it may come in contact with sunlight.
Press “Refrigerator” button to normal or coldest. Keep enough space between food. Should close the door firmly closed. Do not install the refrigerator in a place where it
may come in contact with heat sources. Make food cool enough before putting in
the refrigerator. Do not open & close the door too frequently.
Food in the refrigerator compartment freezes.
Is the temperature set to “Coldest”?
Do you place food with moisture or vegetables nearby the cold air vent? It will be frozen if it is is placed nearby the cold air vent.
Press “Refrigerator” button to narmal or cold.
Keep enough space between food,Do not block the cold air vent.
Dew appears Outside
When the ambient humidity is too high, the door
See content ” Dew or frost is generated” .
gasket may have dew. Please wipe it up with dry cloth.
Page
2
4 6-7 4-5 –
4
4-5 6-7
4-5
19
Dew appears Inside The inside is smelling.
Please wipe it off with dry cloth and please check the details below. Is the door closed firmly? Is the door opened and closed too frequently
or opened for a long time? Is it too humid outside?
Do you store food with odor without warpping it?
The refrigerator is noisy
Make sure the refrigerator is installed frimly. Is the refrigerator touching the wall?
The Control Panel does not respond:
Problem
Things to check
The Control Panel display keeps
changing
–
See content ” Dew or frost is generated” .
Using food wrap or sealed containers. Should be install the refrigerator by following the
preparing instruction manual.
Instructions
This indicates that the refrigerator is running is store-display mode.
The refrigerator will not cool while running in store-display mode.
Turn off the store-display mode by 1) Power off and Power on the refrigerator again. 2) After that the refrigerator will return to normal mode.
19
4-5 4-5
Page
–
This is not a malfunction of the refrigerator:
Problem
The surface of the refrigerator is hot.
If a door is shut, other doors may open.
Does the refrigerator make any abnormal noises (sound)?
There are waving and / or distortions on the door surface, the side and the top surface of the refrigerator.
Things to check
–
–
Instructions
The refrigerator is equipped with the dew prevention and heat radiation tubes. The back and side plates may be heated especially when starting up or if the door is frequently opened and closed.
The two compartments are connected with an air duct. When closing one of the doors, the other door may be opened by the air pressure through the duct. This is a normal phenomenon.
The sound like water flowing and boiling water is the sound of the cooling liquid (refrigerant).
A creaking sound comes from the storage compartment. It is the sound caused by friction of the parts due to temperature change.
Slight waving and/or distortions are generated in the manufacturing process of the refrigerator. They may be conspicuous according to the position of the light source and/or the brightness etc., but there is no problem with the performance.
Page
–
–
16
Troubleshooting
This is not a malfunction of the refrigerator:
Problem
Annoying sound is generated by the refrigerator.
Operation sound lasts long.
Things to check
–
Instructions
You may feel that the operation sound is loud because the compressor operates in high-speed under the following conditions: the refrigerator does not cool fully on the occasion such as using it for the first time, opening/closing the door frequently, the surrounding temperature is high. The sound becomes more quiet after cooling fully. The compressor operates at low speed at night, or during long vacations or absence.
It is because the compressor operates in low-speed for conserving energy
Page
–
Operation sound sometimes becomes louder.
–
It is because the system changes the operating power of
he refrigerator according to the temperature change.
–
There is something strange with the Vacuum Compartment.
Problem
Things to check
Instructions
Page
Is the Handle up?
Push Handle down to the proper position.
–
Has the Handle been pushed down to the If not, there is no vacuum. Push the Vacuum Box Case
–
end already?
inside to the end and push the handle down to the proper
Are Vacuum Compartment gasket and
position.
12
Packing receiver dirty?
If they are, clean them by wiping the stain out.
Is Vacuum Compartment gasket or Vacuum Deliberately attach Vacuum Compartment gasket and
valve (blue) detached or loose.
vacuum valve.
15
In case of occurred these event, Vacuum Compartment might not
Vacuum valve (blue)
be operate.
Is there any bag that contains food or stain If there is any plastic bag that contains things inside,
debris, trash in or around Vacuum
remove it. If the packings are attached to each other,
Compartment gasket and Packing receiver? the Vacuum property will be lost.
15
Thread
Trash
Is the gaskets adhered together, gently stretch it part before using
the Vacuum Compartment?
If the sides of Packing stick to each other, put them apart.
If packing is dirty, clean it.
15
Adhering
It is not known whether it is in the vacuum state or not.
The Handle cannot be locked.
There is shaking “Bu Bu” sound from around Vacuum Compartment.
There are dews or water around the door or inside Vacuum Compartment.
Things stored in Vacuum Compartment are frozen.
Gasket
Has the Vacuum Compartment or R door been opened/closed?
Since the Vacuum Pump is in the status of readiness for work, the absence of the “Whoosh…” sound is not unusual.
If the is the “Whoosh…”sound during the
–
opening, it is normal.
Is there anything stored in the Packing or the inmost side of the Vacuum Compartment?
If there is, remove that thing.
The sound of Pump creating the vacuum state.
If the sound or the shaking happens often, there may be something at the door or the
packing may be dirty.
There is nothing wrong.
If there is plastic bag, remove it and clean the dirty Packing.
Water in food and air can cause diets inside because Vacuum Compartment is
completely closed.
Anything that contains a lot of water should be wrapped or covered. If there are dews or water, wipe them with a
piece of cloth soaked in warm water.
Is there any vegetable that is vulnerable to Check the vegetables that are vulnerable to low
low temperature such as cucumber or
temperature and move them to vegetable compartment.
tomato inside?
–
15 12
17
Troubleshooting
Auto Door
Problem
Noise loud. There is an abnormal noise.
Lamp of open button is off or Auto Door won’t open even if touching.
The Auto Door dose not close.
Auto Door dose not open widely.
Things to check
Hitting sound (thumping sound).
Buzzing sound (whir) (whir).
The operation sound of the Auto Door differs depending on door (left or right).
Is
lamp not lit?
Instructions
This is operating sound of the Aut Door. This is not malfunction. This is operating sound of Electric Refrigerator Unit. This is not malfunction. This may vary depending on installation conditions of the
refrigerator or volume of foods stored in the door pocket.
This is not malfunction.
Page
–
Press
button for 5 second or more until lamp on. 9
Is any food or food bag caught on the compartment?
Did a power failure occur or did the compartment knock against any
obstacle during electrical operation?
Remove food and others that are caught in.
Auto Door function stops on the way, so push in the door
–
with hand.
Don’t stored foods and others make
Remove food and others make contact with the wall.
contact with the wall in
the Refrigerator Compartment.
Installation site may not be levelled out. Opening angle of the Auto Door may vary or the door
–
may go back a little after it is opened automatically
depending on installation conditions of the refrigerator,
but this is not malfunction.
18
Dew or Frost is generated
General operation Please check here
The door of the freezer compartment was not left open temporarily?
Possible causes and / or Recommened solutions
Check that the wrapping paper of the food is not getting caught in order not to make gap between door and door gasket when you close the door.
Frost or ice is generated in the freezer compartment
The door of the freezer compartment was not opened frequently or longer time than necessary?
When the door is opened frequently or if the door is opened when the humidity around the refrigerator is high, moisture in the air may be turned into some frost or ice on the inner wall or component of the freezer compartment, or around the air chanels. This is not a failure. Please try not to open the door too many times or for a long time. Also, please wipe frost or ice generated in the freezer compartment off with use of a dry cloth.
Making extra ice by using an additional ice-tray which was not originally installed in the refrigerator?
When the many containers in which water or liquid is stored are put in the same time, water or liquid may be evaporated and turned into frost or ice on the wall or component of the freezer compartment, or around the air channels. You can suppress these frost and ice by putting lid to avoid evaporation Please wipe frost and ice off with use of a dry cloth.
The door of the refrigerator compartment was not left open temporarily?
Please check not to pinch the food or plastic bag between the door and door frame when you close the door.
Dew is generated in the refrigerator compartment
Dew is generated on outer surface of the refrigerator
The door of the refrigerator compartment was not opened frequently or longer time than necessary?
When the door is opened frequently or if the door is opened
when the humidity around the refrigerator is high, moisture in the air may be turned into some dew on the inner wall or component of the refrigerator compartment, or around the chilled air blow-off port. This is not failure . Please try not to open the door too many times or for long time. Also, please wipe off the dew in the refrigerator compartment with adry cloth.
Dew condensation
Storing many vegetables containing much water?
The humidity of the vegetable compartment is higher than other compartments. Accordingly, depending on the amount or type of the vegetable, dew condensation may be generated on the plastic case of vegetable compartment. However, this is not a failure. When you do not want to have this kind of dew, please warp your vegetables in a plastic flim. Also,when the dew condensation happens many times, water may be accumulated in the vegetable compartment. Please wipe the water off with a dry cloth.
The volume of humidity around When the humidity rises such as in rainy day, some dew many be generated on
the refrigerator is not high?
the outer surface of the refrigerator. Please wipe the dew off with a dry cloth.
The temperature setting is not set as “Coldest”?
When the temperature setting is set as “Coldest”, some dew may be generated on the outer surface of the refrigerator. Please set the
setting as “Normal”. Also, please wipe dew off with use of a dry cloth.
Why frost and dew are generated?
When warm and humid air contacts something cold, dew is generated. For example, if you put some ice in the glass in your room, air around the glass will be cold down and some dew may be generated on the outer surface of the glass.
In the same way, when warm and humid air enters into the refrigerator at the door opening, the warm and humid air contacts cold inner wall and little dew may be generated.
Accordingly, if the door opening is too frequent or too long, dew will be accumulated at every door opening. In some cases, dew may be frozen to generate some frost or ice flakes in the freezer compartment.
19
Hitachi Europe Ltd. Digital Media Group (DMG) Whitebrook Park, Lower Cookham Road, Maidenhead, Berkshire, SL6 8YA, United Kingdom Contact email: [email protected]
About Non-fluorocarbon refrigerator
This refrigerator, including refrigerant and the heat insulator, is using hydrocarbon (non-fluorocarbon). The hydrocarbon is a material that does not rip up the ozone and have very little influence on global warming. It is the global environment concern material).
R600a refrigerant is flammable. But the refrigerant is sealed up by the refrigerant circuit, and never leaks by usual use. In case of the refrigerant circuit being damaged by any chance, please avoid using fire or electric product, open the window and ventilate. Afterwards, please contact Hitachi Service Center.
Sever warning signs for Disposal
Cyclopentane is used as in the insulation. The gases in insulation material require a special disposal procedure. Please contact your local authorities in regard to the environmentally safe disposal of this product.
Information for users in European Union Countries. The mark shown on the right is in compliance with the Waste Electrical & Electronic Equipment directive 2012/19/EU (WEEE). This Mark indicates the requirement NOT to dispose the equipment as unsorted municipal waste, but use the return and collection system available. Business users should contact their supplier and check the terms and conditions of the purchase contract. This product and its electronic accessories should not be mixed with other commercial waste for disposal.
HITACHI REFRIGERATORS DISCLAIMER / WARNING
Some (simple) failures can be adequately handled by the end-user without any safety issue or unsafe use arising, provided that they are carried out within the limits and in accordance with the following instructions (see the “Self-Repair” section). Therefore, unless otherwise authorized in the “Self-Repair” section below, repairs shall be addressed to registered professional repairers in order to avoid safety issues. A registered professional repairer is a professional repairer that has been granted access to the instructions and spare parts list of this product by the manufacturer according to the methods described in legislative acts pursuant to Directive 2009/125/EC. However, only the service agent (i.e. authorized professional repairers) that you can reach through the phone number given in the user manual/warranty card or through your authorized dealer may provide service under the guarantee terms. Therefore, please be advised that repairs by professional repairers (who are not authorized by importer) shall void the guarantee.
Self-Repair
Self-repair can be done by the end-user regarding the following spare parts: door handles, doorHinges (as a part not as an accessory), trays, baskets, and door gaskets. Moreover, to ensure product safety and to prevent risk of serious injury, the mentioned self-repair shall be done following the instructions in the user manual for self-repair. For your safety, unplug the product before attempting any self-repair. Repair and repair attempts by end-users for parts not included above and/or not following the instructions in the user manuals for self-repair, might give raise to safety issues not attributable to the importer, and will void the warranty of the product. Therefore, it is highly recommended that end users refrain from the attempt to carry out repairs falling outside the mentioned list of spare parts, contacting in such cases authorized professional repairers or registered professional repairers. On the contrary, such attempts by end-users may cause safety issues and damage the product and subsequently cause fire, flood, electrocution, and serious personal injury to occur. The manufacturer/seller cannot be held liable in any case where end-users do not comply with the above. The spare part availability of the Hitachi refrigerator that you purchased is 7 years, especially for door gaskets this is expanded to 10 years. During this period, original spare parts will be available to operate the refrigerator properly.
20

Thank you for purchasing this product. This is the basic manual on the product. Visit our website to get the detailed manuals and the latest information on the product. Check them before using the product, for safe use and utilization of the product.
Our website: http://www.hitachi-america.us/projectors
http://www.hitachidigitalmedia.com
https://estadoc.hitachi.eu/index.htm
http://www.hitachiconsumer.com.sg
![]() WARNING ▶Before using this product, be sure to read all manuals for this product. After reading them, store them in a safe place for future reference.
WARNING ▶Before using this product, be sure to read all manuals for this product. After reading them, store them in a safe place for future reference.
▶ Heed all the warnings and cautions in the manuals or on the product ‘
▶ Follow all the instructions in the manuals or on the product.
NOTE • In this manual, unless any comments are accompanied, “the manuals’ means all the documents provided with this product, and means this projector and all the accessories came with the projector;
First of all
Entries and graphical symbols explanation
The following entries and graphical symbols are used for the manuals and the product as follows, for safety purpose. Please know their meanings beforehand, and heed them.
![]() WARNING This entry warns of a risk of serious personal injury or even death.
WARNING This entry warns of a risk of serious personal injury or even death.
![]() CAUTION This entry warns of a risk of personal injury or physical damage.
CAUTION This entry warns of a risk of personal injury or physical damage.
NOTICE This entry notices of fear of causing trouble.
Important safety instruction
The following are important instruction for safely using the product. Be sure to follow them always when handling the product. The manufacturer assumes no responsibility for any damage caused by mishandling that is beyond normal usage defined in these manuals of this projector.
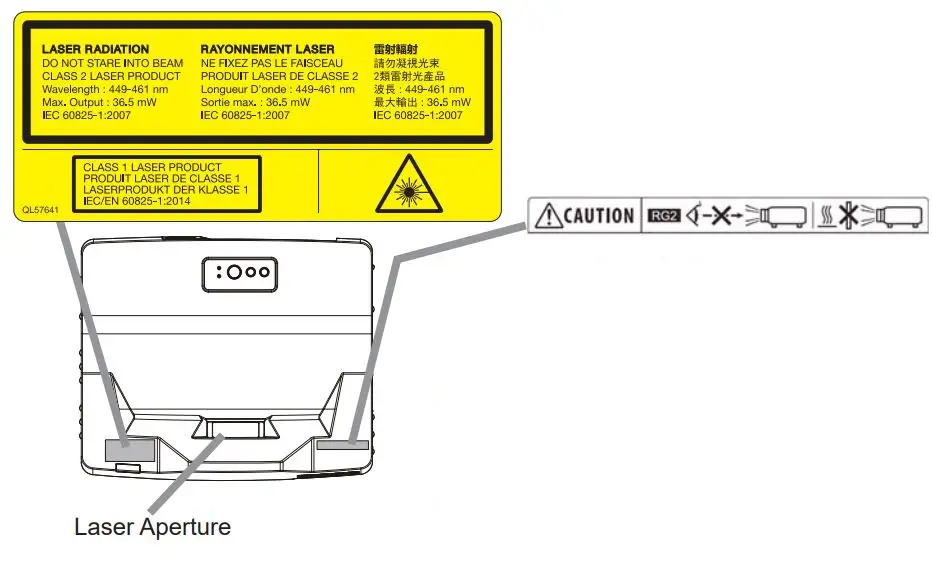
Regulatory notices
About Electro-Magnetic Interference
In CANADA
CAN ICES-3(B)/NMB-3(B)
In the US, and other places where the FCC regulations are applicable
Declaration of Conformity
Trade name HITACHI
Model Number LP-AW4001/LP-AW30001/LP-AX3001
Responsible Party Hitachi America, Ltd.
Address 2420 Fenton Street, Suite 200 Chula Vista, CA 91914 U.S.A.
Telephone Number +1 -800-448-2244
This device complies with part 15 of the FCC Rules. Operation is subject to the following two conditions: (1) This device may not cause harmful
interference, and (2) this device must accept any interference received,
including interference that may cause undesired operation. This equipment
has been tested and found to comply wit the limits for a class B digital device, pursuant to Part 15 of the FCC Rules.
These limits are designed to provide reasonable protection against harmful interference in a residential installation. This equipment generates, uses, and can radiate radio frequency energy and, if not installed and used in accordance with the instructions, may cause harmful interference to radio communications. However, there is no guarantee that interference will not occur in a particular installation. If this equipment does cause harmful interference to radio or television reception, which can be determined by turning the equipment off and on, the user is encouraged to try to correct the interference by one or more of the following measures:
– Reorient or relocate the receiving antenna.
– Increase the separation between the equipment and receiver.
– Connect the equipment into an outlet on a circuit different from that to which the receiver is connected.
– Consult the dealer or an experienced radio/TV technician for help.
INSTRUCTIONS TO USERS: This equipment complies with the requirements of FCC (Federal Communication Commission) equipment provided that the following conditions are met. Some cables have to be used with the core set. Use the accessory cable or a designated-type cable for the connection. For cables that have a core only at one end, connect the core to the projector.
CAUTION: Changes or modifications not expressly approved by the party responsible for compliance could void the user’s authority to operate the equipment.
Product label
The position of the label is shown in the drawing below.

As with any bright source, do not stare into the direct beam, RG2 IEC 62471-5:2015.
Laser evaluation standard:
IEC60825-1: 2007, IEC60825-1: 2014,
EN60825-1: 2014
LP-AW4001:
Internal Laser Specifications
Max. Output: 95W
Wave Length: 449 – 461nm
LP-AW3001/LP-AX3001:
Internal Laser Specifications
Max. Output 71 W
Wave Length: 449 – 461nm
- This projector is classified as a class 1 laser product that complies with IEC60825-1 :2014 and JIS C 68022014, and as a class 2 laser product that complies with IEC60825-1 :2007. Improper handling may cause injury. Be careful of the following.
- If an abnormality occurs in the projector, turn it off immediately, unplug the power cord from the outlet, and consult your dealer or service company. If you continue to use it, it may cause not only electric shock or fire but also vision disorder.
- Do not disassemble or modify the projector. The projector has a high-power laser device inside. It may cause serious injury.
- Do not look into the beam while projecting an image. Do not look into the lens through optical devices such as magnifiers or telescopes. It may cause vision disorder.
- Make sure that nobody is looking into the lens when you turn on the projector by remote control away from the projector.
- Do not let children operate the projector. If children could possibly operate the projector, they must be accompanied by an adult.
- Do not expose optical devices such as magnifiers or reflection mirrors to a projected image. It may cause bad effects on the human body if you continue to use it. It may also cause fire or accidents.
- Do not disassemble the projector when you dispose Of it. Dispose Of it according to laws and regulations of each country or region.
![]() CAUTION ▶ Use of controls or adjustments or performance or procedures other than those specified herein may result in hazardous radiation exposure.
CAUTION ▶ Use of controls or adjustments or performance or procedures other than those specified herein may result in hazardous radiation exposure.
Disposal of Old Equipment and Batteries Only for European Union and countries with recycling systems
![]() The above mark is in compliance with the Waste Electrical and Electronic Equipment Directive 2021/19/EU (WEEE). the mark indicators the requirement NOT to dispose the equipment including any spent or discarded batteries as unsorted municipal waste, but use the return and collection systems available. If the batteries or accumulators included with this equipment display the chemical symbol Hg, Cd, or Pb, then it means that the battery has a heavy metal content of more than 0.0005% Mercury, or more than 0.002% Cadmium or more than 0.004% Lead.
The above mark is in compliance with the Waste Electrical and Electronic Equipment Directive 2021/19/EU (WEEE). the mark indicators the requirement NOT to dispose the equipment including any spent or discarded batteries as unsorted municipal waste, but use the return and collection systems available. If the batteries or accumulators included with this equipment display the chemical symbol Hg, Cd, or Pb, then it means that the battery has a heavy metal content of more than 0.0005% Mercury, or more than 0.002% Cadmium or more than 0.004% Lead.
![]() Note for the battery symbol (bottom symbol): This symbol might be used in combination with a chemical symbol. In this case it complies with the requirement set by the Directive for the chemical involved.
Note for the battery symbol (bottom symbol): This symbol might be used in combination with a chemical symbol. In this case it complies with the requirement set by the Directive for the chemical involved.
Contents of package
Your projector should come with the items shown below. Check that all the items are included. Contact your dealer immediately if any items are missing. Refer to figure F-7 at the back of this manual.
(1) Remote control with two AA batteries
(2) Power cord
(3) Computer cable
(4) User’s manual *
(5) Security label
(6) Adapter cover
(7) Hook metal
(8) Screw
(9) HDMI cable holder (x2)
(10) Cable tie – large (x1)
(11) Cable tie – medium (x2)
(12) Cable tie – small (x1)
(13) Ferrite Core
* The accessory book “User’s Manual (concise)” is a basic manual. Read the detailed manuals (Operating Guide etc.) from our website.
![]() WARNING▶ Do not attempt to install the projector yourself. Have your dealer or service center handle all installation work. Note that manufacturer will accept no liability whatsoever for accidents or injuries resulting from an incorrect installation or improper use.
WARNING▶ Do not attempt to install the projector yourself. Have your dealer or service center handle all installation work. Note that manufacturer will accept no liability whatsoever for accidents or injuries resulting from an incorrect installation or improper use.
![]() CAUTION▶ If the disc comes with this product, use it in a computer disc drive. Never insert the disc into a non-computer disc drive. Inserting the disc into an incompatible disc drive may produce a loud noise and result in ear and speaker damage.
CAUTION▶ If the disc comes with this product, use it in a computer disc drive. Never insert the disc into a non-computer disc drive. Inserting the disc into an incompatible disc drive may produce a loud noise and result in ear and speaker damage.
NOTE • Keep the original packing materials for future reshipment. Be sure to use the original packing materials when moving the projector. use special caution for the lens.
Arrangement
Refer to tables T-1 and T-2 anG¿JXUHVF-1 and F-2 at the end of this manual to determine the screen size and projection distance. The values shown in the table are calculated for a full size screen.
(a) Screen size (diagonal) (b1) , (b2) Projection distance (±8%) (c1) , (c2) Screen height (±8%)
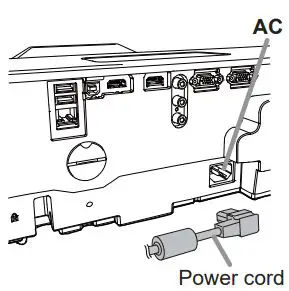
Connecting with your devices
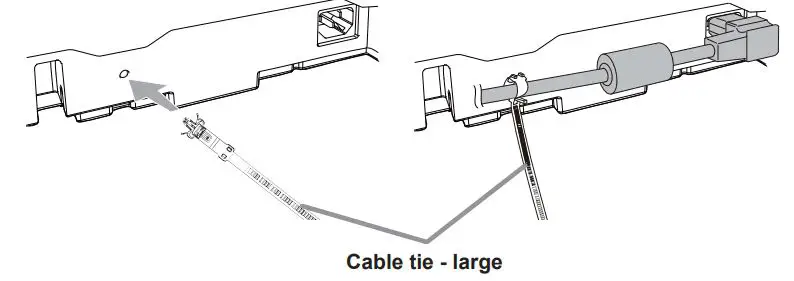
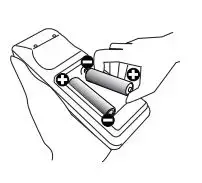
Connecting to a power supply
1. Put the connector of the power cord into the AC (AC inlet) of the projector.
2. Firmly plug the power cord’s plug into the outlet. In a couple of seconds after the power supply connection, the POWER/STATUS1 indicator will light up in steady orange.
Please remember that when the DIRECT POWER ON function is activated, the connection of the power supply makes the projector turn on. When the AUTO POWER ON function is activated and the projector is receiving an input signal, it is turned on by connecting to the power supply.
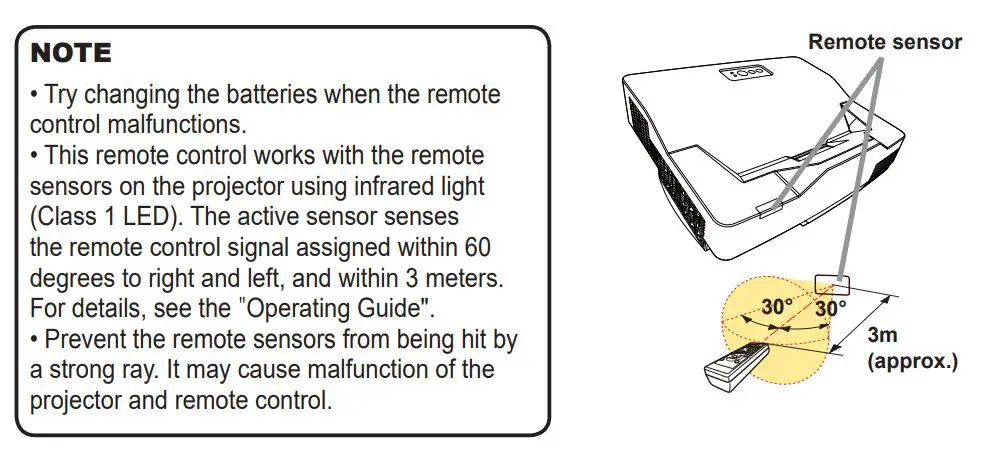
![]() WARNING ▶ Please use extra caution when connecting the power cord, as incorrect or faulty connections may result in fire and/or electrical shock.
WARNING ▶ Please use extra caution when connecting the power cord, as incorrect or faulty connections may result in fire and/or electrical shock.
- Do not touch the power cord with a wet hand.
- Only use the power cord that came with the projector. If it is damaged, consult your dealer to get a new one. Never modify the power cord.
- Only plug the power cord into an outlet whose voltage is matched to the power cord. The power outlet should be close to the projector and easily accessible. Unplug the power cord for complete disconnection.
- Do not distribute the power supply to multiple devices. Doing so may overload the outlet and connectors, loosen the connection, or result in fire, electric shock or other accidents.
- Do not press the main body of projector on the power cord.
- Connect the ground terminal for the AC inlet of this unit to the ground terminal of the building using an appropriate power cord (bundled).
NOTICE ▶ This product is also designed for IT power systems with a phase- to-phase voltage of 220 to 240 V.
Fastening the cable
Use the supplied cable tie to fasten the cable.
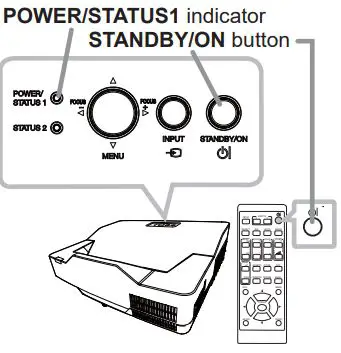
Preparing for the remote control
Please insert the batteries into the remote control before using it. If the remote control starts to malfunction, try to replace the batteries. If you will not use the remote control for long period, remove the batteries from the remote control and store them in a safe place.
1. Remove the battery cover.
2. Align and insert the two AA batteries (Use the appropriate AA carbon-zinc or alkaline batteries (non-rechargeable) in accordance with laws and regulations.) according to their plus and minus terminals as indicated in the remote control.
3. Put the battery cover back to the former state.
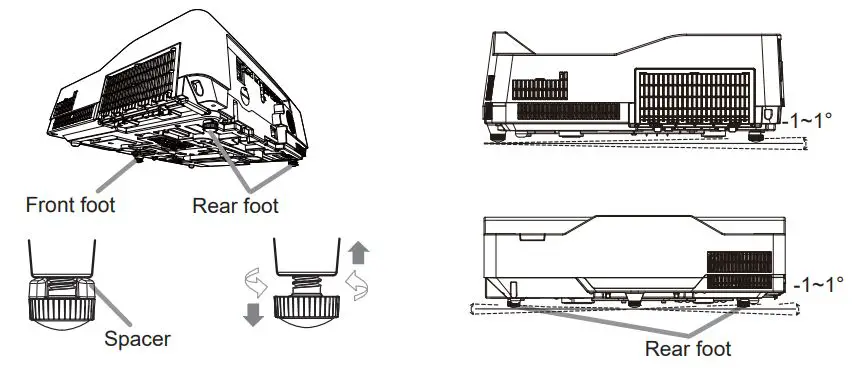
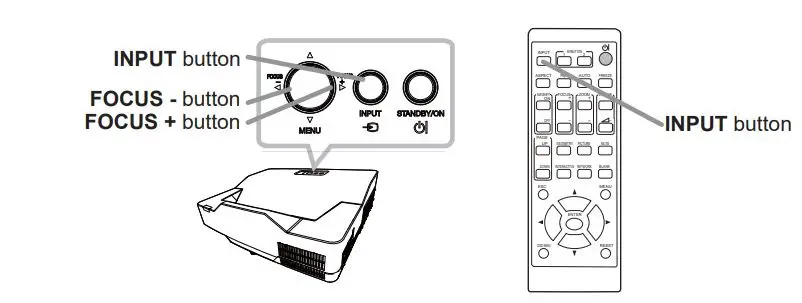
Turning on the power
1. Make sure that the power cord is firmly and correctly connected to the projector and the outlet.
2. Make sure that the POWER/STATUS1 indicator is steady orange.
3. Press the STANDBY/ON button on the projector or the remote control. The projection light source will light up, and the POWER/STATUS1 indicator will begin blinking in green. When the power is completely on, the indicator will stop blinking and light in steady green.
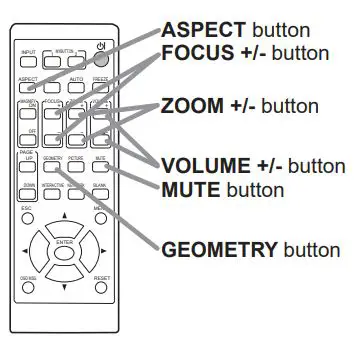
![]() WARNING▶ Never look into the projection window while the projection light source is on, since the projection ray may cause a trouble on your eyes.
WARNING▶ Never look into the projection window while the projection light source is on, since the projection ray may cause a trouble on your eyes.
▶ Do not place the projector vertically as shown in the figure on the right. It could cause malfunction or injury. If you install the projector vertically on a table or desk, be sure to use the designated optional accessories.
▶ The projection window of this machine is made of glass. It can be damaged by excessive force or an impact. Read the following important warnings carefully, and follow them for your own safety.
- Do not apply excessive force on or allow impact to the projection window.
- Keep the projector out of the reach of children.
- If the projection window is broken, the projected image will be distorted. Never touch a broken projection window, and contact your dealer.

NOTE
• Please power on the projector prior to the connected devices.
• The projector has the DIRECT POWER ON function, which can make the projector automatically turn on. For more information, see the “Operating Guide”.
Adjusting the projector’s elevator
The projector has 2 Rear feet for adjusting the horizontal position and inclination. You can use the projector as it is with attached Spacers of Rear feet. You can make more precise adjustments by detaching the spacers and turning the Rear feet.

![]() WARNING▶ Keep the spacers away from children and pets. Be careful not to let them swallow the spacers. If swallowed, consult a physician immediately for emergency treatment.
WARNING▶ Keep the spacers away from children and pets. Be careful not to let them swallow the spacers. If swallowed, consult a physician immediately for emergency treatment.
NOTE • The adjustment angle can be adjusted up to plus or minus 1° each of foot. • You can attach the spacers to set the projector back to the factory default after adjusting the foot. If you install the projector in a different place in the future, it is recommended to keep the spacers and reuse them.
Operation
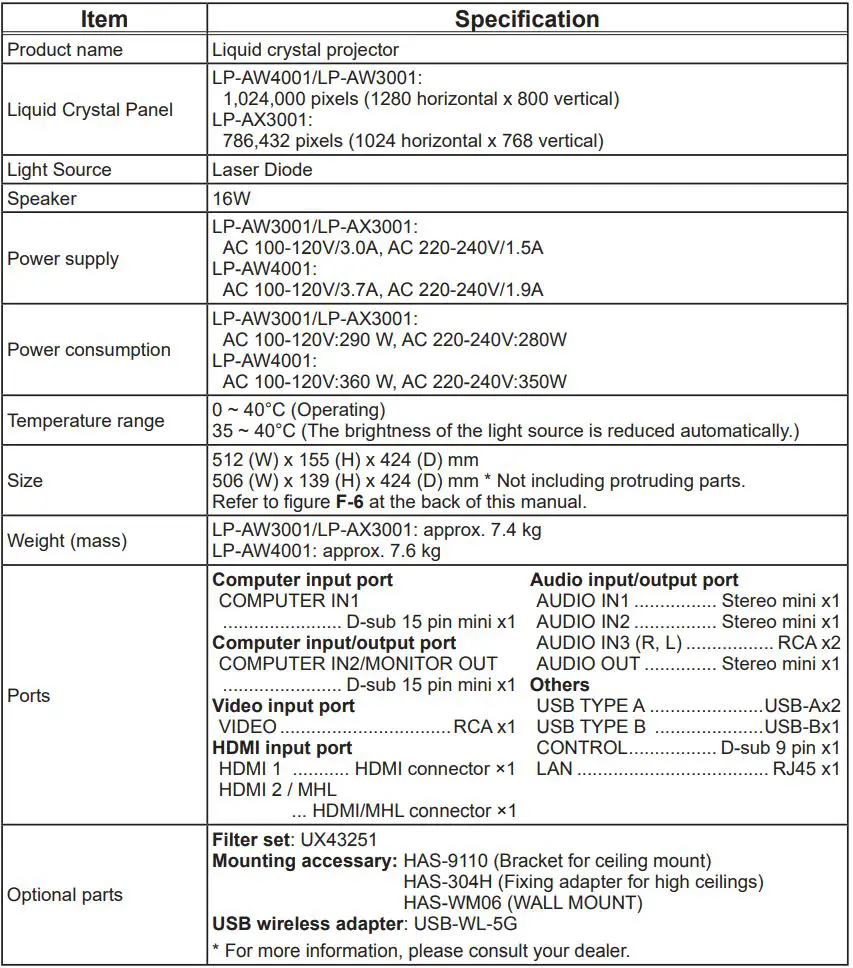
Displaying and switching the image
Press the INPUT button on the projector or the remote control. Select a desirable input referring to the displayed input list. (continued on next page)
Focusing
Use the FOCUS + and FOCUS – buttons on the projector or remote control to adjust the screen focus.
Selecting an aspect ratio
Each time you press the ASPECT button on the remote control, it switches the aspect ratio of the image in turn.
Zooming
Use the ZOOM + and ZOOM – buttons on the remote control to adjust the screen size.

Correcting distortion
Press the GEOMETRY button on the remote control. A dialog will appear on the screen to aid you in correcting the distortion. Use the ▲/▼ cursor buttons to select, KEYSTONE or PERFECT FIT operation, and press the ▶ button to perform the following.
KEYSTONE dialog for keystone correction.
PERFECT FIT displays a dialog for adjusting the shape of the projected image in each of the corners and sides. Use the cursor buttons according to the dialog, checking the image. Press the GEOMETRY button again to finish this operation.
Adjusting the volume
Use the VOLUME +- buttons to adjust the volume. To turn off the sound, press the MUTE button on the remote control.
![]() WARNING ▶ If you wish to have a blank screen while the light source is on, use the BLANK function (see the Operating Guide). Any other method of blocking the projection light, such as attaching something to the projection window or placing something in front of the projection window, may cause the damage to the projector. Blocking the beam by something causes high temperature and could result in fire or smoke.
WARNING ▶ If you wish to have a blank screen while the light source is on, use the BLANK function (see the Operating Guide). Any other method of blocking the projection light, such as attaching something to the projection window or placing something in front of the projection window, may cause the damage to the projector. Blocking the beam by something causes high temperature and could result in fire or smoke.
NOTE
- The ASPECT button does not work when no proper signal is input
- For details, see the “Operating Guide”.
- There may be some noise and/or the screen may flicker for a moment when an operation is made. This is not a malfunction.
Turning off the power
1. Press the STANDBY/ON button on the projector or the remote control. The message Power Off? will appear on the screen for about 5 seconds.
2. Press the STANDBY/ON button again while the message appears. The light source will go off, and the POWER/ STATUS1 indicator will begin blinking in orange. Then the POWER/STATUS1 indicator will stop blinking and light in steady orange when the light source cooling is completed.
![]() WARNING ▶Do not touch around the exhaust vents during use or just after use, since it is too hot.
WARNING ▶Do not touch around the exhaust vents during use or just after use, since it is too hot.
▶ Unplug the power cord for complete disconnection. The power outlet should be close to the projector and easily accessible.
NOTE
- Please power off the projector after any connected devices are powered off.
- This projector has the AUTO POWER OFF function that can make the projector turn off automatically. For more information, see the “Operating Guide”.
Cleaning and Replacing the air Filter
Replacing the internal clock battery

Caring for the projection window

Specifications

Troubleshooting – Warranty and after-service
If an abnormal operation (such as smoke, strange odor or excessive sound) should occur, stop using the projector immediately. Otherwise if a problem occurs with the projector, first refer to “Troubleshooting” of “Operating Guide” and “Network Guide”, and run through the suggested checks. If this does not resolve the problem, please consult your dealer or service company. They will tell you what warranty condition is applied. Check our website where you may find the latest information for this product. (LAI)
NOTE
- The information in this manual is subject to change without notice.
- The illustrations in this manual are for illustrative purposes. They may differ slightly from your projector.
- The manufacturer assumes no responsibility for any errors that may appear in this manual.
- The reproduction, transfer or copy of all or any part of this document is not permitted without express written consent.
Manufacturing year and month
The manufacturing year and month of this projector is indicated as follows in the
serial number of the rating label on the projector.

End User License Agreement for the Product Software
End User License Agreement for the Product Software Software in the product consists of the plural number of independent software modules and there exist our copyright and/or third party copyrights for each of such software modules. The product also uses software modules that we have developed and/or produced. And there exist our copyright and intellectual property for each of such software and related items including but not limited to the software related documents. These rights above are protected by copyright law and other applicable laws. And the product uses software modules licensed as Freeware upon GNU GENERAL PUBLIC LICENSE Version 2 and GNU LESSER GENERAL PUBLIC LICENSE Version 2.1 established by Free Software Foundation, Inc. (U.S.) or license agreements for each software. Refer to the following web page for license agreements for such software modules and other software.
Our website: http://www.hitachiconsumer.com.sg
Contact dealer in your region for inquiry regarding licensed software. Refer to license agreements of each software on the web page for detail of the license conditions and so on. (The original in English is carried since the license agreement is established by third party other than us.) Because the program (the software module) is licensed free of charge, the program is provided “as is” without warranty of any kind, either expressed or implied, to the extent permitted by applicable law. And we do not take any responsibility or compensate for loss of any kind (including but not limited to loss of data, loss of accuracy or loss of compatibility with interface between other programs) by the software conceded and/or use of the software concerned to the extent permitted by applicable law.
Trademark acknowledgment
- HDMI, the HDMI logo and High-Definition Multimedia Interface are trademarks or registered trademarks of HDMI Licensing LLC in the United States and other countries.
- MHL@, the MHL logo, and Mobile High-Definition Link are trademarks or registered trademarks of MHL, LLC in the United States and other countries.
- Blu-ray Disc™ and Blu-ray™ are trademarks of Blu-ray Disc Association. All other trademarks are the properties of their respective owners.