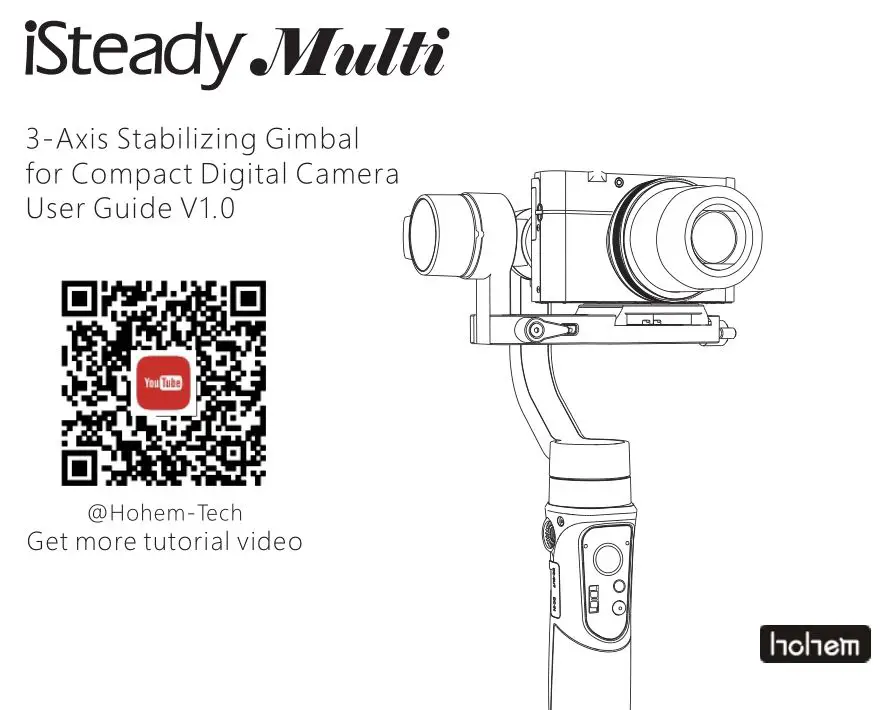
3-Axis Stabilizing Gimbal for Compact Digital Camera User Guide V1.0
DISCLAIMER
- Please use the product in accordance with the user guide.
- Make sure your camera device is mounted before powering on the gimbal.
- Keep the gimbal away from Pre and heat source.
- Prohibiting the product to be used for any illegal purpose. The user who violates the regulation will be responsible for all the consequences by purchasing and using the product.
- For any products which comes from non-normal source, we will not be at any service.
- For any question, please contact the technical support of Hohem Tech. We will be always at your service to provide the technical support and advice for any improper using of gimbal.
- Hohem Tech reserves the right of Pnal explanation.
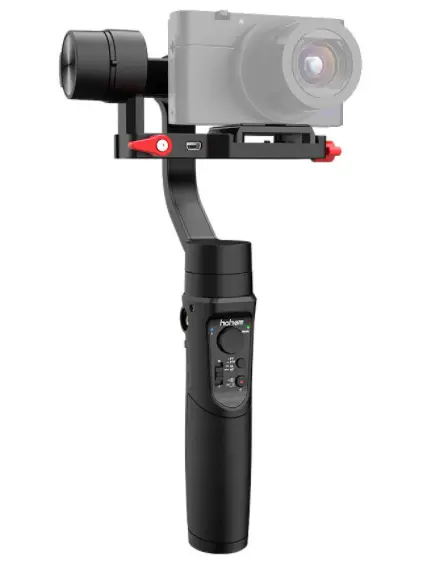
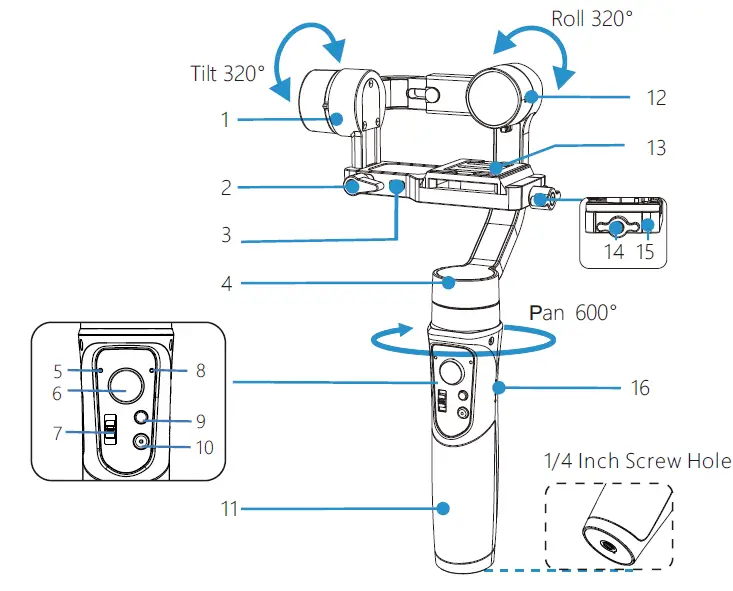
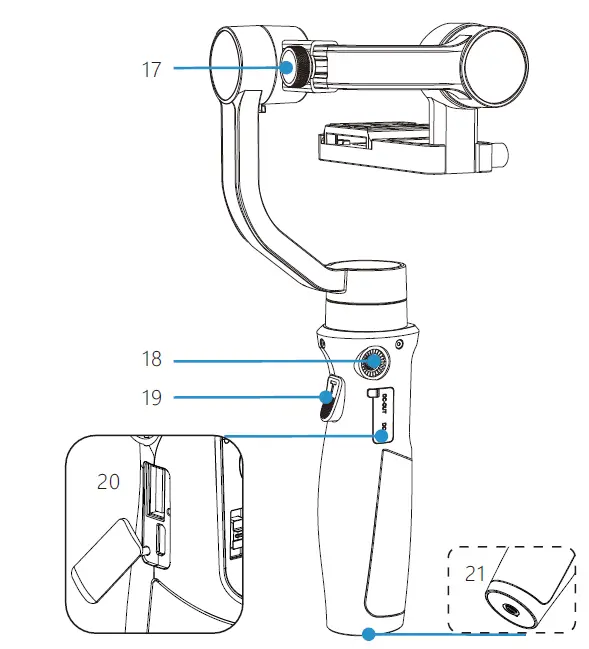
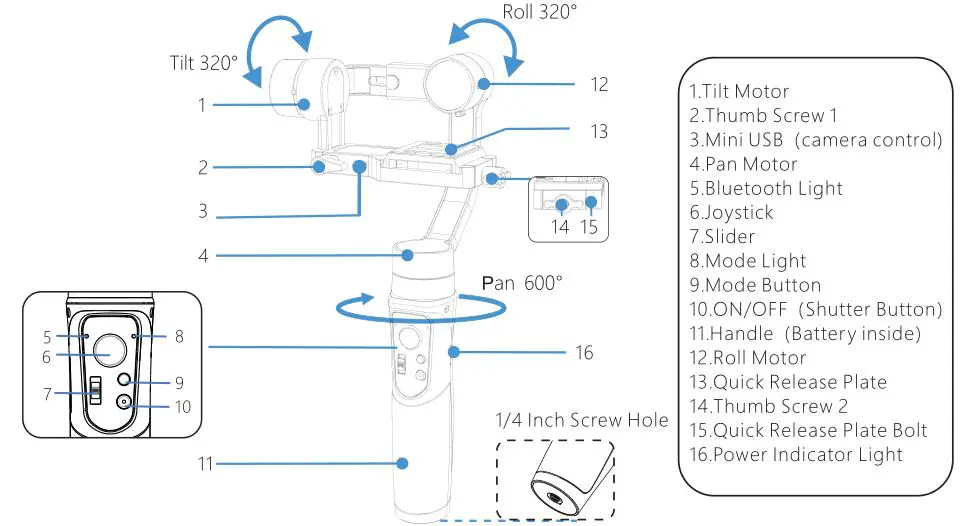
Product Overview

- Tilt Motor
- Thumb Screw 1
- Mini USB(camera control)
- Pan Motor
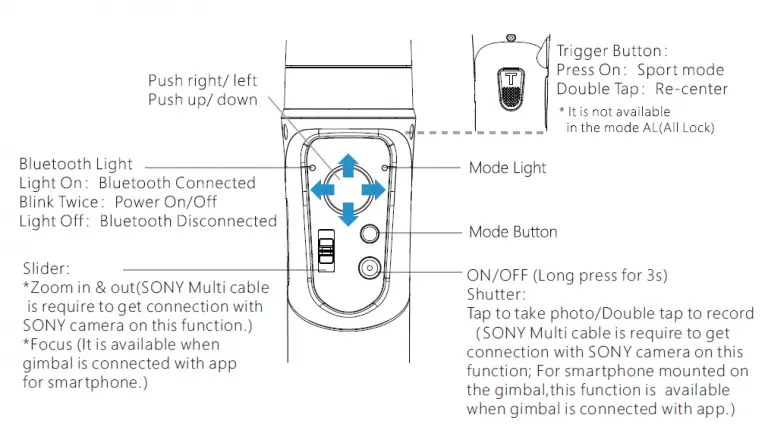
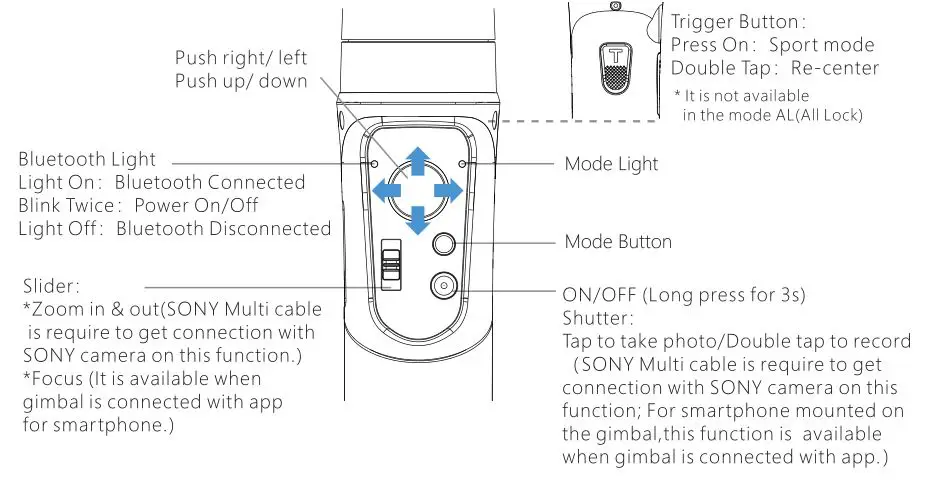
- Bluetooth Light
- Joystick
- Slider
- Mode Light
- Mode Button
- ON/OFF(Shutter Button)
- Handle(Batter y inside)
- Roll Motor
- Quick Release Plate
- Thumb Screw 2
- Quick Release Plate Bolt
- Power Indicator Light

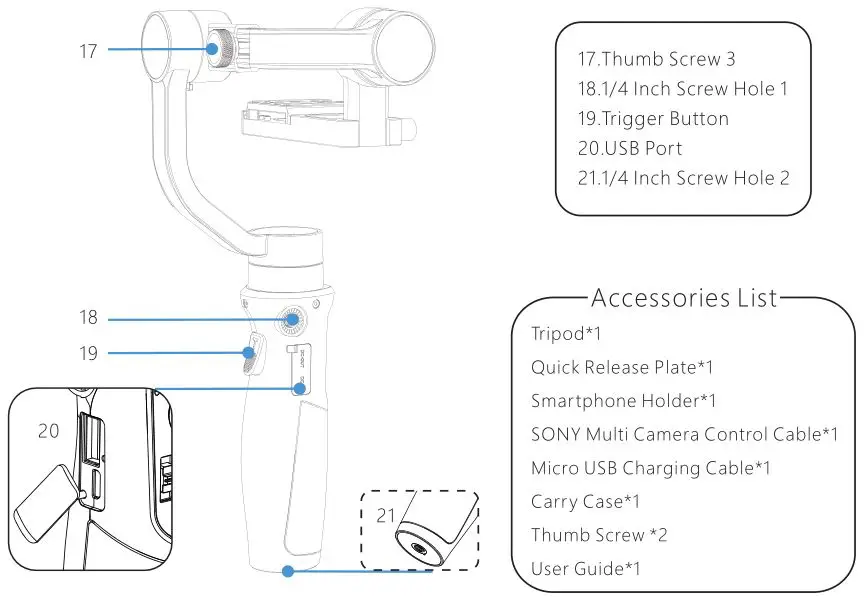
- Thumb Screw 3
- 1/4 Inch Screw Hole 1
- Trigger Button
- USB Port
- 1/4 Inch Screw Hole 2
Accessories List
Tripod*1
Quick Release Plate*1 Smartphone Holder*1 SONY Multi Camera Control Cable*1 Micro USB Charging Cable*1 Carr y Case*1 Thumb Screw *2 User Guide*1
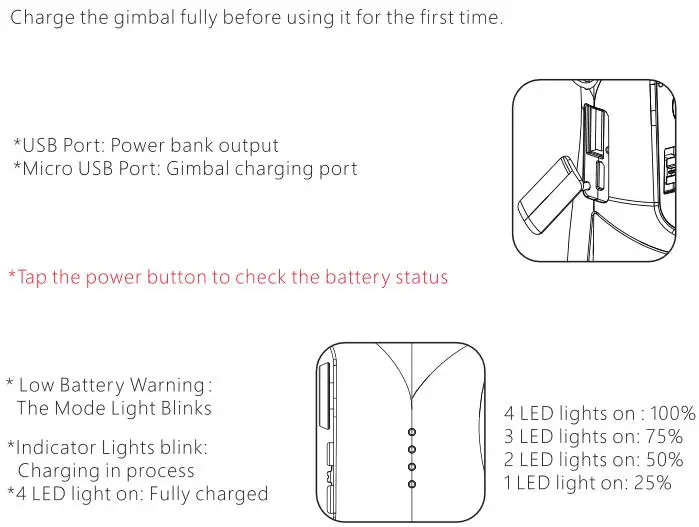
Gimbal Charging
Charge the gimbal fully before using it for the first time. *USB Port: Power bank output
*Micro USB Port: Gimbal charging port
* Low Battery Warning· The Mode Light Blinks
*Indicator Lights blink: Charging in process
*4 LED light on: Fully charged
4 LED lights on: 100% 3 LED lights on: 75%
2 LED lights on: 50% 1 LED light on 25%
Camera/Phone Mounting
CAUTION
Please mount your camera/phone before turning on the gimbal.
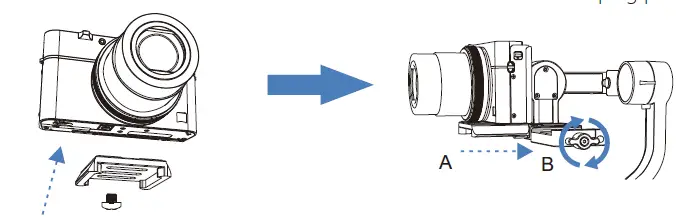
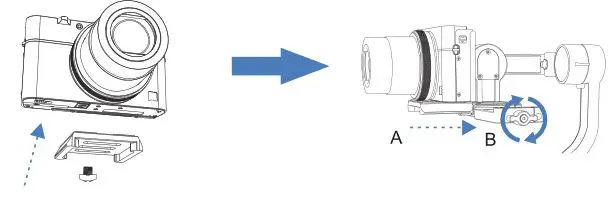
Camera Mounting:
* Some action cameras must add an adaptor with 1/4 screw hole.
- Mount the quick release plate on camera.
- Insert the camera with quick release plate(A) into the slot of clamping plate(B) and tighten the thumb screw
Supported Cameras:
- Digital Camera: SONY RX100 series, Canon G series,Panosonic DMC-LX10
- Action Camera: GoPro Hero series, SONY RX0 series, SONY X300, YI CAM, SJCAM
- Payload: 400g
Phone Mounting:
- Mount the phone holder on the quick release plate with thumb screw
- Insert the phone holder with quick release plate into the slot of clamping plate and mount your phone on the holder, then tighten the quick
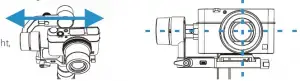
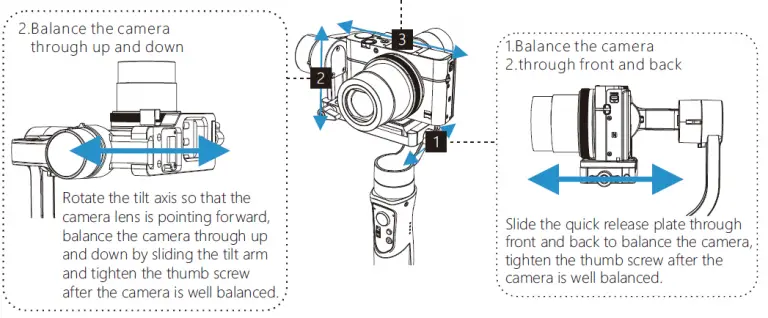
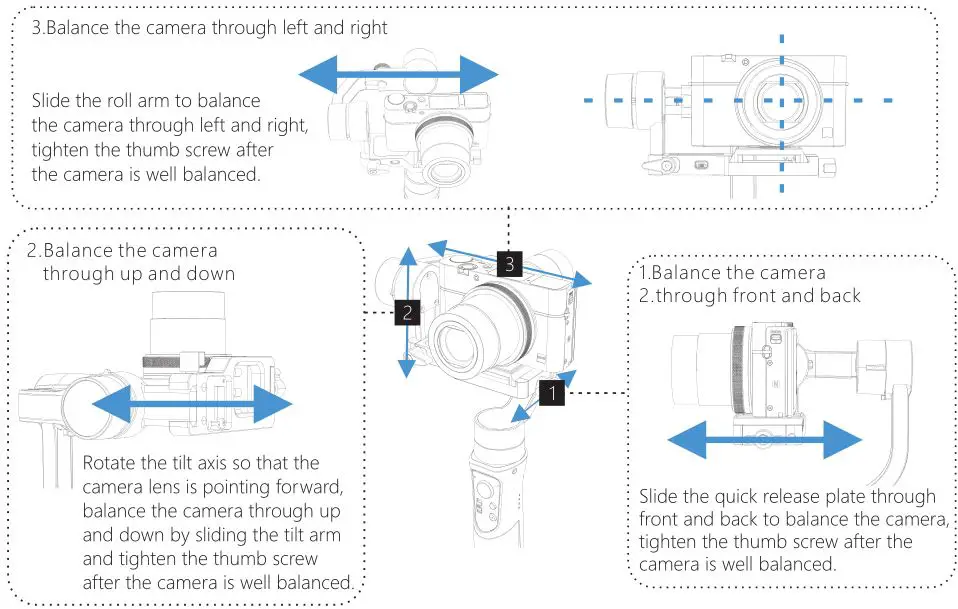
Balancing
It is recommended to turn on the camera before balancing it on the gimbal
3.Balance the camera through left and right
Slide the roll arm to balance the camera through left and right, tighten the thumb screw after the camera is well balanced.

Operation Instruction
App “Hohem Gimbal” Instruction
Bluetooth Connection:
- Enable the bluetooth of smartphone and turn on the gimbal.(Make sure the device is mounted on the gimbal)
- Open the App “Hohem Gimbal” and choose the correct product model “iSteady Multi”to connect.
- Choose the correct device to enter into(For compact camera and action camera mounted,click “camera” to enter; For smartphone mounted,click “phone” to enter.) It allows to connect the bluetooth of smartphone for mounting smartphone on gimbal.Enter the smartphone bluetooth list to search signal “Smartphone Gimbal” to connect the gimbal, which enables the gimbal to control the original phone camera to take phone and record video.
【FAQ】Fail to connect the bluetooth on smartphone or app?
- Reset network setting.
- Disable WiFi and cancel the pairing of “Smartphone Gimbal” connection.
- Reconnection
App “Hohem Gimbal” Instruction
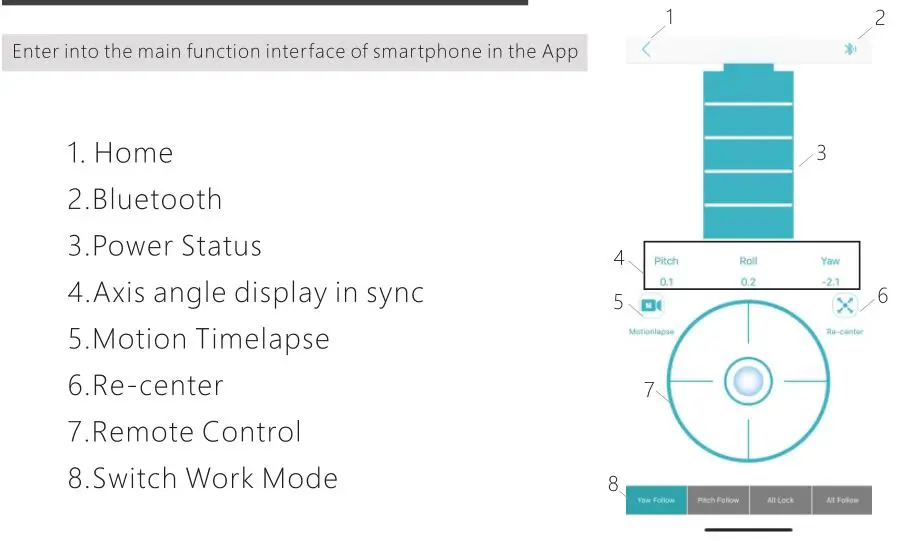
Enter into the main function interface of smartphone in the App
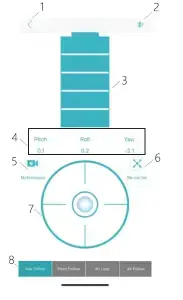
- Home
- Bluetooth
- Power Status
- Axis angle display in sync
- Motion Timelapse
- Re-center
- Remote Control
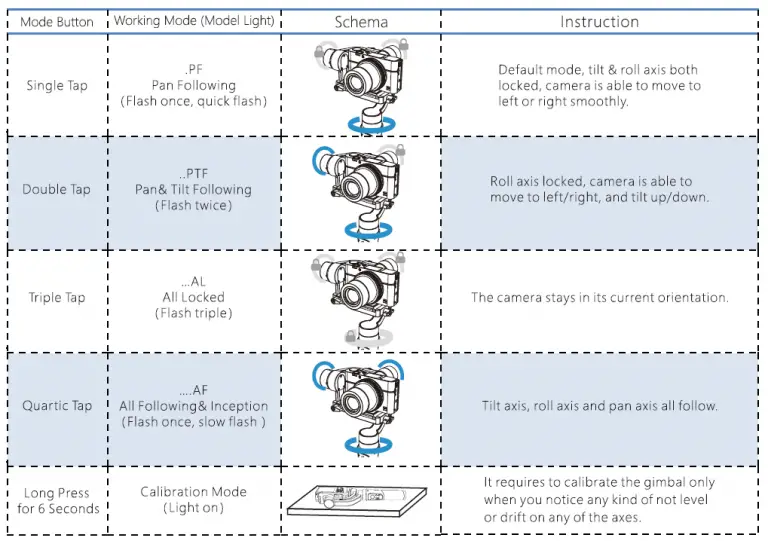
- Switch Work Mode
App “Hohem Gimbal” Instruction
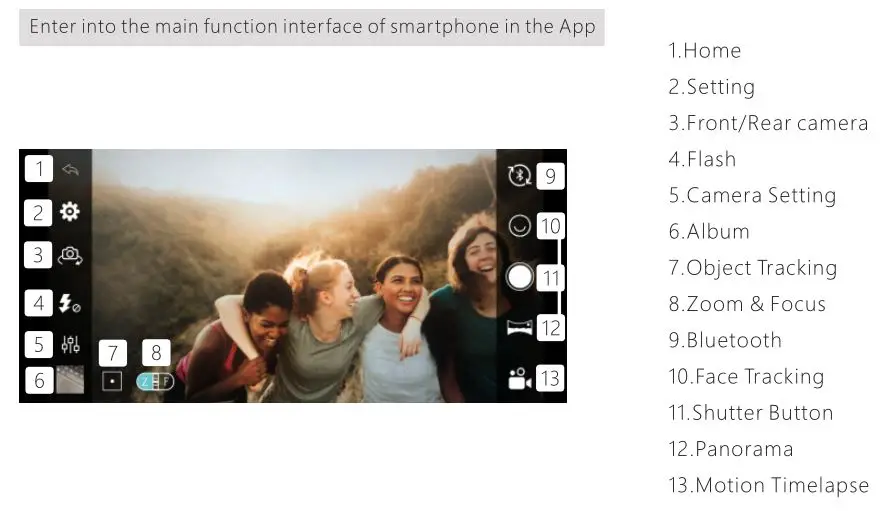
into the main function interface of smartphone in the App

- Home
- Setting
- Front/Rear camera
- Flash
- Camera Setting
- Album
- Object Tracking
- Zoom & Focus
- Bluetooth
- Face Tracking
- Shutter Button
- Panorama
- Motion Timelapse
App “Hohem Gimbal” Instruction
Other App Functions
- Gimbal Specs Setting:
A. Following Speed (To adjust the following speed of pan/tilt/roll axes)
B. Joystick Speed (To adjust the rotating speed by control the joystick)
C. Following Dead Area (No following movement when the rotate angle is less than dead area setting)
D. Trim (To adjust the tilt/roll axis in small angle to get a perfect balance)
E. Joystick Reverse(To reverse the rotation direction by control the joystick)
F. Motor Torsion (To adjust the motor torsion of pan/tilt/roll axes, which is useful to solve the vibrate
issue due to lightweight or over weight mobile phone) - Firmware Upgrade: The firmware is subject to upgrade without a fixed schedule. Firmware upgarde is help to optimize the working of gimbal, please refer to page 14 for details.
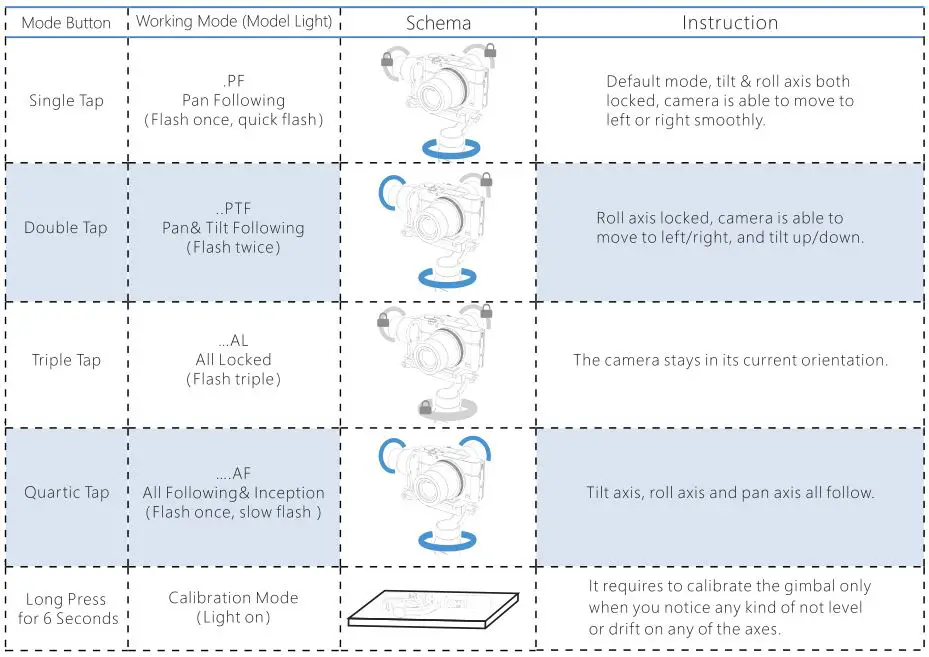
- Calibration: It requires to calibrate the gimbal only when you notice any kind of not level or drift
on any of the axes, please refer to page 13 for details. - Operation Instruction: For any questions, please refer to the user guide for details, the content is subject to change without prior notice.
Calibration
It requires to calibrate the gimbal if you notice it is not work properly as below.
- The pitch angle is not level with the horizontal surface.
- The roll angle is not parallel to the horizontal surface.
- The pan axis drifts when the gimbal is on all lock mode.
Calibration Instruction
Method 1:Off-line Calibration
(1)Power on the gimbal, long press the mode button over 6 seconds till the mode light on. *if the off-line calibration is not useful, please refer to 【Method 2】
(2)Laying the gimbal on a static flat surface without any vibrate. Calibration is completed once the mode light flash twice.
Method 2:6-Side Calibration Via App
Please make sure the gimbal is connected with app via bluetooth successfully, then enter
“Calibration” and follow the instruction in the app to calibrate the gimbal.
Firmware Upgrade
Please make sure the gimbal is connected with app via bluetooth successfully, then enter the “Firmware Upgrade” and follow the instruction to upgrade the latest firmware.
FAQ
Q: Why the gimbal vibrates after powering on?
A: Make sure your camera is mounted firmly and well balanced before powering on the gimbal, do not turn on the gimbal without a balanced load, as doing so many damage the
motors, please refer to page 5. 6 for more details. For some lightweight mobile phone, it needs to adjust the motor torsion, please refer to page 12 for details.
Q: How to connect the gimbal via app?
A:Please be noted that the bluetooth and gimbal must be connected directly in the app “Hohem Gimbal”, rather than connecting in the smartphone bluetooth list. Make sure all the permission is allow when you open the app for the first time. Please refer to the tutorial video on our YouTube channel for more details.
Q: How to do if the gimbal is not level or drift after powering on?
A: Please refer to page 13 for details.
Parameters
| Weight | 530g include battery |
| Main Material | High performance composite |
| Payload | 400g |
| Supported Devices | 1.Digital Camera: SONY RX100 series, Canon G series, Panosonic DMC-LX10 2.Smartphone: iPhone series and Android phone.
3.Action Camera: GoPro Hero series, SONY RX0 , SONY X3000, YI CAM, SJCAM |
| Battery Capacity | 3600 mAh |
| Working Time | 8 hours |
| Charging Time | 3.5 hours |
| Mechanical Range | Panning:600° |
| Rolling:320° | |
| Tilting:320° | |
| Working Temperature | -10~45 ℃ |
| Motors Protection | Gimbal is able to power off automatically due to improper operation of
the motors. |
| Standard Accessories | Tripod*1;Quick Release Plate*1;Smartphone Holder*1; SONY Multi Camera Control Cable*1; Micro USB Charging Cable*1; Carry Case*1;
Thumb Screw *2 |
DISCLAIMER
- Please use the product in accordance with the user guide.
- Make sure your camera device is mounted before powering on the gimbal.
- Keep the gimbal away from Pre and heat source.
- Prohibiting the product to be used for any illegal purpose. The user who violates the regulation will be responsible for all the consequences by purchasing and using the product.
- For any products which comes from non-normal source, we will not be at any service.
- For any question, please contact the technical support of Hohem Tech. We will be always at your service to provide the technical support and advice for any improper using of gimbal.
- Hohem Tech reserves the right of Pnal explanation.

Tel: +86-755-86573216
Email: [email protected]
Web: www.hohem-tech.com
Address: B106, University Creative Park, Xiii, Nanshan, Shenzhen, 518055, P.R. China
Product Overview
GIMBAL CHARGING
Camera/Phone Mounting
CAUTION Please mount your camera/phone before turning on the gimbal.
Camera Mounting: * Some action cameras must add an adaptor with 1/4 screw hole.
1. Mount the quick release plate on camera.
2. Insert the camera with quick release plate(A) into the slot of clamping plate(B) and tighten the thumb screw
Supported Cameras: 1.Digital Camera: SONY RX100 series, Canon G series, Panosonic DMC-LX10 2.Action Camera: GoPro Hero series, SONY RX0 series, SONY X300, YI CAM, SJCAM 3.Payload: 400g
Phone Mounting:
1.Mount the phone holder on the quick release plate with thumb screw.
2. Insert the phone holder with quick release plate into the slot of clamping plate and mount your phone on the holder, then tighten the quick
Balancing
It is recommended to turn on the camera before balancing it on the gimbal.

Operating Instructions
App “Hohem Gimbal” Instruction
- Scan QR code to download the app.
- Hohem Gimbal supports iOS 9.0 and Android 5.0 or above.
- Search for ‘Hohem Gimbal’ in the App Store or Google Play and follow the instructions to install the app.
Bluetooth Connection:
- Enable the Bluetooth of smartphone and turn on the gimbal. Make sure the device is mounted on the gimbal
- Open the App “Hohem Gimbal” and choose the correct product model “iSteady Multi” to connect.
- Choose the correct device to enter into(For compact camera and action camera mounted, click “camera” to enter; For smartphone mounted, click “phone” to enter.
It allows to connect the Bluetooth of smartphone for mounting smartphone on gimbal. Enter the smartphone Bluetooth list to search signal “Smartphone Gimbal” to connect the gimbal, which enables the gimbal to control the original phone camera to take phone and record video.
FAQ
Fail to connect the Bluetooth on smartphone or app?
- Reset network setting.
- Disable WIFI and cancel the pairing of “Smartphone Gimbal” connection.
- Reconnection

Other App Functions
- Gimbal Specs Setting
- A. Following Speed To adjust the following speed of pan/tilt/roll axes
- B. Joystick Speed To adjust the rotating speed by control the joystick
- C. Following Dead Area (No following movement when the rotate angle is less than dead area setting)
- D. Trim (To adjust the tilt/roll axis in small angle to get a perfect balance)
- E. Joystick Reverse (To reverse the rotation direction by control the joystick)
- F. Motor Torsion (To adjust the motor torsion of pan/tilt/roll axes, which is useful to solve the vibrate issue due to lightweight or overweight mobile phone)
- Firmware Upgrade: The firmware is subject to upgrade without a fixed schedule. Firmware upgrade is help to optimize the working of gimbal, please refer to page 14 for details.
- Calibration: It requires to calibrate the gimbal only when you notice any kind of not level or drift on any of the axes, please refer to page 13 for details.
- Operation Instruction: For any questions, please refer to the user guide for details, the content is subject to change without prior notice.
Calibration
It requires to calibrate the gimbal if you notice it is not work properly as below.
- The pitch angle is not level with the horizontal surface.
- The roll angle is not parallel to the horizontal surface. 3. The pan axis drifts when the gimbal is on all lock mode.
Calibration Instruction
Method 1: Off-line Calibration
- Power on the gimbal, long press the mode button over 6 seconds till the mode light on.
- Laying the gimbal on a static flat surface without any vibrate. Calibration is completed once the mode light flash twice.
Method 2: 6-Side Calibration Via App
Please make sure the gimbal is connected with app via Bluetooth successfully, then enter “Calibration” and follow the instruction in the app to calibrate the gimbal.
Firmware Upgrade
Please make sure the gimbal is connected with app via Bluetooth successfully, then enter the “Firmware Upgrade” and follow the instruction to upgrade the latest firmware.
FAQ
Q: Why the gimbal vibrates after powering on?
A: Make sure your camera is mounted firmly and well balanced before powering on the gimbal, do not turn on the gimbal without a balanced load, as doing so many damage the motors, please refer to page 5. 6 for more details. For some lightweight mobile phone, it needs to adjust the motor torsion, please refer to page 12 for details.
Q: How to connect the gimbal via app?
A:Please be noted that the Bluetooth and gimbal must be connected directly in the app “Hohem Gimbal”, rather than connecting in the smartphone Bluetooth list. Make sure all the permission is allow when you open the app for the first time. Please refer to the tutorial video on our YouTube channel for more details.
Q: How to do if the gimbal is not level or drift after powering on
A: Please refer to page 13 for details.
Parameters
