Homematic IP HmIP-CCU3 Central Control Unit CCU3

Information about this manual
Please read this manual carefully before beginning operation with your Homematic IP component. Keep the manual so you can refer to it at a later date if you need to. If you hand over the device to other persons for use, please hand over this manual as well.
- Attention!
- This indicates a hazard.
- Please note: This section contains important additional information.
Hazard information - Do not open the device. It does not contain any parts that can be maintained by the user. If you have any doubts, have the device checked by an expert.
- For safety and licensing reasons (CE), unauthorized change and/or modification of the device is not permitted.
- Do not use the device if there are signs of damage to the housing, control elements or connecting sockets, for example, or if it demonstrates a malfunction. If you have any doubts, have the device checked by an expert.
- The device may only be operated in a dry and dust-free environment and must be protected from the effects of moisture, vibrations, solar or other methods of heat radiation, cold and mechanical loads.
- The device is not a toy; do not allow children to play with it. Do not leave packaging material lying around. Plastic films/bags, pieces of polystyrene, etc. can be dangerous in the hands of a child.
- For power supply, only use the original power supply unit (5 VDC/2500 mA) delivered with the device.
- The device may only be connected to an easily accessible power socket outlet. The main plug must be pulled out if a hazard occurs.
- Always lay cables in such a way that they do not become a risk to people and domestic animals.
- We do not assume any liability for damage to property or personal injury caused by improper use or the failure to observe the hazard information. In such cases, any claim under warranty is extinguished! For consequential damages, we assume no liability!
- If you use the device in a security application it has to be operated in connection with an UPS (uninterruptible power supply) in order to bridge possible power failure according to EN 50130-4.
- The device may only be operated within residential buildings.
- Using the device for any purpose other than that described in this operating manual does not fall within the scope of intended use and shall invalidate any warranty or liability.
Function and device overview
The high-performance Homematic IP Central Control Unit CCU3 for smart home professionals connects and combines the wide product range of Homematic IP and Homematic, enabling the central control of your smart home system via the local WebUI user interface. The reli-able WebUI offers a large number of individual configura-tion and control options via a standard web browser. You can also combine Homematic IP wireless compo-nents with Homematic IP Wired devices, using the WebUI.
The Central Control Unit with high-performance hard-ware offers a quad-core ARM processor, 64-bit architec-ture and 8 GB flash memory as well as highest security by AES-128 encryption and the tried and tested radio proto-col. In addition, you can use the integrated USB ports as optional extension interface. Device overview (see fig. 1):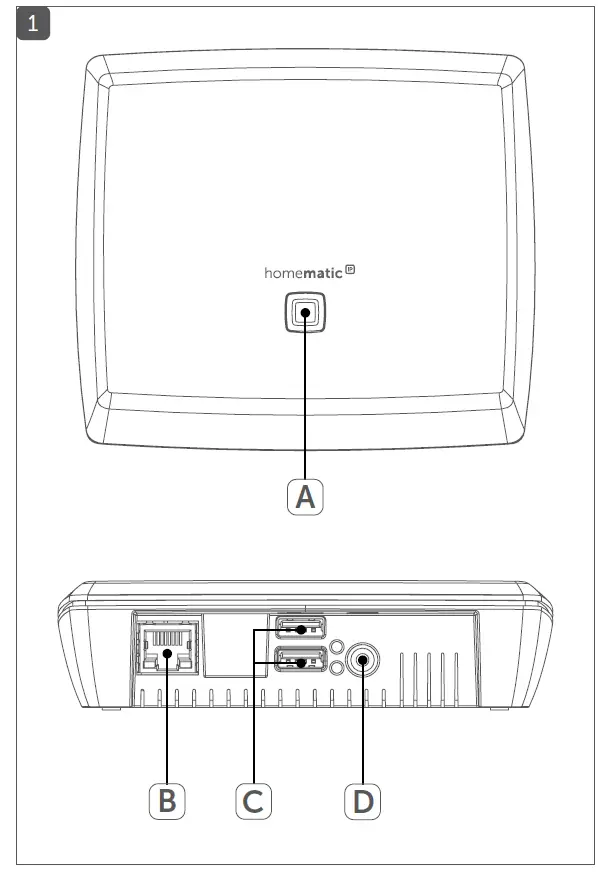
- (A) System button (teach-in/pairing button and LED)
- (B) Ethernet/network cable interface
- (C) USB host interface
- (D) Power supply unit interface
General system information
The smart home Central Control Unit CCU3 communicates via the Homematic IP and Homematic protocols. Homematic IP, as well as Homematic components, can be controlled comfortably and individually via the WebUI user interface or in connection with partner solutions. The available functions provided by the system in combination with other components are described in the Homematic WebUI Manual. All current technical documents and updates are provided at www.homematic-ip.com.
System requirements
Current version of one of the following web browsers:
- Mozilla Firefox®
- Microsoft® Internet Explorer
- Google Chrome
- Safari
Data connection: Ethernet (TCP/IP and DHCP)
Mounting
For mounting the CCU3 to a wall using the supplied screws and plugs, please proceed as follows:
- Select a suitable mounting location on the wall, close to your router and a socket.
- Make sure that no electricity or similar lines run at this location!
- Use a pen to mark the positions of the two boreholes for the brackets (E) with a distance of 90 mm on the wall (see fig. 2).

- Use an appropriate drill to make the 5 mm holes as illustrated.
- Insert the plugs in the holes.
- Turn the screws into the plugs so that they protrude from the wall by approx. 2.5 mm. Hang the device using the brackets on the back behind the screw heads.
Start-up
For the set-up of the CCU3, an active Internet connection must be available. After successful set-up and configuration, the operation can still be carried out also in case of an inactive Internet connection.
Installation
After installation, you can start up your CCU3. To do this, please proceed as follows:
- Connect the CCU3 via the network connection (B) and the supplied network cable to your router (see figure 3).
- Establish the power supply for your device via interface (D) and the supplied plug-in mains adapter (see figure 3).
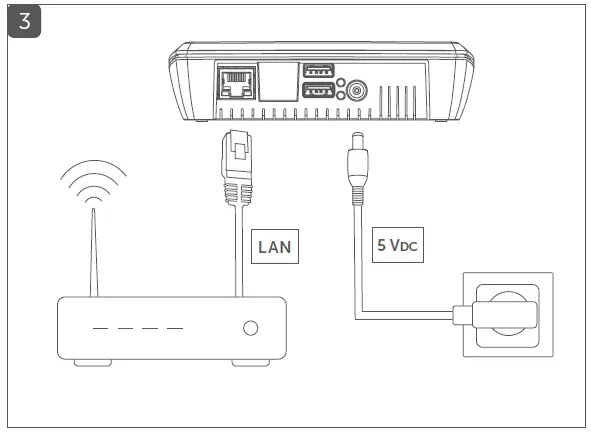
If the device LED (A) lights up permanently blue, the CCU3 is ready for operation and you can continue the set-up.
You will find further information about the flashing be-haviour in section „8.1 Error codes and flashing sequenc-es“ on page 46 .
Starting the WebUI user interface
The WebUI user interface offers a large number of configuration and control options for your Homematic and Homematic IP devices.
To enable local configuration of your devices and to control devices and connect them with each other or for using Central Control Unit programs, you must start and set-up the WebUI.
You can access the user interface via a web browser (see „5 System requirements“ on page 36).
To call the WebUI in your web browser you will need the IP address or the DNS name of your CCU3. You can also use your router or the “NetFinder” add-on software to find out the IP address.
DNS name
As most routers support DHCP, the assignment within the network is carried out automatically. During start-up, the CCU3 tries to receive an IP address. When requesting the DHCP, the desired DNS name is transferred to the DHCP at the same time. The CCU3 uses the DNS name “ccu3-webui”. If the DHCP server supports also the indication of a DNS name (e.g. Fritz!Box), the CCU3 WebUI can be called directly in the web browser via the URL http://ccu3-webui.com
For secure connection, you can also use https://ccu3-webui.com to call the WebUI of your CCU3. De-pending on the web browser used, different safety instructions are shown. Please enable access to the WebUI and confirm opening of the user interface via secure connection.
If the DHCP server does not support the indication of a fix DNS name, you will usually find the IP address of your CCU3 via the web interface of the router (see „7.2.2 Ac-cess to the IP address via the router“ auf Seite 40).
Access to the IP address via the router
You can find the IP address of your CCU3 in the device list of your router. Therefore, you will need the MAC address of your CCU3. It can be found on the device sticker. Depending on the router manufacturer, you will find the CCU3 in the following area of the router back-end:
- Netgear: Connected devices
- TP-Link: Network plan/connected devices
- FritzBox: Home network
- Note the IP address of your Central Control Unit.
- Enter the IP address into your web browser. The WebUI home page is opening.
- Depending on the configuration, the IP address of the CCU3 can also be determined via the net-work area of the windows workplace.
Calling the IP address via “NetFinder”
Please make sure that the “Java” software is installed on your PC. If required, download the free software at www.java.com.
Use the “NetFinder” add-on software to display the IP ad-dress of your CCU3. To download the software, proceed as follows:
- Open the website www.homematic-ip.com.
- Download the NetFinder zip file in the download area and unzip the file at the desired location of your PC.
- Open the NetFinder tool on your PC. The IP ad-dress of your CCU3 is displayed in the window.
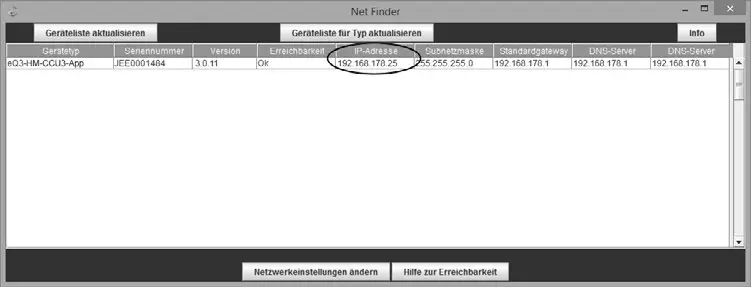
- Note the IP address of your Central Control Unit.
- Enter the IP address into your web browser. The WebUI home page is opening.
Installation of the WebUI software
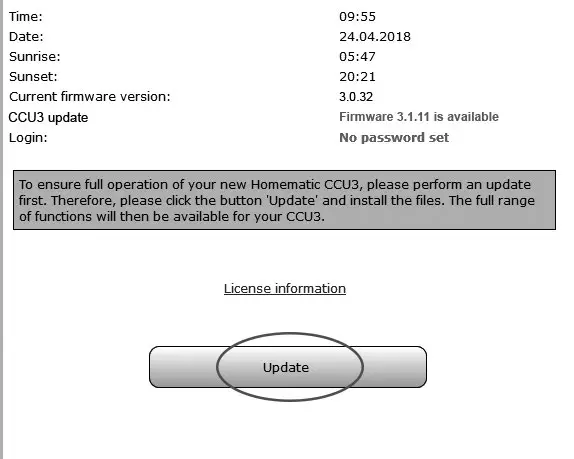
When starting the CCU3 for the first time, please update the software of your device via the WebUI. Please proceed as described and follow the instructions in the WebUI user interface.
- Open the homepage of your WebUI. Therefore, please enter the IP address into your web browser.
- Click on the button “Update”.
- First click on the “Download” button to save the software files to your PC.
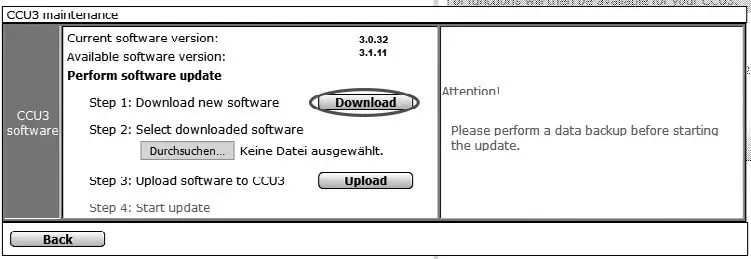
- Accept the license agreement and click on “In-stall” afterwards.
- Save the file on your PC.
- Select the downloaded software via “Select file”.
- Click on “Upload” to load the software to your Central Control Unit. This process may take a few minutes.
- As soon as the software file is uploaded to your CCU3, accept the license agreement again and click “Install”.
- Confirm the update via the button “Start update”. The software update is now in progress.
Once the software update has been carried out, you will need to register on the Central Control Unit again. The full range of functions will then be available for your Cen-tral Control Unit.
Teaching-in devices to the CCU3
Please read this entire section before starting the teach-in procedure.
Your Homematic and Homematic IP device can be conveniently controlled and configured or used in Central Control Unit programs using a software-based method. Therefore, they must be integrated into the system via the WebUI. To do this, please proceed as follows:
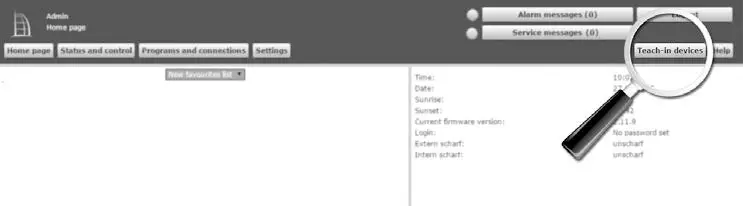
- Start the WebUI user interface in the web browser of your PC.
- Click the “Teach-in devices” button on the right-hand side of the screen.
- To activate teach-in mode of the CCU3, click on the desired teach-in window (e.g. “Teach-in HmIP device”). The teach-in mode of the Central Control Unit will be activated. An information box shows how much teach-in time remains.

- Activate the teach-in mode of the device, that you want to teach in. Please refer to the user manuals of the corresponding devices for further information.
- Please wait until teach-in is completed.
- If teaching-in was successful, the LED lights up green. If the LED lights up red, please try again.
- After a short time, the newly connected device appears in the inbox of your WebUI.
Newly connected devices and the corresponding channels are ready for operation and configuration only after they have been configured in the inbox. You will find further information in the Homematic WebUI Manual, available for download at www.homematic-ip.com.
Troubleshooting
Error codes and flashing sequences
| Flashing code | Meaning | Solution |
| Permanent yellow lighting | CCU3 is booting | Please wait shortly and observe
the subsequent flashing behaviour. |
| Slow blue flashing | Connection to network is being established | Wait until the connection is established and the LED lights permanently blue. |
| Permanent blue lighting | Normal operation, connection to network is established | You can continue operation. |
| Fast yellow flashing | No connection to network or router | Connect the CCU3 to the network/ router. |
| Fast blue flashing | No Internet connection | Please check the Internet connection and firewall settings. |
| Slow magenta flashing | Recovery system starts | Please wait shortly and observe the following flashing behaviour. |
| Fast magenta flashing | Update in progress | Please wait until the update has been completed. |
| Permanent red lighting | System not ready (at least one system component could not be started) | Please restart your CCU3. If a new error message please contact the support. |
| Permanent magenta lighting | Recovery system active | Please wait until the system recovery is completed. |
| Alternately blue and yellow flashing | Service message | Confirm service message (can be switched off via WebUI) |
| Alternately blue and red flashing | Alarm message | Confirm alarm message (can be switched off via WebUI) |
If the device LED is not lit, the CCU3 cannot be started. If the LED does not light up after a minute, restart the system again. If after several attempts the system still does not start, please start the rescue system and install the update again.
Functional limitations
If the functional limitations or any behaviour that is de-scribed in the WebUI Manual occur, it may be caused by the settings of your web browser or additional security tools that are installed on your PC (e.g. anti-virus software, firewall or browser-protection add-ons).
In this case, you should include the IP address of your CCU3 into the exception list of your firewall or browser protection (exceptions are made for the Windows firewall). Furthermo-re, you should always call the IP address via the CCU3 (see „7.2 Starting the WebUI user interface“ on page 39).
Duty cycle
The duty cycle is a legally regulated limit of the transmission time of devices in the 868 MHz range. The aim of this regulation is to safeguard the operation of all devices working in the 868 MHz range. In the 868 MHz frequency range we use, the maximum transmission time of any device is 1% of an hour (i.e. 36 seconds in an hour). Devices must cease transmission when they reach the 1% limit until this time restriction comes to an end. Homematic IP devices are designed and produced with 100% conformity to this regulation.
During normal operation, the duty cycle is not usually reached. However, repeated and radio-intensive teach-in processes mean that it may be reached in isolated instances during start-up or initial installation of a system. If the duty cycle is exceeded, this is indicated by one long flashing of the device LED and may manifest itself in the device temporarily working incorrectly. The device starts working correctly again after a short period (max. 1 hour).
Recovery system
The recovery system is only required if the software of the Central Control Unit has been damaged. This can happen, for example, if the power supply is interrupted during a software update.
Via the LED (A) it is indicated, that the operating system of the CCU3 cannot be started anymore (see „8.1 Error codes and flashing sequences“ on page 46). In this case, a software update has to be carried out via the recovery system.
To start the recovery system, proceed as follows:
- Unplug the cable of the power supply unit (D) of the CCU3 to disconnect the power supply. Wait for 5 seconds.
- Press and hold down the system button (A) for at least 5 seconds, while plugging in the network cable for the power supply.
- Release the system button again.
The Central Control Unit now starts the recovery system. Meanwhile, the device LED (A) starts to flash magenta slowly.
As soon as the recovery system is completely booted up, the device LED permanently lights up magenta. Entering the IP address of your CCU3 in your web browser will take you to the homepage of the recovery system.
Depending on the network infrastructure used, it may occur that the CCU3 is reached via another IP address during active recovery system than du-ring normal operation, as DHCP is activated du-ring the recovery system of the CCU3.
Maintenance and cleaning
The product does not require any maintenance. Enlist the help of an expert to carry out any re-pairs.
Clean the device using a soft, lint-free cloth that is clean and dry. Do not use any detergents containing solvents, as they could corrode the plastic housing and label.
General information about radio operation
Radio transmission is performed on a non-exclusive transmission path, which means that there is a possibility of interference occurring. Interference can also be caused by switching operations, electrical motors or defective electrical devices.
The range of transmission within buildings can differ greatly from that available in the open air. Besides the transmitting power and the reception characteristics of the receiver, environmental factors such as humidity in the vicinity have an important role to play, as do on-site structural/screening conditions.
Hereby, eQ-3 AG, Maiburger Str. 29, 26789 Leer/Germany declares that the radio equipment type Homematic IP
HmIP-CCU3 is in compliance with Directive 2014/53/EU. The full text of the EU declaration of conformity is available at the following internet address: www.homematic-ip.com
Technical specifications
- Device short description: HmIP-CCU3
- Supply voltage: 5 VDC (SELV)
- Current consumption: 1600 mA max.
- Standby power consumption: 1.7 W
- Power consumption plug-in mains adapter: 9.8 W max.
- Supply voltage plug-in mains adapter: 100 to 240 VAC, 50/60 Hz, 0.5 A
- Output voltage:
- plug-in mains adapter: 5 VDC, 2500 mA
- Protection class: III (safe extra-low voltage)
- Pollution degree:2
- Degree of protection: IP20
- Ambient temperature: 0 to 40 °C
- Dimensions (ø x H): 119 x 136 x 35 mm
- Weight: 190 g
- Radiofrequency band: 868.0-868.6 MHz, 869.4-869.65 MHz
- Maximum radiated power: 10 dBm max.
- Receiver category: SRD category 2
Instructions for disposal
Do not dispose of the device with regular domes-tic waste! Electronic equipment must be dis-posed of at local collection points for waste elec-tronic equipment in compliance with the Waste Electrical and Electronic Equipment Directive.
Information about conformity
The CE sign is a free trading sign addressed ex-clusively to the authorities and does not include any warranty of any properties.
For technical support, please contact your retailer.