![]()
Monitor Desk Mount
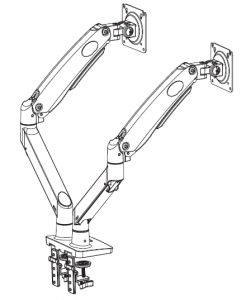
Model: HNDS7
Website: www.huanuoav.com
![]()
Thank you for choosing this HUANUO product! At HUANUO we strive to provide you with the best quality products and services in the industry. Please share your experience of our product with others at www.huanuoav.com/reviews if you are satisfied. Should you have any issues, please don’t hesitate to contact us at Technical Support: (US/CA)1-800-556-0533 Mon-Fri 8am – 8pm(PST) (USA) (CAN) (US/CA)44-808-196-3874 Mon-Fri 2pm – 10pm(UTC) Other Info: [email protected](US/CA) [email protected](DE/UK/FR/IT/ES/NL/SE/AU/PL) [email protected](JP)
IMPORTANT SAFETY INFORMATION
- Please carefully read all instructions before attempting installation. If you do not understand the instructions or have any concerns or questions, please contact our customer service at [email protected].
- CAUTION: Avoid potential personal injuries and property damage!
- Do not use this product for any purpose that is not explicitly specified in this manual. Do not exceed weight capacity. We are not liable for damage or injury caused by improper mounting, incorrect assembly or inappropriate use.
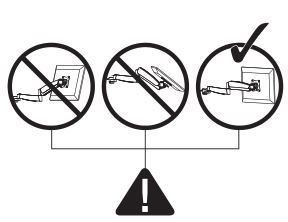
- This product contains a high pressure gas spring, fire and percussion prohibited. Also it is strictly prohibited to dismantle without professionals. Please return to the manufacturer or hand over to professional agencies if the product is abandoned.
- The desk must be capable of supporting three times the weight of the total load (the mount, the monitor and all accessories weight). Don’t use the product on particle board.
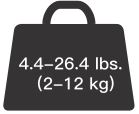
Weight Restrictions
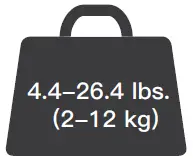
4.4-26.4 lbs. (2-12 kg)
If your monitor weighs more, this mount is NOT compatible.
![]() WARNING
WARNING
DO NOT exceed the maximum weight indicated. This mounting system is intended for use only within the maximum weights indicated. Use with products heavier than the maximum weights indicated may result in failure of the mount and its accessories, causing possible damage and or injury.
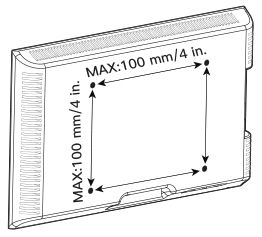
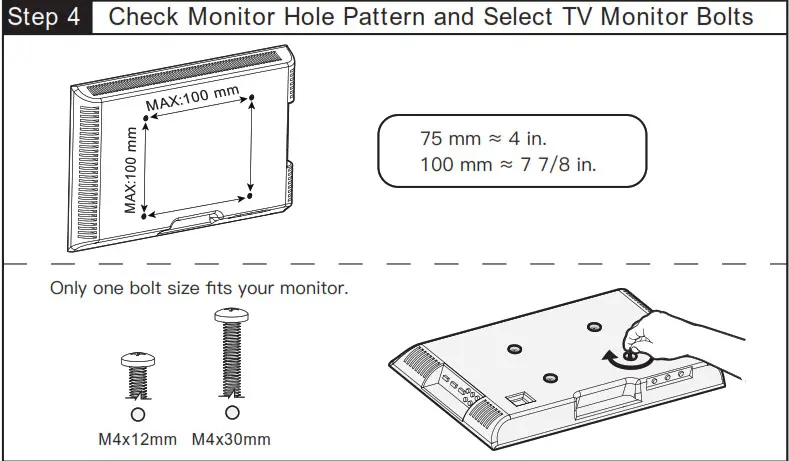
Check the VESA Pattern of Your Monitor before You Begin the Installation
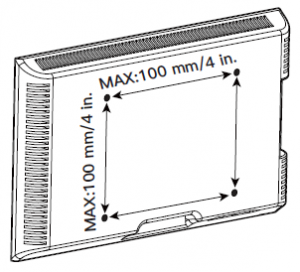
MAX:100 mm/4 in.
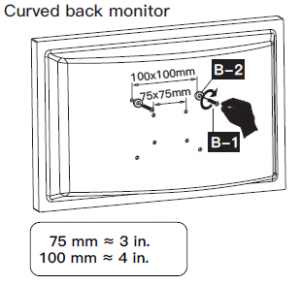
75 mm ≈ 3 in.
100 mm ≈ 4 in.
Minimum VESA pattern: 75mm/3 in.(W)x75mm/3 in.(H)
If your monitor VESA is greater than 100×100 mm/4×4 in. or less than VESA 75x75mm/3x3in., this mount is NOT compatible.
If this desk mount is NOT compatible, please contact customer service at [email protected] to find a compatible product.
Product Features
TENSION ADJUSTMENT SHOULD BE DONE ONLY AFTER MOUNT INSTALLATION
Do not adjust tension without monitor.
- 1. Ensure monitor has been attached to the mount.
- Read your monitor box or manual to find out monitor net weight.
- Ensure the net weight of monitor (including accessories) is between
- 4~26.4 Ibs (2-12 kg).

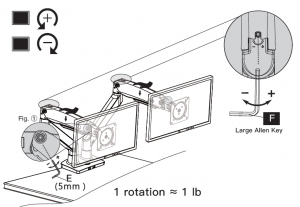
Clockwise to reduce tension(carry less weight)
Counter-clockwise to increase tension(carry more weight)
Warning!

Tools Needed (Not included)

Electric Drill (Optional)

Drill Bit (Optional) 0.4 in.(10mm) – 1.1 in.(27mm)
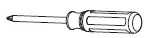
Phillips Screwdriver
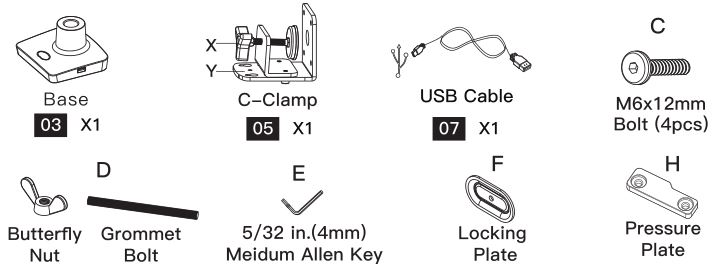
Supplied Parts and Hardware for Step 1
Warning:This product contains small items that could be a choking hazard if swallowed. Before starting assembly, verify all parts are included and undamaged. Do not use damaged or defective parts. lf you require replacement parts, contact our customer service at [email protected].
- Please note: Not all hardware included in this package will be used.
Supplied Parts and Hardware for Step 1
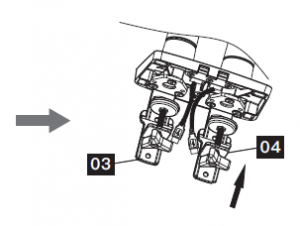
C-Clamp Part
03 X2
![]()
C-Clamp Part
04 X2
![]()
Base 05 X1
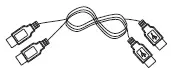
USB Line 07 X1
Pressure Plate x 1

M6x12mm Bolt x 6
D

Butterfly Nut/Grommet Bolt x 1
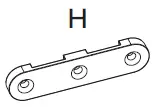
Locking Plate x1
![]()
M4x10mm Bolt (x3)

5/32 in.(4mm) Medium Allen Key
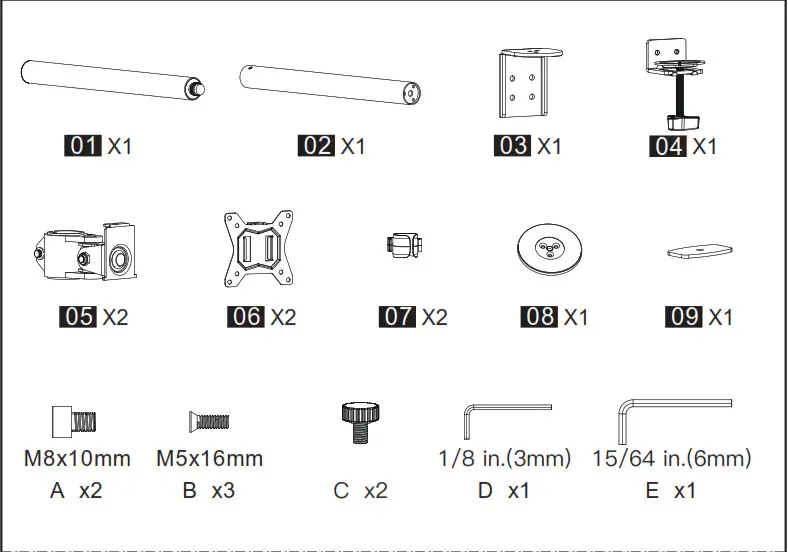
Supplied Parts and Hardware for Step 2
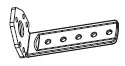
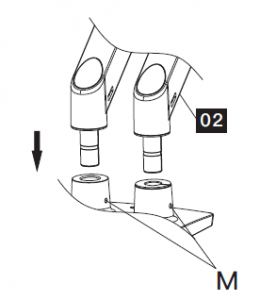
Arm 01 X2
Arm Extender 02 X2

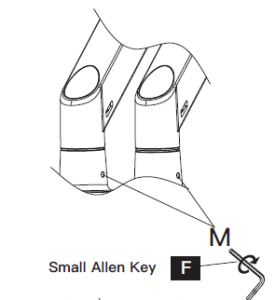
1/8 in.(3mm) Small Allen Key
Supplied Parts and Hardware for Step 3

Monitor Plate 06 X2
![]()
Bolt (x2) M8x38mm

Washer (x2)16×8.2×1.5mm 13/64 in.(5mm)
Large Allen Key
Supplied Parts and Hardware for Step 4

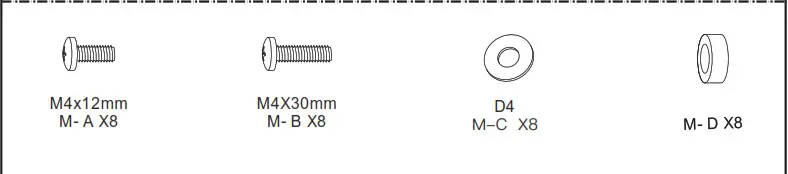
M4x12mm Bolt (x8)

M4x30mm Bolt (x8)
![]()
L13mm Spacer (x8)
Supplied Hardware for Step 5 and 7
13/64 in.(5mm) Large Allen Key
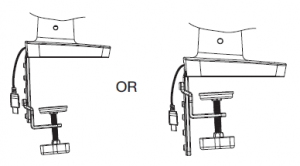
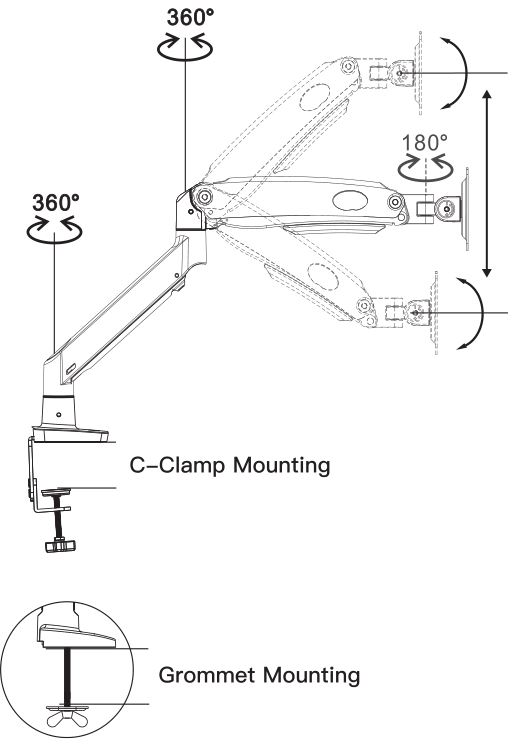
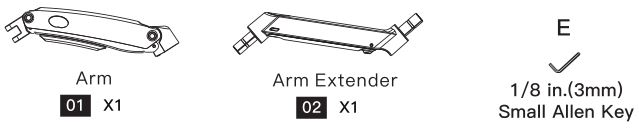
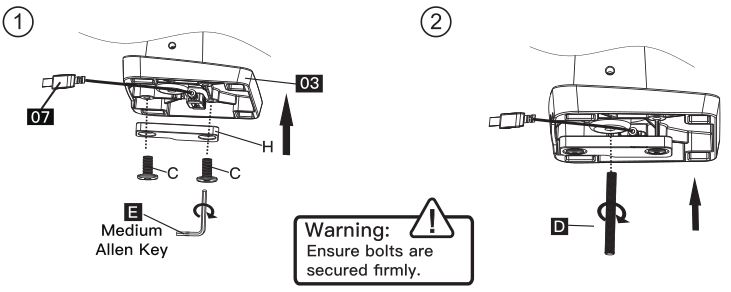
1. Install the Base A. For Clamp Mounting
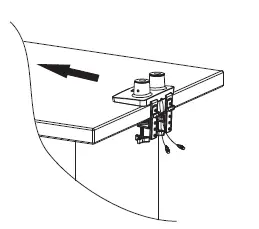
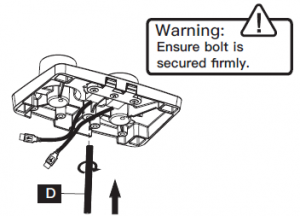
 Warning: Ensure bolts are secured firmly.

![]()
![]()
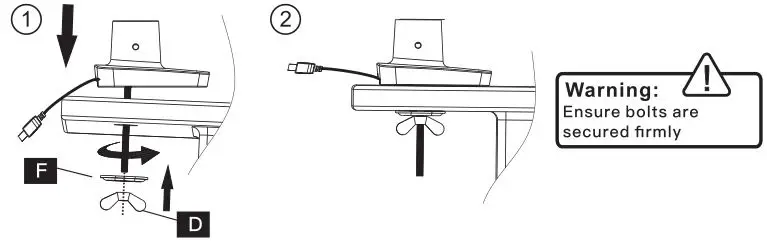
B. For Grommet Mounting
![]()
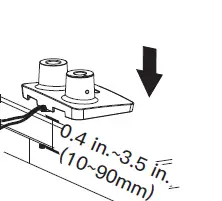
If there is no grommet hole on your desk, position the base [05] on the mounting surface and mark the hole. Drill a hole using the drill bit in a diameter of 0.4 in.(10mm) – 1.1 in.(27mm) at the marked position through the mounting surface.
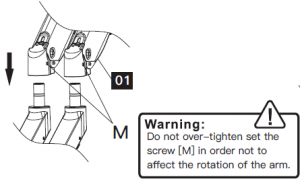
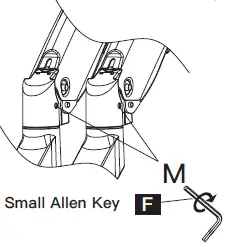
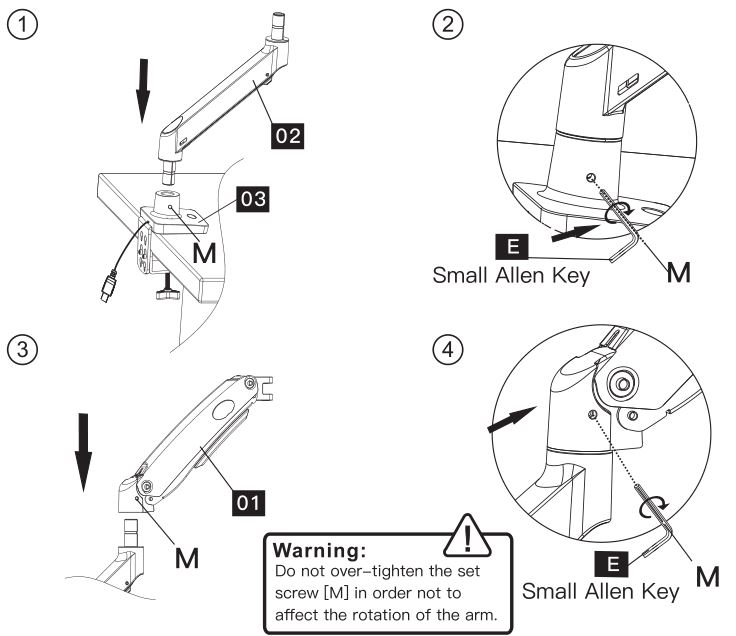
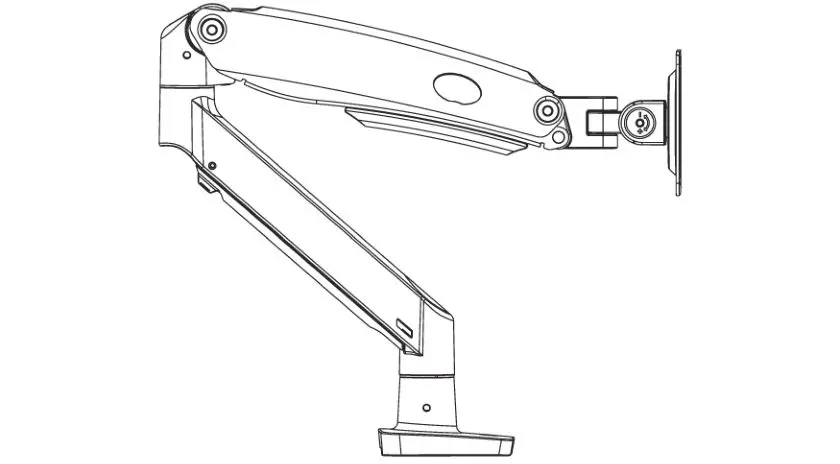
2. Install the Arms
3. Install the Monitor Plates
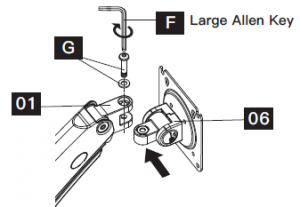
Attach the monitor plate [06] from the sides of the top end of arm [01], then secure the monitor plate using bolt and washer [G]
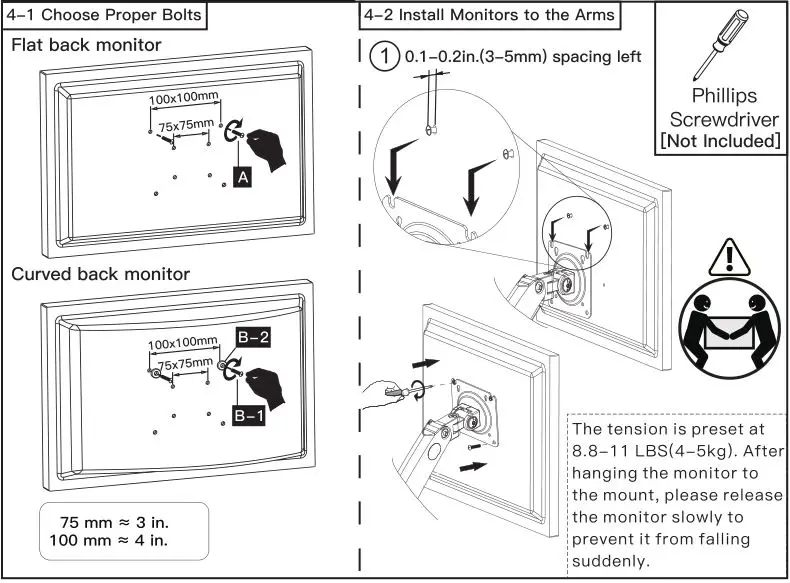
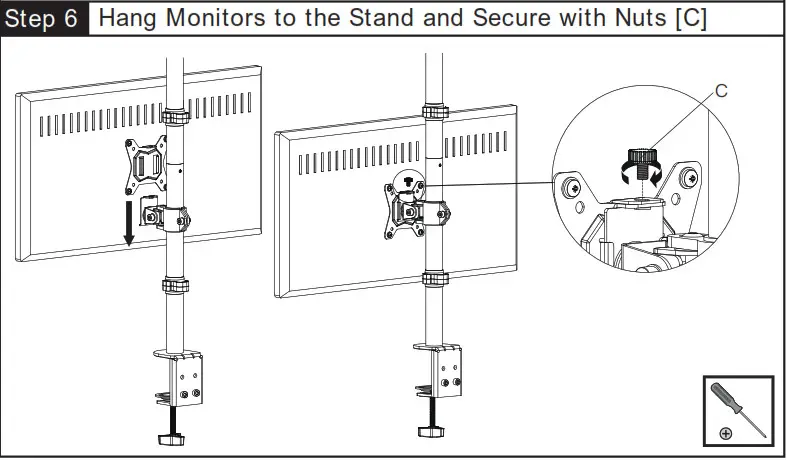
4. Attach Monitors to the Arms
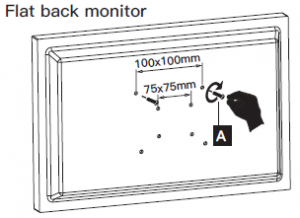
4-1 Choose Proper Bolts Flat back monitor
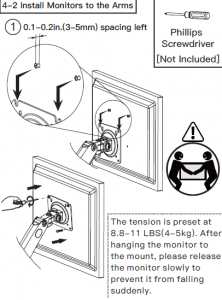
4-2 Install Monitors to the Arms
5. Adjust Gas Spring Tension
Be sure to keep the arm in horizontal position during adjustment. Or else, it would be difficult to adjust the mount or damage the mount.
- If the monitor can stay at the desired height by itself, no adjustment needed.
- If the monitor rises up, press the arm to keep it in horizontal position and then use the 13/64 in. (5mm) Alley key [F] to turn the bolts clockwise(“-” direction) to reduce tension of the arm only until the monitor can stay at the desired height by itself.
- If the monitor falls down, lift the arm to keep it in horizontal position and then use the 13/64 in. (5mm) Alley key [F] to turn the bolts counter-clockwise(“+”Be sure to keep the arm in direction) to increase tension of the arm only until the monitor can stay at the desired height by itself. horizontal position during
- Special situation: If the gas pressure is in mini adjustment. Or else, it would be mum torque tension and monitor is 2kg, the monitor difficult to adjust the mount or can not be hovered at your desired position freely damage the mount. and please wind the set screw(see Fig. ) in “+” direction with the wrench “E” to fix the monitor in place.
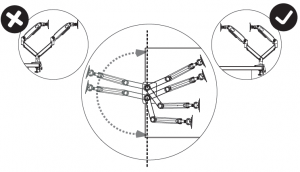
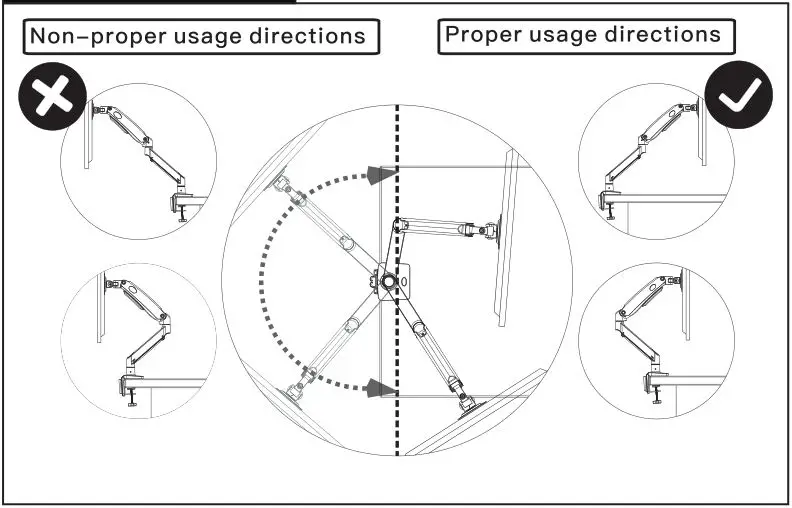
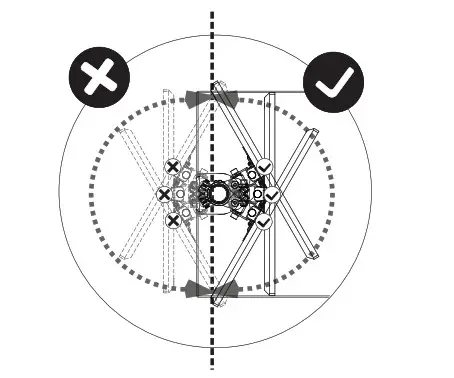
6. Rotation Restriction
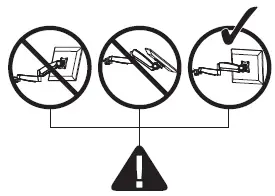
Non-proper usage directions Proper usage directions
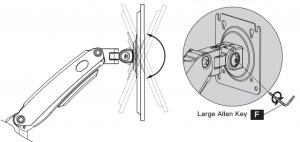
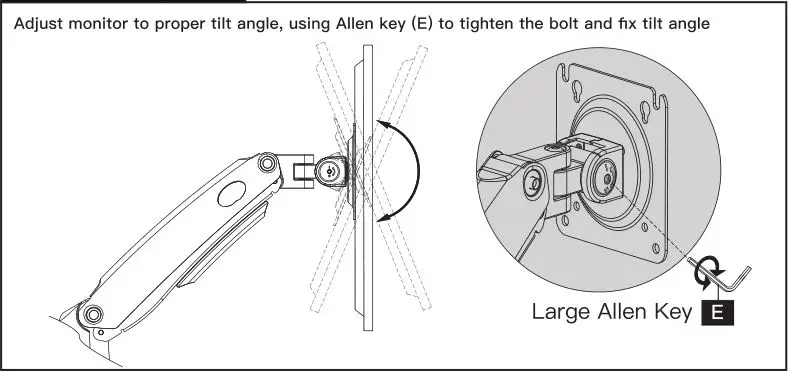
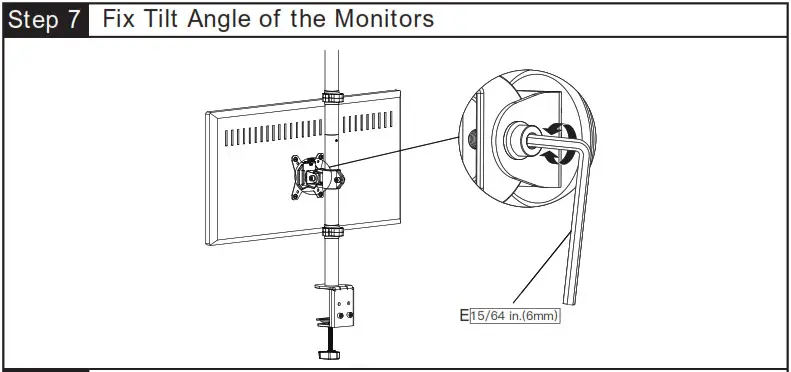
7. Tilt Adjustment
Adjust monitor to proper tilt angle, using Allen key (F) to tighten the bolt and fix tilt
angle
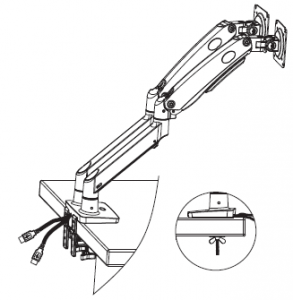
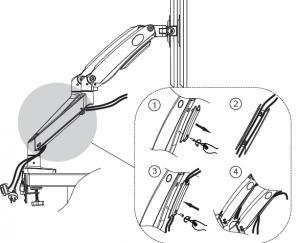
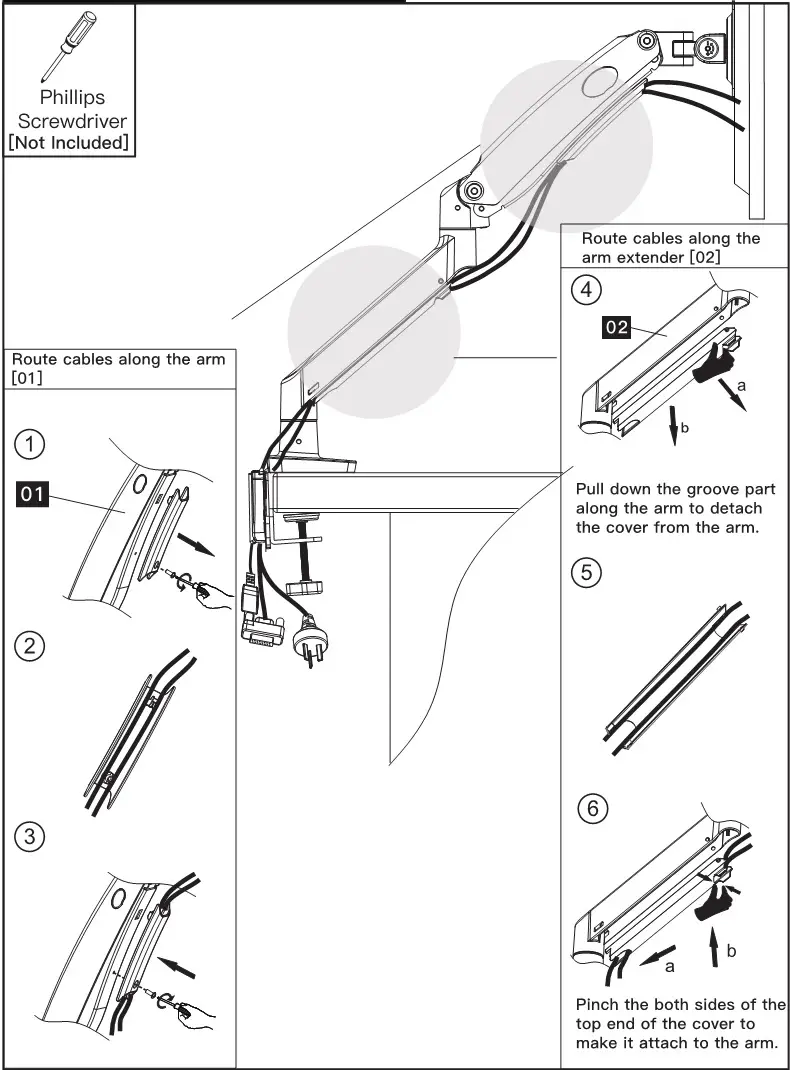
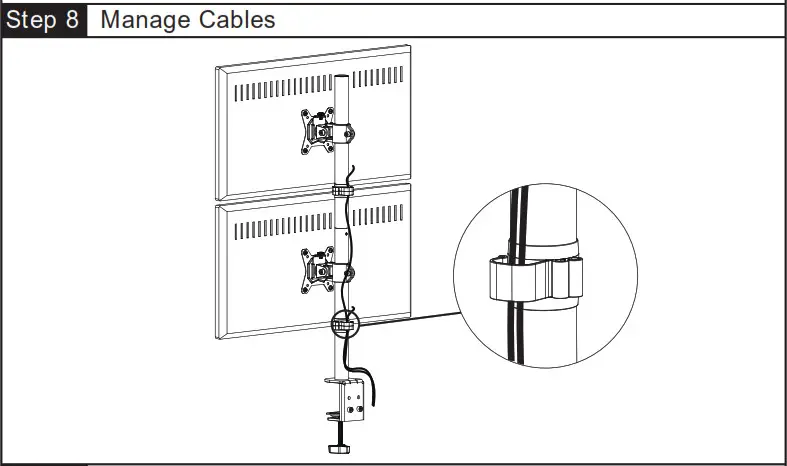
8. Route Cables along the Arms

HUANUO Monitor Desk Mount Instruction Manual

(US/CA)

(JP)
Thank you for choosing this HUANUO product! At HUANUO we strive to provide you with the best quality products and services in the industry. Please share your experience of our product with others at www.huanuoav.com/reviews if you are satisfied. Should you have any issues, please don’t hesitate to contact us.
Technical Support:
1-800-556-0533 Mon-Fri 8am – 8pm (PST) (USA) (CAN)
E-mail:
[email protected] (US/CA)
[email protected] (JP)
IMPORTANT SAFETY INFORMATION
Please carefully read all instructions before attempting installation. If you do not understand the instructions or have any concerns or questions, please contact our customer service at [email protected].
CAUTION: Avoid potential personal injuries and property damage!
- Do not use this product for any purpose that is not explicitly specified in this manual. Do not exceed weight capacity. We are not liable for damage or injury caused by improper mounting, incorrect assembly or inappropriate use.
- This product contains a high pressure gas spring, fire and percussion prohibited. Also it is strictly prohibited to dismantle without professionals. Please return to the manufacturer or hand over to professional agencies if the product is abandoned.
- The desk must be capable of supporting three times the weight of the total load (the mount, the monitor and all accessories weight). Don’t use the product on particle board.
Weight Restrictions
If your monitor weighs more, this mount is NOT compatible.

WARNING
DO NOT exceed the maximum weight indicated. This mounting system is intended for use only with the maximum weights indicated. Use with products heavier than the maximum weights indicated may result in failure of the mount and its accessories, causing possible damage and or injury.
Check the VESA Pattern of Your Monitor before You Begin the Installation
75 mm~ 3 in.
100 mm~ 4 in.
Minimum VESA pattern: 75mm/3 in.(W)x75mm/3 in.(H)
If your Monitor VESA is greater than 100×100 mm/4×4 in. or less than VESA 75x75mm/3x3in., this mount is NOT compatible.
If this desk mount is NOT compatible, please contact customer service at [email protected] to find a compatible product.
Product Features
TENSION ADJUSTMENT SHOULD BE DONE ONLY AFTER MOUNT INSTALLATION
Warning
Do not adjust tension without monitor.
- Ensure monitor has been attached to the mount.
- Read your monitor box or manual to find out monitor net weight.
- Ensure the net weight of monitor (including accessories) is between
- 4~26.4 lbs (2-12 kg).
Adjustment Sign

Warning

Tools Needed (Not Included)

Supplied Parts and Hardware
Warning :This product contains small items that could be a choking hazard if swallowed. Before starting assembly, verify all parts are included and und damaged or defective parts. If you require replacement parts, contact our customer service at [email protected] .
- Please note: Not all hardware included in this package will be used.
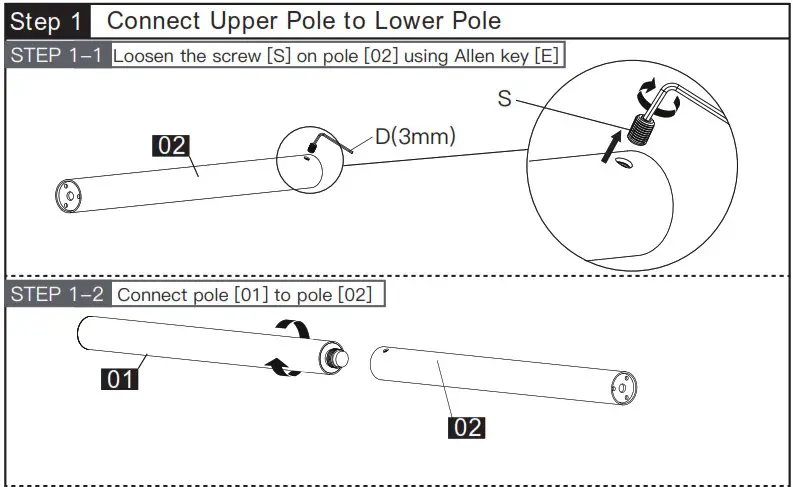
Step 1
Step 2
Step 3

Step 4

Step 5 and 7

Step 8

Install the Base
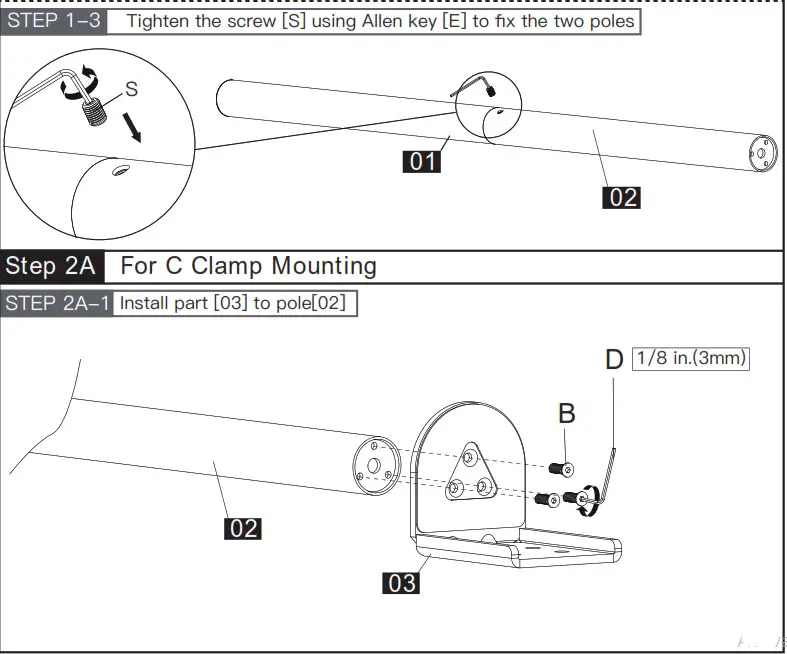
A. For Clamp Mounting
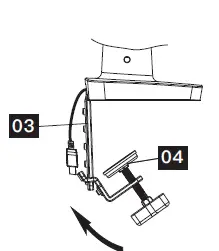
A-1 Install the USB Cable and C Clamp to the Base
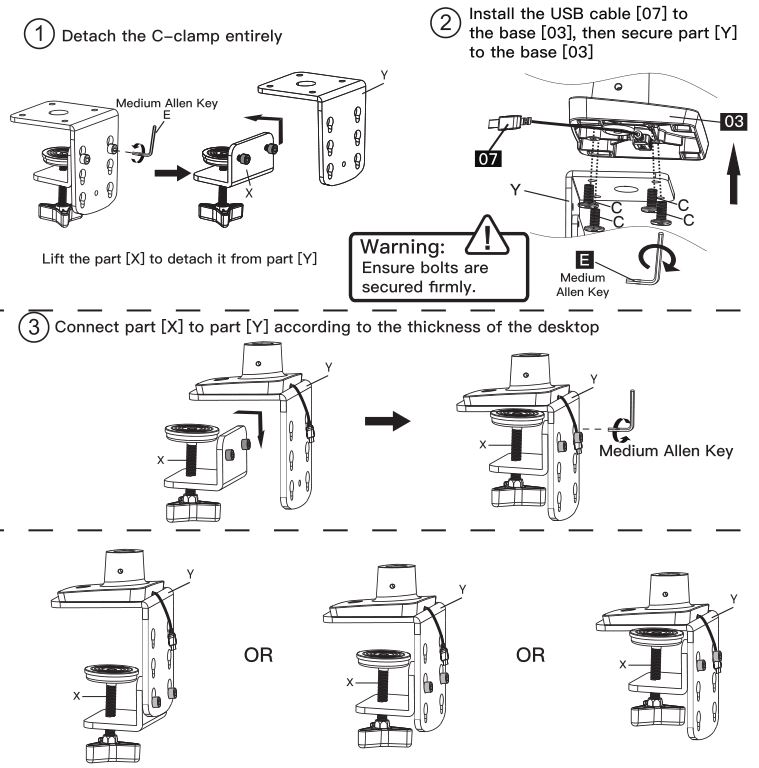
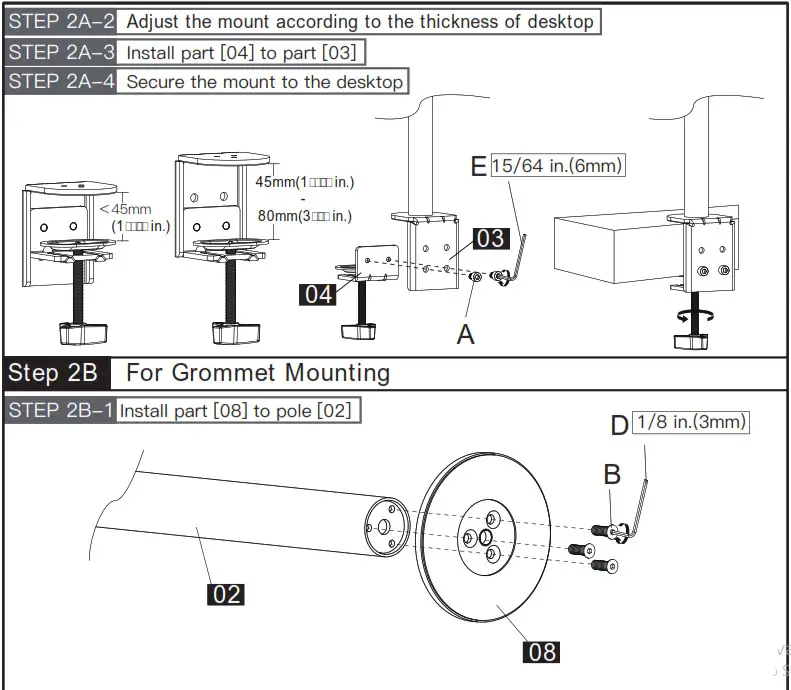
A-2 Secure the Base to the Desktop
B. For Grommet Mounting
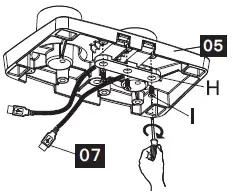
B-1 Install USB Cable and the Grommet Bolt to Base
B-2 Secure the Base to Desktop Using Locking Plate and Butterfly Nut
If there is no grommet hole on your desktop, position the base [03] on the mounting surface and mark the hole. Drill a hole using drill bit in the diameter of 3/8-1 1/16in-.(10-27mm} at the marked position through the mounting surface.
Install the Arms
Install the Monitor Plate

Attach Monitor to the ARM
Adjust Gas Spring Tension
Be sure to keep the arm in horizontal position during adjustment. Or else, it would be difficult to adjust the mount or damage the mount.
- If the monitor can stay at the desired height by itself, no adjustment needed.
- If the monitor rises up, press the arm to keep it in horizontal position and then use the 13/64 in.(5mm) Alley key (E) to turn the bolt clockwise(“-“direction) to reduce tension of the arm only until the monitor can stay at the desired height by itself.
- If the monitor falls down, lift the arm to keep it in horizontal position and then use the 13/64 in.(5mm) Alley key (E) to turn the bolt counter-clockwise(“+” direction) to increase tension of the arm only until the monitor can stay at the desired height by itself.
- Special situation: If the gas pressure is in minimum torque tension and monitor is 2kg, the monitor can not be hovered at your desired position freely and please wind the set screw(see Fig. G)) in “+” direction with the wrench “E” to fix the monitor in place.

Rotation Restriction
Tilt Adjustment
Attach The Decorative Cover to C-Clamp
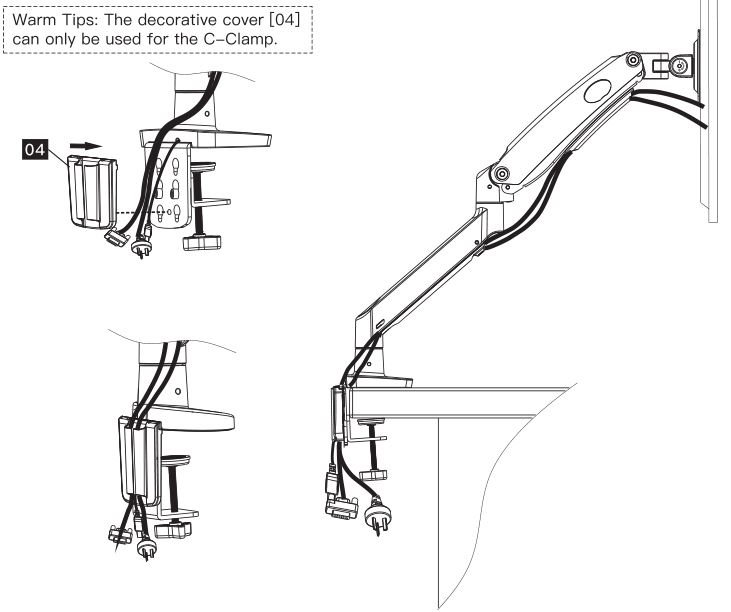
Route Cables along the Arms
Thank you again for choosing this HUANUO product!

www.huanuoav.com
for more products and
company information.
All of us at HUANUO do appreciate your product purchase. We hope that you are as happy with your product as we designing and manufacturing it for you. We strive to provide you with the best quality products and services in the industry. Please share your experience of our product with others at www.huanuoav.com/reviews if you are satisfied. If you have any questions please don’t hesitate to contact us at
Technical Support:
1-800-556-0533 Mon-Fri 8am – 8pm (PST) (USA) (CAN)
Other Info:
[email protected] (US/CA)
Thank you for choosing this Huanuo product! At Huanuo we strive to provide you with the best quality products and services in the industry.
IMPORTANT SAFETY INFORMATION
- Please carefully read all instructions before attempting installation. If you do not understand the instructions or have any concerns or questions, please contact our customer service at [email protected].
CAUTION: Avoid potential personal injuries and property damage! - Do not use this product for any purpose that is not explicitly specified in thismanual. Do not exceed weight capacity. We are not liable for damage or injury caused by improper mounting, incorrect assembly or inappropriate use.
- This product contains a high pressure gas spring, fire and percussion prohibited.
Also it is strictly prohibited to dismantle without professionals. Please return to the manufacturer or hand over to professional agencies if the product is abandoned. - The desk must be capable of supporting three times the weight of the total load (the mount, the monitor and all accessories weight). Don’t use the product on particle board.
Weight Restrictions
| WARNING |
| DO NOT exceed the maximum weight indicated. This mounting system is intended for use only with the maximum weights indicated. Use with products heavier than the maximum weights indicated may result in failure of the mount and its accessories, causing possible damage or injury. |
If your monitor or laptop weighs more, this mount is NOT compatible.
Check the VESA Pattern of Your Monitor before You Begin the Installation
If your Monitor VESA is greater than 100×100 mm/4×4 in. or less than VESA 75x75mm/3x3in., this mount is NOT compatible.
If this desk mount is NOT compatible, please contact customer service at [email protected] to find a compatible product.
SUPPLIED PARTS AND HARDWARE
TOOLS REQUIRED NOT INCLUDED
Step 1 Install the Base
- Measure the thickness of desktop
- a. Adjust the base according to the thickness of desktop
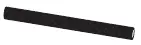
b. Connect the pole [T] to the base [S]
- Secure the base assembly to the desktop
- Detach the base [S] entirely
- connect the pole [T] to the desktop foot [b]
- Keep the rubber pad [e] and 4pcs preassembled bolts for next step when detaching the base
- Install base plate [R] and rubber pad [e] to desktop foot with 4pcs bolts
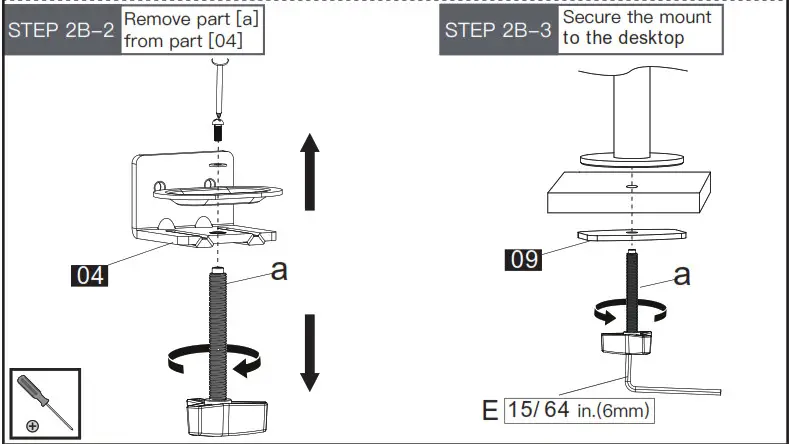
- Install the pole assembly with bolt [d] and clip plate [a]
- Secure the pole assembly to the desktop
Step 2 Attach the VESA Plates to the Monitors
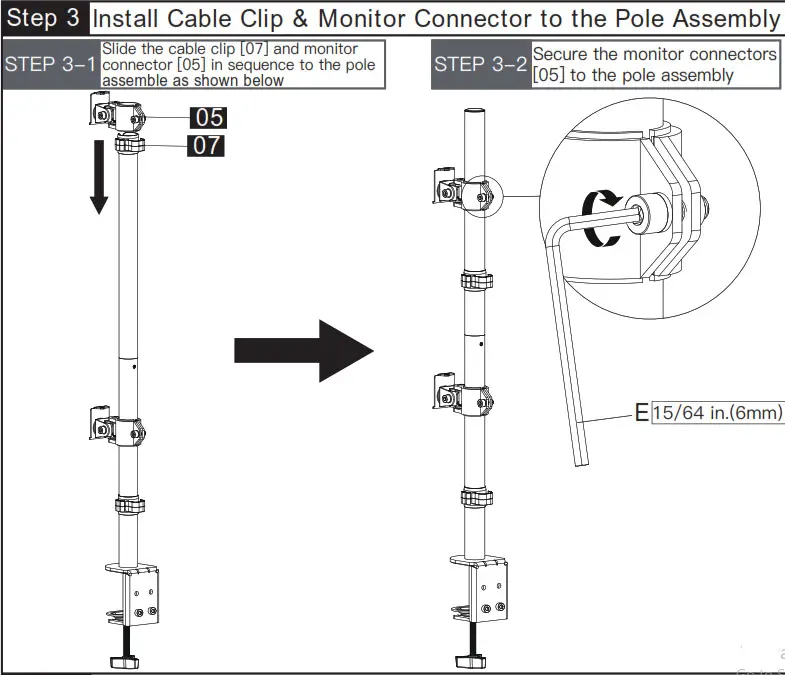
Step 3 Secure the Arm Assembly to the Pole Assembly
Step 3-1 Slide the locating ring [Q], extension arm [Y], locating ring [Q] and supporting part [X] in sequence to the pole.
Step 3-2 Slide the two extension arms [Y] to the supporting part [X] and tighten them using Allen key
Attach the two compression arms [W] to the two extension arms [Y] and tighten them using Allen key [L]
Step 4 Attach the Monitor and Laptop Tray to Arms
Step 5 Adjustments
NOTE: Turn clockwise to reduce tension for lighter monitors and counter-clockwise to increase tension for heavier monitors. Keep adjusting until monitor can keep still at any position.
Be sure to keep the arm in horizontal position during adjustment. Or else, it would be difficult to adjust the mount.
To ensure the swivel function, please don’t over-fasten the bolt
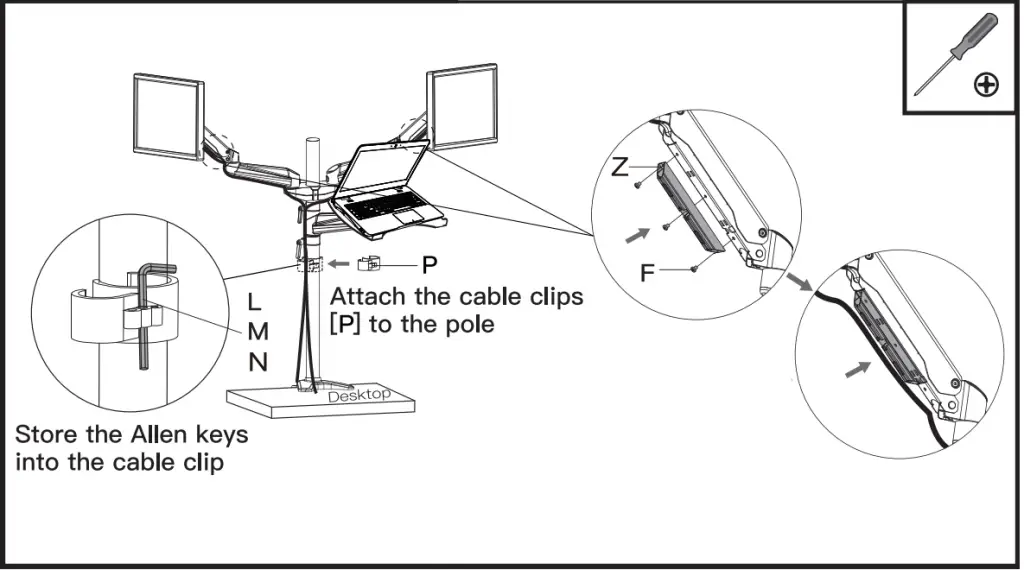
Step 6 Route the Cables
Secure the line hooks [Z] to the compression arms [W] , then route the cables into line hooks [Z] on the compression arms [W] and the line hooks preassembled on the extension arms [Y]
Website:
www.huanuoav.com
Please share your experience of our product with others on www.huanuoav.com/reviews if you are satisfied. Should you have any issues, please don’t hesitate to contact us.
Telephone: 1-800-556-0533 Mon-Fri 10am – 5pm (PST) (USA) (CAN)
Email: [email protected] (US/CA)

Instruction Manual
 Model: HNHM5

Thank you for choosing this HUANUO product! At HUANUO we strive to provide you with the best quality products and services in the industry. Please share your experience of our product with others at www.huanuoav.com/reviews if you are satisfied. Should you have any issues, please don’t hesitate to contact us.
Technical Support: 1-800-556-0533 Mon-Fri 10am – 5pm (PST) (USA) (CAN)
Other Info: [email protected] (US/CA)
UNPACKING INSTRUCTIONS AND IMPORTANT SAFETY INFORMATION
- Carefully open the carton, remove contents and layout on cardboard or another protective surface to avoid
damage. - Check package contents against the Supplied Parts and Hardware Lists to assure that all components were received undamaged. Do not use damaged or defective parts.
- Not all parts and hardware included will be used. lf you require replacement parts, contact customer service at [email protected]
- Carefully read all instructions before attempting installation.
- If you do not understand the instructions or have any concerns or questions, please contact customer service at [email protected]
- This product may contain moving parts. Use with caution.
- Do not use this product for any purpose or in any configuration not explicitly specified in this instruction. We hereby disclaim any liability for injury or damage arising from incorrect assembly, incorrect mounting, or incorrect use of this product.
Supplied Parts and Hardware

Bolt length: Verify adequate thread engagement with bolts or bolts/spacers combination. We recommend thread engagement by at least 5 turns.
-Too short will not hold the monitor.
-Too long will damage the monitor.


Warning: To avoid tipping, please be careful not to extend the monitor too far backward. When you adjust the angle of the monitor, please make sure the monitor is balanced to avoid instability of the center of gravity of the base.
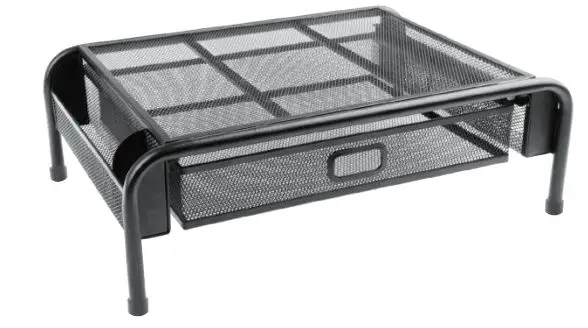
Features
Out Drawer Installation Guide

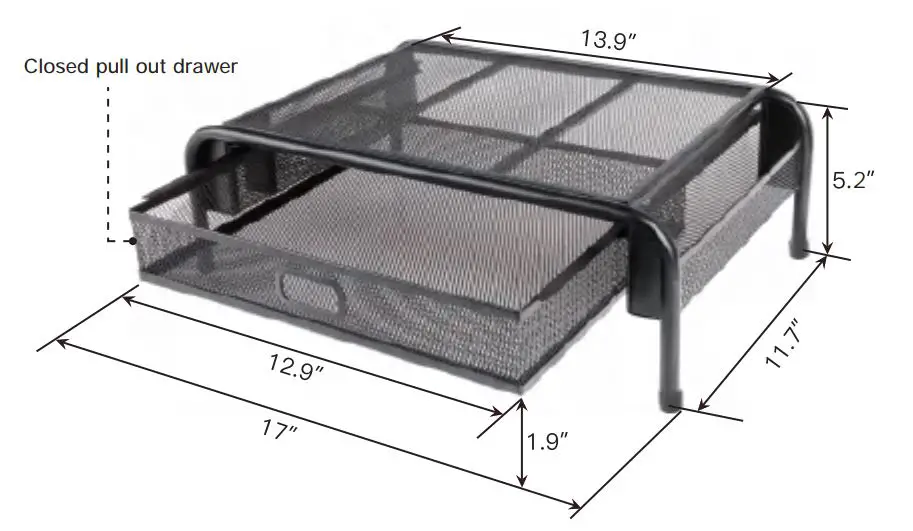
Product Dimensions
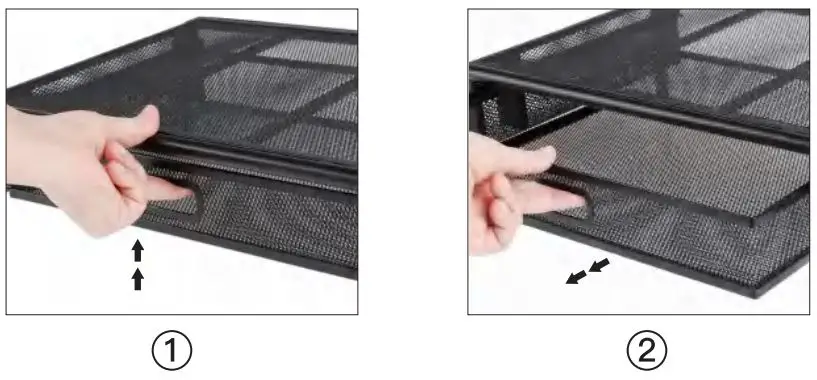
Pull out the Drawer Correctly
Notice: There is a white button on each slideway for locking. To Pull out the drawer smoothly, please lift the drawer a little and then pull it out.
Product Specifications
Material: Mesh Steel
Weight Capacity: 44lbs
Weight Capacity of the Drawer: 11lbs
Functions: Monitor/Printer Stand Riser; Storage
If you have any questions regarding this product, please feel free to contact [email protected]
Model: HNLM1
Website: www.huanuoav.com
Thank you for choosing this HUANUO product! At HUANUO we strive to provide you with the best quality products and services in the industry. Please share your experience of our product with others at www.huanuoav.com/reviews if you are satisfied. Should you have any issues, please don’t hesitate to contact us.
Technical Support:
1-800-556-0533 Mon-Fri 10am – 5pm (PST) (USA) (CAN)
Other Info: [email protected] (US/CA)