 IS-AF001
INNSKY AIR FRYER OVEN
INSTRUCTION MANUAL
PLEASE READ THIS INSTRUCTION THOROUGHLY BEFORE USE
IMPORTANT SAFEGUARDS
When using your electrical appliances, basic safety precautions should always be followed to reduce the risk of fire, electric hazard and injury to persons, including the following.
Danger
- This appliance is not intended for use by persons (including children below 8 years old) with reduced physical, sensory or mental capabilities, or lack of experience and knowledge unless they have been given supervision or instruction concerning the use of appliance by a person responsible for their safety.
- Check if the voltage indicated on the appliance corresponds to the local mains voltage before you connect the appliance.
- Do not use the appliance if the plug or the mains cord or the appliance itself is damaged.
- Never immerse the housing, which contains electrical components and the heating elements, in water nor rinse under tap water.
- Do not let any water or other liquid enter the appliance to prevent electric shock.
- Always put the ingredients to be fried in the accessories to prevent it from coming into contact with the heating elements.
- Do not cover the air inlet and the air outlet while the appliance is operating.
- Do not fill the pan with oil as this may cause a fire hazard.
- While working, the internal temperature of the unit reaches several hundred degrees Fahrenheit. TO AVOID PERSONAL INJURY, never place hands inside the unit unless it is thoroughly cooled.
- Children should be supervised to ensure that they do not play with the appliance. Cleaning and user maintenance shall not be made by children unless they are older than 8 and supervised.
- Keep the main cord away from hot surfaces.
- Do not place the appliance on or near combustible materials such as a tablecloth or curtain.
- Do not place the appliance against a wall or against other appliances. Leave at least 10cm / 3.9in free space on the back and sides and 10cm / 3.9in free space above the appliance. Do not place anything on top of the appliance.
- Do not use the appliance for any other purpose than described in this manual.
- During hot air frying, hot steam is released through the air outlet openings. Keep your hands and face at a safe distance from the steam and from the air outlet openings. Also, be careful of hot steam and air when you remove the pan from the appliance.
- The accessible surfaces may become hot during use.
- After using the appliance, the metal cover inside is very hot, avoid contact with it after cooking.
- Immediately unplug the appliance if you see dark smoke coming out of the appliance. Wait for the smoke emission to stop before you remove the pan from the appliance.
- When reaches the set timer, cooking will stop but the fan WILL CONTINUE RUNNING for 20 seconds to cool down the Unit.
Caution
- Place the appliance on a horizontal, even, and stable surface.
- Improper use and use of the product not listed in the user guide will void the warranty and we are not liable for the damage caused.
- Always unplug the appliance after use.
- Let the appliance cool down for approx. 30 minutes before you handle or clean it.
- The cooktop may smoke the first time it is used. It is not defective and the smoke will burn off within a few minutes.
Overheating Protection
The appliance comes with an overheating protection system. It will be turned off automatically if the inner temperature control system fails. Unplug the main cord, let the appliance cool down and send it to an authorized service center for repair.
Automatic Switch-off
The appliance comes with a built-in shut-off device that will automatically shut down the unit when reaches the set timer. You can manually switch off the appliance at any time by pressing the Power Button. The fan will continue running for about 20 seconds to cool down the unit.
SAVE THE INSTRUCTIONS
PACKAGE CONTENTS
- Top Lid
- Control Panel
- Rails
- Switch
- Handle
- Window
- Lock
- Sliding Chute
Kindly Reminder:
The front door is detachable for easy cleaning and maintenance.
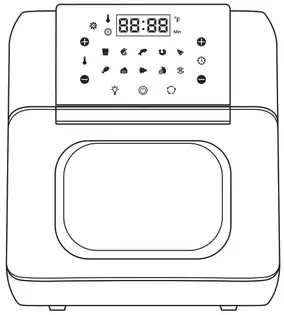
CONTROL PANEL
- LCD Display
- Temperature Indicator
- Working Indicator
- Time Indicator
- Temperature +
- Temperature –
- Mode Indicators
- Light Button
- Power Button
- Rotating Button
- Preheat Button
- Time –
- Time +
| Mode Indicators | Mode Name | Mode Indicators | Mode Name |
|
French Fries | |
Chicken |
|
Beef | |
Cake |
|
Seafood | |
Rotisserie |
|
Shrimp | |
Fruit Dehydrate |
|
Pizza |
SPECIFICATIONS
| Model | IS-AF001 |
| Supply Power | AC 120V 60Hz |
| Rated Power | 1500W |
| Capacity | 10L / 10.5Qt |
| Temperature | 65–200°C / 150-400°F |
BEFORE FIRST USE
- Remove all packaging
- Check the intactness of the appliance and completeness of the accessories.
- Remove any stickers or labels from the appliance.
- Thoroughly clean the accessories with hot water, some mild detergent and a non-abrasive sponge.
- Wipe the inside and outside of the appliance with a damp cloth.
Note: Never wash or submerge the main unit in water.
GET STARTED
HOW TO USE
Connect the appliance to a power source, it enters standby mode with a beep. All the indicators on the control panel will flash once.
Light Control
When the appliance is on, press the Light Button to turn on / off the light.
Power On / Off
- Tap the Power Button to turn on the appliance with a beep. All the indicators on the control panel will light up.
- Tap it again to turn off the appliance. When it is off, the fan will continue working for 20 seconds.
Preheat the Oven
When the appliance is on, tap the Preheat Button to preheat it if needed.
Choose the Cooking Mode
- When the unit is on, tap the Mode Button to choose the cooking mode as desired. The corresponding mode indicator will light up. The LCD display will show the cooking temperature and cooking time alternatively with the latter counting down by the minute.
- When the mode is selected, press the Power Button to start the cooking process. Or you can wait for 3 seconds and cooking will start automatically. The Working Indicator will keep flashing once cooking is started.
- Open the Window during a cooking process, the oven will pause working. Close it again, the appliance will resume working under the previous reaming time and temperature.
Note: Tap the Rotating Button to start rotating if the rotisserie shaft or basket is used for more even results.
Default Cooking Time and Temperature
| Cooking Mode | Temperature | Cooking Time |
| French Fries | 400°F(200°C) | 15min |
| Steaks / Chops | 350°F(177°C) | 25min |
| Fish | 325°F (163°C) | 15min |
| Shrimp | 320°F (160°C) | 12min |
| Pizza | 360°F (182°C) | 15min |
| Chicken | 370°F (185°C) | 40min |
| Baking | 320°F (160°C) | 30min |
| Rotisserie | 375°F (191°C) | 30min |
| Dehydrate | 90°F (32°C) | 120min |
Note: Dehydrate Function
Time Range: 1-24 hours
Temperature Range: 90°F-400°F
Set the Cooking Time
Tap the Time + / – Buttons to increase/decrease the cooking time with a difference of 1 minute in each tap.
Set the Cooking Temperature
Tap the Temperature + / – Buttons to change the cooking temperature.
Kindly Reminder:
Tap and hold the + / – Buttons to increase/decrease the cooking time and temperature continuously.
Recommended Cooking Time and Temperature
| Food | Amount | Time | Temperature | Recommendations |
| Thin Frozen Fries | 1.5–3 cups | 15–16 mins | 400° F (200° C) | |
| Thick Frozen Fries | 1.5–3 cups | 15–20 mins | 400° F (200° C) | |
| Homemade Fries | 1.5–3.5 cups | 10–16 mins | 400° F (200° C) | Add 1/2 tbsp. oil |
| Homemade Potato Wedges | 1.5–3.5 cups | 18–22 mins | 360° F (182° C) | Add 1/2 tbsp. oil |
| Homemade Potato Cubes | 1.5–3 cups | 12–18 mins | 360° F (182° C) | Add 1/2 tbsp. oil |
| Hash Browns | 1 cup | 15–18 mins | 360° F (182° C) | |
| Potato Gratin | 2 cups | 15–18 mins | 400° F (200° C) | |
| Steak | 1/4–1.1 lb | 8–12 mins | 360° F (182° C) | |
| Pork Chops | 1/4–1.1 lb | 10–14 mins | 360° F (182° C) | |
| Hamburger | 1/4–1.1 lb | 7–14 mins | 360° F (182° C) | |
| Sausage Roll | 1/4–1.1 lb | 13–15 mins | 400° F (200° C) | |
| Chicken Drumsticks | 1/4–1.1 lb | 18–22 mins | 360° F (182° C) | |
| Chicken Breast | 1/4–1.1 lb | 10–15 mins | 360° F (182° C) | |
| Spring Rolls | 1/4–3/4 lb | 15–20 mins | 400° F (200° C) | Use oven-ready |
| Frozen Chicken Nuggets | 1/4–1.1 lb | 10–15 mins | 400° F (200° C) | Use oven-ready |
| Frozen Fish Sticks | 1/4–1.1 lb | 6–10 mins | 400° F (200° C) | Use oven-ready |
| Mozzarella Sticks | 1/4–1.1 lb | 8–10 mins | 360° F (182° C) | Use oven-ready |
| Stuffed Vegetables | 1/4–1.1 lb | 10 mins | 320° F (160° C) | |
| Cake | 1.25 cups | 20–25 mins | 320° F (160° C) | Use baking tin |
| Quiche | 1.5 cups | 20–22 mins | 360° F (182° C) | Use baking tin/oven dish |
| Muffins | 1.25 cups | 15–18 mins | 400° F (200° C) | Use baking tin |
| Sweet Snacks | 1.5 cups | 20 mins | 320° F (160° C) | Use baking tin/oven dish |
| Frozen Onion Rings | 1 lb | 15 mins | 400° F (200° C) |
Use the Accessories
Please choose the proper accessories as per the ingredients to be cooked. Pull the handle to open the window and install the accessories as instructed below.
Mesh Racks
Slide the mesh racks into the upper two sliding chutes for dehydration or to cook crispy snacks/reheat items like pizza.
Drip Tray
Slide the drip tray into the lowest sliding chute to collect the dripping oil and residue for easier cleaning of the oven.
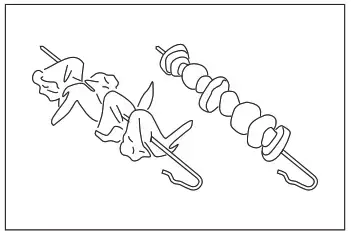
Rotisserie Shaft
It is used to roast whole chicken and relatively large pieces of meat.
- Pass the shaft through the length of the whole chicken.
- Mount the meat forks onto the shaft and insert it into the meat.
- Fix the forks with the screws.
- Toggle the Switch to the right. Place the rotisserie shaft onto the rails push it into the Lock position.
- Release the Switch and lock the shaft into place.
Rotisserie Basket
- Toggle the Switch to the right. Place the rotisserie shaft onto the rails push it into the Lock position.
- Release the Switch and lock the basket into place.
- Use the removal tool to remove the basket to avoid scalding.
Skewers
It is used together with skewer racks to wear meat, fish, vegetables and another ingredient.
Warning!
Skewers and other accessories are relatively sharp due to functional requirements. Please pay special attention during use, and take appropriate protection when necessary. When cooking is done, the temperature of the accessories is very high. Do not touch directly to prevent scalding. Please keep the accessories properly to prevent children from coming into contact with them.
CLEANING AND STORAGE
Cleaning
Clean the air fryer oven after each use. Unplug the power cord from the wall socket and be certain the appliance is thoroughly cooled before cleaning. ·The accessories are dishwasher safe but never use abrasive cleaning materials or utensils on their surfaces to avoid scratches. ·Soak the caked-on food in warm, soapy water for easy removal. ·Wipe the outside of the appliance with a warm cloth damped with mild detergent. ·Clean the inside of the appliance with a warm nonabrasive sponge damped with mild detergent. ·If necessary, remove unwanted food residue from the control panel with a cleaning brush.
Storage
- Unplug the appliance and let it cool thoroughly.
- Make sure all components are clean and dry.
- Place the appliance in a clean, dry place.
TROUBLESHOOTING
| Problem | Possible Cause | Solution | |
| The oven does not work | The appliance is not plugged in | Plug power cord into wall socket | |
| You have not turned on the Unit by setting the cooking time and temperature | Set the temperature and time as instructed | ||
| The product window is not closed properly | Check that window is closed | ||
| The ingredients fried with the air oven are not done | Too much amount of food | Reduce the amount of food for single cooking | |
| Setting temperature too low | Set the temperature higher | ||
| The ingredients are fried unevenly | When tray is used to make food, the tray position is not adjusted | During cooking, adjust the tray
position appropriately |
|
| White smoke comes out of the appliance | You are preparing greasy ingredients | When you fry greasy ingredients in the air fryer, a large amount of oil will leak into the pan. The oil produces white smoke and the pan may heat up more than usual. This does not affect the appliance or the end result | |
| The pan still contains grease residues from previous use | White smoke is caused by grease heating up in the pan. Make sure you clean the pan properly after each use | ||
| Fresh fries are not crispy | The crispiness of the fries depends on the amount of oil and water in the fries. | Make sure you dry the potato sticks properly before you add the oil Cut the potato sticks smaller for a crispier result. Add slightly more oil for a crispier result | |
| All lights flash and error code appears on the display | E1 | Broken circuit of the thermal sensor | Contact Customer Care Team |
| E2 | Short circuit of the thermal sensor | Contact Customer Care Team | |

www.innsky.co
Manufacturer: Shenzhen Xiaojia Technology Co. Ltd.
Address: 505, Bldg 6, Shenglong Garden phase 2, No.2 Shenglong Rd., Longcheng St.,
Longgang Dist., Shenzhen
Facebook page:https://www.facebook.com/innskyservice/
Website:www.innsky.co
E-mail: [email protected]
![]()
Made in China
12-02-2019
IS-AF001_V1.6_
