JENSEN MOBILE AUDIO SYSTEM Owner's Manual

INTRODUCTION
Thank You!
Thank you for choosing a Jensen product. We hope you will find the instructions in this owner’s manual clear and easy to follow. If you take a few minutes to look through it, you’ll learn how to use all the features of your new Jensen receiver for maximum enjoyment.
Features
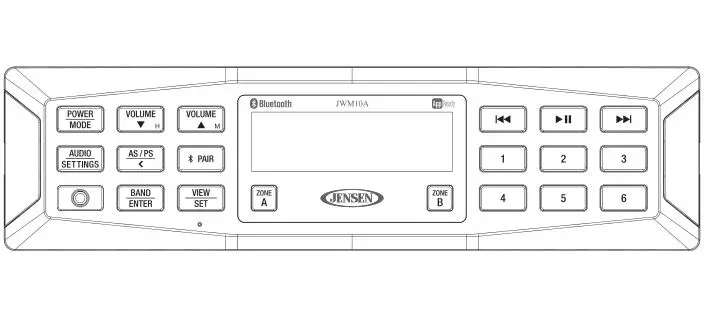
Features of Jensen JWM10A mobile audio system include:
- Backlit Controls and Display
- AM/FM Tuner/30 Preset station (12 AM/18 FM)
- Bluetooth Ready with A2DP/AVRCP streaming Audio
- APP Ready
- Electronic Bass, Treble, Balance and Fader Controls
- Time/Alarm Clock
- 1/8″ Front Aux Audio Input
- Rear Audio RCA Input
- 4 Speaker Outputs (2 zones)
Precautions
- Use the Proper Power Supply
This product is designed to operate with a 12 volt DC, negative ground battery system (the standard system in a North American vehicle). - Use Authorized Ser vice Centers.
Do not attempt to disassemble or ad just this precision product; contact a professional for assistance. - Avoid Moisture
To reduce the risk of fire or electric shock, do not expose this equipment to rain or moisture. - Avoid Cleaning Products.
The front of this unit should only be cleaned with a slightly damp cloth. Do not use cleansers. - Use Recommended Accessories.
TO REDUCE THE RISK OF FIRE OR ELECTRIC SHOCK AND ANNOYING INTERFERENCE, USE ONLY THE RECOMMENDED ACCESSORIES.
Packing List
INSTALLATION
It’s a good idea to read all of the instructions before beginning the installation. We recommend having your Jensen JWM10A installed by a reputable RV dealership.
Tools and Supplies
You will need these tools and supplies to install your JWM10A:
- Phillips screwdriver
- Wire cutters and strippers
- Tools to remove existing radio (screwdriver, socket wrench set or other tools)
- Electrical tape
- Crimping tool
- Volt meter/test light
- Crimp connections
- 16 gauge wire for power connections
- 16-18 gauge speaker wire
Disconnecting the Battery
To prevent a short circuit, be sure to turn off the ignition and remove the negative (-) battery cable prior to installation.
NOTE: If the JWM10A is to be installed in a vehicle equipped with an onboard drive or navigation computer, do not disconnect the battery cable. If the cable is disconnected, the computer memory may be lost. Under these conditions, use extra caution during installation to avoid causing a short circuit.
Selecting the Mounting Location
Select a mounting location, taking care to avoid the following:
- Places exposed to heat-radiating appliances such as electric heaters
- Adjacent to other equipment that radiates heat
- Poorly-ventilated or dusty places Y Moist or humid locations
Mounting the Radio
- Use the mounting hole diagram to measure and cut a mounting hole
- Route power, speakers, AV, and antenna cables through the hole and connect
- Check and ensure correct operation
- Mount the unit using two M3x20mm (3/32 x 0.75″) screws
- Attach Trim ring
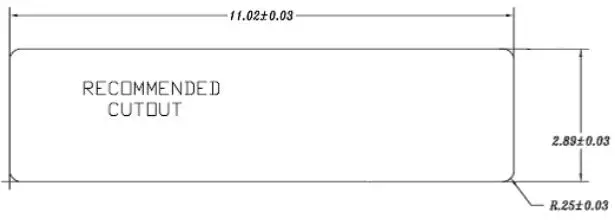
NOTE: Before cutting the mounting hole, make sure the area behind the mounting location is clear of wires, fuel and vacuum or brake lines.
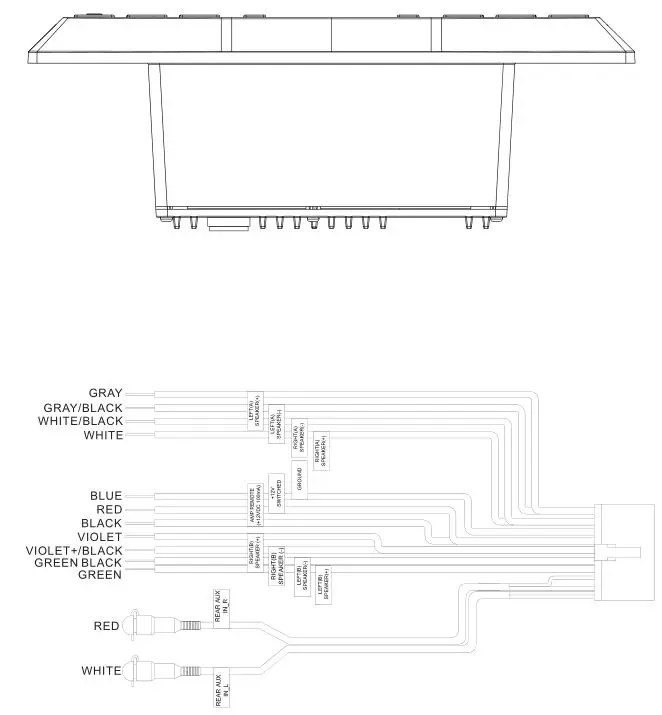
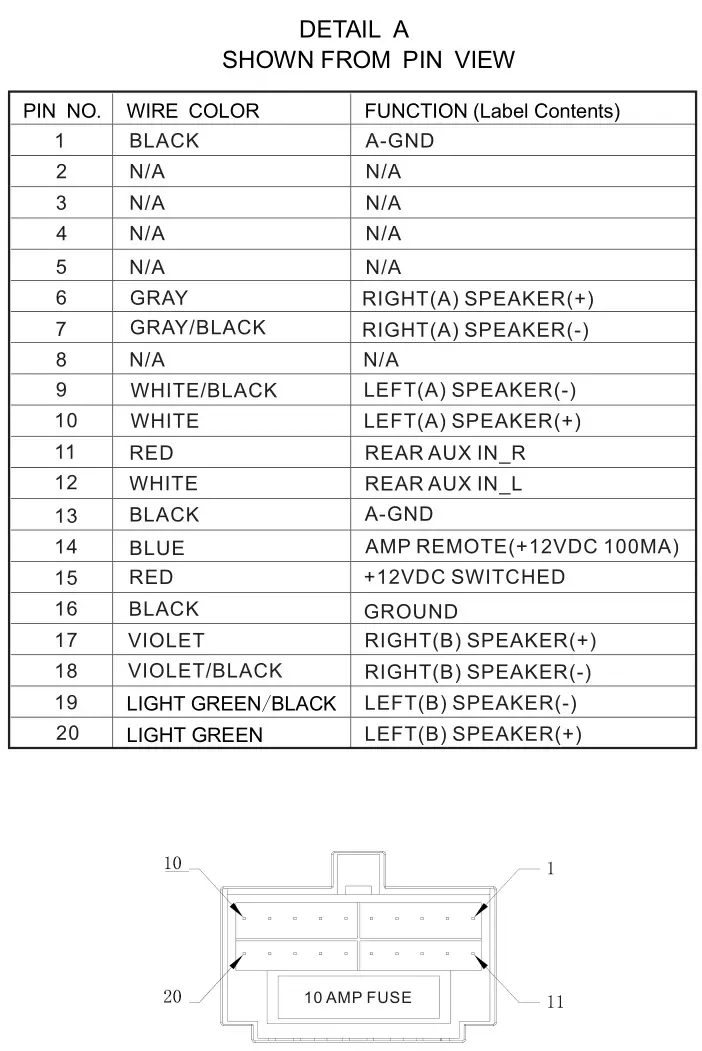
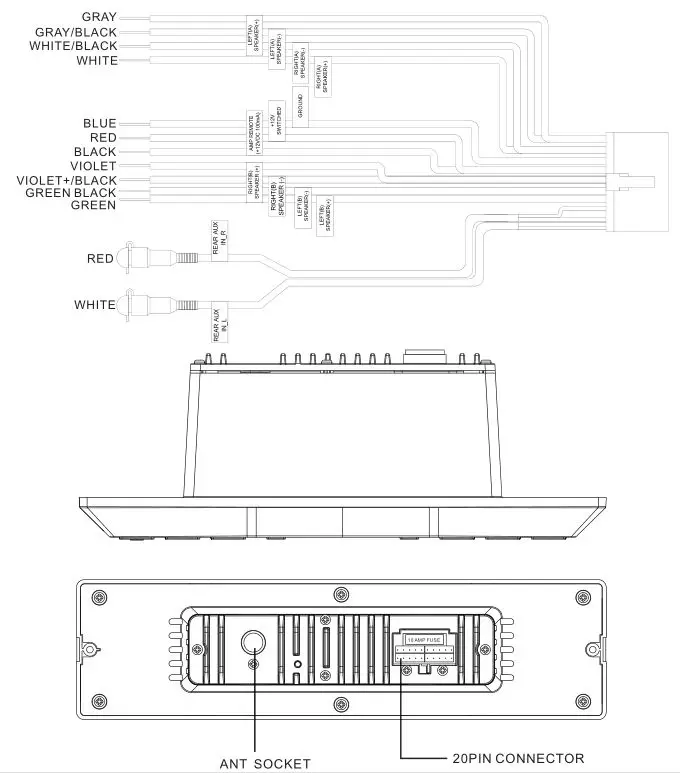
WIRING
The wiring diagram depicts all the wiring connections required for proper .operation of the unit.
BASIC OPERATION
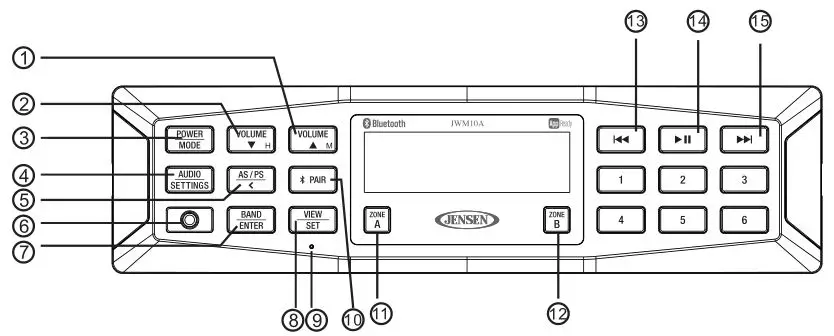
Power
Press the POWER/MODE button (3) to turn the unit on. Press and hold the POWER/MODE button (3) to enter standby mode from unit on.
Mode
After unit turn on, press the POWER/MODE button (3) to cycle through available modes and choose the desired mode.
Volume control
Press the VOLUME M to increase the volume output. Press and hold the VOLUME M to increase the volume output continuously. Press the VOLUME H to decrease the volume output. Press and hold the VOLUME H to decrease the volume output continuously.
Audio menu setting
Press the AUDIO/SETTING button (4) to choose the following audio menu list:
Audio Adjustment
- BAS: Adjust the Bass level from “-7” to “+7”.
- TRE: Adjust the treble from “-7” to “+7”.
- BAL: Adjust the speaker output balance between “L7” (left) and “R7” (right).
“BAL 0” indicates an equal balance between the left and right speakers. - LOUD: Toggle the loudness on/off. When listening to music at low volumes, this feature will boost the bass/treble ranges to compensate for the characteristics of human hearing.
- Use the VOLUME / to make adjustments in each menu item.
System menu setting
Press and hold the AUDIO/SETTING button to enter system menu list and press AUDIO/SETTING once again to choose the following system menu list:
Liquid Crystal Display(LCD)Back Light
- Dimmer: Adjust the brightness of the LCD from “BRI 9” (brightest) to “BRI 0” (off).
NOTE: When subjected to cold temperatures for an extended period of time, LCD panels will take longer to illuminate and the display visibility may slightly decrease. Optimal LCD operation will return to normal when the temperature increases to a normal range.
Sleep Mode
- Sleep: The Sleep Timer will automatically turn off the JWM10A in the designated number of minutes. To set the Sleep Time, press To set the Sleep Time, press VOLUME / repeatedly to change the sleep time from 0(off),15,30.45 or 60 minutes.
Setting the alarm
- Alarm ON/OFF: Press VOLUME / to turn on and off the alarm. The “ALARM” icon will show on the display.
- Press the VOLUME H button (2) to adjust the hour or press the VOLUME M button (1) to adjust the minute.
Setting the Bluetooth
- BT ON/OFF: Press the VOLUME / button to turn on and off the Bluetooth function
- BT DEV (Locked/Unlocked, Disconnect/Connect, Delete) :View, lock and delete from a list of previously paired mobile device models.
- BT PAIR: Press BAND/ENTER (7) to start pairing with a Bluetooth enabled device.
- Preset Volume (PVOL): Select an automatic turn on volume.
Reset
RESET: Press BAND/ENTER button (7) reset the to factory default settings. This function will time out after 5 seconds of inactivity and the unit will resume normal operation.
Auxiliary Input Function
 When a portable audio device is connected to the unit, press the POWER/MODE button(3) repeatedly until AUX 1/ AUX 2 mode is selectable. To connect a portable audio device, insert a standard 3.5mm(audio line output or headphone output from your portable CD/MP3 iPod or other media) into the AUX IN connector(6) on the front of the unit or the AUX-IN RCA jack(AUX AUDIO INPUT) on the rear of the unit.
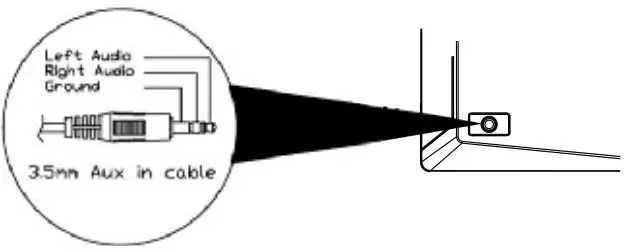
Auxiliary Input Connector
For front panel audio input, an external audio source can be connected with a 3.5mm audio cable adapter. Connect the device to the AUX IN connector(6) on the front panel. In addition to front panel auxiliary input source, the external audio source can also be connected to the RCA audio input through the AUX AUDIO INPUT jack on the rear of the unit.
Clock Display
Press the VIEW/SET button (8) to alternate the display between Playback mode and clock time while in Tuner, Bluetooth or auxiliary input mode.
Clock Setup
Press and hold the VIEW/SET button (8) to access Clock Setup mode. The number representing the hours and minutes will flash. Press VOLUME H buttons to adjust the hour. Press the VOLUME M buttons to adjust the minutes. The new time will be saved 5 seconds after the last adjustment is made.
Zone Output
The two zone output buttons (11)/(12) (ZONE A and ZONE B) control zone output from the radio. Press any of the two buttons to turn the corresponding speaker sets on or off.
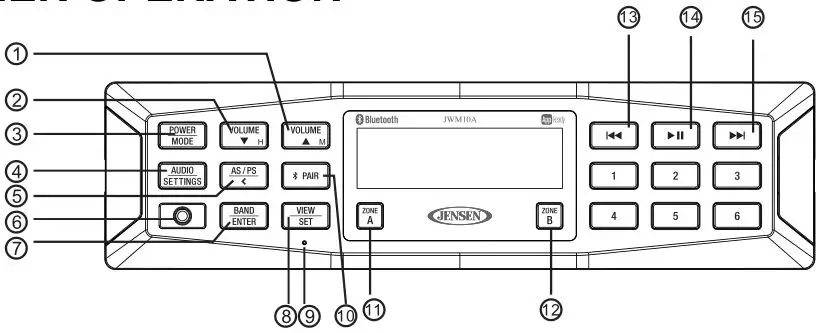
TUNER OPERATION
Select a Band
Press BAND/ ENTER(7) to change between three FM bands (FM1, FM2 and FM3) and two AM bands (AM1 and AM2).
Manual Tuning
Press the tune up(15) or tune down(13) buttons to tune the frequency one step higher or lower. Press and hold to seek tune to next strong station.
Preset Stations
Six numbered preset buttons store and recall stations for each AM and FM band.
Store Preset Stations
Select a band (if needed), then select a station. Hold a preset button for one second. The current station will be stored, and the corresponding preset number will appear in the display.
Recall Preset Stations
Select a band (if needed). Press a preset button momentarily, and the unit will tune to the corresponding stored station.
Automatically Store / Preset Scan (AS/PS)
Automatically Store
Press and hold the AS/PS button (5) for more than one second, and the unit will automatically scan for and store six strong stations for all bands. To stop this function before the automatic storing is complete, press AS/PS again.
Preset Scan
Press AS/PS to scan all preset stations in the current band. The unit will play each station for five seconds before moving on to the next station. To stop this function and play the current station, press the AS/PS button again.
BLUETOOTH OPERATION
The JWM10A includes built-in Bluetooth technology that allows you to connect this head unit to Bluetooth-enabled devices for streaming audio playback.
About Bluetooth Technology
Bluetooth wireless technology is a short-range wireless radio protocol. Operating in the 2.4 GHz range,it transmits audio and data at speeds up to 2.1 Mbit/s over a range of up to 10 meters.
Pairing a Bluetooth
Before you begin, consult the owner’s manual for the Bluetooth device you want to pair with the JWM10A.
1. Make sure the device you want to pair is on and ready to receive a signal from the JWM10A. To begin pairing, press and hold the button (10). The unit will automatically attempt to pair to available devices. When pairing with a smartphone, the JWM10A becomes “discoverable” by your smartphone and can be paired using the phone menu.
2. When the Bluetooth device has completed its search, the mobile phone will display the Bluetooth device name (JWM10A).
3. Select JWM10A.
4. Enter the pairing password (0000), if requested.
5. If successful, the unit will display “BT PAUSE”.
After connecting successfully, you will be able to listen to audio from your Bluetooth enabled device through the JWM10A.
Bluetooth Audio(A2DP)
The A2DP music is available for Bluetooth enabled phones when the phone is connected. To access Bluetooth mode and play songs stored on your phone, press the button (10). While in BT mode , the “BT AUDIO” is displayed on the LCD.
Selecting Tracks
During playback, press the tune up >>|(15) or tune down |<<(13) to play the previous or next track.
Pausing Playback
During playback, press the button(14) to pause the BT AUDIO player. Press again to resume playback. If you change to another mode, the mobile phone audio will pause. Press the button (10) to return to BT mode and resume mobile phone audio playback.
NOTE: If a Bluetooth device is disconnected due to the power being turned off or if the device is out of range, the unit will automatically search for the matching Bluetooth mobile device when the power is restored.
Bluetooth Menu Options
- Press the button (10) to enter menu adjustment mode.
- With “Device” displayed, press the buttons to select.
- Press the buttons to view paired BT devices and press BAND/ENTER(7)button to select.
- Once a device is selected, press the buttons to choose one of
the following options: connect/disconnect, lock/unlock or delete (delete
displays only if the device is not connected).- LOCKED/UNLOCKED: The JWM10A can store up to 5 devices for BT connection. The devices are stored in FIFO (First In First Out) order. To prevent a device from being bumped from the list when more than 5 devices are used, you must lock the device. To Lock/Unlock a device, press the BAND/ENTER button.
- DISCONNECT: To disconnect a paired device, press the BAND/ENTER button to temporarily remove the BT link. The link can be re-established through your phone menu by selecting the JWM10A for connection.
- DELETE: To delete a device from the list, press the BAND/ENTER button.
- Press the BAND/ENTER button to enter.
APP OPERATION
JENSEN® Specialty Controller is the ultimate wireless remote control for your JENSEN stereo system. Store away your old remotes and enjoy the convenience of all the primary functions of your JENSEN stereo right from your phone or tablet by transforming your mobile device into a functional stereo remote control!
FEATURES
This app controls all of the primary functions of your stereo features including:
- Power on/off Y Volume and mute
- AM/FM radio tuner: access station, recall, store presets, switch songs
- Bluetooth® streaming audio
- Auxiliary audio input control auxiliary analog 1 & 2, auxiliary digital coaxial, auxiliary digital optical
- Speaker selection A and/or B Y Audio menu controls-bass, treble, balance, volume and speaker selection settings
- Clock with sleep time and alarm Y Visual display feedback so you can see artist title and album on your mobile screen
Connecting and using jControl app
After downloading and installing jControl app on your apple device. pair your device to the JWM10A as stated above for Bluetooth paring. Once your device is paired you can open the app and use as instructed with the jControl app manual found at http://asaelectronics.com/manuals-guides.
When jControl is installed on Android operating system, close the app before Bluetooth pairing, otherwise there may be errors on Bluetooth connection.
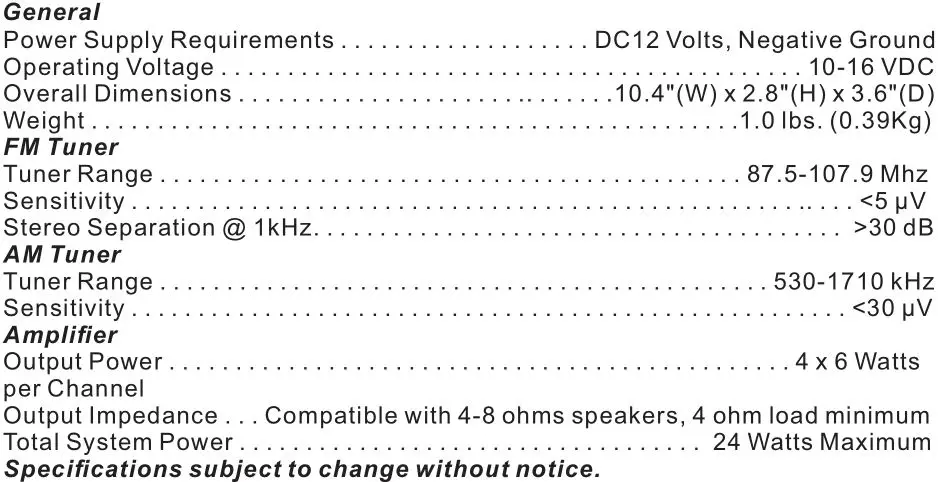
SPECIFICATIONS
FCC Warnings
This device complies with Part 15 of the FCC Rules. Operation is subject to the following two conditions:
- This device may not cause harmful interference, and
- This device must accept any interference received, including interference that may cause undesired operation.
Changes or modifications not expressly approved by the party responsible for compliance could void the user’s authority to operate the equipment.
NOTE: The manufacturer is not responsible for any radio or TV interference caused by unauthorized modifications to this equipment. Such modifications could void the user’s authority to operate the equipment.
![]()
User Manual
![]()

Jensen JCR-232 AM/FM Dual Alarm Clock Radio With Digital Retro Flip Display
PLEASE READ THIS USER MANUAL COMPLETELY BEFORE OPERATING THIS
UNIT AND RETAIN THIS BOOKLET FOR FUTURE REFERENCE.
WARNING
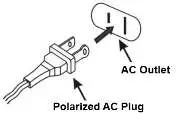
TO PREVENT FIRE OR SHOCK HAZARD, DO NOT USE THIS PLUG WITH AN EXTENSION CORD, RECEPTACLE OR OTHER OUTLET UNLESS THE BLADES CAN BE FULLY INSERTED TO PREVENT BLADE EXPOSURE. TO PREVENT FIRE OR SHOCK HAZARD, DO NOT EXPOSE THIS APPLIANCE TO RAIN OR MOISTURE.
WARNING
To reduce the risk of fire or electric shock, do not expose this apparatus to rain or moisture.
IMPORTANT SAFETY INSTRUCTIONS
- Read these instructions.
- Keep these instructions.
- Heed all warnings.
- Follow all instructions.
- Do not use this apparatus near water.
- Cleaning – Unplug this product from the wall outlet before cleaning. Do not use liquid cleaners or aerosol cleaners. Clean only with a dry cloth.
- Do not block any ventilation openings. Install in accordance with the manufacturer’s instructions.
- Do not install near any heat sources such as radiators, heat registers, stoves, or other apparatus (including amplifiers) that produce heat.
- Do not defeat the safety purpose of the polarized or grounding-type plug. A polarized plug has two blades with one wider than the other. A grounding type plug has two blades and a third grounding prong. The wider or the third prong is provided for your safety. If the provided plug does not fit into your outlet, consult an electrician for replacement of the obsolete outlet.
- Protect the power cord from being walked on or pinched particularly at plugs, convenience receptacles, and the point where they exit from the apparatus.
- Only use attachments/accessories specified by the manufacturer.
- Use only with a cart, stand, tripod, bracket, or table specified by the manufacturer, or sold
with the apparatus. When a cart is used, use caution when moving the cart/ apparatus
combination to avoid injury from tip-over.
- Unplug this apparatus during lightning storms or when unused for long periods of time.
- Refer all servicing to qualified service personnel. Servicing is required when the apparatus
has been damaged in any way, such as power-supply cord or plug is damaged, liquid has been spilled or objects have fallen into the apparatus, the apparatus has been exposed to rain or moisture, does not operate normally, or has been dropped. - This apparatus shall not be exposed to dripping or splashing water and that no object filled with liquids such as vases shall be placed on the apparatus.
- Main plug is used as disconnect device and it should remain readily operable during intended use. In order to disconnect the apparatus completely, the main plug should be disconnected from the main socket outlet completely.
- Battery shall not be exposed to excessive heat such as sunshine, fire or the like.
- The marking information is located at the bottom of the apparatus.
- The Caution Marking is located at the bottom of the apparatus.
- Danger of explosion if battery is incorrectly replaced. Replace only with the same or equivalent type.
 This symbol indicates that this product incorporates double insulation between hazardous mains voltage and user accessible parts.
CAUTION:
TO PREVENT ELECTRIC SHOCK, MATCH WIDE BLADE OF AC PLUG TO WIDE SLOT. FULLY INSERT.
SAVE THESE INSTRUCTIONS
COMPLIANCE WITH FCC REGULATION
This device complies with Part 15 of the FCC Rules. Operation is subject to the following two conditions:
- This device may not cause harmful interference, and
- This device must accept any interference received, including interference that may cause undesired operation.
NOTE: This equipment has been tested and found to comply with the limits for a Class B digital device, pursuant to Part 15 of the FCC Rules. These limits are designed to provide reasonable protection against harmful interference in a residential installation.
This equipment generates, uses and can radiate radio frequency energy and, if not installed and used in accordance with the instructions, may cause harmful interference to radio communications. However, there is no guarantee that interference will not occur in a particular installation. If this equipment does cause harmful interference to radio or television reception, which can be determined by turning the equipment off and on, the user is encouraged to try to correct the interference by one or more of the following measures:
- Reorient or relocate the receiving antenna.
- Increase the separation between the equipment and receiver.
- Connect the equipment into an outlet on a circuit different from that to which the receiver is connected.
- Consult the dealer or an experienced radio/TV technician for help.
WARNING
Changes or modifications not expressly approved by the party responsible for compliance could void the user’s authority to operate the equipment.
DEAR JENSEN® CUSTOMER
Selecting fine audio equipment such as the unit you’ve just purchased is only the start of your musical enjoyment. Now it’s time to consider how you can maximize the fun and excitement your equipment offers. This manufacturer and the Electronic Industries Association’s Consumer Electronics Group want you to get the most out of your equipment by playing it at a safe level. One that lets the sound come through loud and clear without annoying blaring or distortion and, most importantly, without affecting your sensitive hearing. Sound can be deceiving. Over time your hearing “comfort level” adapts to higher volumes of sound. So what sounds “normal” can actually be loud and harmful to your hearing. Guard against this by setting your equipment at a safe level BEFORE your hearing adapts.
To establish a safe level:
- Start your volume control at a low setting.
- Slowly increase the sound until you can hear it comfortably and clearly, and without distortion.
Once you have established a comfortable sound level:
Set the dial and leave it there. Taking a minute to do this now will help to prevent hearing damage or loss in the future. After all, we want you listening for a lifetime.
We Want You Listening For a Lifetime
Used wisely, your new sound equipment will provide a lifetime of fun and enjoyment. Since hearing damage from loud noise is often undetectable until it is too late, this manufacturer and the Electronic Industries Association’s Consumer Electronics Group recommend you avoid prolonged exposure to excessive noise.

Customer’s Record:
The serial number of this product is found on its bottom cover. You should note the serial number of this unit in the space provided as a permanent record of your purchase to aid in identification in the event of theft of loss.
Model Number: JCR-232 Serial Number: ________________
PROTECT YOUR FURNITURE!!
This system is equipped with non-skid rubber ‘feet’ to prevent the product from moving when you operate the controls. These ‘feet’ are made from non-migrating rubber material specially formulated to avoid leaving any marks or stains on your furniture. However certain types of oil based furniture polishes, wood preservatives, or cleaning sprays may cause the rubber ‘feet’ to soften, and leave marks or a rubber residue on the furniture. To prevent any damage to your
furniture we strongly recommend that you purchase small self-adhesive felt pads, available at hardware stores and home improvement centers everywhere, and apply these pads to the bottom of the rubber ‘feet’ before you place the product on fine wooden furniture.
LOCATION OF CONTROLS
POWER CONNECTION
AC POWER CONNECTION
This product operates on 120V~ 60Hz AC power supply. Plug the AC power cord into a household outlet AC source.
INSTALLING/REPLACING THE BACK-UP BATTERY
This unit is equipped with a battery back-up system, requiring one 3V CR2032 lithium battery (included) to maintain the time/calendar settings and radio presets during AC power outage. Prior to first use, please remove the plastic battery insulator tab to activate the backup battery.
- Unscrew and remove the BATTERY COMPARTMENT COVER.
- Install one fresh CR2032 lithium battery into the battery compartment following the polarity diagram on the
BATTERY COMPARTMENT COVER. Use only the specified size and type of battery. - Replace the BATTERY COMPARTMENT COVER and tighten its screw.
Note: The unit will operate without a battery installed but your time & alarm setting and radio presets will be lost and will have to be reset in the event of power interruption or failure.
IMPORTANT:
Be sure that the battery is installed correctly. Wrong polarity may damage the unit and void the warranty. For best performance and longer operating time, we recommend the use of good quality alkaline battery.
WARNING
DO NOT INGEST BATTERY, CHEMICAL BURN HAZARD
This product contains a coin/button cell battery. If the coin/button cell battery is swallowed, it
can cause severe internal burns in just 2 hours and can lead to death.
Keep new and used batteries away from children. If the battery compartment does not close
securely, stop using the product and keep it away from children.
If you think batteries might have been swallowed or placed inside any part of the body, seek
immediate medical attention.
BATTERY CARE:
- Use only the size and type of battery specified.
- If the unit is not to be used for an extended period of time, remove the battery. Old or leaking battery can cause damage to the unit and may void the warranty.
- Do not try to recharge battery not intended to be recharged; they can overheat and rupture (Follow battery manufacturer’s directions).
- Do not dispose of battery in fire, battery may leak or explode.
POWER ON/STANDBY
- In standby mode, tap the POWER ON/STANDBY
 button once to turn on the unit.
 - Press and hold button for about 2 seconds to return the unit to standby mode.
CALENDAR AND TIME SETTING
SETTING THE CALENDAR AND TIME
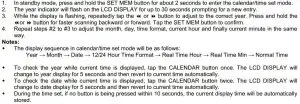
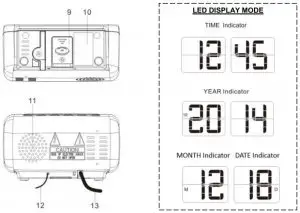
Make sure the hour is set so that the PM indicator is displayed correctly for afternoon/night times.
ALTERNATE DISPLAY BETWEEN TIME AND MONTH-DATE DISPLAY
- In clock mode, press and hold the CALENDAR TOGGLE
 button for about 3 seconds until “ON” appears in the LCD DISPLAY.
 - The DISPLAY will alternate between the current Time for 10 seconds and Month-Date for 5 seconds as follows:
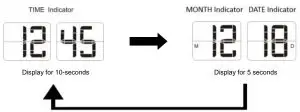
- To cancel this function, press and hold the CALENDAR TOGGLE button for about 3 seconds until “OFF” appears on the LCD DISPLAY. The DISPLAY will switch back to normal time display.
DAYLIGHT SAVING TIME (DST) MODE
If daylight saving time (DST) is available in the summer time in your State, you may use this option to adjust to the correct time easily.
- In standby mode, press and hold DST button for 2 seconds to advance the displayed time by one hour.
- To cancel DST mode, repeat the above operation.
ALARM SETTING
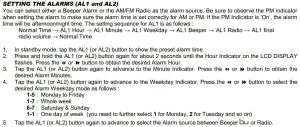
Notes :
- When the Beeper alarm begins, it will sound at a lower beeping rate and gradually increase to the normal rate within 30 seconds.
- If you want to choose radio as the alarm source, you need to set the radio to your desired radio station in radio mode first.
- After selecting the Radio as the alarm source during alarm setting, you need to select FM or AM radio and the preset alarm volume level (up to maximum level 15). When the radio is turned ‘On’ at the preset alarm time, the radio will begin to sound at a low volume and gradually increases to the preset volume level.
Note: it is not possible to adjust the volume level during the radio alarm. If volume adjustment is needed, you must turn ‘Off’ the radio first, and then turn it ‘On’ again using the POWER ON/STANDBY button. The alarm will also be stopped immediately.
6. Press the AL1 (or AL2) button to finish setting and exit to normal time display. 7. To disable ALARM 1 (or 2) from automatically sounding on the upcoming days, press and hold the AL1 (or AL2) button for about 2 seconds, the corresponding AL1 (or AL2) INDICATOR will go off.
8. To resume ALARM 1 (or 2) from automatically sounding on the upcoming days, press and hold the AL1 (or AL2) button for about 2 seconds, the corresponding AL1 (or AL2) INDICATOR will turn on and the alarm(s) will sound the following day at the set time.
TURNING OFF THE ALARM
When the preset alarm time is reached, the AL1 (or AL2) INDICATOR will flash on the LCD DISPLAY and the beeper alarm or radio will sound for 30 minutes unless interrupted by pressing SNOOZE. To stop the alarm immediately, tap the corresponding AL1 (or AL2) button or POWER ON/STANDBY button. The alarm will ring again at the same alarm time on the following day, or when set to go off based on your Alarm settings.
SNOOZE FUNCTION
When the alarm source is sounding, press the SNOOZE button to suspend the alarm and activate the snooze function. The Alarm will temporarily stop and sound again 9 minutes later but the AL1 (or AL2) indicator will keep flashing.
Notes:
- This manual snooze operation can be repeated again and again.
- To turn off the snooze function before it ends, tap the corresponding AL1 (or AL2) button or the button. The AL1 (or AL2) INDICATOR will stop flashing.
LISTENING TO THE RADIO
RADIO TUNING
- In standby mode, tap the POWER ON/STANDBY button to turn the unit ‘On’.
- Tap the AM/FM button repeatedly to select the AM or FM band. The corresponding indicator will light up.
- The LCD DISPLAY will show the radio frequency for about 5 seconds and then revert to normal time display.
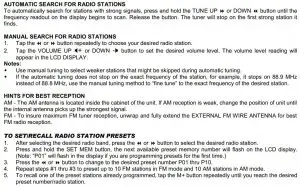
SLEEP TIMER OPERATION
The sleep timer allows you to turn the unit off after a designated time has elapsed.
- While listening to the radio, tap the SLEEP button and sleep time ‘90’ (minutes) appears in the LCD DISPLAY.
- Repeatedly tap the SLEEP button to select a sleep timer of 90, 60, 30 or 15 minutes. Wait for about 10 seconds 7 after your selection for the unit to confirm the selection, the unit will play for the selected length of time then turn itself ‘Off’ automatically.
- To cancel the sleep timer, repeatedly tap the SLEEP button until you see the current time in the LCD DISPLAY after last sleep timer option (15 minutes).
- To turn the unit ‘Off’ before the selected sleep time, press and hold the button at any time.
Note:
There is no sleep indicator in this unit. To check the remaining sleep time, tap the SLEEP button once.
DIMMER CONTROL
Tap the DIMMER button to set the brightness of the LCD display to high, low or off according to your ambient light conditions.
RESETTING THE UNIT
If the system does not respond or exhibits erratic or intermittent operation, you may have experienced an electrostatic discharge (ESD) or a power surge that triggered the internal microcontroller to shut down automatically. If this occurs, disconnect the AC POWER CORD from the wall and remove the backup battery from the compartment. Wait at least 3 minutes, and reinsert the battery for the back-up, and reattach the AC Cord to the wall. The unit is now reset, so you will need to setup the unit time and alarms again.
CARE AND MAINTENANCE
CARE FOR THE UNIT
- Children should be supervised when using this appliance.
- Never wrap the AC POWER CORD around any animal or person. Special care should be taken with long wire.
- Avoid operating your unit under direct sunlight or in hot, humid or dusty places.
- Keep your unit away from heating appliances and sources of electrical noise such as fluorescent lamps or motors.
- Unplug the unit from the electrical power outlet immediately in case of malfunction.
CLEANING THE UNIT
- To prevent fire or shock hazard, disconnect your unit from the AC power source when cleaning.
- The finish on the unit may be cleaned with a dust cloth and cared for as other furniture. Use caution when cleaning and wiping the plastic parts.
- If the cabinet becomes dusty wipe it with a soft dry dust cloth. Do not use any wax or polish sprays on the cabinet.
- If the front panel becomes dirty or smudged with fingerprints it may be cleaned with a soft cloth slightly dampened with a mild soap and water solution. Never use abrasive cloths or polishes as these will damage the finish of your unit.
CAUTION: Never allow any water or other liquids to get inside the unit while cleaning.
TROUBLESHOOTING GUIDE
If you experience difficulties in the use of this clock radio, please check the following or call 1-800-777-5331 for Customer Service.
SPECIFICATIONS


At Spectra, environmental and social responsibility is a core value of our business. We are dedicated to continuous implementation of responsible initiatives with an aim to conserve and maintain the environment through responsible recycling.
Please visit us at http://www.spectraintl.com/green.html for more information on Spectra’s green initiatives or to find a recycler in your area.
90 DAY LIMITED WARRANTY AND SERVICE
VALID IN THE U.S.A. ONLY
SPECTRA MERCHANDISING INTERNATIONAL, INC. warrants this unit to be free from defective materials or factory workmanship for a period of 90 days from the date of original customer purchase and provided the product is utilized within the U.S.A. This warranty is not assignable or transferable. Our obligation under this warranty is the repair or replacement of the defective unit or any part thereof, except batteries, when it is returned to the SPECTRA Service Department, accompanied by proof of the date of original consumer purchase, such as a duplicate copy of a sales receipt.
You must pay all shipping charges required to ship the product to SPECTRA for warranty service. If the product is repaired or replaced under warranty, the return charges will be at SPECTRA’s expense. There are no other express warranties other than those stated herein.
This warranty is valid only in accordance with the conditions set forth below:
- The warranty applies to the SPECTRA product only while:
a. It remains in the possession of the original purchaser and proof of purchase is demonstrated.
b. It has not been subjected to accident, misuse, abuse, improper service, usage outside the descriptions and warnings covered within the user manual or non-SPECTRA approved modifications.
c. Claims are made within the warranty period. - This warranty does not cover damage or equipment failure caused by electrical wiring not in compliance with electrical codes or SPECTRA user manual specifications, or failure to provide reasonable care and necessary maintenance as outlined in the user manual.
- Warranty of all SPECTRA products applies to residential use only and is void when products are used in a nonresidential environment or installed outside the united States.
This warranty gives you specific legal rights, and you may also have other rights which vary from state to state. TO OBTAIN SERVICE please remove all batteries (if any) and pack the unit carefully and send it freight prepaid to SPECTRA at the address shown below. IF THE UNIT IS RETURNED WITHIN THE WARRANTY PERIOD shown above, please include a proof of purchase (dated cash register receipt) so that we may establish your eligibility for warranty service and repair of the unit without cost. Also include a note with a description explaining how the unit is defective. A customer service representative may need to contact you regarding the status of your repair, so please include your name, address, phone number and email address to expedite the process.
IF THE UNIT IS OUTSIDE THE WARRANTY PERIOD, please include a check for $10.00 to cover the cost of repair, handling and return postage. All out of warranty returns must be sent prepaid.
It is recommended that you contact SPECTRA first at 1-800-777-5331 or by email at [email protected] for updated information on the unit requiring service. In some cases the model you have may be discontinued, and SPECTRA reserves the
right to offer alternative options for repair or replacement.
SPECTRA MERCHANDISING INTERNATIONAL, INC.
4230 North Normandy Avenue,
Chicago, IL 60634, USA.
1-800-777-5331
To register your product, visit the link on the website below to enter your information.
http://www.spectraintl.com/wform.html
PORTABLE STEREO COMPACT DISC PLAYER WITH AM/FM R AD IO

MODEL CD-490
Please read this Manual carefully before using the unit and retain it for future reference
WARNING
To prevent fire or shock hazard, do not use this plug with an extension cord, receptacle or other outlet unless the blades can be fully Inserted to prevent blade exposure. To prevent fire or shock Hazard, do not expose this appliance to rain or moisture.
 |
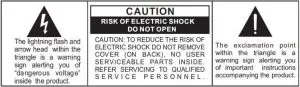
CAUTION |  The exclamation point within the triangle is a warning sign alerting you of important instructions accompanying the product. The exclamation point within the triangle is a warning sign alerting you of important instructions accompanying the product. |
| RISK OF ELECTRIC SHOCK DO NOT OPEN | ||
| CAUTION: TO REDUCE THE RISK OF ELECTRIC SHOCK DO NOT REMOVE COVER (ON BACK), NO USER SERVICEABLE PARTS INSIDE. REFER SERVICING TO QUALIFIED SERVICE PERSONNEL. |
The Caution Marking is located at the bottom enclosure of the apparatus.
IMPORTANT SAFETY INSTRUCTIONS
- Read these instructions.
- Keep these instructions.
- Heed all warnings.
- Follow all instructions.
- Do not use this apparatus near water.
- Cleaning-Unplug this product from the wall outlet before cleaning. Do not use liquid cleaners or aerosol cleaners. Clean only with dry cloth.
- Do not block any ventilation openings. Install in accordance with the manufacturer’s instructions.
- Do not place this product on an unstable cart, stand, tripod, bracket, or table. The product may fall, causing serious injury to a child or adult, and serious damage to the product. Use only with a cart, stand, tripod, bracket, or table recommended by the manufacturer, or sold with the product. Any mounting of the product should follow the manufacturer’s instructions, and should use a mounting accessory recommended by the manufacturer. A product and cart combination should be moved with care-quick stops, excessive force and uneven surfaces may cause the product and cart combination to overturn.
- Do not install near any heat sources such as radiators, heat registers, stoves, or other apparatus (including amplifiers) that product heat.
- Do not defeat the safety purpose of the polarized or grounding-type plug. A polarized plug has two blades with one wider than the other. A grounding type plug has two blades and a third grounding prong. The wide blade or the third prong is provided for your safety. If the provided plug does not fit into your outlet, consult an electrician for replacement of the obsolete outlet.
- Protect the power cord from being walked on or pinched particularly at plugs, convenience receptacles, and the point where they exit from the apparatus.
- Only use attachments/accessories specified by the manufacturer.
- Unplug this apparatus during lightning storms or when unused for a long periods of time.
- Refer all servicing to qualified service personnel. Servicing is required when the apparatus has been damaged in any way, such as power-supply cord or plug is damaged, liquid has been spilled or objects have fallen into the apparatus, the apparatus has been exposed to rain or moisture, does not operate normally, or has been dropped.
- This appliance shall not be exposed to dripping or splashing water and that no object filled with liquids such as vases shall be placed on the apparatus.
- Do not overload wall outlet. Use only power source as indicated.
- Use replacement part as specified by the manufacturer.
- Upon completion of any service or repairs to this product, ask the service technician to perform safety checks.
- Power Sources – This product should be operated only from the type of power source indicated on the marking label. If you are not sure of the type of power supply to your home, consult your product dealer or local power company. For products intended to operate from battery power, or other sources, refer to the operating instruction.
- Object and Liquid Entry – Never push objects of any kind into this product through openings as they may touch dangerous voltage points or short-out parts that could result in a fire or electric shock. Never spill liquid of any kind on the product.
- Damage Requiring Service – Unplug this product from the wall outlet and refer servicing to qualified service personnel under the following conditions:
a) When the power-supply cord or plug is damaged,
b) If liquid has been spilled, or objects have fallen into the product,
c) If the product has been exposed to rain or water,
d) If the product does not operate normally by following the operating instructions. Adjust only those controls that are covered by the operating instructions as an improper adjustment of other controls may result in damage and will often require extensive work by a qualified technician to restore the product to its normal operation.
e) If the product has been dropped or damaged in any way, and
f) When the product exhibits a distinct change in performance – this indicates a need for service.
 This symbol indicates that this product incorporates double insulation between hazardous mains voltage and user accessible parts.
SAVE THESE INSTRUCTIONS
| CLASS 1 LASER PRODUCT |  |
|
| CLASS 1 LASER PRODUCT APPAREIL LASER DE CLASSE 1 PRODUCTO LASER DE CLASE 1 | CAUTION INVISIBLE LASER RADIATION WHEN OPEN AND INTERLOCKS DEFEATED AVOID EXPOSURE TO BEA |
|
| This product contains a low power laser device | ||
ON PROTECTION AGAINST LASER ENERGY EXPOSURE
- As the laser beam used in this compact disc player is harmful to the eyes, do not attempt to
disassemble the casing. - Stop operation immediately if any liquid or solid object should fall into the cabinet.
- Do not touch the lens or poke at it. If you do, you may damage the lens and the player may
- Do not put anything in the safety slot. If you do, the laser diode will be ON when the CD door is still open.
- If the unit is not to be used for a long period of time, make sure that all power sources are disconnected from the unit. Remove all batteries from the battery compartment, and unplug the AC cord from the wall outlet. Make it a practice to remove the AC cord by grasping the main body and not by pulling the cord.
- This unit employs a laser. The use of controls or adjustment or performance of procedures other than those specified here may result in exposure to hazardous radiation.
Should any trouble occur, remove the power source and refer servicing to qualified personnel
COMPLIANCE WITH FCC REGULATIONS
This device complies with Part 15 of the FCC Rules. Operation is subject to the following two conditions:
(1) this device may not cause harmful interference, and
(2) this device must accept any interference received, including interference that may cause undesired operation.
NOTE : This equipment has been tested and found to comply with the limits for a Class B digital device, pursuant to Part 15 of the FCC Rules. These limits are designed to provide reasonable protection against harmful interference in a residential installation. This equipment generates uses and can radiate radio frequency energy and, if not installed and used in accordance with the instructions, may cause harmful interference to radio communications. However, there is no guarantee that interference will not occur in a particular installation. If this equipment does cause harmful interference to radio or television reception, which can be determined by turning the equipment off and on, the user is encouraged to try to correct the interference by one or more of the following measures:
- Reorient or relocate the receiving antenna.
- Increase the separation between the equipment and receiver.
- Connect the equipment into an outlet on a circuit different from that to which the receiver is connected.
- Consult the dealer or an experienced radio/TV technician for help.
WARNING: Changes or modifications not expressly approved by the party responsible for compliance could void the user’s authority to operate the equipment.
PROTECT YOUR FURNITURE!!
This system is equipped with non-skid rubber ‘feet’ to prevent the product from moving when you operate the controls. These ‘feet’ are made from non-migrating rubber material specially formulated to avoid leaving any marks or stains on your furniture. However certain types of oil based furniture polishes, wood preservatives, or cleaning sprays may cause the rubber ‘feet’ to soften, and leave marks or a rubber residue on the furniture.
To prevent any damage to your furniture we strongly recommend that you purchase small self-adhesive felt pads, available at hardware stores and home improvement centers everywhere, and apply these pads to the bottom of the rubber ‘feet’ before you place the product on fine wooden furniture.
DEAR JENSEN® CUSTOMER
Selecting fine audio equipment such as the unit you’ve just purchased is only the start of your musical enjoyment. Now it’s time to consider how you can maximize the fun and excitement your equipment offers. This manufacturer and the Electronic Industries Association’s Consumer Electronics Group want you to get the most out of your equipment by playing it at a safe level. One that lets the sound come through loud and clear without annoying blaring or distortion and, most importantly, without affecting your sensitive hearing. Sound can be deceiving. Over time your hearing “comfort level” adapts to higher volumes of sound. So what sounds “normal” can actually be loud and harmful to your hearing. Guard against this by setting your equipment at a safe level BEFORE your hearing adapts
To establish a safe level:
- Start your volume control at a low setting.
- Slowly increase the sound until you can hear it comfortably and clearly, and without distortion.
Once you have established a comfortable sound level:
- Set the dial and leave it there.
Taking a minute to do this now will help to prevent hearing damage or loss in the future. After all, we want you listening for a lifetime.
We Want You Listening For a Lifetime
 Used wisely, your new sound equipment will provide a lifetime of fun and enjoyment. Since hearing damage from loud noise is often undetectable until it is too late, this manufacturer and the Electronic Industries Association’s Consumer Electronics Group recommend you avoid prolonged exposure to excessive noise.
Customer’s Record:
The serial number of this product is found on its bottom cover. You should note the serial number of this unit in the space provided as a permanent record of your purchase to aid in identification in the event of theft of loss.
Model Number: CD-490 Serial Number: __________________
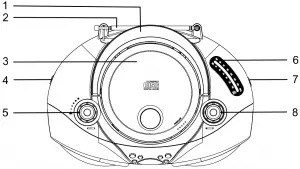
LOCATION OF CONTROLS
TOP VIEW
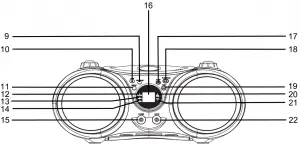
FRONT VIEW
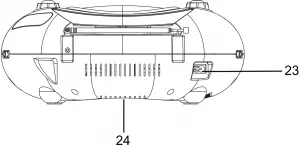
REAR VIEW
1. Carrying Handle
2. FM Antenna
3. CD Door
4. Function Selector
5 Volume Control
6 Dial Scale
7 Band Selector8 Tuning Knob
9 Program Button
10 Stop  Button
11. Repeat Button
12. Program Indicator
13. Repeat Indicator
14. Power Indicator
15. Headphone Jack
16. LED Display
17. Skip Backward  Button
18. Play/Pause  Button
19. Skip Forward  Button
20. Play/Pause Indicator
21. FM Stereo Indicator
22. AUX IN Jack
23. AC Power Socket
24. Battery Compartment
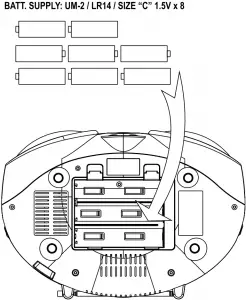
POWER SOURCE
The CD-490 operates on 8 X ‘C’ size (UM-2) batteries (Not included) or from AC120V ~ 60Hz line power.
 A. BATTERY OPERATION
For best performance and longer operating time, we recommend the use of alkaline batteries.
- Remove the Battery Door.
- Following the polarity (+ and -) diagram as shown inside the battery compartment, insert 8 ‘C’ size (UM-2) batteries.
- Replace the Battery Door.
BATTERY WARNING
- Be sure that the batteries are installed correctly. Wrong polarity may damage the unit.
- (a) Do not mix old and new batteries.
(b) Do not mix alkaline, standard (carbon-zinc) or rechargeable (nickel cadmium) batteries. - If the unit is not to be used for an extended period of time, remove the batteries. Old or leaking batteries can cause damage to the unit and may void the warranty.
- Do not dispose of batteries in fire, batteries may explode or leak.
B. AC POWER CONNECTION
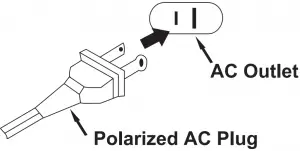
- Insert one end of power cord to the AC Socket on the back of the CD-490
- Insert the power cord to the AC Socket (#23).
- Connect the power cord to AC power source.
- When the unit is operated from AC power source, the internal battery source will automatically be disconnected.
CAUTION:
TO PREVENT ELECTRIC SHOCK, MATCH WIDE BLADE OF PLUG TO WIDE SLOT. FULLY INSERT.
RADIO RECEPTION
- Set the Function Selector (# 4) to “RADIO”.
- Set the Band Selector (# 7) to “AM” or “FM” for the desired radio band.
- Turn the Tuning Knob (# 8) to select the desired radio station.
- Adjust the Volume Control (# 5) to obtain the desired sound level from the Built-in Speakers.
- To turn the Radio off, set the Function Selector (# 4) to the “OFF” position.
TIPS FOR BEST RADIO RECEPTION
- To insure maximum FM tuner reception, the Telescopic Antenna (#2 ) should be fully extended and rotated to obtain the best possible station reception.
- The AM antenna is built into the unit. When tuning in AM reception, be sure to place the unit in a vertical position. To insure best AM reception, try repositioning the unit until the best station reception is obtained.
CD PLAYER OPERATION
Note: This CD player will not only play commercial CDs, but also self compiled CD-R/RW discs. Do not attempt to play CD-ROM, CDI, VCD, DVD or computer CDs.
Notes on CD-R/RW Discs
- Because of non-standardized format definition/production of CD-R/RW, playback quality and performance are not guaranteed.
- Manufacturer is not responsible for the playability of CD-R/RW due to recording conditions such as PC performance, writing software, media ability, etc.
- Do not attach a label or seal to either side of the CD-R/RW disc. It may cause a malfunction.
PLAYING A CD
- Open the CD Door (# 3) by pressing down where the OPEN/CLOSE is indicated on the CD Door (# 3).
- Carefully place an audio CD with its label side upward in the CD compartment and close the CD Door by pressing on the CD Door (# 3) where OPEN/CLOSE is indicated on the CD Door (# 3).
 Set the Function Selector (# 4) to the “CD” position. The POWER Indicator (# 14) will light. The LED Display (# 16) will briefly display flashing “- -”and then the total number of tracks on the CD will appear in the LED Display (# 16) after a few seconds.
 Press the CD Play/Pause
  Button (#18). The Play/Pause Indicator (# 20) will light steadily and the CD will start playing from the first track.
- Adjust the Volume Control (# 5) to obtain the desired sound level from the Built-in Speakers.
- To pause playback, press the CD Play/Pause Button (#18). The Play/Pause Indicator (#20) will flash. To resume playing, press the CD Play/Pause Button (# 18) again.
- You can choose to play your favorite track directly by pressing either the Skip Forward Button (# 19) or Skip Backward Button (# 17). The LED Display (# 18) will indicate the correct track number selected.
- To locate a particular section within a track, press and hold the CD Search Forward Button (# 19) or CD Search Backward Button (# 17) until the section is found. Release the button to continue playing your selection.
- To repeat a particular track, press the CD Repeat Button (#11) until the CD Repeat Indicator (# 13) flashes.
- To repeat the entire CD, press the CD Repeat Button (#11) until the CD Repeat Indicator (#13) light steadily.
- To stop playing, press the CD Stop Button (#10).
- When you wish to turn off the CD Player, set the Function Selector (# 4) to the “OFF” position. The Power Indicator (# 14) will go off.
CD PROGRAMMED PLAY
This function allows the tracks to be played in a programmed sequence.
NOTE: Program can only be set in STOP mode.
 In CD stop mode, press the Program Button (# 9) once. Program No. “01” will appear and blink in the LED Display (#16).
 Press the CD Skip Forward Button (# 19) or CD Skip Backward Button (# 17) to select the song to be programmed. For example track 5 is selected.
- Press the Program Button (#9) again to store selection. The LED Display (#16) will go to “02” and blink to prompt for input.
 Press the CD Skip Forward Button (# 19) or CD Skip Backward button (# 17) to select the next song to be programmed and press the CD Program Button (# 9) to store the second selection.
- You can repeat steps #2 – #4 to program up to 20 tracks. The programmed tracks will be shown in the LED Display (#16) one by one in the programmed sequence after the 20th selection has been stored.
- To check the programmed tracks, press the Program Button (#9) repeatedly until the last Program No. appears and flashes in the Display and then press the Program Button (# 9) once again. The programmed tracks will be displayed one by one in the programmed sequence.
- Press the CD Play/Pause Button (#18) to start playing in the programmed sequence. The Program Indicator (#14) will light steadily. To stop programmed play, press the CD Stop Button (#10).
• After all the programmed tracks have been played the player stops but the program remains in the memory.
• Press the Play/Pause Button (#18) to begin programmed playback again. - Normally all the programmed tracks will be played through once and then stop. However, you can use the Repeat function to repeatedly play a certain track (Repeat 1) or all tracks in the program (Repeat All). You can also tap the CD Skip Forward Button (#19) to go directly to other tracks ahead or use CD Skip Backward Button (#17) to go back to previous track(s) during program play.
- To review/edit the programmed tracks during play, press the CD Stop Button (#10) and then the CD Program Button (#9), “01” will show in the LED DISPLAY (#16) and Program Indicator (#12) will both flash. If you do not want to change any track in the program, press CD Stop Button (#10).
- To edit a programmed track, use the CD Skip Forward Button (#19) or CD Skip Backward Button (#17) to select a new track and press CD Program Button (#9) to confirm. To skip forward, press CD Program Button (#9) until you reach the program number of the track you want to change.
- To cancel program play, press the CD Stop Button (#10) twice while program playback is running or open the CD Door (#3) in stop mode. The Program Indicator (#12) will go off.
AUX IN OPERATION
You can play other music sources (MP3 or other digital audio players) through the speakers of this player by connecting the AUX IN Jack (#22) to your external player’s audio out jack or headphone jack.
- Plug one end of an audio cable (not included) into the AUX IN Jack (#22) and the other end of the cable to the headphone jack of your digital audio player.
- Set the Function Selector (#4) to “AUX IN”.
- Start playing the device you plugged into the AUX IN Jack (#22).
- Slowly adjust both the volume controls of your CD-490 and the external device.
- Turn off your iPod, MP3 player etc. when finish listening.
- Set the Function Selector (#4) to the “OFF” position to turn CD-490 off and unplug the AUX IN Jack.
USING HEADPHONES (NOT INCLUDED)
Inserting the plug of your headphones into the Stereo Headphone Jack (#15) will enable you to
listen to the CD or Radio music in private. When using headphones, the Built-in Speakers will be
disconnected.
READ THIS IMPORTANT INFORMATION BEFORE USING YOUR HEADPHONES
- Avoid extended play at very high volume as it may impair your hearing.
- If you experience ringing in your ears, reduce the volume or shut off your unit.
- Do not use while driving a motorized vehicle. This is dangerous and also illegal in some states.
- Keep the volume at a reasonable level even if your headset is an open-air type designed to allow you to hear outside sounds. Please note excessive high volume may still block outside sounds.
CARE AND MAINTENANCE
- Clean your unit with a damp (never wet) cloth. Solvent or detergent should never be used.
- Avoid leaving your unit in direct sunlight or in hot, humid or dusty places.
- Keep your unit away from heating appliances and sources of electrical noise such as fluorescent lamps or motors.
 If drop-outs or interruptions occur in the music during CD play, or if
the CD fails to play at all, its bottom surface may require cleaning. Before playing, wipe the disc from the center outwards with a good soft cleaning cloth.
TROUBLESHOOTING GUIDE
If you experience difficulties in the use of this music system, please check the following or call 1-800-777-5331 for Customer Service.
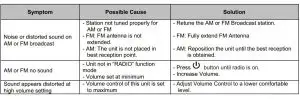
| Symptom | Possible Cause | Solution |
| Noise or sound distorted on AM or FM broadcast | Station not tuned properly for AM or FM. FM: Telescopic antenna is not fully extended. AM: Internal antenna is not positioned correctly |
Fine tune the AM or FM broadcast station. FM: Fully extend the FM Telescopic antenna. AM: Reposition the unit until the best reception is obtained |
| AM or FM no sound | Unit not in Tuner mode, AM or FM band. Volume at minimum | Slide function selector to select AM or FM. Increase Volume |
| CD player will not play | Unit not in CD function mode. CD is installed incorrectly. If the CD is self-compiled, the media used may not be compatible with the player | Select CD function mode. Insert CD with label side up. Use better quality blank media and retest. |
| CD skips while playing | Disc is dirty or scratched | Wipe CD with clean cloth or use another disc. |
| Intermittent sound from CD Player | Dirty or defective disc. Dirty pick-up lens. Player is subject to excessive shock or vibration |
Clean or replace the defective disc. Use a CD-lens cleaning disc to clean the lens. Relocate the player away from shock or vibration |
SPECIFICATIONS
Power Requirement: AC120V 60Hz 14W
Battery (Not included): DC1.5V ’C’ (UM2) x 8
Frequency Range: FM 88-108MHz
AM: 530-1710KHz

At Spectra, environmental and social responsibility is a core value of our business. We are dedicated to continuous implementation of responsible initiatives with an aim to conserve and maintain the environment through responsible recycling.
Please visit us at http://www.spectraintl.com/green.htm for more information on Spectra’s green initiatives or to find a recycler in your area.
90 DAY LIMITED WARRANTY AND SERVICE VALID IN THE U.S.A. ONLY
SPECTRA MERCHANDISING INTERNATIONAL, INC. warrants this unit to be free from defective materials or factory workmanship for a period of 90 days from the date of original customer purchase and provided the product is utilized within the U.S.A. This warranty is not assignable or transferable. Our obligation under this warranty is the repair or replacement of the defective unit or any part thereof, except batteries, when it is returned to the SPECTRA Service Department, accompanied by proof of the date of original consumer purchase, such as a duplicate copy of a sales receipt.
You must pay all shipping charges required to ship the product to SPECTRA for warranty service. If the product is repaired or replaced under warranty, the return charges will be at SPECTRA’s expense. There are no other express warranties other than those stated herein.
This warranty is valid only in accordance with the conditions set forth below:
- The warranty applies to the SPECTRA product only while:
a. It remains in the possession of the original purchaser and proof of purchase is demonstrated.
b. It has not been subjected to accident, misuse, abuse, improper service, usage outside the descriptions and warnings covered within the user manual or non-SPECTRA approved modifications.
c. Claims are made within the warranty period. - This warranty does not cover damage or equipment failure caused by electrical wiring not in compliance with electrical codes or SPECTRA user manual specifications, or failure to provide reasonable care and necessary maintenance as outlined in the user manual.
- Warranty of all SPECTRA products applies to residential use only and is void when products are used in a nonresidential environment or installed outside the United States.
This warranty gives you specific legal rights, and you may also have other rights which vary from state to state. TO OBTAIN SERVICE please remove all batteries (if any) and pack the unit carefully and send it freight prepaid to SPECTRA at the address shown below. IF THE UNIT IS RETURNED WITHIN THE WARRANTY PERIOD shown above, please include a proof of purchase (dated cash register receipt) so that we may establish your eligibility for warranty service and repair of the unit without cost. Also include a note with a description explaining how the unit is defective. A customer service representative may need to contact you regarding the status of your repair, so please include your name, address, phone number and email address to expedite the process.
IF THE UNIT IS OUTSIDE THE W ARRANTY PERIOD, please include a check for $20.00 to cover the cost of repair, handling and return postage. All out of warranty returns must be sent prepaid.
It is recommended that you contact SPECTRA first at 1-800-777-5331 or by email at [email protected] for updated information on the unit requiring service. In some cases the model you have may be discontinued, and SPECTRA reserves the right to offer alternative options for repair or replacement.
SPECTRA MERCHANDISING INTERNATIONAL, INC.
4230 North Normandy Avenue,
Chicago, IL 60634, USA.
1-800-777-5331
To register your product, visit the link on the website below to enter your information. http://www.spectraintl.com/wform.htm
]]>JENSEN FM Digital Dual Alarm Clock Radio

WARNING
TO PREVENT FIRE OR SHOCK HAZARD, DO NOT USE THIS PLUG WITH AN EXTENSION CORD, RECEPTACLE OR OTHER OUTLET UNLESS THE BLADES CAN BE FULLY INSERTED TO PREVENT BLADE EXPOSURE. TO PREVENT FIRE OR SHOCK HAZARD, DO NOT EXPOSE THIS APPLIANCE TO RAIN OR MOISTURE.
The Rating plate is located at the bottom enclosure of the apparatus
IMPORTANT SAFETY INSTRUCTIONS
- Read these instructions.
- Keep these instructions.
- Heed all warnings.
- Follow all instructions.
- Do not use this apparatus near water.
- Clean only with dry cloth.
- Do not block any ventilation openings. Install in accordance with the manufacturer’s instructions.
- Do not install near any heat sources such as radiators, heat registers, stoves, or other apparatus (including amplifiers) that product heat.
- AC adaptor is used as disconnect device and it should remain readily operable during intended use. In order to disconnect the apparatus from the mains completely, the AC adaptor should be disconnected form the mains socket outlet completely.
- Only use attachments/accessories specified by the manufacturer.
- Use only with a cart, stand, tripod, bracket, or table recommended by the manufacturer, or sold with the product. When a cart is used, use caution when moving the cart/apparatus combination to avoid injury from tip-over.
- Unplug this apparatus during lightning storms or when unused for a long periods of time.
- Refer all servicing to qualified service personnel. Servicing is required when the apparatus has been damaged in any way, such as power-supply cord or plug is damaged, liquid has been spilled or objects have fallen into the apparatus, the apparatus has been exposed to rain or moisture, does not operate normally, or has been dropped.
- This appliance shall not be exposed to dripping or splashing water and that no object filled with liquids such as vases shall be placed on the apparatus.
- Do not overload wall outlet. Use only power source as indicated.
- Use replacement part as specified by the manufacturer.
- Upon completion of any service or repairs to this product, ask the service technician to perform safety checks.
- Power Sources – This product should be operated only from the type of power source indicated on the marking label. If you are not sure of the type of power supply to your home, consult your product dealer or local power company. For products intended to operate from battery power, or other sources, refer to the operating instruction.
- Object and Liquid Entry – Never push objects of any kind into this product through openings as they may touch dangerous voltage points or short-out parts that could result in a fire or electric shock. Never spill liquid of any kind on the product.
- Damage Requiring Service – Unplug this product from the wall outlet and refer servicing to qualified service personnel under the following conditions:
- When the power-supply cord or plug is damaged,
- If liquid has been spilled, or objects have fallen into the product,
- If the product has been exposed to rain or water,
- If the product does not operate normally by following the operating instructions. Adjust only those controls that are covered by the operating instructions as an improper adjustment of other controls may result in damage and will often require extensive work by a qualified technician to restore the product to its normal operation.
- If the product has been dropped or damaged in any way, and
- When the product exhibits a distinct change in performance – this indicates a need for service.
- The battery shall not be exposed to excessive heat such as sunshine, fire or the like.
- Minimum distances of 4 inches around the apparatus for sufficient ventilation.
- The ventilation should not be impeded by covering the ventilation openings with items, such as newspapers, table-cloths, curtains, etc.
- No open flame sources, such as lit candles, should be placed on the product.
- The use of apparatus in moderate climates.
- Attention should be drawn to the environmental aspects of battery disposal
SAVE THESE INSTRUCTIONS
COMPLIANCE WITH FCC REGULATIONS
This device complies with Part 15 of the FCC Rules. Operation is subject to the following two conditions:
- This device may not cause harmful interference, and
- This device must accept any interference received, including interference that may cause undesired operation.
This equipment has been tested and found to comply with the limits for a class B digital device, pursuant to Part 15 of the FCC Rules. These limits are designed to provide reasonable protection against harmful interference in a residential installation. This equipment generates uses and can radiate radio frequency energy and, if not installed and used in accordance with the instructions, may cause harmful interference to radio communications. However, there is no guarantee that interference will not occur in a particular installation. If this equipment does cause harmful interference to radio or television reception, which can be determined by turning the equipment off and on, the user is encouraged to try to correct the interference by one or more of the following measures:
- Reorient or relocate the receiving antenna.
- Increase the separation between the equipment and receiver.
- Connect the equipment into an outlet on a circuit different from that to which the receiver is connected.
- Consult the dealer or an experienced radio/TV technician for help.
CAUTION: Changes or modifications not expressly approved by the party responsible for compliance could void the user’s authority to operate the equipment.
PROTECT YOUR FURNITURE!!
This system is equipped with non-skid rubber ‘feet’ to prevent the product from moving when you operate the controls. These ‘feet’ are made from non-migrating rubber material specially formulated to avoid leaving any marks or stains on your furniture. However certain types of oil based furniture polishes, wood preservatives, or cleaning sprays may cause the rubber ‘feet’ to soften, and leave marks or a rubber residue on the furniture. To prevent any damage to your furniture we strongly recommend that you purchase small self-adhesive felt pads, available at hardware stores and home improvement centers everywhere, and apply these pads to the bottom of the rubber ‘feet’ before you place the product on fine wooden furniture.
DEAR JENSEN CUSTOMER
Selecting fine audio equipment such as the unit you’ve just purchased is only the start of your musical enjoyment. Now it’s time to consider how you can maximize the fun and excitement your equipment offers. This manufacturer and the Electronic Industries Association’s Consumer Electronics Group want you to get the most out of your equipment by playing it at a safe level. One that lets the sound come through loud and clear without annoying blaring or distortion and, most importantly, without affecting your sensitive hearing.
Sound can be deceiving. Over time your hearing “comfort level” adapts to higher volumes of sound. So what sounds “normal” can actually be loud and harmful to your hearing. Guard against this by setting your equipment at a safe level BEFORE your
hearing adapts.
To establish a safe level:
- Start your volume control at a low setting.
- Slowly increase the sound until you can hear it comfortably and clearly, and without distortion.
Once you have established a comfortable sound level:
- Set the dial and leave it there. Taking a minute to do this now will help to prevent hearing damage or loss in the future. After all, we want you listening for a lifetime. We Want You Listening for a Lifetime Used wisely, your new sound equipment will provide a lifetime of fun and enjoyment. Since hearing damage from loud noise is often undetectable until it is too late, this manufacturer and the Electronic Industries Association’s Consumer Electronics Group recommend you avoid prolonged exposure to excessive noise.
Customer’s Record:
The serial number of this product is found on its bottom. You should note the serial number of this unit in the space provided as a permanent record of your purchase to aid in identification in the event of theft of loss.
ACCESSORIES
- Clock radio
- Power adaptor
- User manual
LOCATION OF CONTROLS
- ALARM 1 / VOLUME UP BUTTON
- ALARM 2 / VOLUME DOWN BUTTON
- BACK BUTTON
- FORWARD BUTTON
- DIMMER / SLEEP BUTTON
- POWER BUTTON
- LED DISPLAY
- PM INDICATOR
- ALARM 1 INDICATOR (ALARM)
- ALARM 1 INDICATOR (RADIO)
- ALARM 2 INDICATOR (ALARM)
- ALARM 2 INDICATOR (RADIO)
- BATTERY COMPARTMENT
- SPEAKER
- FM ANTENNA
- DC IN JACK
- USB CHARGING PORT
- ALARM OFF / MEM/M+ / SET / YM- D BUTTON
POWER SOURCE (AC ADAPTOR ONLY)
The JCR-229 is powered by an external AC-DC adaptor with an output of DC 5V 1500mA . The unit is also equipped with a battery back-up system for the clock that uses 1 x CR2032 lithium battery (Not included).
POWER CONNECTION
- Connect the cord of the power adaptor to the DC IN JACK (#16) of the JCR-229.
- Plug the power adaptor into a household wall socket. The radio is powered up and in standby mode when you see the display turn on.
Battery Back-up system
- The radio is equipped with a battery back-up system that requires a 3V CR2032 lithium battery (not included). Insert the battery into the BATTERY COMPARTMENT (#13) and make sure the positive and negative (+ or -) sides of the battery are in contact with the corresponding terminals located in the BATTERY COMPARTMENT (#13).
- If a power outage occurs, the radio automatically switches to the battery power supply and keeps the clock and timer settings.
- To open the BATTERY COMPARTMENT (#13), use a screwdriver to loosen the screw on the compartment door.
- When replacing the battery, do not disconnect the power adaptor. Otherwise, all clock and alarm settings will be lost.
WARNING: DO NOT INGEST BATTERY, CHEMICAL BURN HAZARD
This product contains a coin/button cell battery. If the coin/button cell battery is swallowed, it can cause severe internal burns in just 2 hours and can lead to death. Keep new and used batteries away from children. If the battery compartment does not close securely, stop using the product and keep it away from children. If you think batteries might have been swallowed or placed inside any part of the body, seek immediate medical attention.
SETTING THE DATE AND TIME
The display will be flashing when the unit is plugged in for the first time. Tap the SET BUTTON (#18) and the display will stop flashing and go into standby mode.
Note: The JCR-229 has a Date and Time feature, so you will be setting the Year, Month and Date prior to setting the time.
Setting the Date and Time
- In standby mode, Press and hold the SET BUTTON (#18) until the clock display begins to flash.The last 2 digits of the year will be flashing. Repeatedly Tap the BACK BUTTON (#3) / FORWARD BUTTON (#4) to set the current year
- Tap the SET BUTTON (#18) to confirm and move on to setting the Month and Day
- The first 2 digits flashing are the month, and the last 2 digits are the date. Repeatedly Tap the BACK BUTTON (#3) to set the current month (1-12), and the FORWARD BUTTON (#4) to set the current date (1-31).
- Tap the SET BUTTON (#18) to confirm and move on to setting the Hours and Minutes.
- The first 2 digits flashing are the hours, and the last 2 digits are the minutes. Repeatedly tap the BACK BUTTON (#3) to set the hour and the FORWARD BUTTON (#4) to set the minutes.
Note: The PM indicator (#8) in the top left corner of the display will light when the hour is set to PM and will be off when the hour is set to AM. - Tap the SET BUTTON (#18) to confirm the time and the display will stop flashing.
Notes:
• Make sure the hour is set correctly to AM or PM. The PM INDICATOR (#8) is located in the upper left corner of the LED DISPLAY (#7). If the PM INDICATOR (#8) is lit, the displayed time is “PM”. If the PM INDICATOR (#8) is not lit in the LED DISPLAY (#7), the time displayed is “AM”.
• The unit will automatically save the settings and exit the date and time set mode if you do not tap the SET BUTTON (#18) within 5 seconds.
• In standby mode, repeatedly tap the SET BUTTON (#18) to review the Weekday (d1-d7*) – Year (last 2 digits) – Month/day – Time. The unit will automatically switch back to showing the current time after 3 seconds once you stop pressing the SET BUTTON (#18). d1 = Monday, d2 = Tuesday, d3 = Wednesday, d4 = Thursday, d5 = Friday, d6 = Saturday and d7 = Sunday.
ALARM OPERATION
The JCR-229 features a dual alarm clock. Setting the alarms:
- In standby mode, press and hold the ALARM 1 /ALARM 2 BUTTONS (#1/#2) to enter the alarm time setting mode.
- In the alarm time setting mode, press the ALARM 1 /ALARM 2 BUTTONS (#1/#2) repeatedly to cycle through the setting options: Alarm time > Alarm sound source > Alarm frequency
- Setting the alarm time: Tap the BACK BUTTON (#3) repeatedly to set the hour and the tap the FORWARD BUTTON (#4) repeatedly to set the minute.
- Setting the alarm sound source: Tap the BACK BUTTON (#3) or the FORWARD BUTTON (#4) repeatedly to select wake to alarm or wake to radio. The corresponding alarm indicator will turn on according to your selection.
- Setting the alarm frequency: Tap the BACK BUTTON (#3) or the FORWARD BUTTON (#4) repeatedly to select an alarm frequency. (1-5 = Monday to Friday, 1-7 = Everyday, 1-1 = selected day of a week*, 6-7 = Saturday & Sunday)
Note: Once 1-1 is selected, tap the BACK BUTTON (#3) or the FORWARD BUTTON (#4) to select a specific day for the alarm activation (1 to 7 = Monday to Sunday). When all the alarm setting steps are completed, the alarm time will be set and the corresponding alarm indicator (alarm or radio) will light.
Turning the alarms ON or OFF
When the unit is OFF, tap the ALARM 1 /ALARM 2 BUTTONS (#1/#2) to enable or disable the respective alarm. The corresponding ALARM 1 INDICATORS (RADIO #10 or ALARM #9) or ALARM 2 INDICATORS (RADIO #12 or ALARM #11) will light when the alarm is enabled.
Deactivating a sounding alarm
- Press ALARM OFF BUTTON (#18) to switch off the alarm sound.
- When the alarm sounds, the corresponding ALARM 1 INDICATORS (RADIO #10 or ALARM #9) or ALARM 2 INDICATORS (RADIO #12 or ALARM #11) will flash.
Notes: - For setting a one-day alarm, just set the desired alarm time one day before.
- The alarm will sound at the time set the day prior. After having switched off the alarm sound, tap the corresponding alarm button to disable the alarm (the alarm indicator will off).
- To set another one-day alarm, just repeat the above steps.
SNOOZE FUNCTION
When the alarm sounds, tap any button on the top panel to temporarily turn off the alarm and activate the snooze function, the alarm will stop and sound again 9 minutes later. If you tap any button on the top panel again, the alarm will temporarily turn off again and sound again in 9 minutes and so on.
NOTES:
- To temporarily silence an alarm, press any button on the top panel. The alarm will sound again when the snooze period (9 minutes) expires.
- The corresponding Alarm 1 or Alarm 2 indicator (alarm or radio) flashes on the display during the snooze period.
- To cancel the snooze period and the alarm, press the ALARM OFF BUTTON (#18).
RADIO OPERATION
Listening to the radio
1. Press the POWER BUTTON (#6) to turn on the JCR-229.
2. Tap the BACK BUTTON (#3) or the FORWARD BUTTON (#4) to adjust frequency.
3. Press and hold the BACK BUTTON (#3) or the FORWARD BUTTON (#4) to automatically tune to the next available FM station.
4. Tap the VOLUME UP BUTTON (#1) or the VOLUME DOWN BUTTON (#2) to obtain the desired volume level.
5. Press the POWER BUTTON (#6) to turn the radio off.
Notes:
- Use manual tuning to select weaker stations that might be skipped during automatic tuning.
- If the automatic tuning does not stop on the exact frequency of the station, for example, it stops on 88.9 MHz instead of 88.8 MHz, use the manual tuning method to “fine tune” to the exact frequency of the desired station.
- To insure maximum FM tuner reception, unwrap and fully extend the FM ANTENNA (#15) for best FM radio reception
To set / recall the radio presets
- Press the POWER BUTTON (#6) to turn on the JCR-229.
- Tap the BACK BUTTON (#3) or the FORWARD BUTTON (#4) to select the desired station.
- Press and hold the MEM/M+/SET BUTTON (#18) until “P01” (or the next available preset slot shows on the LED DISPLAY (#7).
- Tap the BACK BUTTON (#3) or the FORWARD BUTTON (#4) to select a preset number (P01-P10).
- Press the MEM/M+/SET BUTTON (#18) again to confirm the preset.
- Repeat steps 2 through 5 to preset up to 10 stations.
- To recall one of the preset stations already programmed, tap the MEM/M+/SET BUTTON (#18) repeatedly until you reach the desired preset number/radio station.Alternatively, press the MEM/M+/SET BUTTON (#18) once and then press the BACK BUTTON (#3) or the FORWARD BUTTON (#4) to select a preset station
SLEEP OPERATION
The sleep timer allows the unit turn off automatically after a designated time has elapsed.
- Press the POWER BUTTON (#6) to turn on the JCR-229.
- Press the BACK BUTTON (#3) or the FORWARD BUTTON (#4) to select the desired radio station.
- Press the SLEEP BUTTON (#5) to enter sleep mode.
- Repeatedly tap the SLEEP BUTTON (#5) to select the sleep timer 10 – 20 – 30 – 40 – 50 – 60 – 70 – 80 – 90 – 00 (in minutes). The unit will play for the selected length of time then turn off automatically.
- To cancel the sleep timer, repeatedly tap the SLEEP BUTTON (#5) until the timer shows 00.
- To turn the unit “Off” before the selected length of time, press the POWER BUTTON (#6) at any time.
Note: To check the remaining sleep time, tap the SLEEP BUTTON (#5) once.
CHANGING THE DISPLAY CONTENT
- In standby mode, press the Y-M-D BUTTON (#18) repeatedly to show the day of week, year, month/date and time (d1 = Monday, d2 = Tuesday, d3 = Wednesday, d4 = Thursday, d5 = Friday, d6 = Saturday and d7 = Sunday).
- In radio mode, press the BACK BUTTON (#3) or the FORWARD BUTTON (#4) once to briefly change the display from the clock time to the current radio frequency.
DIMMER OPERATION
In standby mode, press the DIMMER BUTTON (#5) repeatedly to select the brightness settings of the display (High, Low or Off).
USB BATTERY CHARGING
CONNECTING A USB CORD (NOT INCLUDED) FOR CHARGING YOUR CELL PHONE (DC 5V 1000MA)
- Plug the standard end of the USB cable (not included) into the USB CHARGING PORT (#17) located on the back of the JCR-229. Plug the other end of the cable into the device you wish to charge.
- Observe the battery charge indicator on your device to make sure the charging process starts normally.
- Unplug the cable when your device is fully charged.
WARNING!
- The USB port located on the back of the JCR-229 is designed for a smart phone or portable device battery charging only and does not support data transfer or connection to a computer.
- Don’t connect the USB port of the JCR-229 to another USB charger. It may damage both units and void the warranty.
CARE AND MAINTENANCE
- Clean the radio with a soft damp cloth and let all parts dry completely after cleaning.
- Do not use any aggressive cleaners, brushes with nylon bristles, sharp or metallic cleaning utensils, knives, hard scrapers and the like. They could damage the surfaces of the radio.
- Do not immerse the radio in water and do not let water getting into the housing of the radio.
- Unplug the power adaptor and clean the radio before storage.
- Always store the radio in a dry and clean place.
SPECIFICATIONS
Power: AC Adaptor:
Input AC 100-240V ~
Output: DC 5V 1500mA
Backup battery: 1 x 3V CR2032 (not included)
Frequency Range: FM 87.5 – 108 MHz
TROUBLESHOOTING GUIDE
If you experience difficulties in the use of this clock radio, please check the following or call 1-800-777-5331 for Customer Service and support.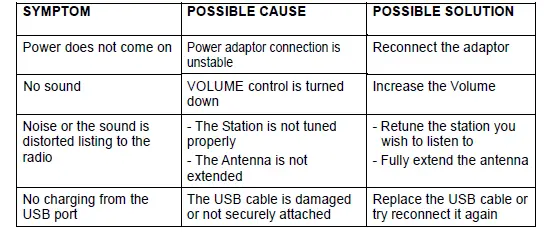
90 DAY LIMITED WARRANTY AND SERVICE VALID IN THE U.S.A. ONLY
SPECTRA MERCHANDISING INTERNATIONAL, INC. warrants this unit to be free from defective materials or factory workmanship for a period of 90 days from the date of original customer purchase and provided the product is utilized within the U.S.A. This warranty is not assignable or transferable. Our obligation under this warranty is the repair or replacement of the defective unit or any part thereof, except batteries, when it is returned to the SPECTRA Service Department, accompanied by proof of the date of original consumer purchase, such as a duplicate copy of a sales receipt. You must pay all shipping charges required to ship the product to SPECTRA for warranty service. If the product is repaired or replaced under warranty, the return charges will be at SPECTRA’s expense. There are no other express warranties other than those stated herein. This warranty is valid only in accordance with the conditions set forth below:
- The warranty applies to the SPECTRA product only while:
- It remains in the possession of the original purchaser and proof of purchase is demonstrated.
- It has not been subjected to accident, misuse, abuse, improper service, usage outside the descriptions and warnings covered within the user manual or non- SPECTRA approved modifications.
- Claims are made within the warranty period.
- This warranty does not cover damage or equipment failure caused by electrical wiring not in compliance with electrical codes or SPECTRA user manual specifications, or failure to provide reasonable care and necessary maintenance as outlined in the user manual.
- Warranty of all SPECTRA products applies to residential use only and is void when products are used in a nonresidential environment or installed outside the United States.
This warranty gives you specific legal rights, and you may also have other rights which vary from state to state. TO OBTAIN SERVICE please remove all batteries (if any) and pack the unit carefully and send it freight prepaid to SPECTRA at the address shown below. IF THE UNIT IS RETURNED WITHIN THE WARRANTY PERIOD shown above, please include a proof of purchase (dated cash register receipt) so that we may establish your eligibility for warranty service and repair of the unit without cost. Also include a note with a description explaining how the unit is defective. A customer service representative may need to contact you regarding the status of your repair, so please include your name, address, phone number and email address to expedite the process.
IF THE UNIT IS OUTSIDE THE WARRANTY PERIOD, please include a check for $12.00 to cover the cost of repair, handling and return postage. All out of warranty returns must be sent prepaid. It is recommended that you contact SPECTRA first at 1-800-777-5331 or by email at [email protected] for updated information on the unit requiring service. In some cases, the model you have may be discontinued, and SPECTRA reserves the right to offer alternative options for repair or replacement. SPECTRA MERCHANDISING INTERNATIONAL, INC. 4230 North Normandy Avenue, Chicago, IL60634, USA. 1-800-777-5331 To register your product, visit the link on the website below to enter your information. http://www.spectraintl.com/wform.htm![]()
User Guide

Exact Comfort Adjustment App
![]() Jensen Exact
Jensen Exact
Comfort Adjustment
 With the Jensen Adjustable Sleep app
Before you start
Download the Jensen Adjustable Sleep app to your iPhone via Appstore, or to your Android via Google Play.
For optimal use of the app, the following app permissions must be allowed, either when you use the app for the first time or in the settings on the phone:
Android: ”Microphone”, ”Position” and ”Storage”
Apple: ”Microphone” and ”Voice Recognition”
The phone must be connected to internet through Wi-Fi or data.
Prepare to connect
- Be sure to enable Bluetooth in your phone and have the Jensen app (Adjustable Sleep) installed.
- Set the motor in pairing mode by disconnecting the power supply for a couple of minutes.
- When you connect power supply again the motor should flash a light and the bed is in pairing mode. The pairing mode will last for a minute or two.

Connect to Bluetooth
- Press the Bluetooth icon in the app.
- Press the connect button, the app will search for any available bed.
- If its unable to find the bed, pull down to refresh and restart the search.
- Repeat step 2 and 3 if you still can’t find your bed.
- When the phone asks to pair with the bed press approve.
- If the app asks you to choose the remote control matching your bed, tap the image resembling the remote control you got with your bed.
Troubleshooting
- If the app is connected and paired correctly but the bed doesn’t move it might need to be reset, you can reset the bed by using the remote control and drive the bed fully down to the bottom with the minus button.
- When the bed reaches the bottom position it will reset itself. If the bed is reset but the app is not working, make sure the app has permissions to use Bluetooth and that the bed has been paired correctly with the phone.

Light under bed
When using the app you can also get access to light under the bed. This is not possible with the remote control.
Touch the light bulb icon to turn the light on and off when you want. The light will automatically turn off after 30 minutes.
![]() Exact
Exact
JENSEN COMFORT ADJUSTMENT
HILDING ANDERS NORWAY AS
Box 19, N-3061 Svelvik, Norge
Tel: +47 33 78 49 50
E-mail: [email protected]
wwwdensen-beds.com
![]() Infb.com/jensenbeds
Infb.com/jensenbeds
![]() pinterest.com/jensenbeds
pinterest.com/jensenbeds
![]() @jensenbeds_official
@jensenbeds_official
![]() Iinkedin.com/company/jensen-beds
Iinkedin.com/company/jensen-beds
Preparation
Please read entire manual before installation.
Before You Start
- Disconnect negative battery terminal. Consult a qualified technician for instructions.
- Avoid installing the unit where it would be subject to high temperatures, such as from direct sunlight, or where it would be subject to dust, dirt or excessive vibration.
Mounting the Head Unit:
Typical DIN mounting
Step 1:
Insert the mounting Sleeve into the installation kit or dashboard.
Step 2:
Bend multiple mounting tabs around the mounting Sleeve unite the mounting Sleeve is secure.
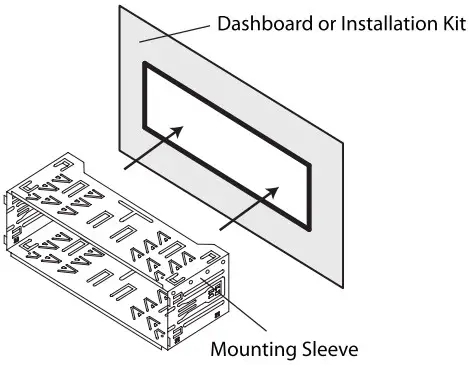
Step 3:
Connect all wiring harnesses and slide the head unite into the mounting Sleeve until it clicks into place.
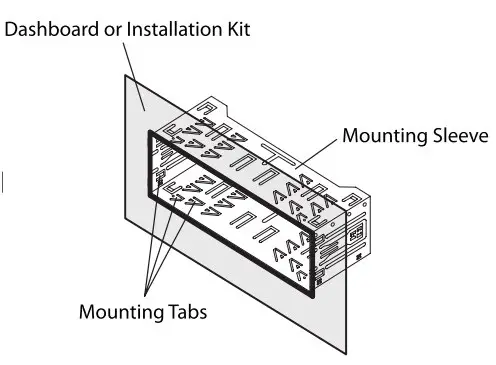
Wiring Diagram
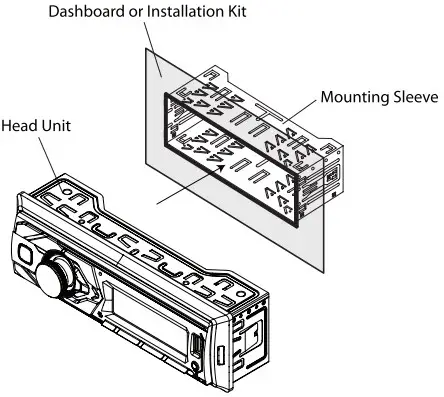
FUSE
When replacing the fuse, make sure new fuse is the correct type and amperage. Using an incorrect fuse could damage the radio. The unit uses one 10 amp AGC fuse located beside the Heat Sink.
Control Locations
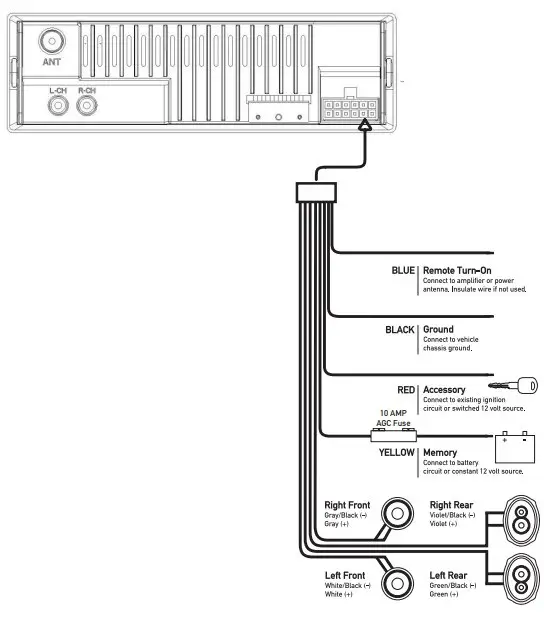
- Power
- Mute
- Voice Control
- Volume Knob
- Bluetooth Talk
- USB Port
- Auxiliary Input
- Reset
- Preset 6 / Folder Up
- Preset 5 / Folder Down
- Preset 4 / Random
- Preset 3 / Repeat
- Preset 2 / Intro
- Preset 1 / Play/Pause
- Mode
- Band/Display
- Tune Up
- Tune Down
General Operation
Power On/Off:
Press the  button to turn the unit on. Press again to turn the unit off.
Changing Modes:
Press MODE to select between Radio, USB, Bluetooth, AUX. Modes of operation are shown in the display.
Volume:
Adjust volume using the volume knob (00-40).
Mute:
Press  to Silence the audio. Press to resume listening at the previously Selected volume.
Auxiliary Inputs:
Insert a 3.5mm cable in the unit’s front AUX port
Reset:
Press the RESET button to reset the unit back to the factory settings if abnormal operation occurs. The reset button is located on the front panel.
Setting the Clock:
With the unit on, long press DISP to display clock time. Press and hold DISP until the hours or minutes begin to flash, then release. Rotate the volume knob to adjust the time. Long press DISP to finish the clock setting.
Display:
Press DISP to toggle display between various displayed information.
Audio / Menu:
Press the volume knob momentarily to select between audio functions.
Press and hold the volume knob for more than two seconds to select between the menu functions.
Rotate the volume knob left/right to adjust or activate the desired function/audio.
AM/FM Tuner Operation
Seek Tuning:
Press TUNE  or TUNE
  to seek to the previous or next strong station.
Manual Tuning:
Press and hold TUNE  or TUNE
  to enter manual tuning mode, then press TUNE
  or TUNE
  momentarily to change radio frequency up or down one step at a time. Press and hold TUNE
  or TUNE
  to advance quickly.
Band:
Press BAND to select between FM1, FM2, FM3, AM1 and AM2 bands. Up to six presets can be programmed for each band, enabling up to 18 FM stations and 12 AM stations to be stored in memory.
Storing Presets:
Up to 18 FM and 12 AM stations can be stored. To store a station, select the desired band and station. Press and hold the desired preset button (1-6) for more than two seconds. When stored, the preset number will appear in the display.
Recalling Presets:
Preset stations can be recalled any time by pressing the corresponding preset button.
Automatically Store:
Press and hold MENU for more than 2 seconds, then press DISP to store 18 FM stations and 12 AM stations automatically.
Preset Scan Stations:
Touch PS to recall each preset station that has been stored in memory for each band.
(Available with the Dual Smart Remote App only)
USB Operation
Playing MP3 Files:
To play MP3 files, insert a USB device containing MP3 files.
Track Select:
Press TUNE to skip to the beginning of the next track. Press TUNE  to skip to the beginning of the previous track.
Fast Forward and Reverse:
Press and hold TUNE  or TUNE
  to fast forward or reverse a track.
Pause:
Press  to temporarily stop USB playback. Press
  again to resume playback.
Folder Access:
Folders can be found by pressing Folder Up or Folder Down. About one second after the folder name is displayed, the first file under the selected folder will be displayed and playback will begin.
Repeat:
Press RPT to toggle between RPT ALL and RPT ONE.
- RPT ALL – Plays all tracks on USB device.
- RPT ONE – Continuously repeats selected track
Random:
Press RDM to play tracks in random order; press again to cancel the RDM function.
Intro:
Press INT to play the first 10 seconds of each track; press again to cancel the INT function.
Bluetooth Operation
Preparation:
Before using a Bluetooth device, it must be paired and connected. Ensure that Bluetooth is activated on your device before beginning the pairing process.
Pairing a New Device:
The head unit broadcasts the pairing signal constantly when no devices are connected. Complete the pairing sequence from your Bluetooth device. Refer to the owner’s manual for your device for more details.
The device name is “JENSEN Media Player”. The Bluetooth passcode is “1234”.
Note: The head unit can be in any mode of operation when pairing is performed.
Streaming Audio Troubleshooting:
The head unit supports A2DP wireless streaming audio from a Bluetooth mobile device directly to your head unit. The following functions can be used to control the music.
- Press
 to skip to the next available audio track.
 - Press to skip to the previous audio track.
- Press
 to toggle between play and pause during playback.
Troubleshooting
| Problem | Cause | Action |
| Unit will not turn on (no power) | Yellow wire not connected or incorrect voltage Red wire not connected or incorrect voltage | Check connections for proper voltage (11~16VDC) |
| Black wire not connected | Check connection to ground | |
| Fuse blown | Replace fuse | |
| Unit has power (but no sound) | Speaker wires not connected | Check connections at speakers |
| One or more speaker wires touching each other or touching chassis ground | Insulate all bare speaker wires from each other and chassis ground | |
| Unit blows fuses | Yellow or red wire touching chassis ground | Check for pinched wire |
| Speaker wires touching chassis ground | Check for pinched wire | |
| Incorrect fuse rating | Use fuse with correct rating | |
| NO FILE appears on display | No playable MP3 files found on the device | Check the device for valid MP3 files |
| NO SUPPORT appears on display | An invalid ID3 tag version is present | Version 1.0 to 2.0 ID3 tags are supported. |
Limited One Year Warranty
This warranty gives you specific legal rights. You may also have other rights which vary from state to state.
Dual Electronics Corp. warrants this product to the original purchaser to be free from defects in material and workmanship for a period of one year from the date of the original purchase.
Dual Electronics Corp. agrees, at our option, during the warranty period, to repair any defect in material or workmanship or to furnish an equal new, renewed or comparable product (whichever is deemed necessary) in exchange without charges, subject to verification of the defect or malfunction and proof of the date of purchase. Subsequent replacement products are warranted for the balance of the original warranty period.
Who is covered? This warranty is extended to the original retail purchaser for products purchased from an authorized Dual dealer and used in the U.S.A.
What is covered? This warranty covers all defects in material and workmanship in this product. The following are not covered: software, installation/removal costs, damage resulting from accident, misuse, abuse, neglect, product modification, improper installation, incorrect line voltage, unauthorized repair or failure to follow instructions supplied with the product, or damage occurring during return shipment of the product. Specific license conditions and copyright notices for the software can be found via www.dualav.com.
What to do?
- Before you call for service, check the troubleshooting guide in your owner’s manual. A slight adjustment of any custom controls may save you a service call.
- If you require service during the warranty period, you must carefully pack the product (preferably in the original package) and ship it by prepaid transportation with a copy of the original receipt from the retailer to an authorized service center.
- Please describe your problem in writing and include your name, a return UPS shipping address (P.O. Box not acceptable), and a daytime phone number with your shipment.
- For more information and for the location of the nearest authorized service center please contact us by one of the following methods:
- Call us toll-free at 1-866-382-5476
- E-mail us at [email protected]
Exclusion of Certain Damages: This warranty is exclusive and in lieu of any and all other warranties, expressed or implied, including without limitation the implied warranties of merchantability and fitness for a particular purpose and any obligation, liability, right, claim or remedy in contract or tort, whether or not arising from the company’s negligence, actual or imputed. No person or representative is authorized to assume for the company any other liability in connection with the sale of this product. In no event shall the company be liable for indirect, incidental or consequential damages.
FCC Compliance
This device complies with Part 15 of the FCC Rules. Operation is subject to the following two conditions:
- this device may not cause harmful interference, and
- this device must accept any interference received, including interference that may cause undesired operation.
Warning: Changes or modifications to this unit not expressly approved by the party responsible for compliance could void the user’s authority to operate the equipment.
Note: This equipment has been tested and found to comply with the limits for a Class B digital device, pursuant to Part 15 of the FCC Rules. These limits are designed to provide reasonable protection against harmful interference in a residential installation. This equipment generates, uses and can radiate radio frequency energy and, if not installed and used in accordance with the instructions, may cause harmful interference to radio communications. However, there is no guarantee that interference will not occur in a particular installation. If this equipment does cause harmful interference to radio or television reception, which can be determined by turning the equipment off and on, the user is encouraged to try to correct the interference by one or more of the following measures:
- Reorient or relocate the receiving antenna.
- Increase the separation between the equipment and receiver.
- Connect the equipment into an outlet on a circuit different from that to which the receiver is connected.
- Consult the dealer or an experienced radio/TV technician for help.
Specifications
FM Tuner:
Tuning range: 87.5MHz-107.9MHz
Usable sensitivity: 8.5dBf
50dB quieting sensitivity: 10dBf
Stereo separation @ 1kHz: >30dB
Frequency response: 30Hz-13kHz
AM Tuner:
Tuning range: 530kHz-1710kHz
Usable sensitivity: <42dBu
Frequency response: 30Hz-2.2kHz
General:
Speaker output impedance: 4~8 ohms
Line output voltage: 2 Volts RMS
Dimensions: 7″ x 2″ x 2″ (178 x 50 x 50 mm)
Design and specifications subject to change without notice
CEA-2006 Power Standard Specifications (reference: 14.4VDC +/- 0.2V, 20Hz~20kHz)
 Power Output: 14 Watts RMS x 4 channels at 4 ohms and < 1% THD+N Signal to Noise Ratio: 75dBA (reference: 1 watt into 4 ohms)
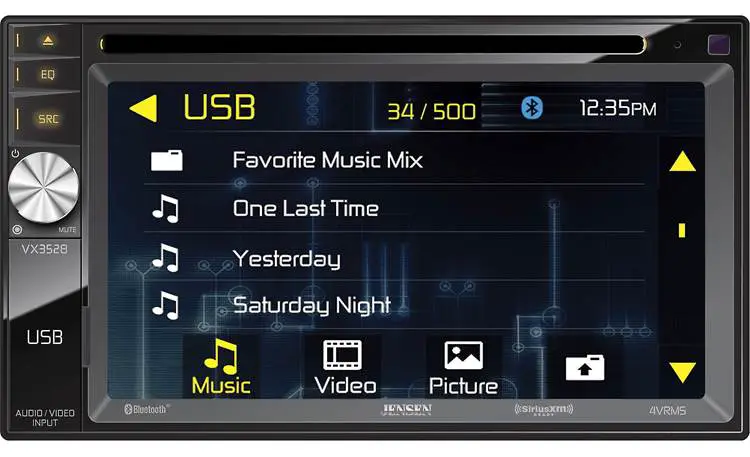
Model: VX3528
Installation
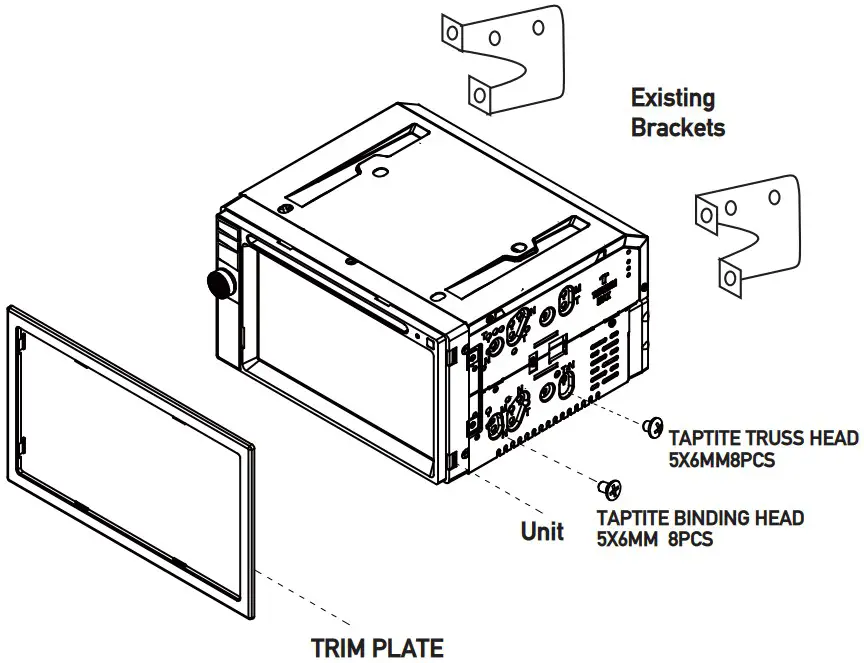
Note:
Using the existing brackets or the brackets supplied with the installation kit, mount the brackets to the sides of the head unit with the screws supplied with the head unit.
Copyright and Trademark Notes
This product incorporates copyright protection technology that is protected by method claims of certain U.S. patents and other intellectual property rights owned by Macrovision Corporation and other rights owners.
Use of this copyright protection technology must be authorized by Macrovision Corporation, and is intended for home and other limited viewing uses only unless otherwise authorized by Macrovision Corporation.
Reverse engineering or disassembly is prohibited. DVD Logo is a trademark of DVD Format/Logo Licensing Corporation registered in the U.S., Japan and other countries. iPod and iPhone are trademarks of Apple Inc., registered in the U.S. and other countries. Dual Electronics Corporation is not affiliated with Apple, Inc.
Sirius, XM and all related marks and logos are trademarks of Sirius XM Radio, Inc. All rights reserved.
The Bluetooth® word mark and logos are owned by the Bluetooth SIG, Inc. Other trademarks and trade names are those of their respective owners.
Wiring Diagram – Inputs/Outputs

Control Locations
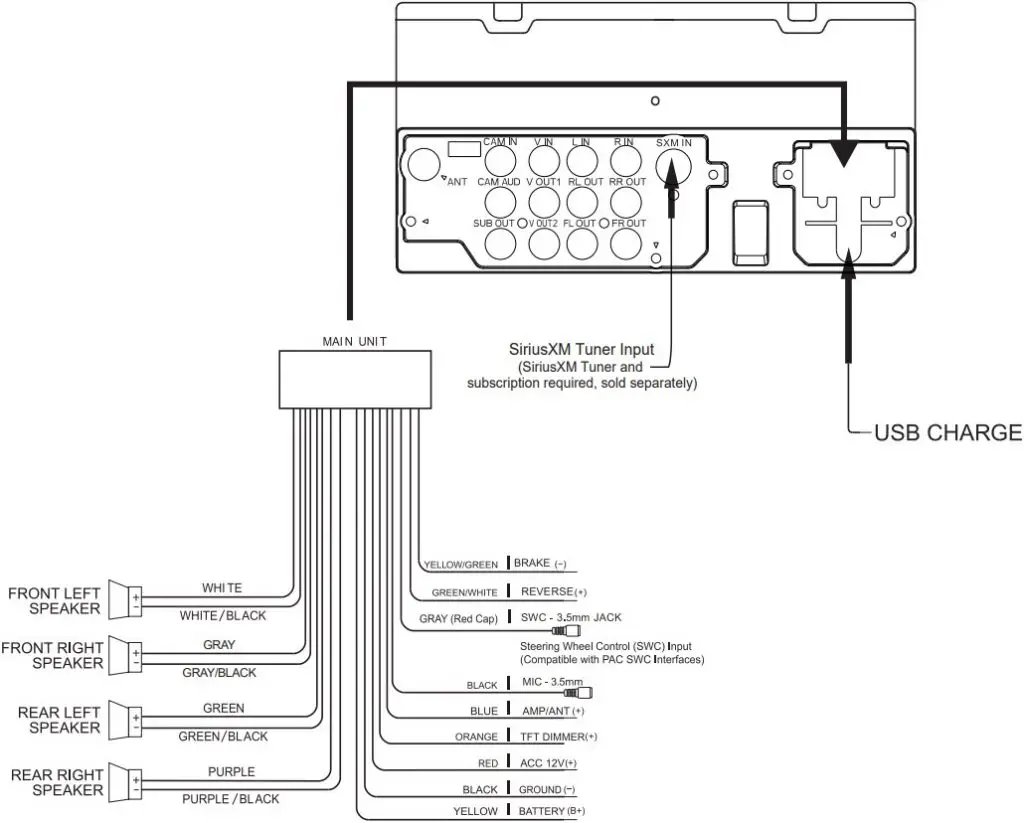
- Eject
- EQ
- Source
- Power / Volume / Mute
- Additional Inputs (USB, AV)
- IR Remote Sensor
- Reset Button
- Disc Slot
Remote Control

- Power/Mute
- Eject
- Play/Pause
- Tune / Track Down
- Previous
- EQ
- Repeat
- Display
- Audio
- Source
- Subtitle
- Menu
- Random
- Volume Down
- PTT
- Volume Up
- Tune/Trak Up
- Band
- AS/PS
- Next
Main Menu
From any operational mode, press the arrow icon in the top left corner to access the Main Menu screen. Use the right and left arrows in the bottom corners to navigate between the two Main Menu screen, and touch any icon to directly access the corresponding mode.
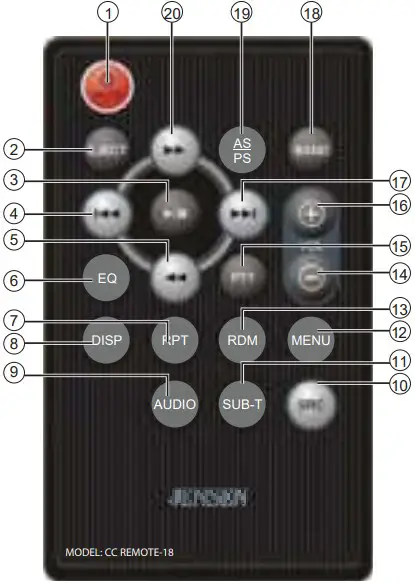
General Operation
From the Main Menu screen, press Settings in the bottom right corners to access the Setup Menu and select from the following categories: General, Time, Display, Panel, Disc, Radio, Bluetooth, SXM, Illumination, Wallpaper and Version.

Radio Operation
Select the Radio icon from the Main Menu screen.

- Main Menu
- Current Mode Indicator
- Current Frequency
- Source
- Band
- Seek Tune Down
- Auto Store
- Manually Tune Down
- Seek Tune Up
- Manually Tune Up
- Additional Options
- Preset Stations
DVD Operation
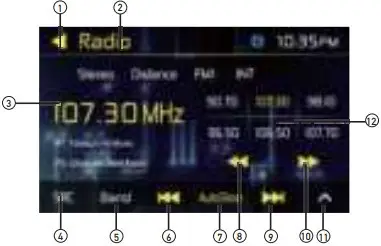
- Main Menu
- Current Mode Indicator
- Elapsed Time
- Source
- Stop
- Previous Chapter
- Play/Pause
- Next Chapter
- Additional Options
- Repeat
- Random
- Direct Entry
- Menu
- Angle
CD / USB Operations
Insert a disc (label facing up) and playback will begin automatically. To switch to CD mode from another mode of operation when a disc is already inserted, select the Disc icon from the Main Menu screen.

- Main Menu
- Current Mode Indicator
- File Information
- Source
- List
- Previous Track
- Elapsed Time
- Play/Pause
- Next Track
- Additional Options
iPod Operation
The unit will automatically switch to iPod mode when an iPod or iPhone is plugged into the front panel USB connector. iPod mode can be accessed from the Main Menu by touching the iPod icon(only available when an iPod or iPhone is connected).
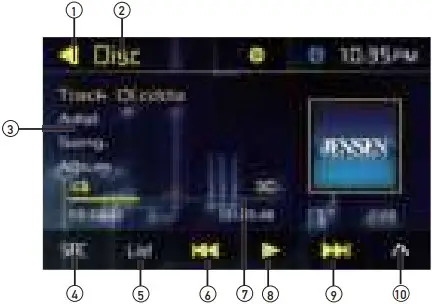
- Main Menu
- Current Mode Indicator
- File Information
- Source
- List
- Elapsed Time
- Previous File
- Play/Pause
- Next File
- Additional Options
- Repeat
- Random
- Direct Entry
- EQ
Pandora Operation
Once you install the Pandora the Pandora app from the Apple Itunes store on to your iPod or iPhone , and connect it to the unit via USB cable, Pandora music will begin to play.

- Main Menu
- Current Mode Indicator
- File Information
- Source
- List
- Elapsed Time
- Previous File
- Play/Pause
- Next File
- Additional Options
- Thumb Up
- Thumb Down
- Bookmark Track
- Bookmark Artist
SiriusXM Operation
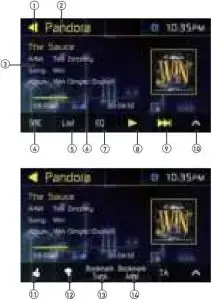
- Main Menu
- Current Mode Indicator
- File Information
- Source
- List
- Previous
- Channel/Category
- Next
- Additional Options
- Band
- Preset Memory
- Channel Scan
- Channel Lock/Unlock
- Direct Channel Access
Bluetooth Operation
Bluetooth Microphone
The external microphone should be mounted in a high clear area, pointed directly at the driver seat.
Pairing and Connecting
Before using Bluetooth functions, you must pair your mobile phone to the VX3528 unit. The device name is “Jensen”. The Bluetooth passcode “5309”. To ensure the best reception for pairing and re-connection, please make sure the mobile phone battery is fully charged before you begin.
Dialing a Number
Press  to display keypad and dial a number.
Making and Ending a Call
Press  to connect a call, and press
  to end a call.
Transferring Audio
Press  to transfer audio between the head unit and mobile phone.
Streaming Audio
Press  to play or pause the music.
Press  to skip to the previous track.
Press  to advance to the next track.

One-Year Limited Warranty
This warranty gives you specific legal rights. You may also have other rights which vary from state to state.
Dual Electronics Corp. warrants this product to the original purchaser to be free from defects in material and workmanship for a period of one year from the date of the original purchase. Dual Electronics Corp. agrees, at our option, during the warranty period, to repair any defect in material or workmanship or to furnish an equal new, renewed or comparable product (whichever is deemed necessary) in exchange without charges, subject to verification of the defect or malfunction and proof of the date of purchase. Subsequent replacement products are warranted for the balance of the original warranty period. Who is covered? This warranty is extended to the original retail purchaser for products purchased from an authorized Dual dealer and used in the U.S.A.
What is covered? This warranty covers all defects in material and workmanship in this product. The following are not covered: software, installation/removal costs, damage resulting from accident, misuse, abuse, neglect, product modification, improper installation, incorrect line voltage, unauthorized repair or failure to follow instructions supplied with the product, or damage occurring during return shipment of the product.Specific license conditions and copyright notices for the software can be found via www.dualav.com.
What to do?
- Before you call for service, check the troubleshooting guide in your owner’s manual. A slight adjustment of any custom controls may save you a service call.
- If you require service during the warranty period, you must carefully pack the product (preferably in the original package) and ship it by prepaid transportation with a copy of the original receipt from the retailer to an authorized service center.
- Please describe your problem in writing and include your name, a return UPS shipping address (P.O. Box not acceptable), and a daytime phone number with your shipment.
- For more information and for the location of the nearest authorized service center please contact us by one of the following methods:
- Call us toll-free at 1-888-921-4088
(Monday-Friday, 9:00 a.m. to 5:00 p.m. EST)
E-mail us at [email protected]
Exclusion of Certain Damages: This warranty is exclusive and in lieu of any and all other warranties, expressed or implied, including without limitation the implied warranties of merchantability and fitness for a particular purpose and any obligation, liability, right, claim or remedy in contract or tort, whether or not arising from the company’s negligence, actual or imputed. No person or representative is authorized to assume for the company any other liability in connection with the sale of this product. In no event shall the company be liable for indirect, incidental or consequential damages.
- Call us toll-free at 1-888-921-4088
FCC Compliance
This device complies with Part 15 of the FCC Rules. Operation is subject to the following two conditions:
- this device may not cause harmful interference, and
- this device must accept any interference received, including interference that may cause undesired operation.
Warning: Changes or modifications to this unit not expressly approved by the party responsible for compliance could void the user’s authority to operate the equipment.
Note: This equipment has been tested and found to comply with the limits for a Class B digital device, pursuant to Part 15 of the FCC Rules. These limits are designed to provide reasonable protection against harmful interference in a residential installation. This equipment generates, uses and can radiate radio frequency energy and, if not installed and used in accordance with the instructions, may cause harmful interference to radio communications.
However, there is no guarantee that interference will not occur in a particular installation. If this equipment does cause harmful interference to radio or television reception, which can be determined by turning the equipment off and on, the user is encouraged to try to correct the interference by one or more of the following measures:
- Reorient or relocate the receiving antenna.
- Increase the separation between the equipment and receiver.
- Connect the equipment into an outlet on a circuit different from that to which the receiver is connected.
- Consult the dealer or an experienced radio/TV technician for help.
Multimedia DVD Receiver with Bluetooth and SiriusXM-Ready featuring 6.2” Touch Screen Display.
This Quick Start Guide gives you the basics to start using your VX3528. Please visit www.jensenmobile.com to download a complete owner’s manual or call customer service at 1-888-921-4088 (Monday-Friday, 9AM-5PM EST).
JENSEN
Customer Service Toll Free: 1-888-921-4088
Safety Notes:
The DVD video display of the in-dash unit will not operate while the vehicle is moving. this is a safety feature to prevent driver distraction. In-dash DVD video functions will only operate when vehicle is in prak and the parking brake is engaged. It is illegal in most states for the driver to view video while the vehicle is in motion.
Visit: www.jensenmobile.com
©2018 Dual Electronics Corp.
NSC0418-V01
Printed in China

Before you get started
Thank you for purchasing the J12W 12″ subwoofer. Although JENSEN has attempted to make sure all of the information contained within this manual is accurate, please be aware that any part of it is subject to change without notice.
 The following instructions should be used a general guideline only. If you are unsure about performing any of the procedures listed below, please consult a professional car audio installation center.
Before installation, please follow these guidelines:
- Be sure to carefully read and understand the instructions before attempting to install this product.
- For safety, disconnect the negative terminal from the battery prior to beginning the installation.
- Use the highest quality connectors for a reliable installation and to minimize signal or power loss.
- Use caution before you drill or cut! Be careful not to cut or drill into gas tanks, fuel lines, brake or hydraulic lines, vacuum lines or electrical wiring when working on any vehicle.
- Never run speaker wires underneath your vehicle. Running speaker wires inside the vehicle provides the best protection from exhaust heat and environmental elements.
- Avoid running wires over, near, or through sharp edged surfaces.
Use rubber grommets to protect any wires routed through metal. - When running the speaker cable from the amplifier, avoid running it near sources of high current (i.e. wiring harnesses, battery cables).
Installation Guidelines
To achieve the best possible sound from this subwoofer enclosure, Dual recommends acquiring the services of a professional car audio installation center.
If you feel confident in your ability to install this product without the assistance of a professional, please read this section thoroughly. We have provided a number of placement recommendations and installation tips to assist you. Keep in mind these are provided as a guideline and you may find that other placements specific to your vehicle may provide better results.
- Make sure all moving parts and factory electrical wires are out of the way and will no interfere after installation.
- Ensure the wire is of sufficient length to avoid pulling or stretching. This is even more important if the wires will be run under or through the factory interior.
- Use electrical tape and wire ties to ensure all wires are properly secured.
- Avoid installing speakers or electronics where they can be subject to moisture.
- Ensure the speaker wires are connected using correct polarity.
The positive polarity is marked by a (+) sign. Incorrectly connected subwoofers will result in limited bass output. - Speaker wire should be isolated from the vehicle’s electrical system to avoid noise being picked up by the amplifiers.
- We recommend using 14 gauge or larger sized speaker wire to ensure your subwoofer receives the full power output of your amplifier.
- Remember to listen responsibly and respect your ears. Being exposed to sounds over 125dB for even short periods of time can create permanent hearing loss!
Specifications
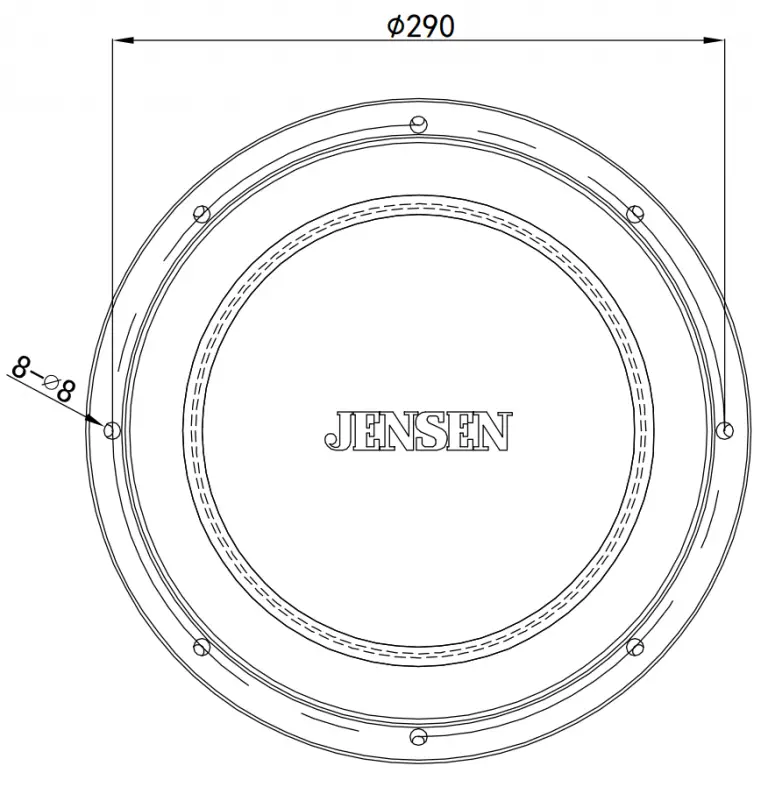
| Sensitivity | 89dB 1W/1M |
| Frequency Response | 27Hz-350Hz |
| Impedance | 4Ω |
| Peak Power | 1200 watts |
| RMS | 300 watts |
| Fs | 30Hz |
| Vas | 92.354 L |
| Qms | 11.701 |
| Qes | 0.595 |
| Qts | 0.566 |
| Terminals | 205/205 |
| Cutout Size | 11″ |
| Magnet Weight | 40oz |
Enclosure Guidelines
To work properly, the walls of your enclosure must be free from flexing during high sound pressure generated by your subwoofer(s).
For best performance, always use MDF (Medium Density Fiberboard) or Baltic Birch Plywood to build your enclosure. We highly recommend that your wood be at least 3/4″ in thickness. The enclosure should be sealed internally with silicon or glue and secured with screws every 4″.
Assemble the box before cutting the subwoofer hole(s). If the box will be mounted in a vehicle, it should be fastened securely using metal “L” shaped brackets.
To build an enclosure, calculations will need to be made using the information found on the following 3 pages.
Remember:
- Use 3/4″ MDF or Baltic Birch Plywood
- Use wood glue in joints
- Seal joints with silicon caulking
- Use screws every 2 to 4 inches
Sealed Enclosure
Good Bass Performance
Mini-Enclosure
(Vb) Box Volume=.75 Cu. Ft.
Dimensions: 14″ W x 14″ H x 11.5″ D
Better Bass Performance
Small Enclosure
(Vb) Box Volume=1.00 Cu. Ft.
Dimensions: 15″ W x 14″ H x 13″ D
Best Bass Performance
Medium Enclosure
(Vb) Box Volume=1.25 Cu. Ft.
Example
Dimensions: 17″ W x 15″ H x 13″ D
Note: All specifications are subject to change without notice
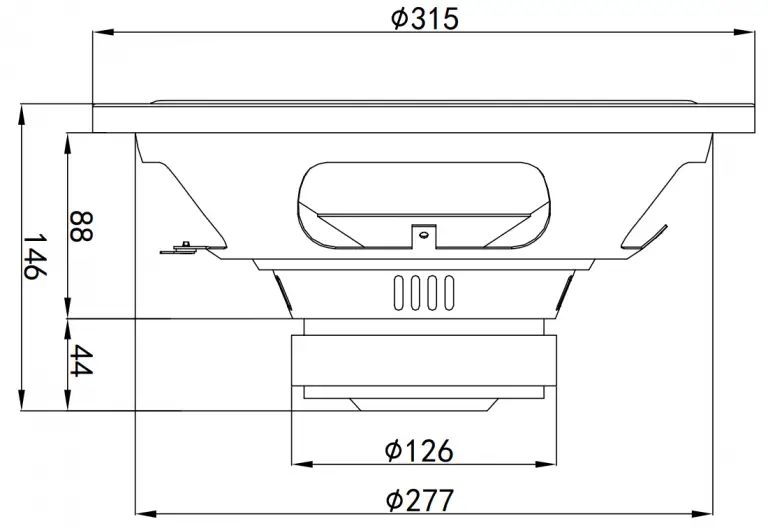
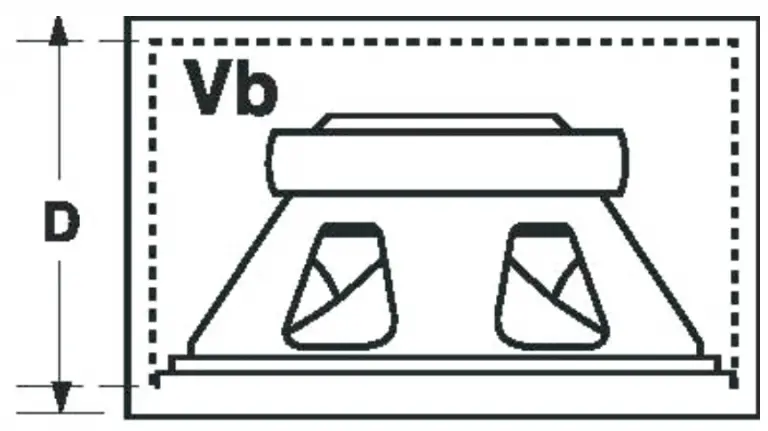
Attention/Notice: Dimensions are external
Vented Enclosure
Good Bass Performance
Mini-Enclosure
(Vb) Box Volume=1 Cu. Ft.
Dimensions: 14.25″ W x 17″ H x 12″ D
(P) Port=3″ ID x 9.7″ Long
Better Bass Performance
Small Enclosure
(Vb) Box Volume=1.25 Cu. Ft.
Dimensions: 14.50″ W x 17″ H x 14″ D
(P) Port=3″ ID x 10.25″ Long
Best Bass Performance
Medium Enclosure
(Vb) Box Volume=1.5 Cu. Ft.
Dimensions: 14″ W x 20.25″ H x 14″ D
(P) Port=3″ ID x 11.75″ Long
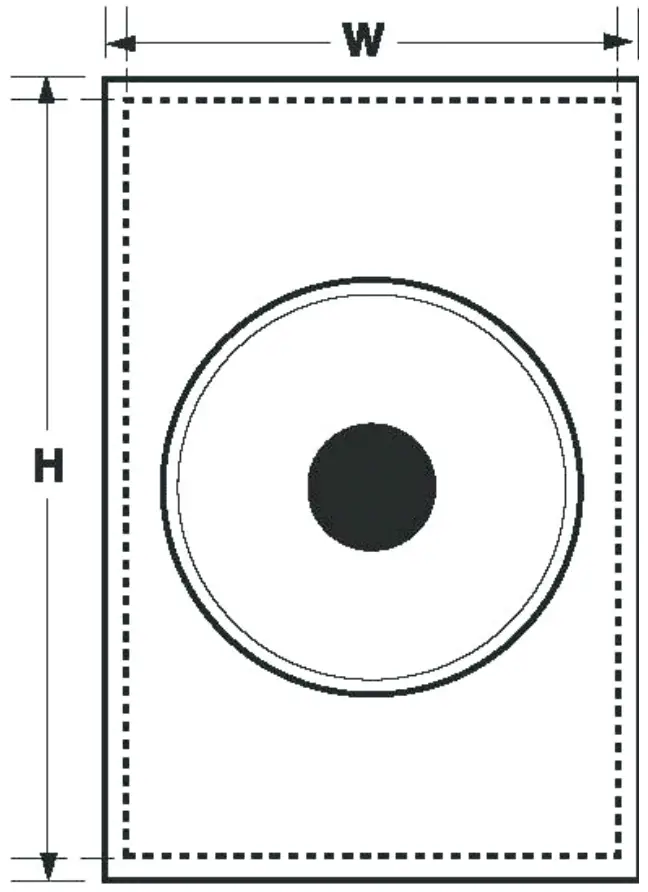
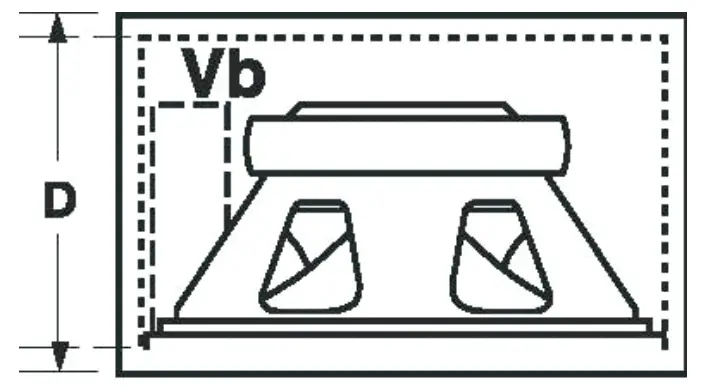
Attention/Notice: Dimensions are external
Bandpass Enclosure
Good Bass Performance/Mini-Enclosure
(Vf) Box Volume .84 Cu. Ft.
(Vr) Box Volume .47 Cu. Ft.
(P) Port 4″ ID x 1.0″ Long
(Sb) Speaker baffle location/outside front: 9.25″
Dimensions: 15″ W x 16.5″ H x 15″ D
Better Bass Performance/Small Enclosure
(Vf) Box Volume .84 Cu. Ft.
(Vr) Box Volume .69 Cu. Ft.
(P) Port 4″ ID x 2.625″ Long
(Sb) Speaker baffle location/outside front: 9.25″
Dimensions: 15″ W x 18.5″ H x 15″ D
Best Bass Performance/Medium Enclosure
(Vf) Box Volume .84 Cu. Ft.
(Vr) Box Volume .91 Cu. Ft.
(P) Port 4″ ID x 4.25″ Long
(Sb) Speaker baffle location/outside front: 9.25″
Dimensions: 15″ W x 20.75″ H x 15″ D
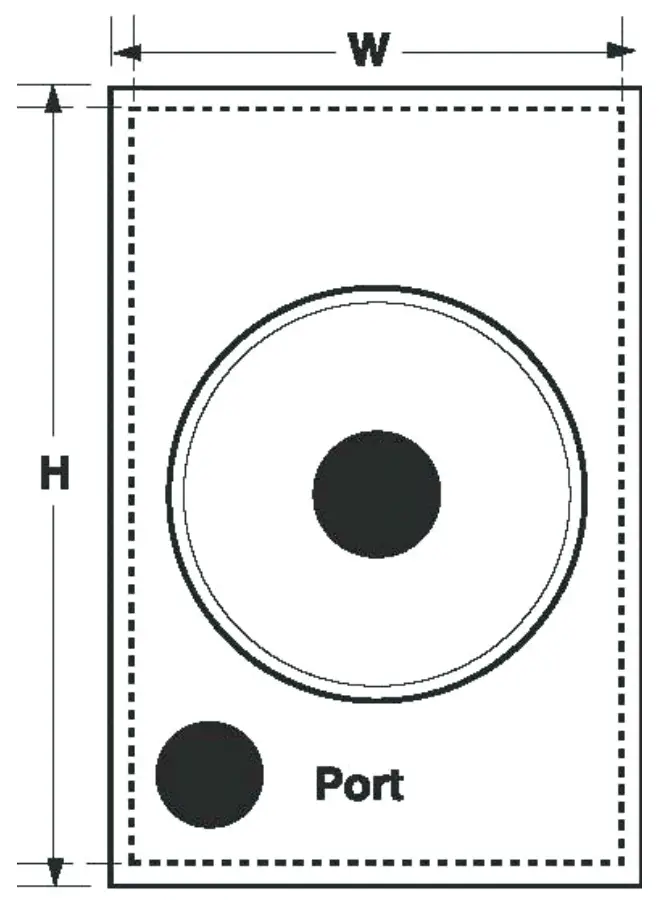
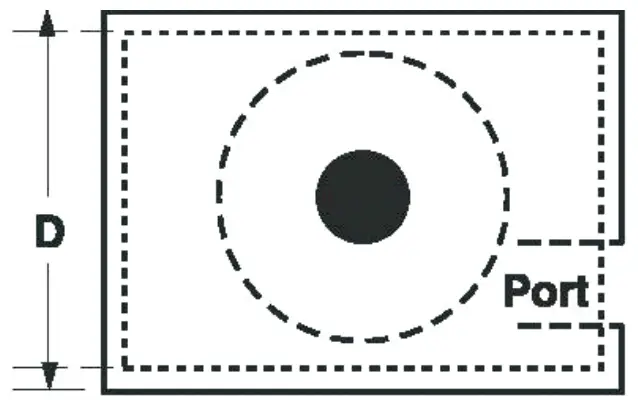
Attention/Notice: Dimensions are external
Limited One Year Warranty
This warranty gives you specific legal rights. You may also have other rights which vary from state to state.
Namsung America Inc. warrants this product to the original purchaser to be free from defects in material and workmanship for a period of one year from the date of the original purchase.
Namsung America Inc. agrees, at our option, during the warranty period, to repair any defect in material or workmanship or to furnish an equal new, renewed or comparable product (whichever is deemed necessary) in exchange without charges, subject to verification of the defect or malfunction and proof of the date of purchase.
Subsequent replacement products are warranted for the balance of the original warranty period.
Who is covered?
This warranty is extended to the original retail purchaser for products purchased from an authorized Dual dealer and used in the U.S.A.
What is covered?
This warranty covers all defects in material and workmanship in this product. The following are not covered: software, installation/removal costs, damage resulting from accident, misuse, abuse, neglect, product modification, improper installation, incorrect line voltage, unauthorized repair or failure to follow instructions supplied with the product, or damage occurring during return shipment of the product.
Specific license conditions and copyright notices for the software can be found via www.jensenmobile.com
What to do?
- Before you call for service, check the troubleshooting guide in your owner’s manual. A slight adjustment of any custom controls may save you a service call.
- If you require service during the warranty period, you must carefully pack the product (preferably in the original package) and ship it by prepaid transportation with a copy of the original receipt from the retailer to an authorized service center.
- Please describe your problem in writing and include your name, a return UPS shipping address (P.O. Box not acceptable), and a daytime phone number with your shipment.
- For more information and for the location of the nearest authorized service center please contact us by one of the following methods:
- Call us toll-free at 1-888-921-4088
- E-mail us at [email protected]
Exclusion of Certain Damages: This warranty is exclusive and in lieu of any and all other warranties, expressed or implied, including without limitation the implied warranties of merchantability and fitness for a particular purpose and any obligation, liability, right, claim or remedy in contract or tort, whether or not arising from the company’s negligence, actual or imputed. No person or representative is authorized to assume for the company any other liability in connection with the sale of this product. In no event shall the company be liable for indirect, incidental or consequential damages.
Customer Support
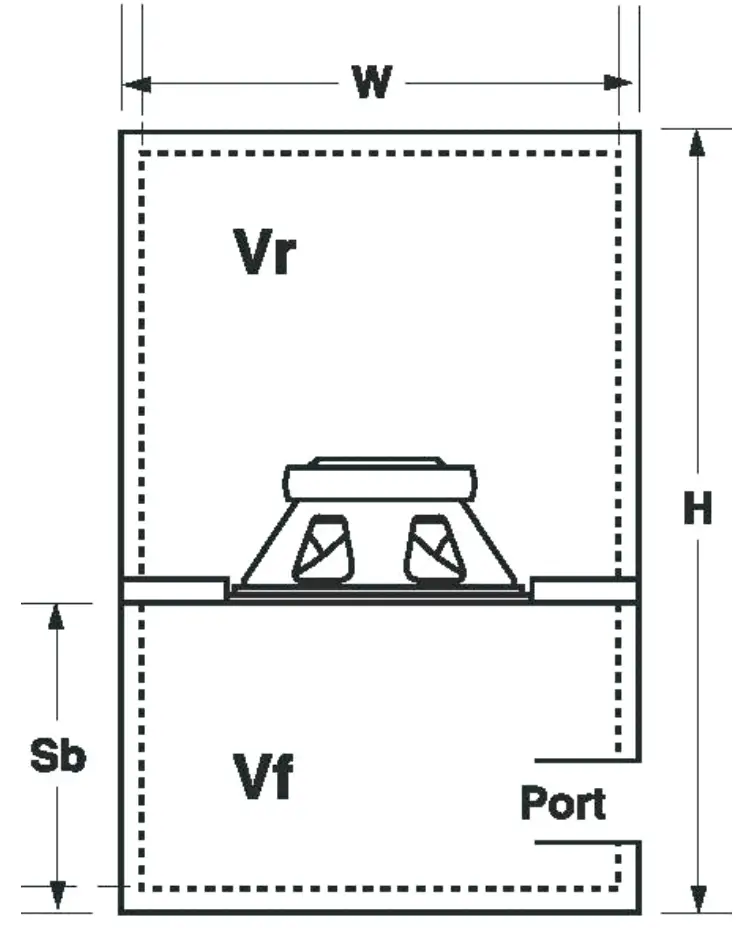 1-888-921-4088
(Monday-Friday, 9AM-5PM EST)
Visit https://www.jensenmobile.com
Designed and Engineered in USA
All rights reserved. No part of this publication may be reproduced, distributed, or transmitted in any form or by any means, including photocopying, recording, or other electronic or mechanical methods, without the prior written permission of NAMSUNG AMERICA INC

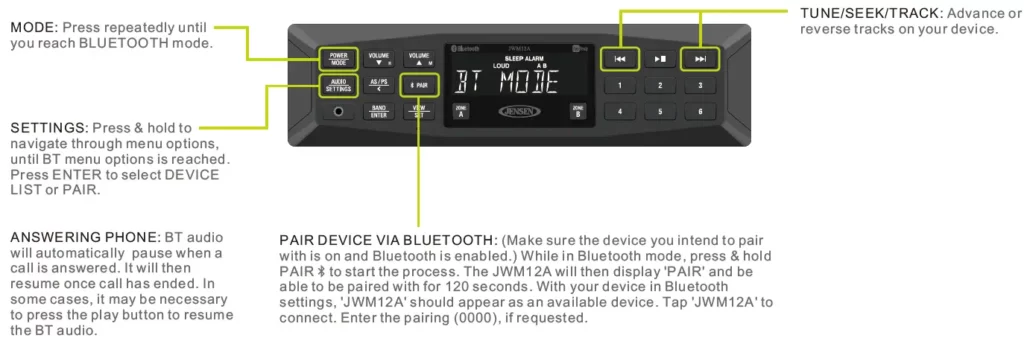
JENSEN Slimline AM FM Bluetooth

Functions
POWER/MODE: Push to turn on.
Press to cycle through sources. Press & hold to turn OFF and enter standby mode.
AUDIO/SETTINGS: Press to bring up AUDIO ADJUSTMENT options: BASS, TREBLE, & BALANCE (left to right).
Press & hold to bring up SETTING MENU options: BLUETOOTH (ON/OFF), BEEP, ADJUST LCD BRIGHTNESS, PRESET VOLUME and RESET. Press VOLUME UP/DOWN buttons will adjust each SETTING option except ‘RESET’.
BACK: Press to exit any menu.
RESET: Use a ball point pen or thin metal object to press the reser buttons.
VOLUME: Press the VOLUME UP (M) button to increase volume or Press the VOLUME DOWN (H) button to decrease volume.
ZONES OUTPUT: Press any zone button (ZONE A and ZONE B) to control corresponding speaker output from the radio, SPK A, SPK B will appear on the display.
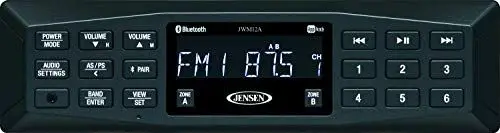
App download and operation:
Control app controls all of the primary functions of the JWM12A directly from your phone or tablet. It can be found by searching for After downloading and installing app, pair your device to the JWM12A as instructed in “Bluetooth Operation” section in this guide. Once your device is paired, open the app and use as instructed. (Device must be paired to JWM12A before opening and using app).
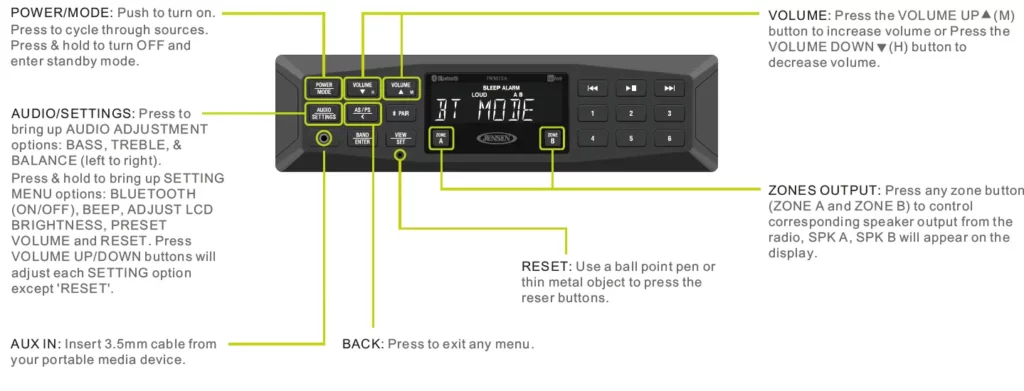
VOLUME: Press the VOLUME UP (M)button to increase volume or Press the VOLUME DOWN (H) button to decrease volume.
MODE: Press repeatedly until you reach TUNER mode displayed as a frequency.
AS/PS: Press to SCAN through currently stored presets. Press & hole to STORE strongest broadcast stations in your area.
BAND: Press to select between two AM BANDS (AM1, AM2) & three FM BANDS(FM1,FM2,FM3).
STATION STORE PRESETS:
Press & hole to store current station. Press once to recall stored channel.
NOTE: Up to 18 FM & 12 AM channels can be stored.
MUTE: Press to MUTE volume. Press again to resume volume.
TUNE/SEEK/TRACK: Press >> button to tune frequency higher. Press << button to tune frequency lower. Press and hold to scan to next strongest station.

MODE: Press repeatedly until you reach BLUETOOTH mode.
SETTINGS: Press & hold to navigate through menu options, until BT menu options is reached. Press ENTER to select DEVICE LIST or PAIR.
ANSWERING PHONE: BT audio will automatically pause when a call is answered. It will then resume once call has ended. In some cases, it may be necessary to press the play button to resume the BT audio.
PAIR DEVICE VIA BLUETOOTH: (Make sure the device you intend to pair with is on and Bluetooth is enabled.) While in Bluetooth mode, press & hold PAIR to start the process. The JWM12A will then display ‘PAIR’ and be able to be paired with for 120 seconds. With your device in Bluetooth settings, ‘JWM12A’ should appear as an available device. Tap ‘JWM12A’ to connect. Enter the pairing (0000), if requested.
TUNE/SEEK/TRACK: Advance or reverse tracks on your device.
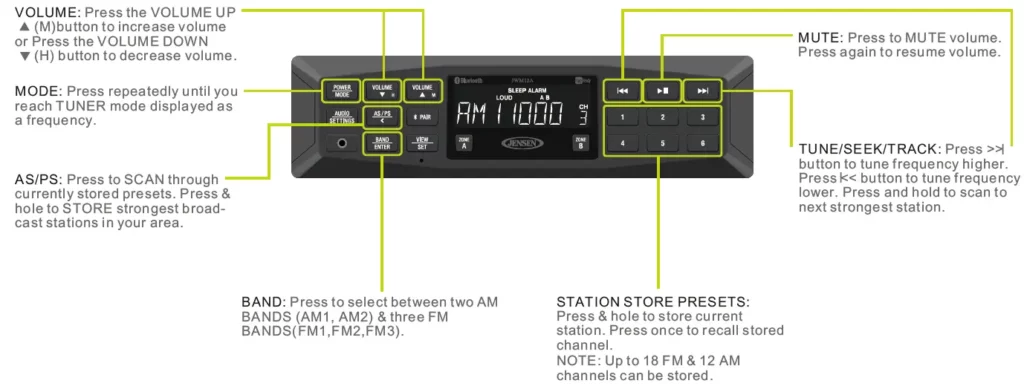
ALARM ON/OFF: Press & hold AUDIO/SETTING button to navigate through menu options, until Alarm ON/OFF menu option is reached. Press VOLUME UP/DOWN to turn ALARM ON or OFF.
ALARM SET: Press & hold AUDIO/SETTING button to navigate through menu options, until ALARM SET mode is reached. In Sleep mode menu, Press the VOLUME UP/DOWN to set Sleep timer: 15, 30, 45, 60, 0 minutes.
VIEW/SET: Press to access CLOCK VIEW mode. Press & hold to set CLOCK time.
TIME SET: Press VOLUME DOWN ▼ (H) to adjust Hours and VOLUME UP ▲ (M) to adjust minutes when setting either CLOCK or ALARM time.
For owner’s manual, please visit http://www.asaelectronics.com/manuals-guides.
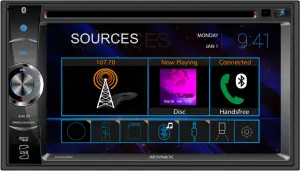
CDR462
DVD Multimedia Receiver with Bluetooth featuring a 6.2″ digital touch screen TFT
![]()
This Quick Start Guide gives you the basics to start using your CDR462
Please visit https://www.jensenmobile.com/usermanuals.html to download a complete owner’s manual, or call our friendly customer service at
1-888-921-4088
(Monday-Friday, 9AM-5PM EST)
Installation
Tools Required


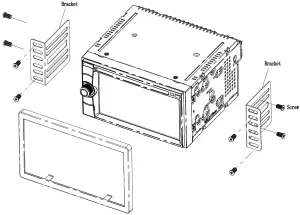 Typical front load ISO-DIN method
Wiring Diagram – Input / Outputs
Copyright and Trademark Notes
SD Logo is a trademark of SD-3C, LLC.
The Bluetooth® word mark and logos are registered trademarks owned by Bluetooth SIG Inc. All trademarks and trade names are property of their respective owners.
All rights reserved. No part of this publication may be reproduced, distributed, or transmitted in any form or by any means, including photocopying, recording, or other electronic or mechanical methods, without the prior written permission of Namsung America Inc.
©2020 Namsung America Inc.
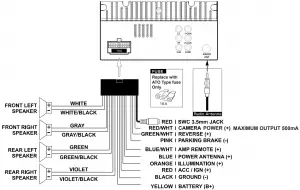 Control Panel

1. BT Microphone 6. microSD Media Port
2. Push to Talk Assistant 7. USB Media Port + 1A Charging
3. Source Mode 8. Reset – Behind Door
4. Volume Rotary – press to MUTE 9. DISC Eject
5. Power Indicator
Safety Notice
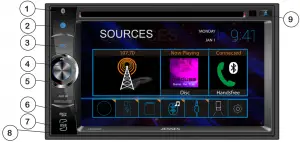
Video / movie playback will not operate while the vehicle is moving. This is a safety feature to prevent driver distraction. In-dash video / movie functions will only operate when vehicle is in Park and the parking brake is engaged. It is illegal in most jurisdictions for the driver to view video while the vehicle is in motion.
Watching video while driving is against Federal, State and Local laws
Drive safely, know and obey traffic rules. Watching this screen and making selections while driving can lead to a serious accident. Check surroundings for safety while camera images are displayed.
Do not use features of this product while driving if it cannot be operated safely and legally in your location. Before operation of smartphone apps accessible from this device, read safety instructions in your Owner’s Manual. When using navigation apps stay alert to observe real world conditions. By pressing “AGREE” button, you have confirmed that you have fully read, understand and accepted these usage terms and conditions.
First Time Setup Wizard
The first time the unit is powered ON, the SETUP WIZARD will help guide you through the main radio system settings and connect to your Bluetooth Device.

![]()

![]()
Select Language Set the Clock
![]()
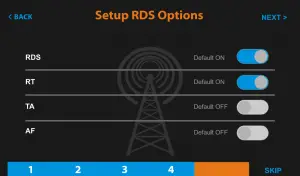
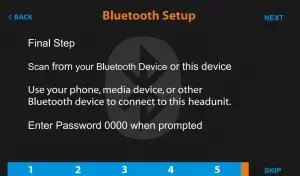
![]()
Set Radio Region Set RDS Functions
![]()

![]()

![]()
Pair Bluetooth Enter PASSCODE
Select JENSEN BT then enter PASSCODE 0000 on your Device
 Tips The SETUP WIZARD can be skipped at any time.
To rerun the SETUP WIZARD again, long press RESET button with a paperclip for 3 seconds, or go to ABOUT section in SETUP, select SETUP WIZARD
 Main Menu
Press the Top Left Source icon to enter Main Source Menu
In the Menu mode, press the desired icon to enter the desired mode:
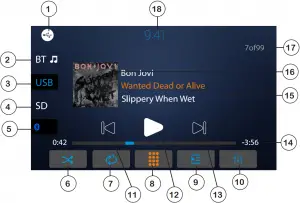
- Radio Direct
- Media Player Last Source
- BT Handsfree Direct
- DISC Direct
- USB Direct
- microSD Card Direct
- BT Streaming Direct
- AUX In Direct
- Rear/Front Camera
- Main System Setup Menu
- Press Clock to Standby Monitor
– Press screen anywhere to return
– Audio will still continue to play while in Standby mode
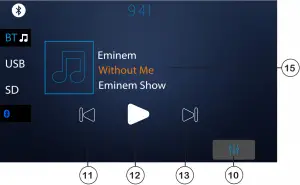 Tuner Operation
Select the Tuner icon from the Main Menu screen
 1. Current Mode Icon / Main Source Menu
2. Tuner Presets – Long press to set
3. AM Direct
4. FM Direct
5. Bluetooth Handsfree Direct
6. Stereo / Mono
7. AS/PS – Auto Scan / Preset Scan
8. Direct Station Entry
9. Station Search
10. EQ Settings
11. Previous Station – Long Press Manual Tune
12. Station Number
 13. Next Station – Long Press Manual Tune
14. Station RDS RT Information Title
15. RDS Information Alert
16. Quick BAND Select – FM 1-2-3 | AM 1-2
17. Radio RDS Quick Setup Menu
18. Monitor Standby
19. Loc/DX
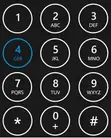 Media Player Operation
USB/microSD Media operation will work the same way

1. Current Mode / Main Source Menu
2. BT Streaming Music Direct
3. USB Media Direct
4. SD Media Direct
5. Bluetooth Handsfree Direct
6. Shuffle On / Off
7. Repeat 1 | All | Off
8. Direct File Entry
9. Drive File List
10. EQ Settings
11. Track Down
12. Play/Pause
13. Track Up
14. Track Time / Status Bar

15. File Playing – ID3 Metadata
16. File Playing – Album Art
17. Track Counter of Folder
18. Press Clock to Standby Monitor
BT Streaming Media operation
10. EQ Settings
11. Track Down
12. Play/Pause
13. Track Up
 Handfree Operation
Bluetooth Microphone – The microphone is built-in to the receiver.
- To ensure the best conversation quality/performance, stay within 3 feet (1 meter) of the unit’s microphone when talking.
Pairing and Connecting 
Before using Bluetooth functions, you must pair your mobile phone to the CDR462. The device name is “JENSEN BT”. The Bluetooth passcode “0000”. To ensure the best reception for pairing and re-connection, please make sure the mobile phone battery is fully charged before you begin.
- Try to perform pairing within a few minutes of the mobile phone being turned on.
- Once the unit has been paired with the mobile phone, the unit’s model number, “JENSEN BT”, will be displayed on the mobile phone.
- To achieve the best performance, always keep the mobile phone within 10 feet (3 meters) of the unit.
- Always keep a clear path between the mobile phone and the unit. Never place a metal object or any other obstacle between the mobile phone and the unit.
- Some mobile phones may have a “Power Saving Mode” option. PLEASE DO NOT use the power saving mode with the CDR462.
- Before accepting or making a call, make sure your mobile phone’s “Bluetooth function” is turned on.

Dialing a Number
Press keypad to dial a number.
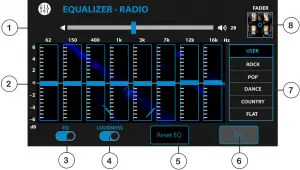
Making a Call
Dial number, press to connect a call
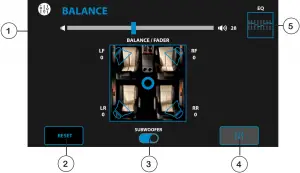 1. Current Mode / Main Source Menu
2. Dial Keypad
3. Back to Last Source
4. Bluetooth Keypad
5. Contacts – must be manually synced
6. Keypad Backspace
7. Recent Calls
8. Device Manager
9. Call Button
10. Number
11. Press Clock to Standby Monitor
– Press screen anywhere to return
– Audio will still continue to play while in Standby

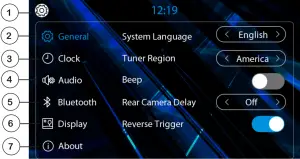
Transferring Audio
Press to transfer call audio between the headunit and mobile phone
1. Hang Up
2. Call Transfer
3. MIC Mute
4. Return to Keypad
![]() EQ Operation
EQ Operation
Press EQ icon in each Source to select EQ settings
Source Tone Memory – Each Source will remember their EQ settings

1. Main System Volume
2. EQ Settings
3. EQ On/Off
4. Loudness On/Off
5. EQ Reset
6. Return to Source
7. EQ Presets / Custom
8. Balance / Fader
Subwoofer Frequency, Fader and Balance controls do not have Source Tone Memory.
 1. Main Volume
2. Fader Reset
3. Subwoofer ON/OFF
4. Return to Source
5. Return to EQ Controls
 System Settings
Press GEAR icon in MAIN Source Menu

1. Back to Main Menu
2. General Setup
3. Clock Settings
4. System Audio
5. Bluetooth
6. Display – RGB LED, TFT
7. About – Software Version
One-Year Limited Warranty
This warranty gives you specific legal rights. You may also have other rights which vary from state to state. Namsung America Inc. warrants this product to the original purchaser to be free from defects in material and workmanship for a period of one year from the date of the original purchase.
Namsung America Inc. agrees, at our option, during the warranty period, to repair any defect in material or workmanship or to furnish an equal new, renewed or comparable product (whichever is deemed necessary) in exchange without charges, subject to verification of the defect or malfunction and proof of the date of purchase. Subsequent replacement products are warranted for the balance of the original warranty period.
Who is covered?
This warranty is extended to the original retail purchaser for products purchased from an authorized Jensen dealer and used in the U.S.A.
What is covered?
This warranty covers all defects in material and workmanship in this product. The following are not covered: software, installation/removal costs, damage resulting from accident, misuse, abuse, neglect, product modification, improper installation, incorrect line voltage, unauthorized repair or failure to follow instructions supplied with the product, or damage occurring during return shipment of the product. Specific license conditions and copyright notices for the software can be found via www.jensenmobile.com.
What to do?
1. Before you call for service, check the troubleshooting guide in your owner’s manual. A slight adjustment of any custom controls may save you a service call.
2. If you require service during the warranty period, you must carefully pack the product (preferably in the original package) and ship it by prepaid transportation with a copy of the original receipt from the retailer to an authorized service center.
3. Please describe your problem in writing and include your name, a return UPS shipping address (P.O. Box not acceptable), and a daytime phone number with your shipment.
4. For more information and for the location of the nearest authorized service center please contact us by one of the following methods:
- Call us toll-free at 1-888-921-4088 (Monday-Friday, 9:00 a.m. to 5:00 p.m. EST).
- E-mail us at [email protected]
Exclusion of Certain Damages: This warranty is exclusive and in lieu of any and all other warranties, expressed or implied, including without limitation the implied warranties of merchantability and fitness for a particular purpose and any obligation, liability, right, claim or remedy in contract or tort, whether or not arising from the company’s negligence, actual or imputed. No person or representative is authorized to assume for the company any other liability in connection with the sale of this product. In no event shall the company be liable for indirect, incidental or consequential damages.
FCC Compliance
This device complies with Part 15 of the FCC Rules. Operation is subject to the following two conditions:
(1) this device may not cause harmful interference, and
(2) this device must accept any interference received, including interference that may cause undesired operation.
Warning: Changes or modifications to this unit not expressly approved by the party responsible for compliance could void the user’s authority to operate the equipment.
Note: This equipment has been tested and found to comply with the limits for a Class B digital device, pursuant to Part 15 of the FCC Rules. These limits are designed to provide reasonable protection against harmful interference in a residential installation. This equipment generates, uses and can radiate radio frequency energy and, if not installed and used in accordance with the instructions, may cause harmful interference to radio communications.
However, there is no guarantee that interference will not occur in a particular installation. If this equipment does cause harmful interference to radio or television reception, which can be determined by turning the equipment off and on, the user is encouraged to try to correct the interference by one or more of the following measures:
- Reorient or relocate the receiving antenna.
- Increase the separation between the equipment and receiver.
- Connect the equipment into an outlet on a circuit different from that to which the receiver is connected.
- Consult the dealer or an experienced radio/TV technician for help.
Exclusion of Certain Damages: This warranty is exclusive and in lieu of any and all other warranties, expressed or implied, including without limitation the implied warranties of merchantability and fitness for a particular purpose and any obligation, liability, right, claim or remedy in contract or tort, whether or not arising from the company’s negligence, actual or imputed. No person or representative is authorized to assume for the company any other liability in connection with the sale of this product. In no event shall the company be liable for indirect, incidental or consequential damages.
www.jensenmobile.com
©2020 Namsung America Inc.
NSA1219-v01
Printed in China