John Lewis Linton Wall Light

Thank you for purchasing this Linton wall light. Please read the instructions carefully before use to ensure safe and satisfactory operation of this product.
Warnings!
This is a Class II product and must NOT be earthed. For your safety, this product must be installed in accordance with local Building Regulations. If in any doubt, or where required by the law, consult a competent person who is registered with an electrical self-declaration scheme. Further information is available online or from your Local Authority. To prevent electric shock switch off at mains supply before installing or maintaining this fitting. Ensure other persons cannot restore the electrical supply without your knowledge. This light fitting should be connected to a 5 amp fused circuit. This product is suitable for installation on surfaces with normal flammability e.g. wood, plasterboard, masonry. It is not suitable for use on highly flammable surfaces (e.g. polystyrene, textiles). Ensure the correct fixings are used for the installation surface. For your safety, always switch off the supply before cleaning or adjusting. This product is not dimmable.
Parts list
Assembly
Refer to assembly drawing opposite. Carefully unpack the carton, making sure all the parts are present before assembly.
Step 1
Before removing the existing fitting, carefully note the position of each set of wires.
Step 2
Remove the 2 hex screws at the top of the product using the supplied hex key to detach the wall back. Keep screws safe for refitting later.
Step 3
See Figure 1. Using the wall back as a template, mark the position of the fixing holes. Make sure the wall back is correctly oriented as per the UP arrow. Drill holes and fit supplied wall plugs (suitable for masonry only – for other surfaces use appropriate fixings). Take care not to damage any concealed wiring or pipes. Fix the wall back to the wall using the supplied screws.
Step 4
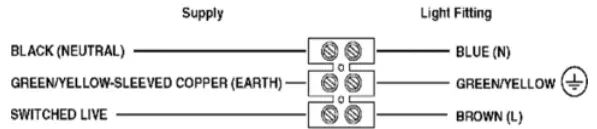
Having identified the household wiring from your existing light fitting, connect to the connection block inside the product as shown. When completed, ensure that there are no bare or loose strands of wire exposed.
Check that
You have correctly identified the house wires. The connections are tight. No loose strands have been left out of the connection block.
Step 5
See Figure 2. Refit the shade to the wall back.
Step 6
Replace fuse or circuit breaker and switch on. Your light is now ready for use.
Care instructions
We recommend cleaning with a soft dry cloth. Do not use abrasive materials as these will damage the finish.
Recommended bulb
2 x 4.5 Watt energy efficient LED
This product contains a non-replaceable LED Module. If the LEDs become damaged then the whole product must be replaced. When moving or cleaning, always switch off at the mains and allow the module to cool before handling.
Specifications
- Max. power: 2×4.5W
- Voltage: 240V, 50Hz
- IP rating: IP20
- Weight: 0.54kg
- 835 lumen output
- Colour temperature: Warm white (3000K)
This symbol indicates that this product should not be treated as normal household waste and it should be recycled. John Lewis do not operate instore take back, but as members of the Distributor Trade Back scheme have funded the development and upgrade of recycling facilities across the UK. Please take it to your nearest collection facility or for further details contact your local council or visit www.recycle-more.co.uk
We have taken great care to ensure that this product reaches you in perfect condition. However, should any parts be damaged or missing please contact the Product Helpline on (01202) 690945.
John Lewis Partnership
171 Victoria Street
London SW1E 5NN
johnlewis.com
Made in China![]()
Thank you for purchasing this White/Wood Four Bar Spot.
Please read the instructions carefully before use to ensure safe and satisfactory operation of this product.
Please keep these instructions for future reference.
Warnings!
This product is Class I and must be earthed.
This fitting should be fitted in accordance with IEE Regulations and the Building Regulations. If in any doubt, or where required by law, consult a competent person who is registered with an electrical self-certification scheme. Further information is available online or from your Local Authority. To prevent electric shock, switch off at the mains supply before installing or maintaining this fitting. Ensure other persons cannot restore the electricity supply without your knowledge.
If you are in any doubt, please consult a qualified electrician.
If replacing an existing fitting, make a note of the connections.
Always use the correct type and power bulb. Never exceed the power stated. When changing a bulb, always switch off at the mains and allow the old bulb to cool down before handling. Dispose of used bulbs carefully.
The flexible cable on this luminaire, if damaged, shall only be replaced by the manufacturer or his service agent or a similar qualified person.
Caution! The bulb and surrounding parts can become hot during use.
Important!
Care instructions
We recommend cleaning with a soft dry cloth.
Do not use abrasive materials as these will damage the finish.
Indoors use only.
Replace bulbs from John Lewis or established brand of the same type and compatibility.

Assembly
Ensure the mains electricity supply switched off at the fuse board.
Step 1
Ensure that the bracket (supplied) is fixed to a wooden joist, or use a suitable fixing to the ceiling which will support the weight of the fitting.
Step 2
Connect cables to terminals as shown below.

Check all wires are tight in the terminal block and no loose strands are left out.
Cover with insulating tape (not included).
Push up ceiling cup and secure with grub screws provided.
Step 3
Fit shade over lamp holder and secure with shade ring by tool provided.
Step 4
Attach the correct type and wattage bulb to the lamp holder (bulb not included).
The maximum power indicated must not be exceeded.
Switch on the electricity supply at the fuse board.
Recommended bulb
4 x 3-6 W SES energy efficient LED Candle bulb
or
4 x 18W SES eco halogen candle bulb
Bulbs not included
Specifications
Max. power: 25W
Voltage: 220-240V~50/60Hz
IP rating: 20
Weight: 5kg
Please retain these instructions for future reference.
This symbol 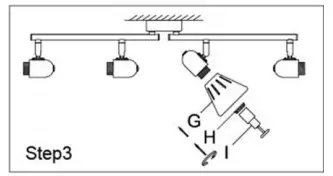 indicates that this product should not be treated as normal household waste and it should be recycled. John Lewis do not operate instore take back, but as members of the Distributor Take Back scheme have funded the development and upgrade of recycling facilities across the UK. Please take it to your nearest collection facility or for further details contact your local council or visit www.recycle-more.co.uk.
We have taken great care to ensure that this product reaches you in perfect condition. However, should any parts be damaged or missing please e-mail [email protected]
Trouble Shooting
Why is the light not working when switched on?
Check your power supply is switched on
Turn off light and check that the bulb is inserted correctly
Check the bulb is still in working order.
John Lewis Partnership
171 Victoria Street
London SW1E 5NN
johnlewis.com
Made in China
]]>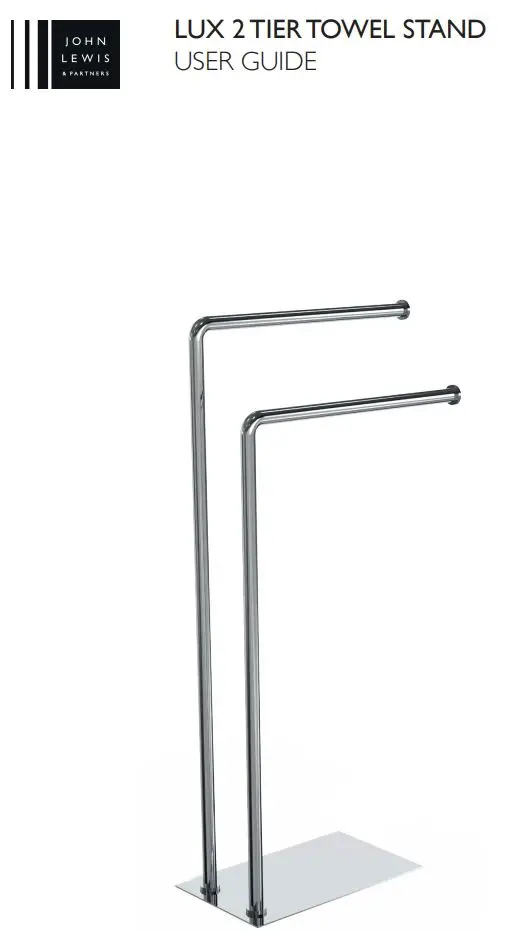
Getting started
Please read the instructions carefully before use to ensure safe and satisfactory use of this Towel Stand. We recommend that this product should ONLY be installed by persons competent in DIY. Please read the instructions carefully before use to ensure safe and satisfactory use of this Towel Stand.
Necessary Tools
Please check the pack contents before attempting to assemble this product. A full checklist of components is given in this leaflet.
Important Safety Information
The product should only be used on level ground. Keep small parts out of reach of children. Ensure the product is fully assembled as illustrate before use.
Do’s
Check the pack and make sure you have all the parts listed. Check all screws or bolts are tightened and inspect regularly.
Don’ts
Do not over tighten screws or bolts. Do not stand on the product. Do not use power tools to construct.
Fittings and parts checklist
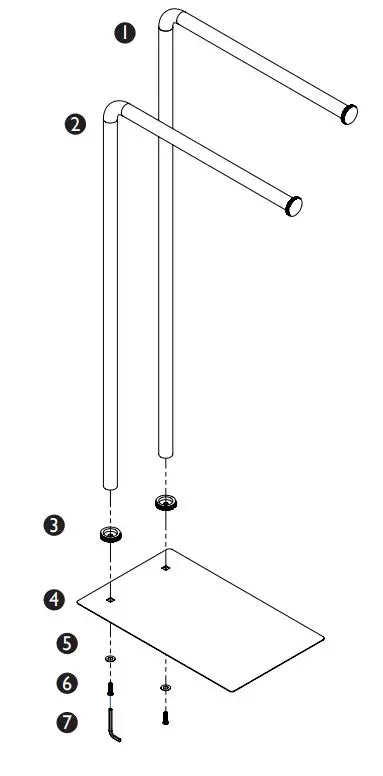
Spare Parts
Missing any parts or require spares, please contact 03456 050 144 and we will be able to help.
Parts Available
– Screw
– Plastic Washer
– Decorative Washer
Care and Maintenance
We recommend regular cleaning with a mild soap liquid and drying with a soft, lint free cloth. The use of abrasive, powder or ammonia based cleaners and bleaches WILL damage the product.
John Lewis Partnership
171 Victoria Street
London SW1E 5NN
www.johnlewis.com
Made in Taiwan
Please retain these instructions for future reference.
]]>