
Egg Incubator
JUMBINCBT12
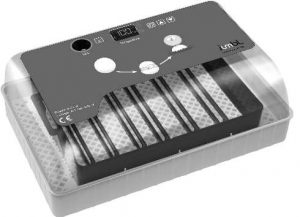
Thank you for purchasing the Jumbl® Egg Incubator. This User Guide is intended to provide you with guidelines to ensure that operation of this product is safe and does not pose risk to the user. Any use that does not conform to the guidelines described in this User Guide may void the limited warranty.
Please read all directions before using the product and retain this guide for reference. This product is intended for domestic use only. It is not intended for commercial use.
This product is covered by a limited one-year warranty. Coverage is subject to limits and exclusions. See warranty for details.
TABLE OF CONTENTS
SAFETY PRECAUTIONS 3
PACKAGE CONTENTS 3
FEATURES 3
PRODUCT OVERVIEW 4
GETTING STARTED WITH YOUR INCUBATOR 5
UNDERSTANDING YOUR CONTROL PANEL 7
HOW TO ADJUST HUMIDITY 9
HOW TO INCUBATE YOUR EGGS 10
ONCE YOUR EGGS HAVE HATCHED 10
EGG INCUBATION BASICS 10
TROUBLESHOOTING 12
SPECIFICATIONS 14
WARRANTY INFORMATION 15
2
SAFETY PRECAUTIONS
- Make sure to familiarize yourself with the appliance itself before using it.
- Before using this appliance, check all the parts to make sure they function properly, and make sure no components have been damaged.
- Keep out of the reach of children.
- Always keep away from heat or flame, and avoid prolonged exposure to sunlight.
- Do not use in areas of extremely high or low temperatures or humidity.
- Keep away from hazardous chemicals or fumes.
- Ensure that the unit is placed on a stable surface.
- Before incubating eggs, ensure that you have a suitable brooding habitat for the chicks once they’ve hatched.
- Do not leave this appliance unattended for long periods of time in case of power outages or other issues. Doing so could result in the loss of your eggs’ viability.
- Once the eggs are hatched, use care in opening the unit as the chicks could leap out suddenly.
PACKAGE CONTENTS

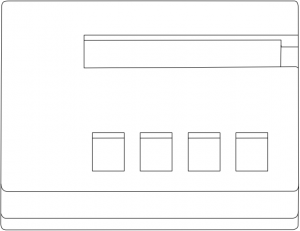
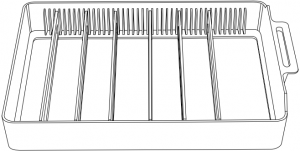
Egg incubator Polyfoam pad Egg tray

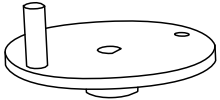

Divider strips for egg tray Rotating shaft Power cord
FEATURES
- Programmable temperature control between 70°F (21.1°C) and 103.1°F (39.5°C)
- Automatic egg turning at predetermined intervals
- Temperature stabilizer
- Easy to clean
- Built-in egg candler
3
PRODUCT OVERVIEW


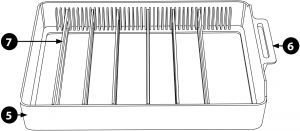
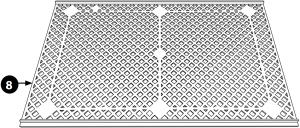
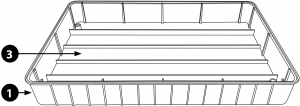
- Main body
- Cover
- Humidity channels
- Rotating shaft
- Egg tray
- Egg tray handle
- Egg tray divider strips
- Grid
4
1. Egg candler 4. Heating indicator light 7. Up button
2. Egg candler power button 5. Settings indicator light 8. Down button
3. LED readout 6. Settings button

GETTING STARTED WITH YOUR INCUBATOR
1. Install the rotating shaft by aligning the opening with the metal prong extending from the inside of the cover and firmly pressing it down into place.

2. Place the dividing strips into the egg tray so that your eggs will have at least 2-3 mm of space between them. You can arrange the dividers to make wide columns if you’re using larger eggs, and smaller columns if you’re using smaller eggs.
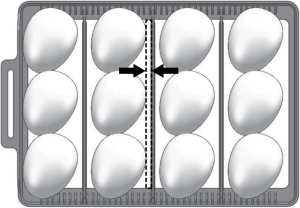
2-3 mm
5
3. If you’re incubating eggs in an area where the ambient temperatures might fall below 68°F (20°C), place the included polyfoam around the incubator for better insulation.
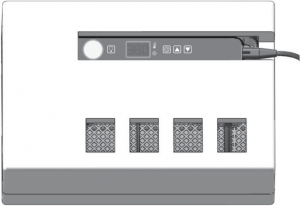
4. Add water to the central humidity channel as needed. Replace the grid on top of the humidity channels and place the egg tray on top of the grid.
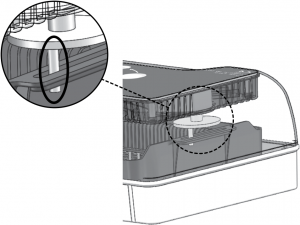
5. Replace the lid on the main body so that the rotating shaft is inserted into the open slot on the egg tray handle as shown. This ensures the egg turning mechanism will function properly.
To avoid egg loss, it is important to test your incubator before first use.
- Ensure that the rotating shaft is properly aligned, as described in the Assembly section.
- Fill the humidity channels with warm water.
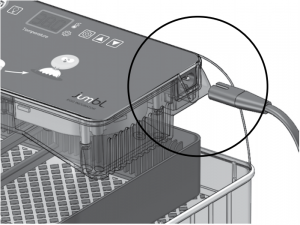
Note: when you get ready to use the incubator for the first time, you will not want all humidity channels to be full; this is just for testing purposes. - Plug in the incubator.
6
4. When first started, the temperature will take some time to reach the factory default temperature setting of 100°F (38°C). This may result in a Low Temperature Alert sounding from the incubator. If this occurs, you can cancel the Low Temperature Alert by pressing any button.
5. The default Egg Turning Interval is set to two (2) hours by default.
a. Leave the cover off so that you can observe the turning action and ensure that it is working properly.
b. Eggs should be gently rolled 45° to the right and left for ten (10) seconds, and then rolled in a random direction thereafter.
UNDERSTANDING YOUR CONTROL PANEL

- Egg candler: This light allows you to perform a visual check of what is happening inside your eggs. Do not test eggs within the first four (4) days of placing them in the incubator, as this can cause embryo death. Once the eggs have completed their first four (4) days, you may check them periodically to see if they’re continuing to develop. Check with your egg supplier for details.
- Egg candler power button: This turns the egg candler on and off.
- LED readout: This readout shows the incubator’s interior temperature within one-tenth of a degree. Machine codes will also be displayed on this readout. Consult the table at the end of this section for the codes and their meanings.
- Heating indicator light: Lights up to let you know that the incubator is heating.
- Settings indicator light: Lights up when you long-press the settings button to let you know you have entered the settings menu.
- Settings button: Use this button to set the temperature, as well as to set the temperature at which you would like to be alerted by a High Temperature Alert Sound and a Low Temperature Alert Sound.
- Up button: Increases the temperature value, allows you to navigate between settings options and adjust setting values.
- Down button: Decreases the temperature value, allows you to navigate between settings options and adjust setting values.
7
| LED Display Codes |
Corresponding Menu |
Default Factory Setting |
| AL | Low temperature alert setting menu |
2.2˚F (-16.6˚C) |
| AH | High temperature alert setting menu |
2.2˚F (-16.6˚C) |
| HS | Upper temperature limit setting menu |
103.1˚F (39.5˚C) |
| LS | Lower temperature limit setting menu |
70˚F (21.1˚C) |
The factory preset temperature is 100°F (38°C). If, after several hours of use, the incubator does not reach this temperature, please check the following:
- The temperature has been set to 100°F (38°C), or above
- The incubator’s fan is functioning
- The cover is closed
- The ambient temperature in the room is above 64.4°F (18°C)
To set the temperature:
- Press the Settings button
 once.
once. - Use the Up
 and Down
  buttons to set your desired temperature.
 - Press the Settings button
 again to confirm.
To set a Low Temperature Alert:
The factory default for this setting is 2.2°F (-16.6°C). To change this default and set an alert for when the temperature drops below a specific point:
- Press and hold the Settings button
 for three (3) seconds until it beeps and the settings indicator light is illuminated.
 - Press the Settings button
 to cycle through menu options until the LED Display reads “AL”.
 - Use the Up
 and Down
  buttons to set the temperature value at which you want to be alerted.
 - Press the Settings button
 again to confirm.
To set a High Temperature Alert:
The factory default for this setting is 2.2°F (-16.6°C). To change this default and set an alert for when the temperature drops below a specific point:
- Press and hold the Settings button
 for three (3) seconds until it beeps and the settings indicator light is illuminated.
 - Press the Settings button
 to cycle through menu options until the LED Display reads “AH”.
 - Use the Up
 and Down
  buttons to set the temperature value at which you want to be alerted.
8
4. Press the Settings button ![]() again to confirm.
again to confirm.
To set upper and lower temperature limits:
The factory defaults for the upper and lower temperature limits are 103.1°F and 70°F, respectively. To change this default and set upper and lower temperature limits:
- Press and hold the Settings button
 for three (3) seconds until it beeps and the settings indicator light is illuminated.
 - Press the Settings button
 to cycle through menu options until the LED Display reads “HS” for the upper temperature limit or “LS” for the lower temperature limit.
 - Use the Up
 and Down
  buttons to set the temperature values for upper or lower temperature limits.
 - Press the Settings button
 again to confirm.
To adjust egg rotation intervals:
Every type of egg needs to be rotated at different intervals, so you should consult with your egg supplier or research to determine how often your eggs need to be rotated.
- Press the Egg Candler Power button
 and hold it down for three (3) seconds.
 - Use the Up
 and Down
  buttons to adjust the time up or down in 10-second intervals. The default setting is to turn the eggs every two (2) hours.
HOW TO ADJUST HUMIDITY
Adding warm water to the humidity channels controls the amount of relative humidity inside the incubator. The type of water does not matter; you can simply add water from a water bottle if you want, as long as the water is warm when you pour it into the channels.
Consult your egg supplier to determine the right humidity level for your species throughout the incubation cycle. You may want to install a hygrometer to keep an eye on humidity levels in your incubator throughout the duration of the hatching cycle. General humidity guidelines are given below, but please note that these numbers are approximate and cannot guarantee precise humidity levels.
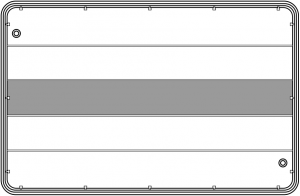
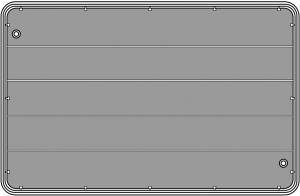
- For an approximate humidity level of 45-55%, add warm water only to the center channel as shown. This level should be maintained for the first period of your breed’s specific incubation cycle.
9
2. For an approximate humidity level of 55-65%, add warm water to the three (3) center channels as shown. This level should be maintained for the second period of the incubation cycle as the eggs develop further.

3. For an approximate humidity level of 65-75%, add warm water to all channels as shown. This level should be maintained for the final few days of the incubation cycle immediately prior to hatching.
HOW TO INCUBATE YOUR EGGS
- Complete the setup process and adjust the temperature and humidity to your desired levels.
- Place the eggs in the egg tray with their pointy sides facing down.
- Close the cover and start the incubator.
- Check the incubator frequently, especially in the beginning, to ensure optimal conditions.
- The humidity channels will need refilling every day or two. Maintain the proper water levels with your point in the incubation cycle, increasing as needed.
- When the eggs are hatching, do not open the lid until they are fully hatched.
ONCE YOUR EGGS HAVE HATCHED
Congratulations! Your chicks are now fully hatched. Allow the chicks to dry off a bit in the warmth of the incubator before moving them to a brooder unit, where they will spend their first few weeks of life. Before moving them, make sure that the brooder unit has reached an appropriate warming temperature for the young chicks.
EGG INCUBATION BASICS
You should only use fertilized eggs from a reputable supplier, to ensure that they are from healthy stock and have been handled with care.
10
Proper hygiene can literally be a matter of life and death when it comes to hatching chicks. Clean the incubator thoroughly before placing eggs inside, and use only clean eggs for incubation. If the eggs you receive are not clean, consult with the your egg supplier, as some eggs may be suitable to gently wash, and other eggs may not be washed. Any time you open the incubator or touch the eggs, be sure to do so with clean hands.
It is important to keep the temperature between 99.5°F (37.5°C) and 102°F (38.9°C), with as little fluctuation as possible. Keep in mind that the eggs themselves will give off heat as the embryos develop. We recommend monitoring the temperature in the incubator several times a day to make sure it doesn’t rise to unsafe levels.
Maintaining the correct level of humidity is essential to the development of the embryos. Humidity should be around 50% – 60% throughout the incubation period. During the last three (3) days of incubation, you will want to raise the humidity to 65%-75% to encourage hatching. The necessary humidity will vary by species, so be sure to check your egg supplier’s instructions.
In order to mimic the actions of a broody hen with her eggs, it is important to turn the eggs several times a day throughout most of the incubation period. Every type of egg needs to be rotated at different intervals, so you should consult with your egg supplier or research to determine how often your eggs need to be rotated. Fortunately, your Jumbl® egg incubator comes with an automatic egg rotation feature, eliminating the need to manually turn the eggs.
For your convenience, we’ve provided some general guidelines on temperature and timing for different species in the chart below. Please make sure to check with your egg supplier for specific information regarding your eggs.
In general, the time to hatch for a chick is ~21 days. Smaller birds may take as few as 10-14 days; larger birds may take up to a month. Temperatures should generally range between 99°F ~ 102°F (37.2°C ~ 38.9°C), with 99.5°F (37.5°C) being largely viewed as the ideal temperature. For the last three (3) days, you should generally lower the temperature by 1-2°F, as the chicks will be putting off their own body heat. Humidity levels should generally range from 40% – 50% for the first 18 days, moving up to 65% – 75% for the final few days.
11
| Type of Bird |
Recommended Temperatures |
Typical Incubation Period |
| Hens | 99.3°F – 99.6°F (37.4°C – 37.6°C) |
21 days |
| Pheasant | 99.6°F – 100°F (37.6°C – 38°C) |
23 – 27 days |
| Quail | 99.6°F – 100°F (37.6°C – 38°C) |
16 – 23 days |
| Ducks | 99.3°F – 99.6°F (37.4°C – 37.6°C) |
28 days |
| Parrots | ||
| Amazons | 98.3°F – 98.6°F (36.8°C – 37.0°C) |
24-29 days |
| Macaws | 98.3°F – 98.6°F (36.8°C – 37.0°C) |
26-28 days |
| Love Birds | 98.3°F – 98.6°F (36.8°C – 37.0°C) |
22-24 days |
| African Greys | 98.3°F – 98.6°F (36.8°C – 37.0°C) |
28 days |
| Eclectus | 98.3°F – 98.6°F (36.8°C – 37.0°C) |
28 days |
TROUBLESHOOTING
| # | Issue | Possible Cause | Try This Solution |
| 1 | Too many clear or infertile eggs |
1a. Incorrect proportion of male to female birds. | Check the breeder’s recommendation for mating ratios. |
| 1b. Male is undernourished. | Make sure that you feed the male birds separately, as the hens may be eating all the feed. | ||
| 1c. Interference among males during mating. | Don’t use too many males in your breeding pen. Make sure that you raise the breeding males together. Erect temporary partitions between the breeding pens or inside the large pens so that males can mate without interference. | ||
| 1d. Males have damaged combs and wattles. | Make sure that the housing is comfortable and you have provided proper drinking fountains for the breeding pens. | ||
| 1e. Male is too old. | Replace elderly birds in the breeding pen. | ||
| 1f. Male is sterile. | Replace with a different male bird. | ||
| 1g. Eggs kept too long or under the wrong conditions before setting. | Don’t keep hatching eggs for longer than seven (7) days. Make sure they are stored in a cool temperature (10-15.6°C) at a relative humidity level of 75-80%. |
12
| # | Issue | Possible Cause | Try This Solution |
| 2 | Blood rings present, indicating very early embryonic death | 2a. Incubator temperature too high or too low. | Check all thermometers, thermostats, and the electricity supply. Make sure you are following the egg supplier’s and incubator’s instructions. |
| 2b. Fumigation procedure performed incorrectly. | Make sure you are using the correct amount of fumigant. Do not fumigate between 24 and 96 hours after setting eggs. | ||
| 2c. See 1g. | See 1g. | ||
| 3 | Many eggs are dead in the shell | 3a. See 2a. | See 2a. |
| 3b. Eggs have not been properly turned. | Check that all components and the power cord are properly connected. Press RESET for three to five (3-5) seconds to test the egg turning function and make sure the eggs are being turned properly. | ||
| 3c. If deaths are high in days 10-14, breeding stocks’ nutrition could be deficient. | Check the stock from whom you’re getting your breeding eggs (if eggs came from your own fowl). | ||
| 3d. Incubator ventilation could be faulty. | Try to increase ventilation by normal means (don’t try anything crazy). | ||
| 3e. Eggs could have infectious diseases. | Make sure the eggs come from healthy stock. Ensure that hatchery hygiene is sound and regularly carried out. | ||
| 4 | Piped eggs fail to hatch | 4a. Insufficient moisture in the incubator. | Increase the evaporating surface of water (add water to more channels) or the sprays. |
| 4b. Too much moisture during earlier stages of hatching process. | Make sure you have a hygrometer installed and check the readings regularly to ensure proper humidity. | ||
| 4c. Nutritional problems. | Check that flock feeding is sound and nutrition is appropriate. | ||
| 5 | Eggs hatching too soon | 5a. Incubator’s temperature is too high. | Ensure that the temperature regulating gear is functioning properly and set to the correct operating temperature. |
| Eggs hatching too late | 5b. Incubator’s temperature is too low. | ||
| Sticky chicks | 5c. Incubator’s temperature is likely too high. | ||
| 6 | Malformed chicks | 6a. Incubator’s temperature is too high. | See 2a. |
13
| # | Issue | Possible Cause | Try This Solution |
| 6b. Incubator’s temperature is too low. | See 2a. | ||
| 6c. Eggs set incorrectly, or not properly turned after being set. | See 3b, make sure the eggs are set with the broad end up, pointed end down. | ||
| 7 | Spraddling chicks | Hatching trays are too smooth. | Use wire-mesh tray floors, or cover the incubator floor with burlap or a similar material. |
| 8 | Weak chicks | 8a. Incubator or hatching unit is overheating. | See 5. |
| 8b. Eggs being set are too small. | Only set eggs that are the normal size for the breed. | ||
| Small chicks | 8c. Too little moisture in the incubator. | See 4a. | |
| 8d. Too much fumigant has been left in the incubator. | See 2b. | ||
| Chicks breathing heavily | 8e. Too much moisture present in the incubator. | See 4b. | |
| 8f. Could be an infectious disease. | Bring the chicks to a veterinary laboratory for diagnosis. | ||
| 8g. Temperature during incubation period is too low. | See 2a. | ||
| Mushy chicks | 8h. Incubator’s ventilation is poor. | See 3d. | |
| 8i. Omphalitis (navel infection). | Carefully clean out and fumigate the incubator using higher-strength formaldehyde, and disinfect all equipment. | ||
| 9 | Hatch not coming off equally | Eggs being set are too diverse in maturity and size. | Make sure to set eggs at least once a week. Don’t retain hatching eggs for more than ten (10) days before setting them. Only incubate average-size eggs. |
SPECIFICATIONS
Power: ≤40 W
Voltage: 110 V
Net weight: 2.6 lbs (1.2 kg)
Product size: 12.6″ x 8.2″ x 4.6″ (32 cm x 20 cm x 11.6 cm)
14
WARRANTY INFORMATION
THIS LIMITED WARRANTY GIVES YOU SPECIFIC LEGAL RIGHTS AND YOU MAY ALSO HAVE OTHER RIGHTS, WHICH VARY FROM STATE TO STATE.
WE WARRANT THAT DURING THE WARRANTY PERIOD, THE PRODUCT WILL BE FREE FROM DEFECTS IN MATERIALS AND WORKMANSHIP.
TO THE EXTENT NOT PROHIBITED BY LAW, THIS WARRANTY IS EXCLUSIVE AND IN LIEU OF ALL OTHER WARRANTIES, ORAL, WRITTEN, STATUTORY, EXPRESS OR IMPLIED. EXCEPT FOR THE EXPRESS WARRANTIES CONTAINED IN THIS LIMITED WARRANTY STATEMENT AND TO THE EXTENT NOT PROHIBITED BY LAW, WE DISCLAIM ALL OTHERWARRANTIES, EXPRESSED OR IMPLIED, STATUTORY OR OTHERWISE, INCLUDINGWITHOUT LIMITATION, THE WARRANTIES OF MERCHANTABILITY AND FITNESS FOR A PARTICULAR PURPOSE. SOME STATES DO NOT ALLOW DISCLAIMERS OF IMPLIED WARRANTIES, SO THIS DISCLAIMER MAY NOT APPLY TO YOU. TO THE EXTENT SUCH WARRANTIES CANNOT BE DISCLAIMED UNDER THE LAWS OF YOUR JURISDICTION, WE LIMIT THE DURATION AND REMEDIES OF SUCH WARRANTIES TO THE DURATION OF THIS EXPRESS LIMITED WARRANTY.
OUR RESPONSIBILITY FOR DEFECTIVE GOODS IS LIMITED TO REPAIR, REPLACEMENT OR REFUND AS DESCRIBED BELOW IN THIS WARRANTY STATEMENT.
C&A Marketing, Inc. located at 114 Tived Lane East, Edison, NJ (“we”) extend this limited warranty only to the consumer who originally purchased the product (“you”). It does not extend to any subsequent owner or other transferee of the product.
This limited warranty covers defects in materials and workmanship of the Jumbl® Egg Incubator (the “product”) for the Warranty Period as defined below.
This limited warranty does not cover any damage due to: (a) transportation; (b) storage; (c) improper use; (d) failure to follow the product instructions or to perform any preventive maintenance; (e) modifications; (f ) unauthorized repair; (g) normal wear and tear; or (h) external causes such as accidents, abuse, or other actions or events beyond our reasonable control.
This limited warranty starts on the date of your purchase and lasts for one year (the “Warranty Period”). The Warranty Period is not extended if we repair or replace the product. We may change the availability of this limited warranty at our discretion, but any changes will not be retroactive.
With respect to any defective product during the Warranty Period, we will, at our sole discretion, either: (a) repair or replace such product (or the defective part) free of charge or (b) refund the purchase price of such product if an exchange unit cannot be provided.
To obtain warranty service, you must contact us at 1-866849-3049 or by email at [email protected] during the Warranty Period to obtain a Defective Merchandise Authorization (“DMA”) number. No warranty service will be provided without a DMA number and return shipping costs to our facilities shall be assumed by you, the purchaser. Shipping costs of the replacement unit to you shall be assumed by us.
15

GET IN TOUCH!
[email protected]
866-849-3049
JUMBL and the JUMBL LOGO are trademarks of C&A IP Holdings, LLC in the US.
All other products, brand names, company names, and logos are trademarks of their respective owners, used merely to identify their respective products, and are not meant to connote any sponsorship, endorsement or approval.
Distributed by C&A Marketing, Inc., 114 Tived Lane East, Edison, NJ 08837.
© 2020. C&A IP Holdings, LLC. All Rights Reserved. Made in China.