
LA CROSSE TECHNOLOGY 616A-1413 Projection Alarm Clock Installation
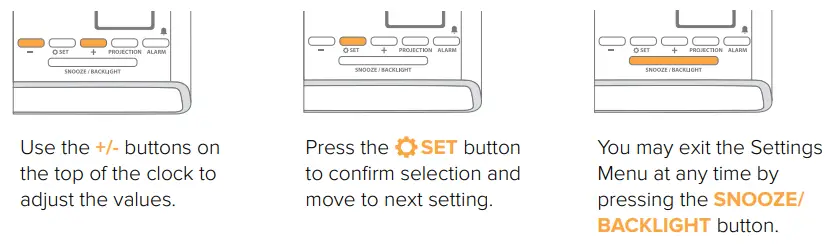
Initial Setup
Power Up
Insert the 5V Power Adapter into an outlet, and then plug it into the Power Jack on the bottom of the alarm clock. Next, remove the Insulation Tab from the Clock’s Battery Compartment.
A greeting will appear on the LCD and the clock will then automatically move into the Settings Menu.
Settings Menu Order
Beep On/Off • 12/24 Format • Hour • Minutes • Year • Month • Date • Fahrenheit/Celsius
Note: To enter the Settings Menu after the initial startup, hold the SET button on the top of the clock.
Note: Weekday will set automatically after year, month, & date settings are adjusted.
Buttons
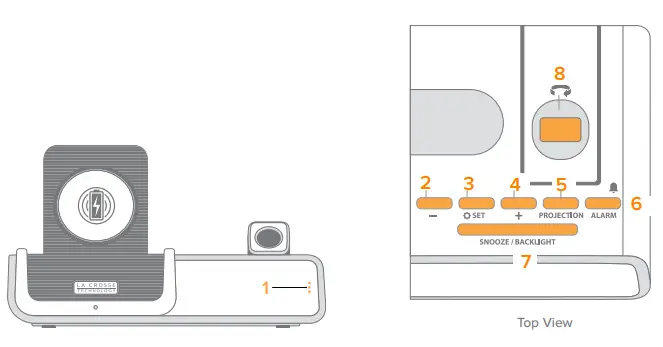
- DISPLAY OPTION
Tap to select LCD display mode options - MINUS –
Press to decrease values, hold to change values quickly - SET
Hold to enter Settings Menu - PLUS +
Press to increase values, hold to change values quickly - PROJECTION
Press to adjust projection intensity. Hold to change projection mode* - ALARM
Press to activate/deactivate alarm. Hold to enter alarm settings - SNOOZE/BACKLIGHT
Press to adjust backlight or snooze a sounding alarm. Hold for Auto-Dim Settings. - ROTATION WHEEL
Scroll to rotate the projection image (left or right)
An add-on sensor is required for additional projection options. See p.16 for details.
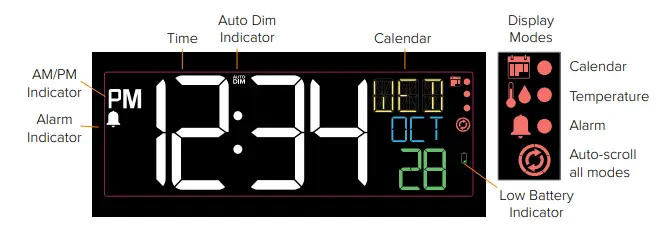
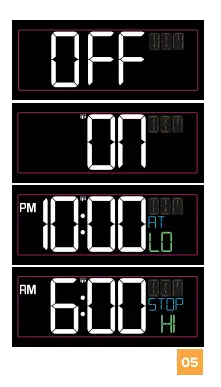
LCD Display
Accessories
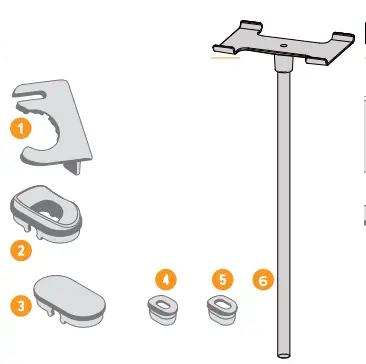
Use, Organize & Store
- Smart Watch Stand
- Earbuds Dock
- Dock Cover
- Small Cable Fitting
- Large Cable Fitting
- Headphone Stand
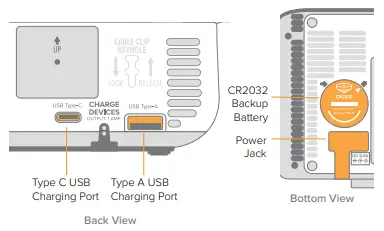
Ports
Small accessories are stored in the bottom compartment of your clock. The Dock Cover is on the top. Headphone stand is in the package
LCD Display Brightness
Adjusting the LCD Display Brightness
Press the SNOOZE/BACKLIGHT button on the top of the clock to adjust the backlight intensity. There are 4 brightness levels, plus an off option.
Auto-Dim Settings
Program your LCD display to automatically dim during preselected times.
- Hold the SNOOZE/BACKLIGHT button to enter the Auto-Dim Settings Menu.
- Press the +/- buttons to turn the Auto-Dim feature on or off. Press the SNOOZE/BACKLIGHT to confirm.
- Press the +/- buttons to adjust the starting hour. Press the SNOOZE/BACKLIGHT to confirm.
- Press the +/- buttons to adjust the stopping hour. Press the SNOOZE/BACKLIGHT to confirm and exit.
The Auto DM icon will appear on the LCD when activated.
Display Modes
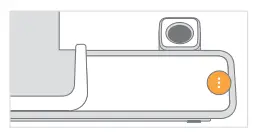
Selecting the Display Mode
Tap the button on the front of the clock to select a display mode or automatically cycle through all of the available options.
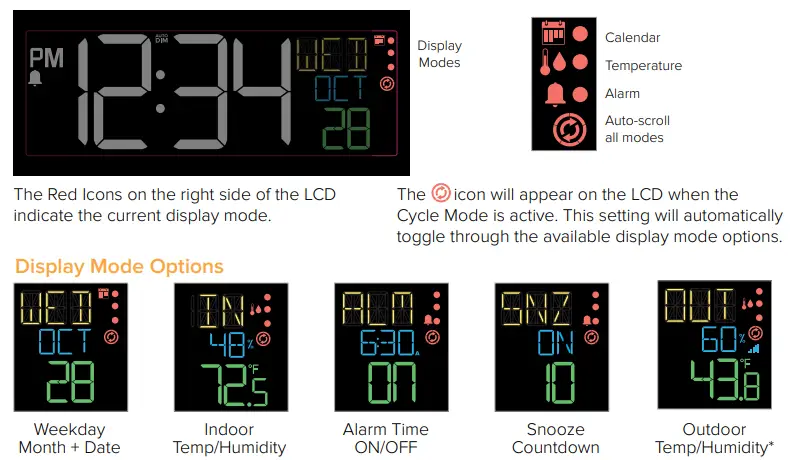
An add-on sensor is required for outdoor data. See p.16 for details.
Time Alarm
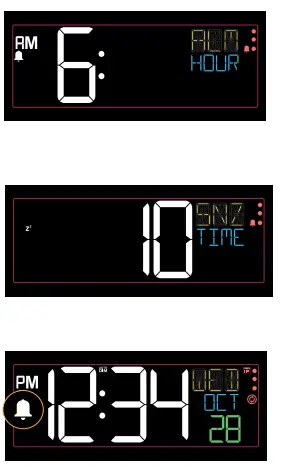
- Hold the ALARM button on the top of the clock to enter the Alarm Settings Menu.
- Use the +/- buttons to set your desired time. Press the ALARM button to confirm.
- Next, use the +/- buttons to set your desired snooze duration (5 to 120 minutes). Press the ALARM button to confirm and exit the Alarm Settings Menu.
- Your time alarm is now activated, indicated by the icon on the LCD.
Activating & Deactivating the Alarm
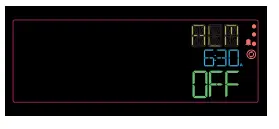
- Press the ALARM button to activate/deactivate the alarm (ON/OFF).
- The Bell icon will appear on the normal time display when the alarm is active.
Ascending Alarm
The alarm will increase in frequency over a 2-minute period. After the 2-minute time frame, the alarm will stop if not snoozed or turned off.
Snooze Duration Countdown
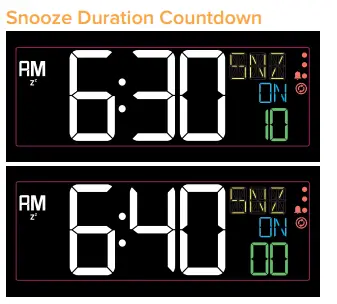
When your alarm sounds, press the SNOOZE/BACKLIGHT button to snooze your alarm for your preselected snooze duration. A countdown will appear on screen. When the snooze time reaches “00,” the alarm will sound again. The snooze feature can be repeated as many times as desired.
Adjusting the Projection Image
Projection Brightness
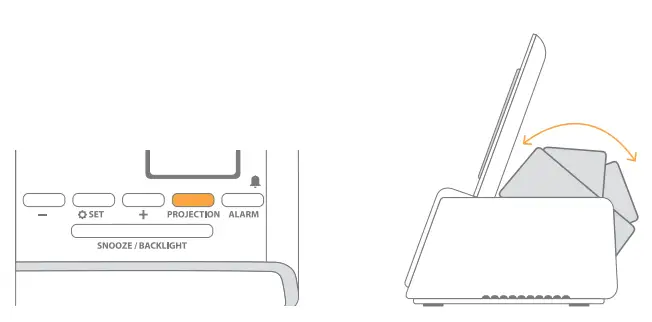
Press the PROJECTION button to adjust the projection’s brightness (HI/LOW/OFF).
The Projection Arm tilts forwards and backwards to adjust the location of the projection image.
Use the Rotation Wheel on the Projection Arm to rotate the viewing angle of the image.
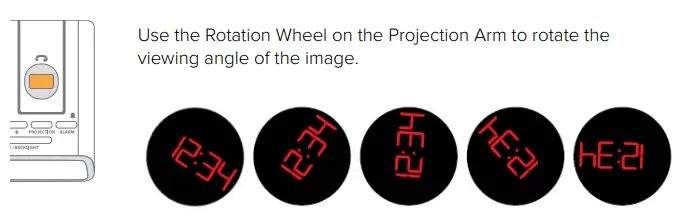
Note: The fixed focus projection image will look best at about 7ft. (2.1m).
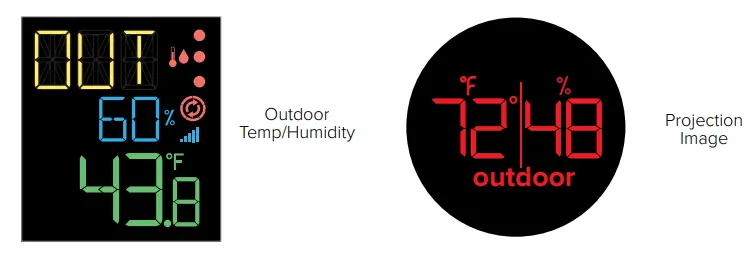
Projection Options
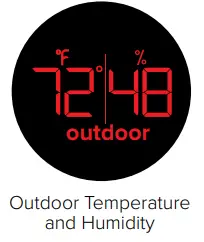
Projection Image Options
You can choose to see the (1) time, (2) outdoor temperature and humidity, or (3) cycle through both options.
Outdoor weather information is only available if an add-on sensor is connected.

Selecting Your Projection Image
- When an outdoor sensor is connected, hold the PROJECTION button on the top of the clock to toggle between the projection options. If no sensor is connected, this button will only adjust the projection’s brightness.
- Time will be the default projection image. Hold and release the PROJECTION button each time to switch between projection modes.
 An add-on sensor is required for additional projection options. See p.15 for details.
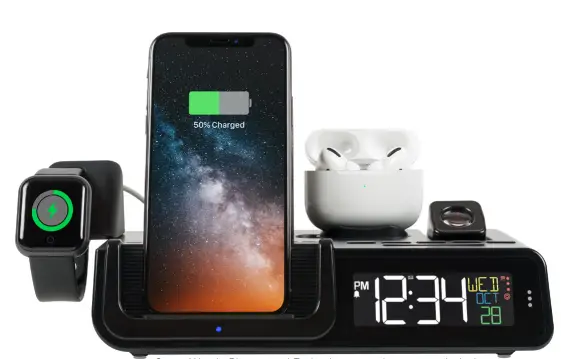
5W Wireless Charger
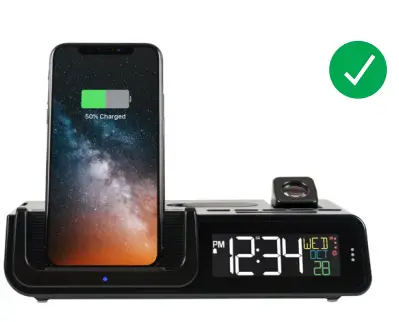
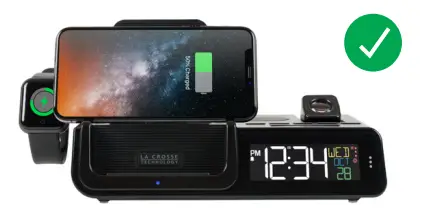
Charging your Qi-Enabled Phone
- Place your Qi-Enabled phone on the platform. Your phone should be centered and should sit flush to the charging cradle.
- The blue Charging Indicator Light below
the platform will be solid when your phone is successfully charging. - The light will flash slowly if your device is not positioned properly or if your device is not compatible with the wireless Qi charging technology. If this problem persists, try removing any large/bulky cases.
Phone Compatibility
Works with all Qi-Enabled phones, such as:
- iPhone 8 or newer
- Galaxy S8 or newer
- Galaxy Note 8 or newer
Compatibility may vary based on phone model and/or case selection.
This list is not comprehensive. Please check your phone’s manual for details regarding Qi-Enabled capabilities.
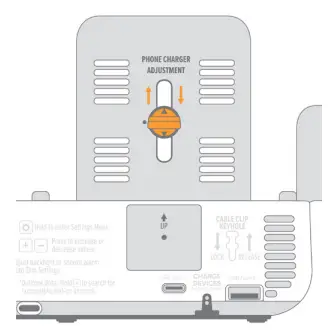
Adjustable Charging Coil
As phone sizes can vary greatly, simply slide the Phone Charger Adjustment Handle up or down to best match your device and get it charging correctly.
Note: Although this clock is capable of delivering 5W wireless charging, actual charging times will be determined by your
mobile device.
Important:
Wireless charging uses magnetic induction to charge your compatible smartphone. Do not place anything between your phone and the charging pad. Keep the charging pad clear of all foreign objects. Magnetic mounts, magnetic cases, or other objects between your phone and the wireless charger may reduce performance or damage magnetic strips or RFID chips found in some credit cards, security badges, passports, and key fobs. If your phone case holds any of these sensitive items, be sure to remove them before charging or make sure they are not between the back of your phone and the charging pad.
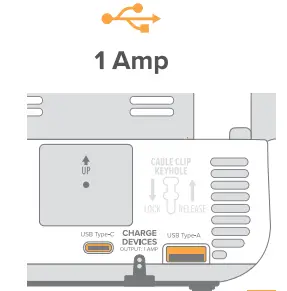
USB Charging Ports
There is a USB Type “A” Charging Port, and a USB Type “C” Charging Port located on the back of your alarm clock.
- Connect your external device’s USB charging cable (not included) into the USB Charging Port.
- Charging times may vary.
- USB Power Output: 1 Amp maximum current
Earbud Charging
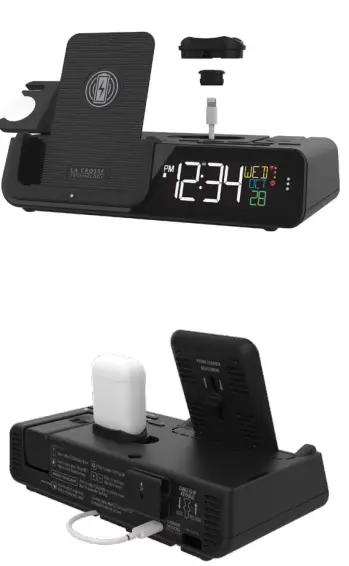
- Remove the Dock Cover from the top of the alarm clock.
- Open the bottom Accessory Compartment and find the Earbud Dock and Cable Fittings.
- Feed your earbud charging cable (not included) up through the Earbud Dock, securing it with the correct Large or Small size Cable Fitting.
- Wrap any extra cord up inside the Accessory Compartment and feed the charging end through the bottom hole.
- Plug the cord into the appropriate 1 amp USB Charging Port.
Accessory Storage
The Earbud Dock, Cable Fittings, and Smart Watch Stand can all be stored in the Accessory Compartment on the bottom of the clock when not in use.
Smart Watch Stand

The removable Smart Watch Stand is engineered to fit a variety of smart watch brands. Its open design allows for easy access to your device’s unique charging port location, for use with the included USB Charging Port.
How to attach the Smart Watch Stand
- Remove the Smart Watch Stand from the Accessory Compartment on the bottom of the alarm clock.
- Insert the watch stand into the left side of the clock.
- Place your watch on the stand and attach its charging cord.
- Plug the charging cord into the correct USB port.
Note: Smartwatch and charging cords not included
Headphone Stand
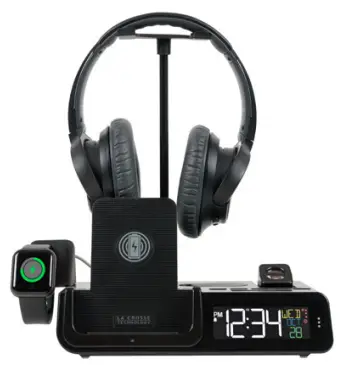
How to attach the Headphone Stand
- Insert the Headphone Stand into the hole on the top of the clock.
- Place your headphones on the stand and attach their charging cord.
- Plug the charging cord into the correct USB port.
Note: Headphones and charging cords not included.
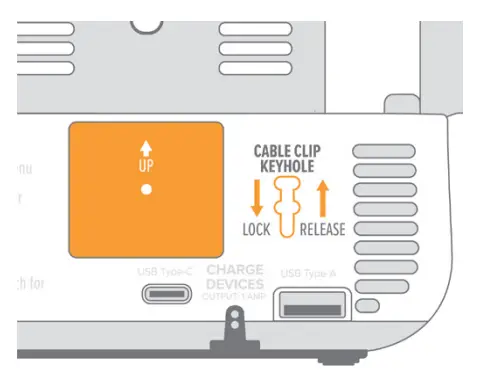
Cable Organizer
Use the included Cable Organizer to keep your charging cords neat and secure. Insert the organizer into the Cable Clip Keyhole and slide it down to lock in place. Lift up and pull the Cable Organizer out to remove it.
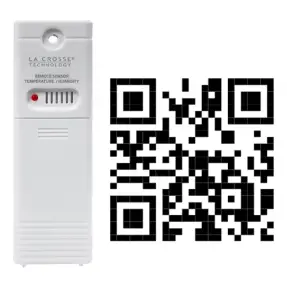
Optional Add-On Sensor
You can purchase an add-on Thermo-Hygro Sensor to get real-time temperature and humidity data, straight from your backyard.
Purchase Your Add-On Sensor at
(or scan QR Code): bit.ly/616a-1413_parts Search for the compatible sensor using the alarm clock’s model number (616A-1413).
Add-On Sensor Setup
- Insert 2 “AA” Batteries into the sensor battery compartment.
- Hold the + button on the clock to search for the sensor.
- Press the TX button inside the sensor battery compartment to transmit a signal.
The sensor’s data should then be viewable on your LCD and as an option to be projected.
Delete Add-On Sensor
- From normal display, press the – button to have the outdoor temperature reading begin flashing.
- Hold the – button to delete the sensor. The sensor will remain deleted until manually reconnected.
Note: To manually reconnect the sensor, follow the Add-On Sensor Setup steps above.
Optional Add-On Sensor
Lost Connection
- If the sensor loses connection to the clock for any reason, the clock will show NO after 30 minutes of disconnection.
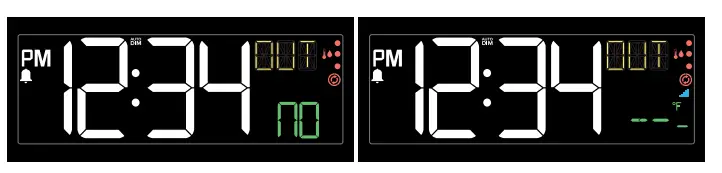
- The Sensor Reception Icon signal will disappear from the bottom right of the LCD and the clock will search for up to 3 minutes every hour to try to reestablish the connection.
- To manually reconnect, hold the + button on the top of the clock to search for the sensor.
- Dashes will show while searching for the sensor and the up to 3 minutes or until the sensor is connected.
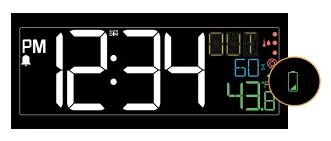
Low Battery
The icon will appear when the sensor batteries needs to be replaced.
Specifications
Power Requirements:
5.0V Power Cord (Included) HX20A-0503500-AU CR2032 Battery for backup (Included)
The plug on the power adapter is intended to serve as the disconnect device, the socket-outlet shall be installed near the equipment and shall be easily accessible.
Projection Brightness:
2 Intensity Levels + OFF
LCD Brightness:
4 Intensity Levels + OFF Programmable Auto-Dim Backlight Option)
Programmable Snooze Duration:
5 to 120 Minutes
Wireless Charger Power Output:
5 Watts
USB “A” and “C” Charging Port:
1 Amp Maximum Current (Charging Cords Not Included)
Indoor Temperature Range:
32°F to 122°F (0°C to 50°C)
Indoor Humidity Range:
10% to 99% RH
Settings Backup:
The CR2032 Battery will save Time and Alarm Settings when power is lost. Projection will not show.
Having Trouble ? We are here to help
For detailed product videos, manuals, and more visit our support website: bit.ly/616a-1413_support
If you need additional assistance, contact our friendly customer support team:
Online: bit.ly/contact_techsupport
Phone Number: 1.608-782-1610
Representatives available Monday-Friday, 8:00am to 6:00pm CST.
Say in Touch
Ask questions, watch set up videos, and provide feedback on our social media outlets.

Follow La Crosse Technology on Youtube, Twitter, Facebook & Instagram.
Button Cell Battery
Replace the Coin Cell Battery
- Use a coin to turn the battery cover to the left to remove it.
- Pull back the metal pin and gently remove thebattery.
- Insert a fresh CR2032 battery with the + side up and snap into place.
- Replace the battery cover and use the coin to turn it to the right to lock.
Battery replacement instruction:
When batteries of different brand or type are used to-gether, or new and old batteries are used together, some batteries may be over-discharged due to a difference of voltage or capacity. This can result in venting, leakage, and rupture and may cause personal injury.
- Always purchase the correct size and grade of battery most suitable for the intended use.
- Always replace the whole set of batteries at one time, taking care not to mix old and new ones, or batteries of different types.
- Clean the battery contacts and those of the device prior to battery installation.
- Ensure the batteries are installed correctly with regard to polarity (+ and -).
- Remove batteries from product during periods of non- use. Battery leakage can cause corrosion and damage to this product.
- Remove used batteries promptly.
- For recycling and disposal of batteries, and to protect the environment please check the internet or your local phone directory for local recycling centers and/ or follow local government regulations.
WARNING
- This product contains a button battery.
- If swallowed, it could cause severe injury or death in just 2 hours.
- Seek medical attention immediately.
KEEP BATTERIES OUT OF REACH OF CHILDREN
- Swallowing may lead to serious injury in as little as 2 hours or death, due to chemical burns and potential perforationof the esophagus.
- If you suspect your child has swallowed or inserted a button battery, immediately seek urgent medical assistance.
- Examine devices and make sure the battery compartment is correctly secured, e.g. that the screw or other mechanical fastener is tightened.
- Do not use if compartment is not secure.
- Dispose of used button batteries immediately and safely.
- Flat batteries can still be dangerous. Tell others about the risk associated with button batteries and how to keep their children safe.
Warranty
La Crosse Technology, Ltd. provides a 1-year limited time warranty (from date of purchase) on this product, relating to manufacturing defects in materials and workmanship. For full warranty details, you can visit: www.lacrossetechnology.com/support La Crosse Technology, Ltd • 2830 S. 26th Street • La Crosse, WI 54601
Recycling & Disposal
Please consider the environment when deciding to dispose of this product. Although household electronics are generally safe to use on a daily basis, incorrect disposal can cause negative and potentially irreversible impacts on our environment.
Check with local donation centers to see if your product can be donated for future use. If disposal is the only option, federal agencies, local governments, and certified retailers may have electronic recycling programs in place. Programs may vary based on location.
Caution!
The manufacturer is not responsible for any radio or TV interference caused by unauthorized changes or modifications
to this equipment. Such changes or modifications could void the user authority to operate the equipment.
All rights reserved. This manual may not be reproduced in any form, even in part, or duplicated or processed using electronic, mechanical or chemical process without the written permission of the publisher.
This booklet may contain errors or misprints. The information it contains is regularly checked and corrections are included in subsequent editions. We disclaim any responsibility for any technical error or printing error, or their consequences. All trademarks and patents are recognized.
FCC Statement
This equipment has been tested and found to comply with the limits for a Class B digital device, pursuant to part 15 of the FCC Rules. These limits are designed to provide reasonable protection against harmful interference in a residential installation. This equipment generates, uses and can radiate radio frequency energy and, if not installed and used in accordance with the instructions, may cause harmful interference to radio communications. However, there is no guarantee that interference will not occur in a particular installation. If this equipment does cause harmful interference to radio or television reception, which can be determined by turning the equipment off and on, the user is encouraged to try to correct the interference by one or more of the following measures:
- Reorient or relocate the receiving antenna.
- Increase the separation between the equipment and receiver.
- Connect the equipment into an outlet on a circuit different from that to which the receiver is connected.
- Consult the dealer or an experienced radio/TV technician for help.
This device complies with Part 15 of the FCC Rules. Operation is subject to the following two conditions:
- This device may not cause harmful interference, and
- This device must accept any interference received, including interference that may cause undesired operation.
Caution!
Any changes or modifications not expressly approved by the party responsible for compliance could void the
user’s authority to operate the equipment