ELECTRIC SCOOTER MANUAL
Thank you for purchasing Laotie Electric Scooter, we will
provide you with better products and better service
L8S pro
SUITABLE FOR: L8S PRO
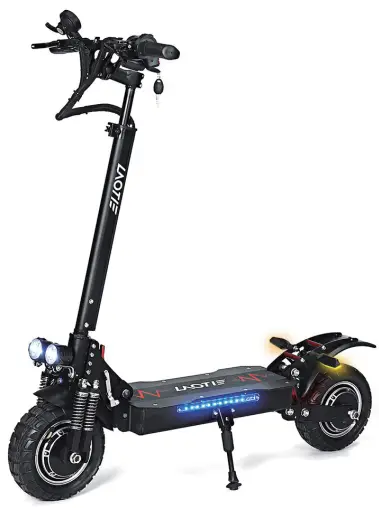
Schematic Diagram Of Electric Scooter
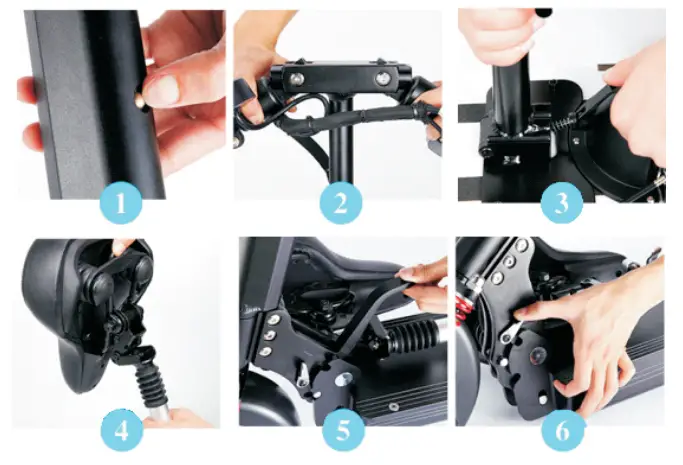
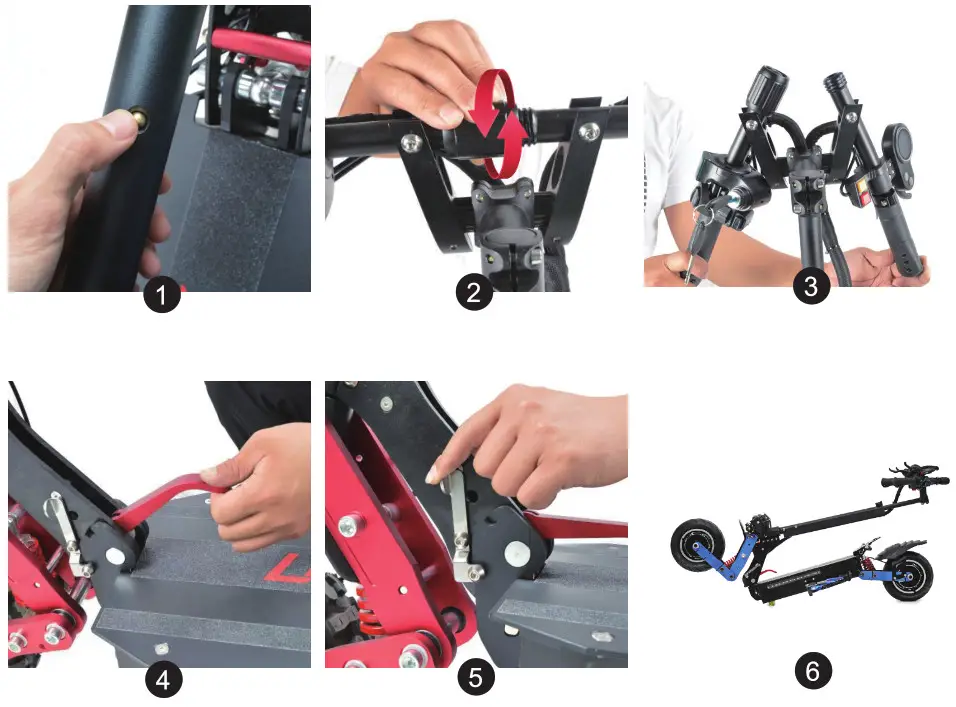
FOLDING PROCESS:
- Press the button on the rod to lower the handle first.
- Pull out the outer ring and folding the handle.
3-4. Press the Folding button under the seat. Release the folding lock on the pedal, then folding the seat.(optional)
5-6. Pull out the folding lock first. And then press the white button as the picture shows. Set down the rod when the button locked again.

Notice: Because Of The Product Upgrade, There May Be Some Difference Between The Product Actually, Get And The Instruction Manual. Not Affecting The Normal Usage
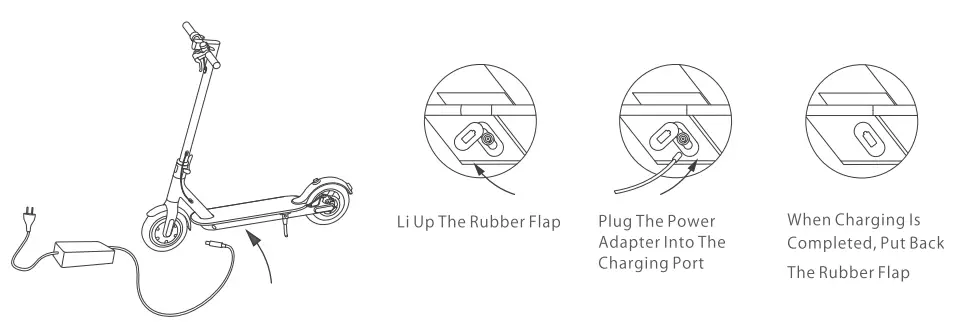
CHARGE YOUR SCOOTER
FOR YOUR PERSONAL AND PROPERTY SAFETY, DO NOT CHARGE INDOORS OR IN AN UNGUARDED PLACE
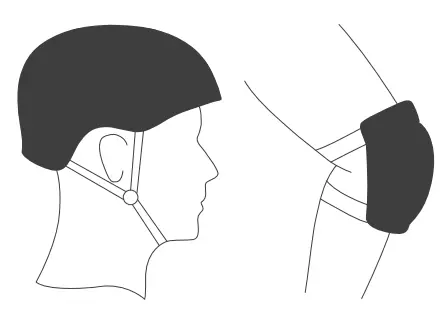
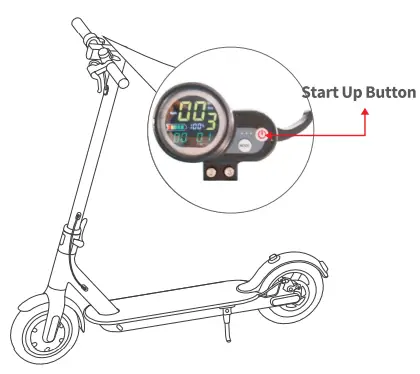
Preparation Before Riding A Scooter
- When you learn to ride a scooter, wear a helmet and knee pads to prevent falls and injuries
- Carefully check the braking performance of the scooter, and check whether the folded part of the scooter is fastened.
Long press the red button on the instrument, the instrument panel will light up, and the boot is successful at this time,
PS: If you have a key vehicle, open it with the key, and then perform the above steps.
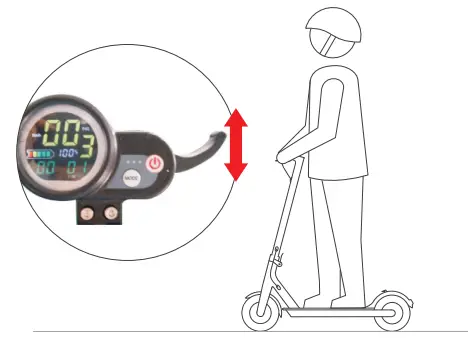
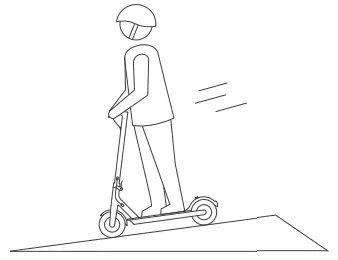
HOW TO RIDE
Step on the deck with one foot, and slowly kicks off the other on the ground.
If you bought a seat version, sit on the seat first. Speed up slowly

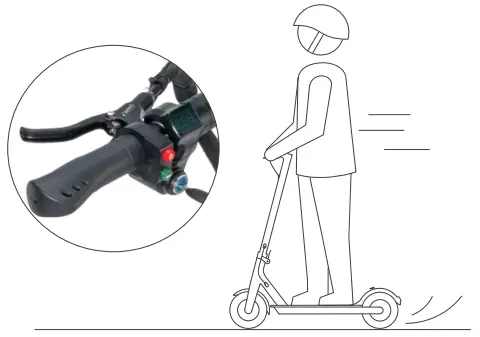
When the scooter starts to coast, put both feet on the deck and press the accelerator (the accelerator initiates once the coasting speed exceeds 5km/h)
Release the accelerator ana the Kinetic energy recovery system (KERS) initiates automatically to brake slowly, And squeeze the brake lever for a sudden brake
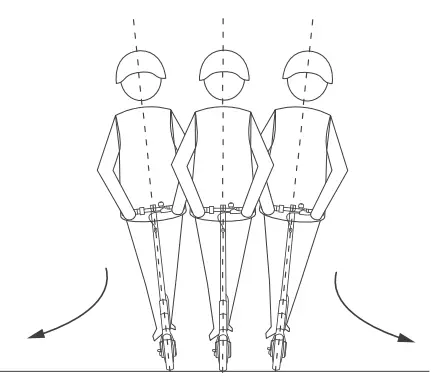
- Tilt your body in the direction of turning, then slowly turn the handlebar
- Beginners suggest controlling the speed at 20km / h
SAFETY INSTRUCTIONS
 It is not recommended to drive in the rain. During the driving, the puddle cannot exceed the position of the battery compartment.

It is strictly forbidden to drive in motor vehicle lanes. Do not drive at high speed. It is recommended that the speed is below 20km / h, otherwise, our company will not bear any responsibility.
 Please control the speed reasonably, and it is forbidden to press the acceleration button when going downhill.
 Do not ride with anyone else, including children
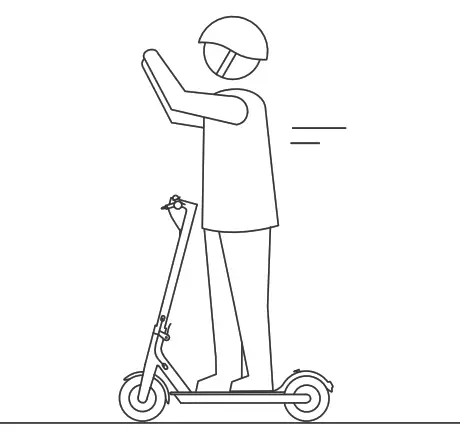
 During driving, do not. extend your hand away from the handlebar
 Do not touch the disc brake and the motor, be careful of burns
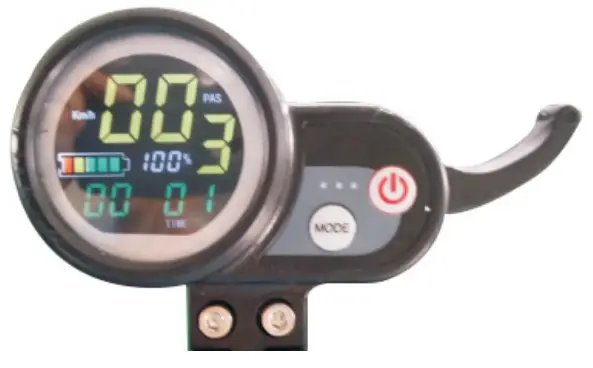
INSTRUMENT OPERATION GUIDE

1, Button
There are two buttons on the display. ![]() is the power button and is the mode button
is the power button and is the mode button
2, Manual
Press the power button ![]() for three seconds to turn it on.
for three seconds to turn it on. ![]() means battery volume. Speed, running status on the top. Range and so on is displayed upon the mode setting. It will auto power off after three minutes when you leave it alone.
means battery volume. Speed, running status on the top. Range and so on is displayed upon the mode setting. It will auto power off after three minutes when you leave it alone.
When CH 2:00 appears on the display means there will be power off in two hours.
Press the ![]() mode button, switch the display contents. There are TIME, TRIP, ODO, DST, VOL, CH 2:00 and so on.TIME means time. Trip means a distance of this trip. ODO means Odometer. DST means the rest range. ( according to the battery status). VOL means battery voltage. CH 2:00 means it will power off in two hours. (some models do not have this function)
mode button, switch the display contents. There are TIME, TRIP, ODO, DST, VOL, CH 2:00 and so on.TIME means time. Trip means a distance of this trip. ODO means Odometer. DST means the rest range. ( according to the battery status). VOL means battery voltage. CH 2:00 means it will power off in two hours. (some models do not have this function)
Press the ![]() mode button for three seconds to erase the TRIP number under the TRIP.
mode button for three seconds to erase the TRIP number under the TRIP.
Press the ![]() power button to initiate modify the numbers. Press the mode button after the numbers is flashing.
power button to initiate modify the numbers. Press the mode button after the numbers is flashing.
Press the ![]() single .01 mode button to modify speed mode. 1 is slow,2is middle speed, 3 is high speed.
single .01 mode button to modify speed mode. 1 is slow,2is middle speed, 3 is high speed.
press the ![]() power button for three seconds to turn it off.
power button for three seconds to turn it off.
3, Setting
Press the ![]() mode and
mode and ![]() power together to access the setting, page.
power together to access the setting, page.
1.Firstly appears P0, press ![]() mode switch next to P1, P2, P3, P4, P5, P6, P7; Meanings: PO tyre size; P1 Undervoltage setting; P2 number of pole pairs; P3 tachometer signal options; P4 kilometre/mile setting; PS Zero starting and non-zero starting mode; P6 cruise setting; P7 launch power setting
mode switch next to P1, P2, P3, P4, P5, P6, P7; Meanings: PO tyre size; P1 Undervoltage setting; P2 number of pole pairs; P3 tachometer signal options; P4 kilometre/mile setting; PS Zero starting and non-zero starting mode; P6 cruise setting; P7 launch power setting
P0, press ![]() the power button, the standard tyre diameter appears.
the power button, the standard tyre diameter appears.
Press ![]() mode button to increase, press
mode button to increase, press![]() power button to decrease. It will auto quit after a few seconds without any data changes.
power button to decrease. It will auto quit after a few seconds without any data changes.
P1,press ![]() power button, the Undervoltage value appears. For example, 315 means battery undervoltage is 31.5V. Press
power button, the Undervoltage value appears. For example, 315 means battery undervoltage is 31.5V. Press ![]() mode to increase 0.5 each press power button to decrease 0.5 each.
mode to increase 0.5 each press power button to decrease 0.5 each.
P2, press ![]() power button, the motor pole pairs number appears.
power button, the motor pole pairs number appears.
Press to increase 1 point each, press![]() to decrease 1 point each.
to decrease 1 point each.
P3, press ![]() power button, There is the number 0 and 1.0 is the standard-setting which means speed data from HALL signal cable. 1 means, external signal.
power button, There is the number 0 and 1.0 is the standard-setting which means speed data from HALL signal cable. 1 means, external signal.
P4, press ![]() power button. There is the number 0 and 1.1 means mile. means kilometer.
power button. There is the number 0 and 1.1 means mile. means kilometer.
P5, press ![]() power button. There is the numbers 0 and 1.0 means zero starting, 1 means non-zero starting.
power button. There is the numbers 0 and 1.0 means zero starting, 1 means non-zero starting.
P6, press![]() power button. There is the number 0 and 1.0 means no cruise. 1 means cruise available.
power button. There is the number 0 and 1.0 means no cruise. 1 means cruise available.
P7, press ![]() the power button. There is the number 0 and 1.0 means soft launch, 1 means hard launch( high power)
the power button. There is the number 0 and 1.0 means soft launch, 1 means hard launch( high power)
5, Error
There are few icon shows the error of electric scooter. Brake errors ![]() motor errors
motor errors ![]() rolling error
rolling error![]() controller errors
controller errors ![]() .
.
DK-218(THIS BUTTON ONLY BELONG TO DUAL DRIVE SCOOTER)
The red button is a dual-drive switch (can exchange single drive and dual drive)
Activate Wind( Yellow button is high-speed and low-speed (ca0 ar adjust or limit the speed)

BASIC OPERATION
Power On/Off
The long press the power button ![]() for 3 seconds, the instrument will be light, which means power on. Power will be automatically off without any operation for ten minutes. Press accelerator, user can control the speed between 1-25km/h.
for 3 seconds, the instrument will be light, which means power on. Power will be automatically off without any operation for ten minutes. Press accelerator, user can control the speed between 1-25km/h.
Power Display
The number of grids shows the remaining battery power. Attention: while power shows 0 grid, the scooter must be charged immediately. Do not let grip disappear totally, which is easy to damage the battery.lt is suggested to charge if there is only one grid power.
Riding Operation
- Choose a wide and flat place.
- Unfold the scooter.
- Adjust the height of the T-bar
- Ensure all safety clamps is closed tightly.
- Press the power button.
- One is on a scooter, and the other is on the ground.
- The scooter will begin to move by triggering the speed switch. Put two feet on the pedal at the same time. The bigger the angle of the speed switch, the faster the scooter moves.
Stop Scooter
Grip the brakes, power for the motor will be cut down immediately and the scooter will be slowed down. Then put one foot on the ground.
GENERAL QUESTIONS
Scooter Cannot Be Power On
- Check to whet her battery gets power or not.
- Open the foot pedal and check whether the battery fuse Is not inserted or has been burnt out.
- Open the pedal to check whether the connector between mainline of the accelerator and controller is plugged in or not.
- Open pedal to check whether the connector between battery and controller Is plugged In or not.
Battery Cannot Be Charged
- Connect the charger to the scooter and charging socket to check whether the indicator light will be on or not.
- Open the foot pedal and check whether the battery fuse is not inserted or has been burnt out.
Scooter Cannot Accelerate.
- Confirm whether the brake lever Is rebounded to its original position or not.
- Open the foot pedal and check whether the connector between the controller and the motor is plugged in actions above have been completed, but the product still does not operate normally. Please contact us.
DAILY CARE AND MAINTENANCE
Cleaning and storage
If you see stains on the scooter’s body, wipe them off with a damp cloth. If the stains won’t scrub off, put on some toothpaste, and brush them with a toothbrush, then wipe them off with a damp cloth. If you see scratches on plastic parts, use sandpaper or other abrasive materials to polish them.
Notes: do not clean the scooter with alcohol, gasoline, kerosene, or other corrosive and volatile chemical solvents to prevent dire damage. Do not wash the scooter with a high-pressure water spray. During cleaning, make sure that the scooter’s turned off, the charging cable is unplugged, and the rubber flap is closed as water leakage may result in electric shock or other major problems.
When the scooter’s not in use, keep it indoors where it is dry and cool. Do not put it outdoors for a long time. Excessive sunlight, overheating and overcooling accelerate tire aging and compromise the scooter and the battery pack’s lifespan.
How To Maintain
- Use original battery packs, use of other models or brands may bring about safety issues;
- Do not touch the contacts. Do not dismantle or puncture the casing. Keep the contacts away from metal objects to prevent short circuits which may result in battery damage or even injuries and deaths;
- Use original power adapter to avoid potential damage or fire;
- Mishandling of used batteries may do tremendous harm to the environment. To protect nature Please follow local regulations to properly dispose of used batteries.
- Mr every use, fully charge the battery to prolong its lifespan
Do not place the battery in an environment where the ambient temperature is higher than 50°C or lower than -20°C (e.g., do not leave the scooter or the batty pack in a car under direct sunlight for an extended time). Do not throw the bay.), pack into the fire as it may lead to battery failure, battery overheating, and even another fire. If the scooter is expected to be le idle for more than 30 days, please fully charge the battery and place it in a dry and cool place. Keep in mind to recharge it every 60 days to protect the ba very from potential damage which is beyond a limited warranty.
Always charge before exhausting the battery to prolong the battery’s Lifespan. The battery pack performs beer at normal temperature and is poor when it Is below 0°C. For instance, when it Is below -20°C, the riding range Is only half or less at normal state. When the temperature rises, the riding range restores.
Note: fully charged Laotie Electric Scooter will last for 120-180 days. The built-In intelligent chip will keep a log of its charging and discharging records. The damage caused by prolonged no charge is irreversible and is beyond a limited warranty. Once the damage Is done, the batty can not be recharged (non-professionals are forbidden to dismantle the battery pack, as it may cause electric shock, short circuit, or even major safety accidents).
CERTIFICATIONS
European Union Compliance Statement Battery recycling information for the European Union

Batteries or packaging for batteries is labeled in accordance with European Directive 2006/66/EC concerning batteries and accumulators and waste batteries and accumulators. The Directive determines the framework for the return and recycling of used batteries and accumulators as applicable throughout the European Union. This label is applied to various batteries to indicate that the battery is not to be thrown away, but rather reclaimed upon the end of life per this Directive.
In accordance with the European Directive 2006/66/EC, batteries and accumulators are labeled to indicate that they are to be collected separately and recycled at end of life. The label on the battery may also include a chemical symbol for the metal concerned in the battery (Pb for lead, Hg for mercury, and Cd for cadmium). Users of batteries and accumulators must not dispose of batteries and accumulators as unsorted municipal waste, but use the collection framework available to customers for the return, recycling, and treatment of batteries and accumulators. Customer participation is important to minimize any potential effects of batteries and accumulators on the environment and human health due to the potential presence of hazardous substances.

User Manual
ES19 Electric scooter
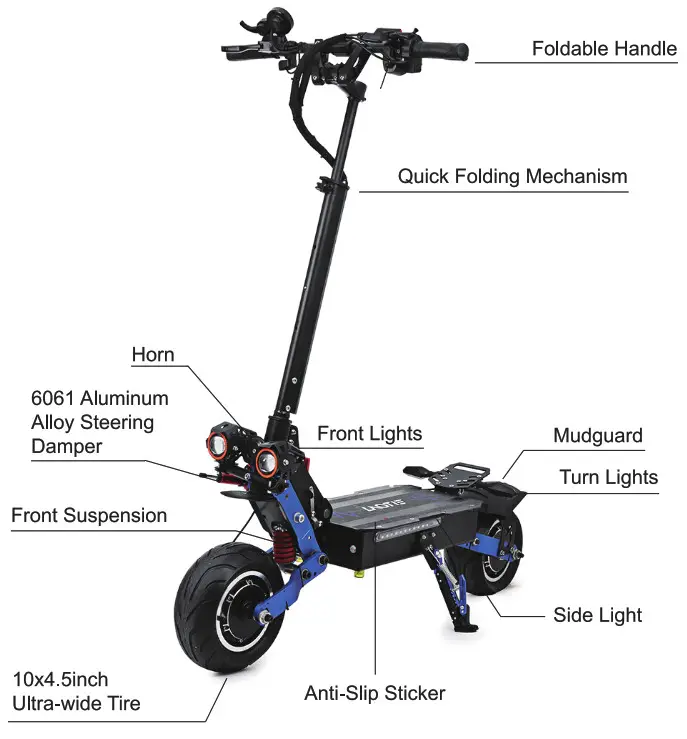
Product Introduction
Product Overview
Main Part Introduction
- Front light button
- Turn signal button
- Horn button
- Volt lock with key
- Smart display (with USB port)
- Power button
- Mode button
- Accelerator
- Speed limit button
- Single / Dual engine button

Folding Instructions
- Press the button on the rod to lower the position
- Rotate the outer ring of the handle
- Fold the handle
- Pull out the red rod
- Press sliver rod to lower the scooter
- Done
Charge your scooter
 |
 |
 |
| Open the rubber flap | Plug the power adapter into the charging port | When charging is completed, put back the rubber flag |
Safety Instructions
- Persons without excellent vision, balance, coordination, reflex, muscle and bone strength, and good decision-making capabilities should not use this product.
- The user of this product assumes ALL risks associated with its To minimize these RISKS, the user must wear a safety helmet, goggles, gloves, elbow and kneepads, and appropriate footwear.
- This manual contains important safety information. It is your responsibility to review this information and make sure that all riders understand all warnings, cautions, instructions, and safety. We’re not liable for incidental damages or consequential damages due directly or indirectly to the use of this product.
- Riding the electric scooter can be hazardous Certain conditions may cause the equipment to fail without the fault of the manufacturer. Like other electric products, the scooter can and is intended to move and it is, therefore, possible to lose control, fall off and/or get into dangerous situations that no amount of care, instruction or expertise can eliminate. If such things occur you can be seriously injured or die, even when using safety equipment and other precautions. RIDE AT YOUR OWN RISK AND USE COMMON SENSE.
Always follow the local laws and regulations.
- Understand your local laws permitting the use of electric scooters.
- Never ride your scooter in conditions of poor visibility.
- Do not do stunts, wheelies or They will increase your chances of injury and damage your LAOTIE ES19.
- Never carry passengers
ON/OFF:
Long press the “Power” button for 3 seconds to start or shut down the scooter. Auto OFF: After five minutes of non-using any function, the scooter will be automatically powered off.
Display content switch:
In power-on condition, short press the “Power” Button to switch TRIP/ODO/VOL on the LCD display.
Note: TRIP is Single mileage, ODO is cumulative mileage, VOL is battery voltage.
Speed Mode Switch: In power-on condition, short press the “Mode” Button to switch speed mode.
Parameters Settings:
Enter/Exit Settings Interface: Long press the “Mode” &“Power Button together for 3 seconds.
P00-P09 Switch: Short press the “Mode” button to switch code number Value Adjustment: Short press the “Mode” or “Power” button to adjust.
| Code Number | Meaning | Detail |
| P00 | Wheel diameter setting | Programmed by the controller, not available. |
| P01 | Under-voltage setting | The standard Parameter should be 50.5 for the LAOTIE ES19 electric scooter. Not recommend changing. |
| P02 | Number of pole pairs setting | Programmed by the controller, not available. |
| P03 | Speed signal selection setting | Programmed by the controller, not available. |
| P04 | KM/ Mile selection setting | 0 is Km, and 1 is Mile. |
| P05 | Non-zero and zero start selection | Programmed by the controller, not available. |
| P06 | Cruise and Non-cruise selection | 0 is Non-cruise, and 1 is Cruise. |
| P07 | Soft start and hard start selection | This P07 setting has been programmed by the controller, not changeable. |
| P08 | Speed limit adjustment | If we want to reduce the top speed, we can press the “Power” or “Mode” button to Decrease or increase the percentage number. (For example, if we want 50% of the top speed, we can reduce the percentage number to be 500/o) |
| P09 | EBS brake strength adjustment | Programmed by the controller, not available. |
Specification
| Items | Specifications |
| Brand | LAOTIE |
| Model | ES19 |
| Motor | Dual 3000W (Peek power) Motors |
| Battery | 60V38.4Ah Lithium Battery |
| Tire | 10×4.5inch Ultra-wide Tires |
| Controller | 45A Controller * 2 |
| Brake | Front and Rear ZOOM Oil Brake & EABS |
| Steering Damper | 6061 Aluminum Alloy Steering Damper |
| Max Speed | 100 km/h |
| Max Range | Dual Motor 60-70 km, Single Motor 135 km |
| Climbing Angle | 50O |
| Max Load | 200KG |
| Gross Weight | 52KG |
| Body Size | 130x126x28cm |
| Folding Size | 127x51x28cm |
| Package Size | 137x36x57cm |
Cleaning and storage
If you see stains on the scooter’s body, wipe them off with a damp cloth. If the stains won’t scrub off, put on some toothpaste, and brush them with a toothbrush, then wipe them off with a damp cloth. If you see scratches on plastic parts, use sandpaper or other abrasive materials to polish them.
Notes: do not clean the scooter with alcohol, gasoline, kerosene or other corrosive and volatile chemical solvents to prevent dire damage. Do not wash the scooter with a high-pressure water spray. During cleaning, make sure that the scooter’s turned off, the charging cable is unplugged, and the rubber flap is closed as water leakage may result in electric shock or other major problems. When the scooter’s not in use, keep it indoors where it is dry and cool. Do not put it outdoors for a long time. Excessive sunlight, overheating and overcooling accelerate tire aging and compromise the scooter and the battery pack’s lifespan.
Battery maintenance
- Use original battery packs, use of other models or brands may bring about safety issues;
- Do not touch the contacts. Do not dismantle or puncture the casing. Keep the contacts away from metal objects to prevent short circuits which may result in battery damage or even injuries and deaths;
- Use original power adapter to avoid potential damage or fire;
- Mishandling of used batteries may do tremendous harm to the To protect the natural environment, please follow local regulations to properly dispose of used batteries.
- After every use, fully charge the battery to prolong its lifespin.
Do not place the battery in an environment where the ambient temperature is higher than 50°C or lower than -20°C (e.g., do not leave the scooter or the battery pack in a car under direct sunlight for an extended time). Do not throw the battery pack into the fire as it may lead to battery failure, battery overheating, and even another fire. If the scooter is expected to be left idle for more than 30 days, please fully charge the battery and place it in a dry and cool place. Keep in mind to recharge it every 60 days to protect the battery from potential damage which is beyond a limited warranty.
Always charge before exhausting the battery to prolong the battery’s lifespan. The battery pack performs better at normal temperature and is poor when it is below 0°C. For instance, when it is below -20°C, the riding range is only half or less at normal state. When the temperature rises, the riding range restores.
Note: fully charged ES19 Electric Scooter will last for 120-180 days. The built-in intelligent chip will keep a log of its charging and discharging records. The damage caused by prolonged no charge is irreversible and is beyond a limited warranty. Once the damage is done, the battery can not be recharged (non-professionals are forbidden to dismantle the battery pack, as it may cause electric shock, short circuit or even major safety accidents).
Contact Us
Technical support Team: [email protected]
If you have any inquires please feel free to contact us,
we will reply within 24 hours.
Official Store
Scan the code to discover the latest from LAOTIE
![]()