

Dymo LetraTag LT-100H Manual
Getting
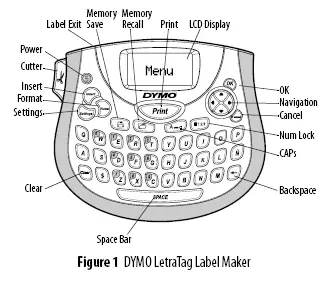
About Your New Label Maker
With your new DYMO LetraTag® label maker, you can create a wide variety of high-quality, self-adhesive labels. The label maker uses DYMO LetraTag (LT) 1/2 inch (12 mm) label cassettes. LT label cassettes are available in a variety of colors and materials such as paper, plastic, metallic, magnetic, and iron-on.
Visit www.dymo.com for a complete User Guide, and for information on obtaining labels for your label maker.
Product Registration
Visit www.dymo.com/registration to register your label maker online.
Getting Started
Follow the instructions in this section to print your first label.
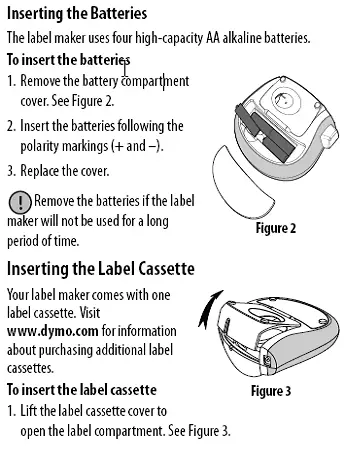
1. Inserting the Batteries
1.Remove the battery compartment cover.
2.Insert the batteries following the polarity markings (+ and –).
3.Replace the cover.
!Remove the batteries if the label maker will not be used for a long period of time.
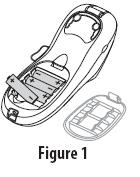
2. Inserting the Label Cassette
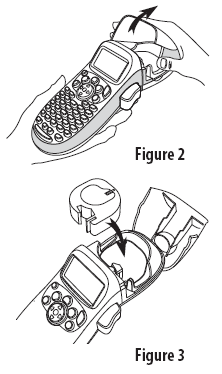
1.Press and release the label cassette cover to open the label compartment. See Figure 2.
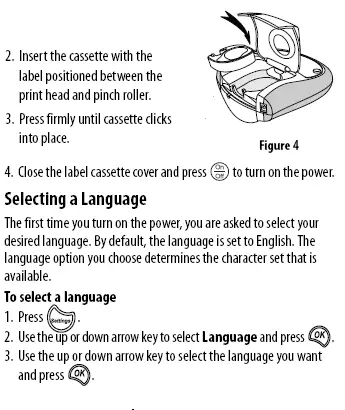
2.Insert the cassette with the label positioned between the print head and pinch roller.
3.Press firmly until cassette clicks into place.
4.Close the label cassette cover and press ON / OFF to turn on the power.
3. Selecting a Language
1.Press  .
.
2.Use the up or down arrow key to select Language and press  .
.
3.Use the up or down arrow key to select the language you want and press .
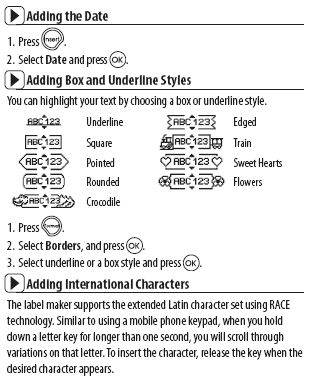
4. Setting the Date and Time
1. Press .
2.Select Set Date and press . The default date is displayed.
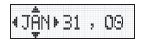
3.Use the left or right arrow key to move the cursor over each setting (month, day, and year) and use the up or down arrow key to increase or decrease the value.
4.When finished, press .The default time is displayed.
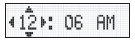
5.Use the left or right arrow key to move the cursor over each setting (hours and minutes) and use the up or down arrow key to increase or decrease the value.
6.When finished, press .
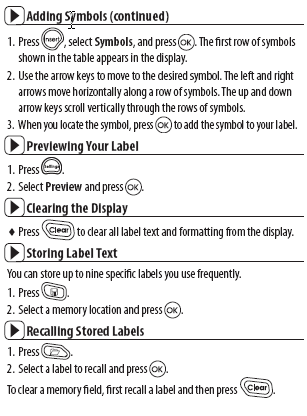
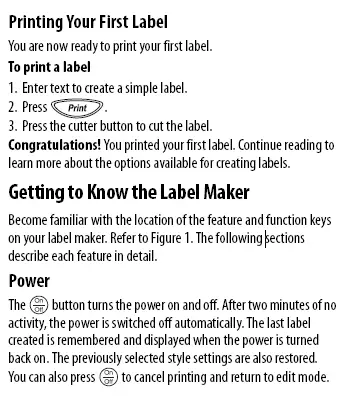
5. Printing Your First Label
1. Enter text to create a simple label.
2. Press  .
.
3. Press the cutter button to cut the label.
4. Remove the paper backing from the label to expose the adhesive, and then attach the label.
Designing Your Label
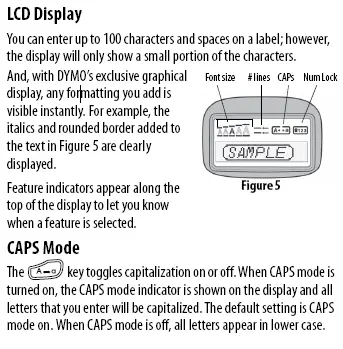
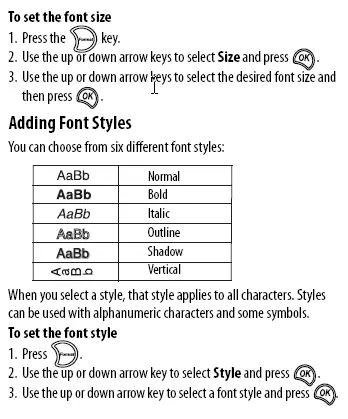
Five font sizes are available for your labels: Extra Small, Small, Medium, Large, and Extra Large.
1.Press the  key.
key.
2.Select Size and press .
3.Select the desired font size and then press .
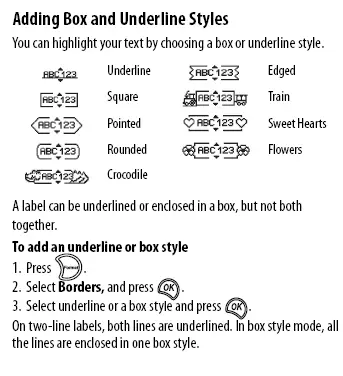
Adding Font Styles
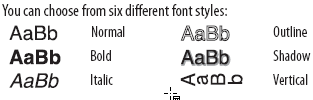
1.Press .
2.Select Style and press .
3.Select a font style and press .
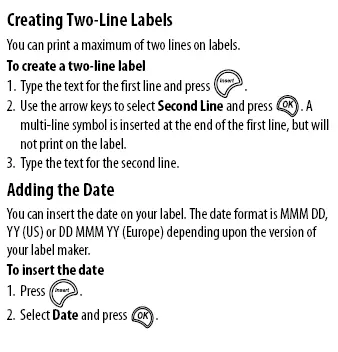
Creating Two-Line Labels
1.Type the text for the first line and press .
.
2.Select Second Line and press . A multi-line symbol is inserted at the end of the first line, but will not print on the label.
3.Type the text for the second line.
1-Year Warranty for your DYMO Product Your electronic DYMO product is sold with a 1-year warranty from the date of purchase against defects in material and workmanship. DYMO will repair or replace your product free of charge on the following conditions:
1.Products returned under this warranty must be accompanied by a description of the defect together with a copy of the product’s proof of purchase and your full contact and delivery details: name, telephone, complete address – street, house number, postal code, city, country.
2.Products returned to DYMO must be adequately packaged. DYMO will accept no liability for goods lost or damaged in transit from the customer.
3.Products must have been used strictly in accordance with operating instructions supplied. DYMO will have no liability for defects caused by accident, misuse, alteration or neglect.
4.DYMO accepts no liability for any consequential loss, damage or expense of any kind resulting from the machines or accessories or the use thereof, save that liability for death or bodily injury caused by such products is not excluded.
5.DYMO label printers are designed for use only with DYMO-branded labels. This warranty does not cover any malfunction or damage caused by the use of third-party labels.
This warranty does not affect your statutory rights as a consumer.
What to do if your product is defective DYMO offers you the following service options:
♦ DYMO Web site: In most situations a visit to www.dymo.com will give you the right assistance. In the Customer Support area, you will find information about your DYMO product, such as Frequently Asked Questions and solutions to known problems. The User Guide also gives you additional information.
♦Dealer: Your DYMO dealer can help you to determine the exact nature of the problem and assist you further.
♦DYMO Help Desk: You can also contact the DYMO Help Desk where an associate will help you to determine the exact nature of the problem and advise you what to do next:
US 1 877 724 8324
Intl +44 203 564 8356
♦Repair Center: You can send your defective product to a DYMO repair center (please see the above-mentioned conditions 1 and 2 on how to replace a defective product). The address of your nearest DYMO repair center can be found at www.dymo.com or you can contact the DYMO Help Desk.
FAQS
How much tape does it come with?
It comes with one tape cartridge
Is this the plus model? What are the differences between the models?
The two printers are functionally the same the only difference is the color of the printer. If you have any further questions, please do not hesitate to give our technical support team a call at 877-724-8324 Monday- Friday 8am- 6pm EST as we will be happy to assist you. We appreciate your business and hope that you will continue to use Dymo products.
What is the difference between DYMO Letra Tag and DYMO Label Manager?
The DYMO Letra Tag is designed for low-volume labeling. It is compact, easy to use and ideal for home or small office use. The DYMO Label Manager is a complete labeling system for professional-looking labels in any quantity.
How do I change the language on my label maker?
Press the “Language” key until the desired language is displayed. See page 3 of the User Guide.
Does this make sticker labels ? And does it come with any replacement tape ?
The labels can be peeled and applied to any surface. The replacements are 3 for $10, on Amazon.
What is the difference between .1 Pack (Machine) and Machine?
One is just the machine and other is machine and an extra roll.
can you change the default font size on the Letra tag LT-100H?
you can change the font size, but once it is turned off you have to change it again. It will always default back to it’s standard setting.
Can this print barcodes?
Unfortunately, this printer does not have the ability to create barcodes. If you have any further questions, please do not hesitate to give our technical support team a call at 877-724-8324 Monday- Friday 8am- 6pm EST as we will be happy to assist you. We appreciate your business and hope that you will continue to use Dymo products.
What is the difference between the 100H plus and 100T plus models?
The only real difference between the 100H and 100T models is in the design; the 100H is a handheld model and the keyboard keys are alphabetical, while the 100T is a tabletop model and has a QWERTY keyboard, similar to an actual computer keyboard.
If you have any additional questions, please let us know!
Does Dymo sell a tape, for the Letra tag, that stays on better then the ones included?
All tape has the same adhesive
Is this battery opersted?
Yes,
Does it use different sizes as in half inch three quarter inch?
you can do different size type-font but the tapes are the same size
what power source do you recommend for this label maker?
It works very well with double A batteries
Will this label maker hold on vacu-seal freezer bags?
No you would need a more industrial style printer for that preferably the 1790415 and tape http://www.dymo.com/en-US/d1-permanent-labels-1-2-in
Does it come with clear tape?
No. Black on white.
What’s the smallest text size it prints?
There are 5 settings: extra small – extra large. If a google document printed at font size 8, extra small would be around 4. It goes extremely small.
]]>
Dymo-Letratag LT100T Manual
About Your New Label Maker
With your new DYMO LetraTag® label maker, you can create a wide
variety of high-quality, self-adhesive labels. You can choose to print
your labels in many different font sizes and styles. The label maker
uses DYMO LetraTag (LT) 12 mm label cassettes. LT cassettes are
available in multiple colors of plastic and metallic tape, and in white
iron-on tape.
Visit www.dymo.com for information on obtaining labels and accessories for your label maker.
Warranty Registration
Please complete the warranty registration card and return it to the appropriate Customer Support address within seven days. Visit www.dymo.com/registration for details or to register online.
Getting Started
Follow the instructions in this section to print your first label.
Connecting the Power
The label maker is powered by standard batteries. To save power, the label maker will automatically turn off after two minutes of inactivity.


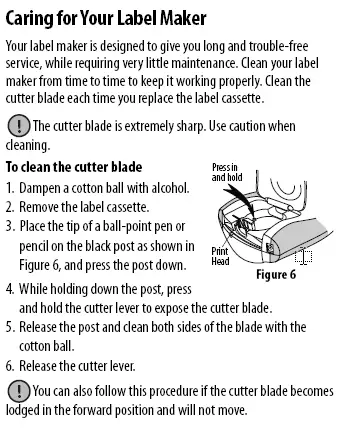
To clean the print head
1. Remove the label cassette.
2. Remove the cleaning tool from inside the label compartment cover.
If you do not have a cleaning tool, contact DYMO Customer Care (http://support.dymo.com).
3. Gently wipe the padded side of the tool across the print head. See Figure 6.
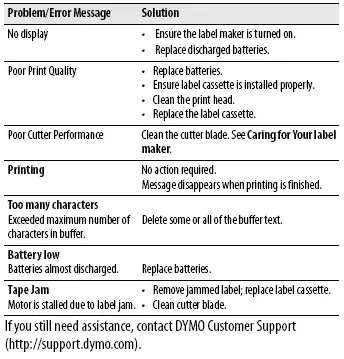
Troubleshooting
Review the following possible solutions if you encounter a problem while using your label maker.
Documentation Feedback
We are constantly working to produce the highest quality documentation for our products. We welcome your feedback.
Send us your comments or suggestions about our user guides. Please include the following information with your feedback:
• Product name, model number, and User Guide page number
• Brief description of instructions that are inaccurate or unclear,
areas where more detail is needed, and so on
We also welcome your suggestions about additional topics you
would like to see covered in the documentation.
Send email messages to: [email protected]
Please keep in mind that this email address is only for
documentation feedback. If you have a technical question, please
contact Customer Support.
This product is CE marked in accordance with the EMC directive and the low voltage directive and is designed to conform with the following international standards:
US FCC Class B Compatibility Safety
– EN 60950, IEC 950, UL 1950 EMC Compatibility EN 61000 3-2/3; EN 61000 4-2/3/4/5/6/8/11; ENV 50204;
EU Immunity
– EN 55024 & addendum A1, A2 Electromagnetic Compatibility (EMC) –
Information Technology equipment, Immunity Characteristics Emissions
– EN 61000-6-3: Electromagnetic Compatibility (EMC) – Part 6: Generic Standards
– Section 3: Emission standard for residential, commercial and light industrial environments. RoHS 2002/95/EC