Medtronic MyCareLink Patient Monitor User Manual
Medtronic MyCareLink Patient Monitor User Manual
Patient Manual Caution: Federal Law (USA) restricts this device to sale by or on the order of a physician.  0123 The following list includes trademarks or registered trademarks of Medtronic in the United States and possibly in other countries. All other trademarks are the property of their respective owners. Medtronic and MyCareLink Explanation of Symbols
|
(European Conformity).This symbol means that the device fully complies with European Directives. |
| 0123 | This symbol means that the device fully complies with the AIMD Directive 90/385/EEC (as amended by 2007/47/EC)(NB 0123) and R&TTE 1999/5/EC |
| IP22 | (Reader) This product complies with international electrical safety rating IP22 with regard to ingress of dust, other foreign objects, and water as required by IEC 60601-11. |
| IP21 | (Monitor base) This product complies with international electrical safety rating IP21 with regard to ingress of dust, other foreign objects, and water as required by IEC 60601-11. |
 |
Keep dry |
 |
Use only with provided power supply |
 |
Type BF applied part |
 |
Caution |
 |
Consult instructions for use |
 |
Package contents |
 |
Home monitor |
 |
Product documentation |
 |
Accessories |
 |
MyCareLink Patient Monitor |
 |
Non-ionizing electromagnetic radiation |
 |
Caution: Federal Law (USA) restricts this device to sale by or on the order of a physician. |
 |
Do not dispose of this product in the unsorted municipal waste stream. Dispose of this product according to local regulations. See http://recycling.medtronic.com for instructions on proper disposal of this product. |
 |
Reorder number |
 |
Serial number |
 |
Temperature limitation |
 |
Humidity limitation |
 |
For US audiences only |
 |
Manufacturer |
 |
Date of manufacture |
 |
Authorized representative in the European community |
 |
Medical equipment with respect to electric shock, fire, and mechanical hazards, only in AAMI/ES 60601-1(2006) / A2 (2010) and CSA 22.2 NO 60601-1 CAN/CSA:2008 |
 |
China RoHS |
 |
USB port |
 |
Direct current. 5V 0.3A |
 |
Refer to instruction manual |
Introduction
This manual is intended to help you use the MyCareLink Patient Monitor Model 24950. If you have any questions setting up or using the monitor, or if you have problems with the monitor, please contact Medtronic. See “How to contact Medtronic” on page 40, or use the information found on the back cover of this manual. If you have questions about your medical condition, talk to your doctor. Your doctor knows your medical history.
About your monitor
The monitor is an electronic device that provides an easy way for your doctor to obtain information about your heart device. The monitor gathers this information to allow your doctor to manage your care.
How your monitor gathers information from your heart device is determined by the kind of heart device you have. Some heart devices communicate wirelessly with your monitor. Once you have set up your monitor and completed an initial manual transmission, themonitor is designed to automatically gather information from your implanted heart device. This automatic wireless communication between your heart device and the monitor takes place at times scheduled by your doctor or clinic. Sending heart device information to your clinic using wireless technology does not require you to interact with your monitor. The process is silent and invisible.
Clinics typically schedule the automatic process to occur while you sleep. For this reason, the monitor must remain plugged into a power outlet. The heart device information is sent to your clinic using the cellular phone network.
Other heart devices require you to use your monitor’s reader to gather information from your heart device so your monitor can send the information to your clinic.
To find out which kind of device you have, see your heart device patient manual, or talk to your doctor.
The monitor is intended specifically for your use only. It will not work with other implanted devices and should only be used by you as directed by your doctor. Unauthorized use by others with implanted devices could interrupt the prescribed operation of their device.
Sending information at the request of your doctor or clinic
You will sometimes need to send information at times other than those scheduled by your doctor or clinic. These times are: • When completing first‐time setup, to allow automatic wireless communication between your monitor and your heart device • At the request of your doctor or clinic
See “Sending information using the monitor” on page 21 of this manual.
Indications for use
The monitor is an external electronic device that interfaces with Medtronic implanted heart devices and a telecommunications connection to transmit stored implanted heart device data to the physician or clinician.
Contraindications
There are no known contraindications for the monitor.
Warnings
Warning: If you are feeling ill, seek immediate medical attention. Do not use the monitor unless directed by your doctor. If there is an emergency, call your local emergency number. If your doctor has provided instructions, follow them. Waiting to seek medical attention could be dangerous to your health.
Warning: To ensure the safe operation of the monitor and your implanted heart device, follow these instructions: Use the monitor as described in this manual. Save this manual. Use the monitor only at the times prescribed by your doctor.
If you need further assistance, please contact Medtronic. See “How to contact Medtronic” on page 40, or use the information found on the back cover of this manual.
Warning: Do not use the monitor if the monitor does not operate as described in “Sending information using the monitor” on page 21. To ensure proper operation of your implanted heart device, follow the instructions in this manual about positioning the reader over your implanted heart device. If you do not follow these instructions, the monitor may not be recording or sending information from your implanted heart device. If you need further assistance, please contact Medtronic. See “How to contact Medtronic” on page 40, or use the information found on the back cover of this manual.
Warning: Do not modify this equipment. Modifications may impact monitor effectiveness and adversely affect your safety.
Warning: Do not touch open ports or plugs, or insert your finger or any objects into the open ports on the monitor. Inserting your finger or objects into an open port may result in electrical shock.
Warning: Important safety instructions. When using the monitor, basic safety precautions should always be followed to reduce the risk of fire, electric shock, and injury to persons, including the following:
• Do not use the monitor near water, for example, near a bathtub, washbowl, kitchen sink, or laundry tub, in a wet basement, or near a swimming pool. • If you suspect a gas leak, do not use the monitor and do not use a telephone in the vicinity of the leak to report a gas leak.
Precautions
- Use only the supplied power cord with this monitor. Using a different power cord could damage the monitor and adversely affect your safety.
- Do not use the monitor within two meters (six feet) of a television, computer monitor or screen, or wireless communications equipment such as wireless home network devices, mobile phones, cordless telephones and their base stations, or ‘walkie‐talkies.’ Using your monitor near these devices could interfere with communication between your implanted heart device and the monitor.
Contents of the monitor package
You should receive the following:
- One Medtronic MyCareLink Patient Monitor Model 24950 base
- One Medtronic MyCareLink Model 24955 removable reader
- One Medtronic MyCareLink Model 24956 power cord
- One Patient Manual
- One Quick Start Guide
- One set of ‘For Your Records’ labels
- One Cellular Modem safety manual
About the monitor
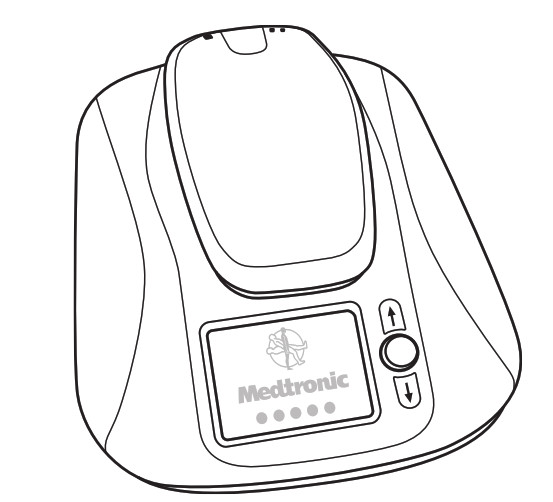
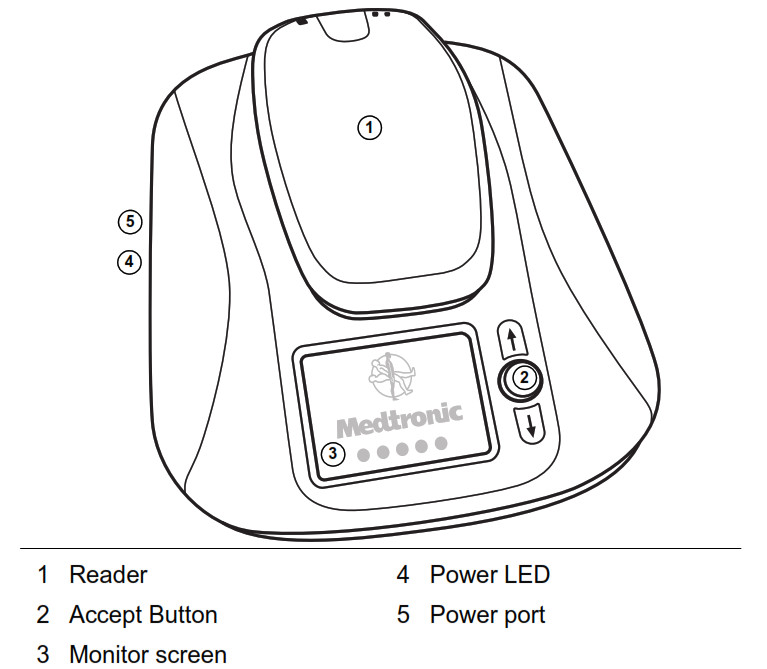 Figure 1: Monitor base and removable reader (front view) The monitor (Figure 2) consists of three components: • A monitor base • A removable reader to gather information from your implanted heart device • A power cord
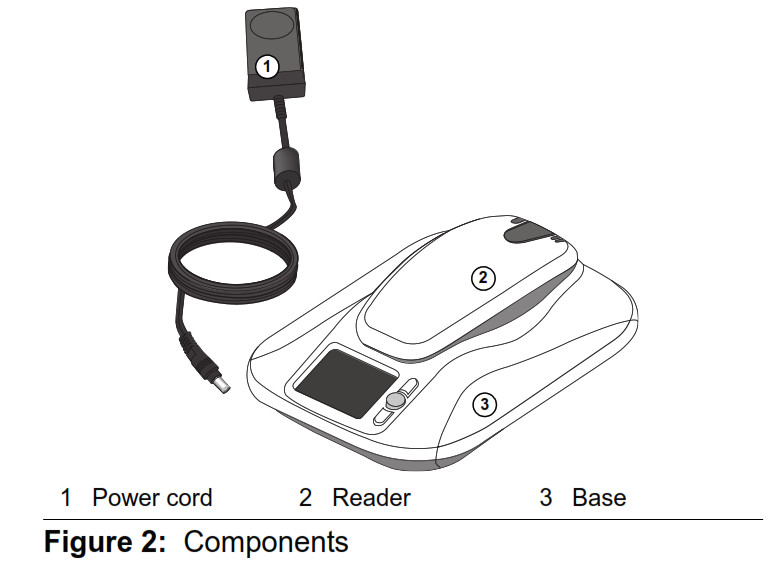
Choosing a place to set up the monitor
Consider the following recommendations for choosing a place to set up the monitor:
- Place the monitor near where you sleep, preferably on a nightstand or a table. Your monitor is capable of receiving signals from your heart device up to 3 meters (10 feet) away, but you should consult your heart device manual for recommended distances specific to your device.
- Place the monitor where you can sit comfortably and see the front of the monitor.
- Place the monitor in a location that receives an adequate cellular signal.
- Place the monitor within reach of a power outlet, and position it so that it can be unplugged from the power outlet if necessary.
- Do not place the monitor anywhere it could get wet.
Setting up the monitor
Before you use the monitor you will need to plug the monitor into a power outlet. To plug in your monitor, locate the power cord port on the left side of the monitor base. Insert the power cord end into the monitor side port, then plug the wall plug into a wall outlet. Caution: Use only the supplied power cord with this monitor. Using a different power cord could damage the monitor and adversely affect your safety. Before you use the monitor you will need to plug the monitor into a power outlet. To plug in your monitor, locate the power cord port on the left side of the monitor base. Insert the power cord end into the monitor side port, then plug the wall plug into a wall outlet. Caution: Use only the supplied power cord with this monitor. Using a different power cord could damage the monitor and adversely affect your safety. 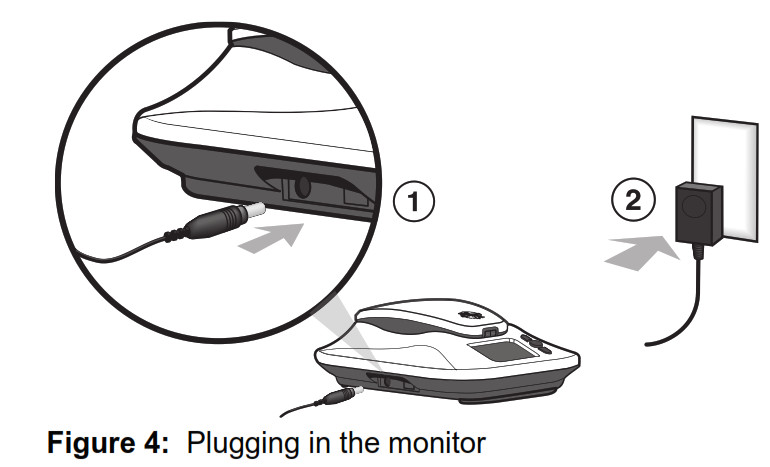
Sending information using the monitor
Use this procedure at these times:
- When completing first‐time set‐up.
- At the request of your doctor or clinic.
Before using your monitor:
- Turn off any television, computer monitor, or screen within two meters (six feet) of the monitor.
- Turn off or remove any cellular phone or other wireless devices that is within two meters (six feet) of the monitor.
When you send a transmission using this procedure, your monitor screen will also show step-by-step instructions for you to follow. You can use these on‐screen instructions to guide you through this procedure. Note: If the monitor screen shows an error message icon during this procedure, refer to “Troubleshooting error messages” on page 31 of this manual. To send information using your monitor, perform the following steps:
- If the monitor screen is dark, press the “A c c e p t ” button on the front of the monitor to wake up the screen.
- When monitor wake‐up is complete, the monitor screen will show an image indicating that the monitor is ready to begin a transmission.
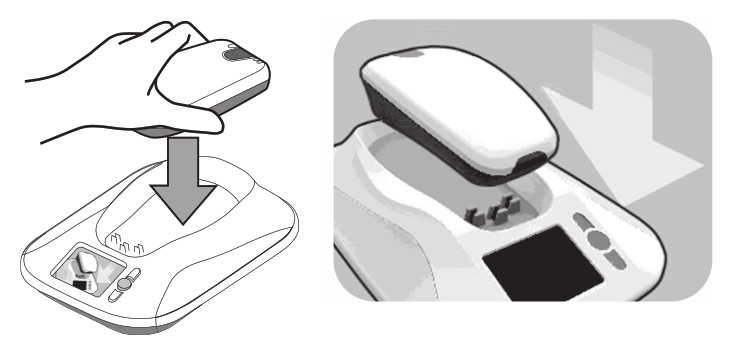
- Press the “Accept” button. The monitor screen will show an image instructing you to pick up the reader.
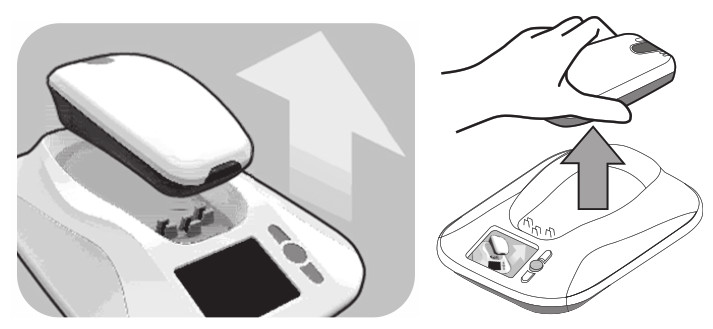
- When the monitor screen shows an image of a reader being placed over a device, hold the reader over your implanted device. You may either hold the reader snugly against your clothing or against your bare skin.

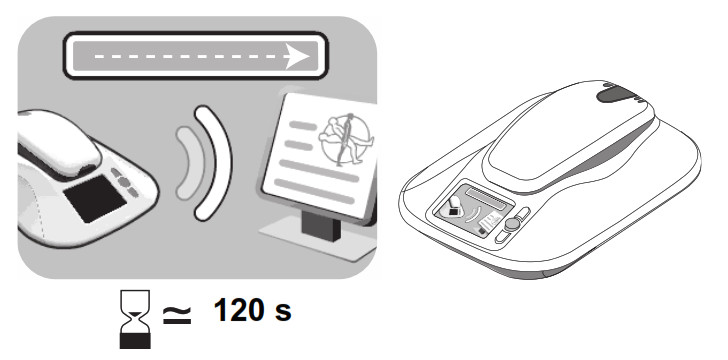
- When the monitor begins reading data from your implanted device, the monitor screen will show a green progress bar, indicating that data is being sent from the reader to the monitor base.
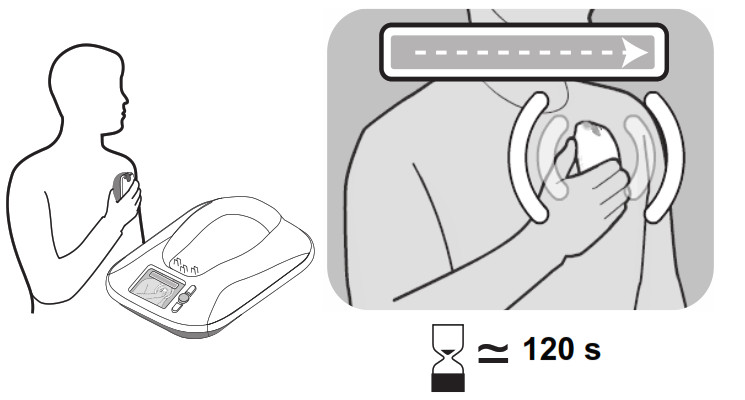 – While the monitor is communicating with your implanted device, remain still and make sure the monitor reader is placed over your implanted device. This process typically takes less than 3minutes but may take up to 12 minutes.
 - When the monitor is finished communicating with your implanted device, the monitor will make two short tones, and the monitor screen will instruct you to return the reader to the monitor base.
- The monitor will send your implanted device data to the CareLink Network. The monitor screen will show a green progress bar indicating that data is being sent.
- Your transmission is complete when the monitor makes two short tones and the monitor screen shows a green checkmark image.

Start-up screen information
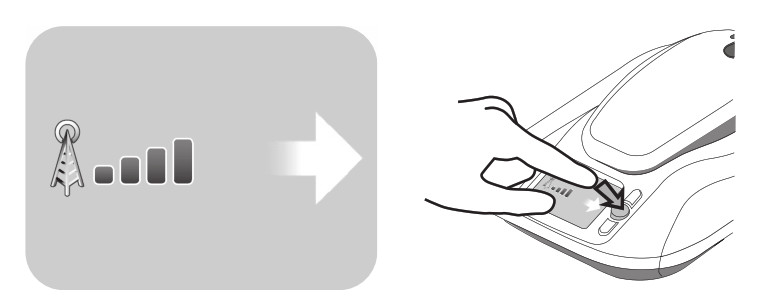
When your monitor is activated by pressing the “Accept” button, your monitor screen will show a system status image with the following information: 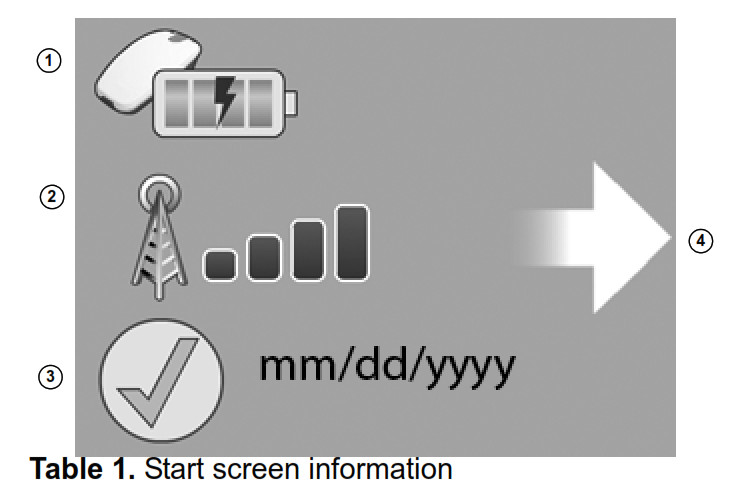
| Image | Description |
| 1 Reader status icon | This area shows the status of the reader. The reader icon may show the reader is charging, missing, or has a low battery. |
| 2 Cellular signal icon | This icon shows the status of the monitor’s connection to a cellular network |
| 3 Last transmission | This icon shows the date of your last successful transmission to the CareLink Network. Note: The date format shown on your monitor will depend on which country you are in. |
| 4 Start transmission icon | This icon means the monitor is ready to begin a transmission. Press the “Accept” button to begin a transmission. |
Reader LED indicator lights
The monitor’s reader has three LED indicator lights that indicate the status of a transmission, the connection between the reader and monitor base, and the reader’s battery status. 
| Indicator Light | Description |
| 1 Green indicator light | The green indicator light shows transmission of data between the reader and monitor base. When the green indicator light is lit, the reader is transmitting data to the monitor base. |
| 2 Blue indicator light | The blue indicator light shows the connection between the reader and monitor base. • A flashing blue light means the reader is establishing a connection with the monitor base • A sold blue light means the reader and monitor base are connected. |
| 3 Amber indicator light | The amber indicator light shows the battery status of the reader. If the amber indicator light is lit, the reader battery is low. Place the reader on the monitor base to recharge the reader battery. |
When you place the reader on the monitor base, all three indicator lights will flash briefly to indicate that the reader is properly docked with the monitor base.
Troubleshooting error messages
Use the information in this section to troubleshoot the use of your monitor. You can find information about the following errors:
- Error #3230 ‐ “Reader not found by monitor base” on page 33
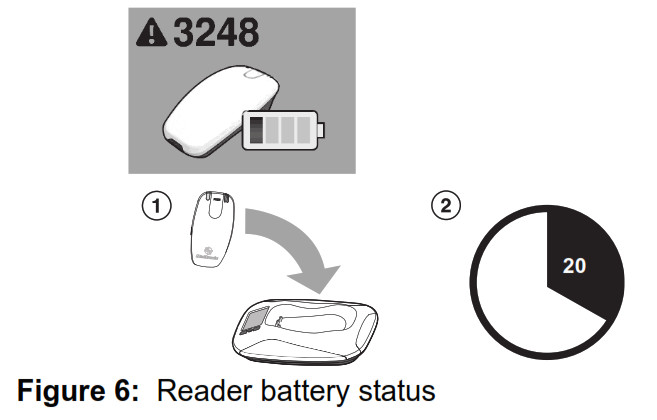
- Error #3248 ‐ “Reader battery status” on page 34
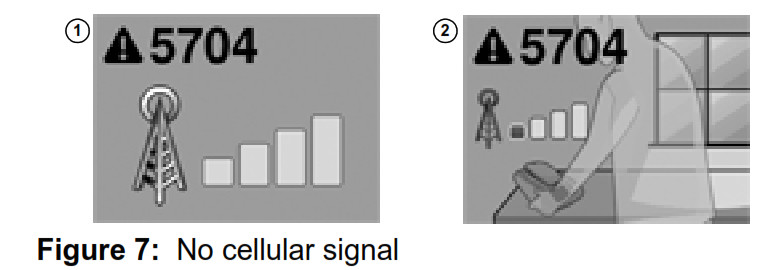
- Error #5704 ‐ “No cellular signal” on page 35
- “Reader position” on page 36
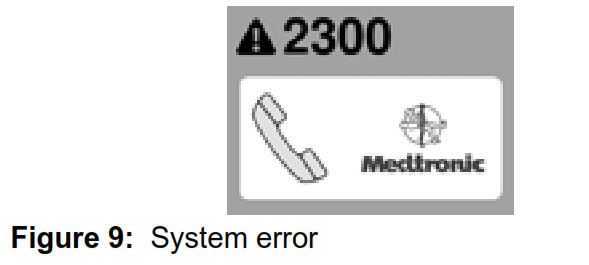
- “System errors” on page 37
If you receive an error message while using your monitor, your monitor screen will show an error icon with an orange background and a 4 digit error number. Some error messages may include an animated demonstration to help you correct the problem. Follow these instructions to resolve the error. For some errors, you will be instructed to contact Medtronic. See “How to contact Medtronic” on page 40, or use the information found on the back cover of this manual.
Reader not found by monitor base
If the monitor base is unable to communicate with the reader, the monitor screen will show Error #3230 ‐ No reader found by monitor base. 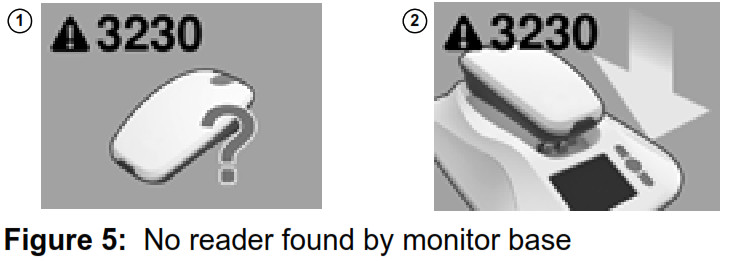 This can occur when:
- The reader is off the monitor base, and has powered down.
- The reader is off the base station and has no battery life remaining.
- The reader is out of range of the monitor base.
To restore communication between the reader and monitor base, return the reader to the monitor base cradle, and wait for the error message to disappear. If returning the reader to the monitor base does not correct the error, please contact Medtronic. See “How to contact Medtronic” on page 40, or use the information found on the back cover of this manual. Reader battery status The monitor reader includes a rechargeable battery. If the reader battery needs to be recharged, the monitor’s screen will show Error #3248 ‐ Recharge Reader. In addition, the amber LED indicator light on the reader’s head may be lit.
- To recharge the reader, place the reader on the monitor base. Recharging the reader battery will take approximately 20 minutes.
Note: The monitor reader should be replaced when your reader battery no longer recharges, or only holds a charge for a brief period. If you are unable to complete a transmission without receiving the Recharge Reader error message, please contact Medtronic. See “How to contact Medtronic” on page 40, or use the information found on the back cover of this manual. No cellular signal Your monitor uses a cellular telephone connection to transmit implanted device data to your doctor. If your monitor does not have adequate cellular service connection, the monitor’s screen will show Error #5704 ‐ No cellular signal. See Figure 7
- Change the orientation of the monitor by rotating the monitor base.
- Change the location of your monitor so it is near a window or outside wall. Remember, your monitor should be placed within 3 meters (10 feet) of where you sleep.
- If you are unable to find an adequate cellular signal for your monitor, please contact Medtronic. See “How to contact Medtronic” on page 40, or use the information found on the back cover of this manual.
 Reader position The reader must be properly positioned over your implanted device in order to communicate with it. If the reader is moved out of position during a transmission, you will hear 3 short tones from your monitor, and see the Reader Placement Problem image on the monitor screen. See Figure 8.
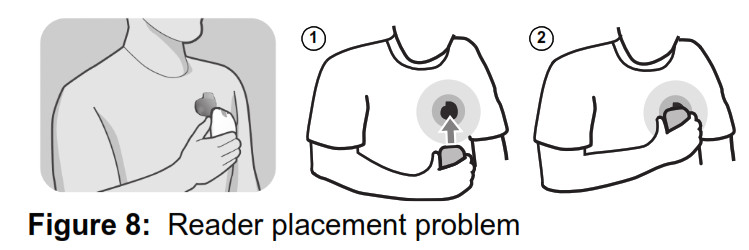
- Reposition the reader over your implanted device.
- When the reader is repositioned correctly a green progress bar will appear on the monitor screen. When the reader is positioned correctly, the monitor will resume data collection. Hold the reader in position until your transmission is completed.
System errors If your monitor encounters a system error, your monitor screen will show a system error icon and an error message code. This image indicates that your monitor has encountered an internal error, and does not mean that there is a problem with your implanted heart device.
If this occurs, restart the monitor by disconnecting then reconnecting the monitor’s power supply.
If restarting your monitor does not correct the error, please contact Medtronic. See “How to contact Medtronic” on page 40, or use the information found on the back cover of this manual.
Refer to the error code shown on your monitor screen to help Medtronic identify the problem.
Traveling with your monitor
Note: Your monitor will work in most locations. However, in some locations, cellular service may not be available. If you are planning on traveling with your monitor, please contact Medtronic to confirm availability of coverage.
Replacing your power supply or reader If your power supply or monitor reader is lost or damaged, you can contact Medtronic to receive information on ordering a replacement. See “How to contact Medtronic” on page 40, or use the information found on the back cover of this manual.
Monitor care Do not drop your monitor or reader on hard surfaces. Dropping the monitor or reader can damage them and prevent them from functioning properly. If your monitor or reader has been damaged, please contact Medtronic. See “How to contact Medtronic” on page 40, or use the information found on the back cover of this manual.
You can clean the exterior of your monitor by using a clean cloth and light application of water, hydrogen peroxide, alcohol (methyl, ethyl, or Isopropyl), or a mild detergent.
The monitor does not require any preventative inspection or maintenance. Caution: Do not get your monitor wet. If you get your monitor wet, please contact Medtronic. See “How to contact Medtronic” on page 40, or use the information found on the back cover of this manual.
How to contact Medtronic
Patients in the United States To speak directly with a Patient Services Specialist, call 1‐800‐929‐4043. Our staff is available Monday through Friday from 8:00 AM to 5:00 PM (Central Standard Time). Medtronic is dedicated to providing you with the most up‐to‐date information available about your monitor. Website information is available 24 hours a day. • Medtronic website: www.medtronic.com • Medtronic CareLink Network information: www.medtronic.com/patients/carelink
Patients outside the United States If you have questions that are not covered in this manual or you want more in‐depth information about your heart monitor, please contact Medtronic using the information on the back cover of this manual.
Monitor specifications
Open Source Software The operating system for this device includes open source software. Information on open source software licensing can be found at www.medtronic.com/mycarelink/monitor/software Standards (The monitor complies with the following:) EMC: CFR 47 Part 15 Patient Safety: IP22 (monitor base); IP21 (reader); IEC 60601‐1, ETL, Type BF applied part (reader), ordinary, continuous operation, Class II, not suitable for use in the presence of a flammable anesthetic mixture with air or with oxygen or nitrous oxide.
Recommended environmental conditions during storage and transport
Temperature: ‐40 °C to 70 °C (‐40 °F to 158 °F) Relative Humidity: 5% to 95%
Safe when stored or transported in temperatures from ‐40 °C without relative humidity control to 70 °C at a relative humidity of 5% to 95%, including condensation.
Recommended operating conditions
Temperature: 5°C to 40 °C (41 °F to 104 °F) Safe when operated at temperatures from 5°C to 40 °C (41 °F to 104 °F) in relative humidity from 15% to 93%, non‐condensing.
Power supply To assure compliance to the specified standards, use only the power supply that came with your monitor: Medtronic Model Number 24956. Rated Voltage AC 100 ‐ 240V Rated Line Frequency 50 ‐ 60Hz Current 0.5A Max. at 90 VAC input The power supply is to be used for mains disconnection.
Expected service life The expected service life of a monitor is 5 years. Disposal
Follow local regulations for proper disposal of this product. Do not dispose of this product in the unsorted municipal waste stream. This product contains materials that can harm the environment. See http://recycling.medtronic.com for instructions on proper disposal of this product.
Testing Electromagnetic Compliance (EMC) testing shows that the monitor provides reasonable protection against harmful interference in a typical medical installation. However, there is no guarantee that interference will not occur in a particular installation. If the monitor does cause harmful interference to other devices or is negatively impacted by other devices, the user is encouraged to try to correct the interference by one or more of the following measures:
• Reorient or relocate the devices. • Increase the separation between the devices. • Consult Medtronic for help.
If you experience performance issues with your Model 24950 MyCareLink Monitor, try using it at least two meters (6 feet) away from all wireless communication devices such as cellular phones, television monitors, or computer screens.
Safety and technical inspection An annual safety and technical inspection of the monitor is not required.
Consumer information and Requirements
Declaration of conformity Medtronic declares that this product is in conformity with the essential requirements of Directive 1999/5/EC on Radio and Telecommunications Terminal Equipment and Directive 90/385/EEC on Active Implantable Medical Devices.
FCC Requirements The monitor has been tested for compliance to FCC regulations. Changes or modifications of any kind not expressly approved by Medtronic could void the user’s authority to operate the monitor.
FCC ID LF524950 FCC ID LF524955 (contains FCC ID T7V1315) This device complies with part 15 of the FCC Rules. Operation is subject to the following two conditions: (1) This device may not cause harmful interference, and (2) this Device must accept any interference received, including interference that may cause Undesired operation. The monitor has been tested for compliance to FCC regulations.
Changes or modifications of any kind not expressly approved by Medtronic could void the user’s authority to operate the monitor
This transmitter is authorized by rule under the Medical Device Radiocommunication Service (in part 95 of the FCC Rules) and may not interfere with stations operating in the 400.15‐406 mhz band in the meteorological aids, meteorological satellite, and earth exploration satellite services (i.e. transmitter and receivers used to communicate weather data) and must accept any interference received, including interference that may cause undesired operation. This transmitter shall be used only in accordance with FCC Rules governing the Medical Device Radiocommunication Service. Analog and digital voice communications are prohibited. Although this transmitter has been approved by the Federal Communication Commission there is no guarantee that it will not receive interference or that any particular transmission from this transmitter will be free from interference.
Industry Canada Requirements IC ID 3408D‐24950
IC ID 3408D‐24955 (contains IC ID 216Q‐1315)
Operation is subject to the following two conditions: (1) this device may not cause interference, and (2) this device must accept any interference, including interference that may cause undesired operation of the device.
“This device may not interfere with stations operating in the 400.150‐406.000 MHz band in the meteorological aids, meteorological‐satellite, and earth exploration‐satellite services and must accept any interference received, including interference that may cause undesired operation.”
![]() Manufacturer Medtronic, Inc. 710 Medtronic Parkway Minneapolis, MN 55432 USA www.medtronic.com Tel. +1 763 514 4000 Fax +1 763 514 4879 Medtronic USA, Inc. Information for patients: Toll-free +1 800 551 5544 (7 a.m.– 6 p.m., Monday–Friday, central time) Fax +1 763 514 1855 Medtronic E.C. Authorized Representative Medtronic B.V. Earl Bakkenstraat 10 6422 PJ Heerlen The Netherlands Tel. +31 45 566 8000 Fax +31 45 566 8668 Technical manuals: www.medtronic.com/manuals Europe/Africa/Middle East Headquarters Medtronic International Trading Sàrl Route du Molliau 31 Case Postale 84 CH-1131 Tolochenaz Switzerland Tel. +41 21 802 7000 Fax +41 21 802 7900 Australia Medtronic Australasia Pty Ltd 97 Waterloo Road North Ryde, NSW 2113 Australia Canada Medtronic of Canada Ltd. 99 Hereford Street Brampton Ontario L6Y 0R3 Tel. +905 460 3800 Fax +905 826 6620 Toll-free in Canada +1 800 268 5346 © Medtronic, Inc. 2012 M953321A001A 2013-01-25 *M953321A001*
Manufacturer Medtronic, Inc. 710 Medtronic Parkway Minneapolis, MN 55432 USA www.medtronic.com Tel. +1 763 514 4000 Fax +1 763 514 4879 Medtronic USA, Inc. Information for patients: Toll-free +1 800 551 5544 (7 a.m.– 6 p.m., Monday–Friday, central time) Fax +1 763 514 1855 Medtronic E.C. Authorized Representative Medtronic B.V. Earl Bakkenstraat 10 6422 PJ Heerlen The Netherlands Tel. +31 45 566 8000 Fax +31 45 566 8668 Technical manuals: www.medtronic.com/manuals Europe/Africa/Middle East Headquarters Medtronic International Trading Sàrl Route du Molliau 31 Case Postale 84 CH-1131 Tolochenaz Switzerland Tel. +41 21 802 7000 Fax +41 21 802 7900 Australia Medtronic Australasia Pty Ltd 97 Waterloo Road North Ryde, NSW 2113 Australia Canada Medtronic of Canada Ltd. 99 Hereford Street Brampton Ontario L6Y 0R3 Tel. +905 460 3800 Fax +905 826 6620 Toll-free in Canada +1 800 268 5346 © Medtronic, Inc. 2012 M953321A001A 2013-01-25 *M953321A001*
Medtronic MyCareLink Patient Monitor User Manual – Download [optimized]
Medtronic MyCareLink Patient Monitor User Manual – Download
FAQS
Is this the same as medtronic my care monitor 24950j?
This is a 24950 model (without the “J”). You will need to check with your provider to see if it is compatible before purchasing.
What data is transmitted?
Nothing personal. Only data regarding your heart.
What is the difference between the 24950 and the 24960?
The 24950 is a home monitor, while the 24960 is a hospital monitor. The 24950 has no telemetry capabilities and does not have the ability to transmit data to a computer. The 24951 is a home monitor that has telemetry capabilities.
What is the difference between the 24960 and the 24951?
The 24960 and 24951 are exactly the same, except for one thing. The 24960 has a non-volatile memory chip that allows it to store data from up to 7 days. The 24951 does not have this chip.
What software do I need to use with my MyCareLink?
You will need either Medtronic’s CareLink software or CardioNet’s Cardiocap Data Manager software. Both of these programs are available for free download from Medtronic’s website.
Can I use my MyCareLink with other devices such as a printer or PC?
No, you can only use your MyCareLink with CareLink or Cardiocap Data Manager software. You cannot connect your MyCareLink directly to any other device such as a printer or PC.
What does a Medtronic monitor do?
It provides easy access to information that allows your doctor to: Manage your heart condition. Monitor your implanted heart device. Obtain information from your implanted heart device on an as-needed basis.
What is Medtronic CareLink?
Today the CareLink™ network is the leading remote monitoring system, with 99.9% of Medtronic devices compatible with the network. 2. The network is customizable and flexible, allowing you to move important data to the forefront and view critical transmissions first via CareAlert™ notifications.
Why is my Medtronic monitor flashing blue?
The green indicator light shows transmission of data between the reader and monitor base. When the green indicator light is lit, the reader is transmitting data to the monitor base. The blue indicator light shows the connection between the reader and monitor base.
Can you shower with a heart monitor?
Don’t take the Holter monitor off — it must be worn during the entire recording period, even while sleeping. Water can damage a Holter monitor. Don’t swim, shower or bathe for the entire time you’re wearing a Holter monitor.
What is CareLink and how does it work?
It’s a financial program that works kind of like a credit card in the sense that any bills that you accumulate while you are a part of CareLink you wind up having to pay back over time. To give you an example, let’s say you had a hospital stay with CareLink and you get a $10,000 hospital bill.
How long can it take the Mycarelink monitor to update?
This screen indicates that the monitor is looking for or receiving a software update. The animated Software Update screen typically displays for about 10-15 minutes before rebooting, but could display for up to 60 minutes depending on the size of the update.
How long can it take the Mycarelink monitor to update?
Do Medtronic pacemakers beep?
It is designed to get your attention, not to alarm you. If you hear a beeping tone, just contact your doctor for instructions.
What are the three lines on a hospital monitor?
The most basic monitors show your heart rate, blood pressure, and body temperature. More advanced models also show how much oxygen your blood is carrying or how fast you’re breathing.
What activities can you not do with a pacemaker?
Don’t engage in excessive physical activity, including movements like leaning on your arms or stretching your arms overhead or behind you. Don’t rub your chest area around or near the incision. Don’t lift heavy objects, which may even include a heavy purse or a dog or cat, especially on the side of the pacemaker.
What is CareLink?
University Health cares about each of our patients, regardless of income level. We offer the CareLink financial assistance program to Bexar County families who do not have health insurance and do not qualify for other coverage.
Do pacemakers record data?
These pacemakers continuously collect data on cardiac events and carry out measurements by, for example, periodically measuring the amplitude of atrial signals. This information is then stored in the pacemaker memory for later retrieval and automatic analysis by the DOs function.
What is a Medtronic heart monitor?
The LINQ II™ insertable cardiac monitoring system is the world’s most accurate ICM,1-4 personalized for the patient’s lifestyle and customized for the clinician’s workflow. LINQ II ICM is ideal for patients experiencing infrequent symptoms that require long-term monitoring or ongoing management.
![]()
Medtronic Registering your CareLink Personal account Installation Guide
Registering your
Simple process to register your account
- Go to Carelink.minimed.eu Select your country and prefered language and click on ‘Create an account’.

- Confirm your language and country.

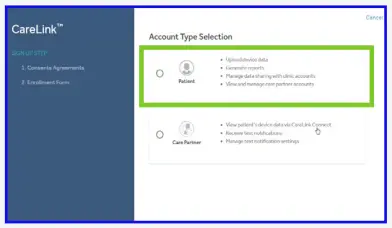
- Select ‘Patient’ as your account type and click ‘Next’.
- You will be taken through the consent process and your consent is required for account set up. Please ensure you scroll down to the bottom of the pages and make your selection.

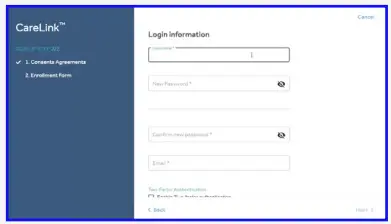
- Please fill in the information in the fields provided. Tip: the password must be at least 8 characters.
You must have access to the email entered for account verification.
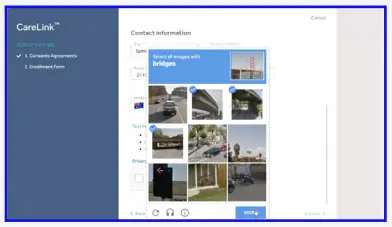
- Confirm ‘You are not a robot’ by selecting the images as instructed.
- Enter the verification code you received via email.

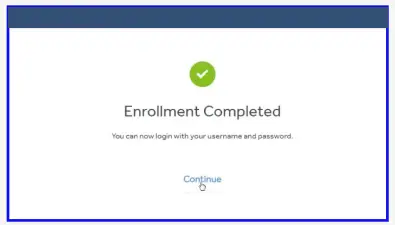
- Your enrollment is now complete.
You are now ready to upload your pump
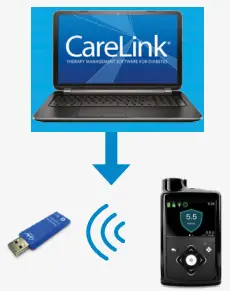
To ensure success, get everything ready:
- Have your blue adapter to hand
- Go to Carelink.minimed.eu on your laptop
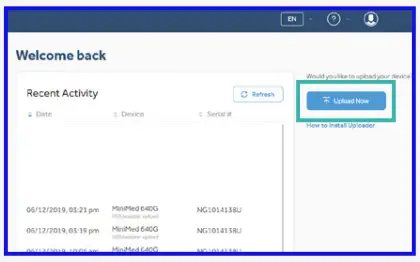
- Log into your Account
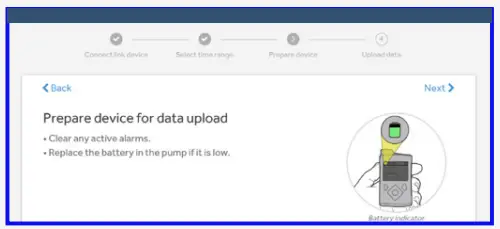
Make sure your pump is ready to upload:
Check that the pump is not on one of these screens.
- Active alarms
- Low battery

Connect your pump
- Click “Upload now” and wait for uploader screen to show.If you have not yet installed the CareLinkTM uploader the software will prompt you to do so before proceeding.
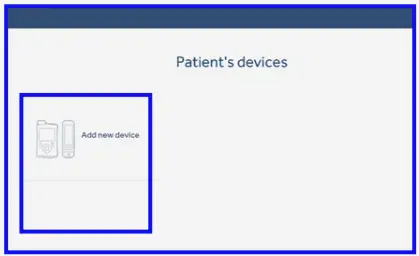
First upload - Select ‘Add new device’.
- Select ‘MiniMed™ pump’.
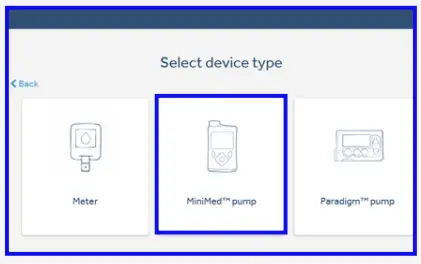
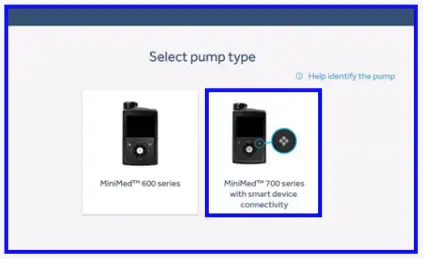
- Select your pump type. If you are unsure of your pump type please click on ‘Help identify the pump’.
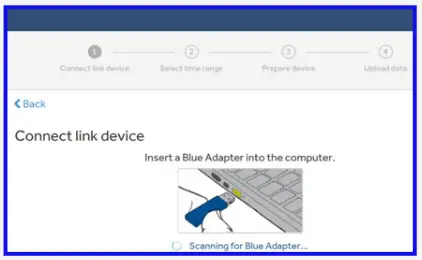
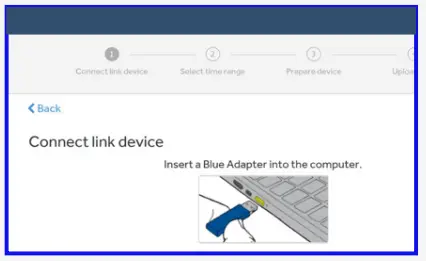
- Connect the blue adapter and follow the ‘Upload your data’ section below.
Future uploads - Select the device you wish to upload on the ‘Select your device type’ screen.

- Connect the blue adapter to upload your data using the ‘Upload your data’ section below.
Upload your data
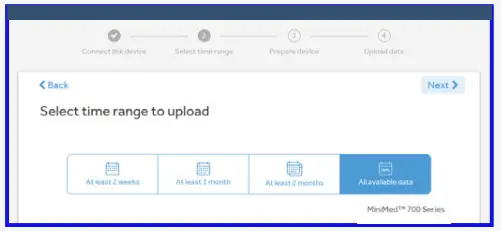
- Select time range to upload.
- Follow on screen instructions to prepare device for data upload.
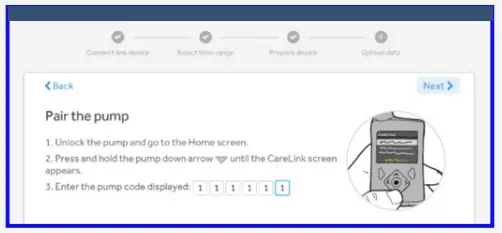
- Enter your pump serial number. Pairing is required on first upload only.
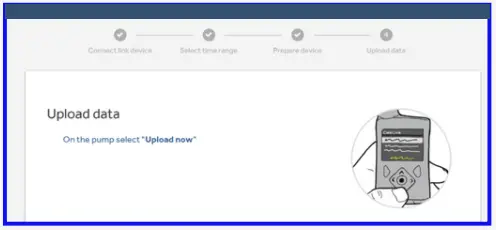
- Select ‘Upload now’ on the pump.
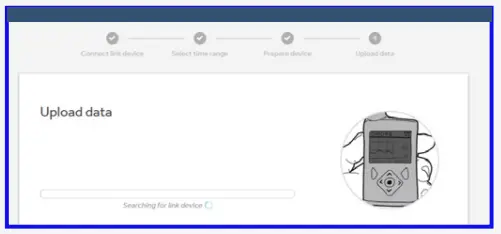
- Wait for upload to complete.
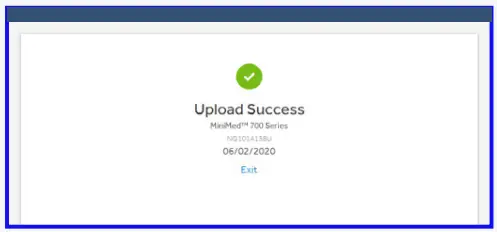
- Upload success.
Personalised diabetes insights to empower your therapy decisions
Medtronic Australasia Pty Ltd
2 Alma Road
Macquarie Park, NSW 2113, Australia
E-Mail: [email protected]
Facebook: www.facebook.com/MedtronicDiabetesAUS
YouTube: Medtronic Diabetes ANZ
Tel: +61 2 9857 9000
Fax: +61 2 9889 5167
Toll Free: 1800 777 808
https://www.medtronic-diabetes.com.au/
Always read the instructions for use.
For detailed information regarding the instructions for use, indications, contraindications, warnings, precautions, and potential adverse events, please consult the device manual.
For further information, contact your local Medtronic representative.
© 2021 Medtronic Australasia Pty Ltd. All Rights Reserved. Please note: In contacting the
Diabetes Toll Free, your personal and health information may be disclosed to an operator located outside Australia. 10315-102021
Medtronic 780G MiniMed Insulin Pump
MiniMed™ 780G system changing the quick-set infusion set quick reference guide
Start here
- Wash your hands. Press. Select Options.

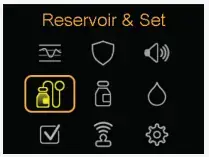
- Select
 Reservoir & Set.
- Select New Reservoir.

- Remove the infusion set you have been using by loosening the adhesive and pulling away from body.

- Remove the used reservoir from the pump.

- Select Rewind.

Fill reservoir & connect to the infusion set tubing
Follow the next steps to fill the reservoir with insulin and connect to the infusion set tubing.
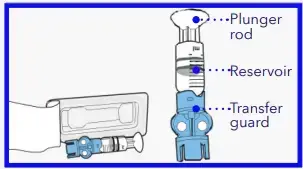
- Remove from package. Make sure insulin vial is at room temperature to reduce the risk of air bubbles.

- Pull plunger down to the amount that you plan to fill with insulin. Wipe vial with alcohol.

- Place vial on table. Firmly press the blue transfer guard onto vial
- Push and hold the plunger down.
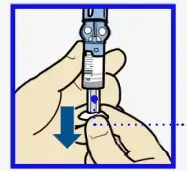
- With your thumb still on the plunger, flip over so vial is on top. Release thumb and pull plunger down to fill with insulin.

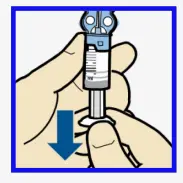
- Tap the reservoir to move air bubbles to top of reservoir. Push plunger up to move air into vial.

- If needed, pull plunger back down to amount of insulin needed for 2-3 days.

- To avoid getting insulin on the top of the reservoir, turn vial over so it is upright. Hold transfer guard and turn reservoir counter-clockwise and remove from transfer guard.

Connect reservoir to infusion set
You will place the tubing connector onto the end of the infusion set to the filled reservoir.
- Remove infusion set from package. Remove the paper that holds the tubing together.
- Gently push the tubing connector onto reservoir. Turn clockwise until locked. You will hear a click.

- If you see air bubbles, tap reservoir to move them to top. Push plunger just a bit to move them into tubing.

- Twist the plunger counter-clockwise to loosen and remove.

The backlight may have turned off
Press any button to turn the screen back on.
- Press to open the menu.

- Select


- Select Next.
Place reservoir into pump
Now place the filled reservoir into the reservoir compartment of the pump.
- Place reservoir into pump.

- Turn clockwise until you feel reservoir lock into place.

- Select Next.
Load reservoir and fill tubing
Follow these steps to load the reservoir and fill the tubing.
- Select Load and keep holding.
- When you see this screen, select Next.
- Select Fill and keep holding until you see drops at the end of tubing, then let go.
- After you see drops, press › and select Next.

Insert infusion set
Next, follow these steps to insert the infusion set into your body.
- Place the MiniMed Quick-serter insertion device onto a sturdy flat surface with handle facing down. Place blue hub into serter, placing the handle in the tubing slot
- Use two fingers to seat the infusion set inside the serter securely and gently push down.
- Peel the paper from the adhesive on both sides of the needle guard.

- Pull green handle down until it clicks. The two green side buttons will also click into place. Do not press the green side buttons at this time.
- Choose an insertion site from the shaded areas shown here. Wipe with alcohol or other antiseptic.
- Turn to loosen needle guard and pull
- Hold serter against cleaned site.

- Press the two green side buttons at the same time.
- If they are not pressed at the same time the infusion set will not insert properly
- Press down the release button of the serter to release the infusion set.
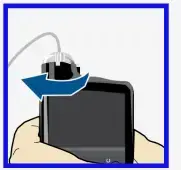
- Pull serter away from body. Press adhesive against skin.
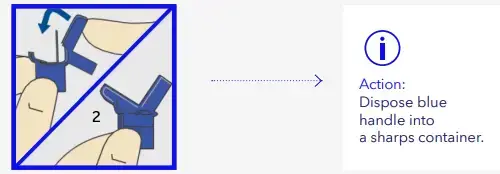
- Hold infusion set. Pull blue handle straight out to remove needle.

- Fold blue handle until locked
Fill cannula
You will now fill the cannula, the little tube under your skin, with insulin.
- Select Fill.
- Select Fill amount and enter:
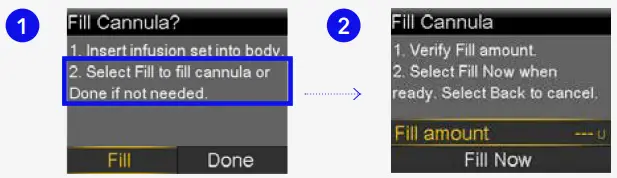 0.300 if using 6mm cannula 0.500 if using 9mm cannula and press .
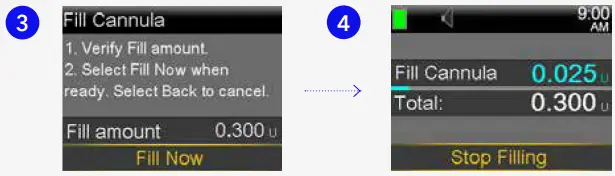
- Select Fill Now.
- The Home screen displays the insulin as it fills the cannula.

Note:
- Your pump will remember the Fill amount that you used last. Always verify that the Fill amount is correct. If it is correct, press to Fill Now and press . If it is incorrect, press . Change to correct amount and press . Select Fill Now.
- Select Stop Filling if you need to stop, for example, if you notice the Total amount is incorrect. This should rarely happen if you have verified the Fill amount on the previous screen.
Medtronic
Medtronic Australasia Pty Ltd 2 Alma Road Macquarie Park, NSW 2113, Australia Tel: +61 2 9857 9000 Fax: +61 2 9889 5167 Toll Free: 1800 777 808
- E-Mail: [email protected]
- Facebook: www.facebook.com/MedtronicDiabetesAUS
- YouTube: Medtronic Diabetes ANZ https://www.medtronic-diabetes.com.au/
Always read the instructions for use.
For detailed information regarding the instructions for use, indications, contraindications, warnings, precautions, and potential adverse events, please consult the device manual. For further information, contact your local Medtronic representative. © 2021 Medtronic Australasia Pty Ltd. All Rights Reserved. Please note: In contacting the Diabetes Toll Free, your personal and health information may be disclosed to an operator located outside Australia. 10317-102021
]]>