
Merkury E038T Sport Wireless Earbuds
Model: XO-9922-1
Locations of Controls
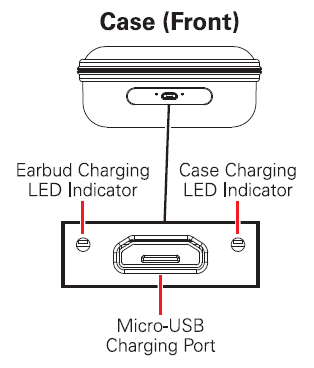
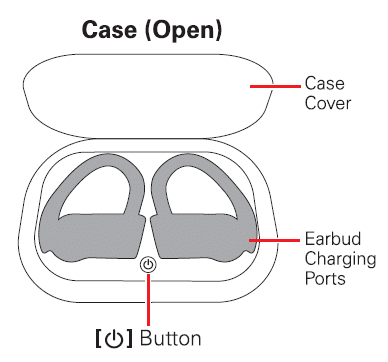

Charging the Case
Insert the small connector of the supplied micro-USB charging cable into the micro-USB charging port on the front of the charging case. Insert the large connector into the USB port on a computer or a 5V USB adapter (not included) and plug into a wall socket.
The case charging LED indicator will flash RED while charging and turn solid RED when fully charged.
When low on power, a tone will be heard and the earbuds’ LED indicators will flash RED to indicate that they need to be recharged.
Charging the Earbuds
Use the included charging case to protect and charge the earbuds as described below.
- Make sure that the case is fully charged.
- Open the cover of the charging case and place the earbuds Into the correct charging ports with their (Multi) buttons facing up. They should easily “clip” Into place and feel secure.
- The earbuds will automatically begin charging when placed into the case. The earbuds’ LED Indicators will turn RED while charging and turn OFFwhen fully charged.
While the earbuds are in the case, you can turn the earbud charging ON and OFF by pressing the [0] button on the platform inside of the case. The earbud charging indicator on the case will turn BLUE when the case is charging the earbuds.
Powering ON/OFF
- The earbuds will automatically power ON when removed from their case, and power OFF when placed into their case.
- When powered ON, the earbuds will automatically pair to each other and then enter Bluetooth pairing mode. They may automatically re-pair to a previously paired device in range.
- The earbuds can also be powered ON and OFF by pressing and holding the earbuds’ [Multi] buttons for 3-4 seconds.
Bluetooth Pairing
- Power the earbuds ON. Both earbuds’ LED indicators will flash RED and BLUE.
- After a moment, a voice will be heard on the earbuds indicating that they have paired to each other. The LED indicator on the main earbud will flash RED and BLUE and the on the other earbud will slowly flash BLUE.
- Set your mobile device to search for Bluetooth devices. When it appears, select MERKURY E0387 from the list of found devices.
- Once successfully paired to your device, a voice will be heard and the LED indicators on both earbuds will slowly flash BLUE.
When paired to a Bluetooth device, volume adjustment & playback can be controlled with your paired device or with the earbud controls below.
- Press the [Multi] button on either earbud to pause and resume playback.
- Press and hold the [Multi] button for 1.5 seconds on either earbud to activate your device’s Voice Assistant if it has one.
- Press the [ + ] button on either earbud to skip to the next track.
- Press the [ – ] button on either earbud to skip to the previous track.
- Press and hold the [ + ] button on either earbud to increase volume.
- Press and hold the [ – ] button on either earbud to decrease volume.
Answering/Ending Phone Calls
To use the earbuds’ phone functions, you must be paired to a Bluetooth-enabled device. Once paired, you can control phone functions with earbud controls listed below.
• Press the [Multi] button on either earbud to answer an incoming phone call.
• Press the [Multi] button on either earbud to end a phone cat.
• Press and hold the [Multi] button on either earbud to reject an incoming phone call.
Re-Pairing the Earbuds
The MERKURY E038T earbuds should pair to each other automatically when powered ON. If the earbuds come un-paired from each other or only one earbud pairs to your device, try following these instructions to re-pair:
- Go to your device’s Bluetooth settings and find the earbuds on the list of Bluetooth devices. Tap to manually “Forger the earbud(s), then turn your device’s Bluetooth OFF
- Power the earbuds OFF and then back ON again at the same time.
- After a moment, the earbuds should automatically re-pair to each other. A voice will be heard indicating that they have paired to each other.
- Once re-pared, you can now pair the earbuds to your mobile device. Turn your device’s Bluetooth- back on again. Follow the instructions in the Bluetooth Pairing section of this manual to try pairing again.
FCC Warning:
This equipment has been tested and found to comply with the limits for a Class B digital device, pursuant to part 15 of the FCC Rule, These limits are designed to provide reasonable protection against harmful interference in a residential installation. This equipment generates, uses and can radiate radio frequency energy and, if not installed and used in accordance with the instructions, may cause harmful interference to radio communications. However, there is no guarantee that interference will not occur in a particular installation. If this equipment does cause harmful interference to radio or television reception, which can be determined by turning the equipment off and on, the user is encouraged to try to correct the interference by one or more of the following measures:
- Reorient or relocate the receiving antenna.
- Increase the separation between the equipment and receiver.
- Connect the equipment into an outlet on a circuit different from that to which the receiver is connected.
- Consult the dealer or an experienced radio/TV technician for help.
Caution: Any changes or modifications to this device not explicitly approved by manufacturer could void your authority to operate this equipment. This device complies with part 15 of the FCC Rules. Operation is subject to the following two condition,
- This device may not cause harmful interference, and
- This device must accept any interference received, including interference that may cause undesired operation.
The device has been evaluated to meet general RF exposure requirement. The device can be used in portable exposure condition without restriction.
]]>
SIERRA
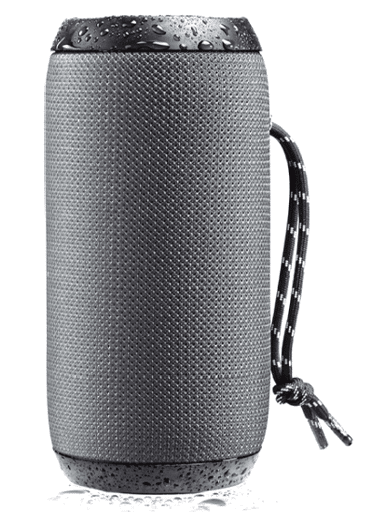
WATER RESISTANT SPEAKER
Model: MI-S047B-101
INCLUDES:
• SIERRA Speaker
• Micro USB Cable
• 3.5mm AUX Cable
TROUBLESHOOTING
No power : Recharge your SIERRA speaker using the included micro USB cable. Try using a different cable.
Music is not playing over Bluetooth : Make sure your Bluetooth® device has A2.DP profile Check if both devices are paired and connected over Bluetooth®. Restart the speaker to reconnect your Bluetooth® device.
Bluetooth device will not reconnect with the speaker : Navigate to your Bluetooth® settings menu on your Bluetooth® device, tap “Merkury S047B” and select “Forget”. Now follow the steps to pair your device again.
TECHNICAL SUPPORT
If you are experiencing problems, do not attempt to fix the product by yourself or return it to the store you bought it from. Please refer to the user manual or just contact our helpful support team:
Merkury Innovations
45 Broadway, 3rd Floor,
New York, New York 10006
www.merkuryinnovations.com
[email protected]
This device complies with Part 15 of the FCC Rules. Operation is subject to the two following conditions:
- This device may not cause harmful interference.
- This device must accept any interference received, including interference that may cause undesired operation.
2020 Merkury Innovations, LLC.
To explore our full selection of products, visit us at: www.merkuryinnovations.com
Bluetooth is a registered trademark of Bluetooth SIG, Inc
The illustrated product and specifications may differ slightly from those supplied
All other trademarks and trade names are those of their respective owners.
CHARGE
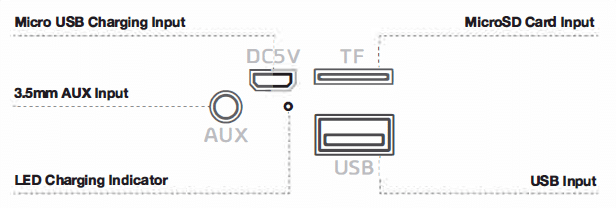
- Plug the micro USB cable into the micro USB port on the back of thespeaker, and connect the other end of the cable with any compatible chargeror wall outlet.
- When charging, the small LED indicator will glow red. When fully charged,the LED indicator will turn off.
- Charging time is approximately 3-4 hours.
- Use the USB output for charging smartphones via USB cable.
PAIR & CONNECT
- Press and hold the power button on the speaker to turn it ON or OFF
- Make sure the speaker is turned ON
- On your Bluetooth® enabled device, navigate to the Bluetooth® settings menu, turn on the Bluetooth® feature, and search for new devices.
- Wait a few seconds & select “Merkury S047B” The speaker will emit a tone when successfully paired
NOTE:
- If your device’s Bluetooth® version is below version 2.1, you may need to enter the password “0000”.
- Insert a USB thumb drive or MicroSD card for direct music playback. Use the on-board controls to scroll through music files.
RECONNECT TO BLUETOOTH
- You only need to pair your Bluetooth® device with the speaker once.
- With your previously paired device’s Bluetooth气urned on & in range, power on the speaker.
- The speaker will automatically reconnect to the last Bluetooth® device it was connected to
- If you have a previously paired device that does not auto-reconnect, navigate to the Bluetooth® settings menu on your device, turn on theBluetooth叮eature, and select “Merkury 5047B” from your list of paired Bluetooth® devices.
ON-BOARD CONTROLS (TOP)
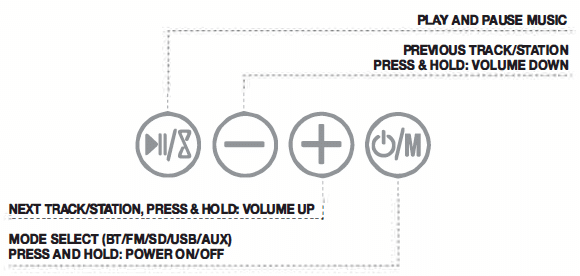
SPEAKER INPUTS (BOTTOM)
Speaker Specifications:
Output Power: 3W
Frequency Response: 30HZ~18KHZ
Dimensions倯HxD): 6.2 x 2.6 x 2.6 1n
Additional Connection Sources:
Audio: 3.5mm AUX cable
Power Source: Built-in rechargeable
battery or via USB cable
Power Information:
Input: DC5V
Battery Capacity: 1200mAH
Music playing time: Up to 4 Hours*
Charging time: 2-3 hours
Bluetooth’” Information:
Bluetooth® Version: 5.0
Operating Distance: 30ft.
System Requirements: Bluetooth’”-capable device
*Depends on individual use and may be slightly more or less than the time specified
FCC STATEMENT :
This device complies with Part 15 of the FCC Rules. Operation is subject to the following two conditions:
(1) This device may not cause harmful interference, and
(2) This device must accept any interference received, including interference that may
cause undesired operation. Warning: Changes or modifications not expressly approved by the party responsible for compliance could void the user’s authority to operate the equipment.
NOTE: This equipment has been tested and found to comply with the limits for a Class B digital device, pursuant to Part 15 of the FCC Rules. These limits are designed to provide reasonable protection against harmful interference in a residential installation. This equipment generates uses and can radiate radio frequency energy and, if not installed and used in accordance with the instructions, may cause harmful interference to radio communications. However, there is no guarantee that interference will not occur in a particular installation. If this equipment does cause harmful interference to radio or television reception, which can be determined by turning the equipment off and on, the user is encouraged to try to correct the interference by one or more of the following measures:
- Reorient or relocate the receiving antenna.
- Increase the separation between the equipment and receiver.
- Connect the equipment into an outlet on a circuit different from that to which the receiver is connected.
- Consult the dealer or an experienced radio/TV technician for help.
FCC Radiation Exposure Statement:
This equipment complies with FCC radiation exposure limits set forth for an uncontrolled environment. This equipment should be installed and operated with minimum distance 20cm between the radiator & your body.

MERKURY Smart Wi-fi Camera
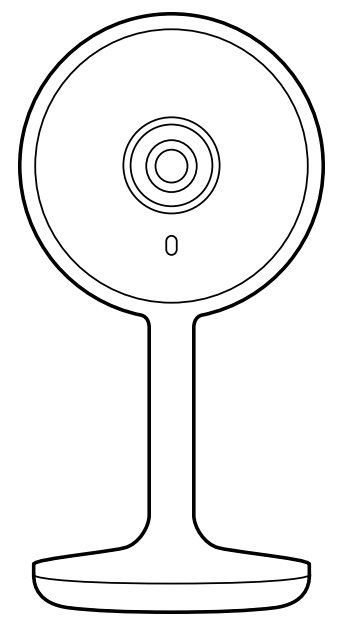
MERKURY Smart Wi-fi Camera
Thank you for purchasing your MERCURY smart home product.
Get started using your new devices by downloading Geeni, one convenient app that manages everything straight from your phone or tablet. Easily connect to your home Wi-Fi, and control multiple devices from the touch of your fingertips.
START GUIDE
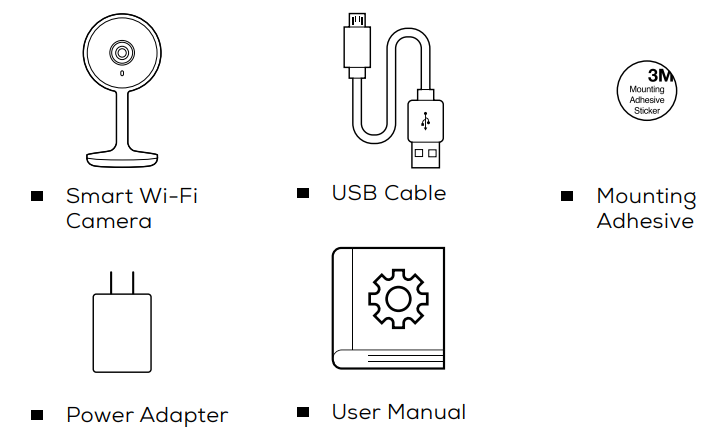
What’s in the Box
Get Ready
 |
 |
| Know your Wi-Fi network and password | Make sure your mobile device is running iOS® 9 or higher or Android™ 5.0 or higher |
 |
 |
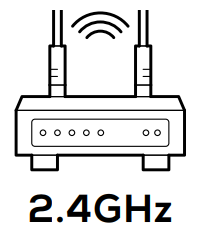
| Make sure you’re connecting to a 2.4GHz Wi-Fi network. (Geeni can’t connect to 5GHz networks) |
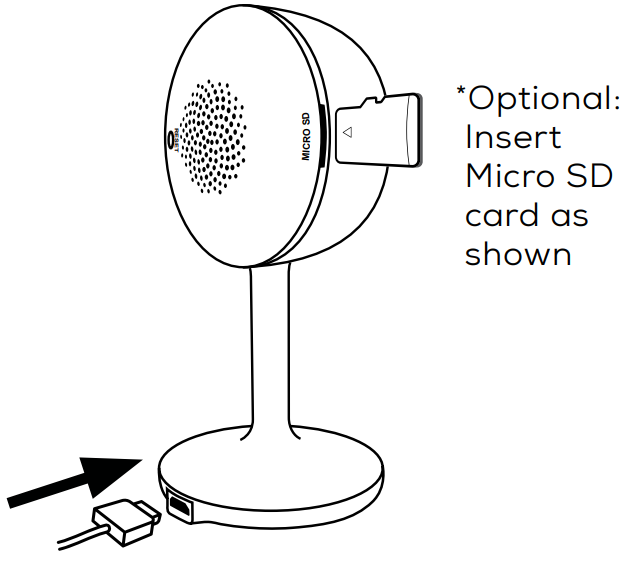
a microSD card can be used to save recorded footage but is not required |
STEP 1
- Download the Geeni App from App Store or Google Play.

https://apps.apple.com/us/app/geeni/id1177386276
https://play.google.com/store/apps/details?id=com.merkuryinnovations.geeni
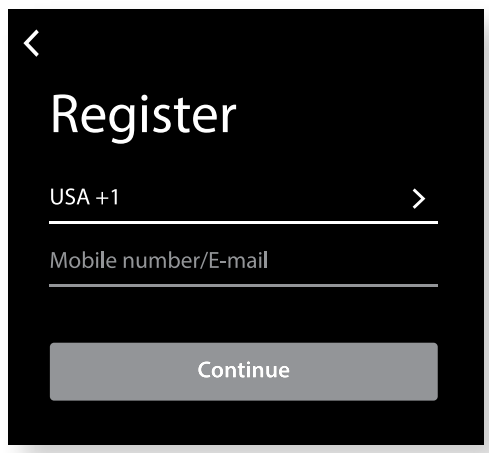
- Register an account on your Geeni App.
- Enter your mobile phone number or email address
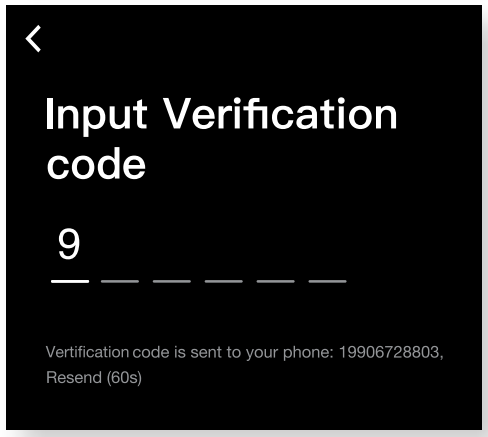
- Enter the verification code and create a password.
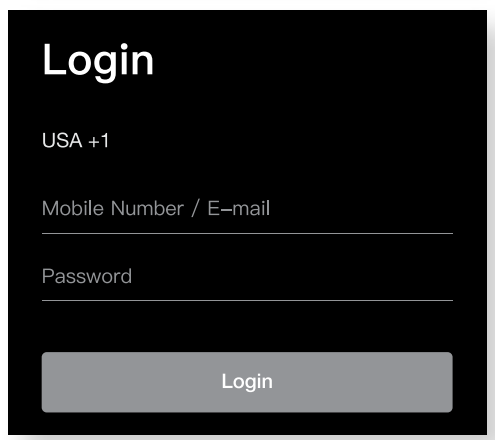
- Log in to the App.
STEP 2
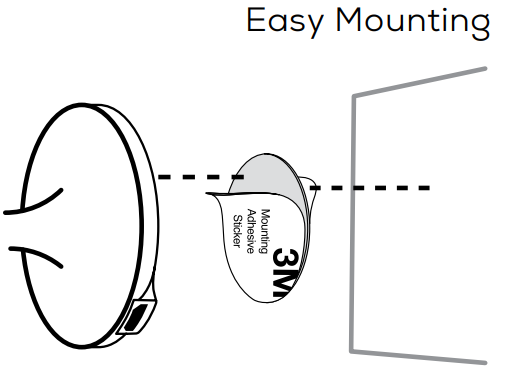
- Plug-In
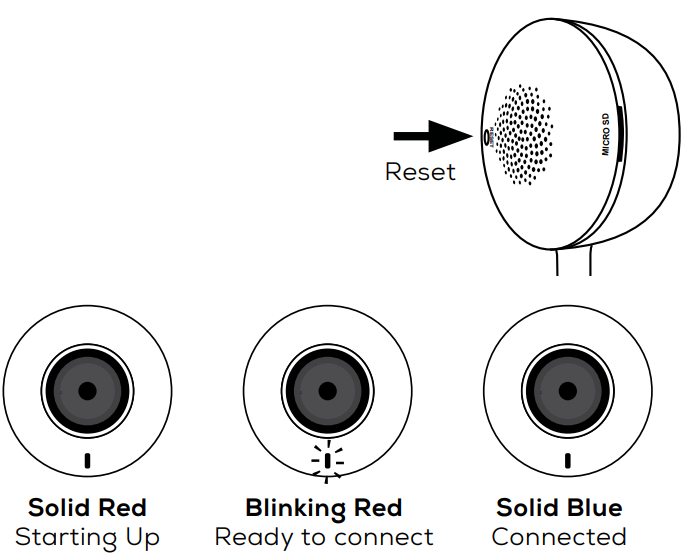
Plug the camera into a power source using the included USB cable. The indicator will remain solid red when starting up but will begin to blink red when connected. If it does not blink, please reset.
*see reset instructions on p. 4
STEP 3
- Add device:
Easy Mode
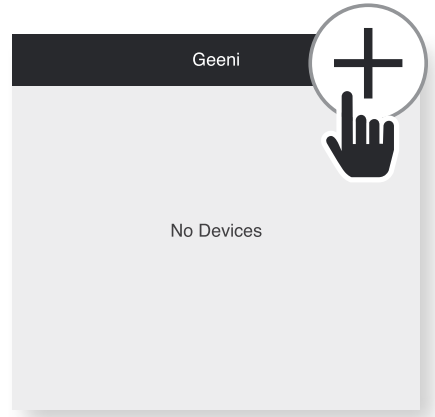
- In the Geeni app, on the top corner of the Devices screen, click Choose “Wi-Fi Camera”.
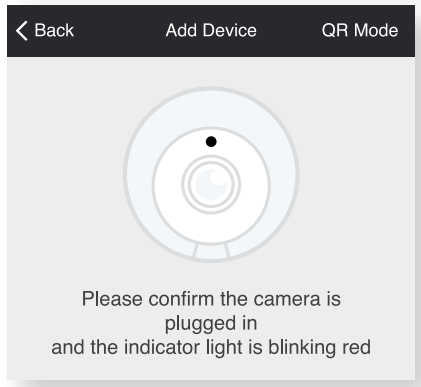
- Make sure the light on the camera is blinking red, indicating the device is ready to connect, then press Next Step.
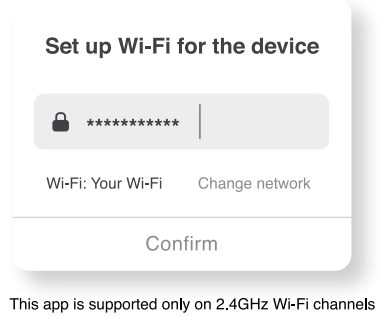
- Enter your Wi-Fi network and password.
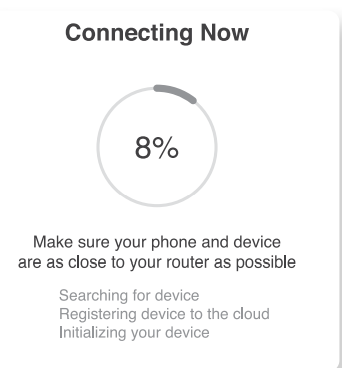
- The Geeni app will attempt to connect.
This may take a few moments. When the blinking light turns solid blue, the connection was successful!
NOTE: Geeni can’t connect to 5GHz networks.
*If the connection fails, try to connect using QR Mode.
- Add device:
QR Code Mode
- Be sure to reset the camera by pressing the reset button for 3-4 seconds.
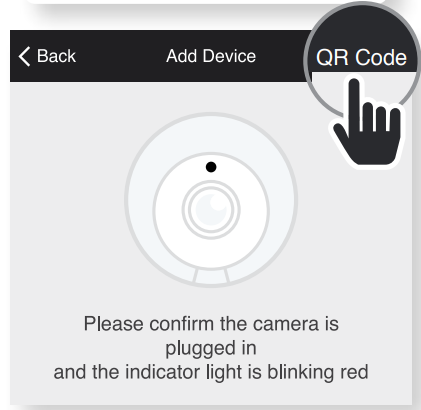
- In the Geeni app, on the top corner of the Devices screen, click + Choose “Wi-Fi Camera” Choose “QR Code” in the top corner.
- Click Next and enter your Wi-Fi details.
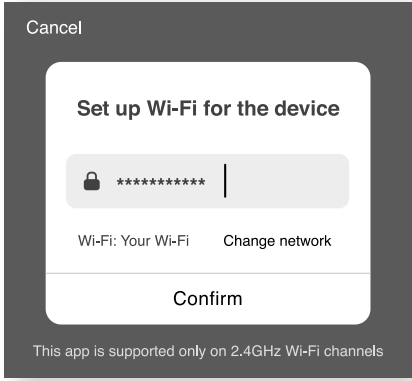
- Scan the QR code with the camera. When you hear the camera beep, select ‘I heard the beep’ and it will add your camera.
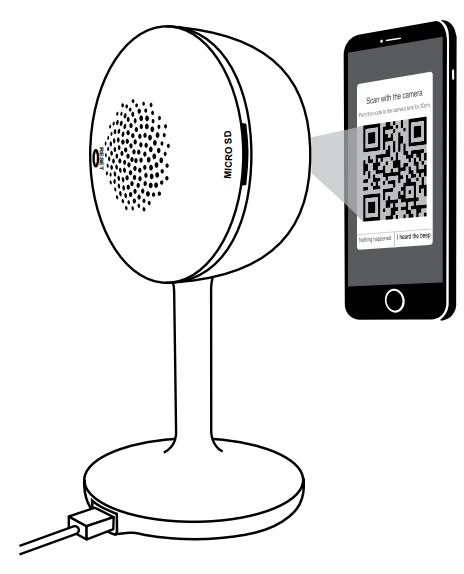
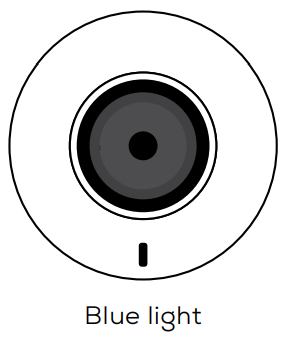
- The indicator light will turn solid blue when the device was connected successfully!
NOTE: Geeni can’t connect to 5GHz networks.
*How do I reset the device and what does the blinking light mean?
Reset the camera by pressing the reset button for 3-4 seconds.
SETTINGS
- Access Camera Settings:
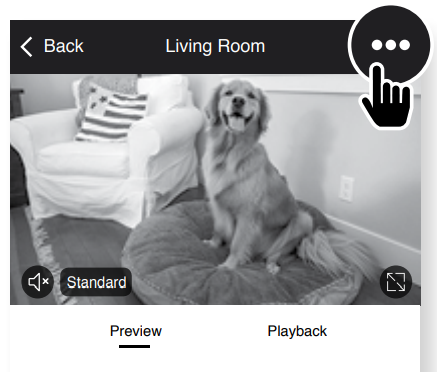
From your main device list, click on the camera you want to edit, then press the “ ••• “ button on the top right for advanced settings. - Device Name:
Press to rename your device to something like “Bedroom” or “Kids’ Room”.
- Device Sharing:
let friends, spouses, roommates, or family keep an eye on what your cameras see. Whether it’s a baby’s crib or the family dog, you can decide who gets to check-in, access the camera, and set notifications.
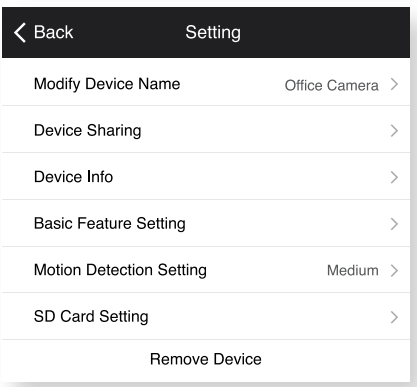
- Remove Device:
Delete the camera from your account. Until it’s deleted, it will always be linked to your account. - Indicator Light:
By default, the camera lights up to show it’s on. Switch “Indicator Light” off to hide the light. - Flip:
If you mount your camera upside down, toggling the “Flip” function will rotate the image so that it’s right side up.
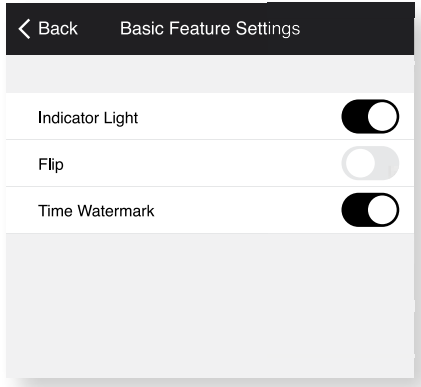
- Time Watermark:
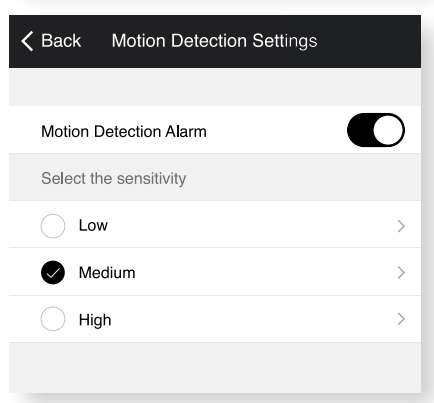
Turn the time watermark on to always see a timestamp of when the video is taking place. - Motion Detection:
When turned on, you’ll receive notifications to your phone whenever the camera senses motion.
Press to turn Motion Detection off or set how sensitive you want it to be.
- Format SD Card:
Press to erase your Micro SD Card.
Frequently Asked Questions
- Can I share with family and friends?
Yes! You can share access to all Merkury devices— cameras, plugs, bulbs, doorbells, etc.— with family & friends. In the Geeni app, press the “Profile” button and click on “Device Sharing” to give or revoke sharing permissions. In order to share, the other user should have already downloaded the Geeni app and registered an account. - Recording and Micro SD Card Usage:
Without a Micro SD card (optional, sold separately), the smart Wi-Fi camera can show live camera video, save screenshots or videos of the camera stream to your phone for later, and record still snapshots of motion alerts when notifications are turned on. Installing a Micro SD card will further enable video recording and playback from your phone. When the card is installed, the camera will continuously record and playback video to your phone until the card is full (up to 128GB supported). Video is encrypted and only viewable through the Geeni app on your phone, so do not try removing the MicroSD card to view the video. - How Much Video Can the Camera Record?
Depending on video quality, the camera will use around 1GB of storage per day, so a 32GB card can provide weeks of continuous video. As the card fills up, the oldest footage will automatically be replaced by a new video, so you don’t have to ever worry about running out of storage space. - How Many Devices Can I Control?
The Geeni app can control an unlimited amount of devices in an unlimited amount of locations. Your router may have a limit of how many devices can be connected to one router. - My Merkury device has a funny name. How do I rename it?
From your main device list, click on one of the devices you want to rename, press the “•••” button on the top right for advanced settings, and click Modify Device Name (or Modify Group Name, if applicable). You’ll then be able to choose a more familiar name. - What’s the Wireless Range?
The range of your home Wi-Fi is heavily dependent on your home router and the conditions of the room. Check with your router specifications for exact range data. - If my Wi-Fi/Internet goes down, will Geeni still work?
Merkury products need to be connected to Wi-Fi in order to use them remotely
Troubleshooting
- Cannot connect to your Wi-Fi network.
Make sure you entered the correct Wi-Fi password during the Wi-Fi setup. Check whether there are any Internet connection problems. If the Wi-Fi signal is too weak, reset your Wi-Fi router and try again.
Reset the device
- The camera can be reset by holding down the reset button for 3-4 seconds.
System Requirements
- Mobile device running iOS® 9 or higher or Android™ 5.0 or higher
- Existing Wi-Fi Network
Technical Specifications
- Camera: up to 1080p (1920 x 1080) at 25 frames/sec.
H.264 encoding - Field of View: 115° diagonal
- Audio: Internal Speaker and Microphone
- Storage: supports up to 128gb MicroSD card (not included)
- Wi-Fi is not compatible with 5GHz Wi-Fi networks.
VOICE CONTROL GUIDE
Thank you for purchasing your MERCURY smart home product. Make sure your devices are already set up using the Geeni app, then follow these steps.
Your video device is able to stream video to these leading smart assistants.
Name and Control Each Device by Voice

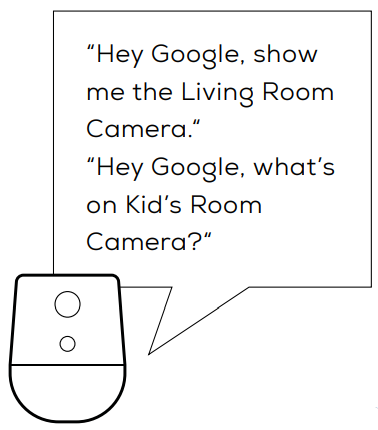
To control your MERCURY smart home products, just say “OK Google,“ or “Hey Google,“ and ask.
Make sure your devices are already set up using the Geeni app.

Things you can say*: Stream to:
 |
Google Home Hub, Google Assistant Smart Displays, Google Nest Hub, and any Google Chromecast-enabled TV, screen, or PC |
*Some commands require compatible devices.
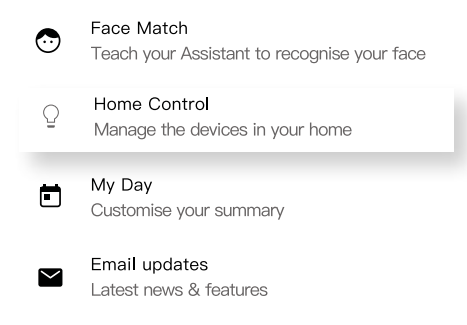
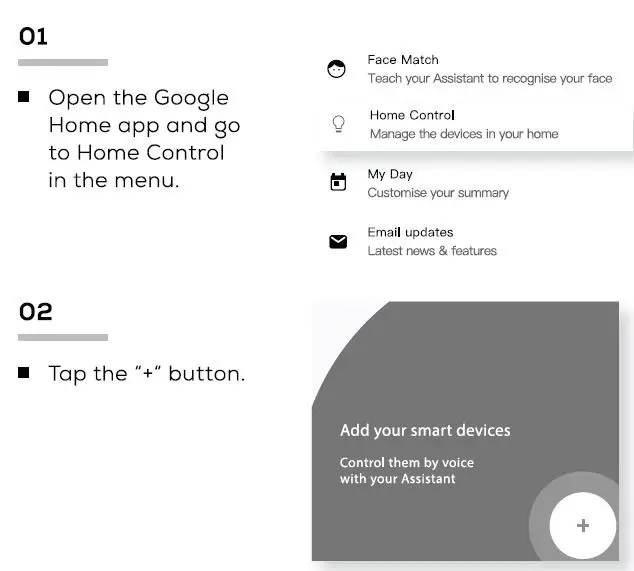
- Open the Google Home app and go to Home Control in the menu.
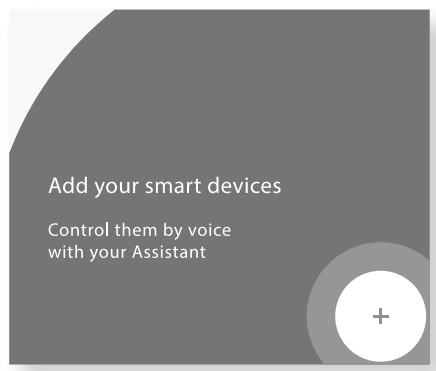
- Tap the “+“ button.
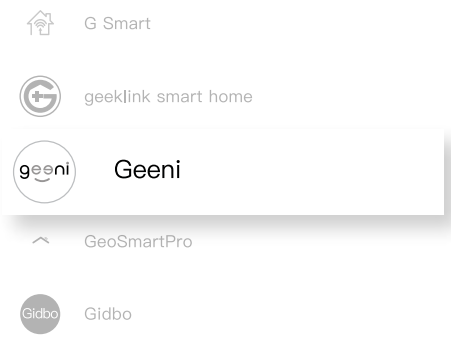
- Choose “Geeni“ from the list of Home Control partners.
- Authorize your account with Google Assistant using the username and password from your Geeni app.
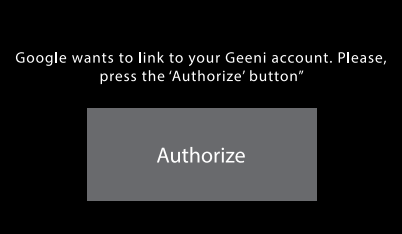
Now your Google Home app and MERCURY devices are linked!
You’re now able to say “Hey Google“ and control your MERCURY devices.
- At any time, go into the “Home Control“ section of the Google Home app to set nicknames and rooms for your devices. You can rename your devices in the Geeni app, and Google Assistant will refer to them by the same name.
So if you rename a camera to ‘Living Room Camera’ or ‘Baby’s Room,“ then Google Assistant will use that same name later on. You can always give it a nickname using the Google Home app as well.
Google Assistant will be able to control devices by room.
To control your MERKURY Smart Wi-fi Camera home products, just ask Alexa.
Make sure your devices are already set up using the Geeni app.

Things you can say*: Stream to:
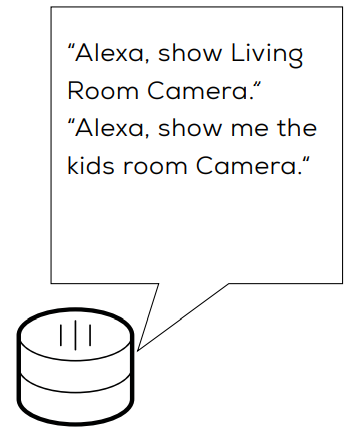 |
To control your MERCURY smart home products, just ask Alexa. Make sure your devices are already set up using the Geeni app. |
*Some commands require compatible devices.
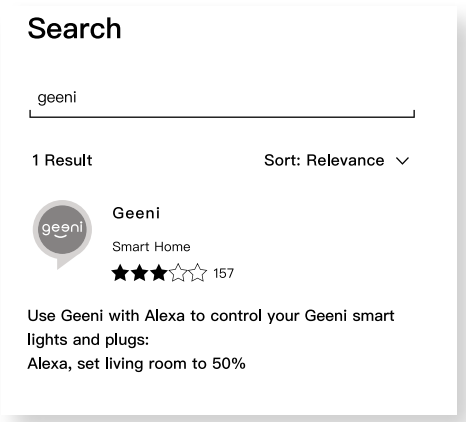
- Open the Alexa app and go to Skills in the menu.

- Search for Geeni then tap Enable.

- Authorize your account with Smart Home Skills using the username and password from your Geeni app.

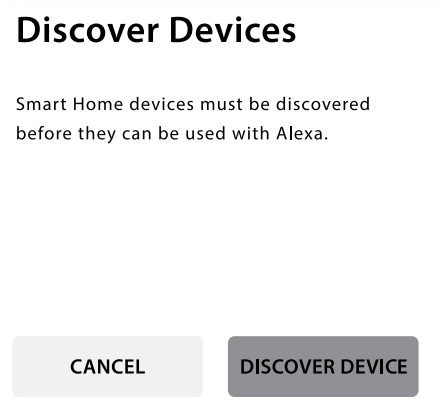
- Choose “Discover Devices.“ After a few seconds, your MERKURY Smart Wi-fi Camera devices will be displayed under Smart Home in the Alexa app.
- You can rename your devices in the Geeni app, and Alexa will refer to them by the same name.
So if you rename a smart bulb to “Living Room“ or a nickname like a smart camera to “Living Room Camera” or “Baby’s Room,”
Alternatively, you can create an Alexa group, like “Bedroom“ or “Downstairs,“ and add the device to the group.
Alexa will recognize the group name in the Alexa app, or the device name in the Geeni app.
More information is available at: http://tinyurl.com/alexa-smart-home-groups
FCC Notice:
This equipment has been tested and found to comply with the limits for a Class B digital device, pursuant to part 15 of the FCC Rules. These limits are designed to provide reasonable protection against harmful interference in a residential installation. This equipment generates, uses and can radiate radio frequency energy and, if not installed and used in accordance with the instructions, may cause harmful interference to radio communications.
However, there is no guarantee that interference will not occur in a particular installation. If this equipment does cause harmful interference to radio or television reception, which can be determined by turning the equipment off and on, the user is encouraged to try to correct the interference by one or more of the following measures:
- Reorient or relocate the receiving antenna.
- Increase the separation between the equipment and receiver.
- Connect the equipment into an outlet on a circuit different from that to which the receiver is connected.
- Consult the dealer or an experienced radio/TV technician for help.
Caution: Any changes or modifications to this device not explicitly approved by the manufacturer could void your authority to operate this equipment.
This device complies with part 15 of the FCC Rules. Operation is subject to the following two conditions: (1) This device may not cause harmful interference, and (2) this device must accept any interference received, including interference that may cause undesired operation.
The device has been evaluated to meet general RF exposure requirements. The device can be used in portable exposure conditions without restriction.
Support:
If you encounter any issues, please contact us at support.mygeeni.com for help.
(888) 232-3143 Toll-free
To explore our full selection of products, visit us at: www.mygeeni.com
© 2020 Merkury Innovations • 45 Broadway 3rd FL, New York NY 10006.
The illustrated product and specifications may differ slightly from those supplied. Geeni is a trademark of Merkury Innovations LLC. iPhone, Apple, and the Apple logo are trademarks of Apple Inc., registered in the U.S. and other countries. App Store is a service mark of Apple Inc. Google, Google Play, and related marks and logos are trademarks of Google LLC. iOS is a registered trademark of Cisco in the U.S. and other countries and is used under license.
Amazon, Alexa, and all related logos are trademarks of Amazon.com, Inc. or its affiliates. All other trademarks and trade names are those of their respective owners.
FAQs
Will this connect to blue iris?
Blue Iris is now functional for this for live view.
Will i be able to see live footage while i’m out of the house, not connected to wifi? will have 4g access to internet?
Yes, once you successfully set up your WiFi camera, you will be able to view your footage or live-viewing from anywhere in the world.
Does this work with the current Amcrest mobile App via Phone?
Yes, please copy and paste this link into a browser for an instruction set on adding in the camera. – https://support.amcrest.com/hc/en-us/articles/360037458872-Using-Amcrest-Smart-Home-Products-with-Amcrest-View-Pro.
Is there an http api available like on your other camera models?
No, the camera is fully managed via the Amcrest Smart Home App. The App allows for full feature management.
Does this nanny cam have a battery or must it always be connected to a power source to operate?
This camera does require a 5 Volt Power Adapter that is included. Data is sent via WiFi.
what is the megapixals of this camera?
A camera with 1080p resolution has a little over 2 mega pixels
Can you watch 2 live playing cameras at the same time?
Yes! You can actually watch up to 4 videos simultaneously.
Can you move the camera From your phone?
Be careful when you’re purchasing this camera you need a certain Wi-Fi band or something like that I purchased it and it did not work I do have their other cameras and yes you can use all functions from your phone
How do I get rid of the static / crackling sound on the app?
Please put it in baby monitor mode.
Will this camera record, with an SD card, continuously, say, for an hour, without any user intervention?
Yes, it records….
How bright are the IR lights? Will night vision work without it if it’s turned off?
Yes, you can turn on and off the camera’s IR Lights within the Amcrest Smart Home App.
Does this work on a 5G network? Some people have said yes but, some people said no!?
ASH 21 model is not dual-band and will NOT connect to a 5 GHz band network.
Can this connect to blue iris using wifi? i can get it working and connected to blue iris using an ethernet cord but not with wi-fi????
My camera is connected with WiFi. Only trouble I have is the distance from the router- causes poor connectivity at times. It’s in the garage which is about 60-75’ through 4 rooms away. If I’m near it with my cell phone, it connects right away.
Is there an app for windows 10?
I don’t know of an app for a computer, BUT I would suggest looking up the IP address on your router and login directly. The other option would be to use Blue Iris software. I use Blue Iris with my other cameras (some of which are Amcrest) and it works great. There is a demo version available for a trial period. I believe the software is around $60
Can i use a power bank that will have 5v power and up to 3.1 amp to power ash21?
Yes, as long as you keep a steady 5 Volts to the camera a power bank or UPS Block will work just fine.
Other top Merkury’s manuals:
- MERKURY MI-WW112-199W 3-Way Switch User Guide
- MERKURY MI-E048T Polaris True Wireless Earbuds User Manual
- MERKURY MIEW011999W Smart Wi-Fi LED Strip User Guide
Can’t connect?
Need help?
WE CAN HELP
DO NOT RETURN THIS PRODUCT TO THE STORE
support.mygeeni.com
(888)232-3143 Toll-free
or tap ‘support‘ for help in the Geeni app.
Made in China

MERKURY Smart Wi-fi Camera User Guide
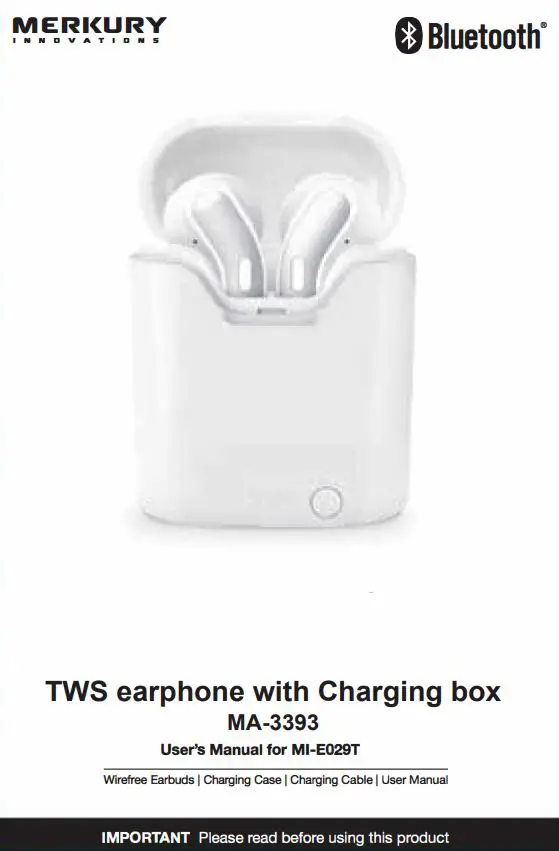
]]>MERKURY MA-3393 Wireless Bluetooth Earbuds with Charging Case User Manual
RECONNECT TO YOUR DEVICE
- You only need to pair your Bluetooth· device with these earbuds once.
- With your device’s Bluetooth· feature turned on and in range, power on the left & right earbuds.
- They will automatically connect to each other and to your smartphone
- If you have a previously paired device that does not auto-reconnect, navigate to the Bluetooth· settings menu on your device and select “Merkury E029T” from the list of paired Bluetooth® devices.
POWER ON/OFF
NOTE: Earbuds Turn On/Off automatically when removed from or returned to case.
- To power on manually, press and hold the power buttons for 2-3 seconds, the LED lights will begin to flash
- To power off manually, press and hold the power buttons for about 8 seconds
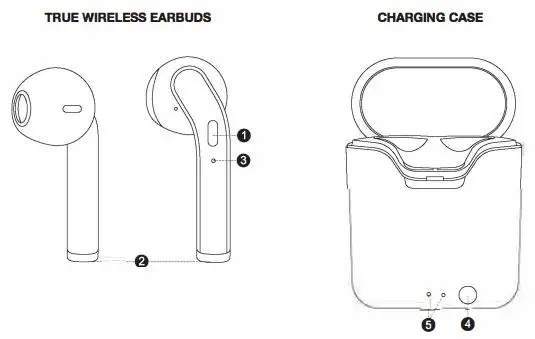
- Power On/Off Play/Pause Answer/End Call
- Charging Connects
- LED Indicator
- Power Button
- LED Charging Case Indicator
PAIR & CONNECT WITH A NEW DEVICE
- APOLLO will tum on automatically once it is removed from charging case It will blink alternately red and blue Indicating that it is In pairing mode
- Open the Bluetooth menu on your smartphone and search for new devices.
- When you see “Merkury E029T” listed, tap it to connect
- Once connected with your device, there will be a BEEP from the right earbud
CHARGING
EARBUDS
- Checking the “R” and “L” indicators on the charging case, place the right and left earbuds into the corresponding slots so that the magnetic metal charging contacts line-up correctly.
- The LED indicators on the earbuds will glow red and the charging indicators on the case will glow blue. Your earbuds are now charging.
- Once your earbuds are fully charged the LED indicators will turn solid blue. After approximately 5 minutes the LED indicators will turn off
CASE
- When the case is charging, the led light will slowly flash red. When charge is complete, the red light will turn solid
- Note: the case can charge the earbuds while charging itself.
PLAY & CALLS
- Connect your device to these earbuds via Bluetooth (see “Pair & Connect with a New Device.’1
- Open your favourite music app and press play.
- All audio, including music, calls, gam videos, and notifications will be routed through the earbuds.

IMPORTANT: Please followed directions In the proper ordo ensure the earbuds pair and connect prophy
- APOLLO will turn on automatically once it is removed from charging case. it will blink alternately red and blue indicating that it is in pairing mode.
- 2. On your smartphone open the Bluetooth menu power on your Bluetooth setting and search for new devices.
- When you se Merkury E029T listed, tap it to connect.
- Once connected with your device, there will be a BEEP form the right earbud.
Note: If your device asks for a passcode to connect enter “0000”

MERKURY INNOVATIONS CONFIDENTIAL
FILE INFORMATION
DATE: 12/18/19
MODEL N UMBER:
MI-E029T _Series
PRINTER SPECIFICATIONS
CONTACT
MERKURY CHINA:
Perry
[email protected]
COMMENTS (Internal reference only)
File created by George
– Please include in all packaging fo「MI-E029T_Series
– Grayscale
– Double sided printing for manual, single sided printing for quick guide
– Fold NEATL
– FCC Statement
– Changes or modifications not expressly approved by the party responsible for compliance could void the user’s authority to operate the equipment.
– This equipment has been tested and found to comply with the limits for a Class B digital device, pursuant to Part 15 of the FCC Rules. These limits are designed to provide reasonable protection against harmful interference in a residential installation. This equipment generates uses and can radiate radio frequency energy and, if not installed and used in accordance with the instructions, may cause harmful interference to radio communications. However, there is no guarantee that interference will not occur in a particular installation. If this equipment does cause harmful interference to radio or television reception, which can be determined by turning the equipment off and on, the user is encouraged to try to correct the interference by one or more of the following measures:
– Reorient or relocate the receiving antenna.
– Increase the separation between the equipment and receiver.
– Connect the equipment into an outlet on a circuit different from that to which the receiver is connected.
– Consult the dealer or an experienced radio/TV technician for help
TROUBLESHOOTING
No power
Recharge your earbuds using the included battery charging case
Music is not playing over Bluetooth®
Make sure your Bluetooth® device has A2DP profile. Check if both devices are paired and connected over Bluetooth·. Restart the earbuds to reconnect your Bluetooth” device.
Bluetooth® device will not reconnect with the earbuds
Navigate to your Bluetooth· settings menu on your Bluetooth· device, tap “Merkury E029T” and select “Forget.” Now follow the steps to pair your device again.
Specification:
Bluetooth· Version: 5.0
Bluetooth· Range: Up to 30ft
Earphone Capacity: 30rnAh
Charging Input: Micro USB
Freq. Response: 20Hz – 20KHz
Charging Case Capacity: 350mAh
Charging Time: Approx. 2 Hours
Playback Time: Approx. 3-4 Hours*
Standby Time: Approx. 8 Hours
*Depends on ind1v1dual use
FCC Notice:
This device complies with Part 15 of the FCC Rules. Operation is subject to the two following condones:
- This device may not cause harmful interference.
- This device must accept any interference received, including interference that may cause undesired operation
Technical Support:
Please do not attempt to fix the product by yourself. If you are experiencing any problems with the product, please do not return It to the store you bought It from. You can contact our technical support representatives and they will assist you with any questions you might have For assistance operating your product, please consult the User’s Manual first, then feel free to contact Merkury Innovations technical support· Merkury Innovations 45 Broadway 3rd Fl. New York, NY 10006
www.merkuryinnovations.com
E-mail: [email protected]
©2020 Merkury Innovations LLC
To explore our full selection of products,
visit us at: www.merkuryinnovations.com
The Bluetooth word mark and logo are registered trademarks owned by Bluetooth SIG, Inc. The illustrated product and specifications may differ slightly from those supplied. All other trademarks and trade names are those of their respective owners Made in China
MERKURY EW010 Smart Wi-Fi LED Strip
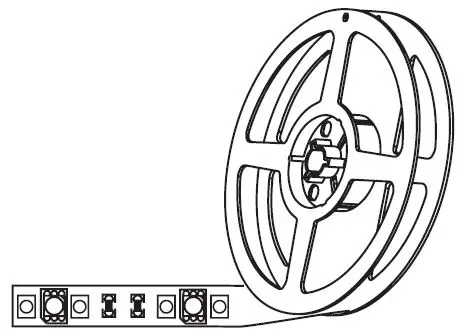
Thank you for purchasing your MERKURY smart home product.
Get started using your new devices by downloading Geeni. one convenient app that manages everything straight from your phone or tablet. Easily connect to your home Wi-Fi, and control multiple devices from the touch of your fingertips.
Can’t connect?
Need help?
WE CAN HELP DO NOT RETURN THIS PRODUCT TO THE STORE
support.mygeeni.com
(888)232-3143 Toll-free or tap ‘support’ for help in the Geeni app.
Authorize your account with Smart Home Skills using the username and password from your Geeni opp.

Choose “Discover Devices.” After a few seconds your MERKURY devices will be displayed under Smart Home in the Alexa opp.
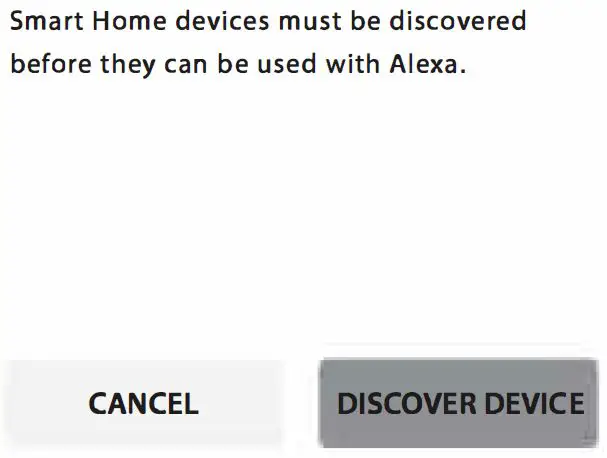
You can rename your devices in the Geeni app, and Alexa will refer to them by the same name.
So if you rename o smart bulb to ·Living Room· or o nickname like s1ossom,” then Alexa will use that same name later on.
Alternatively, you can create an Alexa group, like “Bedroom· or “Downstairs,” and add the device to the group.
Alexa will recognize the group name in the Alexa app, or the device name in the Geeni opp.
More information is available at: http://tinyurl.com/olexo-smort-home-groups
FCC Notice:
This equipment has been tested and found to comply with the limits for a Class B digital device, pursuant to part 15 of the FCC Rules. These limits are designed to provide reasonable protection against harmful interference in a residential installation. This equipment generates, uses and con radiate radio frequency energy and, if not installed and used in accordance with the instructions, may cause harmful interference to radio communications. However, there is no guarantee that interference will not occur in a particular installation. If this equipment does cause harmful interference to radio or television reception, which can be determined by turning the equipment off and on, the user is encouraged to try to correct the interference by one or more of the following measures:
- Reorient or relocate the receiving antenna.
- Increase the separation between the equipment and receiver.
- Connect the equipment into an outlet on a circuit different from that to which the receiver is connected.
- Consult the dealer or on experienced radio/TV technician for help.
Caution: Any changes or modifications to this device not explicitly approved by manufacturer could void your authority to operate this equipment.
This device complies with port 15 of the FCC Rules. Operation is subject to the following two conditions: (1) This device may not cause harmful interference, and (2) this device must accept any interference received, including interference that may cause undesired operation.
The device has been evaluated to meet general RF exposure requirement. The device con be used in portable exposure condition without restriction.
FCC responsible party name : Merkury Innovations
Address : 45 Broadway 3rd Floor, New York, NY 10006
Telephone number : +(888) 232 3143
Things you can say:

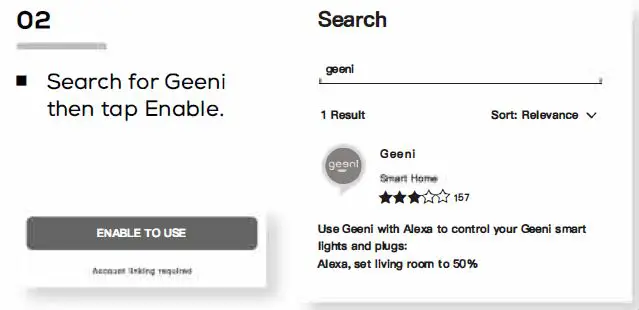
- Open the Alexa app and go to Skills in the menu.

- Search for Geeni then tap Enable.
- Choose “Geeni” from the list of Home Control partners.

- Authorize your account with Google Assistant using the username and password from your Geeni app.

Now your Google Home app and MERKURY devices are linked!
You’re now able to say “Hey Google” and control your MERKURY devices.
At any time, go into the ·Home Control” section of the Google Home app to set nicknames and rooms for your devices. You can rename your devices in the Geeni app, and Google Assistant will refer to them by the same name.
So if you rename a smart bulb to “Living Room” or a nickname like Blossom: then Google Assistant will use that same name later on. You can always give it a nickname using the Google Home app as well. You can also assign bulbs to a specific room, like ·sedroom· or ·Kitchen.”
Google Assistant will be able to control devices by room.
Important Information:
Before installing or replacing a bulb. read and follow all precautions, including the following:CAUTION: RISK OF ELECTRIC SHOCK OR BURNS – USE IN A DRY LOCATION ONLY. The weather resistant IP44 rating only protects the LED strip from splashes in any direction. DO NOT IMMERSE IN WATER. WARNING: The LED strip must be unplugged when making any modifications to the device. Electrical currents are dangerous and may cause electrical shock, injury, or death (in some cases)
Support:
If you encounter any issues, please contact us at support.mygeeni.com for help. To explore our full selection of products, visit us at: www.mygeeni.com
(888) 232-3143 Toll-free
© 2021 Merkury Innovations, 45 Broadway 3rd FL, New York NY 10006. The illustrated product and specifications may differ slightly from those supplied. Geeni is a trademark of Merkury Innovations LLC. iPhone, Apple and the Apple logo are trademarks of Apple Inc .. registered in the U.S. and other countries. App Store is a service mark of Apple Inc. Google, Google Play, and related marks and logos are trademarks of Google LLC. iOS is a registered trademark of Cisco in the U.S. and other countries and is used under license. Amazon, Alexa and all related logos are trademarks of Amazon.com, Inc. or its affiliates. All other trademarks and trade names are those of their respective
Made in China
BOX CONTENT
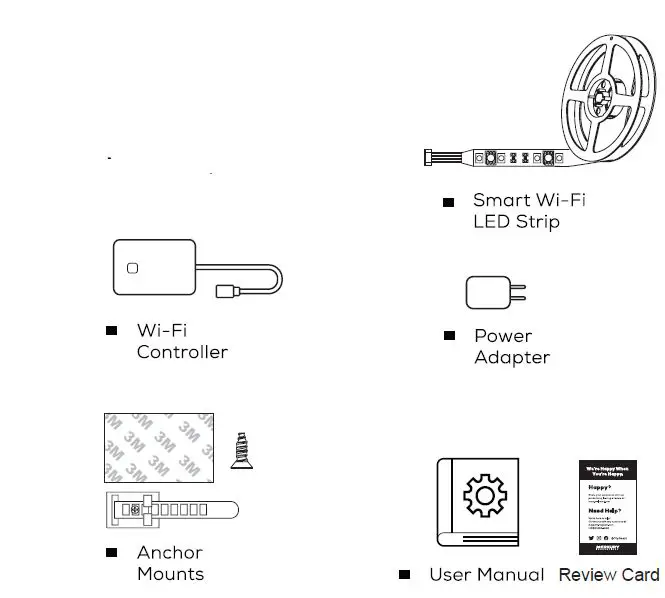
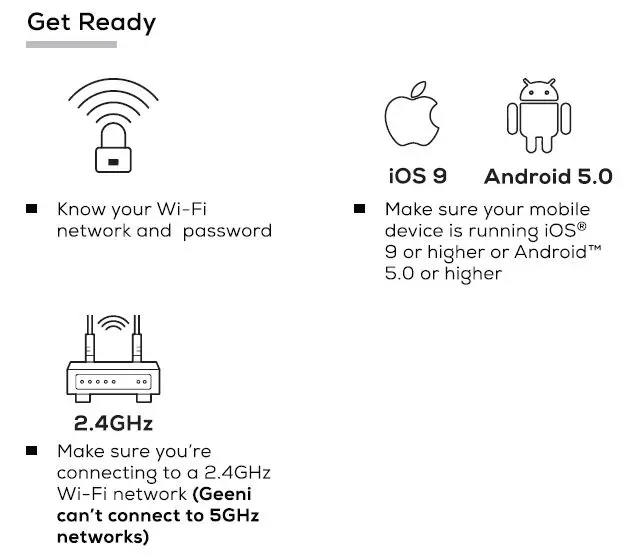
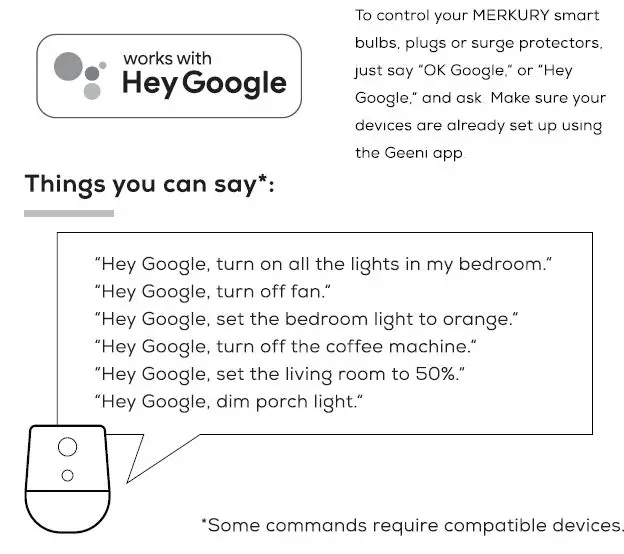
VOICE CONTROL GUIDE
Thank you for purchasing your MERKURY smart home product. Make sure your devices are already set up using the Geeni opp, then follow these steps.
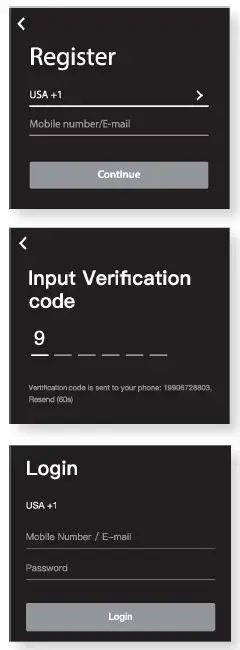
STEP 1
- Download the Geeni App from App Store or Google Play.
- Register an account on your Geeni App.
- Enter your mobile phone number or email address
- Enter the verification code and create a password.
- Log in to the App.
STEP2

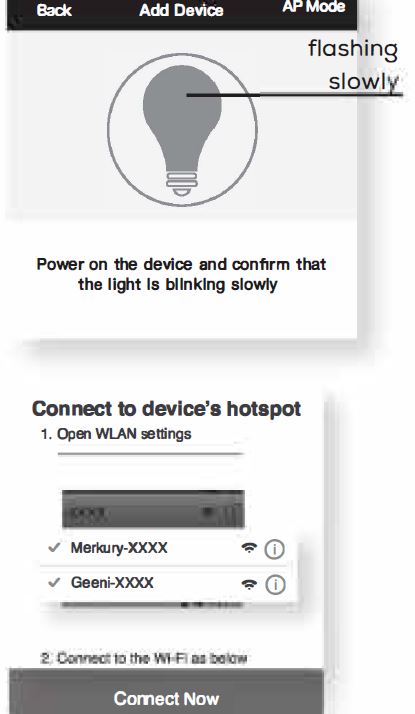
- Plug the device into the wall.
Make sure the indicator light on the device is flashing rapidly, indicating the device is ready to connect. See reset instructions on p. 5 - Measure the area yau wish ta attach the LED strip to. Ensure that the area has a clean. solid surface.

- Measure the LED strip for the desired length. starting at the end closest to the connector for the Wi-Fi Controller.
IMPORTANT: If you measure 6 cut from the opposite end, you will not be able to connect the LED strip to the Wi-Fi Controller.
Troubleshooting
Cannot connect to your Wi-Fi network.
Make sure you entered the correct Wi-Fi password during the Wi-Fi setup. Check whether there are any Internet connection problems. If the Wi-Fi signal is too weak. reset your Wi-Fi router and try again.
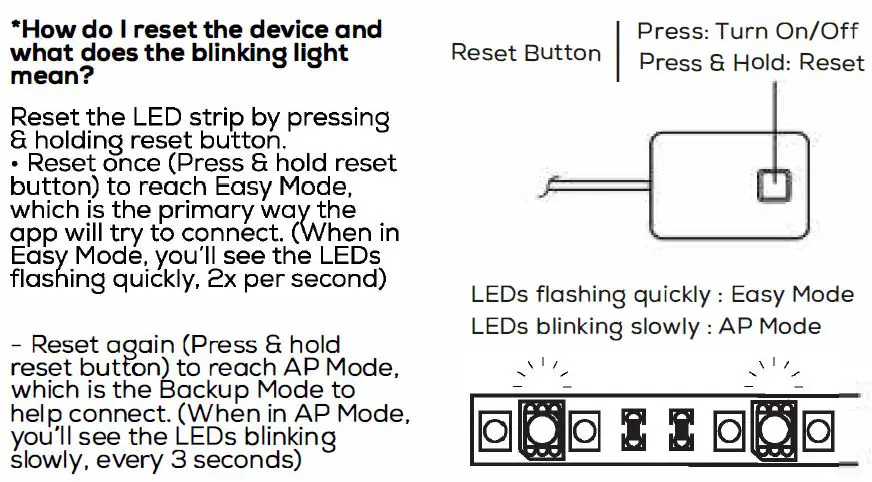
Reset the device
- Reset once (Press 6: hold reset button) to reach Easy Mode, which is the primary way the app will try to connect. (When in Easy Mode. you’ll see the LED flashing quickly. 2x per second)
- Reset again (Press 6 hold reset button) to reach AP, which is the Backup Mode to help connect. (When in AP Mode. you’ll see the LED blinking slowly, every 3 seconds)
System Requirements
- Mobile device running iOS® 9 or higher or Android™ 5.0 or higher
- Existing Wi-Fi Network
Technical Specifications
- Size: 0.5in x 79in
- Input: 100-240V, 50/60Hz
- Life Span: 10000 Hours
- Weatherproof: IP44 (Strip), IP20 (Controller)
- Wi-Fi: IEEE 802.lln, 2.4GHz
(Not compatible with 5GHz Wi-Fi networks)
Frequently Asked Questions
- Can I share with family and friends?
Yes. you can share your bulbs with family and friends who will have access to control your bulbs, plugs, cameras, and other Merkury devices. In the Geeni opp, press the Profile button and click on the “Device Sharing” button, and you will be able to give or revoke sharing permissions.
In order to share, the other user should already have downloaded the Geeni opp and registered a new account. - Can I group multiple Merkury devices together?
Yes, you can group multiple devices of the same type together, by room, location, or however else you want. The same devices can be in multiple groups. (For example, create a group for “Bedroom” and another group for “Entire House”, and your Bedroom lights can be included in both groups). From your main device list, click on one of the devices you want to group. Press the ” … ” button on the top right for advanced settings, and click Create Group. You’ll then be able to choose which devices you’d like to group together and will be able to rename them. - How Many Devices Can I Control?
Geeni app can control an unlimited amount of devices in an unlimited amount of locations. Your router may have a limit of how many devices con be connected to one router. - My Merkury device has a funny name. How do I rename it? From your main device list, click on one of the devices you want to rename, press the “•••” button on the top right for advanced settings, and click Modify Device Name (or Modify Group Name, if applicable). You’ll then be able to choose a more familiar name.
- The device appears offline or unreachable, what should I do? Make sure your Wi-Fi router is online and in range.
Make sure you have the latest Geeni functionality by clicking “Check for firmware update” in your device settings. - What’s the Wireless Range?
The range of your home Wi-Fi is heavily dependent on your home router and the conditions of the room. Check with your router specifications for exact range data. - If my Wi-Fi/lnternet goes down, will Geeni still work? Merkury products need to be connected to Wi-Fi in order to use them remotely.
Each strip can be cut by every 10cm.
LED Strip Adhesive Installation *Follow Instructions Carefully

Be sure to thoroughly clean surface or wall with any standard rubbing alcohol before applying adhesive and let dry.

Peel adhesive lining from the back of the strip light.
Position LED strip upon surface and press every section firmly for at least 30 seconds ensuring a strong hold.
NOTE: 3M adhesive may not adhere well to vinyl surfaces nor to delicate wallpaper.

Installation Using Anchor Mounts
If you would like. you may utilize the included anchor mounts for an additional hold. Each mount can be screwed into the wall with a standard Phillips-head screwdriver (not included) or using the 3M adhesive backing.
The LED light strip light can be placed along each mount and then locked in place with the strap.
STEP3
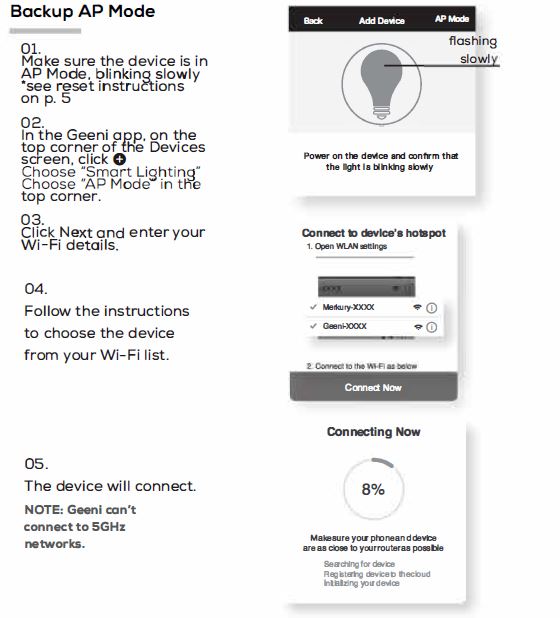
Add device: Easy Mode
- In the Geeni app, on the top corner of the Devices screen, click 0 Choose “Smart LED Strip”.
- Mlight ake is sure flashing the indicator quickly, indicating it’s ready to connect. If not, turn the bulb off and on 3 times until it is flashing. Press “Next Step.”
- Enter your Wi-Fi network and password.
- The Geeni app will try to connect your device.
NOTE: Geeni can’t connect to 5GHz networks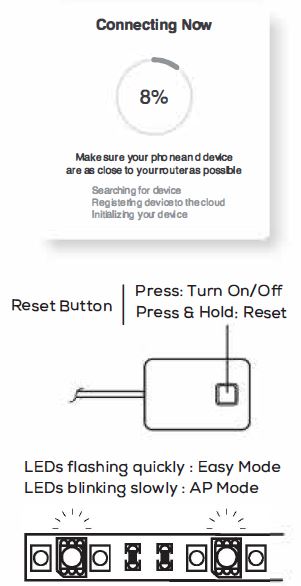
Add device
Backup AP Mode
How do I reset the device and what does the blinking light mean?
FCC WARNING
This device complies with part 15 of the FCC Rules. Operation is subject to the following two conditions: (1) this device may not cause harmful interference, and (2) this device must accept any interference received, including interference that may cause undesired operation.
Any changes or modifications not expressly approved by the party responsible for compliance could void the user’s authority to operate the equipment.
NOTE: This equipment has been tested and found to comply with the limits for a Class B digital device, pursuant to Part 15 of the FCC Rules. These limits are designed to provide reasonable protection against harmful interference in a residential installation. This equipment generates, uses and can radiate radio frequency energy and, if not installed and used in accordance with the instructions, may cause harmful interference to radio communications. However, there is no guarantee that interference will not occur in a particular installation.
If this equipment does cause harmful interference to radio or television reception,
which can be determined by turning the equipment off and on, the user is encouraged to try to correct the interference by one or more of the following measures:
- Reorient or relocate the receiving antenna.
- Increase the separation between the equipment and receiver.
- Connect the equipment into an outlet on a circuit different from that to which the receiver is connected.
- Consult the dealer or an experienced radio/TV technician for help.
To maintain compliance with FCC’s RF Exposure guidelines, This equipment should be installed and operated with minimum distance between 20cm the radiator your body: Use only the supplied antenna.
]]>MERKURY MI-S041S Star Karaoke Speaker + Wireless Mic

IMPORTANT Please read before using this product
INSTRUCTIONS
Charging
- Plug the included USB cable into the 5V input on top of speaker and plug the other end into a standard USB port.
- When charging, the indicator light will glow. Once fully charged, the indicator light will turn off.
Pair and Connect with a New Bluetooth Device
- Turn speaker on with the On/OFF Switch
- If needed, press the Mode Select Button to switch speaker to Bluetooth Mode (BT)
- On your Bluetooth enabled device, navigate to the Bluetooth setting menu and search for new devices.
- Wait a few seconds and select “MERKURY S041 S”
- Speaker will emit a tone when connection is successful!
NOTE: If asked for a password, you may need to enter “0000.”
Reconnect to Bluetooth
- You only need to pair your Bluetooth device with the speaker once.
- With your previously paired device’s Bluetooth turned on and in range, power on the speaker.
- The speaker will automatically reconnect to the last Bluetooth device it was connected to.
- If a previously paired device does not auto-reconnect, navigate to the Bluetooth settings menu on your device, and select “MERKURY S041S” from the list of Bluetooth devices.
Karaoke App Support
- The Star supports many apps found in Apple and Android App store.
- Try out some of these popular apps: Smule, The Voice: On Stage, Karaoke Sing and Record, Yokee: Sing Like A Star!, and StarMaker
- The microphone also supports using Youtube for your karaoke music and lyrical needs. Just search for karaoke songs and press play!
Troubleshooting
- No power from speaker or microphone
No power from speaker or microphone No power from speaker or microphone No power from speaker or microphone No power from speaker or microphone - Music is not playing over Bluetooth
Make sure your Bluetooth device has A2DP profile. Check if both devices are paired and connected over Bluetooth. Restart speaker. - Bluetooth device will not reconnect with the microphone
Navigate to the Bluetooth settings menu on your device. Tap “MERKURY S041S” and select “Forget.” Now follow the steps to pair your device again.
Specifications:
- Power output: 1 OW
- Frequency: 100Hz-18KHz
- Driver: 5 inch
- Lithium battery: 5.0v/1800 mAh
- Product size: 11 x 4.2 x 9.4 in
- Playback time: Approx. 3 Hours•
- Charging time: Approx. 3 hours
- Standby time: Approx. 1 month
“Approximate playback time. Battery life depends on indMdual use and may be slightly more or less than the time specified.
Bluetooth® Information:
- Bluetooth® Specification: V4.2
- Operating Distance: 30 feet (Class II)
- System Requirements: Bluetoolh-capable device
Additional Connection Sources:
- Power Source: Built-in rechargeable battery via Micro USB to USB cable
Compatibility:
Works wirelessly or wired with most devices, tablets, smartphones and laptops.
Technical Support:
If you are experiencing problems, do not attempt to fix the product yourself or return it to the store you purchased it from. Please refer to the user’s manual or just contact our helpful tech support team:
Merkury Innovations 45 Broadway, 3rd Fl New York, NY 10006
www.merkuryinnovations.com
[email protected]
This device complies with Part 15 of the FCC Rules. Operation is subject to the two following conditions:
- This device may not cause harmful interference.
- This device must accept any interference received, including interference that may cause undesired operation.
©2020 Merkury Innovations, LLC.
To explore our full selection of products, visit us at: www.merkuryinnovations.com
The Bluetooth word mark and logos are registered trademarks owned by Bluetooth SIG, Inc. Apple and the Apple logo are trademarks of Apple Inc., registered in the U.S. and other countries. App Store is a service mark of Apple Inc. Google, Google Play, and related marks and logos are trademarks of Google LLC. All other trademarks and trade names are those of their respective owners. The illustrated product and specifications may differ slightly from those supplied. Made in China
MICROPHONE:
- Power Button: Use to power wireless microphone ON and OFF
- Indicator Lights: Lights will blink when wireless microphone battery is low. To charge, please connect to the included USB cable.
- Volume adjuster: Adjust the volume of the microphone higher or lower.
- Echo adjuster: Adjust level of echo effect on the vocals.
- USB 5V Charging Input: Use to charge wireless microphone with the included USB plug.
NOTE: Wireless Microphone charges with the included USB cable separately from the speaker.
SPEAKER:
- On/Off Switch
Power speaker ON and OFF. Speaker will return to the mode it was on when last in use - Indicator Light
Turns on during charging, turns off when fully charged. Always unplug USB cable when charge is complete. Please charge fully when using for the first lime. - 5V Charging Input
Please use a powered USB port to charge the speaker with the included micro USB cable. - USB
Insert USB drive to play music files. The Star can play most common audio formats. - TF
Insert TF/MicroSD card. The Star can play most common audio formats. - AUX Port
Connect via AUX port using the included AUX cable. - Microphone Port
Input port for 3.5mm wired microphone. (Sold separately) - Mode Select:
USB/MicroSD/BT/AUX When a MicroSD, USB drive, or AUX cord is inserted into the speaker, the mode changes to the designated playback automatically. - Volume Down
Press and Hold: Previous Track (Bluetooth, MicroSD, USB mode only) - Play/Pause
Play and Pause your music (Bluetooth, MicroSD, USB mode only) - Volume Up
Press and Hold: Next Track (Bluetooth, MicroSD, USB mode only) - Record
While in TF/MicroSD or USB mode, Press and hold for 2 seconds to begin recording. (A wired microphone must be used) When you are finished, press REC button again to stop recording. - Music/Orig
Press ON/OFF to lower music from speaker instantly to isolate vocals from microphone. - Wireless Microphone Holder:
Dock for microphone when not in use. Please power off the microphone, as the microphone dock is not powered.
FCC statement
This device complies with Part 15 of the FCC rules. Operation is subject to the following two conditions: 1) this device may not cause harmful interference, and 2) this device must accept any interference received, including interference that may cause undesired operation.
Note: This equipment has been tested and found to comply with the limits for a Class B digital device, pursuant to part 15 of the FCC Rules. These limits are designed to provide reasonable protection against harmful interference in a residential installation. This equipment generates uses and can radiate radio frequency energy and, if not installed and used in accordance with the instructions, may cause harmful interference to radio communications. However, there is no guarantee that interference will not occur in particular installation. If this equipment does cause harmful interference to radio or television reception, which can be determined by turning the equipment off and on, the user is encouraged to try to correct the interference by one or more of the following measures:
- Reorient or relocate the receiving antenna.
- Increase the separation between the equipment and receiver.
- Connect the equipment into an outlet on a circuit different from that to which the receiver is connected.
- Consult the dealer or an experienced radio/TV technician for help.
Changes or modifications not expressly approved by the party responsible for compliance could void the user’s authority to operate the equipment.
FCC Radiation Exposure Statement
This device complies with FCC RF radiation exposure limits set forth for an uncontrolled environment. This transmitter must not be co-located or operating in conjunction with any other antenna or transmitter.
FILE INFORMATION
- DATE: 09/04/20
- FACTORY: SZ. HOTOP ELECTRONIC TECHNOLOGY CO.,LTD
- MODEL NUMBER:
- MI-S041S-101, MI-S041 S-199 MI-S041 S-677
PRINTER SPECIFICATIONS
- FILENAME: MI-S041 S-Series_Manual_090420.ai SCALE: 100%
- SIZE: Trim: W 202mm x H 152mm
- PAPER STOCK: 80g Art Paper
- INKS: 1/1
- Greyscale
- PRESS WORK / NOTES: Trim to size, score, fold,
- & glue in specified areas. ——– Trim Score
- DO NOT print Comments or Dielines.
- Physical sample according to specs must be approved by MERKURY before proceeding to production.
CONTACT
MERKURY CHINA:
Perry
[email protected]
COMMENTS
(Internal reference only) File created by George
- Please include this manual in all packaging for MI-S041 S-Series
- Greyscale
- Double sided printing
![]()

![]()
User’s Manual for MI-E048T
True Wireless Earbuds | Charging Case | Micro USB Charging Cable
IMPORTANT Please read before using this product
Charge It
EARBUDS
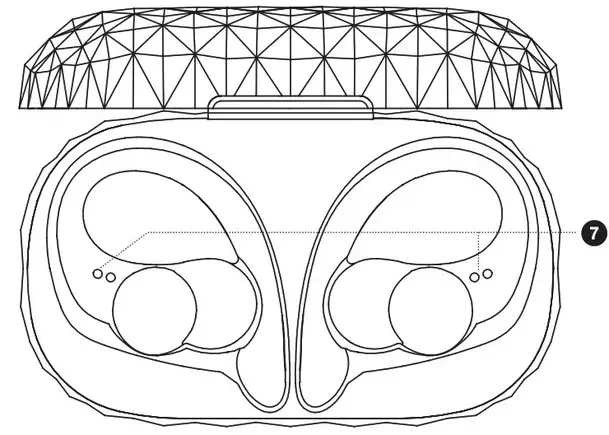
- Checking the “R” and “L” indicators on the charging case, place the right and left earbuds into the corresponding slots so that the magnetic metal charging contacts line-up correctly.
- The LED indicators on the earbuds will glow red and the charging indicators on the case will | glow blue. Your earbuds are now charging.
- Once your earbuds are fully charged the LED indicators will turn off. |
CASE
- When the case is charging, the led light will slowly flash red. When charge is complete, the red light will turn solid.
* Note: the case can charge the earbuds while charging itself.
Pair & Connect with a New Device
- POLARIS will turn on automatically once it is removed from charging case. It will blink alternately red and blue indicating that it is in pairing mode.
- Open the Bluetooth® menu on your smartphone and search for new devices.
- When you see “Merkury E048T” listed, tap it to connect.
- Once connected with your device, there will be a BEEP from the earbuds.
Reconnect to Bluetooth®
- You only need to pair your Bluetooth® device with these earbuds once.
- With your device’s Bluetooth® feature turned on and in range, power on the left & right earbuds.
- They will automatically connect to each other and to your smartphone.
- If you have a previously paired device that does not auto-reconnect, navigate to the Bluetooth® settings menu on your device and select “Merkury E048T from the list of paired Bluetooth® devices.
Play
- Connect your device to the earbuds via Bluetooth® (see “Pair & Connect with a New Device.”)
- Open your favorite music app and press play.
- Control the music tracks and volume from your device or from the on-ear controls on the earbuds. Press the button once to play/pause music & answer calls.
- All audio, including music, games, videos, and notifications will be routed through the earbuds.
TRUE WIRELESS EARBUDS

CHARGING CASE (BACK)
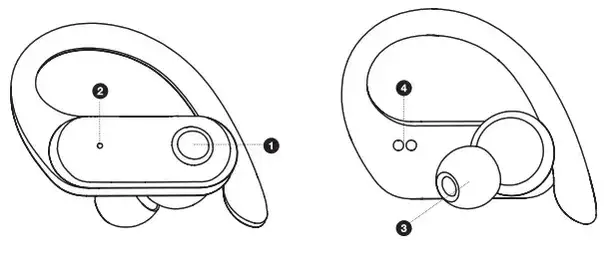
| 1. Power button 2. LED Charging Indicator Light 3. Ear tips 4. Charging Connectors |
5. Charging Input 6. LED Charging Indicator Light 7. Charging Connectors |
CHARGING CASE (TOP)

Multi-Function Power Button
Press Once
* Play/pause music, answer/end phone calls.
* Reject incoming phone calls.
Troubleshooting
| No power | Recharge your earbuds using the included micro USB cable. Try using a different micro USB cable. |
| Music is not playing over Bluetooth | Make sure your Bluetooth® device has A2DP profile. Check if both devices are paired and connected over Bluetooth. Restart the earbuds to reconnect your Bluetooth device. |
| Bluetooth device will not reconnect with the earbuds | Navigate to your Bluetooth® settings menu on your Bluetooth device, tap “Merkury E048T”, and select “Forget”. Now follow the steps to pair your device again. |
Specifications
Frequency Response: 20Hz to 20KHz
Driver Size: 13mm
Battery Information:
Built-in Battery: Lithium
Capacity: 400mAh
Music playing time: App. 3 Hours*
Charging time: 2 hours
Depends on individual use
Bluetooth Information:
Bluetooth Specification: V5.0
Operating Distance: 30 ft.
System Requirements: Bluetooth-capable device
Additional Connection Sources:
Power Source: Built-in rechargeable battery or via USB cable
*Approximate Playback time depends on individual use! and may be more or less than the time specified.
FCC Notice:
This device complies with Part 15 of the FCC Rules. Operation is subject to the two following conditions:
- This device may not cause harmful interference.
- This device must accept any interference received, including interference that may cause undesired operation. |
Technical Support:
Please do not attempt to fix the product by yourself. If you are experiencing any problems with the product, please do not return it to the store you bought it from. You can contact our technical support representatives and they will assist you with any questions you might have.
For assistance operating your product, please consult the User’s Manual first, then feel free to contact Merkury Innovations technical support:
FCC Statement
Changes or modifications not expressly approved by the party responsible for compliance could void the user’s authority to operate the equipment. This equipment has been tested and found to comply with the limits for a Class B digital device, pursuant to Part 15 of the FCC Rules. These limits are designed to provide reasonable protection against harmful interference in a residential installation. This equipment generates uses and can radiate radio frequency energy and, if not installed and used in accordance with the instructions, may cause harmful interference to radio communications. However, there is no guarantee that interference will not occur in a particular installation. If this equipment does cause harmful interference to radio or television reception, which can be determined by turning the equipment off and on, the user is encouraged to try to correct the interference by one or more of the following measures:
- Reorient or relocate the receiving antenna.
- Increase the separation between the equipment and receiver.
- Connect the equipment into an outlet on a circuit different from that to which the receiver is connected.
- Consult the dealer or an experienced radio/T V technician for help
This device complies with part 15 of the FCC rules. Operation is subject to the following two conditions (1)this device may not cause harmful interference, and (2) this device must accept any interference received, including interference that may cause undesired peration.
QUICK PAIRING
GUIDE FOR
NEW DEVICES
MANUAL

IMPORTANT: Please follow these directions in the proper order to ensure the earbuds pair and connect properly.
- POLARIS will turn on automatically once it is removed from charging case. It will blink alternately red and blue indicating that it is in pairing mode.
- On your smartphone open the Bluetooth® _ menu, power on your Bluetooth® setting, and search for new devices.
- When you see Merkury E048T listed, tap it to connect.
- Once connected with your device, there will be a BEEP from the right earbud.
Note: If your device asks for a passcode to connect, enter “0000”.
DO NOT PRINT COMMENTS

MERKURY INNOVATIONS CONFIDENTIAL
FILE INFORMATION
DATE: 03/03/21
MODEL NUMBER:
MI-E048T-SERIES
PRINTER SPECIFICATIONS
FILENAME: MI-E048T-SERIES_ Manual_030321_REV.ai
SCALE: 100%
SIZE: Trim: W 186mm x H 144mm
PAPER STOCK: 80g Art Paper
FINISH: PP Matte Varnish Coating
INKS: 1/0
Greyscale
PRESS WORK / NOTES: Trim to size, score, fold,
& glue in specified areas.
…………………ST
………………..s¢ore
DO NOT print Comments or Dielines.
Physical sample according to specs must be approved by MERKURY before proceeding to production.
CONTACT
MERKURY CHINA:
Perry
[email protected]
COMMENTS (ternal reference only)
File created by GEORGE
- Please include this manual in all packaging for MI-E048T-SERIES
- Greyscale
- Double sided printing
Merkury Innovations 45 Broadway, 3rd Floor New York, New York 10006
www.merkuryinnovations.com
E-mail: [email protected]
©2021 Merkury Innovations, LLC.
To explore our full selection of products, visit us at: www.merkuryinnovations.com
The Bluetooth wordmark and logo are registered trademarks owned by Bluetooth SIG, Inc. The illustrated product and specifications may differ slightly from those supplied. All other trademarks and trade names are those of their respective owners. Made in China
