Rated voltage: 115V
Frequency: 60Hz

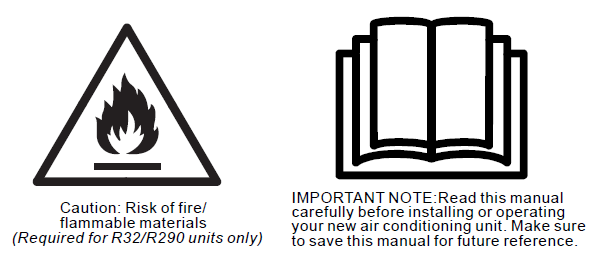
Warning notices: Before using this product, please read this manual carefully and keep it for future reference.
The design and specifications are subject to change without prior notice for product improvement. Consult with your dealer or the manufacturer for details.
WPPD08CW0N
WPPD10CW0N
WPPD10HW0N
www.midea.com
Read This Manual
Inside you’ll find many helpful hints on how to use and maintain your air conditioner properly. Just a little preventive care on your part can save you a great deal of time and money over the life of your air conditioner. You’ll find many answers to common problems in the chart of troubleshooting tips – you should be able to fix most of them quickly before calling the service. These instructions may not cover every possible condition of use, so common sense and attention to safety are required when installing, operating and maintaining this product.
CAUTION
- Contact an authorized service technician for repair or maintenance of this unit.
- The air conditioner is not intended for use by young children or infirm persons without supervision.
- Young children should be supervised to ensure that they do not play with the air conditioner.
- If the power cord needs to be replaced, please contact our consumer service and look for an authorized technician.
- The electrical installation must be performed in accordance with national regulation standards by qualified personnel only
Safety Precautions
To prevent injury to the user or other people and property damage, the instructions shown here must be followed. Incorrect operation due to ignoring of instructions may cause harm or damage. The level of risk is shown by the following indications.
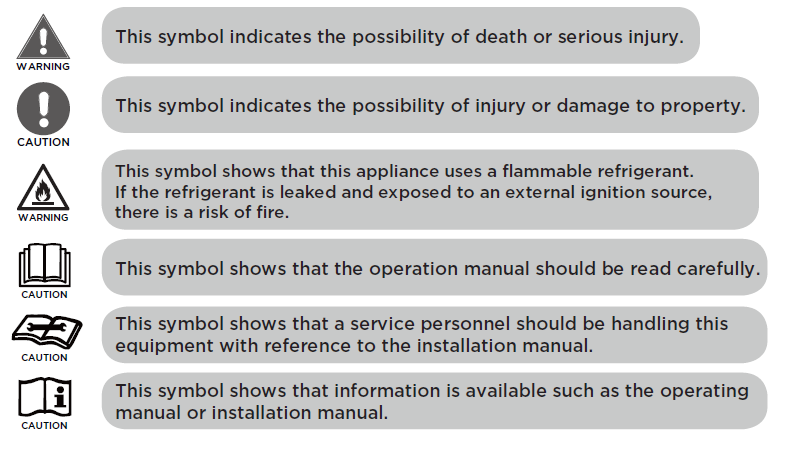
WARNINGS
Please read through these instructions before you start the installation process. Improper installation can cause damage to the unit, your personal property, and also poses a personal safety hazard.
- Installation must be performed according to the installation instructions.
Improper installation can cause water leakage, electrical shock, or fire. - Use only the included accessories and parts, and specified tools for the installation. Using non-standard parts can cause water leakage, electrical shock, fire, and injury or property damage.
- Make sure that the outlet you are using is grounded and has the appropriate voltage. The power cord is equipped with a three-prong grounding plug to protect against shock. Voltage information can be found on the side of the unit, behind the grille.
- Install the unit on a flat, sturdy surface. Failure to do so could result in damage or excessive noise and vibration.
- The unit must be kept free from obstruction to ensure the proper functioning and to mitigate safety hazards.
- DO NOT modify the length of the power cord or use an extension cord to power the unit. DO NOT share a single outlet with other electrical appliances. Improper power supply can cause fire or electrical shock.
- DO NOT install your air conditioner in a wet room such as a bathroom or laundry room. Exposure to water can cause electrical components to short circuit.
- DO NOT install the unit in a location that may be exposed to combustible gas, as this could cause fire.
- The unit has wheels to facilitate moving. Do not attempt to roll the unit across thick carpet or to roll over objects, as this could cause the unit to tip over.
- DO NOT attempt to operate a unit that has been dropped or damaged.
- DO NOT allow children to play with the air conditioner. Children must be supervised around the unit at all times.
- If the air conditioner is knocked over during use, turn off the unit and unplug it from the main power supply immediately. Visually inspect the unit to ensure there is no damage. If you suspect the unit has been damaged, contact a technician or customer service for assistance.
- In a thunderstorm, the unit should be turned off to avoid damage to the machine due to lightning.
CAUTION
- This appliance is not intended for use by persons (including children) with reduced physical, sensory or mental capabilities or lack of experience and knowledge, unless they have been given supervision or instruction concerning use of the appliance by a person responsible for their safety.
- If the power cord is damaged, it must be replaced by the manufacturer, its service agent or similarly qualified persons in order to avoid a hazard.
- Prior to cleaning or other maintenance, the appliance must be disconnected from the supply mains.
- Do not install the appliance in a location that may be exposed to combustible gas. If combustible gas accumulates around the unit, it may cause fire.
- Do not run the power cord under carpeting. Do not cover cord with throw rugs, runners, or similar coverings. Do not route cord under furniture or appliances.
Arrange cord away from traffic area and where it will not be tripped over. - To reduce the risk of fire or electric shock, do not use this air conditioner with any solid-state speed control device.
- The appliance shall be installed in accordance with national wiring regulations.
- Contact the authorized service technician for repair or maintenance of this unit.
- Contact the authorized installer for installation of this unit.
- When there are significant differences between features or operation implied by the remote control illustration and the actual functions described in the USER MANUAL, the descriptions in the USER MANUAL shall prevail.
- Do not mix old and new batteries.
- Do not mix alkaline, standard (carbon-zinc), or rechargeable (ni-cad, ni-mh, etc.) batteries.
WARNINGS (for using R32 refrigerant only)
- Do not use any means to accelerate the defrosting process or to clean the unit, other than those recommended by the manufacturer.
- Do not use or store the appliance in spaces with potential ignition sources (for example: open flames, an operating gas appliance or an operating electric heater).
- Do not pierce or burn refrigerant tubing. Be aware that refrigerants may not contain an odor.
- Keep ventilation openings clear of obstruction.
- Store the appliance in a way that will prevent mechanical damage from occurring.
- Store the appliance in a well-ventilated area where the room size corresponds to the room area as specified for operation.
- Any person who is involved with working on or breaking into a refrigerant circuit should hold a current valid certificate from an industry-accredited assessment authority, which authorizes their competence to handle refrigerants safely in accordance with an industry recognized assessment specification.
- Servicing shall only be performed as recommended by the equipment manufacturer. Maintenance and repair requiring the assistance of other skilled personnel shall be carried out under the supervision of the person competent in the use of flammable refrigerants.
- Flammable refrigerant (R32) is used within the air conditioner. When maintaining or disposing of the air conditioner, the refrigerant (R32) shall be recovered properly, do not discharge to air directly.
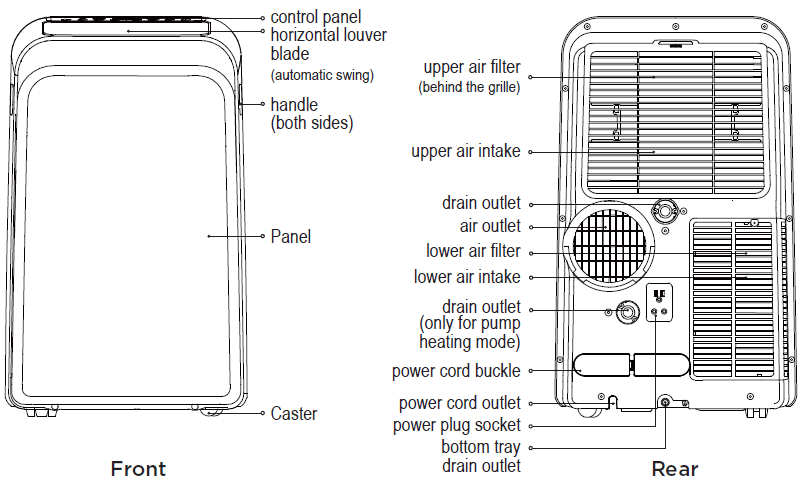
Unit Specifications and Features
Preparation
Design and Compliance Notes
Design Notice:
In order to ensure the optimal performance of our products, the design specifications of the unit and remote control are subject to change without prior notice.
Energy Rating Information:
This product is tested in accordance to the DOE SACC capacity energy rating test.
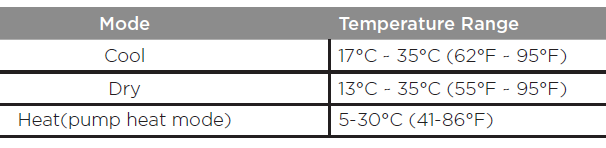
Unit Temperature Range:
Exhaust Hose Installation:
The exhaust hose and adaptor must be installed or removed in accordance with the usage mode.
For COOL or AUTO mode, exhaust hose must be installed.
For FAN or DEHUMIDIFY exhaust hose must be removed.
Operating Instructions
Control Panel Features

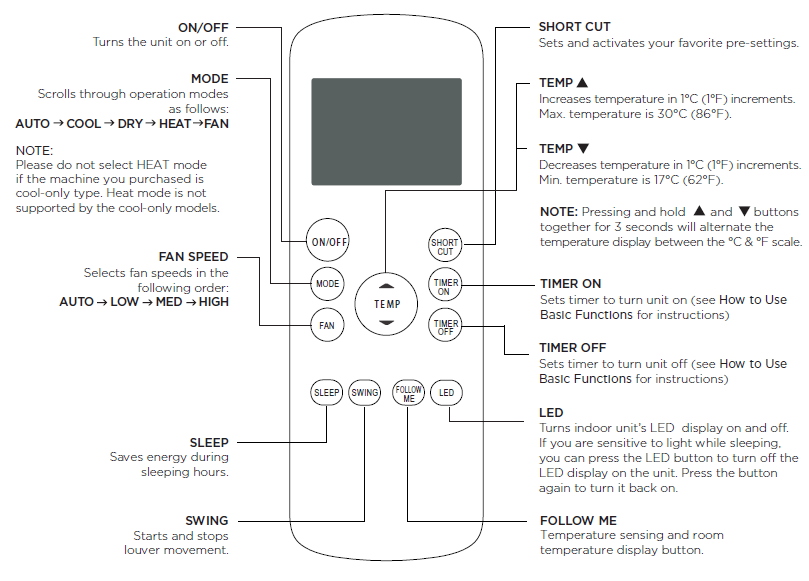
Swing Button (optional)
(Applicable to the models with auto swing feature only)
Used to initiate the Auto Swing feature. When the operation is ON, pressing the SWING button can stop the louver at the desired angle.
Timer button
Used to initiate the AUTO ON start time and AUTO OFF stop time program, in conjunction with the + & – buttons. The timer on or off light will illuminate depending on the selected setting.
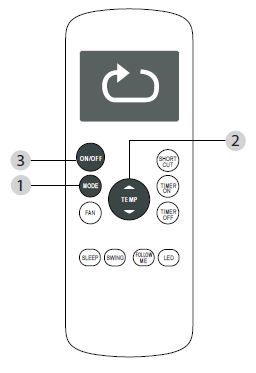
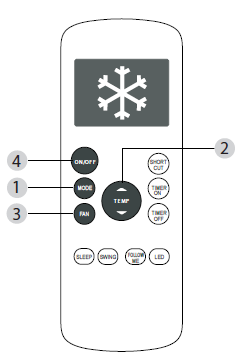
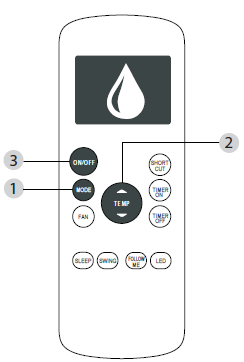
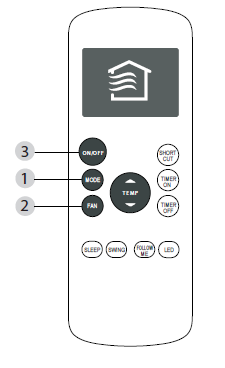
Mode button
Selects the desired operating mode. Each time you press the button, a mode is selected in a sequence that goes from AUTO, COOL, DRY FAN and HEAT. The mode light illuminates and indicates the selected mode.
Up (+) and Down (-) buttons
Used to adjust (increasing/decreasing) temperature settings in 1°C/1°F increments in a range of 17°C/62°F to 30°C/86°F or the TIMER setting in a range of 0 ~ 24hrs.
NOTE: The control is capable of displaying temperature in degrees Fahrenheit or degrees Celsius. To convert from one to the other, press and hold the Up and Down buttons at the same time for 3 seconds.
Fan/ Constant fan button
Controls the fan speed. Press to control the fan speed in four steps – LOW, MID, HIGH and AUTO. The selected fan speed light (except AUTO) will illuminate. When AUTO is selected, no lights will illuminate.
NOTE: In cooling or Dry mode, press the button for 3 seconds to turn on or off the constant fan function. When the function is turned on, the constant fan light will illuminate, identifying the fan continuous run for cooling. When the function is turned off, the constant fan light will go out, identifying the fan cycle run with compressor stop.
Sleep (Eco)/Filter button
Used to initiate the SLEEP/ECO operation.
Power button
Power switch on/off.
LED display
Shows the set temperature in °C or °F and the Auto-timer settings. While on DRY and FAN modes, it shows the room temperature.
Shows Error codes and protection code:
- E1 – Room temperature sensor error.
- E2 – Evaporator temperature sensor error.
- E3 – Condenser temperature sensor error (select models).
- E4 – Display panel communication error.
- P1 – Bottom tray is full — Connect the drain hose and drain the collected water away. If protection code repeats, call for service.
NOTE: When one of the above malfunctions occurs, turn off the unit and check for any obstructions. Restart the Unit. If the malfunction persists, turn off the unit and unplug the power cord. Contact the manufacturer or its service agents or a similar qualified person for service.
Wireless button
Used to initiate the Wireless function. For the first time to use Wireless function, press and hold the swing button for 3 seconds to initiate the Wireless connection mode. The LED DISPLAY shows ‘AP’ to indicate you can set Wireless connection. If the connection(router) is successful within 8 minutes, the unit will exit Wireless connection mode automatically and the Wireless indicator illuminates. If the connection is failure within 8 minutes, the unit exits Wireless connection mode automatically. After the Wireless connection is successful, you can press and hold SWING and DOWN (-) buttons at the same time for 3 seconds to turn off Wireless function and the LED DISPLAY shows ‘OF’ for 3 seconds, press SWING and UP(+) buttons at the same time to turn on Wireless function and the LED DISPLAY shows ‘ON’ for 3 seconds.
NOTE: When you restart the Wireless function, it may take a period of time to connect to the network automatically.
Operating Instructions
HEAT operation (Only for heat & cool models)
- Press the “MODE” button until the “HEAT” indicator light comes on.
- Press the ADJUST buttons “+” or ” – ” to select your desired room temperature.
The temperature can be set within a range of 17°C~30°C/62°F~86°F(or 88°F). - Press the “FAN SPEED” button to choose the fan speed. For some models, the fan speed can not be adjusted under HEAT mode.
COOL operation
- Press the “MODE” button until the “COOL” indicator light comes on.
- Press the ADJUST buttons “+” or “-” to select your desired room temperature. The temperature can be set within a range of 17°C~30°C/62°F~86°F.
- Press the “FAN SPEED” button to choose the fan speed.
DRY operation
- Press the “MODE” button until the “DRY” indicator light comes on.
- While in this mode, you cannot select a fan speed or adjust the temperature.
The fan motor operates at LOW speed. - Keep windows and doors closed for the best dehumidifying effect.
- Do not connect the duct to a window.
AUTO operation
- When you set the air conditioner to AUTO mode, it will automatically select cooling, heating (cooling only models excluded), or fan only operation depending on what temperature you have selected and the current room temperature.
- The air conditioner will control room temperature automatically according to the temperature point set by you.
- Under AUTO mode, you cannot select the fan speed.
FAN operation
- Press the “MODE” button until the ”FAN“ indicator light comes on.
- Press the “FAN SPEED” button to choose the fan speed. The temperature cannot be adjusted.
- Do not connect the duct to a window.
TIMER operation
- When the unit is on, pressing the Timer button will initiate the Auto-off stop program. The TIMER OFF indicator light illuminates. Press the Up or Down button to select the desired time. Press the TIMER button again within 5 seconds. The Autoon start program is initiated and the TIMER ON indicator light illuminates. Press the up or down button to select the desired Autoon start time.
- When the unit is off, press the Timer button to initiate the Auto-on start program.
Pressing it again within five seconds will initiate the Auto-off stop program. - Press or hold the Up or Down button to change the Auto time by 0.5 hour increments, up to 10 hours, then at 1 hour increments up to 24 hours. The control will count down the time remaining until start.
- The system will automatically revert back to display the previous temperature setting if there is no operation within 5 seconds.
- Turning the unit ON or OFF at any time or adjusting the timer setting to 0.0 will cancel the Auto Start/Stop timer program.
- Should a malfunction occur, the Auto Start/ Stop timed program will be cancelled.
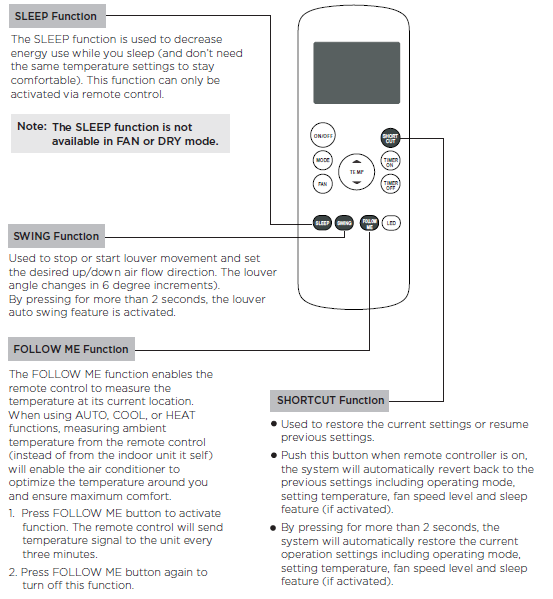
SLEEP/ECO operation
Pressing this button will increase (during cooling operation) or decrease (during heating operation, applicable models) 1°C/1°F after 30 minutes. The temperature will again increase (cooling) or decrease (heating) by another 1°C/1°F after an additional 30 minutes. This new temperature will be maintained for 7 hours before returning to the originally selected temperature. This ends the Sleep/Eco mode and the unit will continue to operate as originally programmed.
NOTE : This feature is unavailable in FAN or DRY mode.
Other Features
FOLLOW ME/TEMP SENSING
Feature (optional)
NOTE : This feature can be activated from the remote control ONLY. The remote control serves as a remote thermostat allowing for the precise temperature control at its location.
To activate the Follow Me/Temp Sensing feature, point the remote control towards the unit and press the Follow Me/Temp Sensing button. The remote display is actual temperature at its location. The remote control will send this signal to the air conditioner every 3 minutes interval until press the Follow Me/Temp Sensing button again. If the unit does not receive the Follow Me/Temp Sensing signal during any 7 minutes interval, the unit will beep to indicate the Follow Me/Temp Sensing mode has ended.
AUTO-RESTART
If the unit shuts off unexpectedly due to a power outage, it will restart with the previously set function automatically when the power resumes.
WAIT 3 MINUTES BEFORE RESUMING OPERATION
After the unit has stopped, it cannot be restarted until 3 minutes time has elapsed. This is to protect the unit. Operation will automatically resume after 3 minutes.
AIRFLOW DIRECTION ADJUSTMENT
The louver can be adjusted automatically. Adjust the airflow direction automatically.
NOTE :
On some models the louver can be adjusted manually only):
- When the Power is ON, the louver opens fully.
- Press the SWING button on the panel or remote controller to initiate the Auto Swing feature. The louver will swing up and down automatically.
- Please do not adjust the louver manually.
Water drainage
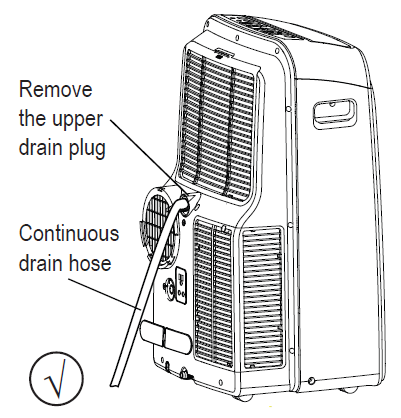
During dehumidifying modes, remove the upper drain plug from the back of the unit and install the drain connector (5/8” universal female mender) with 3/4” hose (locally purchased). For models without drain connector, just attach the drain hose to the hole. Place the open end of the hose directly over the drain area in your basement floor.
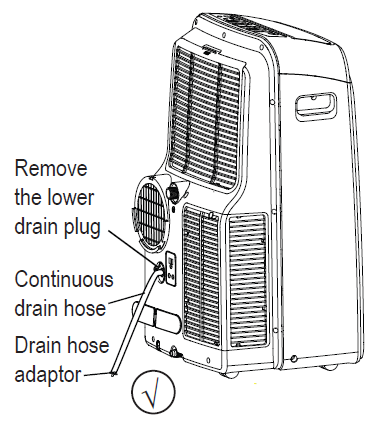
During heat pump mode, remove the lower drain plug from the back of the unit and install the drain connector (5/8” universal female mender) with 3/4” hose (locally purchased). For models without drain connector, just attach the drain hose to the hole. Place the open end of the hose adaptor directly over the drain area in your basement floor.
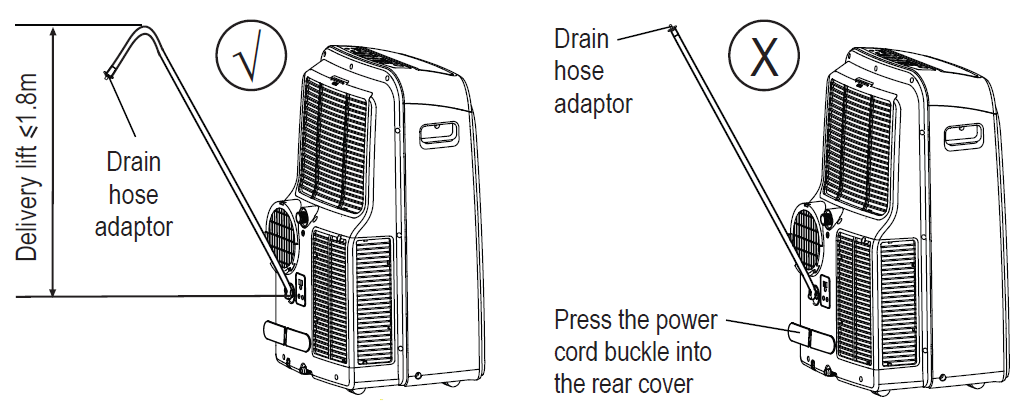
NOTE: Make sure the hose is secure so there are no leaks. Direct the hose toward the drain, making sure that there are no kinks that will impede water flow. Place the end of the hose into the drain and make sure the end of the hose is directed downward to let the water flow smoothly. (See Figs with ![]() ). Installation not recommended. (See Figs with
). Installation not recommended. (See Figs with ![]() ). When the continuous drain hose is not used, ensure that the corresponding drain plug and knob are installed firmly to prevent leakage.
). When the continuous drain hose is not used, ensure that the corresponding drain plug and knob are installed firmly to prevent leakage.
When the water level of the bottom tray reaches a predetermined level, the unit beeps 8 times. The digital display shows “P1.” At this time the air conditioning/ dehumidification process will immediately stop.
However, the fan motor will continue to operate (this is normal). Carefully move the unit to a drain location, remove the bottom drain plug and let the water drain away. Reinstall the bottom drain plug and restart the machine until the “P1” symbol disappears. If the error repeats, call for service.
NOTE: Be sure to reinstall the bottom drain plug firmly to prevent leakage before using the unit.
Installation Instructions
Choosing the Right Location
Your installation location should meet the following requirements:
- Make sure that you install your unit on an even surface to minimize noise and vibration.
- The unit must be installed near a grounded plug, and the Collection Tray Drain (found on the back of the unit) must be accessible.
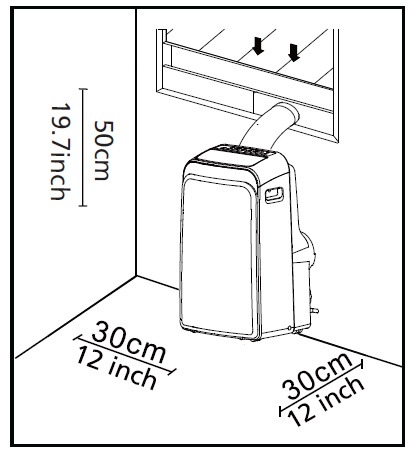
- The unit should be located at least 30 cm (12”) from the nearest wall to ensure proper air conditioning. The horizontal louver blade should be at least 50cm (19.7”) away from obstacles.
- DO NOT cover the Intakes, Outlets or Remote Signal Receptor of the unit, as this could cause damage to the unit.
Recommend Installation

NOTE: All the illustrations in the manual are for explanation purposes only. Your machine may be slightly different.
The unit can be controlled by the unit control panel alone or with the remote controller. This manual does not include. See the Remote Controller Instruction for details.
Note About Fluorinated Gasses
- This air-conditioning unit is a hermetically sealed unit that contains fluorinated gasses. For specific information on the type of gas and the amount, please refer to the relevant label on the unit itself.
- Service, maintenance and repair of this unit must be performed by a certified technician.
- Product recycling must be done according to local regulations.
NOTE: All the illustrations in the manual are for explanation purpose only. Your machine may be slightly different.
The unit can be controlled by the unit control panel alone or with the remote controller. This manual does not include. See the Remote Controller Instruction for details.
Tools Needed
- Medium Phillips screwdriver
- Tape measure or ruler
- Knife or scissors
- Saw (optional, to shorten window adaptor for narrow windows).
Accessories
Your Window Installation Kit fits windows 67.5-123 cm (26.5”-48”) and can be shortened for smaller windows.

Window Installation Kit
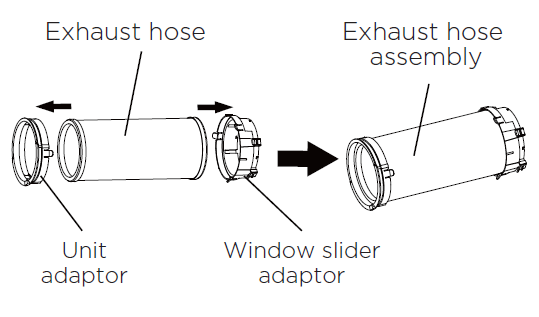
Step One: Preparing the exhaust hose assembly
Press the exhaust hose into the window slider adaptor and unit adaptor, clamp automatically by elastic buckles of the adaptors.
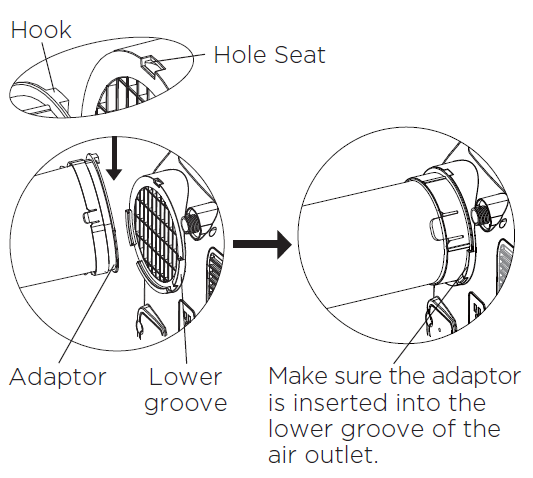
Step Two: Install the exhaust hose assembly to the unit
Insert unit adaptor of the Exhaust hose assembly into the lower groove of the air outlet of the unit with the hook of the adaptor aligned with the hole seat of the air outlet and slide down the Exhaust hose assembly along the direction indicated by the arrow for installation.
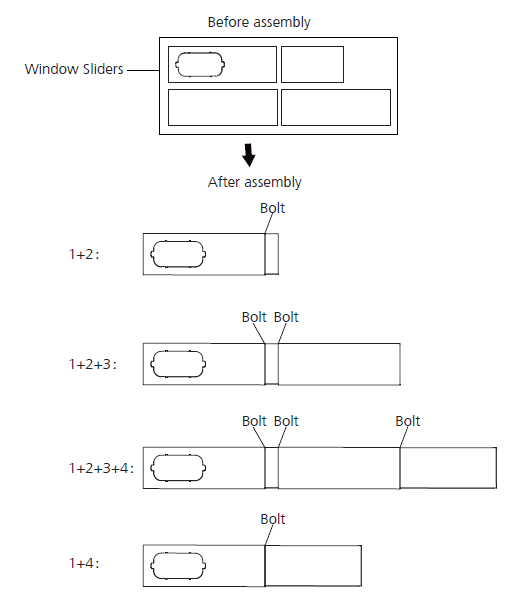
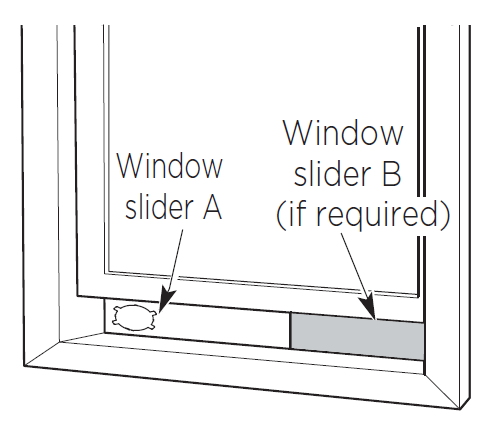
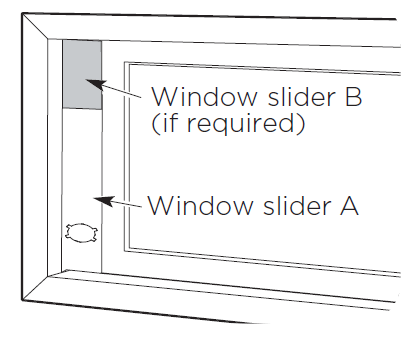
Step Three: Preparing the Adjustable Window Slider
- Depending on the size of your window, adjust the size of the window slider.
- If the length of the window requires two or three window sliders, use the bolt(s) to fasten the window sliders once they are adjusted to the proper length.
NOTE: Once the Exhaust Hose assembly and Adjustable Window Slider are prepared, choose from one of the following two installation methods.
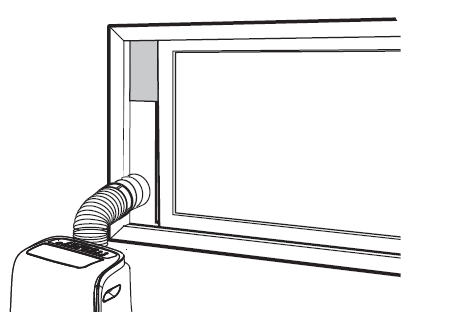
Type 1: Hung window installation
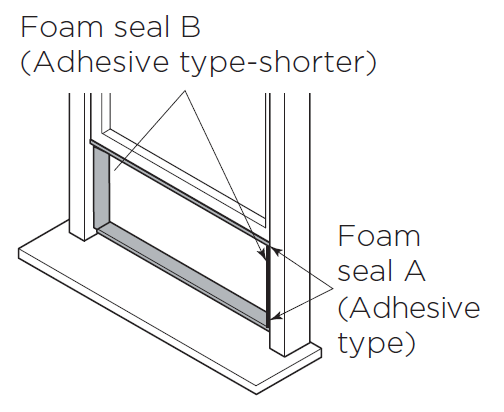
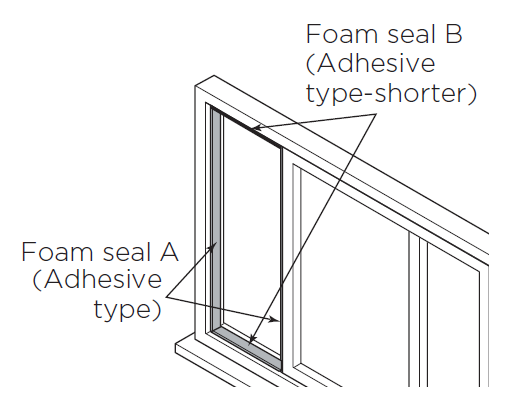
1. Cut the adhesive foam seal A and B strips to the proper lengths, and attach them to the window sash and frame as shown.
2. Insert the window slider assembly into the window opening.
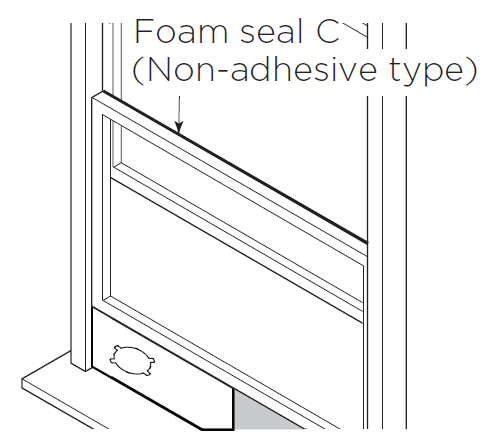
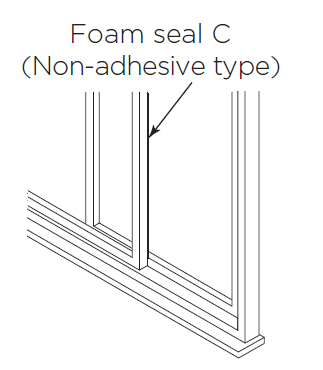
3. Cut the non-adhesive foam seal C strip to match the width of the window. Insert the seal between the glass and the window frame to prevent air and insects from getting into the room.
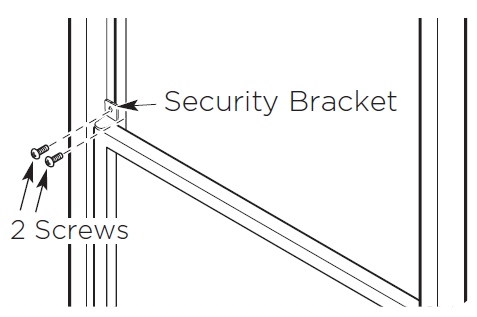
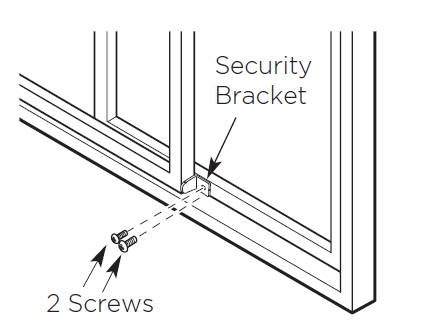
4. If desired, install the security bracket with 2 screws as shown.
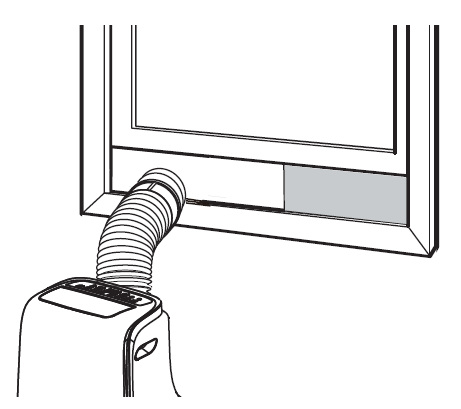
5. Insert the window slider adaptor into the hole of the window slider.
Type 2: Sliding window installation
1. Cut the adhesive foam seal A and B strips to the proper lengths, and attach them to the window sash and frame as shown.
2. Insert the window slider assembly into the window opening.
3. Cut the non-adhesive foam seal C strip to match the window height. Insert the foam seal between the glass and the window frame to prevent air and insects from getting into the room.
4. If desired, install the security bracket with 2 screws as shown.
5. Insert the window slider adaptor into the hole of the window slider.
NOTE
To ensure proper functioning, DO NOT overextend or bend the hose. Make sure that there is no obstacle around the air outlet of the exhaust hose (in the range of 500mm) in order for the exhaust system to work properly. All illustrations in this manual are for explanation purposes only. Your air conditioner may be slightly different. The actual shape shall prevail.

Care and Cleaning
Safety Precautions
- Always unplug the unit before cleaning or servicing.
- DO NOT use flammable liquids or chemicals to clean the unit.
- DO NOT wash the unit under running water. Doing so causes electrical danger.
- DO NOT operate the machine if the power supply was damaged during cleaning.
A damaged power cord must be replaced with a new cord from the manufacturer.
Clean the Air Filter
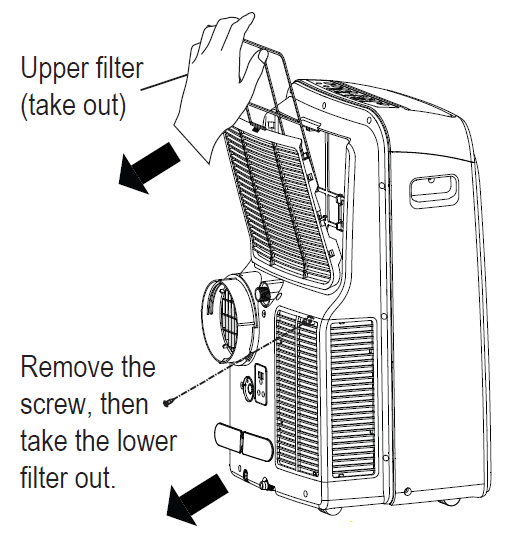
Maintenance Tips
- Be sure to clean the air filter every 2 weeks for optimal performance.
- The water collection tray should be drained immediately after P1 error occurs, and before storage to prevent mold.
- In households with animals, you will have to periodically wipe down the grill to prevent blocked airflow due to animal hair.
Clean the Unit
Clean the unit using a damp, lint-free cloth and mild detergent. Dry the unit with a dry, lint-free cloth.
Store the Unit When Not in Use
- Drain the unit’s water collection tray according to the instructions in the following section.
- Run the unit on FAN mode for 12 hours in a warm room to dry it and prevent mold.
- Turn off the unit and unplug it.
- Clean the air filter according to the instructions in the previous section. Reinstall the clean, dry filter before storing.
- Remove the batteries from the remote control.
NOTE: Be sure to store the unit in a cool, dark place. Exposure to direct sunlight or extreme heat can shorten the lifespan of the unit.
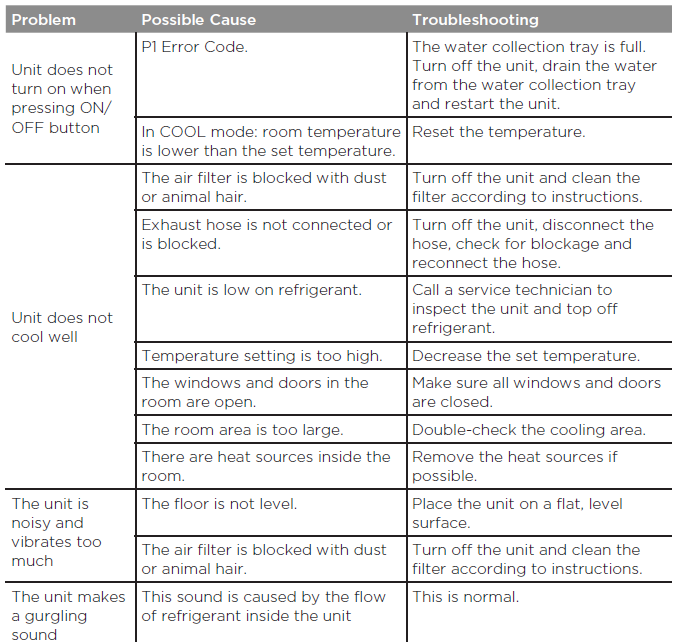
Troubleshooting Tips
Malfunction Diagnosis
Please check the machine according to the following table before calling for service:
Remote Control Instructions
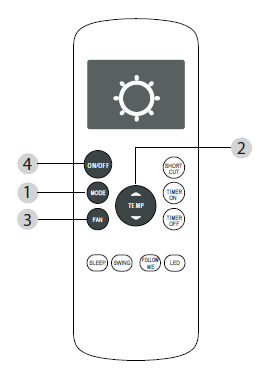
Function Buttons
Before you begin using your new air conditioner, make sure to familiarize yourself with its remote control. The following is a brief introduction to the remote control itself. For instructions on how to operate your air conditioner, refer to the Operating Instructions section of this manual.
Handling the Remote Control
NOT SURE WHAT A FUNCTION DOES?
Refer to the Operating Instructions section of this manual for a detailed description of how to use your air conditioner
SPECIAL NOTE
Button designs on your unit may differ slightly from the example shown.
If the unit does not have a particular function, pressing that function’s button on the remote control will have no effect.
When there are significant differences between features or operations implied by the remote control illustration and the actual functions described in the USER’S MANUAL, the descriptions in the USER’S MANUAL shall prevail
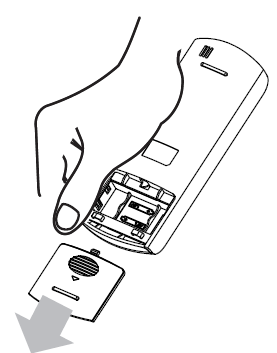
INSERTING AND REPLACING BATTERIES
Your air conditioning unit comes with two AAA batteries. Insert the batteries in the remote control before use.
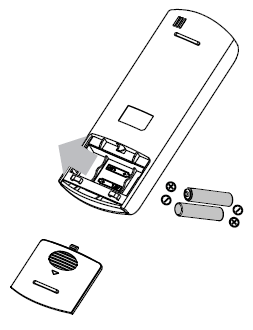
- Slide the back cover of the remote control downward, exposing the battery compartment.
- Insert the batteries, paying attention to align the (+) and (-) ends of the batteries with the symbols inside the battery compartment.
- Slide the battery cover back into place
BATTERY NOTES: For optimum product performance:
- Do not mix old and new batteries, or batteries of different types.
- Do not leave batteries in the remote control if you don’t plan on using the device for more than 2 months.
BATTERY DISPOSAL
Do not dispose of batteries as unsorted municipal waste.
Refer to local laws for proper disposal of batteries.
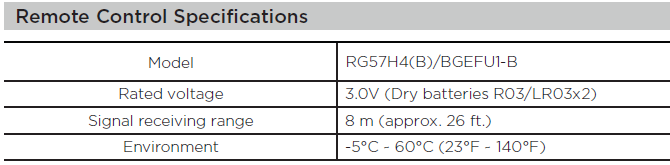
TIPS FOR USING REMOTE CONTROL
- The remote control must be used within 8 meters / 26 feet of the unit.
- The unit will beep when remote signal is received.
- Curtains, other materials and direct sunlight can interfere with the infrared signal receiver.
- Remove batteries if the remote will not be used more than 2 months.
Remote LED Screen Indicators
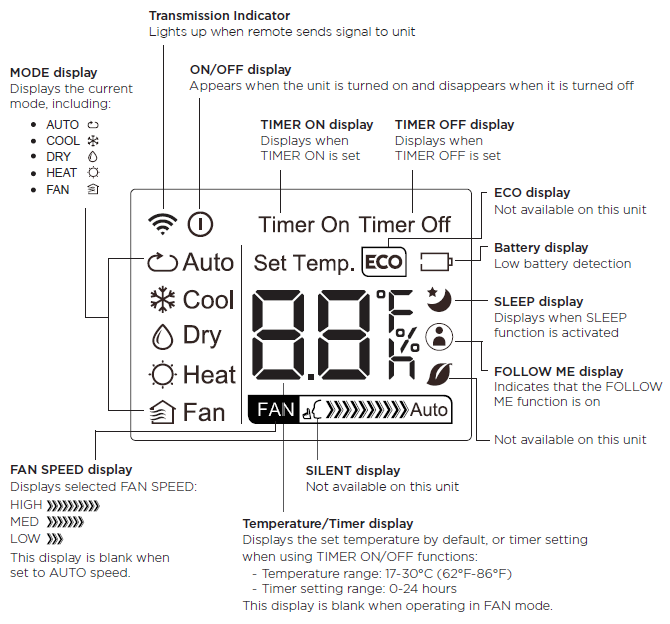
Basic Functions
SETTING THE DESIRED TEMPERATURE
The operating temperature range for this unit is 17-30°C (62°F-86°F). You can increase or decrease the set temperature in 1°C (1°F) increments.
AUTO operation
In AUTO mode, the unit will automatically select the COOL, FAN, HEAT or DRY mode based on the set temperature.
- Press the MODE button to select Auto mode.
- Set your desired temperature using the Temp
 or Temp
  button.
 - Press the ON/OFF button to start the unit.
NOTE: FAN SPEED cannot be set in AUTO mode.
COOL operation
- Press the MODE button to select COOL mode.
- Set your desired temperature using the Temp or Temp button.
- Press the FAN button to select the fan speed: AUTO, LOW, MED,or HIGH.
- Press the ON/OFF button to start the unit.
DRY operation (dehumidifying)
- Press the MODE button to select DRY mode.
- Set your desired temperature using the Temp or Temp button.
- Press the ON/OFF button to start the unit.
NOTE: FAN SPEED cannot be set in DRY mode.
FAN operation
- Press the MODE button to select FAN mode.
- Press FAN button to select the fan speed: AUTO, LOW, MED or HIGH.
- Press the ON/OFF button to start the unit.
NOTE: You cannot set the temperature in FAN mode. As a result, your remote control’s LCD screen will not display temperature.
HEAT operation
- Press the MODE button to select HEAT mode.
- Set your desired temperature using the Temp or Temp button.
- Press the FAN button to select the fan speed: AUTO, LOW, MED, or HIGH.
- Press the ON/OFF button to start the unit.
NOTE: As outdoor temperature drops, the performance of your unit’s HEAT function may be affected. In such instances, we recommend using this air conditioner in conjunction with another heating appliance.
Timer Functions
Your air conditioning unit has two timer-related functions:
- TIMER ON – sets the amount of time after which the unit will automatically turn on.
- TIMER OFF – sets the amount of time after which the unit will automatically turn off.
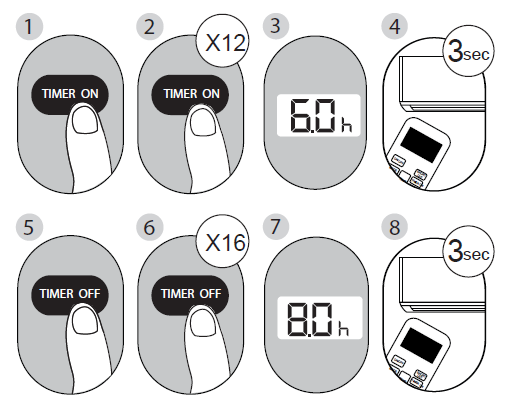
TIMER ON function
The TIMER ON function allows you to set a period of time after which the unit will automatically turn on, such as when you come home from work.
1. Press the TIMER ON button. By default, the last time period that you set and an “h” (indicating hours) will appear on the display.
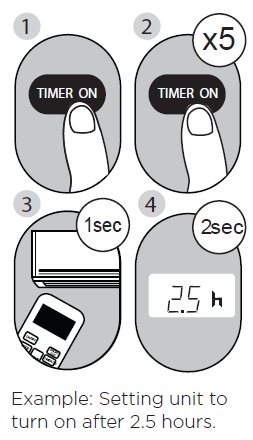
NOTE: This number indicates the amount of time after the current time after which you want the unit to turn on. For example, if you set TIMER ON for 2 hours, “2.0h“ will appear on the screen, and the unit will turn on after 2 hours.
2. Press the TIMER ON button repeatedly to set the time that you want the unit to turn on.
3. Wait 2 seconds, then the TIMER ON function will be activated. The digital display on your remote control will then return to the temperature display
TIMER OFF function
The TIMER OFF function allows you to set a period of time after which the unit will automatically turn off, such as when you wake up.
1. Press the TIMER OFF button. By default, the last time period that you set and an “h” (indicating hours) will appear on the display.
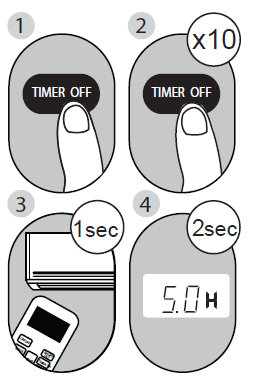
NOTE: This number indicates the amount of time after the current time after which you want the unit to turn off. For example, if you set TIMER OFF for 2 hours, “2.0h“ will appear on the screen, and the unit will turn off after 2 hours.
2. Press the TIMER OFF button repeatedly to set the time that you want the unit to turn off.
3. Wait 2 seconds, then the TIMER OFF function will be activated. The digital display on your remote control will then return to the temperature display.
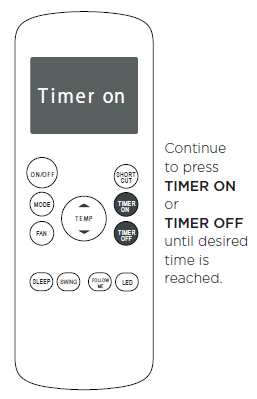
NOTE: When setting the TIMER ON or TIMER OFF functions, up to 10 hours, the time will increase in 30 minute increments with each press. After 10 hours and up to 24, it will increase in 1-hour increments. The timer will revert to zero after 24 hours.
You can turn off either function by setting the timer to “0.0h“.
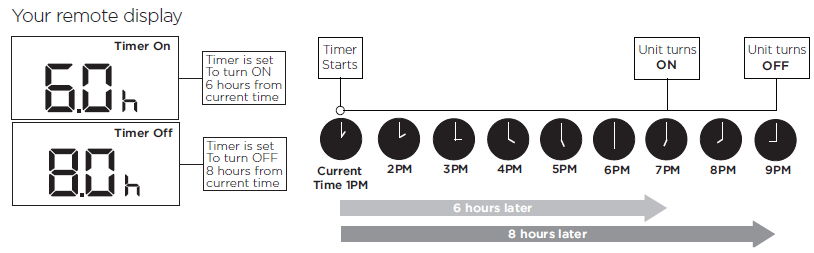
Setting both TIMER ON and TIMER OFF at the same time
Keep in mind that the time periods you set for both functions refer to hours after the current time.
For example, say that the current time is 1:00 PM, and you want the unit to turn on automatically at 7:00 PM and want it to operate for 2 hours, then automatically turn off at 9:00 PM.
Do the following (side figure): Example: Setting the unit to turn on after 6 hours, operate for 2 hours, then turn off (see the figure below)
Advanced Functions
NOTES
- Button configuration shown in the illustrations is based on a typical model and may be slightly different from the actual one you purchased. In this case, the actual physical remote shall prevail.
- All the functions described can also be accomplished by using the unit’s control panel. If the unit is without this feature, there will be no corresponding operation when pressing the relevant button on the remote controller.
- When there are differences between features or operation implied by the remote control illustration and the actual functions described in the USER MANUAL, the descriptions in the USER MANUAL shall prevail.
- The device may comply with local national regulations. In Canada, it should comply with CAN ICES-3(B)/NMB-3(B). In USA, this device complies with part 15 of the FCC Rules. Operation is subject to the following two conditions: (1) This device may not cause harmful interference, and (2) this device must accept any interference received, including interference that may cause undesired operation.
- This equipment has been tested and found to comply with the limits for a Class B digital device, pursuant to part 15 of the FCC Rules. These limits are designed to provide reasonable protection against harmful interference in a residential installation. This equipment generates, uses and can radiate radio frequency energy and, if not installed and used in accordance with the instructions, may cause harmful interference to radio communications. However, there is no guarantee that interference will not occur in a particular installation. If this equipment does cause harmful interference to radio or television reception, which can be determined by turning the equipment off and on, the user is encouraged to try to correct the interference by one or more of the following measures:
• Reorient or relocate the receiving antenna.
• Increase the separation between the equipment and receiver.
• Connect the equipment to an outlet on a circuit different from that to which the receiver is connected.
• Consult the dealer or an experienced radio/TV technician for help. Changes or modifications not approved by the party responsible for compliance could void users authority to operate the equipment.
Warranty
Air Conditioner Limited Warranty
Your product is protected by this Limited Warranty:
Warranty service must be obtained from Midea Consumer Services or an authorized Midea servicer.
Warranty
- One year full warranty from original purchase date.
Midea, through its authorized servicers will:
• Pay all costs for repairing or replacing parts of this appliance which prove to be defective in materials or workmanship.
Consumer will be responsible for:
- Diagnostics, removal, transportation and reinstallation cost required because of service.
- Costs of service calls that are a result of items listed under NORMAL RESPONSIBILITIES OF THE CONSUMER**
Midea replacement parts shall be used and will be warranted only for the original warranty.
NORMAL RESPONSIBILITIES OF THE CONSUMER**
This warranty applies only to products in ordinary household use, and the consumer is responsible for the items
listed below:
- Proper use of the appliance in acordance with instructions provided with the product.
- Routine maintenance and cleaning necessary to keep the good working condition.
- Proper installation by an authorized service professional in accordance with instructions provided with the appliance and in accordance with all local plumbing, electrical and/or gas codes.
- Proper connection to a grounded power supply of sufficient voltage, replacement of blown fuses, repair of loose connections or defects in house wiring.
- Expenses for making the appliance accessible for servicing.
- Damages to finish after installation.
EXCLUSIONS
This warranty does not cover the following:
- Failure caused by damage to the unit while in your possession (other than damage caused by defect or malfunction), by its improper installation, or by unreasonable use of the unit, including without limitation, failure to provide reasonable and necessary maintenance or to follow the written installation and Operating Instructions.
- Damages caused by services performed by persons other than authorized Midea costumer service; or external causes such as abuse, misuse, inadequate power supply or acts of God.
- If the unit is put to commercial, business, rental, or other use or application other than for consumer use, we make no warranties, express or implied, including but not limited to, any implied warranty of merchantability or fitness for use or purpose.
- Products without original serial numbers or products that have serial numbers which have been altered or cannot be readily determined.
NOTE: Some states do not allow the exclusions or limitation of incidental or consequential damages. So this limitation or exclusion may not apply to you.
IF YOU NEED SERVICE
Keep your bill of sale, delivery slip, or some other appropriate payment Record.
The date on the bill establishes the warranty period, should service be required.
If service is performed, its your best interest to obtain and keep all receipts.
This written warranty gives you specific legal rights. You may also have other rights that vary from state to state.
Service under this warranty must be obtained by following these steps, in order:
- Contact Midea Consumer Services or an authorized Midea services at 1 866 646 4332.
- If there is a question as to where to obtain service, contact our consumer relations Department.
RETURN POLICY
Questions about installing or operating your Arctic King product?
If you still need assistance, please call Customer Service at 1-866-646-4332.
Have your sales receipt, serial number and product model mumber available when you call.
The product may be returned within 90 days of purchase with receipt, After 90 days, the product is covered under limited warranty. Please refer to the warranty section in the User Manual for details.

How to Stay Cool with a New Portable Air Conditioner
Because of a new federal test procedure for Portable Air Conditioners, you may notice that the cooling capacity claims on portable air conditioner packaging are significantly lower than that of models produced prior to 2017. This is due to changes in the test procedure, not to the portable air conditioners themselves.
What should I look for first when purchasing a portable air conditioner?
The right air conditioner helps you cool a room efficiently. An undersized unit won’t cool adequately while one that’s too large will not remove enough humidity, leaving the air feeling damp. To find the proper air conditioner, determine the square footage of the room you want to cool by multiplying the room length by its width. You also need to know the air conditioner’s BTU (British Thermal Unit) rating, which indicates the amount of heat it can remove from a room. A higher number means more cooling power for a larger room. (Be sure you are comparing only newer models to each other- older models may appear to have a higher capacity, but are actually the same). Be sure to “size up” if your portable air conditioner will be placed in a very sunny room, in a kitchen, or in a room with high ceilings. After you’ve found the right cooling capacity or your room, you can look at other features.
Why is the cooling capacity lower on newer models than on older units?
Federal regulations require manufacturers to calculate cooling capacity based on a specific test procedure. Models manufactured before 2017 were tested under a different procedure and cooling capacity is measured differently than in prior years’ models. So, while the BTUs may be lower, the actual cooling capacity of the air conditioners has not changed.
What is SACC ?
SACC is the representative value of Seasonally Adjusted Cooling Capacity, in Btu/h, as determined in accordance with the DOE test procedure at title 10 Code of Federal Regulations (CFR) 430, subpart B, appendix CC and applicable sampling plans.


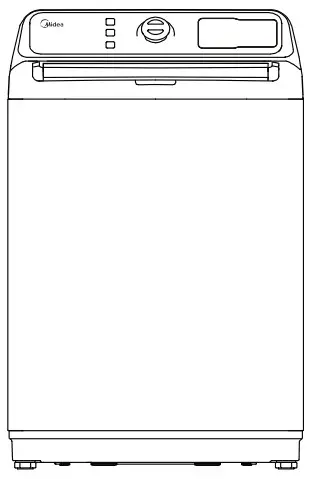
Top-Load Washer
USER MANUAL &
INSTALLATION
INSTRUCTIONS
| Free 3 months extension* of the original limited warranty period! Simply text a picture of your proof of purchase to: 1-844-224-1614
*The warranty extension is for the three months immediately following the completion of the product’s original warranty period. |
MODEL NUMBERS
MLV45N1BWW
MLV45N3BWW
www.midea.com
Power supply: 120V
Frequency: 60Hz
Capacity: 4.5 cu ft
Warning:
Before using this product, please read this manual carefully The design and specifications are subject to change without prior notice for product improvement. Consult with your dealer or manufacturer for details.
version A
Dear user
THANK YOU and CONGRATULATIONS on your purchase of this high-quality Midea product. Your Midea washer is designed for reliable, trouble-free performance. Please take a moment to register your new washer. Register your new washer at www.midea.com under the Support tab.
For future reference, record your product model and serial numbers located on the inside frame of the washer.
Model Number____________________________________
Serial Number_____________________________________
READ AND KEEP THESE INSTRUCTIONS FOR FUTURE REFERENCE
This manual contains important information on the installation, use, and care of your appliance. Please read this manual carefully before installation and operation of this machine to prevent injury and property damage.
Warnings and Important Safety Instructions in this manual DO NOT cover all possible conditions and situations that may occur. It is your responsibility to use common sense, caution, and care when installing, maintaining, and operating your washer.
![]()
SAFETY INSTRUCTIONS
YOUR SAFETY AND THE SAFETY OF OTHERS ARE VERY IMPORTANT
To prevent injury to the user or other people and property damage, the instructions shown here must be followed. Incorrect operation due to ignoring instructions may cause harm or damage, including death.
The level of risk is shown by the following indications.
 This indicates that hazards or unsafe practices may cause serious personal injury or death. To reduce the risk of fire, explosion, electric shock, or personal injury when using your washing machine, you SHOULD follow these basic safety precautions.
 This indicates that hazards or unsafe practices may cause minor personal injury or property damage.
This symbol indicates that there are important operating and maintenance instructions in the literature accompanying your washing machine
 WARNING
State of California Proposition 65 Warnings.
The California Safe Drinking Water and Toxic Enforcement Act requires the Governor of California to publish a list of substances known to the State of California to cause cancer, birth defects, or other reproductive harm and requires businesses to warn of potential exposure to such substances. This product contains a chemical known to the State of California to cause cancer, birth defects, or other reproductive harm. This appliance can cause low-Level exposure to some of the substances listed, including benzene, formaldehyde, and carbon monoxide.
Cancer and Reproductive Harm – www.P65Warnings.ca.gov.
WARNING
Do not store or use gasoline or other f1ammable vapors and liquids in the vicinity of this or any other appliance.
IMPORTANT SAFETY INSTRUCTIONS
 WARNING
- Read all instructions before using the appliance.
- Use this appliance only for its intended purpose as described in this Owner’s Manual.
- Before use, the washer must be properly installed as described in this manual.
- ALWAYS follow the fabric care instructions supplied by the garment manufacturer.
- Do not wash articles that have been previously cleaned in, washed in, soaked in, or spotted with gasoline, dry-cleaning solvents, other flammable or explosive substances as they give off vapors that could ignite or explode.
- Do not allow children to play on or in the appliance. Close supervision of children is necessary when the appliance is used near children. Before the appliance is removed from service or discarded, remove the lid of the washing compartment.
- Do not reach into the appliance if the tub is moving.
- Do not install or store this appliance where it will be exposed to the weather or freezing temperatures.
- Do not tamper with the controls.
- Do not repair or replace any part of the appliance or attempt any servicing unless it is specifically recommended in the user maintenance instructions or in published user-repair instructions that you understand.
- Hydrogen gas is explosive. If the hot water system has not been used for two weeks or more, before using a washer, turn on all hot water faucets and let the water flow from each for several minutes. This will release any accumulated hydrogen gas. The gas is flammable, so do not smoke or use an open flame during this time.
- Keep the area underneath and around your appliance free of combustible materials (lint, paper, rags, and so on), gasoline chemicals, and other flammable vapors and liquids.
- Do not place items exposed to cooking oil in your washer. items contaminated with cooking oil may contribute to a chemical reaction that could cause a load to catch fire.
- This washer is not designed for maritime use or for mobile installations such as in RVs aircraft and other mobile platforms.
- Turn off the water faucets and unplug the washer if the machine is to be left for an extended period of time, such as during vacations.
- Packaging material can be dangerous for children. There is a risk of suffocation! Keep all packaging away from children.
- Always check the inside of the washer for foreign objects before loading laundry. Keep the lid closed when not in use.
WARNING
Installation Warnings and Precautions
- Plug the power cord into an AC 120V/60Hz wall socket rated at 15 amps or higher. Use the socket for this washer only. Do not use an extension cord.
– Sharing a wall socket with another appliance, using a power strip, or extending the power cord may result in electric shock or fire.
– Do not use an electric transformer. lt may result in electric shock or fire.
– Make sure that the power voltage, frequency and current match the product’s specifications. Failing to do so may result in electric shock or fire. - Remove all foreign substances such as dust or water from the power plug terminals and contact points using a dry cloth on a regular basis.
– Unplug the power plug and clean it with a dry cloth.
– Failing to do so may result in electric shock or fire. - Plug the power plug into the wall socket in the right direction so that the cord runs towards the floor.
– If you plug the power plug into the socket in the opposite direction, the electric wires within the cable may be damaged and this may result in electric shock or fire. - Plug the power plug into the wall socket firmly. Do not use a damaged power plug or loose wall socket, because this may result in an electric shock fire.
- Do not pull or excessively bend the power cord. Do not twist or tie the power cord.
- Do not hook the power cord over a metal object. Place a heavy object on the power cord, insect power cord between objects, or push the power cord into the space behind the appliance, because this may result in electric shock or fire.
- Do not pull the power cord when unplugging the power plug.
– Unplug the power plug by holding the plug.
– Failing to do so may result in electric shock or fire. - If the power plug or power cord is damaged, contact your nearest service center.
- Do not install on carpet. Install the washer on a level and solid floor that can support its weight. Failure to do so may result in abnormal vibration, noise, or problems with the product.
- The washer is heavy. Two or more people may be needed to install and move the appliance. Failure to do so may result in bodily or other injuries.
- Store and install the washer where it will not be exposed to temperatures below freezing or exposed to outdoor weather conditions. Failure to do so may result in serious leak damage.
- Position the appliance so that the power plug is easily accessible.
Failure to do so may result in electric shock or fire due to an electrical short circuit. - Failure to follow all of the safety warnings in this guide may result in property damage or injury to persons.
WARNING
Use and Maintenance warnings and Precautions
- If the appliance is flooded, cut the power immediately and contact your nearest service center.
- If the appliance emits a strange noise, a burning smell, or smoke, unplug the power plug immediately and contact your nearest service center. Failure to do so may result in electric shock or fire.
- In the event of a gas leak (such as propane or LP gas) ventilate the area immediately. Do not turn any appliance or light on or off.
– Do not use a ventilating fan.
– A spark may result in an explosion or fire. - Do not force the washer lid open while the washer is operating (high-temperature washing, drying, or spinning).
– Water flowing out of the washer may cause burns or cause the floor to be slippery. This may result in injury.
– Forcing the lid open can damage the product or cause injury. - Make sure to remove the packaging (sponge, styrofoam) attached to the bottom of the washer before using it.
- Do not insert your hand or a metal object under the washer. This may result in injury.
- Do not attempt to operate this appliance if it is damaged, malfunctioning, partially disassembled, or has missing or broken parts, including a damaged cord or plug. This may result in electric shock, fire, or death.
- Do not touch the power plug with wet hands. This may result in electric shock.
- Do not turn the appliance by unplugging the power plug while the washer is in operation. Plugging the power plug into the wall socket again may cause a spark and result in electric shock or fire.
- Keep all packaging material well out of the reach of children, as packaging materials can be dangerous to children. if a child places a bag over his or her head, he or she may suffocate.
- Do not let children or infirm persons use this washer unsupervised.
- Failure to do so may result in electric shock, burns, or injury.
- Do not attempt to repair, disassemble or modify the appliance yourself.
– Do not use any fuse (such as copper, steel wire, etc.) other than the standard fuse.
– If you need to pair or reinstall the appliance, contact your nearest service center.
– Failure to do so may result in electric shock, fire, problems with the product, or injury. - If any foreign substance such as water enters the appliance in any area other than the tub, unplug the power plug and contact your nearest service center. Failure to do so may result in electric shock or fire.
- If the water supply hose comes loose from the faucet and floods the appliance, unplug the power plug. Failure to do so may result in electric shock or fire.
- Do not mix chlorine bleach with ammonia or acids such as vinegar.
- Incorrect usage can produce poisonous gas, resulting in serious injury.
- Do not reach into the washer while parts are moving. Before loading, unloading, or adding items, press the Start Pause button and allow the tub to come to a complete stop before reaching inside. Failure to do so may result in electric shock injury or fire.
- Do not allow children to play on or in the washer. Close supervision of children is necessary when the washer is used near children. As children grow, teach them the proper, safe use of all appliances.
- Failure to do so may result in serious injury.
- Keep laundry products out of reach of children. Observe all warnings on product labels and follow them. Failure to do so may result in serious injury.
- Disconnect this appliance from the power supply before attempting any user maintenance. Pressing the Power button does not disconnect this appliance from the power supply. Failure to do so may result in electric shock, injury, or fire.
- Do not clean the appliance by spraying water directly onto it.
- Do not use benzene, thinner, or alcohol to clean the appliance. This may result in discoloration, deformation, damage, electric shock or fire.
- Unplug the power plug when the appliance is not being used for long periods of time or during a thunder/lightning storm. Failure to do so may result in electric shock or fire.
- Keep hands and foreign objects clear of the lid and latch area when closing the lid. Failure to do so may result in personal injury.
- If the washer is contaminated by a foreign substance such as detergent, dirt, or food waste, unplug the power plug and clean the washer with a damp, soft cloth. Failure to do so may result in discoloration, deformation. Damage or rust.
- The clear portion of the lid can be broken by a strong impact. Take care when using the washer. If the clear portion is cracked or broken, it may result in injury.
- After a water supply failure or when reconnecting the water supply hose, open the faucet slowly.
- Open the faucet slowly after a long period of non-use. The air pressure in the water supply hose or the water pipe may result in damage to a part or in water leakage.
- If a drain error occurs during an operation, check if there is a draining problem. If the washer is used when it is flooded because of a draining problem, it may result in electric shock or fire due to an electrical short circuit. Do not insert your hand or a metal object under the washer.
- This may result in injury.
- Insert the laundry into the washer completely so that the laundry does not get caught in the lid. LF laundry gets caught in the lid, it may result in damage to the laundry or the washer, or result in water leakage.
- Make sure that the faucet is turned off when the washer is not being used.
- Make sure that the water supply hose connectors are properly tightened. Failure to do so may result in property damage or injury.
- Open the faucet and check if the water supply hose connector is firmly tightened and that there is no water leaking before using the product.
- If the water supply hose connectors are loose, it may result in water leakage.
- Do not stand on top of the appliance or place objects (such as laundry, lighted candles, lighted cigarettes, dishes, chemicals, metal objects, etc.) on the appliance. This may result in electric shock, fire, problems with the product, or injury.
- Do not operate the appliance with wet hands. This may result in electric shock.
- Do not spray volatile material such as insecticide onto the surface of the appliance. As well as being harmful to humans, it may also result in electric shock, fire, or problems with the product.
- Do not place an object that generates an electromagnetic field near the washer. This may result in injury due to a malfunction.
- Since the water drained during a high-temperature wash or drying cycle is hot, do not touch the water. This may result in burns or injury.
- Do not wash, spin, or dry water-proof seats, mats, or clothing.
- Do not wash thick, hard mats even if the washer mark is on the care label. This may result in injury or damage to the washer, walls, floor, or clothing due to abnormal vibrations.
- Do not operate the washer when the detergent dispenser is removed.
This may result in electric shock or injury due to water leakage. - Do not insert your hand into the detergent dispenser after opening it.
This may result in injury because your hand may be caught. - Do not place any non-Laundry objects, such as shoes, food waste, or animals into the washer. This can cause abnormal vibrations that can damage the washer, and in the case of pets, cause severe injury or death.
- Do not press the buttons using sharp objects such as pins, knives, or fingernails. This may result in electric shock or injury.
- Do not wash laundry contaminated by oils, creams, or lotions usually found in skin-care shops or massage clinics. This may result in the rubber seal becoming deformed and water leakage.
- Make sure that the water inlet pipe is connected and the tap is opened before washing clothes.
- Do not leave metal objects (safety pins, hairpins, and so on) or bleach in the tub for long periods of time. This may cause the tub to rust.
– If rust appears on the surface of the tub, apply a neutral cleansing
agent to the surface and use a sponge to clean it. Never use a metal brush. - Do not use hot water from water cooling/heating devices. This may result in problems with the washer.
- Do not use natural hand-washing soap in the washer. if it hardens and accumulates inside the washer, it may cause problems with the product, discoloration, rust, or bad odors.
- If using a washing net with this machine (not provided), do not wash laundry items such as bedding in the washing net. Doing so may result in injury due to abnormal vibrations. Place only smaller items such as lace socks and lingerie in the washing net.
- Do not use hardened powdered detergent. If it accumulates inside the washer, it may result in water leakage.
- Do not wash throw rugs or doormats. Doing so may cause sand to accumulate inside the washer, resulting in mechanical problems.
WARNING
Grounding/Earthing
- This appliance must be properly grounded.
- Do not ground the appliance to a gas pipe plastic water pipe or telephone line.
– Improper grounding may result in electric shock, fire, explosion, or problems with the product.
– Never plug the power cord into a socket that is not grounded correctly. Make sure that the socket you use is grounded in accordance with local and national codes.
WARNING
Choosing a Proper Location
- Do not install this appliance near a heater or inflammable material.
- Do not install this appliance in a humid, oily, or dusty location, or in a location exposed to direct sunlight or water (raindrops).
- Do not install this appliance in a location where gas may leak. Failure to do so may result in electric shock or fire.
- If the washer is moved to a new location, have it checked and reinstalled by a qualified service technician. Failure to follow this warning may result in electric shock or fire.
- Do not pull the power cord or drain outlet hose to move the appliance to desired location place.
FEATURES
Package Contents
Make sure that the following items came with your washer

NOTE:
- Use the clamps to secure the drain hose to the washer rear panel.
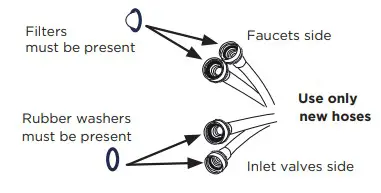
- Use the filters to replace the rubber washers in the water hoses (faucet sides).
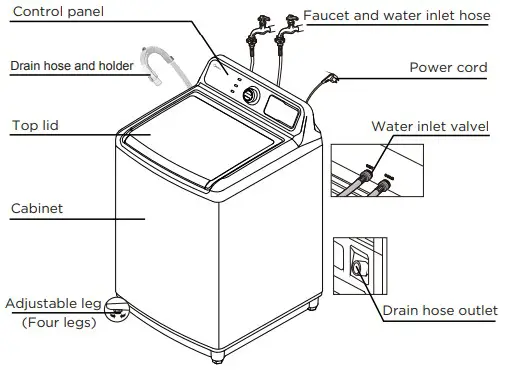
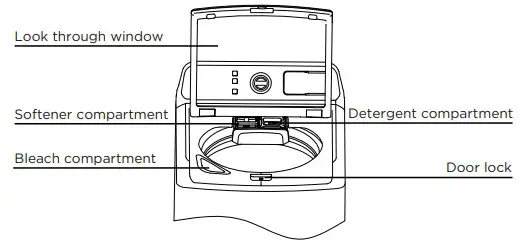
Main Components
INSTALLATION REQUIREMENTS
Electrical requirements
WARNING
To reduce the risk of ire, electric shock, or injury to persons, read the SAFETY INSTRUCTIONS before operating this appliance.
Use a 120 Volt, 60Hz, 15 amp fuse or circuit breaker. We recommend an individual branch circuit that serves only your washer.
WARNING
Never use an extension cord.
Electrical grounding is required for your washer.
You must ground your washer. IN the event of a malfunction or breakdown, grounding reduces the risk of electric shock by providing a path of least resistance for the electric current.
Your washer is equipped with a power cord with a three-pronged grounding plug for use in a correctly installed and grounded outlet.
The outlet must be correctly installed and grounded in accordance with all local codes and ordinances.
WARNING
- You are responsible for providing adequate electrical services for your washer.
- An incorrectly connected equipment-grounding conductor can increase the risk of electrical shock. Check with a qualified electrician or serviceman if you are not sure whether your washer is grounded correctly.
- Do not modify the power cord plug that came with your washer. if the plug does not fit the outlet, have the correct type of outlet installed by a qualified electrician.
- To prevent unnecessary risk of fire, electrical shock or personal injury, all wiring and grounding must be done in accordance with the
National Electrical Code ANSI/FNPA, No.70 Latest Revision, and local codes and ordinances. - Never connect the ground wire to plastic plumbing lines, gas lines, or hot water pipes.
Water requirements
To fill your washer in the correct amount of time, the water pressure needs to be between 14 and 116 psi (100 to 800 kPa).
- If the water pressure is less than 14 psi (100 kPa):
- The water valve may fail or may not shut off completely.
- The time it takes to fill your washer may be longer than the time your washer controls allow. Your washer will turn off and report an error. A time limit is built into the controls to prevent flooding in your home if a hose becomes loose.
- Water inlet hoses must be purchased separately. You can buy inlet hoses in various lengths up to 8 ft. (240 cm).
To avoid the possibility of water damage: - Make sure that the water faucets are easily accessible.
- Turn off the faucets when you are not using your washer.
- Periodically check to make sure that water is not leaking from the water hose fittings.
Drainage requirements
- The recommended height for the drain standpipe is 48 in. (122 cm).
- The drain hose must be routed through the drain hose clip to the standpipe.
- The standpipe must be large enough to accept the outside diameter of the drain hose.
INSTALLATION INSTRUCTIONS
Unpacking your washer
WARNING
- Packing materials can be dangerous to children. Keep all packing materials (plastic bags, polystyrene, and so on) well out of the reach of children.
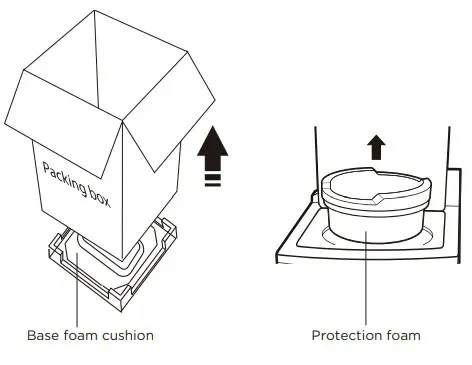
- Do not operate your washer on the foam base cushion. Doing so will result in serious vibration, which could cause equipment damage or result in physical injury.
Remove the packing box and lift the washer up and away from the foam base cushion. Open the lid of the washer to take out all accessories including the protective foam.
Choosing a location
WARNING
- Do not install your washer in areas where water may freeze, because your washer always retains some water in its water valve, pump, and hose areas. Frozen water can damage the valve, pump, hoses, and other components.
- Never install on a platform or weakly supported structure.
For best performance, you must install your washer on a solid, level floor. Wooden floors may need to be reinforced to minimize vibration or unbalanced load situations.
Carpeting and soft tile surfaces can contribute to excessive vibration, which can cause your washer to move slightly during the spin cycle.
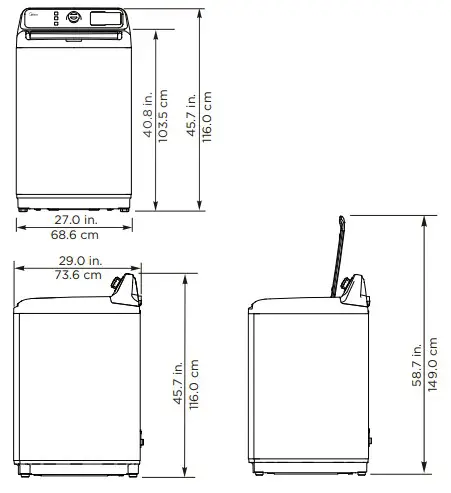
Washer dimensions and installation measurements
If you install your washer in an alcove or closet, the front of the closet must have two unobstructed air openings for a combined minimum total area of 72 sq. in. (465 sq.cm) with a minimum clearance of 3 in. (7.6 mm) at the top and bottom. A slatted door with equivalent space clearance is acceptable.
![]()
Installing in an alcove or closet
Minimum clearances between your washer and adjacent walls or other surfaces are:
- Either side: 1 in. (2.5 cm)
- Rear: 6 in. (15.2 cm)
- Closet Front: 2 in. (5.1 cm)
- Top: 24 in. (61 cm)
- The gap between the end of the water valve and the wall:
– Case 1: If you connect the supply hose after you install your washer: Over 3.9 in. (10 cm)
– Case 2: If you connect the supply hose before you install your
washer: Over 2.8 in. (7 cm)
If you install your washer and dryer side-by-side in a closet, the closet front must have an unobstructed air opening of at least 72 square inches (465 square cm).
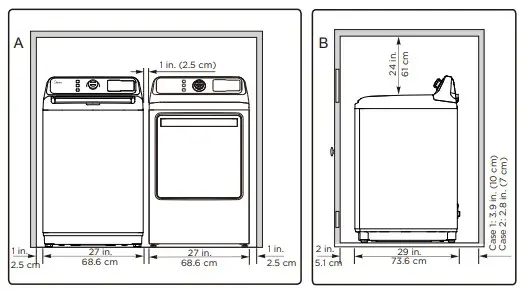
A. Recessed area
B. Side view – closet or confined area
WARNING
Before you install your washer, make sure that the location:
- Is a hard, level surface without carpeting or soft flooring that can obstruct ventilation?
- Is away from direct sunlight.
- Has adequate ventilation.
- Is not exposed to freezing temperatures (32 F or 0 C).
- Is away from heat sources such as oil or gas.
- Has enough space so that the washer does not rest on its power cord.
Tools you will need

Connect the water hoses
NOTE: The water supply hoses are not supplied with your washer and must be purchased separately.
Caution
- Use new water supply hoses. Using old hoses can result in leakage or overflow that can damage your property.
- Do not connect multiple water supply hoses together to increase the length of the hose. Hoses connected this way can leak and cause
electrical shock. If a hose is too short, replace the hose with a longer, high-pressure hose.
- Make sure that there are rubber washers inside the fittings at both ends of each new water hose. Remove the rubber washers on the faucet side and replace them with filters. Installing the water supply hoses without rubber washers can cause water leakage.
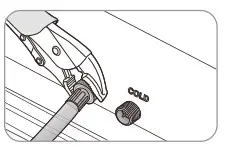
- Tighten the hose and faucet fittings by hand until they are snug, then tighten them an additional two-thirds of a turn with pliers or a wrench.
Pull the water supply hoses downwards to make sure that they are connected securely.
Caution
Do not overtighten the fittings or apply tape or sealant to the faucets or water supply intake. This can damage the fittings. - Place the unconnected ends of the hoses into a bucket and turn on the faucets connected to the water supply hoses for 10 or 15 seconds to remove any foreign substances. Turn off the faucets.
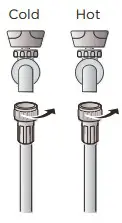
- Connect the ends of the water supply hoses to the water supply intake connections at the top of the washer. Make sure that the rubber washers are in place. The water supply hose connected to the hot faucet must be connected to the hot water supply intake and the water hose connected to the cold faucet must be connected to the cold water supply intake.
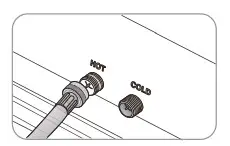 NOTE: If you do not want to use the hot water supply hose, insert a water intake cap into the hot water supply intake hole. In this case, you must select the Tap Cold option for the water temperature.
NOTE: No intake cap is provided with your washer. It must be purchased separately. - Tighten the fittings by hand until they are snug, and then tighten them an additional two-thirds of a turn with a wrench.
 Caution
Do not overtighten the fittings or apply tape or sealant to the faucets or water supply intakes. This can damage the fittings.
Make sure that the water supply hoses are not twisted or bent. A bent or twisted hose can leak and cause an electric shock due to the water leakage. To ensure the correct water usage, connect both hot and cold water faucets. if either or both are not connected, an error code could occur. - Turn on the hot and cold water supplies and check all the water supply intake connections and the faucets for water leaks.
Connect the drain hose
Caution
- Failure to slide the drain hose completely over the washer’s drainpipe may result in water leakage.
- Failure to move the clamp or hoop onto the washer’s drainpipe will result in water leakage.
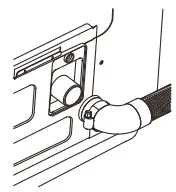
- Find the end of the drain hose that has the clamp, then slide the clamp away from the end of the hose.
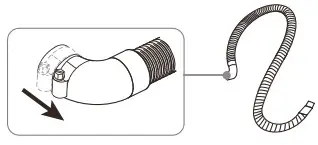
- Insert the drain hose with the clamp onto the washer’s drainpipe.
Make sure that the drain hose completely covers the end of the drain pipe.
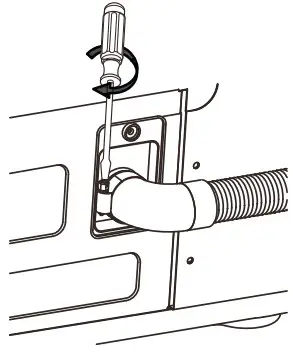
- Move the clamp toward the drainpipe outlet. Tighten the clamp with a flat blade screwdriver.
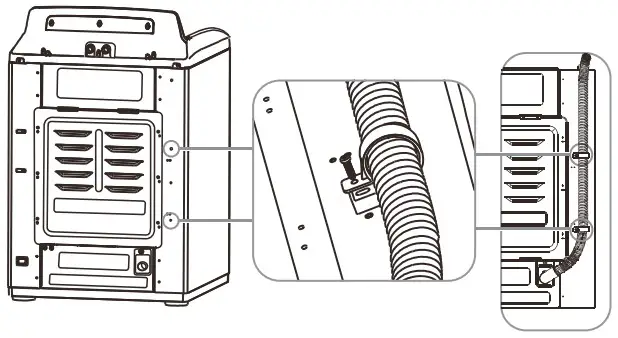
- Fasten the drain hose to the washer frame at the indicated directions with the hose clamps (2) provided, using a Phillips screwdriver.
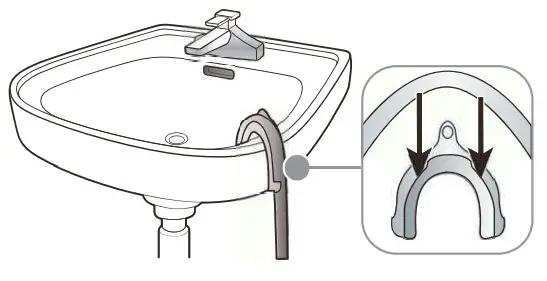
- Position the other end of the drain hose (the loose end) in one of the following ways:
Caution
Make sure that the connection between the drain hose and the washbasin, standpipe, or laundry tub is not airtight.
- Over the edge of washbasin – Secure the guide to the side of the basin wall with a hook, tape it or tie it with a piece of cord to prevent the drain hose from moving.
- In a standpipe – The standpipe must be no shorter than39 in. (99 cm) and no longer than 96 in. (244 cm).
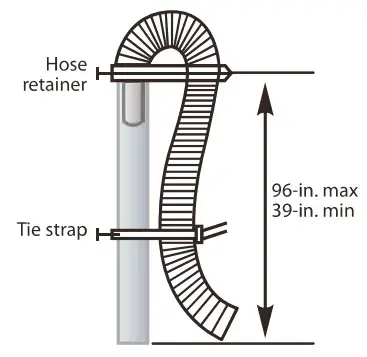
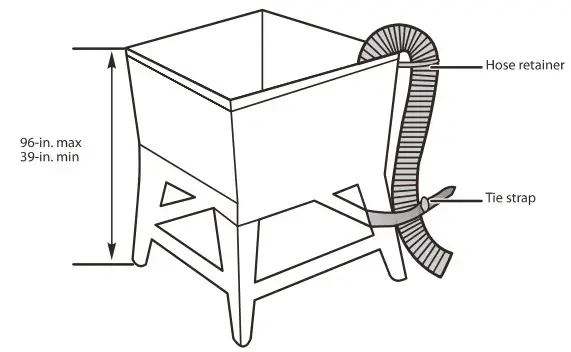
- In a laundry tub – The laundry tub must be no shorter than 39-in. (99 cm) and no higher than 96-in (244 cm) maximum.
Level your washer
Caution
Do not use your washing machine without leveling. If your washer is not level, it may:
- Vibrate excessively which can cause your washer to malfunction.
- Make excessive noise.
- Indicate error codes E3, E4, or E5 when the washer is running.
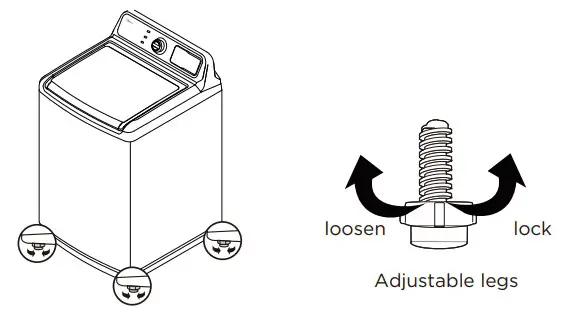
Extend the leveling feet only as much as is necessary. If the feet are extended too much, your washer may vibrate.
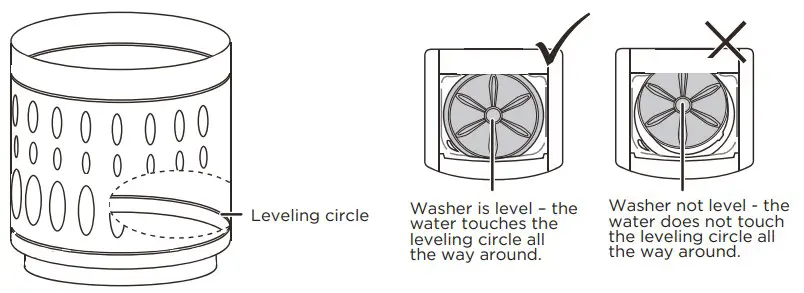
Determine if the washer is level by checking the position of the tub or by using a level.
- Slide the washer into position.
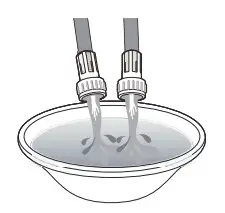
- Open the lid of the washer, then pour water into the tub to the leveling circle. If the washer is level, the water will touch the leveling circle all the way around. If the washer is not level, the water will only touch a part of the leveling circle.
- If your washer is not level, carefully tilt your washer just enough to adjust the leveling feet on the bottom front of your washer. Extend the feet only as much as is necessary. If the feet are extended too much, your washer may vibrate.
Power on
Plug the power cord into a well-grounded, 3-prong, 120 Volt 60 Hz approved electrical outlet, protected by a 15-amp fuse or comparable circuit breaker. Your washer is grounded through the third prong of the power cord.
Run a test cycle
Run a test cycle to make sure that your washer is properly installed.
- Load about 6 pounds (2.7 kg) of laundry into the tub.
- Press the Power button to turn on your washer.
- Turn the cycle selector to select the Rinse & Spin cycle.
- Press the Start Pause button to start the test cycle. Your washer should not rock or vibrate excessively when water fills the tub or when washing or spinning. The washer should drain well during the spin cycle.
Caution
- If you detect any water leaks while the washer is filling or draining, check the water connections. See Connect the water hoses on page 19 or Connect the drain hose on page 21.
- If the washer rocks and/or vibrates excessively, level it again. See Level your washer on page 24.
WASHER USE
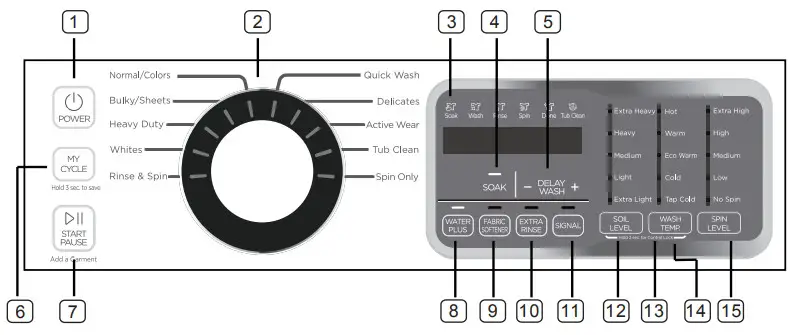
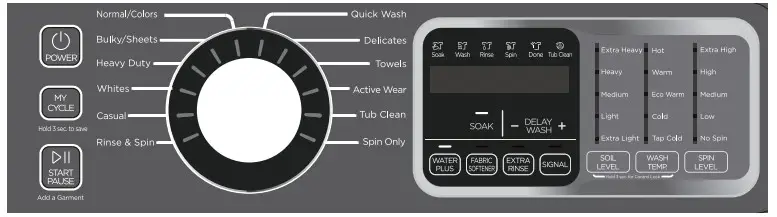
Control panel
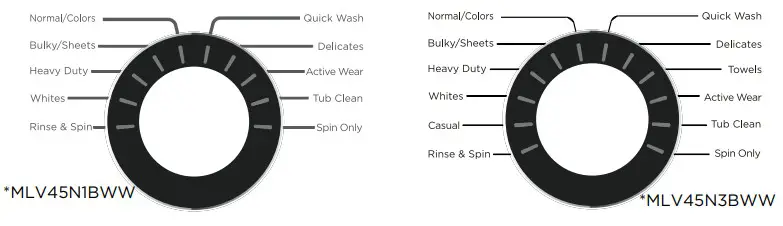
MLV45N1BWW
MLV45N3BWW
- POWER
Press to turn on your washer. Press again to turn off your washer. If you leave your washer on and do not press the START PAUSE button within 10 minutes, your washer will automatically turn off. - Cycle selector
Turn to select a wash cycle. The cycle you select determines the wash pattern for the cycle. For more information, see Washer options and settings on page 35. - Digital display
The initial display is the total time for the cycle you select.
While your washer is running, the display shows the cycle process and time remaining in the cycle.
NOTE: the time shown is an estimate based on normal operating conditions.
External factors (such as the load size, room temperature, incoming water temperature, and water pressure) can affect actual time. If you set a delay time for the start of the cycle, the display shows the time when the cycle will start. - SOAK
Press to select the SOAK option. Press again to cancel. Select this option for heavily soiled items that need to soak to remove stains and heavy dirt.
Soak occurs after the tub fills and detergent is added but before the wash process. The agitator or impeller will rotate seral times during the soak process. - Delay
Press to select a time when you want the cycle to begin. You can set the time up to 24 hours in advance in one-hour increments. The display shows the time when the cycle will start. For more information, see Set a delayed start time on page 32. - MY CYCLE
Press and hold for 3 seconds to remember your favorite washing cycle.
Press once to load your favorite cycle settings. - START PAUSE
Press once to start the wash cycle. Press again to pause the cycle. If you pause the cycle, you can add or remove items, but you cannot change any settings. Press again to restart the cycle. - WATER PLUS
Press once to increase one higher water level. Press again to cancel this function. If the water level is already set to the highest, the level will not change. - FABRIC SOFTENER
Add liquid fabric softener to the fabric softener compartment, and then press this button. The fabric softener will be added to the cycle at the correct time. - EXTRA RINSE
Press to add an extra rinse to the wash cycle. Press again to cancel. - SIGNAL
The sound-off function can be selected during all courses. - SOIL LEVEL
Press to select the soil level. Different soil levels result in different washing times and wash cycle settings. For more information, see Washer options and settings on page 35. - Control lock
Press and hold the SOIL LEVEL and Temp. buttons at the same time for 3 seconds to turn on the child lock function. Press and hold these buttons again for 3 seconds to turn off the function. When the child lock function is turned on, the only button that works is the POWER button and the SOIL LEVEL and Temp. buttons you use to turn off the child lock. - WASH TEMP.
Press to select the washing water temperature. The rinse water temperature is always cold. - SPIN LEVEL
Press to select the spin level to increase the spin time or short the spin time. This function can be selected with Normal/Colors and Tub Clean cycle.
Washing a load of laundry
WARNING
To reduce the risk of fire, electric shock, or injury to persons, read the SAFETY INSTRUCTIONS before operating this appliance.
Selecting a detergent
Your washer is designed to use high efficiency (HE) detergents.
- For the best cleaning results, use an HE detergent. We recommend that you do not use a regular detergent. HE detergents contain suppressors that reduce or eliminate suds. When fewer suds are produced, the load tumbles more efficiency, and cleaning is maximized.
- Reducing the amount of detergent may reduce the quality of cleaning.
Make sure that you:
– Pre-treat stains.
– Sort carefully by color and soil level.
– Avoid overloading.
Turn on your washer
Press the Power button to turn on your washer. Your washer’s initial settings are
- Normal on cycle selector with — displayed on the digital display.
- Medium for the Soil Level.
- Warm for the Wash Temp.
Load your washer
Caution
Before loading your laundry, make sure that you remove coins, keys, and other hard objects and close zippers. These items may damage clothes.
- Sort laundry by fabric type, soil level, color, and load size.
- Fill the tub with dry, unfolded clothes. Load the tub no more than 3/4 fill.
NOTE:
- Overloading may reduce washing efficiency, cause excess wear, and possibly cause creasing or wrinkling of the load.
- Wash delicate items such as bras, hosiery, and other lingerie on the Delicates cycle with similar lightweight items.
- When washing big, bulky items (such as rugs or pillows) or a few smaller items (such as stuffed toys or one or two sweaters) that do not fill the tub completely, add a few towels to improve spin performance.
- Always use the Bulky cycle for bulky items.
- When washing heavily soiled loads, do not overload your washer to ensure good cleaning results.
Load your washer
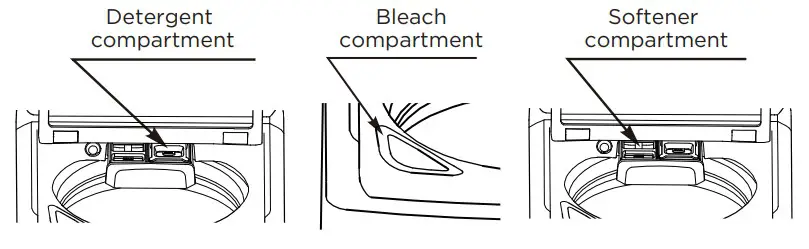 Loading the liquid or powder detergent compartment
- Pour the recommended amount of laundry detergent directly into the compartment before starting your washer.
- If you are using color-safe bleach, add it with the detergent to the detergent compartment.
NOTE:
- When adding color-safe bleach with detergent, both laundry products should be in the same form (liquid).
- If no detergent compartment, you should add the detergent into the tub.
Loading the bleach compartment (liquid bleach only)
- Add chlorine bleach to the bleach compartment. Do not over-fill the compartment.
- there is no water inlet to the bleach dispenser, so the bleach will directly load into the tub when you pour it in.
Caution
- Avoid splashing or over-filling the compartment.
- Never pour undiluted liquid chlorine bleach directly onto the load or into the tub. Doing so can damage fabrics, by weakening the fibers or stripping the color.
NOTE: Do not pour color-safe bleach into the bleach compartment. Instead, add it to the detergent compartment.
Loading the fabric softener compartment
- Pour the recommended amount of liquid fabric softener into the softener compartment. The dispenser automatically releases the liquid fabric softener at the correct time during the rinse cycle.
Caution
- Use the softener compartment ONLY for liquid fabric softeners.
- Do not use the Downy Ball in the fabric softener compartment.
- Do not use a liquid fabric softener that is too sticky as it may not mix with the water sufficiently.
- Be sure to select the Fabric Softener option when using fabric softener so that it is released in the rinse portion of the cycle.
Select the appropriate cycle and options for the load
- Turn the cycle selector to select a washing cycle. For information on wash cycles, see Washer options and settings on page 35.
- Optional: Use the control panel buttons (like Fabric Softener) to customize the washing cycle. For descriptions of buttons, see the Control panel on page 27. For information about which buttons are available for each cycle type, see Washer options and settings on page 35.
(Optional) Set a delayed start time
You can program a wash cycle, then set a time when you want a wash cycle to begin.
- Press the DELAY WASH button to turn on the delay start time function.
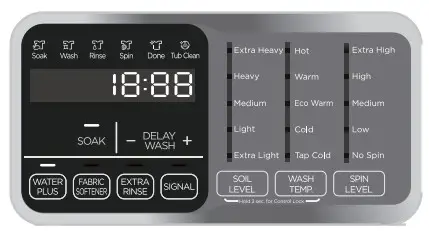
- Press the Delay button repeatedly to select the delay time you want.
The delay start time, in hours, will be shown on the display, in sequence, from 0 to 24, then back to 0. You can also press and hold the Delay button to quickly adjust the time until the desired time appears on the display. - If you want to change the wash cycle settings while you are setting the delay start time, turn the cycle selector. To return to set the delay start time function, repeat Steps 1 and 2.
NOTE:
- Once the number of delay hours is reached by pushing the Delay button, release the button for three seconds and it will be set. The delayed light will remain on.
- After the delay time is set, if you wish to change the delay setting, press the Delay button again until the desired hour is reached.
Release the button for three seconds and it will be set. - If you decide to cancel the delay setting, you can either turn the cycle selector or push the Delay button until 0 is reached.
- Ideally, you should set your cycle before setting the Delay, because turning the cycle selector after the delay is set cancels the delay.
- The Delay Start Time cannot be changed after the program has started.
- To cancel the delay start time function before you save the setting, press the Delay button until 0 appears on the display, or turn the cycle selector knob.
IMPORTANT:
- You can change settings or cancel the delay start time function anytime before you press the Start Pause button by turning the cycle selector. The delay start time cannot be changed after you press the Start Pause button.
- If you pressed the Start Pause button, you can cancel the delay start-time function by pressing the Power button to turn off your washer, then pressing the Power button again to turn it back on.
Start your washer
- Press the Start Pause button.
NOTE
- If you have not set a delayed start time or if the delay time has expired, your washer starts the cycle and the Wash light turns on.
- As your washer moves from stage to stage in the wash cycle, the related light turns on (such as Rinse or Spin).
- If you set a delayed start time, the Delay light turns on, and your washer starts counting down the start time.
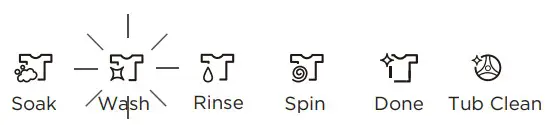
- If you need to pause the cycle (for example to add or remove items or adjust the load), press the Start Pause button, then open the lid. Your washer stops. When you are ready to resume washing, close the door, then press the Start Pause button.
Unload your laundry
When the wash cycle is complete:
- The done light turns on.
- Your washer beeps six times and flashes 11, 22, 33, 44, 55, 66 after the cycle is done.
- Your washer unlocks the lid.

- Open the lid and remove the laundry.
Setting the child lock
Your washer has a child lock function to prevent children from playing with your washer. When you turn on the child lock, the only buttons that work are the Power button and the Soil Level and Temp. buttons you use to turn off the child lock.
- Press and hold both the Soil Level and Temp. buttons for three seconds.
The child lock light turns on.

- To turn off the child lock, press and hold both the Soil Level and Temp.
buttons for three seconds.
NOTE: - If your washer is not turned on, the child lock can still remain set.
Press the Power button, turn on the child lock function, then press the Power button to turn off your washer. When you want to use your washer, you need to turn off the lock function. - If you turn on the child lock function while the washer lid is open, E3 appears on the display. If you do not close the lid within 20 seconds, your washer sounds an alarm, displays CL, and drains all the water in the tub. To clear the alarm, press the Power button to turn off your washer.
Washer options and settings
Options and settings table of MLV45N1BWW.
- Maximum load weight= 18.65 lbs (8.46 kg) (Dry clothes)
- Bolded options are initial settings. (dots) indicate options functions you can select.
| Cycle | Fabric type | Soil level options | Temp. options | Spin Level options | Delay | Soak | Extra rinse | Fabric softener | Water Plus | Signal |
| Normal/ Colors | Cotton, linen Towels, Shirts Sheets, Jeans Mixed loads | Extra Heavy Heavy Medium Light Extra Light | Hot Warm Eco Warm Cold Tap Cold | • | • | • | • | • | • | |
| Heavy Duty | Heavily soiled
cotton fabrics |
Extra Heavy Heavy Medium Light Extra Light | Hot Warm Eco Warm Cold Tap Cold | Extra-High High Medium Low No spin | • | • | • | • | • | • |
| Tub Clean | See page 36 | Extra Heavy | Hot | • | • | |||||
| Spin Only | Extra-High High Medium Low No spin | • | • | |||||||
| Rinse & Spin | Warm Eco Warm Cold Tap Cold | Extra-High High Medium Low No spin | • | • | • | • | ||||
| Bulky/ Sheets | Large items like blankets and comforters | Extra Heavy Heavy Medium Light Extra Light | Hot Warm Eco Warm Cold Tap Cold | Extra-High High Medium Low No spin | • | • | • | • | • | • |
| Delicates | Dress shirts Blouses Nylons Sheer/lacy | Heavy Medium Light Extra Light | Hot Warm Eco Warm Cold Tap Cold | Extra-High High Medium Low No spin | • | • | • | • | • | • |
| Quick Wash | Lightly soiled and small loads | Medium Light Extra Light | Hot Warm Eco Warm Cold Tap Cold | • | • | • | • | • | • | |
| Whites | White Fabric | Medium Light Extra Light | Hot Warm Eco Warm Cold Tap Cold | Extra- high High Medium Low No spin | • | • | • | • | • | • |
| Activewear | Active Wear | Heavy Medium Light Extra Light | Hot Warm Eco Warm Cold Tap Cold | Extra High High Medium Low No spinDelay | • | • | • | • | • | • |
WASHER CARE
Caution
Turn off the water faucets after final use. This shuts off the water supply to your washer and prevents the possibility of damage from escaping water. Leave the lid open to let the inside of your washer dry out.
CLEANING AND MAINTENANCE
Cleaning the exterior
Use a soft cloth to wipe up all detergent, bleach, or other spills as they occur.
Cleaning the interior
- Clean the interior of your washer periodically to remove any dirt, soil, odor, mold, mildew, or bacterial residue that may remain in your washer as a result of washing clothes.
- Failure to follow these instructions may result in unpleasant conditions, including odors or permanent stains in your washer or on your laundry.
- To remove hard water deposits, use a cleaner labeled “Washer safe”.
Cleaning the control panel
- Clean with a soft, damp cloth. Do not use abrasive powders or cleaning pads.
- Do not spray cleaners directly on the panel. The control panel finish may be damaged by some laundry pre-treatment soil and stain remover products. Apply such products away from your washer and wipe up any spills or overspray immediately.
Cleaning the detergent, bleach, or softener compartment
- To remove laundry product residue, wipe with a damp cloth and towel dry.
- You can remove the bleach detergent and softener compartments to clean them.
Cleaning the tub The Tub
The clean cycle is a self-cleaning cycle that removes the causes of odors that may occur inside your washer without using a cleaning agent. We suggest cleaning the tub about once a month.
Caution
Never use the tub clean cycle when laundry is in your washer. This may damage the laundry or your washer.
- With the tub empty, add one cup of chlorine bleach to the bleach dispenser.
- Press the Power button.
- Turn the cycle selector to Tub Clean. When you select Tub Clean, the only option you can change is the delay option.
- Press the Start Pause button.
Storing your washer
You can damage your washer if you do not remove water from hoses and internal components before storage.
To prepare your washer for storage:
- Select the Quick Wash cycle and add bleach to the washer. Run your washer through the cycle without a load.
- Turn the water faucets off and disconnect the inlet hoses.
- Unplug your washer from the electrical outlet and leave your washer lid open to let air circulate inside the tub.
Caution
If your washer has been stored in below-freezing temperatures, allow time for any leftover water in your washer to thaw out before use.
BEFORE YOU CALL FOR SERVICE…
Troubleshooting Tips
Save time and money! Review the charts on the following pages first and you may not need to call for service.
| Problem | Solutions |
| The washer does not start |
|
| No water or not enough water |
|
| When washer has excessive vibration or noise |
|
| Washer stops |
|
| The lid is locked or will not open |
|
| The washer does not drain or spin |
|
| The water temperature is not correct |
|
| Load is too wet at the end of the cycle |
|
| Water leaks |
|
| Overseas condition |
|
| Prevent odor |
|
ERROR CODES
| Description | Reason | Solutions |
| E1 | The unit takes more than 10 minutes to drain. |
|
| E2 | The lid is open. The washer is not level. |
|
| E3 | Your washer is out of balance more than three times in spin operation. |
|
| E4 | Your washer is not level. Impact switch failed. |
|
| E5 | The EEPROM failed |
|
| F2 | Load sensing failed. |
|
| F5 | The water level sensor failed. |
|
| F8 | The lid lock failed. |
|
| Fd | The PCB failed. |
|
| C9 | The lid has been open for over 20 seconds with the Child Lock function activated. |
|
| MIDEA LAUNDRY WASHER LIMITED WARRANTY | ATTACH YOUR RECEIPT HERE. PROOF OF PURCHASE IS REQUIRED TO OBTAIN WARRANTY SERVICE.
Please have the following information available when you call the Customer Service Center: ■ Name, address, and telephone number |
| IF YOU NEED SERVICE:
1. Before contacting us to arrange service, please determine whether your product requires repair. Some questions can be addressed without service. Please take a few minutes to review the Troubleshooting section of the User Manual, or email [email protected] 2. All warranty service is provided exclusively by our authorized Midea Service Providers, in the U.S. and Canada. Midea Customer Service In the U.S.A. or Canada, call 1-866-646-4332 or email [email protected]. |
| LIMITED WARRANTY |
| WHAT IS COVERED |
| FIRST-YEAR LIMITED WARRANTY (PARTS AND LABOR)
For one year from the date of purchase, if this major appliance is installed, operated and maintained according to instructions attached to or furnished with the product, Midea America Corporation (hereafter “Midea”) will pay for factory specified replacement parts and repair labor to correct defects in materials or workmanship that existed when this major appliance was purchased, or at its sole discretion replace the product. In the event of product replacement, your appliance will be warranted for the remaining term of the original unit’s warranty period. LIFETIME LIMITED WARRANTY (STAINLESS STEEL TUB) For the lifetime of the product from the date of original purchase, when this major appliance is installed, operated, and maintained according to instructions attached to or furnished with the product, Midea will pay for factory specified parts and repair labor for the following components to correct non-cosmetic defects in materials or workmanship that existed when this major the appliance was purchased: ■ Stainless steel tub YOUR SOLE AND EXCLUSIVE REMEDY UNDER THIS LIMITED WARRANTY SHALL BE PRODUCT REPAIR OR REPLACEMENT AS PROVIDED HEREIN. Service must be provided by a Midea designated service company. This limited warranty is valid only in the 50 States of the United States or Canada and applies only when the major appliance is used in the country in which it was purchased. This limited warranty is effective from the date of the original consumer purchase. |
LIMITED WARRANTY |
| WHAT IS NOT COVERED |
The cost of repair or replacement under these excluded circumstances shall be borne by the customer. DISCLAIMER OF IMPLIED WARRANTIES IMPLIED WARRANTIES, INCLUDING ANY IMPLIED WARRANTY OF MERCHANTABILITY OR IMPLIED WARRANTY OF FITNESS FOR A PARTICULAR PURPOSE, ARE LIMITED TO ONE YEAR OR THE SHORTEST PERIOD ALLOWED BY LAW. Some states and provinces do not allow limitations on the duration of implied warranties of merchantability or fitness, so this limitation may not apply to you. This warranty gives you specific legal rights, and you also may have other rights that vary from state to state or province to province. DISCLAIMER OF REPRESENTATIONS OUTSIDE OF WARRANTY Midea makes no representations about the quality, durability, or need for service or repair of this major appliance other than the representations contained in this warranty. If you want a longer or more comprehensive warranty than the limited warranty that comes with this major appliance, you should ask Midea or your retailer about buying an extended warranty. LIMITATION OF REMEDIES; EXCLUSION OF INCIDENTAL AND CONSEQUENTIAL DAMAGES YOUR SOLE AND EXCLUSIVE REMEDY UNDER THIS LIMITED WARRANTY SHALL BE PRODUCT REPAIR AS PROVIDED HEREIN. MIDEA SHALL NOT BE LIABLE FOR INCIDENTAL OR CONSEQUENTIAL DAMAGES. Some states and provinces do not allow the exclusion or limitation of incidental or consequential damages, so these limitations and exclusions may not apply to you. This warranty gives you specific legal rights, and you also may have other rights that vary from state to state or province to province. |
REGISTRATION INFORMATION
PROTECT YOUR PRODUCT:
We will keep the model number and date of purchase of your new Midea product on file to help you refer to this information in the event of an insurance claim such
as fire or theft.
Register online at https://us.midea.com/product-registration
OR
Please fill out and return it to the following address:
Midea America Corp. 759 Bloomfield Ave #386, West Caldwell, NJ 07006-6701
———————————– (detach here) —————————-
| Name: | Model#: Serial #: Card: |
| Address: | Date Purchased: Store / Dealer Name: |
| City: State: Zip: |
E-mail Address: |
| Area Code: Phone Number: |
Occupation: |
| Did you purchase an additional warranty: | As your Primary Residence: |
| How did you learn about this product:
❑ Advertising |
Age: Marital Status: |
Information collected or submitted to us is only available to company internal employees for purposes of contacting you or sending you emails, based on your request for information and to company service providers for purposes of providing services relating to our communications with you. All data will not be shared with other organizations for commercial purposes.
Please consider leaving a customer review at www.midea.com.
Midea America Corp.
5 Sylvan Way,
Parsippany, NJ 07054
Customer Service 866-646-4332
Made in China
]]>Midea MPPD25C Remote Controller
Remote Controller Specifications
| Model |
RG10F(B)/BGEF、RG10F1(B)/BGEF、RG10F2(B1)/BGEFU1、RG10F3(B1)/BGEFU1 |
| Rated Voltage | 3.0V( Dry batteries R03/LR03×2) |
| Signal Receiving Range | 8m |
| Environment | -5°C~60°C(23°F~140°F) |
Quick Start Guide
- FIT BATTERIES
- SELECT MODE
- SELECT TEMPERATURE
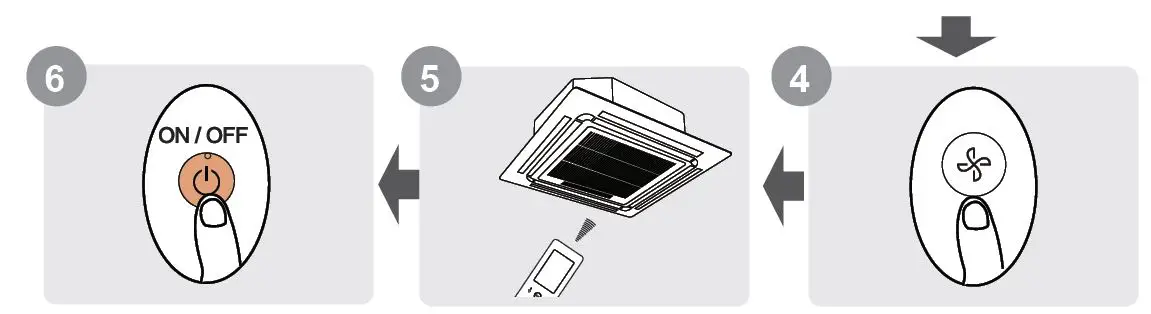
- PRESS POWER BUTTON
- POINT REMOTE TOWARD UNIT
- SELECT FAN SPEED
NOT SURE WHAT A FUNCTION DOES?
Refer to the How to Use Basic Functions and How to Use Advanced Functions sections of this manual for a detailed description of how to use your air conditioner.
SPECIAL NOTE
- Button designs on your unit may differ slightly from the example shown.
- If the indoor unit does not have a particular function, pressing that function’s button on the remote control will have no effect.
- When there are wide differences between “Remote controller Manual” and “USER’S MANUAL” on function description, the description of “USER’S MANUAL” shall prevail.
Handling the Remote Controller
Inserting and Replacing Batteries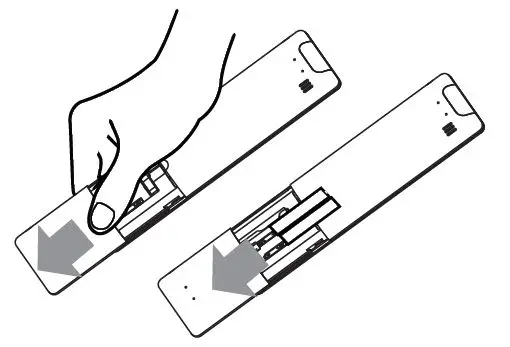
Your air conditioning unit may come with two batteries(some units). Put the batteries in the remote control before use.
- Slide the back cover from the remote control downward, exposing the battery compartment.
- Insert the batteries, paying attention to match up the (+) and (-) ends of the batteries with the symbols inside the battery compartment.
- Slide the battery cover back into place.
BATTERY NOTES
For optimum product performance:
- Do not mix old and new batteries, or batteries of different types.
- Do not leave batteries in the remote control if you don’t plan on using the device for more than 2 months.
BATTERY DISPOSAL
Do not dispose of batteries as unsorted municipal waste. Refer to local laws for proper disposal of batteries.
TIPS FOR USING REMOTE CONTROL
- The remote control must be used within 8 meters of the unit.
- The unit will beep when remote signal is received.
- Curtains, other materials and direct sunlight can interfere with the infrared signal receiver.
- Remove batteries if the remote will not be used more than 2 months.
NOTES FOR USING REMOTE CONTROL
The device could comply with the local national regulations.
- In Canada, it should comply with CAN ICES-3(B)/NMB-3(B).
- In USA, this device complies with part 15 of the FCC Rules. Operation is subject to the following two conditions:
- This device may not cause harmful interference, and
- this device must accept any interference received, including interference that may cause undesired operation.
This equipment has been tested and found to comply with the limits for a Class B digital device, pursuant to part 15 of the FCC Rules. These limits are designed to provide reasonable protection against harmful interference in a residential installation. This equipment generates, uses and can radiate radio frequency energy and, if not installed and used in accordance with the instructions, may cause harmful interference to radio communications. However, there is no guarantee that interference will not occur in a particular installation. If this equipment does cause harmful interference to radio or television reception, which can be determined by turning the equipment off and on, the user is encouraged to try to correct the interference by one or more of the following measures:
- Reorient or relocate the receiving antenna.
- Increase the separation between the equipment and receiver.
- Connect the equipment into an outlet on a circuit different from that to which the receiver is connected.
- Consult the dealer or an experienced radio/TV technician for help. Changes or modifications not approved by the party responsible for compliance could void the user’s authority to operate the equipment.
Buttons and Funcitons
Before you begin using your new air conditioner, make sure to familiarize yourself with its remote control. The following is a brief introduction to the remote control itself. For instructions on how to operate your air conditioner, refer to the How to Use Basic Functions section of this manual.
Model: RG10F(B)/BGEF (Fresh feature is not available) RG10F1(B)/BGEF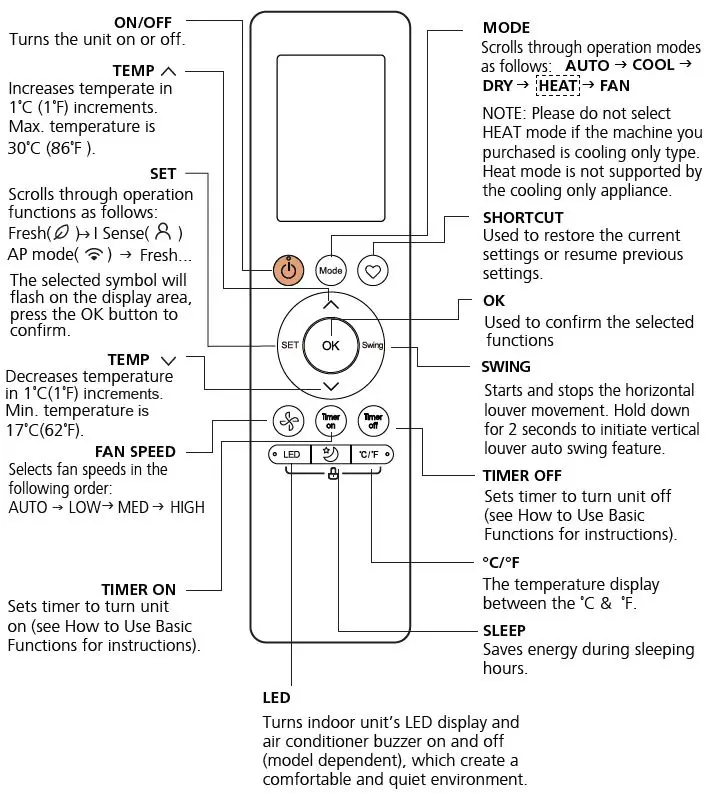
Model: RG10F2(B1)/BGEFU1(Fresh feature is not available)RG10F3(B1)/BGEFU1
Remote Screen Indicators
Information are displayed when the remote controller is power up.
NOTE:
All indicators shown in the figure are for the purpose of clear presentation. But during the actaul operation, only the relative function signs are shown on the display window.
How to Use Basic Functions
Basic operation
ATTENTION! Before operation, please ensure the unit is plugged in and power is available.
SETTING TEMPERATURE
The operating temperature range for units is 17°C-30°C (62°F-86°F). You can increase or decrease the set temperature in 1°C (1°F) increments.
AUTO Mode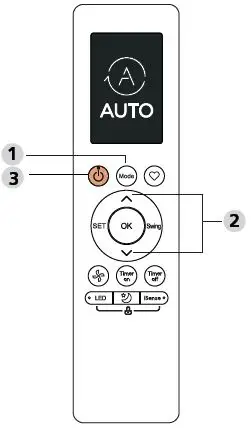
In AUTO mode, the unit will automatically select the COOL, FAN, or HEAT function based on the set temperature.
- Press the MODE button to select AUTO.
- Set your desired temperature using the TEMP or TEMP button.
- Press the ON/OFF button to start the unit.
NOTE: FAN SPEED can’t be set in AUTO mode.
COOL Mode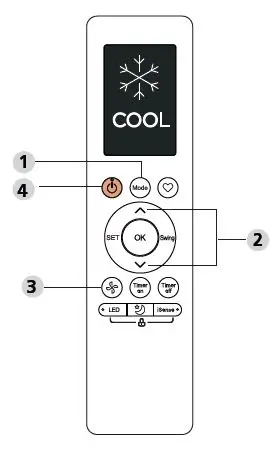
- Press the MODE button to select COOL mode.
- Set your desired temperature using the TEMP or TEMP button.
- Press the FAN button to select the fan speed: AUTO, LOW, MED or HIGH.
- Press the ON/OFF button to start the unit.
DRY Mode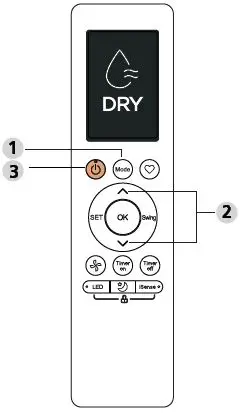
- Press the MODE button to select DRY.
- Set your desired temperature using the TEMP or TEMP button.
- Press the ON/OFF button to start the unit.
NOTE: FAN SPEED cannot be changed in DRY mode.
FAN Mode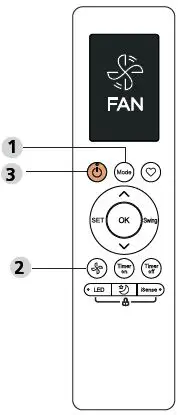
- Press the MODE button to select FAN mode.
- Press FAN button to select the fan speed: AUTO, LOW, MED or HIGH.
- Press the ON/OFF button to start the unit.
NOTE: You can’t set the temperature in FAN mode. As a result, your remote control’s LCD screen will not display the temperature.
HEAT Mode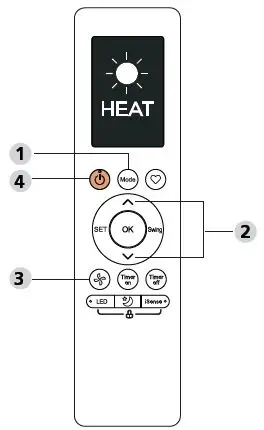
- Press the MODE button to select HEAT mode.
- Set your desired temperature using the TEMP or TEMP button.
- Press FAN button to select the fan speed: AUTO, LOW, MED or HIGH.
- Press the ON/OFF button to start the unit.
NOTE: As outdoor temperature drops, the performance of your unit’s HEAT function may be affected. In such instances, we recommend using this air conditioner in conjunction with other heating appliances.
Setting the TIMER
TIMER ON/OFF – Set the amount of time after which the unit will automatically turn on/off.
TIMER ON setting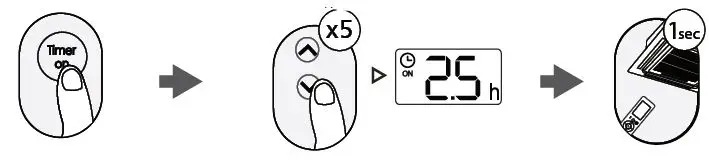
- Press the TIMER ON button to initiate the ON time sequence.
- Press up or down button for multiple times to set the desired time to turn on the unit.
- Point remote to unit and wait 1sec, the TIMER ON will be activated.
TIMER OFF setting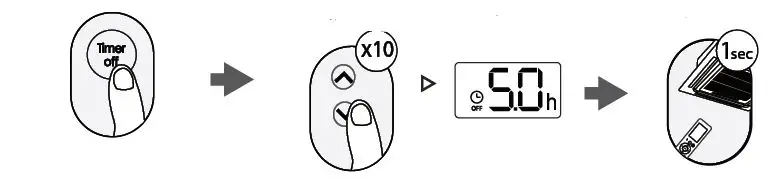
- Press TIMER OFF button to initiate the OFF time sequence.
- Press Temp. up or down button for multiple times to set the desired time to turn off the unit.
- Point remote to unit and wait 1sec, the TIMER OFF will be activated.
NOTE:
- When setting the TIMER ON or TIMER OFF, the time will increase by 30 minutes increments with each press, up to 10 hours. After 10 hours and up to 24, it will increase in 1 hour increments.( For example, press 5 times to get 2.5h, and press 10 times to get 5h,) The timer will revert to 0.0 after 24.
- Cancel either function by setting its timer to 0.0h.
TIMER ON & OFF setting(example)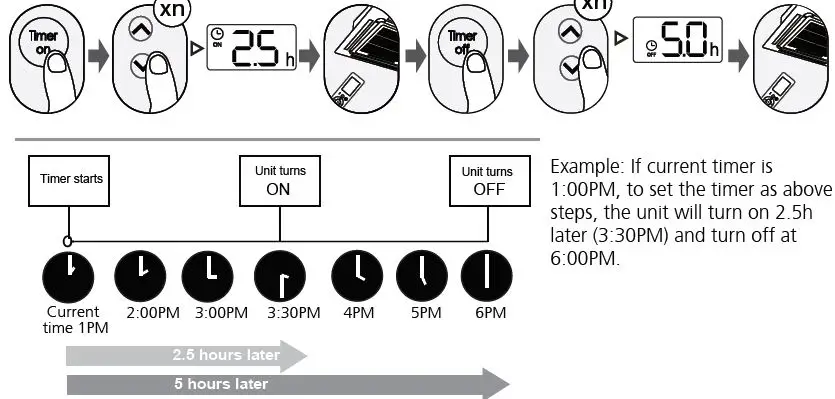
Keep in mind that the time periods you set for both functions refer to hours after the current time.
How to Use Advanced Functions
SHORTCUT function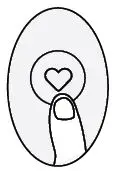
Press the SHORTCUT button Push this button when the remote controller is on, the system will automatically revert back to the previous settings including operating mode, setting temperature, fan speed level and sleep feature (if activated). If pushing for more than 2 seconds, the system will automatically restore the current operation settings including operating mode, setting temperature, fan speed level and sleep feature (if activated ).
°C/°F (some models)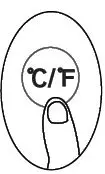
Press this button will alternate the temperature display between the °C & °F.
Swing function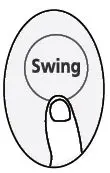
Press the Swing button The horizontal louver will swing up and down automatically when pressing the Swing button. Press again to make it stop.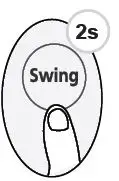
Keep pressing this button more than 2 seconds, the vertical louver swing function is activated. (Model dependent)
LED DISPLAY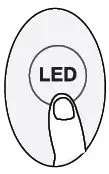
Press LED button Press this button to turn on and turn off the display on the indoor unit.
SLEEP Function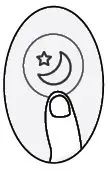
Press SLEEP button The SLEEP function is used to decrease energy while you sleep(and don’t need the same temperature settings to stay comfortable). This function can only by activated via remote control. For the details, please see “sleep operation ” in “ USER’S MANUAL ”.
NOTE: The SLEEP function is not available in FAN or DRY mode.
I SENSE (some models)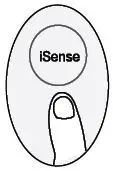
Press I SENSE button When the I SENSE function is activated, the remote display is actual temperature at its location. The remote control will send this signal to the air conditioner every 3 minutes interval until press the I SENSE button again.
LOCK function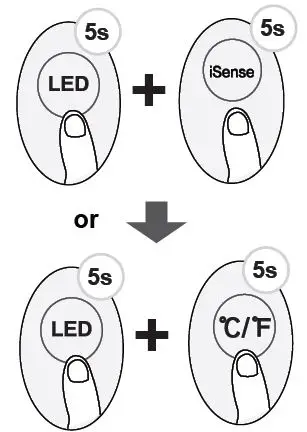
Press together LED button and I SENSE or LED and °C/°F button at the same time for more than 5 seconds to activate the Lock function. All buttons will not respond except pressing these two buttons for two seconds again to disable locking.
SET function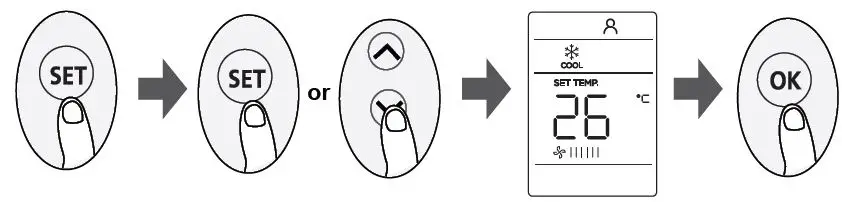
- Press the SET button to enter the function setting, then press the SET button or TEMP or TEMP button to select the desired function. The selected symbol will flash on the display area, press the OK button to confirm.
- To cancel the selected function, just perform the same procedures as above.
- Press the SET button to scroll through operation functions as follows:
Fresh * [ ]: If your remote controller has I Sense button, you can not use the SET button to select the I sense feature.
FRESH function (some units)
When the FRESH function is initiated, the Ionizer/Plasma Dust Collector(depending on models) is energized and will help to remove pollen and impurities from the air.
AP function (some units)
Choose AP mode to do wireless network configuration. For some units, it doesn’t work by pressing the SET button. To enter the AP mode, continuously press the LED button seven times in 10 seconds.
The design and specifications are subject to change without prior notice for product improvement. Consult with the sales agency or manufacturer for details.
]]>
Midea Dehumidifier
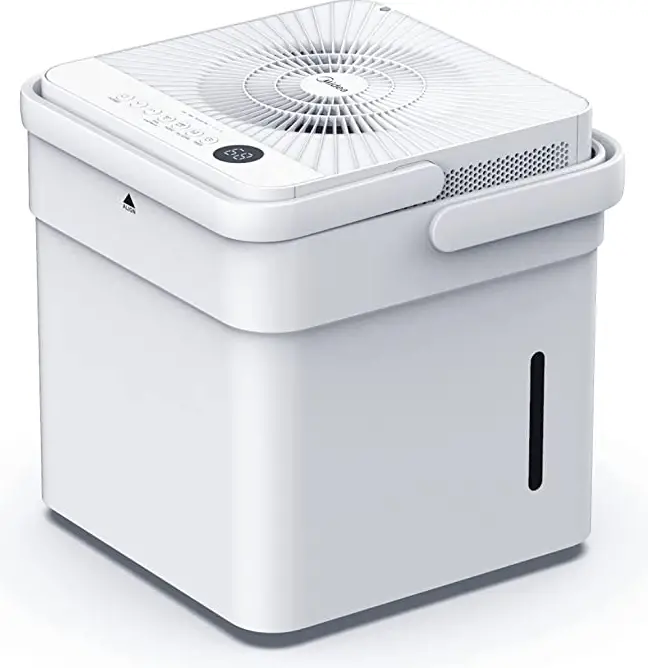
Midea Dehumidifier
CAUTION
- Contact an authorized service technician for repair or maintenance of this unit.
- The unit is not designed to be used by young children or people with reduced physical, sensory or mental capabilities without supervision.
- Young children should be supervised to ensure that they do not play with the unit.
- If the power cord needs to be replaced, please contact our consumer service or an authorized technician.
- Electrical installation, if needed, must be performed in accordance to national regulation standards by qualified personnel only.
Safety Precautions
To prevent injury to the user or personal and property damage, these instructions must be followed. Incorrect operation due to ignoring of instructions may cause harm or damage. The level of risk is shown by the following indications.
- This symbol indicates the possibility of death or serious injury.
- This symbol indicates the possibility of injury or damage to property.
WARNING
- Plug in power plug properly.
Otherwise, it may cause electric shock or fire due to excess heat generation. - Do not modify power cord length or share the outlet with other appliances.
It may cause electric shock or fire due to overheating. - Always ensure effective grounding.
Incorrect grounding may cause electric shock. - Unplug the unit if strange sounds, smells, or smoke come from it.
A damaged product may cause fire and electric shock. - Ventilate room before operating the unit if there is a gas leak from other appliances.
- Do not operate or stop the unit by inserting or pulling out the power plug.
It may cause electric shock. - Do not allow water to enter into electric parts.
It may cause failure or electric shock. - Do not use the power outlet if it is loose or damaged.
It may cause fire and electric shock. - Do not use or keep the power cord close to heating appliances or heat sources such as fireplaces.
It may cause fire and electric shock. - Do not disassemble or modify unit.
It may cause failure and electric shock. - Do not damage or use an unspecified power cord.
It may cause fire and electric shock. - If the power cord is damaged, it must be replaced by the manufacturer or an authorized service center or a similarly qualified person in order to avoid electrical risk.
- Do not use the unit near flammable gas or combustibles, such as gasoline, benzene, thinner, etc. It may cause fire.
- Before cleaning, turn off the power and unplug the unit.
- Do not remove the water bucket during operation, the bucket full protection may be activated and risk electric shock.
- Do not use the unit in small spaces.
Lack of ventilation can cause overheating and fire. - Do not use in places where water may splash onto the unit.
Water may enter the unit and degrade the insulation. It may cause an electric shock or fire. - Place the unit on a level, sturdy section of the floor.
If the unit falls over, it may cause water to spill and damage belongings, or cause electrical shock or fire. - Never insert your finger or other foreign objects into grills or openings. Take
special care to warn children of these dangers. It may cause failure or electric shock. - Do not climb up on or sit on the unit.
You may be injured if you fall or if the unit falls over. - Always insert the filters securely, and take caution to avoid injuries to hand and fingers. Clean filter once every two weeks.
If water enters the unit, turn the unit off and disconnect the power, contact a qualified service technician. - Do not place flower vases or other water containers on top of the unit.
Water may spill inside the unit, causing insulation failure and electrical shock or fire. - If the unit is knocked over during use, turn off the unit and unplug it from the main power supply immediately. Visually inspect the unit to ensure there is no damage. If you suspect the unit has been damaged, contact customer service or a qualified technician.
- In a thunderstorm, the power should be disconnected to the unit due to lightning.
- Do not run power cord under carpeting. Do not cover cord with throw rugs, runners, or similar coverings. Do not route cord under furniture or appliances.
Arrange cord away from traffic area and where it will not be tripped over.
WARNING – Electrical Information
- The manufactures nameplate is located on the rear panel of the unit and contains electrical and other technical data specific to this unit.
- Be sure the unit is properly grounded. To minimize shock and fire hazards, proper grounding is important. The power cord is equipped with a three-prong grounding plug for protection against shock hazards.
- Your unit must be used in a properly grounded wall receptacle. If the wall receptacle you intend to use is not adequately grounded or protected by a time delay fuse or circuit breaker, have a qualified electrician install the proper
receptacle. - Ensure the receptacle is accessible after the unit installation.
- To avoid the possibility of personal injury, always disconnect the the unit from power supply, before installing and/or servicing.
WARNING – For your safety
- Do not store or use gasoline or other flammable vapors and liquids in the vicinity of this or any other appliance.
- Avoid fire hazard or electric shock. Do not use an extension cord or an adaptor plug. Do not remove any prongs from the power cord.
Unit Specifications and Features
Product overview
NOTE
All the pictures in this manual are for illustrative purposes only. The actual shape of the dehumidifier you purchased may be slightly different, but its operations and functions are similar.
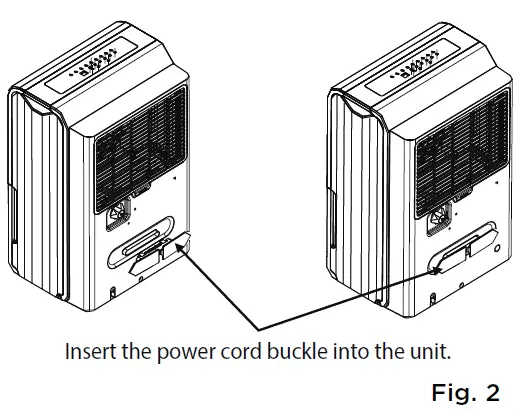
Accessories
- Pump drain hose (1 pc) (only for units with the drain pump feature)
- Power cord buckle (1 pc)
Operating Instructions
CAUTION: Clean your unit occasionally to keep it looking new. Be sure to unplug the unit before cleaning to prevent shock or fire hazards.
Key Pad Features
NOTE: The appearance of the control panel on your unit may vary slightly. Functions will be similar.
Control Pads
When you push the button to change operation modes, the unit will make a beep sound to indicate that it is changing modes.
(PUMP) Button
Press to activate the pump operation.
NOTE: Make sure the pump drain hose is installed into the unit and the continuous drain hose is removed from the unit before the pump operation is activated. When the bucket is full, the pump starts to work. Refer to the next pages for removing the collected water. Do not use this operation when the outdoor temperature is equal to or less than 0°C (32°F).
(COMFORT) Button
Press to activate the comfort dehumidifying operation.
NOTE
When COMFORT function is turned on, set humidity is automatic and cannot be changed manually.
(FILTER) Button
This feature is a reminder to clean the Air Filter for more efficient operation. The LED (light) will illuminate after 250 hours of operation. To reset after cleaning the filter, press the Filter button and the light will go off. The 250 hour counter will reset.
Press to activate the continuous dehumidifying operation.
NOTE: When CONTINUOUS mode function is turned on, set humidity is automatic and cannot be changed manually.
(TURBO) Button
Control the Turbo speed. Press to select either Turbo or normal fan speed. Set the Turbo control to high for maximum moisture removal. When room humidity is at your preferred level, it is advised to turn off Turbo speed.
(TIMER) Button
Starts the Timer ON and Timer OFF function setting.
- Humidity Set Control Buttons
The humidity level can be set within a range of 35% RH (Relative Humidity) to 85% RH (Relative Humidity) in 5% increments.
For drier air, press the button and set to a lower value (%).
(POWER) Button
Press to turn the dehumidifier on and off.
LED Display
Shows the set % humidity level from 35% to 85% or auto start/stop time (0 ~ 24) while setting, then shows the actual (+/- 5% accuracy) room % humidity level in a range of 30% RH (Relative Humidity) to 90% RH (Relative Humidity).
Error Codes and Protection Code:
AS – Humidity sensor error – Unplug the unit and plug it back in. If error persists, contact Customer Service.
ES – Tube Temperature sensor of the evaporator error – Unplug the unit and plug it back in. If error persists, contact Customer Service.
P2 – Bucket is full or bucket is not in right position – Empty the bucket and replace it in the right position. (only available for the unit with no pump feature.)
P2 – Bucket is full – Empty the bucket. (only available for the unit with pump feature.)
EC – Refrigerant leakage detection – Display area will show EC when the unit detects refrigerant leakage. If error persists, contact Customer Service.
E3 – Unit malfunction – Unplug the unit and plug it back in. If error persists, contact Customer Service.
Eb – Bucket is removed or not in right position – Replace the bucket in the right position. (only available for the unit with pump feature.)
Other Features
Bucket Full Light
Lights up when the bucket is ready to be emptied.
Auto Shut Off
The dehumidifier shuts off when the bucket is full, or when the bucket is removed or not replaced in the proper position. When the set point humidity level is reached, the unit will be shut off automatically. The fan motor will continue operating.
Auto Defrost
When frost builds up on the evaporator coils, the compressor will cycle off and Auto Defrost function will run automatically.
3 minute compressor operation delay protection
After the unit has stopped, it can not be restarted in the first 3 minutes to protect compressor operation. The unit will restart automatically after 3 minutes.
Auto-Restart
If the unit stops unexpectedly due to a power cut, it will restart with the previous function setting automatically when the power resumes.
Setting the Timer ON and Timer OFF
- When the unit is on, first press the Timer button, the Timer OFF indicator light illuminates. It indicates the Timer OFF program is initiated. Press it again the Timer ON indicator light illuminates. It indicates the Timer ON is initiated.
- When the unit is off, first press the Timer button, the Timer ON indicator light illuminates. It indicates the Timer ON program is initiated. Press it again the Timer OFF indicator light illuminates. It indicates the Timer OFF
is initiated. - Press or hold the and key buttons to change the Timer by 0.5 hour increments, up to 10 hours, then at 1 hour increments up to 24 hours. The control will count down the time remaining until start.
- The selected time will register in 5 seconds and the system will automatically revert back to display the previous humidity setting.
- When the Timer ON and Timer OFF times are set, within the same program sequence, indicator lights illuminate identifying both ON and OFF times are now programmed.
- Turning the unit ON or OFF at any time or adjusting the timer setting to 0.0 will cancel the Timer function.
- When LED display window displays the code of P2, the Auto Start/Stop function will also be cancelled.
NOTES
- When first using the dehumidifier, operate the unit continuously 24 hours. Make sure the plastic cover on the continuous drain hose outlet install stightly properly so there are no leaks.
- This unit is designed to operate with a working environment between 5°C/41°F and 35°C/95°F.
- Make sure the water bucket is positioned correctly so that the unit can operate properly. When the water in the bucket reaches a certain level, please be careful while moving the unit to avoid it spill.
Removing Collected Water
There are three ways to remove collected water:
Use the bucket
- When the unit is off, if the bucket is full, the Full indicator light will light.
- When the unit is on, if the bucket is full, the compressor and the fan turn off, and the Full indicator light will light, the digital display shows P2.
- Slowly pull out the bucket. Grip the left and right handles securely, and carefully pull out straight so water does not spill. Do not put the bucket on the as because the bottom of the bucket is uneven. Otherwise water may be spilled.
- Empty the water and reposition the bucket.
- The unit will restart operation when the bucket is back in place.
- Pull out the bucket.
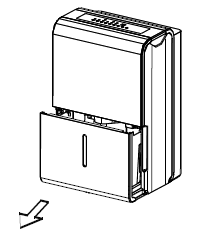
- Hold both sides of the bucket evenly, and pull it out from the unit.
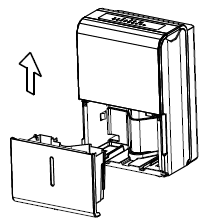
- Pour the water out.
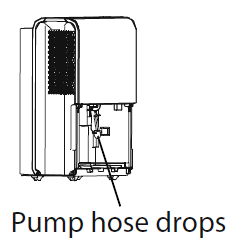
NOTES
- • When you remove the bucket, do not touch any parts inside the unit. Doing so may damage the product.
• Be sure to push the bucket gently all the way into the unit.
• If the pump hose falls off when you remove the bucket (see Fig. 7), you must reinstall the pump hose properly to the unit before replacing the bucket into the unit (see Fig. 8).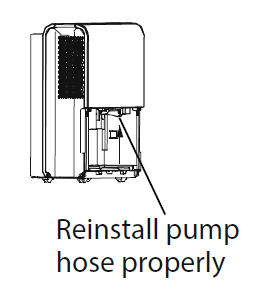
• When the unit is on, if the bucket is removed, the compressor and the fan turn off, then the unit will beep 8 times and the digital display shows Eb.
• When the unit is off, if the bucket is removed, the unit will beep 8 times and the digital display shows Eb.
Continuous draining
- Water can be automatically emptied into a floor drain by attaching the unit with a water hose (Id Ø 5/16”, not included) with a female threaded end (ID: M = 1”, not included).
- Remove the plastic cover from the back drain outlet of the unit and set aside, then insert the drain hose through the drain outlet of the unit and lead the drain hose to the floor drain or a suitable drainage facility. (See Fig. 9 and Fig. 10)
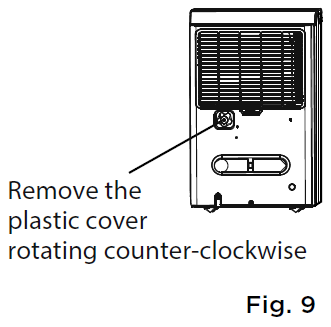
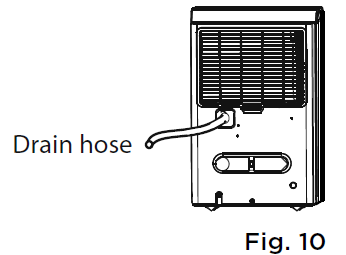
- When you remove the plastic cover, if there is some water in the back drain outlet of the unit you must dry it. Make sure the hose is secure so there are no leaks and the end of the hose is level or sloping downwards to let the water flow.
- Direct the hose toward the drain, making sure that there are no kinks that will stop the water flowing.
- Select the desired humidity setting and fan speed on the unit for continuous draining to start.
NOTE: When the continuous draining feature is not being used, remove the drain hose from the outlet, and dry the water in the continuous drain hose outlet.
Pump draining (Pump models only)
Water can be automatically emptied into a floor drain or a suitable drainage facility by attaching the pump drain out with a pump drain hose (Ø od = 1/4”, supplied).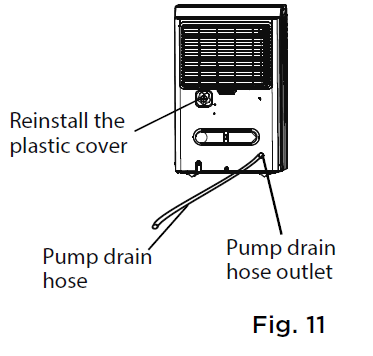
- Remove the continuous drain hose from the unit and install the plastic cover to the continuous drain hose outlet of the unit by clockwise rotation. (See Fig. 11)
- Insert the pump drain hose into the pump drain hose outlet for at least 15 mm (See Fig. 11), then lead the water hose to the floor drain or a suitable drainage facility.
- Press the pump pad on the unit to activate the pump operation. When the bucket is full the pump starts to work.
NOTE: The pump may generate a loud noise for the first 3~5 minutes of operation. - Make sure the hose is secure so there are no leaks.
- Direct the hose toward the drain, making sure that there are no kinks that will stop the water flowing.
- Place the end of the hose into the drain.
- Select the desired humidity setting and fan speed on the unit for pump draining to start.
NOTE: The pump operation light blinks when a failure occurs. Please turn off the unit and disconnect the power cord. Check the following items: - Cleaning the pump filter:
– Remove the bucket from the unit, take down the pump and clean the pump filter (See Fig. 12).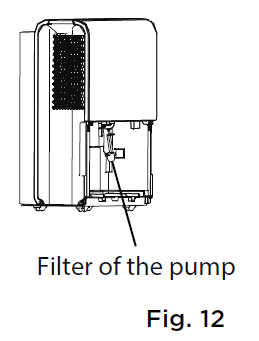
- Check if the drain hose is clean and free of debris.
- Empty the water from the bucket.
- Check the hose connection and the bucket for proper fitment. If the error persists, contact Customer Service.
NOTE:
Do not use this operation when the outdoor temperature is equal to or less than 0°C (32°F), otherwise water may freeze ice causing the water hose to be blocked and the unit to stop operating.
Make sure to empty the bucket at least once a week a week when using the pump draining feature. When the pump draining feature is not being used, remove the pump drain hose from the outlet.
Installation Instructions
Positioning the Unit
A dehumidifier operating in a basement will have little or no effect in drying an adjacent enclosed storage area, such as a closet, unless there is adequate circulation of air in and out of the area. (See Fig. 13)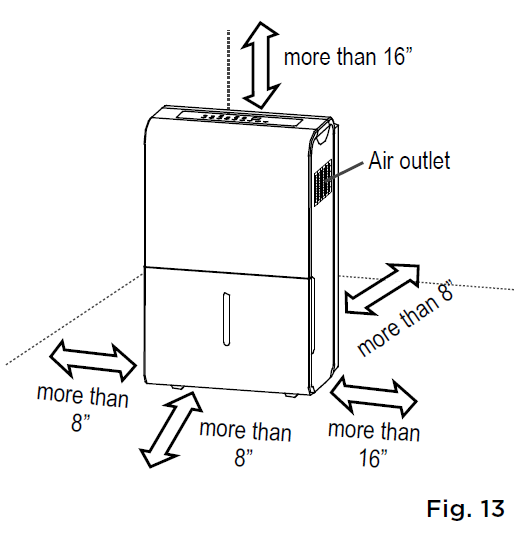
- Do not use outdoors.
- This dehumidifer is intended for indoor residential applications only. This dehumidifier should not be used for commercial or industrial applications.
- Place the dehumidifier on a smooth, level floor strong enough to support the unit with a full bucket of water.
- Allow at least 8” of air space on all sides of the unit for air circulation (at least 16” for air outlet).
- Place the unit in an area where the temperature will not fall below 41°F (5°C). The coils can become covered with frost at at lower temperatures, which may reduce performance.
- Place the unit away from any clothes dryer, heater or radiator.
- Close all doors, windows and other outside openings to the room.
Care and Cleaning
Turn the dehumidifier off and disconnect the plug from the power source before cleaning.
Clean the Grill and Case
- Use water and a mild detergent. Do not use bleach or abrasives.
- Do not splash water directly onto the unit. Doing so may cause an electrical shock, cause the insulation to deteriorate, or cause the unit to rust.
- The air intake and outlet may get dirty during operation, use a vacuum cleaner or brush to clean.
Clean the bucket
Every few weeks, clean the bucket thoroughly to prevent growth of mold, mildew and bacteria. Partially fill the bucket with clean water and mild detergent. Swish it around in the bucket, empty and rinse.
Note: Do not use a dishwasher to clean the bucket.
Clean the air filter
- To remove the filter, pull filter outwards (See Fig. 14).
- Wash the filter with clean water then dry.
- Re-install the filter, replace bucket.
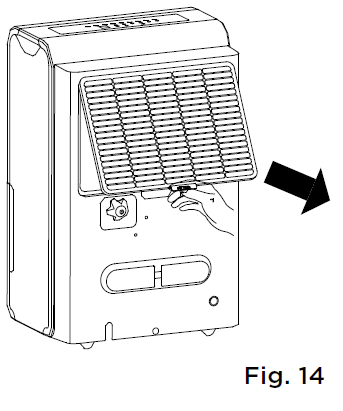
DO NOT operate the dehumidifier without a filter to avoid loss of performance and damage to the unit.
When not using the unit for long time periods
- Before storing the unit, let it rest for one full day so that the system can dry out naturally.
- Clean the unit, water bucket and air filter.
- Wrap the cord with the power cord buckle.
- Cover the unit with a plastic bag.
- Store the unit upright in a dry, well-ventilated area.
FAQ’S
Do dehumidifiers use a lot of electricity?
Yes. Dehumidifiers use a lot of electricity. While the wattage (483.24W is average) and the hourly electricity usage (0.427 kWh is average) are not substantial, the long duration of use results in dehumidifiers consuming a considerable amount of electricity.
What are the disadvantages of a dehumidifier?
Disadvantages of dehumidifiers
they can make quite some noise.
might not work in low temperatures.
needs regular maintenance.
can be quite large and heavy.
uses electricity constantly, therefore;
increases energy bill.
purchase costs are around $200.
windows and doors need to be closed.
Can I use dry mode all day?
Dry mode will not remove 100% of the moisture in the air. Instead, it will help lower the humidity to a healthy level. However, it’s recommended not to run your AC on dry mode for more than 1-2 hours at a time to avoid drying the air too much.
Why is my Midea dehumidifier leaking water?
It may seem like an obvious issue, but more often than not, a leaking dehumidifier is caused by a disconnected drainage hose. For new units, this often occurs because the drainage hose was never hooked up in the first place. But it is also possible for a functioning hose to become disconnected or loosened over time.
Can a dirty filter cause a dehumidifier to leak?
The following possible issues that can cause this are; dirty air filter, dirty evaporator coils, the dehumidifier being set to operate at too low of a temperature for an extended time, and not enough refrigerant in the compressor.
Why do dehumidifiers start fires?
About 2 Million Dehumidifiers In The U.S. Have Been Recalled Over Possible Fire Hazard : NPR. About 2 Million Dehumidifiers In The U.S. Have Been Recalled Over Possible Fire Hazard The Consumer Product Safety Commission has recalled dehumidifiers made by New Widetech because they can overheat and catch fire.
How do I know if my dehumidifier is working properly?
If you’re not sure whether your dehumidifier is working, you can always approach it, place your hand above it, and feel for airflow. Some models have different settings, so there’s a chance that you’ve set yours at low operating speeds, making it hard to see if it’s doing its job.
Can you leave dehumidifier on overnight?
Yes, we recommend using a dehumidifier 24hrs, however, be aware that there will always be a noise generated from the machine when it is operating.
Will dehumidifier work with windows open?
The windows in a room should be kept closed when running a dehumidifier. As open windows let moisture in from the outside, they can work against the dehumidifier and keep the room from drying out because the continuous flow of air can be counterproductive.
Why are my bedroom windows wet in the morning?
The reason it happens is because the external air is warmer than the temperature of the glazed pane’s surface – and the dew point of the air is higher. It is more likely to occur at night or early in the morning when temperatures are low, particularly if there is a clear sky and almost no wind.
Why do dehumidifiers fail so quickly?
Dehumidifiers contain electrical components that can go bad, in addition to internal wiring that can short or come loose from connection terminals. Models made within the past decade or so might contain electronic control boards that can burn out and stop working.
Why is my dehumidifier running but not collecting water?
If your dehumidifier is not collecting water, the unit is not operating properly: Try resetting the dehumidifier by disconnecting power to the unit for 30 seconds and re-connecting the power. Then, set the control settings and see if the unit operates properly.
Midea Dehumidifier
www://midea.com/us/
OWNER’S MANUAL
AIR COOLER
AC100-18BR

READ AND SAVE THESE INSTRUCTIONS
Attention: Pictures in the IM are for reference only.
SAFETY INSTRUCTION
- If the supply cord is damaged, it must be replaced by the manufacturer, its service agent, or a similarly qualified person in order to avoid a hazard.
- This appliance can be used by children aged 8 years and above and persons with reduced physical, sensory or mental capabilities or lack of experience and knowledge if they have been given supervision or instruction concerning the use of the appliance in a safe way and understand the hazards involved. Children shall not play with the appliance. Cleaning and user maintenance shall not be made by children without supervision.
- Unplug the appliance during filling and cleaning.
- Prior to cleaning or other maintenance, the appliance must be disconnected from the supply mains.
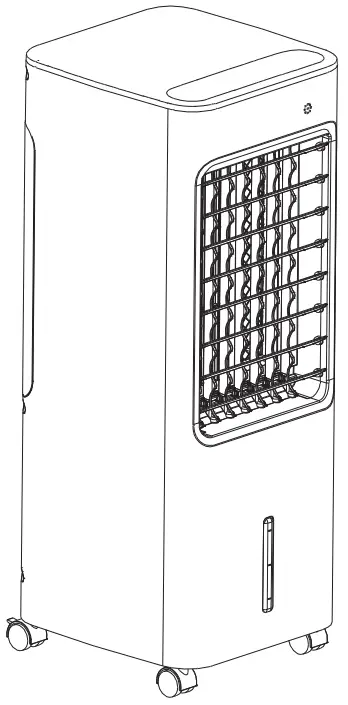 Correct Disposal of this product
This marking indicates that this product should not be disposed of with other household wastes throughout the EU. To prevent possible harm to the environment or human health from uncontrolled waste disposal, recycle it responsibly to promote the sustainable reuse of material resources. To return your used device, please use the return and collection systems or contact the retailer where the product was purchased. They can take this product for environmentally safe recycling.
INSTALLATION INSTRUCTIONS
Name of components
| Foot-Wheel Installation |
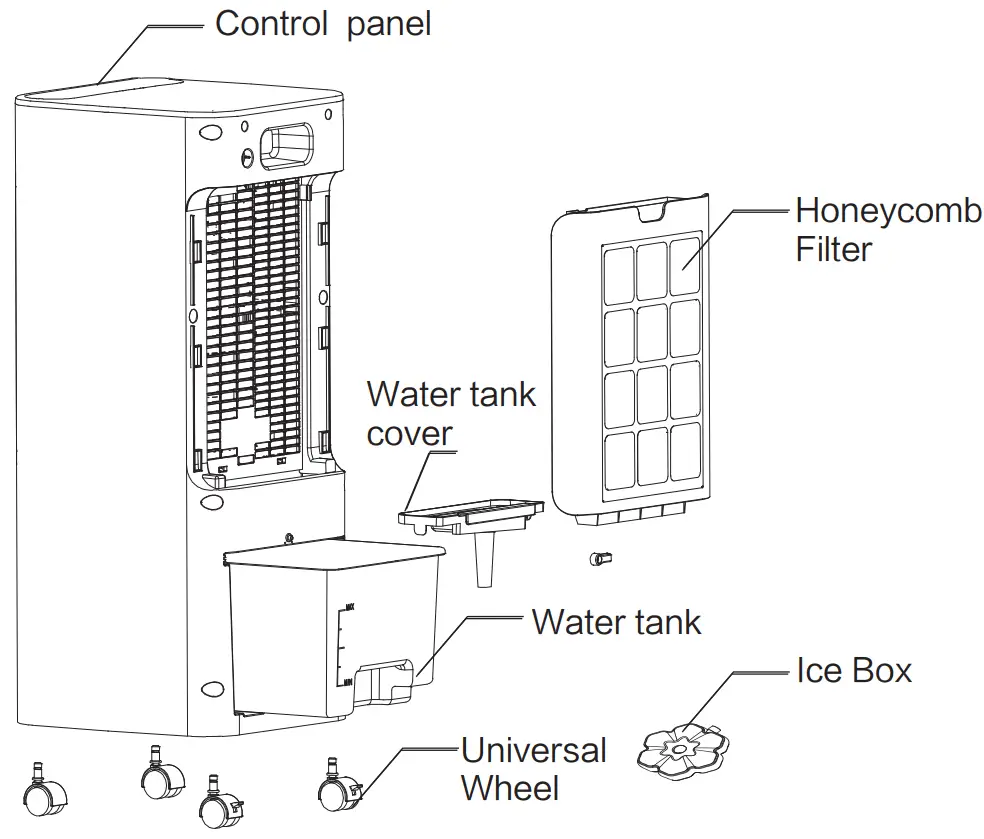 |
| Instructions for operation of the body |
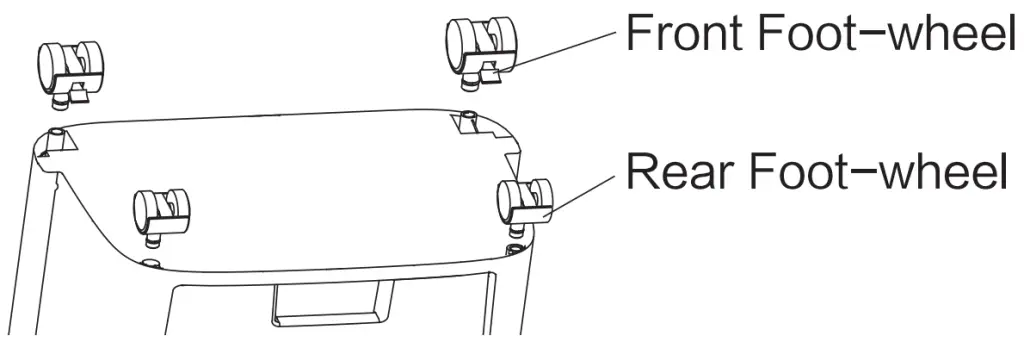 |
Press a key on the unit to activate a corresponding function.
For instance:
- Press
[SPEED] Key to adjust 3 speeds of airflow. - Press [
STYLE] Key to switch between Natural and Sleep Functions. - Press [
TIMER] Key: When the fan is on, press the“PRO./TIMER” key to time the fan to shut down after 1-7 hours. In standby mode, you can pre-set the fan to start in 1-7 hours. - When [
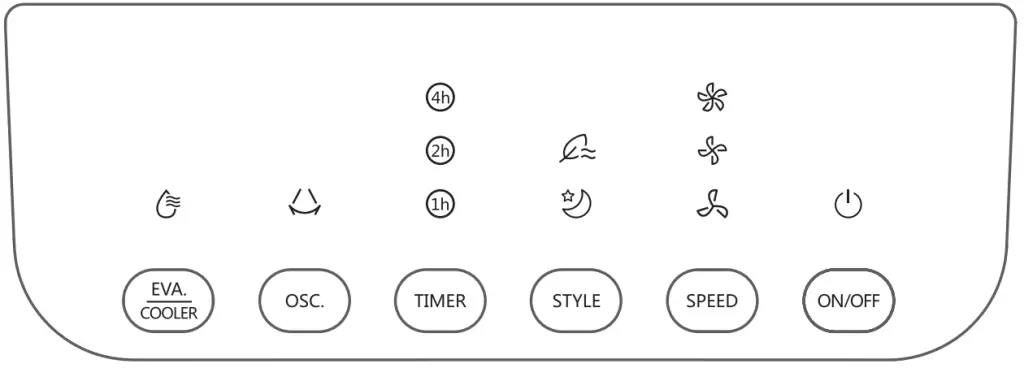 ] key is pressed, the indicator lights up constantly if the operation is normal; when the indicator flashes, it denotes a water shortage, please add water immediately.
Considerate Hint:
Push Buttons on the unit may differ based on the actual product model.
| Using the Water tank |
 |
Considerate Hint:
When humidifying, the water level in the Water Tank must remain under MAX indication; replenish water if level gets lower than MIN indication.
INSTRUCTIONS FOR USE
| Instructions for the key of a remote controller |
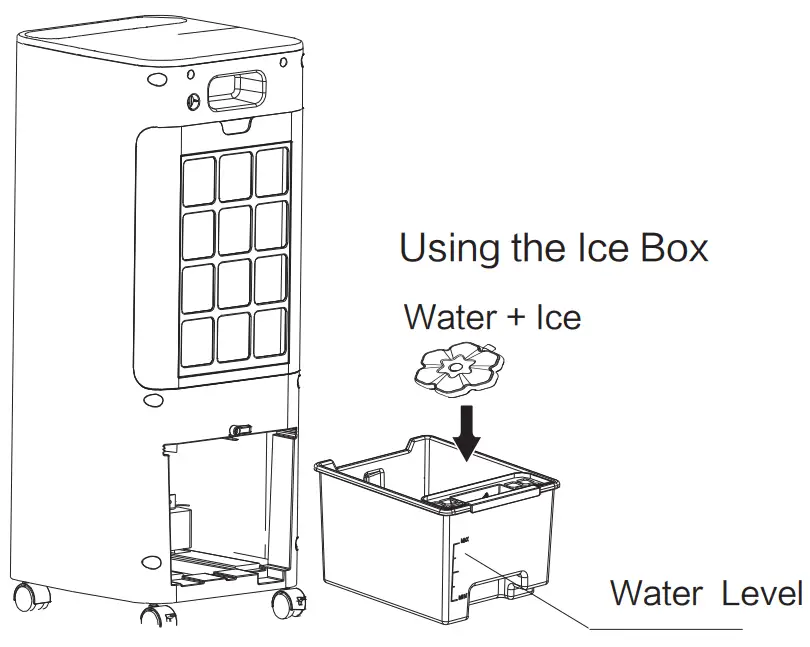 |
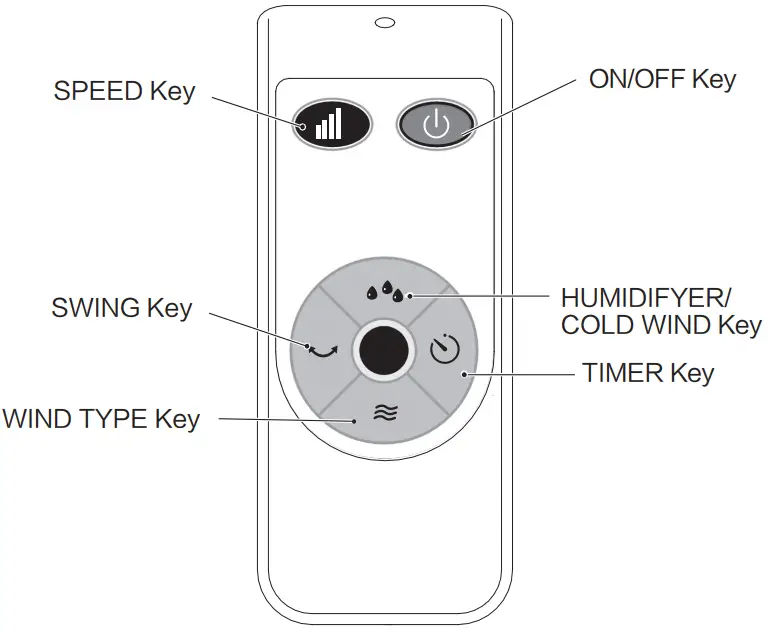
It uses one button battery of type “CR2032“.
Warm tips:
- The positive pole shall be faced upward when installing the battery.
- The remote controller shall be in 5m in the front of the product and normally used in the range of deviation angle for 30 degrees.
MAINTENANCE INSTRUCTION
The fan requires little maintenance. Do not try to fix it by yourself.
Refer it to qualified service personnel if service is needed.
- Before cleaning and assembling, fan must be unplugged.
- To ensure sufficient air supply, the honeycomb filter and dust filter shall be cleaned regularly.
- Please wipe the exterior parts with a soft cloth soaking a mild detergent.
- Do not use any abrasive detergent or solvents to avoid scratching the surface.
Do not use any of the following as a cleaner: gasoline, thinner. - Do not allow water or any other liquid into the motor housing or interior parts.
CLEANING
1. Be sure to unplug from the electrical supply source before cleaning.
2. Plastic parts should be cleaned with a soft cloth moistened with mild soap. Thoroughly remove soap film with a dry cloth.
Midea AC200-17JR 50L Air Cooler
MODEL:AC200-17JR
SAFETY INSTRUCTION
- If the supply cord is damaged, it must be replaced by manufacturer or its service agent or a similarly qualified person in order to avoid a hazard.
- Household Indoor use only.
- This appliance is not intended for use by persons (including children) with reduced physical, sensory or mental capabilities, or lack of experience and knowledge, unless they have been given supervisionor instruction concerning use of the appliance by a person responsiblefor their safety.Children should be supervised to ensure that they do not play with the appliance.
- Unplug the appliance during filling and cleaning.
- Prior to cleaning or other maintenance, the appliance must be disconnected from the supply mains.
Correct Disposal of this product
This marking indicates that this product should not be disposed with other household wastes throughout the EU. To prevent possible harm to the environment or human health from uncontrolled waste disposal, recycle it responsibly to promote the sustainable reuse of material resources. To return your used device, please use the return and collection systems or contact the retailer where the product was purchased. They can take this product for environmental safe recycling.
INSTALLATION INSTRUCTIONS
Installation of the water tank:

Foot-Wheel Installation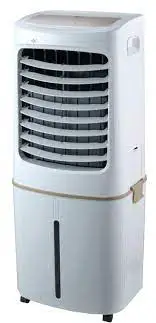
INSTRUCTIONS FOR USE
Instructions for key of remote controller
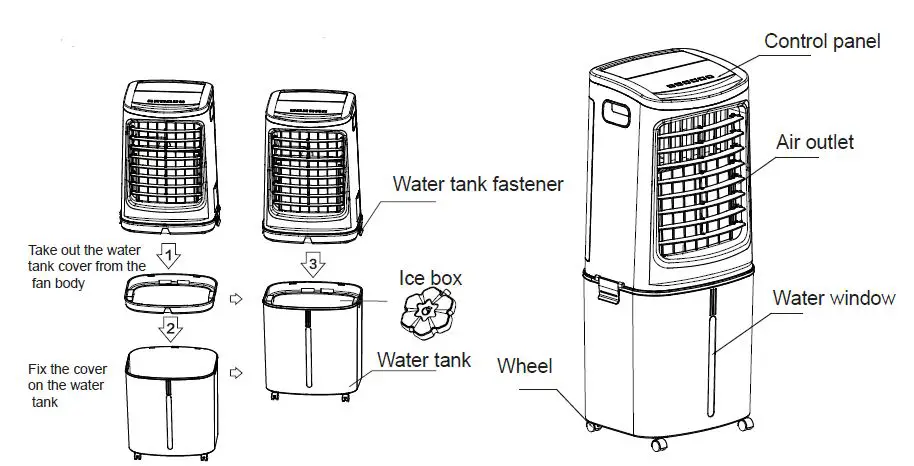 Considerate Hint:
- Effective Range of Remote Control: within 5m distance and 30- degree deflection in front of Product.
Instructions for operation of body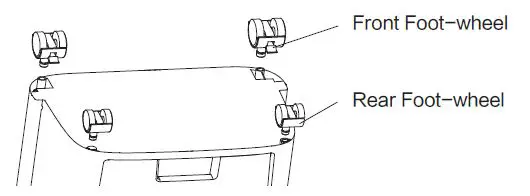 Press a key on the unit to activate a corresponding function. For instance:
- Press [OSC.] Key to activate or deactivate Swing Function. (Note: Manual horizontal blade allows tilting flow direction.)
- Press [SPEED] Key to adjust 3 speeds of air flow.
- Press [STYLE] Key to switch between Normal, Natural and Sleep Functions.
- Press [TIMER] Key to set 1-12 hour timer setting.
- When [EVA./COOLER] Key is pressed, the indicator lights
up constantly if the operation is normal; when the indicator flashes, it denotes a water shortage, please add water immediately.
Please Note:
Push Buttons on the unit may differ based on the actual product model.
ADD WATER
Add water from top: Rotate water tank’s top cover, fill in water.
Add water from side: Rotate water tank’s side cover, fill in water. Considerate Hint:
- When humidifying, water level in the Water Tank must remain under MAX indication; replenish water if level gets lower than MIN indication.
- The water level in the tank is below minimum scale marked on water display window, don’t use the humidification function.
- When the tank water level is lower than the minimum scale, the unit shall make 3 seconds buzzing warnings sound, then the water pump stop running, this time need add water to run humidification function.
- When the tank water level exceed the maximum, the unit shall make 10 seconds buzzing warnings sound, to prevent the water in a water flooded lead to overflow
TROUBLESHOOTING
In case the product cannot be operated normally after installation, checks shall be made for items described bellow:
- Power cable unplugged or faulty contact.
- Honeycomb filter assembly not properly installed.
- Power Switch on the back of product or in the display panel not switched on.
If product remains dysfunctional after checking, a local dealer shall be sought for assistance.
MAINTENANCE
- Make sure power supply is disconnected before cleaning the product.
- Never clean the product with any abrasive tool or solvent. Clean with detergent and wipe dry with cloth immediately.
- Never wash the unit in water. For cleaning, remove components (water tank, honeycomb filter, etc.) and clean them with water and soft brush. Allow them to air-dry before re-assembling.
- Never dismantle the product or attempt to make any modification. Regular check and cleaning of the product is recommended for prolonging its lifespan.
View Fullscreen
Instruction Manual
Model Code: MDWCSS MDWCW 12 place settings 6 Wash Programs Push Button Controls
Service Call: 1800 886 010
Quick Operation Guide
For detailed operating guide, read corresponding contents in the Instruction Manual.
Switch on the appliance
Open the door, press the On/Off button to switch on the appliance.
Use tablet or liquid fill the detergent dispenser
Compartment A: For each washing cycle.
Compartment B: For programs with pre-wash only. (Follow the user instructions)
Check the rinse aid level
Mechanical indicator C. Electric indicator on control panel (if provided).
Load the baskets Select a program
Scrape off any large food particles. Soften remnants of burnt food in pans, after then load the baskets. Refer to the dishwasher loading instructions.
Close the door, and Press Wash Program button to select a desired program. ( See the section entitled Operating Instructions)
Run the dishwasher
Turn the water tap and press the Start/Pause button. The machine will start working after about 10 seconds.
Change the program
Add forgotten dishes in the dishwasher.
1. A running cycle can only be modified if it has been running for a short time. Otherwise the detergent may have already been released and the water already drained. If this is the case, the detergent dispenser must be refilled.
2. Press the Start/Pause button, then press the program button more than 3 seconds to cancel the running
program.
3. Select a new program.
4. Restart the dishwasher.
1. Press the Start/Pause button to stop the machine. 2. Open the door. 3. Add the forgotten dishes. 4. Close the door, then press the Start/Pause button, the dishwasher will
start running again after 10 seconds.
WARNING!
Open the door carefully. Hot steam may escape when the door is opened!
If the appliance is switched off during a washing cycle.
If the appliance is switched off during a washing cycle, when switched on again, please re-select the washing cycle and operate the dishwasher according to the original power-on state).
Switch off the appliance
When the working cycle is finished, the buzzer of the dishwasher will sound 8 times, after then stop. Turn off the appliance using the On/Off button. If the appliance is under standby mode, it will power off
automatically after 30 minutes without any operation.
Turn off the water tap, unload the baskets
Warning: Wait about 15 minutes before unloading the dishwasher to avoid scald, as the dishes and utensils are still hot and more susceptible to break.
They could also be dried better. Unload the appliance, starting from the lower basket.
Read this Manual
Dear Customer, This appliance is intended for use in the home environment and for washing domestic dishes. – Staff kitchen areas in shops, offices and other working
environments; – Farm houses; – By clients in hotels, motels and other residential type
environments; – Bed and breakfast type environments.
Please carefully read this Manual before using the dishwasher, it will help you to use and maintain the dishwasher properly. Keep it for reference in future. Pass it on to any subsequent owner of the appliance. This Manual contains sections on Safety Instructions, Operating Instructions, Installation Instructions Troubleshooting Tips, etc.
Before Calling for Service
Reviewing the Troubleshooting Tips will help you to solve some common problems by yourself. If you can not solve the problems by yourself, please ask for help from the professional technicians.
NOTE:
The manufacturer, following a policy of constant development and updating of the product, may make modifications without giving a prior notice.
1) Safety Information……………………………………………. 1
2) Operating Instructions……………………………………… 2 Control Panel ……………………………………………………. 2 Dishwasher Features …………………………………………. 2
3) Prior Using for the First Time …………………………… 3 A. Rinse Aid Dispenser ………………………………………. 3 B. Detergent……………………………………………………… 3
4) Loading the Dishwasher Basket. ………………………. 6 Attention before or after Loading the Dishwasher Baskets ………………………………………….. 6 The Method of Loading Normal Dishware …………….. 7
5) Starting a Washing Program …………………………….. 8 Washing Cycle Table………………………………………….. 8 Turning on the Appliance ……………………………………. 8 Changing the Program……………………………………….. 8 At the End of the Washing Cycle …………………………. 9
6) Maintenance and Cleaning ……………………………… 10 Filtering System ………………………………………………. 10 Caring for the Dishwasher ………………………………… 11
7) Installation Instructions………………………………….. 12 Positioning the Appliance………………………………….. 12 About Power Connection ………………………………….. 12 Water Connection ……………………………………………. 13 Starting the Dishwasher……………………………………. 14
8) Troubleshooting Tips……………………………………… 15 Before Calling for Service …………………………………. 15 Error Codes…………………………………………………….. 16 Technical Information ……………………………………….. 17
Loading the baskets according to (*AS/NZS 2007.1)
IMPORTANT SAFETY INFORMATION READ ALL OF THE INSTRUCTIONS BEFORE USING
WARNING! When using your dishwasher, follow the precautions listed below:
GROUNDING INSTRUCTIONS
This appliance must be grounded. In the event of a malfunction or breakdown, grounding will reduce the risk of an electric shock by providing a path of least resistance of electric current. This appliance is equipped with a cord having an equipmentgrounding conductor and a grounding plug. The plug must be plugged into an appropriate outlet that is installed and grounded in accordance with all local codes and ordinances.
WARNING!
Improper connection of the equipment-grounding conductor can result in the risk of an electric shock. Check with a qualified electrician or service representative if you are in doubt whether the appliance is properly grounded. Do not modify the plug provided with the appliance. If it does not fit the out let, have a proper outlet installed by a qualified electrician.
WARNING! PROPER USE
Do not abuse, sit on, or stand on the door or dish rack of the dishwasher. Do not touch the heating element during or immediately after use. (This instruction is only applicable to machines with a visual heating element.) Do not operate your dishwasher unless all enclosure panels are properly in place. Open the door very carefully, because if the dishwasher is operating, there will be a risk of water squirting out. Do not place any heavy objects on or stand on the door when it is open. The appliance could tip forward. When loading items to be washed: 1) Locate sharp items so that they are not likely to
damage the door seal; 2) Warning: Knives and other utensils with sharp
points must be loaded in the basket with their points down or placed in a horizontal position. When using your dishwasher, you should prevent plastic items from coming into contacting with the heating element. (This instruction is only applicable to machines with a visual heating element.) Check that the detergent compartment is empty after completion of the washing cycle. Do not wash plastic items unless they are marked with dishwasher safe or the equivalent. For plastic items not so marked, check the manufacturer’s recommendations. Use only detergent and rinsing additives designed for an automatic dishwasher. Never use soap, laundry detergent, or hand washing detergent in your dishwasher. Keep these products out of the reach of children.
Keep children away from detergent and rinse aid, keep children away from the open door of the dishwasher, there could still be some detergent left inside. This appliance is not intended for use by persons (including children) with reduced physical, sensory or mental capabilities, or lacking experience and knowledge, unless they have been given supervision or instruction concerning use of the appliance by a person responsible for their safety. Children should be supervised to ensure that they do not play with the appliance. Dishwasher detergents are strongly alkaline, they can be extremely dangerous if swallowed. Avoid contacting with skin and eyes and keep children away from the dishwasher when the door is open. The door should not be left open, since this could increase the risk of tripping. If the supply cord is damaged, it must be replaced by the manufacturer or its service agent or a similarly qualified person in order to avoid a hazard. Remove the door to the washing compartment when removing an old dishwasher from service or discarding it. Please dispose of packing materials properly. Use the dishwasher only for its intended function. During installation, the power supply must not be excessively or dangerously bent or flattened. Do not tamper with controls. The appliance is to be connected to the water mains using new hose sets and the old hose-sets should not be reused. The maximum number of place settings to be washed is 12. The maximum permissible inlet water pressure is 1 Mpa. The minimum permissible inlet water pressure is 0.04Mpa.
READ AND FOLLOW THIS SAFETY INFORMATION CAREFULLY KEEP THESE INSTRUCTIONS
1
2. Operating Instructions
MPORTANT To get the best performance from your dishwasher, read all operating instructions before using it for
the first time.
Control Panel
1. On/Off button and indicator: To turn on/off the power supply;
2. Rinse aid indicator: Indicates when the dispenser needs to be refilled; Program end indicator:
Indicates when the program ends; Water faucet indicator: Indicates when the water faucet is closed; 3. Display screen: Shows the reminding time, delay time, error code, etc; 4. Delay button: Press the button to add delay time; 5. Extra drying function select button: To select extra drying function. (This function only is used with programs Intensive, Heavy, Eco, Glass and 90min.)
6. Program buttons and indicators: To select a program; Intensive program: Heavy program: ECO program: 90 min program: Glass program: Rapid program:
7. Start/Pause button: To start the selected washing program or pause it when the dishwasher is working.
Dishwasher Features
Front View
Back View
Upper basket Inner pipe Lower basket
Dispenser Cup shelf Spray arms
Filter assembly Inlet pipe connector Drain pipe
2
3. Prior to Using for the First Time
Before using your dishwasher for the first time: A. Fill the rinse aid dispenser B. Add the detergent
A. Rinse Aid Dispenser
Rinse Aid Dispenser
The rinse aid is released during the final rinse to prevent water from forming droplets on your dishes, which can leave spots and streaks. It also improves drying by allowing water to roll off the dishes. Your dishwasher is designed to use liquid rinse aids. The rinse aid dispenser is located inside the door next to the detergent dispenser.
To fill the dispenser, open the cap and pour the rinse aid into the dispenser until the level indicator turns completely black. The volume of the rinse aid container is about 110ml.
Function of Rinse Aid
Rinse aid is automatically added during the last rinse, ensuring thorough rinsing, and spot and streak free drying.
Attention!
Only use branded rinse aid for dishwasher. Never fill the rinse aid dispenser with any other substances (e.g. dishwasher cleaning agent, liquid detergent). This would damage the appliance.
When to Refill the Rinse Aid Dispenser
If there is no rinse aid warning light in the control panel, you can judge the amount of rinse aid by the color of the optical level indicator “C” located next to the cap. When the rinse aid container is full, the whole indicator will be dark. As the rinse aid diminishes, the size of the dark dot decreases. You should never let the rinse aid get below 1 / 4 full.
As the rinse aid diminishes, the size of the black dot on the rinse aid level indicator changes, as illustrated below.
Full 3 / 4 full 1 / 2 full 1 / 4 full – Should refill to eliminate spotting Empty
C (Rinse aid indicator)
How to Fill the Rinse Aid Dispenser
1 Open the dispenser, turn the cap to the “open” (left) arrow and lift it out. 2 Pour the rinse aid into the dispenser, and be careful not to overfill. 3 Replace the cap by inserting it aligned with “open” arrow and turning it to the closed (right) arrow.
Be careful not to overfill the dispenser, because this could cause over sudsing. Wipe away any spills with a damp cloth. Don’t forget to replace the cap before you close dishwasher door.
Attention! Clean up any rinse aid spilled during filling with an absorbent cloth to avoid excess foaming during the next wash.
3
NOTE: Clean up any rinse aid spilled during filling with an absorbent cloth to avoid excessive foaming during the next
wash. Don’t forget to replace the cap before you close dishwasher door.
Adjusting Rinse Aid Dispenser
Adjust lever (Rinse)
Adjust lever (Rinse). The rinse aid dispenser has six or four settings. Always start with the dispenser set on “4”. If spots and poor drying are a problem, increase the amount of rinse aid dispensed by removing the dispenser lid and rotating the dial to “5”. If the dishes still are not dried properly or show spots, adjust the dial to the next higher lever until your dishes are spot-free. The recommended setting is “4”. (Factory value is “4”.)
NOTE:
Increase the dose if there are drops of water or lime spots on the dishes after washing. Reduce it if there are sticky whitish stains on your dishes or a bluish film on glassware or knife blades.
B. Detergent
Detergents have chemical ingredients that are necessary to remove dirt, crush dirt and transport it out of the dishwasher. Most of the commercial quality detergents are suitable for this purpose.
Detergent
There are 3 sorts of detergents 1. With phosphate and with chlorine 2. With phosphate and without chlorine 3. Without phosphate and without chlorine
Normally new pulverized detergent is without phosphate. Thus the water softener function of phosphate is not given. If detergents without phosphate are used in the case of hard water, often white spots appear on dishes and glasses. In this case, please add more detergent to reach better results. Detergents without chlorine do only bleach a little. Strong and coloured spots will not be removed completely. In this case, please choose a program with a higher temperature.
Concentrated Detergent
Based on their chemical composition, detergents can be split in two basic types: Conventional, alkaline detergents with caustic components Low alkaline concentrated detergents with natural enzymes
The use of normal washing program in combination with concentrated detergents reduces pollution and is good for your dishes; The washing program is specifically matched to the dirt-dissolving properties of the enzymes of the concentrated detergent. For this reason, an normal washing program in which concentrated detergents are used can achieve the same results that can otherwise only be achieved using an intensive program.
Detergent Tablet
Detergent tablets of different brands dissolve at different speeds. For this reason, some detergent tablets cannot dissolve and develop their full cleaning power during short programs. Therefore please use long programs when using detergent tablets, to ensure the complete removal of detergent residuals.
Detergent Dispenser
The dispenser must be refilled before the start of each washing cycle following the instructions provided in the Washing Cycle Table . Your dishwasher uses less detergent and rinse aid than conventional dishwasher. Generally, only one tablespoon of detergent is needed for a normal wash load. More heavily soiled items need more detergent. Always add the detergent just before starting the dishwasher, otherwise it could get damp and will not dissolve properly.
4
Proper Use of Detergent
Use only detergent specifically made for the use in dishwashers. Keep your detergent fresh and dry. Don’t put powdered detergent into the dispenser until you’re ready to wash dishes.
Adding Detergent into Dispenser
Push latch to open
Add the Detergent
Fill the detergent dispenser with detergent. The marking indicates the dosing level, as illustrated on the right:
For main wash detergent. For pre-wash detergent.
Please observe the manufacturers dosing and storage recommendations as stated on the detergent packaging.
Close the lid and press until it is locked in place.
If the dishes are heavily soiled, place an additional detergent dose in the pre-wash detergent chamber. This detergent will take effect during the pre-wash phase.
NOTE:
If the lid is closed, push the latch to open. Always add the detergent just before starting each washing cycle. Only use branded detergent and rinse aid for dishwasher. You see information about the amount of detergent for the single program on page 8. Please be aware that soiling levels and water hardness can effect wash results. Please observe the manufacturer’s recommendations on the detergent packaging.
WARNING! Dishwasher detergent is corrosive! Take care to keep it out of reach of children.
5
4. Loading the Dishwasher Baskets
Recommendation
Consider buying utensils which are identified as dishwasher-proof. Use a mild detergent that is described as ‘kind to dishes’. If necessary, seek further information from the detergent manufacturers. For particular items, select a program with as low temperature as possible. To prevent damage, do not take glass and cutlery out of the dishwasher immediately after the program has ended.
Suitability of Use in the Dishwasher
Not suitable for use
Cutlery with wooden, horn china or mother-of-pearl handles. Plastic items that are not heat resistant. Older cutlery with glued parts that are not temperature resistant. Bonded cutlery items or dishes. Pewter or cooper items. Crystal glass. Steel items subject to rusting. Wooden platters. Items made from synthetic fibres.
Limited suitability
Some types of glasses can become dull after a large number of washes. Silver and aluminum parts have a tendency to discolour during washing. Glazed patterns may fade if washed by machines frequently.
Attention before or after Loading the Dishwasher Baskets
(For the best performance of the dishwasher, follow these loading guidelines. Features and appearance of baskets and cutlery baskets may vary from model to model.)
Scrape off any large food particles. Soften remnants of burnt food in pans. It is not necessary to rinse the dishes under running water. Place objects in the dishwasher in the following way: 1. Items such as cups, glasses, pots/pans, etc. are placed face downwards. 2. Curved items, or ones with recesses, should be loaded aslant so that water can run off. 3. All utensils are stacked securely and can not tip over. 4. All utensils are placed in the way that the spray arms can rotate freely during washing.
NOTE: Very small items should not be washed in the dishwasher as they could easily fall out of the basket.
Load hollow items such as cups, glasses, pans, etc. with the opening downwards, so that water can’t be collected in the container or a deep base. Dishes and items of cutlery must not lie inside one another, or cover each other. To avoid damage to glasses, they must not be touched with each other. Load large items which are the most difficult to clean into the lower basket. The upper basket is designed to hold more delicate and lighter dishware such as glasses, coffee and tea cups. Long bladed knives stored in an upright position are a potential hazard! Long and/or sharp items of cutlery such as carving knives must be positioned horizontally in the upper basket. Please do not overload your dishwasher, which is important for good results and for reasonable consumption of energy.
Removing the Dishes
To prevent water dripping from the upper basket into the lower basket, we recommend that you empty the lower basket first and then the upper basket.
6
The Method of Loading Normal Dishware
Loading the Upper Basket
Loading the Lower Basket
The upper basket is designed to hold more delicate and lighter dishware such as glasses, coffee and tea cups and saucers, as well as plates, small bowls and shallow pans (as long as they are not too dirty). Position the dishes and cookware so that they will not get moved by the spray of water.
We suggest that you place large items and the most difficult to clean items into the lower basket: such as, pots, pans, lids, serving dishes and bowls, as shown in the figure below. It is preferable to place serving dishes and lids on the side of the racks in order to avoid blocking the rotation of the top spray arm.
Please be reminded that: Pots, serving bowls, etc, must always be placed top down. Deep pots should be slanted to allow water to flow out. The bottom basket features folding spikes so that larger or more pots and pans can be loaded.
Adjusting the Upper Basket
The height of the upper basket can be adjusted in order to create more space for large utensils both for the upper /lower basket. The height of the upper basket can be adjusted by placing the wheels on different height of the rails. Long items, serving cutlery, salad servers and knives should be placed on the shelf so that they do not obstruct the rotation of the spray arms.
Lower position
Upper position
Folding back the Cup Shelves
For better stacking of pots and pans, the spikes can be folded down as shown in the picture right.
Folding Spikes of Lower Basket
For better stacking of pots and pans, the spikes can be folded down as shown in the picture right.
Wheels
Cutlery Basket
Cutlery should be placed in the cutlery basket with the handles at the bottom. If the rack has side baskets, the spoons should be loaded separately into the appropriate slots, especially long utensils should be placed in the horizontal position at the front of the upper basket as shown in the picture.
WARNING! Do not let any item extend through the bottom. Always load sharp utensils with the sharp point down!
For personal safety and a top quality cleaning, place the silverware in the basket making sure that:
They do not rest together. Silverware is placed with the handles-down. But knives and other potentially dangerous utensils are placed with the handles-up.
7
5. Starting a Washing Program
Washing Cycle Table
NOTE: ( ) Means: need to fill rinse aid into the Rinse-Aid Dispenser.
Program
Cycle Selection Information
Description of Cycle
Intensive
For the heaviest soiled loads, such as pots, pans, casserole dishes and dishes that have been sitting with dried food on them for a while.
Prewash (50°C) Wash (60°C) Rinse Rinse Rinse (65°C) Drying
Heavy
For heavily soiled loads, such as pots, plates, glasses and lightly soiled pans.
Prewash (45°C) Wash (55°C) Rinse Rinse (65°C) Drying
For normally soiled loads, such
as pots, plates, glasses and
(*AS/NZS 2007.1) lightly soiled pans, standard daily cycle.
Glass
For lightly soiled loads, such as glasses, crystal and fine china.
90 min For lightly soiled crockery and glass.
Prewash Wash (45°C) Rinse (50°C) Drying
Prewash Wash (42°C) Rinse Rinse (60°C) Dry Wash (65°C) Rinse Rinse (65°C) Drying
Rapid
A shorter wash for lightly soiled loads that do not need drying.
Wash (40°C) Rinse Rinse (45°C)
Detergent Running Energy Pre/Main Time (min) (Kwh)
5/25g
170
1.6
5/25g
160
1.4
5/25g
170
0.71
5/25g
125
0.9
30g
90
1.2
25g
30
0.6
Water (L)
Rinse Aid
18.5
15 10.2 14.5 11.5 11.5
NOTE:
*AS/NZS 2007.1 : This program is the test cycle. The information for comparability test in accordance with AS/NZS 2007.1, is as follows: Capacity: 12 setting Upper basket position: upper wheels on rails Rinse aid setting: 6 Open the door slightly 50mm to assist in drying of the dishes after every wash
Turning on the Appliance
Starting a cycle wash
Draw out the lower and upper baskets, load the dishes and push them back. It is recommended to load the lower basket first, then the upper one (see the section entitled Loading the Dishwasher Basket). Pour in the detergent (see the section entitled Detergent and Rinse Aid ). Insert the plug into the socket. The power supply is 220-240 VAC /50 HZ, the specification of the socket is 10A 250VAC. Make sure that the water supply is turned on to full pressure. Close the door, press the On/Off button to switch on the machine. Turn the program selector, the washing program will be changed as the following direction: Intensive->Heavy->Eco->Glass->90min->Rapid If a program is selected, the responding light will be on. Then press the Start/Pause button, the dishwasher starts.
8
Changing the Program
Premise: A cycle that is underway can only be modified if it has only been running for a short time. Otherwise, the detergent may have already been released, and the appliance may have already drained the wash water. In this case, the detergent dispenser must be refilled (see the section entitled “Detergent”).
Press the Start/Pause button for more than 3s to stop washing, the machine will be in a standby state, and then you can change the program to the desired cycle setting (see the section entitled “Starting a Wash Program”)
NOTE:
If you open the door during a washing cycle, the machine will pause. The program light will stop blinking and the buzzer will beep every minute unless you close the door. After you close the door, the machine will keep on working after 10 seconds
Forgetting to Add a Dish
A forgotten dish can be added any time before the detergent cup opens.
Press the Start/Pause button to stop the washing.
Add forgotten dishes.
Open the door a little.
Close the door.
After the spray arms stop working, you can open the door completely.
Press the Start/Pause button, the dishwasher will run after 10 seconds.
At the End of the Washing Cycle
When the working cycle has finished, the buzzer of the dishwasher will sound for 8 seconds, then stop. Turn off the appliance using the ON/OFF button, shut off the water supply and open the door of the dishwasher. Wait for a few minutes before unloading the dishwasher to avoid scalding. The dishes and utensils are still hot and more susceptible to breakage. They will also be dried better.
Switch off the Dishwasher The LED screen is on but the colon icon is not blinking, and only in this case the program has ended. 1. Switch off the dishwasher by pressing the ON/OFF button. 2. Turn off the water tap.
Open the Door Carefully. Hot dishes are sensitive to knocks. The dishes should be allowed to cool down around 15 minutes before removed from the appliance. Open the dishwasher’s door, leave it ajar and wait a few minutes before removing the dishes. In this way they will be cooler and the drying will be improved.
Unload the Dishwasher It is normal that the dishwasher is wet inside. Empty the lower basket first and then the upper one. This will avoid water dripping from the upper basket on to the dishes in the lower one.
WARNING! It is dangerous to open the door when washing, because the hot water may scald you.
9
6. Maintenance and Cleaning
Filtering System
The filter prevents larger remnants of food or other objects from getting inside the pump. The residues may block the filter. In this case they must be removed.
The filter system consists of a coarse filter, a flat filter (main filter) and a micro filter (fine filter).
Main filter
Food and soil particles trapped in this filter are pulverized by a special jet on the lower spray arm and washed down to drain.
Coarse filter
Larger items, such as pieces of bones or glass, which could block the drain, are trapped in the coarse filter. To remove the items caught in this filter, gently squeeze the tap on the top of this filter and lift it out.
Fine filter
This filter holds soil and food residues in the sump area and prevents them from being redeposited on the dishes during washing cycle.
Filter Assembly
The filter efficiently removes food particles from the wash water, allowing it to be recycled during the cycle. For best performance and results, the filter must be cleaned regularly. For this reason, it is a good idea to remove the larger food particles trapped in the filter after each washing cycle by rinsing the semicircular filter and cup under running water. To remove the filter device, pull the cup handle in a upward direction.
WARNING!
The dishwasher must never be used without the filters. Improper replacement of the filter may reduce the performance level of the appliance and damage dishes and utensils.
Open
Step 1 Turn the filter in anti-clockwise direction.
Step 2 Lift the filter assembly up.
NOTE: When following this procedure from Step 1 to Step 2, the filter system will be removed; When following from Step 2 to Step 1, the filter system will be installed. 10
Notes:
– Inspect the filters for blocking after every time the dishwasher has been used. – By unscrewing the coarse filter, you can remove the filter system. Remove any food remnants and clean the filters under
running water.
NOTE: The entire filter assembly should be cleaned once a week.
Cleaning the Filter
To clean the coarse filter and the fine filter, use a cleaning brush. Reassemble the filter parts as shown in the figures on the last page and reinsert the entire assembly in the dishwasher, positioning it in its seat and pressing downwards.
WARNING!
When cleaning the filters, don’t knock on them. Otherwise, the filters could be contorted and the performance of the dishwasher could be decreased.
Caring for the Dishwasher
The control panel can be cleaned by using a lightly dampened cloth. After cleaning, make sure to dry it thoroughly.
For the exterior, use a good appliance polish wax. Never use sharp objects, scouring pads or harsh cleaners on any part of the dishwasher.
Cleaning the Door
To clean the edge around the door, you should use only a soft warm, damp cloth. To avoid penetration of water into the door lock and electrical components, do not use a spray cleaner of any kind.
WARNING!
Never use a spray cleaner to clean the door panel as it may damage the door lock and electrical components. Abrasive agents or some paper towels should not be used because of the risk of scratching or leaving spots on the stainless steel surface.
Protect against Freezing
Please take frost protection measures on the dishwasher in winter. Every time after washing cycles, please operate as follows 1. Cut off the electrical power to the dishwasher. 2. Turn off the water supply and disconnect the water inlet pipe from the water valve. 3. Drain the water from the inlet pipe and water valve. (Use a pan to gather the water) 4. Reconnect the water inlet pipe to the water valve. 5. Remove the filter at the bottom of the tub and use a sponge to soak up water in the sump.
NOTE: If your dishwasher cannot work because of the ice, please contact professional service personnel.
Cleaning the Spray Arms
It is necessary to clean the spray arms regularly for hard water chemicals will clog the spray arm jets and bearings.
To remove the upper spray arm, hold the nut, rotate the arm clockwise to remove it.
To remove the lower spray arm, pull out the spray arm upward.
Wash the arms in soapy and warm water and use a soft brush to clean the jets. Replace them after rinsing them thoroughly.
11
How to Keep Your Dishwasher in Shape
After Every Wash
After every wash, turn off the water supply to the appliance and leave the door slightly open so that moisture and odours are not trapped inside.
Removing the Plug
Before cleaning or performing maintenance, always remove the plug from the socket.
No Solvents or Abrasive Cleaning
To clean the exterior and rubber parts of the dishwasher, do not use solvents or abrasive cleaning products. Only use a cloth with warm soapy water. To remove spots or stains from the surface of the interior, use a cloth dampened with water and a little vinegar, or a cleaning product made specifically for dishwashers.
When Not in Use for a Long Time
It is recommend that you run a washing cycle with the dishwasher empty and then remove the plug from the socket, turn off the water supply and leave the door of the appliance slightly open. This will help the door seals last longer and prevent odours forming within the appliance.
Moving the Appliance
If the appliance must be moved, try to keep it in the vertical position. If absolutely necessary, it can be positioned on its back.
Seals
One of the factors that cause odours to form in the dishwasher is food that remains trapped in the seals. Periodic cleaning with a damp sponge will prevent it.
Installation Instructions
Positioning the Appliance
Position the appliance in the desired location. The back should rest against the wall behind it, and the sides, along the adjacent cabinets or walls. The dishwasher is equipped with water supply and drain hoses that can be positioned to either the right or the left side to facilitate proper installation.
Levelling the Appliance
Once the appliance is positioned for levelling, the height of the dishwasher may be altered via adjustment of the screwing level of the feet.
About Power Connection
WARNING!
For personal safety: DO NOT USE AN EXTENSION CORD OR AN ADAPTER PLUG WITH THIS APPLIANCE. DO NOT, UNDER ANY CIRCUMSTANCES, CUT OR REMOVE THE GROUNDING CONNECTION FROM THE POWER CORD.
Electrical Requirements
Please look at the rating label to know the rating voltage and connect the dishwasher to the appropriate power supply. Use the required fuse 10 amp, time delay fuse or circuit breaker recommended and provide separate circuit serving only this appliance.
Electrical Connection
Insure proper grounding before use
Ensure the voltage and frequency of the power being correspond to those on the rating plate. Only insert the plug into an electrical socket which is grounded properly. If the electrical socket to which the appliance must be connected is not appropriate for the plug, replace the socket, rather than using adapters or the like as they could cause overheating and burns.
GROUNDING INSTRUCTIONS
This appliance must be grounded. In the event of a malfunction or breakdown, grounding will reduce the risk of electric shock by providing a path of least resistance for the electric current. This appliance is equipped with a cord having an equipment-grounding conductor and an grounding plug. The plug must be plugged into an appropriate outlet that is installed and grounded in accordance with all local standards and requirements.
12
WARNING!
Improper connection of the equipment grounding conductors can result in the risk of an electric shock.
Check with a qualified electrician or service representative if you are in doubt whether the appliance is properly grounded.
Do not modify the plug provided with the appliance. If the plug does not fit properly to the outlet, please have a qualified electrician to install a proper outlet.
Water Connection
Cold Water Connection
Connect the cold water supply hose to a threaded 3/4 (inch) connector and make sure that it is fastened tightly in place. If the water pipes are new or have not been used for an extended period of time, let the water run to make sure that the water is clear. This precaution is needed to avoid the risk of the water inlet being blocked and damaging the appliance.
WARNING! Please close the hydrant after using.
Drain Hose Connection
Insert the drain hose into a drain pipe with a minimum diameter of 40mm, or let it run into the sink, making sure it will not be bent or crimped. The top of the hose must be less than 1000mm.
PLEASE HANG UP THE DRAIN HOSE IN EITHER WAY OF A, B
Front
NOTE The top of the hose must be less than 1000mm.
Drain Pipe
40mm
MAX 1000mm
Counter
13
How to Drain Excess Water from Hoses
If the sink is more than 1000mm higher than the floor, the excess water in hoses cannot be drained directly into the sink. It will be necessary to drain excess water from hoses into a bowl or suitable container that is held outside and lower than the sink.
Water Outlet
Connect the water drain hose. The drain hose must be correctly fitted to avoid water leaking. Ensure that the water drain hose is not kinked or squashed.
Extension Hose
If you need a drain hose extension, make sure to use a similar drain hose. It must be no longer than 4 metres, otherwise the cleaning effect of the dishwasher could be reduced.
Syphon Connection
The waste connection must be at a height less than 1000 mm (maximum) from the bottom of the dish. The water drain hose should be fixed.
Starting the Dishwasher
The following things should be checked before starting the dishwasher. 1 The dishwasher is level and fixed properly. 2 The inlet valve is open. 3 There is a leakage at the connections of the conducts. 4 The wires are tightly connected. 5 The power is switched on. 6 The inlet and drain hoses are knotted. 7 All packing and printing materials should be taken out of the dishwasher.
Attention: After installation, please make sure to keep this Manual. The content of this Manual is very helpful to users.
14
Troubleshooting Tips
Before Calling for Service
Reviewing the charts on the following pages may save you from calling for service.
Problems
Possible Causes
Fuse blown, or the circuit breaker acted
Power supply is not turned on
What to Do
Replace fuse or reset circuit breaker. Remove any other appliances sharing the same circuit with the dishwasher.
Make sure the dishwasher is turned on and the door is closed securely. Make sure the power cord is properly plugged into the wall socket.
Technical problems
Water not pumped from dishwasher
Suds in the tub
Error code: E1; Water Check that the water supply is connected properly and the water
pressure is low
is turned on.
Door of dishwasher not properly closed.
Make sure to close the door properly and latch it.
Kink in drain hose
Check drain hose.
Filter clogged Kitchen sink clogged
Check the coarse filter (see section titled ” Cleaning the Filter “)
Check the kitchen sink to make sure it is draining well. If the problem is the kitchen sink not draining, you may need a plumber rather than a serviceman for dishwashers.
Improper detergent
Use only the special dishwasher detergent to avoid suds. If this occurred, open the dishwasher and let suds evaporate. Add 1 gallon of cold water to the tub. Close and latch the dishwasher, then select any cycle. Dishwasher will drain out the water at the first step. Open the door after draining stops and check if the suds disappear. Repeat if necessary.
General problems
Noise
Stained tub interior
White film on inside surface
There are rust stains on cutlery
Knocking noise in the wash cabinet
Rattling noise in the wash cabinet
Knocking noise in the water pipes
Spilled rinse-aid Detergent with colourant is used Hard water minerals
The affected items are not corrosion resistant.
Always wipe up rinse-aid spills immediately. Make sure that the detergent is the one without colourant.
To clean the interior, use a damp sponge with dishwasher detergent and wear rubber gloves. Never use any other cleaner than dishwasher detergent with the risk of foaming or suds.
The items should be corrosion resistant.
A spray arm is knocking against an item in a basket.
Items of crockery are loose in the wash cabinet.
Interrupt the program, and rearrange the items which are obstructing the spray arm.
Interrupt the program, and rearrange the items of crockery.
This may be caused by on-site installation or the cross-section of the piping.
This has no influence on the dishwasher function. if in doubt, contact a suitably qualified plumber.
15
Problems The dishes are not clean
Unsatisfactory washing result
Cloudiness on glassware Black or gray marks on dishes Detergent left in dispenser cups The dishes are not drying
Unsatisfactory drying result
Possible Causes
The dishes are not loaded correctly.
What to Do See notes in “Loading the Dishwasher Baskets “.
The program is not powerful enough.
Select a more intensive program. See” Washing Cycle Table “.
Not enough detergent Use more detergent, or change your detergent. is dispensed.
Items are blocking the Rearrange the items so that the sprayer can rotate freely. path of spray arms.
The filter combination is not clean or is not correctly fitted. This may cause the spray arm jets get blocked.
Clean and/or fit the filter combination correctly. Clean the spray arm jets. See “Cleaning the Spray Arms”.
Combination of soft water and too much detergent. Aluminum utensils have rubbed against dishes.
Dishes block detergent cup opens.
Improper loading
Too little rinse-aid
Use less detergent if you have soft water and select a shortest cycle to wash the glassware and to get them clean. Use a mild abrasive cleaner to eliminate those marks.
Re-loading the dishes properly.
Load the dishwasher as suggested in the instructions. Increase the amount of rinse-aid/refill the rinse-aid dispenser.
Dishes are removed too soon
Do not empty your dishwasher immediately after washing. Open the door slightly so that the steam can escape. Begin unloading the dishwasher only when the dishes are barely warm by touching. Empty the low basket first. This prevents water form dropping from dishes in the upper basket.
Wrong program has been selected
Use of cutlery with a low-quality coating
Before Calling for Service
In short program, the rinse temperature is lower. This also lowers cleaning performance. Choose a program with a long high rinse temperature.
Water drainage is more difficult with these items. Cutlery or dishes of this type are not suitable for washing in the dishwasher.
When some malfunctions occur, the appliance will display error codes to warn you:
Codes
E1 E3 E4
Meanings
Longer inlet time. Not reaching required temperature. Overflow.
Possible Causes
The faucet is not opened, water intake is restricted, or water pressure is too low. Malfunction of heating elements.
Some element of dishwasher leaks.
WARNING!
If overflow occurs, turn off the main water supply before calling a service. If there is water in the base pan because of an overfill or small leak, the water should be removed before restarting the dishwasher.
16
Technical Information
610 (with the door closed)
Height: Width: Depth: Water pressure: Power supply: Capacity:
845mm 598mm 610mm (with the door closed) 0.04-1.0MPa See rating label 12 place settings
17
18
Loading the baskets according to (*AS/NZS 2007.1) :
1. Upper basket:
1 2
3 2
1
1 3
3 1
1
2
1
1
1
2. Lower basket:
65
6
4
6
7
6
Cups
1
2 Saucers
3
Glasses
4 Dinner plates
5 Soup plates
6
Dessert dishes
7
Cutlery basket
3. Cuttery basket:
21 2 111 212
4 44 44 4 4 44 44 4
2 12 15 2 52
212 111 2 12
3 3 3 33 3 5 55 5 3 33 33 3
5 55 5
55
1 Forks 2 Soup spoons 3 Dessert spoons 4 Teaspoons
5 Knives
Information for comparability tests in accordance with (*AS/NZS 2007.1)
Capacity: 12 place settings Upper basket position: lower position Program: ECO Rinse aid setting: 6 or max Open the door slightly 50mm to assist in drying of the dishes after every wash