
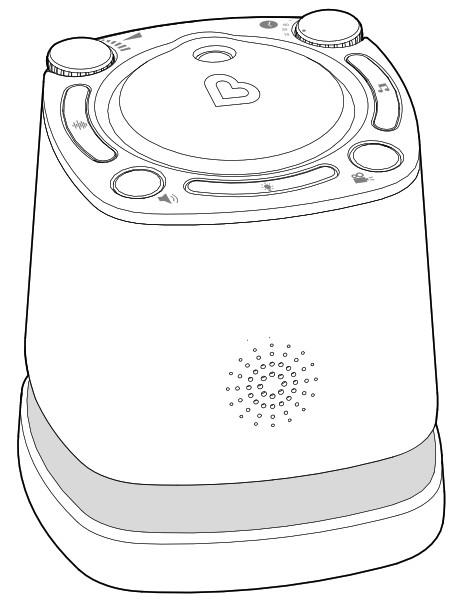
Nursery Projector & Sound System
Owner’s Guide
 KEEP FOR FUTURE REFERENCE

 WARNING:
STRANGULATION HAZARD!
Keep out of reach of children. Do not use extension cords.
WARNING: THIS IS AN
ELECTRIC LAMP – NOT A TOY!
To avoid risk of fire, burns, personal injury and electric shock it should not be played with or placed where small children can reach it.
WARNING: To reduce the risk of fire or electric shock, do not expose this apparatus to rain or moisture.
IMPORTANT SAFETY INSTRUCTIONS
When using electrical appliances, basic safety precautions should always be followed, including the following:
• Read these instructions. Keep these instructions. Heed all warnings. Follow all instructions.
• The product should be placed roughly 4 feet away from child’s ear(s).
• Do not use sound projector for more than 8 hours of continuous use per day.
• Do not use this apparatus near water.
• Clean only with dry cloth.
• Do not block any ventilation openings. Install in accordance with the manufacturer’s instructions.
• Do not install near any heat sources such as radiators, heat registers, stoves, or other apparatus (including amplifiers) that produce heat.
• Protect the power cord from being walked on or pinched particularly at plugs, convenience receptacles, and the point where they exit from the apparatus.
• Only use attachments/accessories specified by the manufacturer.
• Unplug this apparatus during lightning storms or when unused for long periods of time.
• Refer all servicing to qualified service personnel. Servicing is required when the apparatus has been damaged in any way, such as power-supply cord or plug is damaged, liquid has been spilled or objects have fallen into the apparatus, the apparatus has been exposed to rain or moisture, does not operate normally, or has been dropped.
• For use by adults for intended purpose only. Any other use is inappropriate and dangerous. Keep out of the reach of children.
• For indoor use only. Do not use outdoors.
• Appliance should be placed on a flat and stable area. Do not let the cord hang over the edge of the table or counter.
• Do not operate any appliance with a damaged cord or Power Adapter after the appliance malfunctions or has been damaged in any manner. Return appliance to Munchkin, Inc. for examination, repair, or adjustment.
• Always make sure unit is “off” before removing Power Adapter from wall outlet.
• Do not look directly at lighted lamp.
FCC WARNING
The device complies with part 15 of the FCC Rules. Operation is subject to the following two conditions: (1) This device may not cause harmful interference, and (2) This device must accept any interference received, including interference that may cause undesired operation.
WARNING: Changes or modifications to this unit not expressly approved by the party responsible for compliance could void the user’s authority to operate the equipment.
NOTE: This equipment has been tested and found to comply with the limits for a Class B digital device, pursuant to part 15 of the FCC Rules. These limits are designed to provide reasonable protection against harmful interference in a residential installation. This equipment generates, uses, and can radiate radio frequency energy and if not installed and used in accordance with the instructions, may cause harmful interference to radio communications. However, there is no guarantee that interference will not occur in a particular installation. If this equipment does cause harmful interference to radio or television reception, which can be determined by turning the equipment off and on, the user is encouraged to try to connect the interference by one or more of the following measures:
• Reorient or relocate the receiving antenna.
• Increase the separation between the equipment and receiver.
• Connect the equipment into an outlet on a circuit different from that to which the receiver is connected.
• Consult the dealer or an experienced radio/TV technician for help.
This CLASS(B) DIGITAL APPARATUS complies with CANADIAN ICES-3 (B)/NMB-3(B)

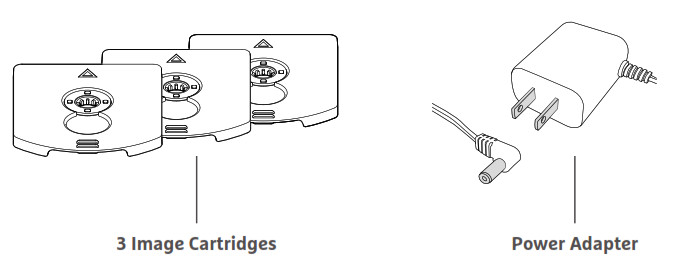
INCLUDED PARTS

TO USE NIGHTLIGHT
1. Place the unit on a flat surface away from the reach of children. 2. Attach the Power Adapter to the jack located on the unit and insert the cord into a 120V household outlet.
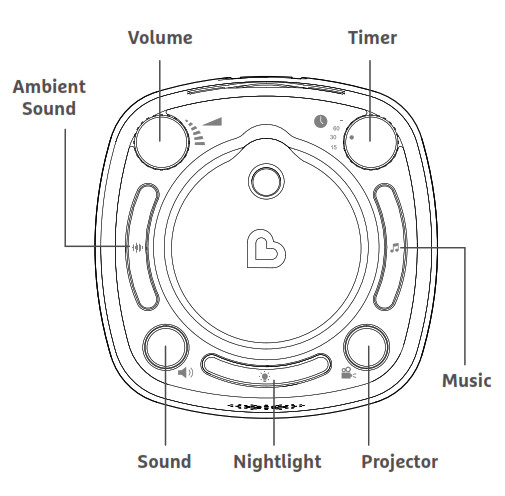
3. Press the NIGHTLIGHT button to turn on the Nightlight. The light will cycle through the full spectrum of colors.
4. Press the NIGHTLIGHT button again to make the Nightlight pause on a certain color.
NOTE: The night light button is backlit so you can easily spot it in the dark.
TO LISTEN TO SOUNDS
- Press the AMBIENT SOUND button repeatedly to select the desired ambient sound:
• Heartbeat
• White Noise
• Ocean - Press the MUSIC button repeatedly to select the desired song:
• Hush Little Baby
• Rockabye Baby
• Mozart Lullaby
• Twinkle Twinkle - To access the sound that was last played, simply press the SOUND button.
- Turn the VOLUME knob to adjust the sound to your desired volume.
- Press the SOUND button to turn off the Sounds.
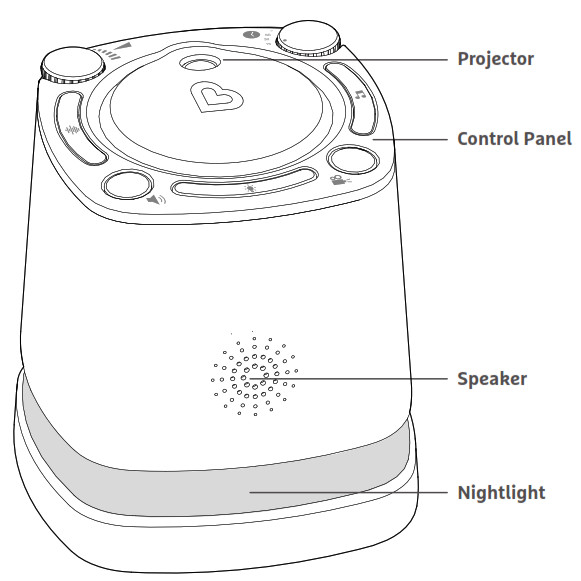
TO PROJECT IMAGES AND LOAD THE IMAGE CARTRIDGE
To load the Image Cartridge, the Projector must be turned off. To turn the projector off, press the PROJECTOR button once.
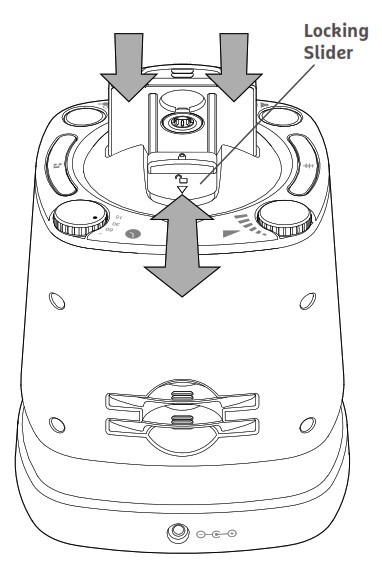
- Select the Cartridge you wish to play.
- Rotate the Projector to access the cartridge loading slot.
- Slide the Locking Slider down to load the Cartridge.
- Make sure the cartridge is inserted right side up with the arrow on the cartridge facing away from the Locking Slider.
NOTE: Cartridge may get permanently stuck if loaded into the unit incorrectly. - Once the Cartridge is loaded make sure that the Locking Slider is pushed up in a locked position or the Cartridge won’t play.
- Turn on the Projector system by pressing the PROJECTOR button.
- Rotate the angle of the Projector to project onto the wall or the ceiling.
- When finished, turn off the Projector by pressing the PROJECTOR button.
- You can conveniently store Cartridges in the compartment on the back of the unit.
NOTE: If the Cartridge you wish to play is already loaded, simply turn on the Projector by pressing the PROJECTOR button and adjust the Projector angle as needed.
TO OPERATE SOUNDS, PROJECTOR, AND NIGHTLIGHT TOGETHER
Sounds, Images, and the Nightlight can be used together or independently.
1. Press the SOUND, PROJECTOR, and NIGHTLIGHT buttons if you wish to play them together. Otherwise simply select one or more of the features.
TO SET THE AUTO-OFF TIMER
You have the option of using the Auto-Off Timer for the Sound and/or Projector.
1. Turn the TIMER knob to 15, 30 or 60 minutes.
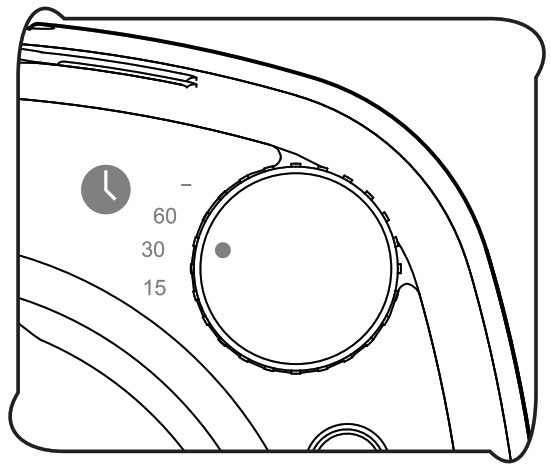 NOTE: If you do not wish to use a timer, set the TIMER knob to OFF, indicated by the – symbol.
TO CLEAN
Always unplug the unit and ensure that it is cool before cleaning. Clean only with dry cloth.
ONE-YEAR LIMITED WARRANTY
Nursery Projector & Sound System includes a one-year limited warranty against defects from the date of purchase. In the event of a malfunction or defect during the in-warranty period, Munchkin, Inc., at its option, will replace or repair the product under warranty. Upon receipt of the product and the proof of purchase with a valid date of purchase, the defective part will be immediately repaired or replaced and returned to you free of charge (USA only). Please send defective unit, proof of purchase with the original store receipt, and a description of the problem you have encountered to: Munchkin, Inc., 7835 Gloria Ave., Van Nuys, CA 91406, USA – Attn: Nursery Projector & Sound System Warranty NOTE: This warranty does not cover a defect that has been caused by abuse, negligence, alterations, environmental exposures, accident, or misuse of the product.

TECHNICAL SPECIFICATIONS
• Model Number MKNU0665
• Power Adapter, Input: 100-240VAC, 50-60Hz, 150 mA, Output 6VDC, 0.5A
• Nursery Projector and Sound System, Input: 6VDC, 0.5A
• Conforms to UL STD. 60065
• Certified to CSA STD. C22.2 No. 60065

If you have any questions or wish to provide comments about this product, feel free to contact our
Customer Satisfaction team at 1-800-344-2229 (M-TH 8:00am-5:00pm PST,
F 8:00am-1:00pm PST) or visit our website at www.munchkin.com.
munchkin.com. 800-344-2229
© 2020 MUNCHKIN, INC. 7835 GLORIA AVE., VAN NUYS, CA 91406. MUNCHKIN BABY CANADA LTD.,
3-8460 MOUNT PLEASANT WAY, MILTON, ON L9T 8W7. MADE IN CHINA / FABRIQUÉ EN CHINE.
munchkin Sleep Safety Bed Rail Owner’s Manual

IMPORTANT SAFEGUARDS
 WARNING: STRANGULATION HAZARD!
- Gaps in and around bed rails have entrapped young children and killed infants.
- NEVER use with children younger than 2 years old. Use ONLY with older children who can get in and out of adult bed without help. NEVER use in place of crib.
- NEVER use unless bed rail is tight against mattress, without gaps, and at least 9 in. from headboard and footboard. Do not fill gaps with pillows, blankets, or other items that can suffocate children.
- NEVER use on a toddler bed, bunk bed, water bed, or bed with inflatable mattress. Use ONLY on adult bed.
- Discontinue use if damaged, broken, or if parts are missing.
CHECK FOR CORRECT INSTALLATION
Once the bed rail has been installed, the anchors should be firmly against the sides of the mattress with no gaps. To check for tightness of the bed rail, place your hand between the fabric cover of the bed rail and the mattress. Your hand should fit snugly and you should feel resistance. If you do not feel resistance, further tighten the safety straps. To do so pull on the safety straps tightly and tuck remaining strap length under mattress. Do not use the bed rail unless there is a snug fit between the bedrail and the mattress. If you experience difficulty, call 1-800-344-BABY for assistance.
IMPORTANT SAFETY REMINDERS
Please complete the following steps after the bed rail has been assembled on bed:
- Make sure that the safety straps are pulled tight enough to create significant indentations where the anchors meet the mattress.
- Make sure there are no gaps or voids between the side of the mattress and bed rail frame.
- Make sure that bed rail is snug against the mattress by sliding your hand between the face of the mattress and the bed rail frame. Resistance should be felt. This should be done periodically during the use of the bed rail.
- Make sure that excess straps are NOT hanging off the bed or accessible to a child. If so, tuck straps under the mattress. Check for loose straps often and after each bed-making.
- Make sure that your child’s hands are away from the hinge area before raising or lowering the bed rail.
INCLUDED PARTS


How to Use
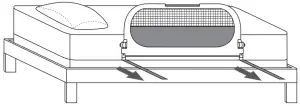
EXTENDING BED RAIL
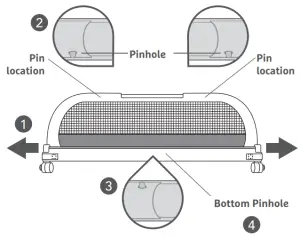
- Pull sides of bed rail frame outward using force until pins come through the pinholes under aluminum bar.
NOTE: Pins are not exposed through material bedrail cover. - You will hear a “click” when fully extended and engaged.
- Pull sides of bed rail frame outward at hinges to ensure bottom pinlock is engaged and bed rail frame is fully extended.
- Ensure all 3 pinlocks are engaged before proceeding.
ATTACHING LEGS TO BED RAIL

NOTE: Ensure the fabric is pulled down close to the hinge prior to opening the hinges.
- Press hinge buttons simultaneously and unfold hinges so that they are extended.
- Ensure hook and loop straps are fastened securely.
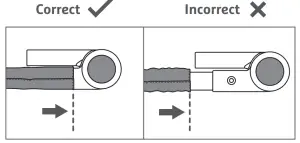
NOTE: Bottom zipper has been disabled for your protection. - Insert leg into hinge end until pin is inserted into pin hole. You will hear a “click” when it is correctly inserted. Repeat on other side.
ADJUSTING BED RAIL STRAPS
NOTE: You will need 2 people to attach the bed rail to the bed.
- Lift lever on strap clamp and extend mattress anchors until safety strap is longer than the width of the mattress.
- Lift mattress. Place safety straps on top of boxspring/platform/slats. Make sure mattress anchors extend beyond the width of the mattress.

- Position bed rail at least 9” from the headboard and footboard.

NOTE: Fits platform beds up to 4” deep.

SECURING BED RAIL TO BED
- Lay mattress on top of safety straps making sure mattress anchors are capturing mattress securely.

- Pull safety straps until mattress anchors are tight against the side of the mattress.
USING YOUR BED RAIL
Tuck away any remaining safety strap length under the mattress. Make sure straps do not hang below bed through slats if using on a platform bed frame.

Bed rail can be folded down for easy bed making. Press the hinge buttons simultaneously and fold the bedrail down on the side of the bed. To raise, press hinge buttons simultaneously and lift bed frame into locked position.

REMOVING AND STORING THE BED RAIL
To store the bed rail, remove the bed rail from the mattress. Undo the hook-and loop fasteners and slide the fabric cover up the frame to access the locking pins. Push the pins in to unlock them. Push on both ends of the bed rail frame to contract the bed rail for storage. Unlock the side locks to collapse the bedrail legs. Bed rail will now be folded flat for easy storage.
TO CLEAN
Wipe with a damp cloth. Do not bleach. Air-dry. Do not iron.
Customer Service
CONTACT US
If you have any questions or wish to provide comments about this product, feel free to contact our Customer Satisfaction team at 1-800-344-2229 (M-TH 8:00am 5:00pm PST, F 8:00am-1:00pm PST) or visit our website at www.munchkin.com.
]]>munchkin 21330 Bluetooth Enabled Baby Swing
IMPORTANT SAFEGUARDS
Important Safeguards
 WARNING: To prevent serious injury or death from infants falling or being strangled in straps:
- Always secure infant in the restraint system provided.
- Never leave infant unattended in swing.
- Discontinue use of swing when infant attempts to climb out (approximately 9 months).
- Always place swing on floor. Never use on any elevated surface
- Maximum weight 20 lbs (9 kg).
- Check this product regularly and contact Munchkin for replacement parts and instruction if needed. Never substitute parts.
- Power adapter cable: strangulation hazard! Keep cable out of reach of children.
- This product contains a Button or Coin Cell Battery. A swallowed Button or Coin Cell battery can cause internal chemical burns in as little as two hours and lead to death
- Dispose of used batteries immediately. Keep new and used batteries away from children. If you think batteries might have been swallowed or placed inside any part of the body, seek immediate medical attention.
- This product is not intended for prolonged periods of sleeping.
- Do not move or lift this product with the baby inside it.
BATTERY WARNING
In exceptional circumstances, batteries may leak fluids that can cause a chemical burn injury or ruin your product. To avoid battery leakage, follow the instruction below.
- Insert batteries in the correct polarity position (+ and -).
- Do not short circuit battery terminals.
- Remove batteries during long periods of non-use. Always remove exhausted batteries from product. Dispose batteries properly.
- Use caution when opening battery compartment as some batteries may leak, explode or catch on fire.
- Do not submerge in water or other liquids.
- Do not dispose of this product in a fire. The batteries inside may explode or leak.
- Only batteries of the same or equivalent type as recommended are to be used.
FCC WARNING
The device complies with part 15 of the FCC Rules. Operation is subject to the following two conditions: (1) This device may not cause harmful interference, and (2) This device must accept any interference received, including interference that may cause undesired operation.
WARNING: Changes or modifications to this unit not expressly approved by the party responsible for compliance could void the user’s authority to operate the equipment.
NOTE: This equipment has been tested and found to comply with the limits for a Class B digital device, pursuant to part 15 of the FCC Rules. These limits are designed to provide reasonable protection against harmful interference in a residential installation. This equipment generates, uses and can radiate radio frequency energy and if not installed and used in accordance with the instructions, may cause harmful interference to radio communications. However, there is no guarantee that interference will not occur in a particular installation. If this equipment does cause harmful interference to radio or television reception, which can be determined by turning the equipment off and on, the user is encouraged to try to connect the interference by one or more of the following measures:
- Reorient or relocate the receiving antenna.
- Increase the separation between the equipment and receiver.
- Connect the equipment into an outlet on a circuit different from that to which the receiver is connected.
- Consult the dealer or an experienced radio/TV technician for help.
This CLASS(B) DIGITAL APPARATUS complies with CANADIAN CAN ICES-3 (B)/NMB-3(B)
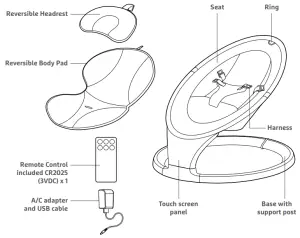
INCLUDED PARTS
Included Parts
HOW TO USE
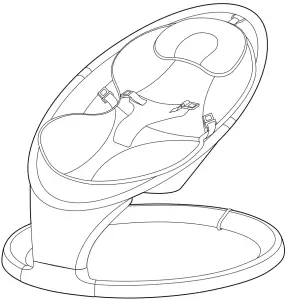
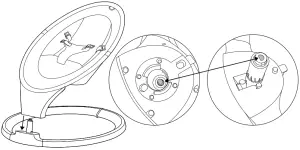
HOW TO ASSEMBLE
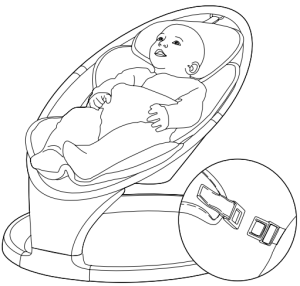
- Slide the seat’s frame onto the base support post.
IMPORTANT: The D-shaped anchor inside the seat’s frame must fit into the D-shaped port in the support post. Always ensure that the seat is locked securely onto the base before use
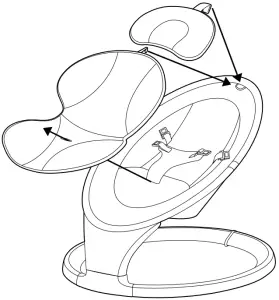
- Place the reversible body pad onto the seat, then thread the harness strap through the bottom slot of the pad.
- Pull the hook-and-loop strap at the top of the body pad through the ring. Fold the strap to secure its position.
- Place the headrest onto the seat, then pull the hook-and-loop strap through the ring. Fold to secure.
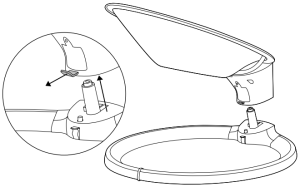
HOW TO DISASSEMBLE
- Pull the release tab out and then lift the seat from the support post.
HOW TO USE
- Raise the swing lock on the back of the base to prevent the seat from moving.
IMPORTANT: Always set the swing on a flat, stable surface. Never use the seat without safely buckling your child into the harness.
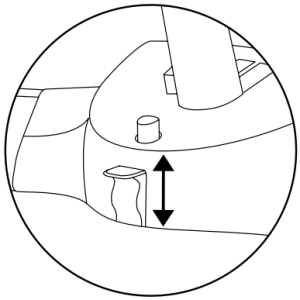
- Place the baby into the seat and then buckle the safety harness. Adjust the strap length if necessary. After the baby is secure, release the swing lock on the back of the base. Maximum weight 20 lbs (9 kg)
- Connect the power cord to the port on the back of the display panel. Then plug the cord into an electrical outlet.
NOTE: Swing does not operate off of batteries. Power cord is the only source of power.

- Touch anywhere near the center of the display panel to activate the screen.
- Control the unit’s functions with the buttons indicated below:

 |
POWER: Press to turn power ON/OFF. |
 |
SWING: Press to increase speed. After 5 levels, speed resets to zero. |
 |
TIMER: Press to set time to 8 min, 15 min, 30 min, or cancel. Unit will turn off automatically when timer finishes. |
 |
PLAY/PAUSE: Press to play built-in sounds and songs. Press again to choose next sound or song (12 total). Hold for 2 seconds to pause song. |
 |
VOLUME: Press to increase sound volume. After 5 levels, volume resets to zero |
SOUNDS:
Ocean, White noise, Rain, Heartbeat, Stream, Car ride, Birds Chirping, Fan
SONGS:
Bach, Beethoven, Mozart, Chopin
CONNECTING VIA BLUETOOTH®
The swing has a Bluetooth®-enabled speaker that can play music from a mobile device or smartphone.
Simply open your device’s Bluetooth® settings and connect to “MUNCHKIN.” The swing will chime twice when pairing is successful.
To switch back to built-in sounds, press the swing’s play/pause button.
NOTE: The swing must remain within your device’s Bluetooth® range for the connection to stay active.
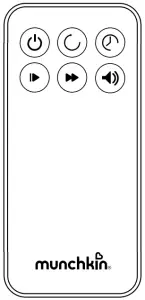
USING THE REMOTE CONTROL
The buttons on the remote control function the same way as the controls on the display panel.
 |
Power: Press to turn power ON/OFF. |
 |
Swing: Press to increase speed. After 5 levels, speed resets to zero. |
 |
Timer: Press to set time to 8 min, 15 min, 30 min, or cancel. Unit will turn off automatically when timer finishes. |
 |
Play/Pause: Press to play built-in sounds and songs. Press again to pause song. |
 |
Next: Press to move to the next sound of song (12 total). |
 |
Volume: Press to increase sound volume. After 5 levels, volume resets to zero. |
HOW TO REPLACE REMOTE CONTROL BATTERY
- Unscrew the battery compartment door using a Phillips-head screwdriver.
- Insert a new CR2025 battery. Ensure correct polarity as indicated in battery compartment.
- Close the compartment door and tighten screw. Do not overtighten.
HOW TO CLEAN
Washing the body pad and headrest: Machine wash cold, tumble dry warm.
Cleaning the seat fabric and swing: Wipe with a clean, damp cloth. Do not bleach. Air Dry.
ONE-YEAR LIMITED WARRANTY
Munchkin’s Swing includes a 1-year limited warranty against defects from the date of purchase. In the event of a malfunction or defect during the in-warranty period, Munchkin, Inc. at its option, will replace or repair the product under warranty. Upon receipt of the product and proof of purchase with a valid date of purchase, the defective part will be immediately repaired or replaced and returned to you free of charge (USA only). Please send defective unit, proof of purchase and a description of the problem you have encountered to:
Munchkin, Inc.
7835 Gloria Avenue
Van Nuys, CA 91406, USA
Attn: Swing Warranty
NOTE: This warranty does not cover misuse, abuse, abnormal wear & tear, negligence, environmental exposure, alteration or accident. Any alteration or removal of the product date code invalidates all claims against the manufacture.
Customer Service
TECHNICAL SPECIFICATIONS
- Product Name: Swing
- Model: MKCA0788 REV 1
Electrical Rating
Power Adapter
- Input Voltage:100-240 VAC, 50/60 Hz, 0.2A
- Output Voltage: 5VDC, 1A
Swing
- Dual power inputs: Unit can be powered through micro-USB.
Micro-USB power given priority - Rated Input: 5VDC, 1A
Remote Control
- Battery CR2025 button Cell
CONTACT US
If you have any questions or wish to provide comments about this product, feel free to contact our Customer Satisfaction team at 1-800-344-2229 (M-TH 8:00am-5:00pm PST, F 8:00am-1:00pm PST) or visit our website at www.munchkin.com.
© 2020 MUNCHKIN, INC. 7835 GLORIA AVE., VAN NUYS, CA 91406. MUNCHKIN BABY CANADA LTD., 3-8460 MOUNT PLEASANT WAY, MILTON, ON L9T 8W7. MADE IN CHINA / FABRIQUÉ EN CHINE.


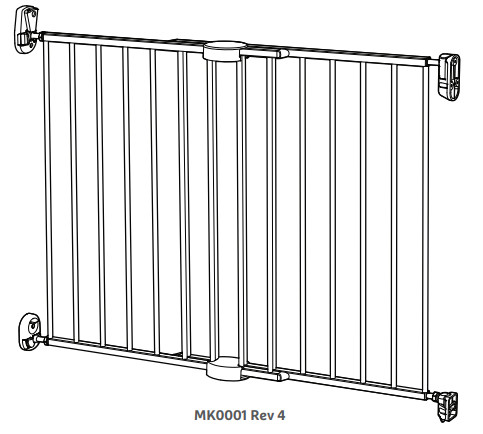
Owner’s Manual
Push to Close™ Gate
KEEP FOR FUTURE REFERENCE
Please read the instructions carefully before installing this gate. For additional help, installation videos are
available at www.munchkin.com
Important Information
INTRODUCTION
Thank you for choosing a Munchkin safety gate to help protect your family.
Please inspect your gate immediately. If you see any damage, do not attempt installation. Check page 20 of this manual for information on damaged products.
Assemble the gate away from small children. Some of the parts may present a choking hazard when loose.
DISCLAIMERS
Any misuse, abuse, abnormal use, excessive wear and tear, improper assembly, negligence, environmental exposure, accident or alteration of the gate, as well as removal or alteration of its serial number, invalidates any and all claims against the manufacturer. Any damage to property during installation is the sole responsibility of the end-user.
 WARNING:
- Children have died or been seriously injured when gates are not securely installed.
- ALWAYS install and use gates as directed using all required parts.
- STOP using when a child can climb over or dislodge the gate.
- Use only with locking mechanism securely engaged.
- NEVER use a gate to keep the child away from pool.
- Install according to manufacturer’s instructions.
- Intend for use with children from 6 months through 24 months.
- This product will not necessarily prevent all accidents. Never leave child unattended.
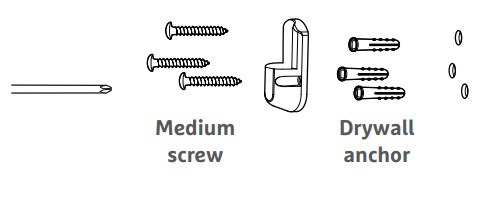
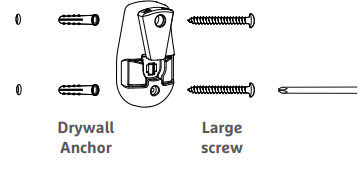
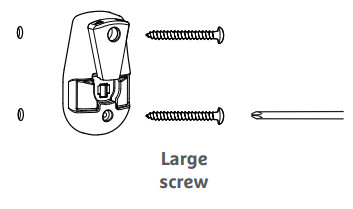
INCLUDED PARTS
If any parts are missing or damaged, please contact our Customer Satisfaction Team at 1-800-344 -2229.
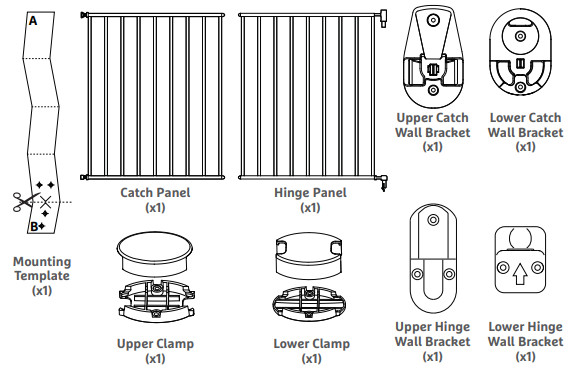
* Carefully separate templates “A” and “B” at the cut line.

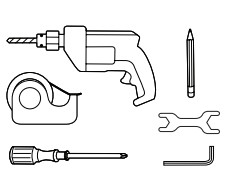
TOOLS NEEDED:
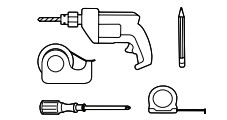
- Drill
- Phillips screwdriver
- Tape measure
- Pencil
- Adhesive tape
Getting Started
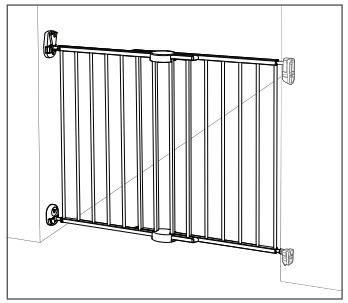
STEP 1: IDENTIFY GATE PLACEMENT
GATE IS SUITABLE FOR:
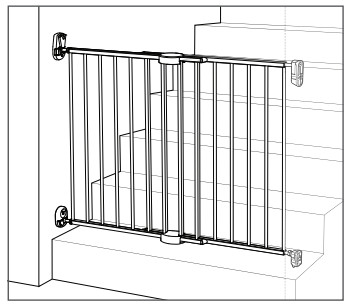
TOP OF STAIRS
If installing the gate at the top of stairs, it MUST be placed on the top landing and only swing away from the stairs.
BOTTOM OF STAIRS
If installing the gate at the bottom of the stairs, we recommend placing it on the floor. If the gate must be placed on the lowest stair, position it toward the front of the step.
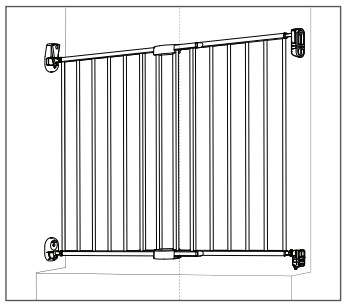
HALLWAYS AND DOORWAYS
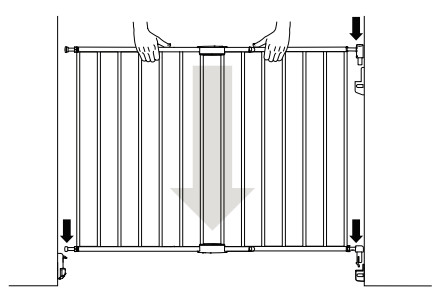
STEP 2: ASSEMBLING GATE PANELS
1.Place both hinge panel and catch panel side by side where you intend to install your gate. This gate fits opening 28.5″ to 45″ (72.4cm to 114cm).
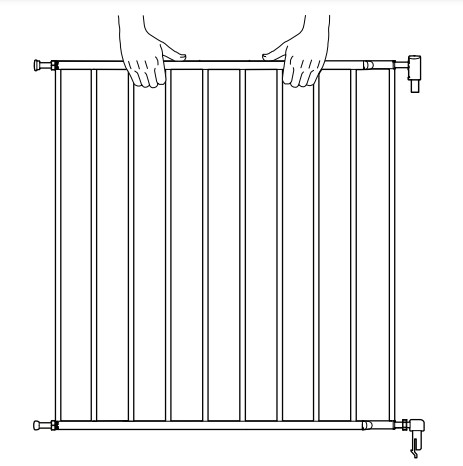
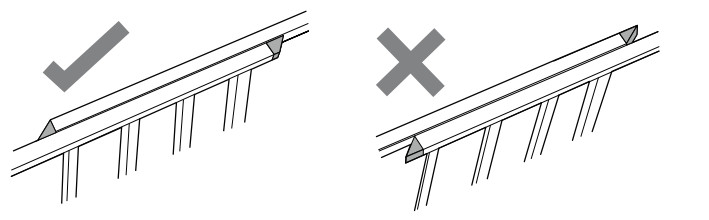
PLEASE NOTE: For correct orientation, make sure the text on the panels is upright, and the tapered ends of each panel should slope inward.
How To Install
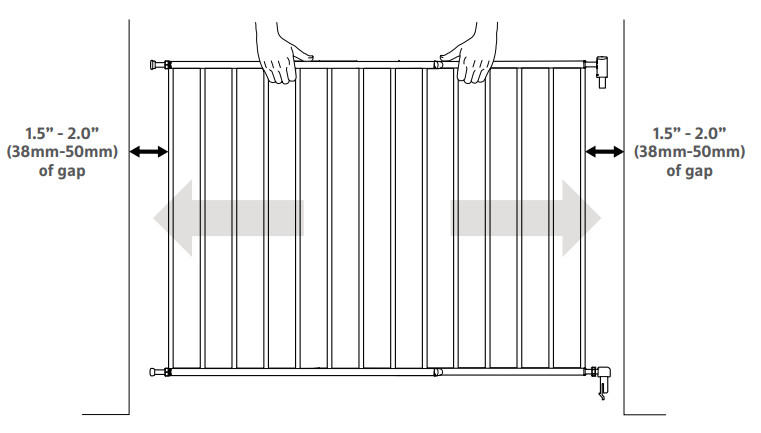
2. Size to your opening by sliding the hinge panel and catch panel outward towards the wall. For ease of gate installment later, please keep between a 1.5” and 2” (38mm-50mm) gap from the gate panel to the wall.
3.Secure the hinge panel and catch panel together using the upper and lower clamps. If the bars are not lined up, shorten the gate width by sliding panels inwards away from walls to allow room for the clamps.
Use the small screws to attach the top and bottom halves of each clamp together.
 STEP 3:INSTALL LOWER HINGE (WALL BRACKET)
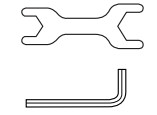
TOOLS NEEDED:
- Drill
- Phillips screwdriver
- Adhesive tape
- Hex key
- Pencil
- Wrench
- Cut template along the dotted line to separate template “A” and “B”.
- Decide which side of your opening will be the hinge side (i.e. the side that does NOT open). Next, place template “A” against the wall using tape. Template should be flush to the floor/step.
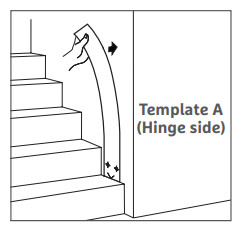
- Mark the screw holes in the cut-out piece with a pencil to create an indentation, then remove the cut-out the piece on the bottom of template “A”.

- Determine whether there is a stud behind the drywall where you will install the lower hinge wall bracket.
Proceed to either 5a or 5b.
PLEASE NOTE: Leave template “A” in place to help align the upper hinge bracket later.
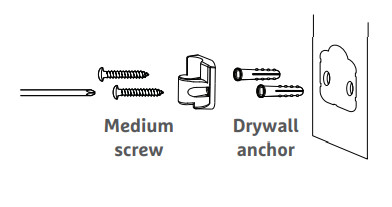
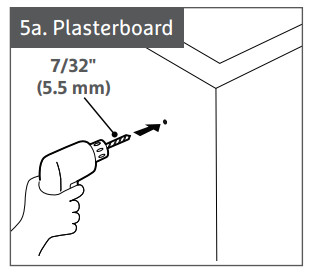
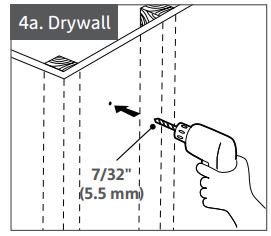
5a. For Drywall Without Stud / Plasterboard:
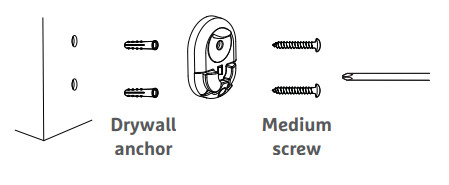
Drill a 7/32”(5.5mm) hole into the drywall at each pencil mark. Insert a drywall anchor into each hole.
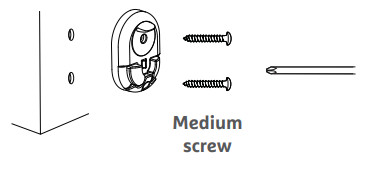
Use a screwdriver or drill to insert the screws through the lower hinge wall bracket into the drywall anchors.

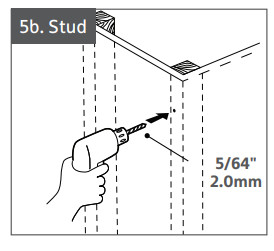
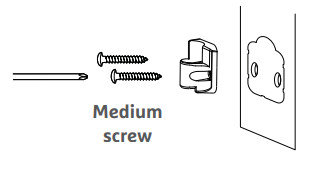
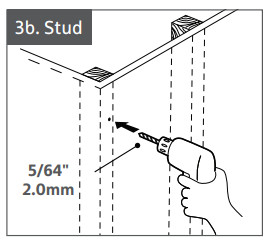
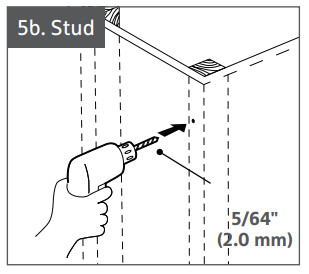
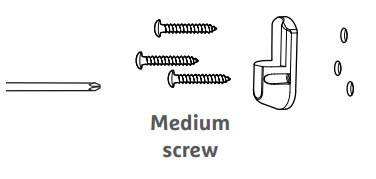
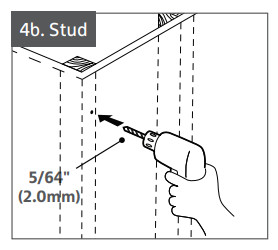
5b. For Drywall with Stud:
Drill a 5/64”(2mm) pilot hole into the stud at each pencil mark (no anchor needed).
Use a screwdriver or drill to insert the screws through the lower hinge wall bracket into the stud.
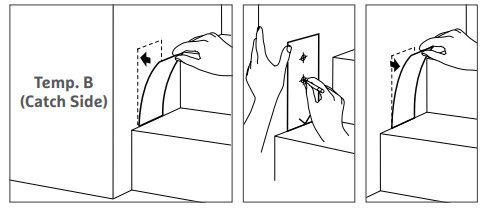
STEP 4: INSTALL LOWER CATCH (WALL BRACKET)
- Place template “B” against the wall with tape, flush to the floor with tape, flush to the floor. Mark the screw holes in the cut-out piece with a pencil to create an indentation, then remove the template.
- Determine whether there is a stud behind the drywall where you will install the lower catch wall bracket.
Proceed to either 3a or 3b.
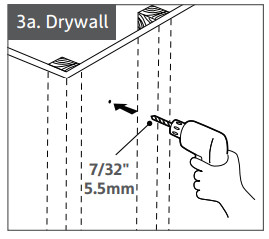
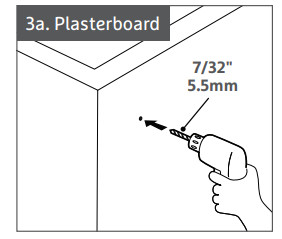
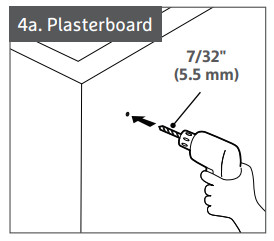
3a. For Drywall Without Stud / Plasterboard:
Drill a 7/32”(5.5mm) hole into the drywall at the center mark. Insert a drywall anchor. Then, use a screwdriver or drill to insert the screws through the lower catch wall bracket into the drywall anchor.
3b. For Drywall with Stud:
Drill a 5/64”(2mm) pilot hole into the stud at each pencil mark (no anchor needed). Then, use a screwdriver or drill to insert the screws through the lower catch wall bracket into the stud.
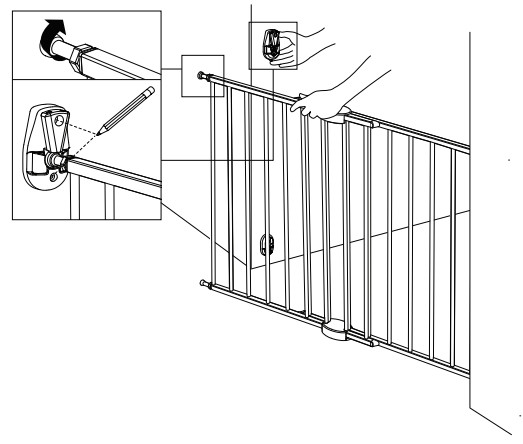
STEP 5: SETTING YOUR GATE
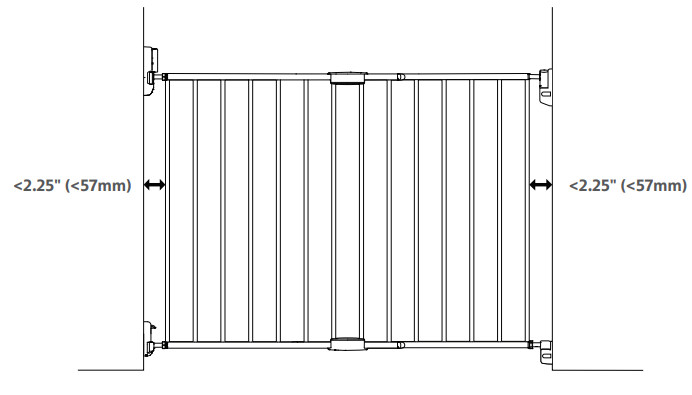
- The gap between the gate to the wall should be less than 2.25” (57mm). If necessary, adjust the lower hinge pin using the wrench to its appropriate length. Then tighten the nut against the tube by using the wrench.
- Next, insert the gate’s lower hinge pin down into the lower hinge bracket on the wall until it clicks.
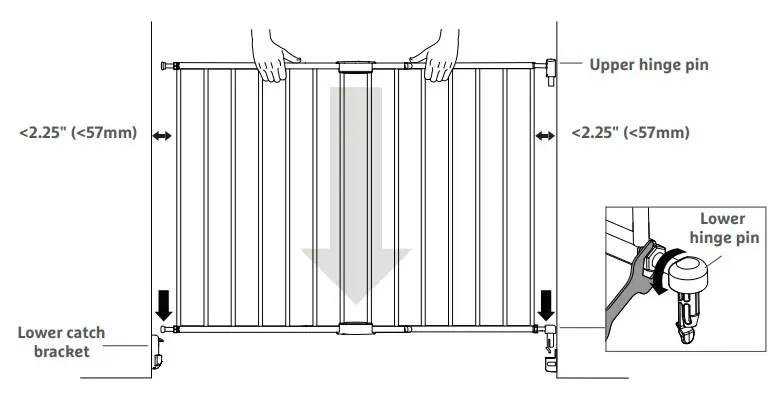
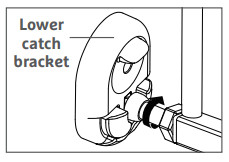
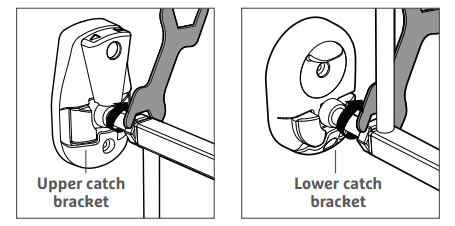
- On the catch side of the gate, loosen the nut around the lower adjustment rod using a wrench. Extend the adjustment rod by turning it clockwise until it is seated in the lower catch bracket on the wall. (The rod should fully depress the bracket’s center button.) Then, tighten the nut against the tube by using the wrench.
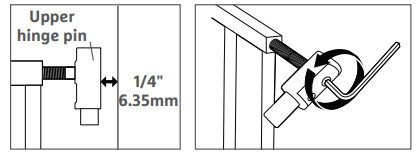
- Position the upper hinge pin 1/4” (6.35mm) from the wall. If necessary, extend the hinge pin by inserting
the hex key wrench into the end and turning counterclockwise to create the 1/4” (6.35mm) gap.
STEP 6: INSTALL UPPER HINGE (WALL BRACKET)
- Slide the upper hinge bracket into the upper hinge pin. Hold the bracket against the wall so that it’s directly above the lower hinge.
Use the lines of template “A” as a guide to do this.
Trace the upper hinge bracket’s position with a pencil. Remove the upper hinge bracket and place it aside.
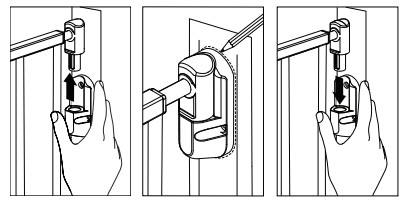
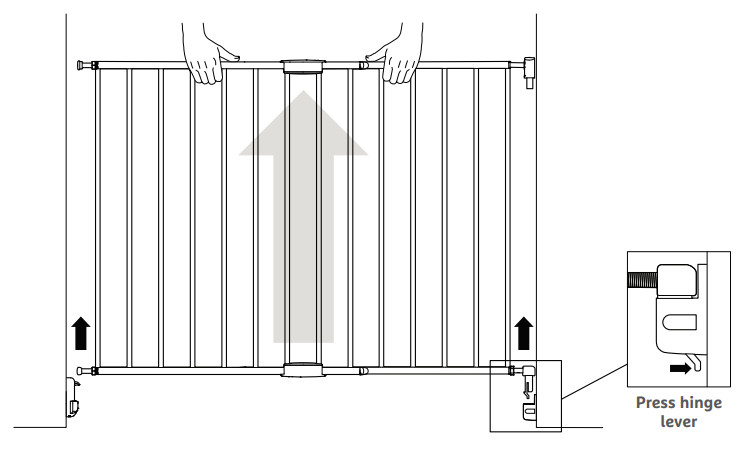
- Release the lower hinge pin by pushing the hinge lever toward the wall. Then lift the gate to remove and place it aside.
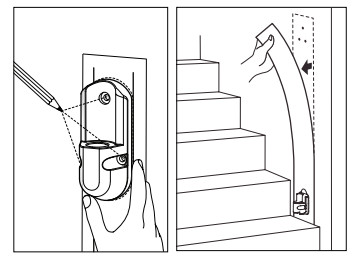
- Place again the upper hinge bracket against the pencil lines on the wall and mark the screw holes with a pencil to create an indentation.
Then, remove template “A” from the wall. - Determine whether there is a stud behind the drywall where you will install the upper hinge bracket. Proceed to either 5a or 5b.
5a. For Drywall Without Stud / Plasterboard:
Drill a 7/32”(5.5mm) hole into the drywall at the center mark. Insert a drywall anchor.
Use a screwdriver or drill to insert the screw through the upper hinge wall bracket into the drywall anchor.

5b. For Drywall with Stud:
Drill a 5/64”(2mm) pilot hole into the stud (no anchor needed).
Use a screwdriver or drill to insert the screw through the upper hinge wall bracket into the stud.
STEP 7: INSTALL UPPER CATCH (WALL BRACKET)
- Place the gate back into position, hinge side first. Drop both the upper and lower hinge pins into their
respective brackets at the same time.
- Place the upper catch bracket against the wall. If necessary, loosen the nut and extend the adjustment rod on the upper catch side until it is seated in the bracket. (The rod should press against the bracket’s center button.) Then, mark the screw holes with a pencil to create an indentation.
- Determine whether there is a stud behind the drywall where you will install the upper catch wall bracket. Proceed to either 4a or 4b.
4a. For Drywall Without Stud / Plasterboard:
Drill a 7/32”(5.5mm) hole into the drywall at the center mark. Insert a drywall anchor.
Use a screwdriver or drill to insert the screw through the upper catch wall bracket into the drywall anchor.
4b. For Drywall with Stud:
Drill a 5/64”(2mm) pilot hole into the stud (no anchor needed).
Use a screwdriver or drill to insert the screw through the upper catch wall bracket into the stud.
ADJUSTING BOLT ADJUSTER
 TOOLS NEEDED:
- Wrench
- Hex key
Check again that the center button on the upper and lower catch wall brackets are being fully pressed in by the bolt adjuster. If so, use the wrench to firmly tighten the nut.
PLEASE NOTE: The gap between the gate to the wall should be less than 2.25” (57mm).
How to Use
OPENING YOUR GATE
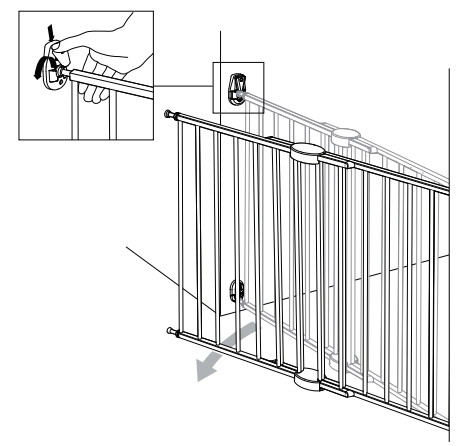
Push the lever on the upper catch bracket to the side with your thumb, then lift the gate out.
CLOSING YOUR GATE
Swing the gate back to its closed position. Simply push the gate door closed until it clicks.
PLEASE NOTE:
Always check that the gate is securely locked on the top and bottom brackets, and never leave your child unattended.
ADJUSTING THE SWING GUARD
The swing guard is located on the lower catch wall bracket.
If the gate is placed at the top or bottom of the stairs, always rotate the swing guard so that the gate can only swing away from the stairs. Choose either 3 o’clock or 9 o’clock position.
If the gate is placed at the hallways or doorways, we recommend rotating the swing guard to 12 o’clock position so the gate can swing in either direction.
Once the swing guard position is set, secure with a screwdriver.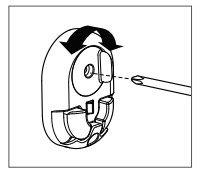
CLEANING YOUR GATE
Use mild soap and wipe with a damp cloth. Be careful NOT to wash or wipe the stickers on the base of the gate.
Removing or damaging the stickers will void the warranty.
Customer Service
ONE-YEAR LIMITED WARRANTY
A. Munchkin, Inc.’s safety gates include a one-year limited warranty from the date of purchase.
POLICY: In the event of a malfunction or defect during the in-warranty period, Munchkin, Inc., at its option, will replace or repair a gate under warranty. Munchkin, Inc.’s limited warranty extends only to the gate’s original purchaser.
PROCEDURE: We ask that you contact Munchkin, Inc. to provide all pertinent information relating to any issues you are experiencing with your safety gate. Munchkin, Inc.’s Customer Satisfaction Team can be reached at 1-800-344-2229 Monday through Friday from 8 am to 5 pm (Pacific Time) or by email at [email protected]. The following information, when applicable, is required for all warranty claims:
- Gate Name
- Model Number
- Date Code
- Receipt Copy
This may be faxed, emailed, or sent via mail to Munchkin, Inc. to the attention of Customer Satisfaction.
ATYPICAL ISSUES: For atypical issues that require physical review, Munchkin, Inc. will request that you return your gate to its Quality Assurance department. Munchkin, Inc. will compensate you for shipping costs by providing a complimentary gift equal in value to the expense incurred in shipping the product. Alternatively, Munchkin, Inc. at its option, may issue a UPS call tag in order to expedite receipt of the defective product for review.
B. Conditions that void Munchkin, Inc.’s one-year limited warranty.
POLICY: Munchkin, Inc.’s one-year limited warranty does not cover a defect that has been caused by misuse, abuse, abnormal use, excessive wear and tear, improper assembly, negligence, environmental exposure, alteration, or accident. Important Note: A safety gate that has had its batch code altered or removed invalidates any and all claims against the manufacturer.
C. CONSUMER REIMBURSEMENT: Munchkin, Inc. does not provide refunds as a remedy for defective or nonconforming safety gates. Nor does Munchkin, Inc. offer cashback for returned products purchased through any of Munchkin, Inc’s safety gate websites. Exception: Munchkin, Inc. will provide a cashback refund on purchases made through any of Munchkin, Inc.’s safety gate websites ONLY if there was a processing or shipping error made by Munchkin, Inc. Contact Customer Satisfaction Team with any questions at 1-800-344-2229.
CONTACT US
If you have any questions about installing your gate, or if you wish to provide comments about this product, feel free to contact our Customer Satisfaction Team at 1-800-344-2229 (M-F from 8:00 am-5:00 pm PST) or visit our website at www.munchkin.com
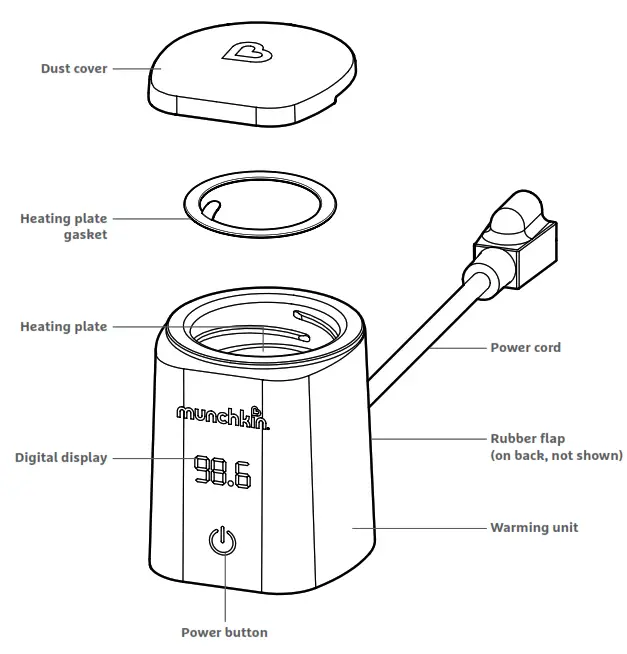
 Owner’s Guide
 WARNING: Strangulation hazard! Keep out of reach of children. Do not use extension cords.
When using electrical appliances, basic safety precautions should always be followed, including the following:
- Read all instructions carefully before using your digital bottle warmer.
- To protect against electrical shock, do not immerse the appliance, cord, or plug in water or any liquid. Clean with a damp cloth only. Avoid spillage on the connector.
- For use by adults for intended purposes only. Any other use is inappropriate and dangerous. Keep out of the reach of children.
- The appliance should be placed on a flat and stable area away from hot surfaces.
- Do not let the cord hang over the edge of the table or counter or touch a hot surface.
- Do not move the appliance when in use or if it contains hot water or liquid.
- The warming chamber may become hot. Do not touch while in use and let cool before handling.
- Ensure the baby bottle contents are at a safe temperature before feeding.
- Use plastic baby bottles approved for boiling or glass thermo-resistant baby bottles with this appliance.
- Do not use this product to heat frozen baby bottles.
- Unplug from outlet when not in use and before cleaning. Allow cooling before putting on or taking off parts and before cleaning. Allow warmer to cool before cleaning.
- Do not operate any appliance with a damaged cord or plug after the appliance malfunctions or has been damaged in any manner. Return appliance to Munchkin, Inc. for examination, repair, or adjustment.
- The use of accessory attachments is not recommended by the appliance manufacturer and may cause injuries.
- Do not place on or near a hot gas or electric burner, or in a heated oven.
- Always attach the plug to the appliance first, then plug the cord into the wall outlet. To disconnect, turn any control to “off” then remove the plug from the wall outlet.
- To disconnect, always make sure the unit is “off” before removing the plug from the wall outlet.
- Do not use appliances for other than intended use.
- Before serving the contents, unplug the cord from the wall outlet. Do not leave the cord within the child’s reach.
- Close supervision is necessary when any appliance is used by or near children.
- Extreme caution must be used when moving an appliance containing hot liquids.
- This appliance is not intended for use by persons (including children) with reduced physical, sensory or mental capabilities, or lack of experience and knowledge, unless they have been given supervision or instruction concerning the use of the appliance by a person responsible for their safety. Children should be supervised to ensure that they do not play with the appliance.
- A short power-supply cord (or detachable power-supply cord) should be used to reduce the risk resulting from becoming entangled in or tripping over a longer cord. Longer detachable power-supply cords or extension cords are available and may be used if care is exercised in their use. If a longer detachable power-supply cord or extension cord is used:
a. The marked electrical rating of the cord set or extension cord should be at least as great as the electrical rating of the appliance.
b. The cord should be arranged so that it will not drape over the countertop or tabletop where it can be pulled on by children or tripped over unintentionally.
c. If the appliance is of the grounded type, the cord set or extension cord should be a grounding-type 3-wire cord. - To be used with baby bottles only. May cause serious injury if used with any other vessel.
- The heating element surface is subject to residual heat after use.
- For household use only. Do not use outdoors.
- Do not touch hot surfaces.
SAVE THESE INSTRUCTIONS
NOTE: These instructions are to be used as a guide only. Please note that there are many variables, such as the size of the baby bottle, ambient temperature, and starting temperature of the liquid, which can impact the speed as well as the final temperature at which this unit warms the liquid. Adjustments to the instructions below may be necessary. Always test the temperature of the liquid with a thermometer before feeding the baby. The food should not be heated for an extended amount of time.
FCC WARNING
This device complies with part 15 of the FCC Rules. Operation is subject to the following two conditions:
- This device may not cause harmful interference, and
- This device must accept any interference received, including interference that may cause undesired operation.
WARNING: Changes or modifications to this unit not expressly approved by the party responsible for compliance could void the user’s authority to operate the equipment.
NOTE: This equipment has been tested and found to comply with the limits for a Class B digital device, pursuant to part 15 of the FCC Rules. These limits are designed to provide reasonable protection against harmful interference in a residential installation. This equipment generates, uses, and can radiate radio frequency energy and if not installed
and used in accordance with the instructions, may cause harmful interference to radio communications. However, there is no guarantee that interference will not occur in a
particular installation. If this equipment does cause harmful interference to radio or television reception, which can be determined by turning the equipment off and on, the user is encouraged to try to connect the interference by one or more of the following measures:
- Reorient or relocate the receiving antenna.
- Increase the separation between the equipment and receiver.
- Connect the equipment into an outlet on a circuit different from that to which the receiver is connected.
- Consult the dealer or an experienced radio/TV technician for help.

No adapter is necessary for:
- Avent Natural 4oz and 9oz*
- Evenflo Balance 5oz and 9oz*
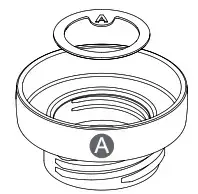
| Adapter A (with Gasket) for: • Dr. Brown’s 4oz and 8oz* • Medela 5oz and 8oz* • Nuk First Essentials 5oz and 9oz* • EvenFlo Feeding Classic 4oz and 8oz* • Parents Choice 5oz and 9oz* |
 |
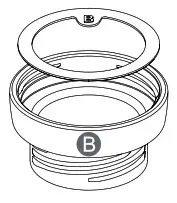
| Adapter B (with Gasket) for: • Tommee Tippee 5oz and 9oz* |
 |
| Adapter C (with Gasket) for: • Nuk Simply Natural 5oz and 9oz* |
 |
| Adapter G (with Gasket) for: • Comotomo 5oz and 8oz* • Olababy 4oz and 8oz* • Boon Nurse 4oz and 8oz* |
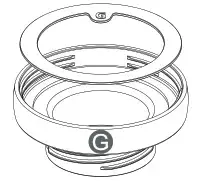 |
WARNING: Do not use a glass baby bottle without an adapter.
*Dr. Brown’s, Medela, Nuk, EvenFlo, Parent’s Choice, Tommee Tippee, Avent, Comotomo, Olababy, and Boon Nurse are trademarks of their respective owners.
BEFORE YOU BEGIN
FOR USE WITH ROOM-TEMPERATURE OR REFRIGERATED LIQUIDS ONLY. FROZEN BREAST MILK MUST BE THAWED BEFORE USING THIS APPLIANCE.
The warmer should not be powered ON without a baby bottle filled with water or breast milk installed on the warmer.
Warmer may overheat if used improperly.
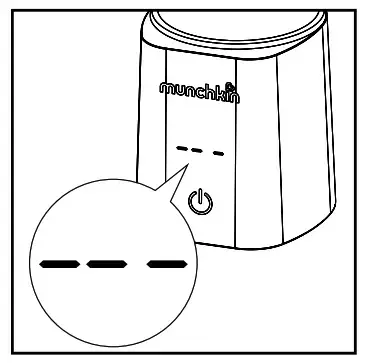
Three dashes of “_ _ _” on the front of the warmer indicate that the warmer’s heating plate has overheated.
Under this scenario, you must wait 15 minutes before the unit is ready for use.
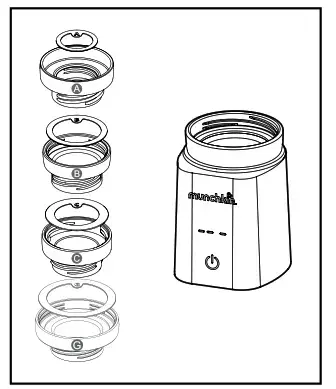
- Choose the correct adapter for your baby bottle (see Included Adapters on page 7).
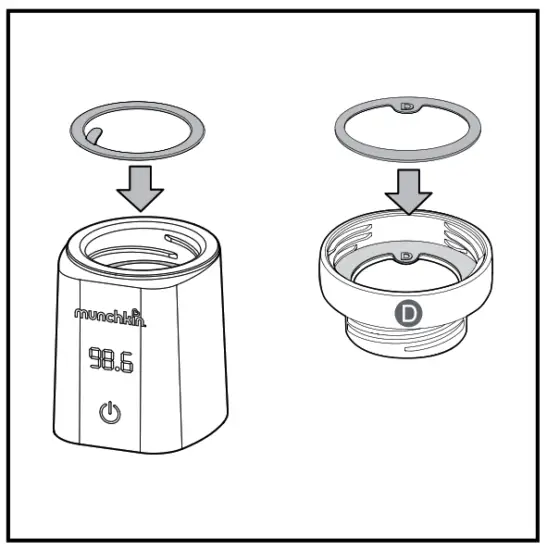
Ensure the gaskets are installed in the warming unit and adapter (gasket identification letter facing up).
Screw the adapter into the neck of the warming unit.
If no adapter is needed, proceed to step 2.
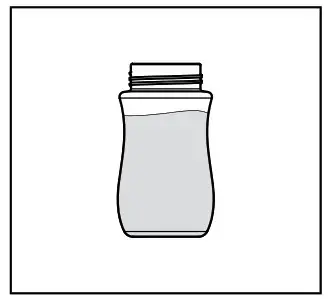
- Fill the baby bottle with water (for formula) or breast milk.
NOTE: Warm water first, then mix in powdered formula once the heating cycle is complete.
For best results do not use heat premixed formulas or alternative milk.
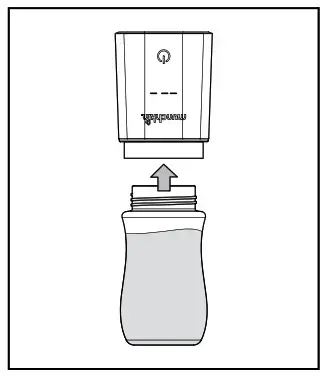
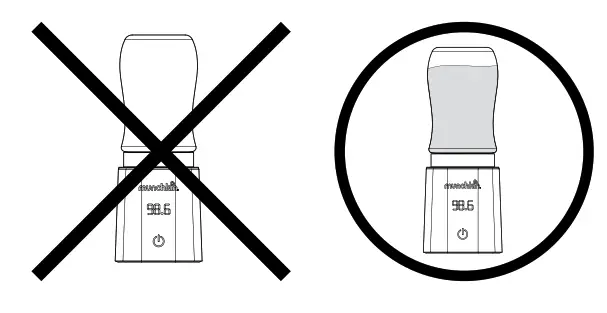
- FLIP THE WARMING UNIT UPSIDE DOWN
and screw the baby bottle into the unit or adapter. Twist until the bottle is pressed firmly against the gasket to ensure a watertight seal.
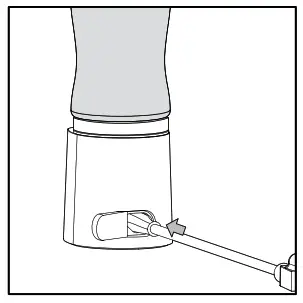
- Open the rubber cover on the back of the warming unit, then insert the power cord. Plug the cord into an electrical outlet.
The standby mode is ready and the display will blink 00.0, it will automatically stop after 30 seconds if no action is taken.
NOTE: When the warmer turn off after 30 seconds of no activity. PRESS AND HOLD the button once for 2 seconds to activate the standby mode. Next PRESS and HOLD again for 2 seconds to activate the heating cycle.
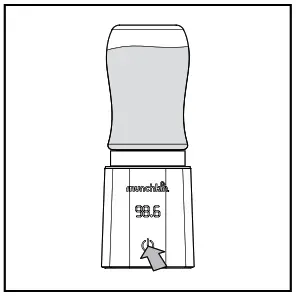
- Make sure the warming unit is right side up when standby mode is ready and then press and hold the power button for two seconds to start warming. The digital 98. C display will turn on.
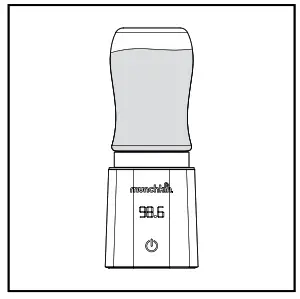
- When the liquid reaches approximately 98.6°F, the warming unit will beep to indicate the cycle is complete. The liquid will be kept at this temperature for up to 15 minutes after the cycle is complete. After 15 minutes, the warming unit will auto shut off.
NOTE: To ensure your liquid is warmed properly, wait until the end of the warming cycle before removing the bottle.
- When ready to remove the bottle, press and hold the power button for two seconds to turn off the unit. Then unplug the cord from the unit and the wall outlet. Flip the device upside down, unscrew the baby bottle and shake the bottle well to ensure proper heat distribution.
Always check the liquid’s temperature before feeding.
NOTE: Warming a second bottle –Allow at least 5 minutes for the unit to cool before the next use.ON/OFF: Press and hold for 2 seconds
WARMING TIMES
| VOLUME | STARTING MILK TEMPERATURE | |
| 72°F (22°C) | 42°F (5°C) | |
| 4oz/120ml | ~4 mins | ~5.5 mins |
| 6oz/180ml | ~5 mins | ~7 mins |
| 8oz/240ml | ~6.5 mins | ~9 mins |
NOTE: Based on most common standard-sized bottles.
~4 mins means “approximately 4 minutes”
The warming durations are to be used as a guide only. Bottle style and size, liquid starting temperature, and volume can impact the warming speed and final temperature.
For optimal heating, and temperature uses 4oz to 8oz of liquid.
HOW TO CLEAN
Always unplug the unit and ensure that it is cool before cleaning. Do not use scouring pads, abrasives, or solvents for cleaning; they may damage the appliance and its surface. Place the rubber plug back into the plug attachment to prevent water intrusion and cause electrical short during cleaning.
Digital Bottle Warmer: Wipe all surfaces with a damp cloth or sponge using mild liquid soap, and rinse with clear water. Allow air-drying. Do not submerge the unit in liquid.
Adapters and Gaskets: Wash with mild liquid soap and rinse with clear water. Allow to air-dry. Always replace gaskets to their proper locations (gasket identification letter facing up).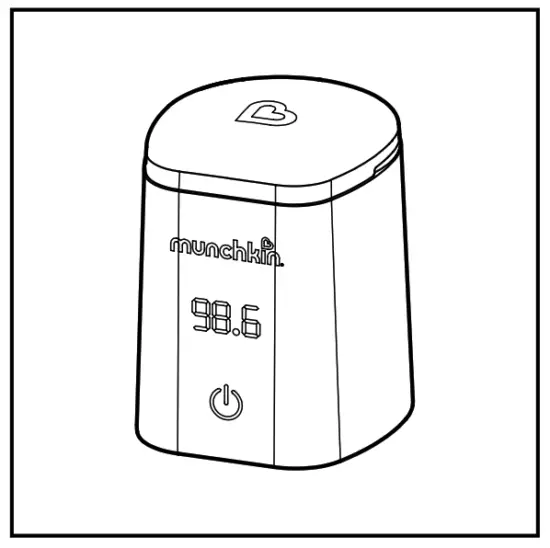
Keep Dust Cover on when not in use to keep the heating plate clean.
DE-SCALE
De-scale your bottle warmer after every use to ensure residual deposits are removed from the heating plate and the silicone seal. To de-scale, mix 15ml (0.5oz) of white vinegar with 15ml (0.5oz) of cold water and pour into the heating plate. Allow liquid to stand in the unit until any deposits (limescale) have dissolved. Discard liquid and wipe heating plate with a damp cloth. Repeat process if necessary.
To avoid bacteria growth, perform “Cleaning” and “De-Scaling” after every use.
TROUBLESHOOTING
Blinking display: Digital Bottle Warmer will not operate if tilted more than 30°. Place warmer on a flat and stable surface.
Overheat protection: The power switch turns off after three consecutive beeps – circuit protection detects a rapid increase in internal temperature to prevent damage to the device.
Three beeps: Digital Bottle Warmer will power off due to limescale deposit build-up on the heating plate or if breast milk has not been mixed thoroughly.
Display “E1″: Digital Bottle Warmer is not responding to input command from the control panel due to not functioning temperature sensor.
The display shows “E2”: Digital Bottle Warmer is not responding to input command from the control panel due to not functioning heating element.
For “E1” and “E2” errors, please contact our Customer Satisfaction team at 1-800-344-2229 (M-TH 8:00am-5:00pm PST, F 8:00am-1:00pm PST) or visit our website at
www.munchkin.com.

TECHNICAL SPECIFICATIONS
- Product name: 98° Digital Bottle Warmer
- Model: MKFE0769-01
Electrical Rating:
- Input Voltage: 120VAC, 60Hz
- Wattage: 110W
- Warming unit dimensions: L3.3”(8.3 cm) x W3” (7.6 cm) x H3.4” (8.5 cm)
- Warming unit net weight: 0.4 lb(198g)
- Safety listings:
- CONFORMS TO UL STD. 1026
ONE-YEAR LIMITED WARRANTY
Munchkin’s 98° Digital Bottle Warmer includes a 1-year limited warranty against defects from the date of purchase. In the event of a malfunction or defect during the in-warranty period, Munchkin, Inc. at its option, will replace or repair the product under warranty.
Upon receipt of the product and proof of purchase with a valid date of purchase, the defective part will be immediately repaired or replaced and returned to you free of charge (the USA only). Please send the defective unit, proof of purchase, and a description of the problem you have encountered to:
Munchkin, Inc.
7835 Gloria Avenue
Van Nuys, CA 91406, USA
Attn: 98° Digital Bottle Warmer Warranty
NOTE: This warranty does not cover misuse, abuse, abnormal wear & tear, negligence, environmental exposure, alteration, or accident. Any alteration or removal of the product date code invalidates all claims against the manufacturer.
CONTACT US
If you have any questions or wish to provide comments about this product, feel free to contact our Customer Satisfaction team at 1-800-344-2229 (M-TH 8:00 am-5:00 pm PST,
F 8:00am-1:00pm PST) or visit our website at www.munchkin.com.
munchkin.com
800.344.2229
© 2021 MUNCHKIN, INC. 7835 GLORIA AVE., VAN NUYS, CA 91406. WWW.MUNCHKIN.COM/PATENTS
MADE IN CHINA. 17555-IS-1