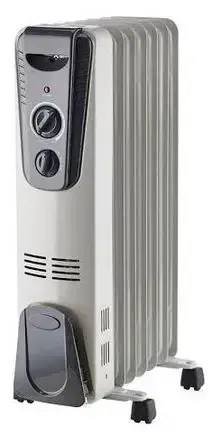
NOMA 043-8416-2 Oil Filled Portable Radiator Heater

PLEASE READ AND SAVE THESE IMPORTANT SAFETY INSTRUCTIONS
When using electrical appliances, basic precautions should always be followed to reduce the risk of fire, electric shock, and injury to persons, including the following:
- Read all instructions before using this heater.
- This heater is hot when in use. To avoid burns, do not let bare skin touch hot surfaces. If provided, use handles when moving this heater. Keep combustible materials, such as furniture, pillows, bedding, papers, clothes, and curtains at least 3′ (0.9 m) from the front of the heater and keep them away from the sides and rear.
- Extreme caution is necessary when any heater is used by or near children or invalids and whenever the heater is left operating and unattended.
- Always unplug heater when not in use.
- Do not operate any heater with a damaged cord or plug or after the heater malfunctions, has been dropped or damaged in any manner. Discard heater or return heater to authorized service facility for examination, electrical or mechanical adjustment, or repair.
- Do not use outdoors.
- This heater is not intended for use in bathrooms, laundry areas and similar indoor locations. Never locate heater where it may fall into bathtub or other water container.
- Do not run cord under carpeting. Do not cover cord with throw rugs, runners, or similar coverings. Do not route cord under furniture or appliances. Arrange cord over. remove plug from outlet.
- 10. Do not insert or allow foreign objects to enter any ventilation or exhaust opening as this may cause an electric shock or fire, or damage the heater.
- To prevent a possible fire, do not block air intakes or exhaust in any manner. Do not use on soft surfaces, like a bed, where openings may become blocked.
A heater has hot and arcing or sparking parts inside. Do not use it in the areas where gasoline, paint, or flammable liquids are used or stored. - Use this heater only as described in this manual. Any other use not recommended by the manufacturer may cause fire, electric shock, or injury to persons.
- CAUTION: Always plug heaters directly into a wall outlet/receptacle. Never use with an extension cord or relocatable power tap (outlet/power strip).
- This heater draws 12.5 A during operation. To prevent overloading a circuit, do not plug the heater into a circuit that already has other appliances working.
- It is normal for the plug to feel warm to the touch; wever, a loose fit between the AC outlet (receptacle) and plug may cause overheating and distortion of the plug. Contact a qualified electrician to replace a loose or worn outlet.
- The output of this heater may vary and its temperature may become intense enough to burn exposed skin. Use of this heater is not recommended for persons with reduced sensitivity to heat or an inability to react to avoid burns.
- Don’t leave the heater on unattended.
- This heater cannot provide professional-grade temperature control and should not be used to keep a storage unit from freezing or to maintain temperature for animals, pets, plants, etc.
- Connect to properly grounded outlets only.
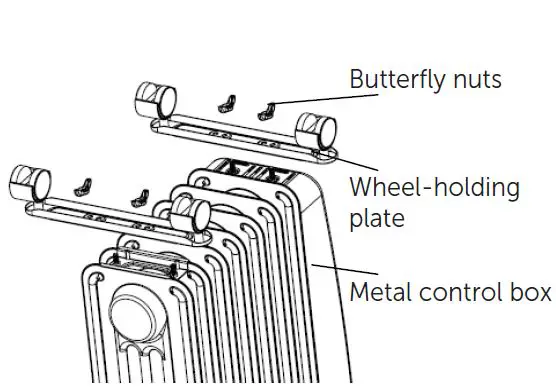
TO ATTACH WHEELS:
- Unpack heater and locate wheel-holding plates stored between the fins. heater is unplugged.
- TURN THE HEATER UPSIDE DOWN.
- Attach the wheel-holding plates using the butterfly nuts as shown.
- TURN THE HEATER UPRIGHT.
Your heater is now ready to use.
WARNING: Risk of fire. Do not operate heater without wheel assemblies attached. Operate heater in upright position only—any other position could create a hazardous situation. Ensure that the surface beneath the heater is clean and free of any obstructions. It is not recommended that this heater be placed on high-pile carpeting or any other surface that impedes the flow of air underneath the heater.
Control Panel Functions
- Power Indicator Light
- Thermostat Control
- Power and Setting Control
- Ensure that the heater and power cable are both in good condition.
- Place the heater on a firm, level surface free from obstructions and at least 3’ (0.9 m) from any wall or other object such as furniture, chairs, plants, or combustible material. 60 Hz outlet.
- Important: your heater is equipped with a polarized plug (one blade is wider than the other). This plug will only fit into an outlet one way. If the plug does not fit fully in the outlet, reverse the plug. If it still won’t fit, contact a qualified electrician to have a polarized outlet installed. Do not attempt to defeat this safety feature. To do so could result in an electric shock hazard.
- To turn the heater on, turn the power and setting control (C) to your desired power setting: low (I), medium (II) or high (III). The power indicator light (A) will illuminate. Turn the thermostat control (B) to your desired setting from “MIN” to “MAX”.
Setting for Optimum Comfort: When the room reaches a comfortable temperature, slowly turn the thermostat control (B) counter-clockwise This is the point at which the thermostat setting equals the room temperature. At this setting, the thermostat will automatically turn the heater.
OVERHEAT PROTECTION
This heater includes an overheat protection system that shuts the unit and remove any objects on or adjacent to the heater that may cause high temperatures. Wait 10 to 20 minutes for the unit to cool down then plug it back in and resume normal operation.
TIP-OVER SWITCH
Your heater is equipped with a tip-over switch which is designed to returned to normal upright position, the heater will automatically come on again. This is a feature to avoid possibility of fire should the unit be accidentally tipped over.
POWER INDICATOR LIGHT
This heater is equipped with a power indicator light. The power light will illuminate when the heater is plugged in. This feature is to prevent you from being unaware the heater is in operation. This heater has additional features:
- Cord Wrap: neatly stores power cord when the heater is not in use.
- Convenient Carry Handles and Heavy-duty Castor Wheels: allow for easy maneuvering from room to room.
If your heater fails to operate, please follow these procedures prior to contacting Customer Service.
| Problem | Cause | Solution |
|
The heater does not operate or has shut o unexpectedly. |
There is no power going to the appliance. | Ensure the heater is plugged in and the electrical outlet is working. |
|
One of the safety protection devices has been activated. |
Check that the heater is in an upright position. | |
| Check for any obstructions. If you find an obstruction, turn the heater o , unplug the heater and wait at least 10 minutes for it to cool down. Carefully remove the obstruction. Plug the heater in and restart it as described in the OPERATING INSTRUCTIONS section.
If the heater does not restart, unplug the heater and have it checked by an authorized service centre. |
||
| The set temperature is lower than the current room temperature. | Set the desired temperature higher than the current temperature to restart the heater. | |
| The room temperature has reached the temperature set on the thermostat. | It is normal for the heater to turn
o . The heater will restart once the room temperature falls below the set temperature. |
|
|
The room is not hot enough. |
The window is open. | Close the window. |
| The set temperature or power setting is too low. | Increase the desired temperature setting or increase the power setting. | |
| The room is too large. | Use more portable heaters or choose one with a larger capacity. |
CAUTION: Please do not attempt to open or repair the heater yourself. Doing so may void the warranty and could cause damage or personal injury.
- Before any cleaning:
- Make sure that the heater is turned OFF.
- Disconnect power supply at source by removing plug from power outlet.
- Regular cleaning:
- Dust can often be removed by using a vacuum cleaner with a crevice tool attachment.
- Do not use cleaning spray-on liquids or other chemicals on the unit.
- To clean enclosure, use a clean, soft and lightly damp cloth to gently heating element and the switches. Allow the unit to dry completely before further use.
- Storage:
- After cleaning, wipe all parts to dry.
- Pack the heater in a plastic bag or in its original box and store it in a cool, dry place.
- Voltage: 120 V AC, 60 Hz
- Current: Maximum continuous draw: 12.5 A
- Output: 5200 BTUs
- Power: LOW = 600 W, MED = 900 W, HIGH = 1500 W
LIMITED 1-YEAR WARRANTY
This product carries a one (1) year warranty against defects in workmanship and materials. NOMA Canada agrees to replace a defective product, within the stated warranty period, when returned to the place of purchase with proof of purchase. This product is not guaranteed against wear or breakage due to misuse and/or abuse.