NVK Dog Training Collar Manual
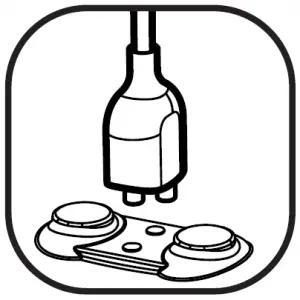
COMPONENTS

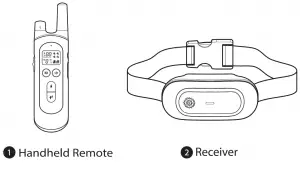
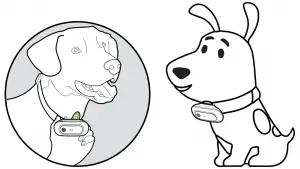
OVERVIEW
Handheld Remote
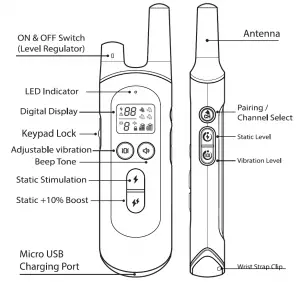
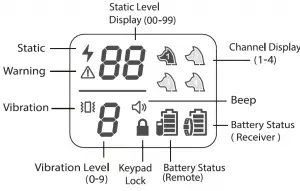
Screen
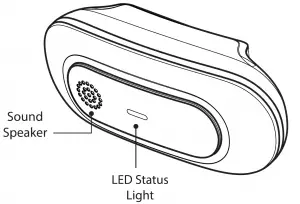
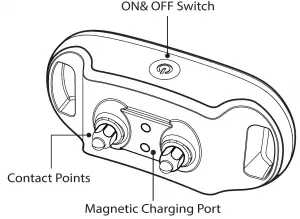
Receiver
Important Safety Information
 WARNING: indicates a hazardous situation which, if not avoided, could result in serious injury.
CAUTION
Caution: used with the safety alert symbol, indicates a hazardous situation, which, if not avoided could result in minor or moderate injury.
- Safety during on-leash training. It is vitally important that you and your dog remain safe while learning during on-leash training. Your dog should be on a strong leash, long enough for him to attempt to cha.se an object, but short enough for him not to reach a road or other unsafe area. You must also be physically strong enough to restrain your dog when he tries to chase.
- This pet training device is not a toy, keep away from children.
CAUTION
Caution: used without the safety alert symbol, indicates a hazardous
situation, which, if not avoided, could result in harm to your pet.
Risk of skin damage. Please read and follow the instructions in this manual. Proper fit of the collar is important. A collar worn for too long or made too tight on the pets neck may cause skin damage. Ranging from redness to pressure ulcers; this condition is commonly known as bed sores.
- Avoid leaving the collar on the dog for more than 12 hours per day.
- Possible reposition the collar on the pet’s neck every 1 to 3 hours.
- Check the fit to prevent excessive pressure; follow the instructions in this manual.
- Never connect a leash to the electronic collar; it will cause excessive pressure on the contact points.
- When using a separate collar for a leash, don’t put pressure on the electronic collar.
- Wash the dog’s neck area and the contacts of the collar weekly with a damp cloth.
- Check the contact area daily for signs of a rash or a sore.
- If a rash or sore is found, discontinue use of the collar until the skin has healed.
If the condition persists beyond 48 hours, see your veterinarian.
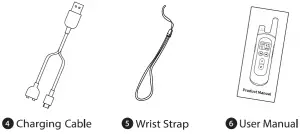
COMPONENTS DETAIL
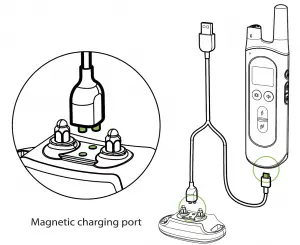
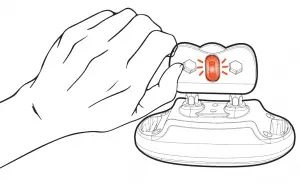
- Charge the Collar and Remote
When charging is completed, the green light will appear. - Fit the Receiver Collar
Note: The Contact Points must have direct contact with Dog’s skin on the underside of neck. Check the tightness of the Collar by inserting one finger snugly between the collar and neck. - To turn the Remote and Receiver on

When not using the collar, turn it off to increase the battery life. Long press the button 3 secs to turn off the Receiver. - Keypad Lock
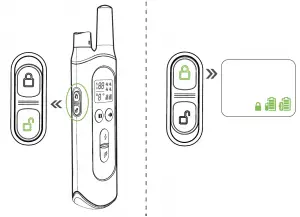
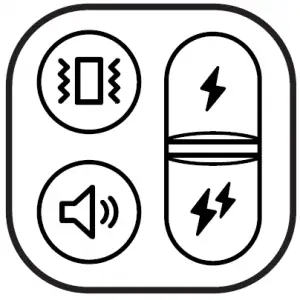
Security Keypad : lock or unlock - Beep Tone command
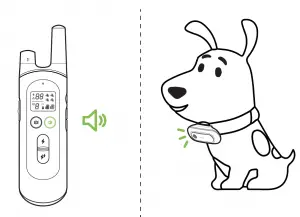
Delivers a beep tone with non- adjustable volume to the collar. - Vibration command
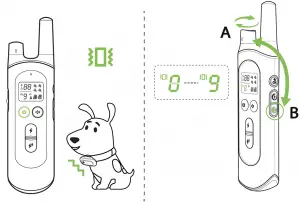
Delivers vibration to the collar. Vibration Intensity adjustment: Press and hold the vibration Level button B, at the same time, rotating the level regulator A of the remote. - Static Stimulation command
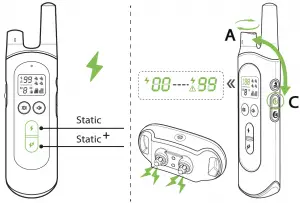
- Static button: Delivers currently selected level Static stimulation to the collar.
- Static+ button: That is 10% higher than the currently selected level. Some consumers would like to instant access to a higher setting where the dog may not respond to lower levels.
- Static Intensity adjustment: Press and hold the static Level button C, at the same time, rotating the level regulator A of the remote.
How to find the Best Static Level for Your Dog ?
Very Important: Always start at the lowest level and choose the level that is best for your dog.
Have 1 to 99 different Stimulation Levels. Follow the steps below to find the best Level:
- Step 1: Starting at Level 1 o on the Digital Display, press the static button to see dog’s reaction.
- Step 2: Move up through the Stimulation levels until your pet reliably responds to the Stimulation.
- Step 3: If your dog continues to show no response at Level 50, check the fit of the Receiver Collar. If your dog has long or thick hair, change to a longer set of Contact Points, or dog’s hair will need to be trimmed around the Contact Points.
- If all of these steps have been done and dog continues to show no reaction, see the “How to use Test light Tool” section.
Main Features
 Vibration, Tone and Static training model
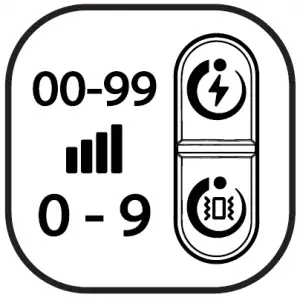 9 adjustable vibration level and 99 adjustable static level
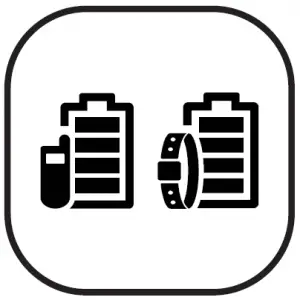 Dual batteries status display for Remote and Receiver
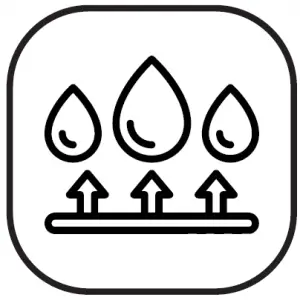 Receiver collar IPX7 waterproof (Remote non-waterproof)
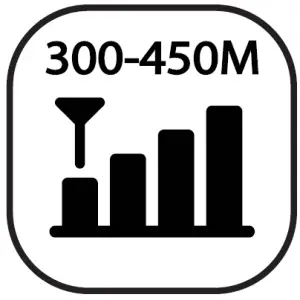 Remote range 1000-1 600 feet
 Long life Lithium Polymer battery
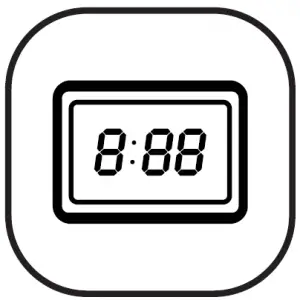 Big digital display
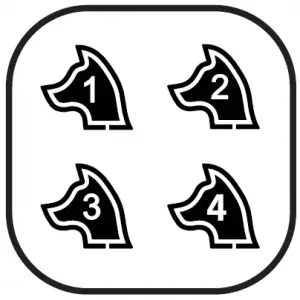 Support maximum 4 receiver collars with one remote
 Magnetic charging port
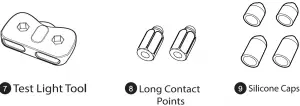
How to use Test Light Tool
A: Static function test
- Make sure the Remote and Receiver Collar on.
- Hold the Test Light tool contacts to the Contact Points.
- Press a Static button on the Remote Transmitter. The Test Light will be lighted.
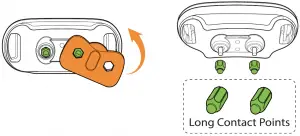
B: As a tool to tighten or loosen the contact points
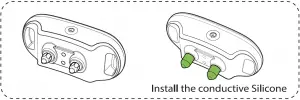
For dog with shorter coats, use 2pcs shorter contact point. Or install the conductive Silicone onto the contact point to make it softer. It may better to your dog’s skin.
For dog with thicker coats, use 2pcs longer contact points. Or install the conductive Silicone.
Training Tips
If you wan to eliminating unwanted behavior – For examples barking. Please follow these training steps.
- Put a separate non-metallic collar on your dog’s neck above the Receiver Collar, and attach a 8- 10 foot leash. ( Note: Be sure the extra collar does not put pressure o n the Contact Points. )
- Hold the leash and the Remote Transmitter
- Choose your pet’s Recognition Level.
- As soon as your pet is barking, press the Stimulation button and give the command “No” or” No barking.”
- Release the Stimulation button immediately once your dog stop barking, and verbally praise him.
- If your pet ignores the stimulation, increase the Intensity Level by 3 to 5.
- Practice this exercise in several different areas.
Pairing
( Notes: You may skip this step because the set is already paired by factory setting. )
- Make sure the Receiver is turned off.
- Press and hold Switch for 5 secs until the green light is flashing fast.
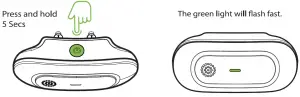
- Press the remote Pairing/Channel Select button D to paring the receiver.
- Pairing successful: the receiver will beep and t he green light flash slowly.
Two, Three, Four Receiver System
( Note: Please skip this step if you only use one receiver. This setting only for multiple receiver with one remote.)
Part I : Pairing 2nd, 3rd, or 4th Receiver.
( Note: You should buy an additional receiver collar.)
● Receiver:
- Make sure the Receiver is turned off.
- Press and hold Switch for 5 secs until the green light flashes fast.
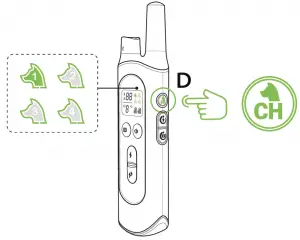
● Remote: - Press and hold channel button D, at the same time, rotating the level
regulator A to select the dog icon. ( For examples Dog 2, the Dog 2 icon will flash.) - Press the remote Pairing/Channel Select button D to paring the receiver.
Part II : Receiver Switching:
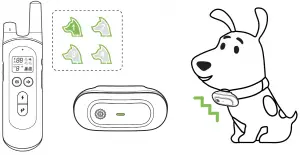
- Able to train 4 dogs at the same time.
- Press and hold channel button D, .at the same time, rotating the level regulator A to select the dog to train.
Part Ill: Reset all paired receiver collar.
- Make sure the remote is “ON”.
- Press and hold Static level button C and Vibration level button B, at the same time, turning the regulator switch A OFF to ON. All paired receiver will be removed and the dog 1 icon w1ill flash.
- Pairing the receiver again.
Question and Answer
How to change the longer prongs for this collar? I don’t think they are getting through my Labs thick hair.
Answer:
Just part the hair or trim it a bit. I have a dog with very thick neck of hair. I parted it with my hands . Just be sure remote is off then start on low setting and work your way up. If no response repeat steps of working prongs thru hair remember to turn off or lock remote.
Troubleshooting
- My pet is not responding when I press a beep vibration or static button.
● Check the Receiver Collar if it is On.
● Please check to see if the battery is low in either the Remote Transmitter or Receiver Collar.
● Verify the Receiver Collar is delivering Stimulation to your pet by placing the Test Light, enclosed in your kit, on the Receiver Collar.
● Increase the correction level. Refer to “Find the Best Stimulation Level For Your dog”.
● Make sure the Receiver Collar’s Contact Points are placed snugly against your pet’s skin. - The Receiver Collar will not turn on.
● Make sure the Receiver Collar has been charged. - The Receiver Collar is not responding to the Remote Transmitter.
● Verify the Receiver Collar has been turned on.
Compliance
FCC Statement
This device complies with part 15 of the FCC Rules. Operation is subject to the following two conditions:
(1) This device may not cause harmful interference, and (2) this device must accept any interference received, including interference that may cause undesired operation.
CAUTION: Modification or changes to this equipment not expressly approved by Radio Systems Corporation may void the user’s authority to operate the equipment.
NOTE: This equipment has been tested and found to comply with the limits for a Class B digital device, pursuant to part 15 of the FCC Rules. These limits are designed to provide reasonable protection against harmful interference in a residential installation. This equipment generates, uses, and can radiate radio frequency energy and, if not installed and used in accordance with the instructions, may cause harmful interference to radio communications. However, there is no guarantee that interference will not occur in a specific installation. If interference does occur to radio or television reception, which can be determined by turning the equipment off and on, the user is encouraged to try to correct the interference by one or more of the following measures:
- Reorient or relocate the receiving antenna.
- Increase the separation between the equipment and the receiver.
- Connect the equipment to an outlet on a circuit different from that to which the receiver is connected.
- Consult customer care, the dealer, or an experienced radio/TV technician for help
FAQS
What is the difference between the PetSafe and SportDog models?
The PetSafe model is designed for small dogs, while the SportDog model is designed for medium to large dogs. The PetSafe model has a range of up to 1/2 mile, while the SportDog model has a range of up to 1/2 mile. The PetSafe model has a rechargeable battery, while the SportDog model uses AAs. Both models are waterproof and have a tone and vibration mode. Both models are available in black or orange.
What’s the difference between the PetSafe Deluxe and Deluxe Plus models?
he Deluxe Plus model has an additional 5 levels of stimulation, so there are 10 levels total. It also has an additional beep tone, so there are 5 total beep tones. And it has an additional vibration mode, so there are 3 total vibration modes.
Is this system waterproof?
Yes, both the handheld remote and receiver collar are waterproof. However, if you submerge either device in water for an extended period of time (longer than one minute), you will void your warranty. If you accidentally drop it in water or get caught in a rainstorm with it on, just wipe it off with a towel and let it air dry before using it again.
How long does the battery last?
The battery lasts about 2 weeks if used 2 hours per day on level 8 stimulation (the highest level). If you use lower levels of stimulation or if you use it less frequently, then the battery will last longer. If your dog is particularly stubborn or hard-headed and requires higher levels of stimulation for training, then you may need to replace the battery more often than every two weeks.
How do I know when I need to replace my batteries?
You will know when your batteries need replacing because your receiver collar will begin beeping every few seconds when you press your button to activate it. This is a low battery warning that tells you that your batteries should be replaced soon. When this happens, go ahead and replace them right away so that they don’t die in the middle of training!
How do I change my batteries?
First remove your old batteries by gently prying them out with a small screwdriver or other similar tool (they should pop right out). Then insert your new batteries as shown in Figure 3a below (positive side up), making sure that they are oriented correctly (as shown in Figure 3b below). Your new batteries should last about 2 weeks if used 2 hours per day on level 8 stimulation (the highest level). If you use lower levels of stimulation or if you use it less frequently, then the battery will last longer. If your dog is particularly stubborn or hard-headed and requires higher levels of stimulation for training, then you may need to replace the battery more often than every two weeks.
Would this work for 5-6 pound dogs? I do t see it listed anywhere?
NVK dog shock collar is suitable for all sizes dogs from 10 to 110 lbs.
Why isn’t My collar charging?
Same with mine. Only one battery charging. I contacted NVK and they wanted pictures which i sent showing only one battery charged. No answer back after pictures sent.
How do I sync the remote to collar number 2?
Here are the pairing steps:
1: Long press the receiver for 15 seconds, the LED light will start to flash
2: Rotate the remote control switch button at the same time to select the channel number (1-4) …
Does this shock itself when nobody isn’t home?
Not
For barking is it automatically set or do you have to manually use the remote for barking
This does not automatically shock. You have to push the buttons on the remote to activate either sound, vibrate or shock when your dog does an undesirable behavior.
How long is the warranty
2 years
Will this fit a st Bernard?
It fits my great pyraneese
Will this collar autocorrect a barking dog without using the remote?
No, it only works by pressing one of the shock buttons.
How young can a dog be to use this?
This dog training collar is suitable for small, medium, and large dogs from 10-110 lbs. The straps of the shock collar can be adjusted in length according to your dog’s size, which is very convenient.
How large are the collars? My 7 month old puppies are 96 lbs.
This dog training collar is suitable for small, medium, and large dogs from 10-110 lbs. The straps of the shock collar can be adjusted in length according to your dog’s size, which is very convenient.
What size mm is the collar charger 10 or 6?
Don’t bother buying any of this unit, even separately. They have no customer service and do not stand behind their product. I have bought 2 complete units trying to remedy my issue…and neither one works property.
Will this fit 3 lb Yorkie?
Doubtful…we have 10 bishonpoodle and it’s almost too big for him…
VIDEO
![]()