![]() Instruction Manual
Instruction Manual
OMEGA OVEN
OBO698PXB
Thank you for purchasing an Omega appliance
Tailored for the modern aesthetic and lifestyle of busy people, your new Omega Appliance will make a welcome addition to the family.
Omega caters to style-savvy customers who look for a balance between stunning form and clever function. This means a combination of sleek, chic, sophisticated design yet effortless functionality. And we source from the best. The best craftsmanship. The best innovation. From the best international design-houses.
All brought together under an appliance that stands for design-led balance.
Please take the time to read through the following instruction manual to familiarise yourself with the installation, operation requirements, and maintenance to ensure optimum performance.
Further Information
For important information about your Omega Appliances such as warranty registration, manuals, features, and specifications please visit omegaappliances.com.au (if you are in Australia) and omega appliances.com.nz (if you are in New Zealand) or contact our Customer Care team on the below email or phone numbers.
Registering Your Warranty
For peace of mind, you can register your warranty at omegaappliances.com.au. Further information on the Warranty can be found at the end of this manual.
Contact Us
Our customer service team is here to help you with any questions or concerns. They are on call Monday to Friday 8.30am to 5.00pm and of course you can always send an email at your convenience.
Email: [email protected]
Phone: 1300 739 033
To stay up to date and find simple and easy recipes, follow us on our socials:
facebook.com/omegaappliances
instagram.com/omegaappliances_aus
READ THE INSTRUCTION BOOKLET BEFORE INSTALLING AND USING THE APPLIANCE.
It is important that you retain these instructions, proof of purchase as well as other important documents about this product for future reference. The manufacturer will not be responsible for any damage to property or to persons caused by incorrect installation or improper use of the appliance. Due to continual product development, Omega reserves the right to alter specifications and appearances without notice.
Disposal Information
- Most of the packaging materials are recyclable. Please dispose of these materials through your local recycling depot or by placing them into appropriate collection containers.
- If you wish to discard this product, please contact your local authorities and ask for the correct method of disposal.
Important Safety Warnings
- This User Instruction Manual contains important information, including safety & installation points, which will enable you to get the most out of your appliance. Please keep it in a safe place so that it is easily available for future reference; for you or any person not familiar with the operation of the appliance.
- This appliance and its accessible parts become hot during use. Care should be taken to avoid touching heating elements.
- Children less than 8 years of age shall be kept away unless continuously supervised.
- This appliance is not intended for use by persons (including children) with reduced physical, sensory or mental capabilities, or lack of experience and knowledge unless they have been given supervision or instruction concerning the use of the appliance by a person responsible for their safety.
- Children should be supervised to ensure that they do not play with the appliance.
- A steam cleaner is not to be used to clean this appliance.
- Do not use harsh abrasive cleaners or metal scrapers to clean the oven door glass as this can scratch the surface, which may result in the oven glass shattering.
- Warning: The appliance must not be installed behind a decorative door in order to avoid overheating.
- The air must not be discharged into a flue that is used for exhausting fumes from appliances burning gas or other fuels.
 Warning: Danger of fire
 - Do not allow paper or cloth to come into contact with any heating element.
- Never store or use corrosive chemicals, vapors, flammable, or nonfood products in or near the oven. It is specifically designed for use when heating or cooking food. The use of corrosive chemicals in heating or cleaning will damage the appliance and can result in injury
- If food inside an oven should ignite, keep the door closed. Switch off the oven and disconnect from the power supply.
- Exercise caution when opening the door. Standing to the side, open the door slowly and slightly to let hot air and/or steam escape. Keep your face clear of the opening and make sure there are no children or pets near the oven. After the release of hot air and/or steam, proceed with your cooking. Keep the door closed at all times unless necessary for cooking or cleaning purposes.
- Only use utensils that are suitable for use with ovens.
 Warning: Danger of explosion
 - Liquids and other foods must not be heated in sealed containers as they are liable to explode.
- If smoke is observed, switch off the oven and keep the door closed in order to stifle any flames.
- Do not allow any accessories or electric cables to come into contact with the hot parts of the oven.
 Warning: Hot surfaces; risk of burns
 - During use the appliance becomes hot. Care should be taken to avoid touching heating elements inside the oven.
- Warning: Accessible parts may become hot during use. Young children should be kept away.
- Never move racks or pans when they are hot. Wait until they cool.
- This appliance is designed for domestic household use and can be built into a standard kitchen cabinet or housing unit.
- Certain types of vinyl or laminate kitchen furniture are particularly prone to heat damage or discoloration at high temperatures.
- Do not place heavy objects on the oven door or lean them against the oven door whilst it is open, as this can cause damage to the oven door hinges.
- Do not leave hot oil or fat unattended as it is a fire hazard.
- Do not place pans or baking trays directly onto the base of the oven cavity, even if aluminum foil is placed underneath them.
- Do not allow the power cable or plug to come into contact with the hot areas of the appliance.
- Do not install the appliance next to curtains or soft furnishings.
- Do not attempt to lift or move the oven by the oven door or handle, as this can damage it or result in injury to the person lifting the oven.
- Warning: Do not install behind a decorative door in order to avoid overheating.
Installation Instructions
![]() WARNING: This appliance must be installed by an authorized service person or qualified technician, according to the instructions in this guide and in compliance with the current local regulations.
WARNING: This appliance must be installed by an authorized service person or qualified technician, according to the instructions in this guide and in compliance with the current local regulations.
- Incorrect installation may cause harm and damage, for which the manufacturer accepts no responsibility and the warranty will not be valid.
- Prior to installation, ensure that the local distribution conditions (electricity voltage and frequency) and the adjustments of the appliance are compatible. The adjustment conditions for this appliance are stated on the label.
- The laws, ordinances, directives, and standards in force in the country of use are to be followed (safety regulations, proper recycling in accordance with the regulations, etc.).
General Instructions
- After removing the packaging material from the appliance and its accessories, ensure that the appliance is not damaged. If you suspect any damage, do not use it and contact an authorized service person or qualified technician immediately.
- Make sure that there are no flammable or combustible materials in the close vicinity, such as curtains, oil, cloth etc. which may catch fire.
- The worktop and furniture surrounding the appliance must be made of materials resistant to temperatures above 100°C.
- The appliance should not be installed directly above a dishwasher, fridge, freezer, washing machine or clothes dryer.
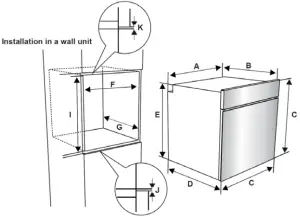
- This appliance is supplied with installation kits and can be installed in a worktop with the appropriate dimensions. The dimensions for hob and oven installation are given below.
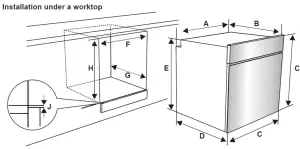
| A (mm) | 557 | min./max. F (mm) | 560/580 |
| B (mm) | 550 | min. G (mm) | 555 |
| C (mm) | 595 | min. H/I (mm) | 600/590 |
| D (mm) | 575 | min. J/K (mm) | 5/10 |
| E (mm) | 574 |
Installation Instructions
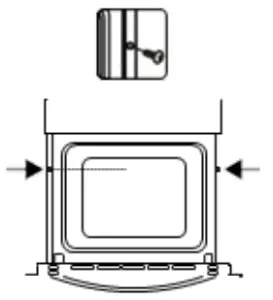
After making the electrical connections, insert the oven into the cabinet by pushing it forward. Open the oven door and insert 2 screws in the holes located on the oven frame. While the product frame touches the wooden surface of the cabinet, tighten the screws.
Electrical Connection
![]() WARNING: The electrical connection of this appliance should be carried out by an authorized service person or qualified electrician, according to the instructions in this guide and in compliance with the current local regulations.
WARNING: The electrical connection of this appliance should be carried out by an authorized service person or qualified electrician, according to the instructions in this guide and in compliance with the current local regulations.
WARNING: THE APPLIANCE MUST BE EARTHED.
- Before connecting the appliance to the power supply, the voltage rating of the appliance (stamped on the appliance identification plate) must be checked for correspondence to the available mains supply voltage, and the mains electric wiring should be capable of handling the appliance’s power rating (also indicated on the identification plate).
- During installation, please ensure that isolated cables are used. An incorrect connection could damage your appliance. If the mains cable is damaged and needs to be replaced this should be done by qualified personnel.
- Do not use adaptors, multiple sockets, and/or extension leads.
- The supply cord should be kept away from hot parts of the appliance and must not be bent or compressed. Otherwise, the cord may be damaged, causing a short circuit.
- If the appliance is not connected to the mains with a plug, an all-pole disconnector (with at least 3 mm contact spacing) must be used in order to meet the safety regulations.
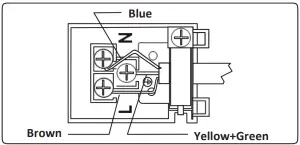
- The appliance is designed for a power supply of 220-240V ~ and 380-415V 3N~. If your supply is different, contact the authorized service person or a qualified electrician. The power cable (H05VV-F) must be long enough to be connected to the appliance, even if the appliance stands on the front of its cabinet.
- Ensure all connections are adequately tightened.
- Fix the supply cable in the cable clamp and then close the cover.
- The terminal box connection is placed on the terminal box.
Operating Instructions
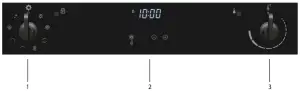 Oven Function Control Knob
- Timer
- Oven Thermostat Control Knob
Oven Functions
 |
Defrost Function The oven’s warning lights will switch on and the fan will start to operate. To use the defrost function, place your frozen food in the oven on a shelf in the third slot from the bottom. It is recommended that you place an oven tray under the defrosting food to catch the water accumulated due to melting ice. This function will not cook or bake your food; it will only help to defrost it. |
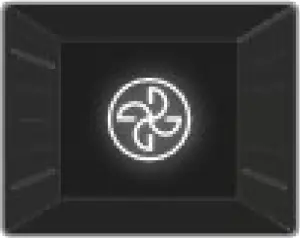 |
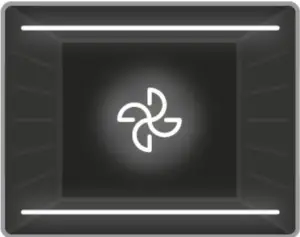
Fan Forced The oven’s thermostat and warning lights will switch on, and the ring heating element and fan will start operating. The turbo function evenly disperses the heat in the oven so all food on all racks will cook evenly. It is recommended that you preheat the oven for about 10 minutes. |
 |
Conventional The oven’s thermostat and warning lights will switch on, and the lower and upper heating elements will start operating. The static cooking function emits heat, ensuring even cooking of food. This is ideal for making pastries, cakes, baked pasta, lasagna, and pizza. Preheating the oven for 10 minutes is recommended and it is best to use only one shelf at a time in this function. |
 |
Conventional + Fan Assist The oven’s thermostat and warning lights will switch on, and the upper and lower heating elements and fan will start operating. This function is good for baking pastry. Cooking is carried out by the lower and upper heating elements within the oven and by the fan, which provides air circulation, giving a slightly grilled effect to the food. It is recommended that you preheat the oven for about 10 minutes. |
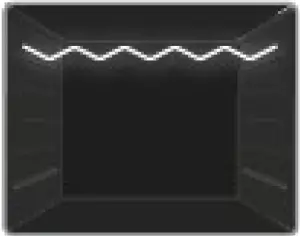 |
Half Grill The oven’s thermostat and warning lights will switch on, and the grill heating element will start operating. This function is used for grilling and toasting foods on the upper shelves of the oven. Lightly brush the wire grid with oil to stop food sticking and place food in the center of the grid. Always place a tray beneath the food to catch any drips of oil or fat. It is recommended that you preheat the oven for about 10 minutes. Warning: When grilling, the oven door must be closed and the oven temperature should be adjusted to 190° |
Operating Instructions
 |
Full Grill The oven’s thermostat and warning lights will switch on, and the grill and upper heating elements will start operating. This function is used for faster grilling and for grilling food with a larger surface area, such as meat. Use the upper shelves of the oven. Lightly brush the wire grid with oil to stop food sticking and place food in the center of the grid. Always place a tray beneath the food to catch any drips of oil or fat. It is recommended that you preheat the oven for about 10 minutes. |
 |
Full Grill + Fan Assist The oven’s thermostat and warning lights will switch on, and the grill, upper eating elements, and fan will start operating. This function is used for faster grilling of thicker food and for grilling food with a larger surface area. Both the upper heating elements and grill will be energized along with the fan to ensure even cooking. Use the upper shelves of the oven. Lightly brush the wire grid with oil to stop food sticking and place food in the center of the grid. Always place a tray beneath the food to catch any drips of oil or fat. It is recommended that you preheat the oven for about 10 minutes. Warning: When grilling, the oven door must be closed and the oven temperature should be adjusted to 190°C. |
 |
Pyrolytic Cleaning Function This function allows you to clean the inside of the oven thoroughly. Warning: Before activating the pyrolytic cleaning function, remove any excessive spillage and make sure that the oven is empty. Do not leave anything inside the oven cavity in order to prevent damage.
|
Operating Instructions
Oven Function Control Table 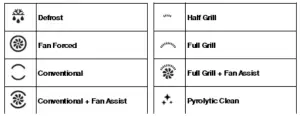 Use of the Digital Timer
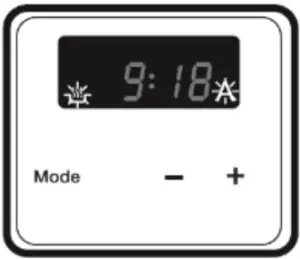
Time adjustment
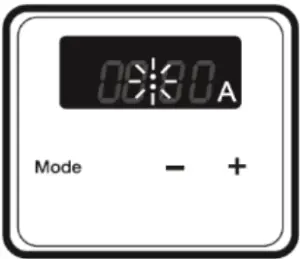
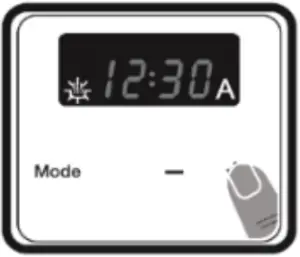
The time must be set before you start using the oven. Following the power connection, the symbol “A” and “00:00” will flash on the display screen.
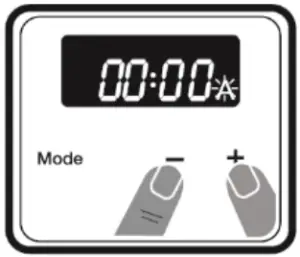 |
1. Press the “+” and “-“ buttons simultaneously. The dots in the middle of the screen will start to flash. |
 |
2. Adjust the time using the “+” and “-“ buttons while the dots are flashing. |
 |
3. After a few seconds, the dots will stop flashing and will remain illuminated. |
Key Lock
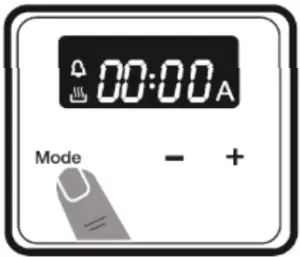
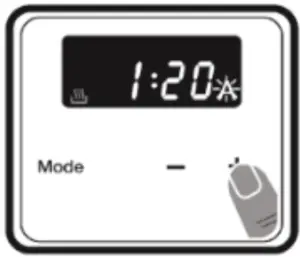
The key lock automatically activates after the timer has not been used for 5 seconds. a symbol will appear and remain illuminated. To unlock the timer buttons, press and hold the MODE button for 2 seconds. The desired operation can then be carried out.
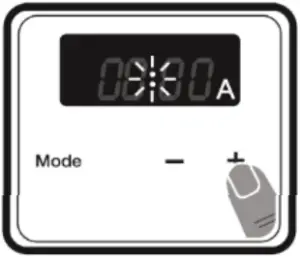
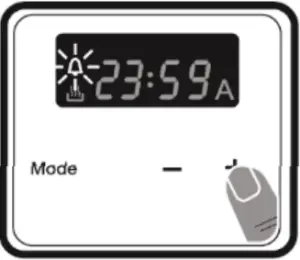
Audible warning time adjustment
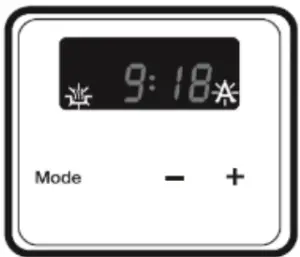
The audible warning time can be set to any time between 0:00 and 23:59 hours. The audible warning time is for warning purposes only, the oven will not be activated with this function.
Operating Instructions
 |
1. Press MODE. The symbol  will start flashing and “000” will appear. will start flashing and “000” will appear. |
 |
2. Select the desired time period using the “+’ and “-“ keys while is flashing. |
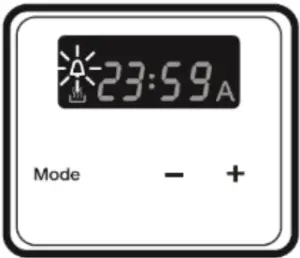 |
3. The symbol will remain illuminated, the time will be saved and the warning will be set. |
When the timer reaches zero, an audible warning will sound and the symbol will flash. Press any key to stop the sound and the symbol will disappear.
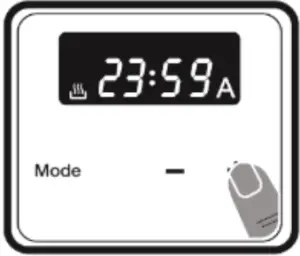
Semi-automatic time adjustment (cooking period)
This function helps you to cook for a fixed period of time. A time range between 0 and 10 hours can be set. Prepare the food for cooking and put it in the oven.
 |
1. Select the desired cooking function and the temperature using the control knob. 2. Press MODE until you see “end” on the screen. The symbol “A” and the current time of day will start to flash. |
 |
3. Use the “+” and “-“ buttons to set the desired finishing time. |
 |
4. The current time will reappear on the screen and the symbols “A” and |
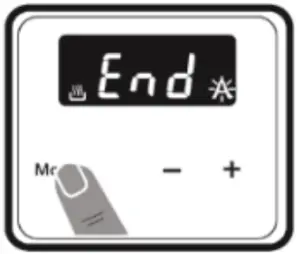
When the timer reaches zero, the oven will switch off, an audible warning will sound and the symbol “A” will flash. Turn both control knobs to the “0” position and press any key on the timer to stop the sound. The symbol will disappear and the timer will switch back to manual function.
Operating Instructions
Full-automatic programming
This function is used to start cooking after a certain period of time and for a certain duration. A time of up to 10 hours after the current time of day can be set. Prepare the food for cooking and put it in the oven.
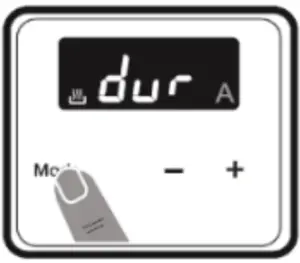 |
1 Select the desired cooking function. 2 Press MODE until you see “dur” on the screen. The symbol “A” will flash. |
 |
3 Select the desired cooking time period using the “+” and “-“ buttons. |
 |
4 The current time will reappear on the screen and the symbols “A” and |
|
5 Press MODE until you see “end” on the screen. The symbol “A” and the current time of day will flash. |
|
6 Select the desired finishing time using the “+” and “-“ buttons. |
 |
7 Add the cooking period to the current time of day. You can set a time of up to 23 hours and 59 minutes after this. |
|
8 The current time will reappear on the screen, and the symbols “A” and |
The operating time will be calculated and the oven will automatically start so that cooking will finish at the set finishing time. When the timer reaches zero, the oven will switch off, an audible warning will sound and the symbol “A” will flash. Turn both control knobs to the “0” position and press any key to stop the sound. The symbol will disappear and the timer will switch back to manual function. Sound Adjustment
To adjust the volume of the audible warning sound, press the MODE button three times while the signal is sounding. The oven function selector knob must be at the “0” position. L3” will appear on the display screen. Press the “+” and “-“ buttons to adjust the sound level. Release the buttons and, after a few seconds, the signal sound volume will be set.
Accessories
The EasyFix Wire Rack
Clean the accessories thoroughly with warm water, detergent, and a soft clean cloth on first use.

- Insert the accessory to the correct position inside the oven.
- Allow at least a 1 cm space between the fan cover and accessories.
- Take care when removing cookware and/or accessories out of the oven. Hot meals or accessories can cause burns.
- The accessories may deform with heat. Once they have cooled down, they will recover their original appearance and performance.
- Trays and wire grids can be positioned on any level from1 to 9.
- Telescopic rails can be positioned on levels T1, T2, T3, 4, 5, 6, 7, 8, and 9.
- Level 3 is recommended for single-level cooking.
- Level T2 is recommended for single-level cooking with telescopic rails.
- Level 2 and Level 4 are recommended for double-level cooking.
- Level T1 and Level T3 are recommended for double-level cooking with telescopic rails.
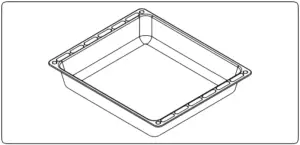 |
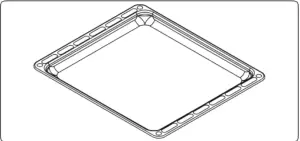
The 8 cm-deep Tray The 8 centimeter-deep tray is best used for cooking stews. Put the tray into any rack and push it to the end to make sure it is correctly placed. For the most efficient use, place the tray on the third shelf. WARNING: The 8 cm-deep tray should not be used on the first (lowest) shelf. It is not recommended to simultaneously cook food using two 8 cm-deep trays. |
 |
The Wire Grid for Deep Trays Make sure the wire grid is correctly placed within a deep tray. It is recommended to use this accessory for grilling steaks, meatballs, and similar food. |
 |
The Shallow Tray The shallow tray is best used for baking pastries. Put the tray into any rack and push it to the end to make sure it is correctly placed. |
 |
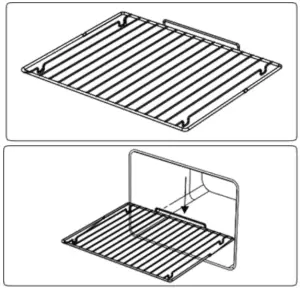
The Wire Rack with Easyfix Half Telescopic Rail The half telescopic rail extends halfway out, to allow easy access to your food. |
Accessories
 |
Telescopic Rails Clean the accessories thoroughly with warm water, detergent, and a soft clean cloth on first use.
|
 |
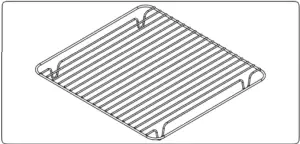
The Wire Grid The wire grid is best used for grilling or for processing food in oven-friendly containers. WARNING: Place the grid to any corresponding rack in the oven cavity correctly and push it to the end. |
 |
The Water Collector In some cases of cooking, condensation may appear on the inner glass of the oven door. This is not a product malfunction.
|
Cleaning and Maintenance
 WARNING: Switch off the appliance and allow it to cool before cleaning is to be carried out.
General Instructions
- Check whether the cleaning materials are appropriate and recommended by the manufacturer before use on your appliance.
- Use cream cleaners or liquid cleaners which do not contain particles. Do not use caustic (corrosive) creams, abrasive cleaning powders, rough wire wool or hard tools as they may damage the cooker surfaces.
- Do not use cleaners that contain particles as they may scratch the glass, enameled, and/or painted parts of your appliance.
- Should any liquids overflow, clean them immediately to avoid parts becoming damaged.
- Do not use steam cleaners for cleaning any part of the appliance.
- Cleaning the Inside of the Oven The inside of enameled ovens is best cleaned while the oven is warm.
- Wipe the oven with a soft cloth soaked in soapy water after each use. Then, wipe the oven over again with a wet cloth and dry it.
- You may need to use a liquid cleaning material occasionally to completely clean the oven.
Pyrolytic Cleaning
WARNING: Before activating the pyrolytic cleaning function, remove any excessive spillage and make sure that the oven is empty. Do not leave anything inside the oven, such as wire grids, trays, or oven shelves and supports (if available), as they could be damaged during pyrolytic cleaning.
- The oven cavity is coated with a special enamel that is resistant to high temperatures. During the pyrolytic cleaning operation, the temperature inside the oven can reach about 475°C.
- The oven door will automatically lock, for your safety, while the pyrolytic cleaning function is in operation. After the cleaning is complete, the cooling fan will begin operating and the oven will
remain locked until it has cooled. - It is advisable to wipe the oven down with a sponge soaked in warm water after each cooking operation or pyrolytic cleaning cycle has been carried out.
- During the pyrolytic operation, a smell and some fumes will emanate due to the destruction of food residue within the oven. This is normal. Oven cleaning fumes could be fatal to birds, children, and pets so all should be kept away until the operation is complete.
- The area where the oven is installed should be kept well-ventilated, especially during the pyrolytic cleaning function, and any doors leading into the area should be closed to avoid passing the smell and fumes throughout.
Cleaning and Maintenance
Cleaning the Glass Parts
- Clean the glass parts of your appliance on a regular basis.
- Use a glass cleaner to clean the inside and outside of the glass parts. Then, rinse and dry them thoroughly with a dry cloth. Cleaning the Stainless Steel Parts
- Clean the stainless steel parts of your appliance on a regular basis.
- Wipe the stainless steel parts with a soft cloth, soaked in only water. Then, dry them thoroughly with a dry cloth.
- Do not clean the stainless steel parts while they are still hot from cooking.
- Do not leave vinegar, coffee, milk, salt, water, lemon, or tomato juice on the stainless steel for a long time.
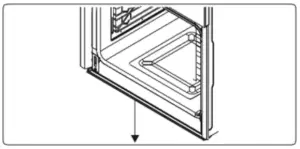
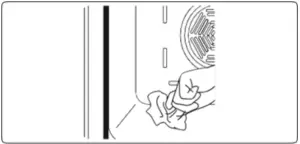
Removal of the Oven Door
Before cleaning the oven door glass, you must remove the oven door, as shown below:
- Open the oven door.
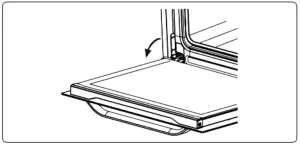
- Open the locking catch (a) (with the aid of a screwdriver) up to the end position.
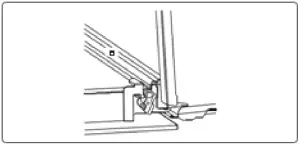
- Close the door until it is almost in the fully closed position, and remove the door by pulling it towards you.

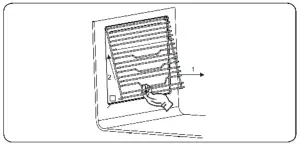
Removal of the Wire Shelf
To remove the wire rack, pull the wire rack as shown in the figure. After releasing it from the clips (a), lift it up.
Cleaning and Maintenance
WARNING: The maintenance of this appliance should be carried out by an authorized service person or qualified technician only. Changing the Oven Lamp
WARNING: Switch off the appliance and allow it to cool before cleaning your appliance
- Remove the glass lens and then remove the bulb.
- Insert the new bulb (resistant to 300 °C) to replace the bulb that you removed (230 V, 15-25W, Type E14).
- Replace the glass lens, and your oven is ready for use. The lamp is designed specifically for use in household cooking appliances. It is not suitable for household room illumination.
Troubleshooting
If you still have a problem with your appliance after checking these basic troubleshooting steps, please contact an authorized service person or qualified technician.
| Problem | Possible Cause | Solution |
| Oven does not switch on. | Power is switched off. | Check whether there is power supplied. Also check that other kitchen appliances are working. |
| No heat or oven does not warm up. | Oven temperature control is incorrectly set. Oven door has been left open. |
Check that the oven temperature control knob is set correctly. |
| Cooking is uneven within the oven. | Oven shelves are incorrectly positioned. | Check that the recommended temperatures and shelf positions are being used. Do not frequently open the door unless you are cooking things that need to be turned. If you open the door often, the interior temperature will be lower and this may affect the results of your cooking. |
| Oven light (if available) does not operate. | Lamp has failed. Electrical supply is disconnected or switched off. |
Replace lamp according to the instructions. Make sure the electrical supply is turned on at the wall socket outlet. |
| The oven fan (if available) is noisy. | Oven shelves are vibrating. | Check that the oven is level. Check that the shelves and any bake ware are not vibrating or in contact with the oven back panel. |
Australian & New Zealand Product Warranty Statements of Standard Warranty Conditions
Australian Customers
Our goods come with guarantees that cannot be excluded under the Australian Consumer Law. You are entitled to a replacement or refund for a major failure and for compensation for any other reasonably foreseeable loss or damage. You are also entitled to have the goods repaired or replaced if the goods fail to be of acceptable quality and the failure does not amount to a major failure.
New Zealand Customers
Nothing herein contained shall be construed in any way as excluding or limiting your rights under the Consumer Guarantee Act 1993.
Our Warranty
This product is also covered by the manufacturer’s warranty set out in this document (Our Warranty). Our Warranty is for a period of twenty-four (24) months from the date of purchase and for refrigeration appliances will have an additional thirty-six (36) months after the first twenty-four (24) months on the Sealed System (PARTS only) Compressor & condenser etc. The labor cost to replace these parts is the responsibility of the customer. This is in addition to (and does not exclude, restrict or modify) any rights or remedies to which you may already be entitled under the Australian Consumer Law or the New Zealand Consumer Guarantee Act 1993 relating to this product. Our Warranty (which is subject to the conditions below) covers rectification free of charge of any fault arising from defective materials or components, or faulty workmanship. The product will be repaired or replaced at the option of Omega, and all costs of installation, removal, cartage, freight traveling expenses, and insurance are to be paid by the customer. Our Warranty is subject to the following conditions:
- That the purchaser contacts Omega prior to any product repair.
- That the purchaser carefully follows all instructions provided with the product and complies with all relevant electrical & plumbing regulations in their State when installing the product.
- That the purchaser carefully follows the instructions provided in the owner’s handbook relating to the proper use and care of the product and does not use the product for any purpose other than the DOMESTIC use for which it has been designed. If the appliance is used in commercial applications or for rental purposes, Our Warranty is limited to a warranty of Twelve (12) months covering all parts with Three (3) months on any labor cost of service or repair.
Service Area
The provision of service under Our Warranty is limited by the boundary/territory area of the nearest service center. Travelling cost incurred for service outside this area is not covered by Our Warranty and service will incur commercial costs to be paid by the customer regulated by the number of kilometers traveled beyond the service area. These costs will be disclosed to you for acceptance by prior to your claim being processed. Microwave ovens must be returned to your nearest Authorised Service Centre for repair as they are a carry-in serviceable appliance. What is Covered by our warranty During the warranty period, Omega or its authorized Service Centre will, at no extra charge, if your appliance is readily accessible without the need of special equipment and subject to the terms and conditions of this warranty, repair or replace any parts which it considers defective.
What is not covered by our Warranty
- Products installed damaged or incomplete or not in compliance with the relevant electrical & plumbing regulations in their State.
- Normal wear and tear e.g. cleaning, light globes, filters, etc.
- Failure resulting from power surges and electrical storms.
- Insect or vermin infestation.
- Unauthorized repairs or use of non-genuine Omega parts.
- Any failure caused by the product not being used inaccordance with the instruction and the installation manual provided with the product.
- Misuse or abuse, including failure to properly maintain or service.
- The clearing of blockages in pumps and hoses.
- Damage that occurs during delivery or installation.
- Claims to product surface coating due to liquid or solid spill-overs, accidental damage or damage caused from cleaning products not recommended by Omega
How to Claim Our Warranty
While registering your warranty is not a requirement, for peace of mind you can register your warranty at omegaappliances.com.au. To make a claim under Warranty you will need to contact Omega in Australia or New Zealand by using the contact details below.
If you are contacting Omega regarding any warranty claims and spare parts inquiries, please make sure you have the following information on hand:
- Product Name/Model Number
- Serial Number/s
- Purchase Date (as per invoice or proof of purchase)
- Purchased From
- Warranty Registration Number (if registered)
Contact Us Australia
Omega is a division of Shriro Australia Pty Ltd
Phone: 1300 739 033
Email: [email protected]
Contact Us New Zealand
Omega is a division of Monaco Corporation (member of Shriro)
Phone: 09 415 6000
Email: [email protected]
![]()
 omegaappliances
 @omegaappliances_aus
Email: [email protected] omegaappliances.com.au Phone: 1300 739 033 omegaapphances.co.nz