
Orbit Sprinkler Timer 94876
Orbit Sprinkler Timer
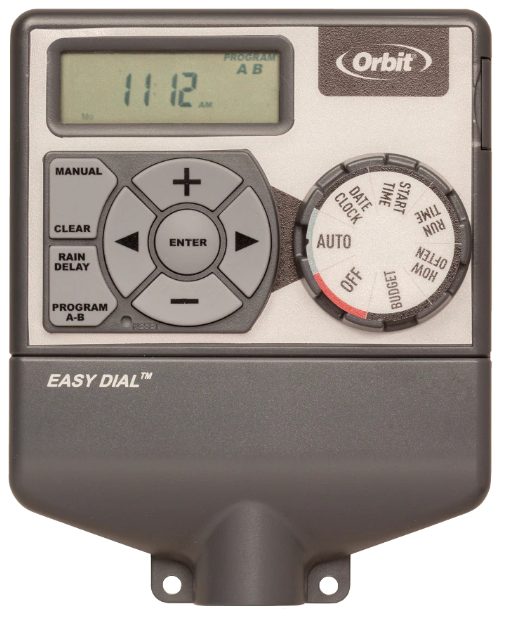
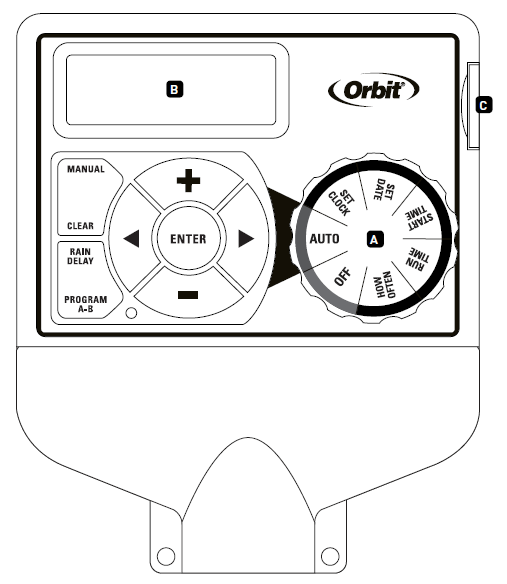
Section 1: Get to know your timer
A: Dial
B: Digital Display
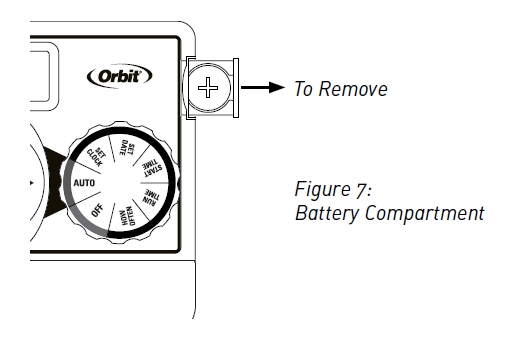
C: Battery Compartment
| Buttons | Function |
| ENTER | To confirm a new setting |
| MANUAL | To water manually |
| CLEAR | To clear a setting |
| PROGRAM | To move between programs: A and B |
| ARROW [ |
To advance to the next setting/watering station or move to other programs/ settings |
ARROW [  ] ] |
To go back to the previous setting/ watering station or move to other programs/settings |
| RAIN DELAY | To pause operation for 24-72 hours due to rain or other factors |
| + | To increase a numeric setting |
| – | To decrease a numeric setting |
| Dial Position | Function |
| AUTO | Set program is running automatically |
| SET CLOCK | Set clock time |
| SET DATE | Year, Month, and day |
| START TIME | Set time to begin watering |
| RUN TIME | Set watering duration for each station |
| HOW OFTEN | Set frequency of watering days |
| OFF | Turn all stations/functions off |
Section 2: Installation
Required Tools
- Phillips Screwdriver
- Wire Strippers
1. Select a Location
When choosing a location for your timer, consider the following:
- Choose a location near an electrical outlet.
- Ensure operating temperatures are not below 0°Celsius or above 70° Celsius.
- Locate the timer where there is easy access to sprinkler wire (from valves).
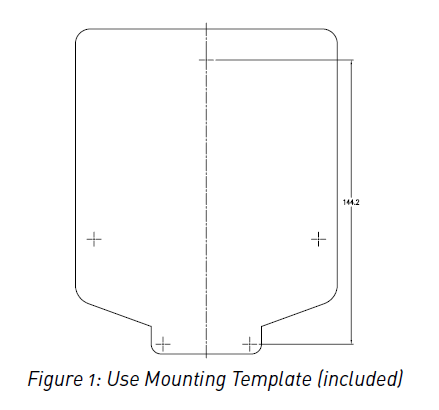
2. Mount the Timer
- Use the mounting template (included) to mark the mounting screw location on the wall. See figure 1
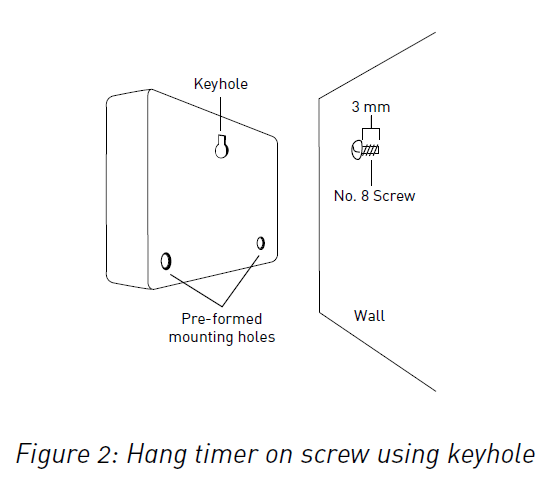
- Install a No. 8 screw into wall in the upper template location. Leave the screw head protruding 3mm from wall. Use expanding anchors (included) in plaster or masonry, if necessary, for a secure hold.
- Slip the timer over protruding screw (using keyhole slot in back of timer). See figure 2
- Drive a No. 8 screw through one of the two pre-formed holes located in lower corners of the cabinet. See figure 2
3. Connect Valve Wires to Timer
- Strip 12 mm of the plastic insulation off the end of each wire for both the timer wires and the valve wires.
- Connect one wire from each valve (it doesn’t matter which wire) to a single “Common” sprinkler wire (usually white).
- Connect the remaining wire from each valve to a separate colored sprinkler wire.
See figure 3
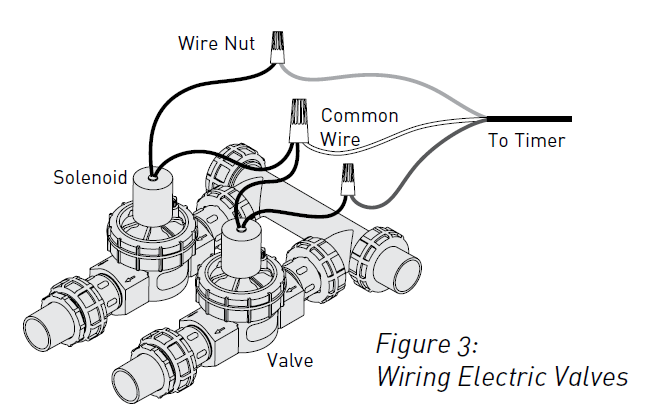
Note: The maximum loading for each station/pump is 250mA (one valve), the maximum loading for the timer is 500mA.
If more than one valve is connected to a station the timer will be permanently damaged.
If the distance between the sprinkler timer and valves is under 210 m, use Orbit® sprinkler wire or 20 gauge (AWG) plastic jacketed thermostat wire to connect the sprinkler timer to the valves. If the distance is over 210 m, use 16 gauge (AWG) wire.
Important: All wires should be joined together using wire nuts, solder, and/or vinyl tape. In wet environments like a valve box it is recommended to use Orbit Grease Caps or Speed Seals to prevent corrosion of the connection and for protection from water infiltration.
Wiring Electric Valves
Strip 12 mm of plastic insulation off the end of each individual wire. Each valve has two wires. One wire (it doesn’t matter which one) is to be connected as the common. The other valve wire is to be connected to the specific station wire that will control that valve. The common wires for all the valves can be connected together to one common wire going to the controller. To avoid electrical hazards and damage to the timer, only one valve should be connected to each station. See Figure 4
Important: The wire can be buried in the ground; however, for more protection wires can be pulled through PVC pipe and buried underground. Be careful to avoid burying the wires in locations where they could be damaged by digging or trenching in the future.
Only connect one valve to each terminal (station) or damage will occur
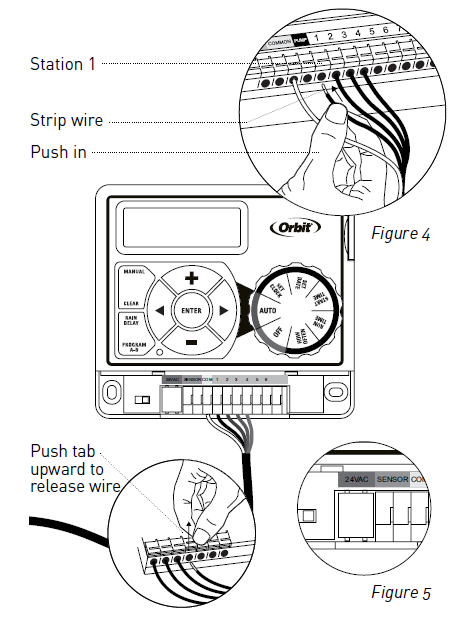
Your timer is equipped with the simple “push-in” terminals for easy connection. Connect common wire to the common terminal. Connect remaining wires to corresponding terminal locations.
4. Connect Electrical Transformer Power
Connect power connector to the timer. Insert the transformer into an 120V electrical outlet. See Figure 5
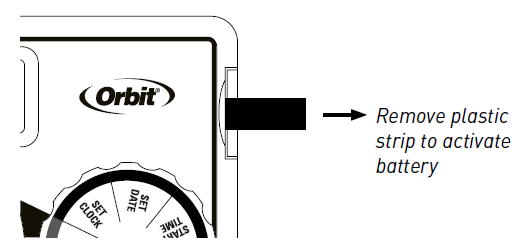
5. Activate Battery
One Lithium CR2032 battery (included) is required to retain the program in memory during power loss. Annual replacement is recommended.
Remove the plastic strip to activate the pre-installed battery. (See page 12 for battery replacement)
Note: The battery alone will not operate the valves in your sprinkler system. The sprinkler timer has a built-in transformer that must be connected to an AC voltage source.
Section 3: Programming with
A note about multiple programs
Your sprinkler timer provides the flexibility of using 2 independent programs (A, B). The programs are where you store all of your sprinkler settings. Each program consists of a group of stations set to specific start times and run times. Multiple programs allow you to run different valves on different days with different run times. While many applications only require one program (A), using multiple programs (A, B) can be useful for drip areas, newly planted lawn, or rotary sprinkler stations. Using programs to group stations with similar water needs will maximize irrigation efficiency.
Primary programming can be accomplished in just a few basic steps.
Primary Programming
Press the [RESET] to clear any previous factory programming
1. Set Clock
- Turn dial to [SET CLOCK].
- Press the [+/–] buttons to set the current time of day.
Tip: To increase or decrease more rapidly, hold down either the [+] or [-] buttons until the display goes into rapid advance mode.
- Press the [
 ] buttons to set am/pm.
 - Turn dial to accept time.
2. Set Date
- Turn dial to [SET DATE].
- Press the PROGRAM button to select which program you’d like to set.
- Press the [ ] buttons to select which stations you’d like to set
- Y/M/D will appear (blinking letter indicates selection).
- Press the [+/–] buttons to set the correct year, then press [ENTER] or [ ].
- Press the [+/–] buttons to set the correct month, then press [ENTER].
- Press the [+/–] buttons to set the correct date.
- Turn dial to accept date.
3. Start time
- Turn dial to [START TIME].
- Press the [+/–] buttons to select time you’d like your watering to begin. (time will adjust in 1 minute increments)
The display will show:
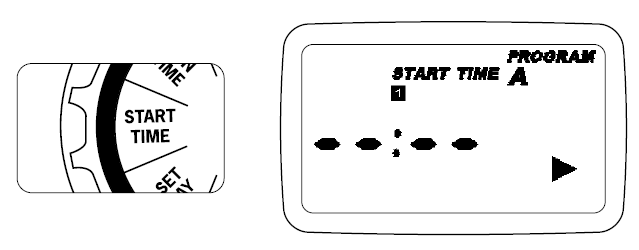
Please note that [START TIME] is the time of day that your programmed watering starts. You can set up to 4 start times at each program if you want to water more than once per day. All stations that have a programmed run time (how long) will run in sequence at each start time.
Note: Start-Time Stacking
When a start time is set before the previous program has completed, that start time will be “stacked” or delayed, and will start upon completion of the previous program.
Example: Bill just planted new grass seed and wants to water three times per day. He sets START TIME 1 for 5am, START TIME 2 for 12pm, and START TIME 3 for 5 pm.
He sets the INT (interval) to water every 1 DAYS (see section 3, HOW OFTEN).
In AUTO mode the system will water 3 times per day. Once Bill’s sod is established he can CLEAR start times 2 and 3 and return to watering just once per day.
4. Run Time
- Turn the dial to [RUN TIME].
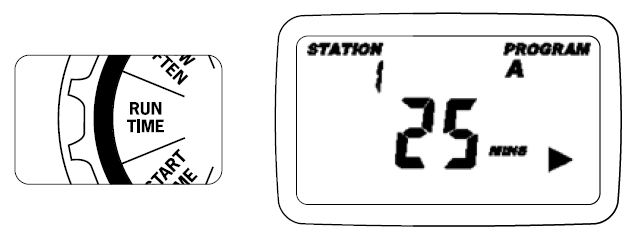
- Press the PROGRAM button to select which program you’d like to set.
STATION is the area that will be watered by each valve. On this screen the RUN TIME or duration for each station is set.
- Press the [ ] to select a station and press the [+/–] buttons to enter the watering duration for that station.
- Press [ENTER] or the [ ] buttons to move to the next station/valve, and enter watering duration for each station.
5. How Often
- Turn the dial to [HOW OFTEN] – this screen allows you to set how often to water.
There are 3 options provided:
- Days of the week (Mon, Tues, Wed, etc.)
- Intervals (Every “X” number of days)
- Odd or Even Days
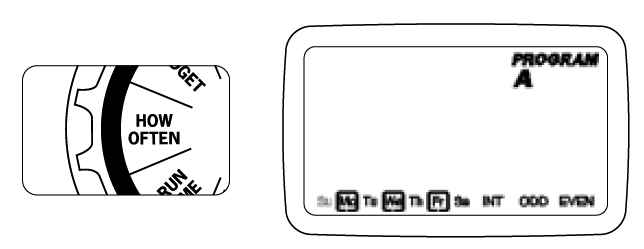
Days of the Week
- Your dial should be set to [HOW OFTEN].
– Press the PROGRAM button to select which program you’d like to set
– Press the [ ] buttons to move from one day to another.
– Press [+] or [ENTER] to select a day for watering. A frame will appear around the selected days. - To delete a previously entered day, press [-] or [CLEAR].
Example: Monday, Wednesday, & Friday Intervals
- Use the [ ] buttons to move to the INTERVAL option “INT”.
- Press [+/–] buttons to select the number of days between watering.
Example: An interval of 1 will water every day; an interval of 3 will water every 3rd day, etc.
Odd or Even Days
- Use the [ ] buttons to move to the ODD or EVEN day watering.
– Press [+] or [ENTER] - Selecting a different option or pressing clear will erase the previous selection.
Example: Odd: 1st, 3rd, 5th, etc.
Example: Even: 2nd, 4th, 6th, etc.
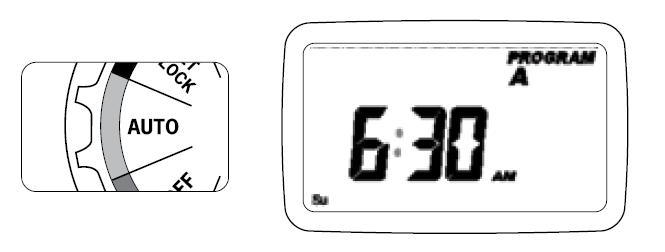
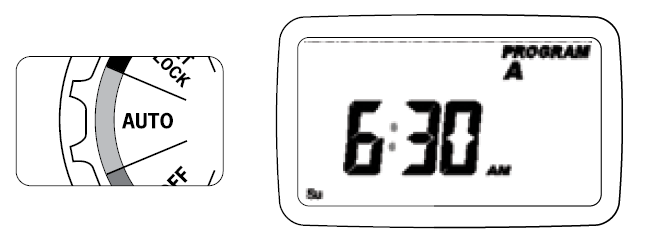
Turn the dial to [AUTO] and that’s it!
You have programmed your timer!
Turn dial to [AUTO] to activate your program.
Note: If your program is lost, the factory installed fail-safe program will turn on each station every day for 10 minutes.
Note: Your prior programming will not be disturbed unless altered. Always be aware of the program you are in (A or B) when you are making changes.
Reviewing and Changing Your Program
If you want to review or change the start times, run times, or how often to water, simply follow the directions again for that option. After reviewing or changing a watering schedule, remember to turn the dial back to [AUTO] for automatic operation.
Section 4: Additional Features
Rain Delay
[RAIN DELAY] allows you to delay your sprinkler timer from watering for a set period of time. Delay settings are 24, 48, and 72 hours.
- Turn dial to [AUTO]
- Press the [RAIN DELAY] button to automatically delay watering for 24 hours.
- If a longer Rain Delay is desired, press the or [+/–] buttons to increase or decrease the setting.
- Press [ENTER] or wait 10 seconds and the selected rain delay will begin.
- [CLEAR] button stops the rain delay and scheduled watering will resume.
- At the end of the selected rain delay amount of time, automatic watering resumes.
- While in rain delay mode, the timer display will switch between the actual time and the remaining hours of the delay, every 2 seconds.
Manual Watering
Your timer has the ability to allow you to manually water without disturbing the preset program.
- Turn the dial to [AUTO].
- Press the [MANUAL] button. Display will show A B and ALL. After a few seconds or by pressing [ENTER] the timer will begin manual watering.
- All stations will water consecutively for their programmed duration.
Note: If the run times have not been set, the timer will not initiate manual watering and the screen will return to the current time.
- To specify a specific program or stations, Press the [ ] buttons to select A or B.
- Press [ENTER] to activate.
- To select a specific station, continue pressing the [ ] buttons until desired station number appears.
- Press the [+/–] to enter the desired duration from 1 to 240 minutes.
- Wait 5 seconds and your station will begin.
- To stop Manual Watering press [CLEAR].
- The timer will go back to your original automatic watering schedule.
Example: To manually water on station 3 for five minutes, press the [MANUAL] button then press the [ ] buttons until you see station 3; using the [+/–] buttons, set duration to five minutes; press [ENTER].
Note: After the [MANUAL] button has been pushed, if a selection is not made within 5 seconds all stations and programs will begin watering using the programmed RUN TIMES. If no RUN TIMES have been set, nothing will happen and the display will return to the time of day.
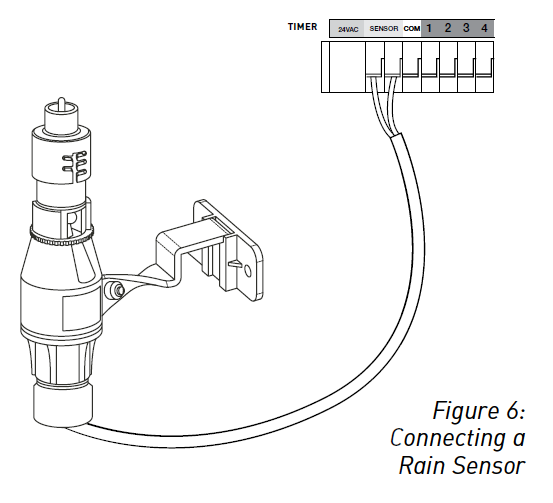
Connecting a Rain Sensor
- Connect the rain sensor wires to the wiring terminal ports (yellow in color) labeled “Sensor” (see figure 6).
Note: Refer to your rain sensor manual for specific wiring instructions.
- Place the sensor on/off switch to the “on” position to begin operation.
Rain Sensor Bypass
This sprinkler timer is equipped with a sensor override “on/off” switch. This switch is for use during maintenance and repairs, so the sprinkler timer can be operated even if the rain sensor is in active mode.
Important: If the rain sensor switch is in the “on” position and no sensor is connected, the sprinkler timer will not operate. To resume sprinkler timer operation place the switch in the off position.
Replacing the Battery
Your timer requires a CR2032 Lithium battery.
- The battery will maintain your program in case of an AC power loss.
- Battery should last approximately one year.
- Open by sliding the battery tray out to the right.
- Insert one CR2032 battery into the compartment with the + side up.
- Slide back into place.
A weak or missing battery can cause the time, date, and program to be erased after a power failure. If this happens, you will need to install a fully charged battery and reprogram the timer.
Tip: Replace battery every year, to avoid loss of programming.
Note: A battery alone will not operate the valves in your sprinkling system. The sprinkler timer transformer must be connected to an AC line voltage source.
Section 5: Reference
| TERM | DEFINITION |
| START TIME | The time the program begins watering the first programmed station . |
| VALVE | supplies water to a specific station or area . The opening and closing of the valve is accomplished through electrical current supplied by the sprinkler timer . |
| MAsTeR VAlVe | Typically located at the main water source . Turns on and off water for the entire irrigation system when not in use . |
| MULTIPLE START TIME | A controller feature that allows a program to be operated multiple times on the same watering day . |
| OVERLAPPING PROGRAMS | When a “start Time” is set for a program before the previous program has completed . |
| PROGRAM ( A OR B) | Individual programs as set by the user . each program operates independently . If one program overlaps the other the programs will be “stacked .” After the first program finishes the next program will begin . |
| RAIN DELAY | A feature that postpones the running of a scheduled watering program for a specific duration . |
| SOLENOLD | The electrical part on an irrigation valve that opens and closes the valve . |
| SPRINKLER TIMER | A device which instructs the station valves to operate . |
| STATION | A grouping of sprinklers operated by a single valve which is controlled by the timer . |
Troubleshooting
| PROBLEM | POSSIBLE CAUSE |
| One or more valves do not turn on | 1 . Faulty solenoid connection 2 . Wire damaged or severed 3 . Flow control stem screwed down, shutting valve off 4 . Programming is incorrect |
| Stations turn on when they are not supposed to | 1 . Water pressure is too high 2 . More than one start time is programmed 3 . AM/PM is incorrect 4 . B program activated |
| One station is stuck on and will not shut off | 1 . Faulty valve 2 . Particles of dirt or debris stuck in valve 3 . Valve diaphragm faulty |
| All valves do not turn on | 1 . Transformer defective or not connected 2 . Programming is incorrect |
| Timer will not power up | 1 . Transformer not plugged into a working outlet |
| Valves continue to turn on and off when they are not programmed | 1 . More than one start time is programmed with overlapping schedules 2 . excessive pressure 3 . B program activate |
HELP
1-800-488-6156 or 1-801-299-5555
www.orbitonline.com
Before returning this sprinkler timer to the store, contact Orbit® Technical Service at: 1-800-488-6156, 1-801-299-5555.
LISTINGS
This Class B digital apparatus complies with Canadian ICES-003.
Disconnection : Type 1Y
Normal Pollution Situation.
TRADEMARK NOTICE
WaterMaster® is a registered trademark of Orbit® Irrigation Products, Inc. The information in this manual is primarily intended for the user who will establish a watering schedule and enter that schedule into the sprinkler timer. This product is intended to be used as an automatic sprinkler timer for activating 24 VAC irrigation valves, as described in this manual.
WARRANTY AND STATEMENT
Orbit® Irrigation Products, Inc. warrants to its customers that its products will be free from defects in materials and workmanship for a period of 3 years from the date of purchase.
We will replace, free of charge, the defective part or parts found to be defective under normal use and service for a period of up to 3 years after purchase (proof of purchase required).
We reserve the right to inspect the defective part prior to replacement.
Orbit® Irrigation Products, Inc. will not be responsible for consequential or incidental cost or damage caused by the product failure. Orbit® liability under this warranty is limited solely to the replacement or repair of defective parts. To exercise your warranty, return the unit to your dealer with a copy of the sales receipt.
FCC STATEMENT
This device complies with Part 15 of the FCC Rules. Operation is subject to the following two conditions:
- This device may not cause harmful interference.
- This device must accept any interference received, including interference that may cause undesired operation.
Warning: Changes or modifications to this unit not expressly approved by the party responsible for compliance could void the user’s authority to operate the equipment.
NOTE: This equipment has been tested and found to comply with the limits for a Class B digital device, pursuant to Part 15 of the FCC Rules. These limits are designed to provide reasonable protection against harmful interference in a residential installation. This equipment generates, uses and can radiate radio frequency energy and, if not installed and used in accordance with the instructions, may cause harmful interference to radio communications.
However, there is no guarantee that interference will not occur in a particular installation.
If this equipment does cause harmful interference to radio or television reception, which can be determined by turning the equipment off and on, the user is encouraged to try to correct the interference by one or more of the following measures:
- Reorient or relocate the receiving antenna.
- Increase the separation between the equipment and receiver.
- Connect the equipment into an outlet on a circuit different from that to which the receiver is connected.
- Consult the dealer or an experienced radio/TV technician for help.
Caution: This appliance is not intended for use by young children or infirm persons without supervision. Young children should be supervised to ensure that they do not play with the appliance.
Caution: Risk of electric shock or personal injury or fire, only use power unit model WR1-41-065R-1 (or WT1-41-065R) with this timer.
Pump Start & Master Valve
The sprinkler timer allows a master valve or pump start relay to operate whenever a station is on.
Note: If you are activating a pump from this timer, you must purchase a Pump Start Relay. From the pump start relay (or master valve); connect one wire to the “Pump” terminal and the other wire to the “Common” terminal.
Download Resources
- Orbit Sprinkler Timer User Manual: [ Download PDF ]
FAQ’S
How do I know if my timer is set to automatic or manual?
The dial will be in the “A” position. If you want to change the setting, turn the dial to the “M” position.
How do I set my timer for a manual watering schedule?
Set the dial to the “M” position.
How do I set my timer for a semi-automatic watering schedule?
Set the dial to the “S” position.
How do I set my timer for an automatic watering schedule?
Set the dial to the “A” position.
How do I program my orbit irrigation timer?
Position press the plus or the minus button to change the time up or down. If you hold the plus or the minus button it will go more quickly to the hour of the day that you need.
Why isn’t my orbit sprinkler timer working?
Check the connection to the docking port to ensure the timer is plugged in properly. Try removing the timer and reinserting it into the docking port, pushing down until you hear a click. If you are still not getting power, the timer may be defective.
Why is my controller not starting the watering cycle?
Check the valve.
Make sure the valve is operating normally by turning the solenoid 1/2″ turn counter-clockwise. Turning the solenoid will turn the valve on manually. Turn the solenoid clockwise until snug to turn off the valve. If the valve will not turn on manually, check the water supply to the valve.
How do I test my orbit sprinkler timer?
Turn the dial to the “Auto” position and move the slide switch for the desired valve up to the “Manual On” position to test valves on Orbit’s “Individual Station Slide” timers. To test all the valves in sequence, simply press the “Manual” key and press “Enter.”
What type of battery does the orbit use?
ORBIT is powered by a CR2025 coin cell battery (included). It lasts 6 months with normal use and 12 months when on standby.
Why do my Orbit sprinklers turn on twice?
A common reason why a program is repeating is that you have a second start time set. The start times control the exact time your ESP-Me timer will begin to water and they also control how many times a day your timer will water.
What size battery does orbit use?
ORBIT is powered by a CR2025 coin cell battery (included). It lasts 6 months with normal use and 12 months when on standby.
Why are my sprinklers running when turned off?
It’s possible your valves were opened manually. Locate your valve box(es) and turn the solenoid(s) clockwise until snug. The solenoid is located on top of the valve and looks like a cylinder with two wires protruding out of it.
]]>
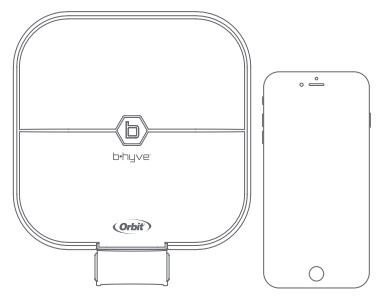
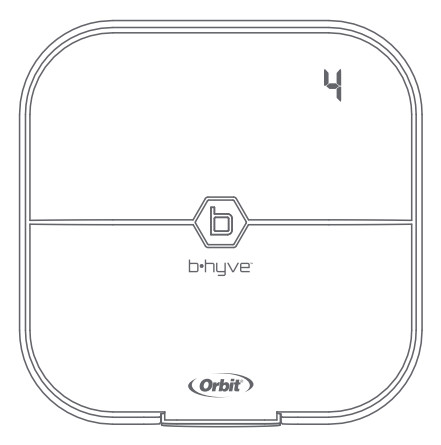
Orbit WT24 B-Hyve Smart WiFi Indoor Sprinkler Timer User Guide
Contents in the Box
- Wi-Fi Indoor Sprinkler Timer
- Screwdriver
- Mounting Screws and Anchors
- Transformer
- Quick Start Guide
- Conduit Cover
FCC and IC Statement
This device complies with Part 15 of the FCC Rules and Industry Canada license-exempt RSS standards. Operation is subject to the following two conditions: (1) This device may not cause harmful interference, and (2) this device must accept any interference received, including interference that may cause undesired operation.
FCC Warning: Any changes or modifications not expressly approved by the party responsible for compliance could void the user’s authority to operate this equipment.
Note: This equipment has been tested and found to comply with the limits for a Class B digital device, pursuant to Part 15 of the FCC
Rules. These limits are designed to provide reasonable protection against harmful interference in a residential installation. This equipment generates, uses, and can radiate radio frequency energy and, if not installed and used in accordance with the instructions, may cause harmful interference to radio communications. However, there is no guarantee that interference will not occur in a particular installation. If this equipment does cause harmful interference to radio or television reception, which can be determined by turning the equipment off and on, the user is encouraged to try to correct the interference by one of the following measures:
- Reorient or relocate the receiving antenna.
- Increase the separation between the equipment and the receiver.
- Connect the equipment into an outlet on a circuit different from that to which the receiver is connected.
- Consult the dealer or an experienced radio/TV technician for help This device meets the FCC and IC requirements for RF exposure in public or controlled environments. The end-user is advised to maintain a distance of 20 cm from the controller and any personnel to ensure compliance with RF exposure regulations.
This Class B digital apparatus complies with Canadian ICES-003
The B-have App
Install the B-have app on your smart device
You will need a smart device to connect the timer to Wi-Fi.
Note: The app will guide you through the initial setup of your sprinkler timer. In addition, there are help icons throughout the app with more information and useful tips.
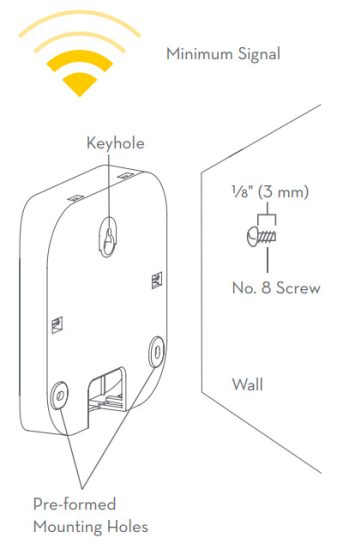
Timer Installation
Select a location
Choose a location near power and away from direct sunlight, if possible.
This location should also have a good Wi-Fi signal. You can check this using a smartphone. (Find a location that has a minimum of two bars)
Note: If replacing a timer, it is helpful to take a photo of the wires before you remove them from the old-timer.
Mount the timer
Install a screw (included) into the wall.
Use the expanding anchors (included) for plaster, masonry, or drywall installations. Hang the timer on the installed screw using the keyhole slot.
Level the timer and use the second screw in one of the preformed mounting holes to secure the timer.
Connect Valve Wires
Prepare wire
Strip 1/2″ (13 mm) of insulation from each wire.
Connect wires
Attach one wire from each valve to a “Common” (COM) wire and the other wires to a numbered terminal (only one wire per terminal.)

Timer Installation–Connecting to Wi-Fi
- Plugin your Orbit® B-have timer
Once your B-have timer is plugged into the power source, it will automatically look to pair with your smart device. They will begin to blink blue. This indicates that your timer is ready to pair with your smart device. Ensure that your smart device has Bluetooth® turned on. - Connect to your Orbit® B-have timer
Open your B-have app, create an account or log in, and follow the step-by-step process to add and set up your device. The B-have app will connect to your device and you will, then, be guided to connect to your home Wi-Fi network. - Connect to your Wi-Fi network
Select your network from the list and enter the password for the network to connect your timer to your Wi-Fi signal. When connected, the will illuminate solid white indicating a successful pairing.
Note: If you do not see your network name in the list, tap the refresh button in the app. If your network name still does not appear, tap “Advanced” in the app and enter your network name and password. This device will only connect through 2.4 GHz Wi-Fi networks. 5.0 GHz networks are not supported and will not appear in your app.
FOR OPTIMUM TIMER PERFORMANCE, CONNECT TO WIFI TO RECEIVE THE LATEST TIMER UPDATES.
Programming and Operation
- Programming the timer
The app has help screens and videos to assist you with Wi-Fi connections, programming, smart watering, and other general questions you may have. - Note: Your programmed schedules are stored both in the app and on the timer. Watering will continue if the Wi-Fi connection is lost.
- Manual Operation
All programming and full functionality of the timer is available in the B-have app. If you have the need, there are some basic operations you can perform directly at your timer.
| Function | Button Press |
| MANUAL WATERING | Hold 0 until R (water ALL stations) appears, then release. Quickly press 0 again until the desired station appears. Default watering is 10 min. per station. |
| CANCEL STATION | Press 0 once to cancel the current station. |
| RAIN DELAY | Set in-app; 0 blinks yellow and d appears. |
| ON/OFF | Hold 0 for 10 sec. until 0 turns white. |
| HARD RESET | Quickly press 05 times. |
Specifications
Transformer ratings:
Input:
Argentina: 230V AC 50Hz 23W
Australia: 240V AC 50/60Hz 23W
Chile: 220V AC 50Hz 23W
Europe: 230V AC 50/60Hz 23W
Peru: 220V AC 50/60Hz 23W
USA:
120V AC 60Hz 23W
Output: 24V 750 mA
Timer ratings:
Input/Output:
Argentina, Australia, Chile, Europe, Peru:
26V AC 750 mA 50/60 Cycle
USA: 24V AC 750 mA 60Hz
Timer Temperature Operating Range:
Operating: 32-158° F (0–70° C)
Storage & transport: -4–176° F (-20–80° C)
Timer Humidity Operating Range:
Operating: 0–80%
Storage & transport: 0–90%
Altitude:
6,500′ (2,000 meters)
RF Specifications:
Technologies: Bluetooth® / WiFi
Frequencies: 2402 – 2480 MHz
EIRP: BT (8.9mW), WiFi (114.29mW)
Installation Class II
Over Voltage Category II
This timer works with any standard 24V irrigation solenoid.
The internal fuse is non-replaceable.
Help
Europe & South Africa
Email:
South America
Phone: +56 2 22419718
Email: | bhyve.orbitonline.com
 This product should not be mixed with general household waste.
For proper treatment, recovery, and recycling, local codes require that you take this product(s) to designated collection points where it will be recycled free of charge.
Acts as a hub for other B-have products Orbit ® Irrigation Products, Inc.
845 North Overland Road
North Salt Lake, UT 84054 USA
FAQS
Does the Orbit WT24 B-Hyve Smart WiFi Indoor Sprinkler Timer work with my sprinkler system?
Yes, the Orbit WT24 B-Hyve Smart WiFi Indoor Sprinkler Timer can be used with any sprinkler system.
Can I control my Orbit WT24 B-Hyve Smart WiFi Indoor Sprinkler Timer remotely?
Yes, you can control your Orbit WT24 B-Hyve Smart WiFi Indoor Sprinkler Timer from anywhere using your smartphone or tablet. You can also control it from your computer using a web browser.
How many sprinklers can I control with my Orbit WT24 B-Hyve Smart WiFi Indoor Sprinkler Timer?
The Orbit WT24 B-Hyve Smart WiFi Indoor Sprinkler Timer can control up to 24 sprinklers at once.
Dose it come with power supply cord?
It comes with a 24 volt AC power pack. One of those wall watt power supply. You run low voltage wires from that wall wart to the controller. I was replacing old controller and used the already existing transformer as the 24 VAC is standard for these.
What if wifi takes a crap? And happens when you’re on vacation? Or won’t shut off & you’re gone 6 hours? Is it like flying w/auto pilot but no yoke?
If wifi is down, nothing happens. If your on vacation you can make a custom schedule for that time
You have complete control of your system, water saturation levels, everything.. And can adjust or change anytime.
How many zones does my Orbit WT24 B-Hyve Smart WiFi Indoor Sprinkler Timer support?
The Orbit WT24 B-Hyve Smart WiFi Indoor Sprinkler Timer supports up to 8 zones.
Can I use my existing wires to connect my Orbit WT24 B-Hyve Smart WiFi Indoor Sprinkler Timer?
Yes, you can use your existing wires to connect your Orbit WT24 B-Hyve Smart WiFi Indoor Sprinkler Timer to your irrigation controller. All you have to do is connect the wires according to the instructions in this manual and then mount the unit on a wall or ceiling using the included mounting hardware.
Can you use 2 different Orbit wifi controllers on same app?
Yes
Does this replace a diaphragm valve, or a timer that a pump is hooked up to?
It controls the opening and closing of diaphragm valves, but it does not replace them. It does have a “pump” circuit, to switch your pump on and off at running times.
Can I remotely turn on a valve manually from the smartphone app? That is why I want to buy a wifi controller.
Yes you can, you can manually control individual valves from the app.
Can a master valve be wired? If so, where does it plug in? Can I plug it at the “pump” terminal?
Yes, you can wire a master valve into the “Pump” terminal.
Can this controller use to control one 24v solenoid for a 4 zone index valve? did anyone tried and succeed ? capable of 4 on/off times in 1 day?
Yes it can! Also…You can set as many on/off times you want in a 24 hour period.
Does this work with Smartthings?
No, it doesn’t work with smartthings.
Is it compatible with Google home mini?
Do not know what google mini is
Does this time have the ability to withstand heat and cold? It would be placed on my garage wall (inside).
The package insert says operating temperature range is 32-158°F (0-70°C), humidity 0-80% and altitude 6,500ft. I have no idea why the altitude would be a limiting factor unless there is a built-in barometric pressure sensor on the circuit board.
Can this replace an old time for four zone system?
It should providing the old system used low voltage (24vac) valves and used a 24vac contactor to start and stop the pump if your system has a pump. If your old system used a mechanical time clock and an indexing valve to switch zones you would need to replace the time clock with a low voltage contactor and program the new controller to switch the pump off and back on to make the indexing change zones. This controller has 5 low power relays internally that the controller uses to turn power on and off to the valves and pump control contactor.
how to change when watering occurs?
Not quite sure what the question is.
If you’re asking about changing settings once your lawn has been watered then all you have to do is open the app and make any changes moving forward.
Is it safe for outside ?
It’s not weather sealed, so no. And it requires the router password for your internet system which means it’s not safe inside OR outside.
why are the dimensions conflicting?
Yes
Can the B-hyve connect over a Verizon cellular mifi for monitoring and use at a remote location?
As long as you have a wifi internet connection between your phone and the controller you should be able to control the unit.
]]>BLUETOOTH HOSE FAUCET TIMER
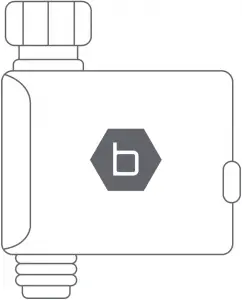
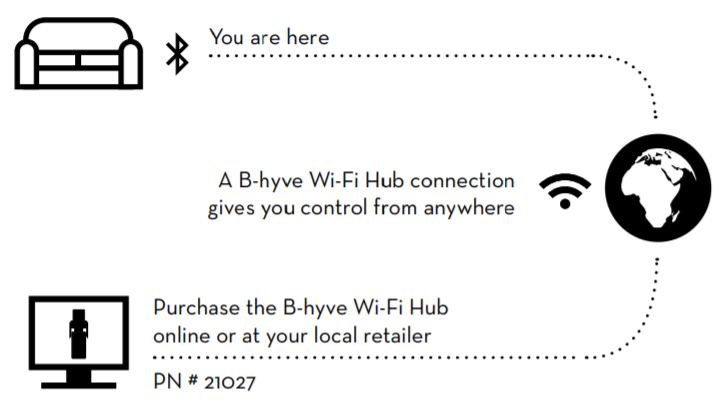
Congratulations on the purchase of your B-hyve Bluetooth Hose Faucet Timer! Faucet watering has never been faster, easier or more convenient with the ability to control it from your phone. You can schedule, manually operate and monitor flow without climbing through your shrubs to access the timer. The timer works much like other Bluetooth devices: if you are within range of the timer you can connect to it with the push of a button via the home screen in the app. Your B-hyve Hose Faucet Timer uses a Bluetooth chip that has great range, up to 150 ft., to maximize the distance from which you can connect. It also allows you to water down to seconds, which is great for gardening, hydroponics, filling pet dishes or even bird baths
If Bluetooth doesn’t provide the flexibility you need, you can add the B-hyve Wi-Fi Hub to connect to your hose faucet timer from anywhere in the world. With the addition of a hub you can connect to the Internet and have your timer automatically update and adjust based on the weather forecast.
Whatever your connected outdoor watering needs, B-hyve provides best-in class smart products to help you more effectively manage and control your watering. Thanks for your purchase, and welcome to B-hyve.
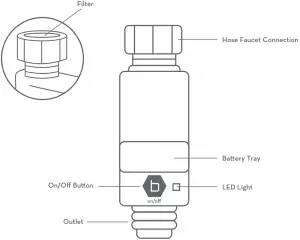
Meet the B-hyve™ Hose Faucet Timer
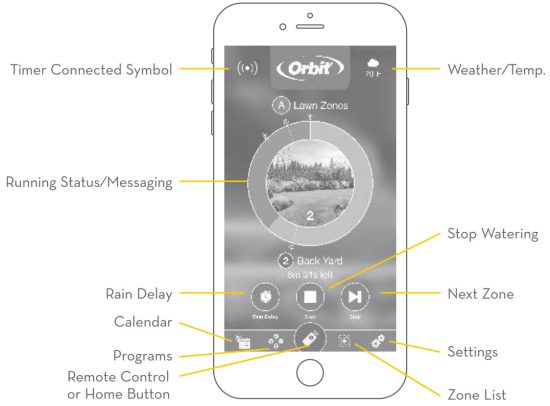
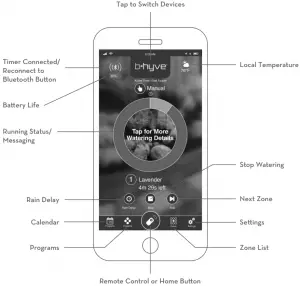
Meet the B-hyve App Home Screen
Initial B-hyve App Setup
1) Download the B-hyve App
If you don’t already have the B-hyve App on your smart device,
search for “B-hyve” and download the free Android or iOS app.


2) Open the B-hyve App
Create an account or login with an existing account to begin timer setup.
3) Add a Device
There is a wizard in the app to guide you through initial set up of your timer.
In addition, there are help icons throughout the app with more information and useful tips.
Initial B-hyve Timer Setup
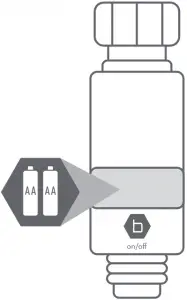
1) Insert Two AA Batteries
Batteries are not included and you will need two alkaline AA batteries to power your timer. Remove the battery tray and install the batteries according to the drawings located in the tray. Firmly reinstall the battery tray back into the timer.
Your timer is now in pairing mode and will flash a blue light every 5 seconds. You will also hear two clicks about 6 seconds apart, this is normal and ensures the valve is closed before you turn on the water.
 If at any time you need to re-pair, press the on/off button quickly 5 times.
Replace batteries when timer flashes a red light every 5 seconds, or when the app notifies you that batteries need replacing.
If you remove or change the batteries, you will need to reconnect to Bluetooth to set the correct time and date.
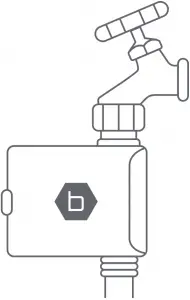
2) Install the Timer Connect the timer to an outdoor hose faucet. Your timer is now ready to be used with any product that can be attached to a standard hose faucet.
Do not place the timer in an underground valve box or anywhere
your Bluetooth signal will be obstructed.
3) Turn on Your Water
The water must remain on for the timer to work properly
Additional B-hyve Timer Features
Manual Watering
Your timer has the ability to allow you to manually water without disturbing the programmed schedule. Manual is used to test equipment, run an extra watering cycle in an area, or to use the hose faucet without removing the timer.

Press and hold the on/off button for 3 seconds to activate manual watering. Using the B-hyve app you can set how long you want the preset manual cycle to run for. Go to Settings>Devices>Device>Preset Runtime. Default runtime is 10 minutes.
Stop Watering
You can stop the flow of water at any time whether it is during manual watering, or during a programmed time.
Press the on/off button once to stop watering.
Manual Watering
The LED Light on your timer will display different colors at different intervals depending how your timer is functioning
| Light Colo | Light Type | Duration | Description |
| Blue | Blink | Every 2 sec. for 10 min. | n pairing mode, ready to connect to your smart device |
| Blue/White | Alternating | 3 sec | Bluetooth connected successfully |
| Green | Blink | Every 5 sec. for 5 min | Watering |
| Red | Blink | Every 5 sec. | Low Battery: Low battery indication at 2.6V and valve shutoff at 2.5V |
| Yellow | Blink | Every 10 sec. | Rain Delay: initiated from app and adds a specified auto watering delay to program |
| White | Blink | Every 2 sec. | Timer is updating |
| Blue/Yellow | Alternating | Every 2 sec. until connected | Attempting to reconnect to your smart device |
| Red/White/Blue | Alternating | Every 2 sec | Identify which device you are connected to |
Timer
Range: 150 ft without interference
Pressure operating range: 10-100 psi
Temperature operating range: 32°f-158°f (0-70°c)
For outdoor use with cold water only
Not for use with appliances
Do not mix alkaline, standard (carbon-zinc), or rechargeable (nickel cadmium) batteries.
Used up or dead batteries must be removed from the timer and disposed of properly.
 WARNING: Battery must be removed from the timer before it is scrapped. Do not dispose of batteries in fire. Batteries may explode or leak.
FCC Statement: FCC ID: ML6HT25
This device complies with Part 15 of the FCC Rules. Operation is subject to the following two conditions: (1) This device may not cause harmful interference, and (2) this device must accept any interference received, including interference that may cause undesired operation.
FCC Warning: Any changes or modifications not expressly approved by the party responsible for compliance could void the user’s authority to operate this equipment.
Note: This equipment has been tested and found to comply with the limits for a Class B digital device, pursuant to Part 15 of the FCC Rules. These limits are designed to provide reasonable protection against harmful interference in a residential installation. This equipment generates, uses, and can radiate radio frequency energy and, if not installed and used in accordance with the instructions, may cause harmful interference to radio communications. However, there is no guarantee that interference will not occur in a particular installation.
If this equipment does cause harmful interference to radio or television reception, which can be determined by turning the equipment off and on, the user is encouraged to try to correct the interference by one of the following measures:
• Reorient or relocate the receiving antenna.
• Increase the separation between the equipment and the receiver.
• Connect the equipment into an outlet on a circuit different from that to which the receiver is connected.
• Consult the dealer or an experienced radio/TV technician for help.
This device meets the FCC and IC requirements for RF exposure in public or controlled environments. The end user is advised to maintain a distance 20 cm from the timer and any personnel to ensure compliance with RF exposure regulations.
IC Statement: IC: 3330A-HT25
This device complies with Industry Canada license exempt RSS standard(s). Operation is subject to the following two conditions: (1) This device may not cause harmful interference, and (2) this device must accept any interference received, including interference that may cause undesired operation. This Class B digital apparatus complies with Canadian ICES-003.
IMPORTANT INFORMATION ABOUT YOUR RIGHTS AND OBLIGATIONS, AS WELL AS LIMITATIONS AND EXCLUSIONS THAT MAY APPLY TO YOU.
- YOUR RIGHTS AND THIS LIMITED WARRANTY
This Limited Warranty gives you specific legal rights. You may also have other legal rights that vary by state, province or jurisdiction. The disclaimers, exclusions, and limitations of liability under this Limited Warranty will not apply to the extent prohibited by applicable law. For a full description of your legal rights you should refer to the laws applicable in your jurisdiction and you may wish to contact a relevant consumer advisory service. - WHAT THIS LIMITED WARRANTY COVERS; PERIOD OF COVERAGE
Orbit Irrigation Products, Inc. (“Orbit”) warrants to the owner of the enclosed product that the product contained in this box (“Product”) will be free from defects in materials and workmanship for a period of two (2) years from the date of delivery following the original retail purchase (the “Warranty Period”). If the Product fails to conform to this Limited Warranty during the Warranty Period, Orbit will, at its sole discretion, either (a) repair or replace any defective Product or component; or (b) accept the return of the Product and refund the money actually paid by the original purchaser for the Product. Repair or replacement may be made with a new or refurbished product or components, at Orbit’s sole discretion. If the product or a component incorporated within it is no longer available, Orbit may replace the Product with a similar product of similar function, at Orbit’s sole discretion. This is your sole and exclusive remedy for breach of this Limited Warranty. Any Product that has either been repaired or replaced under this Limited Warranty will be covered by the terms of this Limited Warranty for the longer of thirty (30) days from the date of delivery or the remaining Warranty Period. This Limited Warranty is transferable from the original purchaser to subsequent owners, but the Warranty Period will not be extended in duration or expanded in coverage for any such transfer. - WARRANTY CONDITIONS; HOW TO GET SERVICE IF YOU WANT TO CLAIM UNDER THIS LIMITED WARRANTY
Before being able to claim under this Limited Warranty, the owner of the Product must notify Orbit of the intention to claim by visiting www.orbitonline.com/contact during the Warranty Period and provide a description of the alleged failure, and comply with Orbit’s return shipping instructions. Orbit will have no warranty obligations with respect to a returned Product if it determines, in its reasonable discretion after examination of the returned Product, that the Product is an Ineligible Product (defined below). Orbit will bear all costs of return shipping to owner and will reimburse any shipping costs incurred by the owner, except with respect to any Ineligible Product, for which owner will bear all shipping costs. - WHAT THIS LIMITED WARRANTY DOES NOT COVER
This warranty does not cover the following (collectively “Ineligible Products”): Products marked as “sample” or sold “AS IS”; or Products that have been subject to: (a) modifications, alterations, tampering, or improper maintenance or repairs; (b) handling, storage, installation, testing, or use not in accordance with instructions provided by Orbit; (c) abuse or misuse of the Product; (d) breakdowns, fluctuations, or interruptions in water supply, electric power or the telecommunications network; or (e) Acts of God, including lightning, flood, tornado, earthquake, or hurricane. This warranty does not cover consumable parts, including batteries, unless damage is due to defects in materials or workmanship of the Product, or software (even if packaged or sold with the product). Orbit recommends that you use only authorized service providers for maintenance or repair. Unauthorized use of the Product or software can impair the Product’s performance and may invalidate this Limited Warranty. Unless explicitly promising a “guarantee,” Orbit does not guarantee or promise any specific level of water savings, garden and lawn health, or other benefit from the use of a Product or any feature of it. Actual water savings, garden and lawn health, and other benefits vary with factors beyond Orbit’s control or knowledge. - Disclaimer of warranties except as stated above in this limited warranty, and
To the maximum extent permitted by applicable law, orbit disclaims all express, Implied, and statutory warranties and conditions with respect to the product, Including the implied warranties of merchantability and fitness for a particular Purpose. To the maximum extent permitted by applicable law, orbit also limits the Duration of any implied warranties or conditions to the duration of this limited Warranty. - Limitation of damages in addition to the above warranty disclaimers, in no Event will orbit be liable for any consequential, incidental, exemplary, or Special damages, including any damages for lost data or lost profits, arising From or relating to this limited warranty or the product, and orbit’s total Cumulative liability arising from or related to this limited warranty or the Product will not exceed the amount actually paid for the product by the original purchaser.
- Limitation of liability you have the ability to use certain orbit services (“services”) with your products. Your use of those services are subject to separate terms of service.
- VARIATIONS THAT MIGHT APPLY TO THIS LIMITED WARRANTY
Some jurisdictions do not allow limitations on how long an implied warranty lasts or exclusions/limitations on incidental or consequential damages, so some of the limitations set out above may not apply to you
1-800-488-6156 or 1-801-299-5555 | [email protected]
www.orbitonline.com | bhyve.orbitonline.com
![]()
![]() B-HYVE XD BLUETOOTH®
B-HYVE XD BLUETOOTH®
HOSE FAUCET TIMER
QUICK START GUIDE
HT32BT

Write down the MAC address: 12 digit alphanumeric code located on the bottom of the timer.
Timer MAC Address: __ __ :__ __ :__ __ :__ __ :__ __ :__ __
Installing the Batteries
Insert two AA (1.5V) alkaline batteries (not included) and replace the tray.
Note: Firmly replace the battery tray to ensure water resistance and increase battery life. You will know the battery tray is fully inserted if it does not pull out easily.
![]() Replace batteries when the low battery icon appears on display.
Replace batteries when the low battery icon appears on display.
 Used up or dead batteries must be removed from the timer and disposed of properly. Do not dispose of batteries in a fire. Batteries may explode or leak. Remove batteries when storing timer.
PROGRAMMING THE TIMER WITH BLUETOOTH®
Open the B-hyve® App
Log into your B-hyve account and tap “My B-hyve”. Go to “Devices” then “add device”. Select the B-have XD timer with two outlets. The app will walk you through the rest of the process.
![]()
![]() For new users, search apps for “B-have” and download the free Android or iOS app. Create an account to begin setup.
For new users, search apps for “B-have” and download the free Android or iOS app. Create an account to begin setup.
![]() The Bluetooth® icon on the display should be flashing indicating the timer is in pairing mode.
The Bluetooth® icon on the display should be flashing indicating the timer is in pairing mode.
![]() If at any time you need to repair or do a factory reset, turn the dial so the arrow is pointing to OFF, press and hold the dial for 5 seconds.
If at any time you need to repair or do a factory reset, turn the dial so the arrow is pointing to OFF, press and hold the dial for 5 seconds.
Note: Your LCD will show Lock Icon to indicate that the timer is using the B-have app to program your timer.
Note: When the display shows a full screen of symbols releases the dial. The display will show 12:00 pm in the AUTO/MANUAL mode verifying the reset has been completed. Resetting the timer will erase all programs and it will have to be reprogrammed to your desired watering schedule.
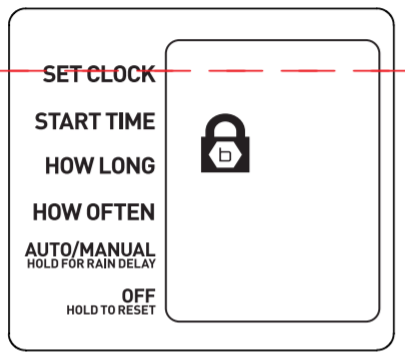
PROGRAMMING THE TIMER AT THE FAUCET
Set Clock
- Turn the dial so the arrow is pointing to SET CLOCK.
- Press the dial to select, the hour will begin to flash.
- Turn the dial until the current hour is displayed including the correct AM or PM, then press the dial to confirm. The minutes will begin to flash, indicating the next step.
- Turn the dial until the current minutes are displayed, then press the dial to confirm.
Start Time
- Turn the dial so the arrow is pointing to START TIME.
- Zone [1] is automatically selected 9noted by the box around it.)
- Press the dial to select, the hour will begin to flash.
- Turn the dial until the desired start time hour is displayed including the correct AM or PM, then press the dial to confirm. The minutes will begin to flash, indicating the next step.
- Turn the dial until the desired minutes are displayed, then press the dial to confirm.
How Long
- Turn the dial so the arrow is pointing to HOW LONG, zone [1] is automatically selected.
- Press the dial to select, the minutes will begin to flash.
- Turn the dial until the desired number of minutes is displayed. Select between 1 to 360 minutes then press dial to confirm
How Often
- Turn the dial so the arrow is pointing to HOW OFTEN, zone [1] is automatically selected.
- Press the dial to select, the number will begin to flash.
- Turn the dial until the desired number of hours or days is displayed, then press to confirm. You may choose to water every 1 hour, 3 hours, 6 hours, 12 hours, or from 1 to 7 days.
Note: 1 is every day, 2 is every other day, etc.
Congratulations!
Zone 1 is now programmed. Turn your dial to AUTO to allow your timer to water according to programmed time and frequency, or complete the steps to program zone 2.
Programming Zone 2
- Turn the dial so the arrow is pointing to START TIME.
- Press the ZONE button to select zone [2], this will set Zone 2 as the default station.
- With Zone 2 now selected, repeat the steps for Start Time, How Long, and How Often.
Congratulations!
Zone 2 is now programmed. Turn your dial to AUTO to allow your timer to water according to programmed time and frequency.
more information on the back![]()
ADDITIONAL FEATURES
Rain Delay
Rain delay allows you to postpone watering for a set period of time. To access the rain delay, follow the steps below.
- With the timer in the AUTO/MANUAL mode, press and hold the dial for 3 seconds.
- The rain delay symbol will appear and the number of days will begin to flash.
- Turn the dial until the desired number of days is displayed, then press to confirm. You may select a delay of 12 hours, 24 hours, or from 2 to 7 days.
- The screen will flash between the clock and the remaining time before the programmed cycle resumes.
![]() To remove a rain delay, press and hold the dial for 3 seconds. The rain delay symbol will turn off and your timer will resume its programmed watering schedule.
To remove a rain delay, press and hold the dial for 3 seconds. The rain delay symbol will turn off and your timer will resume its programmed watering schedule.
Manual/Hand Watering
This feature allows you to water without interrupting your set schedule. To access this feature, follow the steps below.
- With the arrow pointing to AUTO/MANUAL, press the dial to select.
- Manual will appear and minutes will begin to flash.
Zone [1] is automatically selected, press the ZONE button if you want to manually water from Zone [2] - Turn the dial until the desired number of minutes is displayed. Select between 1 to 360 minutes then press the dial to confirm.
- The manual icon will appear and the screen will flash between clock and time remaining before the programmed cycle resumes.
Note: There may be a slight delay between the time the dial is pressed and when watering begins.
![]() To stop manual watering press the dial. The manual watering symbol will turn off and your timer will resume its programmed watering schedule.
To stop manual watering press the dial. The manual watering symbol will turn off and your timer will resume its programmed watering schedule.
![]() If the manual watering runs into the next scheduled event, the next watering event is canceled–manual watering takes priority.
If the manual watering runs into the next scheduled event, the next watering event is canceled–manual watering takes priority.
Timer
Range: 150 ft without interference
Pressure Operating Range: 10-100 PSI
Temperature Operating Range: 35°F-122°F (2-50°C)
For Outdoor Use With Cold Water Only Not For Use With Appliances
FCC Statement: FCC ID: ML6-HT32BT
This device complies with Part 15 of the FCC Rules. Operation is subject to the following two conditions:
(1) This device may not cause harmful interference, and (2) this device must accept any interference received, including interference that may cause
undesired operation.
FCC Warning: Any changes or modifications not expressly approved by the party responsible for compliance could void the user’s authority to operate this equipment.
Note: This equipment has been tested and found to comply with the limits for a Class B digital device, pursuant to Part 15 of the FCC Rules.
These limits are designed to provide reasonable protection against harmful interference in a residential installation. This equipment generates, uses,
and can radiate radio frequency energy and, if not installed and used in accordance with the instructions, may cause harmful interference to radio communications. However, there is no guarantee that interference will not occur in a particular installation.
If this equipment does cause harmful interference to radio or television reception, which can be determined by turning the equipment off and on,
the user is encouraged to try to correct the interference by one of the following measures:
- Reorient or relocate the receiving antenna.
- Increase the separation between the equipment and the receiver.
- Connect the equipment into an outlet on a circuit different from
that to which the receiver is connected. - Consult the dealer or an experienced radio/TV technician for help.
This device meets the FCC and IC requirements for RF exposure in public or controlled environments. The end-user is advised to maintain a distance of 20 cm from the timer and any personnel to ensure compliance with RF exposure regulations.
IC Statement: IC: 3330A-HT32BT
This device complies with Industry Canada license-exempt RSS standard(s). Operation is subject to the following two conditions: (1) This device may not cause harmful interference, and (2) this device must accept any interference received, including interference that may cause undesired operation. This Class B digital apparatus complies with Canadian ICES003.
Need Help?
If you encounter a problem, please use the following resources before returning your B-have to the store.
Scan the QR Code to access the help page online. https://www.orbitonline.com/help-center/
![]() text us
text us
801-905-8260
 email us
[email protected]
 call us
1-801-299-5555
 or visit us at orbitonline.com
 ![]()
 PN 24632-24 rA