Pace 500 Series eBike User Manual
DISPLAY / CONTROL SPECIFICATIONS
- 48 Volt Power Supply
- Current Rated: 10mA
- Maximum Operating Current: 30mA
- Power Off Leakage Current < 1uA
- Operating Current to Controller: 50mA
- Operating Temperature: -18º to 65ºC
- Storage Temperature: -30º to 80ºC
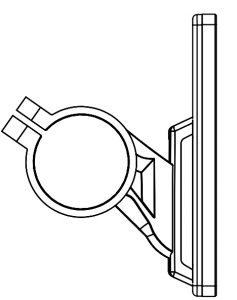
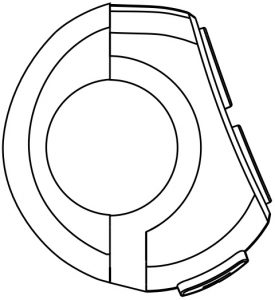
- Display Panel
- (Side View)
- Control pad
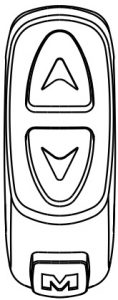
- (Side View)
GETTING STARTED
The Pace 500 is operated using the control pad on the handlebars. The control pad is located near the left-hand brake lever
First, tap the power button on the battery to turn on. The current charge level will be temporarily displayed on the LEDs (4 = full, 1 = near empty), then one green LED to show the battery is turned on. Next, press and hold the “M” button on the handlebar controls to turn on the display. Now, your e-bike is ready to ride. To turn off, press and hold “M” for 3 seconds.
The Pace 500 ebike offers pedal assist. When using pedal assist, an electric motor supplements the rider’s own effort. To use the pedal assist, simply start pedaling, then tap the  or “
or “ ” arrows to increase or decrease the amount of pedal assist from levels 0-5. Pedal assist will engage at speeds up to 28 MPH / 45 KPH.
The Pace 500 ebike is equipped with a throttle, which is mounted near the rider’s left thumb, to propel the bike without pedaling. To use the throttle, start pedaling (one pedal revolution) then apply the throttle. Once the bike is moving on throttle power, you can stop pedaling entirely and use your thumb to control the speed of the bike. The throttle can propel you at speeds up to 20 MPH / 32 KPH.
The motor stops when you: stop pedaling, squeeze the brake levers, or release the throttle. Simply start pedaling again to re- engage the motor.
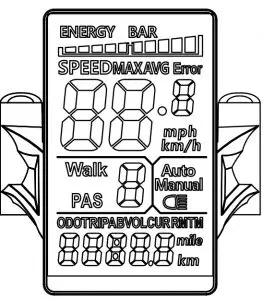
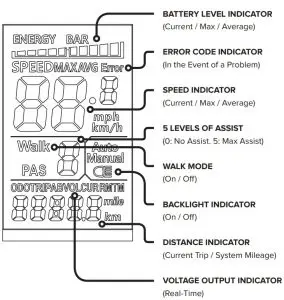
WHAT’S ON THE DISPLAY
While you are riding, you can use the display to monitor your speed, the amount of pedal assist, battery life remaining, and other data.
As shown below, your Pace 500 uses a LCD display screen that looks like this:
USING THE CONTROLS
To turn on your bike, tap the power switch on the battery, then press and hold the “M” button for 3 seconds. To turn off, press and hold the “M” button for 3 seconds, then press and hold the power button on the battery for 2 seconds. The display and battery have an energy-saving feature, if there is no activity for 10 minutes, they will turn off automatically to preserve battery life.
Tap the “” or “” arrows to change the level of pedal assist.
Hold “U” and “M” for 3 seconds to switch between showing realtime speed, average speed, and max speed.
Tap “M” to toggle between the display of the Odometer, Trip
Distance, Voltage, and Elapsed Time.
Press and hold “” for 3 seconds to enable the back light on the display. Press and hold “” again for 4 seconds to turn it off. To enable walk mode, first come to a complete stop and stand next to the bike. Press and hold “” for 3 seconds. The bike will slowly move forward at 3.5 MPH / 6 KPH as long as you hold the “” button. This feature is useful for pushing the bike up a hill or walking through a crowd, where you cannot safely ride.
CUSTOMIZING THE DISPLAY
You can use the settings features of the display to customize the Pace 500 for your use. To enter the “Settings” mode, hold the “” and “” buttons at the same time for 2 seconds.
You can customize 5 out of the 6 different functions on the display. Tap the “M” button to move from function to function, and use the “” and “” arrows to adjust each to your preferences. When you are finished, press and hold the “M” button to save your changes.
Note: The system will save your changes automatically after 8 seconds.
FUNCTION 01P – BACKLIGHT BRIGHTNESS
You can control how bright you’d like the display back light to be. 1 being the dimmest and 3 is the brightest.
FUNCTION 02P – UNIT OF MEASURE
You can toggle between miles or kilometers, based on your preference.
FUNCTION 03P – BATTERY VOLTAGE
This function sets the battery voltage of the system. On the Pace 500, this function is locked at 48V to match the battery and motor, and cannot be changed.
FUNCTION 04P – WHEEL SIZE
This function can be used to change the wheel size to 16, 18, 20, 22, 24, 26, 27.5, or 28” wheels. The Pace 500 comes stock with 27.5” wheels, which is the default and recommended setting. Note: Selecting the incorrect wheel size will affect the accuracy of the bike’s speed, the odometer, and the functionality of its pedal assist
FUNCTION 05P – SPEED LIMIT
The Pace 500 is a California Class III ebike. This designation carries a pedal assist limit of 28 MPH (45 KPH). You can pedal faster without assist, but the motor will stop providing assist when the speed limit is reached. You can use the Speed Limit function to change the speed limit based on your preferences and the law in your area. The Speed Limit function can be set from 20-51 KPH (for reference, that is 12.4 – 31.7 MPH) and is always set in KPH. You should only set the Speed Limit to a value that is safeand legal in your community. This function does not affect the max speed on throttle, which is locked at 20 MPH (32 KPH).
BATTERY AND CHARGING
The Pace 500 uses a Lithium-Ion battery which can be charged on or off the bike. We recommend charging the battery indoors, in moderate temperature conditions. To charge the battery, plug the charger into the charging port and then connect the charger to a wall outlet. The LED indicator light will be red when charging and will turn green when charging is complete. When finished, unplug the the charger from the wall outlet.
Take care of the battery to ensure a long service life:
- Charge and store the battery indoors if possible. The battery can be removed from the bicycle for this purpose
- Avoid extreme hot and cold temperatures
- DO NOT submerge your bike or any of the components in This action will void the warranty.
To optimize the performance of the battery over time, try and use it (discharging and charging) at least monthly. But if you won’t be riding your Level for a long period of time, it’s best to store the battery fully charged. After many charging and discharge cycles, runtime and range will be reduced. Replacement batteries are available from Aventon to extend the life of your ebike. The lifespan of the battery is about 500 charge / discharge cycles.
When you install the battery on the Level, lock it into place with the supplied key. To unlock it for removal, use the key. Do not ride the bicycle if the battery rattles or moves – it should be firmly Attached.
The Pace 500 battery contains a USB port for transmitting diagnostic data only, not for charging. It will not charge or power devices via USB.
MAINTENANCE AND SERVICE
Properly maintaining your Pace 500 ensures its longevity and smooth operation. Before assembling your bike, please watch the “How To Assemble” video we’ve prepared for you. If you have questions during the assembly process, please contact Aventon at (866) 300-3311 or email [email protected].
Once you’re up and running, please make sure to:
- When cleaning your bike, use a damp cloth and gentle dish
Note: DO NOT use a pressure washer or sprayer. - Periodically apply a light bicycle lubricant to moving parts, including the links of the chain, derailleur pivots, and sifter cable inner wire where it enters the cable
- If you ride in wet / humid environments clean and dry electric connections and apply an anti-corrosive.
All bicycles will need a periodic tune-up or adjustments by a professional. An annual “check-up” is beneficial. Your bike’s service schedule will depend on the frequency of its use. In between expert services at a bike shop, we suggest:
- Keep tires inflated to their recommended pressure (30-50 PSI / 0-3.5 BAR / 200-350 KPA) and check weekly.
- Clean the drive train and lubricate the chain (monthly)
For more information about further recommended maintenance, we suggest the excellent video series offered by Park Tool on Youtube.
SAFETY
You should wear an approved bicycle helmet every time you ride a bicycle, regardless of the legal requirement to do so. Additionally, some jurisdictions require helmet use when riding Class III ebikes like the Pace 500. You should comply with local law when riding your Aventon bicycle.
Your Pace 500 comes with reflectors and we encourage you to install and use them. Reflectors are not a substitute for lights, which are not included with your bicycle. You should purchase, install, and use front and rear lights when riding in dim or dark conditions.
Some jurisdictions restrict where bikes can and cannot be ridden. These limits may include specific speeds and motor voltage. Your Pace 500 is a California Class III bike, 500 watts with pedal assist up to 28 MPH and throttle up to 20 MPH. You should only ride it where it’s legal and safe.
Your Pace 500 will run without the throttle plugged in. You can remove the throttle to comply with local regulations if needed.
SAFE STARTING & STOPPING
Remember that if pedal assist is turned on, the motor will turn on and begin to push you forward anytime the pedals rotate (even if you rotate the pedals unintentionally.) That could be unsafe if you weren’t expecting the motor to turn on.
You should turn off pedal assist (by setting the display to level zero) when you are not using it to prevent accidentally engaging the motor on your bike.
The motor interrupt brake levers on Aventon bikes stop the motor from running when they are squeezed. This adds an additional measure of safety – when you are sitting on, or straddling the bike, but not moving, (for example, when stopped at a stoplight) get into the habit of squeezing the brake levers. This habit stops you from accidentally engaging the motor. Release the brake levers when you begin riding and intend to use pedal assist again.
The motor interrupt brake levers can also be used to control your speed in areas where pedal assist is not desired. For example, if you are riding at slow speed through a farmer’s market or downtown pedestrian mall, you can pedal to propel the bike forward, while simultaneously lightly dragging the brakes. This allows you to ride without the motor turning on at all.
When you’re completely done riding your bike, power off both the display and battery (if your model is equipped with a separate power switch on the battery) to prevent accidentally engaging the
motor while parking. Never leave your bike powered on when parking, hanging from a hook in the garage, or while loading your bike onto a car or truck rack for transport.
If your bike ever needs repairs or maintenance (for example: to fix a flat tire) always completely power down the bike before starting work.
ERROR CODES AND TROUBLESHOOTING
In the event of a problem with the electrical components of your bike, the display will show an error code. Compare the code with this list below and HOW TO RESOLVE:
| CODE | ERROR | HOW TO RESOLVE |
| 21 | Current Error Current Limit Exceeded or Damaged Cable |
|
| 22 | Throttle Error Damaged Throttle Cable or Throttle Hall Sensor | When you press and release the throttle, it should return to the original position. Remove any obstructions.
Check the throttle and throttle cable for damage, such as a cut or frayed cable. If this fails to resolve the error code, replace the throttle assembly. |
| 23 | Motor Phase Error Damaged Motor Phase(s) or Damaged Controller | Check the cable that connects the rear hub motor to the rest of the system and make sure it is free from grit or contaminants and is firmly connected. This error might appear if you don’t reconnect the cable after removing the rear wheel (for example, after changing a flat tire.) At least one of the motor phase wires has been damaged or is disconnected. If checking the connection doesn’t resolve the error, replace the motor; replace controller if a new motor doesn’t solve the issue. |
| 24 | Motor Hall Sensor Error Motor Cable Not Connected or Damaged Motor Hall Sensor | If you have confirmed that the motor cable is properly connected, service or replace the rear hub. |
| 25 | Brake Error Loos, Brake Inhibitor Sensor o Brake Has Been Engaged for More Than 5 Secs | The Level uses special brake levers that stop the motor when you apply the brakes – built in “magnetic reed switches” disengage the motor’s power when the lever is squeezed. If the lever is damaged (for example, following a crash), it might need to be replaced. |
| 26 | Overheat Protection Overheated Due to Heavy Use | Turn off the bike, allow the components to cool, then try again to see if the error code disappears. If this does not resolve the issue and the error code remains even when the bike is cool, replace the controller. |
| 27 | Motor Lock Protection Hub Motor Encounters Resistance | Remove the bike from the obstacle, power off, and power on again to resume riding. |
| 28 | Low Voltage Voltage Too Low to Operate | The voltage supplied by the battery is too low to operate the bike. Charge the battery and try again. If the issue persists, check the voltage output on the battery terminals using a volt meter. If a fully-charged battery does not output the correct voltage on the volt meter, battery needs to be replaced. |
| 29 | Over Voltagen Battery Supplying Too Much Voltage to Controller | Make sure you are using the correct battery for your bike. For example, the 48V Pace 500 battery cannot be used to power the 36V Pace 350 ebike, even though they look similar. |
| 30 E1E | Communication Error Controller Has No or Poor Connection to Display | Check all cable connections between the controller and the display and that the connectors are undamaged and not contaminated with grit. If this does not resolve the issue, replace the display. If the bike does not work correctly with a new display, replace the controller. |
| 38 | Battery Voltage Error Low Voltage from Battery or, Wrong Battery | Use the display to view the real-time voltage being output from the battery to confirm it is correct. It can also be checked at the battery terminals using a volt meter. If the battery is old and has been charged/discharged many times, it may need to be replaced. |
| NO CODE | No Pedal Assist Damaged Cadence Sensor | Confirm all cables are connected, then test the bike by using walk mode. If the motor works when using walk mode, but not pedal assist, replace the cadence sensor found under the left- side crankarm. |
ADDITIONAL TROUBLESHOOTING
Having trouble with your Pace 500? Most problems are easy to correct.
- Start by making sure you have a charged battery. You may wish to leave the battery on the charger overnight to ensure a 100% charge before doing additional
- If the motor of your bike will not engage, or only engages intermittently, double check the cable connection where the rear wheel motor plugs into the rest of the This connector must be firmly and fully plugged in to function correctly. If necessary, loosen the clips holding the cable to the frame to create additional slack in the cable, then re-tighten the clips after you have the motor cable firmly plugged in.
- The throttle on the Pace 500 will only engage after the motor is turned on via pedal This is a safety feature designed to prevent you from accidentally engaging the throttle while parking or walking the bike. If you have having difficulty with the throttle, remember to make one revolution of the pedals first, then engage the throttle. You can stop pedaling after the throttle function turns on.
- If you bent the derailleur hanger on your Pace 500 in a fall, don’t worry. It’s actually designed to fail, sparing the more expensive frame, and is inexpensively replaceable for this reason. We’ve included a spare rear derailleur hanger in the accessory box “just in case.” If you need more, they are available on Aventon.com or at partner bike shops.
- If your bike powers up normally and shows no error messages, but will not run when you turn the pedal assist on, check to ensure the cadence sensor under the left crankarm is plugged
BATTERY TROUBLESHOOTING
Your ebike battery uses several sophisticated monitoring systems to prevent damage from overcharging, overheating, deep battery discharge, charging with the wrong voltage, and other errors.
Please use the specific charger supplied with your bike. Other chargers may not supply the correct voltage required for charging. Those that do may not be programmed to initiate the charge cycle. To resolve this:
- Remove the battery from the
- Plug the charging tip into the
- Plug the charger into wall
- Tap the power button on the battery once to turn it
- Charge the battery
- When charging is complete, put the battery back on the bike and check for proper Having trouble with your bike? Most problems are easy to correct.
If a situation occurs that could damage the battery, the battery can go into a protective “sleep mode” – the battery cells inside are OK, but the battery won’t turn on and won’t take a charge. To “wake up” the battery, please follow this procedure:
- Put the battery on the
- Plug the charging tip into the
- Plug the charger into wall
- Tap the power button on the battery once to turn it
- Press and hold “M”on the controls to turn on the display
- Allow the battery to charge overnight
- Once charged, remove from wall power and check for proper overnight
Under specific circumstances you might see one single LED flashing constantly on the battery. One blinking LED is a warning of excessive strain on the battery for its charge level. To correct this issue:
- Reduce the strain on the battery and charge the If it will not take a charge, please take the previous steps to resolve the issue.
FREQUENTLY ASKED QUESTIONS
- Do the components of the Pace 500 and Pace 350 bikes interchange?Some components interchange across the line of Pace bikes, like saddles, seat posts, handlebars, and grips. The bike-specific components, however, like batteries,controllers, displays, and motor do not interchange. Pace 350 is a 36V system vs. 48V on the Pace 500 and these parts are not compatible.
- My Pace bike is too fast for me, or exceeds my local speed limit, or only Class I bikes are allowed on my favorite bike
Pace bikes can have the speed limit changed using the settings in the control panel and can be set as low as 14 MPH if desired to comply with local laws. Pace ebikes can also have the throttle unplugged and removed (but will continue to run on pedal assist) if desired in locations where throttle bikes are not permitted.
- On the Pace line of bikes, I can’t use the throttle from a complete stop, only once I’m Why?
This is a safety feature to prevent you from accidentally engaging the throttle while parking or standing with the bike, if you forget to turn it off and then hit the throttle accidentally. You can engage the throttle at any time while you are pedaling. If you are at a complete stop, you can push the throttle, start pedaling (about one pedal revolution), then stop pedaling, and the bike will stay in throttle mode.
- How many times can I recharge my bike battery?
Lithium-Ion bike batteries use a similar technology to your laptop or mobile phone. They can absorb about 500 charging cycles before performance starts to degrade. Afterwards, they can continue to be recharged, however, their capacity will decrease.
- Can I put a suspension fork on the Pace bike?
Yes, it is possible to put a suspension fork on the Pace line of bikes. You would need a replacement fork with these specs: 1 1/8” to 1.5” tapered steerer tube, 51mm IS mount for disc brakes (or a 74mm mount with an add-on adapter to 51mm), 27.5” / 650B wheel size, and the quick release / open type dropout style. Selecting and installing a suspension fork is probably a job for a bike shop.
- Can I put a suspension seat post on the Pace bike?
Yes, you can add a suspension seat post to your bike. Shop for a model with the same diameter as the seat post you are replacing. The seat post diameter is stamped on the post, near the minimum insertion mark. The Pace 500 uses a 31.6mm and a 30.4mm (Step-Through models) seat posts.
- How fast can the Pace 500 go?
We ship the Pace 500 bike in a “Class III” configuration to meet ebike laws which have been adopted in many states. The user can modify the speed limit using the settings, for example, if you live in a state without bike laws, or if you are riding on private property. During our testing, we have found that the Pace 500 can achieve about 31 MPH on flat ground if you remove the speed limit.
- Do I have to wear a helmet when riding an bike?
This depends on the specific bike class you are riding (I, II, or III), your age, and your state. For more information, visit this page and click on your state.
- What rear rack fits the Aventon Pace e-bikes?
We recommend the Planet Bike Eco Rack. The Pace 500 size S and M need an add-on Planet Bike Extended Length mounting kit. The Pace 500 size L doe - How should I care for my e-bike battery?
Please read this article, Caring for your bike battery. - How can I calculate the capacity of an e-bike battery?
bike battery capacity is measured in Watt-Hours, or Wh. This is the size of the “fuel tank” on the bike. Like a car, some motors guzzle fuel, others sip. To calculate the capacity, multiply the voltage (V) used on the bike by the Ampere-Hour (Ah) rating. For the Aventon Pace 500, for example, multiply 48V by 11.6Ah = 556.8 Wh. More Watt-Hours equals more - Why does the amount of battery remaining shown on the LEDs on the battery not match the “Energy Bar” on the display?
The green LEDs on the battery itself show the remaining charge left in the battery, but this doesn’t account for how you are using the bike. The Energy Bar function on the display is designed to account for the charge on the battery plus other factors, like speed, throttle usage, and riding conditions like hills or wind. You’ll see it fall quickly under heavy usage, and more slowly when you are not taxing the motor. - What are the weight limits for the Pace 500?
Maximum Rider Weight: 250 LB / 113.3 KG
Maximum Cargo Weight: 50 LB / 22.6 KG