
Transmitter
TXCC17
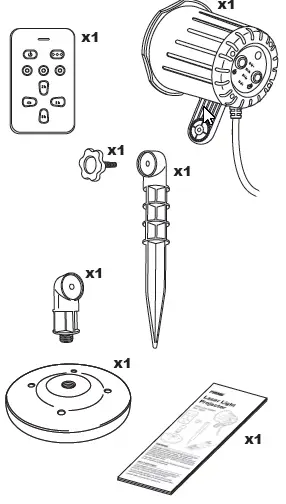
Each Box Contains:
1 Laser Light Projector
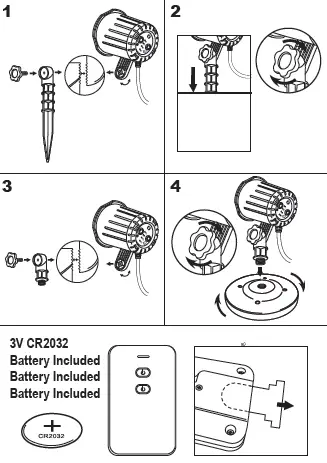
1 Ground Stake
1 ground stake knob
1 Remote Control (3V CR2032 Battery Included)
2 Piece Indoor stand
1 Instruction Manual
Getting Started
Battery Replacement:
Required Tool:
Small Phillips Screwdriver (not included)
PROGRAMMING INSTRUCTIONS
Plug the laser into an outdoor rated GFCI receptacle.
NOTE: When you first plug in the laser
• The default settings are:
• Light Color: Red & Green Mode
• Timer: 6 hours
• The laser light color may be adjusted/set from the Power button on the laser housing.
The time setting may be changed by pressing Xthe X Xsbutton don dthed laser body
- The laser will automatically turn on at dusk each day and run for the time programmed. It may take up to 10 minutes before the laser reaches full brightness.
a. IMPORTANT NOTE: Once you have plugged in the laser to start using it, do not unplug it until done using it in that location. - There are 3 different color display options to choose from: RED & GREEN (default), GREEN ONLY or RED ONLY.
a. RED & GREEN MODE i. As mentioned, when the laser is first plugged into an outlet, this is the default setting.
ii. RED & GREEN Mode
To manually select this mode, press the button on the base of the laser until the laser projects red & green light. The laser must run through a full timer cycle, (one night’s use) for the color mode you selected to be saved to repeat the next night. The color mode will automatically be saved even when the button on the remote control is used to manually turn off the laser.
b. GREEN MODE
i. To manually select this mode, press the button on the base of the laser until the laser projects green light. The laser must run through a full timer cycle, (one night’s use) for the color mode you selected to be saved to repeat the next night. The color mode will automatically be saved even when the button on the remote control is used to manually turn off the laser
i. To manually select this mode, press the button on the base of the laser until the laser projects green light. The laser must run through a full timer cycle, (one night’s use) for the color mode you selected to be saved to repeat the next night. The color mode will automatically be saved even when the button on the remote control is used to manually turn off the laser
c. RED MODE
i. To manually select this mode, press the button on the base of the laser until the laser projects red light. The laser must run through a full timer cycle, (one night’s use) for the color mode you selected to be saved to repeat the next night. The color mode will automatically be saved even when the button on the remote control is used to manually turn off the laser.
ci. POWER OFF
To turn off the laser using the remote control, press the button. The laser will automatically turn on again the next evening at dusk in the last color and timer modes. To turn off the laser manually, press the button until the laser turns OFF. The laser will automatically turn on again the next evening at dusk in the last color mode programmed.
WARNING
This product contains a built-in heater to protect the laser diodes (light source) from freezing. The heater must continue to receive power even when the light is turned off. Failure to maintain the electrical power to this product when temperatures drop below 32°F can cause permanent failure of the laser diodes.
It may take up to 10 minutes after the laser has been turned on for it to achieve full brightness.
c. To manually select the timer setting, press the
button on the base of the laser until the
indicator light next to the desired time setting is
illuminated.
- The laser projector can receive signals from the remote control up to 24.38m (80ft) away. The distance may vary depending on line of sight (such as sending the signal through a wall) between the laser and the remote control.
- To operate properly, and to prolong the life of your laser projector, the laser must not be disconnected from the power source even when it has been turned off, until you are ready to stop using it at the end of the event or season. Store it in a cool, dry place when not in use.
IMPORTANT NOTE: Be sure to read all of the safety information, cautions, helpful tips and trouble-shooting sections of this manual before using this laser projector.
TROUBLESHOOTING
Problem:
Laser Light Projector is too dim.
Possible Cause:
The outside temperature is too cold
Corrective Action:
Allow the Laser Light Projector up to 10 minutes to brighten to full intensity.
Problem:
Laser Light Projector does not turn on at all.
Possible Causes:
• The outside temperature is too cold.
• The outlet the unit is plugged into is not working.
Corrective Action:
• Occasionally, if it is very cold, the Laser Light Projector
will appear to be off for a few minutes before slowly
turning on. Allow the Laser Light Projector up to 10
minutes to warm up to operating temperature.
• Check outlet to ensure flow of electricity:
- If plugged directly into a GFCI receptacle, press the “reset” button. If there is no “reset” button on the outlet but a sticker stating that it is GFCI protected, find the nearest GFCI receptacle in the house or in another area outside and press the “reset” button to ensure that it is activated so power may flow to the outlet where the Laser Light Projector is getting its power.
- Check the circuit breaker in the main electrical panel to ensure that the breaker is set and has not been tripped. If it has tripped, unplug the Laser Light Projector then reset the breaker before trying again.
Problem:
The remote control doesn’t work
Possible Cause:
• The remote control is not synced to the laser projector.
• The distance between the remote control and the laser is too far or the view is impeded.
• Battery is weak or spent.
Corrective Action:
• Move closer to the laser when using the remote control. The range and response will be impeded if the signal is going through solid objects like walls, doors, trees or heavy furniture.
• Replace the battery in the remote control with a new 3V CR2032 battery. Follow the steps outlined in step 6 of the set-up instructions.
To sync the remote control to the laser:
a. Turn OFF and unplug the laser from its power source. Remove the battery from the battery compartment by following the instructions outlined in step 6 of the set-up instructions in this manual. Press any button on the remote twice to discharge the battery.
b. Plug the laser back to its power source. Place the battery into the battery compartment following the instructions outlined in tstep 6 of the set-up instructions of this manual. Press any button on the remote. This will automatically begin syncing the remote to the laser. The blue LED on the remote will blink continuously while syncing. The remote will be synced and ready for use when the LED on the remote stops blinking.
c. If you cannot sync the remote control after following the steps above, contact Prime’s customer service at (888) 445-9955, toll-free between 8:00AM and 4:00PM Pacific Time Zone.
HELPFUL TIPS
• The Laser Light Projector safely operates in temperatures from -26°C up to 32°C (-15°F up to 90°F). It has a built-in heater and fan to help it maintain an optimal operating temperature. For these features to work properly, the Laser Light Projector must be plugged in at all times. In temperatures below 13°C (55°F) please allow up to 10 minutes for the laser to achieve full brightness.
• Do not at any time shine the Laser Light Projector directly into anyone’s eyes or your own.
• Do not place the laser in such a position that it will shine into cars or low flying aircraft.
• Do not place the laser in shaded areas away from direct sunlight. In order for the photosensor feature to work, the laser must detect sunlight and dusk to automatically turn on each day.
BATTERY INFORMATION
WARNING: This product contains a button cell battery. If swallowed, it could cause severe injury or death in just 2 hours. Seek medical attention immediately.
Batteries may explode or leak, and cause burns or injury if disposed in fire, mixed with a different battery type, inserted backwards, or disassembled.
Check with your local solid waste authority or recycling center for detailed information for proper button cell battery disposal.
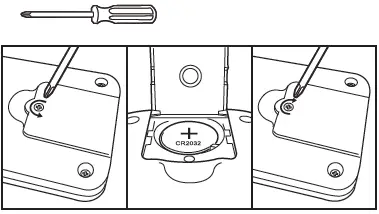
The remote control included with this laser light projector
requires a 3V CR2032 button cell battery. To replace spent batteries, use a Phillips screwdriver to unscrew the battery compartment cover on the backside of the remote control.
The screw loosens when turning it counterclockwise (Fig. 5). To open the plastic battery compartment cover, twist the battery compartment cover counterclockwise with a coin or other flat tool, aligning the arrow on the cover to the UNLOCKED symbol (Fig. 6). Remove the plastic cover over the button cell battery. Make sure the negative side (-) of the battery faces inward and the positive side (+) faces outward (Fig. 7). Align the arrow on the cover with the UNLOCKED symbol on the outside of the remote control.
Twist the battery compartment cover to the right with a coin or other flat tool to align the arrow with the LOCKED symbol. Place the screw back into the designated compartment. Use the Phillips screwdriver, and twist clockwise to close the battery compartment (Fig. 8).
compartment cover on the backside of the remote control.
The screw loosens when turning it counterclockwise (Fig. 5). To open the plastic battery compartment cover, twist the battery compartment cover counterclockwise with a coin or other flat tool, aligning the arrow on the cover to the UNLOCKED symbol (Fig. 6). Remove the plastic cover over the button cell battery. Make sure the negative side (-) of the battery faces inward and the positive side (+) faces outward (Fig. 7). Align the arrow on the cover with the UNLOCKED symbol on the outside of the remote control.
Twist the battery compartment cover to the right with a coin or other flat tool to align the arrow with the LOCKED symbol. Place the screw back into the designated compartment. Use the Phillips screwdriver, and twist clockwise to close the battery compartment (Fig. 8).
SAFETY INFORMATION
This device is for use with a 110 – 125VAC power source.
120V AC/60 Hz
• Do not use with an external remote control, timer or light switch, as the laser contains a heating element for operation in low temperatures that needs power at all times.
• Do not connect your Laser Light Projector to a dimmer at any time as this may damage the laser itself.
• At no point should you shine the laser directly into anyone’s eyes.
• When operating this device in unsupervised, accessible areas, it is recommended that up-close access to the Laser Light Projector is restricted or prevented.
• Do not stare into the laser light source.
• Do not shine the laser into any moving vehicles or low flying aircraft.
• Do not attempt to disassemble the Laser Light Projector as there are no user-erviceable components.• Unplug and store in a cool dry place when not in use.
• Read and follow all instructions on the product and/or operating instructions provided with the product.
• Before using or reusing, inspect the product carefully.
Do not use the Laser Light Projector if there are any cracks in the lens or the housing, cuts or frayed areas in the power supply cord or connection of the cord to the plug, broken plug blades or any other damage that could be deemed a safety hazard.
• Do not directly cover the Laser Light Projector while in use (such as cloth, paper or any material not part of the product that would prevent heat dissipation or be a fire hazard).
• Do not hang ornaments or other objects from the cord or the Laser Light Projector.
• Do not mount or place near gas or electric heaters, fireplaces, candles or other similar heat sources.
• Keep away from children and pets.
WARNING: CHOKING HAZARD
The components packaged with the laser light projector contain small parts.
Keep out of reach of children.
CAUTION
Use of this product other than specified in the instruction manual or on the box may cause harm to yourself or others and may result in unfavorable results when using your Laser Light Projector.
This laser projector is certified as a class 3R/llla laser product to the requirements of the US Federal Laser Product Performance Standard (FLPPS) contained in the regulations in 21 CFR Subchapter J. Class 3R/llla laser products can be hazardous when directly viewed.
Avoid direct viewing of Class 3R/llla laser energy. For reference, the FLPPS requirements for demonstration laser products like laser pointers are limited to Class 3R/llla levels of laser energy. This product uses diffractive optics to scatter the beam energy. This scattering effect causes the energy concentration to drop below the exposure limits for momentary or accidental viewing at a relatively short distance from the laser aperture. As similar with all bright light sources, when operating this device in unsupervised general public areas, it is recommended that up close access to the Laser Light Projector be restricted or prevented.
This laser display device incorporates a Class 3R/llla laser system which, by itself, may be hazardous. However, this laser display device incorporates a protective housing and diffractive holographic optics in the machine design to prevent exposure or human access to laser radiation during operation or maintenance above the Class 3R/llla limits. Each individual laser beam power is under 1mW which is less than a standard laser pointer.
UNDER NO CIRCUMSTANCE shall attempts be made to open protective housing or operate the device if the aperture windows are damaged. Opening the Laser light Projector housing voids any safety agency certifications (cETLus, FCC, FDA
LASER SAFETY INITIATIVE
Aiming a laser at an aircraft is a serious safety risk and violates federal law. Lasers can cause temporary visual impairment for pilots who are trying to fly safely to their destinations and may be carrying hundreds of passengers. The FAA and Transport Canada are working with federal, state, and local law enforcement agencies to pursue civil and criminal penalties against individuals who purposely aim a laser at an aircraft.
FCC REGULATORY STATEMENT
WARNING: Changes or modifications to this unit not expressly approved by the party responsible for compliance could void the user authority to operate the equipment.
This device complies with part 15 of the FCC rules.
Operation is subject to the following two conditions:
- This device may not cause harmful interference, and This device must accept any interference received, including interference that may cause undesired operation.
Notes: This equipment has been tested and found to comply with the limits for a Class B digital device, pursuant to Part 15 of the FCC Rules. These limits are designed to provide reasonable protection against harmful interference in a residential installation. This equipment generates, uses and can radiate radio frequency energy and, if not installed and used in accordance with the instructions, may cause harmful interference to radio communications. However, there is no guarantee that interference will not occur in a particular installation. If this equipment does cause harmful interference to radio or television reception, which can be determined by turning the equipment off and on, the user is encouraged to try to correct the interference by one or more of the following measures: - Reorient or relocate the receiving antenna.
- Increase the separation between the equipment and receiver.
- Connect the equipment into an outlet on a circuit different from that to which the receiver is connected.
- Consult the dealer or an experienced radio/TV technician for help.
IC REGULATORY STATEMENT
Under Industry Canada regulations, this radio transmitter may only operate using an antenna of a type and maximum (or lesser) gain approved for the transmitter by Industry Canada. To reduce potential radio interference to other users, the antenna type and its gain should be so chosen that the equivalent isotropically radiated power (e.i.r.p.) is not more than that necessary for successful communication.
This device complies with Industry Canada licence-exempt RSS standard(s). Operation is subject to the following two conditions: (1) this device may not cause interference, and (2) this device must accept any interference, including interference that may cause undesired operation of the device.
CAUTION / ATTENTION / PRECAUTION
LASER RADIATION. DO NOT STARE INTO BEAM OR VIEW DIRECTLY WITH OPTICAL
INSTRUMENTS. LASER RADIATION WHEN OPEN AND INTERLOCK DEFEATED.
RAYONNEMENT LASER NE PAS FIXER LE FAISCEAU NI REGARDER DIRECTEMENT
AVEC DES INSTRUMENTS OPTIQUES RAYONNEMENT LASER EN CAS
D’OUVERTURE ET DE DISPOSITIF DE VERROUILLAGE DÉFAIT.
RADIACIÓN LÁSER. NO MIRE FIJAMENTE EL HAZ NI LO OBSERVE DIRECTAMENTE CON INSTRUMENTOS ÓPTICOS. RADIACIÓN LÁSER CUANDO ESTÁ ABIERTO Y EL INTERBLOQUEO ESTÁ DESACTIVADO.
532-635nm Max Output <3mW CLASS IIIa LASER PRODUCT This product complies with 21 CFR 1040.10 and 1040.11 Sortie max. 532-635nm <3mW PRODUIT LASER CLASSE IIIa Ce produit est conforme au 21 CFR 1040.10 et 1040.11 Salida máx. de <3mW a 532-635 nm PRODUCTO LÁSER CLASE IIIa. Este producto cumple con 21 CFR 1040.10 y 1040.11