Proscenic 850T Robot Vacuum Cleaner
Important Safety Instructions
To reduce the risk of injury or damage, keep these safety precautions in mind when setting up, using and maintaining your robot vacuum cleaner:
- Read all safety and operating instructions before operating your robot.
- Retain the safety and operating instructions for future reference.
- Pay attention to all warnings on your robot, battery, charging dock and in the user manual.
- Follow all operating and use instructions.
- The external flexible cable or cord of the power supply unit can not be replaced; if the cord or plug is damaged, the power supply unit shall be disposed of.
- This product is designed to be plugged into a standard outlet only. Product may not be used with any type of power converter. Use of power converters will immediately void the warranty.
- CAUTION: Only charge one of the following robot batteries: maximum 14.4V, max2600mAh Ni-MH or maximum 2600mAh Li-ion battery. Other type of batteries may burst causing injury. Always contact Customer Care for the correct replacement of your battery.
- Always charge and remove the battery from your robot and accessories before long-term storage or transportation.
- The battery must be removed from this device before this device is disposed of. To remove the battery from this device, first remove the screws on the bottom, then remove the main PCB and unscrew the battery cover by using a screwdriver. Remove the battery by disconnecting the quick connector.
 WARNING: Chemical Exposure: If the battery pack is leaking, do not allow the liquid to come in contact with skin or eyes. If contact has been made, wash the affected area with copious amounts ofwater and seek medical advice. Place the battery (the used battery pack included when the robot willv be disposed) in a sealed plastic bag and dispose of safely according to local environmental regulation.
- WARNING: Fire or Explosion Hazard: Do not crush or dismantle battery packs. Do not heat or place the battery pack near any heat source or direct sunlight. Do not incinerate or short-circuit the battery pack. Do not subject batteries to mechanical shock.
- Contact your local waste management authority for battery recycling and disposal regulations in your area.
- Your robot is not a toy. Do not sit or stand on robot. Children and pets should be supervised when your robot is operating.
- Robot is for indoor use only.
- Do not use non-rechargeable batteries. Use only the rechargeable battery supplied with the product.
- For replacement, purchase identical robot battery or contact robot Customer Care for alternative battery options.
- Store and operate robot in room temperature environments only.
- Do not spray or pour liquids on your Robot.
- Do not use any other power supply cord. For replacement cords, please contact Customer Care to ensure proper selection of country specific power supply cord.
- Do not use robot to pick up sharp objects, glass, or anything that is burning or smoking.
- Do not immerse the battery pack in any liquid.
Do not use robot to pick up spills of water bleach, paint, or other chemicals, or anything wet. - Before using robot, pick up objects like clothing, loose papers, pull cords for blinds or curtains, power cords, and any fragile objects. If robot passes over a power cord and drags it, there is a chance an object could be pulled off a table or shelf.
- If the room to be cleaned contains a balcony, a physical barrier should be used to prevent access to the balcony and ensure safe operation.
- Do not place anything on top of your robot.
- Be aware that the robot moves on its own. Take care when walking in the area that the robot is operating in to avoid stepping on it.
- Do not operate the robot in areas with exposed electrical outlets in the floor.
- Do not use this device on an unfinished, unsealed, waxed or rough floor. It may result in damage to the floor and this device. Use only on hard floor surfaces or low pile carpet.
- This device has been designed to be used on floors without scratching them. We still recommend that you test this device on a a small area of the room to be cleaned to ensure no scratches are made before cleaning the whole room.
Battery and Charging Information
Lithium-ion Battery
Important: Lithium-ion batteries and products that contain Lithium-ion are subject to stringent transportation regulations. If you need to ship this product (with the battery included) for service, travel or any other reason, you MUST comply with the following shipping instructions:
- Remove the Lithium-ion battery from the product.
- Place a piece of tape over the battery’s metal charging contacts.
- Reinstall the battery (with the tape on it) in the product and secure the battery door.
- Package the product in its original packaging or in your own packaging that prevents any movement during transportation.
- Ship via ground transportation only (no air shipping).
Battery Storage
If storing robot off the charging dock, remove the battery first. Then store robot and the battery in a cool, dry place.
! The symbol on the product or its packaging indicates:
Do not dispose of electrical appliances as unsorted municipal waste, use separate collection facilities.
Contact your local authority for information regarding the collection systems available. If electrical appliances are disposed of in landfills or dumps hazardous substances can leak into the groundwater and get into the food chain, damaging your health and well-being. Please contact your local or regional waste authority for more information on collection, reuse and recycling programs.
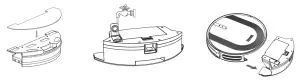
About Your Robot
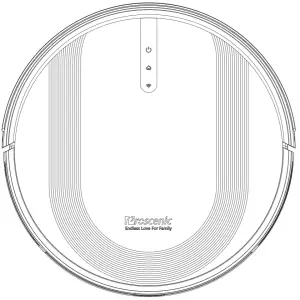
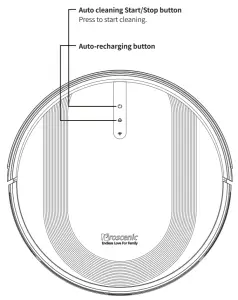
Robot

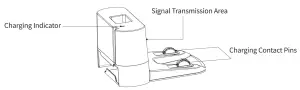
Charging Dock
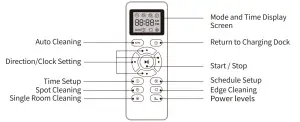
Remote Control
|
Install 2 AAA batteries before using the remote control for the first time. Make sure the positive and negative ends are facing the correct polarity direction as marked in the battery compartment. When using the remote control, please aim at the robot and the effective distance is 0-5m. |
LED Indicator
| LED light | Status |
| Start/Stop Button Recharge Button | Solid blue light: Normal working/pause/standby Blue light flash: is powering on/upgrading firmware Yellow light flash: low battery/recharging Green light flash: charging Solid green light: Fully charged Red light flash quickly: Abnormal/Error Light off: Off/sleep |
| WIFI indicator light flash slowly | Configuring network |
| Solid white light of WIFI indicator light | Successful network configuration |
Using Your Robot
Quick Start
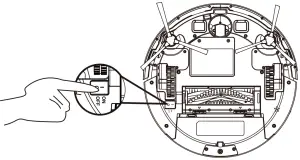
- Plug in the charging dock, and take the rest wire into the trunking at the bottom of charging dock.
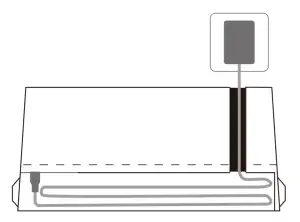
Note: If you don’t put the rest wire into the trunking, it may stuck the robot while charging or cleaning. - Charging Dock Position
1) Place the charging dock on a hard, level surface and against a wall.
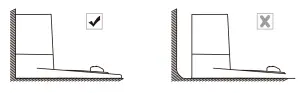
2) Place the charging dock again the wall and make sure the place is open & uncluttered area leaving at least.
• 2 meters (6.5 feet) in front of the charging dock; 1 meter (2.3 feet) on both sides of the charging dock.

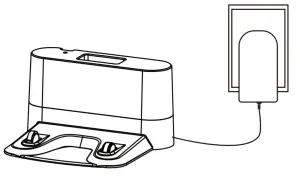
3) Connect the round connector of the adapter into the power socket on the charging dock and the other end into a wall outlet.
Note: Please make sure the the indicator light is on when the charging dock is plugged in, otherwise the robot can not be charged.
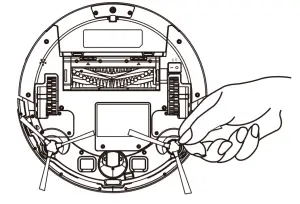
- Install Side Brushes
Attach side brushes to the bottom of robot by pressing a brush into each slot.
- Turn on the main power switch on the bottom of robot.
- Activate the Robot
Place robot onto the charging dock, making sure the metal charging contacts on the charging dock match up with those underneath the robot.
If successful, you will hear a series of tones.

- Start Cleaning Cycle
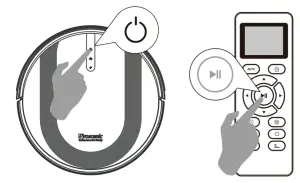
• Press the power button once to wake up the robot.

• Press the power button again or press the  button on remote control to start a cleaning cycle.
- Pause
• To pause the robot during a cleaning cycle, press the button or press the  button on remote control.
• To start the robot, press the button or press the button on remote control.
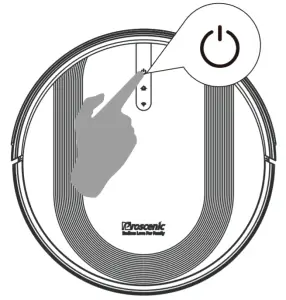
- Power OFF
• To end the cleaning cycle and put robot in standby mode, press and hold button until robot indicators turn off.
How Robot Clean Your Home
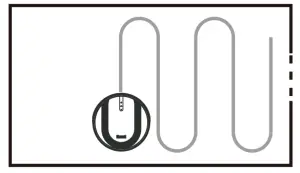
- Auto Cleaning
• Press the button on robot or press the button on remote control to start auto cleaning.
• If the battery is low while the cleaning is not finished, the robot will return to the charging dock for charging.
Warm Tips: During the recharging process, there may be a phenomenon that the charging dock cannot be found. At this time, the robot will flash red light and “BEEP” four times. Please manually put the robot onto the charging dock to charge

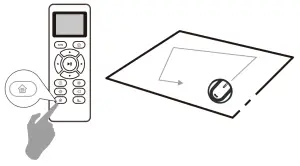
- Spot Cleaning
When you select spot cleaning, robot intensely cleans a localized area by spiraling outward about3 feet (1 meter) in diameter and then spiraling inward to where it started. When spot cleaning, robot boosts vacuum power to provide the best cleaning possible where you need it. To use spot cleaning, place robot on top of the localized debris and press (Spot) on the remote control.

- Power levels
1. When the robot vacuum cleaner is in sweeping mode, press this button to adjust the suction power;
2. When the robot vacuum cleaner is in sweeping and mopping simultaneous mode, press this button to adjust the suction power;
3. When the robot vacuum cleaner is in mopping mode, press this button to adjust the speed of the water output.
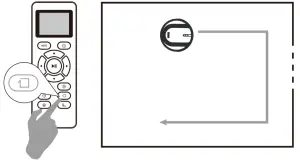
- Edge Cleaning
After robot finishes cleaning the open areas of your floor, it uses edge clean to ensure that it has cleaned along walls and around furniture Legs. If you prefer a quicker edge cleaning, press the button on remote control.
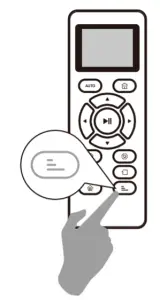
- Single Room Cleaning
Press the button on the remote control to start random cleaning.
Warm Tips: In this mode, the robot will keep cleaning for about 30 minutes and then stop. Please close the door to ensure the robot will not go out the room.
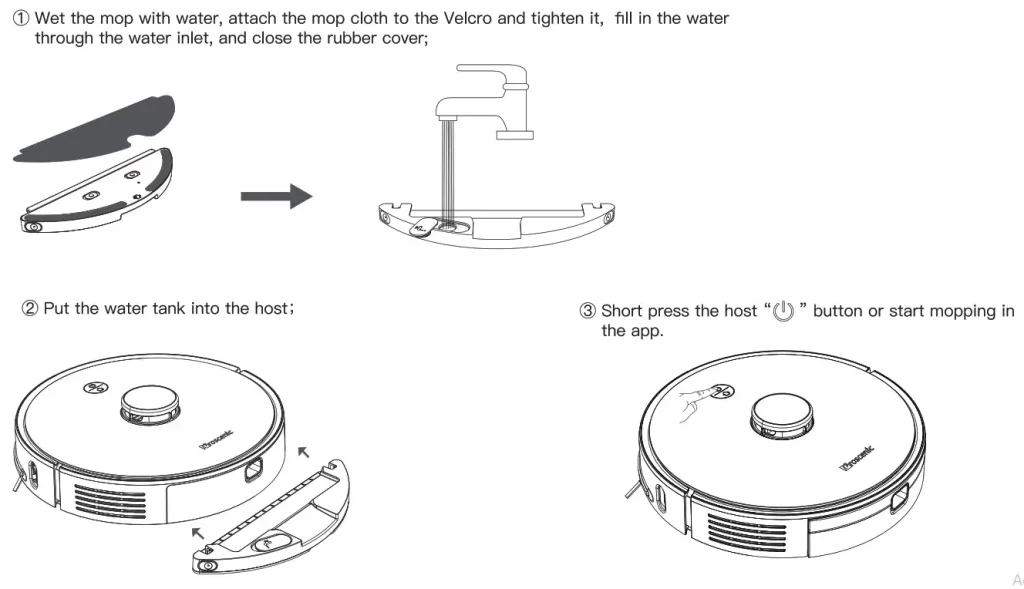
- Floor Mopping Cleaning
Robot is equipped with a water tank so that it can clean your home in floor mopping cleaning mode.
• Attach the cloth and fill in the water tank with water.
• Remove the dust bin.
• Put the water tank back to robot and start the robot.
Note: If you are using a dry sweeping cleaning mode, skip the step offilling water.
Cleaning Schedule
Robot has cleaning schedule settings which allow you to customize when Robot cleans your home.
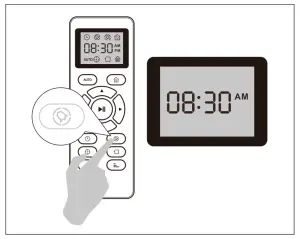
- Set the Remote Control’ s Clock
Press ® button on remote control, and then the hour section begins to flash in the clock display setting window.
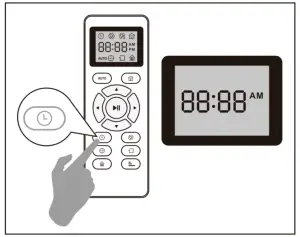
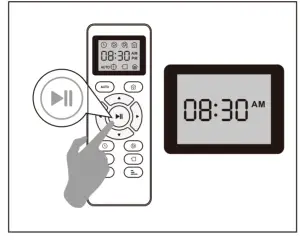
Press the ◄ or ► button to select the minute or hour section. Press ▲ or ▼ button to select the desired figures

And then press the button, the robot will “BEEP” when the clock setting completed.
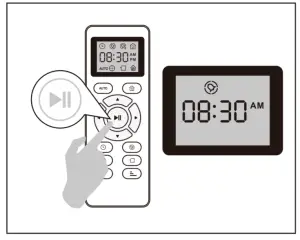
- Setting Cleaning Schedule
Press button on remote control, and then the hour section begins to hash in the cleaning schedule display setting window.

Press the ◄ or ► button to select the minute or hour section. Press ▼ or ▲ button to select the desired figures.

And then press the button, the robot will “BEEP” when the cleaning schedule setting is completed.
- Cancel the Cleaning Schedule
Press and hold button approximately 4 seconds on remote control, the robot will “BEEP” when the cleaning schedule process is canceled.
Regular Robot Care
To keep robot running at peak performance, perform the following care procedures. If you notice robot picking up less debris from your floor, then empty the bin, clean the filter and rolling brush. Recommended cleaning /replacement frequency:
| Robot part | Cleaning | Replacement frequency |
| Dust bin | After each use | |
| Filters | Once every week | Every 2 months |
| Rolling brush | Once every week | Every 6-12 months |
| Side brushes | Once every month | Every 3-6 months (or when visibly worn) |
| Brush guard | Once every month | Every 3-6 months (or when the silicone rubber strip on the brush guard is visibly worn) |
| Sensors | Once every month | |
| Charging pins | Once every month | |
| Swivel wheel | Once every month |
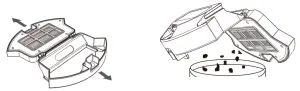
Empty Robot’ s Bin
- Press bin release button to remove the bin.

- Open bin’ s door to empty it.
Clean Robot’ s Filter
- Remove filter by grasping the white tab.
- Shake off debris by tapping the filter against your trash container.

Clean Robot’ s Rolling Brush, Side Brush, Swivel Wheel and Sensors
- Take out the rolling brush, clean the vacuuming aisle by a cloth.
- Clean the rolling brush. Cut down the hair winded in the rolling brush with the provided cleaning tool’s knife.
- Remove the side brush, use a cloth to remove the dust from the brush.
- Pull out the swivel wheel, then clean the swivel wheel with the cleaning tool.
- Dust off the cliff sensors to maintain the best performance.

Troubleshooting
Robot will tell you something is wrong with a two-tone distress sound. The indicator will also blink or light red. Refer to the chart as below to resolve the robot’s problem. If the problem is not resolved, please contact our COST FREE customer service team for more assistance.
Warm Tips: For some errors, rebooting the robot may resolve the problem. To reboot the robot, press the power button on the bottom on robot, you will hear an audible tone signifying a successful reboot.
| Robot blinks and says | Likely cause | What to do | |
| Flash red indicator light | BEEP once | Gyroscope error. | Keep the robot at a stable place to restart and do not move the machine. |
| BEEP twice | Bumper is stuck. | Check whether the bumper is flexible. | |
| BEEP triple | Robot’s cliff sensors are dirty, it is hanging over a drop, or it is stuck on a dark surface. | If the robot is hanging over a drop, or on a dark surface, please start in a new location. Otherwise, wipe its cliff sensors with a dry cloth. | |
| BEEP quartic | Low power or charging error. | The voltage of robot is too low and needs manually charging. | |
FAQ
| Problems | Solutions |
| Robot cannot be activated. |
|
| The remote control does not work. |
|
| Robot stops working suddenly. |
|
| You can’t schedule cleaning. |
|
| Suction power is weak. |
|
| Robot can’t be charged. |
|
| Robot can’t return to the charging dock. |
|
| The rolling brush doesn’t rotate. |
|
| Robot movements or travel paths are abnormal. |
|
AFTER-SALE SERVICE
- Our customer service is friendly and hassle-free, please contact us if you need our help.

![]()
User Manual
Proscenic Technology Co., Ltd.
E-mail: [email protected]
Web: www.proscenic.com
Please keep this user manual in your sight, read it throughly and carefully before using this product.
Packing List
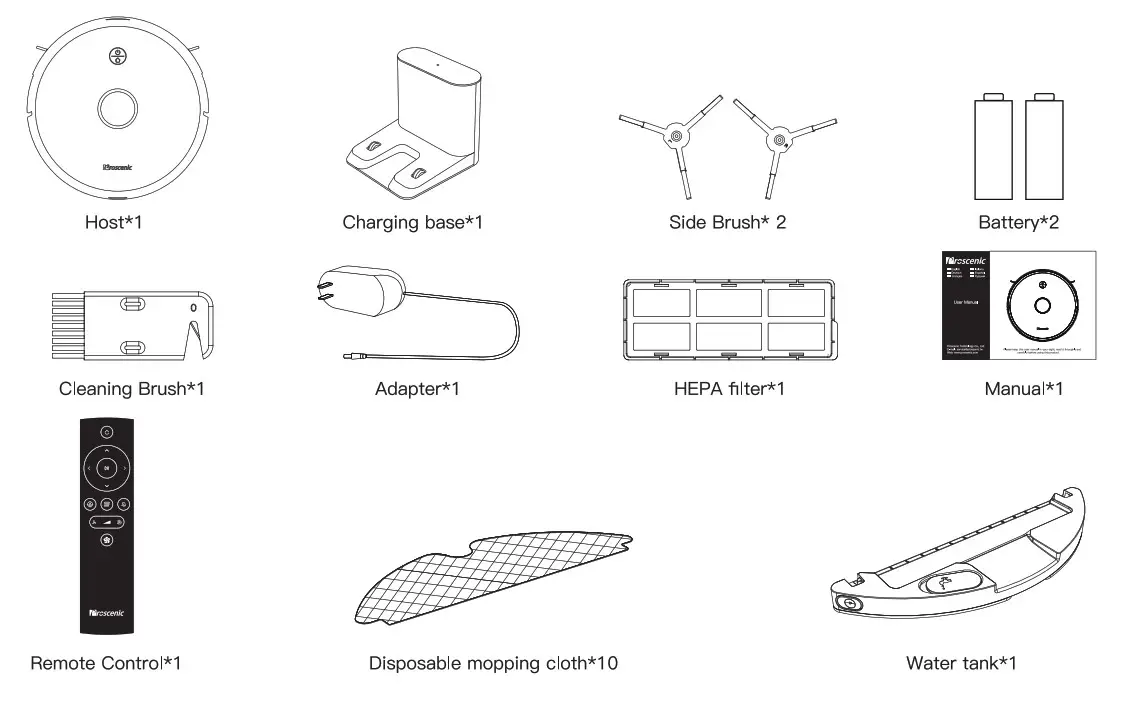
Product description
Host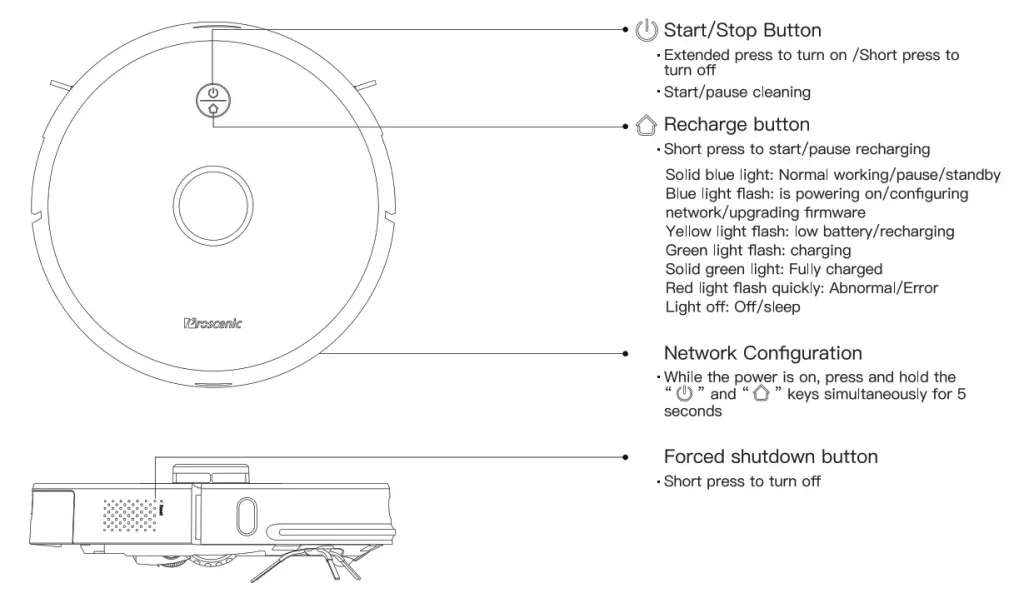
Host and sensor
Charging base
Installation Note
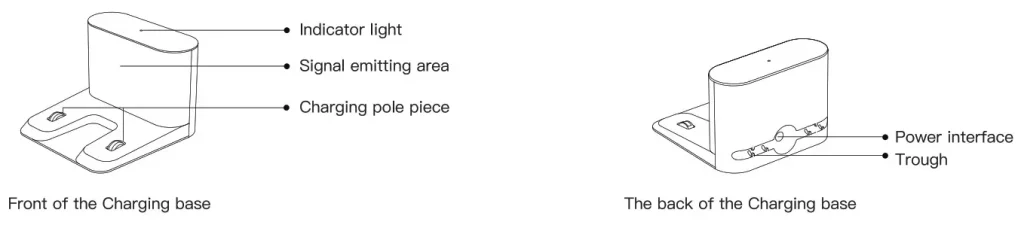
Installing the charging base
Connect the power cord and the charging base is placed against a wall on a flat surface.

* Make sure that there is more than 1.2 meters in front of the charging base and more than 0.5 meters in the left and right sides to ensure a smooth backfill.
* Do not place the cradle in direct sunlight.
Instruction for use
Power on/off
Press and hold the “  ” button to power on, and the host enters the standby state. After booting, press and hold the “ ” button to shut down.
Note: When the host is charging on the charging stand, it will automatically turn on, and it cannot be turned off during charging.
Under the power on state, short press the “ ” button to start the whole house cleaning. Press any key to pause while cleaning. Note: It is recommended that the sweeping robot start cleaning from the charging stand; When the battery is too low, the cleaning will not start. Please charge and then start cleaning. When the power is insufhcient during the cleaning process, the host will automatically return to the charging base for charging. After the battery is fully charged, it will automatically return to the interruption to continue cleaning.
Charging
Automatic recharge: The host will automatically return to the charging base to charge after the cleaning is completed or when the batter is insufhcient. Manual charging: Press the “  ” button to start recharging; after the host is powered off, you can manually put the host back into the charging base to charge. Note: Please make sure the charging pole piece is in good contact.
Sleep
If there is no operation for more than 20 minutes, the host will automatically enter into sleep state. Note: The host will not enter the sleep state when charging; Automatically shuts down after sleeping to no power.
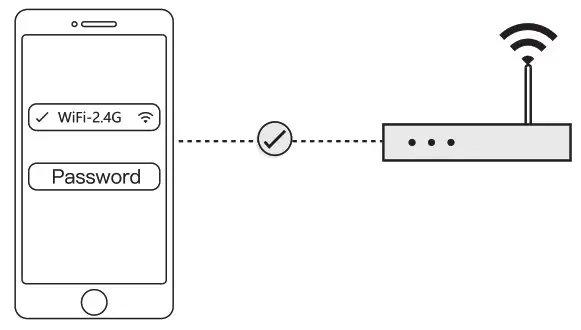
Connect to the mobile client
- The phone is connected to WiFi;
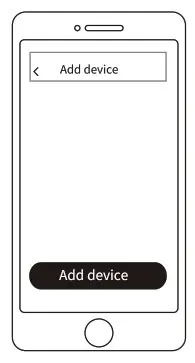
- Scan the QR code below, or search for “ProscenicHome” in the mobile app store to download the app, register and login to the account;

- Add device on the home page choose sweeping robot”M7 PRO”;
- Press and hold the “” and “ ” keys for 5 seconds to enter the network configuration;

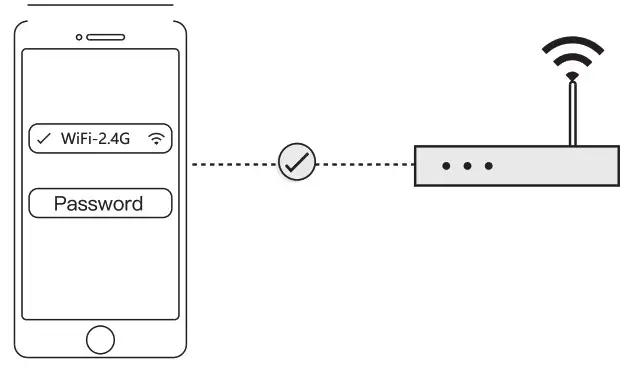
- Select the connected WiFi of the phone and enter the WiFi password;
- Go to the mobile phone WLAN list and select and connect the “Proscenic—XXXX” device hotspot;

Remote control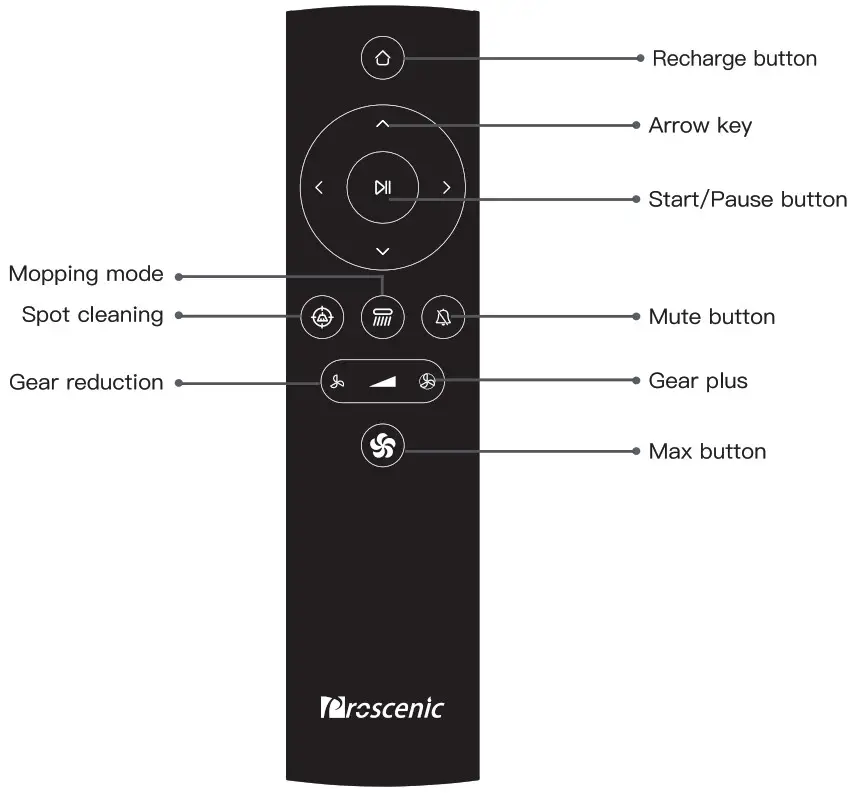
Note:
1. To ensure remote control effectively, it is recommended to use it in the front area of the host;
2. The effective distance of the remote control is 8 meters.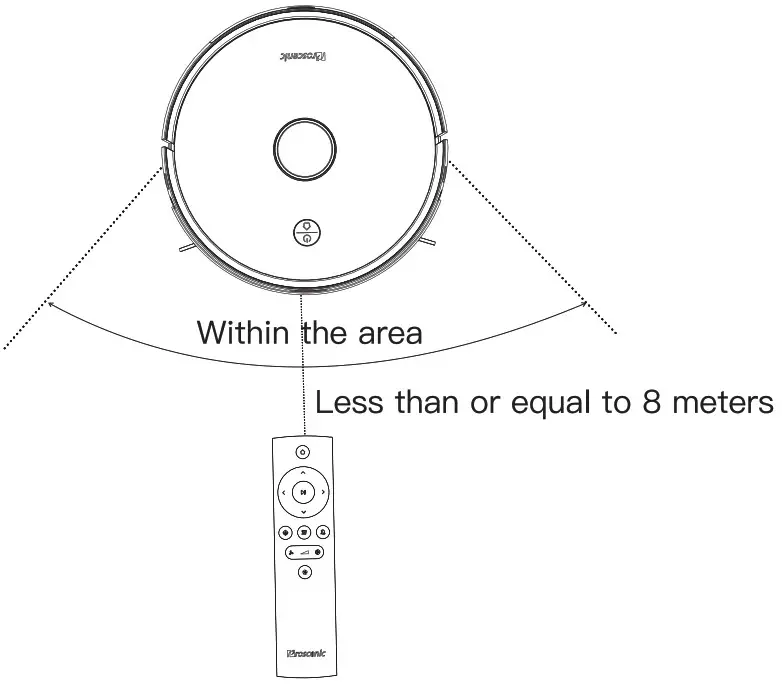
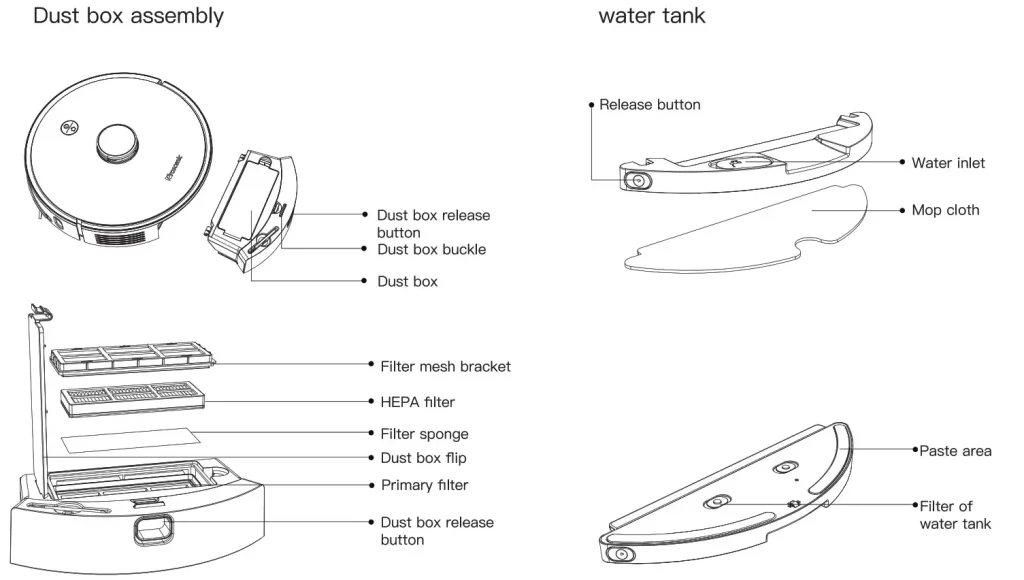
Water tank
If you need to mop the floor, you can use the water tank.
Note: Do not mop the floor on the carpet to avoid wet carpet.
Routine maintenance
Dust box and filter assembly (recommended weekly)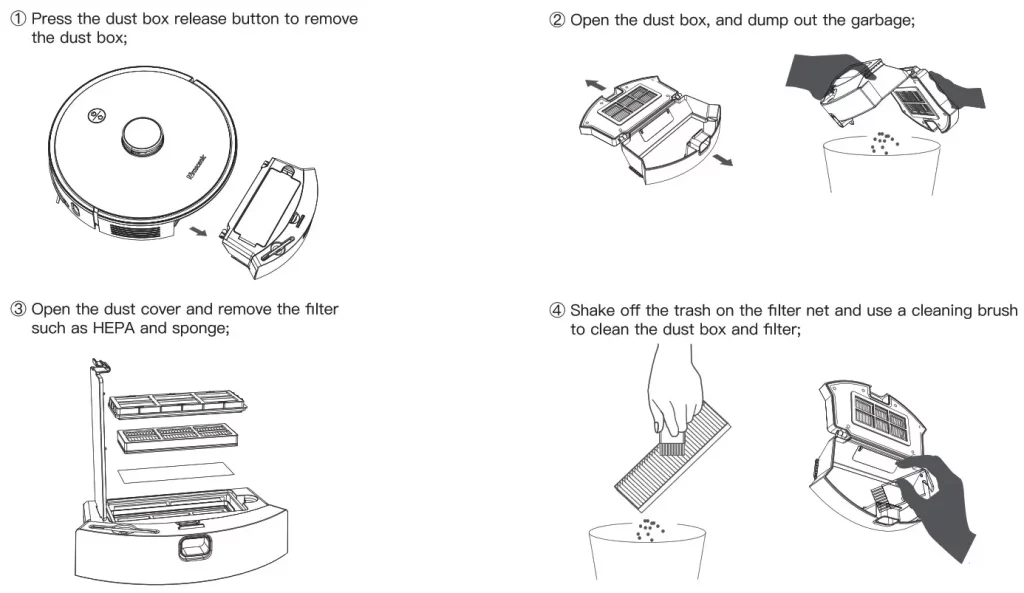 5. After filling clean water into the dust box, shut off the dust box and shake it to the left and right, and pour out the dirty water. Repeat this step several times until the dust box is cleaned;
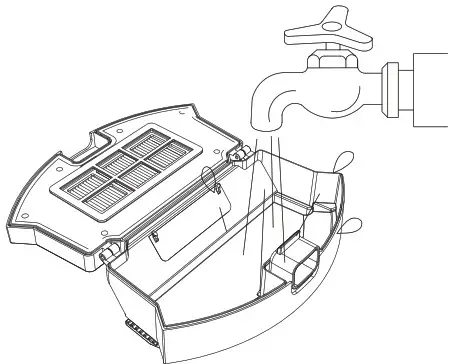
6. After drying the filter and dust box, replace the filter and dust box.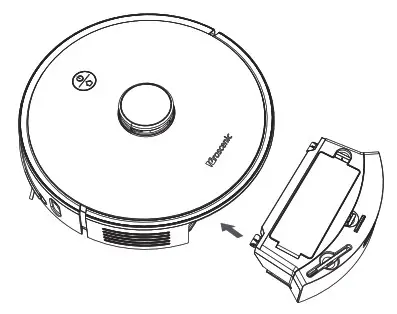
Water tank (recommended every time)
1. Press the release button to remove the water tank;
2. Remove the mop cloth, rinse with water and dry it; (If using a disposable mop, discard it directly after use)
3 Pour out the remaining water in the water tank and dry the water tank;
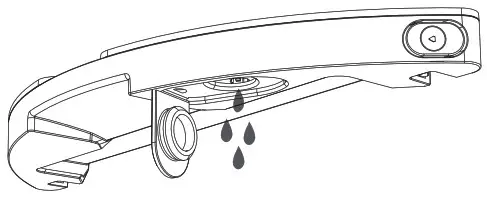
@ After the rag and water tank are dry, put it back for use;
5. Filter of Water tank
If the amount of water is small or does not produce water, it is recommended to replace the tank filter.
- Pull out two old filters
- Press the new filter element down firmly until it is fastened.
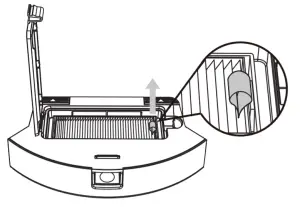
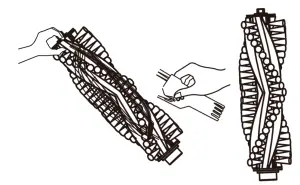
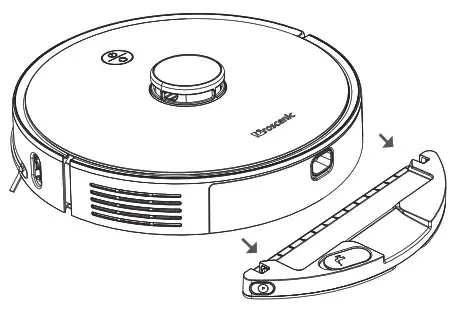
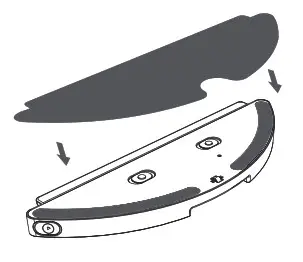
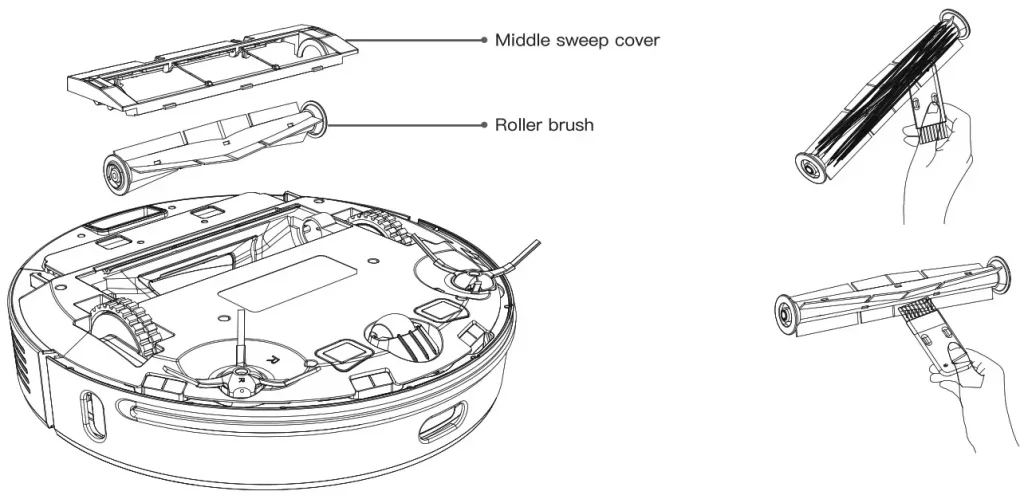
Main brush (recommended weekly)
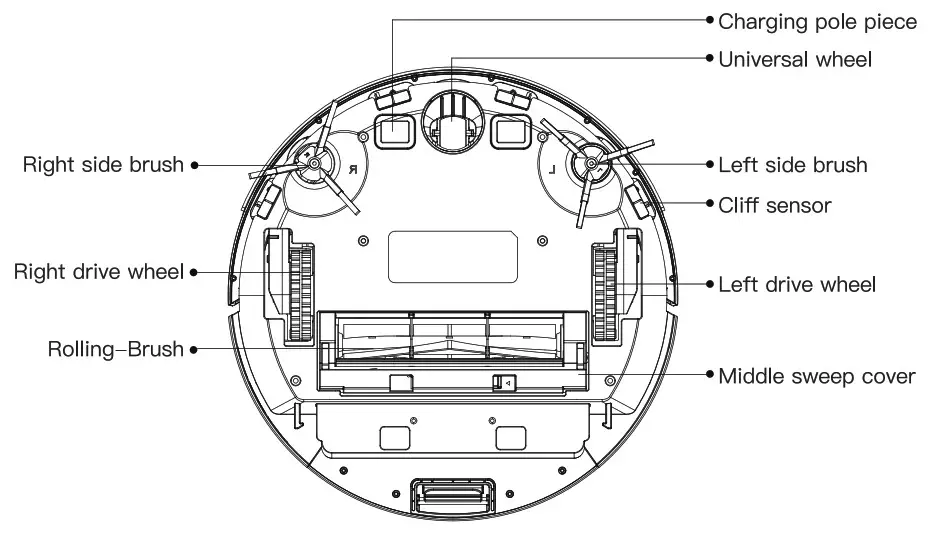
- Turn the main unit, press the left and right buckles, and remove the middle sweep cover;
- Remove the roller brush upwards and clean the entangled hair and rubbish with a cleaning brush;
- Replace the roller brush and insert the three legs of the middle sweep cover into the slot, press down, and fix the buckle.
Note: Depending on the application, it is recommended to replace the main brush for 6—12 months to ensure the cleaning effect.
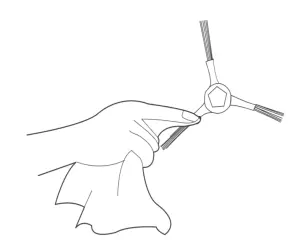
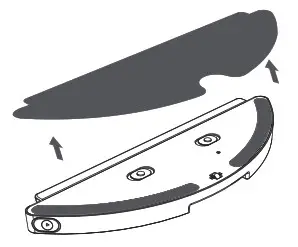
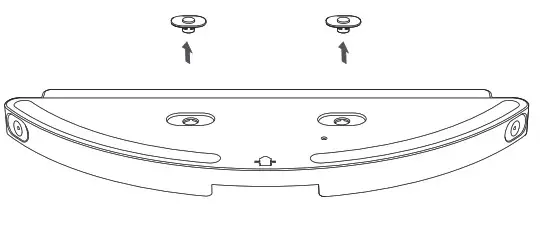
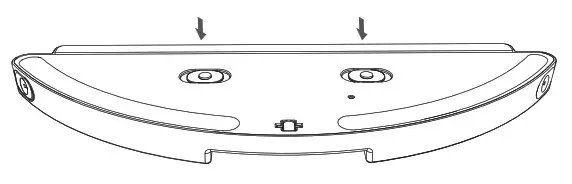
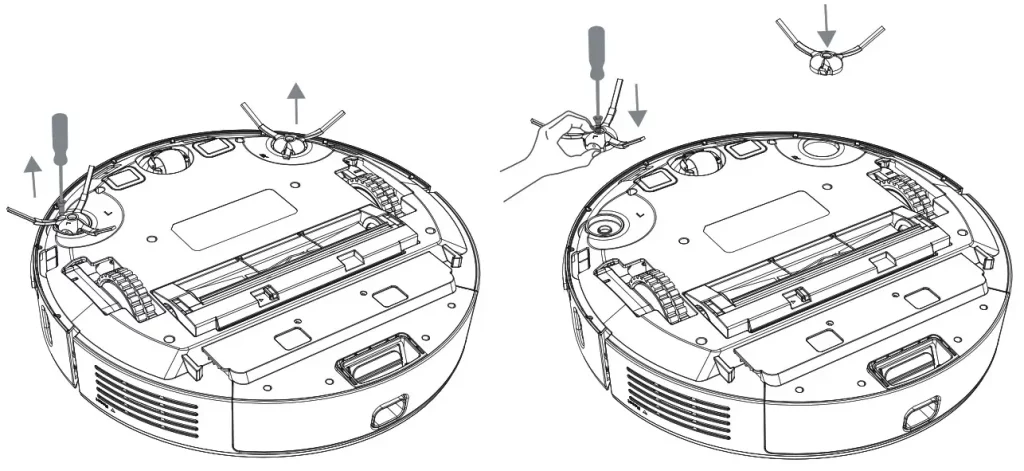
Side brush (recommended weekly)
- Use a screwdriver to unscrew the 2 side brush screws and remove the 2 side brushes;
- After cleaning the wrapped hair and rubbish on the side brush, replace the side brush.
Note: Depending on the application, it is recommended to replace the side brush for 3—6 months to ensure the cleaning effect.
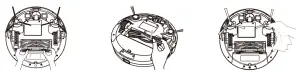
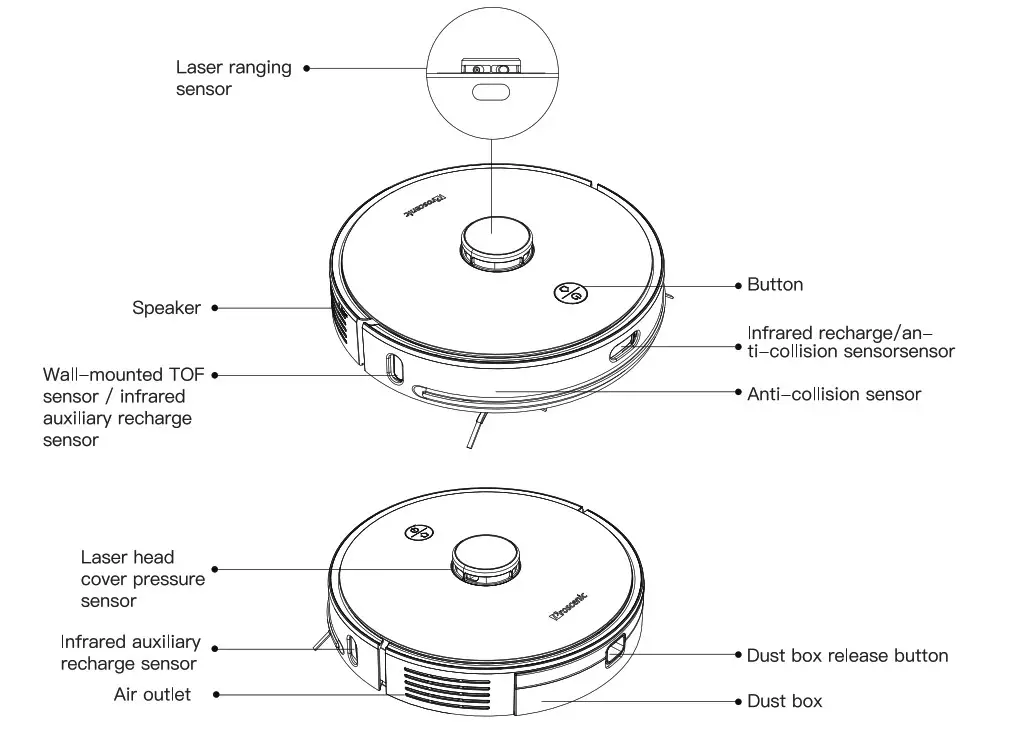
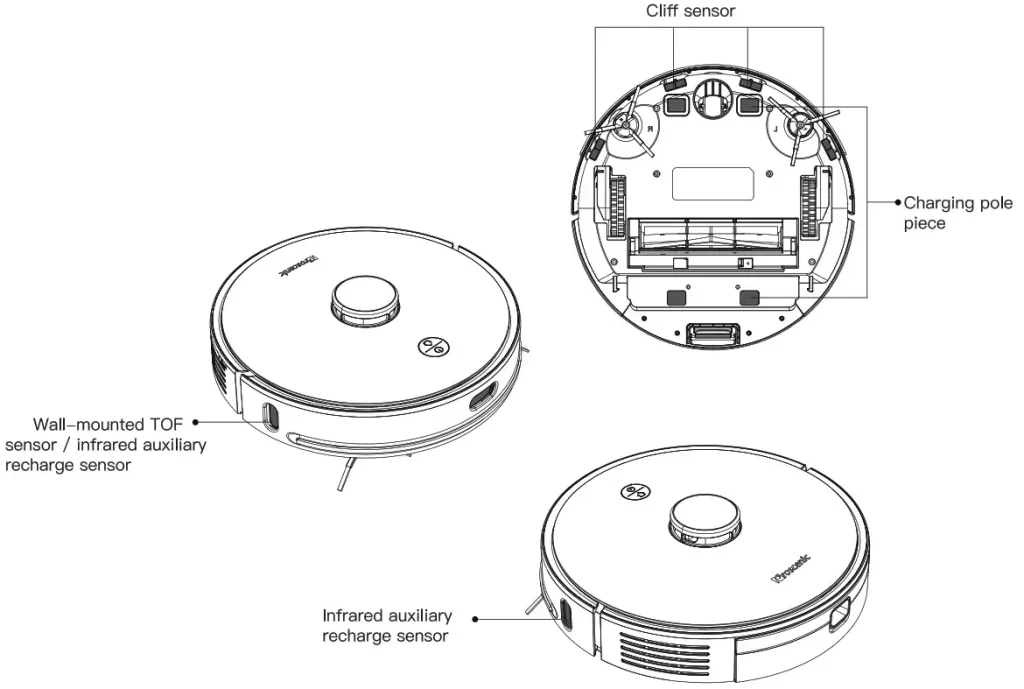
Host and sensor (recommended monthly)
- Wipe the sensor on the main unit with a soft, dry cloth, including: 4 cliff sensors at the bottom of the main unit
- Wall sensor on the right side of the host
- Infrared auxiliary recharge sensor
- Charging pole at the bottom of the main unit Cliff sensor
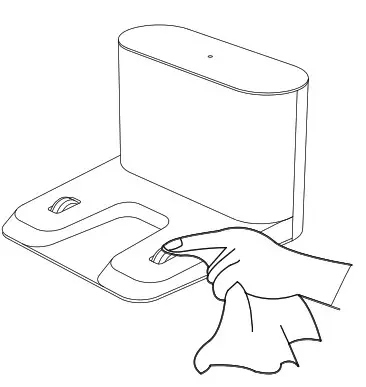
Charging base (recommended monthly)
Wipe the charging pole of the charging base with a soft, dry cloth.
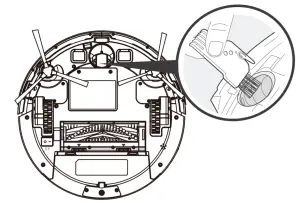
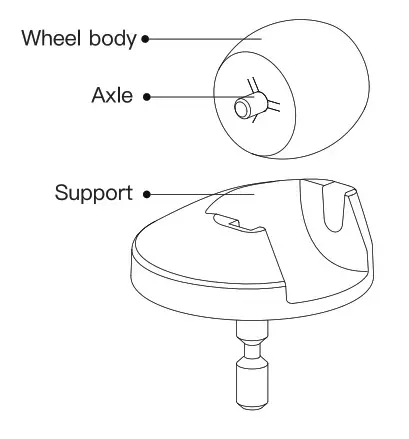
Universal wheel (recommended monthly cleaning)
- Flip the main unit and pull out the universal wheel upwards;
- Clean the hair and dust on the wheel, axle and support;
- Reinstall the universal wheel and press it tight.
Note: Wash with water, dry it and put it back.
Basic parameters
Host
| Name | Parameters |
| Dimensions | (1)350mmxcl)350mmx98mm |
| Product weight | ≈3.6kg |
| Rated voltage | 14.4V  |
| Rated power | 50W |
| Battery capacity | 5200mAh |
Charging base
| Dimension | 145mm×140mm×99mm |
| Rated power | 30W |
| Rated input | 24V1.2A |
| Rated output | 24V1.2A |
Troubleshooting
| Fault prompt | Solution |
| Abnormal 1. Please confirm that the laser radar is not blocked | Please check or remove foreign objects around the lidar or move the device to a new location to restart |
| Abnormal 2. Please wipe the cliff sensor and move to the new position to start | Wipe the main power cliff sensor and try again (refer to the manual for sensor location) |
| Abnormal 3. A strong magnetic field is detected, moved to a new location, and then retried | Please move the host to a new location and try again |
| Abnormal 4. Please check the collision sensor and clear the foreign object around it | Try pressing the front bumper and clearing the foreign object, then restart |
| Abnormal 5. The host temperature is
abnormal. Please wait for the temperature to return to normal |
The host temperature is too high or too low. Please wait until the temperature returns to normal before using |
| Abnormal 6. Charging is abnormal. Please clean the charging contact area | Please check if the original power adapter is used. Please check if the charging stand is in the horizontal position |
Common problem
| Question type | Solution |
| Can not boot | The battery is low, please charge it before using it
Ambient temperature is too low (less than 0°C) or too high (higher than 50°C) |
| Unable to start cleaning | The battery is low, please charge it before starting it |
| Unable to recharge
the open area |
There are too many obstacles near the charging stand. Please put the charging stand in
The host is too far from the recharge seat. Please try to place the main unit near the charging stand |
| Abnormal behavior | Reboot after shutdown |
| There is abnormal noise during cleaning | Roller brush, side brush or left/right wheel may wrap foreign objects, please clean after shutdown |
| Decrease in cleaning ability or falling out from machine | The dust box is full, please clean the dust box
HEPA components have been blocked, please clean up The roller brush is wrapped by foreign matter, please clean the main brush |
| Unable to connect to WiFi | WiFi signal is not good, please make sure the host is in a good WiFi signal coverage area WiFi connection is abnormal, reset WiFi and download the latest app Try to connect again |
| Breakpoint cleaning | Please confirm that the host is not in the do not disturb mode, it will not continue to clean in this mode
Manually recharging or putting the main unit back into the charging stand will lead the machine not to continue cleaning from last interruption |
| Cannot return to the charging stand after spot cleaning or moving the position | After spot cleaning or long-distance moving position, the host will re-generate the map. If the charging stand is far away, it may not be able to automatically recharge.Please manually put the host back into the charging stand to charge |
| Unable to charge | Make sure there is enough space around the cradle, and there is no dust or obstruction on the surface of the charging base electrode |
| Scheduled cleaning does not work | Please confirm that the device is connected to the network. If the device is not connected to the network, you cannot synchronize the scheduled cleaning task |
| Host is always offline | Please ensure that the equipment distribution network is successful and always within the WiFi coverage |
| Phone cannot pair device | Please make sure that the charging stand and the host are within the WiFi coverage and the signal is good. Follow the instructions to reset the WiFi and then pair it |
Security Information
Use limit
- This product is onl used for floor cleaning in the home environment. Do not use it outdoors (such as open balconies), non-ground (such as so as), commercial or industrial environments, such as non—ground (such as sofas), commercial or industrial environments.
- Do not use in environments where there is liquid or viscous material above 40°C, below 0°C.
- Do not use or operate this product for people with physical, mental or cognitive impairments, including children.
- Do not allow children to use the host as a toy. When working, please supervise chil ren and pets to keep them as far away as possible.
- Please arrange all kinds of wires on the ground before cleaning to avoid the power failure or damage of the appliance caused by the main unit being dragged during cleaning.
- Do not use the lidar cover, main unit cover, an bumper as handling equipment.
- Do not use to clean any burning objects (such as cigarettes that are not extinguished).
- Do not allow the main unit to pick up hard objects or sharp objects (such as ecoration waste, glass, nails, etc.).
- Do not wipe the product with a damp cloth or any liquid.
- Do not place hea o ects on the main unit.
- Do not place the cleaning brush in an area that children can touch (the brush head has a sharp blade).
- Do not place the main uni upside down (the laser radar cannot be placed on the ground).
- Do not spill an liquid into the product (the dust box can be cleaned and wiped dr Do not place e air, fingers, etc. of the body or pet close to the suction port of e main unit while the main unit is working.
- Please use this product according to the instructions of the manual.
- If any loss or damage is caused by improper use, the user will bear the responsibilit If you need to transport e product, please make sure that the main unit is turned off. It is recommended to use the original packaging.
- If it is not used for a long time, please turn off the main unit and put it in a cool and dry place after fully charging.
- Please clean the maintenance main unit and the charging stand uring shutdown or power off.
Battery and charging
- Do not use any third—par batteries, power adapters, or charging docks.
- Do not disassemble, repair or modify the battery and charging stand.
- Do not place the cradle near a heat source (suc as a radiator).
- Do not wipe the charger with a damp cloth or an liquid.
- Do not discard batteries at will. It is recommende to be dispose of by professional agencies.
- If the power cord is broken or damaged, please stop using i immediatel and contact customer service.
- Charge at least once a month to avoid damage to the battery.
- It is orbidden to incinerate products, and the battery may cause explosion.
FCC Statement
- This device complies with Part 15 of the FCC Rules. Operation is subject to the following two conditions:
(1) This device may not cause harmful interference, and
(2) This device must accept any interference received, including interference that may cause undesired operation. - Changes or modifications not expressly approved by the party responsible for compliance could void the user’s authority to operate the equipment.
NOTE: This equipment has been tested and found to comply with the limits for a Class B digital device, pursuant to Part 15 of the FCC Rules. These limits are designed to provide reasonable protection against harmful interference in a residential installation.
This equipment generates uses and can radiate radio frequency energy and, if not installed and used in accordance with the instructions, may cause harmful interference to radio communications. However, there is no guarantee that interference will not occur in a particular installation. If this equipment does cause harmful interference to radio or television reception, which can be determined by turning the equipment off and on, the user is encouraged to try to correct the interference by one or more of the following measures:
Reorient or relocate the receiving antenna.
Increase the separation between the equipment and receiver.
Connect the equipment into an outlet on a circuit different from that to which the receiver is connected.
Consult the dealer or an experienced radio/TV technician for help.
FCC Radiation Exposure Statement
This equipment complies with FCC radiation exposure limits set forth for an uncontrolled environment. This equipment should be installed and operated with minimum distance 20cm between the radiator & your body