CE Cook’s Essentials Air Fryer CM1708 User Manual
Important Safeguards
When using electrical appliances, basic safety precautions should always be followed, including:
- READ AND FOLLOW all instructions carefully.
- NEVER IMMERSE the Main Unit Housing, which contains electrical components and heating elements, in water. Do not rinse under the tap.
- TO AVOID ELECTRICAL SHOCK, do not put liquid of any kind into the Main Unit Housing containing the electrical components.
- THIS APPLIANCE HAS A POLARIZED PLUG (one blade is wider than the other). To reduce the risk of electric shock, this plug is intended to fit into a polarized outlet only one way. If the plug does not fitfully into the outlet, reverse the plug. If it still does not fit, contact a qualified electrician. Do not attempt to modify the plug in any way.
- MAKE SURE the appliance is plugged into a wall socket. Always make sure that the plug is inserted into the wall socket properly.
- TO PREVENT FOOD CONTACT with the heating elements, do not overfill the Fry Basket.
- DO NOT cover the Air Intake Vent or Air Outlet Vent while the Air Fryer is operating. Doing so will prevent even cooking and may damage the Unit or cause it to overheat.
- NEVER POUR oil into the Outer Basket. Fire and personal injury could result.
- WHILE COOKING, the internal temperature of the Unit reaches several hundred degrees F. To avoid personal injury, never place hands inside the Unit unless it is thoroughly cooled down.
- THIS APPLIANCE IS NOT INTENDED FOR use by persons with reduced physical, sensory, or mental capabilities, or lack of experience and knowledge, unless they are under the supervision of a responsible person or have been given proper instruction in using the appliance. This appliance is not intended for use by children.
- DO NOT use this Unit if the plug, the power cord or the appliance itself is damaged in any way.
- IF THE POWER CORD IS DAMAGED, you must have it replaced by the manufacture, its service agent, or a similarly qualified person in order to avoid hazard.
- KEEP THE APPLIANCE and its power cord out of the reach of children when it is in operation or in the “cooling down” process.
- KEEP THE POWER CORD away from hot surfaces. Do not plug in the power cord or operate the Unit controls with wet hands.
- NEVER CONNECT THIS APPLIANCE to an external timer switch or separate remote-control system.
- NEVER USE THIS APPLIANCE with an extension cord of any kind.
- DO NOT OPERATE THE APPLIANCE on or near combustible materials such as tablecloths and curtains.
- WHEN COOKING, do not place the appliance against a wall or against other appliances. Leave at least 5” free space on the back and sides and above the appliance. Do not place anything on top of the appliance.
- DO NOT USE the Air Fryer for any purpose other than described in this manual.
- NEVER operate the appliance unattended.
- WHEN IN OPERATION, hot steam is released through the Air Outlet Vent. Keep your hands and face at a safe distance from the Air Outlet Vent. Also avoid the hot steam and air while removing the Outer Basket and Fry Basket from the appliance.
- THE UNIT’ S OUTER SURFACES may become hot during use. The Outer Basket, Fry Basket and Cake Pan will be hot… wear oven mitts when handling hot components or touching hot surfaces.
- SHOULD THE UNIT EMIT BLACK SMOKE, unplug immediately and wait for smoking to stop before removing Outer and Fry Baskets.
CAUTION: Do not move Sliding Button Guard forward until Fry Basket and Outer Basket are resting on a level, heat-resistant surface. Discontinue use if Sliding Button Guard ever becomes detached from Unit.
CAUTION
- Always operate the appliance on a horizontal surface that is level, stable and noncombustible.
- This appliance is intended for normal household use only. It is not intended for use in commercial or retail environments.
- If the Air Fryer is used improperly or for professional or semi-professional purposes or if it is not used according to the instructions in the user manual, the warranty becomes invalid and we will not be held liable for damages.
- Always unplug the appliance after use.
- Let the appliance cool down for approximately 30 minutes before handling, cleaning or storing.
- Make sure the ingredients prepared in this Unit come out cooked to a golden-yellow color rather than dark or brown. Remove burnt remnants.
- The Air Fryer is equipped with an internal micro switch that automatically shuts down the fan and heating element when the Outer Basket is removed.
- Do not move the Sliding Button Guard forward until Fry Basket and Outer Basket are resting on a level, heat resistant surface. Discontinue use if Sliding Button Guard ever becomes detached from Unit.
AUTOMATIC SWITCH-OFF
The appliance has a built-in Timer and will automatically shut down when the countdown reaches zero. You can manually switch the appliance off by pressing the Timer Button until is shows zero or by pressing the Power Button one time. In either case, the appliance will automatically shut down within 20 seconds.
ELECTRIC POWER
If the electrical circuit is overloaded with other appliances, your new Unit may not operate properly. It should be operated on a dedicated electrical circuit.
OVERHEATING PROTECTION SYSTEM
Should the inner temperature control system fail, the overheating protection system will be activated and the Unit will not function. Should this happen, unplug the power cord, allow time for the Unit to cool completely before restarting or storing.
ELECTROMAGNETIC FIELDS (EMF)
This appliance complies with all standards regarding electromagnetic fields (EMF). If handled properly and according to the instructions in this user manual, the appliance is safe to use based on scientific evidence available today.
SAVE THESE INSTRUCTIONS. FOR HOUSEHOLD USE ONLY.
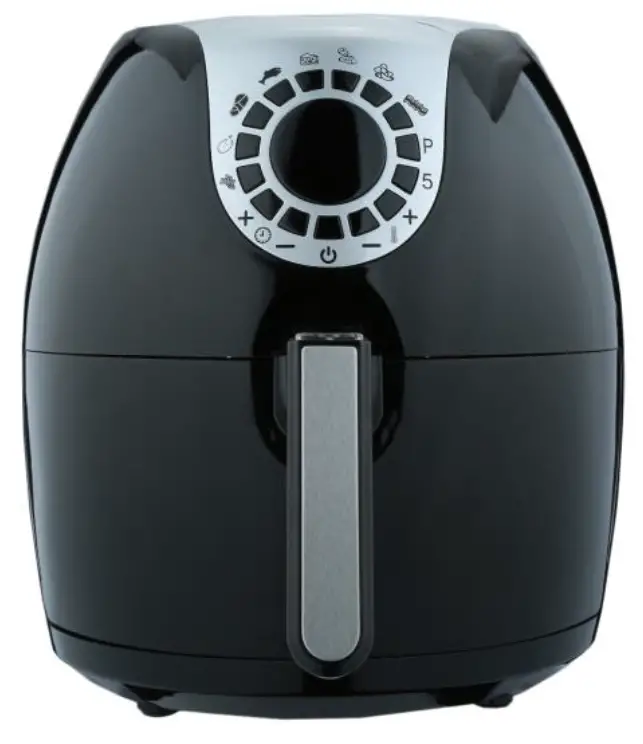
Air Fryer Parts
IMPORTANT: Your Air Fryer has been shipped with the components shown below. Check everything carefully before use. If any part is missing or damaged do not use this product and contact shipper using the customer service number located in the back of this owner’s manual.
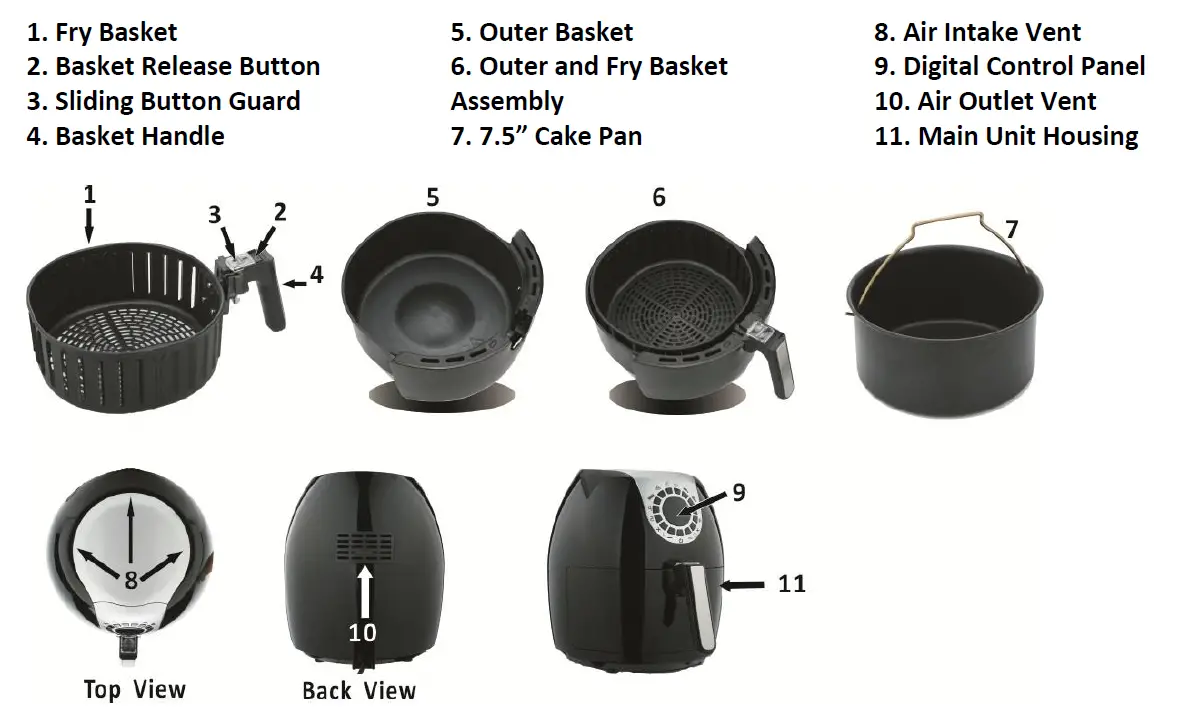
CAUTION: Be careful not to touch the Air Outlet Vent (10) behind the unit.
Sliding Button Guard and Basket Release Button
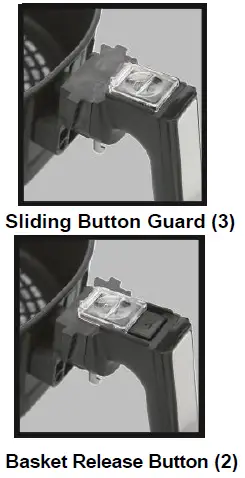 The Sliding Button Guard helps to ensure you do not press the Basket Release Button by accident. Pressing the Basket Release Button causes the Outer Basket to separate from the Fry Basket and may result in injury if not done on a level, heat-resistant surface.
Do not move Sliding Button Guard forward until Fry Basket and Outer
Basket are resting on a level, heat-resistant surface.
CAUTION: Discontinue use if Sliding Button Guard ever becomes
detached from Unit.
Using The Digital Control Panel
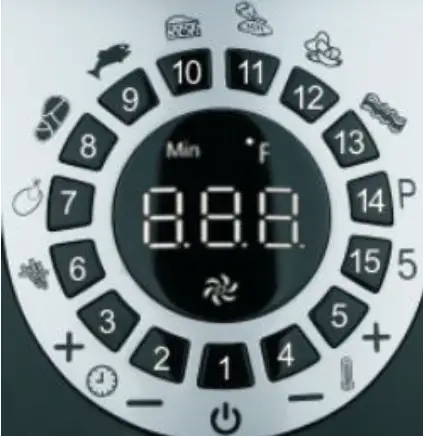
Button 1 – Power Button
Once the Outer Basket and Fry Basket are properly placed in the main Unit housing, the Digital Control Panel will display ‘OFF’. Selecting the Power Button one time will set the Unit to a default temperature of 370°F, and the cooking time will be set to 15 minutes. Selecting the Power Button a second time will start the cooking process. Pressing the power button during the cooking cycle will turn the unit off. The white fan light will continue to flash, for 20 seconds.
Buttons 2 & 3 – Timer Control Buttons
The + and – symbols enable you to add or decrease cooking time, one minute at a time. Keeping the button held down will rapidly change the time (1-30 min).
Buttons 4 & 5 – Temperature Control Buttons
The + and – symbols enable you to add or decrease cooking temperature 10°F at a time. Keeping the button held down will rapidly change the temperature. Temperature Control range: 170°F – 400°F.
6 – 15. Buttons 6 through 15 – Preset Choices
Ten presets to choose from including: fries, chicken, steak, fish, cheese melt, chicken wings, potato chips, bacon, preheat (P) and Quick 5 (5).
Once selected, the predetermined time and cooking temperature function begins.
Note: For buttons 6-13, you can override the preset function by increasing or decreasing time and temperature manually. For button 14, the preheat function, you cannot override the time or temperature. For button 15, Quick 5, you can adjust the time setting. Each time you press the Quick 5 button, the time will increase in 5-minute intervals.
Time and Temperature
This display will keep track of the temperature and remaining cook time.
White Fan Icon
The flashing, White Fan Icon will appear when the Unit is turned on and for up to 20 seconds after it is turned off.
![]()
Cooking with the Air Fryer Without Presets
Once you are familiar with the Air Fryer you may want to experiment with your own recipes. You do not need to select a preset function. Simply choose the time and temperature that suits your personal taste.
Preheating the Air Fryer
You may preheat the Unit for more efficient cooking simply by selecting the Preheat preset button or by manually selecting a cook time of 2 or 3 minutes, and cook at the default or higher temperature. For preheating, you will need to insert the empty Fry Basket and Outer Basket into the Unit housing.
WARNING:
Never fill the Outer Basket with cooking oil or any other liquid! Fire hazard or personal injury could result.
Unit Features
- Digital Air Fryer
- 10 Preset Programs
- Timer (1-30 min) with Auto Shut Off
- 1700 Watts (120v / 60hz)
- Large Easy-Grip Handle
- Large 5.3 QT Basket with Non-Stick Coating
- Dimensions: 15”w x 14.4”h x 12.8”d
General Operating Instructions
Before using the Air Fryer for the first time…
Remove all packing materials, labels and stickers, then wash the Outer and Fry Basket, and Cake Pan with warm soapy water. The Outer and Fry Basket, and Cake Pan are also dishwasher safe. Wipe the inside and outside of the cooking Unit with a clean moist cloth. Never wash or submerge the cooking Unit in water. Never fill the Outer Basket with oil… this Unit cooks with hot air only.
Preparing for use
- Place the appliance on a stable, level, horizontal and heat resistant surface.
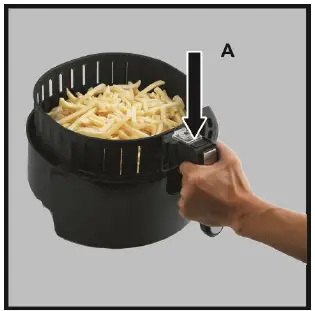
- Place the Fry Basket in the Outer Basket properly. (Fig. A)
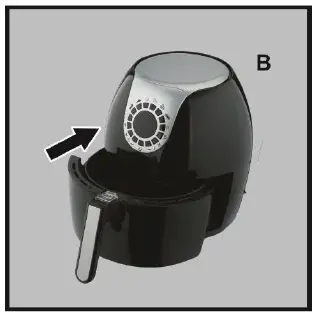
- Slide the Fry Basket into the cooking Unit until it “clicks” into place. (Fig. B)
Note: The Unit will not work unless the Fry Basket is inserted properly.
- Plug the power cord into the 120V, dedicated outlet.
NEVER:
- Put anything on top of the appliance.
- Cover the air vents on the top and back of the cooking Unit.
A Versatile Appliance
The Air Fryer is designed to cook a wide variety of your favorite foods. The charts and tables provided within this manual and the Recipe Guide will help you get great results. Please refer to this information for proper time/temperature setting sand proper food quantities.
Time to Air Fry…
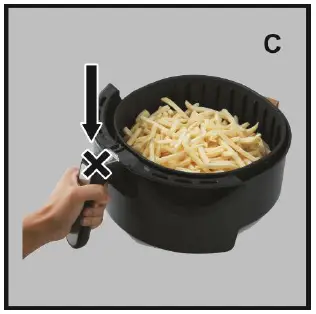
When removing the Outer Basket you may feel slight resistance. Place your hand on top of the Unit and pull gently on the Outer Basket.
CAUTION: WHEN REMOVING OUTER BASKET, BE CAREFUL NOT TO PRESS THE BASKET HANDLE BUTTON. OUTER BASKET WILL SEPARATE FROM FRY BASKET. (Fig. C)
WARNING:
Wear an oven mitt on the hand you use to hold the Unit in place.
Place the ingredients in the Fry Basket. (Fig. A, page 6)
Note: Never fill the Fry Basket above the recommended amount as this could affect the quality of the end result or interfere with the electric heating coils.
Slide the Fry Basket back into the unit until it “clicks” in place, (Fig. B, page 6). Never use the Outer Basket without the Fry Basket.
Caution: During the cooking process, the Outer Basket will become very hot. When you remove it to check on the progress, make sure you have a heat resistant surface nearby to set it down on.
1. When the Fry Basket and food is securely in place, press the Power Button once (Fig. 1, page 4).
2. Select a Preset function (Figs. 6-15, page 4) or manually set the Temperature and then the Time (Figs. 2-5, Page 4).
3. Press The Power Button (Fig. 1, page 4) once and the Air Fryer will cycle through the cooking process.
Note: You may remove the Fry Basket at any time during the process to check the progress. If you wish to preheat the Unit, see instructions on page 5.
Because the rapid hot air technology instantly reheats the air inside the appliance, pulling the Outer Basket briefly out of the appliance during hot air frying barely disturbs the process.
Consult the Charts in this manual or the Recipe Guide to determine the correct settings.
Shaking…
To ensure even cooking, some foods require “shaking” during the cooking process. To do this, simply remove the Outer Basket and Fry Basket from the Unit… gently shake the contents as needed and place back in Unit to continue cooking. For heavier foods, you might want to separate the Fry Basket from the Outer Basket before shaking. To do this, place the assembled Outer Basket and Fry Basket on a heat resistant surface. Move Sliding Button Guard forward to expose Basket Release Button. Press the Basket Release Button (top photo) and gently lift the Fry Basket. Shake ingredients, place the Fry Basket in the Outer Basket and return it to the Unit to finish cooking.
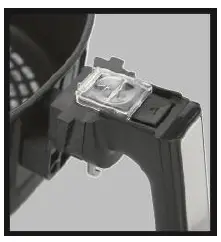

Caution: The Outer Basket will be hot… wear an oven mitt during this procedure. Never move the Sliding Button Guard while shaking or you may press the Basket Release Button accidentally.
Tip: Set the Timer to 1/2 the time needed for the recipe and the Timer bell will alert you when it’s time to “shake”.
When you hear the Timer bell, the Preset preparation time has elapsed. Pull the Outer Basket out of the appliance and place it on a heat-resistant surface.
To remove ingredients (i.e., fries), place the Outer Basket on a heat resistant-surface. Move Sliding Button Guard forward. Press the Basket Release Button (top photo) and lift the Fry Basket out of the Outer Basket. Turn the Fry Basket over and let the ingredients fall on a plate. Use nonabrasive utensils to remove larger foods.
Do not turn the Fry Basket upside down with the Outer Basket still attached… excess oil that has collected on the bottom of the Outer Basket will leak onto the food.
When a quantity of food is cooked, the Unit is instantly ready for preparing another batch. When the cooking cycle is over, you may begin use again immediately.
Settings
- The following table will help you select the correct temperature and time for best results. As you become more familiar with the Air Fryer cooking process, you may adjust these settings to suit your own personal tastes.
- Because the rapid hot air technology instantly reheats the air inside the appliance, pulling the Fry Basket briefly out of the appliance during hot air frying barely disturbs the process.
Tips
- Foods that are smaller in size usually require a slightly shorter cooking time than larger ones.
- Large quantities of food only require a slightly longer cooking time than smaller quantities.
- “Shaking” smaller sized foods halfway through the cooking process, assures that all the pieces are evenly fried.
- Adding a bit of vegetable oil to fresh potatoes is suggested for a crispier result. When adding a little oil, do so just before cooking.
- Snacks normally cooked in an oven can also be cooked in the Air Fryer.
- Use pre-made dough to prepare filled snacks quickly and easily. Pre-made dough also requires a shorter cooking time than homemade dough.
- Place a baking tin or oven dish in the Fry Basket when baking a cake or quiche. A tin or dish is also suggested when cooking fragile or filled foods.
- You can use the Air Fryer to reheat foods. Simply set the temperature to 300°F for up to 10 minutes.
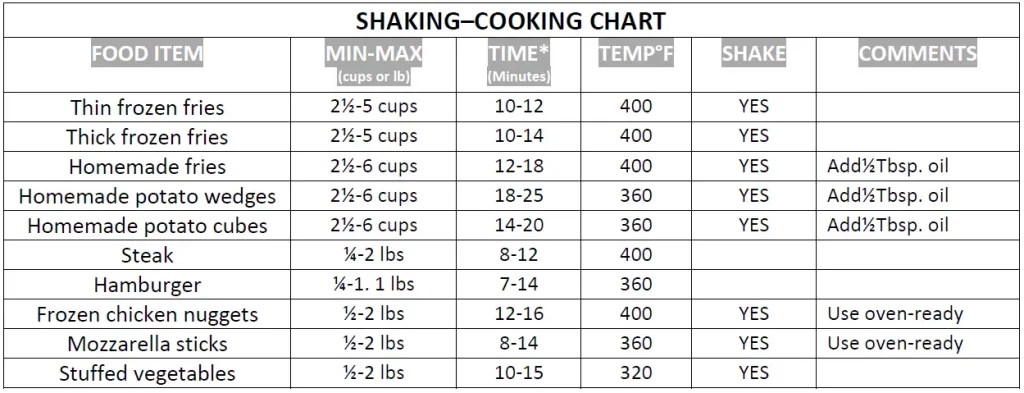
The table above will help you choose the basic settings for the ingredients selected.
*Add 3 minutes to cooking time when starting with a cold appliance.
Note: Keep in mind that these settings are indications. As ingredients differ in origin, size, shape and brand, we cannot guarantee the best settings for your ingredients.
Cleaning and Storage
Cleaning
Clean the Air Fryer after each use. The Outer Basket, Fry Basket and Cake Pan are coated with a special non-stick surface. Never use abrasive cleaning materials or utensils on these surfaces.
- Remove the power cord from the wall socket and be certain the appliance is thoroughly cooled before cleaning.
Note: Separating the Outer Basket from the Fry Basket will allow them to cool quicker. - Wipe the outside of the appliance with a warm moist cloth and mild detergent.
- Clean the Outer Basket, Fry Basket and Cake Pan with hot water, a mild detergent and a nonabrasive sponge.
Note: The Outer Basket, Fry Basket and Cake Pan are dishwasher-safe.
Tip: Should Outer Basket and Fry Basket contain difficult to remove food particles, leave the Fry Basket and Outer Basket assembled, fill with hot soapy water and soak for 10 minutes. - Clean the inside of the appliance with hot water, a mild detergent and a nonabrasive sponge.
- If necessary, remove unwanted food residue from the heating element with a cleaning brush.
Storage
- Unplug the appliance and let it cool down thoroughly.
- Make sure all components are clean and dry.
- Place the appliance in the clean, dry place.
Environment
Dispose of all unwanted appliances according to local environmental regulations.
Preserve the planet.
Troubleshooting
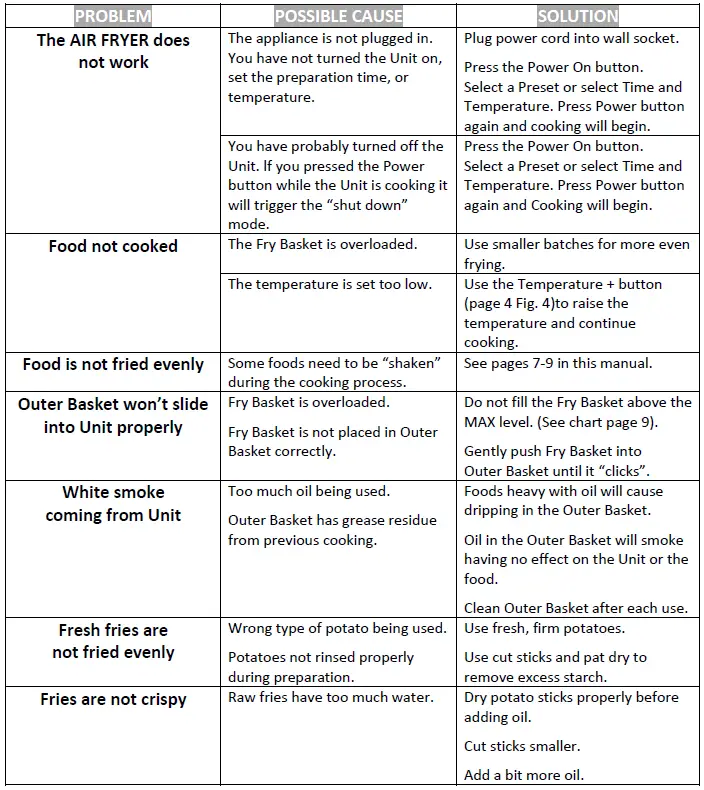
Frequently Asked Questions
- Can I prepare foods other than fried dishes with my Air Fryer?
You can prepare a variety of dishes including steaks, chops, burgers and baked goods.
See the Air Fryer Recipe Guide. - Is the Air Fryer good for making or reheating soups and sauces?
Never cook or reheat liquids in the Air Fryer. - Is it possible to shut off the Unit at any time?
Press the Power button once or remove the Outer Basket. - What do I do if the Unit shuts down while cooking?
As a safety feature the Air Fryer has an auto shut off device that prevents damage and overheating. Remove the Outer Basket and set it on a heat resistant surface. Allow the Unit to cool down. Remove the power cord from the outlet. Restart with the Power button. - Does the Unit need time to heat up?
If you are cooking from a “cold start, ”add 3 minutes to the cook time to compensate. - Can I check the food during the cooking process?
You can remove the Outer Basket at any time while cooking is in progress. During this time you can “shake” the contents in the Fry Basket if needed to ensure even cooking. - Is the Air Fryer dishwasher safe?
Only the Fry Basket, Outer Basket and Cake Pan are dishwasher safe. The Unit itself containing the heating coil and electronics should never be submersed in liquid of any kind or cleaned with anything more than a hot moist cloth or nonabrasive sponge with a small amount of mild detergent. - What happens if the Unit still does not work after I have tried all the troubleshooting suggestions?
Never attempt a home repair. Contact the manufacturer and follow the procedures set forth by the warranty. Failure to do so could render your warranty null and void. - What is the purpose of the Sliding Button Guard?
The Sliding Button Guard helps to ensure you do not press the Basket Release Button accidentally. Pressing the Basket Release Button causes the Outer Basket to separate from the Fry Basket and may result in injury of not done on a level, heat-resistant surface.
Air Fryer
Should you have any problem, our friendly customer service staff is here to help you.
1-866-533-1184.
QVC E236768 HALO Bolt Air+ Car Jump Starter
and Air Compressor Instruction Manual

HALO BOLT AIR+ DC
Thank you for choosing HALO! Powerful and loaded with features including an easy to use digital display, the HALO BOLT AIR+ DC can be used to safely jump start your vehicle, inflate your tires and power your electronic devices anywhere. The HALO BOLT AIR+ DC provides portable power so you can charge your phone, tablet and other electronic devices anywhere! The HALO BOLT AIR+ DC includes an all new DC output that seamlessly integrates with 12V devices including a HALO AC inverter to power household items. The HALO BOLT AIR+ DC also includes a convenient floodlight and emergency light. Compact, versatile and simple to use, the HALO BOLT AIR+ DC and all accessories fit neatly in its carrying pouch and is perfect to store in your home or vehicle for every day use or an emergency need. Never be without a charge, a jump start, or with a flat tire again!
DANGER-CAUTION Read and understand all safety information before using this product. Failure to follow these instructions may result in electrical shock, explosion, fire which may result in serious injuries, death or property damage.
- When used correctly, lithium- ion rechargeable batteries provide a safe and dependable source of portable power. However, if they are misused or abused, this may result in leakage, burns, fire or explosion, causing personal injury or damage to other devices.
- Misusing or incorrectly connecting your HALO BOLT AIR+ DC may cause electric shock to users and damage equipment. · Do not operate in explosive atmospheres such as in the presence of flammable liquids, gases or dust.
- Remove jump start clamps from vehicle battery after jump starting vehicle.
- Keep your HALO BOLT AIR+ DC dry and away from moisture and corrosive materials. The HALO BOLT AIR+ DC should not be used near water or wet areas such as bathtubs, showers, bathrooms, sinks, swimming pools or basements.
- Do not expose your HALO BOLT AIR+ DC to moisture, water, rain, or snow.
- Keep your HALO BOLT AIR+ DC away from heat sources, including open flames, radiators, stoves, ovens, and any other devices that product heat.
- The lithium-ion rechargeable battery used in this charging device may present a risk of fire or chemical burn if mistreated. Do not expose to fire or excessive temperature. Do not expose to heat above 212°F (100°C) or incinerate.
- In the unlikely event of leakage or explosion use sand or a chemical fire extinguisher.
- Your HALO BOLT AIR+ DC may become warm under extended high power operation. Do not cover, wrap, or otherwise restrict the HALO BOLT AIR+ DC during operation.
- Do not disassemble your HALO BOLT AIR+ DC. There are no user-serviceable parts inside. Incorrect reassembly may result in shock or fire hazard.
- Do not drop or subject to strong impacts. Do not operate your HALO BOLT AIR+ DC if it has received a sharp blow, or has otherwise been damaged in any way.
- Do not puncture, crush or subject to mechanical shock.
- Only charge your HALO BOLT AIR+ DC by the specified method with the specified charging adapter provided with the unit.
- Do not use any non-HALO-branded accessories with the HALO BOLT AIR+ DC. Doing so may cause electric shock to users and damage equipment.
- The HALO BOLT AIR+ DC, along with its accessories, are not toys and should be kept away from children.
- Make sure the jumper cables are fully plugged into the jump start output before trying to jumpstart your vehicle.
- Do not touch red (positive) and black (negative) jumper clamps together at any point.
- Do not insert any foreign object into the ports or openings of your HALO BOLT AIR+ DC. · Do not clean your HALO BOLT AIR+ DC with harsh chemicals, soaps or detergents. Just wipe the case with a soft cloth.
- Make sure the HALO BOLT AIR+ DC’s charging ports do not become contaminated with lint or other debris. Use a canned-air type of product periodically to ensure that the port openings are clear.
- When using the air compressor, always check and follow the manufacturer’s recommended pressure. Use caution as the air hose and connectors may get hot after extended use.
- Batteries should be recycled or disposed of as per state and local guidelines.
- Storage: 4°F – 158°F (-15°C – 70°C), Discharge: 14°F – 140°F (-10°C – 50°C), Charge: 32°F – 113°F (0°C – 45°C)
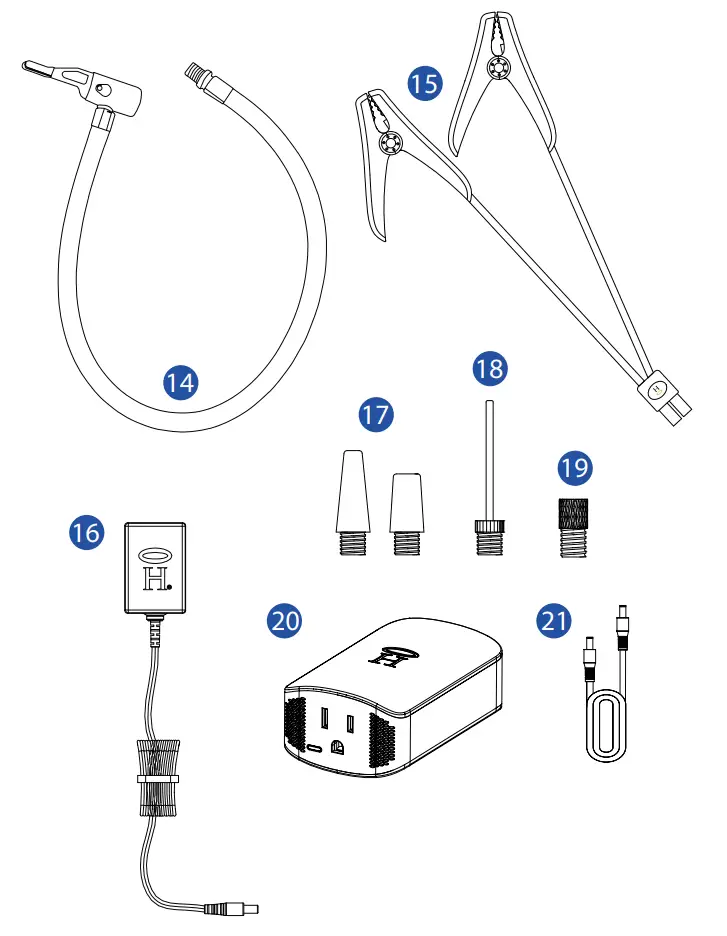
INCLUDED ITEMS
– HALO BOLT AIR+ DC
– Jumper Cables
– AC Inverter
– Carrying Pouch
– Wall Charging Adapter
– Interchangeable Air Nozzle Kit
– 24 Inch Air Hose Extension
– DC to DC Cable
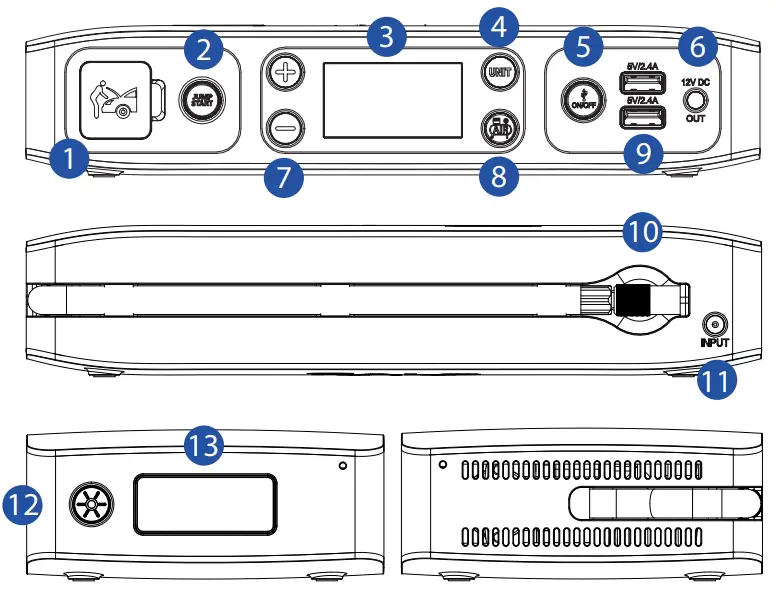
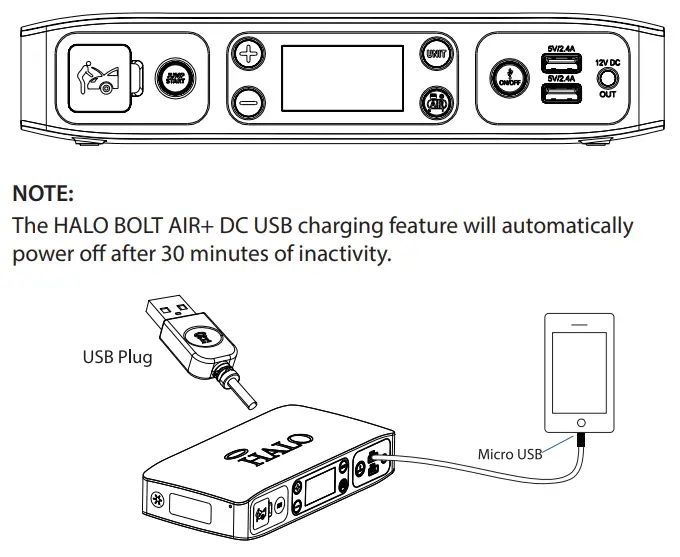
- Jump Start Output
- Jump Start Button
- Digital Screen
- Pressure Unit Button
- USB ON/OFF Button
- DC Output Port
- Pressure Settings (+) and (-)
- Air Compressor ON/OFF Button
- USB Outputs
- Air Hose
- Charging Input
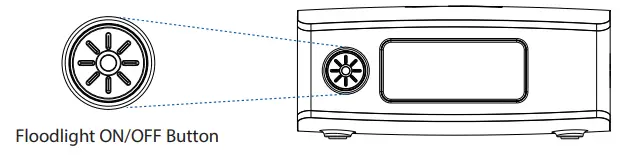
- Floodlight ON/OFF Button
- Floodlight/Emergency Light
- 24 Inch Air Hose Extension
- Jumper Cable Clamps
- Wall Charging Adapter
- Tapered Air Nozzle
- Inflation needle
- Prester Valve Adapter
- AC Inverter
- DC to DC Cable
OPERATING INSTRUCTIONS
CHARGING YOUR HALO BOLT AIR+ DC
To charge your HALO BOLT AIR+ DC, use the provided Wall Charging Adapter, and plug the AC adapter plug into the charge input. Next, connect the AC adapter into a wall outlet. The HALO BOLT AIR+ DC will automatically begin charging. When the HALO BOLT AIR+ DC is fully charged, all five battery indicator lights will be solid green and the digital screen will indicate 100% charge. (This could take up to 9 hours).
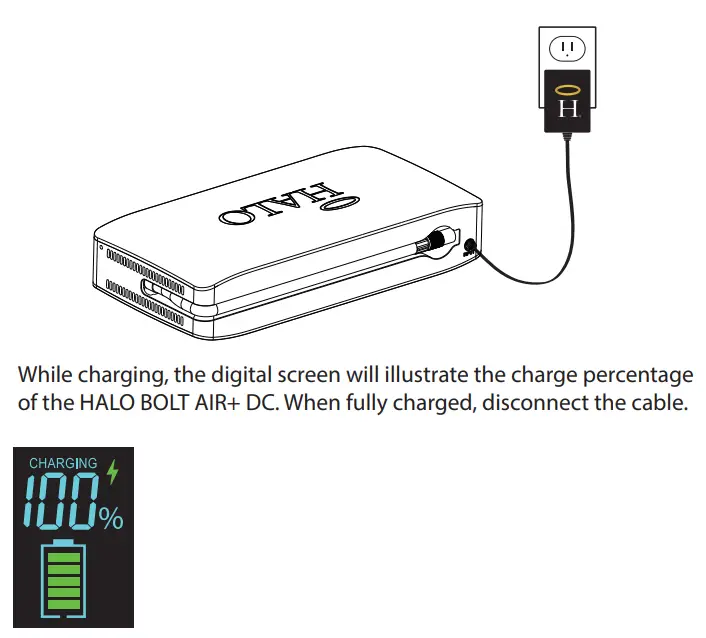
NOTE: The HALO BOLT AIR+ DC is designed to charge between 32°F-113°F (0-45° C). A “TEMP” indicator will be illustrated on the digital display if the HALO BOLT AIR+ DC is attempted to be charged outside of this temperature range.
 JUMP STARTING YOUR VEHICLE WITH THE HALO BOLT AIR+ DC
- Plug the jumper cables into the jump start output on the HALO BOLT AIR+ DC.
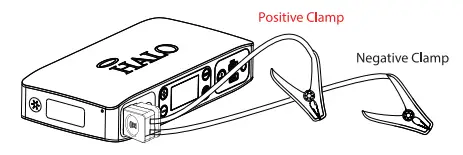
NOTE: Make sure the jumper cables are fully plugged into the jump start output before trying to jump your vehicle. - Attach the jumper cable clamps to the vehicle battery.
– Red clamp on positive terminal (+)
– Black clamp on negative terminal (-)
NOTE:
• Once the jumper cable clamps are attached to the vehicle battery, the LCD will display the vehicle battery voltage.
• Do not touch red (positive) and black (negative) clamps together at any point. If the jump start button flashes red, the jumper cables have been connected incorrectly. If this flashing red condition occurs, disconnect the jumper cables from vehicle battery and restart the process from Step 1. - Press the “Jump Start” button and wait for solid green light.

NOTE: A flashing green light indicates safety checks are in progress. - Start your vehicle.
NOTE: If your vehicle fails to start after the first attempt, wait 30 seconds and repeat step 3 and step 4. If your vehicle does not start after three attempts, we recommend you consult a certified mechanic. - Disconnect the jumper cable clamps from the car battery.
NOTE: The jump start function can not be used in conjunction with USB charging or the air compressor. Please ensure that you have not activated the USB or Air Compressor output modes when attempting to jump start your vehicle.
NOTE: The HALO BOLT AIR+ DC is designed to allow a jump start when used within a safe temperature range. A “TEMP” indicator will be illustrated on the digital display if used outside of the temperature operating range.
JUMP START TROUBLESHOOTING TIPS

NOTE:
If none of these troubleshooting tips work, please consult a certified mechanic for assistance.
HALO BOLT AIR+ DC COMPRESSOR
The HALO BOLT AIR+ DC comes equipped with a 24 Inch Air Hose Extension and Interchangeable Air Nozzles. Simply twist on the corresponding nozzle to inflate balls, pool floaties, bike tires, and more!
- Connect the air hose to the tire or use the appropriate nozzle to connect to your inflatable device
- Press the (+) or (-) button to set the desired pressure. The pressure measuring units can be changed by pressing the UNIT button.
- Once the desired pressure has been set, begin inflating by pressing the Air Compressor ON/OFF button. The air compressor will shut off automatically once the pressure has been reached.

NOTE: The air compressor can be started or stopped at any point by pressing the air compressor ON/OFF button. The (+) and (-) may be long pressed to set the desired pressure quickly.
![]() Note: Always check and follow the manufacturer’s recommended pressure. Use caution as the air hose and connectors may get hot after extended use. The HALO BOLT AIR+ DC compressor is designed to automatically stop after an extended run-time or if an over-temperature protection set point is reached.
Note: Always check and follow the manufacturer’s recommended pressure. Use caution as the air hose and connectors may get hot after extended use. The HALO BOLT AIR+ DC compressor is designed to automatically stop after an extended run-time or if an over-temperature protection set point is reached.
USING THE AC INVERTER
The DC to AC inverter can be used to power any device that operates at 110VAC, this includes laptops that use a standard AC wall outlet.
Connect one end of the supplied DC cable to the DC Input on the AC Inverter and the other end to the DC Output on the HALO BOLT AIR+ DC. Connect your device’s AC plug in the AC Inverter’s AC port. The LED on the AC Inverter will be solid green if no safety protection is triggered and the device is charging normally.
TROUBLESHOOTING
- If the LED on the AC Inverter is solid red, then a power fault is detected.
- If the LED on the AC Inverter is flashing red, then a temperature protection is triggered.
If the LED on the AC Inverter is illuminated red, solid or flashing, unplug the device from the Inverter and disconnect the Invert from the HALO BOLT AIR+ DC. The Inverter will reset.
USING THE 12V DC OUTPUT
The 12V DC output may be used for powering numerous DC electronics and appliances. To use, simply connect the 5.5 x 2.5mm barrel jack connector from your device directly into the DC output port of the HALO BOLT AIR +DC. Turn on the DC output by pressing the ON/Off Button on the HALO BOLT AIR +DC.
NOTE: The HALO 100W AC Inverter is designed to seamlessly connect to the DC output to provide normal household power to your electronic devices and appliances.
CHARGING AN ELECTRONIC DEVICE USING 5V/2.4A USB OUTPUT PORT
- Use the charging cable provided with your electronic device and connect the Standard USB end into either one of the HALO BOLT AIR+ DC US 5V/2.4A Output ports.
- Turn on the USB charging by pressing the USB Power ON/OFF Button on the HALO BOLT AIR+ DC.
HALO SMART CHARGE TECHNOLOGY
Your HALO BOLT AIR+ DC contains the HALO SMART CHARGE TECHNOLOGY to achieve higher compatibility for charging standard 5V USB electronic devices. The HALO SMART CHARGE TECHNOLOGY will allow the HALO BOLT AIR+ DC to communicate with your electronic device and provide the fastest and safest charge for that device.
COMPATIBILITY
Standard 5V USB electronic devices including: Mobile phones, Tablets, PSP, NDS, MP3, MP4, MP5, Bluetooth, GPS, Cameras, and more.

USING YOUR HALO BOLT AIR+ DC FLOODLIGHT
The floodlight can be turned on and off by simply pressing and releasing the floodlight ON/OFF button. The first press will turn on the floodlight. Second press will turn on the red emergency light. Third press will turn on SOS flashing red light. The floodlight will automatically turn off after 2 hours of inactivity.
NOTE: Do not look directly into the LED floodlight.
SPECIFICATIONS
Battery Cells: 3x Li-Polymer 5000mAh
Battery Pack Energy: 55500 mWh
Jump Start: 12V/600Amps
Air Compressor: 100PSI max
Input: 14V/0.85A
USB Output: 2x USB 5V/2.4A
DC Output: 12V/10A
Dimensions: 4.65 x 9.52 x 1.85 inches
Weight: 2.54 lbs
Operating Temperature: 32°F – 113°F (0°C – 45°C)
AC INVERTER
DC Input: 12VDC
AC Output: 115VAC/60Hz
Rated Power: 100W
COMPLIANCE WITH FCC REGULATION
This device complies with part 15 of the FCC Rules and RSS-Gen of IC Rules. Operation is subject to the following two conditions: (1) This device may not cause harmful interference, and (2) this device must accept any interference received, including interference that may cause undesired operation.
NOTE: This equipment has been tested and found to comply with the limits for a Class B digital device, pursuant to part 15 of the FCC Rules. These limits are designed to provide reasonable protection against harmful interference in a residential installation. This equipment generates, uses, and can radiate radio frequency energy and, if not installed and used in accordance with the instructions, may cause harmful interference to radio communications. However, there is no guarantee that interference will not occur in a particular installation.
If this equipment does cause harmful interference to radio or television reception, which can be determined by turning the equipment off and on, the user is encouraged to try to correct the interference by one or more of the following measures:
- Reorient or relocate the receiving antenna.
- Increase the separation between the equipment and receiver.
- Connect the equipment into an outlet on a circuit different from that to which the receiver is connected.
- Consult the dealer or an experienced radio/TV technician for help.
CAUTION: To comply with the limits of the Class B digital device, pursuant to Part 15 of the FCC Rules, this device must be used with certified peripherals and shielded cables. All peripherals must be shielded and grounded. Operation with non-certified peripherals or non-shielded cables may result in interference to radio or reception.
LIMITED WARRANTY
HALO warrants its products to be free from defects in material and workmanship under normal use.
For all questions or exchange requests, please call 888-907-6274, contact us at zagg.com/support or visit www.zagg.com/warranty-policies.
This Limited Warranty sets forth the full scope of HALO’s obligations and liabilities with respect to the product. All implied warranties, including without limitation the implied warranties of merchantability and fitness for a particular purpose, are limited to the duration of this Limited Warranty. In no event shall HALO be liable for any incidental, special, consequential or punitive damages or any damages or losses of or to electronic equipment or products that are used with any of HALO’s products.
![]()
FOR TECHNICAL SUPPORT PLEASE CONTACT US AT:
ZAGG.COM/SUPPORT OR
CALL US AT: 888 907 6274
HALO 910 W LEGACY CENTER WAY STE. 500, MIDVALE, UTAH 84047
WWW.ZAGG.COM/HALO
© 2021 ZAGG Inc | www.ZAGG.com/HALO The HALO and H trademarks are the property of ZAGG Inc. All rights reserved. 314-00994-A.
ZAGG Inc | 910 W Legacy Center Way, Ste. 500, Midvale, Utah 84047 Made in China.
![]()
qvc V43252 Easy Cool PORTABLE AIR CONDITIONER
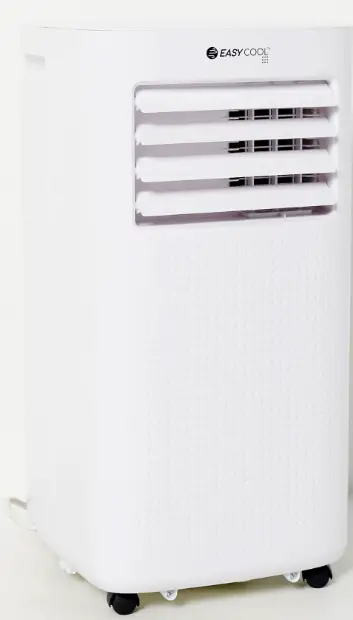
Thank you for choosing Easy Cool portable air conditioning. Please keep the manual for later review and read the manual carefully before use.
Important Safeguards
- Use this appliance only as described in this instruction manual. As with all electrical equipment while the instructions aim to cover as many eventualities as possible, caution and common sense should be applied when operating and installing this appliance.
- The air conditioning is only suitable for indoor use and is not suitable for other applications.
- Follow local grid interconnection rules while installing the air conditioning and ensure that it is properly grounded. If you have any question on electrical installation, follow the instructions of the manufacturer, and if necessary, ask a professional electrician to install it.
- Place the machine in a flat and dry place and keep at least 19 inches between the machine and the surrounding objects or walls.
- Do not use extension cords.
- After the air conditioning is installed, ensure that the power plug is intact and firmly plugged into the power outlet, and place the power cord orderly to prevent someone from being tripped or pulling out the plug.
- Do not put any object into the air inlet and outlet of the air conditioning. Keep the air inlet and outlet free from obstructions. Check regularly to ensure the inlet and outlet are free of dust, dirt or debris to prevent overheating.
- While adjusting the upper and lower wind-guide strips of the air outlet, remove it with hands gently to avoid damaging wind-guide strips.
- When moving the machine, make sure that it is in an upright position and make sure the tank has been emptied. After being moved, wait at least 1 hour before starting the appliance.
- Do not install, use or store the appliance in rooms containing gasoline, stoves, alcohol, oil, sulfur, other heat sources and pressurized containers such as aerosol cans etc.
- Do not cover the appliance with Plastic bags when storing.
- Don’t disassemble, overhaul, or modify the machine arbitrarily, otherwise it will cause a machine malfunction or even bring harm to persons and properties. To avoid danger, if a machine failure occurs, ask the manufacturer or professionals to repair it. If the unit requires repair, contact a qualified electrician or service center for repairs. Repairs carried out by unauthorized personnel may be dangerous.
- If the power cord becomes damaged, it must be replaced by a licensed professional or service center to avoid risks.
- Do not install and use the air conditioning in the bathroom or other humid environments.
- Do not pull the plug to turn off the machine.
- Never unplug the appliance by pulling on the power cord. Grasp the plug firmly and pull to remove.
- Do not place heavy or hot objects on top of the appliance. Do not set cups or other objects on the body to prevent water or other liquids from spilling into the air conditioning.
- Do not use insecticide sprays or other flammable substances near the air conditioning.
- Do not wipe or wash the air conditioning with chemical solvents such as gasoline and alcohol. When you need to clean the air conditioning, you must always turn off and then unplug the appliance from the outlet/power supply. Clean it with a damp soft cloth. If the machine is dirty, scrub with a mild detergent.
- The appliance should be used with adult supervision. Children should not play with or around the appliance. Cleaning and maintenance shall not be made by children without supervision.
- Clean the air filter at least once a week.
- Do not use any means to accelerate the defrosting process or to clean, other than those recommended
by the manufacturer. - Do not pierce or burn the appliance.
- Be aware that refrigerants may not contain an odor.
- Packaging can be recycled. Please recycle!
- At the end of the appliances working life, dispose of at a appliance recycle/specialist collection center.
- These instructions are also available on-line at www.kmswholesale.com
- No liability can be accepted for any damage caused by non compliance with these instructions or any other improper use or mishandling.
* Risk Of Fire Or Explosion. Flammable Refrigerant Used. To Be Repaired Only By Trained Service Personnel. Do Not Puncture Refrigerant Tubing.
* Risk Of Fire Or Explosion. Dispose Of Properly In Accordance With Federal Or Local Regulations. Flammable Refrigerant Used.
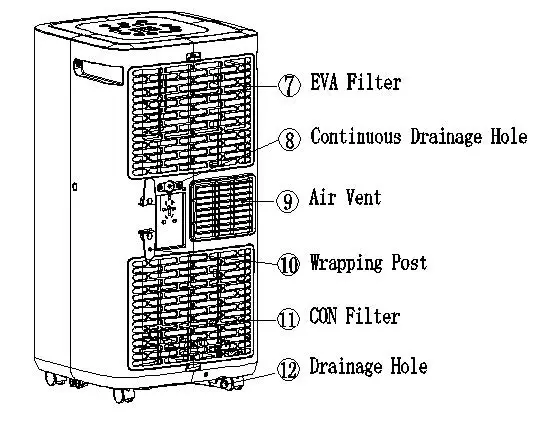
Features and Components
Features
Cooling, dehumidifier, fan f unction and continuous water drainage functions.
LCD display on the control panel. The machine is beautiful and elegant. Provided remote control is equipped to facilitate operation. The remote control can be placed on the back of the body. It adopts a user-friendly remote control storage design.
Handles on both sides adopt dividing point design, so that it is easier to carry it and the body design is more ergonomic.
The structure of wrapping the power cord on the back facilitates users to hang the power cord without hanging it down to the ground and staining and damaging the power cord.
Outdoor interface is set high to facilitate assembly and keep the smooth flow of the heat pipe. Air filtration capability.
Timing switch function.
If you experience loss of power the unit offers a protection function that will automatically restart the compressor after three minutes, with a variety of other protection functions.
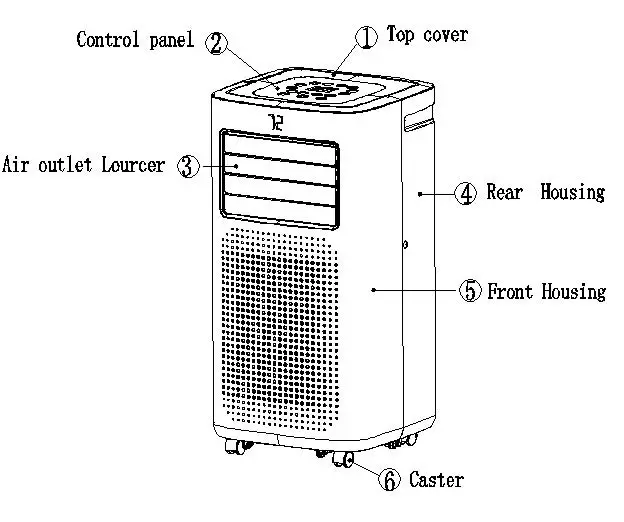
Components:
Installation and Adjustment
Installation:
Warning: before using the mobile air conditioning, keep it upright for at least 24 hours.
The air conditioning can be easily moved in the room. In the moving process, ensure that the air conditioning is in the upright position and the air conditioning should be placed on a flat surface. Do not install and use the air conditioning in the bathroom or other humid environments.
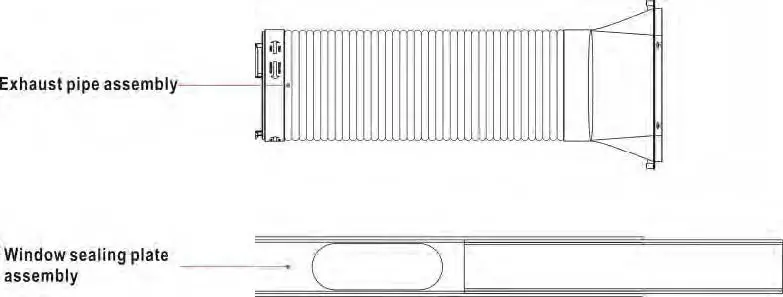
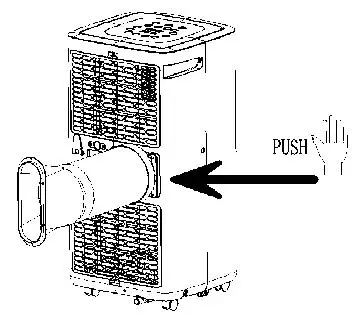
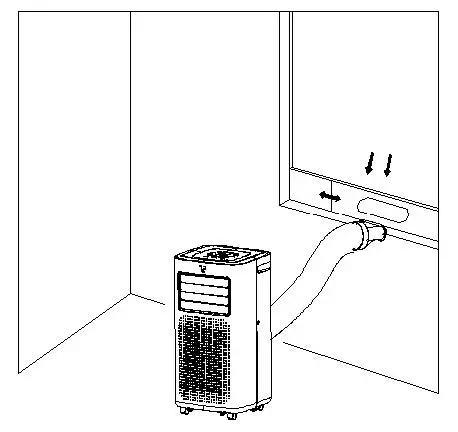
Install the heat pipe assembly (as shown in Figure 1): screw the heat pipe assembly (exhaust fitting end) into the exhaust port on the rear panel (counterclockwise).
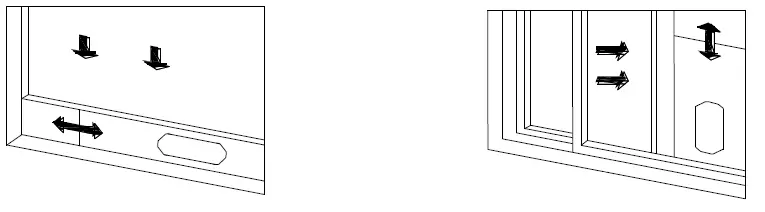
Install the window sealing plate assembly
- Half open the window and mount the window sealing plate assembly to the window (as shown in Figure 2 and Figure 3); the assembly can be placed in horizontal and vertical direction.
- Pull various components of the window sealing plate assembly open, adjust their opening distance to bring both ends of the assembly into contact with the window frame, and fix various components of the assembly.
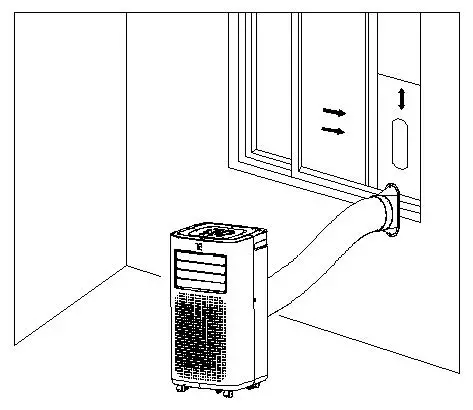
Install the body
- Move the machine with installed heat pipe and fittings before the window, and the distance between the body and walls or other objects shall be least 50 cm (as shown in figure 4.)

- Elongate the heat pipe and snap the flat end of the heat pipe joints into the elliptical hole of the window sealing plate assembly (as shown in Figure 5 and Figure 6).
Notes- the flat end of the heat pipe joints must be snapped into place.
- The pipe cannot be distorted nor has substantial turning (greater than 45 °). Keep the ventilation of the heat pipe unobstructed.
Important Notice
The length of the exhaust hose shall be (280~1,500mm) 11-59 Inches, and this length is based on the specifications of the air conditioning. Do not use extension tubes or replace it with other different hoses, or this may cause a malfunction. Exhaust must be unobstructed; otherwise, it may cause overheating.
Control Setting
Operating instructions:

- POWER: Press the key to turn on and turn off the unit.
- UP: Press this button to increase the temperature setting or set up the timer to the required timer setting. This function is not available under FAN mode and DEHUMIDIFYING mode. Simultaneously press UP and DOWN keys to switch between Celsius (℃) and Fahrenheit (℉) .
- DOWN: Press this button to decrease the temperature setting or set down the timer to the required timer setting. This function is not available under FAN mode and DEHUMIDIFYING mode.
- SLEEP: Press this button to turn on sleep mode.
- SPEED/FAN: In cooling, heating, and fan mode, press the key to select high, low fan speed.
- This function is not available in SLEEP mode and DEHUMIDIFYING mode.
- HEATING: Press this button to turn on heating mode.
- FAN: Press this button to turn on fan mode.
- DEHUMIDIFYING: Press this button to turn on dehumidifying mode.
- COOLING: Press this button to turn on cooling mode.
- DISPLAY WINDOW
- WATER FULL: When water full light is on, the unit will stop working, and need to drain the water.
- TIMER: Press TIMER button to set the unit automatically turn ON or OFF. Use the + and -buttons to program the hour increment.
Operating Instructions of the Remote Control
Operation interface of the remote control is as follows
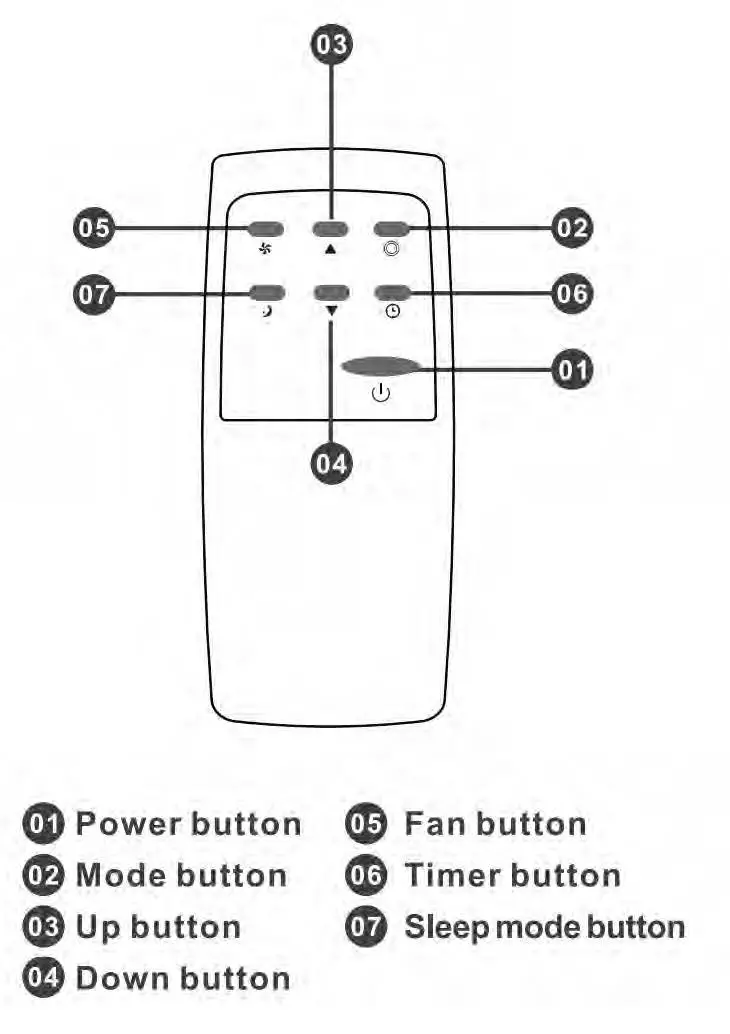
Instructions of key operation of the high-quality remote control are as follows:
- Power: Press the key to turn on or turn off the machine
- Mode: press the key to switch between cooling, air supply, dehumidification and heating (single cold with no such function) mode.
- Up: press the key to increase temperature and timing set value.
- Down: press the key to reduce temperature and timing set value.
- Fan: press the key to select high and low wind speed output circularly.
- Timer: press the key to set timing value.
- Sleep Mode: Press the key to turn on the sleep mode.
*NOTE: AAA 1.5VDC battery ( not included )
Variety of Protection Functions
Frost Protection Function:
In cooling, dehumidification, or economic power saving mode, if the temperature of the exhaust pipe is too low, the machine will automatically enter
protection status; if the temperature of the exhaust pipe rises to a certain temperature, it can automatically revert to normal operation.
Overflow Protection Function:
When water in the water pan exceeds the warning level, the machine will automatically sound an alarm, and the LDC temperature display area will show “FL”. At this point, you need to move the drainage pipe connecting the machine or the water outlet to sewer or other drainage area to empty the water (details see Drainage Instructions at the end of this chapter). After the water is emptied, the machine will automatically return to the original state.
Automatic Defrosting (heating and cooling models have this function):
The machine has automatic defrosting function: during defrosting, heating symbol on the display screen will flash.
Automatic Thermal Protection:
To protect the service life of the machine, the machine has automatic thermal protection in heating mode. During the protection period, the compressor and the lower motor will stop operation and will automatically return to normal heating state after the temperature of the machine recovers.
Protection Function of the Compressor:
To increase the service life of the compressor, it has a 3-minute delay booting protection function after the compressor is turned of.
Drainage Instructions
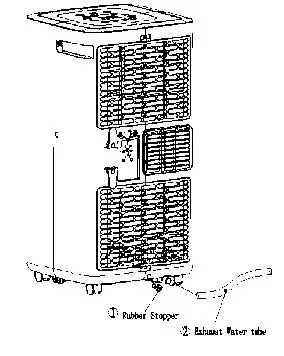
- Manual drainage:
- When the machine stops after the water is full, turn off the machine power and unplug the power plug.
Notes: Please move the machine carefully, so as not to spill the water in the water pan at the bottom of the body. - Place the water container below the side water outlet behind the body.
- Unscrew the rotary knob and unplug rubber stopper, the water will automatically flow into the water container.
- Keep the rotary knob and rubber stopper in a safe place for ease of locating.
- During drainage, the body can be tilted slightly backwards.
- If the water container cannot hold all the water, before the water container is full, plug the water outlet with rubber stopper as soon as possible to prevent water from flowing to the floor or the carpet.
- When the water is discharged, plug rubber stopper, and tighten the rotary knob.
Notes: Restart the machine after rubber stopper and rotary knob are installed, otherwise condensate water of the machine will flow to the floor or the carpet.
- When the machine stops after the water is full, turn off the machine power and unplug the power plug.
- Continuous drainage (only applicable to cooling and dehumidification mode), as shown in figure: (Drainage Pipe Not Included )
- Unscrew the rotary knob and unplug rubber
- Set the drainage pipe into the water outlet.
- Connect the drainage pipe to the bucket.
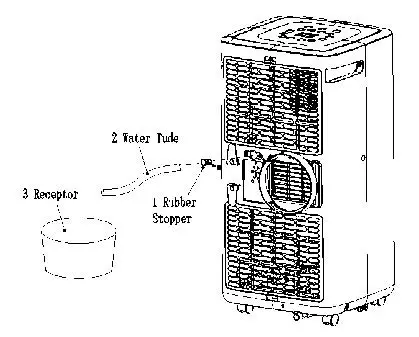
Note: If the internal bucket becomes full, the unit display will show “FL” and the unit will turn off as a safety feature.
Maintenance
Cleaning: before cleaning and maintenance, turn off the machine and unplug the plug.
- Clean the surface
Clean with surface of machine with a wet soft cloth. Do not use chemicals, such as benzene, alcohol, gasoline, etc.; otherwise, the surface of the air conditioning will be damaged or even the whole machine will be damaged. - Clean the filter screen
- If the filter screen is clogged with dust, and the effectiveness of the air conditioning is reduced, be sure to clean the filter screen once every two weeks.

- Clean the upper filter screen frame
- Clasp the wedging block of the filter screen frame with hands. Force down from the outside to remove the filter screen frame. Unscrew four screws fixing the filter screen and the rear housing to remove the EVA filter screen (as shown in the above figure).
- Put the filter screen into warm water with neutral detergent (about 40℃ / 104℉) and dry it in the shade after rinsing clean.
- If the filter screen is clogged with dust, and the effectiveness of the air conditioning is reduced, be sure to clean the filter screen once every two weeks.
Postseason Storage:
- Unscrew the rotary knob, unplug rubber stopper, and discharge the water in the water pan into other water containers or directly tilt the body to discharge the water into other containers.
- Turn on the machine, adjust it to low-wind ventilation mode, and maintain this state until the drainage pipe becomes dry, to keep the inside of the body in a dry state and prevent it from mildewing.
- Turn off the machine, unplug the power plug, and wrap the power cord around the wrapping
post; install rubber stopper and the rotary knob. - Remove the exhaust pipe and keep it in a safe place for ease of locating.
- Cover the air conditioning with a plastic bag. Put the air conditioning in a dry place, keep it out of the reach of children, and take dust control measures.
- Remove batteries of the remote control.
Note: Ensure that the unit is placed in a dry place and keep all machine components in a safe place for ease of locating.
Troubleshooting
Do not repair or disassemble the air conditioning by yourself. Unqualified repair will lead to failure of the warranty card and may cause damage to users or their properties.
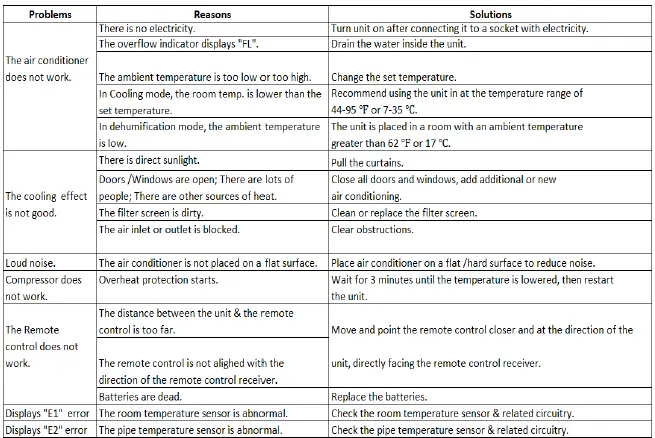
If problems not listed in the table occur or recommended solutions do not work, please contact A professional service organization.
Appendix
Schematic Diagram
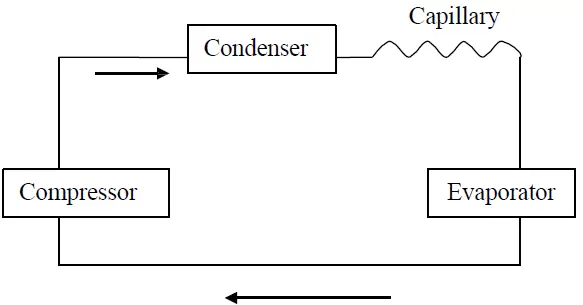
All the technical and specific parameters, please refer to product nameplate.
Due to continuous improvement, we reserve the right to change some design without any notice.
Treatment: Don’t put the abandoned machine with other unsorted waste together. Such waste shall be placed separately for other special use.
Warranty & Information
6 MONTH LIMITED WARRANTY
To utilize the warranty, you must register your purchase within 30 days from the date of purchase.
The manufacturer warrants this unit against defects in materials and workmanship on functional parts, for a period of 6 months from the original date of purchase. Your sales receipt showing the date of purchase of the product is your proof of purchase. Keep sales receipt in a safe place for future reference. this product is made with the highest quality materials and is warranted to be free from defects in materials and workmanship at the time of purchase. This limited warranty applies to products manufactured or distributed by the manufacturer, are delivered in the continental United States, and extends to the original purchaser, or gift recipient. This warranty becomes valid at the time of purchase and terminates either by the specified time frame listed above and or owner transfer. Any refunds or monetary compensations must be claimed through the place of purchase (retailer), and not through the manufacturer. Any extended warranties (Warranties that cover above and beyond this manufacturer warranty) that are sold through a retailer or third party, are not directly correlated with this product’s limited warranty, and may be redirected to said retailer or third party for coverage. This warranty extends through the manufacturer of the product and covers functional parts only. Cosmetics are not covered, unless unequivocally determined it is a workmanship defect. Shipping damage should be addressed with the shipping company, retailer, or place of purchase, not the manufacturer unless the manufacturer was the direct shipper. The manufacturer’s sole obligation under this warranty shall be limited to furnishing the original purchaser replacement parts for units deemed repairable by the supplier’s warranty department. The purchaser is responsible for purchasing insurance on any parts shipped or returned if desired. The purchaser is responsible to prepay any shipping charges (both ways) including, but not limited to taxes and duties. All exchanged parts and products replaced under this warranty will become the property of the manufacturer. The manufacturer reserves the right to change manufactures of replacement parts or products for use, to cover any existing warranty. The purchaser may be asked to provide the supplier with proof of purchase documents including the date of purchase. Any evidence of alteration, erasing or forgery of proof of purchase documents will be justified cause to void this limited warranty. Products, in which the serial number has been defaced or removed, are not eligible for warranty coverage. This warranty does not apply if the unit has been subject to negligence, fabrication, misuse, abuse or repairs, alteration by non-manufacturer authorized personnel,
inappropriate installations, or any case beyond the control of the manufacturer. Examples of warranty invalidation may also include, but are not limited to: Use of lacquer or paints in (and around) the unit Electrical requirement deficiencies (see manual for specific electrical requirements) Use with extension cords/timers/surge protectors/GFCI Outdoor Applications Normal wear /tear/weathering Pet / Consumer accidents
The manufacturer shall not be liable for any loss due to use (or misuse) of the unit or other incidental or consequential costs, expenses, or damage without irrefutable foundations. Under no circumstances shall the manufacturer or any of its representatives be held liable for injury to any person or damage to any property, however arising. Any implied warranty shall have duration equal of the applicable warranty stated above. Specifications are subject to change without notice or obligation. This limited warranty gives the original purchaser specific legal rights. Other rights may vary from state to state. To utilize the warranty, you must register your purchase within 30 days from the date of purchase.
PRODUCT REGISTRATION PRODUCT REGISTRATION
Registration must be completed on-line at kmswholesale.com or complete and mail the attached registration card to:
KMS INC.
ATTN: CUSTOMER SERVICE
811 E WATERMAN
WICHITA, KS 67202
For questions or part(s) on your Easy Cool air conditioner please visit our website at kmswholesale.com or email [email protected]. If you do not have on-line access please call 800-752-5262 x 251.
For Parts, please provide the model number, copy of receipt from purchase, name/part number and a brief description of the part needed, your name and the mailing address where you would like the replacement part to be sent. If you are unable to register your warranty on-line at kmswholesale.com. Please fill out and mail the attached registration card to the address listed above. Keep the rest of this information in a safe place for reference.
WIFI INSTRUCTIONS
JHS Smart (Wi-Fi) Guide
OPERATION GUIDE:
- Please ensure your mobile device is connected to WIFI router. Also, the WIFI router should already be connected to Internet before doing user registration and network configuration process.
- Download and Install APP:
Scan QR Code on the control panel or search “JHS smart” in - Registration
Open JHS smart APP, start Register

Registration
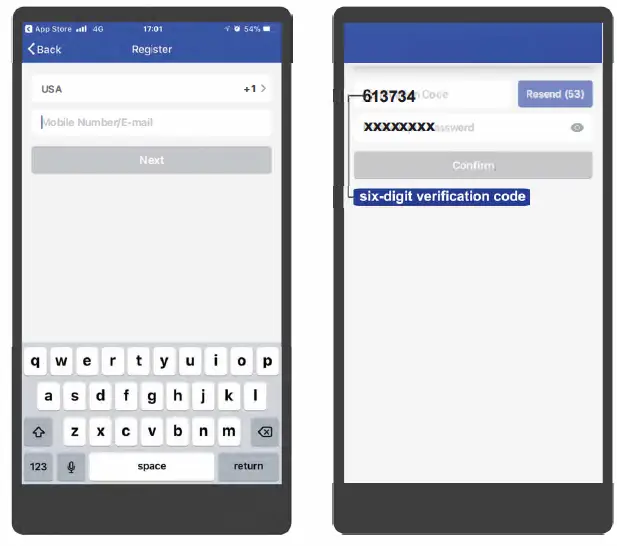
- Fill in your mobile number or e-mail address. Click Next and wait a moment (1-10 minutes)
- Enter the verification code which is sent from JHS service center via SMS or email, then set a password by yourself. Click Confirm to finish registration
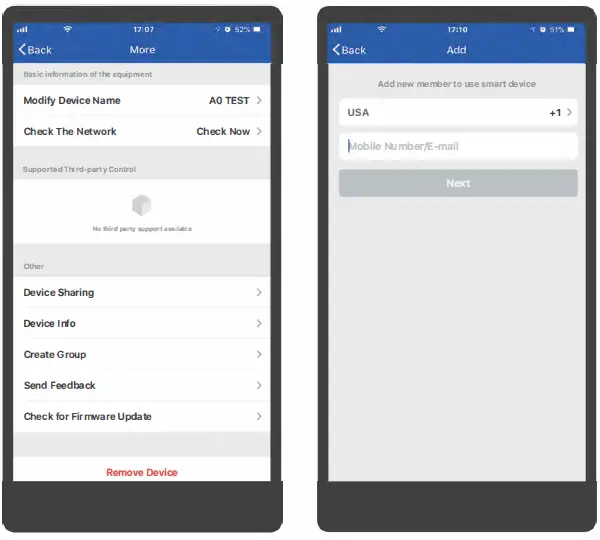
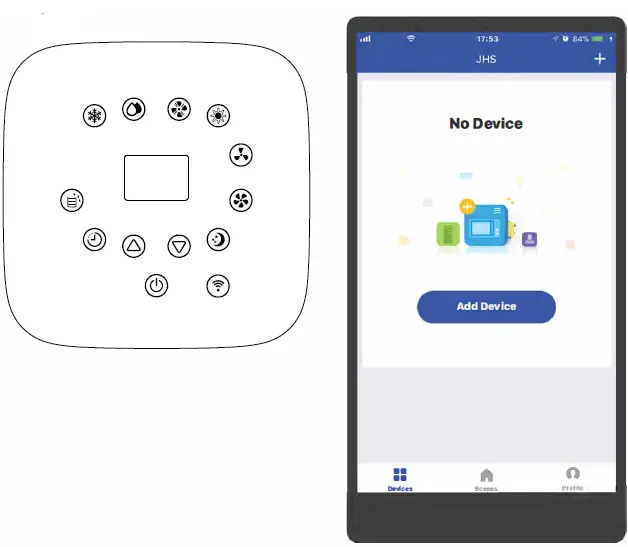
Add a new JHS smart unit.
Insert power plug to keep unit be standby. Touch the WIFI button on the unit panel for 5 seconds until LED indicator keep continuous flashing.
Back to home page, click Login Fill in your mobile number or e-mail address. Fill in your password and finish login.
Add a new JHS smart unit.
Select your corresponding device
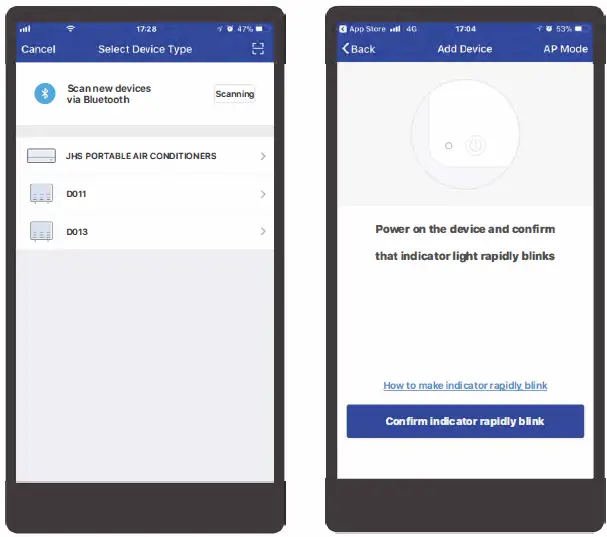
Add a new JHS smart unit.
Fill in the WIFI password and confirm
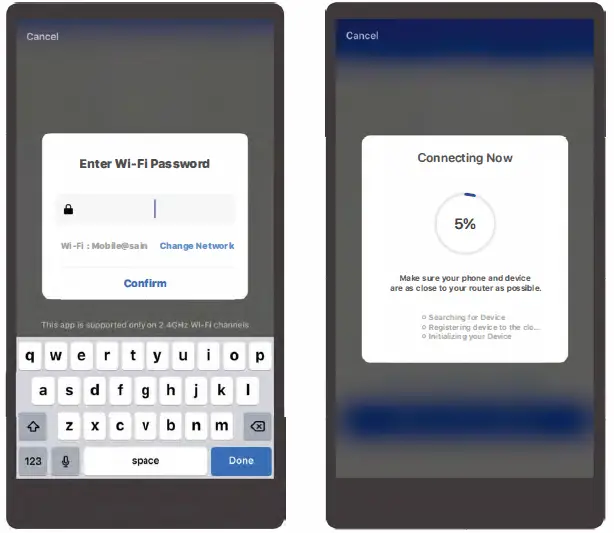 Add a new JHS smart unit
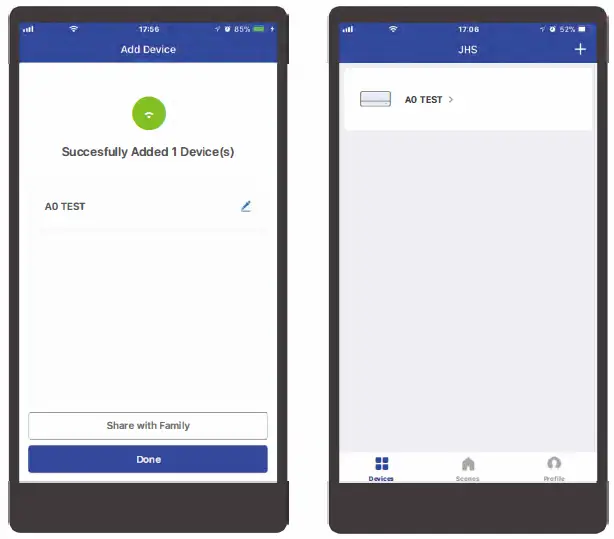
Now you can control the unit to set your room temperature whether you are driving on road or at the office.
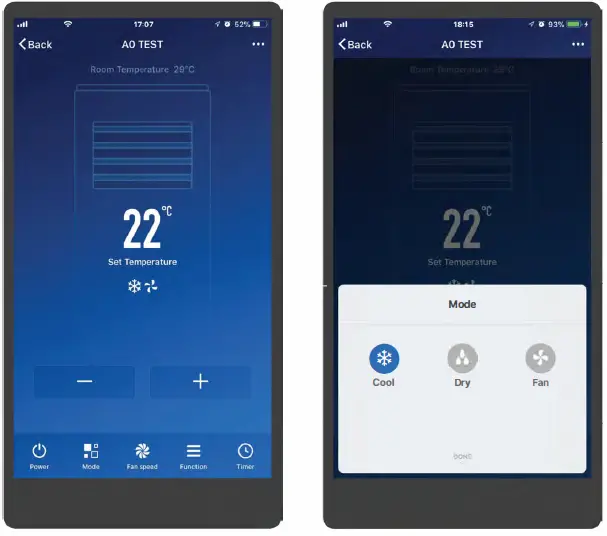
Turn your JHS air conditioner on and off
Change working modes Set the temperature
Now you’ll have the control you need to set your room temperature whether you’re driving on the road or at office.
Set fan speeds for comfort and energy savings.
Set schedules to programme a customized timer
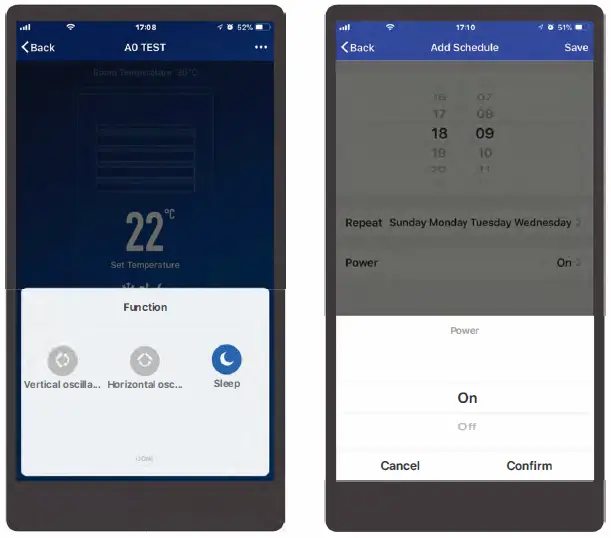
Now you’ll have the control you need to set your room temperature whether you’re driving on the road or at office.

Special Functions
e.g. Share the unit to your family or friend which installed JHS smart APP, tell them to finish login, then come true multi-user control.